

Page 1
Rain+Birdt
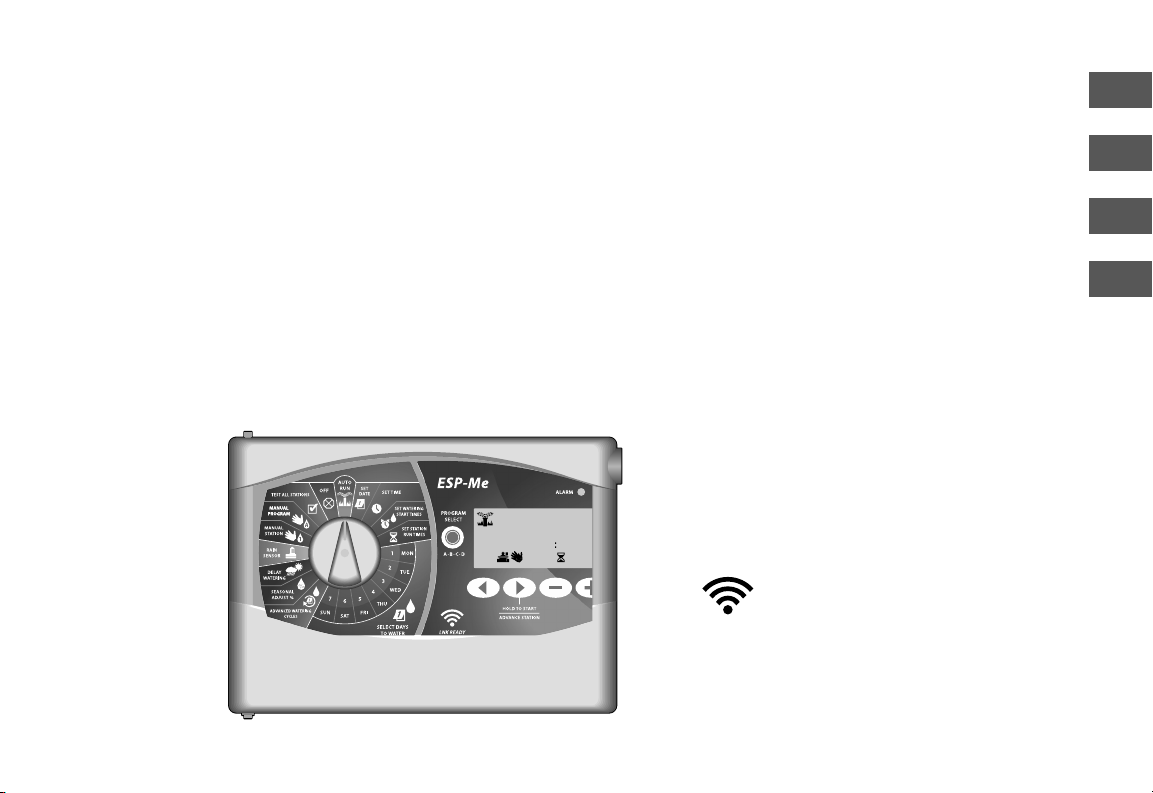
ESP-Me Controller User Manual
ENG
ESP
FRA
Manual del usuario del Controlador ESP-Me
Manuel d’utilisation du programmateur ESP-Me
Manual do utilizador do programador ESP-Me
English ............................... 2
Español ............................36
Français............................70
MMHH
1 020
Português ..................... 104
LNKTM Ready
* sold separately
Compatible con LNK
Compatible LNK
LNKTM Pronto
POR
TM
TM
Page 2
English
ENG
Technical Support
Questions?
For help setting up and operating
the Rain Bird ESP-Me Controller,
scan the QR code to visit
www.rainbird.com/espme
Additional user documentation is available under the
Manuals & Literature tab, including:
• User Manual (this document)
• Quick Reference Guide
• Programming Guide
• Foreign Language Support
To learn more about Rain Bird irrigation systems and
our Rain Bird Academy training programs, visit:
www.rainbirdservices.com/training
To see instructional videos for the ESP-Me, visit
www.youtube.com/
Disposal of Electronic Waste
In compliance with European Directive 2002/96/
CE and EURONORM EN50419:2005, this device
must not be thrown away with household garbage. This device must be the object of an
appropriate, selective removal procedure in
order to recuperate it.
2
ESP-Me Controller
Page 3

ESP-Me Controller User Manual
Technical Support ......................................................... 2
Disposal of Electronic Waste ...........................................2
Introduction ..................................................5
Welcome to Rain Bird ................................................... 5
The Intelligent Use of Water® .........................................5
ESP-Me Controller Features ........................................ 5
WiFi Enabled .........................................................................6
Installation ...................................................7
Mount Controller .......................................................... 7
Wiring Connections ...................................................... 8
Connect Valves ....................................................................8
Connect Master Valve (optional) ...................................8
Connect Pump Start Relay (optional) ..........................9
Connect Rain/Freeze Sensor (optional) ................... 10
Connect Power ................................................................. 11
Station Expansion Modules ...................................... 13
Install Modules ................................................................. 13
Station Numbering ......................................................... 14
Module Conguration ................................................... 14
Complete Controller Installation .............................15
English
Normal Operation ......................................16
Controls and Indicators .............................................16
AUTO RUN ..........................................................................17
OFF ........................................................................................ 17
Program-Based Scheduling ...................................... 18
Program Stacking ............................................................ 18
Common Programming Error .....................................19
Basic Programming ....................................20
1. Set Date and Time ..................................................20
2. Set Watering Start Times ......................................20
3. Set Station Run Times ...........................................21
4. Set Watering Days .................................................. 21
Custom Days of the Week ............................................. 21
Manual Watering Options ..........................22
Test All Stations ........................................................... 22
Run a Single Station ................................................... 22
Run a Single Program ................................................23
ENG
Contents
ESP-Me Controller
3
Page 4

ENG
Contents
Advanced Programming ............................24
Odd or Even Calendar Days ......................................24
Cyclic Days ....................................................................24
Rain Sensor .................................................................. 25
Seasonal Adjust ...........................................................26
Delay Watering ............................................................26
Permanent Days O ...................................................27
Total Run Time Calculator
By Program ..................................................................27
Special Features .........................................28
Options ....................................................... 29
Reset Button ................................................................ 29
Remote Accessories ....................................................29
Remote Programming ...............................................30
Battery Life ................................................................... 30
Troubleshooting .........................................31
Error Detection ............................................................31
Programming Errors (blinking LED) .......................... 31
Electrical Errors (non-blinking LED) .......................... 31
Clearing Electrical Error Alarms .................................. 31
Watering Issues ...........................................................32
Electrical Issues (solid LED illuminated) ................. 34
Safety Information...........................................................35
4
ESP-Me Controller
Page 5
Introduction
830
PGM
A
Welcome to Rain Bird
Thank you for choosing Rain Bird’s ESP-Me controller.
In this manual are step by step instructions for how to
install and operate the ESP-Me.
The Intelligent Use of Water®
We believe it is our responsibility at Rain Bird to
develop products that use water eciently.
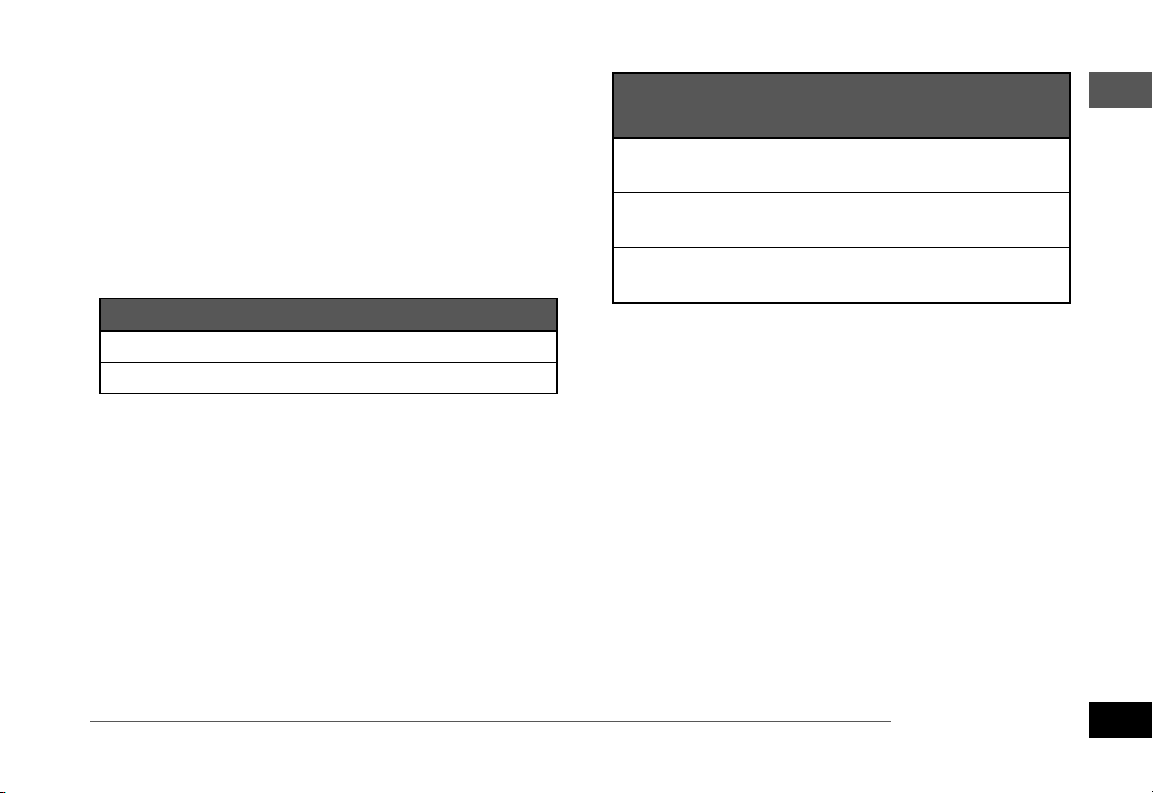
ESP-Me Controller Features
Feature Description
Maximum Stations 22 (with optional Station Modules)
Master Valve or Pump Start
Relay
Start Times 6
Programs 4
Program Cycles Custom Days, Odd, Even and Cyclic
Permanent Days Off Supported
Master Valve Control On/Off per station
Rain Delay Supported
Rain/Freeze Sensor Supported
Sensor Bypass By station
Seasonal Adjust Global or by program
Manual Station Run Yes
Manual Program Run Yes
Manual Test All Stations Yes
Short Detect Yes
Delay Between Stations Yes
Accessory Port Yes (5 pin)
Save & Restore Programming Yes
WiFi Enabled Yes
Supported
ENG
Introduction
ESP-Me Controller
5
Page 6
ENG
Introduction
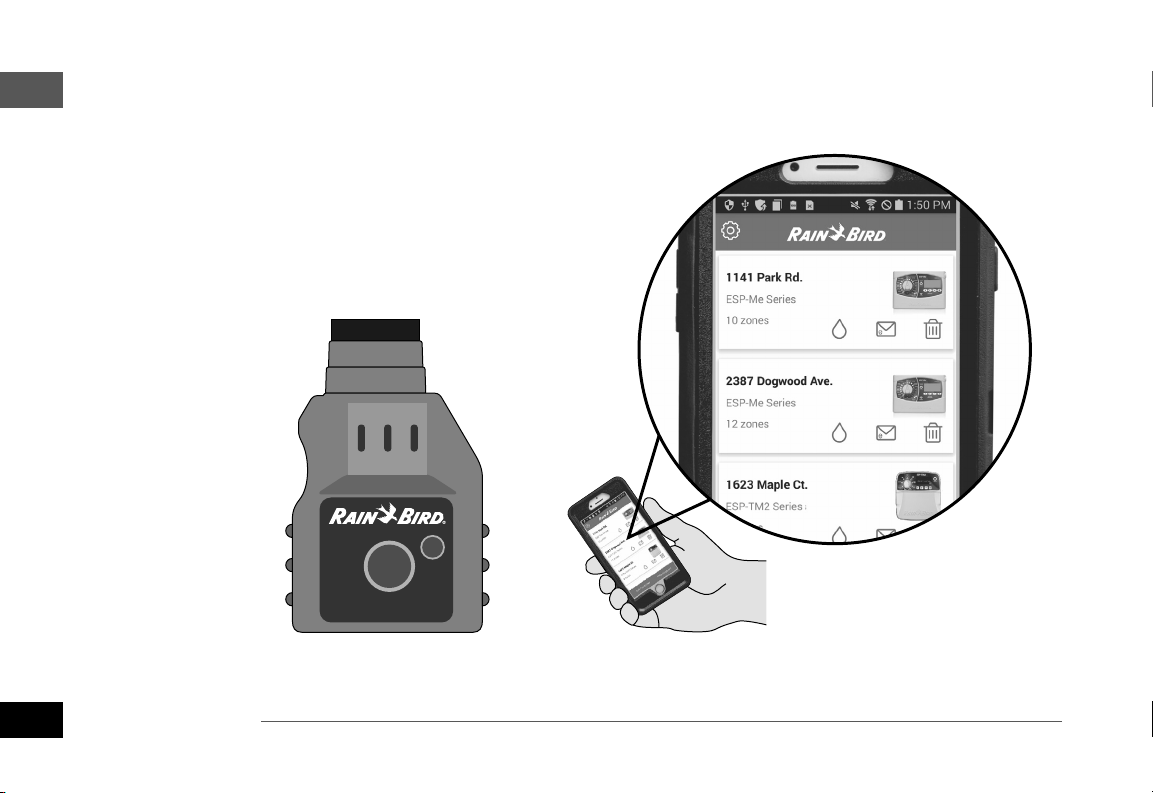
WiFi Enabled
The LNK WiFi Module allows remote connection to a Rain Bird
ESP-Me Controller using an Apple iOS or Android compatible
smart device. The mobile application allows remote access
and conguration of one or more irrigation controllers.
For more information on the LNK WiFi Module and the value
this product can provide for your ESP-Me controller, please
visit: http://wi-pro.rainbird.com
LNK WiFi Module
(sold separately)
Manage Sites
Remotely
6
ESP-Me Controller
Page 7
Installation
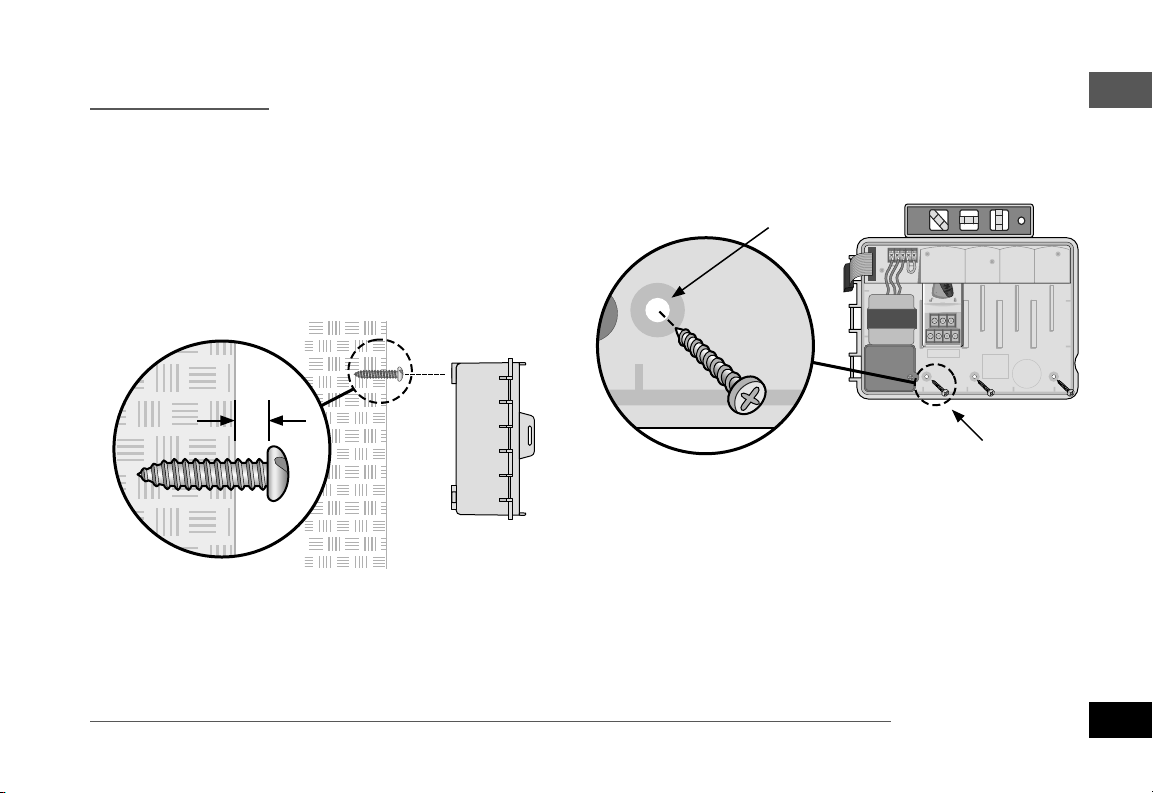
Mount Controller
Drive a mounting screw into the wall, leaving an
A
1/8 inch gap between the screw head and the
wall surface (use the supplied wall anchors if
necessary), as shown.
Locate the keyhole slot on back of the controller
B
unit and hang it securely on the mounting screw.
Open the front panel, and drive three additional
C
screws through the open holes inside the
controller and into the wall, as shown.
C
VT MV COM 567 11 12 13 17 18 19
GND
1234 8910141516202122
SENS
24VAC
VT MV COM
ENG
Installation
A
1/8 IN.
B
1234
VT=VALVETEST
CONNECT
120 VAC
ESP-Me Controller
7
Page 8
ENG
Installation
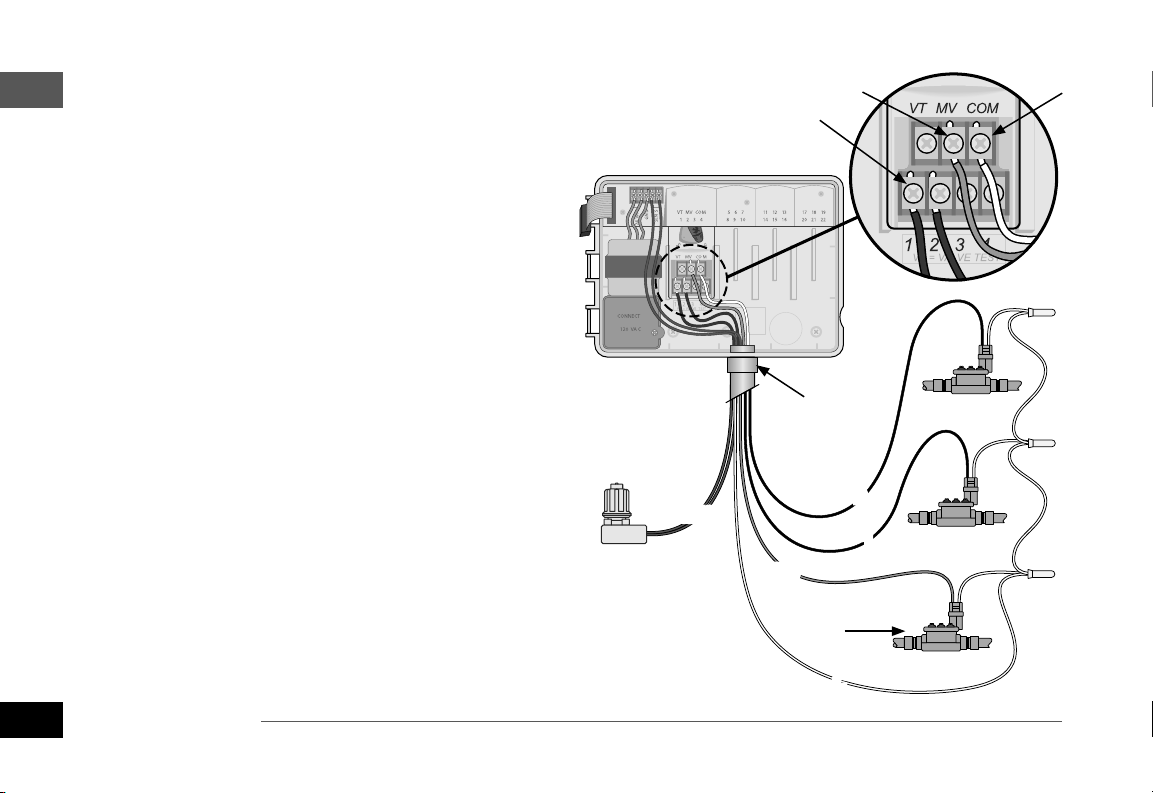
Wiring Connections
Connect Valves
Route all eld wires through the opening at the
A
bottom or back of the unit. Attach conduit if
desired, as shown.
WARNING: Do not route the valve wires through
the same opening as the power wiring.
Connect one wire from each valve to the terminal
B
on the base module or Station Module that
corresponds to the desired station number (1-22).
Connect a eld common wire (C) to the common
C
terminal (C) on the base module. Then connect
the remaining wire from each valve to the eld
common wire, as shown.
To perform a Valve Test, connect the common wire
D
to the “COM” terminal and the power wire to the “VT”
terminal. This will immediately turn the valve “ON” .
Connect Master Valve (optional)
Connect a wire from the master valve to the master
E
valve terminal (MV) on the base module. Then
connect the remaining wire from the master valve
to the eld common wire, as shown.
E C
B
A
2
SENS
1
MV
MASTER
VALVE
C
8
ESP-Me Controller
Page 9
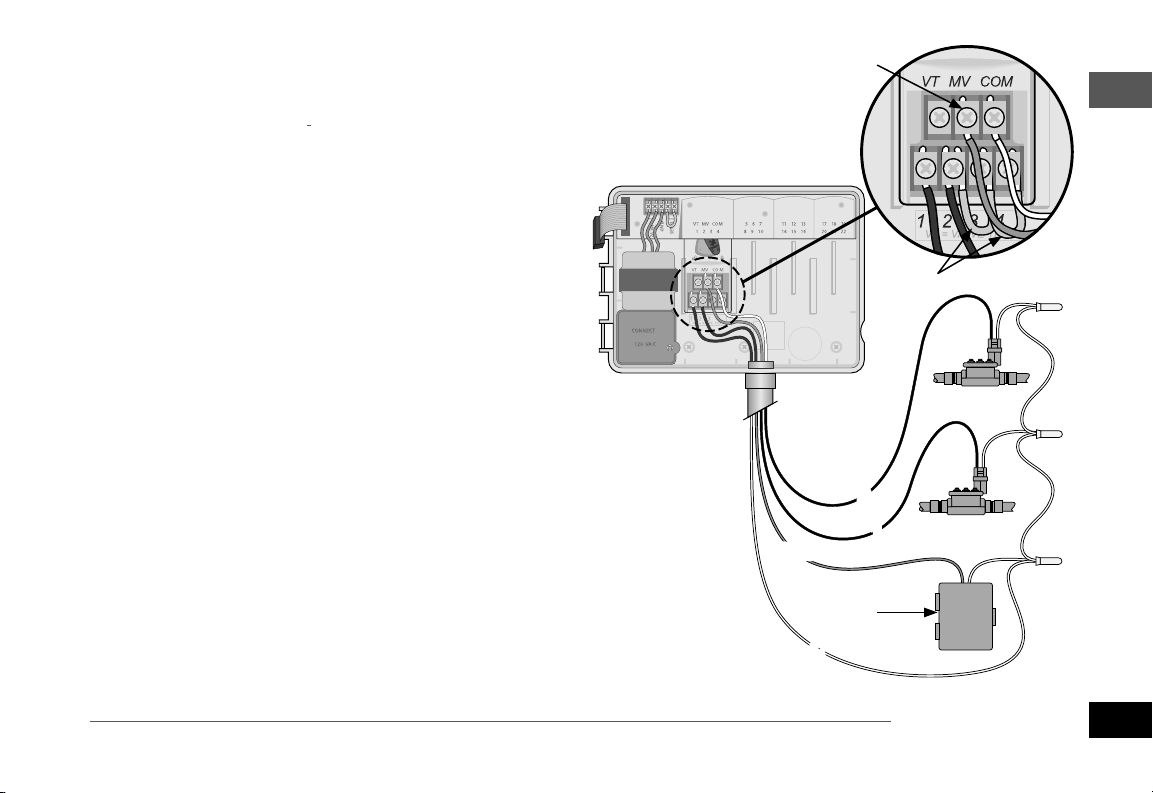
Connect Pump Start Relay (optional)
The ESP-Me can control a pump start relay, to turn the
pump on and o as needed.
Connect a wire from the pump start relay (PSR)
A
to the master valve terminal (MV) on the base
module. Then connect another wire from the
pump start relay to the eld common wire, as
shown.
To avoid the possibility of damage to the pump,
B
connect a short jumper wire from any unused
terminal(s) to the nearest terminal in use, as
shown.
NOTE: The ESP-Me controller DOES NOT pro-
vide power for a pump. The relay must be wired
according to manufacturer instructions.
For the most up to date compatibility list of pump
start relays, visit our website at:
www.rainbird.com/controllersupport:
NOTE: Connec-
tion to pump
and external
power not
shown. Refer to
pump installation instructions.
A
ENG
Installation
B
2
1
PSR
PUMP START
RELAY
C
ESP-Me Controller
9
Page 10

ENG
Installation
Connect Rain/Freeze Sensor (optional)
The ESP-Me controller can be set to obey or ignore a
rain sensor. Refer to the Rain Sensor section under
Advanced Programming.
Remove the yellow jumper wire from the SENS
A
terminals on the controller.
NOTE: Do not remove the yellow jumper wire
unless connecting a rain sensor.
Connect both rain sensor wires to the SENS
B
terminals, as shown.
WARNING: Do not route the rain sensor wires
through the same opening as the power wiring.
NOTE: Rain Bird controllers are only compatible
with normally closed rain sensors.
NOTE: For wireless rain/freeze sensors, refer to
installation instructions for sensor.
B
10
ESP-Me Controller
Page 11
Connect Power
WARNING: DO NOT plug in the transformer or
connect external power until you have completed and checked all wiring connections.
WARNING: Electric shock can cause severe injury
or death. Make sure power supply is turned OFF
before connecting power wires.
Electrical Specications
Input 230VAC, 0.2AMP, 50/60Hz
Output 25.5VAC, 1.0AMP, 50/60Hz
Power Wiring Connections
230 VAC (International)
Brown supply wire (hot) to the brown transformer wire
labeled with “L”
Blue supply wire (neutral) to the blue transformer wire
labeled with “N”
Green-with-yellow-stripe supply wire (ground) to the
green-with-yellow-stripe transformer wire
ENG
Installation
ESP-Me Controller
11
Page 12

ENG
Installation
Locate the transformer wiring compartment in
A
the lower left corner of the controller unit. Use a
screwdriver to remove the cover and expose the
transformer connection wires.
Route the three external power source wires
B
through the conduit opening at the bottom of
the unit and into the wiring compartment.
Connect the external power source wires (two
C
power and one ground) to the transformer
connection wires inside the wiring compartment.
WARNING: Ground wire must be connected to
provide electrical surge protection. Permanently
mounted conduit shall be used for connecting
main voltage to the controller.
NOTE: Use either the provided wire nuts or the
installed connector for this step.
Verify that all wiring connections are secure,
D
then replace the wiring compartment cover and
secure it with the screw.
C
L
N
A
B
12
ESP-Me Controller
Page 13
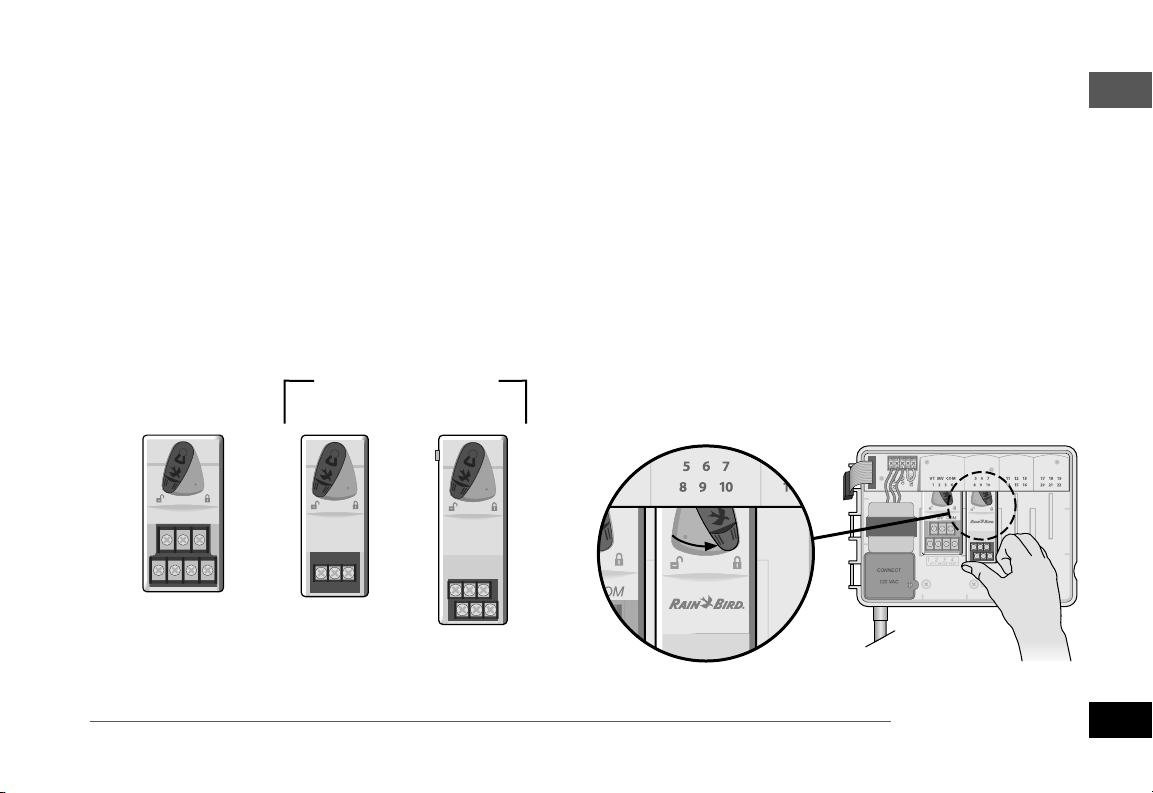
Station Expansion Modules
Optional Station Modules are installed in the empty
slots to the right of the base module to increase the
station capacity up to 22 stations.
NOTE: 6-Station module is compatible only with
the ESP-Me. They are not backwards compatible
with the previous ESP-M vintage controller.
NOTE: For ideal station sequencing, it is rec-
ommended that a 6-Station module always be
installed in Bay 2. For more details see the Station
Numbering section.
Base Module
(included)
Expansion Modules
(sold separately)
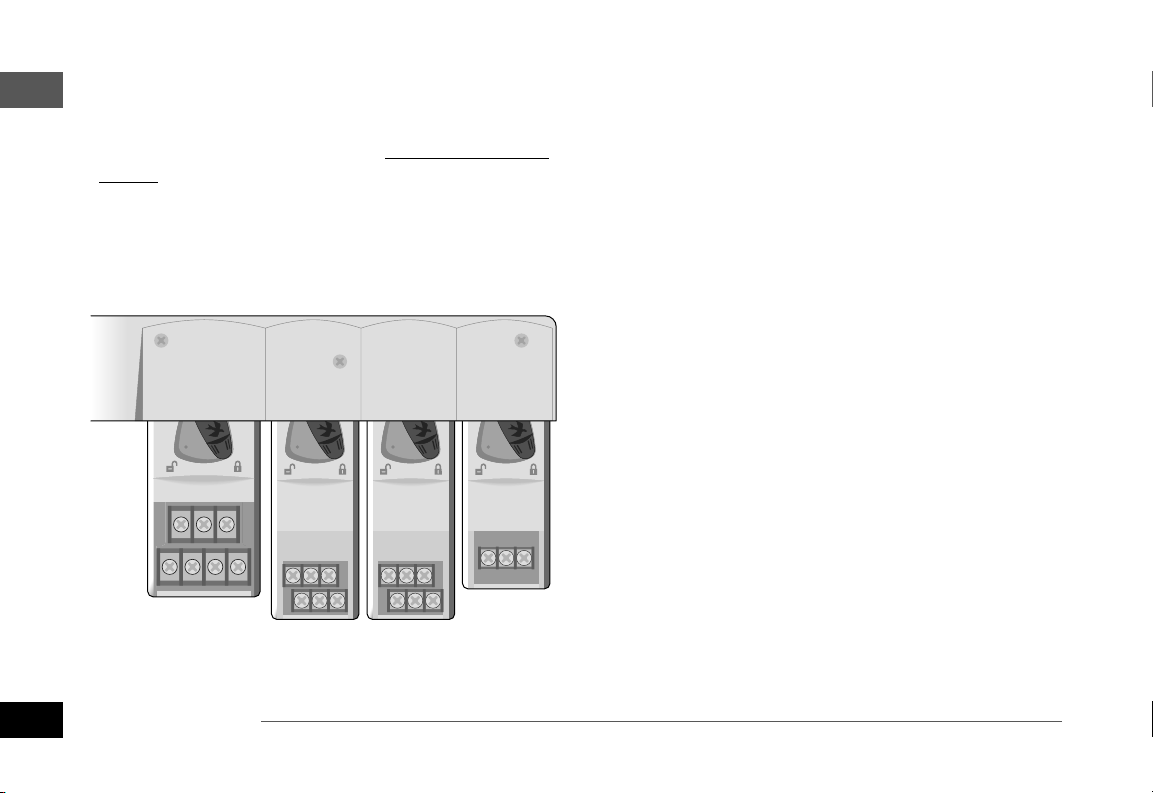
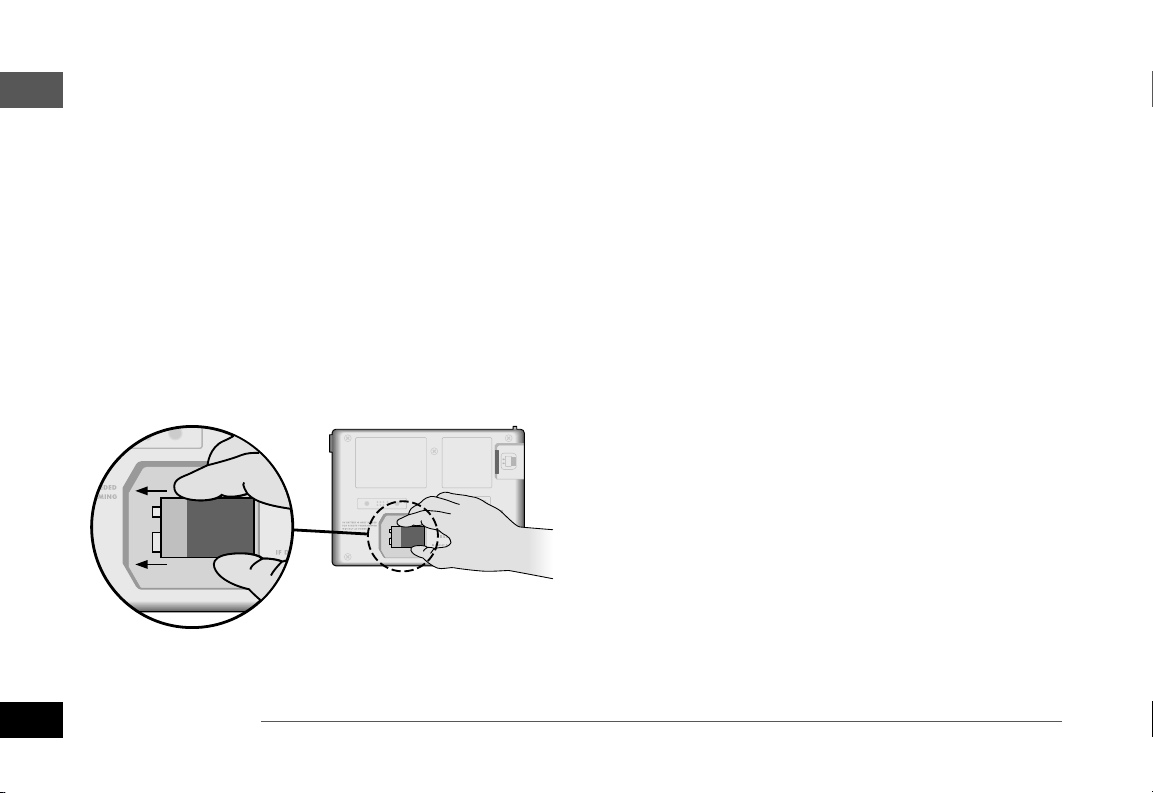
Install Modules
Verify the securing lever on the module is in the
A
unlocked position (slide to the left).
Place the module under the desired slot between
B
the plastic rails.
Push the module up into the slot until secure.
C
Slide the securing lever to the locked position
D
(slide to the right).
REPEAT for additional modules.
NOTE: Modules can be installed or removed with
OR without AC power connected. They are considered “hot-swappable”.
D
ENG
Installation
VT MV COM
3-STATION
(ESPSM3)
6-STATION
(ESPSM6)
BC
ESP-Me Controller
13
Page 14
ENG
Installation
Station Numbering
Fixed Station Numbering Description
The controller is congured with Fixed Station Numbering. Each bay is set up to accept a 6 station module
and reserve the station number for future use if a 6 station module is NOT installed in Bays 2, 3 or 4.
Station numbers are pre-assigned as follows:
Bay 1 Bay 2 Bay 3 Bay 4
VT MV COM 567 11 12 13 17 18 19
1234 8910141516202122
VT MV COM
Example Of Recommended Installation For 19 Stations
Module Conguration
Example of installation with station numbering gaps:
• A total of 19 stations are installed.
• The Base Module is installed in Bay 1 and uses Stations 1 through 4.
• A 6-Station Expansion Module is installed in Bays 2
and 3 using Stations 5 through 16.
• A 3-Station module is installed in Bay 4 and uses
stations numbered 17 through 19.
Because a 3-Station module is installed in Bay 4, only
the rst three station numbers assigned to that bay will
be used and the unused numbers will be “reserved” for
future use.
NOTE: During programming, the controller will
skip any unused station numbers, creating a gap
in station numbering.
14
ESP-Me Controller
Page 15
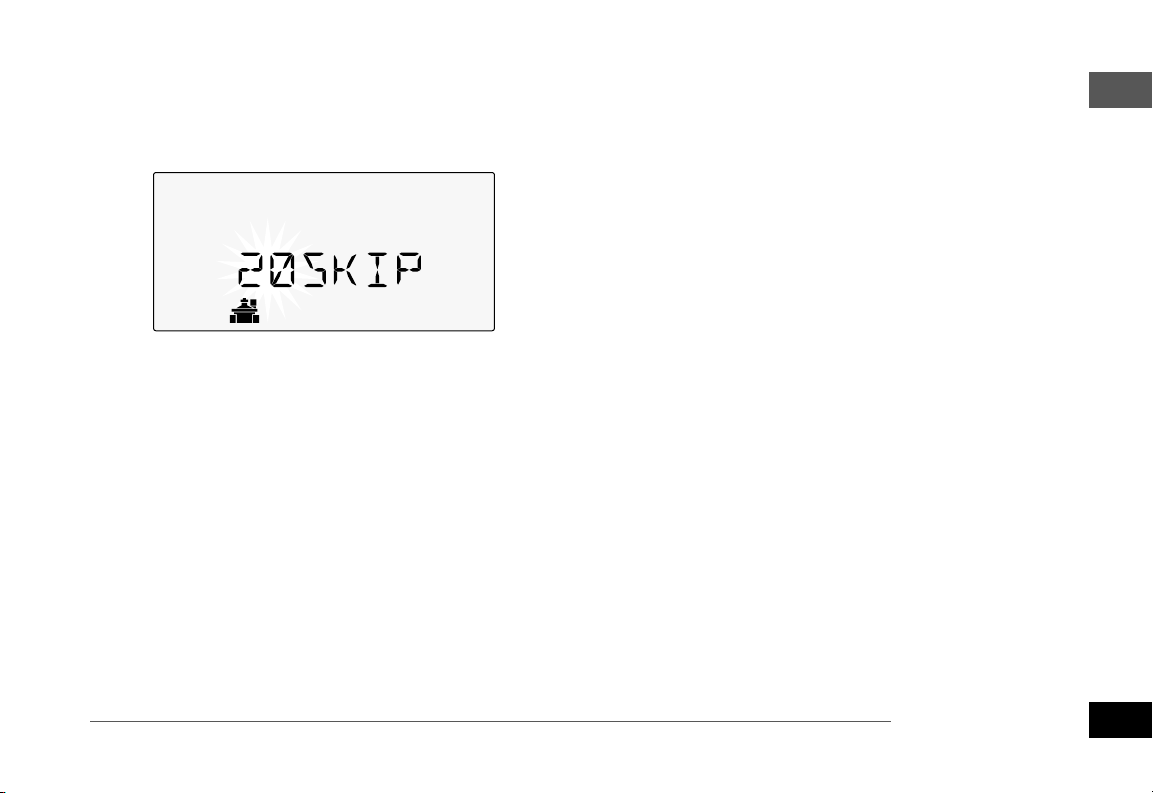
As an example: a 3-Station module was installed in
Bay 4, so stations 20-22 will be unavailable for programming. During programming the missing stations
will show on the display as 20SKIP, 21SKIP, etc.
The screen displays “20SKIP” with the “20” ashing to
indicate that Station 20 (and also 21-22) are unused
and unavailable for programming.
Complete Controller Installation
Reinstall and reconnect the front panel.
A
Apply power to the controller and test the system.
B
NOTE: The electrical connections can be checked
even if water is not available. If water is available
and you would like to test some or all of your stations, use the Test All Stations feature of the controller.
ENG
Installation
ESP-Me Controller
15
Page 16

830
PGM
A
ENG
Normal Operation
Normal Operation
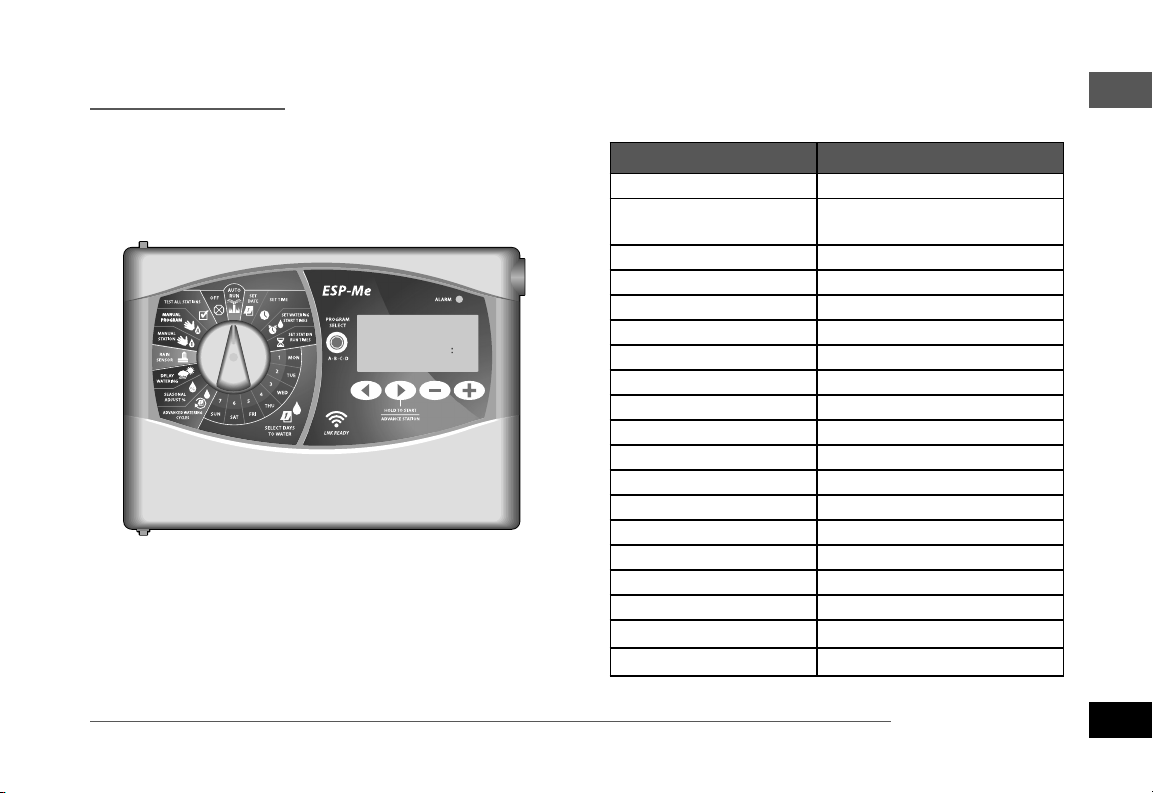
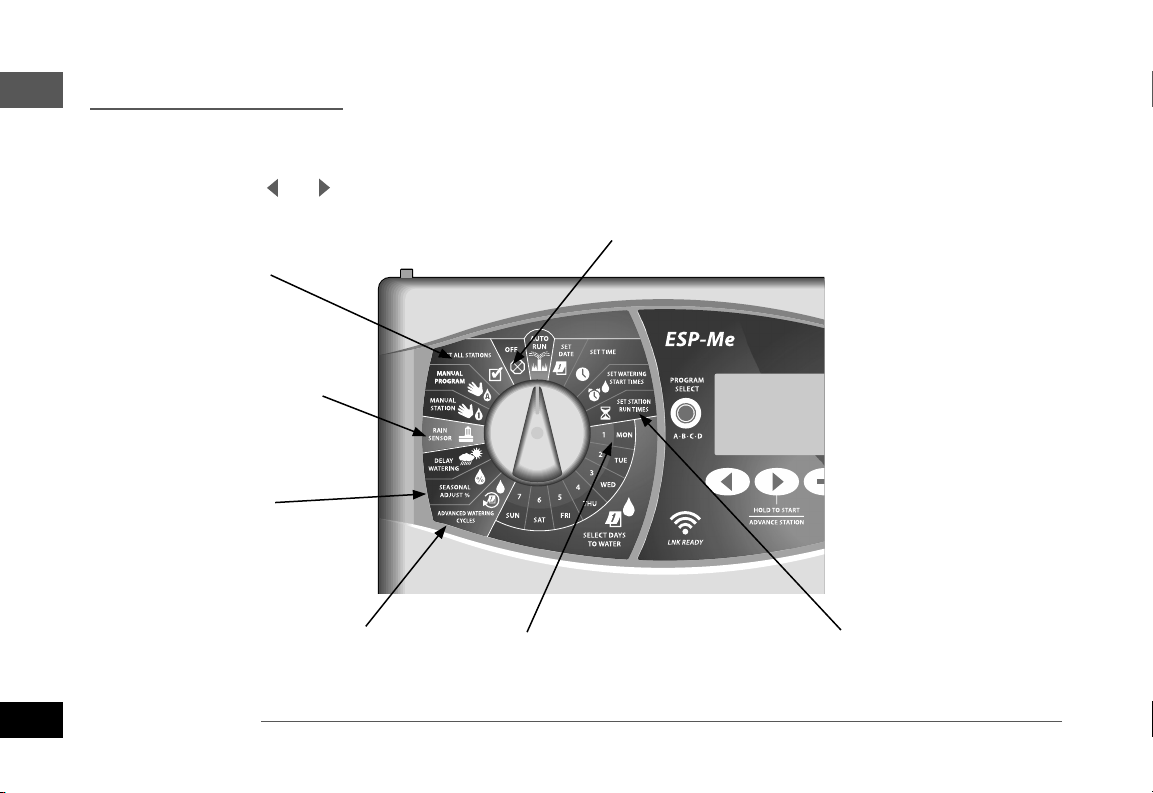
Controls and Indicators
Key operational features of the ESP-Me Controller:
16
ESP-Me Controller
OFF
Disables automatic
irrigation
TEST ALL STATIONS
MANUAL WATERING
Start watering any or all
stations immediately
RAIN SENSOR
Set controller to obey
or ignore a rain sensor
DELAY WATERING
Up to 14 days
SEASONAL ADJUST
Adjust Run Times
from 5% up to 200%
WATER DAY(S) OPTIONS
By Day, Odd, Even or Cyclic
AUTO RUN
Watering occurs
automatically
WATERING DAYS
Select days to
allow watering
DATE/TIME
Set the current
Date and Time
BACK/NEXT BUTTONS
Select programming
options
START TIMES
Set up to 6 Start
Times per program
HOLD TO START
Manual irrigation
RUN TIMES
Set Run Times for
each program
ALARM
INDICATOR
PROGRAM
SELECT
BUTTON
Select Program
A, B, C or D
– / + BUTTONS
Adjust program
settings
Page 17

AUTO RUN
AUTO RUN is the normal operating mode. Return the
dial to AUTO RUN when programming is complete..
During Watering:
The display shows a blinking sprinkler symbol, the
active Station Number or Program, and the Remaining
Run Time.
• To cancel watering, turn the dial to OFF for three
seconds until the screen shows OFF.
To Manually Start a Program:
Press the PROGRAM SELECT button to select a
A
program.
Press the HOLD TO START button to immediately
B
run the displayed program.
OFF
Turn the dial to OFF to stop automatic irrigation or to
cancel all active watering immediately.
CAUTION: Watering will NOT occur if the controller
remains in OFF.
ENG
Normal Operation
ESP-Me Controller
17
Page 18
ENG
Normal Operation
Program-Based Scheduling
The ESP-Me uses a programmed-based scheduling
method to create irrigation schedules.
For each Program (A, B, C and D):
Select Watering Days (Custom, Odd/Even, Cyclic)
A
and Start Times that apply globally to the entire
program.
Assign a Run Time to each available station
B
number to run during the selected program.
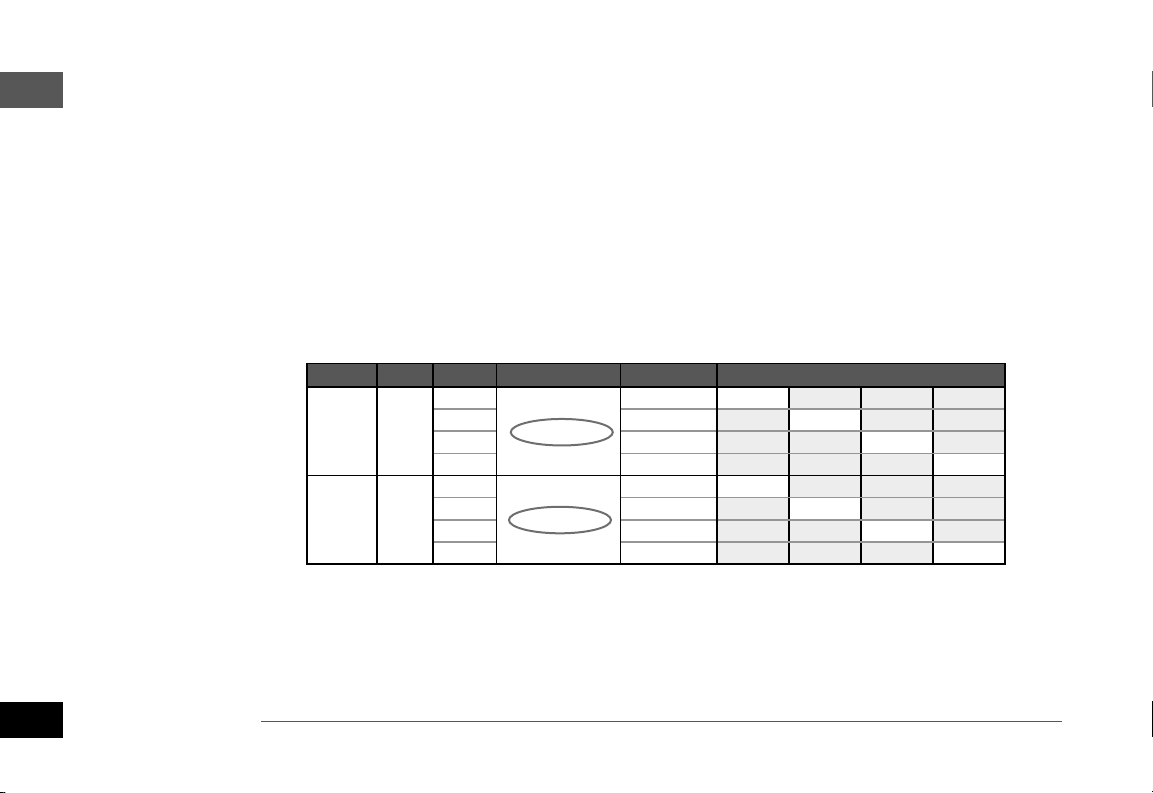
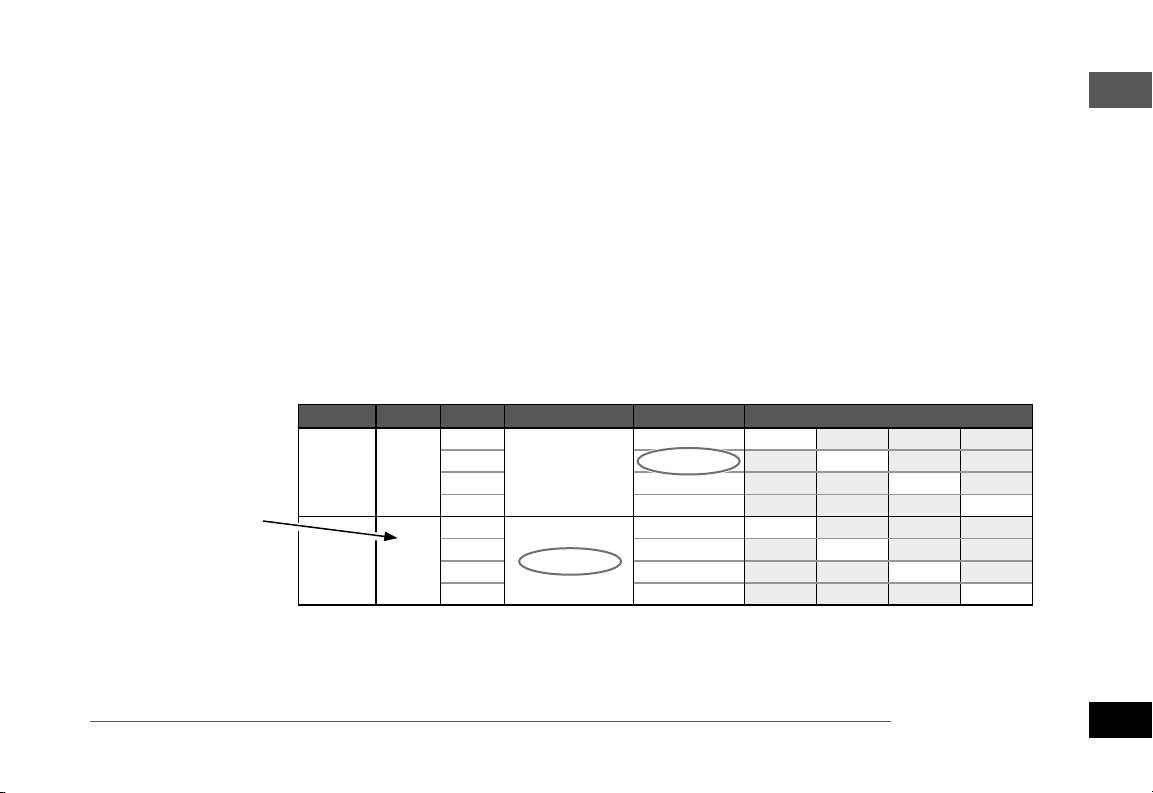
Program START Station Scheduled Start Actual Start Run Times
1
With Program Stacking,
Program B only starts
when Program A is
nished
A 1
B 1
2 8:30 AM 30 MIN
st
3 9:00 AM 30 MIN
4 9:30 AM 30 MIN
5
6 10:30 AM 30 MIN
st
7 11:00 AM 30 MIN
8 11:30 AM 30 MIN
Program Stacking
If any programs have Start Times that overlap, the ESPMe will “stack” the Start Times. When all Stations have
run in Program A, then Program B will start watering.
Individual stations will water in sequential order.
As an example: Program A and B are both set to start
at 8:00 AM. But Program B will not run until Program A
is nished.
8:00 AM 30 MIN
8:00 AM
10:00 AM 30 MIN
8:00 AM
18
ESP-Me Controller
Page 19
Common Programming Error
The most common programming error for any program-based controller is multiple Program Start Times
that cause watering cycles to repeat.
st
As an example: Program A has a 1
run at 8:00 AM. With program stacking, each Station
will run in order, until all zones are watered. There’s no
need to set each Station to run separately.
nd
In this example, a 2
Start Time has mistakenly been
set for 8:30 AM, which means that some zones would
be watered twice that morning.
Program START Station Scheduled Start Actual Start Run Times
Multiple Start Times
cause Stations to
water repeatedly.
A 1
To x, remove the
nd
additional 2
Time
Start
A 2
Start Time set to
1
2 8:30 AM 30 MIN
st
3 9:00 AM 30 MIN
4 9:30 AM 30 MIN
1
nd
2 10:30 AM 30 MIN
3 11:00 AM 30 MIN
4 11:30 AM 30 MIN
8:00 AM
8:30 AM
NOTE: Only assign Run Times in a Program for sta-
tions you want to water. If you do not want a specic station to run in a selected program then set
the Run Time to zero.
8:00 AM 30 MIN
10:00 AM 30 MIN
ENG
Normal Operation
ESP-Me Controller
19
Page 20
ENG
Basic Programming
Basic Programming
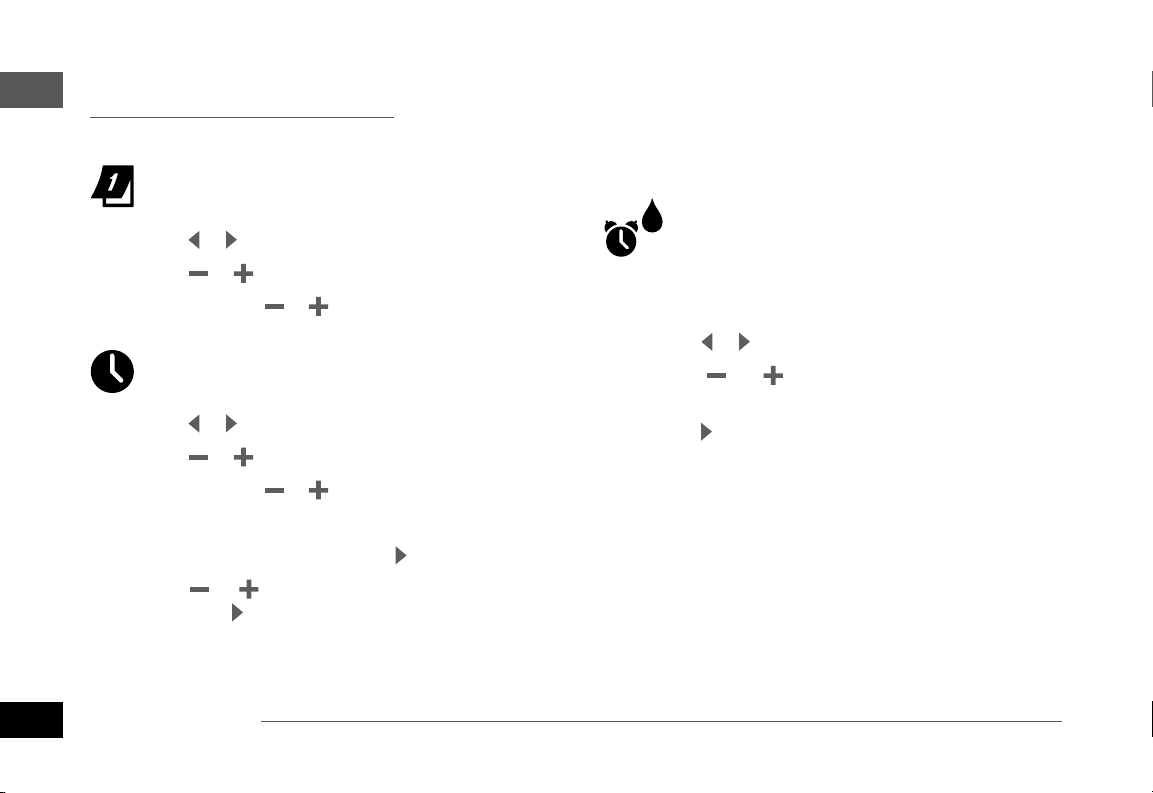
1. Set Date and Time
Turn the dial to SET DATE
2. Set Watering Start Times
Up to six Start Times are available for each program.
A
B
C
A
B
C
To change the time format (12 hour or 24 hour):
A
B
20
ESP-Me Controller
Press or to select the setting to change.
Press or to change the setting value.
Press and hold or to accelerate adjustments.
Turn the dial to SET TIME.
Press or to select the setting to change.
Press or to change the setting value.
Press and hold or to accelerate adjustments.
With MINUTES blinking, press .
Press or to select the desired time format,
then press to return to the time setting.
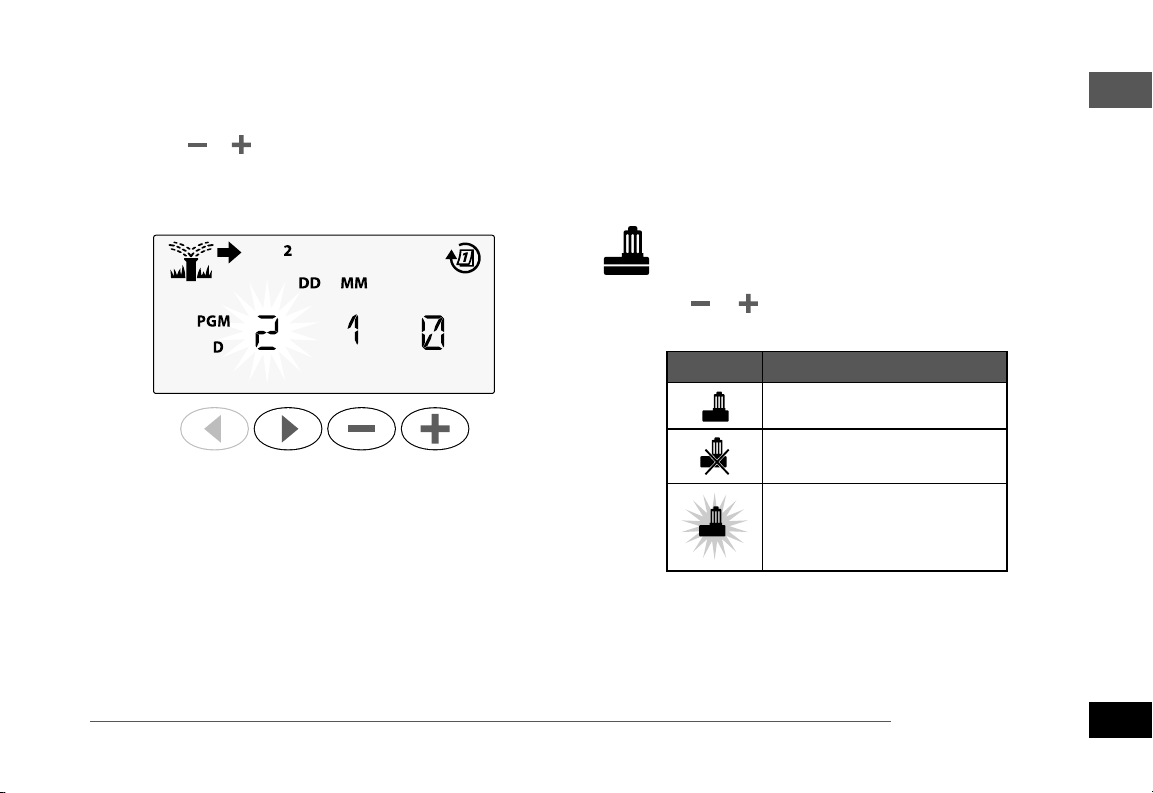
Turn the dial to SET WATERING START TIMES
Press PROGRAM SELECT to choose the desired
A
Program (if necessary).
Press or to select an available Start Time.
B
Press or to set the selected Start Time
C
(ensure the AM/PM setting is correct).
Press to set additional Start Times.
D
NOTE: The OFF Position for any start time is
between 11:45 PM and 12:00 AM.
Page 21
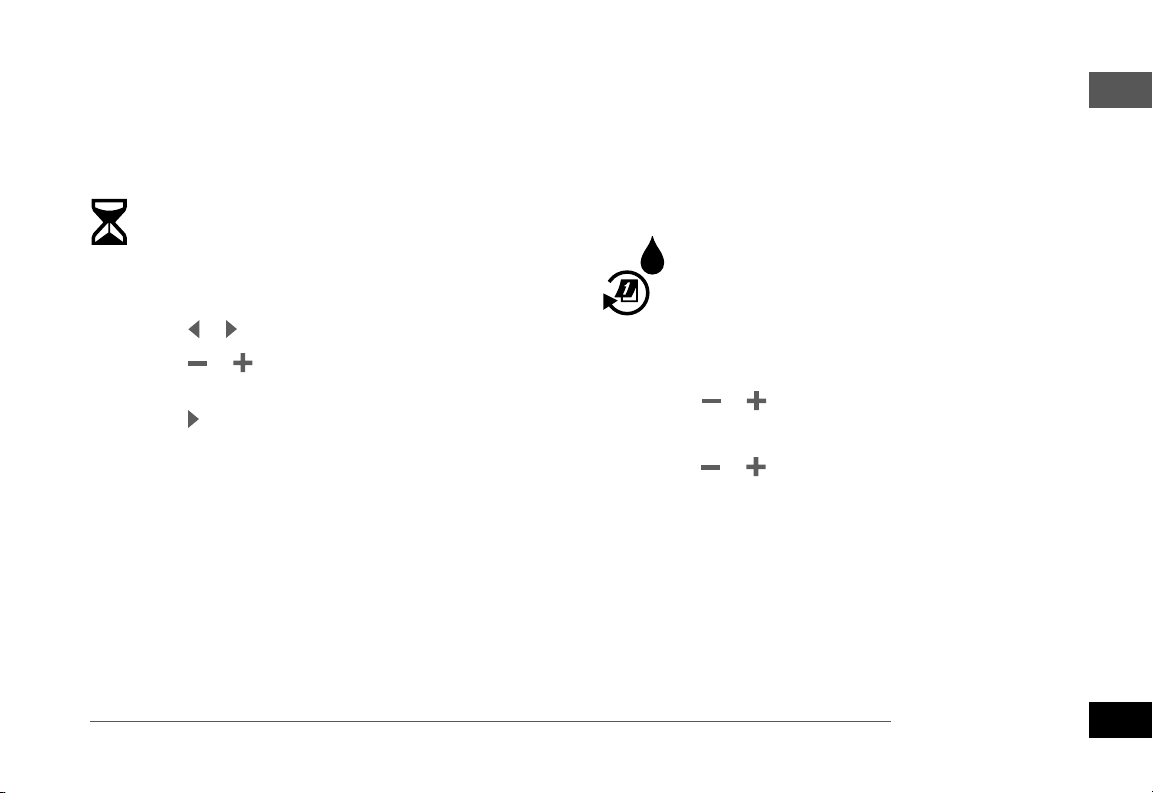
3. Set Station Run Times
Run Times can be set from one minute up to six hours.
Turn the dial to SET STATION RUN TIMES
ENG
Basic Programming
4. Set Watering Days
Custom Days of the Week
Set watering to occur on specic days of the week.
Press PROGRAM SELECT to choose the desired
A
Program (if necessary).
Press or to select a Station.
B
Press or to set the Run Time for the selected
C
Station.
Press to set additional Station Run Times.
D
Turn the dial to
ADVANCED WATERING CYCLES
Press PROGRAM SELECT to choose the desired
A
Program (if necessary).
Press or to select BY DAY.
B
Turn the dial to MON.
C
Press or to set the selected (blinking) day as
D
either ON or OFF, then turn the dial to the next
day of the week.
REPEAT to select additional days as desired for
the selected program.
ESP-Me Controller
21
Page 22
ENG
Manual Watering Options
Manual Watering Options
Test All Stations
Verify operation of valves in the system.
Turn the dial to TEST ALL STATIONS.
Press or to set a Run Time.
A
Press the HOLD TO START button.
B
Turn the dial to AUTO RUN after display shows
C
TESTING.
During Testing:
The display shows a blinking sprinkler symbol, the
active Station Number or Program, and the Remaining
Run Time.
To cancel the test, turn the dial to OFF for three
D
seconds until the screen shows OFF.
Run a Single Station
Start watering immediately for a single station.
Turn the dial to MANUAL STATION.
Press or to select a Station.
A
Press or to set a Run Time.
B
Press the HOLD TO START button.
C
Irrigation will begin and “STARTED” will appear
D
on the display.
22
ESP-Me Controller
Page 23

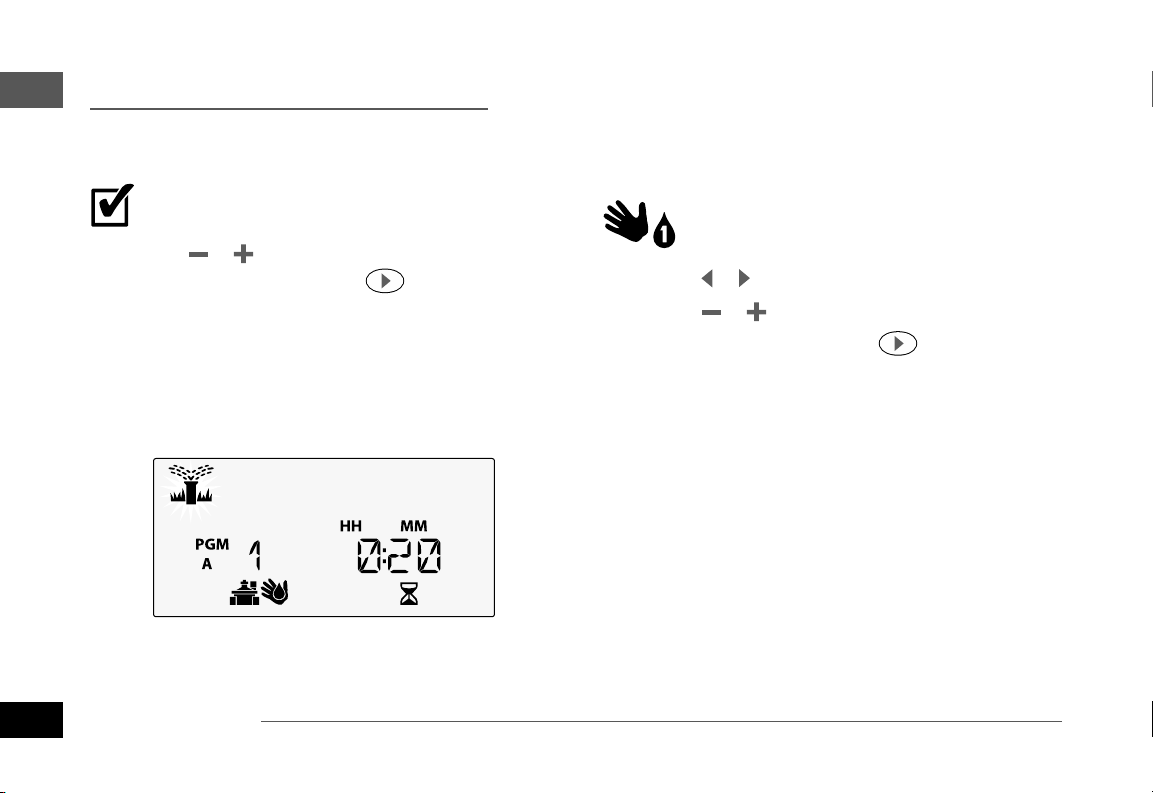
Run a Single Program
Start watering immediately for one program.
Turn the dial to MANUAL PROGRAM.
Press PROGRAM SELECT to choose the desired
A
Program (if necessary). The total run time for the
program is displayed.
Press the HOLD TO START button to begin
B
watering start the selected Program.
REPEAT as desired to queue additional programs
to run manually.
NOTE: A maximum of 38 stations can be queued
across all four programs.
Irrigation will begin and “STARTED” will appear
C
on the display.
Press the ADVANCE STATION button to
D
advance to the next station if desired.
ENG
Manual Watering Options
During Manual Watering (Single Station or Single
Program):
The display shows a blinking sprinkler symbol, the
active Station Number or Program, and the Remaining
Run Time.
• To cancel manual watering, turn the dial to OFF for
three seconds until the screen shows OFF.
ESP-Me Controller
23
Page 24
ENG
Advanced Programming
Advanced Programming
Odd or Even Calendar Days
Set watering to occur on all ODD or EVEN calendar days.
Turn the dial to
ADVANCED WATERING CYCLES
Press PROGRAM SELECT to choose the desired
A
Program (if necessary).
Press or to select ODD or EVEN.
B
NOTE: ODD or EVEN is displayed when the dial is
turned to any day of the week position.
Cyclic Days
Set watering to occur at specic intervals, such as
every 2 days, or every 3 days, etc.
Turn the dial to
ADVANCED WATERING CYCLES.
Press PROGRAM SELECT to choose the desired
A
Program (if necessary).
Press or to select CYCLIC, then press
B
Press or to set the desired DAY CYCLE, then
C
press
24
ESP-Me Controller
Page 25
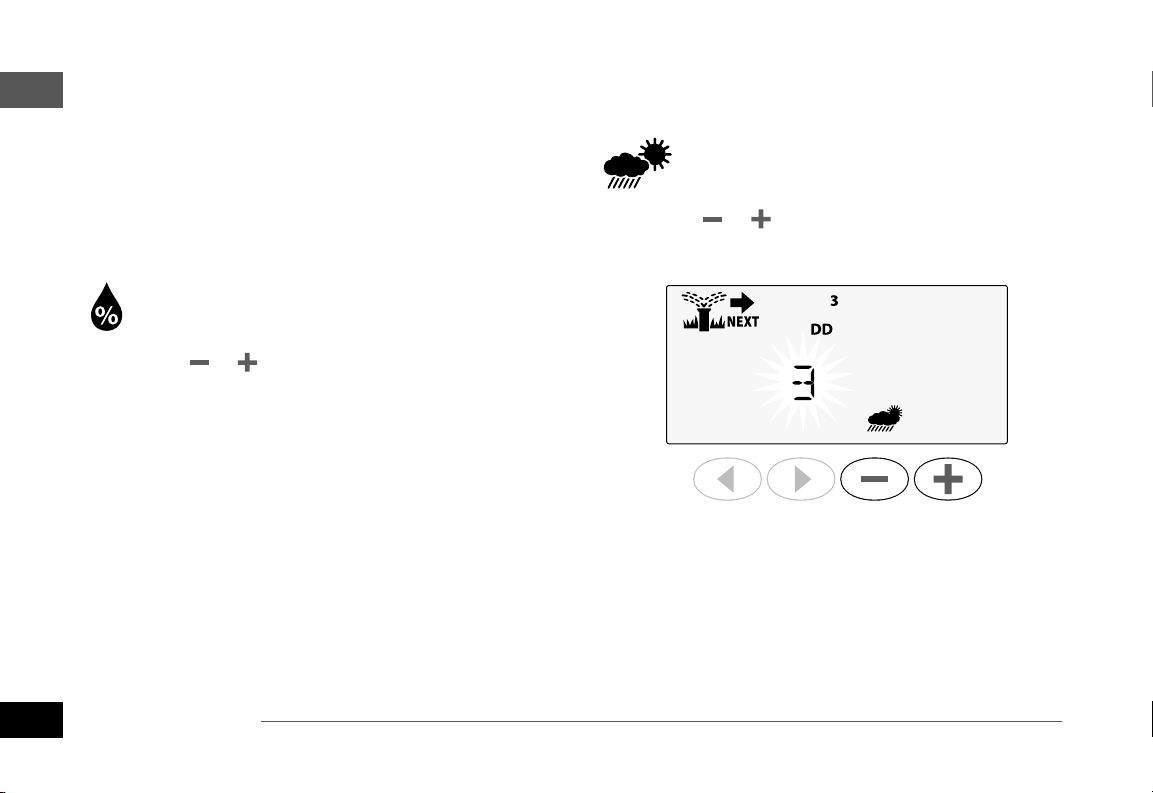
Press or to set the DAYS REMAINING before
D
the cycle begins. The NEXT watering day updates
on the display to indicate the day that watering
will start as shown.
Rain Sensor
Set the controller to obey or ignore a rain sensor.
When set to ACTIVE, automatic irrigation will be suspended if rainfall is detected. When set to BYPASS all
programs will ignore the rain sensor.
Turn the dial to RAIN SENSOR.
ENG
Advanced Programming
• Press
(ignore).
or to select ACTIVE (obey) or BYPASS
Legend Rain Sensor Icon Status
Active
Bypassed
Rain detected
NOTE: See Special Features to set Rain Sensor
Bypass by Station.
ESP-Me Controller
25
Page 26
ENG
Advanced Programming
Seasonal Adjust
Increase or decrease program run times by a selected
percentage (5% to 200%).
As an example: If the Seasonal Adjust is set to 100%
and the station Run Time is programmed for 10 minutes, the station will run for 10 minutes. If the Seasonal
Adjust is set to 50%, the station will run for 5 minutes.
Turn the dial to SEASONAL ADJUST.
Press or to increase or decrease the global
A
percentage setting.
To adjust an individual Program, press PROGRAM
B
SELECT to choose the desired Program (if
necessary).
Delay Watering
Suspend watering for up to 14 days.
Turn the dial to DELAY WATERING.
Press or to set the DAYS REMAINING. The
A
NEXT watering day will update on the display to
indicate when watering will resume.
To cancel a Rain Delay, set the DAYS REMAINING
B
back to 0.
NOTE: When the delay expires, automatic irriga-
tion resumes as scheduled.
26
ESP-Me Controller
Page 27
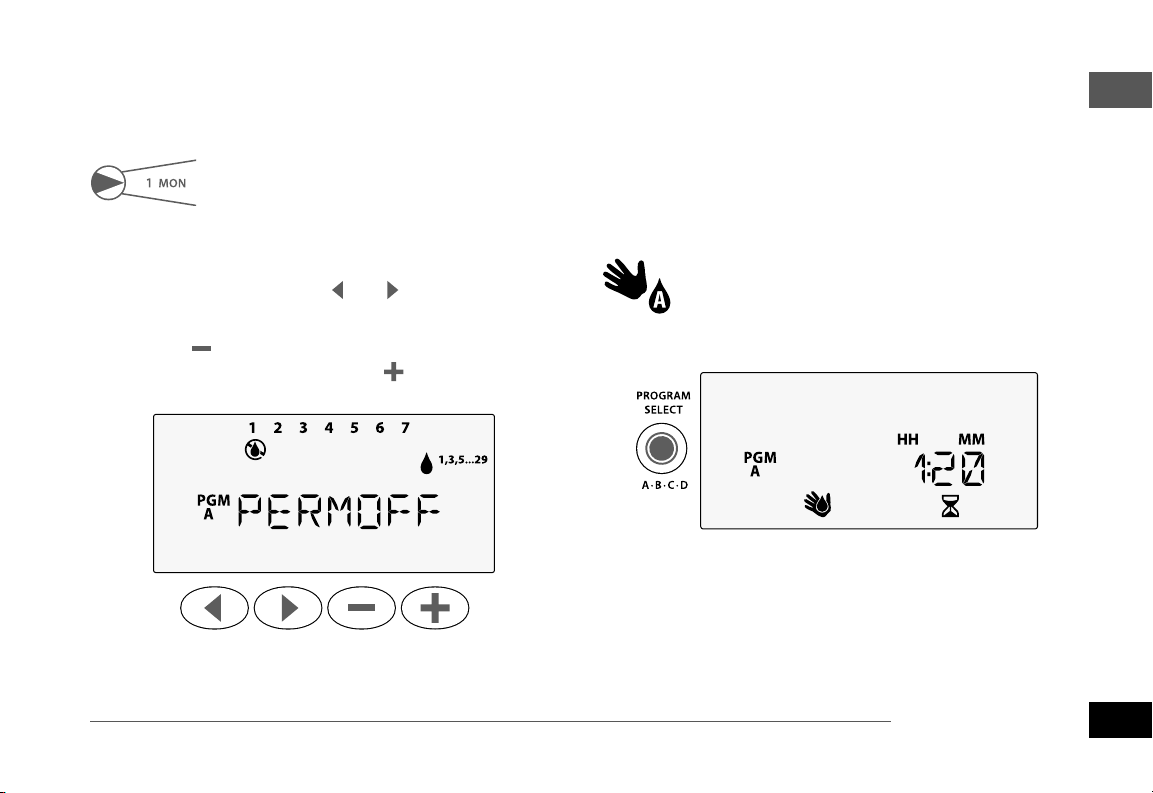
Permanent Days O
Prevent watering on selected days of the week (for
Odd, Even or Cyclic programming only).
Turn the dial to 1 MON.
(or any desired day)
Press PROGRAM SELECT to choose the desired
A
Program (if necessary).
Press and HOLD both and at the same time
B
until the Permanent Days O screen is displayed.
Press to set the selected (blinking) day as a
C
Permanent Day O or press to leave the day
ON.
Total Run Time Calculator By Program
View the Total Run Time for an entire program.
The controller can determine the Total Run Time of a
program by adding up all the Run Times for each station in that program.
Turn the dial to MANUAL PROGRAM.
The Total Run Time for PGM A is displayed.
A
Press the PROGRAM SELECT button to view the
B
Total Run Time for the next program.
NOTE: The run time displayed for each program
is the seasonally adjusted run time and only
includes one start time.
ENG
Advanced Programming
ESP-Me Controller
27
Page 28
830
PGM
A
ENG
Special Features
Special Features
Turn the dial to the desired position indicated
A
below for each Special Feature.
Press and hold and at the same time.
B
SAVE PROGRAMS
BYPASS RAIN SENSOR FOR
ANY STATION
Tells an individual station to
obey or ignore a rain sensor.
RESET TO FACTORY
DEFAULTS
All programmed schedules
will be erased.
DELAY BETWEEN VALVES
A station delay (from 1 second to 9 hours)
ensures that a valve has completely closed
before the next one opens.
28
ESP-Me Controller
RESTORE SAVED
PROGRAMS
PERMANENT DAYS OFF
Prevent watering on selected
days of the week.
SET MASTER VALVE BY STATION
Allows a station to be controlled by a
master valve or pump start relay.
Page 29
Options
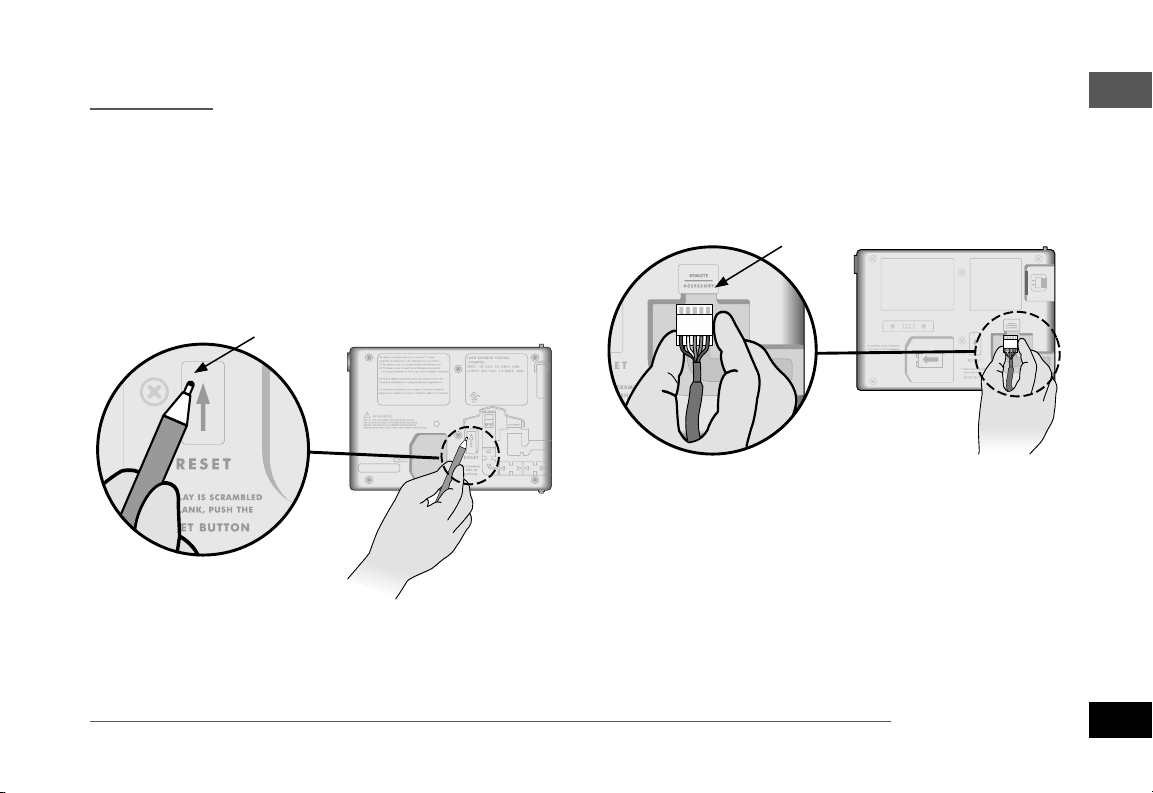
Reset Button
If the controller is not working properly, you can try
pressing RESET.
• Insert a small tool such as a paper clip, into the
access hole and press until the controller is reset.
All previously programmed watering schedules
will remain stored in memory.
RESET
Remote Accessories
A 5 pin accessory port is available for Rain Bird
approved external devices, including:
• LNK WiFi Module
• LIMR Receiver Quick Connect harness
PORT
ENG
Options
ESP-Me Controller
29
Page 30
ENG
Options
Remote Programming
Program the front panel remotely on battery power.
The front panel can be removed from the controller
and programmed remotely using a 9 volt battery for
power. Settings can be programmed for all 22 stations
regardless of which station modules are installed in
the controller.
NOTE: This is useful if a contractor wants to pro-
gram the controller prior to installation on site.
Remove the front panel.
A
Install a 9V battery in the battery compartment.
B
Program the controller.
C
NOTE: Program information is stored in nonvola-
tile memory so it is never lost if the front panel
loses power.
Replace the front panel (refer to Complete
D
Installation in the Installation section).
NOTE: After the front panel is re-installed, any
station that does not have a corresponding Station Module installed will function as though the
run time is zero.
Battery Life
If the display repeatedly shows “-- -- -- -- --” when using
a 9V battery for remote programming, replace the battery.
30
ESP-Me Controller
Page 31

Troubleshooting
Error Detection
The ESP-Me controller has built-in error detection that
can automatically generate an ALARM caused by an
essential programming error or if an electrical short
condition is detected.
The ALARM LED light on the ESP-Me controller front
panel will light up to indicate an alarm condition:
Programming Errors (blinking LED)
Error
No Start Times are set BLINK NO START TIMES
No Run Times are set BLINK NO RUN TIMES
No Watering Days are set BLINK NO WATER DAYS
The ESP-Me controller will reset or clear when the error
is corrected.
NOTE: The dial must be in the AUTO RUN position
for an ALARM message to appear on the display.
ALARM
LED
Error Message
On Display
Electrical Errors (non-blinking LED)
Error
Master Valve short SOLID MASTER VALVE/PUMP WIRE
Station short SOLID STATION “X” WIRE SHORTED
When an electrical error is detected, irrigation for the
aected station is cancelled and watering advances to
the next operable station in the program.
The controller will attempt to water the aected station again at the next scheduled watering. Completion
of a successful watering will clear the error condition
associated with that station.
ALARM
LED
Error Message
On Display
SHORTED OR HIGH CURRENT
Clearing Electrical Error Alarms
Turn the dial to the AUTO RUN posi-
tion to view the error message on the
display. To clear the ALARM, press the
right arrow button.
ENG
Troubleshooting
ESP-Me Controller
31
Page 32

ENG
Troubleshooting
Watering Issues
Problem Possible Cause Possible Solution
Display shows a
program is active, but
system isn’t watering.
NO AC message on
display.
It just rained and
the alarm light is not
illuminated, why?
Water source not supplying water. Verify there is no disruption to the main water line and
that all other water supply lines are open and functioning
properly.
Wiring is loose or not properly
connected.
Field wires are corroded or damaged. Check field wiring for damage and replace if necessary.
Loss of AC power. When there is a power loss and a 9 volt battery is
No Power detected. Check circuit breaker and that unit is plugged into socket
Controller may be plugged into a GFI
outlet or an outlet that is wired to a GFI
outlet.
This is normal operation. The ESP-Me
does not consider the interruption
of irrigation due to rainfall an alarm
condition.
Check that field wiring and master valve or pump start
relay wiring is securely connected at the controller and in
the field.
Check wiring connections and replace with watertight
splice connectors if needed.
installed, the system does not irrigate but programs show
as remaining active.
or properly connected to power source.
Check power to the outlet or reset the circuit breaker.
This is normal operation.
32
ESP-Me Controller
Page 33

Watering Issues
Problem Possible Cause Possible Solution
Programmed
schedules do not
start.
Too much irrigation Multiple Start Times in the same
Connected rain sensor may be activated. Set Rain Sensor to BYPASS to ignore the rain sensor. If
watering resumes, the sensor is operating properly and
no further correction is needed.
Connected rain sensor may not be
operating properly.
If no rain sensor is connected, the
jumper wire connecting the two SENS
terminals on the terminal strip may be
missing or damaged.
program.
Multiple programs are running at the
same time.
Valve is malfunctioning. Check to see if the ALARM light on the controller is lit
Seasonal Adjust setting is too high. Set Seasonal Adjust to 100%.
Let the rain sensor dry out, or disconnect it from the
controller terminal strip and replace it with a jumper wire
connecting the two SENS terminals, or set to Bypass.
Move dial position to Sensor Bypass and set to Bypass.
Turn off any additional Start Times that are causing
watering cycles to repeat (the Start Time OFF position
is between 11:45 and 12:00). See “Program Stacking” on
page 18 for more information.
Review programming to assure that the same Station is
not active in multiple Programs.
solid, then repair or replace the valve if necessary.
ENG
Troubleshooting
ESP-Me Controller
33
Page 34

ENG
Troubleshooting
Electrical Issues (solid LED illuminated)
Problem Possible Cause Possible Solution
Display is blank or
frozen, the controller
will not accept
programming or is
operating abnormally.
Power not reaching the
controller.
Controller needs to be reset. Press the Reset Button. For details see “Reset Button” section.
Verify the main AC power supply is securely plugged in or
connected and working properly.
Automatic error
detection indicates a
problem by ALARM LED
and an error message
on display.
LED is flashing or solidly
illuminated but I see no
message on the LCD.
34
ESP-Me Controller
An electrical surge may
have interfered with the
controller’s electronics.
Short circuit or overload
condition in valve, master
valve or pump start relay
wiring.
Dial not in AUTO RUN
position.
Unplug the controller for 2 minutes, then plug it back in. If there is
no permanent damage, the controller should accept programming
and resume normal operation.
Identify and repair the fault in the wiring. Refer to compatible
pump start relays. For details see “Connect Pump Start Relay”
section.
Turn dial to AUTO RUN position.
Page 35

Safety Information
CAUTION: This appliance is not intended for use by persons (includ-
ing children) with reduced physical, sensory or mental capacity,
or lack of experience and knowledge unless they have been given
supervision or instruction concerning use of the appliance by a person responsible for their safety. Children should be supervised to
ensure that they do not play with the appliance.
WARNING: Special precautions must be taken when valve
wires (also known as station or solenoid wires) are located
adjacent to, or share a conduit with other wires, such as those
used for landscape lighting, other “low voltage” systems or
other “high voltage” power.
Separate and insulate all conductors carefully, taking care not
to damage wire insulation during installation. An electrical
“short” (contact) between the valve wires and another power
source can damage the controller and create a re hazard.
WARNING: All electrical connections and wiring runs must
comply with local building codes. Some local codes require
that only a licensed or certied electrician can install power.
Only professional personnel should install the controller.
Check your local building codes for guidance.
NOTE: Date and time are retained by a lithium battery which
must be disposed of in accordance with local regulations.
CAUTION: Use only Rain Bird approved accessory devices. Unapproved devices may damage the controller and void warranty. For a
list of compatible devices go to: www.rainbird.com
FCC Part 15
This equipment has been tested and found to comply with the limits for a
Class B digital device, pursuant to Part 15 of the FCC Rules. These limits are
designed to provide reasonable protection against harmful interference in
a residential installation.
This equipment generates, uses, and can radiate radio frequency energy
and, if not installed and used in accordance with the instructions, may
cause harmful interference to radio communications. However, there is no
guarantee that interference will not occur in a particular installation.
If the equipment does cause harmful interference to radio or television
reception, which can be determined by turning the equipment off and on,
the user is encouraged to try to correct the interference by the following
measures:
• Reorient or relocate the receiving antenna.
• Increase the separation between the equipment and receiver.
• Connect the equipment into an outlet on a circuit different from that to
which the receiver is connected.
• Consult the dealer or an experienced radio/TV technician for help.
• Changes or modifications not expressly approved by Rain Bird Corporation could void the user’s authority to operate the equipment.
• This product was FCC certified under test conditions that included
the use of shielded I/O cables and connectors between system components. To bin in compliance with FCC regulations, the user must use
shielded cables and connectors and install them properly.
• This class B digital apparatus meets all requirements of the Canadian
Interference Causing Equipment Regulations.
Cet appareil Numérique de la classe B respecte toutes les exigences du
Règlement sur le matériel brouilleur du Canada
ENG
Troubleshooting
ESP-Me Controller
35
Page 36

Español
ESP
Asistencia técnica
¿Tiene preguntas?
Escanee el código QR
para visitar y obtener ayuda
sobre cómo instalar y utilizar el
Controlador ESP-Me de Rain Bird
www.rainbird.com/espme
Hay más documentación disponible para el usuario
en la pestaña Manuals & Literature (Manuales y
documentación), incluyendo:
• Manual del usuario (este documento)
• Guía de referencia rápida
• Guía de programación
• Apoyo en otros idiomas
Para obtener más información sobre los sistemas de
riego de Rain Bird, así como los programas formativos
de Rain Bird Academy, visite:
www.rainbirdservices.com/training
Para ver vídeos de instrucciones sobre el ESP-Me, visite
www.youtube.com/
Eliminación de residuos electrónicos
En cumplimiento de la Directiva Europea
2002/96/CE y la norma Europea EURONORM
EN50419:2005, este dispositivo no puede desecharse con la basura común del hogar. Este dispositivo debe ser desechado siguiendo un proceso apropiado y selectivo que permita su
recuperación.
36
Controlador ESP-Me
Page 37

Manual del usuario del Controlador ESP-Me
Español
Asistencia técnica ....................................................... 36
Eliminación de residuos electrónicos .......................36
Introducción ...............................................39
Bienvenido a Rain Bird ............................................... 39
The Intelligent Use of Water® ...................................... 39
Características del controlador ESP-Me .................39
Habilitado para WiFi ........................................................40
Instalación ..................................................41
Montar el controlador ................................................41
Conexiones de los cables ..........................................42
Conectar las válvulas ...................................................... 42
Conectar una válvula maestra (opcional) ............... 42
Conectar un relé de arranque de la bomba
(opcional) ............................................................................ 43
Conectar sensor de lluvia/congelación ................... 44
Conectar a la toma de corriente .................................45
Módulos de ampliación de estaciones ................... 47
Instalar módulos .............................................................. 47
Numeración de estaciones ........................................... 48
Conguración del módulo ........................................... 48
Instalación completa del controlador ....................49
Funcionamiento normal .............................50
Controles e indicadores ............................................. 50
AUTO RUN ..........................................................................51
OFF ........................................................................................ 51
Conguración basada en programas ......................52
Programas sucesivos ......................................................52
Error de programación común ................................... 53
Programación básica .................................54
1. Congurar fecha y hora ........................................54
2.
Programar la hora de inicio del riego ........................54
3. Establecer tiempos de riego de la estación ......55
4. Programar los días de riego ................................. 55
Días de la semana personalizados ............................. 55
Opciones de riego manual .........................56
Probar todas las estaciones ......................................56
Riego en una única estación ..................................... 56
Riego de un único programa .................................... 57
Controlador ESP-Me
ESP
Contenido
37
Page 38

ESP
Contenido
Programación avanzada ............................58
Días pares o impares .................................................. 58
Días cíclicos .................................................................. 58
Sensor de lluvia ........................................................... 59
Ajuste estacional .........................................................60
Retrasar riego .............................................................. 60
Días sin actividad permanentes ............................... 61
Calculadora de tiempo total de riego
por programa ..............................................................61
Funciones especiales ..................................62
Opciones ....................................................63
Botón Reset ..................................................................63
Accesorios remotos ....................................................63
Programación remota ................................................ 64
Duración de la batería ...............................................64
Resolución de problemas ...........................65
Detección de errores .................................................. 65
Errores de programación (LED parpadeando) ...... 65
Fallos eléctricos (LED ja) ..............................................65
Borrar alarmas de fallo eléctrico ................................. 65
Problemas de riego ....................................................66
Fallos eléctricos (LED encendida y ja) ................... 68
Información de seguridad ............................................ 69
38
Controlador ESP-Me
Page 39

Introducción
830
PGM
A
Bienvenido a Rain Bird
Gracias por elegir el Controlador ESP-Me de Rain Bird.
En este manual encontrará instrucciones paso a paso
sobre cómo instalar y utilizar el Controlador ESP-Me.
The Intelligent Use of Water®
En Rain Bird, creemos que es nuestra responsabilidad
desarrollar productos que utilicen el agua de manera
eciente.
Características del controlador ESP-Me
Característica Descripción
Número máximo de estaciones 22 (utilizando los módulos de
estaciones opcionales)
Válvula maestra o relé de
arranque de la bomba
Horas de inicio 6
Programas 4
Ciclos Días personalizados, pares,
Días sin actividad permanentes Disponible
Control de la válvula maestra Encendida/apagada para cada
Retraso por lluvia Disponible
Sensor de lluvia/congelación Disponible
Bypass del sensor Por estación
Ajuste estacional Global o por programa
Riego manual por estación Sí
Riego manual por programa Sí
Probar todas las estaciones de
manera manual
Detección de cortocircuitos Sí
Retraso entre estaciones Sí
Entrada para accesorios Sí (5 pines)
Guardar y recuperar programas Sí
Habilitado para WiFi Sí
Disponible
impares y cíclico
estación
Sí
ESP
Introducción
Controlador ESP-Me
39
Page 40

ESP
Introducción
Habilitado para WiFi
El módulo LNK WiFi permite establecer una conexión remota
con el controlador ESP-Me de Rain Bird, desde un dispositivo
inteligente con sistema operativo Apple iOS o Android.
La aplicación móvil permite acceder y congurar uno o más
controladores de riego de manera remota.
Para obtener más información sobre el módulo LNK WiFi y las
ventajas que aporta cuando se utiliza junto con el controlador
ESP-Me, visite: http://wi-pro.rainbird.com
Módulo LNK WiFi
(se vende por separado)
Gestione el riego
de manera remota
40
Controlador ESP-Me
Page 41

Instalación
Montar el controlador
Coloque un tornillo de montaje en la pared dejando
A
un espacio de 1/8 de pulgada (3,2 mm) entre la
cabeza del tornillo y la supercie (de ser necesario
utilice los tacos incluidos), tal como se muestra.
Localice la ranura de montaje en la parte trasera de
B
la unidad y cuélguela rmemente sobre el tornillo.
A
1/8“
(3,2 mm)
B
Abra el panel frontal e introduzca tres tornillos
C
adicionales a través de los agujeros abiertos en el
interior del controlador, tal como se muestra.
C
VT MV COM 567 11 12 13 17 18 19
GND
1234 8910141516202122
SENS
24VAC
VT MV COM
1234
VT=VALVETEST
CONNECT
120 VAC
ESP
Instalación
Controlador ESP-Me
41
Page 42

Conexiones de los cables
Conectar las válvulas
ESP
Instalación
Conectar una válvula maestra (opcional)
Pase todos los cables del sistema a través de la
A
apertura en la parte inferior o trasera de la unidad.
Si lo desea, una el conducto tal como se muestra.
ADVERTENCIA: No pase los cables de las válvulas
por la misma apertura que el cableado de corriente.
Conecte un cable de cada válvula al terminal del
B
módulo base o del módulo de estaciones que
corresponde al número de estación deseado (1-22).
Conecte un cable común del sistema (C) al terminal
C
común (C) del módulo base. A continuación
conecte el cable restante de cada válvula al cable
común del sistema, tal como se muestra.
Para realizar una comprobación de las válvulas,
D
conecte el cable común al terminal "COM" y el
cable de corriente el terminal "VT". La válvula se
encenderá inmediatamente.
Conecte un cable desde la válvula maestra al terminal de
E
válvula maestra (MV) en el módulo base. A continuación
conecte el cable restante de la válvula maestra al cable
común del sistema, tal como se muestra.
E C
B
A
2
SENS
1
MV
VÁLVULA
MAESTRA
C
42
Controlador ESP-Me
Page 43

Conectar un relé de arranque de la bomba (opcional)
El ESP-Me puede controlar un relé de arranque de la
bomba, activándolo o apagándolo según sea necesario.
Conecte un cable desde el relé de arranque de la
A
bomba (PSR) al terminal de válvula maestra (MV)
en el módulo base. A continuación conecte otro
cable del relé de arranque de la bomba al cable
común del sistema, tal como se muestra.
Para evitar daños a la bomba, conecte un cable
B
corto de puente eléctrico entre cualquier terminal
no utilizado y el terminal más cercano, tal como
se muestra.
NOTA: El controlador ESP-Me NO proporciona
corriente a la bomba. Conecte el cableado del relé
siguiendo las instrucciones del fabricante.
Para consultar la lista más actualizada de relés de
arranque de la bomba compatibles, visite nuestro sitio
web: www.rainbird.com/controllersupport:
NOTA:
No se muestran
la conexión con
la bomba y con la
corriente externa.
Consulte las
instrucciones de
instalación de la
bomba.
A
2
1
PSR
RELÉ DE
ARRANQUE DE
LA BOMBA
C
ESP
Instalación
B
Controlador ESP-Me
43
Page 44

Conectar sensor de lluvia/congelación
ESP
Instalación
El controlador ESP-Me se puede congurar para
obedecer o ignorar un sensor de lluvia. Consulte
la sección Sensor de lluvia, en el apartado de
Programación avanzada.
Quite el cable amarillo de puente eléctrico de los
A
terminales marcados como SENS en el controlador.
NOTA: No quite el cable de puente eléctrico
amarillo salvo para conectar un sensor de lluvia.
Conecte los dos cables del sensor de lluvia a los
B
terminales SENS, como se muestra.
ADVERTENCIA: No pase los cables del sensor de
lluvia por la misma apertura que el cableado de
corriente.
NOTA: Los controladores Rain Bird solamente
son compatibles con sensores de lluvia que
normalmente están cerrados.
NOTA: En el caso de sensores de lluvia y
congelación, consulte las instrucciones de
instalación del sensor.
B
44
Controlador ESP-Me
Page 45

Conectar a la toma de corriente
ADVERTENCIA: NO conecte el transformador
ni suministre corriente eléctrica al controlador
hasta que haya completado y vericado todas las
conexiones de los cables.
ADVERTENCIA: Una descarga eléctrica puede
causar lesiones graves o la muerte. Asegúrese
de que la fuente de alimentación está APAGADA
antes de conectar los cables de alimentación.
Especicaciones eléctricas
Entrada 230 VCA, 0,2 A, 50/60Hz
Salida 25,5 VCA, 1,0 A, 50/60Hz
Conexiones para el cableado a la corriente eléctrica
230 VCA (internacional)
Cable de alimentación negro (fase) con el cable negro del
transformador, etiquetado como "L"
Cable de alimentación azul (neutro) con el cable azul del
transformador etiquetado como "N"
Cable de alimentación verde con una franja amarilla
(tierra) con el cable del transformador verde con una
franja amarilla
ESP
Instalación
Controlador ESP-Me
45
Page 46

ESP
Instalación
Localice el compartimento de cableado del
A
transformador en la esquina inferior izquierda
del controlador. Use un destornillador para retirar
la cubierta y exponer los cables de conexión del
transformador.
Pase los tres cables de corriente externa a través
B
de la apertura del conducto de la parte inferior de
la unidad e introdúzcalos en el compartimento
del cableado.
Conecte los cables de alimentación externos
C
(dos de corriente y uno de tierra) con los cables
del transformador, dentro del compartimento de
cableado.
ADVERTENCIA: El cable de tierra debe estar
conectado para proporcionar protección
frente a las sobrecargas eléctricas. El conducto
permanente debe utilizarse para conectar la
corriente principal al controlador.
NOTA: Para este paso, utilice las tuercas para
cables incluidas o bien el conector ya instalado.
Verique que todas las conexiones de cableado
D
son seguras, vuelva a colocar la cubierta del
compartimento de cableado y asegúrela con el
tornillo.
C
L
N
A
B
46
Controlador ESP-Me
Page 47

Módulos de ampliación de estaciones
Los módulos de estaciones opcionales se instalan en las
ranuras vacías a la derecha del módulo base para incrementar el número máximo de estaciones hasta 22.
NOTA: El módulo de 6 estaciones solamente es
compatible con el ESP-Me. No es compatible con
el controlador ESP-M antiguo.
NOTA: Para lograr una secuencia óptima de
estaciones, se recomienda instalar siempre el
módulo de 6 estaciones en el Puerto 2. Para
obtener más información, consulte la sección
sobre numeración de estaciones.
Módulo base
(incluido)
Módulos de ampliación
(se venden por separado)
Instalar módulos
Compruebe que la palanca de seguridad del
A
módulo está en la posición de desbloqueo
(desplazar hacia la izquierda).
Coloque el módulo debajo de la ranura deseada,
B
entre las guías de plástico.
Introduzca el módulo en la ranura hasta que
C
quede sujeto.
Desplace la palanca de seguridad a la posición de
D
bloqueo (desplazar hacia la derecha).
REPETIR para los módulos adicionales.
NOTA:
con O sin corriente CA. Son "intercambiables en fase".
Los módulos pueden instalarse o retirarse
D
ESP
Instalación
VT MV COM
3 estaciones
(ESPSM3)
6 estaciones
(ESPSM6)
BC
Controlador ESP-Me
47
Page 48

Numeración de estaciones
ESP
Instalación
Descripción de la numeración de estaciones ja
El controlador viene programado con Numeración
de estaciones ja. Cada puerto está congurado para
aceptar un módulo de 6 estaciones y reservar esos
números de estaciones para su uso futuro en caso de
que NO se instale un módulo en los puertos 2, 3 o 4.
Los números de estaciones se asignan de la siguiente
manera:
Puerto 1 Puerto 2 Puerto 3 Puerto 4
VT MV COM 567 11 12 13 17 18 19
1234 8910141516202122
VT MV COM
Conguración del módulo
Ejemplo de instalación con lagunas en la numeración:
• Hay un total de 19 estaciones instaladas.
• El módulo base está instalado en el puerto 1 y
utiliza las estaciones 1 a 4.
• Hay un módulo de ampliación de 6 estaciones
instalado en los puertos 2 y 3 que utiliza las
estaciones 5 a 16.
• Hay un módulo de ampliación de 3 estaciones
instalado en el puerto 4 que utiliza las estaciones
17 a 19.
Como hay un módulo de 3 estaciones instalado en
el puerto 4, solamente se utilizarán los 3 primeros
números de estación asignados a ese puerto. Los
números no utilizados se "reservarán" para el futuro.
NOTA: Durante la programación, el controlador
ignorará cualquier número de estación no
utilizado, creando una laguna en la numeración.
Ejemplo de instalación recomendada para 19 estaciones
48
Controlador ESP-Me
Page 49

Por ejemplo: se instaló un módulo de 3 estaciones en
el puerto 4, por lo que las estaciones 20-22 no estarán
disponibles. Durante la programación, las estaciones
no disponibles aparecerán en pantalla como 20SKIP,
21SKIP, etc.
La pantalla muestra el mensaje "20SKIP" con el número
20 parpadeando, indicando que la estación 20 (así
como la 21-22) no está siendo utilizada y no puede ser
programada.
Instalación completa del controlador
Vuelva a instalar y conectar el panel frontal.
A
Suministre corriente al controlador y compruebe
B
el sistema.
NOTA: Puede comprobar las conexiones eléctricas
aunque no haya agua todavía. Si ya dispone de
agua y quiere comprobar algunas o todas las
estaciones, utilice la función Test All Stations
(probar todas las estaciones).
ESP
Instalación
Controlador ESP-Me
49
Page 50

830
PGM
A
Funcionamiento normal
ESP
Controles e indicadores
Funcionamiento normal
OFF (apagado)
Desactiva el riego
automático
TEST ALL STATIONS
(probar todas las
estaciones)
RIEGO MANUAL
Riega una o todas las
estaciones
RAIN SENSOR
(sensor de lluvia)
Obedecer o ignorar un
sensor de lluvia
DELAY WATERING
(retrasar riego)
Hasta 14 días
SEASONAL ADJUST
(ajuste estacional)
Ajustar los tiempos
de riego del 5 al 200%
OPCIONES DE DÍAS DE RIEGO
Días especícos, pares, impares y cíclico
Funciones clave del Controlador ESP-Me:
AUTO RUN
(riego automático)
El riego es
automático
DÍAS DE RIEGO
Seleccionar
días de riego
permitido
FECHA/HORA
Fijar la fecha y
hora actuales
BOTONES ATRÁS/
SIGUIENTE
Seleccionar opciones
de programación
START TIMES
(horas de inicio)
Fijar hasta 6 horas de
inicio por programa
HOLD TO START
(mantener pulsado
para comenzar)
Riego manual
RUN TIMES
(tiempos de riego)
Fijar tiempos de riego
para cada programa
LUZ DE
ALARMA
PROGRAM
SELECT
(seleccionar
programa)
Seleccionar
programa
A, B, C o D
BOTONES – / +
Para ajustar la
conguración
50
Controlador ESP-Me
Page 51

AUTO RUN
AUTO RUN (riego automático) es el modo de
funcionamiento normal. Devuelva el dial a la posición
AUTO RUN cuando haya terminado la programación.
Durante el riego:
La pantalla muestra un símbolo de aspersor que
parpadea, el número de la estación o el programa activo
y el tiempo de riego restante.
Para iniciar un programa de forma manual:
Pulse el botón PROGRAM SELECT (seleccionar
A
programa) para seleccionar un programa.
Pulse el botón HOLD TO START (mantener
B
pulsado para comenzar) para iniciar el programa
mostrado de manera inmediata.
ESP
Funcionamiento normal
• Para cancelar el riego, gire el dial hasta OFF
(apagado) durante tres segundos, hasta que la
pantalla muestre el mensaje OFF.
OFF
Gire el dial hasta OFF (apagado) para detener el riego
automático o cancelar cualquier riego activo de forma
inmediata.
PRECAUCIÓN: El riego NO tendrá lugar si el controlador
se encuentra en la posición OFF.
Controlador ESP-Me
51
Page 52

Conguración basada en programas
El ESP-Me utiliza una conguración basada en
ESP
Funcionamiento normal
programas para establecer los horarios de riego.
Para cada programa (A, B, C y D):
A
B
Seleccione los días de riego (personalizados,
pares/impares, cíclicos) y horas de inicio que
apliquen a todo el programa.
Asigne un tiempo de riego a cada estación
disponible.
Programas sucesivos
Si hay programas cuyas horas de inicio coinciden, el
ESP-Me las organizará de forma "sucesiva". Cuando
todas las estaciones del programa A hayan regado,
comenzarán a regar las del programa B. Las estaciones
individuales regarán de manera secuencial.
Por ejemplo: Los programas A y B han sido
congurados para comenzar a las 8:00 AM. Pero el
programa B no comenzará hasta que haya nalizado
el programa A.
Gracias a la función de
programas sucesivos, el
programa B comenzará
cuando termine el
programa A.
52
Controlador ESP-Me
Programa INICIO Estación
1
A 1º
B 1º
2 08:30 AM 30 MIN
3 09:00 AM 30 MIN
4 09:30 AM 30 MIN
5
6 10:30 AM 30 MIN
7 11:00 AM 30 MIN
8 11:30 AM 30 MIN
Inicio
programado
08:00 AM
08:00 AM
Inicio real Tiempos de riego
08:00 AM 30 MIN
10:00 AM 30 MIN
Page 53

Error de programación común
El error de programación más común en los controladores basados en programas es la conguración de
varias horas de inicio que repiten los ciclos.
Por ejemplo: La primera hora de inicio del programa
A es a las 8:00 AM. Con la función de programas sucesivos, cada estación regará en orden hasta que todas las
zonas hayan sido regadas. No es necesario programar
cada estación de manera individual.
En este ejemplo, se ha congurado una segunda hora
de inicio por error para las 8:30 AM. Esto signica que
algunas zonas se regarán dos veces esa mañana.
NOTA: Asigne tiempos de riego a aquellas
estaciones que desea regar. Si no desea que una
estación especíca riegue dentro de un programa,
programe el tiempo de riego como cero.
ESP
Funcionamiento normal
Múltiples horas
de inicio hacen
que las estaciones
rieguen de forma
ininterrumpida.
Para solucionarlo,
elimine la segunda
hora de inicio
Programa INICIO Estación
1
A 1º
A 2
2 08:30 AM 30 MIN
3 09:00 AM 30 MIN
4 09:30 AM 30 MIN
1
2 10:30 AM 30 MIN
º
3 11:00 AM 30 MIN
4 11:30 AM 30 MIN
Inicio
programado
08:00 AM
08:30 AM
Inicio real Tiempos de riego
08:00 AM 30 MIN
10:00 AM 30 MIN
Controlador ESP-Me
53
Page 54

ESP
Programación básica
Programación básica
1. Congurar fecha y hora
Gire el dial hasta SET DATE (congurar fecha)
Pulse los botones o para seleccionar el
A
parámetro que desea cambiar.
Pulse los botones o para cambiar el valor del
B
parámetro.
Mantenga pulsado el botón o para acelerar
C
el cambio.
Gire el dial hasta SET TIME (congurar hora).
Pulse los botones o para seleccionar el
A
parámetro que desea cambiar.
Pulse los botones o para cambiar el valor del
B
parámetro.
Mantenga pulsado el botón o para acelerar
C
el cambio.
Para cambiar el formato de hora (12 o 24 horas):
Mientras parpadea el mensaje MINUTES
A
(minutos), pulse .
Pulse o para seleccionar el formato deseado,
B
y pulse para volver a la conguración de hora.
2.
Programar la hora de inicio del riego
Hay hasta cuatro horas de inicio para cada programa.
Gire el dial hasta SET WATERING START TIMES
(congurar horas de inicio)
Pulse PROGRAM SELECT (seleccionar programa)
A
para seleccionar el programa deseado (si es
necesario).
Pulse o para seleccionar una hora de inicio
B
disponible.
Pulse o para jar la hora de inicio
C
seleccionada (asegúrese de que la conguración
AM/PM es correcta).
Pulse para congurar horas de inicio adicionales.
D
NOTA: La posición OFF de cualquier hora de
inicio es entre las 11:45 PM y las 12:00 AM.
54
Controlador ESP-Me
Page 55

3. Establecer tiempos de riego de la estación
Pueden programarse tiempos de riego desde un
minuto hasta seis horas.
Gire el dial hasta SET STATION RUN TIMES
(congurar tiempos de riego)
Pulse PROGRAM SELECT (seleccionar programa)
A
para seleccionar el programa deseado (si es
necesario).
Pulse o para seleccionar una estación.
B
Pulse o para congurar el tiempo de riego
C
de la estación seleccionada.
Pulse para congurar tiempos de riego
D
adicionales.
4. Programar los días de riego
Días de la semana personalizados
Programar el riego para ciertos días de la semana.
Gire el dial hasta
ADVANCED WATERING CYCLES
(ciclos avanzados de riego)
Pulse PROGRAM SELECT (seleccionar programa)
A
para seleccionar el programa deseado (si es
necesario).
Pulse o para seleccionar BY DAY (por día).
B
Gire el dial hasta MON (lunes).
C
Pulse o para congurar el día seleccionado
D
(el que parpadea) como ON o OFF (encendido o
apagado), y a continuación gire el dial hasta el
siguiente día de la semana.
REPITA para congurar días adicionales según lo
deseado para el programa.
ESP
Programación básica
Controlador ESP-Me
55
Page 56

Opciones de riego manual
ESP
Opciones de riego manual
Probar todas las estaciones
Para comprobar el funcionamiento de las válvulas.
Gire el dial hasta TEST ALL STATIONS
(probar todas las estaciones).
Pulse los botones o para congurar un
A
tiempo de riego.
Pulse el botón HOLD TO START (mantener
B
pulsado para comenzar).
Gire el dial hasta AUTO RUN (riego automático)
C
una vez que la pantalla muestre el mensaje
TESTING (comprobando).
Durante la prueba:
La pantalla muestra un símbolo de aspersor que
parpadea, el número de la estación o el programa activo
y el tiempo de riego restante.
Para cancelar la prueba, gire el dial hasta OFF
D
(apagado) durante tres segundos, hasta que la
pantalla muestre el mensaje OFF.
Riego en una única estación
Comienza el riego de manera inmediata en una única
estación.
Gire el dial hasta MANUAL STATION
(estación manual).
Pulse o para seleccionar una estación.
A
Pulse o para congurar un tiempo de riego.
B
Pulse el botón HOLD TO START (mantener
C
pulsado para comenzar).
Comenzará el riego y aparecerá el mensaje
D
STARTED (comenzado).
56
Controlador ESP-Me
Page 57

Riego de un único programa
Comienza el riego de manera inmediata en un único
programa.
Gire el dial hasta MANUAL PROGRAM
(programa manual).
Pulse PROGRAM SELECT (seleccionar programa)
A
para seleccionar el programa deseado (si es
necesario). Aparecerá el tiempo de riego total del
programa.
Pulse el botón HOLD TO START (mantener
B
pulsado para comenzar) para comenzar el riego
en el programa seleccionado.
REPITA para programar el riego manual sucesivo
de programas adicionales.
NOTA: Se puede programar el riego sucesivo de un
máximo de 38 estaciones en los cuatro programas.
Comenzará el riego y aparecerá el mensaje
C
STARTED (comenzado).
Pulse el botón ADVANCE STATION (siguiente
D
estación) para pasar a la siguiente estación.
Durante el riego manual (estación o programa
individual):
La pantalla muestra un símbolo de aspersor que
parpadea, el número de la estación o el programa activo
y el tiempo de riego restante.
• Para cancelar el riego manual, gire el dial hasta
OFF (apagado) durante tres segundos, hasta que la
pantalla muestre el mensaje OFF.
ESP
Opciones de riego manual
Controlador ESP-Me
57
Page 58

Programación avanzada
ESP
Programación avanzada
Días pares o impares
Programa el riego para todos los días IMPARES o PARES.
Gire el dial hasta
ADVANCED WATERING CYCLES
(ciclos avanzados de riego)
Pulse PROGRAM SELECT (seleccionar programa)
A
para seleccionar el programa deseado (si es
necesario).
Pulse o para seleccionar ODD (impar) o
B
EVEN (par).
NOTA: La pantalla muestra ODD (impar) o EVEN
(par) siempre que el dial se encuentre en la
posición de cualquier día de la semana.
Días cíclicos
Programar el riego para intervalos especícos; por
ejemplo, cada 2 días, cada 3 días, etc.
Gire el dial hasta
ADVANCED WATERING CYCLES
(ciclos de riego avanzados).
Pulse PROGRAM SELECT (seleccionar programa)
A
para seleccionar el programa deseado (si es
necesario).
Pulse o para seleccionar CYCLIC (cíclico), y a
B
continuación pulse
Pulse o para congurar el DAY CYCLE
C
(ciclo de días) deseado y después pulse
58
Controlador ESP-Me
Page 59

Pulse o para congurar los DAYS
D
REMAINING (días restantes) antes de que
comience el ciclo. El mensaje NEXT (siguiente)
aparece en pantalla para indicar el siguiente día
de riego.
Sensor de lluvia
Programar el controlador para obedecer o ignorar un
sensor de lluvia.
Cuando se encuentra ACTIVO, el riego automático será
suspendido si se detecta lluvia. Cuando se encuentra
en BYPASS (ignorar), todos los programas ignorarán el
sensor de lluvia.
Gire el dial hasta RAIN SENSOR (sensor de lluvia).
ESP
Programación avanzada
• Pulse los botones
(obedecer) o IGNORAR.
o para seleccionar ACTIVO
Leyenda Estado del sensor de lluvia
Activo
Ignorado
Lluvia detectada
NOTA: Consulte las Funciones especiales para
programar el Bypass del Sensor de lluvia para
cada estación.
Controlador ESP-Me
59
Page 60

ESP
Programación avanzada
Ajuste estacional
Aumente o reduzca los tiempos de riego de los programas
en un porcentaje determinado (entre 5 y 200%).
Por ejemplo: Si el ajuste estacional está congurado
para un 100% y el tiempo de riego de la estación está
programado para 10 minutos, la estación regará durante
10 minutos. Si el ajuste estacional está congurado para
un 50%, la estación regará durante 5 minutos.
Gire el dial hasta SEASONAL ADJUST (ajuste
estacional).
Pulse o para aumentar o reducir el valor del
A
porcentaje global.
Para ajustar un programa individual, pulse
B
PROGRAM SELECT (seleccionar programa) para
seleccionar el programa deseado (si es necesario).
Retrasar riego
Suspenda el riego hasta 14 días.
Gire el dial hasta DELAY WATERING
(retrasar riego).
Pulse o para congurar los DAYS
A
REMAINING (días restantes). El mensaje NEXT
(siguiente) aparecerá en pantalla indicando el día
en que se reanudará el riego.
Para cancelar un retraso de riego, congure los
B
DAYS REMAINING (días restantes) como 0.
NOTA: Cuando naliza el retraso, se reanuda el
riego automático programado.
60
Controlador ESP-Me
Page 61

Días sin actividad permanentes
Impida el riego para determinados días de la semana
(solamente para programación impar, par o cíclica).
Gire el dial hasta 1 MON (1 lunes),
o cualquier día que desee
Pulse PROGRAM SELECT (seleccionar programa)
A
para seleccionar el programa deseado (si es
necesario).
MANTENGA PULSADOS los botones y
B
hasta que aparezca la pantalla días de no riego
permanentes.
Pulse para congurar el día seleccionado (el
C
que parpadea) como día de no riego permanente
(PERMOFF), o pulse para que el día siga ON
(encendido).
Calculadora de tiempo total de riego por programa
Vea el tiempo total de riego de un programa.
El controlador puede calcular el tiempo total de riego
de un programa sumando los tiempos de riego de
todas las estaciones del programa.
Gire el dial hasta MANUAL PROGRAM
(programa manual).
Se muestra el tiempo total de riego del
A
PGM A (programa A).
Pulse el botón PROGRAM SELECT (seleccionar
B
programa) para ver el tiempo de riego total del
próximo programa.
NOTA: El tiempo de riego mostrado para el
programa es el tiempo después de aplicar el
ajuste estacional y solo incluye una hora de inicio.
ESP
Programación avanzada
Controlador ESP-Me
61
Page 62

830
PGM
A
ESP
Funciones especiales
Funciones especiales
Gire el dial a la posición indicada abajo
A
para acceder a cada función especial.
Mantenga pulsados los botones y al mismo tiempo.
B
GUARDAR PROGRAMAS
IGNORAR SENSOR DE LLUVIA
PARA CUALQUIER ESTACIÓN
Programa una estación
individual para obedecer o
ignorar un sensor de lluvia.
RESTABLECER
CONFIGURACIÓN DE
FÁBRICA
Todos los programas serán
eliminados.
RESTAURAR PROGRAMAS
GUARDADOS
DÍAS SIN ACTIVIDAD PERMANENTES
Evita el riego ciertos días de la semana.
RETRASO ENTRE ESTACIONES
Un retraso de estación (desde 1 segundo hasta
9 horas) garantiza que la válvula se cierre
completamente antes de que se abra la siguiente.
CONFIGURAR VÁLVULA
MAESTRA POR
ESTACIÓN
Permite que una estación
sea controlada por una
válvula maestra o un relé
de arranque de la bomba.
62
Controlador ESP-Me
Page 63

Opciones
Botón Reset
Si el controlador no está funcionando correctamente,
puede pulsar el botón RESET (reiniciar).
• Inserte una herramienta de tamaño pequeño, un
clip por ejemplo, en el agujero de acceso, y pulse
el botón hasta que se reinicie el controlador. Todos
los programas de riego quedarán almacenados en
la memoria.
RESET (reiniciar)
Accesorios remotos
Existe una entrada para accesorios de 5 pines,
disponible para dispositivos externos aprobados por
Rain Bird, incluyendo:
• Módulo LNK WiFi
• Arnés de acople rápido del receptor LIMR
PUERTO
ESP
Opciones
Controlador ESP-Me
63
Page 64

ESP
Opciones
Programación remota
Programe el panel frontal de manera remota,
utilizando pilas.
El panel frontal puede retirarse del controlador y
ser programado de manera remota utilizando una
pila de 9 voltios. Puede congurar las 22 estaciones,
independientemente de qué módulos de estaciones
están instalados en el controlador.
NOTA: Esto resulta útil cuando un contratista
quiere programar el controlador antes de
proceder a la instalación sobre el terreno.
Retire el panel frontal.
A
Instale una pila de 9V en el compartimento de
B
pilas.
Programe el controlador.
C
NOTA: La información de los programas se
almacena en la memoria no volátil, por lo que
nunca se pierde aunque el panel frontal se quede
sin corriente.
Vuelva a colocar el panel frontal (consulte el
D
proceso de instalación completa en la sección de
instalación).
NOTA: Después de instalar el panel frontal,
cualquier estación sin un módulo asociado
funcionará como si el tiempo de riego fuera cero.
Duración de la batería
Si la pantalla muestra “-- -- -- -- --” cuando está utilizando
una pila de 9V para la programación remota, sustituya
la pila.
64
Controlador ESP-Me
Page 65

Resolución de problemas
Detección de errores
El controlador ESP-Me cuenta con detección de errores
incorporada capaz de generar una ALARMA por
errores de programación o en caso de detección de un
cortocircuito.
La luz LED de ALARMA en el panel frontal del controlador
ESP-Me se encenderá para indicar un estado de alarma:
Errores de programación (LED parpadeando)
Error
No hay horas de inicio PARPADEA NO START TIMES
No hay tiempos de riego PARPADEA NO RUN TIMES
No hay días de riego PARPADEA NO WATER DAYS
Una vez corregido el error, el controlador ESP-Me se
reiniciará o el mensaje desaparecerá.
NOTA: El dial debe encontrarse en la posición
AUTO RUN (riego automático) para que aparezca
un mensaje de ALARMA en pantalla.
LED de
ALARMA
Mensaje de
error en
pantalla
Fallos eléctricos (LED ja)
Error
Cortocircuito en la
válvula maestra
Cortocircuito en la
estación
Cuando se detecta un fallo eléctrico, se cancela el riego
en la estación afectada y el riego avanza a la siguiente
estación operativa en el programa.
El controlador intentará regar la estación afectada de
nuevo en el próximo riego programado. Cuando se
haya completado el riego de forma satisfactoria, el
error asociado a esa estación desaparecerá.
LED de
ALARMA
FIJA MASTER VALVE/PUMP WIRE
FIJA STATION “X” WIRE SHORTED
Mensaje de error en
pantalla
SHORTED O HIGH CURRENT
Borrar alarmas de fallo eléctrico
Gire el dial hasta la posición AUTO RUN
(riego automático) para ver el mensaje
de error en pantalla. Para eliminar la
ALARMA, pulse el botón de echa
derecha .
ESP
Resolución de problemas
Controlador ESP-Me
65
Page 66

Problemas de riego
Problema Posible causa Posible solución
ESP
La pantalla muestra
un programa activo,
Resolución de problemas
pero el sistema no está
regando.
Mensaje NO AC (sin
corriente CA) en
pantalla.
Acaba de llover y la
luz de alarma no se ha
encendido. ¿Por qué?
La fuente de agua no suministra agua. Verifique que no hay ningún problema en la línea principal
de agua y que todas las demás líneas de suministro de agua
están abiertas y funcionan correctamente.
El cableado está suelto o no está
correctamente conectado.
Los cables del terreno están corroídos o
dañados.
Pérdida de corriente CA. Cuando se produce una pérdida de corriente y se instala
No se detecta corriente. Compruebe el disyuntor y compruebe que la unidad
El controlador podría estar conectado a
una toma de corriente GFI o a una toma
cuyo cableado conduce a una toma GFI.
Se trata de un funcionamiento normal.
El ESP-Me no considera como alarma la
interrupción del riego por lluvia.
Compruebe que el cableado del sistema y el de la
válvula maestra o el relé de arranque de la bomba están
conectados con firmeza al controlador y sobre el terreno.
Revisar el cableado sobre el terreno y cambiarlo de ser
necesario. Compruebe las conexiones del cableado y
sustitúyalas por conectores para enroscado de cables si es
necesario.
una pila de 9V, el sistema no riega aunque los programas
aparecen como activos.
está conectada a una toma de corriente o una fuente de
alimentación.
Compruebe que llega corriente a la toma o reinicie el
disyuntor.
Se trata de un funcionamiento normal.
66
Controlador ESP-Me
Page 67

Problemas de riego
Problema Posible causa Posible solución
Los programas
configurados no
comienzan.
Demasiado riego Múltiples horas de inicio en un mismo
Un sensor de lluvia conectado podría
encontrarse activo.
El sensor de lluvia conectado podría no
estar funcionando correctamente.
Si no hay un sensor de lluvia conectado,
el cable de puente eléctrico que conecta
los dos terminales SENS podría faltar o
estar dañado.
programa.
Hay múltiples programas activos al
mismo tiempo.
La válvula no funciona correctamente. Compruebe si la luz de ALARMA del controlador está
El valor de ajuste estacional es
demasiado elevado.
Establezca el modo BYPASS del sensor de lluvia para ignorarlo.
Si se reanuda el riego, el sensor funciona correctamente y no
es necesario realizar ninguna otra corrección.
Deje que se seque el sensor de lluvia o desconéctelo del
bloque de terminales del controlador y conecte un cable
de puente eléctrico entre los dos terminales SENS; o bien
utilice el modo Bypass (ignorar).
Gire el dial hasta la posición Bypass del sensor y establezca
el modo Bypass (ignorar).
Desactive cualquier hora de inicio adicional que esté
causando la repetición de ciclos de riego (la posición de
APAGADO de una hora de inicio es entre las 11:45 y las
12:00). Vea “Programas sucesivos” en la página 52 para
obtener más información.
Revise la programación para asegurarse de que la misma
estación no está activa en varios programas.
encendida y fija; repare o sustituya la válvula si es necesario.
Configure el valor de ajuste estacional como 100%.
ESP
Resolución de problemas
Controlador ESP-Me
67
Page 68

Fallos eléctricos (LED encendida y ja)
Problema Posible causa Posible solución
ESP
La pantalla está
congelada o en blanco;
Resolución de problemas
el controlador no
puede ser programado
o funciona de manera
inusual.
La detección automática
de errores indica un
problema a través de la
LED de ALARMA y un
mensaje de error en la
pantalla.
La luz LED está
parpadeando o fija pero
no veo ningún mensaje
en la pantalla LCD.
El controlador no tiene
corriente.
Es necesario reiniciar el
controlador.
Una sobrecarga eléctrica
puede haber dañado los
componentes electrónicos
del controlador.
Situación de sobrecarga o
cortocircuito en el cableado
de la válvula, la válvula
maestra o el relé de arranque
de la bomba.
El dial no se encuentra en la
posición AUTO RUN (riego
automático).
Verifique que el suministro de corriente CA está conectado de forma
segura y funcionando correctamente.
pulse el botón Reset (reinicio). Para obtener más información,
consulte la sección "Botón Reset".
Desenchufe el controlador durante 2 minutos y vuelva a enchufarlo.
Si no se ha producido daño permanente, el controlador debe
funcionar con normalidad y ser programable.
Encuentre y repare el problema de cableado. Consulte los relés de
arranque de la bomba compatibles. Para obtener más información,
consulte la sección "Conectar un relé de arranque de la bomba".
Gire el dial hasta la posición AUTO RUN (riego automático).
68
Controlador ESP-Me
Page 69

Información de seguridad
PRECAUCIÓN: Este dispositivo no está diseñado para ser utilizado
por personas (incluidos los niños) con una capacidad física, sensorial
o mental reducida, o bien sin los conocimientos o experiencia
necesarios, a menos que sean supervisados o hayan recibido
instrucciones acerca del uso del dispositivo de manos de una persona
que se hace responsable de su seguridad. Es necesario supervisar a
los niños para asegurar que no juegan con el dispositivo.
ADVERTENCIA: Deben tomarse precauciones especiales
cuando los cables de la válvula (también llamados cables
de la estación o del solenoide) se encuentren junto a, o
compartan conducto con otros cables, como los utilizados
para la iluminación del jardín, sistemas de "bajo voltaje" u
otras fuentes de "alto voltaje".
Separe y aísle todos los conductores con especial cuidado de
no dañar el aislamiento del cable durante la instalación. Un
cortocircuito (contacto) entre los cables de la válvula y otra
fuente de corriente eléctrica podría dañar el controlador y
producir un riesgo de incendio.
ADVERTENCIA: Todas las conexiones eléctricas y el cableado
deben cumplir las normas de construcción locales. Algunas
normas locales dictan que solamente un electricista
certicado puede instalar la corriente. El controlador debe ser
instalado únicamente por profesionales. Consulte las normas
de construcción locales para obtener más directrices.
NOTA: Una batería de litio retiene la fecha y la hora; esta
batería debe desecharse de acuerdo con la regulación local.
PRECAUCIÓN: Utilice únicamente aquellos dispositivos accesorios
aprobados por Rain Bird. Los dispositivos no aprobados podrían
dañar el controlador e invalidar la garantía. Para obtener una lista de
dispositivos compatibles, visite: www.rainbird.com
FCC Parte 15
Este equipo ha sido probado y se ha verificado que cumple con los límites
establecidos para los dispositivos digitales de Clase B, de conformidad con
el apartado 15 de las normas de la FCC. Estos límites están diseñados para
proporcionar una protección razonable contra interferencias nocivas en
una instalación residencial.
Este equipo genera, usa y puede radiar energía de radiofrecuencia y, si no se
instala y utiliza de acuerdo a las instrucciones, puede producir interferencias
en las comunicaciones de radio. Con todo, no existen garantías de que no se
produzcan interferencias en alguna instalación en particular.
Si el equipo produce interferencias en la recepción de radio o televisión, lo cual
que puede averiguarse encendiendo y apagando el equipo, se aconseja al
usuario que intente corregir las interferencias tomando las siguientes medidas:
• Volver a orientar la antena de recepción o colocarla en otro lugar.
• Aumentar la separación entre el equipo y el receptor.
• Conectar el equipo a un enchufe de un circuito diferente del que está
conectado el receptor.
• Consultar con el vendedor del producto o con un técnico de radio y
televisión especializado.
• Los cambios o modificaciones no aprobados expresamente por Rain
Bird Corporation podrían anular el derecho del usuario a operar el
equipo.
• Este producto obtuvo la certificación de la FCC bajo condiciones de
prueba para las que se utilizaron cables reforzados I/O y conectores
entre los componentes del sistema. Para cumplir la normativa de la FCC,
el usuario debe utilizar cables reforzados y conectores e instalarlos de
manera correcta.
• Este aparato digital de clase B cumple todos los requisitos del Reglamento canadiense para equipos que producen interferencias.
Cet appareil Numérique de la classe B respecte toutes les exigences du
Règlement sur le matériel brouilleur du Canada
Controlador ESP-Me
ESP
Resolución de problemas
69
Page 70

Français
FRA
Assistance technique
Vous avez des questions?
Si vous avez besoin d'aide
pour installer ou utiliser le
programmateur Rain Bird ESP-Me,
scannez le code QR pour vous
rendre sur
www.rainbird.com/espme
De la documentation utilisateur supplémentaire
est disponible sous l'onglet Manuals & Literature
(manuels et documentations), notamment:
• Le manuel d'utilisation (ce document)
• Le guide de référence rapide
• Le guide de programmation
• La prise en charge linguistique
Pour en savoir plus sur les systèmes d'arrosage Rain
Bird, rendez-vous sur le site de la Rain Bird Academy à
l'adresse :
www.rainbirdservices.com/training
Pour acher des vidéos d'instructions pour le ESP-Me,
rendez-vous sur
www.youtube.com/
Élimination des déchets électroniques
Conformément aux directives européennes
2002/96/CE et EURONORM EN50419:2005, cet
appareil ne devra pas être jeté avec les ordures
ménagères. Cet appareil doit faire l'objet d'une
élimination sélective appropriée pour le recycler.
70
Programmateur ESP-Me
Page 71

Manuel d'utilisation du programmateur ESP-Me
Français
Assistance technique ................................................. 70
Élimination des déchets électroniques ................... 70
Introduction ................................................ 73
Bienvenue chez Rain Bird .......................................... 73
The Intelligent Use of Water® ...................................... 73
Fonctionnalités du programmateur ESP-Me ......... 73
Compatible WiFi ............................................................... 74
Installation .................................................75
Fixation du programmateur .....................................75
Câblage ......................................................................... 76
Connexion des vannes...................................................76
Connexion de la vanne maîtresse (facultatif)........76
Connexion d'un relais de démarrage de pompe
(facultatif) ........................................................................... 77
Connexion de la sonde de pluie/gel (facultatif) ...78
Connexion de l'alimentation ....................................... 79
Modules d'extension des stations ........................... 81
Installation des modules ............................................... 81
Numérotage des stations ............................................. 82
Conguration des modules ......................................... 82
Terminez l'installation du programmateur ............ 83
Fonctionnement normal ............................84
Commandes et indicateurs ....................................... 84
DÉMARRAGE AUTOMATIQUE ......................................85
ARRÊT ................................................................................... 85
Planication par programme ...................................86
Empilement de programmes ...................................... 86
Erreur de programmation commune ....................... 87
Programmation de base ............................. 88
1. Paramétrage de la date et de l'heure .................88
2. Conguration des heures de démarrage de
l’arrosage ...................................................................... 88
3. Réglage des durées d'arrosage ...........................89
4. Réglage des jours d'arrosage ...............................89
Jours personnalisés ......................................................... 89
Options d'arrosage manuel........................90
Tester toutes les stations ........................................... 90
Activation d'une seule station ..................................90
Activation d'un seul programme ............................. 91
Programmateur ESP-Me
FRA
Table des matières
71
Page 72

Programmation avancée ...........................92
Jours pairs ou impairs ................................................ 92
Jours cycliques ............................................................ 92
Sonde de pluie ............................................................ 93
FRA
Table des matières
Ajustement saisonnier ............................................... 94
Diérer l'arrosage ....................................................... 94
Jours désactivés permanents ................................... 95
Calculatrice de la durée d'arrosage totale par
programme .................................................................. 95
Fonctionnalités spéciales ...........................96
Options ....................................................... 97
Bouton de réinitialisation .........................................97
Accessoires externes .................................................. 97
Programmation à distance .......................................98
Durée de vie de la pile ...............................................98
Dépannage .................................................99
Détection des erreurs ................................................99
Erreurs de programmation (diode clignotante) ... 99
Erreurs électriques (diode non clignotante) .......... 99
Eacement des alarmes liées à une erreur
électrique............................................................................ 99
Problèmes d'arrosage ..............................................100
Problèmes électriques (diode allumée en continu) ..102
Informations sur la sécurité .......................................103
72
Programmateur ESP-Me
Page 73

Introduction
830
PGM
A
Bienvenue chez Rain Bird
Merci d'avoir choisi le programmateur ESP-Me de Rain
Bird. Dans ce manuel, vous trouverez des instructions
étape par étape pour installer et utiliser l'ESP-Me.
The Intelligent Use of Water®
Nous estimons que chez Rain Bird, il est de notre
responsabilité de développer des produits qui
utilisent l'eau ecacement.
Fonctionnalités du programmateur ESP-Me
Caractéristique Description
Nombre maximal de stations 22 (avec des modules de station
en option)
Vanne maîtresse ou relais de
démarrage de pompe
Heures de démarrage 6
Programmes 4
Cycles de programmation Jours personnalisés, pairs,
Jours désactivés permanents Pris en charge
Contrôle de la vanne maîtresse Activé/Désactivé en fonction de
Délai de pluie Pris en charge
Sonde de pluie/gel Prise en charge
Contournement de la sonde Par station
Ajustement saisonnier Global ou par programme
Activation manuelle des stations Oui
Activation manuelle des programmes Oui
Test manuel de toutes les stations Oui
Détection de court-circuit Oui
Délai entre les stations Oui
Port accessoire Oui (5 broches)
Enregistrer et restaurer les
programmes
Compatible WiFi Oui
Pris en charge
impairs et cycliques
la station
Oui
FRA
Introduction
Programmateur ESP-Me
73
Page 74

FRA
Introduction
Compatible WiFi
Le module WiFi LNK permet de se connecter à distance à un
programmateur ESP-Me de Rain Bird, à l'aide d'un appareil
intelligent compatible avec Apple iOS ou Android. L'application
mobile permet d'accéder à distance à un ou plusieurs
programmateurs d'arrosage et de les congurer.
Pour plus d’informations sur le module WiFi LNK et sur la valeur
que ce produit peut ajouter à votre programmateur ESP-Me,
veuillez vous rendre à l'adresse: http://wi-pro.rainbird.com
Module WiFi LNK
(vendu séparément)
Gérez les sites
à distance
74
Programmateur ESP-Me
Page 75

Installation
Fixation du programmateur
Enfoncez une vis de xation dans le mur, en
A
laissant un espace de 1/8 pouces (3,2 mm) entre
la tête de la vis et le mur (si nécessaire, utilisez les
ancrages muraux fournis), comme indiqué.
Accrochez le programmateur à la vis de xation
B
par le biais du trou en poire qui se trouve sur sa
partie arrière.
A
1/8 in.
(3,2 mm)
B
Ouvrez le panneau frontal et, par le biais des
C
orices situés à l'intérieur du programmateur,
enfoncez dans le mur les trois vis supplémentaires,
comme indiqué.
C
VT MV COM 567 11 12 13 17 18 19
GND
1234 8910141516202122
SENS
24VAC
VT MV COM
1234
VT=VALVETEST
CONNECT
120 VAC
FRA
Installation
Programmateur ESP-Me
75
Page 76

Câblage
Connexion des vannes
FRA
Installation
Connexion de la vanne maîtresse (facultatif)
Faites passer tous les ls par l’ouverture située en
A
bas ou à l'arrière de l'unité. Si vous le souhaitez,
vous pouvez xer le conduit comme indiqué.
AVERTISSEMENT : Ne faites pas passer les ls
de vanne par la même ouverture que le l
d'alimentation.
Branchez un l de chaque vanne à la borne
B
du module de base ou du module de station
correspondant au numéro de station désiré (1-22).
Branchez un l neutre (C) à la borne neutre (C) du
C
module de base. Branchez ensuite le l restant de
chaque vanne au l neutre, comme indiqué.
Pour tester une vanne, branchez le l neutre à la
D
borne "COM" et le l d'alimentation à la borne "VT".
Cela activera immédiatement la vanne.
Branchez un l entre la vanne maîtresse et la
E
borne de vanne maîtresse (MV) du module de
base. Connectez ensuite le l restant de la vanne
maîtresse au l neutre, comme indiqué.
E C
B
A
2
SENS
1
MV
VANNE
MAÎTRESSE
C
76
Programmateur ESP-Me
Page 77

Connexion d'un relais de démarrage de pompe (facultatif)
L'ESP-Me peut contrôler un relais de démarrage de
pompe pour activer et désactiver la pompe selon les
besoins.
Branchez un l entre le relais de démarrage de
A
pompe (PSR) et la borne de vanne maîtresse (MV)
du module de base. Connectez ensuite un autre
l entre le relais de démarrage de pompe et le l
neutre, comme indiqué.
Pour éviter tout risque d'endommager la pompe,
B
connectez un petit l de raccordement entre
les bornes inutilisées et la borne utilisée la plus
proche, comme indiqué.
REMARQUE: Le programmateur ESP-Me ne per-
met PAS d'alimenter une pompe. Le relais doit
être branché conformément aux instructions du
fabricant.
Pour une liste de relais de démarrage de pompe
compatibles, rendez-vous sur notre site Web :
www.rainbird.com/controllersupport:
REMARQUE:
Lebranchement
à la pompe et à
l'alimentation
externe ne sont
pas indiqués.
Consultez les
instructions
d'installation de
la pompe.
A
FRA
Installation
B
2
1
PSR
RELAIS DE
DÉMARRAGE
DE POMPE
C
Programmateur ESP-Me
77
Page 78

Connexion de la sonde de pluie/gel (facultatif)
FRA
Installation
Le programmateur ESP-Me peut être paramétré pour
obéir à une sonde de pluie ou l'ignorer. Consultez la
section Sonde de pluie, sous Programmation avancée.
Retirez le l de raccordement jaune des bornes
A
SENS du programmateur.
REMARQUE : Ne retirez le l de raccordement
jaune que si vous branchez une sonde de pluie.
Connectez les deux ls de la sonde de pluie aux
B
bornes SENS, comme indiqué.
AVERTISSEMENT : Ne faites pas passer les ls de
la sonde de pluie par la même ouverture que le l
d'alimentation.
REMARQUE : Les programmateurs Rain Bird sont
uniquement compatibles avec les sondes de
pluie normalement fermées.
REMARQUE : Pour les sondes de pluie/gel sans
l, consultez les instructions d'installation de la
sonde.
B
78
Programmateur ESP-Me
Page 79

Connexion de l'alimentation
AVERTISSEMENT : Ne branchez PAS le trans-
formateur et ne connectez PAS l'alimentation
externe avant d'avoir eectué et vérié tous les
branchements.
AVERTISSEMENT : Les décharges électriques
peuvent entraîner des blessures graves, voire mortelles. Vériez que l’alimentation est hors tension
(OFF) avant de connecter les ls d’alimentation.
Caractéristiques électriques
Entrée 230 V c.a., 0,2 A, 50/60 Hz
Sortie 25,5 V c.a., 1,0 A, 50/60 Hz
Câblage de l’alimentation
230 V c.a. (International)
Fil noir d’alimentation (tension) sur le fil noir du
transformateur indiquant «L»
Fil bleu d’alimentation (neutre) sur le fil bleu du
transformateur indiquant «N»
Fil vert rayé jaune d’alimentation (terre) sur le fil vert rayé
jaune du transformateur
FRA
Installation
Programmateur ESP-Me
79
Page 80

FRA
Installation
Le compartiment de câblage du transformateur
A
se trouve dans le coin inférieur gauche du
programmateur. À l'aide d'un tournevis, retirez le
couvercle et exposez les ls du transformateur.
Faites passer les trois ls de la source d'alimen-
B
tation externe par l'ouverture située en bas de
l'unité, jusqu'au compartiment de câblage.
Connectez les ls de la source d'alimentation
C
externe (deux d'alimentation et un de mise à la
terre) aux ls du transformateur à intérieur du
compartiment de câblage.
AVERTISSEMENT : Le l de mise à la terre doit
être connecté pour assurer une protection en cas
de surtension. Un conduit xe servira à brancher
l'alimentation principale au programmateur.
REMARQUE: Pour cette étape, utilisez les serre-
ls fournis ou le connecteur installé.
Vériez que toutes les connexions soient correctes,
D
puis remettez le couvercle du compartiment de
câblage et xez-le avec les vis.
C
L
N
A
B
80
Programmateur ESP-Me
Page 81

Modules d'extension des stations
Des modules de station optionnels peuvent s'installer
dans les emplacements vides, à droite du module de
base, pour accroître la capacité à 22 stations.
REMARQUE : Le module à 6 stations n'est
compatible qu'avec l'ESP-Me. Il n'est pas compatible
avec les anciens programmateurs ESP-M.
REMARQUE : Pour un séquencement idéal des
stations, il est recommandé de toujours installer
le module à 6 stations dans le compartiment 2.
Pour plus de détails, voir la section Numérotage
des stations.
Module de base
(inclus)
Modules d'extension
(vendus séparément)
Installation des modules
Assurez-vous que le levier de xation du module
A
est déverrouillé (faites-le glisser vers la gauche).
Positionnez le module sous l'emplacement désiré,
B
entre les rails en plastique.
Poussez le module vers le haut dans l'emplace-
C
ment, jusqu'à ce qu'il soit xé.
Faites glisser le levier de xation en position de
D
verrouillage (vers la droite).
RÉPÉTEZ l'opération pour les modules
supplémentaires.
REMARQUE : Il est possible d'installer ou de
supprimer des modules que l'alimentation secteur
soit connectée OU non. Ils sont considérés comme
"remplaçables à chaud".
D
FRA
Installation
VT MV COM
3 STATIONS
(ESPSM3)
6 STATIONS
(ESPSM6)
BC
Programmateur ESP-Me
81
Page 82

Numérotage des stations
FRA
Installation
Description du numérotage des stations xes
Le programmateur est conguré avec un numérotagedes
stations xe. Chaque compartiment est paramétré pour
accepter un module à 6 stations et réserver le numéro
de station à une utilisation ultérieure si AUCUN module à
6stations n'est installé dans les compartiments 2, 3 ou 4.
Les numéros de station sont pré-attribués comme suit:
Comparti-
ment 1
VT MV COM 567 11 12 13 17 18 19
1234 8910141516202122
VT MV COM
Comparti-
ment 2
Comparti-
ment 3
Comparti-
ment 4
Conguration des modules
Exemple d'installation avec des intervalles dans la
numérotation des stations:
• 19 stations au total sont installées.
• Le module de base, installé dans le compartiment
1, utilise les stations 1 à 4.
• Un module d'extension à 6 stations, installé dans
les compartiments 2 et 3, utilise les stations 5 à 16.
• Un module d'extension à 3 stations, installé dans le
compartiment 4, utilise les stations 17 à 19.
Étant donné qu'un module à 3 stations est installé
dans le compartiment 4, seuls les trois premiers numéros de station attribués à ce compartiment seront utilisés, tandis que les numéros inutilisés seront "réservés"
pour une utilisation ultérieure.
REMARQUE : Lors de la programmation, le pro-
grammateur ignorera tous les numéros de station
inutilisés, ce qui créera des intervalles dans la
numérotation des stations.
Exemple d'installation recommandée pour 19 stations
82
Programmateur ESP-Me
Page 83

Exemple: un module à 3 stations a été installé dans
le compartiment 4, aussi les stations 20-22 seront-elles
indisponibles pour la programmation. Lors de la programmation, les stations manquantes s'acheront sur
l'écran en tant que 20SKIP, 21SKIP, etc.
L'écran ache "20SKIP" avec le "20" qui clignote pour
indique que la station 20 (ainsi que la 21 et la 22) sont
inutilisées et indisponibles pour la programmation.
Terminez l'installation du programmateur
Réinstallez et reconnectez le panneau frontal.
A
Mettez le programmateur sous tension et testez
B
le système.
REMARQUE : Les branchements électriques
peuvent être vériés même si l'eau n'est pas
disponible. Si l'eau est disponible et que vous
voulez tester certaines de vos stations ou la
totalité, utilisez la fonctionnalité Test All Stations
(tester toutes les stations) du programmateur.
FRA
Installation
Programmateur ESP-Me
83
Page 84

830
PGM
A
Fonctionnement normal
Commandes et indicateurs
OFF (arrêt)
Désactive l'arrosage
FRA
Fonctionnement normal
84
automatique
TEST ALL STATIONS
(tester toutes les
stations)
ARROSAGE MANUEL
Commencez à arroser
immédiatement une
station ou toutes les
stations
RAIN SENSOR
(sonde de pluie)
Paramétrez le
programmateur pour
obéir à une sonde de
pluie ou l'ignorer
DELAY WATERING
(diérer l’arrosage)
Jusqu'à 14 jours
SEASONAL ADJUST (ajustement
saisonnier) Ajustez les durées
d'arrosage entre 5% et 200%
Programmateur ESP-Me
Principales fonctionnalités d'utilisation du programmateur ESP-Me:
AUTO RUN
(démarrage
automatique)
L'arrosage se déclenche
automatiquement
OPTIONS DE JOUR
D'ARROSAGE
Par jour, pair,
impair ou cyclique
DATE/HEURE
Congurez la
date et l'heure
JOURS D'ARROSAGE
Sélectionnez les jours
auxquels l'arrosage
est autorisé
START TIMES
(heures de démarrage)
Paramétrez jusqu'à 6
heures de démarrage par
programme
RUN TIMES (durées
d’arrosage)
Paramétrez des durées
d'arrosage pour chaque
programme
INDICATEUR D'ALARME
PROGRAM SELECT
(sélection du
programme)
Sélectionnez le
programme A, B, C ou D
BOUTONS – / +
Ajustez les
paramètres du
programme
HOLD TO START
(maintenez enfoncé
pour démarrer)
BOUTONS
PRÉCÉDENT/SUIVANT
Sélectionnez les options de
programmation
Arrosage manuel
Page 85

DÉMARRAGE AUTOMATIQUE
AUTO RUN (démarrage automatique) est le mode de
fonctionnement normal. Remettez toujours la roue
en position AUTO RUN une fois la programmation
terminée.
Pendant l’arrosage:
L'écran ache un symbole clignotant en forme
d'arroseur, le numéro de la station ou du programme
actif, ainsi que la durée d'arrosage restante.
• Pour annuler l'arrosage, positionnez la roue sur
OFF (arrêt) pendant trois secondes, jusqu'à ce que
l'écran ache OFF.
Pour lancer manuellement un programme:
Appuyez sur le bouton PROGRAM SELECT
A
(sélection du programme) pour sélectionner un
programme.
Appuyez sur le bouton HOLD TO START
B
(maintenir enfoncé pour démarrer) pour lancer
immédiatement le programme aché.
ARRÊT
Tournez la roue jusqu'à OFF (arrêt) an d'arrêter l'arrosage automatique ou d'annuler immédiatement tous
les arrosages en cours.
ATTENTION : L'arrosage ne s'eectuera PAS si le
programmateur reste en mode OFF.
FRA
Fonctionnement normal
Programmateur ESP-Me
85
Page 86

Planication par programme
L'ESP-Me utilise une méthode de planication par
programme an d'élaborer des calendriers d'arrosage.
Pour chaque programme (A, B, C ou D):
FRA
Fonctionnement normal
Sélectionnez des jours d'arrosage (personnalisés,
A
pairs/impairs, cycliques) et des heures de
démarrage devant s'appliquer à la totalité du
programme.
Attribuez une durée d'arrosage à chaque
B
numéro de station disponible devant arroser lors
du programme sélectionné.
Empilement de programmes
Si des programmes ont des heures de démarrage qui
se chevauchent, l'ESP-Me "empilera" les heures de
démarrage. Lorsque toutes les stations auront arrosé
dans le programme A, le programme B commencera
à arroser. Les stations arroseront à la suite les unes des
autres.
Exemple: Le programme A et B sont tous les deux
paramétrés pour démarrer à 8:00 AM. Cependant, le
programme B n'arrosera pas tant que le programme A
n'aura pas ni.
Avec l'empilement
des programmes,
le programme B ne
commence qu'une
fois le programme A
terminé
86
Programmateur ESP-Me
Programme DÉMARRAGE Station
1
A 1
B 1
er
er
2 8:30 AM 30 MIN
3 9:00 AM 30 MIN
4 9:30 AM 30 MIN
5
6 10:30 AM 30 MIN
7 11:00 AM 30 MIN
8 11:30 AM 30 MIN
Démarrage
programmé
8:00 AM
8:00 AM
Démarrage
eectif
8:00 AM 30 MIN
10:00 AM 30 MIN
Durées d'arrosage
Page 87

Erreur de programmation commune
L'erreur de programmation la plus commune consiste
à répéter des cycles d'arrosage à cause d'heures de
démarrage multiples.
re
Exemple: Le programme A a une 1
rage à 8:00 AM. Avec l'empilement des programmes,
chaque station arrosera dans l'ordre, jusqu'à ce que
toutes les zones aient été arrosées. Il est inutile de
paramétrer séparément l'arrosage de chaque station.
e
Dans cet exemple, une 2
heure de démarrage a
accidentellement été paramétrée pour 8:30 AM, ce qui
signie que certaines zones vont être arrosées deux
fois ce matin-là.
heure de démar-
REMARQUE : Dans un programme, attribuez
uniquement des durées d'arrosage aux stations
qui doivent arroser. Si vous ne voulez pas qu'une
station en particulier se déclenche lors d'un programme, paramétrez la durée d'arrosage sur zéro.
FRA
Fonctionnement normal
Des heures de
démarrage multiples
provoquent un
arrosage à répétition
des stations.
Pour corriger
ce problème,
e
supprimez la 2
heure de démarrage
Programme DÉMARRAGE Station
1
A 1
A 2
er
e
2 8:30 AM 30 MIN
3 9:00 AM 30 MIN
4 9:30 AM 30 MIN
1
2 10:30 AM 30 MIN
3 11:00 AM 30 MIN
4 11:30 AM 30 MIN
Démarrage
programmé
8:00 AM
8:30 AM
Démarrage
eectif
8:00 AM 30 MIN
10:00 AM 30 MIN
Durées d'arrosage
Programmateur ESP-Me
87
Page 88

Programmation de base
1. Paramétrage de la date et de l'heure
FRA
Programmation de base
Appuyez sur ou pour sélectionner le paramètre
A
à modier.
Appuyez sur ou pour sélectionner la valeur du
B
paramètre.
Maintenez enfoncé ou pour accélérer les
C
ajustements.
Appuyez sur ou pour sélectionner le paramètre
A
à modier.
Appuyez sur ou pour sélectionner la valeur du
B
paramètre.
Maintenez enfoncé ou pour accélérer les
C
ajustements.
Pour modier le format horaire (12 heures ou 24 heures):
Quand MINUTES clignote, appuyez sur .
A
Appuyez sur ou pour sélectionner le format
B
horaire désiré, puis appuyez sur pour retourner au
réglage de l'heure.
Tournez la roue jusqu'à SET DATE
(régler la date).
Tournez la roue jusqu'à la position SET TIME
(régler l'heure).
2. Conguration des heures de
démarrage de l’arrosage
Jusqu'à six heures de démarrage sont disponibles
pour chaque programme.
Tournez la roue jusqu'à SET WATERING START
TIMES (régler les heures de démarrage de
l'arrosage)
Appuyez sur PROGRAM SELECT (sélection du
A
programme) pour choisir le programme désiré (si
nécessaire).
Appuyez sur ou pour sélectionner une heure
B
de démarrage disponible.
Appuyez sur ou pour paramétrer l'heure
C
de démarrage sélectionnée (assurez-vous que le
paramètre AM/PM est correct).
Appuyez sur pour paramétrer des heures de
D
démarrage supplémentaires.
REMARQUE: La position OFF (arrêt) pour toutes
les heures de démarrage est entre 11:45 PM et
minuit.
88
Programmateur ESP-Me
Page 89

3. Réglage des durées d'arrosage
Les durées d'arrosage peuvent aller d'une minute à six
heures.
Tournez la roue jusqu'à SET STATION RUN TIMES
(paramétrer les durées d'arrosage des stations)
Appuyez sur PROGRAM SELECT (sélection du
A
programme) pour choisir le programme désiré (si
nécessaire).
Appuyez sur ou pour sélectionner une station.
B
Appuyez sur ou pour paramétrer la durée
C
d'arrosage de la station sélectionnée.
Appuyez sur pour paramétrer des durées
D
d'arrosage supplémentaire.
4. Réglage des jours d'arrosage
Jours personnalisés
Paramétrez l'arrosage pour qu'il s'eectue certains
jours de la semaine.
Tournez la roue jusqu'à ADVANCED WATERING
CYCLES (cycles d'arrosage avancés)
Appuyez sur PROGRAM SELECT (sélection du
A
programme) pour choisir le programme désiré (si
nécessaire).
Appuyez sur ou pour sélectionner BY DAY
B
(par jour).
Positionnez la roue sur MON (lundi).
C
Appuyez sur ou pour paramétrer le jour
D
sélectionné (clignotant) sur ON (activé) ou OFF
(désactivé), puis positionnez la roue sur le jour
suivant.
RÉPÉTEZ l'opération an de choisir des jours
supplémentaires pour le programme sélectionné.
FRA
Programmation de base
Programmateur ESP-Me
89
Page 90

Options d'arrosage manuel
FRA
Options d'arrosage manuel
Tester toutes les stations
Vériez le fonctionnement des vannes du système.
Tournez la roue jusqu'à TEST ALL STATIONS
(tester toutes les stations).
Appuyez sur ou pour paramétrer une durée
A
d'arrosage.
Appuyez sur le bouton HOLD TO START
B
(maintenir enfoncé pour démarrer).
Tournez la roue jusqu'à AUTO RUN (démarrage
C
automatique) après que l'écran ache TESTING
(test en cours).
Pendant le test:
L'écran ache un symbole clignotant en forme d'arroseur,
le numéro de la station ou du programme actif, ainsi que la
durée d'arrosage restante.
Pour annuler le test, positionnez la roue sur OFF
D
(arrêt) pendant trois secondes, jusqu'à ce que
l'écran ache OFF (arrêt).
Activation d'une seule station
Lancez immédiatement l'arrosage d'une seule station.
Tournez la roue jusqu'à la position MANUAL
STATION (arrosage manuel station).
Appuyez sur ou pour sélectionner une station.
A
Appuyez sur ou pour paramétrer une durée
B
d'arrosage.
Appuyez sur le bouton HOLD TO START
C
(maintenir enfoncé pour démarrer).
L'arrosage commence et “STARTED” (commencé)
D
apparaît sur l'écran.
90
Programmateur ESP-Me
Page 91

Activation d'un seul programme
Lancez immédiatement l'arrosage pour un seul
programme.
Tournez la roue jusqu'à MANUAL PROGRAM
(programme manuel).
Appuyez sur PROGRAM SELECT (sélection du
A
programme) pour choisir le programme désiré
(si nécessaire). La durée d'arrosage totale du
programme s'ache.
Appuyez sur le bouton HOLD TO START
B
(maintenir enfoncé pour démarrer) pour lancer
l'arrosage du programme sélectionné.
RÉPÉTEZ l'opération si vous le souhaitez
pour planier manuellement l'arrosage de
programmes supplémentaires.
REMARQUE : 38 stations au maximum peuvent
être mises en le d'attente sur les quatre
programmes.
L'arrosage commence et “STARTED” (commencé)
C
apparaît sur l'écran.
Appuyez sur le bouton ADVANCE STATION
D
(passer à la station suivante) pour passer à la
station suivante si vous le souhaitez.
Pendant l'arrosage manuel (une seule station ou un
seul programme):
L'écran ache un symbole clignotant en forme
d'arroseur, le numéro de la station ou du programme
actif, ainsi que la durée d'arrosage restante.
• Pour annuler l'arrosage manuel, tournez la roue
jusqu'à OFF (arrêt) pendant trois secondes, jusqu'à
ce que l'écran ache OFF.
FRA
Options d'arrosage manuel
Programmateur ESP-Me
91
Page 92

Programmation avancée
FRA
Programmation avancée
Jours pairs ou impairs
Paramétrez l'arrosage pour qu'il s'effectue tous les jours
PAIRS ou IMPAIRS.
Tournez la roue jusqu'à ADVANCED
WATERING CYCLES (cycles d'arrosage
avancés)
Appuyez sur PROGRAM SELECT (sélection du
A
programme) pour choisir le programme désiré, si
nécessaire).
Appuyez sur ou pour sélectionner ODD
B
(impair) ou EVEN (pair).
REMARQUE : ODD (impair) ou EVEN (pair)
s'ache lorsque vous positionnez la roue sur un
jour de la semaine.
Jours cycliques
Paramétrez l'arrosage pour qu'il s'eectue à des
intervalles spéciques, par exemple tous les 2 jours, ou
tous les 3 jours, etc.
Tournez la roue jusqu'à ADVANCED
WATERING CYCLES (cycles d'arrosage
avancés).
Appuyez sur PROGRAM SELECT (sélection du
A
programme) pour choisir le programme désiré, si
nécessaire).
Appuyez sur ou pour sélectionner CYCLIC
B
(cyclique), puis appuyez sur
Appuyez sur ou pour paramétrer le DAY
C
CYCLE (cycle de jours) désiré, puis appuyez sur
92
Programmateur ESP-Me
Page 93

Appuyez sur ou pour paramétrer les DAYS
D
REMAINING (jours restants) avant le début du
cycle. Le jour d'arrosage NEXT (suivant) s'actualise
sur l'écran pour indiquer le jour auquel l'arrosage
commencera, comme indiqué.
Sonde de pluie
Paramétrez le programmateur pour obéir à une sonde
de pluie ou l'ignorer.
Lorsque le paramètre est ACTIF, l'arrosage automatique
sera interrompu si de la pluie est détectée. Lorsque
le paramètre est IGNORER, tous les programmes
ignoreront la sonde de pluie.
Tournez la roue jusqu'à RAIN SENSOR
(sonde de pluie).
FRA
Programmation avancée
• Appuyez sur
IGNORER.
ou pour sélectionner ACTIF ou
Légende État de l'icône de la sonde de pluie
Active
Contournée
Pluie détectée
REMARQUE : Consultez Fonctions spéciales
pour paramétrer le contournement de la sonde
de pluie en fonction des stations.
Programmateur ESP-Me
93
Page 94

FRA
Programmation avancée
Ajustement saisonnier
Augmentez ou réduisez les durées d'arrosage des
programmes en fonction d'un pourcentage donné
(5% à 200%).
Exemple : Si l'ajustement saisonnier est paramétré
sur 100 % et que la durée d'arrosage de la station
est programmée pour 10 minutes, la station arrosera
pendant 10 minutes. Si l'ajustement saisonnier est
paramétré sur 50 %, la station arrosera pendant
5 minutes.
Tournez la roue jusqu'à la position SEASONAL
ADJUST (ajustement saisonnier).
Appuyez sur ou pour augmenter ou réduire
A
le paramètre de pourcentage global.
Pour ajuster un programme en particulier,
B
appuyez sur PROGRAM SELECT (sélection du
programme) an de choisir le programme désiré
(si nécessaire).
Diérer l'arrosage
Diérez l'arrosage jusqu'à une période de 14 jours.
Tournez la roue jusqu'à la position
DELAY WATERING (diérer l'arrosage).
Appuyez sur ou pour paramétrer les DAYS
A
REMAINING (jours restants). Le jour d'arrosage
NEXT (suivant) s'actualise sur l'écran pour
indiquer quand l'arrosage reprendra.
Pour annuler une suspension de l'arrosage,
B
paramétrez DAYS REMAINING (jours restant)
sur0.
REMARQUE : Quand le délai expire, l'arrosage
automatique reprend comme prévu.
94
Programmateur ESP-Me
Page 95

Jours désactivés permanents
Empêchez l'arrosage certains jours de la semaine
(pour la programmation paire, impaire ou cyclique
uniquement).
Tournez la roue jusqu'à la position
1MON (1 lundi, ou tout autre jour)
Appuyez sur PROGRAM SELECT (sélection du
A
programme) pour choisir le programme désiré (si
nécessaire).
Maintenez enfoncé et en même temps
B
jusqu'à ce que l'écran jours désactivés permanents
s'ache.
Appuyez sur pour paramétrer le jour
C
sélectionné (clignotant) en tant que jour
désactivé permanent (PERMOFF), ou appuyez sur
pour que le jour reste ON (actif).
Calculatrice de la durée d'arrosage totale par programme
Consultez la durée d'arrosage totale pour tout un
programme.
Le programmateur peut déterminer la durée d'arrosage
totale d'un programme en ajoutant toutes les durées
d'arrosage de chaque station de ce programme.
Tournez la roue jusqu'à MANUAL PROGRAM
(programme manuel).
La durée d'arrosage totale de PGM A s'ache.
A
Appuyez sur le bouton PROGRAM SELECT
B
(sélection du programme) pour acher la durée
d'arrosage totale du programme suivant.
REMARQUE : La durée d'arrosage indiquée
pour chaque programme correspond à la durée
d'arrosage modiée en fonction de l'ajustement
saisonnier et ne comprend qu'une seule heure de
démarrage.
Programmateur ESP-Me
FRA
Programmation avancée
95
Page 96

830
PGM
A
FRA
Fonctionnalités spéciales
96
Fonctionnalités spéciales
Tournez la roue jusqu'à la position désirée, indiquée
A
ci-dessous, pour chaque fonctionnalité spéciale.
Maintenez enfoncés et en même temps.
B
ENREGISTRER DES
PROGRAMMES
CONTOURNER LA SONDE DE
PLUIE POUR UNE STATION
Indique à une station d'obéir
à une sonde de pluie ou de
l'ignorer.
RÉTABLIR LES PARAMÈTRES
PAR DÉFAUT
Toutes les planications
programmées seront eacées.
RESTAURER LES PROGRAMMES
ENREGISTRÉS
Programmateur ESP-Me
JOURS DÉSACTIVÉS
PERMANENTS
Empêchez l'arrosage certains
jours de la semaine.
DÉLAI ENTRE LES VANNES
Le délai de station (entre 1 seconde et 9 heures)
permet de veiller à ce qu'une vanne se ferme
complètement avant que la suivante s'ouvre.
PARAMÉTRER LA VANNE MAÎTRESSE
EN FONCTION DES STATIONS
Permet à une station d'être contrôlée
par une vanne maîtresse ou un relais de
démarrage de pompe.
Page 97

Options
Bouton de réinitialisation
Si le programmateur ne fonctionne pas correctement,
vous pouvez essayer d'appuyer sur RESET
(réinitialiser).
• Insérez un outil n, comme un trombone, dans
l'orice d'accès et appuyez jusqu'à ce que
le programmateur se réinitialise. Toutes les
planications d'arrosage programmées resteront
stockées en mémoire.
RESET (réinitialiser)
Accessoires externes
Un port accessoire à 5 broches est disponible pour
les appareils externes approuvés par Rain Bird,
notamment:
• Module WiFi LNK
• Faisceau de connexion rapide du récepteur LIMR
PORT
FRA
Options
Programmateur ESP-Me
97
Page 98

FRA
Options
Programmation à distance
Programmez à distance le panneau frontal alimenté
par pile.
Le panneau frontal peut être retiré du programmateur
et programmé à distance grâce à l'alimentation fournie
par une pile de 9 volts. Les paramètres peuvent être
programmés pour la totalité des 22 stations, quels
que soient les modules de station installés dans le
programmateur.
REMARQUE : C'est utile si un prestataire veut
programmer le programmateur avant de
l'installer sur site.
Retirez le panneau frontal.
A
Insérez une pile 9V dans le compartiment.
B
Programmez le programmateur.
C
REMARQUE : Les informations sur les programmes
sont stockées dans une mémoire non volatile,
aussi ne seront-elles jamais perdues si le panneau
frontal n'est plus alimenté.
Remettez le panneau frontal (consultez Terminez
D
l'installation dans la section Installation).
REMARQUE : Une fois le panneau frontal
réinstallé, toutes les stations pour lesquelles
aucun module de station correspondant n'est
installé fonctionneront comme si la durée
d'arrosage était de zéro.
Durée de vie de la pile
Si l'écran ache "-- -- -- -- --" de manière répétée alors
que vous utilisez une pile 9V pour la programmation à
distance, remplacez la pile.
98
Programmateur ESP-Me
Page 99

Dépannage
Détection des erreurs
Le programmateur ESP-Me est équipé d'un dispositif
de détection d'erreur intégré qui peut générer automatiquement une ALARME causée par une erreur
de programmation essentielle ou un problème de
court-circuit.
La diode d'alarme sur le panneau frontal du programmateur ESP-Me s'allume pour indiquer un problème:
Erreurs de programmation (diode clignotante)
Erreur
Aucune heure de démarrage n'a été paramétrée
Aucune durée d'arrosage
n'a été paramétrée
Aucun jour d'arrosage
n'a été paramétré
Le programmateur ESP-Me se réinitialise ou s'eace
lorsque l'erreur est corrigée.
REMARQUE : La roue doit être en position AUTO
RUN (démarrage automatique) pour qu'un message
d'ALARME apparaisse sur l'écran.
DIODE
D’ALARME
CLIGNOTEMENT NO START TIMES
CLIGNOTEMENT NO RUN TIMES (pas
CLIGNOTEMENT NO WATER DAYS (pas
Message d'er-
reur sur l'écran
(pas d’heure de
démarrage)
de durée d'arrosage)
de jour d'arrosage)
Erreurs électriques (diode non clignotante)
Erreur
Court-circuit de la
vanne maîtresse
Court-circuit de la
station
Lorsqu'une erreur électrique est détectée, l'arrosage
de la station concernée est annulé et l'arrosage passe à
la station active suivante du programme.
Le programmateur réessaiera d’arroser la station
concernée au prochain arrosage prévu. La réussite
d'un arrosage eacera l'erreur associée à cette station.
DIODE
D’ALARME
ALLUMÉE EN
CONTINU
ALLUMÉE EN
CONTINU
Message d'erreur
sur l'écran
MASTER VALVE/PUMP WIRE
SHORTED OR HIGH CURRENT
(court-circuit de la vanne
maîtresse/pompe ou courant
trop fort)
STATION “X” WIRE SHORTED
(court-circuit de la station "X")
Eacement des alarmes liées à
une erreur électrique
Positionnez la roue sur AUTO RUN
(démarrage automatique) pour voir le
message d'erreur sur l'écran. Pour eacer l'ALARME, appuyez sur le bouton de
la èche droite .
Programmateur ESP-Me
FRA
Dépannage
99
Page 100

FRA
Dépannage
100
Problèmes d'arrosage
Problème Cause possible Solution possible
L'écran indique qu'un
programme est actif,
mais le système
n'arrose pas.
Message NO AC (pas
d'électricité) sur
l'écran.
Il vient de pleuvoir
mais l'alarme
ne s'allume pas.
Pourquoi?
Programmateur ESP-Me
La source d'eau n'envoie pas d'eau. Assurez-vous qu'il n'y a pas de coupure dans la canalisation
d'eau principale et que toutes les autres canalisations
d’alimentation en eau sont ouvertes et fonctionnent
correctement.
Des câbles sont desserrés oumal
branchés.
Les fils sont corrodés ou endommagés. Vérifiez que les fils ne soient pas endommagés, et remplacez-
Panne d'alimentation électrique. Lorsqu'il y a une panne d'alimentation et qu'une pile
Aucune alimentation détectée. Vérifiez le coupe-circuit et assurez-vous que l'unité est
Le programmateur peut être branché
à une prise à disjoncteur de fuite de
terre ou à une prise reliée à une prise à
disjoncteur de fuite de terre.
C'est normal. L'ESP-Me ne considère pas
l'interruption de l'arrosage dû à la pluie
comme une alarme.
Vérifiez que les câbles sur le terrain, ainsi que les fils de la
vanne principale ou du relais de démarrage de pompe, sont
correctement branchés au niveau du programmateur et sur
le terrain.
les si nécessaire. Vérifiez les connexions des fils et remplacez-
les si nécessaire par des connecteurs sertis étanches.
de 9 volts est installée, le système n'arrose pas mais les
programmes sont signalés comme actifs.
branchée à une prise ou une source d'alimentation électrique.
Vérifiez l'alimentation à la prise ou réinitialisez le coupe-
circuit.
C'est normal.
 Loading...