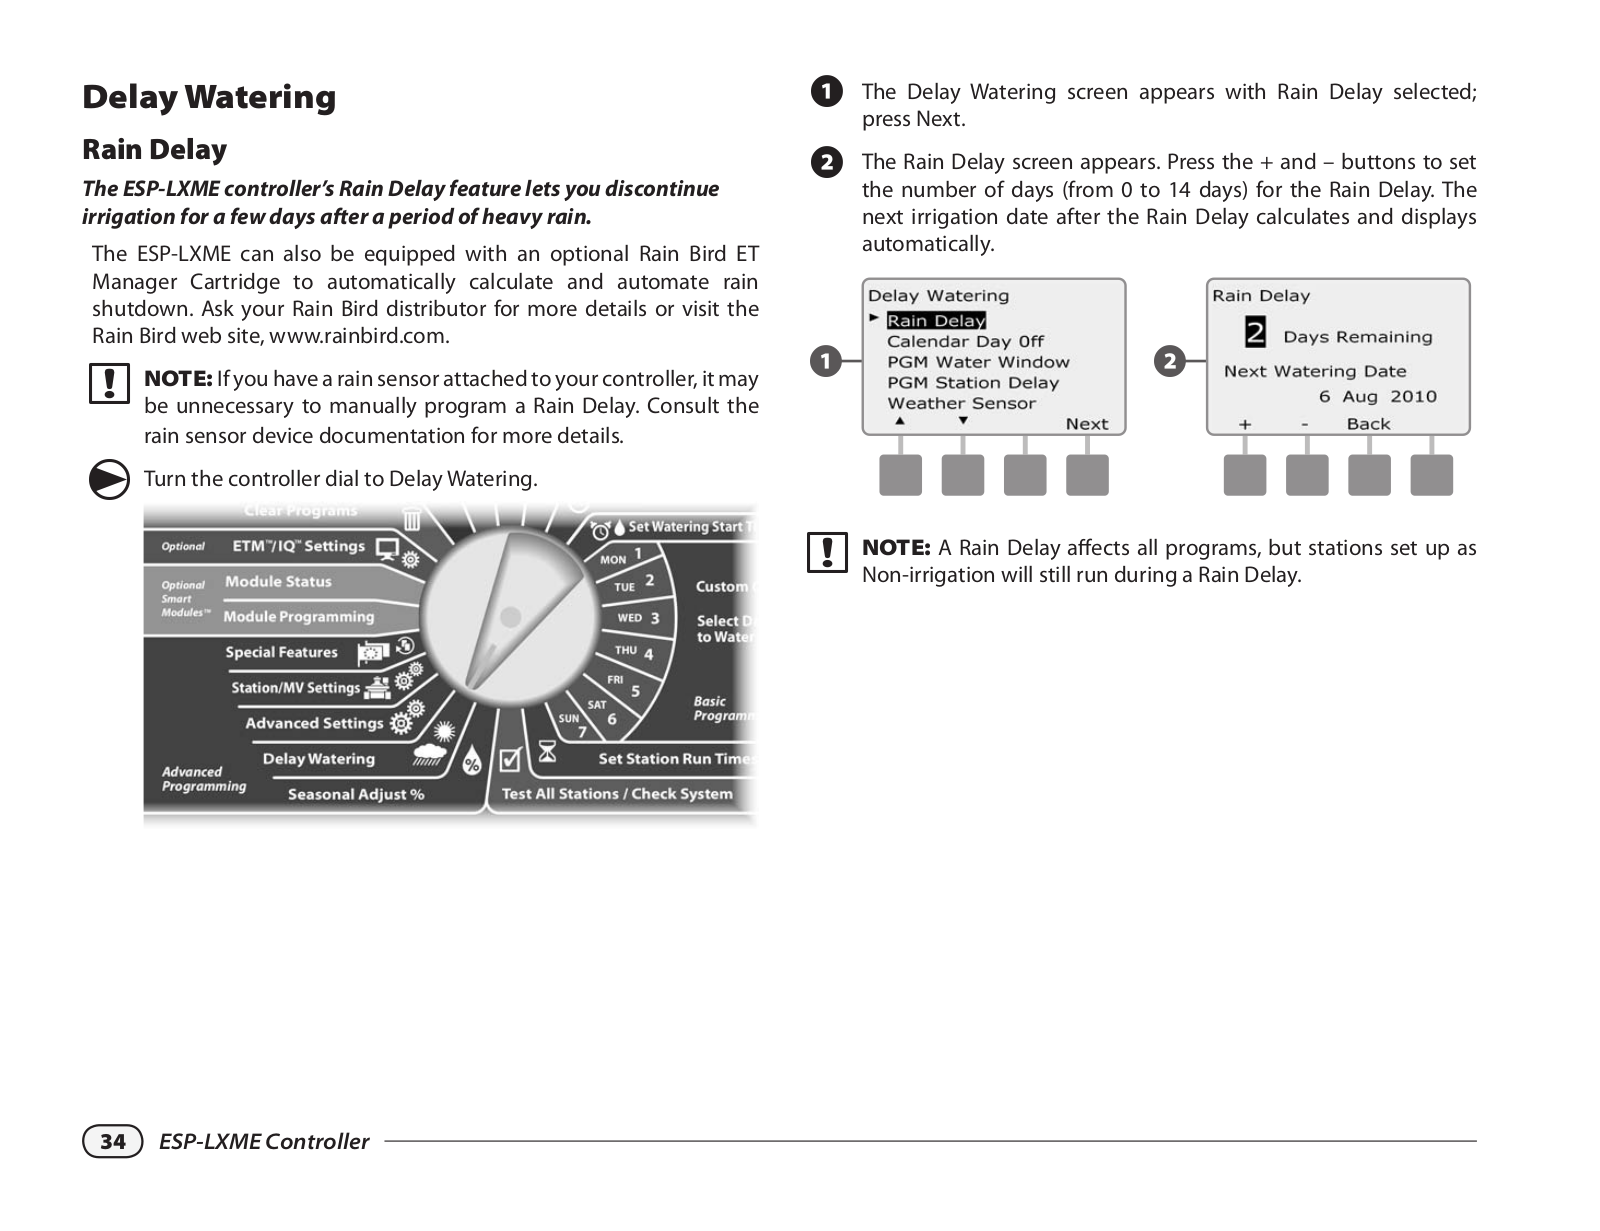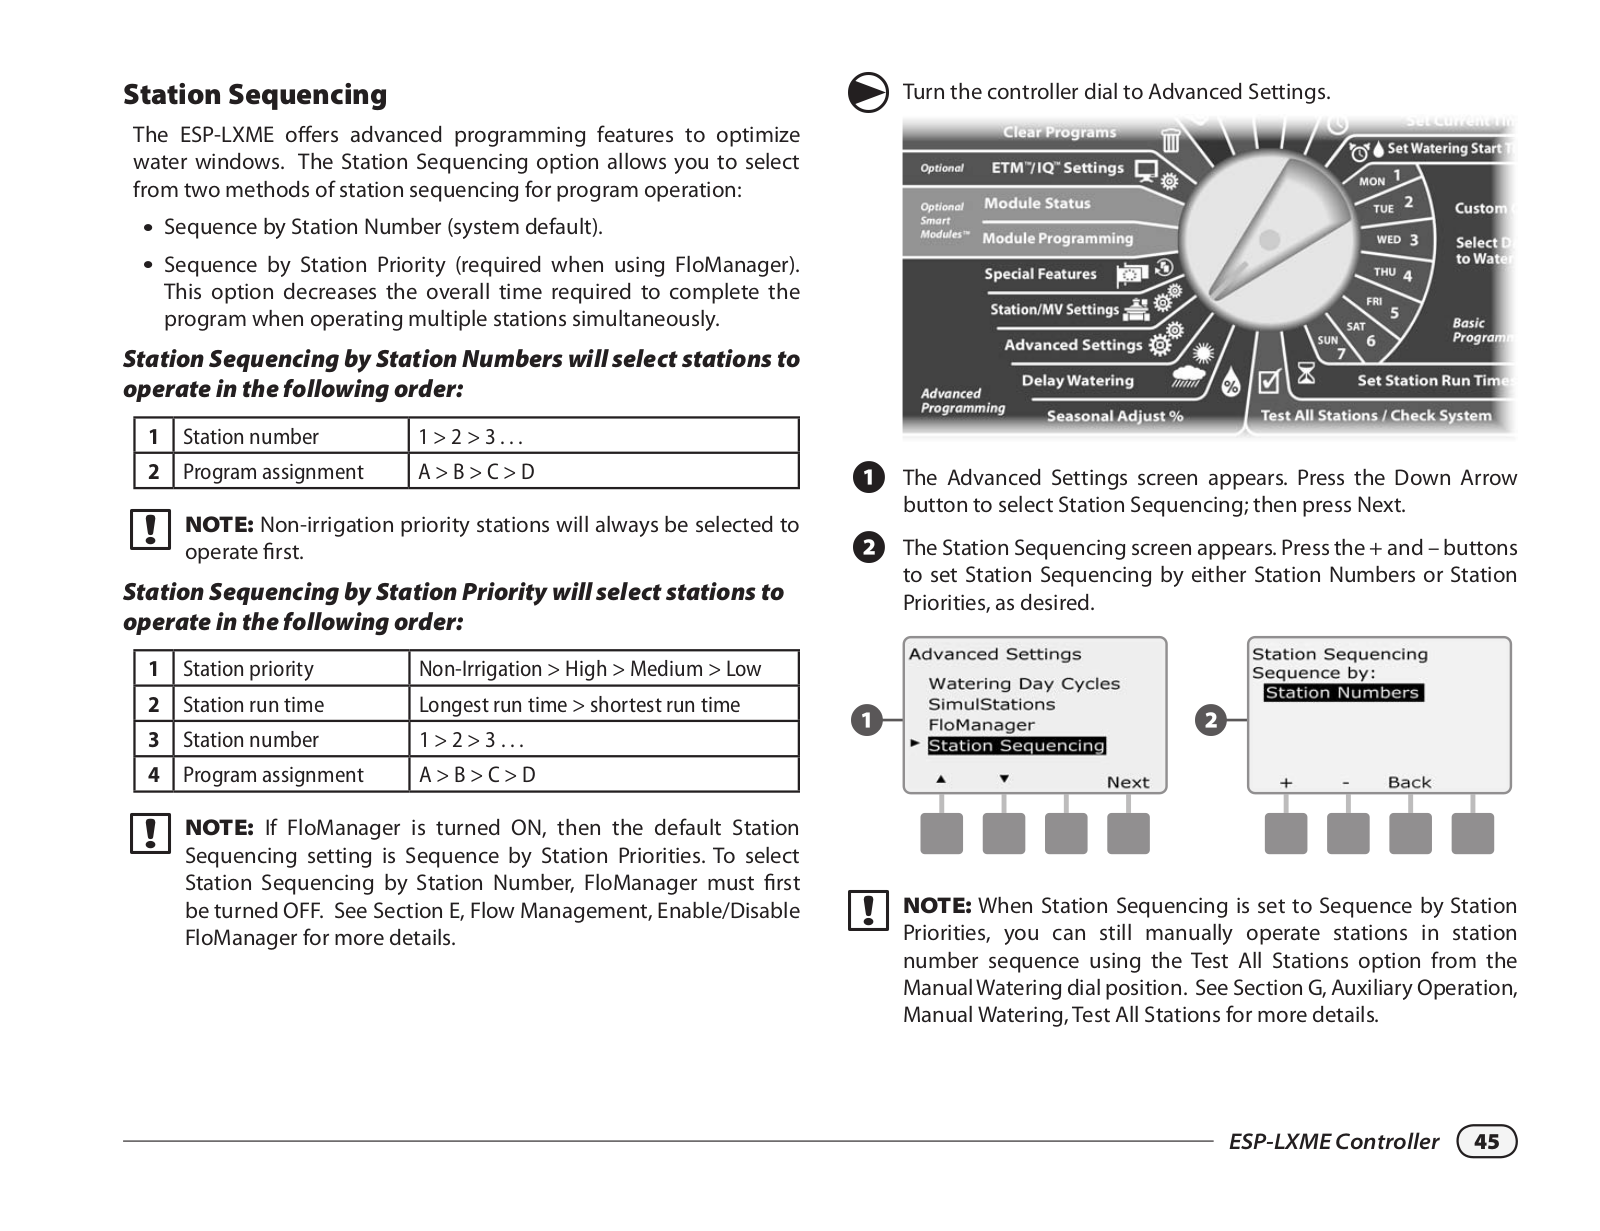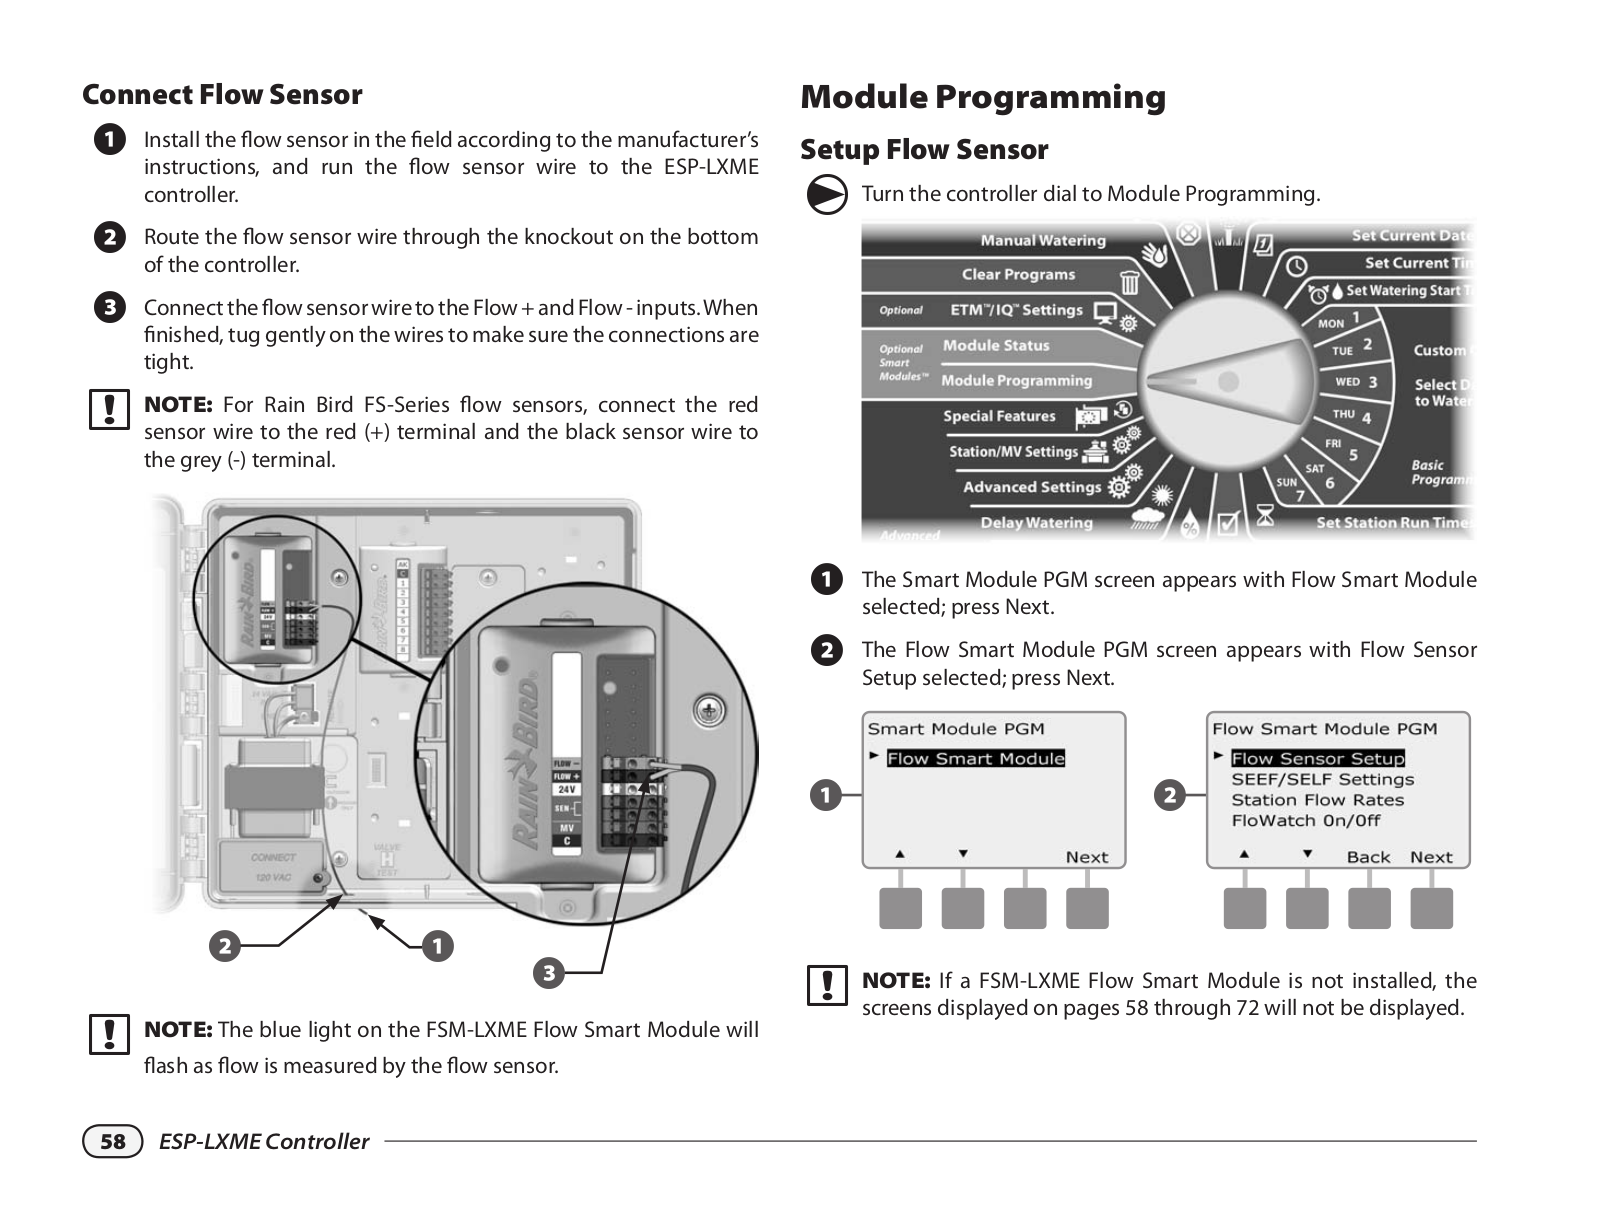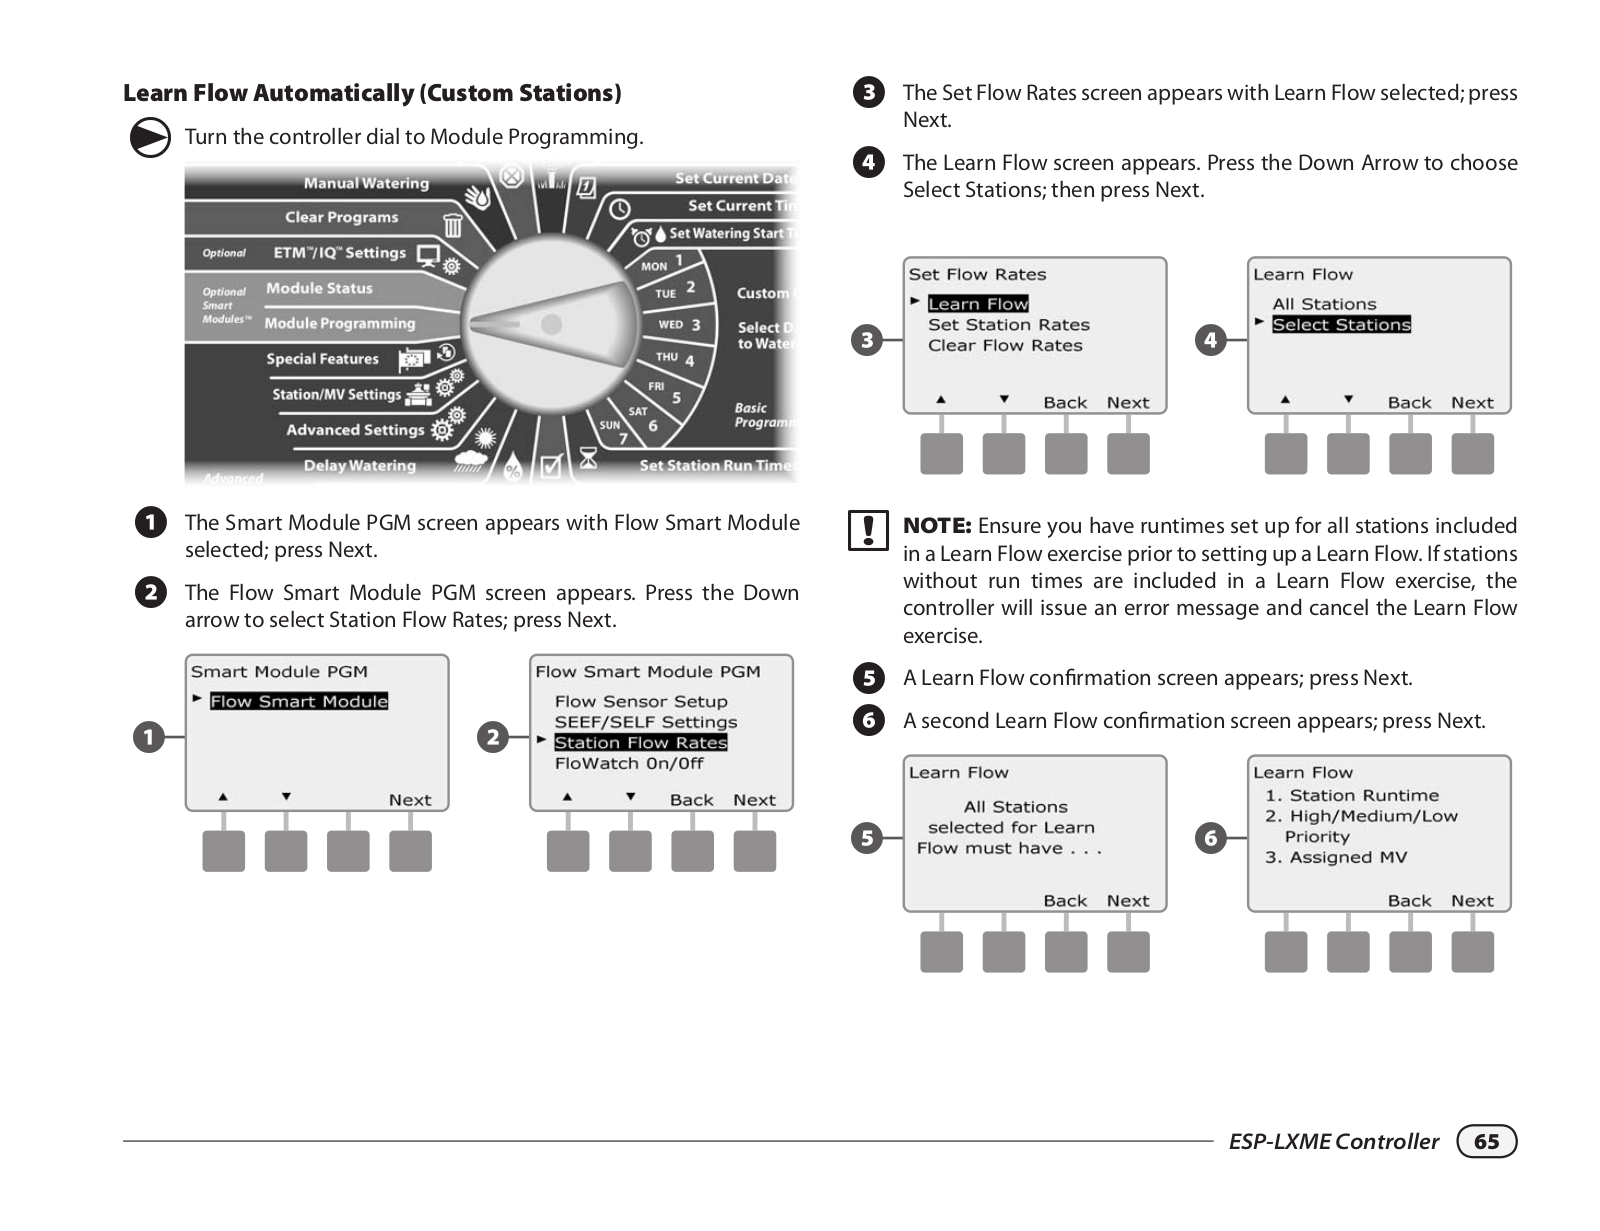
RAIN BIRD ESP-LXME Operating Instructions

RAIN BIRD ESP-LXME Operating Instructions

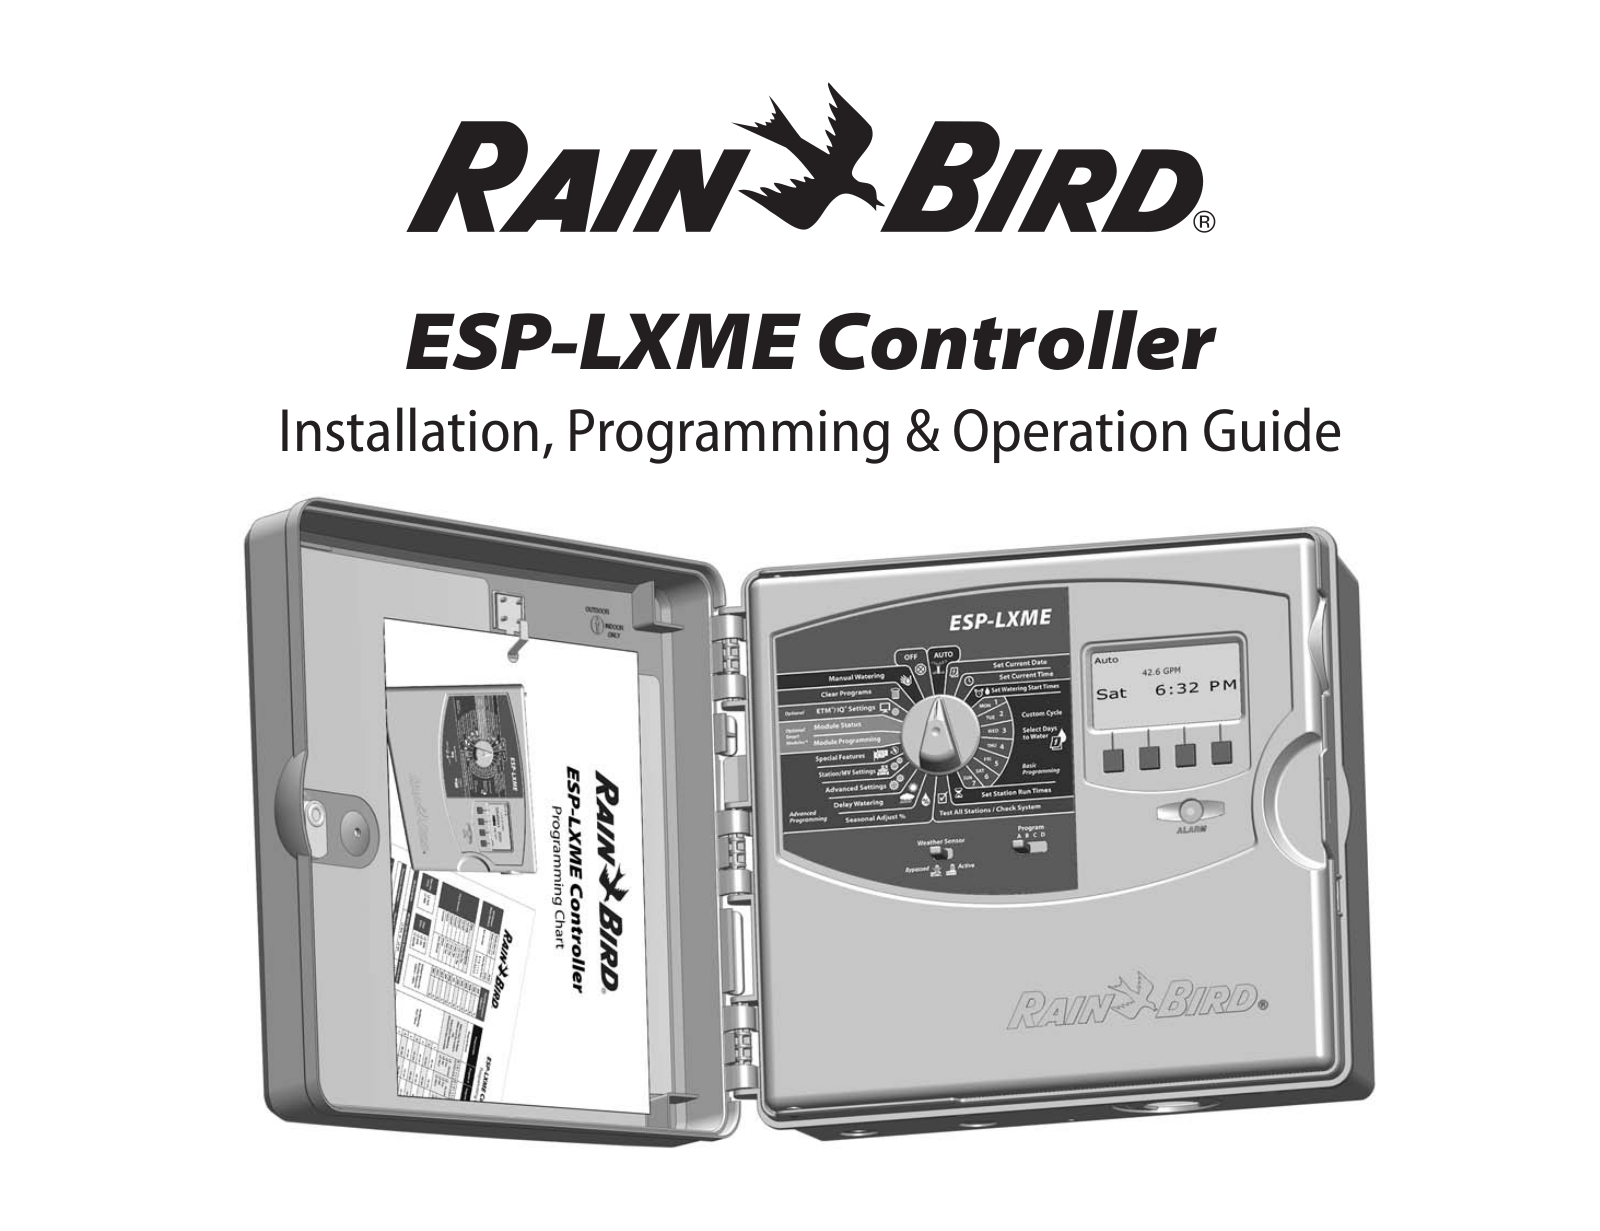
ESP-LXME Controller

Installation, Programming & Operation Guide

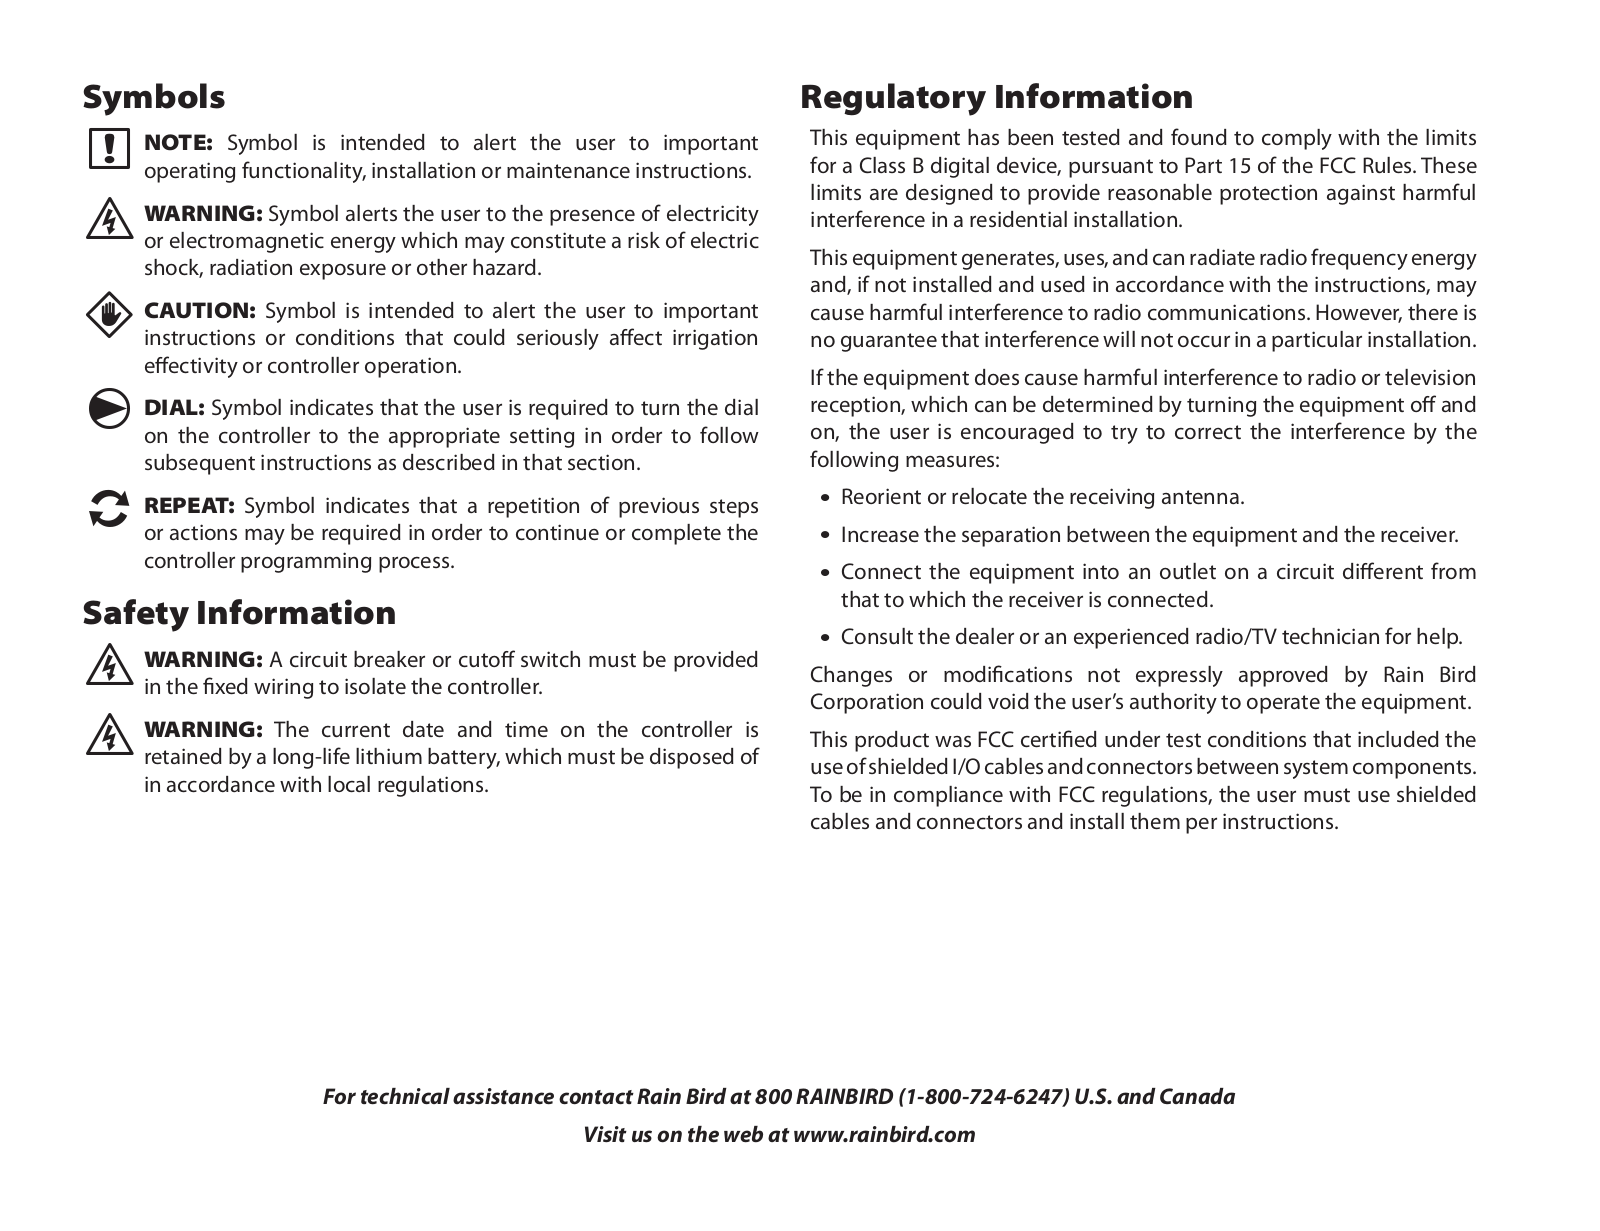
Symbols

bbNOTE: Symbol is intended to alert the user to important operating functionality, installation or maintenance instructions.

ccWARNING: Symbol alerts the user to the presence of electricity or electromagnetic energy which may constitute a risk of electric shock, radiation exposure or other hazard.

ddCAUTION: Symbol is intended to alert the user to important instructions or conditions that could seriously affect irrigation effectivity or controller operation.

ggDIAL: Symbol indicates that the user is required to turn the dial on the controller to the appropriate setting in order to follow subsequent instructions as described in that section.

eeREPEAT: Symbol indicates that a repetition of previous steps or actions may be required in order to continue or complete the controller programming process.

Safety Information

ccWARNING: A circuit breaker or cutoff switch must be provided in the fixed wiring to isolate the controller.

ccWARNING: The current date and time on the controller is retained by a long-life lithium battery, which must be disposed of in accordance with local regulations.

Regulatory Information

This equipment has been tested and found to comply with the limits for a Class B digital device, pursuant to Part 15 of the FCC Rules. These limits are designed to provide reasonable protection against harmful interference in a residential installation.

This equipment generates, uses, and can radiate radio frequency energy and, if not installed and used in accordance with the instructions, may cause harmful interference to radio communications. However, there is no guarantee that interference will not occur in a particular installation.

If the equipment does cause harmful interference to radio or television reception, which can be determined by turning the equipment off and on, the user is encouraged to try to correct the interference by the following measures:

llReorient or relocate the receiving antenna.

llIncrease the separation between the equipment and the receiver.

llConnect the equipment into an outlet on a circuit different from that to which the receiver is connected.

llConsult the dealer or an experienced radio/TV technician for help.

Changes or modifications not expressly approved by Rain Bird Corporation could void the user’s authority to operate the equipment.

This product was FCC certified under test conditions that included the use of shielded I/O cables and connectors between system components. To be in compliance with FCC regulations, the user must use shielded cables and connectors and install them per instructions.

For technical assistance contact Rain Bird at 800 RAINBIRD (1-800-724-6247) U.S. and Canada

Visit us on the web at www.rainbird.com

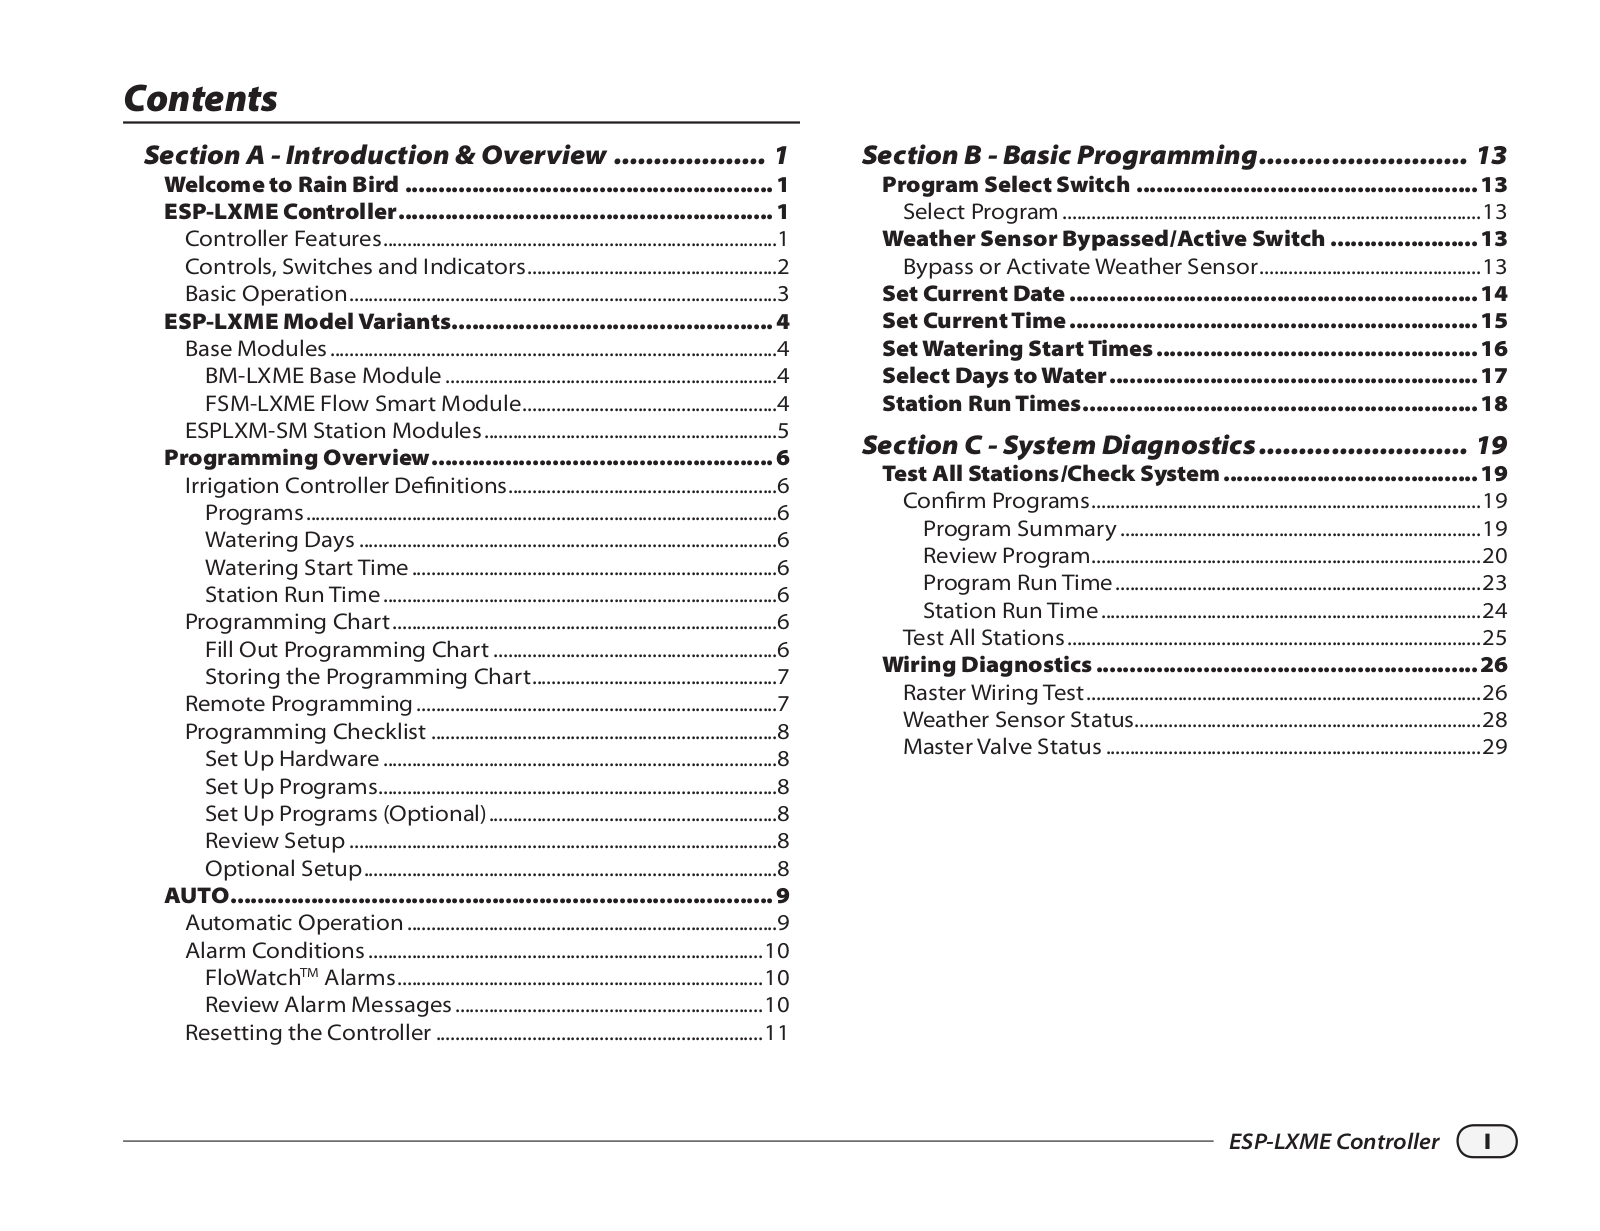
Contents


Section A - Introduction & Overview

.................... 1

Welcome to Rain Bird........................................................

1

ESP-LXME Controller........................................................

1

Controller Features..................................................................................

1

Controls, Switches and Indicators....................................................

2

Basic Operation.........................................................................................

3

ESP-LXME Model Variants................................................

4

Base Modules..............................................................................................

4

BM-LXME Base Module......................................................................

4

FSM-LXME Flow Smart Module.....................................................

4

ESPLXM-SM Station Modules..............................................................

5

Programming Overview...................................................

6

Irrigation Controller Definitions........................................................

6

Programs...................................................................................................

6

Watering Days........................................................................................

6

Watering Start Time.............................................................................

6

Station Run Time...................................................................................

6

Programming Chart.................................................................................

6

Fill Out Programming Chart............................................................

6

Storing the Programming Chart...................................................

7

Remote Programming............................................................................

7

Programming Checklist.........................................................................

8

Set Up Hardware...................................................................................

8

Set Up Programs...................................................................................

8

Set Up Programs (Optional)............................................................

8

Review Setup..........................................................................................

8

Optional Setup......................................................................................

8

AUTO.................................................................................

9

Automatic Operation..............................................................................

9

Alarm Conditions...................................................................................

10

FloWatchTM Alarms............................................................................

10

Review Alarm Messages.................................................................

10

Resetting the Controller.....................................................................

11

Section B - Basic Programming..........................

13

Program Select Switch....................................................

13

Select Program........................................................................................

13

Weather Sensor Bypassed/Active Switch.......................

13

Bypass or Activate Weather Sensor...............................................

13

Set Current Date..............................................................

14

Set Current Time..............................................................

15

Set Watering Start Times.................................................

16

Select Days to Water........................................................

17

Station Run Times...........................................................

18

Section C - System Diagnostics...........................

19

Test All Stations/Check System.......................................

19

Confirm Programs.................................................................................

19

Program Summary............................................................................

19

Review Program.................................................................................

20

Program Run Time.............................................................................

23

Station Run Time................................................................................

24

Test All Stations.......................................................................................

25

Wiring Diagnostics..........................................................

26

Raster Wiring Test...................................................................................

26

Weather Sensor Status........................................................................

28

Master Valve Status...............................................................................

29

ESP-LXME Controller

I


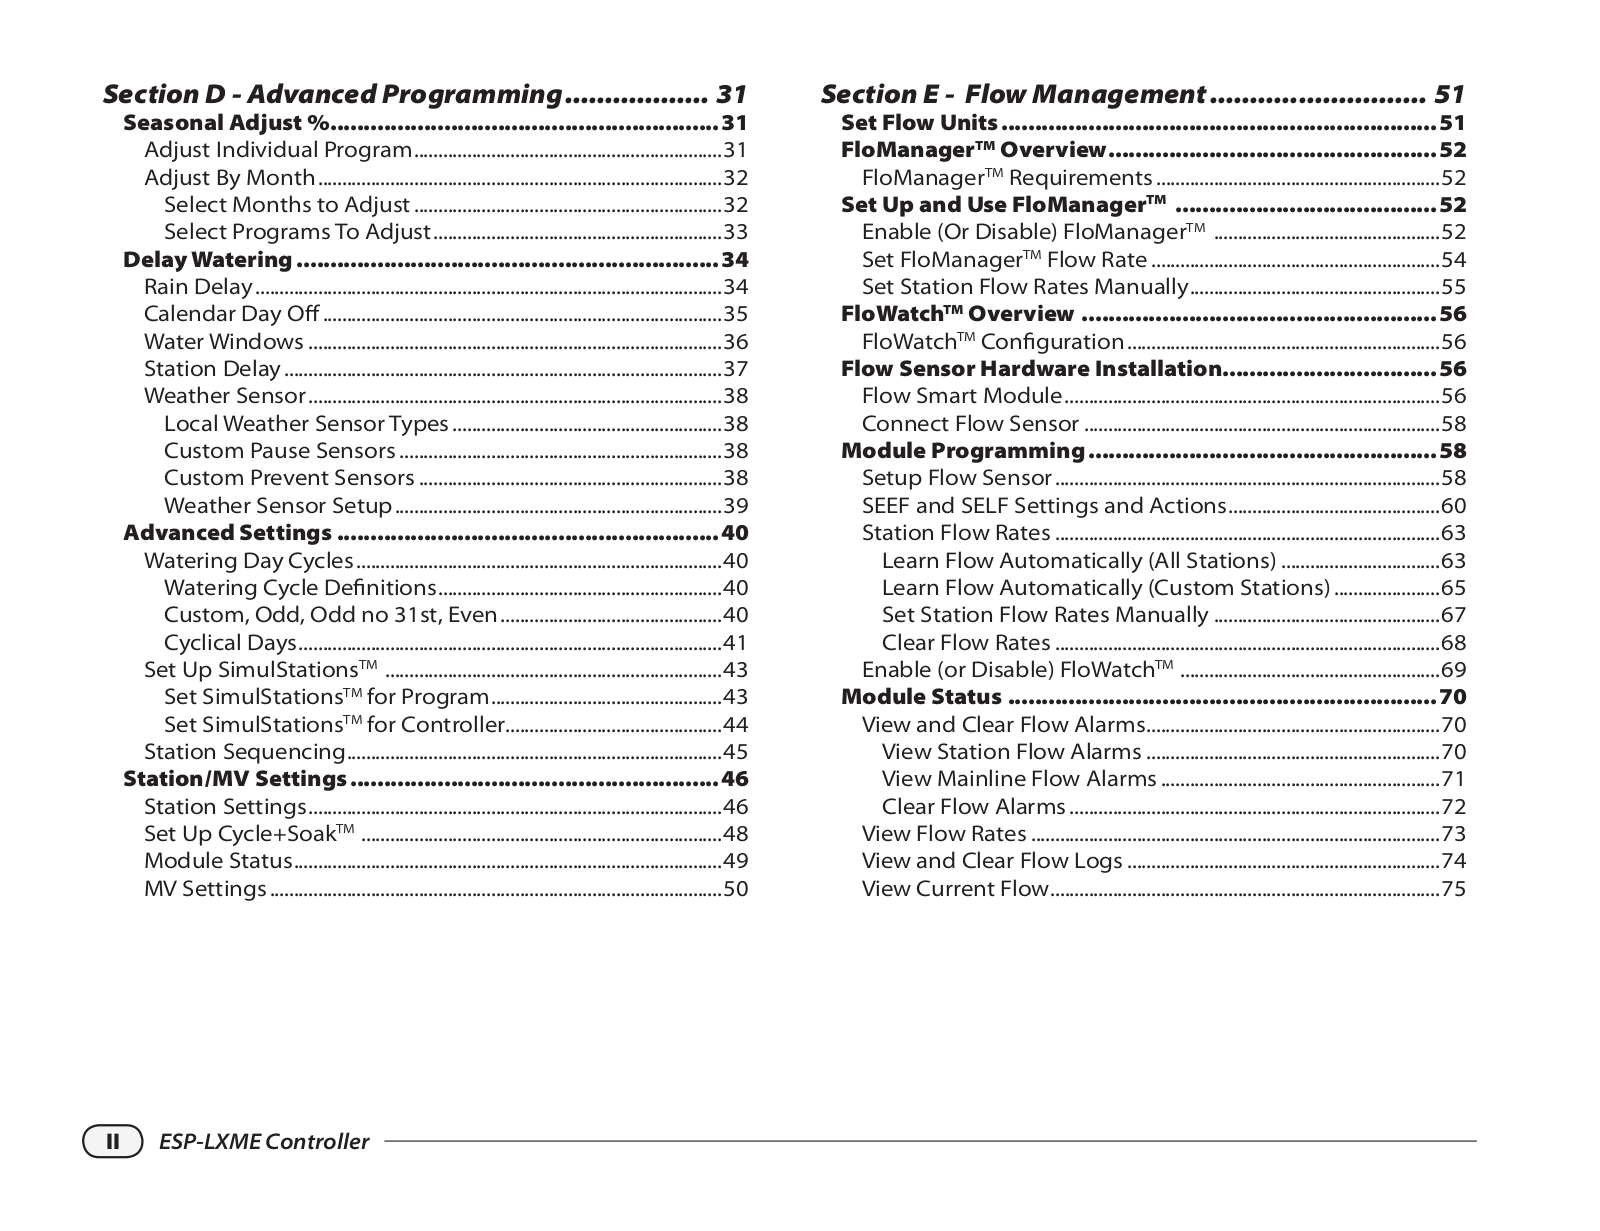
Section D - Advanced Programming..................

31

Seasonal Adjust %..........................................................

31

Adjust Individual Program................................................................

31

Adjust By Month.....................................................................................

32

Select Months to Adjust.................................................................

32

Select Programs To Adjust.............................................................

33

Delay Watering................................................................

34

Rain Delay..................................................................................................

34

Calendar Day Off....................................................................................

35

Water Windows.......................................................................................

36

Station Delay............................................................................................

37

Weather Sensor.......................................................................................

38

Local Weather Sensor Types.........................................................

38

Custom Pause Sensors....................................................................

38

Custom Prevent Sensors................................................................

38

Weather Sensor Setup.....................................................................

39

Advanced Settings..........................................................

40

Watering Day Cycles.............................................................................

40

Watering Cycle Definitions...........................................................

40

Custom, Odd, Odd no 31st, Even...............................................

40

Cyclical Days........................................................................................

41

Set Up SimulStationsTM .......................................................................

43

Set SimulStationsTM for Program................................................

43

Set SimulStationsTM for Controller.............................................

44

Station Sequencing..............................................................................

45

Station/MV Settings........................................................

46

Station Settings......................................................................................

46

Set Up Cycle+SoakTM ...........................................................................

48

Module Status.........................................................................................

49

MV Settings...............................................................................................

50

Section E - Flow Management............................

51

Set Flow Units..................................................................

51

FloManagerTM Overview.................................................

52

FloManagerTM Requirements............................................................

52

Set Up and Use FloManagerTM ........................................

52

Enable (Or Disable) FloManagerTM ................................................

52

Set FloManagerTM Flow Rate.............................................................

54

Set Station Flow Rates Manually....................................................

55

FloWatchTM Overview......................................................

56

FloWatchTM Configuration..................................................................

56

Flow Sensor Hardware Installation................................

56

Flow Smart Module...............................................................................

56

Connect Flow Sensor...........................................................................

58

Module Programming.....................................................

58

Setup Flow Sensor.................................................................................

58

SEEF and SELF Settings and Actions............................................

60

Station Flow Rates.................................................................................

63

Learn Flow Automatically (All Stations)..................................

63

Learn Flow Automatically (Custom Stations).......................

65

Set Station Flow Rates Manually................................................

67

Clear Flow Rates.................................................................................

68

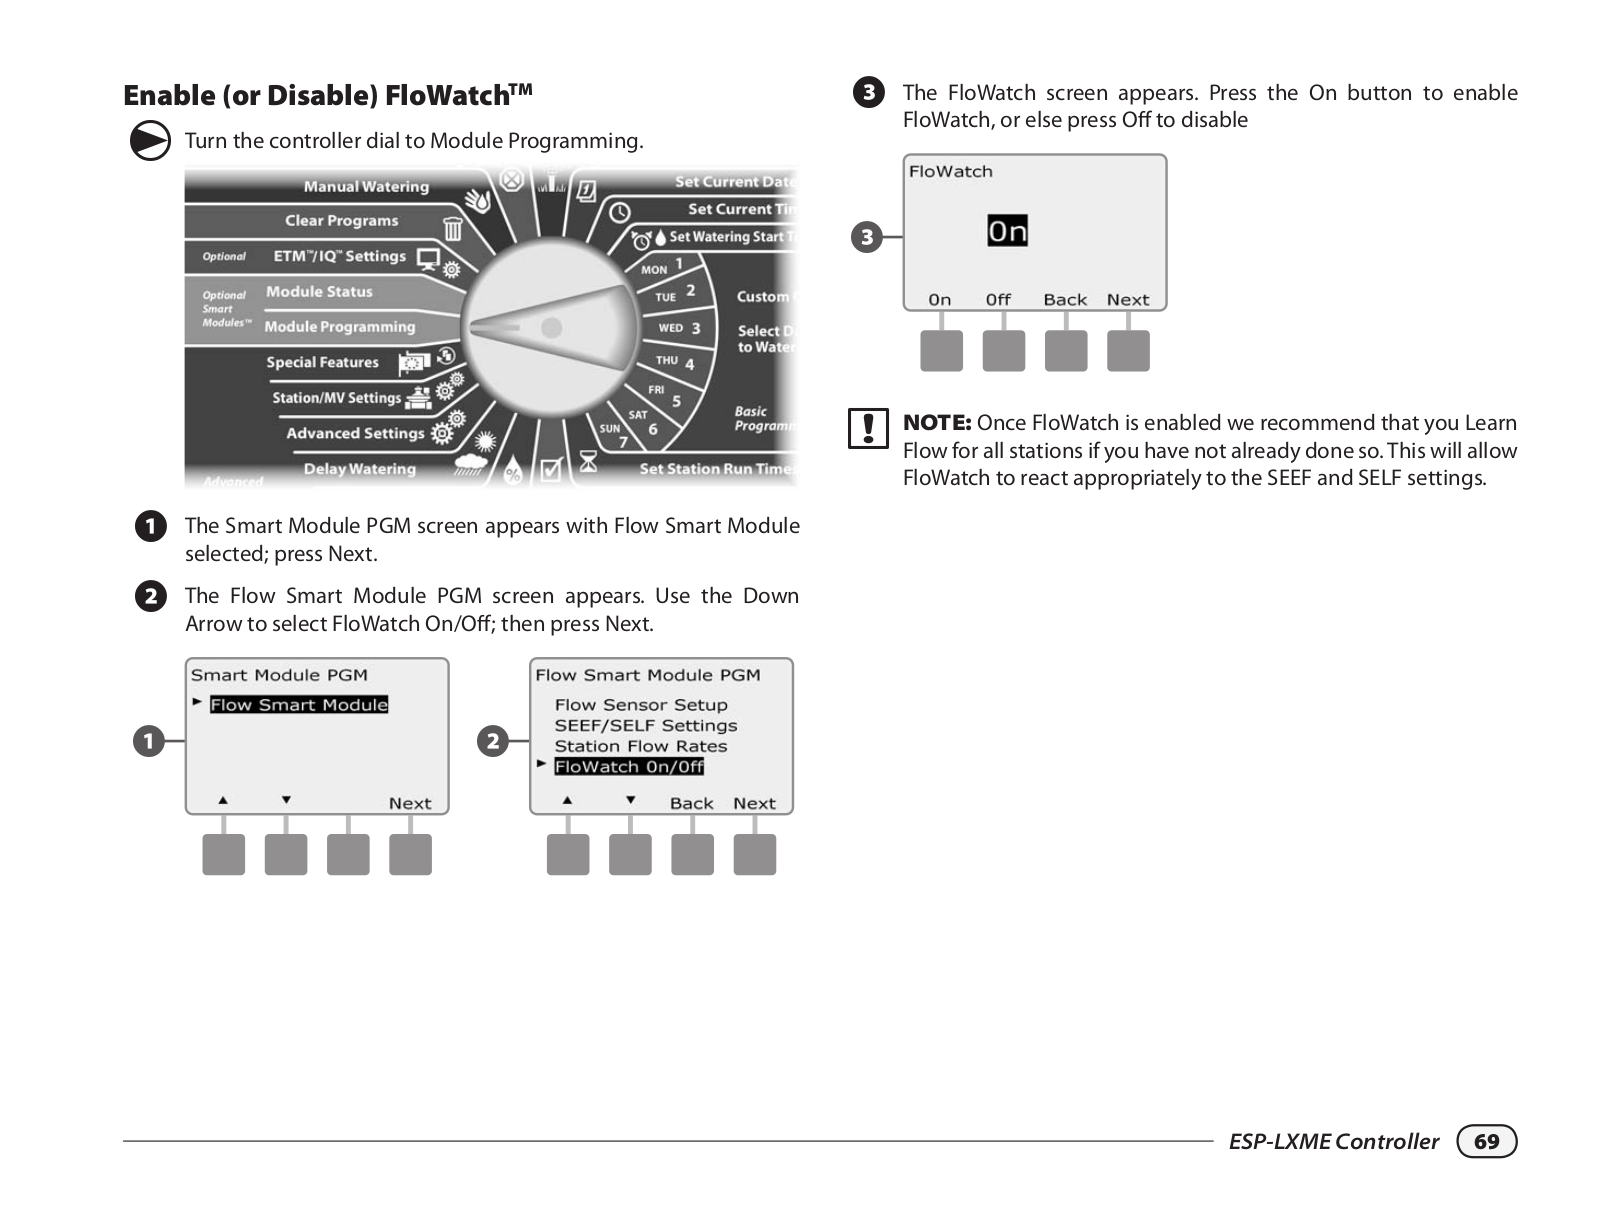
Enable (or Disable) FloWatchTM ......................................................

69

Module Status.................................................................

70

View and Clear Flow Alarms.............................................................

70

View Station Flow Alarms..............................................................

70

View Mainline Flow Alarms...........................................................

71

Clear Flow Alarms..............................................................................

72

View Flow Rates......................................................................................

73

View and Clear Flow Logs..................................................................

74

View Current Flow.................................................................................

75

II ESP-LXME Controller

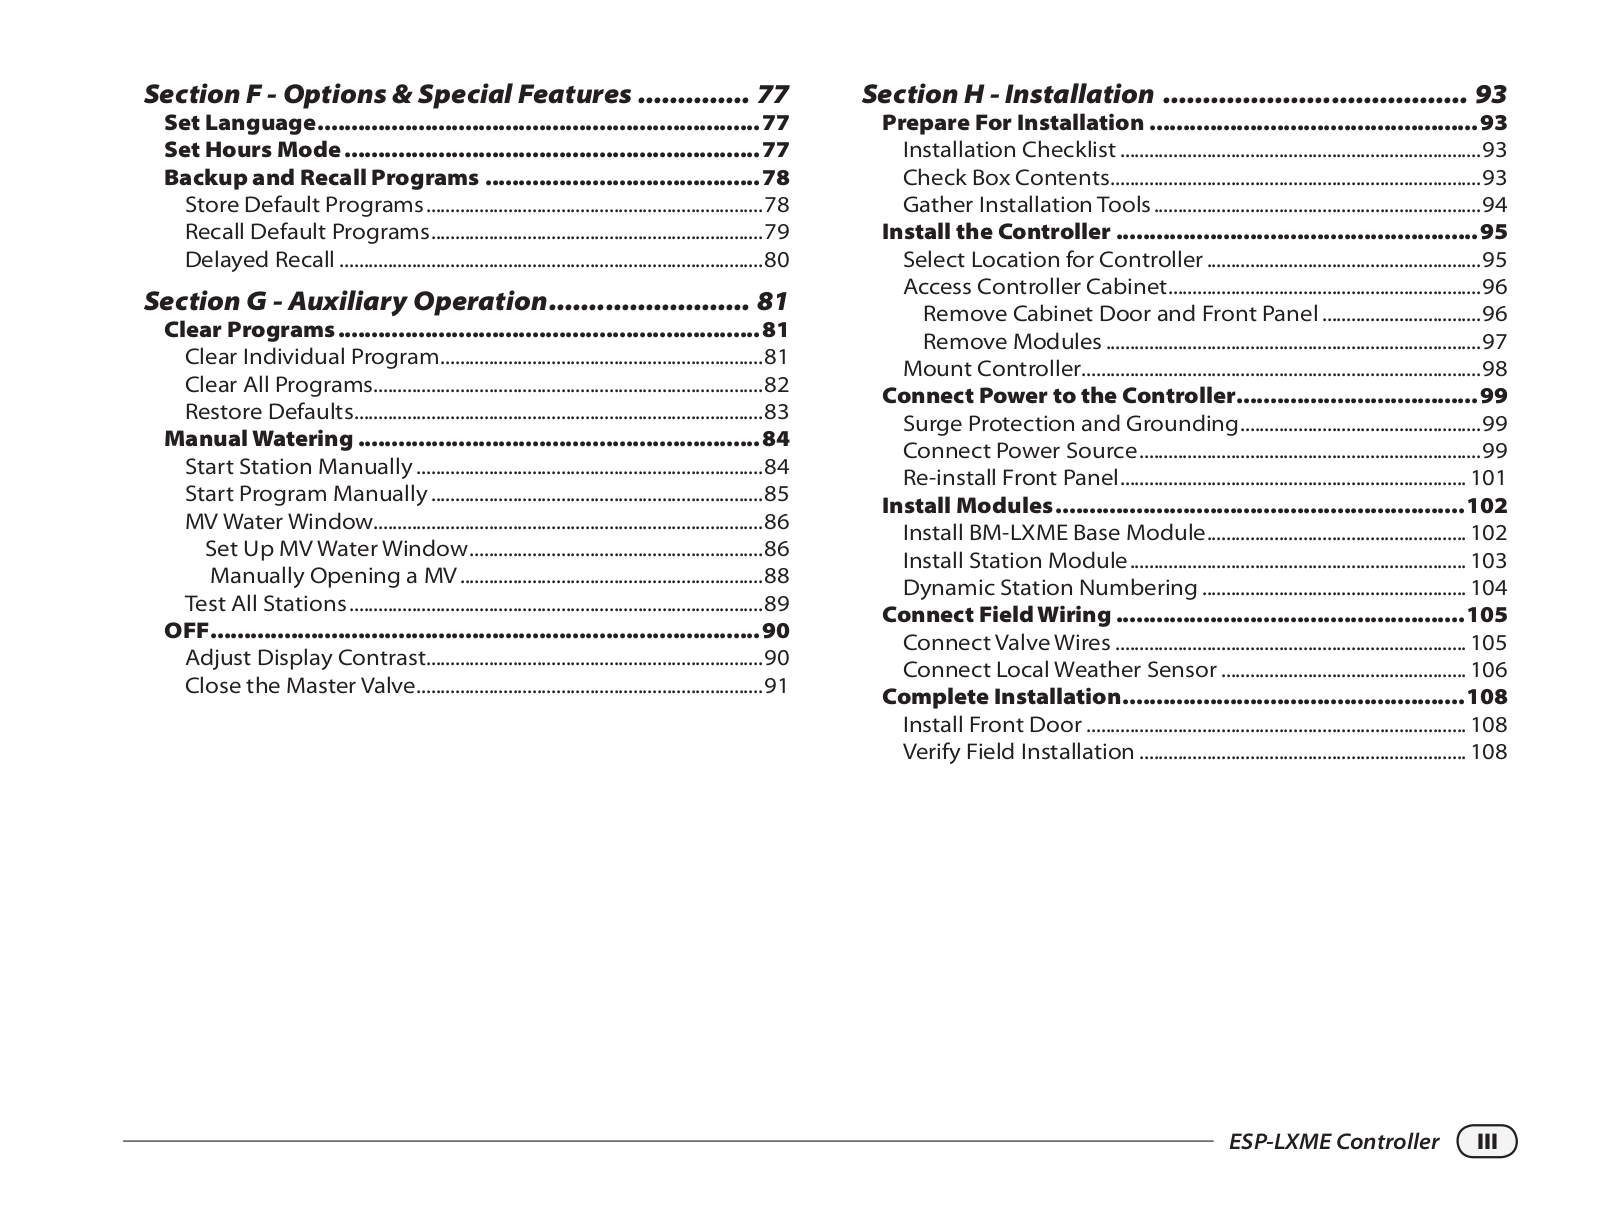
Section F - Options & Special Features...............

77

Set Language..................................................................

77

Set Hours Mode...............................................................

77

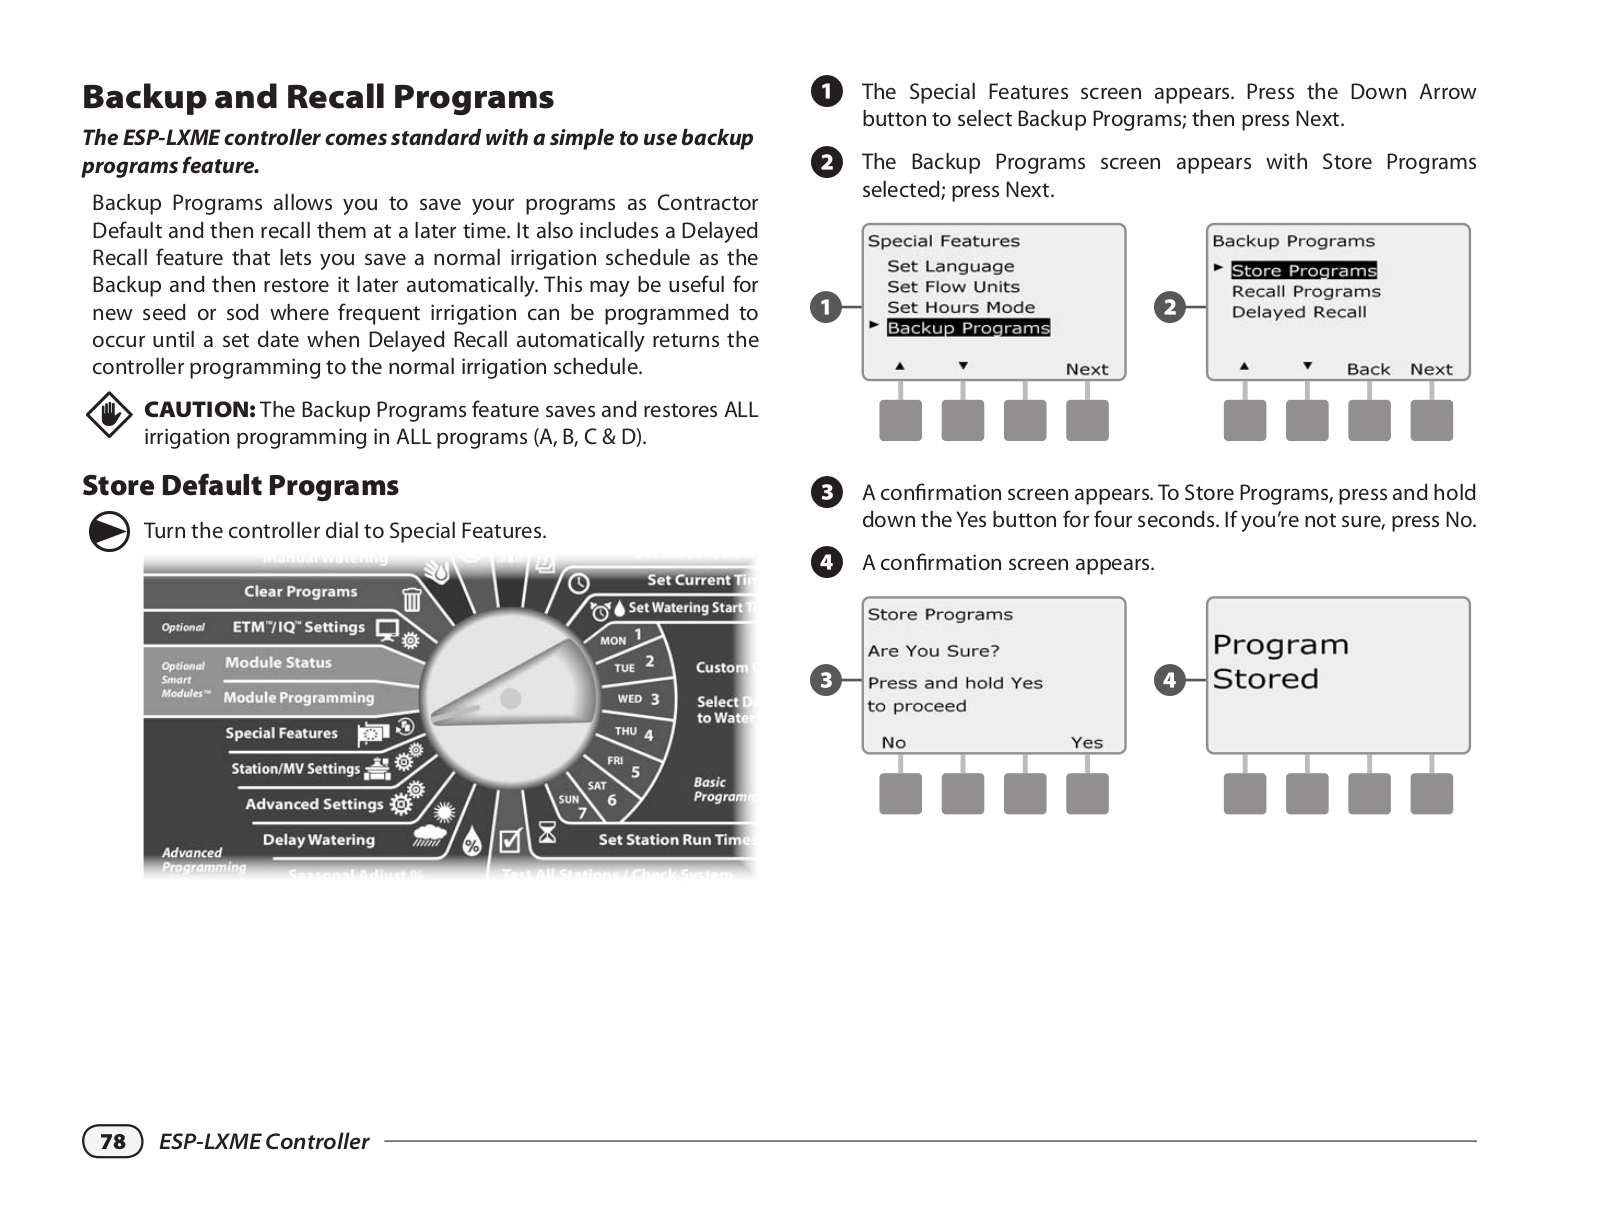
Backup and Recall Programs..........................................

78

Store Default Programs.......................................................................

78

Recall Default Programs.....................................................................

79

Delayed Recall.........................................................................................

80

Section G - Auxiliary Operation.........................

81

Clear Programs................................................................

81

Clear Individual Program...................................................................

81

Clear All Programs.................................................................................

82

Restore Defaults.....................................................................................

83

Manual Watering.............................................................

84

Start Station Manually.........................................................................

84

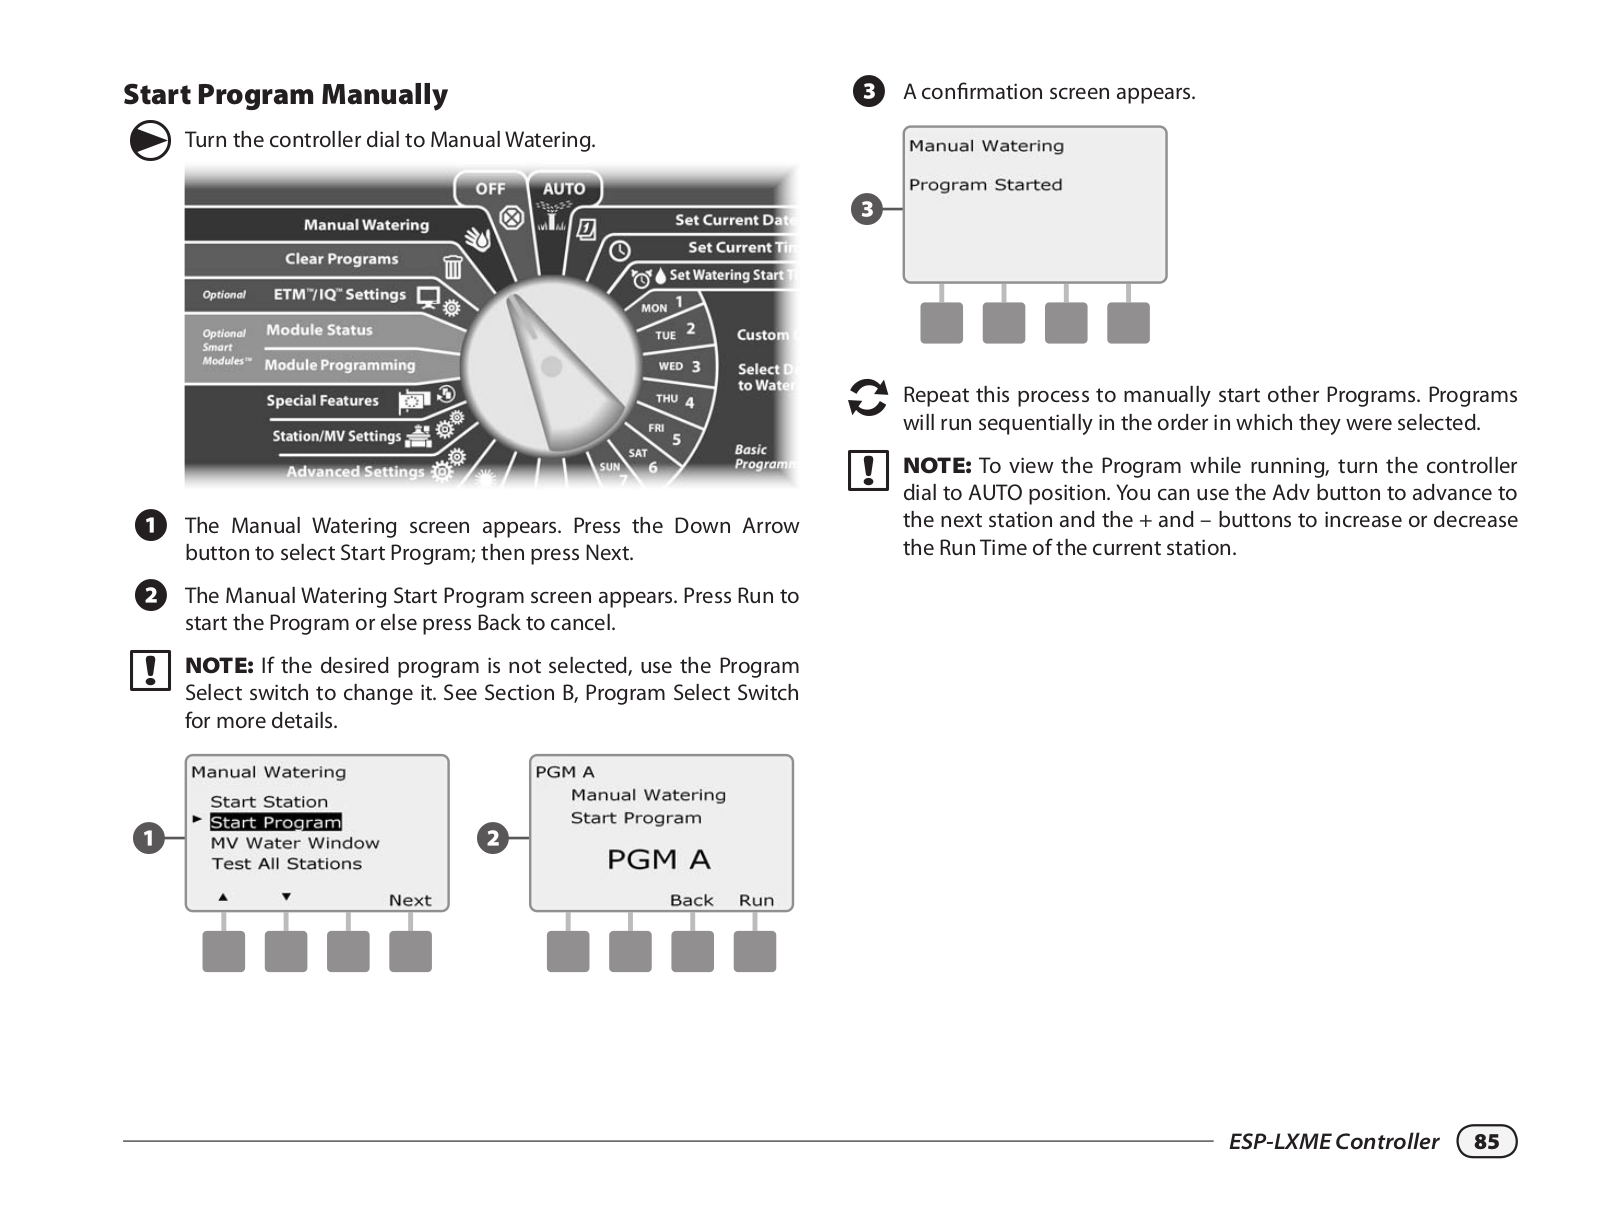
Start Program Manually......................................................................

85

MV Water Window.................................................................................

86

Set Up MV Water Window.............................................................

86

Manually Opening a MV................................................................

88

Test All Stations.......................................................................................

89

OFF..................................................................................

90

Adjust Display Contrast......................................................................

90

Close the Master Valve........................................................................

91

Section H - Installation.......................................

93

Prepare For Installation..................................................

93

Installation Checklist............................................................................

93

Check Box Contents.............................................................................

93

Gather Installation Tools.....................................................................

94

Install the Controller.......................................................

95

Select Location for Controller..........................................................

95

Access Controller Cabinet.................................................................

96

Remove Cabinet Door and Front Panel..................................

96

Remove Modules...............................................................................

97

Mount Controller...................................................................................

98

Connect Power to the Controller....................................

99

Surge Protection and Grounding..................................................

99

Connect Power Source........................................................................

99

Re-install Front Panel........................................................................

101

Install Modules..............................................................

102

Install BM-LXME Base Module......................................................

102

Install Station Module.......................................................................

103

Dynamic Station Numbering........................................................

104

Connect Field Wiring.....................................................

105

Connect Valve Wires..........................................................................

105

Connect Local Weather Sensor....................................................

106

Complete Installation...................................................

108

Install Front Door................................................................................

108

Verify Field Installation.....................................................................

108

ESP-LXME Controller III

this page intentionally left blank

Section A - Introduction & Overview

Welcome to Rain Bird

Thank you for purchasing your new state-of-the-art Rain Bird ESPLXME controller.

For over seven decades Rain Bird has led the irrigation industry in meeting water management needs by providing the highest quality products and services available.

ESP-LXME Controller

Your new Rain Bird controller is designed to provide years of highly manageable irrigation control.

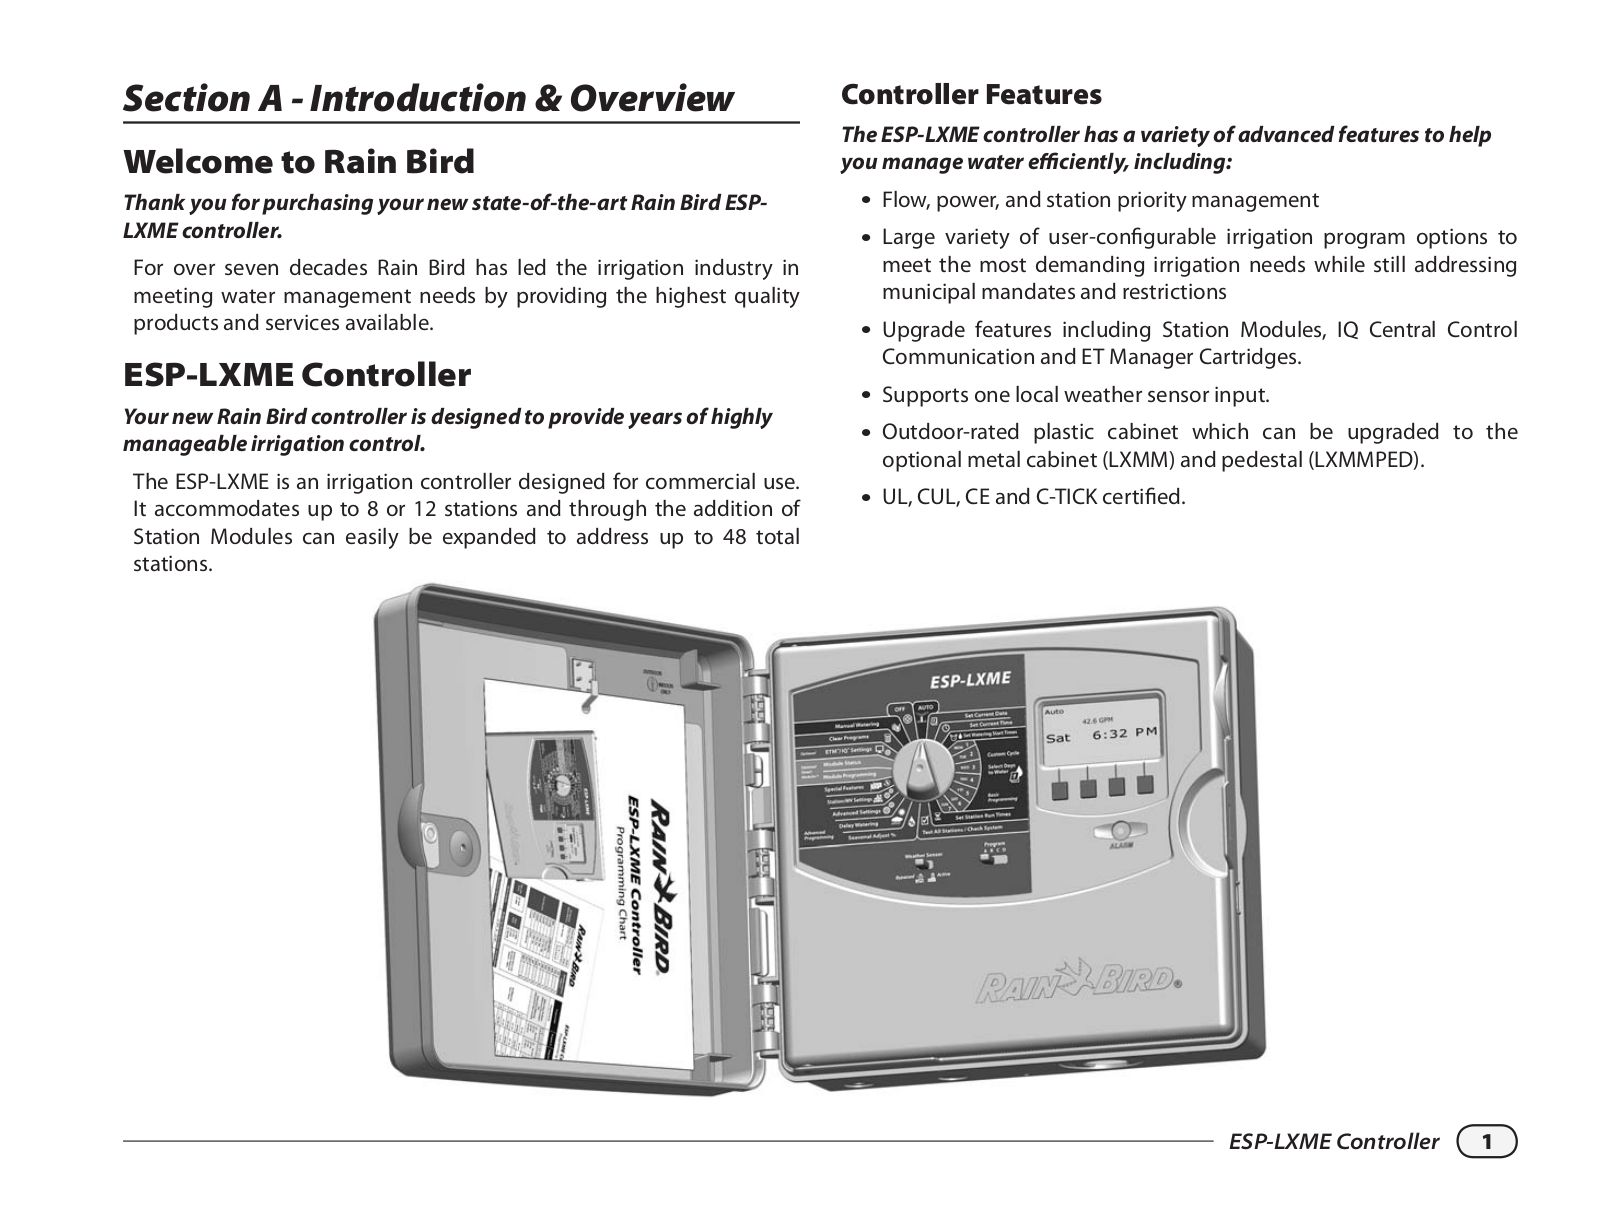
The ESP-LXME is an irrigation controller designed for commercial use. It accommodates up to 8 or 12 stations and through the addition of Station Modules can easily be expanded to address up to 48 total stations.

Controller Features

The ESP-LXME controller has a variety of advanced features to help you manage water efficiently, including:

llFlow, power, and station priority management

llLarge variety of user-configurable irrigation program options to meet the most demanding irrigation needs while still addressing municipal mandates and restrictions

llUpgrade features including Station Modules, IQ Central Control Communication and ET Manager Cartridges.

llSupports one local weather sensor input.

llOutdoor-rated plastic cabinet which can be upgraded to the optional metal cabinet (LXMM) and pedestal (LXMMPED).

llUL, CUL, CE and C-TICK certified.

ESP-LXME Controller 1

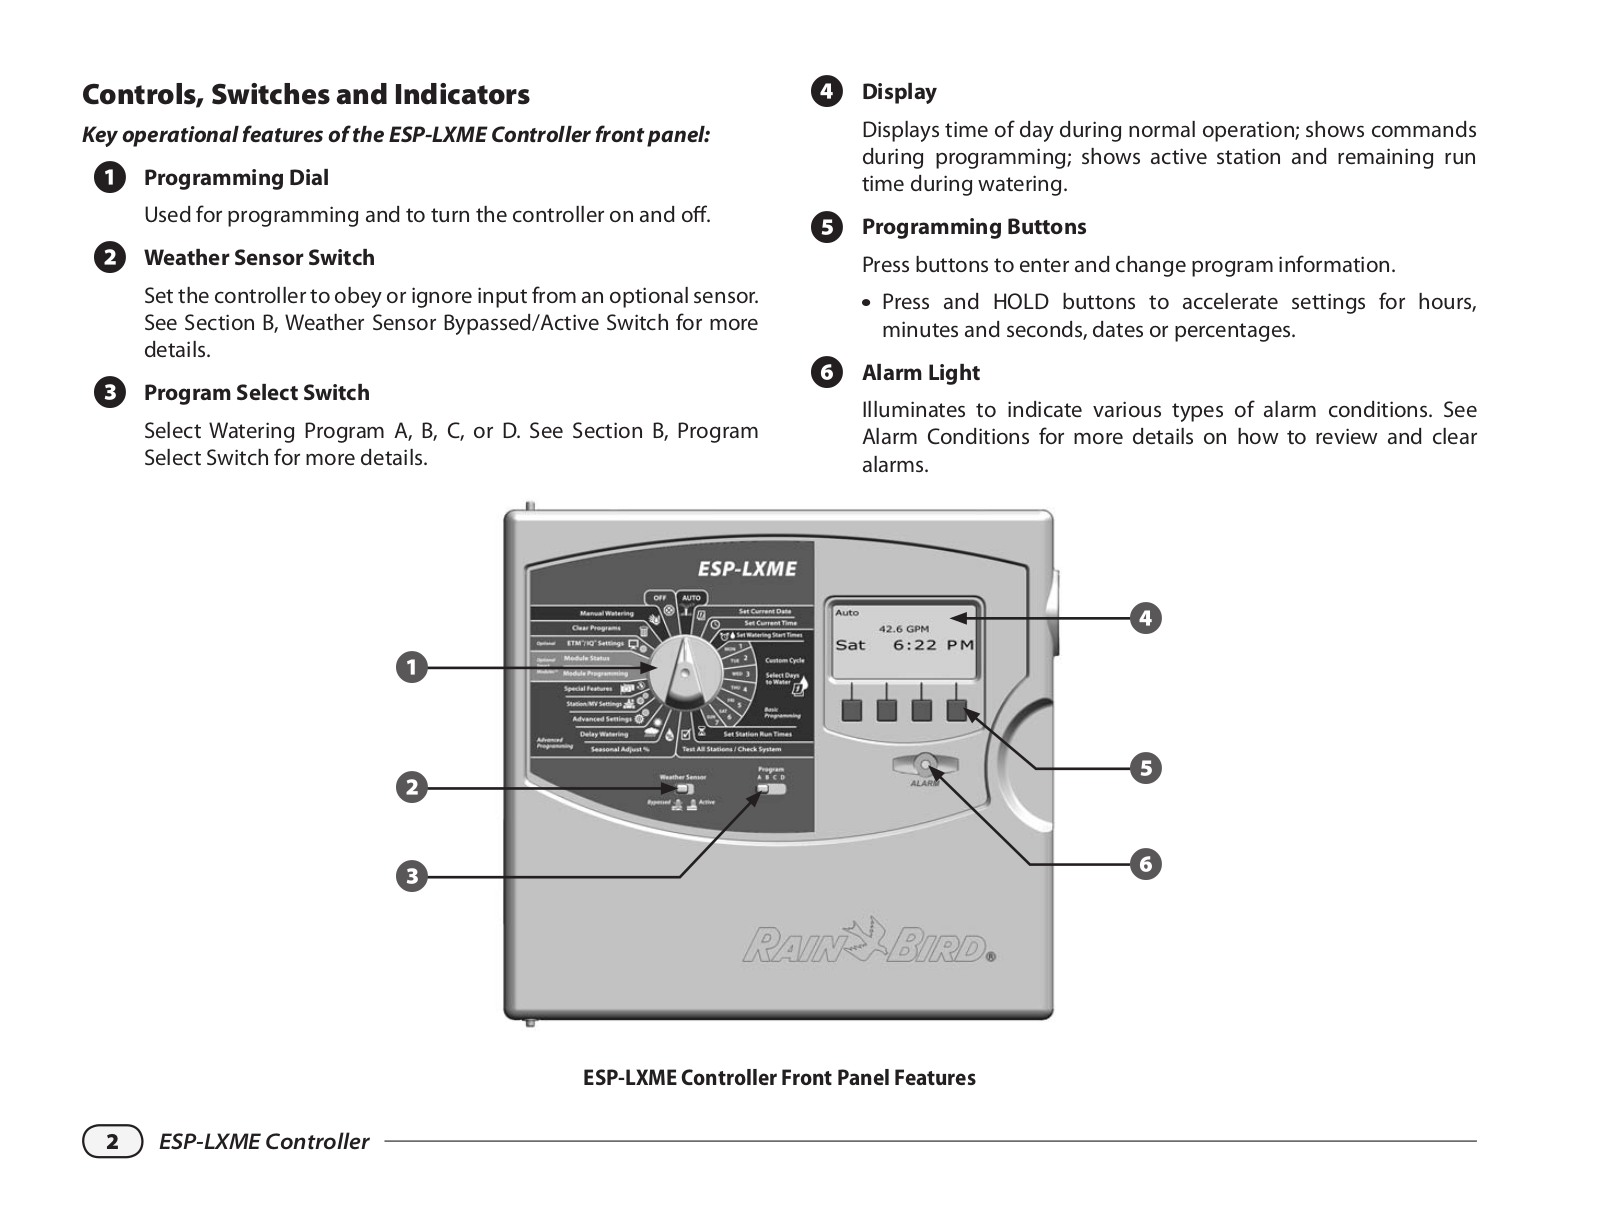
Controls, Switches and Indicators

Key operational features of the ESP-LXME Controller front panel:

AProgramming Dial

Used for programming and to turn the controller on and off.

BWeather Sensor Switch

Set the controller to obey or ignore input from an optional sensor. See Section B, Weather Sensor Bypassed/Active Switch for more details.

CProgram Select Switch

Select Watering Program A, B, C, or D. See Section B, Program Select Switch for more details.

1

2

3

DDisplay

Displays time of day during normal operation; shows commands during programming; shows active station and remaining run time during watering.

EProgramming Buttons

Press buttons to enter and change program information.

llPress and HOLD buttons to accelerate settings for hours, minutes and seconds, dates or percentages.

FAlarm Light

Illuminates to indicate various types of alarm conditions. See Alarm Conditions for more details on how to review and clear alarms.

4

5

6

ESP-LXME Controller Front Panel Features

2 ESP-LXME Controller

Basic Operation

Valves (or stations) operate at times as specified by irrigation programs.

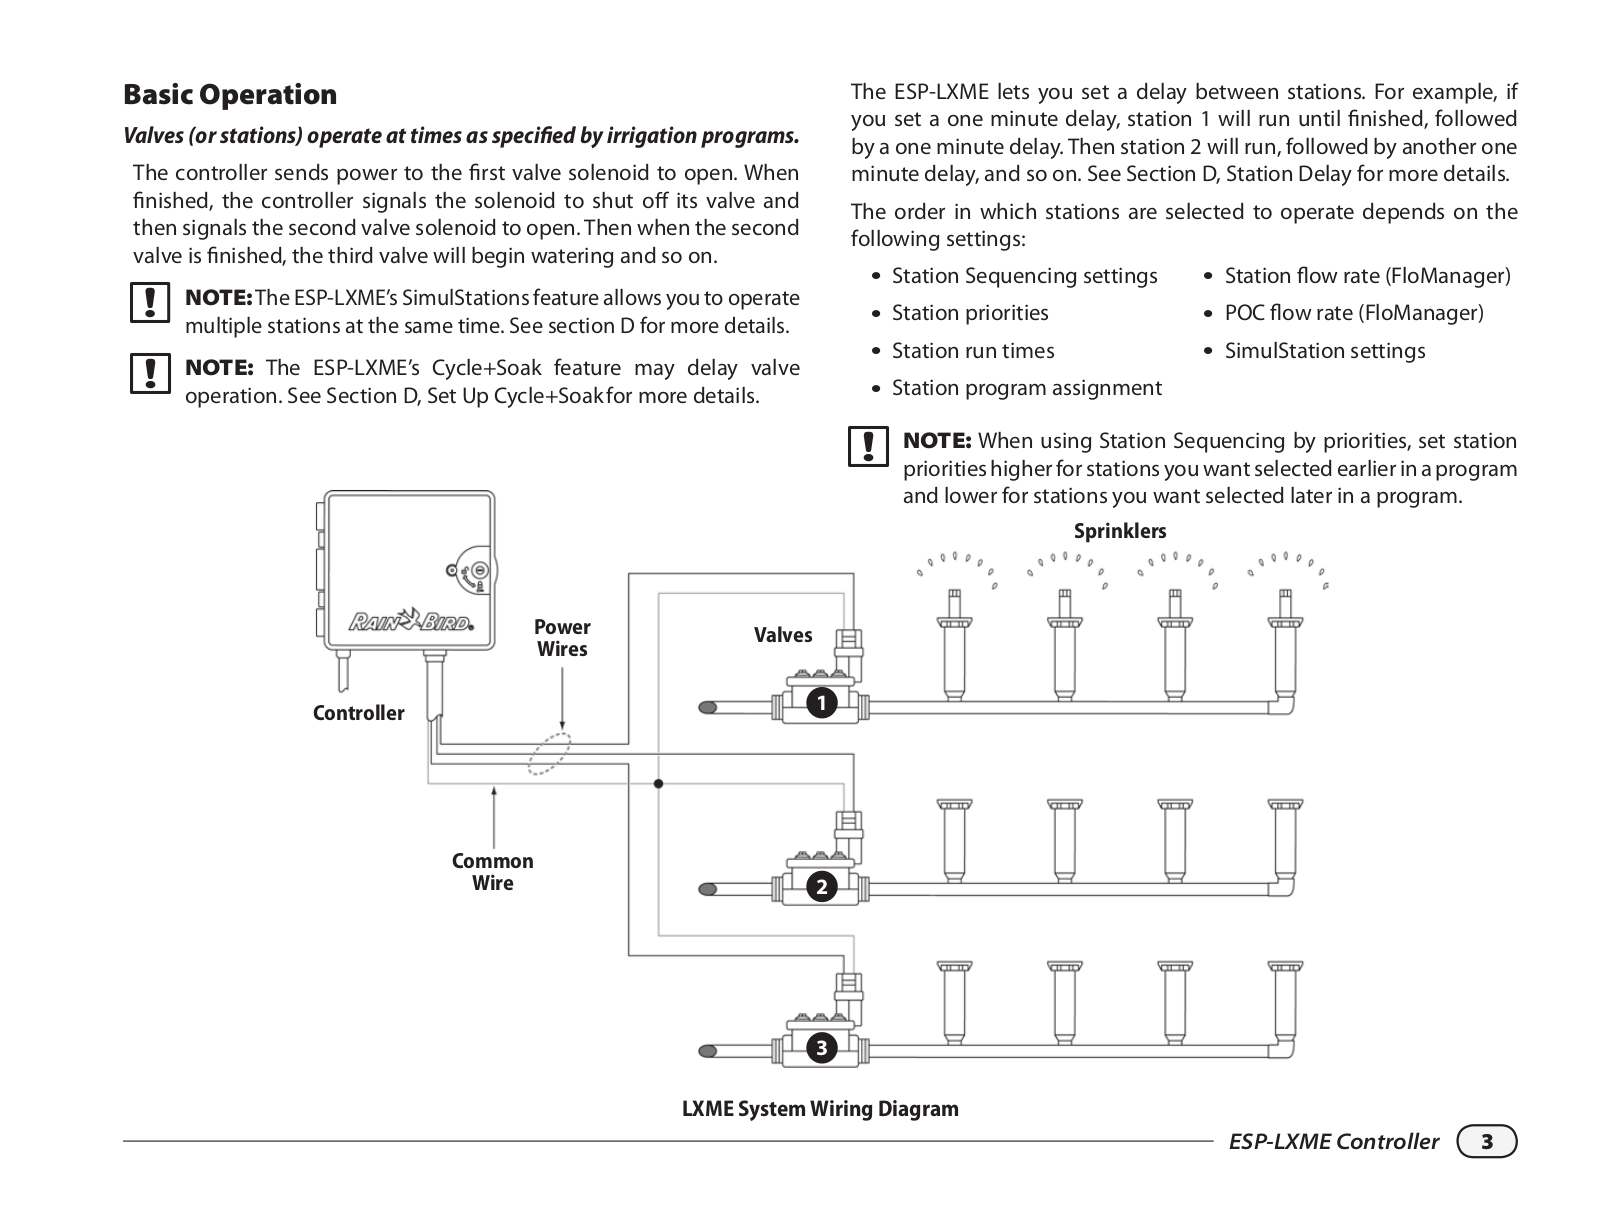
The controller sends power to the first valve solenoid to open. When finished, the controller signals the solenoid to shut off its valve and then signals the second valve solenoid to open. Then when the second valve is finished, the third valve will begin watering and so on.

bbNOTE:The ESP-LXME’s SimulStations feature allows you to operate multiple stations at the same time. See section D for more details.

bbNOTE: The ESP-LXME’s Cycle+Soak feature may delay valve operation. See Section D, Set Up Cycle+Soak for more details.


Power

Valves


Wires


Controller


1


Common


Wire

2

3

The ESP-LXME lets you set a delay between stations. For example, if you set a one minute delay, station 1 will run until finished, followed by a one minute delay. Then station 2 will run, followed by another one minute delay, and so on. See Section D, Station Delay for more details.

The order in which stations are selected to operate depends on the following settings:

llStation Sequencing settings

llStation flow rate (FloManager)

llStation priorities

llPOC flow rate (FloManager)

llStation run times

llSimulStation settings

llStation program assignment


bbNOTE: When using Station Sequencing by priorities, set station priorities higher for stations you want selected earlier in a program and lower for stations you want selected later in a program.

Sprinklers

LXME System Wiring Diagram

ESP-LXME Controller 3

ESP-LXME Model Variants

Rain Bird offers different variants of the ESP-LXME controller, depending on your irrigation requirements.

Available options include:

Model

Modules Included

ESP8LXME

BM-LXME Base Module

ESP-LXM-SM8 Station Module


ESP12LXME

BM-LXME Base Module

ESP-LXM-SM12 Station Module


ESP8LXMEF

FSM-LXME Flow Smart Module

ESP-LXM-SM8 Station Module


ESP12LXMEF

FSM-LXME Flow Smart Module

ESP-LXM-SM12 Station Module


Base Modules

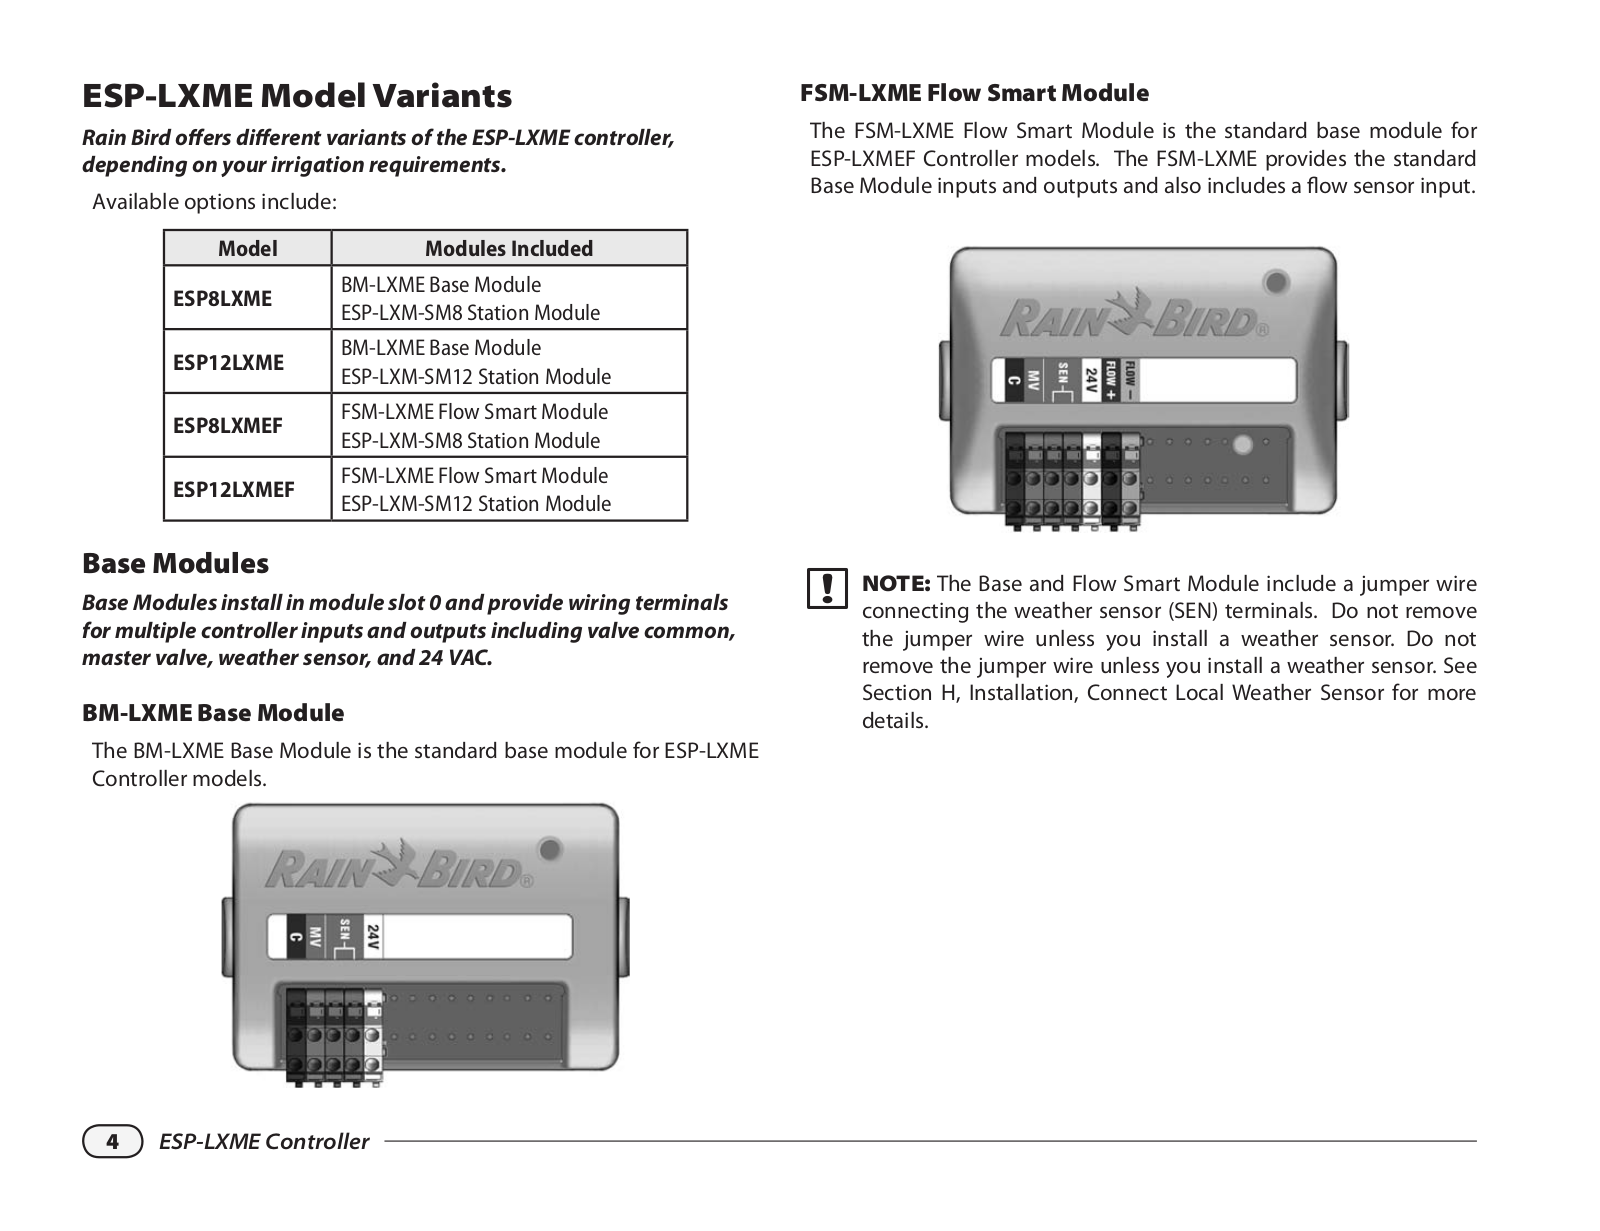
Base Modules install in module slot 0 and provide wiring terminals for multiple controller inputs and outputs including valve common, master valve, weather sensor, and 24 VAC.

BM-LXME Base Module

The BM-LXME Base Module is the standard base module for ESP-LXME Controller models.

FSM-LXME Flow Smart Module

The FSM-LXME Flow Smart Module is the standard base module for ESP-LXMEF Controller models. The FSM-LXME provides the standard Base Module inputs and outputs and also includes a flow sensor input.

bbNOTE: The Base and Flow Smart Module include a jumper wire connecting the weather sensor (SEN) terminals. Do not remove the jumper wire unless you install a weather sensor. Do not remove the jumper wire unless you install a weather sensor. See Section H, Installation, Connect Local Weather Sensor for more details.

4 ESP-LXME Controller

ESPLXM-SM Station Modules

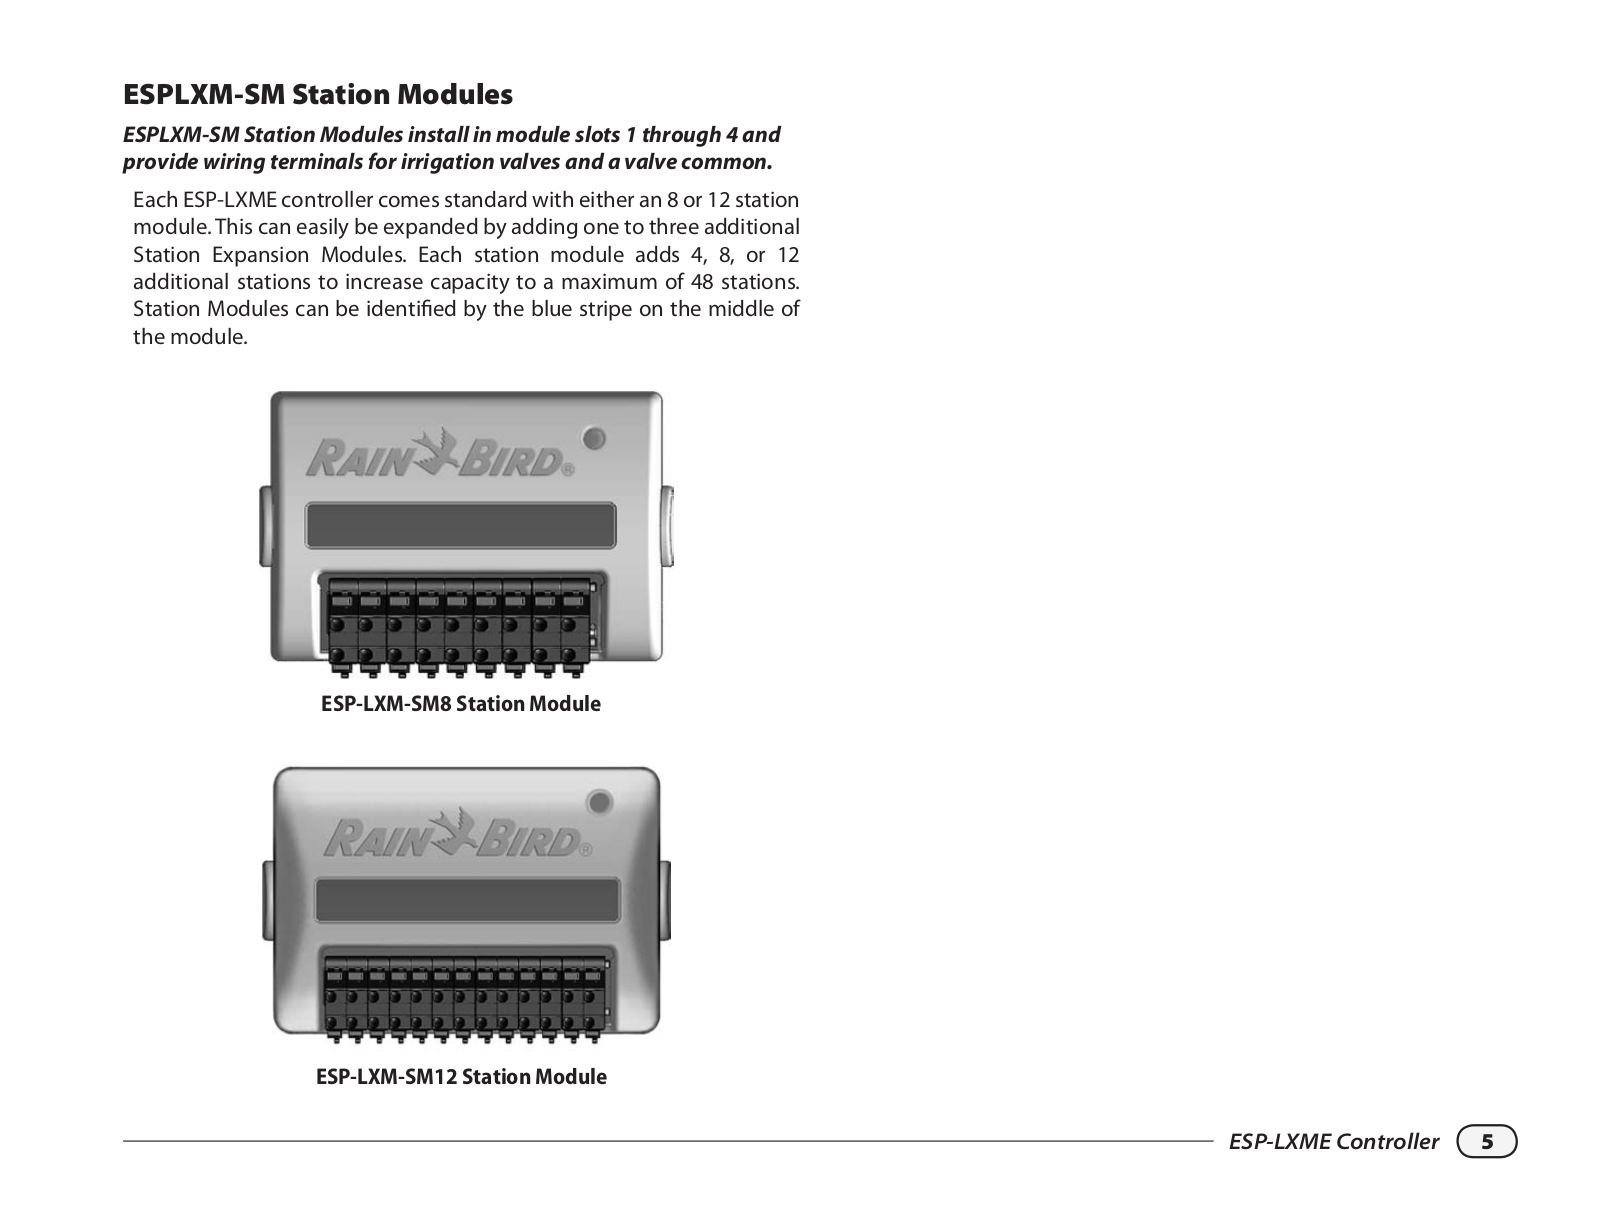
ESPLXM-SM Station Modules install in module slots 1 through 4 and provide wiring terminals for irrigation valves and a valve common.

Each ESP-LXME controller comes standard with either an 8 or 12 station module. This can easily be expanded by adding one to three additional Station Expansion Modules. Each station module adds 4, 8, or 12 additional stations to increase capacity to a maximum of 48 stations. Station Modules can be identified by the blue stripe on the middle of the module.

ESP-LXM-SM8 Station Module

ESP-LXM-SM12 Station Module

ESP-LXME Controller 5

Programming Overview

Irrigation Controller Definitions

Programs

The process of telling the controller exactly when and for how long you want to water. The controller opens and closes the remote control valves according to a program you set.

Each program contains:

Watering Days

The days of the week or calendar dates on which irrigation is allowed. For example, specific days such as Monday, Wednesday and Friday could be designated as your “watering days”. Alternatively, the Cyclical watering cycle can be used to water at a regular interval, such as every third day.

Watering Start Time

The time(s) of day that irrigation begins; this is the time that the first station in the program begins watering; all other stations in the program then follow in sequence.

bbNOTE: The term “start time” refers to the time that a program starts, not to the time that each individual station begins to run.

Station Run Time

The length of time (in hours and minutes) that each individual station is programmed to run.

Programming Chart

Before you begin programming, fill out the Programming Chart. See the Programming Chart instructions for more details.

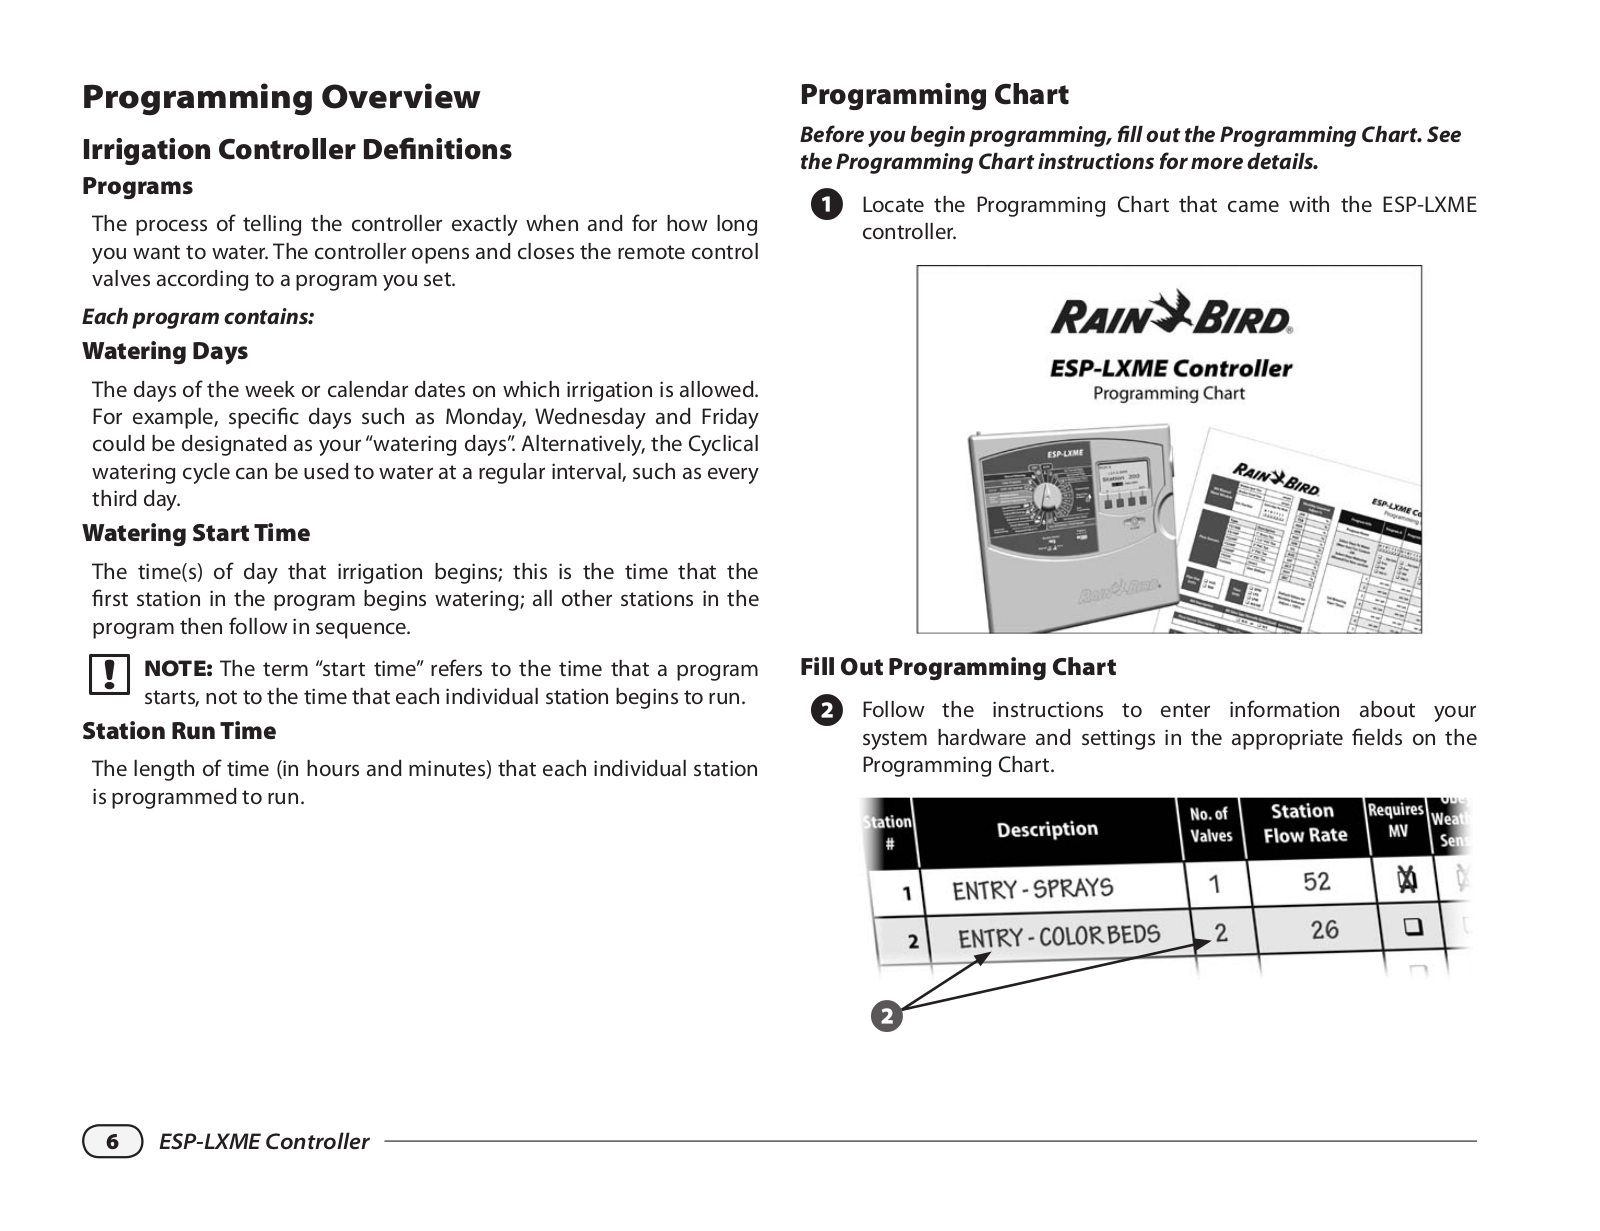
ALocate the Programming Chart that came with the ESP-LXME controller.

Fill Out Programming Chart

BFollow the instructions to enter information about your system hardware and settings in the appropriate fields on the Programming Chart.

2

6 ESP-LXME Controller

Storing the Programming Chart

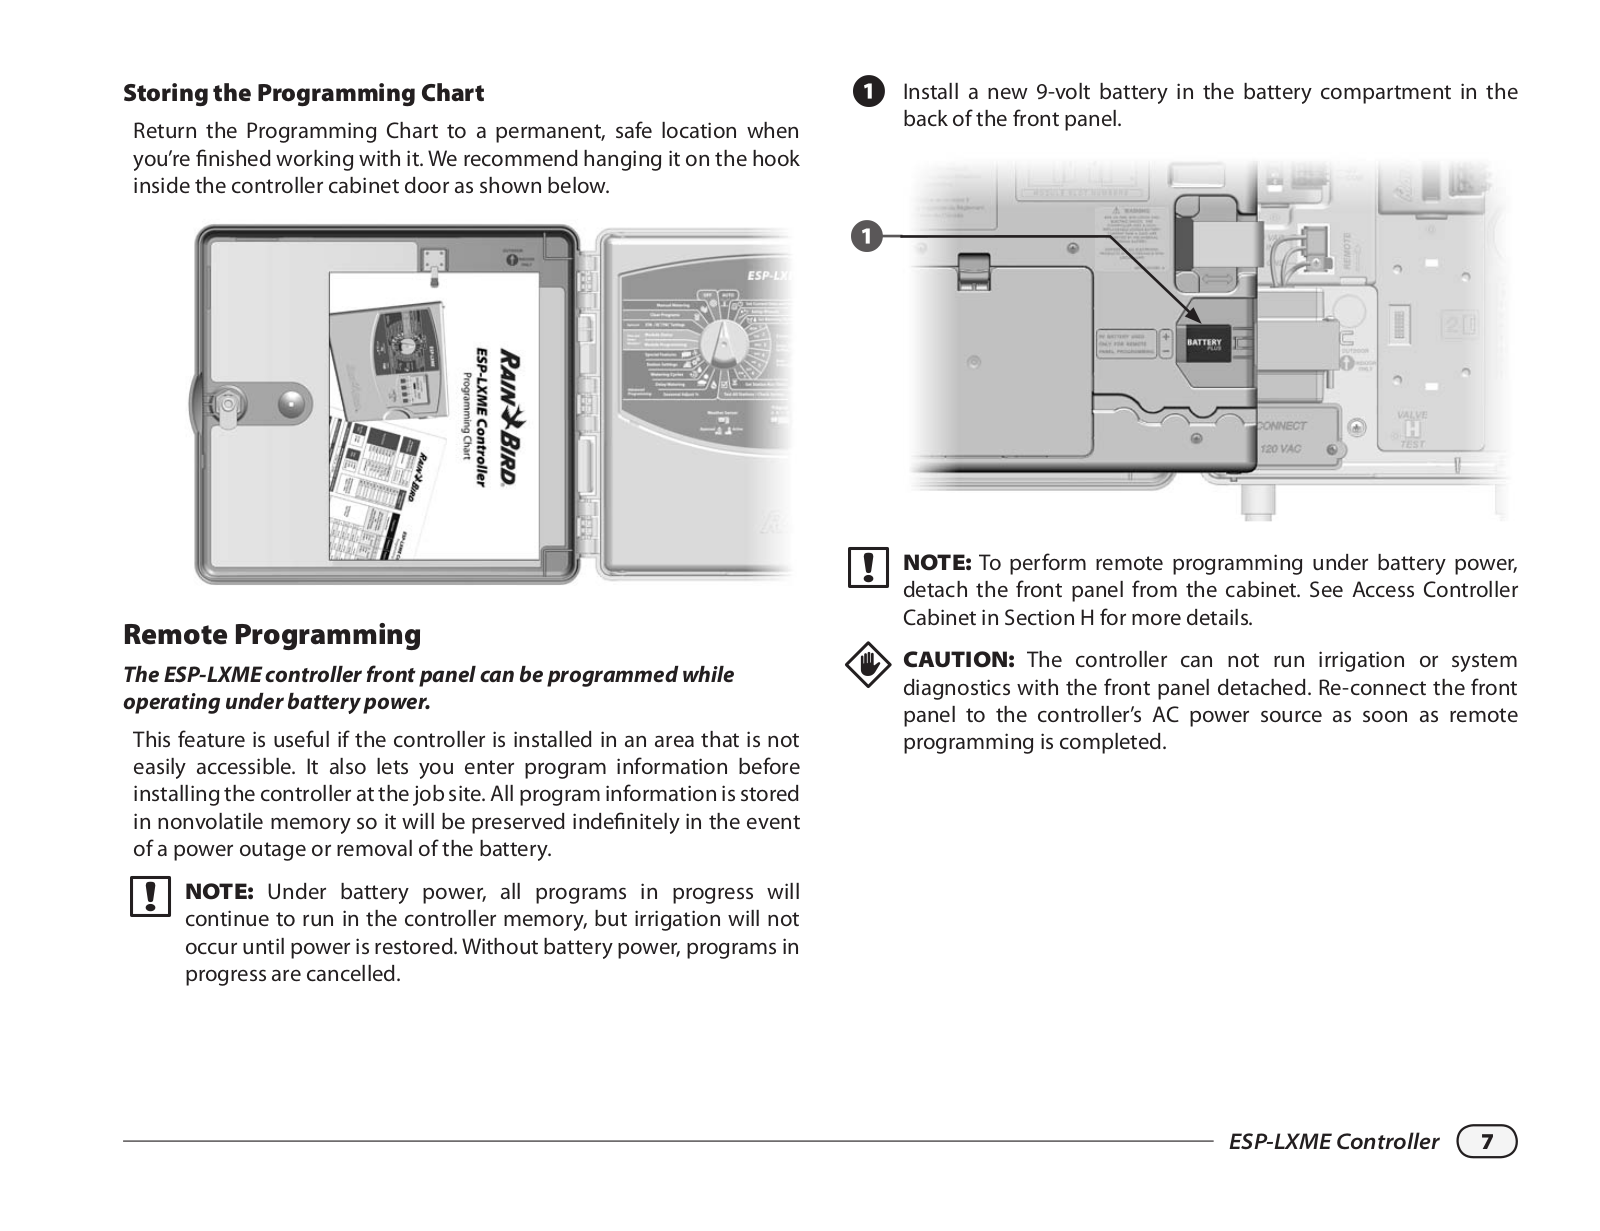
Return the Programming Chart to a permanent, safe location when you’re finished working with it. We recommend hanging it on the hook inside the controller cabinet door as shown below.

Remote Programming

The ESP-LXME controller front panel can be programmed while operating under battery power.

This feature is useful if the controller is installed in an area that is not easily accessible. It also lets you enter program information before installing the controller at the job site. All program information is stored in nonvolatile memory so it will be preserved indefinitely in the event of a power outage or removal of the battery.

bbNOTE: Under battery power, all programs in progress will continue to run in the controller memory, but irrigation will not occur until power is restored. Without battery power, programs in progress are cancelled.

AInstall a new 9-volt battery in the battery compartment in the back of the front panel.

1

bbNOTE: To perform remote programming under battery power, detach the front panel from the cabinet. See Access Controller Cabinet in Section H for more details.

ddCAUTION: The controller can not run irrigation or system diagnostics with the front panel detached. Re-connect the front panel to the controller’s AC power source as soon as remote programming is completed.

ESP-LXME Controller 7

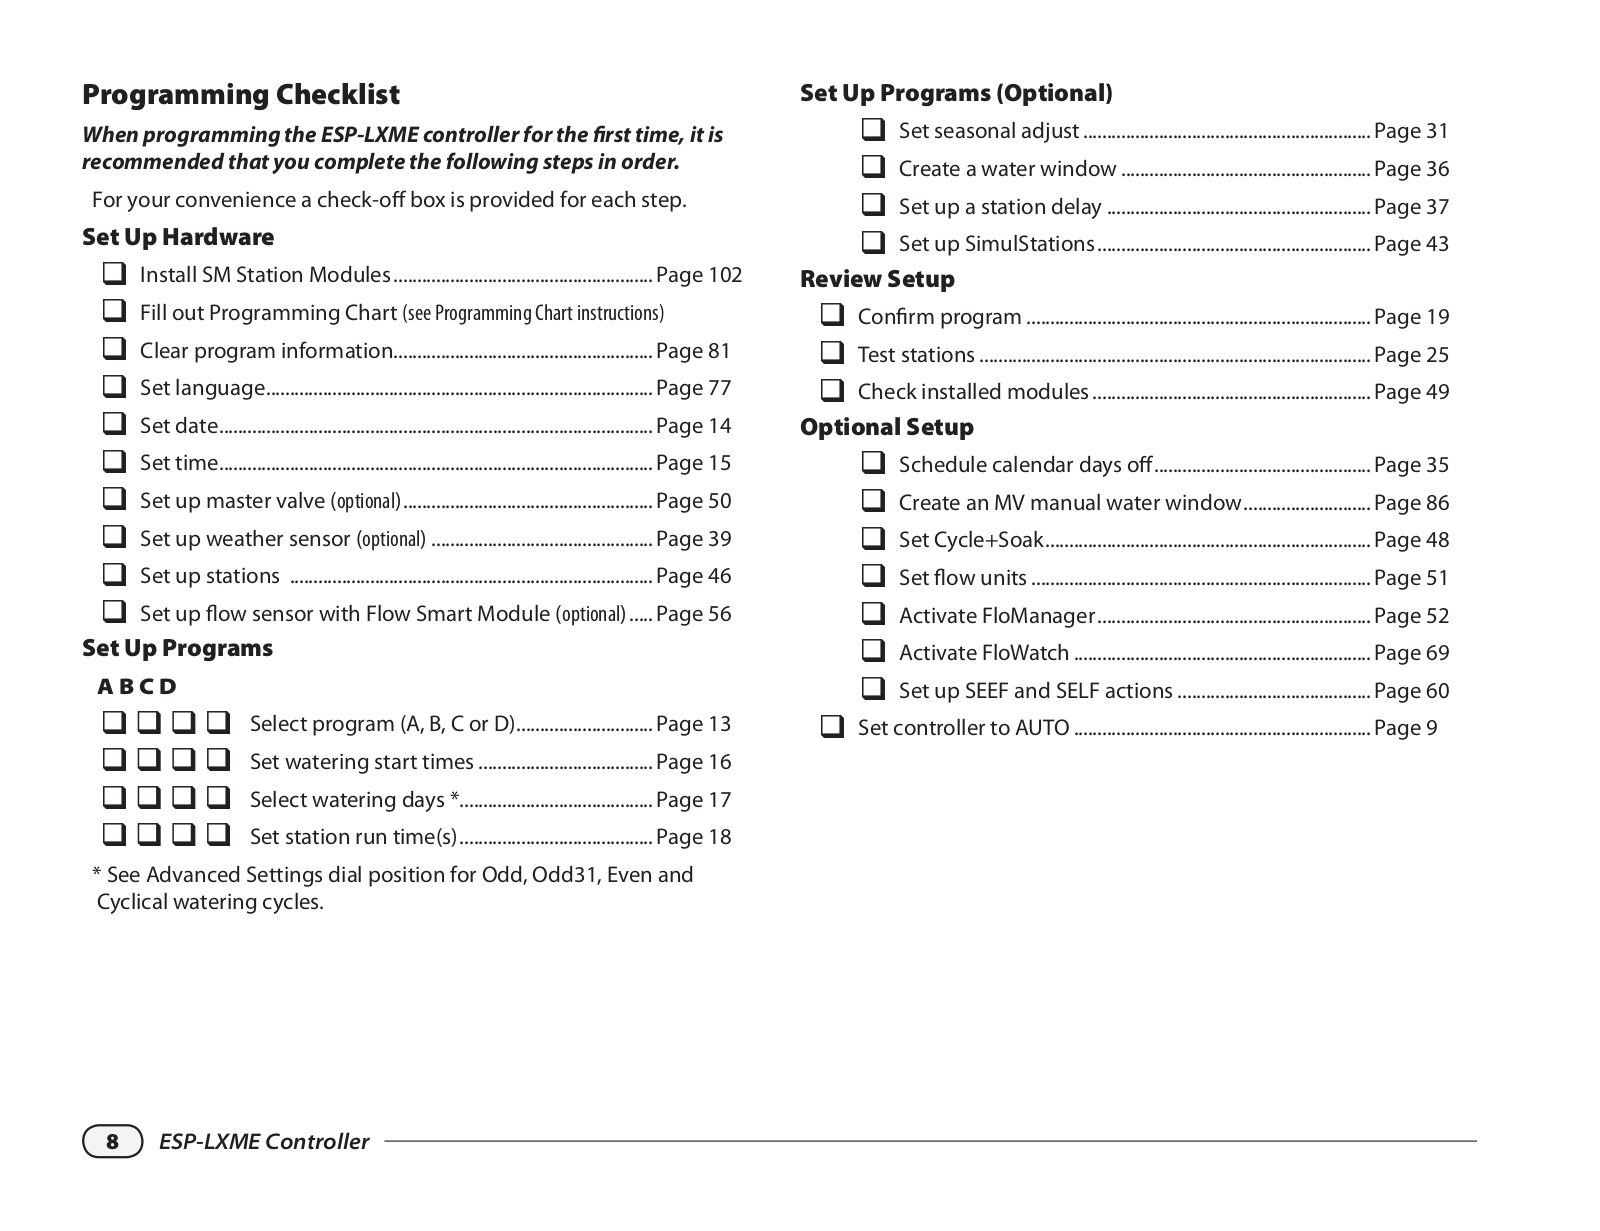
Programming Checklist

When programming the ESP-LXME controller for the first time, it is recommended that you complete the following steps in order.

For your convenience a check-off box is provided for each step.

Set Up Hardware


11Install SM Station Modules........................................................

Page 102

11Fill out Programming Chart (see Programming Chart instructions)

11Clear program information.......................................................

Page 81

11Set language..................................................................................

Page 77

11Set date............................................................................................

Page 14

11Set time............................................................................................

Page 15

11Set up master valve (optional).....................................................

Page 50

11Set up weather sensor (optional)................................................

Page 39

11Set up stations ..............................................................................

Page 46

11Set up flow sensor with Flow Smart Module (optional)......

Page 56

Set Up Programs


A B C D


44Select program (A, B, C or D).............................

Page 13

44Set watering start times......................................

Page 16

44Select watering days *.........................................

Page 17

44Set station run time(s).........................................

Page 18

* See Advanced Settings dial position for Odd, Odd31, Even and Cyclical watering cycles.

Set Up Programs (Optional)


11Set seasonal adjust..............................................................

Page 31

11Create a water window......................................................

Page 36

11Set up a station delay.........................................................

Page 37

11Set up SimulStations...........................................................

Page 43

Review Setup


11Confirm program..........................................................................

Page 19

11Test stations....................................................................................

Page 25

11Check installed modules............................................................

Page 49

Optional Setup


11Schedule calendar days off..............................................

Page 35

11Create an MV manual water window...........................

Page 86

11Set Cycle+Soak.....................................................................

Page 48

11Set flow units.........................................................................

Page 51

11Activate FloManager...........................................................

Page 52

11Activate FloWatch................................................................

Page 69

11Set up SEEF and SELF actions..........................................

Page 60

11Set controller to AUTO................................................................

Page 9

8 ESP-LXME Controller

AUTO

Automatic Operation

The controller will operate automatically with the controller dial set to AUTO.

If you forget to return the dial to AUTO, the controller will automatically continue to run programs, unless the dial is set to the OFF position when all irrigation is canceled.

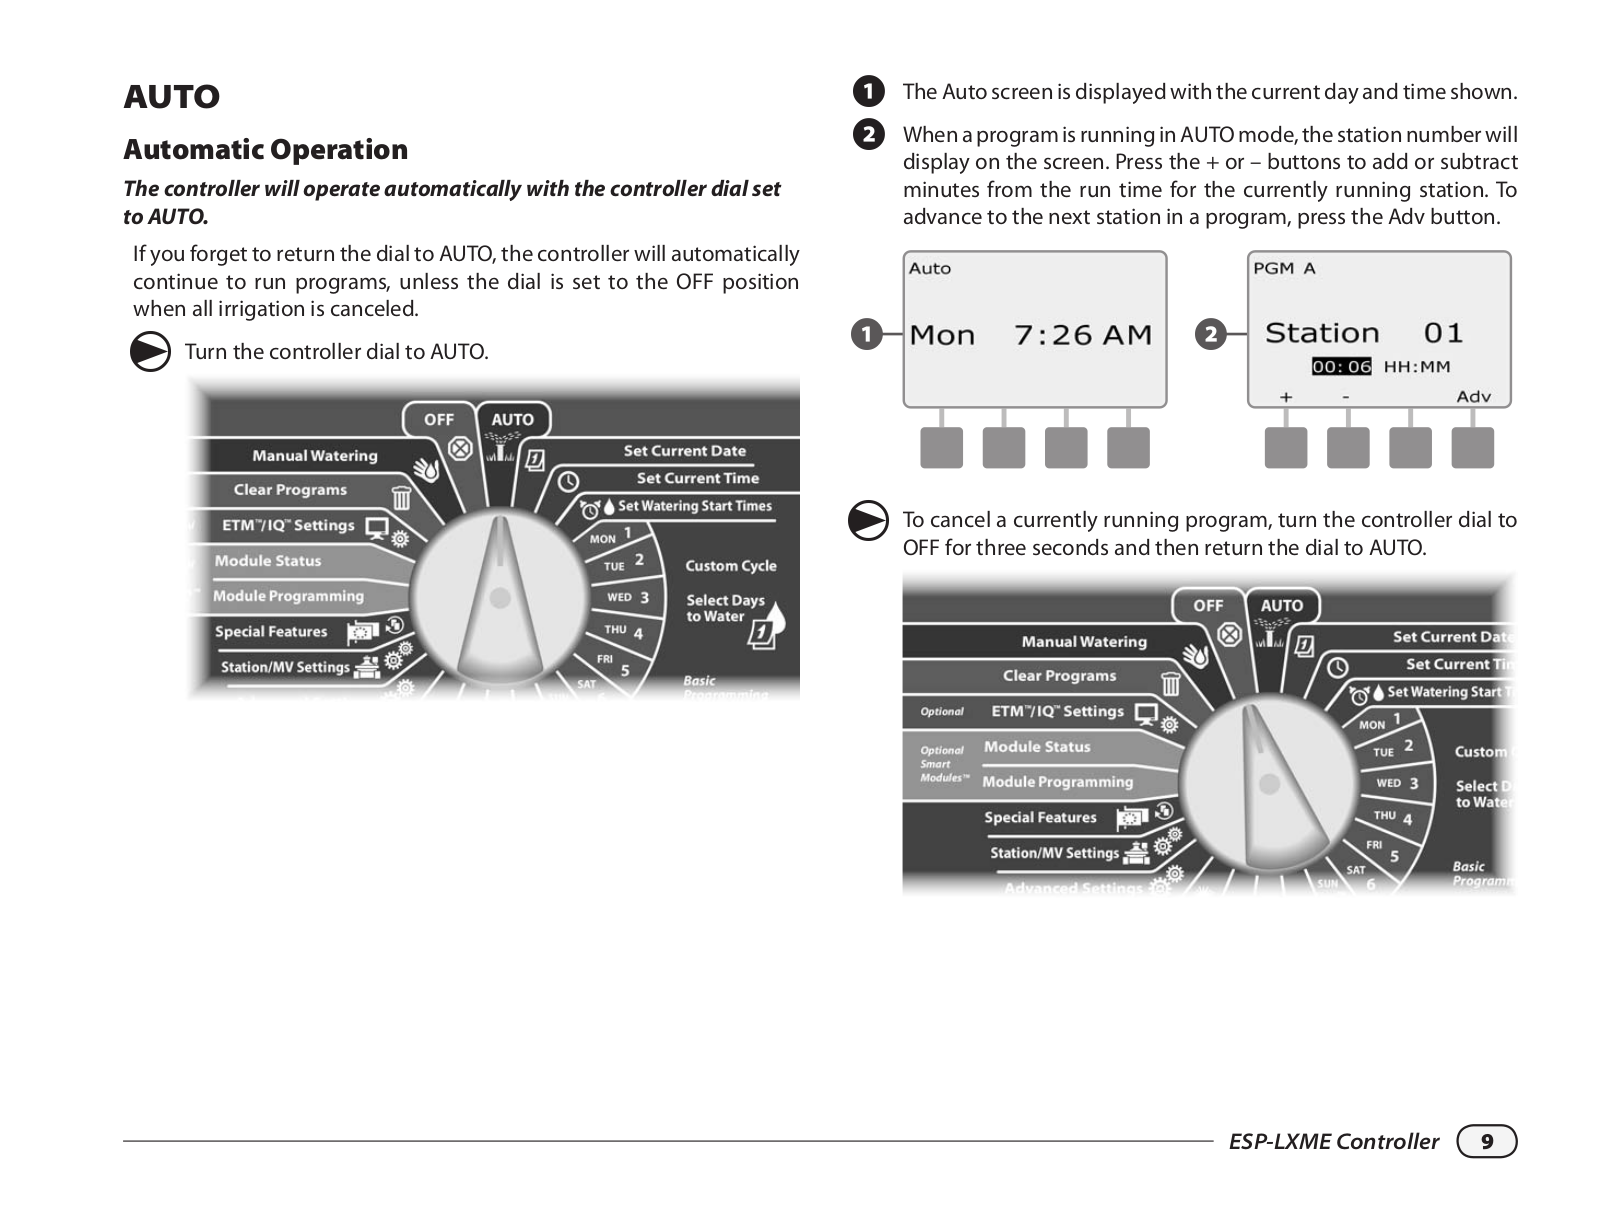
ggTurn the controller dial to AUTO.

A The Auto screen is displayed with the current day and time shown.

BWhen a program is running in AUTO mode, the station number will display on the screen. Press the + or – buttons to add or subtract minutes from the run time for the currently running station. To advance to the next station in a program, press the Adv button.

12

ggTo cancel a currently running program, turn the controller dial to OFF for three seconds and then return the dial to AUTO.

ESP-LXME Controller 9

Alarm Conditions

An alarm condition can occur when programming omissions or other issues prevent normal irrigation.

FloWatchTM Alarms

The controller will alarm for certain flow conditions if you have the optional Flow Smart Module installed. See Section E, FloWatch for more details.

Review Alarm Messages

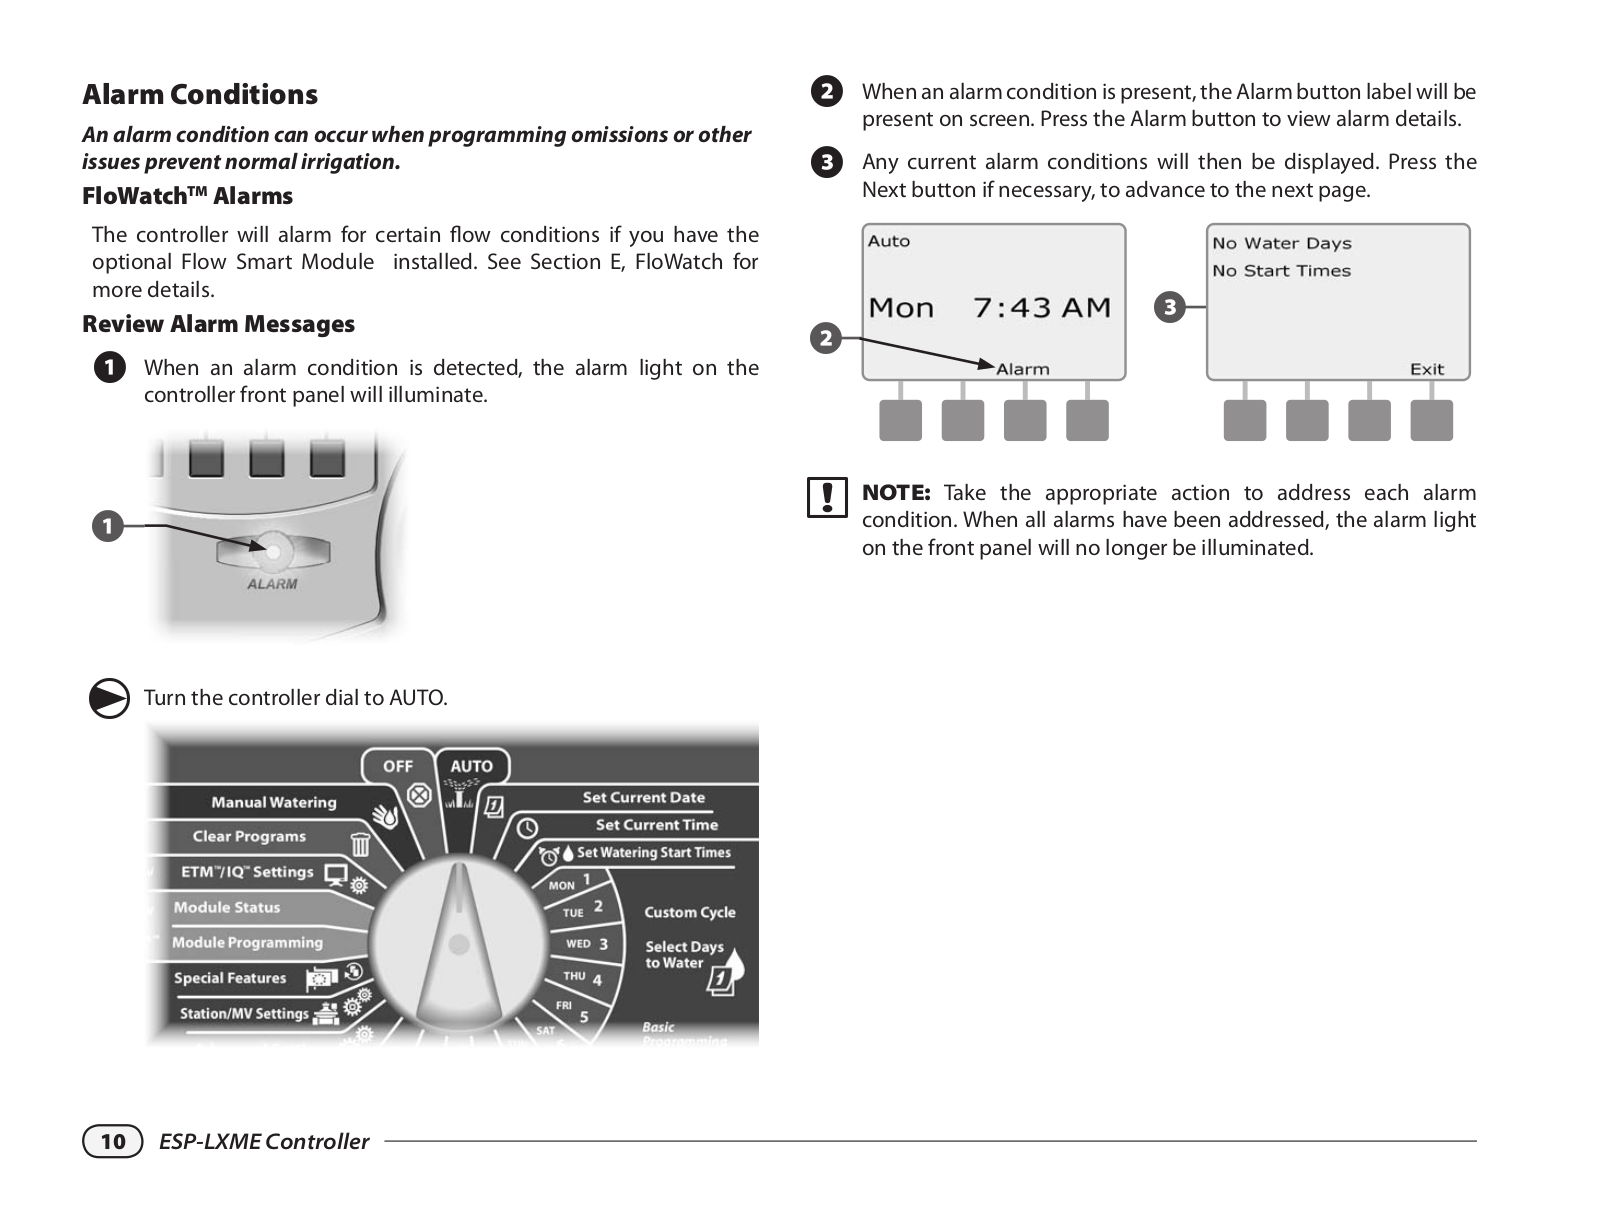
AWhen an alarm condition is detected, the alarm light on the controller front panel will illuminate.

1

ggTurn the controller dial to AUTO.

BWhen an alarm condition is present, the Alarm button label will be present on screen. Press the Alarm button to view alarm details.

CAny current alarm conditions will then be displayed. Press the Next button if necessary, to advance to the next page.

3

2

bbNOTE: Take the appropriate action to address each alarm condition. When all alarms have been addressed, the alarm light on the front panel will no longer be illuminated.

10 ESP-LXME Controller

Resetting the Controller

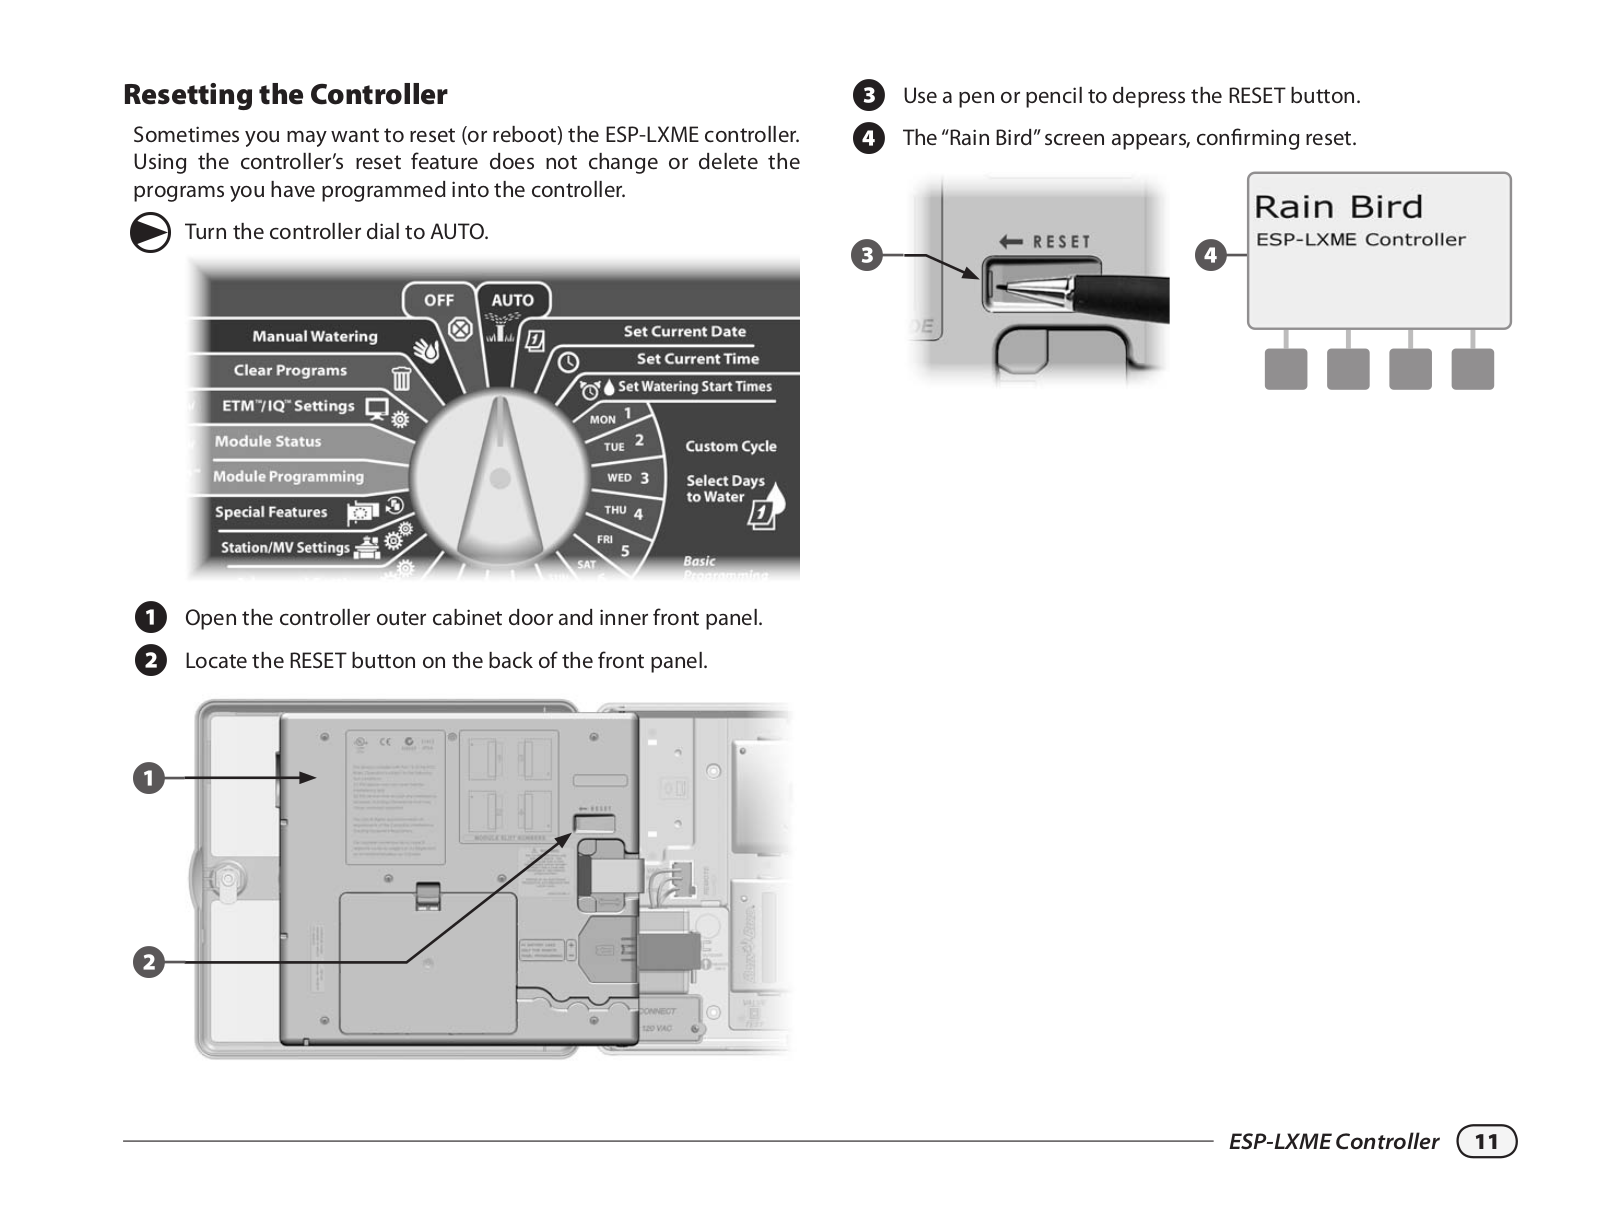
Sometimes you may want to reset (or reboot) the ESP-LXME controller. Using the controller’s reset feature does not change or delete the programs you have programmed into the controller.

ggTurn the controller dial to AUTO.

A Open the controller outer cabinet door and inner front panel. B Locate the RESET button on the back of the front panel.

1

2

C Use a pen or pencil to depress the RESET button. D The “Rain Bird” screen appears, confirming reset.

3 4

ESP-LXME Controller 11

this page intentionally left blank

12 ESP-LXME Controller

Section B - Basic Programming

Program Select Switch

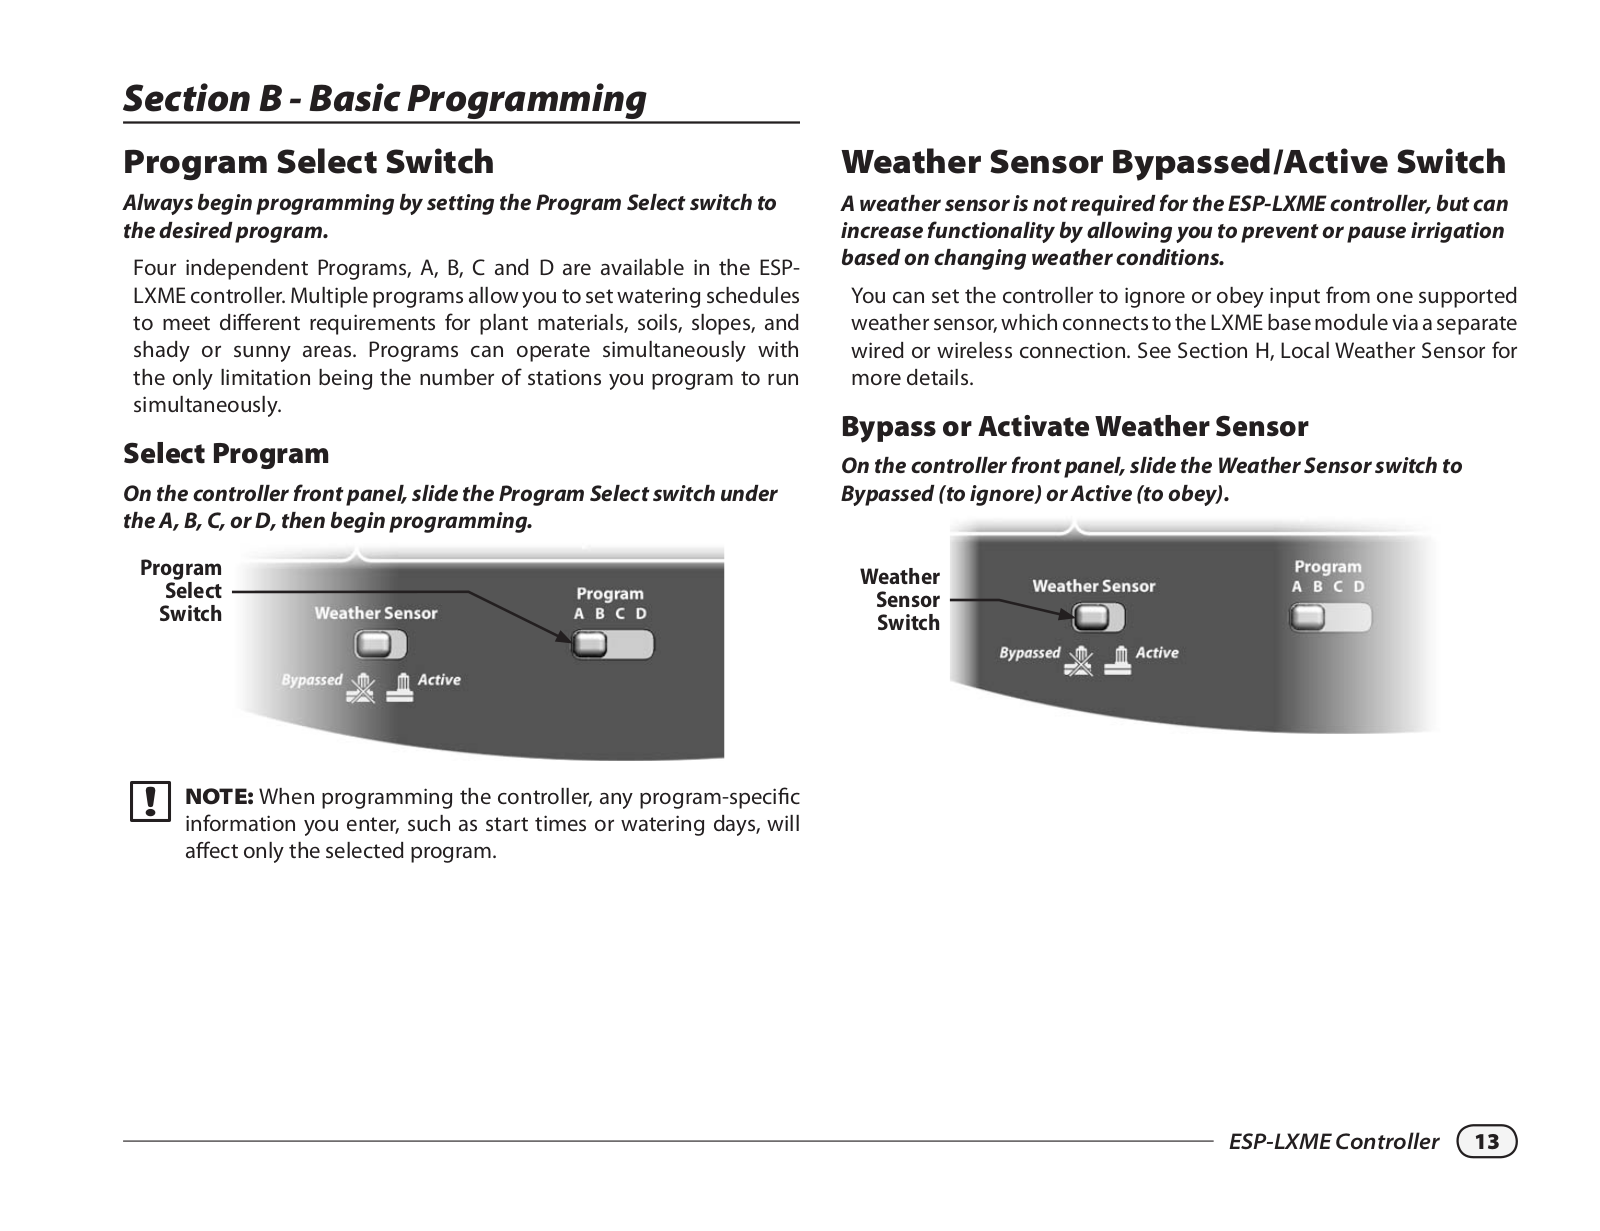
Always begin programming by setting the Program Select switch to the desired program.

Four independent Programs, A, B, C and D are available in the ESPLXME controller. Multiple programs allow you to set watering schedules to meet different requirements for plant materials, soils, slopes, and shady or sunny areas. Programs can operate simultaneously with the only limitation being the number of stations you program to run simultaneously.

Select Program

On the controller front panel, slide the Program Select switch under the A, B, C, or D, then begin programming.

Program

Select

Switch

bbNOTE: When programming the controller, any program-specific information you enter, such as start times or watering days, will affect only the selected program.

Weather Sensor Bypassed/Active Switch

A weather sensor is not required for the ESP-LXME controller, but can increase functionality by allowing you to prevent or pause irrigation based on changing weather conditions.

You can set the controller to ignore or obey input from one supported weather sensor, which connects to the LXME base module via a separate wired or wireless connection. See Section H, Local Weather Sensor for more details.

Bypass or Activate Weather Sensor

On the controller front panel, slide the Weather Sensor switch to Bypassed (to ignore) or Active (to obey).

Weather

Sensor

Switch

ESP-LXME Controller 13

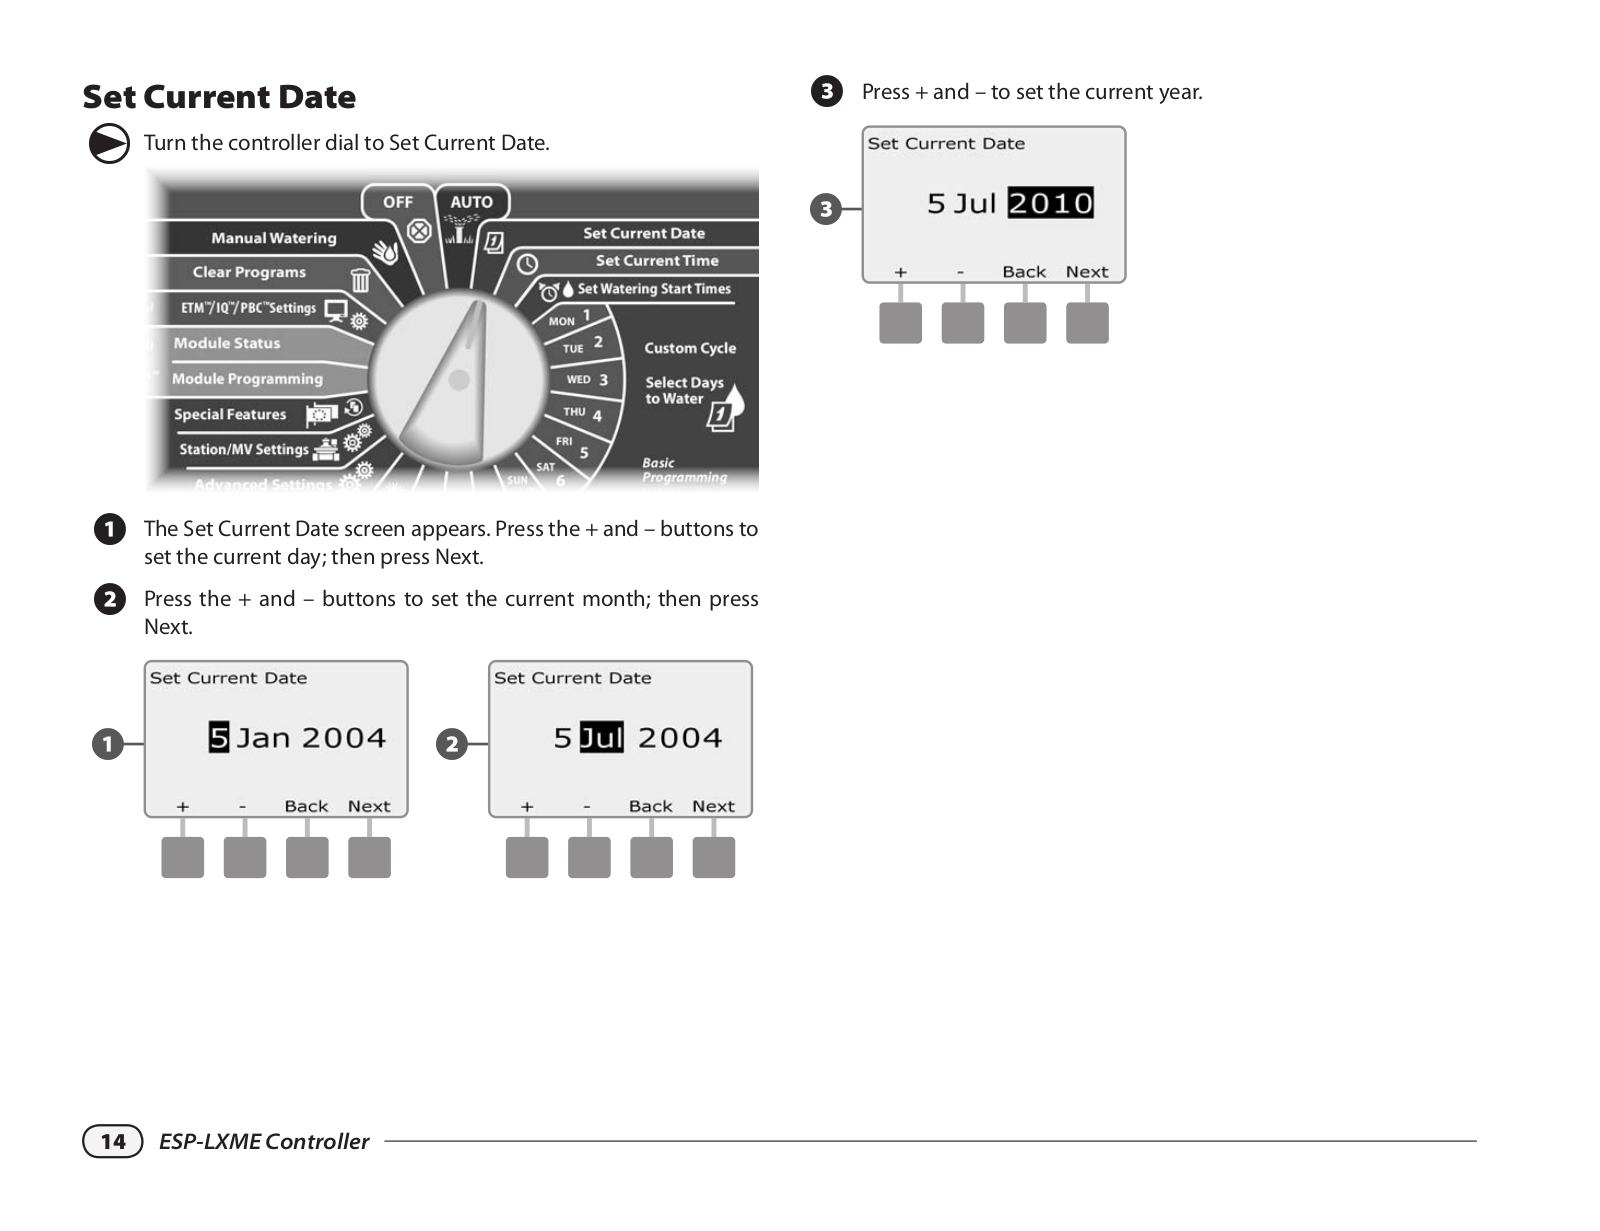
Set Current Date

C Press + and – to set the current year.

ggTurn the controller dial to Set Current Date.

3

AThe Set Current Date screen appears. Press the + and – buttons to set the current day; then press Next.

B PressNext. the + and – buttons to set the current month; then press

12

14 ESP-LXME Controller

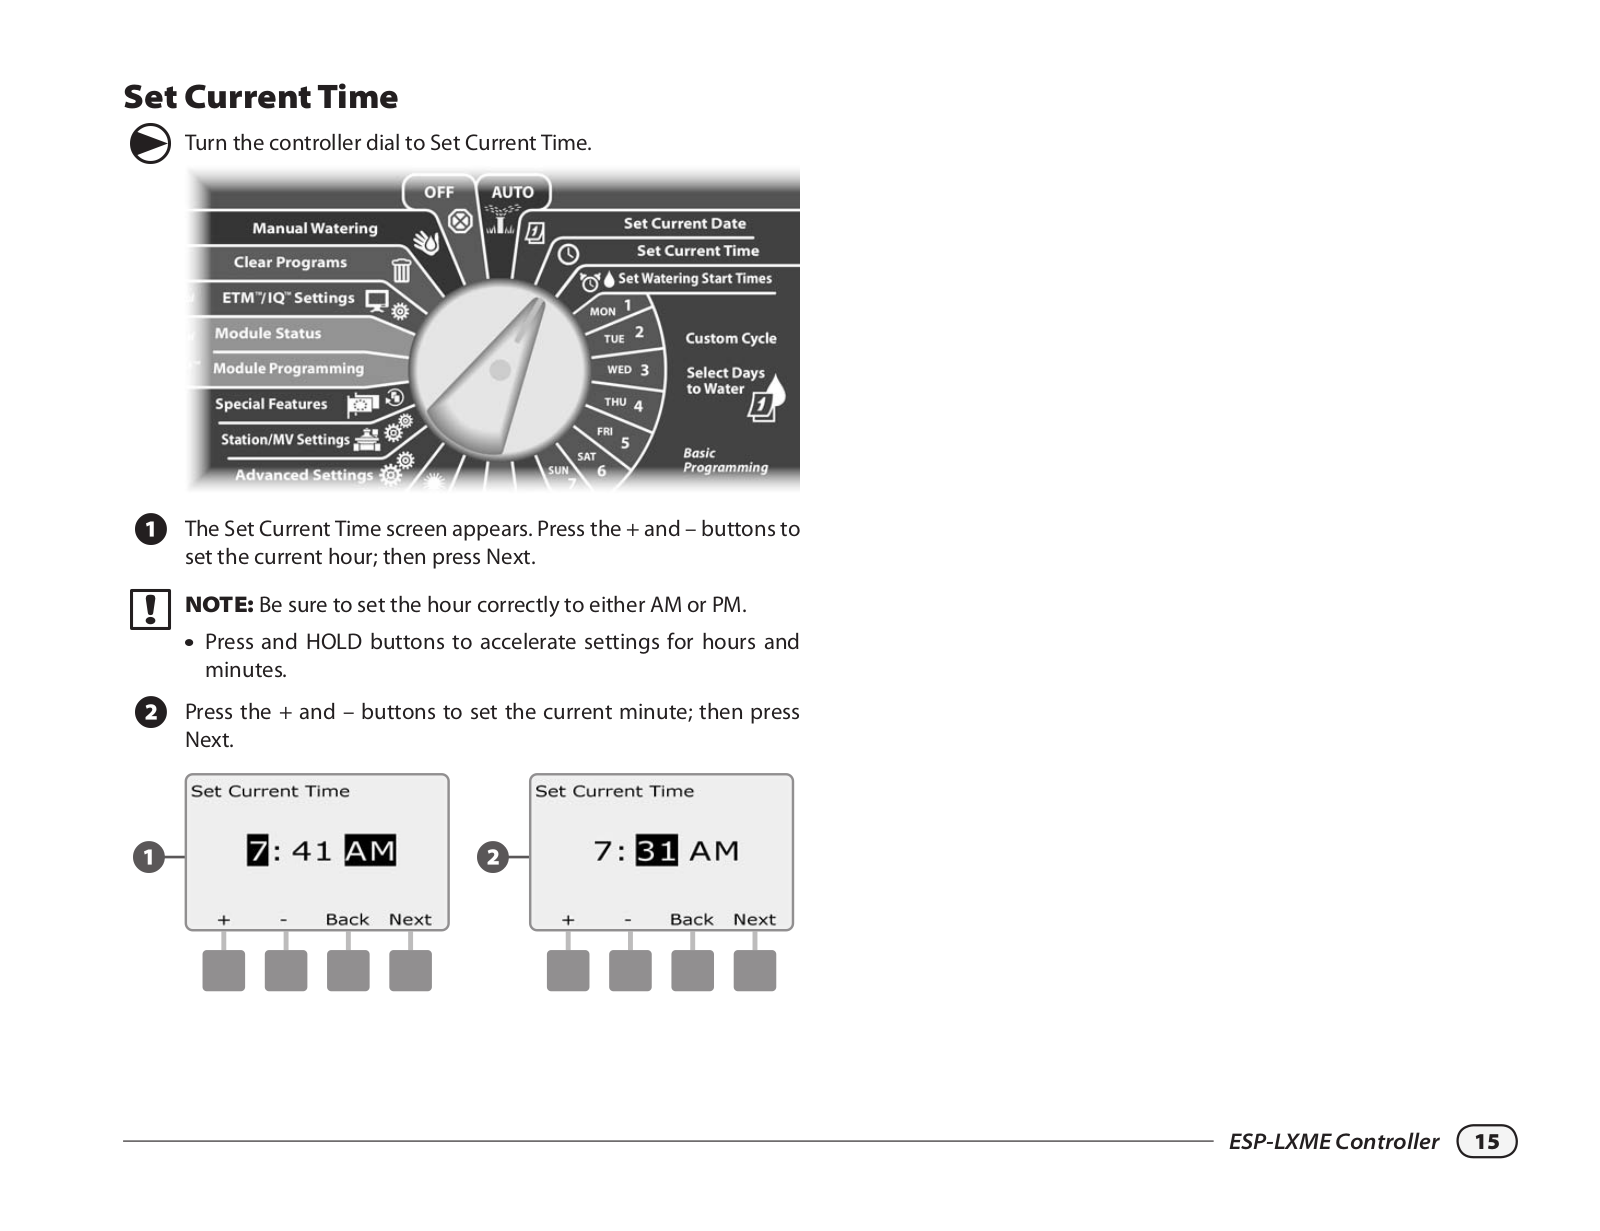
Set Current Time

ggTurn the controller dial to Set Current Time.

AThe Set Current Time screen appears. Press the + and – buttons to set the current hour; then press Next.

bbNOTE: Be sure to set the hour correctly to either AM or PM.

llPress and HOLD buttons to accelerate settings for hours and minutes.

B PressNext. the + and – buttons to set the current minute; then press

12

ESP-LXME Controller 15

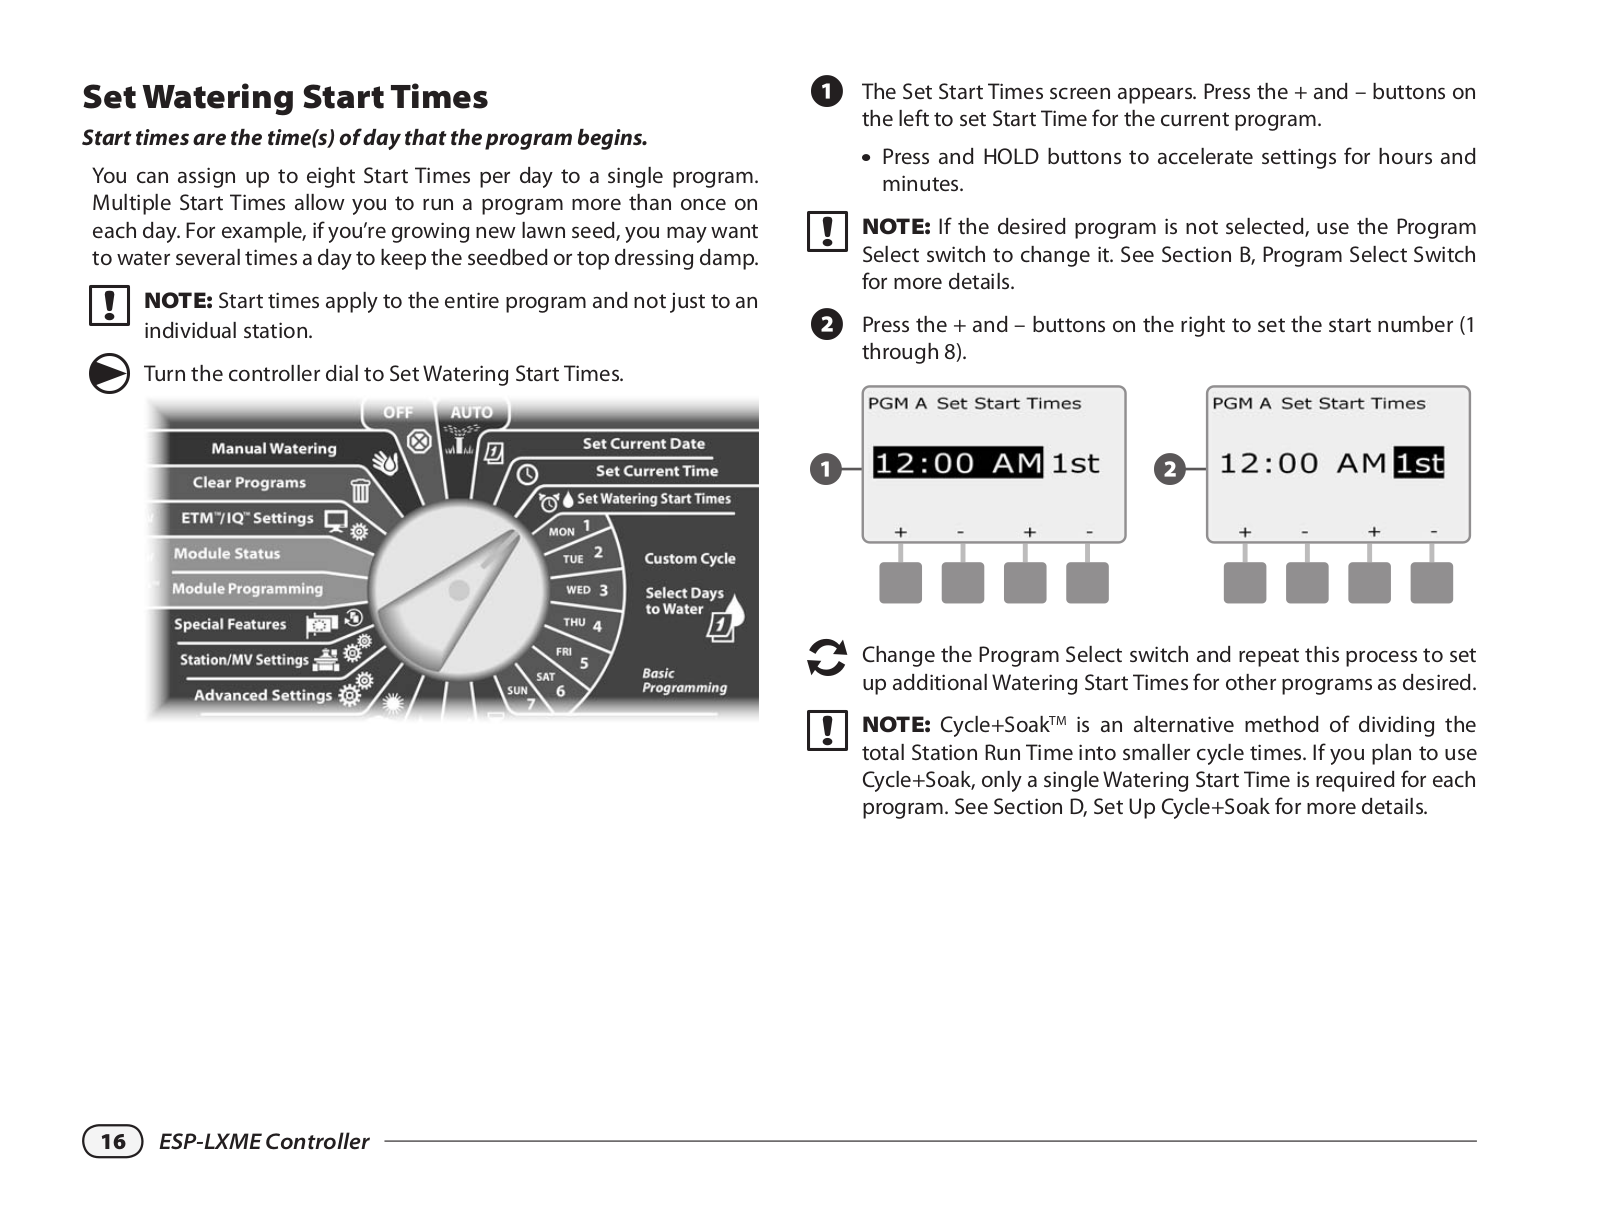
Set Watering Start Times

Start times are the time(s) of day that the program begins.

You can assign up to eight Start Times per day to a single program. Multiple Start Times allow you to run a program more than once on each day. For example, if you’re growing new lawn seed, you may want to water several times a day to keep the seedbed or top dressing damp.

bbNOTE: Start times apply to the entire program and not just to an individual station.

ggTurn the controller dial to Set Watering Start Times.

AThe Set Start Times screen appears. Press the + and – buttons on the left to set Start Time for the current program.

llPress and HOLD buttons to accelerate settings for hours and minutes.

bbNOTE: If the desired program is not selected, use the Program Select switch to change it. See Section B, Program Select Switch for more details.

BPress the + and – buttons on the right to set the start number (1 through 8).

12

eeChange the Program Select switch and repeat this process to set up additional Watering Start Times for other programs as desired.

bbNOTE: Cycle+SoakTM is an alternative method of dividing the total Station Run Time into smaller cycle times. If you plan to use Cycle+Soak, only a single Watering Start Time is required for each program. See Section D, Set Up Cycle+Soak for more details.

16 ESP-LXME Controller

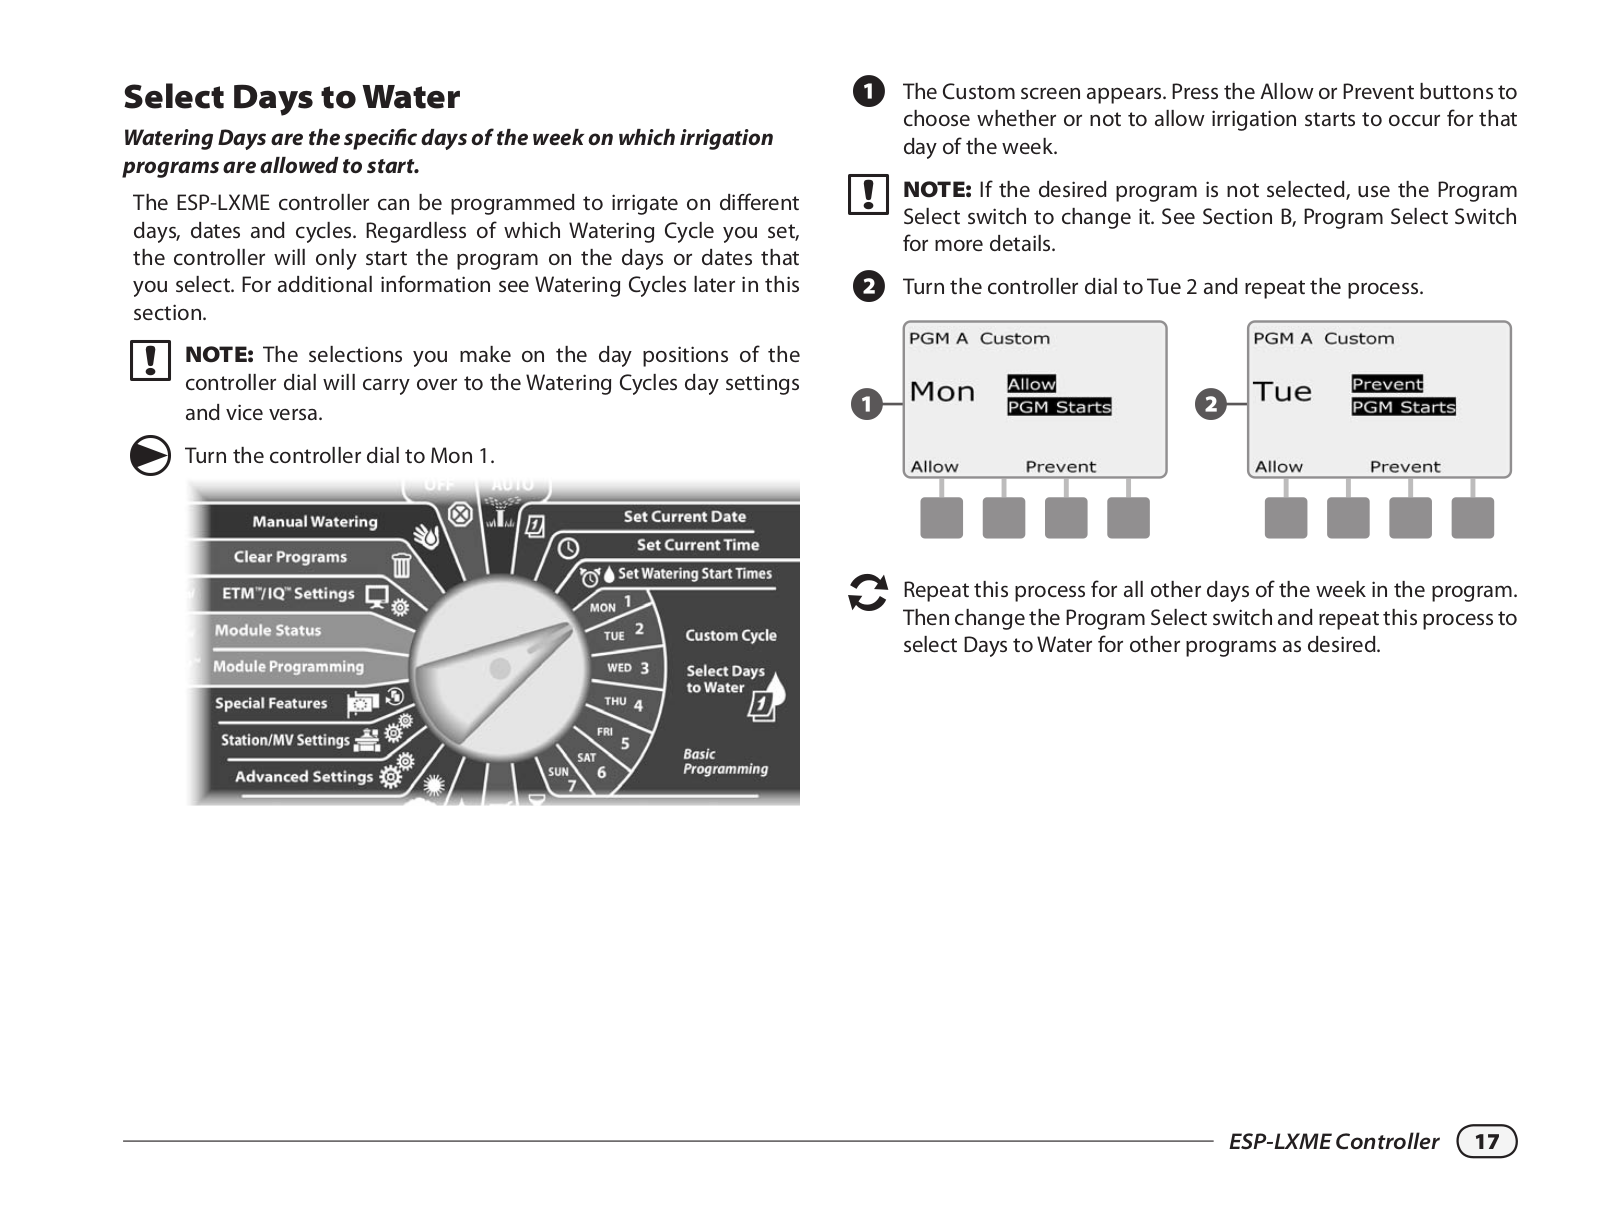
Select Days to Water

Watering Days are the specific days of the week on which irrigation programs are allowed to start.

The ESP-LXME controller can be programmed to irrigate on different days, dates and cycles. Regardless of which Watering Cycle you set, the controller will only start the program on the days or dates that you select. For additional information see Watering Cycles later in this section.

bbNOTE: The selections you make on the day positions of the controller dial will carry over to the Watering Cycles day settings and vice versa.

ggTurn the controller dial to Mon 1.

AThe Custom screen appears. Press the Allow or Prevent buttons to choose whether or not to allow irrigation starts to occur for that day of the week.

bbNOTE: If the desired program is not selected, use the Program Select switch to change it. See Section B, Program Select Switch for more details.

B Turn the controller dial to Tue 2 and repeat the process.

12

eeRepeat this process for all other days of the week in the program. Then change the Program Select switch and repeat this process to select Days to Water for other programs as desired.

ESP-LXME Controller 17

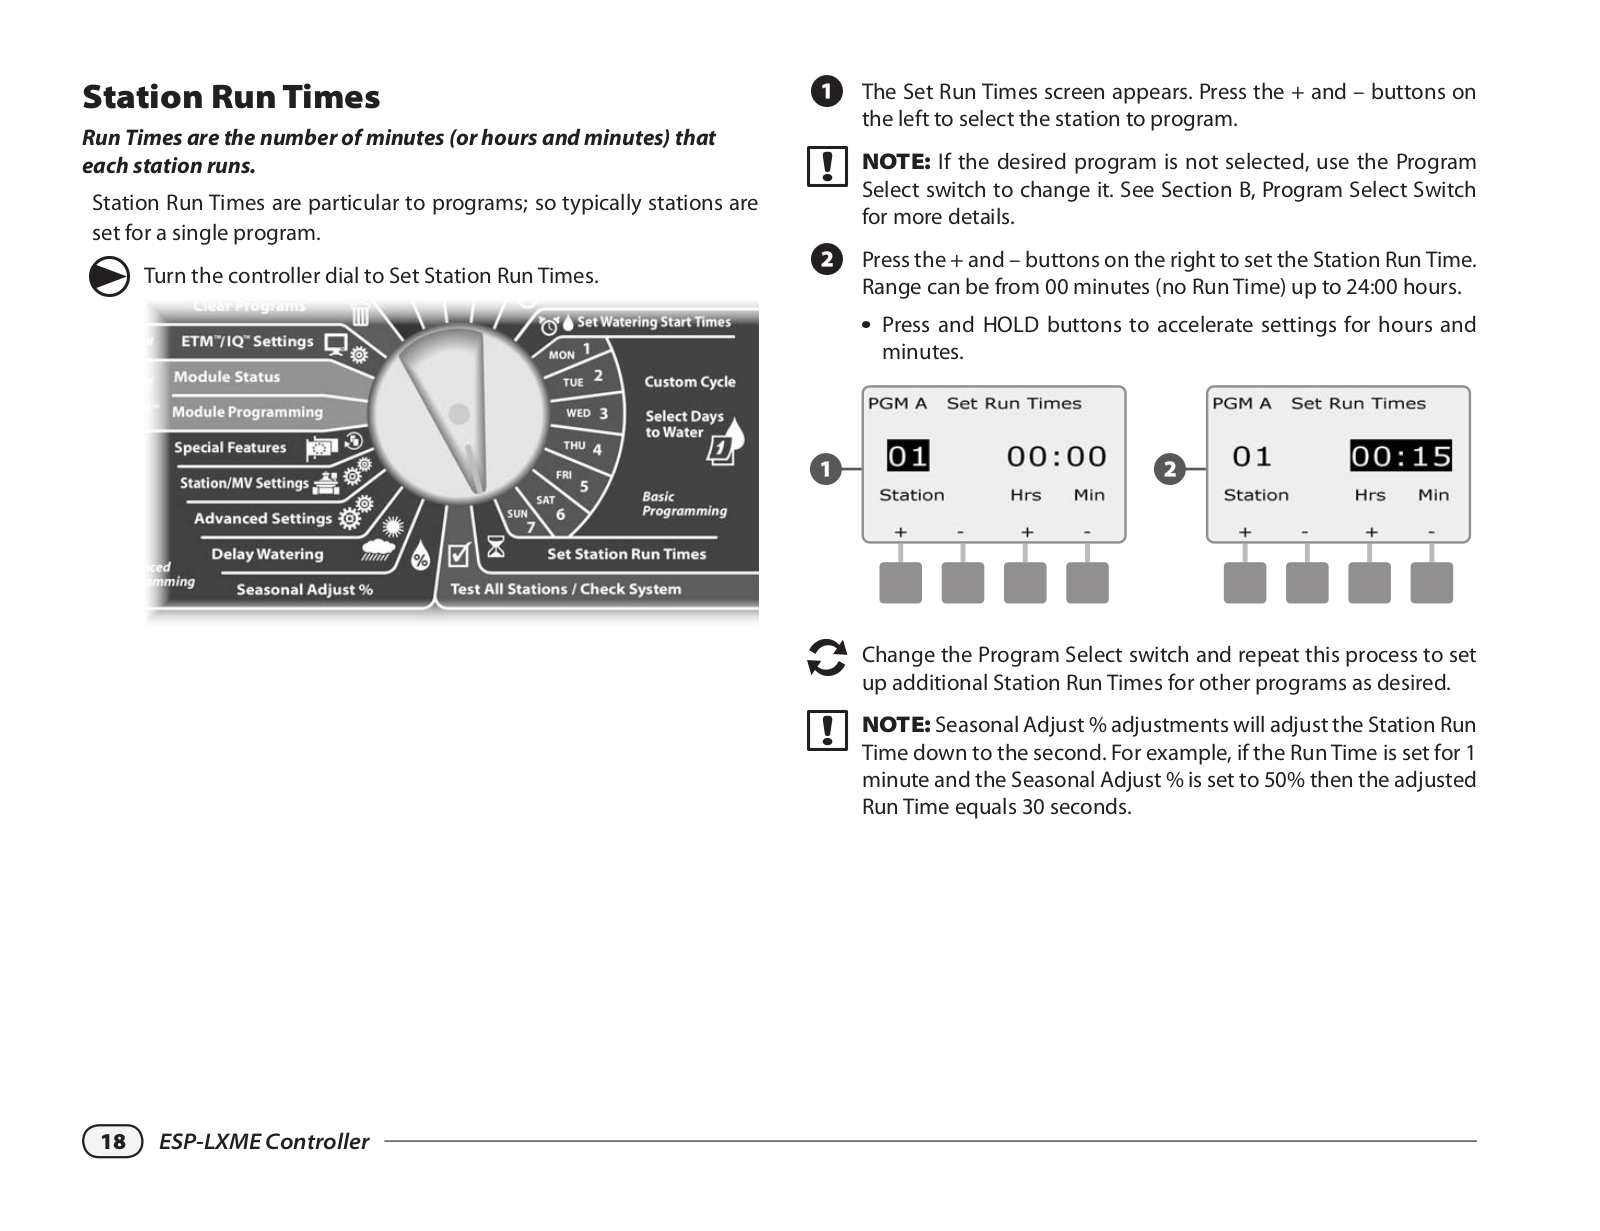
Station Run Times

Run Times are the number of minutes (or hours and minutes) that each station runs.

Station Run Times are particular to programs; so typically stations are set for a single program.

ggTurn the controller dial to Set Station Run Times.

AThe Set Run Times screen appears. Press the + and – buttons on the left to select the station to program.

bbNOTE: If the desired program is not selected, use the Program Select switch to change it. See Section B, Program Select Switch for more details.

BPress the + and – buttons on the right to set the Station Run Time. Range can be from 00 minutes (no Run Time) up to 24:00 hours. llPress and HOLD buttons to accelerate settings for hours and

minutes.

12

eeChange the Program Select switch and repeat this process to set up additional Station Run Times for other programs as desired.

bbNOTE: Seasonal Adjust % adjustments will adjust the Station Run Time down to the second. For example, if the Run Time is set for 1 minute and the Seasonal Adjust % is set to 50% then the adjusted Run Time equals 30 seconds.

18 ESP-LXME Controller

Section C - System Diagnostics

Test All Stations/Check System

Review and confirm scheduled irrigation Programs, Program Run Times and Station Run Times.

Confirm Programs

The ESP-LXME controller can make calculations and provide feedback on Start Times and total Run Times for programs and stations.

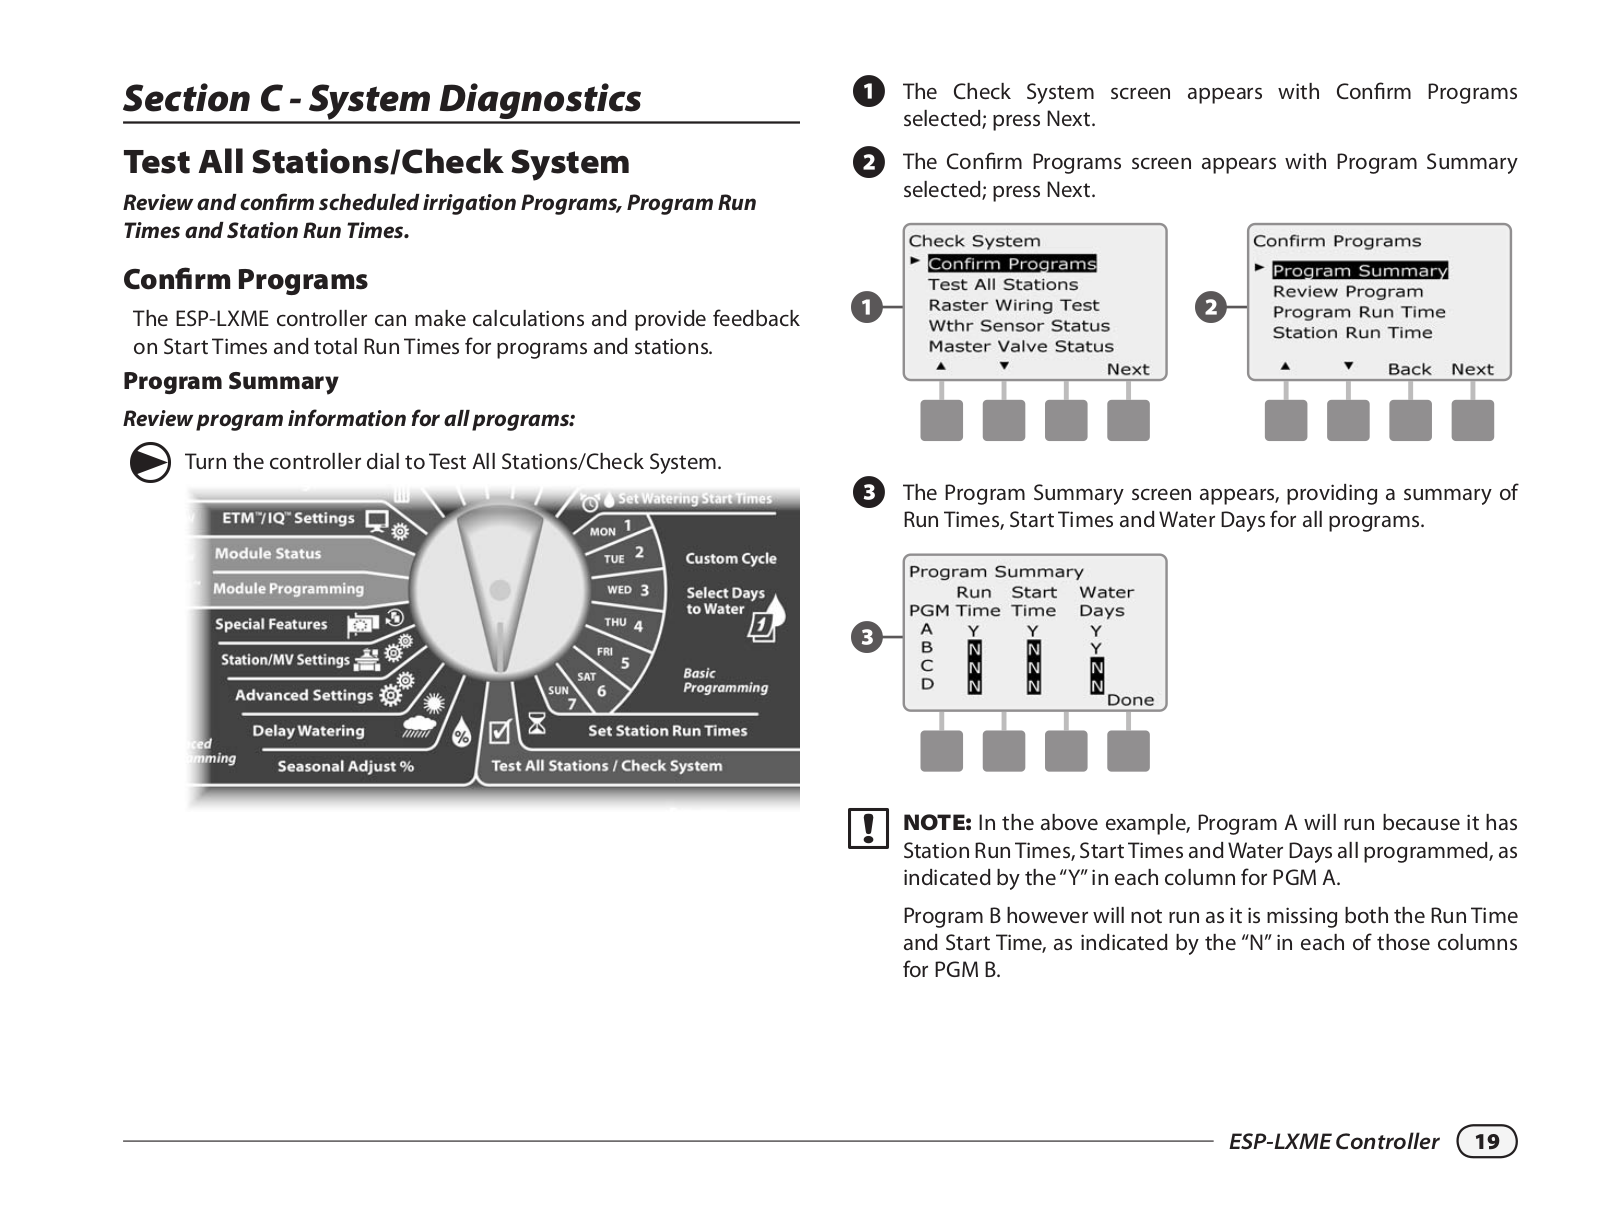
Program Summary

Review program information for all programs:

ggTurn the controller dial to Test All Stations/Check System.

AThe Check System screen appears with Confirm Programs selected; press Next.

BThe Confirm Programs screen appears with Program Summary selected; press Next.

12

CThe Program Summary screen appears, providing a summary of Run Times, Start Times and Water Days for all programs.

3

bbNOTE: In the above example, Program A will run because it has Station Run Times, Start Times and Water Days all programmed, as indicated by the “Y” in each column for PGM A.

Program B however will not run as it is missing both the Run Time and Start Time, as indicated by the “N” in each of those columns for PGM B.

ESP-LXME Controller 19

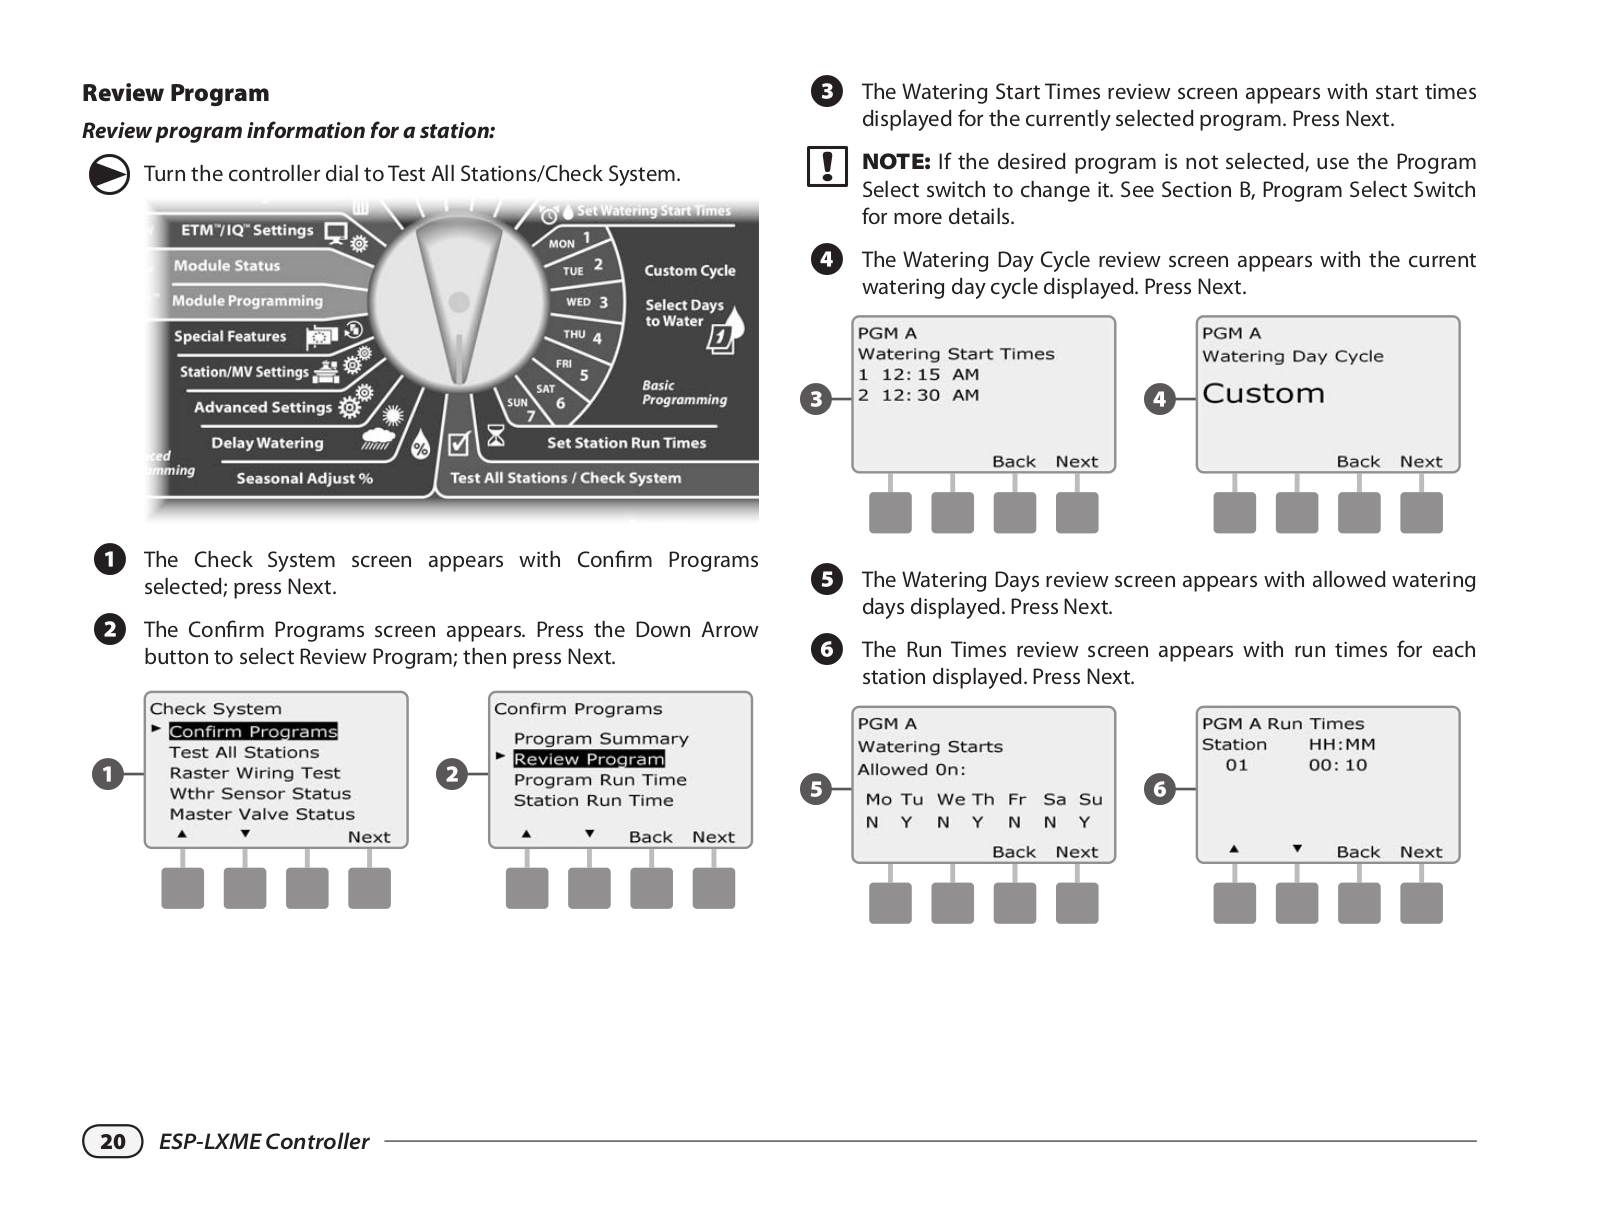
Review Program

Review program information for a station:

ggTurn the controller dial to Test All Stations/Check System.

CThe Watering Start Times review screen appears with start times displayed for the currently selected program. Press Next.

bbNOTE: If the desired program is not selected, use the Program Select switch to change it. See Section B, Program Select Switch for more details.

DThe Watering Day Cycle review screen appears with the current watering day cycle displayed. Press Next.

c d

A The Check System screen appears with Confirm Programs


E The Watering Days review screen appears with allowed watering

selected; press Next.


B The Confirm Programs screen appears. Press the Down Arrow


days displayed. Press Next.

F The Run Times review screen appears with run times for each

button to select Review Program; then press Next.


station displayed. Press Next.

a

b

e


f


20 ESP-LXME Controller

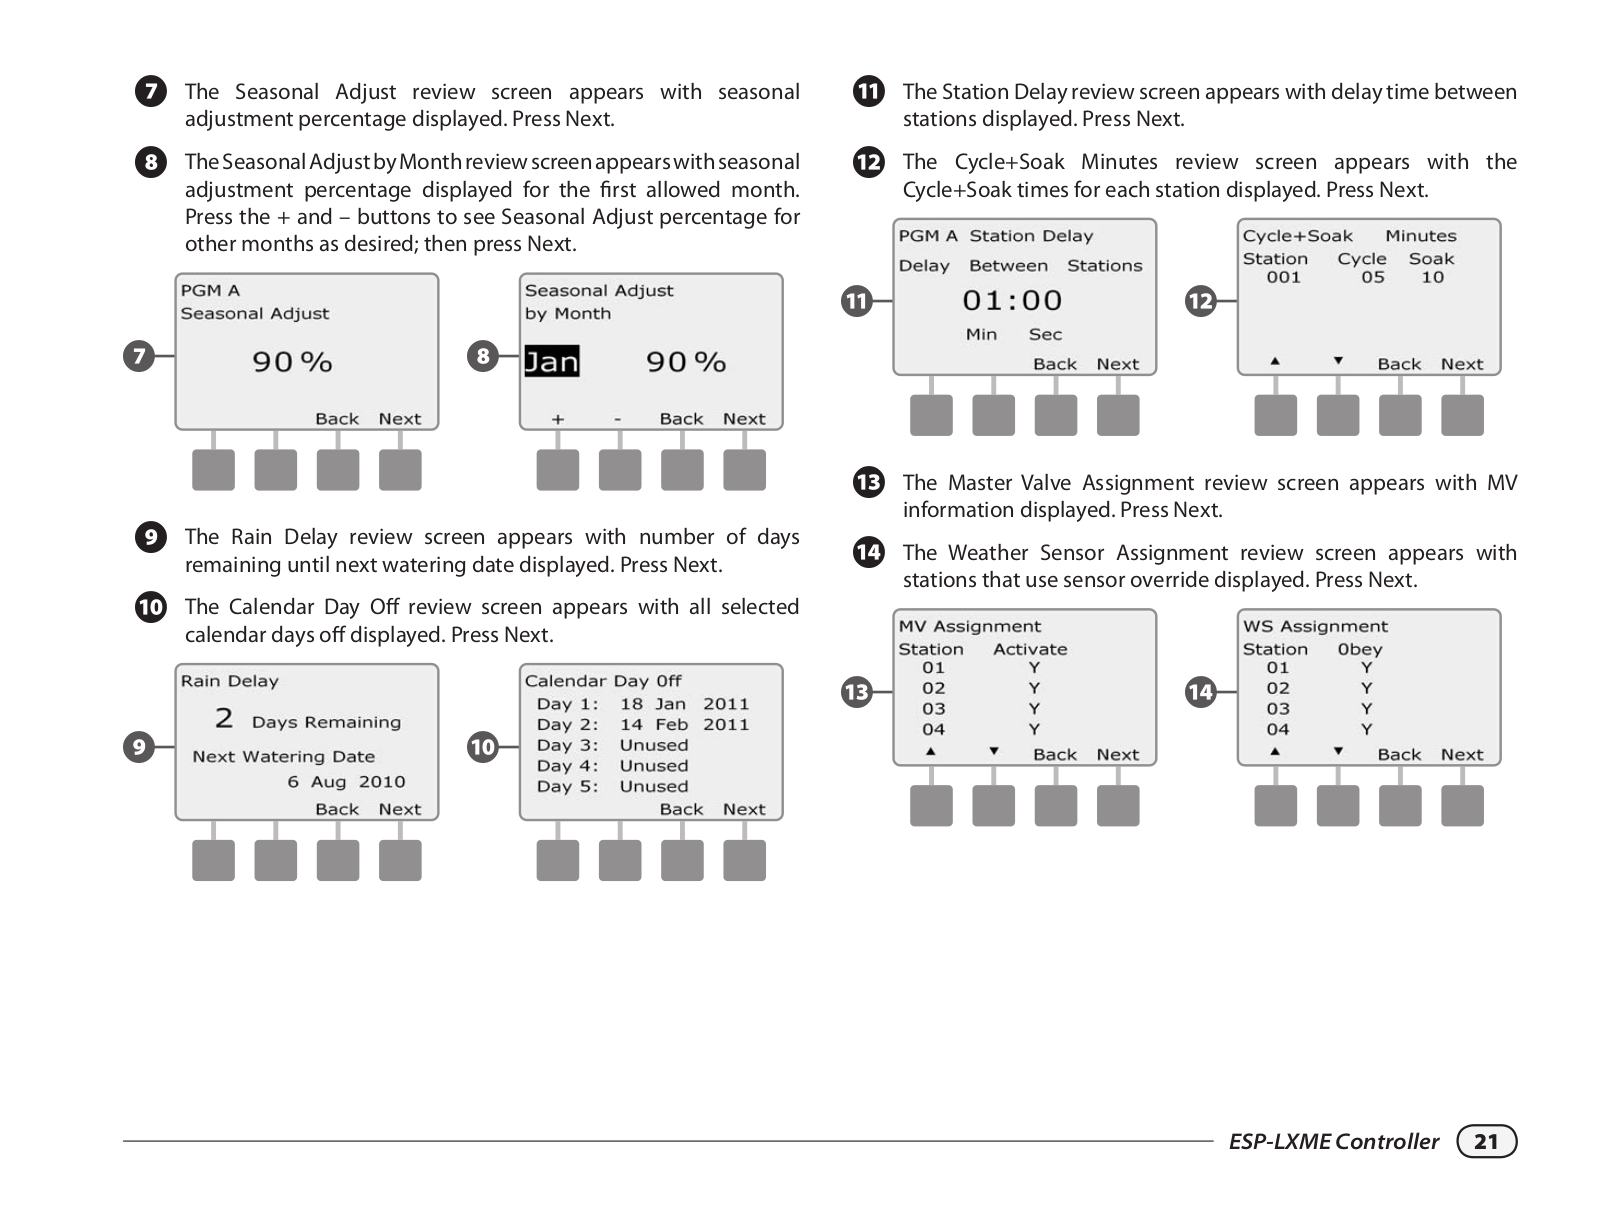
GThe Seasonal Adjust review screen appears with seasonal adjustment percentage displayed. Press Next.

HTheSeasonalAdjustbyMonthreviewscreenappearswithseasonal adjustment percentage displayed for the first allowed month. Press the + and – buttons to see Seasonal Adjust percentage for other months as desired; then press Next.

gh

KThe Station Delay review screen appears with delay time between stations displayed. Press Next.

LThe Cycle+Soak Minutes review screen appears with the Cycle+Soak times for each station displayed. Press Next.

kl

IThe Rain Delay review screen appears with number of days remaining until next watering date displayed. Press Next.

JThe Calendar Day Off review screen appears with all selected calendar days off displayed. Press Next.

ij

MThe Master Valve Assignment review screen appears with MV information displayed. Press Next.

NThe Weather Sensor Assignment review screen appears with stations that use sensor override displayed. Press Next.

mn

ESP-LXME Controller 21

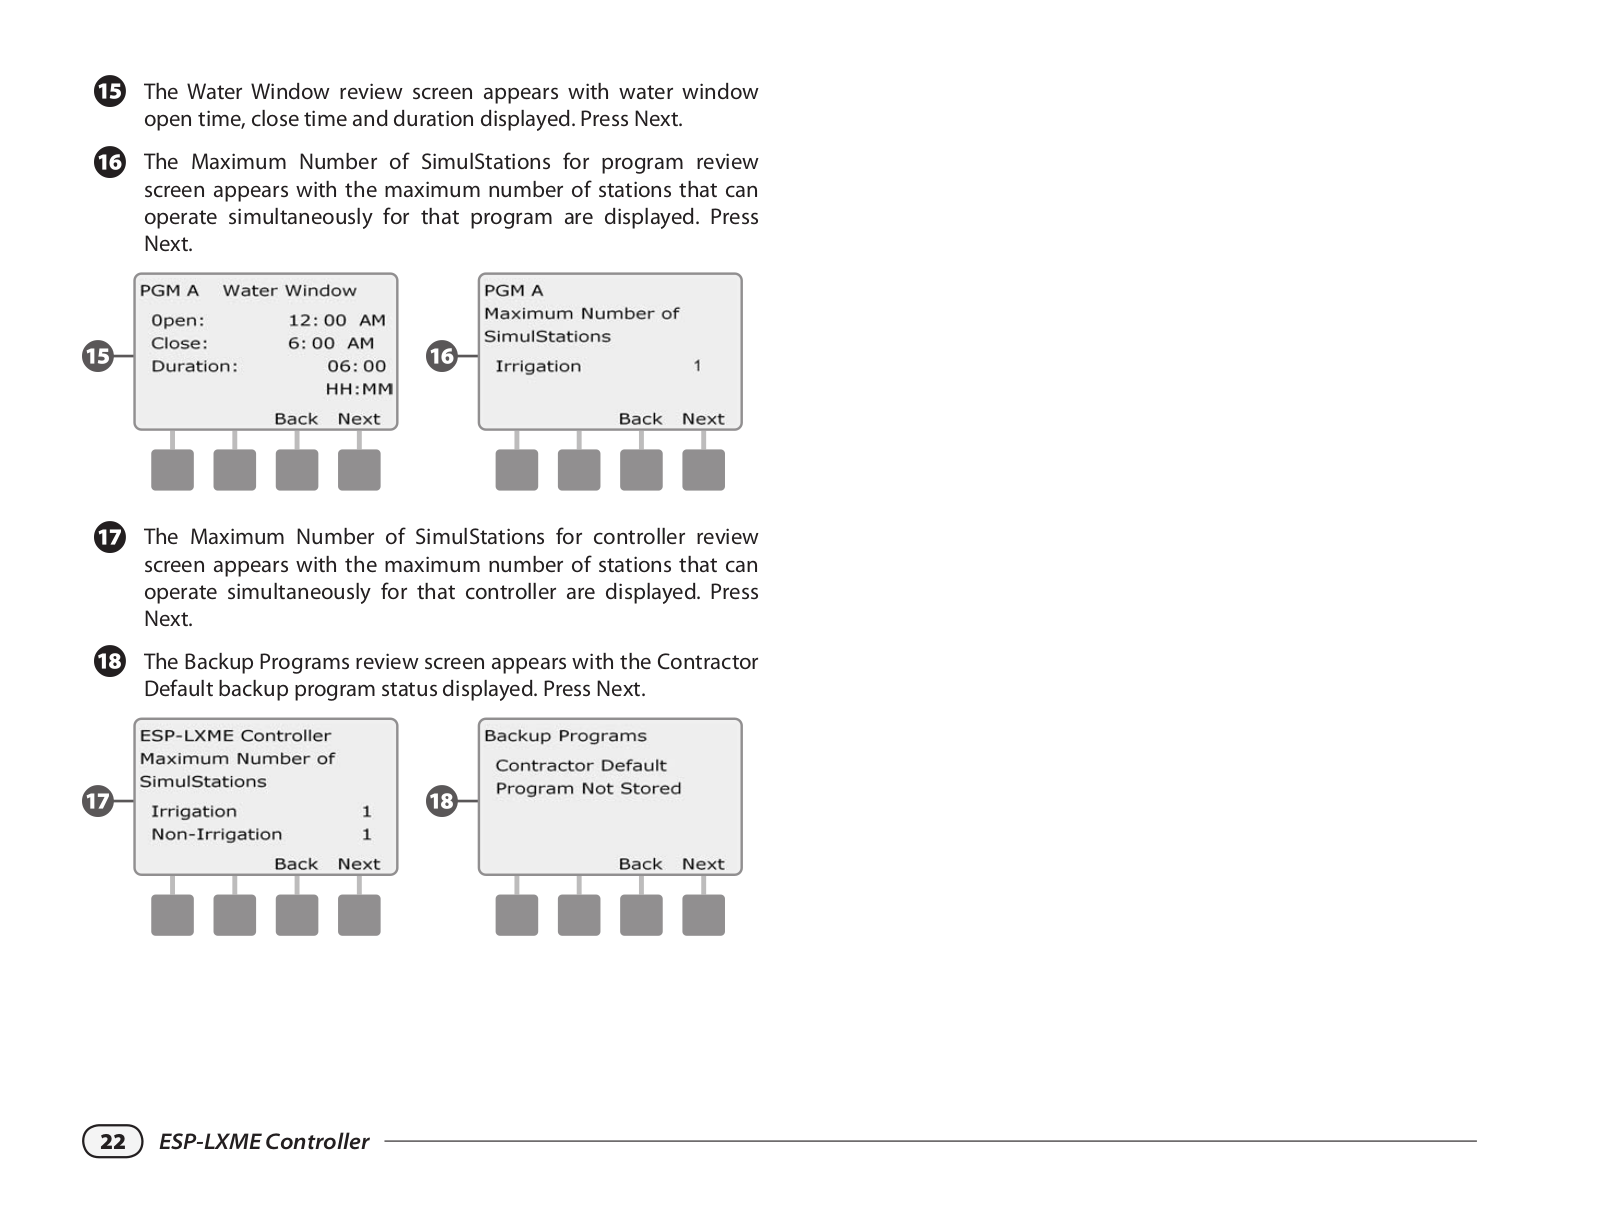
OThe Water Window review screen appears with water window open time, close time and duration displayed. Press Next.

PThe Maximum Number of SimulStations for program review screen appears with the maximum number of stations that can operate simultaneously for that program are displayed. Press Next.

op

QThe Maximum Number of SimulStations for controller review screen appears with the maximum number of stations that can operate simultaneously for that controller are displayed. Press Next.

RThe Backup Programs review screen appears with the Contractor Default backup program status displayed. Press Next.

qr

22 ESP-LXME Controller

Program Run Time

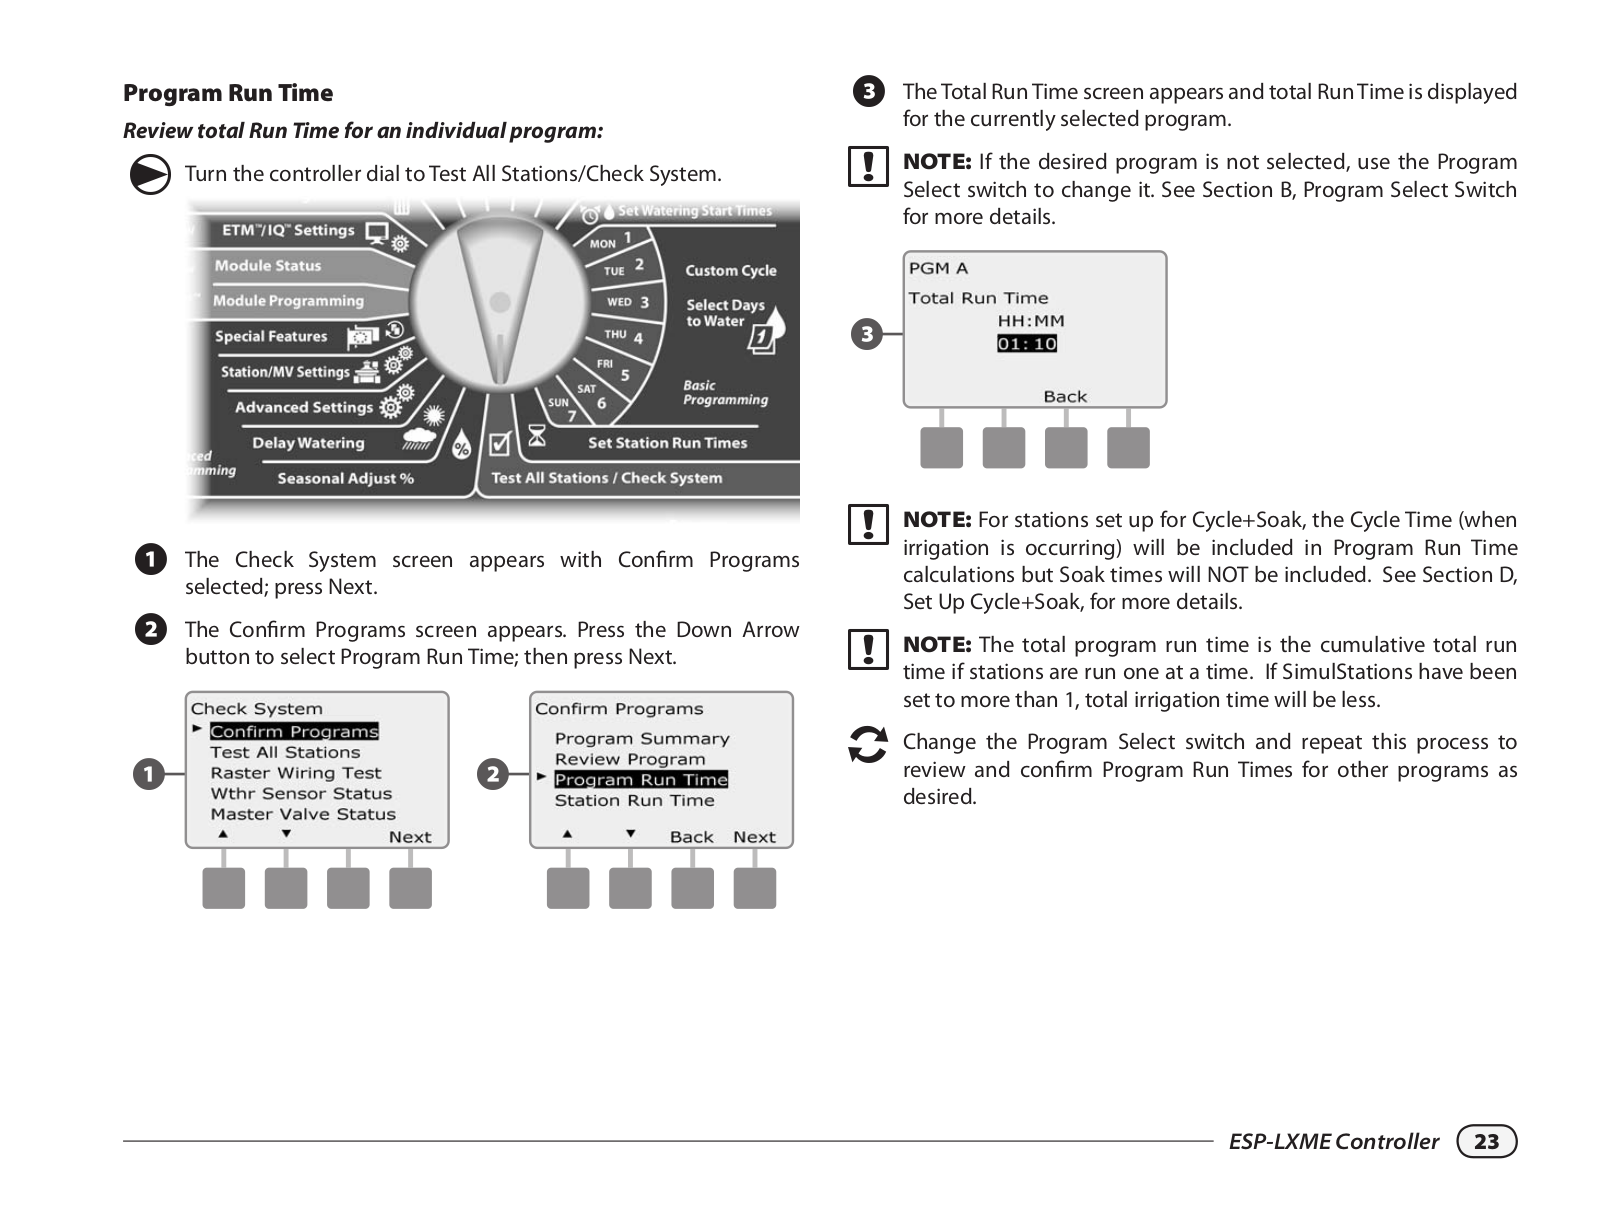
Review total Run Time for an individual program:

ggTurn the controller dial to Test All Stations/Check System.

CThe Total Run Time screen appears and total Run Time is displayed for the currently selected program.

bbNOTE: If the desired program is not selected, use the Program Select switch to change it. See Section B, Program Select Switch for more details.

3

AThe Check System screen appears with Confirm Programs selected; press Next.

BThe Confirm Programs screen appears. Press the Down Arrow button to select Program Run Time; then press Next.

12

bbNOTE: For stations set up for Cycle+Soak, the Cycle Time (when irrigation is occurring) will be included in Program Run Time calculations but Soak times will NOT be included. See Section D, Set Up Cycle+Soak, for more details.

bbNOTE: The total program run time is the cumulative total run time if stations are run one at a time. If SimulStations have been set to more than 1, total irrigation time will be less.

eeChange the Program Select switch and repeat this process to review and confirm Program Run Times for other programs as desired.

ESP-LXME Controller 23

Station Run Time

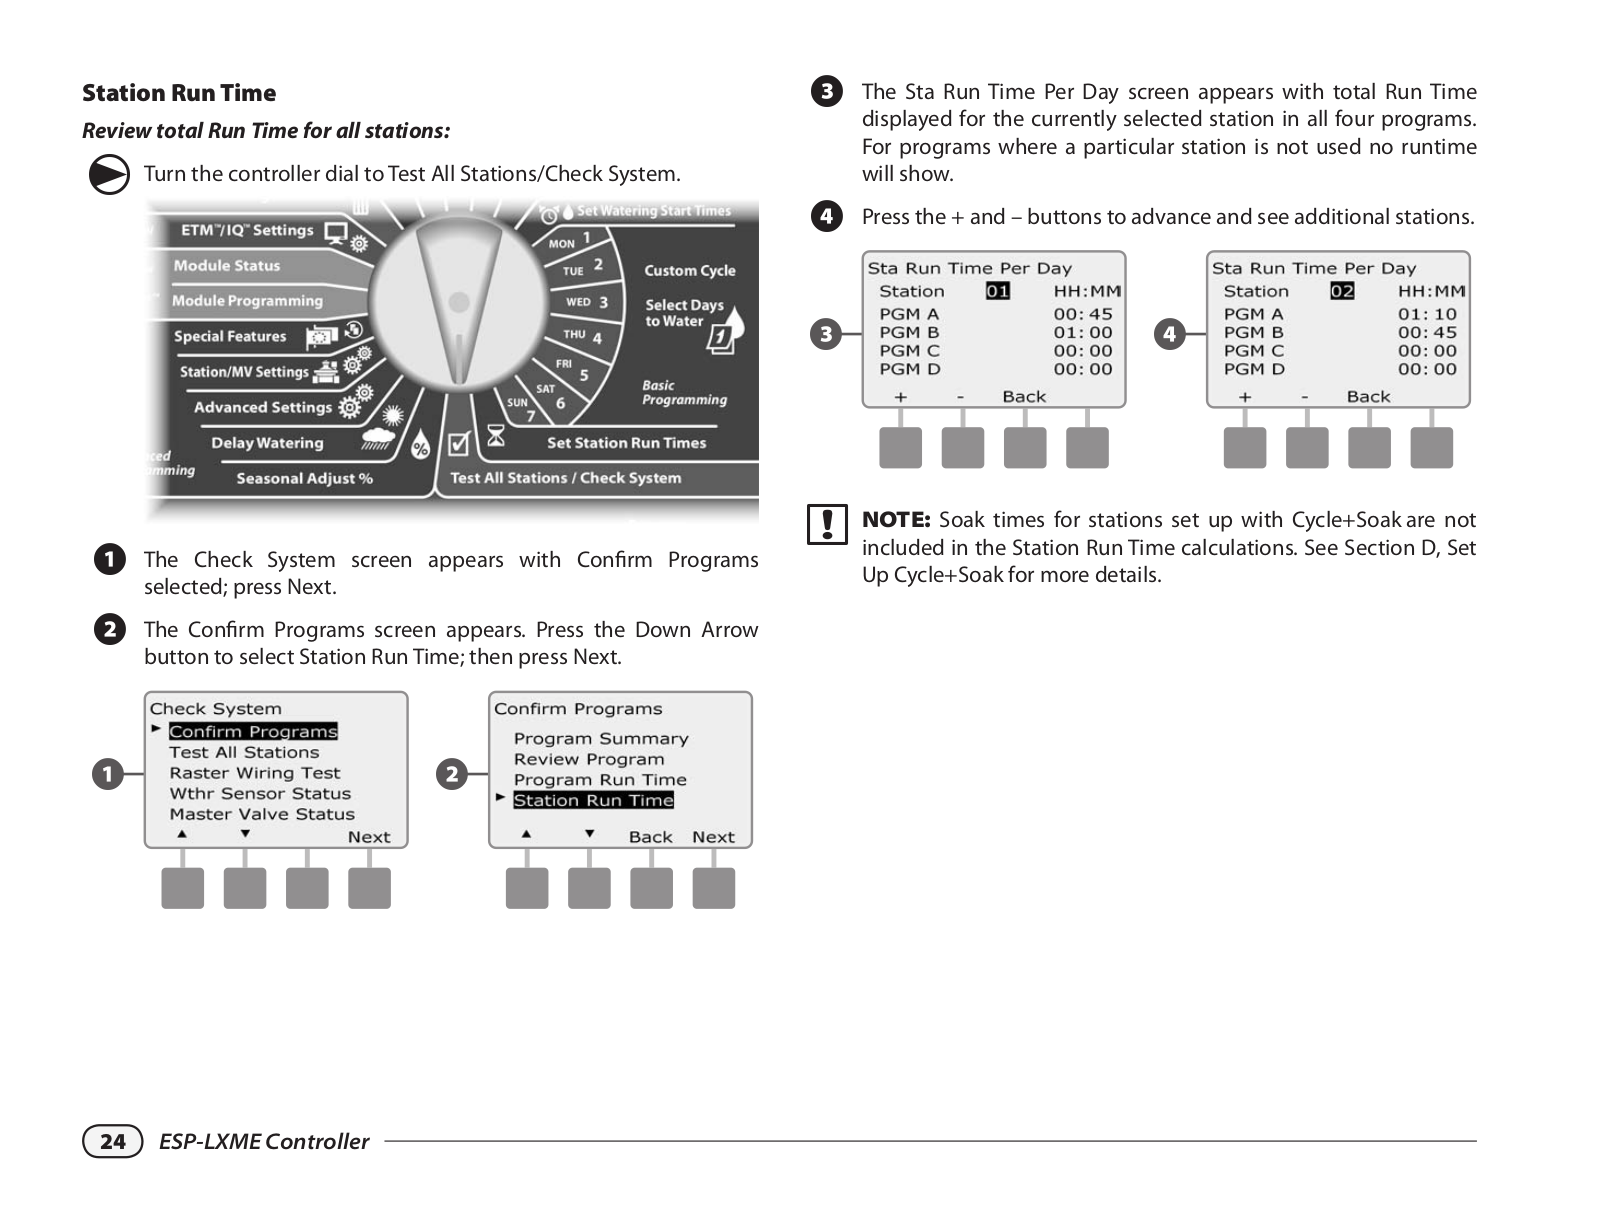
Review total Run Time for all stations:

ggTurn the controller dial to Test All Stations/Check System.

CThe Sta Run Time Per Day screen appears with total Run Time displayed for the currently selected station in all four programs. For programs where a particular station is not used no runtime will show.

D Press the + and – buttons to advance and see additional stations.

34

AThe Check System screen appears with Confirm Programs selected; press Next.

BThe Confirm Programs screen appears. Press the Down Arrow button to select Station Run Time; then press Next.

12

bbNOTE: Soak times for stations set up with Cycle+Soak are not included in the Station Run Time calculations. See Section D, Set Up Cycle+Soak for more details.

24 ESP-LXME Controller

Loading...
+ 86 hidden pages