

Rain Bird ESP-6LX+, ESP-8LX+, ESP-20LX+, ESP-24LX+, ESP-8LXi+ Installation, Programming, And Operation Manual
...
1
ESP-LX+ & LXi+ Installation, Programming, & Operation Guide
Rain Bird Sales, Inc. - Turf Products
970 W. Sierra Madre, Azusa, CA 91702
www.rainbird.com
P/N 634415-B
Installation, Programming, & Operation Guide
ESP-LX+ and ESP-LXi+
Indoor Models
ESP-8LXi+
ESP-12LXi+
ESP-16LXi+
Indoor / Outdoor Models
ESP-6LX+ ESP-16LX+
ESP-8LX+ ESP-20LX+
ESP-12LX+ ESP-24LX+
Special Upgrade Oer
Save an extra 15% o new sprinkler timers and
irrigation controllers at the Rain Bird Online Store.*
Still struggling with your old sprinkler
timer? Having a hard time complying
with local watering restrictions?
Upgrading to a new Rain Bird sprinkler
timer is easier than you might think.
New timers are easier to program than
ever before, with powerful features to
help save you time and water while
keeping your yard healthy and vibrant.
There are lots of models to meet your
needs, including indoor and outdoor
versions, exible modular timers and
even smart controllers that
automatically adjust themselves
based on the weather.
Shop Now at store.rainbird.com and
enjoy exclusive upgrade savings!
UPGRADE15
at checkout to save an extra 15% o*
* Additional discount not valid on clearance items, bundles or store specials.
Discount applies to controller products only. Cannot be combined with
other store discount codes. Valid at the Rain Bird Online Store only.
Enter discount code:
Subject to change without notice.
® Registered trademark of Rain Bird Corporation.

2
ESP-LX+ & LXi+ Installation, Programming, & Operation Guide
TABLE OF CONTENTS
Introduction ....................................................................................... 2
LX+ and LXi+ Series Controllers.................................................. 2
Controller Stations ................................................................... 2
Station Layout .......................................................................... 3
Controls, Switches, and Indicators ................................................ 4
Programming the Controller ............................................................... 6
Definitions ..................................................................................... 6
Programming Under Battery Power ............................................. 6
Programming Checklist ................................................................ 7
Fill Out Programming Chart .......................................................... 8
Clear All Program Information ..................................................... 10
Set Time...................................................................................... 11
Set Date ...................................................................................... 12
Select Program........................................................................... 13
Set Watering Day Cycle............................................................... 14
Custom .................................................................................. 14
Cyclical .................................................................................. 16
Odd/Even Cycle .................................................................... 18
Set Station Watering Times .......................................................... 19
Set Program Start Times ............................................................. 21
Set Water Budget........................................................................ 23
Set Station Delays ....................................................................... 24
Set MV / Pump Starts ................................................................. 26
Set Rain Delay............................................................................. 28
Set Calendar Days OFF .............................................................. 29
Set Sensor System and Bypass Switch ...................................... 31
Operating the Controller ................................................................... 33
Operate Controller Automatically ................................................ 33
Run Program(s) Manually ........................................................... 34
Run Station(s) Manually .............................................................. 35
Run Test Program ....................................................................... 36
Rapid Station Test Routine RASTER........................................... 37
Introduction ................................................................................ 37
RASTER Operation ..................................................................... 38
Running a RASTER (Rapid Station Test Routine) ......................... 38
Valve Testing ............................................................................... 40
Troubleshooting Open and Shorted Valve Circuits ...................... 43
Open Circuits ......................................................................... 43
Short Circuits ......................................................................... 44
Installing the Controller .................................................................... 45
Installation Checklist .................................................................... 45
Select Location ........................................................................... 46
Remove Door and Face Panel.................................................... 48
Mount Controller on Wall ............................................................. 50
Connect Field Wires .................................................................... 52
Field Wire Entrances .............................................................. 52
Station Valve Wiring ............................................................... 53
Master Valve Wiring ............................................................... 53
Sensor System Wiring ........................................................... 54
Pump Start Relay Wiring ............................................................. 55
Connect Main Power Wires ......................................................... 56
ESP-LX+ (Outdoor / Indoor Controller)................................. 56
ESP-LXi+ (Indoor only Controller) ......................................... 60
Install Battery .............................................................................. 62
Diagnostic Circuit Breaker .......................................................... 64
Troubleshooting ............................................................................... 65

1ESP-LX+ & LXi+ Installation, Programming, & Operation Guide
ATTENTION: UN DISJONCTEUR OU UN INTERRUPTEUR DOIT ETRE
INSTALLE SUR LE PRIMAIRE POUR ISOLER LE PROGRAMMATEUR.
LA MEMOIRE EST MAINTENUE GRACE A UNE BATTERIE RE-
CHARGEABLE A DISPOSER SELON LA REGLEMENTATION
LOCALE.
Léclair avec le symbole de la flèche, placé dans les
limites dun triangle èquilatéral est prévu pour avertir
lutilisateur de la présence de tension dangereuse
non isolé dans lenceinte du produit qui pourrait ëtre
dune importance suffisante pour présenter un risque
dèlectrocution aux personnes.
Le point dexclamation dans un triangle èquilatéral est
prévu pour avertir lutilisateur de la présence
dinstructions importantes pour les opérations et
lentretien (service) dans les manuels fournis avec
lappareil.
WARNING: A CIRCUIT BREAKER OR CUTOFF SWITCH IS TO BE
PROVIDED IN THE FIXED WIRING TO ISOLATE THE CONTROL-
LER.
MEMORY IS RETAINED BY A BATTERY, WHICH IS TO BE DIS-
POSED OF IN ACCORDANCE WITH LOCAL REGULATIONS.
CAUTION ICONS
The lightning flash with arrowhead symbol, within an
equilateral triangle, is intended to alert the user to the
presence of uninsulated dangerous voltage within
the products enclosure that may be of sufficient
magnitude to constitute a risk of electronic shock to
persons.
The exclamation point within an equilateral triangle is
intended to alert the user to the presence of important
operating and maintenance (servicing) instructions in
the literature accompanying the product.

2 ESP-LX+ & LXi+ Installation, Programming, & Operation Guide
INTRODUCTION
LX+ and LXi+ Series Controllers
The ESP (Extra Simple Programming) -LX+, -LXi+ Series
controller is an irrigation timing system for residential and light
commercial use.
The ESP-LX+ comes in 6-, 8-, 12-, 16-, 20-, or 24-station
models, designed for either indoor or outdoor use. The
ESP-LXi+ comes in 8-, 12-, or 16-station models, for indoor use
only.
ESP-LX+ and ESP-LXi+ controllers bearing the
remote ready icon (shown at right) can be
connected to Rain Birds Radio Frequency (RF)
receivers (RM-1R & RMX-1R).
For example, the illustration on page 3 shows that station 1 is
currently watering. When station 1 is finished, the controller
will shut it off and start station 2. In the same way, station 3 will
begin watering when station 2 is finished.
NOTE: ESP-LX+ and -LXi+ controllers let you set a
delay between stations. For example, if you set a oneminute delay, station 1 will run until finished, followed
by a one-minute delay. Then station 2 will operate,
followed by a one-minute delay.
Controller Stations
Your ESP-LX+ or LXi+ Series controller is an electronic clock
that controls when your sprinkler system turns on, and how
long the sprinklers run. The controller has several sprinkler
stations connected to it, as shown in the illustration on the
following page. Each station is connected to a remote control
sprinkler valve.
The valve opens when it receives power from the controller,
and the sprinklers connected to that valve turn on. When these
sprinklers have run for their programmed time, the controller
shuts off the valve and opens the next valve in sequence.

3ESP-LX+ & LXi+ Installation, Programming, & Operation Guide
Station Layout
4 ESP-LX+ & LXi+ Installation, Programming, & Operation Guide
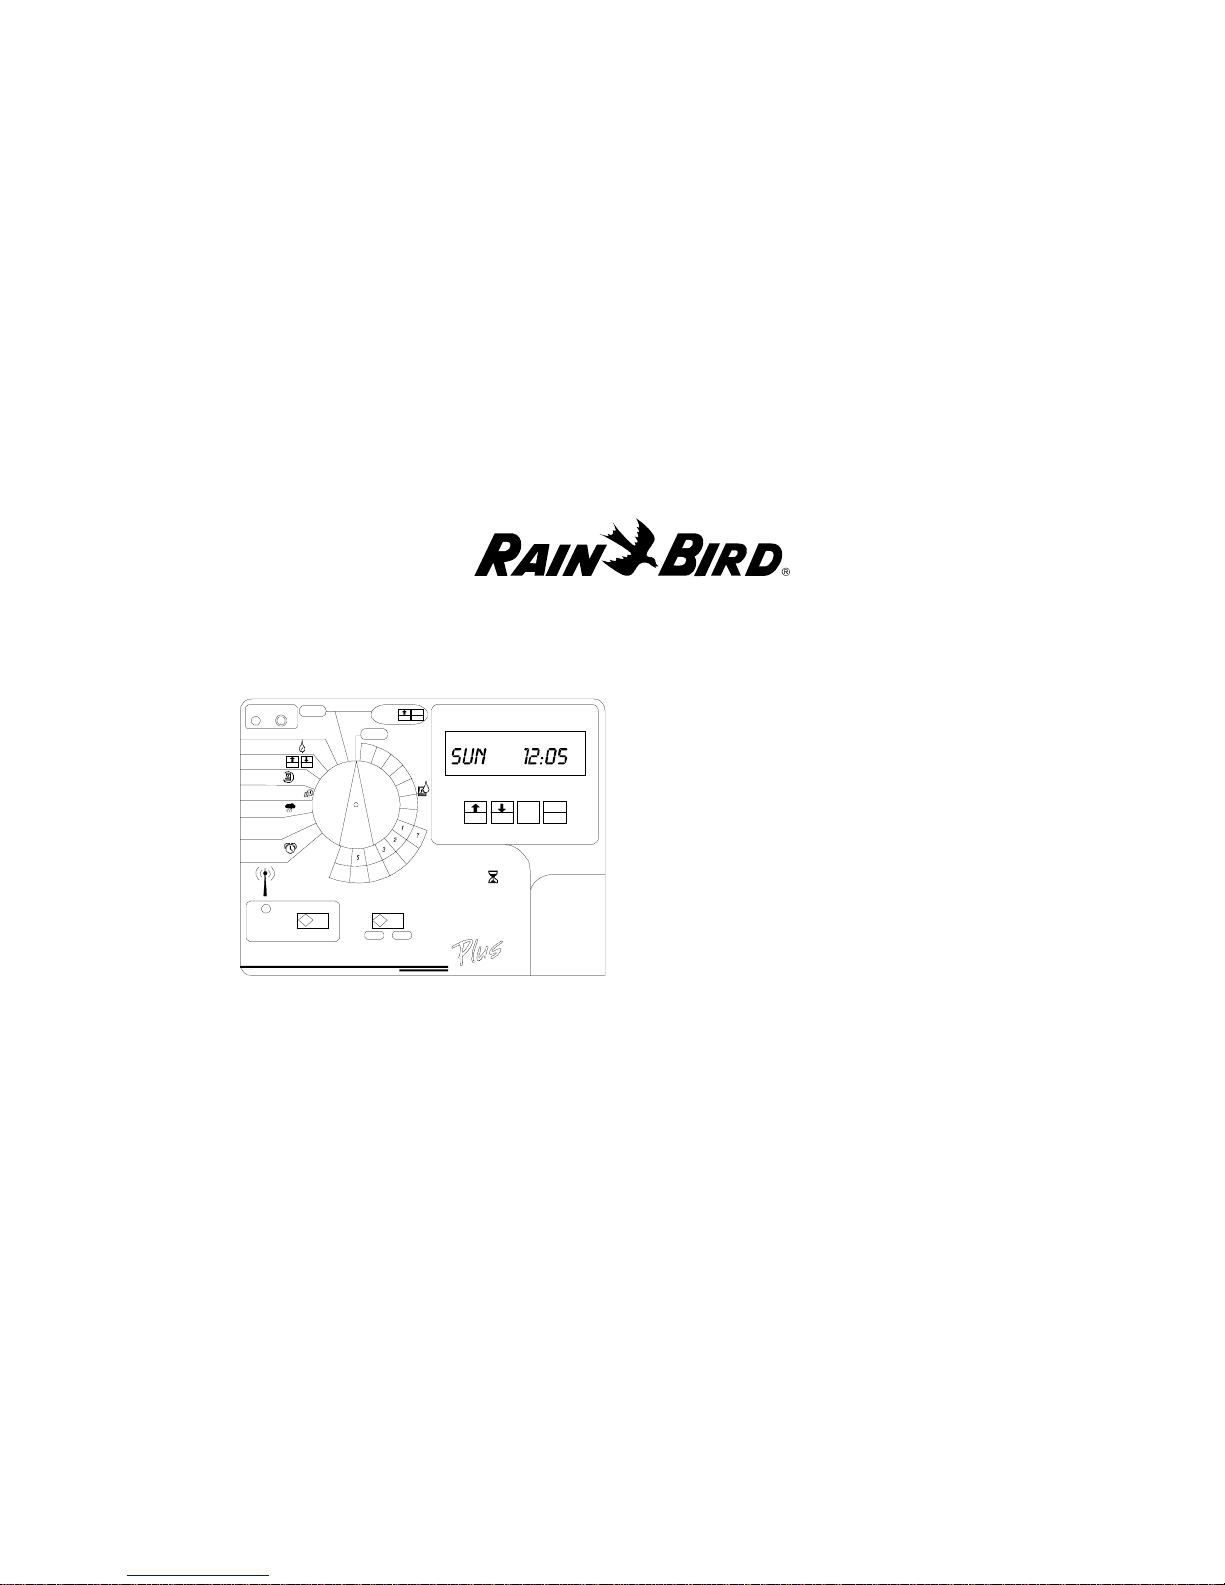
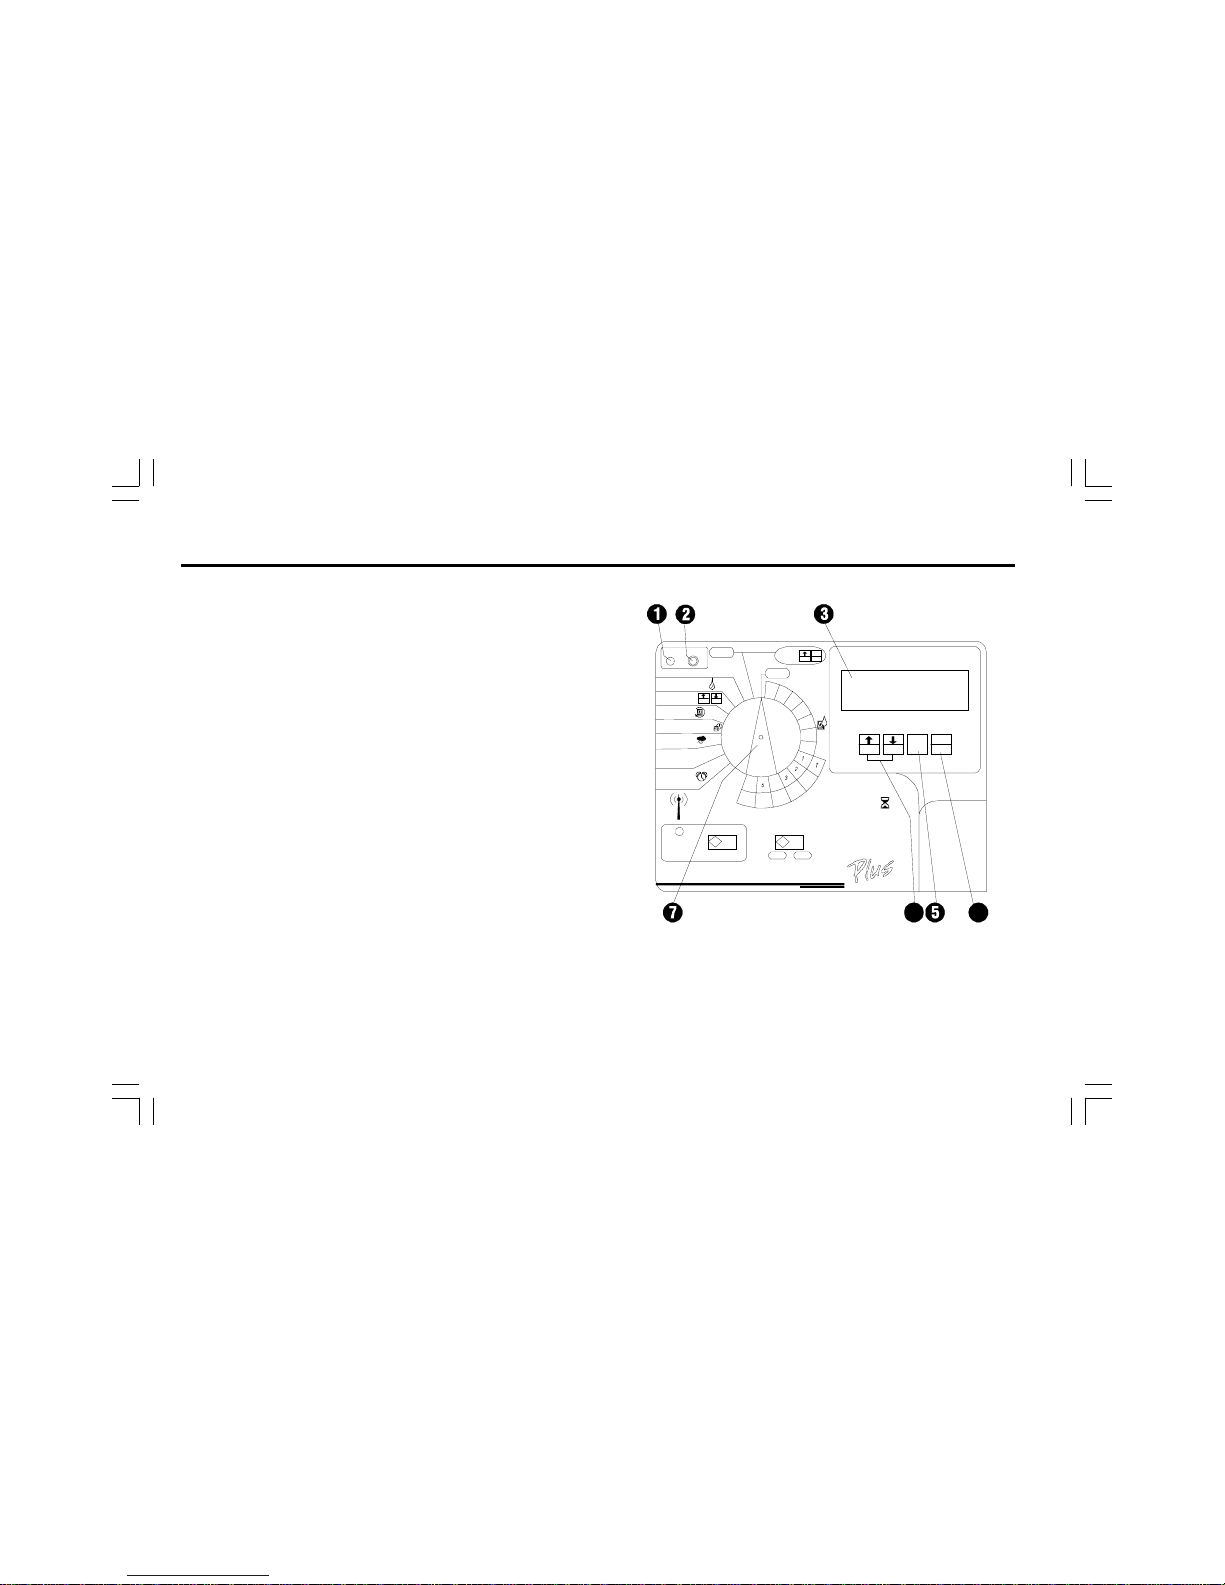
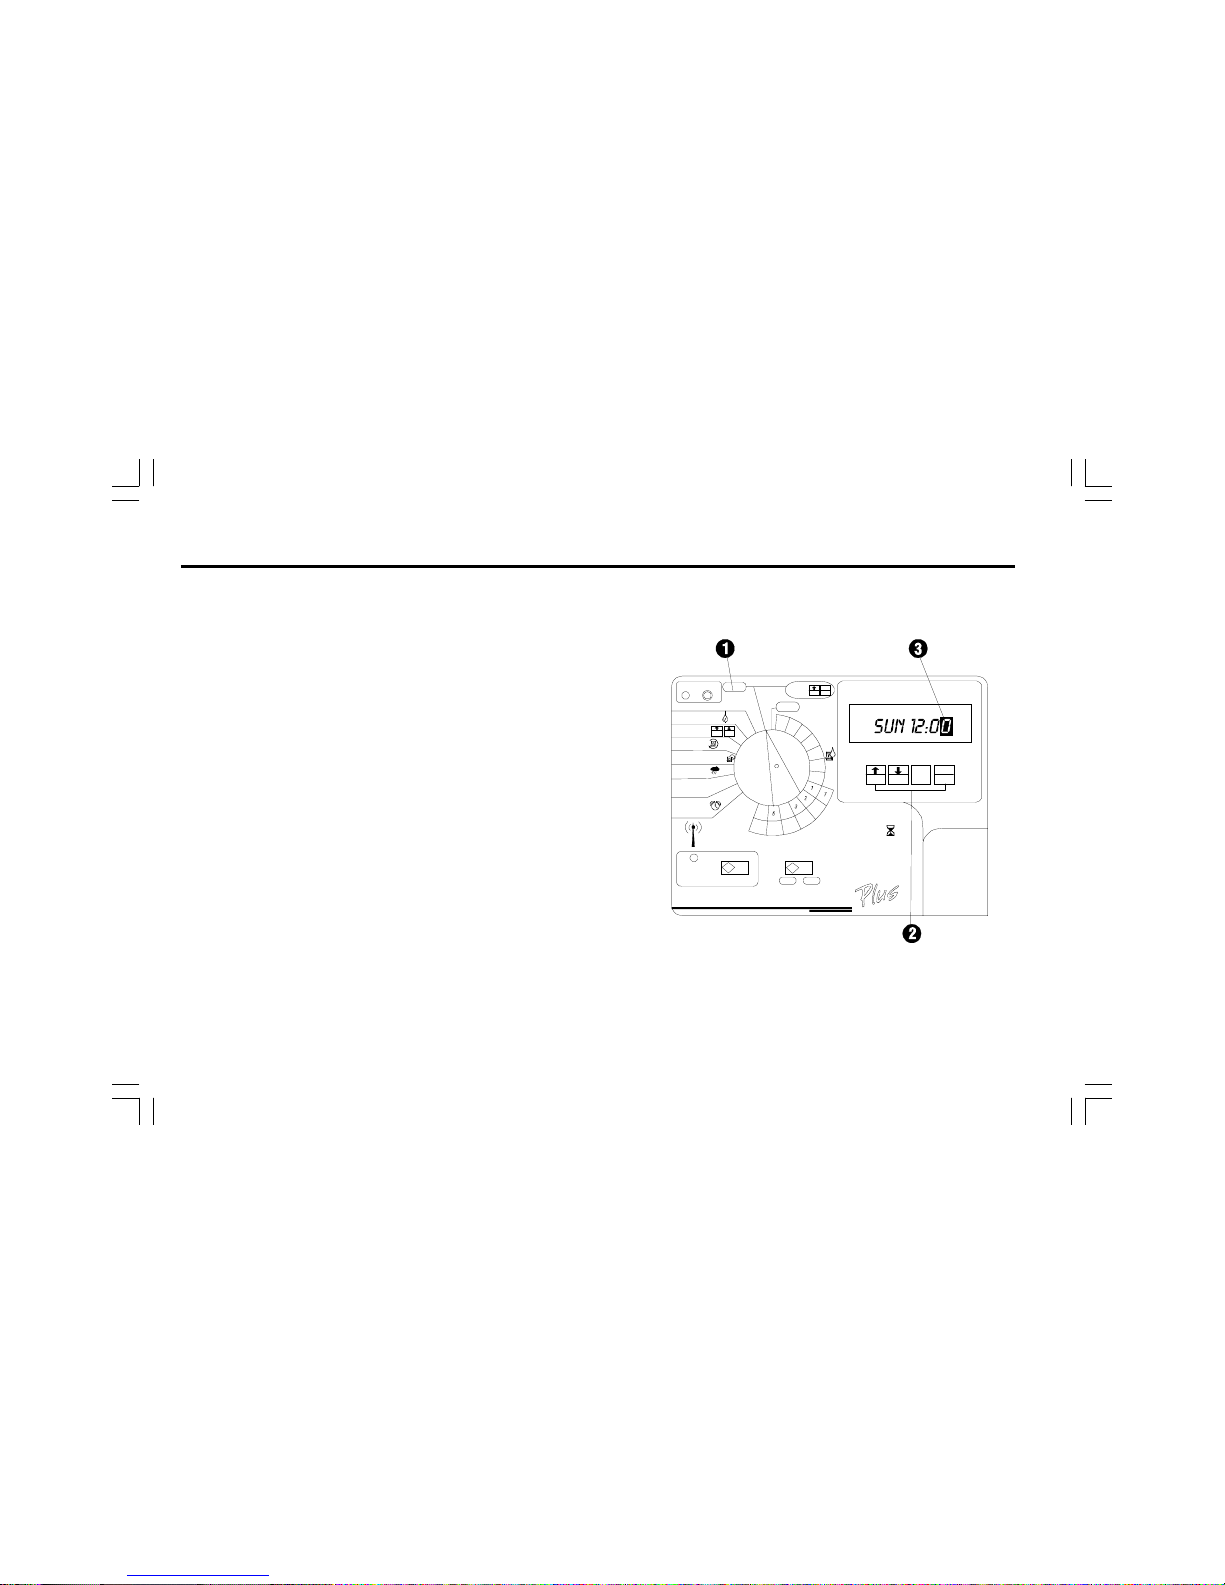
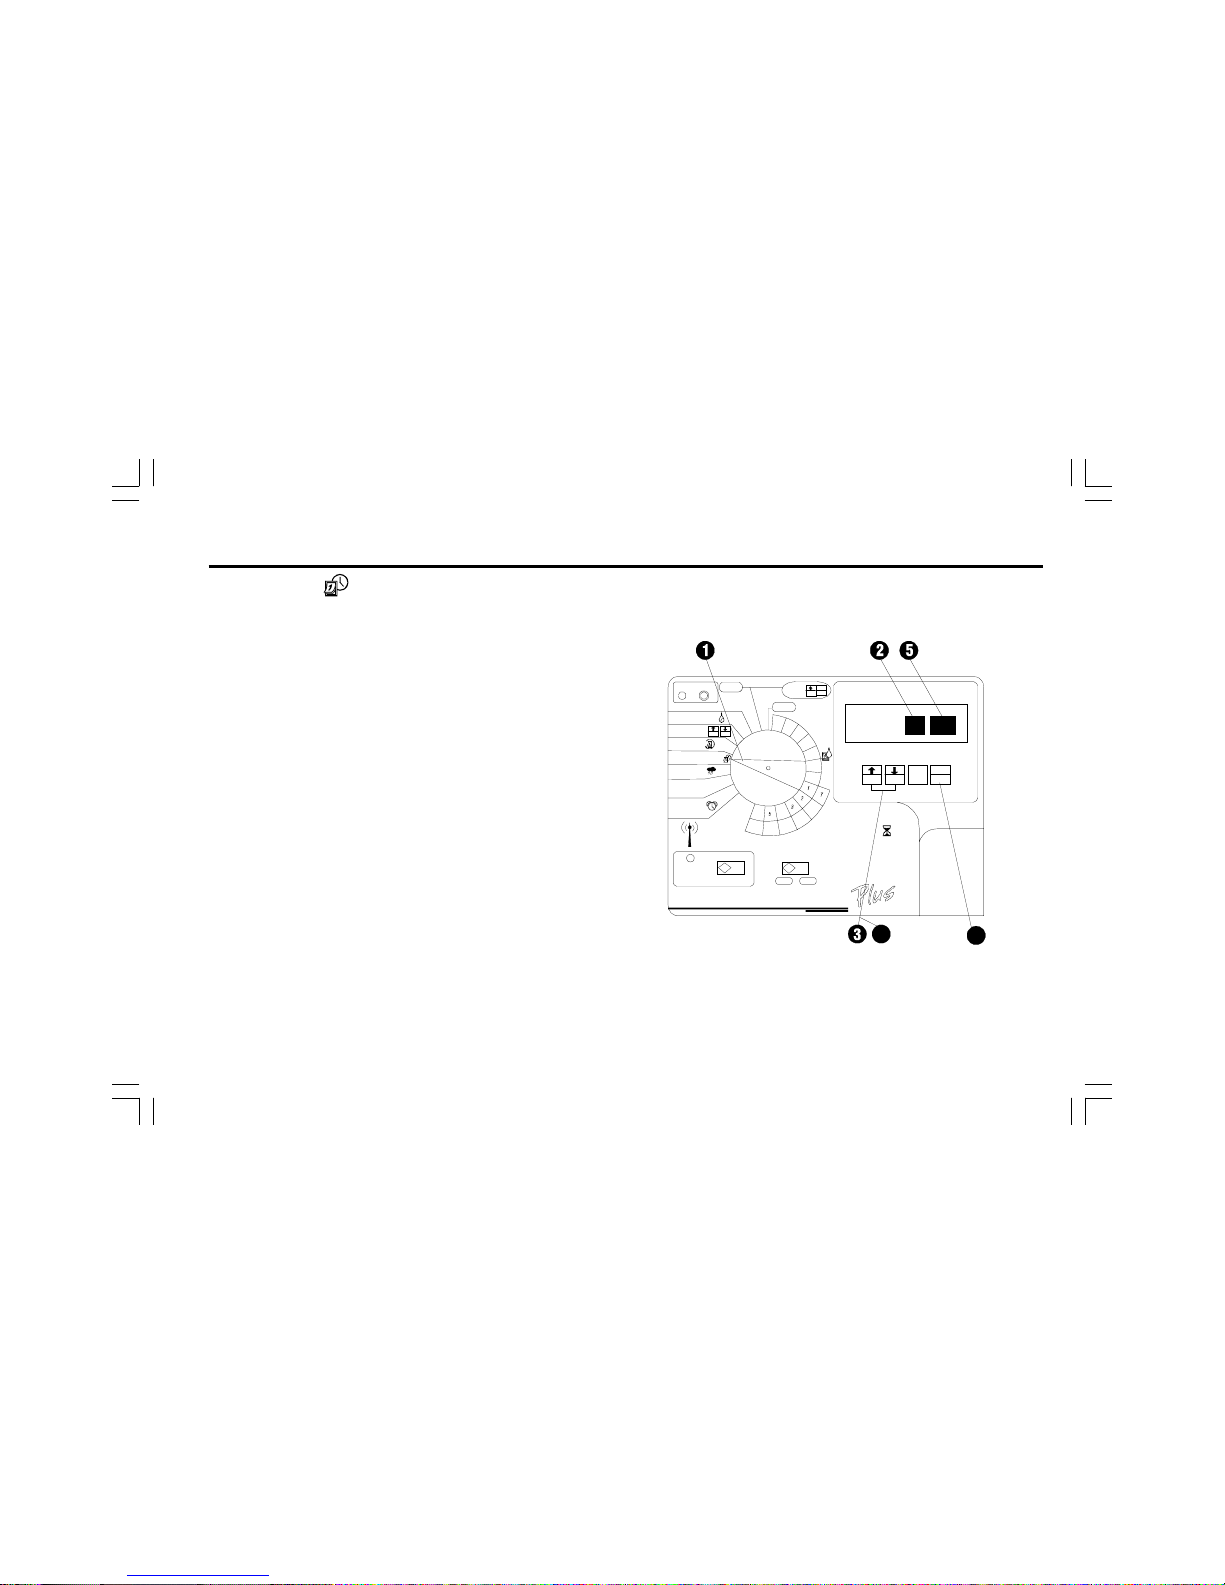
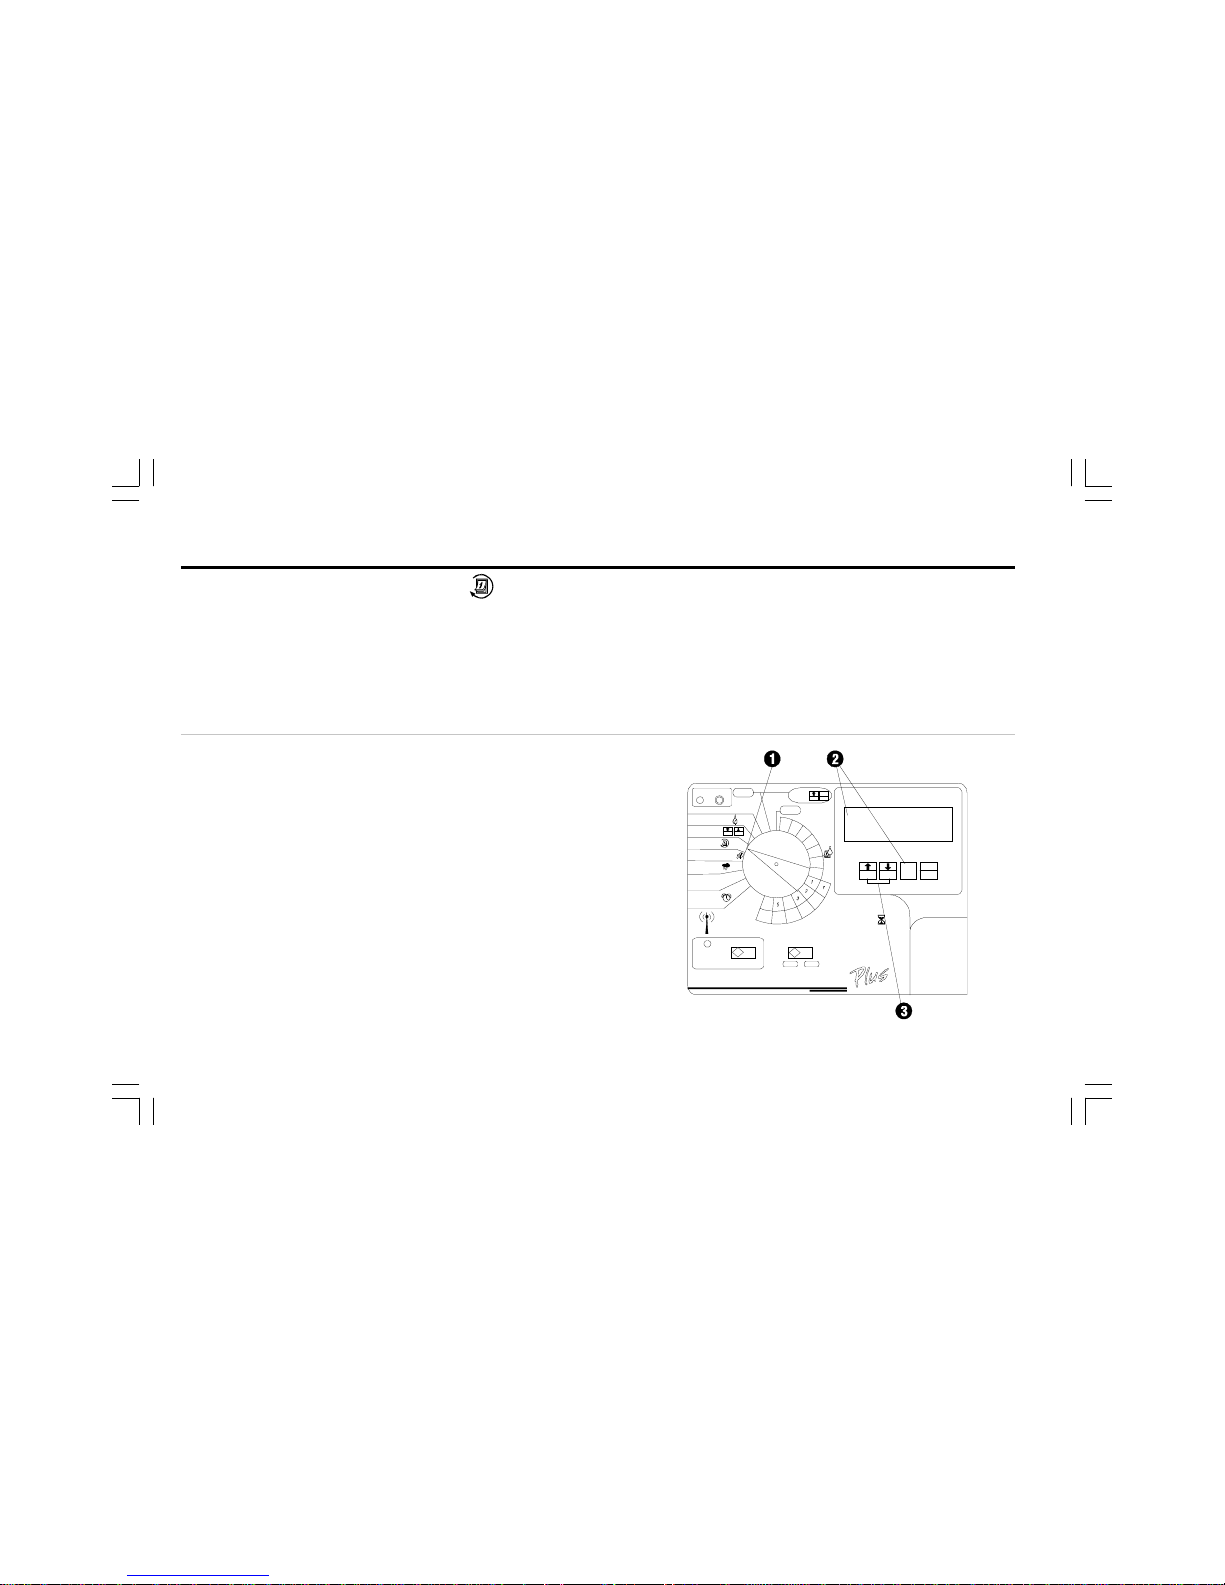
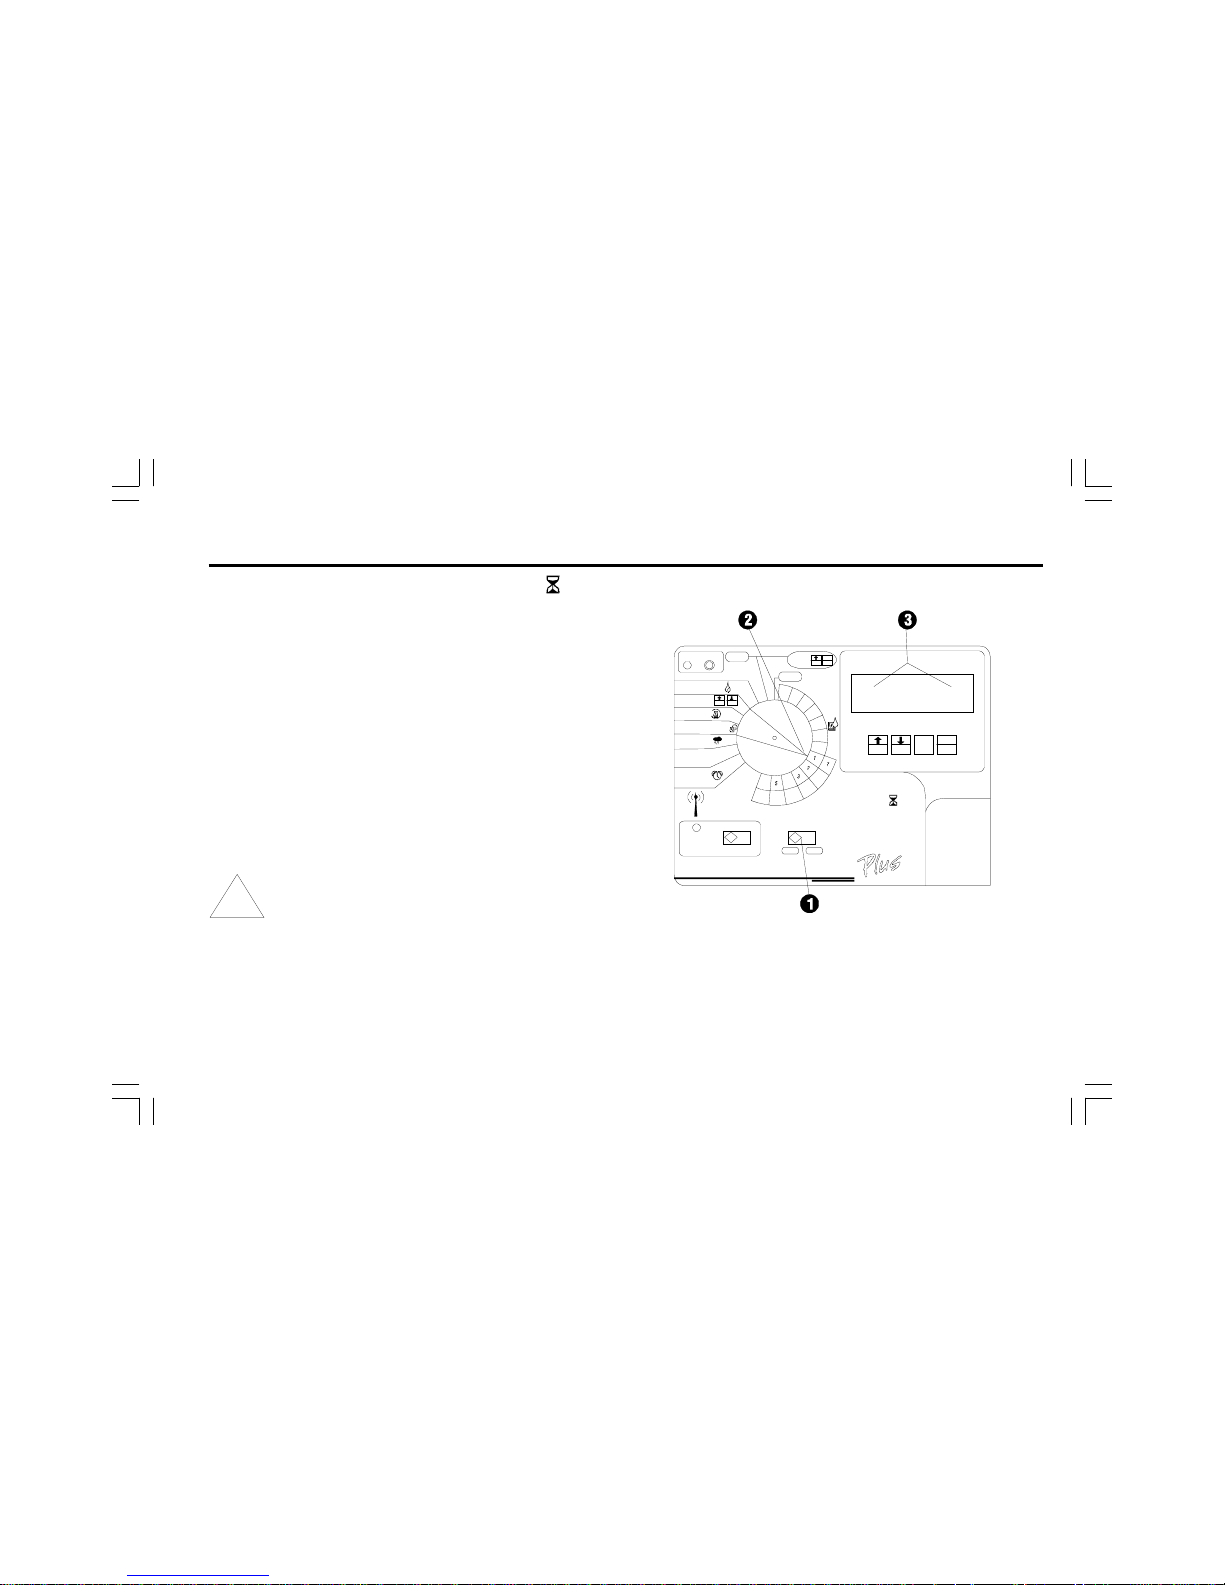
Controls, Switches, and Indicators
This illustration shows the controls, switches, and indicators on
ESP-LX+ and LXi+ controllers, including:
➊ Fault LED flashes when the controller senses a station
short circuit.
➋ Clear Fault Button used to turn off the Fault LED and
clear the flashing LCD Error indicator after the fault has
been corrected.
➌ LCD Display during normal operation, displays the time
of day; during programming, shows the result of your
commands; during watering, shows the station that is
running and the minutes remaining in its run time (when
program dial is set to the AUTO position).
➍ Manual Start / Advance Button used to start a program
manually or to manually advance watering from one
station to the next. Also used to make program changes.
➎ PGM Button used to select watering program A, B, C, or
D-drip.
➏ Arrow / ON-OFF Buttons used to set times and days, and
to make program changes.
Programming Dial used to turn the controller off and on,
and for programming.

5ESP-LX+ & LXi+ Installation, Programming, & Operation Guide
➑ Watering Suspended by Sensor LED glows when watering
is prevented by a moisture sensor.
➒ Sensor Bypass Switch used to tell the controller to obey
or ignore input from a moisture sensor system. (Sensor
systems are optional.)
➓ Stations Slide Switch used to select one of the station
rows around the Programming Dial. (For 12-, 16-, 20-, and
24-station models only.)

6 ESP-LX+ & LXi+ Installation, Programming, & Operation Guide
• Start time(s) - the time(s) of day that the program
begins; this is the time that the first station in the program
begins watering; all other stations in the program then
follow in sequence.
NOTE: The term start time refers to the time that a
program starts not to the time that each individual
station begins to run.
• Run time - the number of minutes (or hours and minutes)
that each station runs.
PROGRAMMING THE CONTROLLER
Programming Under Battery Power
If you wish, you can remove the front face panel of the controller and program the unit under battery power. This feature can
be useful if the controller is installed in an area that is not
readily accessible. This feature also lets you enter program
information before installing the controller at the job site.
Definitions
Programming is the process of telling the controller exactly
when and how long you want to water. The controller opens
and closes the remote control valves according to the program you set.
Each program contains:
• Watering days - the specific days of the week on which
watering takes place (for example, Monday, Wednesday,
Friday), or the watering interval (for example, every third day,
or only on even or odd days of the month).
To program the ESP-LX+ or ESP-LXi+ controller under battery
power, install the battery as described on page 62. To remove
the face panel, see the instructions on page 48. The controller
can be programmed under battery power, but should not be
operated on battery power alone. Connect the controller to an
AC power source as soon as possible to avoid battery drain.

7ESP-LX+ & LXi+ Installation, Programming, & Operation Guide
Programming Checklist
To program the ESP-LX+ or LXi+ controller for the first time,
we recommend that you complete the following steps in order.
For your convenience, a check-off box (❐) is provided for each
step.
❐ Fill out Programming Chart .................................................. Page 8
❐ Clear all program information ............................................... Page 10
❐ Set time and date................................................................. Page 11
For each program:
)*+,
❐❐❐❐Select program (A, B, C, or D-drip). ... Page 13
❐❐❐❐Set watering day cycle ....................... Page 14
❐❐❐❐Set station watering times. ................. Page 19
❐❐❐❐Set program start time(s). ................... Page 21
❐❐❐❐Set water budget (optional). ............... Page 23
❐❐❐❐Set station delays (optional). .............. Page 24
❐ Set master valve / pump starts for each station (optional). . Page 26
❐ Set rain delay (optional). ...................................................... Page 28
❐ Set calendar day(s) OFF (optional). ..................................... Page 29
❐ Set sensor system and bypass switch (optional). ............... Page 31
❐ Set controller to automatic operation. ................................. Page 33
❐ Run test program (optional). ................................................. Page 36

8 ESP-LX+ & LXi+ Installation, Programming, & Operation Guide
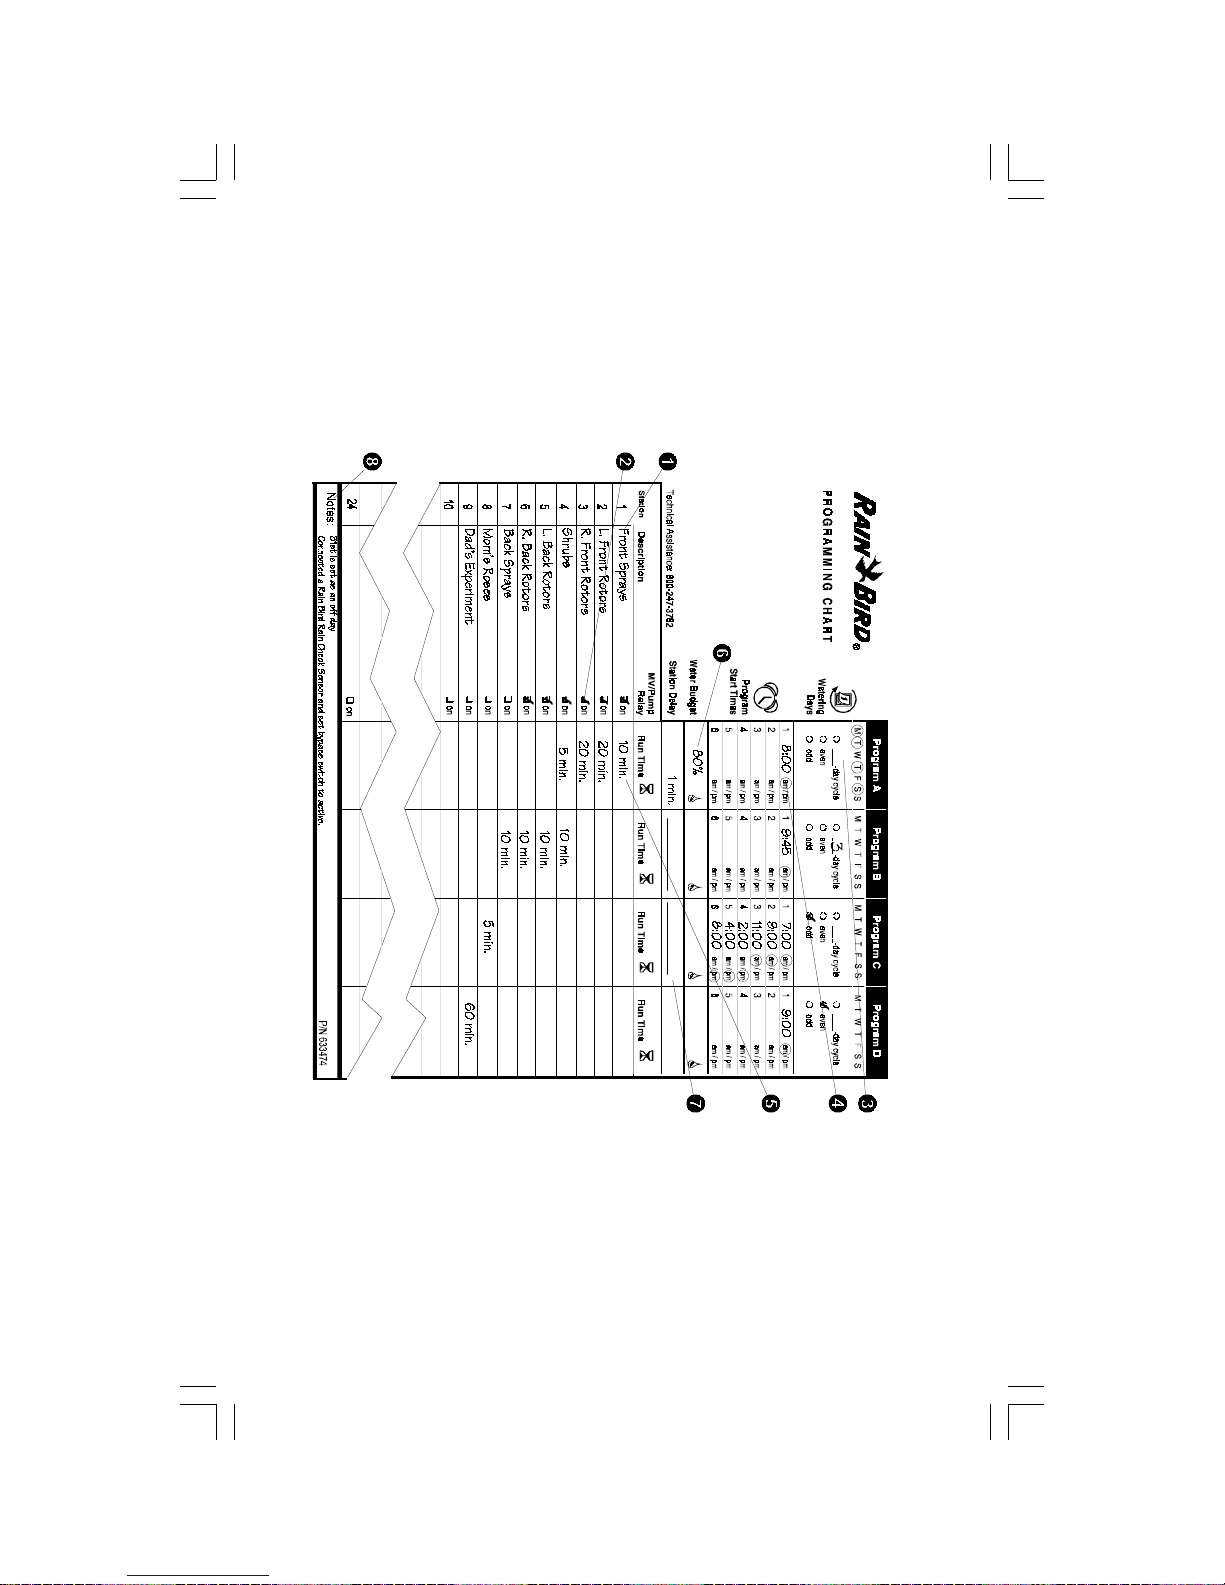
Fill Out Programming Chart
Before you begin programming, fill out the Programming Chart
and attach it to the inside of the controller door. A sample
Programming Chart is shown on page 9. Follow these instructions to complete the chart.
➊ Describe the sprinklers or plant zones covered by each
station on the controller.
➋ Indicate which stations drive a master valve or booster
pump relay by checking ON in the MV / Pump column.
(See page 26 for more information).
➌ In the Program A column, for Custom cycle, circle the
specific days of the week; for Cyclical schedule, write the
cycle period (e.g., 3-day cycle means every third day);
for ODD/EVEN-day watering, check ODD or EVEN.
➍ Enter the start time for Program A. You may enter up to six
start times for each program, but only one is needed to run
the program.
NOTE: Start times apply to the program, not to the
individual stations assigned to the program. In this
example, Program A begins watering at 8:00 a.m. on
Mondays, Tuesdays, Thursdays, and Saturdays.
Station 1 runs for ten minutes, followed by Station 2
for 20 minutes, Station 3 for 20 minutes, and Station 4
for 5minutes. The entire program takes about an
hour.
➎ Enter the watering run time (in hours and minutes) for each
station assigned to Program A.
➏ Enter the water budget percentage by program. The water
budget for sample Program A is set to 80%.
➐ Enter the station delays for Program A. A station delay is
the time between the end of one stations operation and
the beginning of the next. Use a station delay to let a water
well recover or to allow slow-closing valves to turn off
completely. If neither of these situations applies to your
site, leave the station delay set to 0. A station delay setting
applies to all stations in the program.
In the sample chart, Program A has a one-minute delay
between stations. When Station 1 ends, the controller waits
one minute before starting Station 2. There will also be a
one-minute delay between Station 2 and Station 3, etc.
➑ Make any special notes in the space provided.
➒ Repeat steps 2 through 7 for Programs B, C, and D.
NOTE: Stations assigned to Program D cannot be
used in any other programs. See page 19 for more
information.
For E S P -LX + a nd LX i+ Co n trollers
D
9ESP-LX+ & LXi+ Installation, Programming, & Operation Guide
10 ESP-LX+ & LXi+ Installation, Programming, & Operation Guide
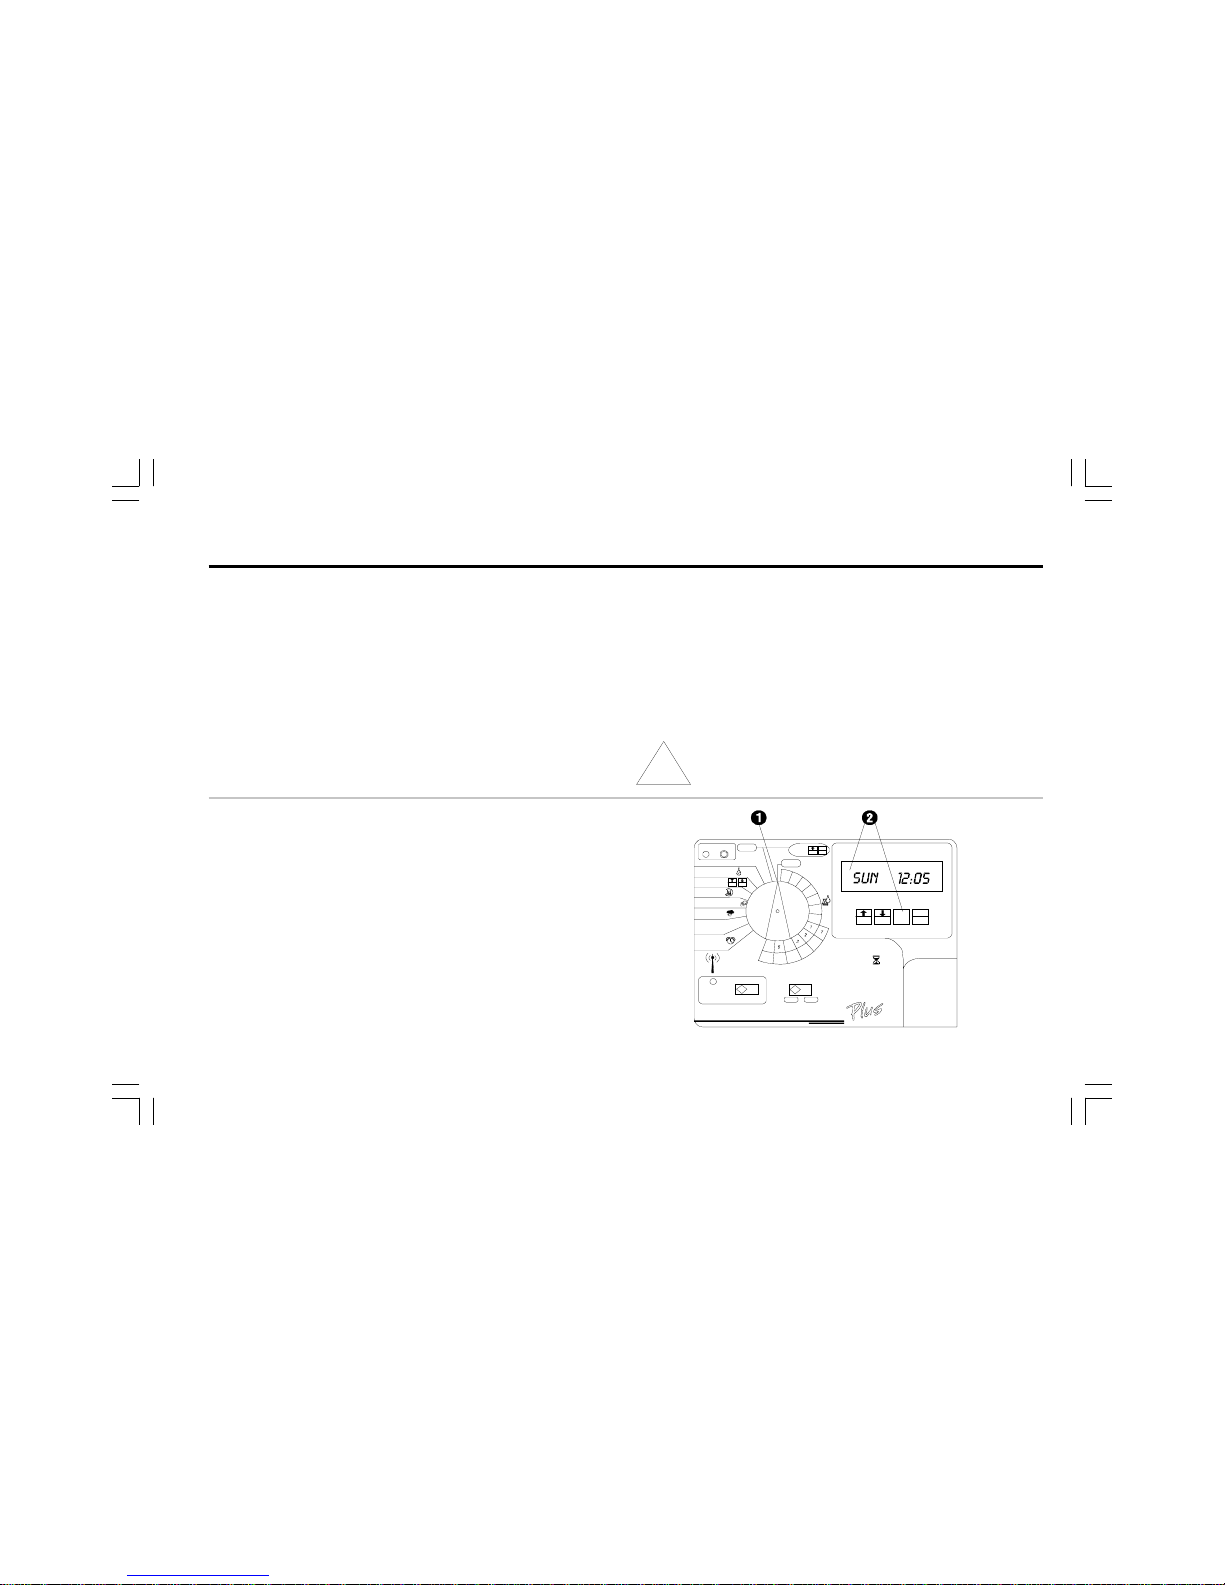
Clear All Program Information
To ensure you begin with a clean setup, clear the controller of
all existing program settings.
➊ Turn the dial to OFF.
➋ Hold down ON and MAN. START/ADV. for about seven
seconds until the display reads INITSYS and then begins to
scroll.
➌ When the last digit in SUN 12:00 flashes in the display, the
existing program settings have been cleared.
11ESP-LX+ & LXi+ Installation, Programming, & Operation Guide
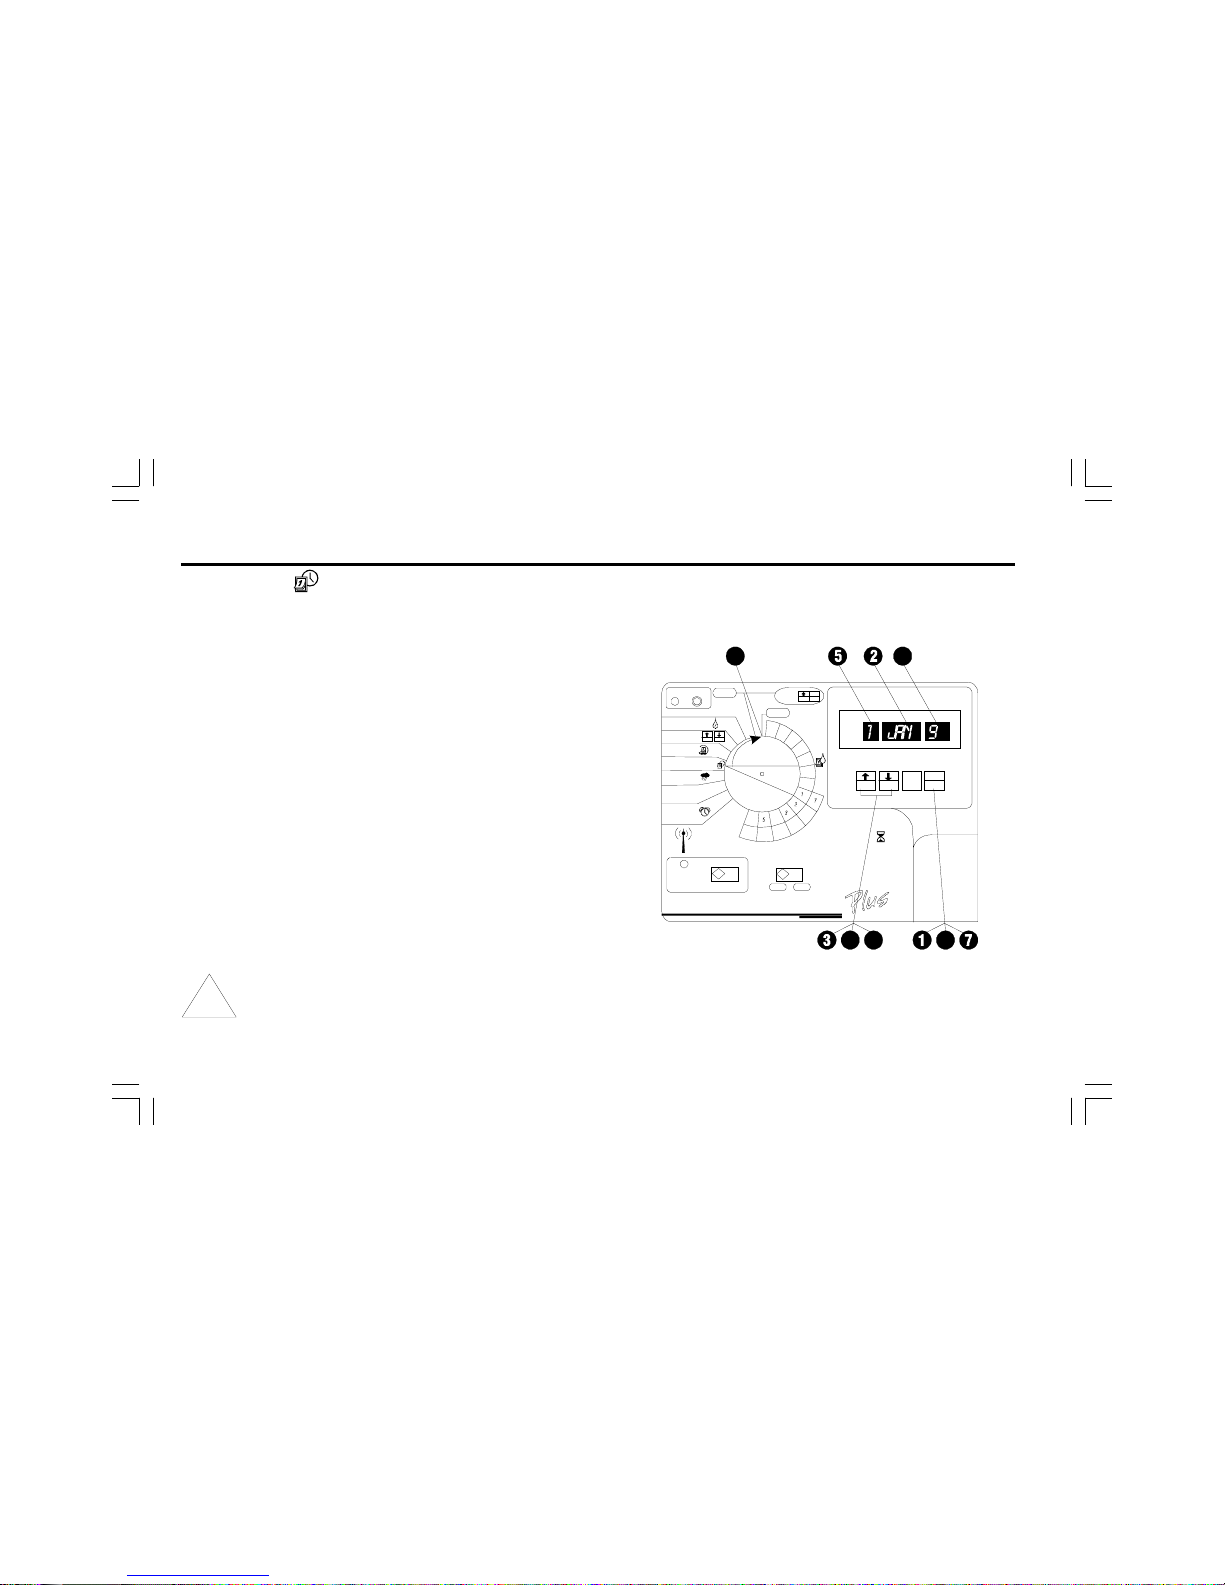
Set Time
Before you can program the controller, you must set its internal
clock to the correct time and date.
➊ Turn the dial to TIME & CALENDAR.
➋ The hour digits in the display flash.
➌ Press ñ or ò to set the current hour. Make sure the AM/
PM indicator is set to the correct designation.
➍ Press MAN. START/ADV.
➎ The minutes digits in the display flash.
➏ Press ñ or ò to set the current minute.
12 ESP-LX+ & LXi+ Installation, Programming, & Operation Guide
Set Date
➊ Press MAN. START/ADV. until the date (1/JAN/95) shows
in the display.
➋ The month flashes in the display.
➌ Press ñ or ò to set the current month.
➍ Press MAN. START/ADV.
➎ The day number flashes in the display.
➏ Press ñ or ò to set the current day of the month.
➐ Press MAN. START/ADV.
➑ The year flashes in the display.
➒ Press ñ or ò to set the current year.
➓ You are finished setting the time and date. Turn the dial to
AUTO.
NOTE: If you do not want to water on a specific day of
the month or on the 31st of any month, see Set
Calendar Days OFF on page 29.
13ESP-LX+ & LXi+ Installation, Programming, & Operation Guide
Programs A, B, and C are not allowed to overlap each other. If
they are programmed to overlap, programs A, B, or C will
stack (run in consecutive order upon the completion of the
program in progress).
Program stacking prevents excessive flow demand and low
water pressure caused by having too many valves running at
one time.
NOTE: It is easier to select one program and program
it completely. Jumping from program to program can
be confusing.
Select Program
Four independent programs are available in the ESP-LX+,
LXi+ Series controller: A, B, C, and D-drip. Multiple independent programs let you enter watering schedules to meet the
requirements of different types of plant materials, soils, slopes,
shady or sunny areas, etc.
The D-drip program is designed for drip irrigation equipment.
Stations assigned to the D-drip program cannot be assigned
to any other program. The D-drip program can overlap, or run
concurrently, with programs A, B, or C.
➊ Turn the dial to AUTO.
➋ Press PGM to cycle through the available programs. The
program indicator on the far left side of the display shows
which program is currently selected.
14 ESP-LX+ & LXi+ Installation, Programming, & Operation Guide
Set Watering Day Cycle
Each program can operate in one of four watering day cycles:
1. CUSTOM waters on the days of the week you select. See
the instructions below.
2. CYCLICAL waters on a selected daily interval (for example,
every other day, or every third day). See page 16.
3. ODD waters only on odd-numbered days of the month.
See page 18.
4. EVEN waters only on even-numbered days of the month.
See page 18.
Custom
To set a custom cycle:
➊ Turn the dial to DAY CYCLE.
➋ The display shows the currently selected program. If the
program you want is not displayed, press PGM until it
appears.
➌ Press ñ or ò until CUSTOM appears in the display.

15ESP-LX+ & LXi+ Installation, Programming, & Operation Guide
➍ Turn the dial to MON.
➎ The display shows the selected day and either ON or
OFF. ON means the selected day is a watering day. OFF
means watering doesnt take place on that day.
➏ Press ñ or ò to set the day ON or OFF.
➐ Turn the dial to the next day of the week. Repeat steps 5 and
6 until you have set each day of the week ON or OFF.
➑ Turn the dial to AUTO.
16 ESP-LX+ & LXi+ Installation, Programming, & Operation Guide
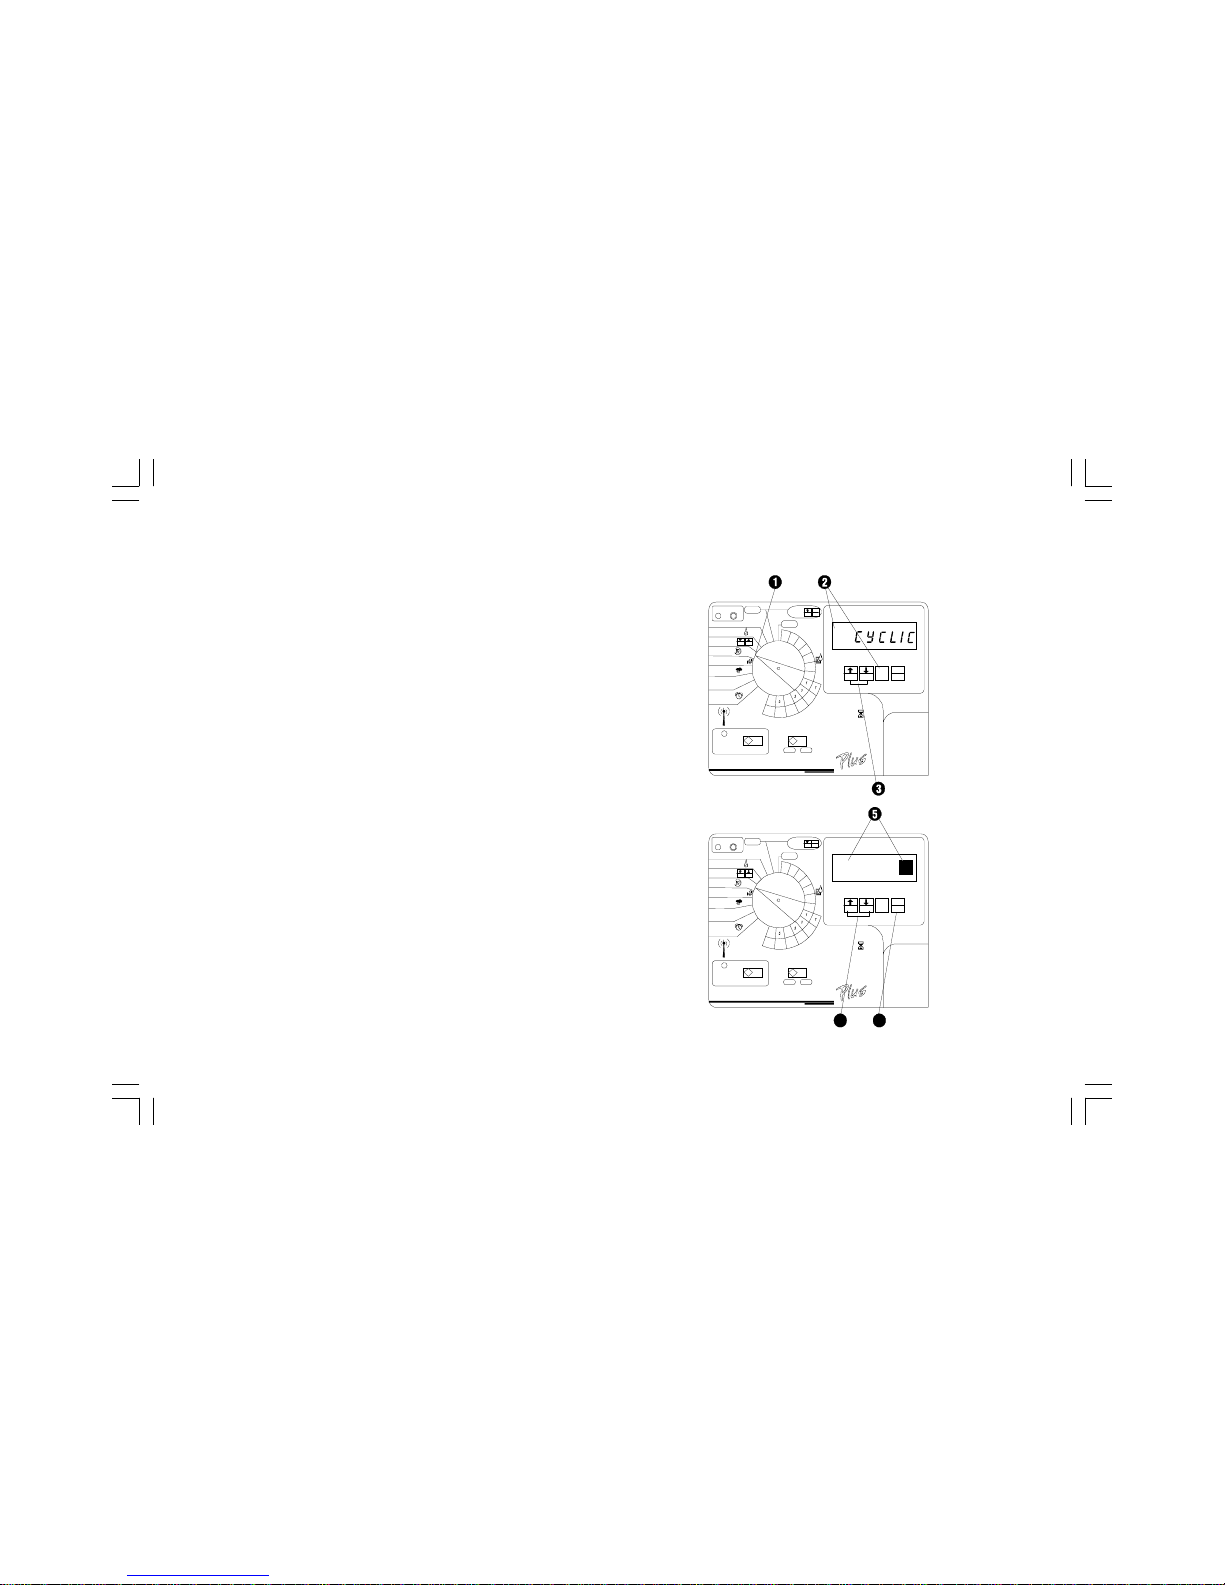
Cyclical
To set a cyclical schedule:
➊ Turn the dial to DAY CYCLE.
➋ The display shows the currently selected program. If the
program you want is not displayed, press PGM until it
appears.
➌ Press ñ or ò until CYCLIC appears in the display.
➍ Press MAN. START/ADV.
➎ The display shows the number of days remaining until a
watering day and the number of days in the cycle. The DAY
CYCLE digit flashes.
➏ Press ñ or ò to set the number of days in the cycle. For
example, if you want to water every other day, set the day
cycle to 2. If you want to water every third day, set the day
cycle to 3.
17ESP-LX+ & LXi+ Installation, Programming, & Operation Guide
➐ Press MAN. START/ADV.
➑ The DAYS REMAINING digit flashes.
➒ Press ñ or ò to set the number of days remaining before
the next watering day. 0 means that today is a watering
day. So if you want watering to begin tomorrow, set the days
remaining to1.
➓ Turn the dial to AUTO.
18 ESP-LX+ & LXi+ Installation, Programming, & Operation Guide
Odd/Even Cycle
To set an odd/even cycle:
➊ Turn the dial to DAY CYCLE.
➋ The display shows the currently selected program. If the
program you want is not displayed, press PGM until it
appears.
➌ Press ñ or ò until ODD or EVEN appears in the
display.
➍ Turn the dial to AUTO.
NOTE: If you do not want to water on the 31st of any
month (a restriction imposed in some local areas), you
must set the 31st day OFF. See page 29 for
instructions.
19ESP-LX+ & LXi+ Installation, Programming, & Operation Guide
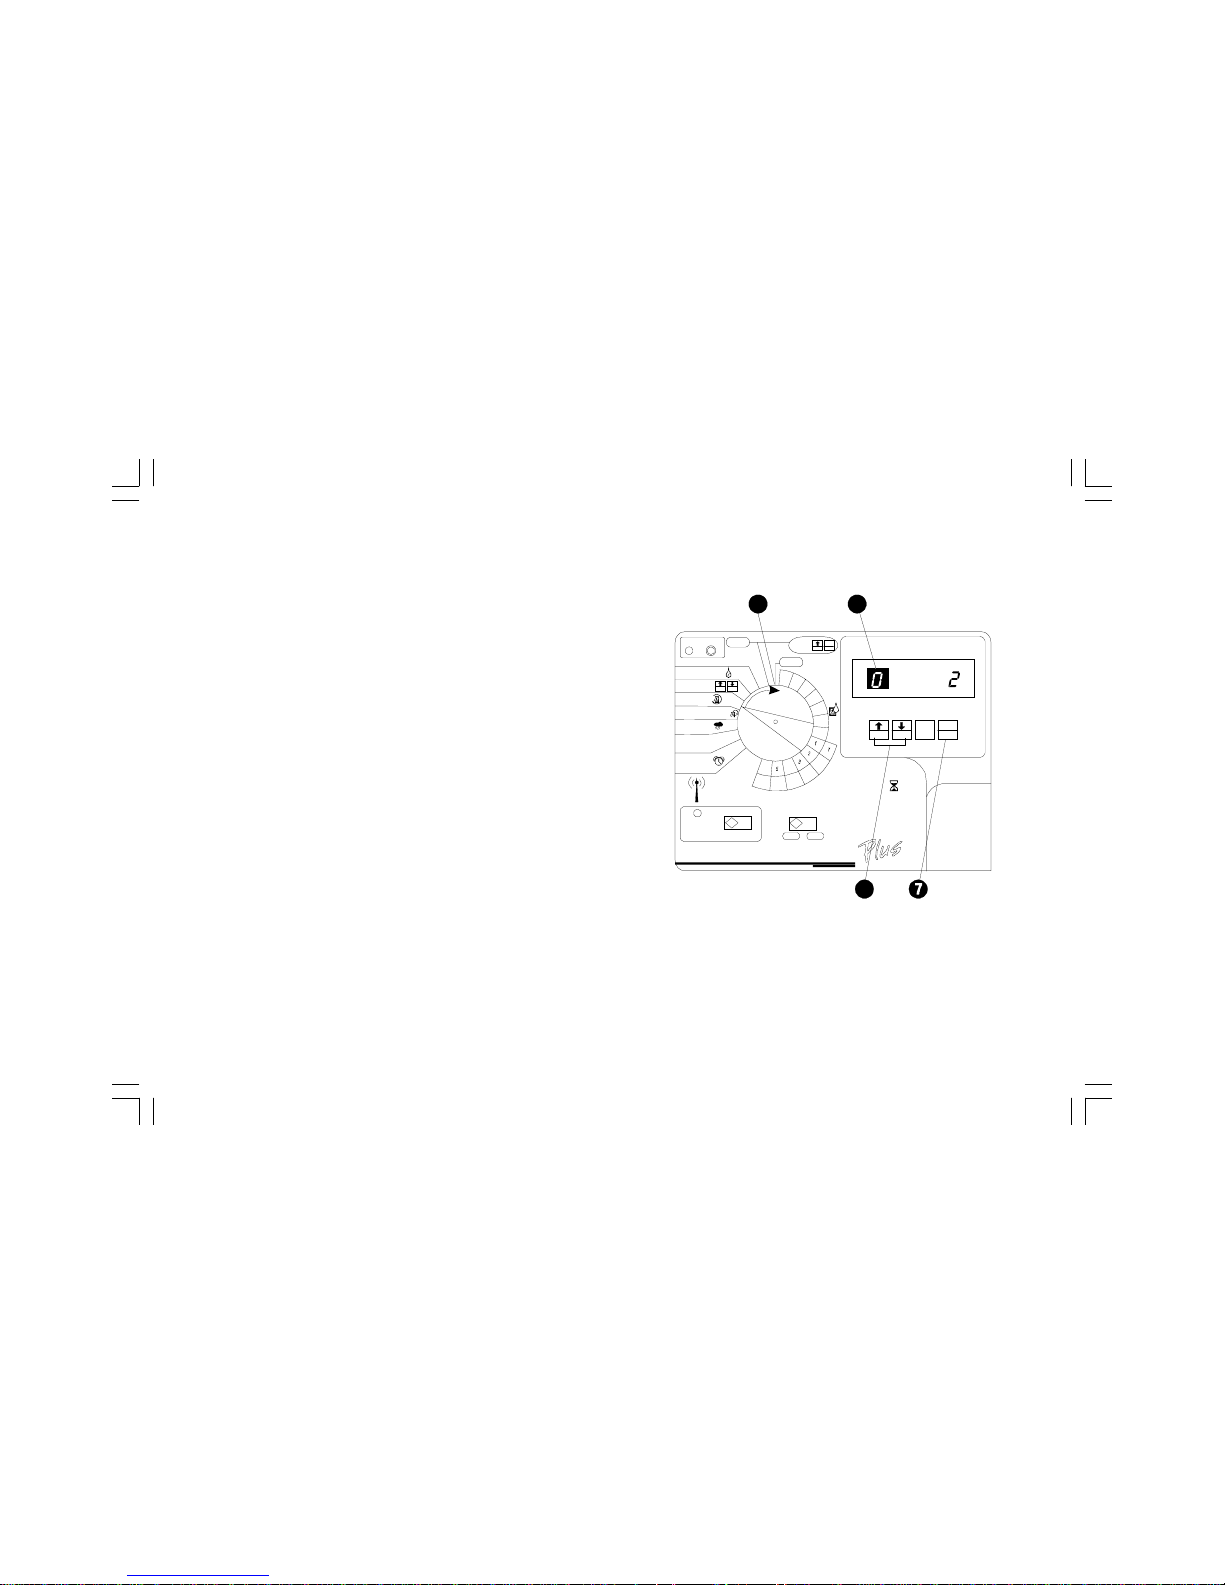
Set Station Watering Times
You can set any station to run from 0 to 12 hours. For the first
two hours, you can set the watering time in one-minute increments. For the remaining 10 hours, you can set the watering
time in 10-minute increments.
➊ On 12-, 16-, 20-, and 24-station models, set the STA-
TIONS slide switch to the block of stations you want to set.
➋ Turn the dial to the station number you want in the
WATERING TIME PER STATION section of the dial.
➌ The display shows the program, the station number, and
the currently set watering time. If the station has been
included in another program, USED appears in the
display.
NOTE: If USED appears, you can still set a watering
time for the station unless the station has been
previously assigned to the D-drip program. Stations
assigned to the D-drip program cannot be used by
any other program.
 Loading...