

ToxiRAE II
PGM-1100 Series
Personal Toxic Gas Monitor
User Manual
045-4003-001, Rev A December 2012
- READ BEFORE OPERATING -
!
!!!
!
This manual must be carefully read by all individuals who have or will
have the responsibility of using, maintaining, or servicing this product.
The product will perform as designed only if it is used, maintained, and
serviced in accordance with the manufacturer’s instructions.
CAUTION!
To reduce the risk of electric shock, turn off power before removing
the monitor cover. Disconnect the battery before removing sensor
module for service. Never operate this monitor while the cover is
removed. Remove monitor cover and sensor module only in an
area known to be non-hazardous.
Sensors are not interchangeable; use only RAE Systems sensors,
and use only the sensor type specied for your ToxiRAE II monitor.
Use only RAE Systems batteries. Use of non-RAE Systems
components will void the warranty and can compromise the safe
performance of this product.
Calibrate before use.
Make sure gas inlet is free of dirt and debris.
Properly recycle Lithium batteries when disposing.
US & Canadian Intrinsic Safety
UL/cUL Class I, Groups A, B, C, D, T5
European Intrinsic Safety
0575 II 1G EEx ia IIB T5 / 2G EEx ia IIC T5
DEMKO 02 ATEX 0233306X
-40°C ≤ T
≤ 55°C
amb

Table of Contents
Standard Contents ......................1
Calibration Kit ..........................1
General Information .....................2
Physical Description .....................3
Display Features .......................4
Operating the ToxiRAE II .................5
Turning the Monitor ON ..................5
Using the ToxiRAE II ....................5
Short Term Exposure Limit (STEL) ..........6
Time Weighted Average (TWA) ............6
Turning the Monitor OFF .................6
Peak Reading (PEAK) ...................6
Program Mode .........................7
Entering Program Mode ..................8
Calibration ............................8
Zero Calibration ........................9
Span Calibration .......................10
Changing Preset Limits or Span Gas Values .12
Maintenance ..........................13
Changing The Battery ...................13
Changing The Filter (All Versions) ..........15
Changing The Sensor (All Non-U.S. Versions)
Specications .........................17
Table A: Sensor Conguration ............18
Table B: Alarm Signals (H2S) .............19
..
16

Proper Product Disposal At End Of Life
The Waste Electrical and Electronic Equipment
(WEEE) directive (2002/96/EC) is intended to
promote recycling of electrical and electronic
equipment and their components at end of life.
This symbol (crossed-out wheeled bin) indicates
separate collection of waste electrical and
electronic equipment in the EU countries. This
product may contain one or more Nickel-metal
hydride (NiMH), Lithium-ion, or Alkaline batteries.
Specic battery information is given in this user
guide. Batteries must be recycled or disposed of
properly.
At the end of its life, this product must undergo
separate collection and recycling from general
or household waste. Please use the return and
collection system available in your country for the
disposal of this product.

Standard Contents
ToxiRAE II monitor with sensor as specied
High-capacity Lithium battery installed
Gas adapter
Alligator clip
Stainless steel belt clip / hardhat adapter
Operation instructions
Calibration Kit
Test gas (for sensor as specied)
Gas regulator with ow controller
Hard transport case
1

General Information
The ToxiRAE II single-gas monitor continuously displays
toxic gas concentrations. The ToxiRAE II is a full-featured
gas monitor providing continuous, digital display of the
selected toxic gas concentration, STEL, TWA and Peak
values, as well as high, low, TWA and STEL alarms.
2
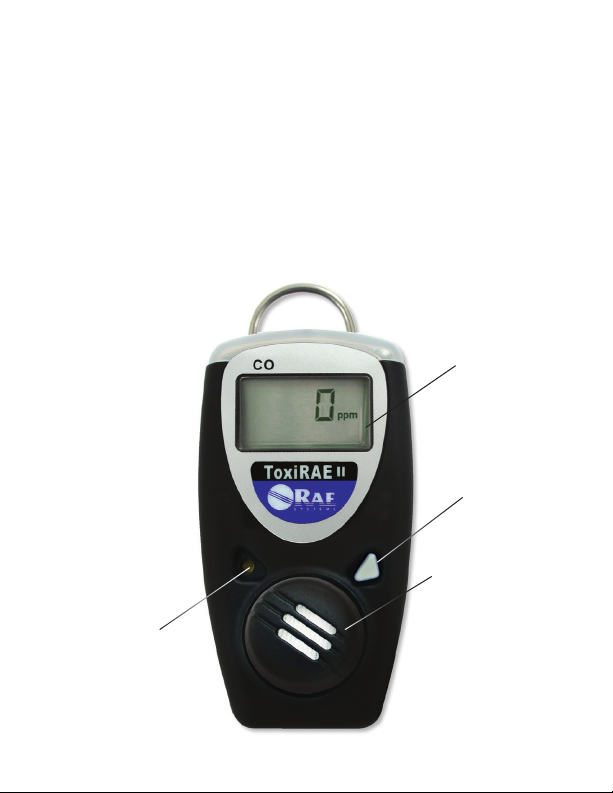
Physical Description
1 Bright red LED Alarm
2 Display
3 Audio Alarm
4 Gas Inlet
5 Button
6 Alligator Clip
6
1
2
5
4
3
3
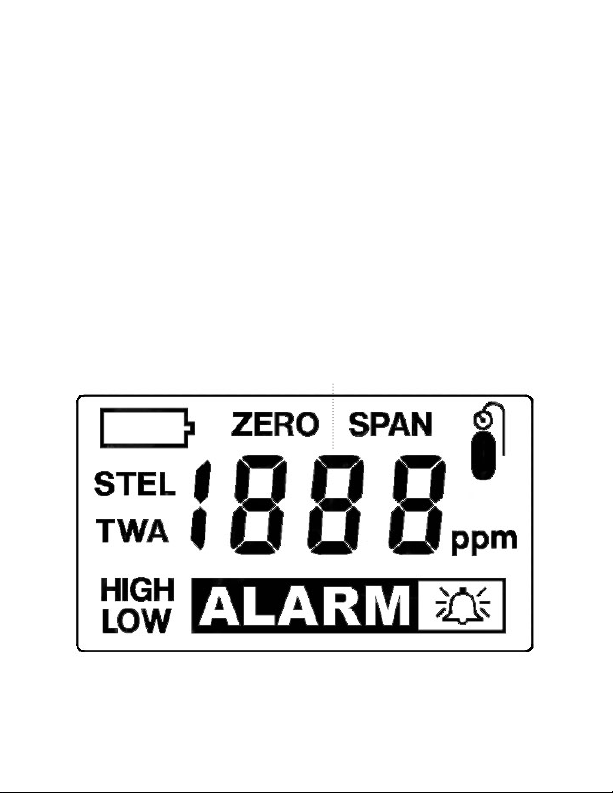
Display Features
1 Zero Calibration
2 Low Battery Indicator
3 Short Term Exposure Limit (STEL)
4 Time Weighted Average (TWA)
5 Low Alarm
6,7 High Alarm
8 Parts Per Million (ppm)
9,10 Span Calibration
11 Gas Concentration
2
1
1011
9
3
4
8
6
5
4
7

Operating the ToxiRAE II
Turning the Monitor ON
Make sure the Lithium battery is installed.
Hold the button down and release when the
display says “on.” The monitor is now on.
The monitor performs a self-test preceding the
warm-up and zero calibration.
You will see the rmware version displayed briey
(e.g., “F10” means rmware version 1.0). The
current gas concentration reading is displayed.
NOTE: Turn the monitor on in clean ambient
air. Units with rmware version 1.4 are
automatically zeroed at power on. (For rmware
version 1.7, there is no auto-zeroing. After the rmware
version is displayed, there is a 10-second countdown, it
beeps at 1 second, and then it shows the current reading.)
Using the ToxiRAE II
After the monitor is turned on and completes its warmup, it is in Monitor Mode. The display shows the current
concentration of the specied gas in ppm.
You may also view exposure analysis—the STEL, TWA, and
PEAK—in Monitor Mode.
From the current gas concentration, press the button to
cycle through each exposure analysis reading. After a
minute of idle time, the monitor automatically returns to the
current gas concentration display from any of the analysis
displays.
5

Short Term Exposure Limit (STEL)
The STEL is the average reading of the gas
concentration for the last 15 minutes.
NOTE: The STEL reading does not appear
until 15 minutes have elapsed.
Time Weighted Average (TWA)
The TWA is the accumulated reading of the
gas concentration since the monitor was
turned on, divided by 8 hours.
Peak Reading (PEAK)
The peak reading is the highest reading since
the monitor was turned on.
NOTE: The display switches back and forth
between “P” and the actual peak reading.
If the preset alarm limits are exceeded, the
monitor goes into alarm, and you should leave
the contaminated area immediately. See Table
A for the preset limits.
Turning the Monitor OFF
Hold the button down, through the “5…4… 3…
2… 1… OFF” sequence.
The monitor is off when the display is blank.
6

Program Mode
Use the Program Mode to perform any of the following
actions (listed in order of appearance):
Calibration
Changing Preset Limits or Span Gas Values
Entering Program Mode (Firmware Version
1.4, sensors for HCN, Cl
PH3, SO
or NH3):The instrument must rst
2,
be turned on. Press and hold the button for 3
seconds, and release it when “Pro” ashes in
the display. Then, hold the button down until
the display reads “go”. (To exit the Program
Mode at this point, do not press the button,
and the monitor will automatically return to the Monitor
Mode.) Release the button when “go” starts ashing on the
screen. You are now in Program Mode.
Entering Program Mode (Firmware Version
1.7, sensors for CO, CO High Range, H2S,
or O2):The instrument must rst be turned off.
Press the button rapidly, 3 times in succession.
“Pro” appears in the display. Immediately hold
the button down again until the display reads
“on.” The display counts down and the buzzer,
lights, and vibration alarms are tested. “Cal”
and “Go” are alternately shown. You are now in
Program Mode.
2,
ClO
NO, NO2,
2,
7

Calibration
All newly purchased ToxiRAE II instruments
should be bump tested by exposing the sensor
to known concentration calibration gas before
the instrument is used or put into service. A
bump test is dened as a brief exposure of the
monitor to the calibration gas and the sensors
to show response and trigger the lowest alarm
set point for each sensor.
The ToxiRAE II must be calibrated if it does
not pass a bump test, or at least once every
180 days, depending on use and sensor
exposure to poisons and contaminants.
•
Calibration intervals and bump test procedures
may vary due to national legislation.
• RAE Systems recommends using RAE
calibration gas.
• Any rapid up-scale reading followed by a
declining or erratic reading may indicate a gas
concentration beyond the upper scale limit,
which may be hazardous.
For maximum safety, the accuracy of the monitor
should be checked by exposing the sensor to
known concentration calibration gas before each
day’s use (eld calibration).
8

You will see the “CAL” (calibration) and “go”
messages switch back and forth on the screen.
To advance or skip to the next submenu,
press the button once.
Zero Calibration (Firmware version 1.7
Only)
Note: Zero calibration is performed auto–
matically at startup with rmware version 1.4.
To perform a zero (fresh air) calibration,
press and hold the button. Release when
“go” displays continuously without ashing
on and off.
There will be a countdown from 10 to 0.
When it is done, the display will show “dn”
(done).
Note: To interrupt the zero calibration while it
is in progress, press and hold the button. The
countdown stops, and the display shows “no.”
Press the button again to conrm and advance to the next
submenu.
9

Span Gas Calibration
To perform span gas calibration, press and
hold the button. Release when “go” displays
continuously without ashing on and off.
The “gAS” and span gas preset value switches
back and forth on the screen. During these 10
seconds, connect the span gas to the monitor.
(See picture on page 11.)
When the monitor detects a change in gas
concentration or after 10 seconds of idle
time, or when the key is pressed, the next
countdown timer begins (time depends on the
type of sensor).
Span calibration fails when the monitor does
not detect any change in gas concentration.
In the latter case, the “Err” (error) message
appears on the screen, the monitor beeps and
the LED lights up. In either case, begin span
calibration again.
When span calibration is complete, “dn” (done)
and the real time reading briey appear on the
screen before advancing to the next submenu.
10

To interrupt and exit span calibration during
the countdown, press the button and “no”
appears on the screen. Press the button
again to conrm and advance to the next
submenu.
span gas cylinder
regulator
Tygon tubingcalibration adapter
11

Changing Preset Limits or Span Gas Values
STELHigh Alarm SPANTWALow Alarm
Example:
Changing the High
Alarm preset
Cycle through the submenus by pressing the
button once after each; stop at appropriate screen.
(With Firmware version 1.4, the monitor returns to
the Monitor Mode after the span gas value.)
You will see “SEt” and “go” switch back and
forth on the screen, prompting you to change
the preset limit or value.
To change the preset, press and hold the
button. Release when “go” stops ashing.
The current preset will appear on the screen.
The blinking digit is the one that will change.
To change the digit, press the button and it
will increase by one increment; the digits cycle
from 0 through 9.
To move to the next digit, hold the button down
and release when the next digit starts blinking.
To save the new limit, hold the button and
release when “dn” appears on the screen. The
monitor will advance to the next submenu.
To exit Program Mode (Firmware version 1.4): Press the button
until the zero reading appears. The ToxiRAE II is now in Monitor
Mode.
12

!
To exit Program Mode (Firmware version 1.7): Press the button
until “Pro” and “End” appear. Hold the button down for 5 seconds
and release. The ToxiRAE II is now in Monitor Mode.
Maintenance
Follow these instructions carefully and calibrate and test your
monitor according to this User Manual’s instructions before
placing it in service again.
Replacing the Lithium Battery
The ToxiRAE II is shipped with its Lithium battery installed.
Change the battery when the low battery
symbol appears. When a battery needs
replacement, the alarm beeps and ashes once
a minute until a fresh battery is installed.
Just before the battery dies, “oFF” will appear
instead of the reading. The alarm will continue
to beep, ash and vibrate for a minute until the
battery is dead.
CAUTION!
Change the battery only in an area known to be nonhazardous.
!
Warning!
Use only the following battery model:
EVE ER14335
13

Step 1. To replace the battery, remove the four screws from
the back of the monitor.
Step 2. Remove the back cover.
Step 3. Gently pull the ribbon to remove the battery from the
monitor.
Step 4. Install a Lithium battery (Voltage: 3.6V, Capacity:
1.65AH, Size: 2/3AA, P/N: 500-0076-100).
Important! Use only RAE Systems batteries.
Use of non-RAE Systems components will void
the warranty and can compromise the safe
performance of this product.
Make sure the ribbon rests underneath the battery.
Note the polarity of the battery.
Step 5. Reattach the back cover and tighten the screws.
Step 6. Calibrate and test your ToxiRAE II.
Ribbon
Battery polarity:
14
Back cover

Replacing the Filter (All Versions)
The ToxiRAE II has a removable sensor cover that allows
you to change the sensor lter. Replace the lter (P/N:
045-2054-000) when it appears dirty or when the sensor is
replaced.
To remove the sensor cap, use the calibration adapter to
turn the sensor cap one quarter-turn counterclockwise. Next
pull off the sensor cap.
Then carefully remove the lter and replace it with a new
one. Avoid touching the sensor.
Replace the sensor cap and calibrate and test the monitor
before placing it back in service.
15

Replacing the Sensor
!
ToxiRAE II models are designes so that you can easily
change the sensor.
New sensors need to warm up before rst calibration and use.
!
(See Table A for required warm-up times.)
To replace the sensor, use the calibration adapter to turn the
sensor cap one quarter-turn counterclockwise. Next pull off
the sensor cap.
Then carefully remove the sensor by pulling it straight out.
Also remove the lter that is held in place with an o-ring,
located in the ToxiRAE II housing above the sensor.
Replace these with a new sensor and lter. Replace the
lter (P/N: 045-2054-000) when it appears dirty or when the
sensor is replaced. (See Table A for sensor part numbers.)
Sensors are not interchangeable. Use only RAE Systems sensors,
and use only the sensor type specied for your ToxiRAE II
monitor. Use of non-RAE Systems components will void the
warranty and can compromise the safe performance of this
product.
Make sure the pins are not bent or corroded. Align the pins
to the corresponding holes and push the sensor straight in.
The sensor should t ush against the printed circuit board.
Replace the sensor cap and calibrate and test the monitor
before placing it back in service.
16

Specications
Size 3.6" (9.3 cm) x 1.9" (4.9 cm) x 0.9" (2.2 cm)
Weight 3.6 oz (102 gm) with clip
Battery User-replaceable 2/3 AA high-capacity Lithium battery
Operating Period 2 years typical battery life for CO/H2S/O2 sensors or 730 minutes of alarm.
Direct Readout • Instantaneous display of toxic gas concentration in ppm (or oxygen in %)
Calibration Two-point eld calibration; Auto-zero at startup (rmware version 1.4 only),
Hazardous Area
Temperature -40° to 131° F (-40° to 55° C) for O2, CO, and H2S. For specic temperature ranges
Attachments Wrist strap, stainless-steel alligator clip (installed), stainless-steel belt clip/
*Ongoing projects to enhance our products means that these specications are subject to change.
All other low- or high-bias sensor-equipped models, typical 1 year or 360
minutes of alarm. Extra battery included for use if maximum alarm minutes are
exceeded.
Display
Easy-to-read LCD for continuous display of concentration in ppm and text messages
Keypad One-button operation
• STEL & TWA values
• Peak hold
Alarms • Audible: 90dB at 12” (10 cm)
• Visual: Bright Red/Green LED bar visible from top, front, and sides
• Sensory: Built-in vibration alarm
• High: Displays “High” emits 3 beeps and ashes per second
• Low: Displays “Low” 2 beeps and ashes per second
• STEL: Displays “STEL” 1 beep and ash per second
• TWA: Displays “TWA” 1 beep and ash per second
user- intiated span/standard reference gas.
EMI/RFI Highly resistant to EMI / RFI. Compliant with EMC Directive 89/336/EEC
IP Rating IP-65 rating: protected against dust, protected against low pressure jets of
water from all directions
• UL/cUL Classied as Intrinsically Safe for use in Class I, Division 1 Groups A,
Approval
B, C, D, Hazardous Locations T5 rating
• ATEX, II 1G, EEx ia IIB T5, or II 2G, EEx ia IIC T5
European Conformity (Conformite Europene)
• IECEx Ex ia IICT4
for other sensors, please reference RAE Systems Technical Note TN-114.
Humidity 0-95% relative humidity (non-condensing)
hardhat adapter
Warranty 2-year warranty for instrument and CO/H2S/O2 sensors (all other sensors have
1-year warranty)
17

Table A: Sensor Conguration
!
Sensors are not interchangeable. Use only RAE Systems
sensors, and use only the sensor type specied for your ToxiRAE
II monitor. Use only RAE Systems batteries. Use of non-RAE
Systems components will void the warranty and can compromise
the safe performance of this product.
Model and
Part Number
NH
045-0518-000
045-0512-000
CO*
045-0512-200
Cl2*
045-0516-000
ClO2*
045-0523-000
HCN*
045-0517-000
H2S
045-0511-000
NO*
045-0514-000
NO2*
045-0515-000
045-0006-000
PH3*
045-0519-000
SO2*
045-0513-000
*Call for availability
** Applies to newly installed sensor only
Range
Resolution
(ppm)
3
CO
0-1999 10 100 35 200 100 35 20 min
O2*
(ppm)
0-50 1 50 25 50 35 25 20 min
0-500 1 100 35 200 100 35 20 min
0-10 0.1 10 0.5 5 1 0.5 20 min
0-1 0.01 0.5 0.2 0.5 0.3 0.1 20 min
0-100 1 10 4.7 50 4.7 4.7 20 min
0-100 1 25 10 20 15 10 20 min
0-250 1 25 25 50 25 25 4 hours
0-20 0.1 5 1 10 1 1 20 min
0-30 0.1
0-5 0.01 5 1 2 1 0.3 20 min
0-20 0.1 5 2 10 5 2 20 min
Span
Low
High
Gas
(ppm)
(ppm)
0.0%
19.5 23.5 - - 20 min
(N2)
(ppm)
STEL
(ppm)
TWA
(ppm)
Sensor
Warm-Up
Time **
18

Table B: Alarm Signals (H2S)
Alarm Type Display Cause
Over Range
High
Low
TWA
STEL STEL Reading
Negative Reading < 0
Battery Low Battery < 3.2V 1 beep/min None
Battery Dead Battery < 3.1V 1 beep/sec once every
Reading >
maximum range
Reading > High
Alarm Limit
Reading > Low
Alarm Limit
TWA reading >
TWA Limit
> STEL Limit
ppm
Buzzer &
LED
3 beeps/sec
3 beeps/sec
2 beeps/sec
1 beep/sec
1 beep/sec once every
1 beep/sec once every
Vibration
Alarm
once every
second
once every
second
once every
second
once every
second
second
second
second
19

RAE Systems, Inc. Contact Information
Main Ofce
Telephone
Instrument Sales
Email
Website
Technical Service
SPECIAL NOTE: If the monitor needs to be serviced, contact either:
the RAE Systems distributor where the unit was purchased; they will return the
monitor on the user’s behalf,
or the RAE Systems Technical Service department. Before returning the unit
for service or repair, obtain a Returned Material Authorization (RMA) number for
proper tracking of your equipment. This number needs to be on all documentation
and posted on the outside of the box in which the monitor is returned for service or
upgrade. Packages without RMA Numbers will be refused at the factory.
3775 N. First St.
San Jose, CA 95134-1708 USA
408.952.8200
408.952.8480
Fax
877.723.2878
RaeSales@raesystems.com
www.raesystems.com
888.723.4800
Tech@raesystems.com
 Loading...