

Page 1
MultiRAE Lite
Diffusion
QuickStart Guide
WARNINGS
Read Before Operating
The MultiRAE User’s Guide must be carefully read by all
individuals who have or will have the responsibility of
using, maintaining, or servicing this product. The product
will perform as designed only if it is used, maintained, and
serviced in accordance with the manufacturer’s instructions.
CAUTION!
Never operate the monitor when the rear cover is removed. Remove rear cover, sensors, and/or battery only
in an area known to be non-hazardous. Never use the
instrument with the calibration adapter installed, as this
can cause distorted readings, a potential safety threat.
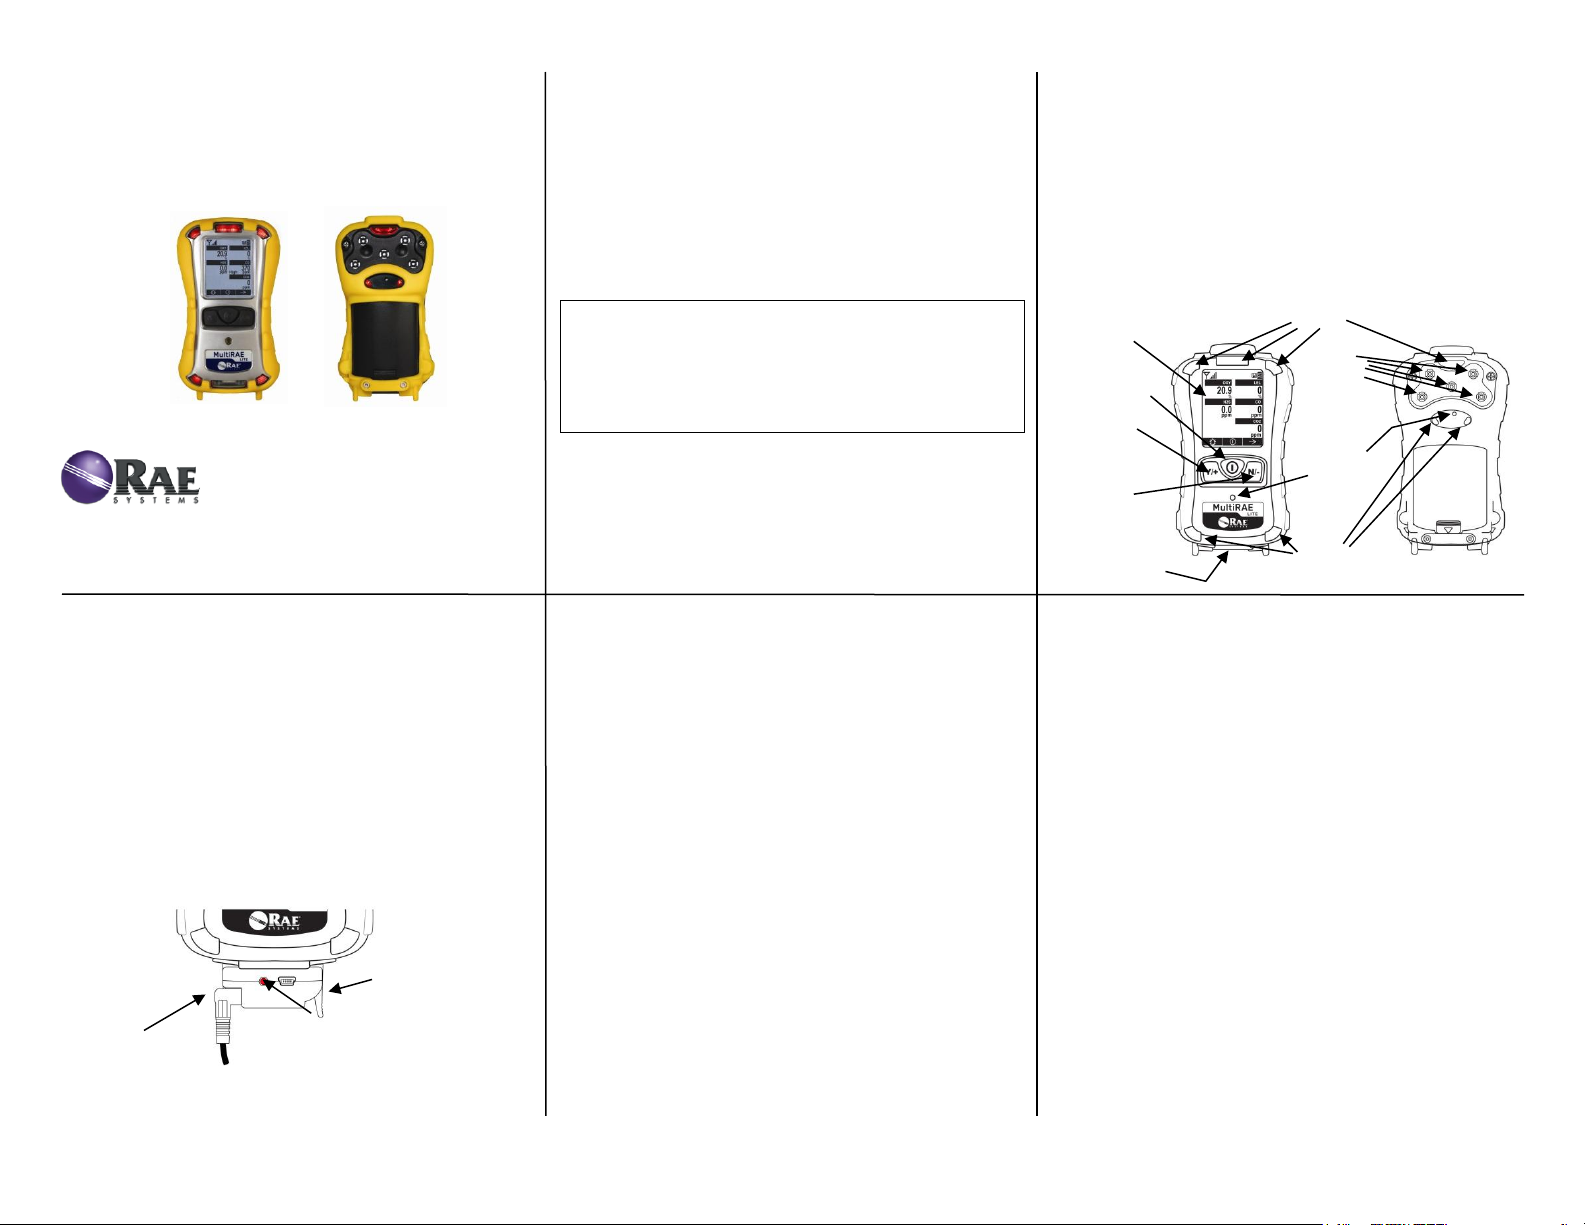
User Interface
The MultiRAE Lite’s user interface consists of the
display and three keys, [Y/+], [MODE] and [N/-].
The flippable LCD displays information such as
monitored threats, real-time readings and
measurement units, alarm type (when in alarm,
including cal. overdue), battery status, datalog (if on),
and radio and connection quality (if available).
Charging The MultiRAE Lite
Always fully charge the battery before use. Contacts on
the bottom of the MultiRAE Lite meet the Travel
Charger’s or Charging Cradle’s contact pins,
transferring power. Make sure the charger and
MultiRAE Lite are firmly attached. Then connect the
AC Adapter’s plug to the charger, and plug its
transformer into an AC outlet. While charging, the
LED on the cradle glows red. When the battery is fully
charged, the LED glows green.
Turning The MultiRAE Lite On
With the instrument turned off, press and hold the
[MODE] key until the audible alarm stops, and then
release. During startup, the battery, buzzer, vibration
alarm, and LEDs are tested, and then the MultiRAE Lite
performs self-testing of its other functions. When the
main measurement screen appears, the MultiRAE is
ready for calibration or use.
Note: If the battery is completely empty, then the
display briefly shows the message “Battery Fully
Discharged,” and the MultiRAE Lite shuts off. You
should charge the battery or replace it with a fully
charged battery before turning it on again.
Note: If Fast Startup is enabled on the instrument,
fewer screens are shown during startup, compared
to Normal Startup sequence.
Turning The MultiRAE Lite Off
Press and hold [MODE]. A 5-second countdown to shutoff
begins. You must continue pressing on the key for the
entire shutoff process. If you remove your finger from the
key during the countdown, the shutoff operation is canceled
and the MultiRAE Lite continues normal operation.
When the countdown ends and the screen displays “Unit
Off,” release your finger from the [MODE] key. The
MultiRAE is now off.
Testing The Alarm
Under normal-operation mode and non-alarm conditions, the buzzer, vibration alarm, LED, and backlight
can be tested anytime by pressing [Y/+] once. If any
alarm does not respond, check the Alarm Settings in
Programming Mode to make sure all alarms are
enabled. If any alarms are enabled but are not
functional, do not use the instrument.
2.
3.
5.
6.
4.
Charging
status LED
Phone: 408-952-8200 Fax: 408-952-8480
Email: customerserv@raesystems.com
www.raesystems.com
RAE Systems, Inc.
3775 N. First St.
San Jose, CA 95134-1708 USA
[N/-] key
[MODE] key
Gas
inlets
Display
LEDs
Alarm
Buzzers
LEDs
[Y/+] key
Charging and
Communication
Contacts
AC adapter
plug
Cable from
AC adapter
MultiRAE Lite
Charger
Rear
Front
Page 2

Calibration
The MultiRAE Lite can be automatically bump tested and
calibrated using the AutoRAE 2 Test and Calibration
System (refer to its User’s Guide for instructions).
Manually calibrate using a fixed-flow regulator (flow rate
between 0.5 and 1.0 liters per minute) and the supplied
special calibration adapter that covers the gas inlet:
1. To begin calibration, connect the zero air or
calibration gas cylinder, flow regulator, and calibration
adapter to the MultiRAE Lite.
2. Enter Programming Mode by pressing and holding
[MODE] and [N/-] simultaneously until the password
screen appears.
3. Input the 4-digit password. (The default password is
“0000.” If you do not know the password, select
“Done.”) Then follow the instructions for individual
or multiple zero and span calibration.
Important! After a bump test or calibration, remove the
calibration adapter to ensure correct readings.
Zero & Fresh Air Calibration
The MultiRAE Lite should be zero-calibrated in clean
air with 20.9% oxygen or with a cylinder of clean zero
air. In Programming Mode, select “Fresh Air.” Then:
Press [Y/+] to start a Fresh Air calibration for the listed
sensors. All are fresh-air calibrated at once.
To individually zero calibrate sensors:
1. Select “Single Sensor Zero” and select a sensor.
2. Press [Y/+] to select a sensor to zero calibrate.
3. Start the flow of the zero gas, if used, and press [Y/+].
4. The screen says, “Zeroing” and counts down.
5. When done, it says, “Zero Calibration Passed” (the
reading should be 0 or very close to it for toxic gas sensors,
and 20.9% Vol. for an oxygen sensor).
6. Shut off the flow of zero air (if used) and remove
the calibration adapter.
Note: If your MultiRAE Lite is equipped with a CO2
sensor, it must be zero calibrated using 100% Nitrogen
(N2), or isobutylene, instead of fresh air or zero air.
Span Calibration
In Programming Mode, and with “Multi Sensor Span” or
“Single Sensor Span” highlighted:
1. Press [Y/+]. The screen displays the sensor(s) to be
calibrated.
· Multi: The list is shown.
· Single: Select a sensor and press [Y/+]
2. Attach the calibration adapter, and connect the
calibration gas cylinder’s flow regulator to the
MultiRAE Lite, and start the gas flow.
3. Press [Y/+] to start calibration.
4. Upon completion, a pass/fail calibration result
appears and the readings are shown (they should be
within ±10% of the span gas value).
5. Turn off the gas and remove the calibration
adapter.
Bump (Functional) Testing
RAE Systems recommends periodic bump testing to
confirm that the sensors and alarms are functional.
Test each sensor with an appropriate test gas in a
concentration not less than the sensor’s low alarm
setting. To pass, each sensor should go at least to a low
alarm. With the MultiRAE Lite in Normal Mode:
1. Connect the calibration gas cylinder, flow
regulator, and calibration adapter to the
MultiRAE Lite and start the gas flow.
2. Make sure the unit goes into at least a low alarm
for each of the tested sensors and that the buzzer
produces at least two beeps per second, the LED
lights flash on and off, and the vibration alarm
functions. The display backlight should
illuminate and an alarm message should be
shown in the display.
3. Turn off the gas flow.
4. Remove the calibration adapter.
8.
9.
10.
P/N: M01-4017-000 Rev C 201305
Basic Menu Navigation In Hygiene Mode
Pressing [N/-] repeatedly
allows you to step through
the screens as shown here.
Note: The gray box indicates the datalog functions
when datalogging is in
Manual mode. When datalogging is in Automatic
mode, this screen does not
appear. Refer to the
User’s Guide for information on selecting Automatic, Manual, or Snapshot
datalogging.
7.
11.
Page 3

WARNINGS
ANY RAPID UP-SCALE READING FOLLOWED BY A DECLINING OR ERRATIC
READING MAY INDICATE A GAS CONCENTRATION BEYOND UPPER SCALE LIMIT,
WHICH MAY BE HAZARDOUS.
TOUTE LECTURE RAPIDE ET POSITIVE,
SUIVE D’UNE BAISSE SUBITE AU
ERRATIQUE DE LA VALEUR, PEUT
INDIQUER UNE CONCENTRATION DE GAZ
HORS GAMME DE DÉTECTION QUI PEUT
ÊTRE DANGEREUSE.
ONLY THE COMBUSTIBLE GAS DETECTION
PORTION OF THIS INSTRUMENT HAS BEEN
ASSESSED FOR PERFORMANCE.
UNIQUMENT, LA PORTION POUR
DÉTECTOR LES GAZ COMBUSTIBLES DE
CET INSTRUMENT A ÉTÉ ÉVALUÉE.
CAUTION: HIGH OFF-SCALE READINGS
MAY INDICATE AN EXPLOSIVE
CONCENTRATION.
ATTENTION: DES LECTURES HAUTES ET
HORS D’ECHELLE PEUVENT INDIQUER
DES CONCENTRATIONS DE GAZ
INFLAMMABLES.
CAUTION: SUBSTITUTION OF COMPONENTS MAY IMPAIR INTRINSIC SAFETY.
CAUTION: BEFORE EACH DAY’S USAGE,
SENSITIVITY OF THE LEL SENSOR MUST BE
TESTED ON A KNOWN CONCENTRATION OF
METHANE GAS EQUIVALENT TO 20 TO 50% OF
FULL-SCALE CONCENTRATION. ACCURACY
MUST BE WITHIN 0 AND +20% OF ACTUAL.
ACCURACY MAY BE CORRECTED BY
CALIBRATION PROCEDURE.
ATTENTION: AVANT CHAQUE UTILISATION
JOURNALIERE, VERIFIER LA SENSIBILITE DU
CAPTEUR DE LIE AVEC UNE CONCENTRATION
CONNUE DE METHANE EQUIVALENTE DE 20
A 50% DE LA PLEINE ECHELLE. LA PRECISION
DOIT ETRE COMPRISE ENTRE 0 ET 20% DE LA
VALEUR VRAIE ET PEUT ETRE CORRIGEE PAR
UNE PROCEDURE D’ETALONNAGE.
Note: Users are recommended to refer to ISARP12.13, Part II-1987 for general information
on installation, operation, and maintenance of
combustible gas detection instruments.
The MultiRAE Lite multi-gas detector must be
calibrated if it does not pass a bump test, or at
least once every 180 days, depending on use
and sensor exposure to poisons and
contaminants.
SPECIAL CONDITIONS FOR SAFE USE
1. The PGM-62xx shall only be fitted with
RAE Systems Battery Pack type M013051-000 or M01-3053-000 or Battery
Adapter M01-3052-000 or M01-3054-000
fitted with Duracell MN1500 batteries.
2. The PGM-62xx shall only be charged
outside hazardous areas.
3. No precautions against electrostatic
discharge are necessary for portable
equipment that has an enclosure made of
plastic, metal, or a combination of the two,
except where a significant static-generating
mechanism has been identified. Activities
such as placing the item in a pocket or on a
belt, operating a keypad or cleaning with a
damp cloth, do not present a significant
electrostatic risk. However, where a staticgenerating mechanism is identified, such as
repeated brushing against clothing, then
suitable precautions shall be taken, e.g., the use
of anti-static footwear.
13.
16.
15.
12.
14.
Page 4

WARNING
To reduce the risk of ignition of hazardous
atmospheres, recharge, remove, or replace the
battery only in an area known to be non-hazardous!
WARNING
Do not replace sensors in hazardous locations.
BATTERY PACKS
A Li-Ion battery pack (PN: M01-3051-000 or M013053-000) and an alkaline battery adapter (PN:
M01-3052-000 or M01-3054-000) are supplied
with each MultiRAE.
There are two types of output power for battery
packs or adapters. The battery pack (PN: M013051-000) and adapter (PN: M01-3052-000) are
used for MultiRAE model number PGM-62x0.
Battery pack (PN: M01-3053-000) and adapter
(PN: M01-3054-000) are used for model number
PGM-62x6/PGM-62x8.
The alkaline battery adapter accepts four AA
alkaline batteries (use only Duracell MN1500). Do
not mix old and new batteries or batteries from
different manufacturers.
HAZARDOUS LOCATION APPROVALS
Exia Class I, Division 1, Groups A, B, C, D, T4
SIRA 11ATEX2152X, 0575 II 1G Ex ia IIC T4 Ga
(for PGM62x0/PGM62x6)
SIRA 11ATEX2152X, 0575 II 2G Ex ia d IIC T4 Gb
(for PGM62x8)
UM = 20V
IECEx SIR 11.0069X, Ex ia IIC T4 Ga (for
PGM62x0/PGM62x6)
IECEx SIR 11.0069X, Ex ia d IIC T4 Gb (for
PGM62x8)
WIRELESS CERTIFICATION
Complies with the following:
FCC Part 15
R&TTE Directive (1999/5/EC)
Wireless Operation
If your MultiRAE Lite is equipped with a wireless
modem, its settings are controlled via the menu
items under “Wireless.” In order to save time while
operating the MultiRAE Lite in a network, it is best
to configure the settings before taking the
MultiRAE Lite into the field. Consult the User’s
Guide for more detailed instructions.
1. Enter Programming Mode by pressing and holding
[MODE] and [N/-] simultaneously until the password
screen appears.
2. Input the 4-digit password. (The default password
is “0000.” If you do not know the password, select
“Done.”) Then follow the instructions for individual
or multiple zero and span calibration.
3. Press [N/-] repeatedly until “Wireless” is
highlighted.
4. Press [Y/+] to select Wireless Settings.
5. Check that the radio is turned on, the PAN ID
matches the PAN ID of the network, and match the
channel of the network, too. Select Join Network if
a network is already established. You may also set
the reporting interval and turn on the off-network
alarm.
6. When you are done with the settings, press
[MODE] to go back to the programming screen,
and [MODE] again to return to the main screen.
7. Start the RAELink3 Mesh wireless modem and
ProRAE Guardian on your computer.
8. The antenna icon and signal-strength bars should be
shown on the screen’s upper-left corner.
9. Check that data is being received by ProRAE
Guardian.
18.
17.
19.
20.
 Loading...