

Page 1
Handheld PID Monitors User’s Guide
Handheld PID Monitors
Rev. A
P/N: 059-4026-000
User’s Guide
1
November 2018
Page 2

Product Registration
Register your product online by visiting:
https://www.raesystems.com/customer-care
By registering your product, you can:
• Receive notification of product upgrades or enhancements
• Be alerted to Training classes in your area
• Take advantage of Honeywell RAE Systems special offers and promotions
© 2018 Honeywell International.
Handheld PID Monitors User’s Guide
2
Page 3

Handheld PID Monitors User’s Guide
Contents
1. Standard Contents ............................................................................................................................... 11
2. General Information ............................................................................................................................. 11
3. Physical Description ............................................................................................................................ 11
4. Charging The Battery .......................................................................................................................... 12
4.1. Charging A Spare Rechargeable Battery .................................................................................... 13
4.2. Low Voltage Warning .................................................................................................................. 13
4.3. Clock Battery ............................................................................................................................... 13
4.4. Data Protection While Power Is Off ............................................................................................. 13
5. User Interface ...................................................................................................................................... 14
6. Display ................................................................................................................................................. 16
6.1. Icons ............................................................................................................................................ 17
7. Operating The Instrument ................................................................................................................... 18
7.1. Turning The Instrument On ......................................................................................................... 18
7.2. Turning The Instrument Off ......................................................................................................... 18
7.3. Auto-Zero At Startup Option ........................................................................................................ 19
7.4. Operating The Built-In Flashlight ................................................................................................. 19
7.5. Pump Status ................................................................................................................................ 20
7.6. Calibration Status ........................................................................................................................ 20
7.7. Bump Status ................................................................................................................................ 20
7.8. Glance Mode ............................................................................................................................... 21
7.8.1. Enter Glance Mode ............................................................................................................... 21
7.8.2. Glance Mode Screens .......................................................................................................... 22
7.8.3. Exit Glance Mode.................................................................................................................. 22
7.9. Reverse Direction – Main Navigation .......................................................................................... 22
7.10. Policy Enforcement ..................................................................................................................... 23
7.10.1. Setting Policy Enforcement ................................................................................................... 23
8. Operating Modes – MiniRAE 3000+ & ppbRAE 3000+ ....................................................................... 25
8.1. Basic User Level/Hygiene Mode (Default Settings) – MiniRAE 3000+ & ppbRAE 3000+ .......... 26
9. Operating Modes – UltraRAE 3000+ ................................................................................................... 27
10. Compound-Specific Operation – UltraRAE 3000+ .............................................................................. 29
10.1. Compound-Specific Measurement .............................................................................................. 29
10.2. Measurement Phases ................................................................................................................. 29
10.3. Performing A Measurement – UltraRAE 3000+ .......................................................................... 29
10.4. Separation Tube Preparation ...................................................................................................... 30
10.5. Inserting The Separation Tube .................................................................................................... 32
10.6. Measuring .................................................................................................................................... 32
11. VOC Operation – UltraRAE 3000+ ...................................................................................................... 35
11.1. Basic User Level/Hygiene Mode (Default Settings) .................................................................... 35
11.2. Basic Operation – MiniRAE 3000+ .............................................................................................. 36
12. Alarm Signals ...................................................................................................................................... 36
12.1. Alarm Signal Summary ................................................................................................................ 36
12.2. Preset Alarm Limits & Calibration................................................................................................ 37
12.3. Testing The Alarm ....................................................................................................................... 37
12.4. Integrated Sampling Pump .......................................................................................................... 37
12.5. Backlight ...................................................................................................................................... 38
12.6. Datalogging ................................................................................................................................. 38
3
Page 4

Handheld PID Monitors User’s Guide
12.6.1. Datalogging event ................................................................................................................. 38
12.6.2. Datalogging sample .............................................................................................................. 38
12.6.3. Auto/Manual/Snapshot Datalogging ..................................................................................... 38
13. Accessories ......................................................................................................................................... 39
14. Standard Kit & Accessories ................................................................................................................. 40
14.1. AC Adapter (Battery Charger) ..................................................................................................... 40
14.2. Alkaline Battery Adapter .............................................................................................................. 40
14.3. External Filter .............................................................................................................................. 41
15. Optional Accessories ........................................................................................................................... 42
15.1. Calibration Adapter ...................................................................................................................... 42
15.2. Calibration Regulator ................................................................................................................... 42
15.3. Organic Vapor Zeroing Kit ........................................................................................................... 42
15.4. AutoRAE 2 Automatic Test & Calibration System ....................................................................... 42
16. Standard Two-Point Calibration (Zero & Span) ................................................................................... 43
16.1. Zero (Fresh Air) Calibration ......................................................................................................... 45
16.1.1. Reflex PID Technology™ ..................................................................................................... 45
16.2. Span Calibration .......................................................................................................................... 47
17. Three-Point Calibration........................................................................................................................ 49
18. Bump Test ........................................................................................................................................... 51
19. Programming Mode ............................................................................................................................. 52
19.1. Entering Programming Mode ...................................................................................................... 52
20. Programming Mode Menus ................................................................................................................. 54
20.1. Exiting Programming Mode ......................................................................................................... 54
20.2. Navigating Programming Mode Menus ....................................................................................... 55
20.3. Reverse Direction – Menu Selection ........................................................................................... 55
20.4. Calibration ................................................................................................................................... 56
20.4.1. Zero Calibration .................................................................................................................... 56
20.4.2. Span Calibration ................................................................................................................... 56
20.4.3. Bump Test ............................................................................................................................. 56
20.5. Measurement .............................................................................................................................. 57
20.5.1. Meas. Gas ............................................................................................................................. 57
20.5.2. Meas. Unit ............................................................................................................................. 57
20.5.3. Tube Selection (UltraRAE 3000+ only) ................................................................................. 59
20.5.4. Alarm Setting ........................................................................................................................ 60
20.5.5. High Alarm ............................................................................................................................ 60
20.5.6. Low Alarm ............................................................................................................................. 61
20.5.7. STEL Alarm ........................................................................................................................... 61
20.5.8. TWA Alarm ............................................................................................................................ 62
20.5.9. Alarm Mode ........................................................................................................................... 62
20.5.10. Buzzer & Light ..................................................................................................................... 63
20.6. Datalog ........................................................................................................................................ 63
20.6.1. Clear Datalog ........................................................................................................................ 64
20.6.2. Interval ............................................................................................................................... 64
20.6.3. Data Selection ....................................................................................................................... 64
20.6.4. Datalog Type ......................................................................................................................... 65
20.6.5. Manual Datalog ..................................................................................................................... 65
20.6.6. Snapshot Datalog ................................................................................................................. 66
4
Page 5

Handheld PID Monitors User’s Guide
20.7. Monitor Setup .............................................................................................................................. 66
20.7.1. Op Mode ............................................................................................................................... 66
20.7.2. Site ID ............................................................................................................................... 67
20.7.3. User ID ............................................................................................................................... 67
20.7.4. User Mode ............................................................................................................................ 68
20.7.5. Date ............................................................................................................................... 68
20.7.6. Time ............................................................................................................................... 68
20.7.8. Duty Cycle ............................................................................................................................. 69
20.7.9. Temperature Unit .................................................................................................................. 69
20.7.10. Pump Speed........................................................................................................................ 69
20.7.11. Language ............................................................................................................................ 69
20.7.12. Real Time Protocol .............................................................................................................. 70
20.7.13. Power On Zero .................................................................................................................... 70
20.7.14. Unit ID ............................................................................................................................... 70
20.7.15. LCD Contrast....................................................................................................................... 71
20.7.16. Lamp ID ............................................................................................................................... 71
20.7.17. PAN ID ............................................................................................................................... 71
20.7.18. Mesh Channel ..................................................................................................................... 71
20.7.19. Mesh Interval ....................................................................................................................... 72
21. Hygiene Mode ..................................................................................................................................... 73
21.1. Basic User Level & Hygiene Mode .............................................................................................. 73
21.2. Entering Search Mode From Hygiene Mode ............................................................................... 74
22. Advanced User Level (Hygiene Mode Or Search Mode) .................................................................... 75
22.1. Advanced User Level & Hygiene Mode ...................................................................................... 75
22.2. Basic User Level & Search Mode................................................................................................ 77
22.3. Advanced User Level & Search Mode ........................................................................................ 78
23. Diagnostic Mode .................................................................................................................................. 79
23.1.1. Entering Diagnostic Mode ..................................................................................................... 79
23.1.2. Adjusting The Pump Stall Threshold .................................................................................... 79
23.1.3. Pump High ............................................................................................................................ 79
23.1.4. Testing The Humidity Sensor ................................................................................................ 80
23.1.5. Pump Low ............................................................................................................................. 81
23.1.6. Exiting Diagnostic Mode ....................................................................................................... 81
24. Transferring Data To & From A Computer .......................................................................................... 82
24.1. Downloading The Datalog To A PC ............................................................................................ 82
24.2. Uploading Firmware To The instrument From A PC ................................................................... 82
25. Maintenance ........................................................................................................................................ 83
25.1. Battery Charging & Replacement ................................................................................................ 83
25.1.1. Replacing The Li-ion Battery ................................................................................................ 83
25.1.2. Replacing The Alkaline Battery Adapter ............................................................................... 84
25.2. PID Sensor & Lamp Cleaning/Replacement ............................................................................... 85
25.2.1. Cleaning The PID Sensor ..................................................................................................... 87
25.2.2. Cleaning The Lamp Housing Or Changing The Lamp ......................................................... 87
25.2.3. Determining The Lamp Type ................................................................................................ 88
25.2.4. Sampling Pump ..................................................................................................................... 89
25.2.5. Cleaning The Instrument ...................................................................................................... 89
25.3. Special Servicing Note ................................................................................................................ 89
5
Page 6

Handheld PID Monitors User’s Guide
25.4. Crash Recovery ........................................................................................................................... 90
26. Troubleshooting ................................................................................................................................... 91
27. Technical Support ................................................................................................................................ 92
28. Controlled Part Of Manual ................................................................................................................... 93
32. Specifications ...................................................................................................................................... 99
32.1. MiniRAE Lite+ Specifications ...................................................................................................... 99
32.2. MiniRAE 3000+ Specifications .................................................................................................. 100
32.3. ppbRAE 3000+ Specifications ................................................................................................... 102
32.4. UltraRAE 3000+ Specifications ................................................................................................. 103
6
Page 7

Handheld PID Monitors User’s Guide
WARNINGS
This Manual must be carefully read by all individuals who have or will have the responsibility of using,
maintaining, or servicing this product. The product will perform as designed only if it is used, maintained, and
serviced in accordance with the manufacturer’s instructions. The user should understand how to set the
correct parameters and interpret the obtained results.
For safety reasons, this equipment must be operated and serviced by qualified personnel only. Read and
understand the instruction manual completely before operating or servicing.
AVERTISSEMENT
Pour des raisons de sécurité, cet équipment doit être utilisé, entretenu et réparé uniquement par un
personnel qualifié. Étudier le manuel d’instructions en entier avant d’utiliser, d’entretenir ou de réparer
l’équipement.
Read Before Operating
This manual must be carefully read by all individuals who have or will have the responsibility of using,
maintaining, or servicing this product. The product will perform as designed only if it is used, maintained, and
serviced in accordance with the manufacturer’s instructions. The user should understand how to set the
correct parameters and interpret the obtained results.
CAUTION!
To reduce the risk of electric shock, turn the power off before opening this instrument or performing service.
Never operate the instrument when the instrument is open. Service this product only in an area known to be
non-hazardous.
ATEX WARNING!
To reduce the risk of electrostatic ignition, do not use the instrument without the rubber boot in place.
7
Page 8

Handheld PID Monitors User’s Guide
WARNINGS
STATIC HAZARD: Clean only with a damp cloth.
For safety reasons, this equipment must be operated and serviced by qualified personnel only. Read and
understand instruction manual completely before operating or servicing.
USE ONLY RAE SYSTEMS BATTERY PACKS, PART NUMBERS 059-3051-000, 059-3052-000, AND 0593054-000. THIS INSTRUMENT HAS NOT BEEN TESTED IN AN EXPLOSIVE GAS/AIR ATMOSPHERE
HAVING AN OXYGEN CONCENTRATION GREATER THAN 21%. SUBSTITUTION OF COMPONENTS
MAY IMPAIR INTRINSIC SAFETY. RECHARGE BATTERIES ONLY IN NON-HAZARDOUS LOCATIONS.
DO NOT MIX OLD AND NEW BATTERIES OR BATTERIES FROM DIFFERENT MANUFACTURERS.
THE CALIBRATION OF ALL NEWLY PURCHASED RAE SYSTEMS INSTRUMENTS SHOULD BE TESTED
BY EXPOSING THE SENSOR(S) TO KNOWN CONCENTRATION CALIBRATION GAS BEFORE THE
INSTRUMENT IS PUT INTO SERVICE.
FOR MAXIMUM SAFETY, THE ACCURACY OF THE INSTRUMENT SHOULD BE CHECKED BY
EXPOSING IT TO A KNOWN CONCENTRATION CALIBRATION GAS BEFORE EACH DAY’S USE.
DO NOT USE USB/PC COMMUNICATION IN HAZARDOUS LOCATIONS.
AVERTISSIMENT
DANGER RISQUE D'ORIGINE ELECTROSTATIQUE: Nettoyer uniquement avec un chiffon humide.
Pour des raisons de sécurité, cet équipment doit être utilisé, entretenu et réparé uniquement par un
personnel qualifié. Étudier le manuel d’instructions en entier avant d’utiliser, d’entretenir ou de réparer
l’équipement.
Utiliser seulement l'ensemble de batterie RAE Systems, la reference 059-3051-000 au 059-3052-000 au 0593054-000. Cet instrument n’a pas été essayé dans une atmosphère de gaz/air explosive ayant une
concentration d’oxygène plus élevée que 21%. La substitution de composants peut compromettre la sécurité
intrinsique. Ne charger les batteries que dans emplacements désignés non-dangereuse.
Ne pas melanger les anciennes et les nouvelles batteries, ou bien encore les batteries de differents
fabriquants.
La calibration de toute instruments de RAE Systems doivent être testé en exposant l’instrument a une
concentration de gaz connue par une procédure diétalonnage avant de mettre en service l’instrument pour la
première fois.
Pour une securite maximale, la sensibilité du l’instrument doit être verifier en exposant l’instrument a une
concentration de gaz connue par une procédure diétalonnage avant chaque utilisation journalière.
Ne pas utiliser de connection USB/PC en zone dangereuse.
Proper Product Disposal At End Of Life
EU Directive 2012/19/EU: Waste Electrical and Electronic Equipment (WEEE)
This symbol indicates that the product must not be disposed of as general industrial or domestic waste.
This product should be disposed of through suitable WEEE disposal facilities. For more information about
disposal of this product, contact your local authority, distributor, or the manufacturer
8
Page 9

Caution
This device complies with Part 15 of the FCC Rules / Industry Canada license-exempt RSS standard(s). Operation
is subject to the following two conditions: (1) this device may not cause harmful interference, and (2) this device
must accept any interference received, including interference that may cause undesired operation.
Le présent appareil est conforme aux CNR d'Industrie Canada applicables aux appareils radio exempts de licence.
L'exploitation est autorisée aux deux conditionssuivantes : (1) l'appareil ne doit pas produire de brouillage, et (2)
l'utilisateur del'appareil doit accepter tout brouillage radioélectrique subi, même si le brouillage estsusceptible d'en
compromettre le fonctionnement.
Changes or modifications not expressly approved by the party responsible for compliance could void the user's
authority to operate the equipment.
This equipment has been tested and found to comply with the limits for a Class B digital device, pursuant to part 15
of the FCC Rules. These limits are designed to provide reasonable protection against harmful interference in a
residential installation. This equipment generates uses and can radiate radio frequency energy and, if not installed
and used in accordance with the instructions, may cause harmful interference to radio communications. However,
there is no guarantee that interference will not occur in a particular installation. If this equipment does cause harmful
interference to radio or television reception, which can be determined by turning the equipment off and on, the user
is encouraged to try to correct the interference by one or more of the following measures:
• Reorient or relocate the receiving antenna.
• Increase the separation between the equipment and receiver.
• Connect the equipment into an outlet on a circuit different from that to which the receiver is connected.
• Consult the dealer or an experienced radio/TV technician for help.
Under Industry Canada regulations, this radio transmitter may only operate using an antenna of a type and
maximum (or lesser) gain approved for the transmitter by Industry Canada. To reduce potential radio interference to
other users, the antenna type and its gain should be so chosen that the equivalent isotropically radiated power
(e.i.r.p.) is not more than that necessary for successful communication.
Conformément à la réglementation d'Industrie Canada, le présent émetteur radio peutfonctionner avec une
antenne d'un type et d'un gain maximal (ou inférieur) approuvé pour l'émetteur par Industrie Canada. Dans le but
de réduire les risques de brouillage radioélectrique à l'intention des autres utilisateurs, il faut choisir le type
d'antenne et son gain de sorte que la puissance isotrope rayonnée équivalente (p.i.r.e.) ne dépasse pas l'intensité
nécessaire à l'établissement d'une communication satisfaisante.
Handheld PID Monitors User’s Guide
9
Page 10

Handheld PID Monitors User’s Guide
IMPORTANT! BUMP TEST THE MONITOR BEFORE EACH DAY’S USE
Prior to each day’s use, every gas detection monitor should be bump tested to confirm the response of
all sensors and activation of all alarms by exposing the monitor to a concentration of target gas that
exceeds the low alarm set point. A bump test is also recommended if the monitor has been subjected to
physical impact, liquid immersion, an Over Limit alarm event, or custody changes, or anytime the
monitor’s performance is in doubt.
To ensure greatest accuracy and safety, only bump test and calibrate in a fresh air environment.
The monitor should be calibrated every time it does not pass a bump test, but no less frequently than
every six months, depending on use and exposure to gas and contamination, and its operational mode.
• Calibration intervals and bump test procedures may vary due to national legislation.
• Honeywell recommends using calibration gas cylinders containing the gas that is appropriate to the
sensor you are using, and in the correct concentration.
Special Notes
When the instrument is taken out of the transport case and turned on for the first time, there may
be some residual organic or inorganic vapor trapped inside the detector chamber. The initial PID
sensor reading may indicate a few ppm. Enter an area known to be free of any organic vapor and
turn on the instrument. After running for several minutes, the residual vapor in the detector
chamber will be cleared and the reading should return to zero.
The battery of the instrument discharges slowly even if it is turned off. If the instrument has not
been charged for 5 to 7 days, the battery voltage will be low. Therefore, it is a good practice to
always charge the instrument before using it. It is also recommended to fully charge the instrument
for at least 10 hours before first use. Refer to this User Guide’s section on battery charging for
more information on battery charging and replacement.
10
Page 11

Handheld PID Monitors User’s Guide
1. Standard Contents
• Instrument
• Calibration Kit
• Charger Stand
• AC/DC Adapter
• Alkaline Battery Adapter
• Data Cable
• CD-ROM With User’s Guide, Quick Start Guide, and related materials
2. General Information
The compact instrument is designed as a broadband VOC gas monitor and datalogger for work in
hazardous environments. It monitors Volatile Organic Compounds (VOC) using a photoionization
detector (PID) with a 9.8 eV, 10.6 eV, or 11.7eV gas-discharge lamp. The instrument consists of a
PID with associated microcomputer and electronic circuit. The unit is housed in a rugged case with
a backlit LCD and 3 keys to provide easy user interface. It also has a built-in flashlight for
operational ease in dark locations.
Key Features
Lightweight and Compact
• Compact, lightweight, rugged design
• Built-in sample draw pump
Dependable and Accurate
• Up to 16 hours of continuous monitoring with rechargeable battery pack
• Designed to continuously monitor VOC vapor at parts-per-million (ppm) and/or parts-per-billion
(ppb) levels
User-friendly
• Preset alarm thresholds for STEL, TWA, low- and high-level peak values.
• Audio buzzer and flashing LED display are activated when the limits are exceeded.
Datalogging Capabilities
• 260,000-point datalogging storage capacity for data download to PC
3. Physical Description
The main components of the portable VOC monitoring instrument include:
• Three keys for user interaction with the instrument: 3 operation/programming keys for normal
operation or programming
• LCD display with back light for direct readout and calculated measurements
• Built-in flashlight for illuminating testing points in dark environments
• Buzzer and red LEDs for alarm signaling whenever exposures exceed preset limits
• Charge contacts for plugging directly to its charging station
• Gas entry and exit ports
• USB communication port for PC interface
• Protective rubber cover
Easy-to-use separation tube holder (UltraRAE 3000+)
11
Page 12
Handheld PID Monitors User’s Guide
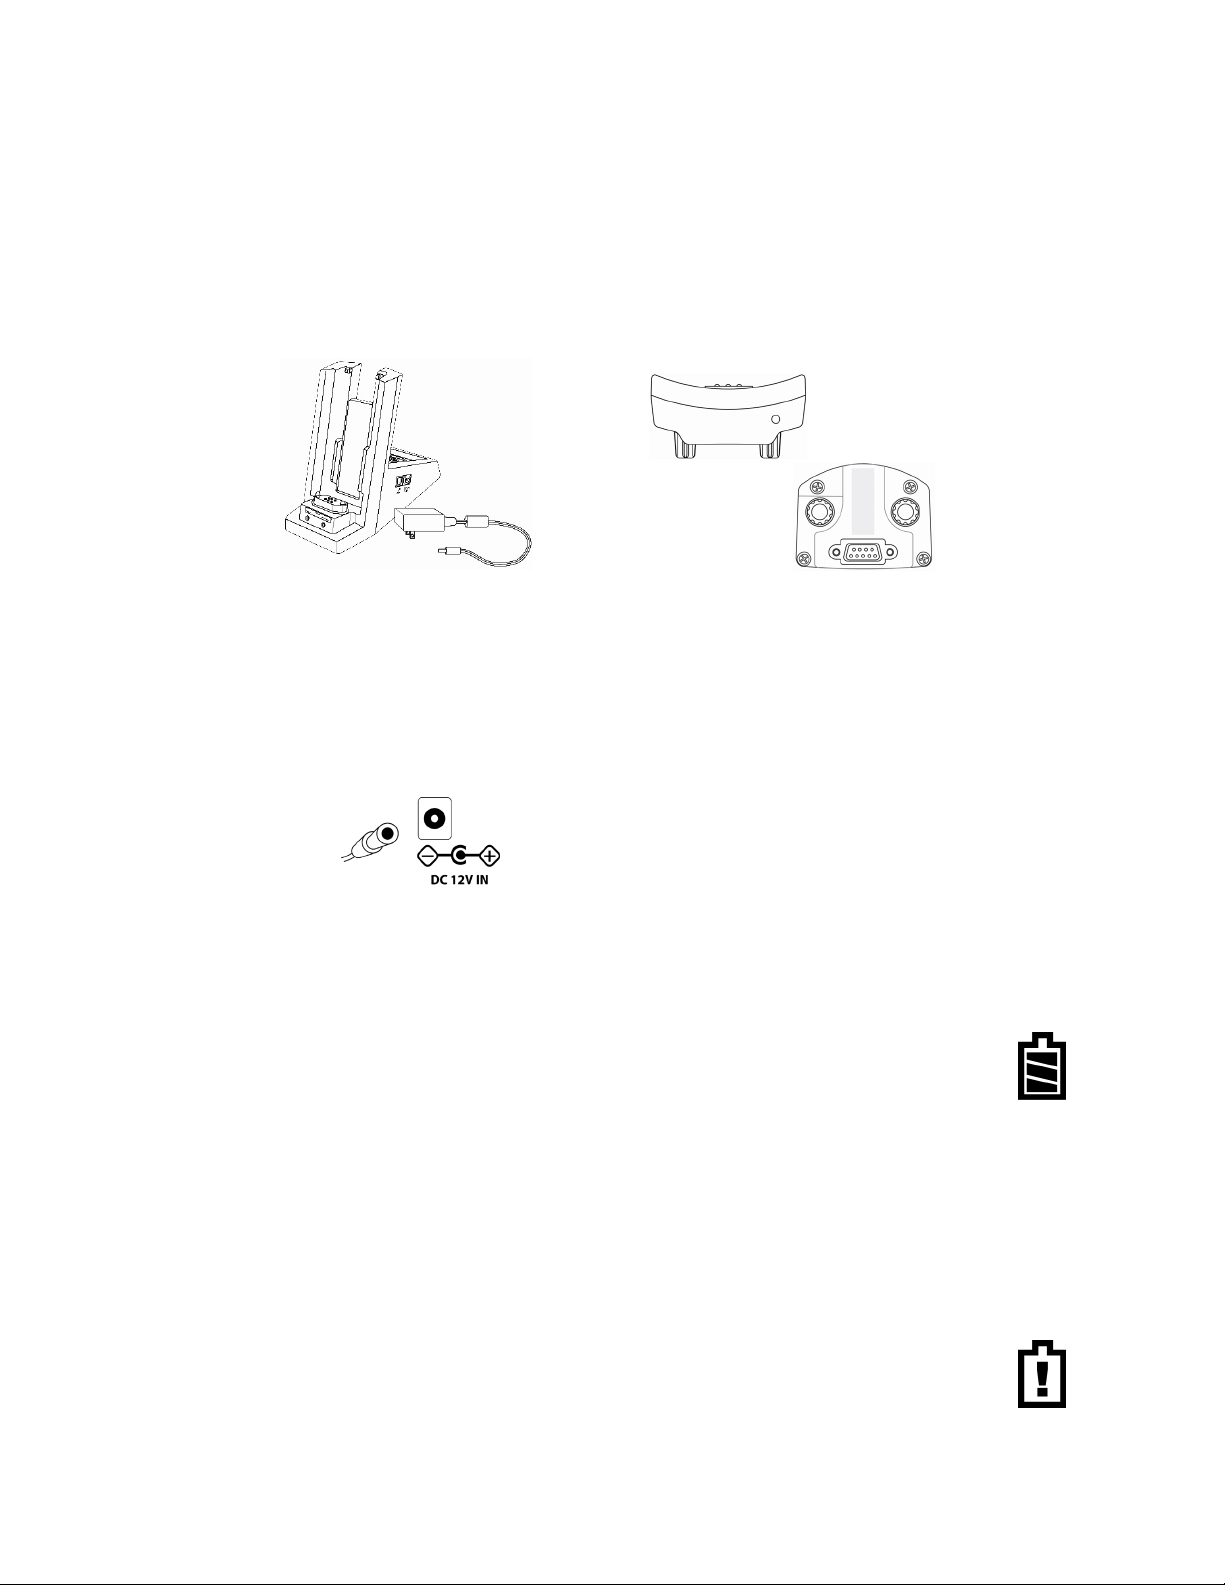
Charger Stand
Travel
Charger
4. Charging The Battery
Always fully charge the battery before using the instrument. The instrument’s Li-ion battery is
charged by attaching the instrument to the Travel Charger (or by placing the instrument in the
optional Charger Stand). Contacts on the bottom of the instrument meet the Travel Charger’s (or
Charger Stand’s) contacts, transferring power without other connections.
Note: Before connecting the charger to the instrument, visually inspect the contacts to make sure
they are clean. If they are not, wipe them with a soft cloth. Do not use solvents or cleaners.
Follow this procedure to charge the instrument:
1. Plug the AC/DC adapter’s barrel connector into the instrument’s Charger Stand or Travel
Charger.
2. Plug the AC/DC adapter into the wall outlet.
3. Connect the AC/DC adapter to the Travel Charger (or
Charger Stand).
4. Place the instrument into the Travel Charger or Charger Stand. The LED in the Travel Charger
(or Charger Stand) should glow.
The instrument begins charging automatically. (If the optional Charger Stand is used, the
“Primary” LED blinks green to indicate charging.) During charging, the diagonal lines in the
battery icon on the instrument’s display are animated and you see the message
“Charging...”
Note: If the Li-ion battery has been discharged below a certain threshold, the “Charging...”
message does not display immediately. The charging LED blinks to indicate that it is charging, and
after it has been charging for a while, the “Charging...” message appears.
When the instrument’s battery is fully charged, the battery icon is no longer animated and shows a
full battery. The message “Fully charged!” is shown. (If the Charger Stand or Travel Charger is
used, its LED glows continuously green.)
Note: If you see the “Battery Charging Error” icon (a battery outline with an exclamation
mark inside), check that the instrument or rechargeable battery has been properly set into
the Travel Charger (or Charger Stand). If you still receive the message, check the
Troubleshooting section of this guide.
12
Page 13

Handheld PID Monitors User’s Guide
Note: If the instrument or battery has been charging for more than 10 hours and you see the
“Battery Charging Error” icon and a message that says, “Charging Too Long,” this indicates that the
battery is not reaching a full charge. Try changing the battery and make sure the contacts on the
instrument are meeting the Travel Charger’s (or Charger Stand’s) contacts. If the message is still
shown, consult your distributor or RAE Systems Technical Services.
4.1. Charging A Spare Rechargeable Battery
A rechargeable Li-ion battery can be charged when it is not inside the monitor. The Charger Stand
is designed to accommodate both types of charging. Contacts on the bottom of the battery meet the
contacts on the cradle, transferring power without other connections, and a spring-loaded capture
holds the battery in place during charging.
1. Plug the AC/DC adapter into the monitor’s cradle.
2. Place the battery into the cradle, with the gold-plated contacts on top of the six matching
charging pins.
3. Plug the AC/DC adapter into the wall outlet.
The battery begins charging automatically. During charging, the Secondary LED in the cradle blinks
green. When charging is complete, it glows steady green.
Release the battery from the cradle by pulling it back toward the rear of the cradle and tilting it out
of its slot.
Note: If you need to replace the Li-ion battery pack, replacements are available from RAE
Systems. The part number is 059-3051-000.
Note: An Alkaline Battery Adapter (part number 059-3052-000), which uses four AA alkaline batteries
(Duracell MN1500), may be substituted for the Li-Ion battery.
WARNING!
To reduce the risk of ignition of hazardous atmospheres, recharge and replace batteries
only in areas known to be non-hazardous. Remove and replace batteries only in areas
known to be non-hazardous.
4.2. Low Voltage Warning
When the battery’s charge falls below a preset voltage, the instrument warns you by
beeping once and flashing once every minute, and the “empty battery” icon blinks on and
off once per second. You should turn off the instrument within 10 minutes and either
recharge the battery by placing the instrument in its cradle, or replace the battery with a
fresh one with a full charge.
4.3. Clock Battery
An internal clock battery is mounted on one of the instrument’s printed circuit boards. This long-life
battery keeps settings in memory from being lost whenever the Li-ion battery or alkaline batteries
are removed. This backup battery should last approximately five years, and must be replaced by an
authorized Honeywell service technician. It is not user-replaceable.
4.4. Data Protection While Power Is Off
When the instrument is turned off, all the current real-time data including last measured values are
erased. However, the datalog data is preserved in non-volatile memory. Even if the battery is
disconnected, the datalog data will not be lost.
13
Page 14
Handheld PID Monitors User’s Guide
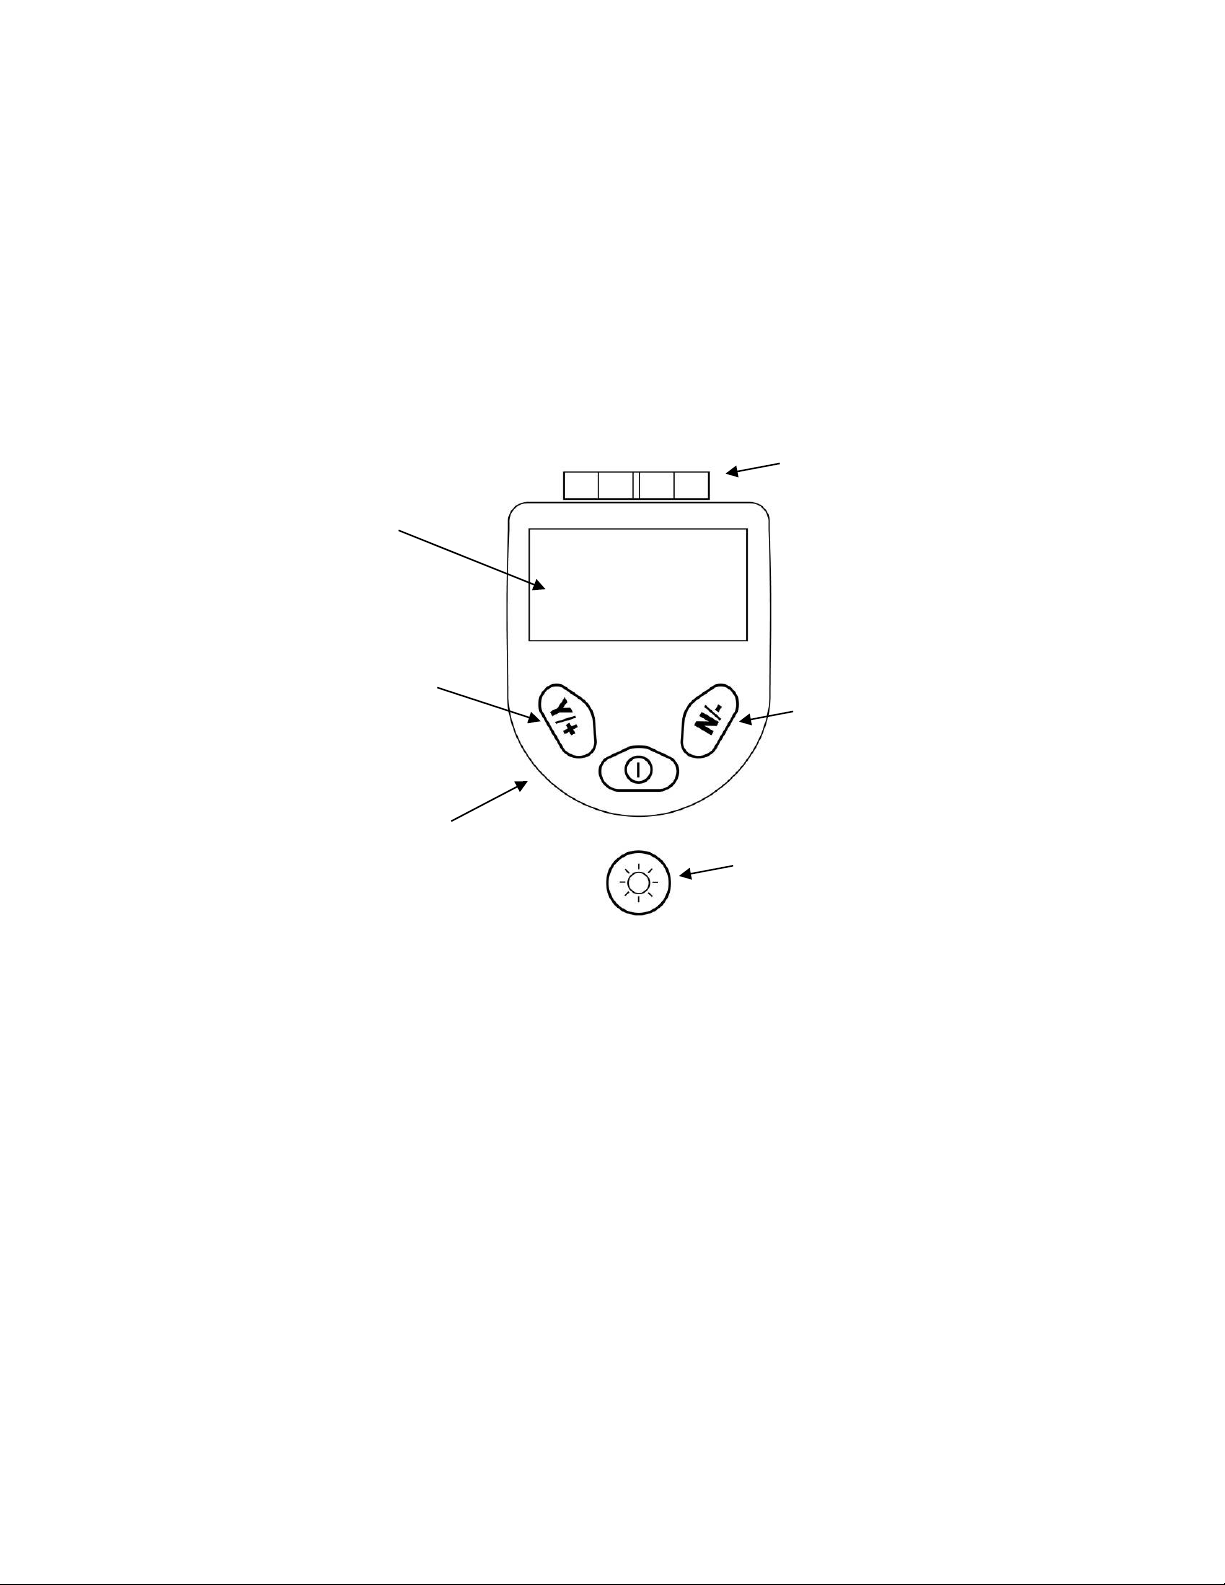
Display
Y/+ key
N/- key
MODE key
Flashlight
LEDs and
5. User Interface
The instrument’s user interface consists of the display, LEDs, an alarm transducer, and four keys.
The keys are:
Y/+
MODE
N/Flashlight on/off
The LCD display provides visual feedback that includes the reading, time, battery condition, and
other functions.
flashlight
on/off key
14
Page 15
Handheld PID Monitors User’s Guide
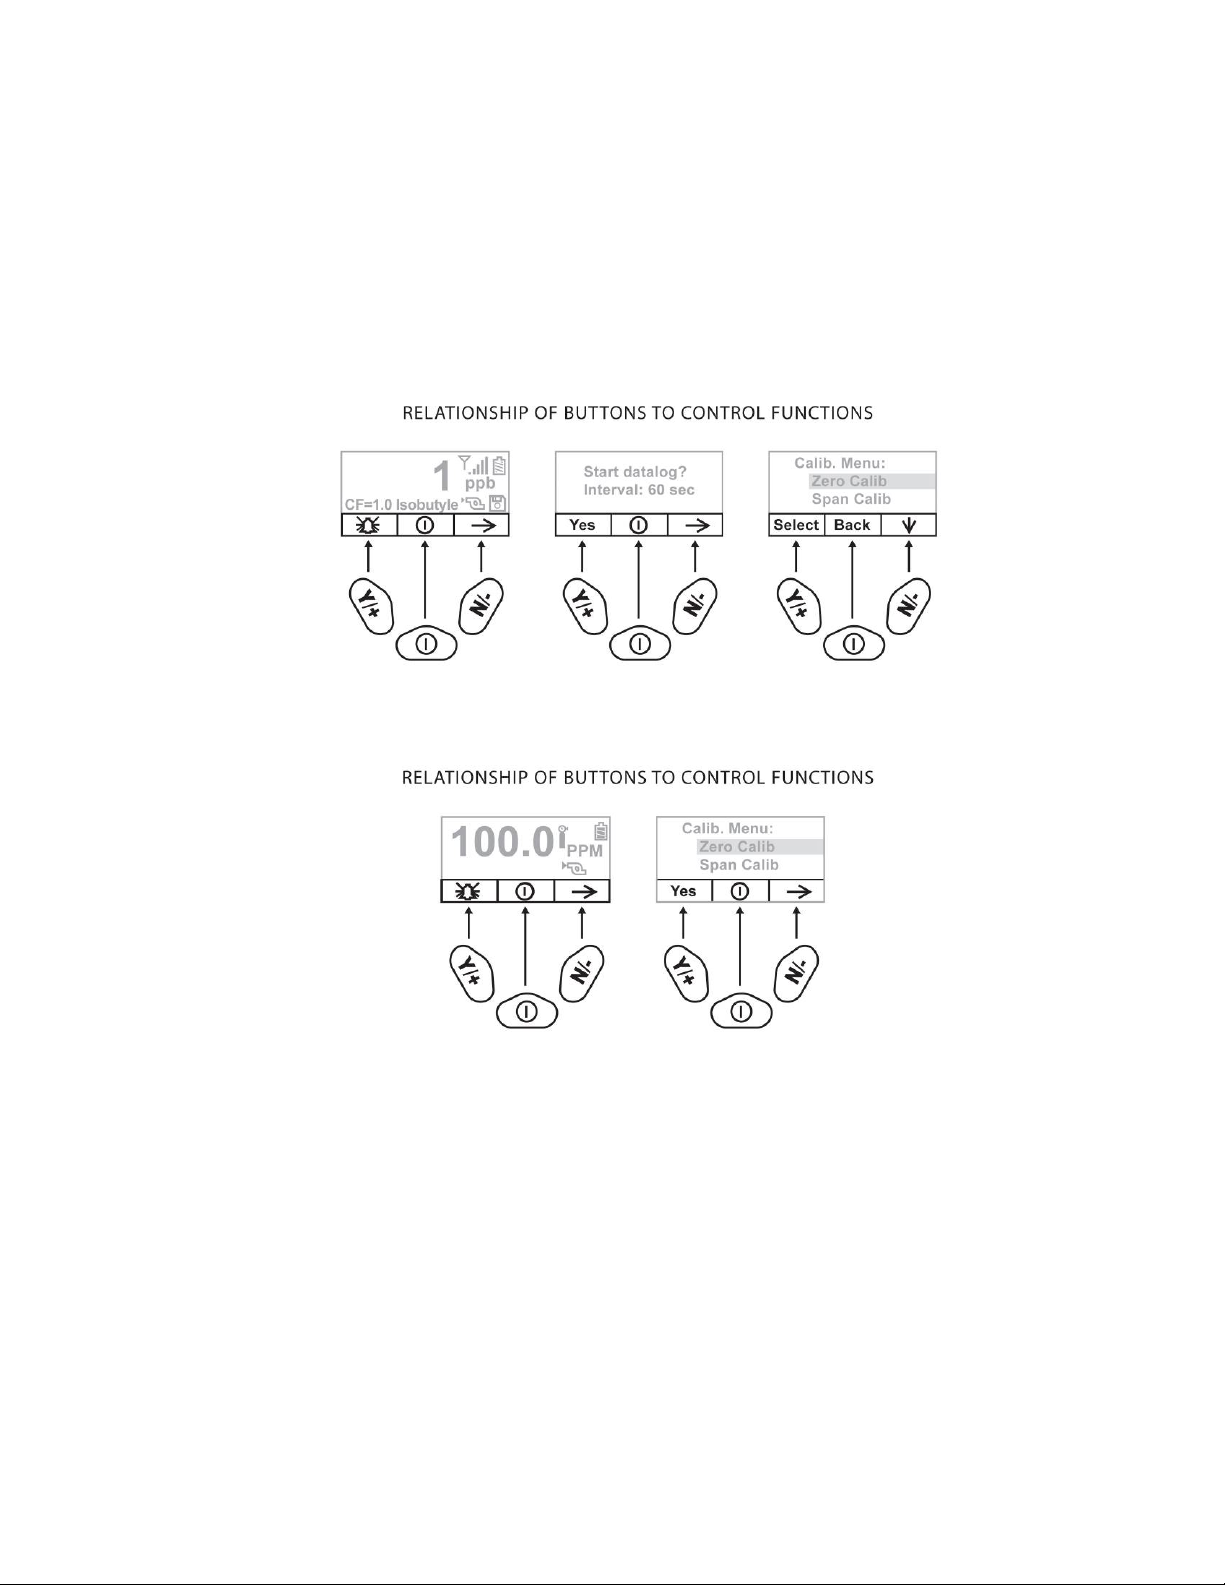
In addition to their labeled functions, the keys labeled Y/+, MODE, and N/- act as “soft keys” that
control different parameters and make different selections within the instrument’s menus. From
menu to menu, each key controls a different parameter or makes a different selection.
Three panes along the bottom of the display are “mapped” to the keys. These change as menus
change, but at all times the left pane corresponds to the [Y/+] key, the center pane corresponds to
the [MODE] key, and the right pane corresponds to the [N/-] key. Here are three examples of
different menus with the relationships of the keys clearly shown:
MiniRAE 3000+, ppbRAE 3000+, UltraRAE 3000+
MiniRAE Lite+
15
Page 16
Handheld PID Monitors User’s Guide
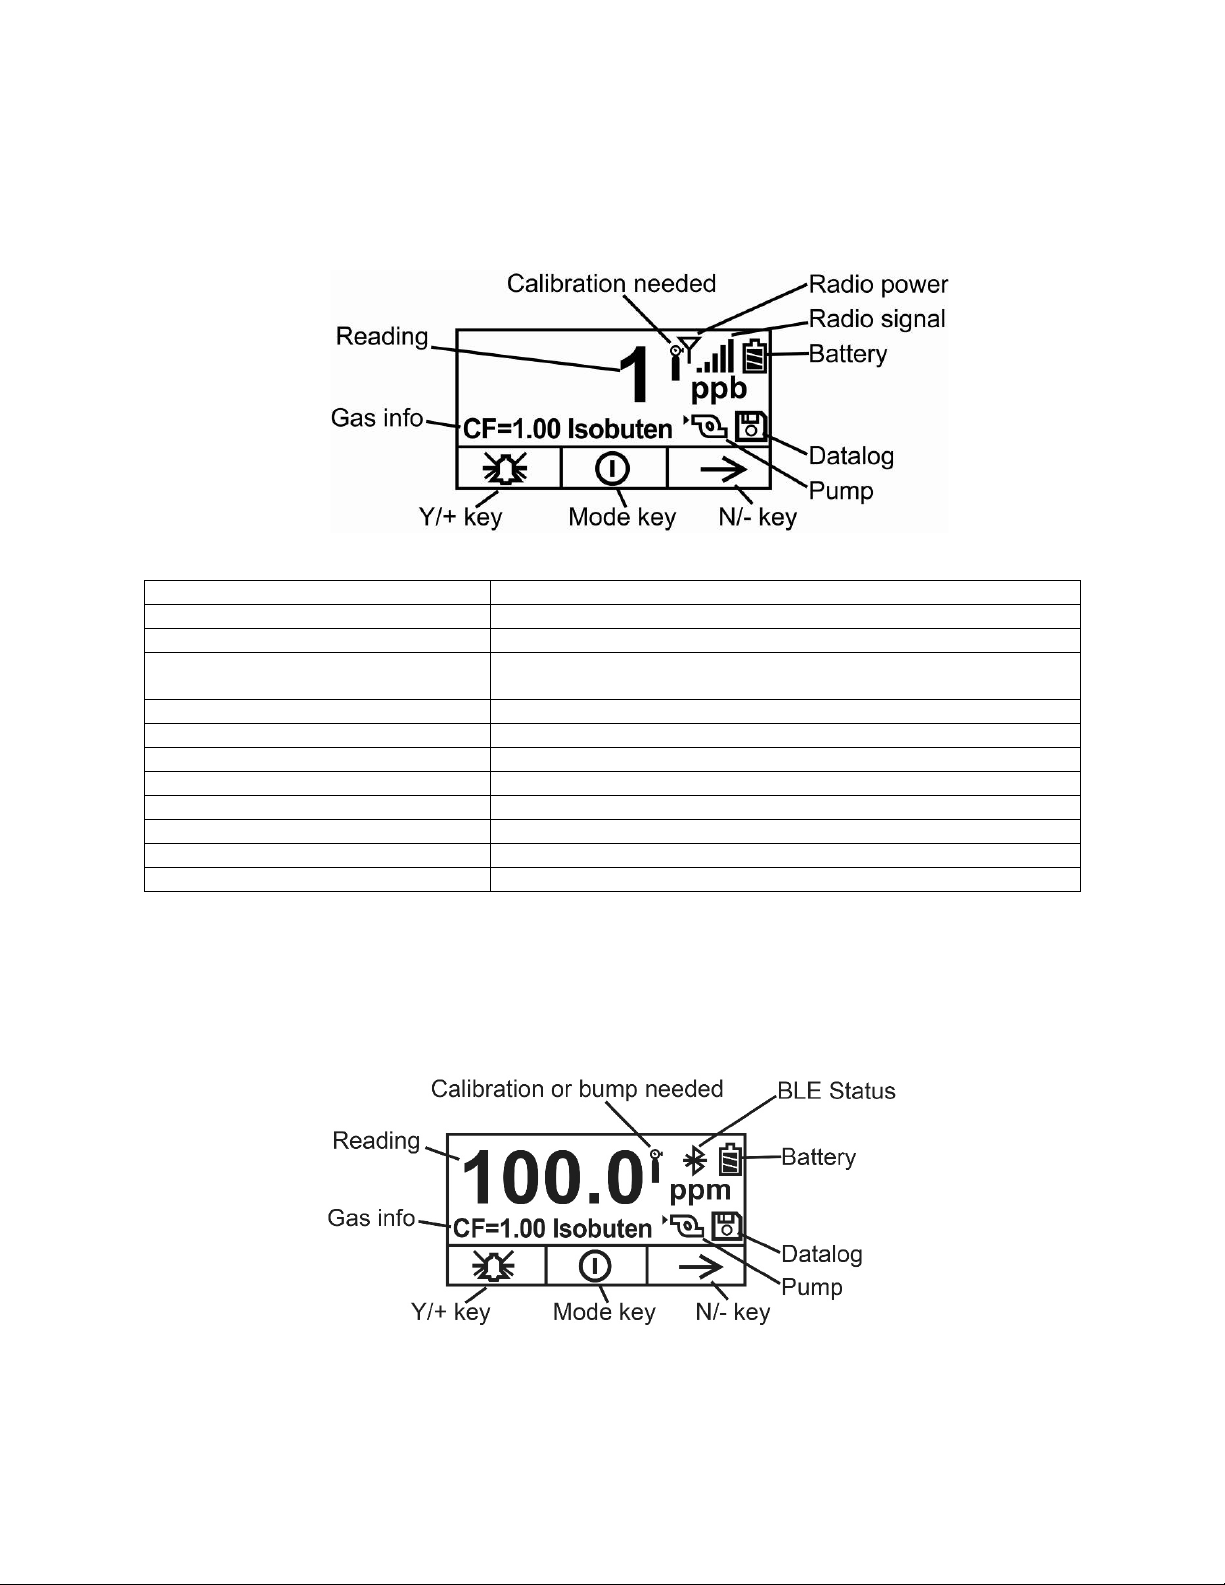
Gas info
Tells the Correction Factor and type of calibration gas
Reading
Concentration of gas as measured by the instrument
Calibration needed
Indicates that calibration should be performed
Calibration (or bump) needed
Dark icon indicates that calibration should be performed;
light icon indicates bump should be performed
Radio power
Indicates whether Mesh radio connection is on or off
Radio signal
Indicates signal strength (more bars = greater strength)
Battery
Indicates level in 3 bars
Pump
Indicates that pump is working
Datalog
Indicates whether datalog is on or off
Y/+
Y/+ key’s function for this screen
MODE
MODE key’s function for this screen
N/-
N/- key’s function for this screen
6. Display
The display shows the following information:
Note:The “Radio power” icon and “Radio signal” icon are only shown if a Mesh radio is installed in the
instrument. If the instrument has a BLE radio, the Bluetooth icons shown on the next page are used.
If the instrument is equipped with BLE instead of other wireless, the BLE Status icon is shown:
16
Page 17
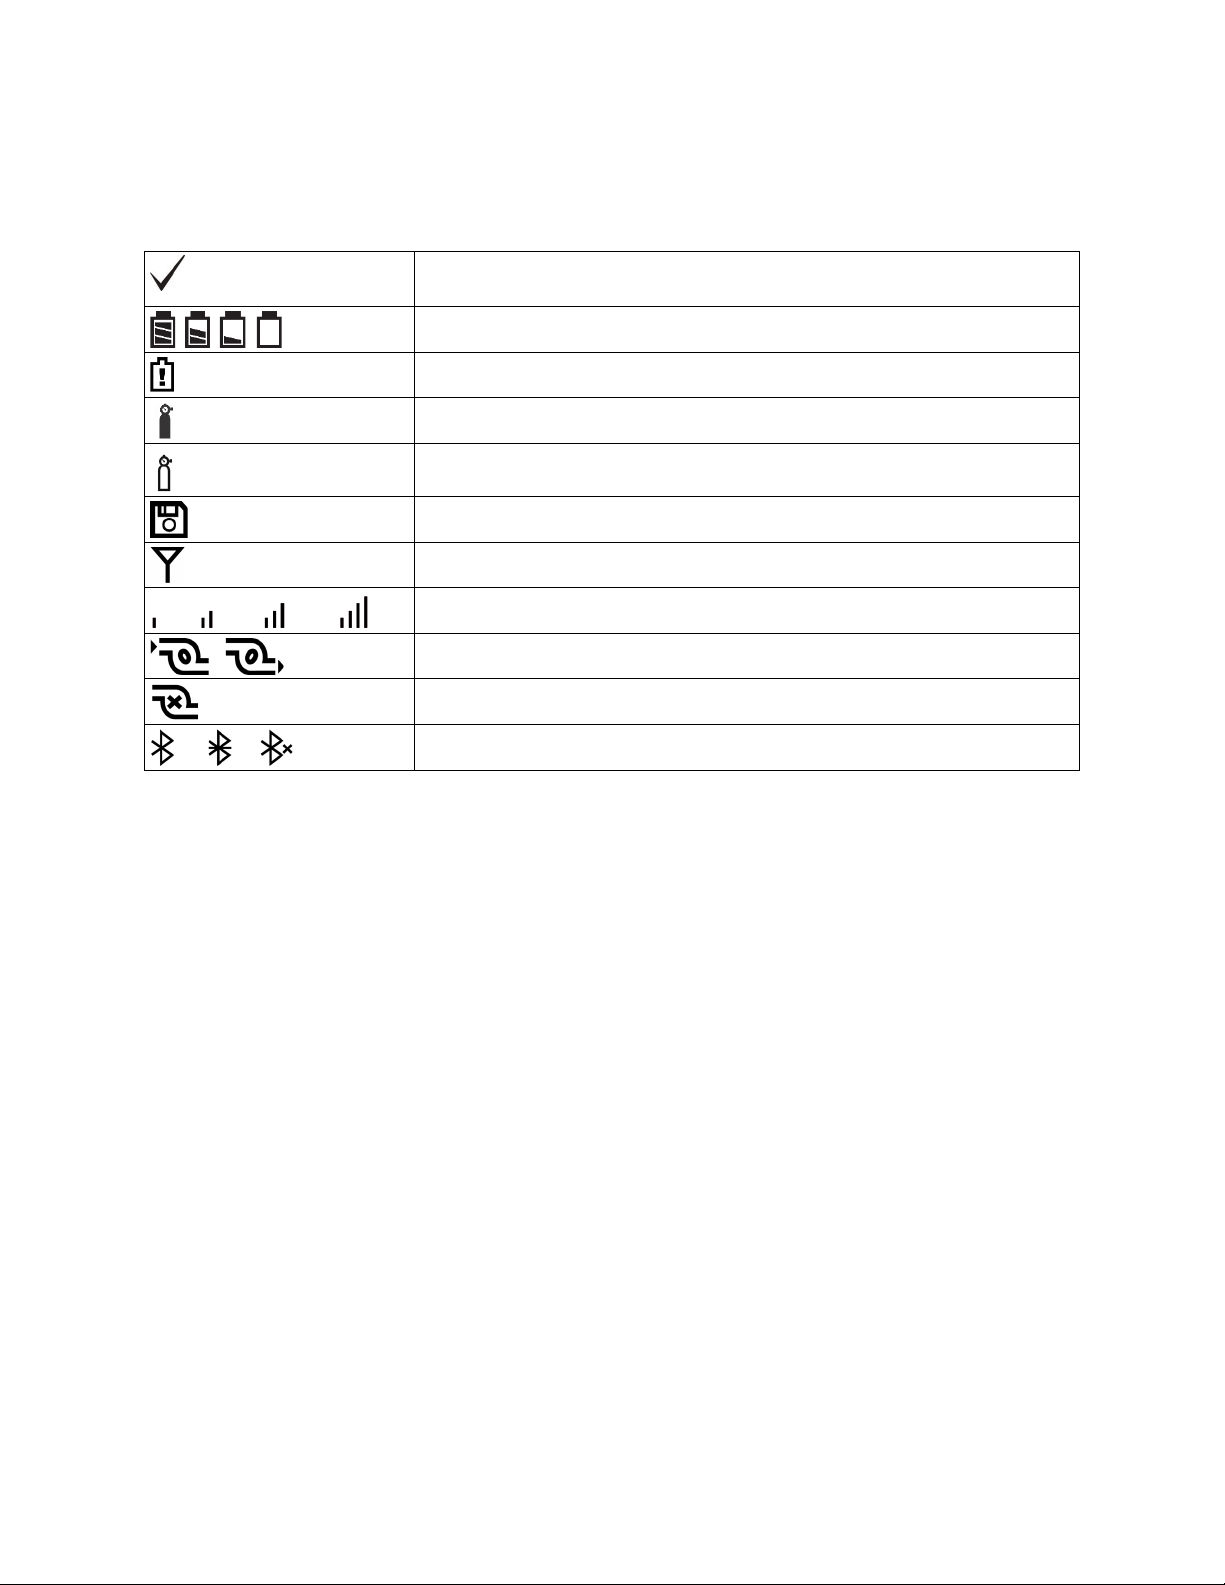
Handheld PID Monitors User’s Guide
The instrument has been bump tested and calibrated in compliance with the
policy settings
Battery level
Charging error
Calibration required
Bump test required
Datalog on
Radio Power
Radio signal
Pump operational
Pump blocked or stalled
BLE status: Installed, Connected, Turned Off
6.1. Icons
These are the icons shown on the display to indicate functions or status.
17
Page 18
Handheld PID Monitors User’s Guide
7. Operating The Instrument
The instrument is designed as a broadband VOC gas monitor and datalogger for work in hazardous
environments. It gives real-time measurements and activates alarm signals whenever the exposure
exceeds preset limits. Prior to factory shipment, the instrument is preset with default alarm limits
and the sensor is pre-calibrated with standard calibration gas. However, you should test the
instrument and verify the calibration before the first use. After the instrument is fully charged and
calibrated, it is ready for immediate operation.
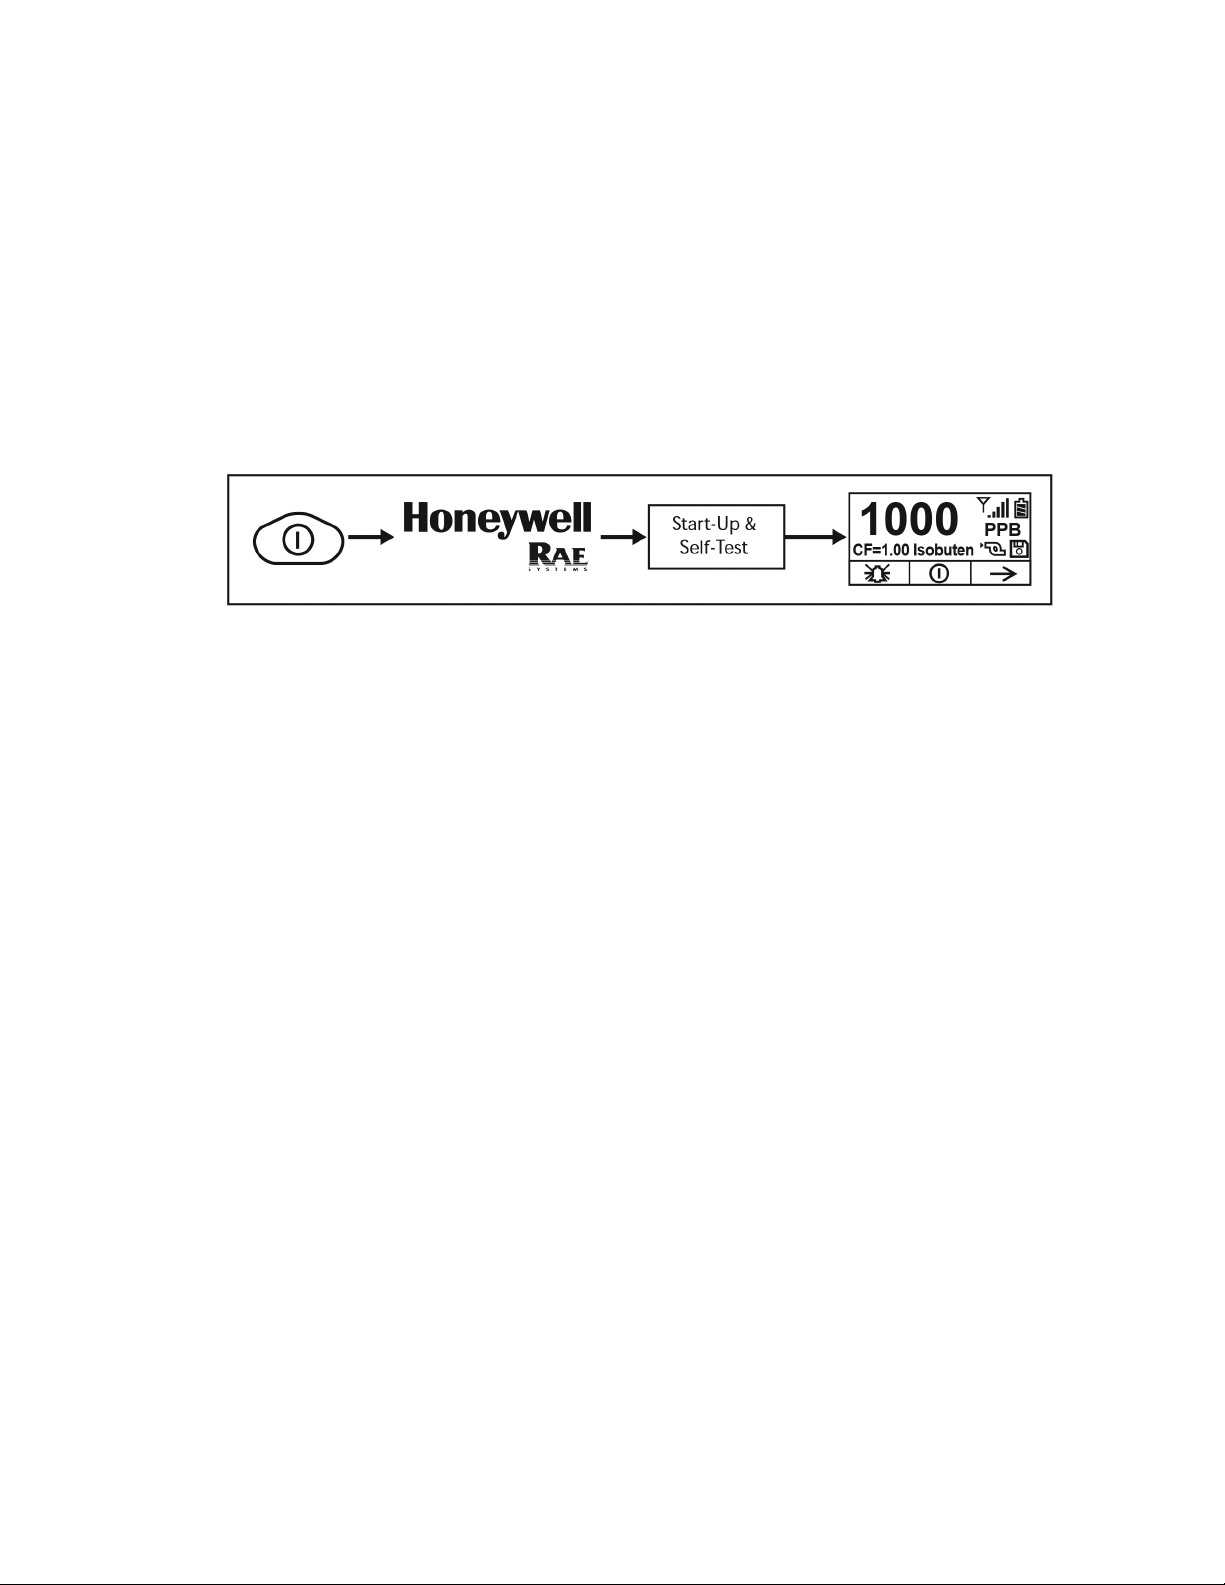
7.1. Turning The Instrument On
1. With the instrument turned off, press and hold [MODE].
2. When the display turns on, release the [MODE] key.
Note: The main display may show ppb or ppm and other features, depending on the instrument.
The Honeywell logo should appear first. (If the logo does not appear, there is likely a problem and
you should contact your distributor or Honeywell RAE Systems Technical Support.) The instrument
is now operating and performs self tests. If any tests (including sensor and memory tests fail), refer
to the Troubleshooting section of this guide.
Once the startup procedure is complete, the instrument shows a numerical reading screen with
icons. This indicates that the instrument is fully functional and ready to use.
7.2. Turning The Instrument Off
1. Press and hold the Mode key for 3 seconds. A 5-second countdown to shutoff begins.
2. Once the countdown stops, the instrument is off. Release the Mode key.
3. When you see “Unit off...” release your finger from the [MODE] key. The instrument is now off.
Note: You must hold your finger on the key for the entire shutoff process. If you remove your finger
from the key during the countdown, the shutoff operation is canceled and the instrument continues
normal operation.
18
Page 19
Handheld PID Monitors User’s Guide
7.3. Auto-Zero At Startup Option
Using ProRAE Studio II (version 1.11.4 and above) or Honeywell™ Safety Suite Device
Configurator, the instrument can be programmed to automatically perform a zero calibration after
self-testing during startup.
Note: The option is disabled by default. If it is disabled, the instrument performs its self-test and
then goes directly to reading mode.
The zeroing process can be aborted by pressing the [N/-] key at any time during the process, and
the instrument will go directly to normal reading mode.
Notes:
• When a ppbRAE 3000+ is in normal reading mode and is not in system alarm (Low Alarm or
High Alarm), zero calibration is triggered in a locked interval (1 hour). If the instrument is in low
alarm, Auto Zero is skipped until the alarm clears.
• We do not recommend using this function on the UltraRAE3000+ and ppbRAE3000+.
• We highly recommend that you make sure the instrument is in a clean air environment during
startup and zeroing.
7.4. Operating The Built-In Flashlight
The instrument has a built-in flashlight that helps you point the probe in dark places. Press the
flashlight key to turn it on. Press it again to turn it off.
Note: Using the flashlight for extended periods shortens the battery’s operating time before it needs
recharging.
19
Page 20

Handheld PID Monitors User’s Guide
7.5. Pump Status
IMPORTANT!
During operation, make sure the probe inlet and the gas outlet are free of obstructions.
Obstructions can cause premature wear on the pump, false readings, or pump stalling. During
normal operation, the pump icon alternately shows inflow and outflow as shown here:
During duty cycling (PID lamp cleaning), the display shows these icons in alternation:
If there is a pump failure or obstruction that disrupts the pump, you will see this icon blinking on and
off:
If you see this blinking icon, consult the Troubleshooting section of this guide.
7.6. Calibration Status
The instrument displays this icon if it requires calibration:
Calibration is required (and indicated by this icon) if:
• The lamp type has been changed (for example, from 10.6 eV to 9.8 eV).
• The sensor has been replaced.
• It has been 30 days or more since the instrument was last calibrated.
• If you have changed the calibration gas type without recalibrating the instrument.
• If the instrument fails a bump test.
7.7. Bump Status
The instrument displays this icon if it requires a bump test:
A bump test is required (and indicated by this icon) if:
• The defined period between bump tests has been exceeded (bump test overdue).
• The sensor has failed a previous bump test.
• The sensor(s) should be challenged on a periodic basis.
20
Page 21
Handheld PID Monitors User’s Guide
7.8. Glance Mode
Glance Mode allows you to get vital information without turning on the instrument. You can check
information such as the instrument’s model and serial number, installed sensor types, wireless
modules installed, etc., which may help when taking inventory of instruments and their sensors or
when working with service or support personnel. Glance Mode can be enabled/disabled via
ProRAE Studio II or Honeywell Safety Suite Device Configurator.
7.8.1. Enter Glance Mode
Note: The instrument must be configured so that Glance Mode is turned on (the default mode is
“Off”). This can be done in ProRAE Studio II or Honeywell Safety Suite Device Configurator. In
ProRAE Studio II or Honeywell Safety Suite Device Configurator, Glance Mode can be enabled or
disabled by checking or unchecking the box labeled “Enable Glance Mode.” You can also set which
screens will be displayed, as well as their order.
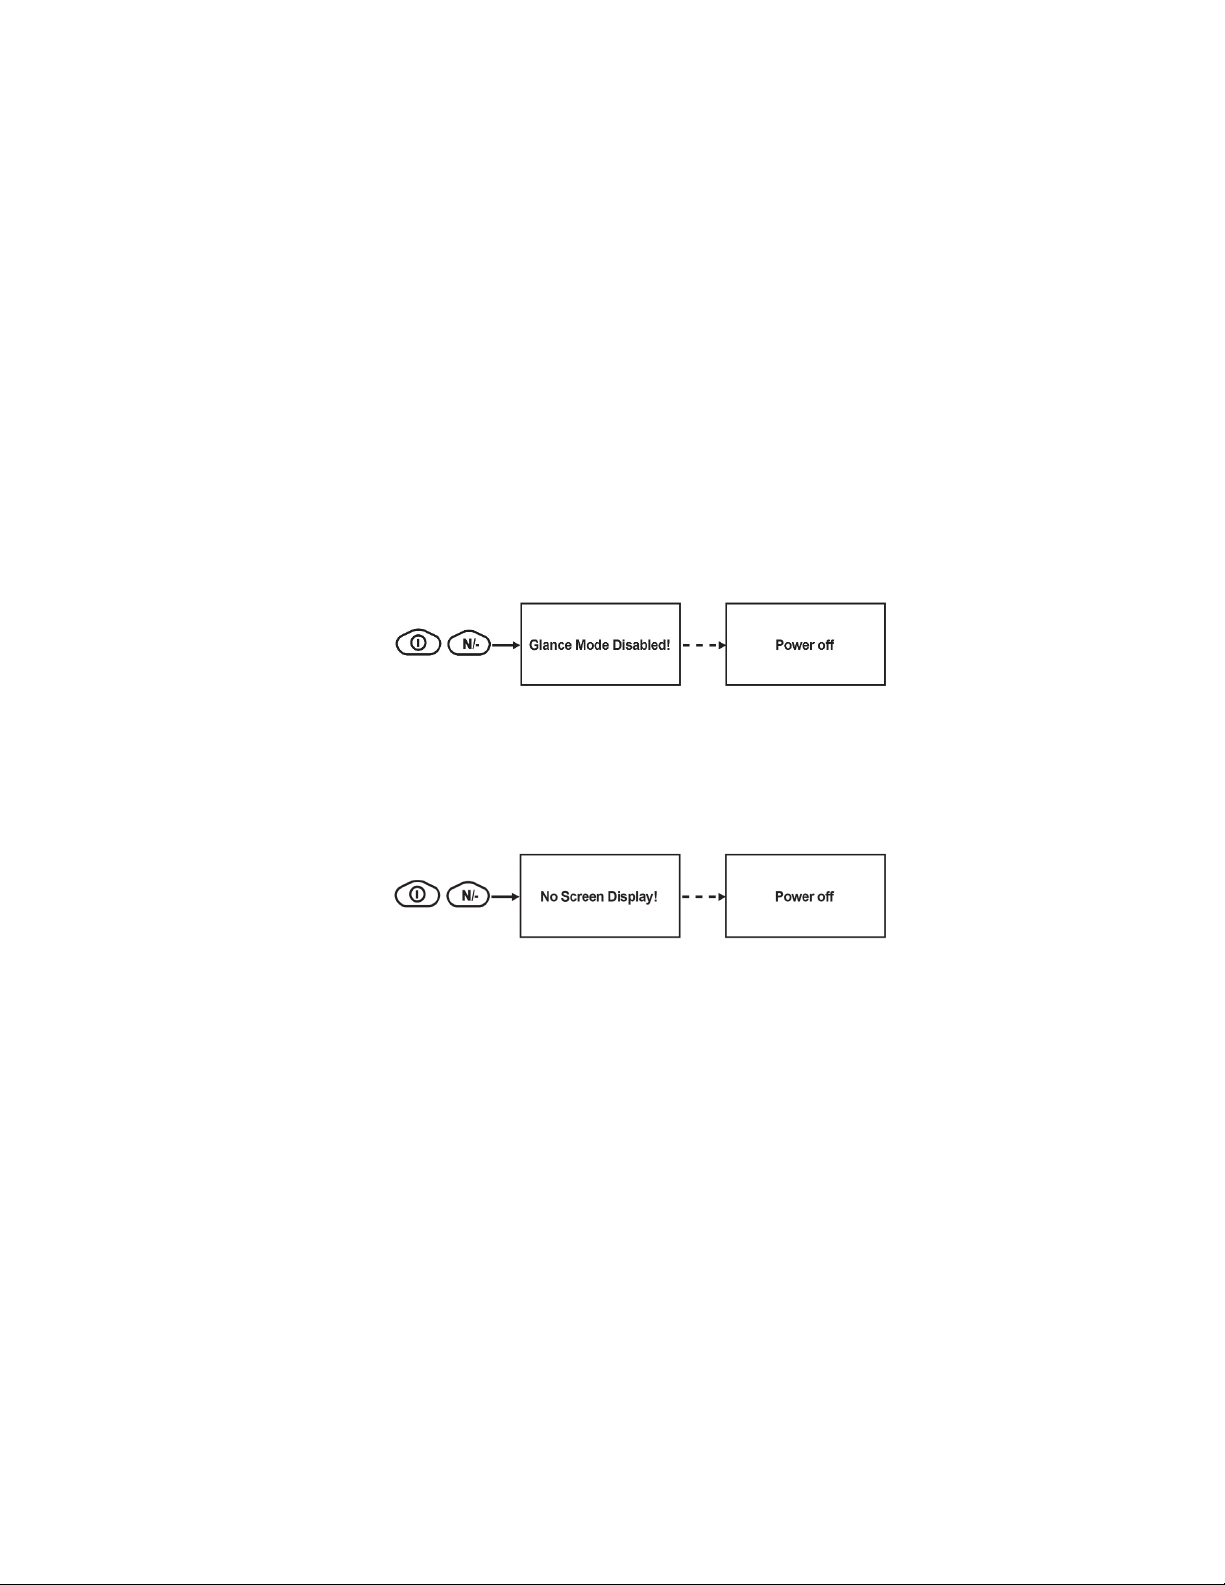
With the instrument turned off, press and hold [MODE] and [N/-] simultaneously for 2 seconds to
enter Glance Mode. If you see the message “GLANCE DISABLED,” you must configure the
instrument to use Glance Mode.
If Glance Mode is enabled, the first screen, with the Honeywell Logo, is displayed. Release the
[MODE] and [N/-] keys, and the first screen with information about the instrument is shown.
Note: If there is no information to show, the instrument will display “No Screen Display!” and turn
itself off.
21
Page 22
Handheld PID Monitors User’s Guide
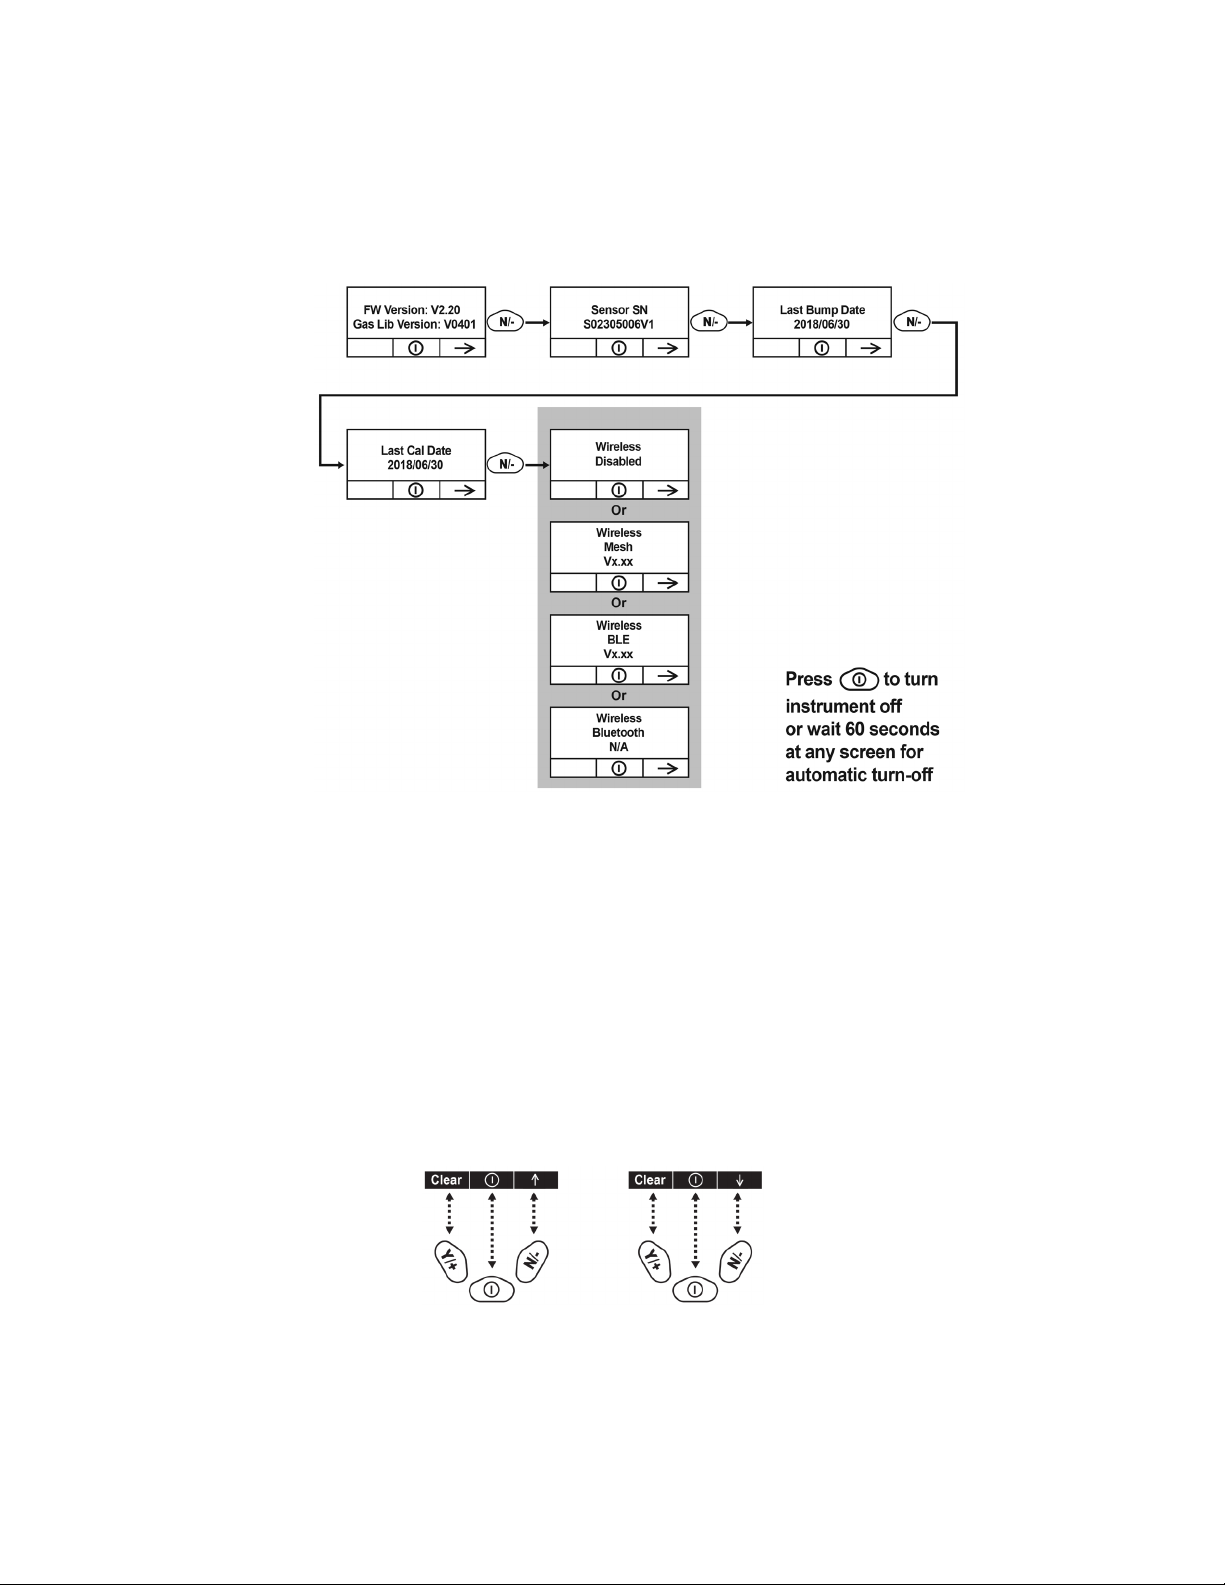
7.8.2. Glance Mode Screens
Every screen displayed in sequence as configuration. Press [N/-] to advance to the next screen. If
the Wireless modem is turned off, the screen shows “Disabled”. Otherwise, the type of wireless is
shown. When the last screen is shown, pressing [N/-] “loops” to the first screen.
7.8.3. Exit Glance Mode
The instrument exits Glance Mode and turns off when you press the [MODE] key. The display
shows “Power Off”, and after 3 seconds, it turns off. In addition, if you do not press either key in 60
seconds, the instrument automatically exits Glance Mode and shuts off.
7.9. Reverse Direction – Main Navigation
Sometimes you want to go back to a previous screen rather than advance through an entire set of
screens before “wrapping around” to that screen again.
To reverse direction:
1. Press and hold [N/-] for 3 seconds.
2. When the arrow changes from pointing up to pointing down, release your finger.
Now when you press [N/-], you step back through the screens.
To change direction again: Press and hold [N/-] for 3 seconds and then release.
22
Page 23

Handheld PID Monitors User’s Guide
Note: Changing direction does not work with all screens. It works primarily in submenus.
7.10. Policy Enforcement
The instrument can be configured to enforce a facility/company’s requirements that calibration
and/or bump testing be performed at specified intervals, and to explicitly prompt the user that
calibration/bump testing is required. Depending on how Policy Enforcement features are
configured, the user may be required to perform a bump test or calibration prior to being able to use
the instrument. That is, it can be set to not allow normal operation of the instrument unless
calibration or bump testing is performed.
If the instrument has been bump tested and calibrated in compliance with the policy settings, a
check-mark icon is included along the top of the instrument screen:
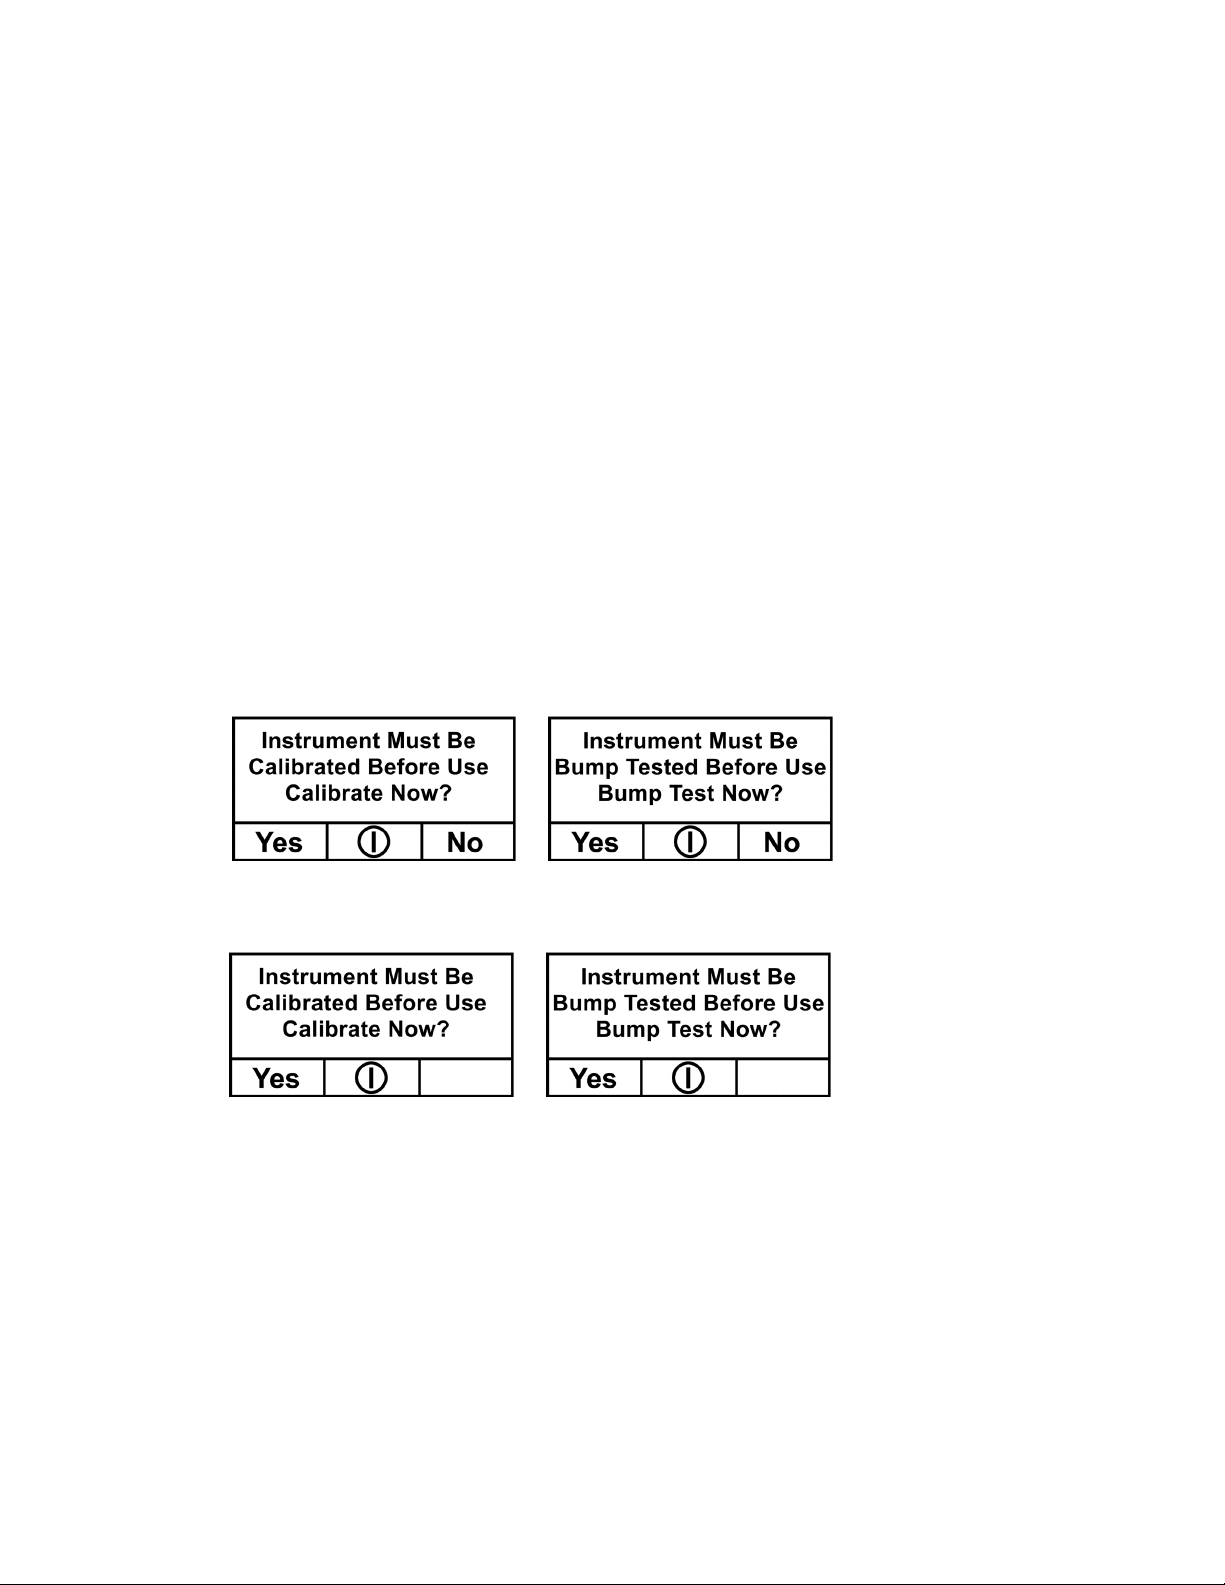
If Policy Enforcement is enabled, then after startup the instrument displays a screen that informs
the user that the instrument requires either a bump test or a calibration. If both are required, then
they are shown in sequence.
Note: Policy enforcement features are disabled by default.
7.10.1. Setting Policy Enforcement
You must use ProRAE Studio II or Honeywell Safety Suite Device Configurator to make changes to
Policy Enforcement settings. You must use an AutoRAE 2 Cradle, a Travel Charger, or a Charger
Stand. Policy violations are captured in the datalog.
Using The Travel Charger, Charger Stand, or AutoRAE 2 Automatic Test And
Calibration System
To program an instrument via an AutoRAE 2, you need ProRAE Studio II Instrument Configuration
and Data Management Software, the AutoRAE 2 connected to a power source, and a USB PC
communications cable. Here are directions for using ProRAE Studio II. (For Device Configurator,
consult its manual.)
1. Connect a USB cable between a PC with ProRAE Studio II and the AutoRAE 2 Cradle,
Travel Charger, or Charger Stand.
2. Apply power to the AutoRAE 2 Cradle, Travel Charger, or Charger Stand.
3. Turn off the instrument (or put it into AutoRAE 2 Mode or Communication Mode) and set it in
the cradle.
4. Start ProRAE Studio II software on the PC.
5. Select “Administrator” and input the password (the default is “rae”).
6. Click “Detect the instruments automatically” (the magnifying glass icon with the letter “A” in it).
After a few seconds, the AutoRAE 2 Cradle is found and it is shown, along with its serial
number.
7. Click on the icon to highlight it, and then click “Select.”
8. In ProRAE Studio II, the instrument or AutoRAE 2 Cradle is shown, including its Serial
Number, under “Online.”
9. Expand the view to show the instrument or to show the instrument in the AutoRAE 2 Cradle
by clicking the “+” to the left of the image of the AutoRAE 2 Cradle.
10. Double-click on the icon representing the instrument
11. Click “Setup.”
23
Page 24
Handheld PID Monitors User’s Guide
12. In the menu that now appears on the left side, click “Policy Enforcement.” It is highlighted,
and the Policy Enforcement pane is shown. For “Must Calibrate” and “Must Bump,” you have
the options of no enforcement or enforcement (including “Can’t Bypass,” and “Can Bypass”).
Must Calibrate. The user is prompted to calibrate the instrument when calibration is due (as set by
the calibration interval). There are two programmable options:
• Can’t Bypass. Unless calibration is performed, the instrument cannot be used, and the only
option is to turn off the instrument.
• Can Bypass. If calibration is due but the user does not want to perform a calibration, the
instrument can still be used. In this case, the instrument records that the user has bypassed
the calibration requirement in a Policy Violation report.
Must Bump. The user is prompted to bump test the instrument when a bump test is due (as set by
the bump test interval). There are two programmable options:
• Can’t Bypass. Unless a bump test is performed, the instrument cannot be used, and the only
option is to turn off the instrument.
• Can Bypass. If a bump test is due but the user does not want to perform one, the instrument
can still be used. In this case, the instrument records that the user has bypassed the bump
testing requirement in a Policy Violation report.
These are the screens that are shown on the instrument after startup if “Can Bypass” is selected:
If “Can’t Bypass” is selected, the display looks like this, and only allows the options of
performing the test or shutting down:
16. Once you have made your selections in ProRAE Studio II, you must upload the changes to the
instrument. Click the icon labeled “Upload all settings to the instrument.”
17. A confirmation screen is shown. Click “Yes” to perform the upload, or “No” to abort.
Uploading takes a few seconds, and a progress bar is shown. You can abort the upload by
clicking “Cancel.”
18. Exit ProRAE Studio II.
19. Press [Y/+] on the instrument to exit Communication Mode.
24
Page 25

Handheld PID Monitors User’s Guide
8. Operating Modes – MiniRAE 3000+ &
ppbRAE 3000+
Your instrument operates in different modes, depending on the model and its factory default
settings. In some cases, you can change modes using a password and the instrument’s navigation.
In other cases, you must use ProRAE Studio II or Honeywell Safety Suite Device Configurator
software.
The default setting for your instrument is:
User Level: Basic
Operation Mode: Hygiene
This is outlined in detail on page 73.
The other options, covered later in this guide, are:
User Level: Advanced (page 75)
Operation Mode: Hygiene
User Level: Advanced (page 75)
Operation Mode: Search
Using ProRAE Studio II or Honeywell Safety Suite Device Configurator allows access to other
options. In addition, Diagnostic Mode (page 79) is available for service technicians.
25
Page 26
Handheld PID Monitors User’s Guide
8.1. Basic User Level/Hygiene Mode (Default Settings) –
MiniRAE 3000+ & ppbRAE 3000+
The instrument is programmed to operate in Basic User Level/Hygiene Mode as its default. This gives you the
most commonly needed features while requiring the fewest parameter adjustments.
Pressing [N/-] steps you from one screen to the next, and eventually return to the main display. If you do not
press a key within 60 seconds after entering a display, the instrument reverts to its main display.
Note: While viewing any of these screens, you can shut off your instrument by pressing [MODE].
Note: At the Average & Peak, Date & Time & Temperature, Calibration Gas & Measurement Gas &
Correction Factor, and PC Communications screens, the instrument automatically goes to the main display
after 60 seconds if you do not push a key to make a selection.
26
Page 27

Handheld PID Monitors User’s Guide
9. Operating Modes – UltraRAE 3000+
The UltraRAE is actually two monitors in one:
• Compound-specific monitor
• VOC monitor
As a compound-specific monitor, it takes timed measurements and uses a separation tube in
conjunction with software that enables the UltraRAE 3000+ to give specific readings on one
particular type of compound, such as benzene or butadiene.
As a VOC monitor, the UltraRAE 3000+ operates in different modes. In some cases, you can
change modes using a password and using the instrument’s navigation. In other cases, you must
use ProRAE Studio II or Honeywell Safety Suite Device Configurator software.
The following two sections cover operation in the two modes.
• Compound Specific, page 29.
• VOC, page 35.
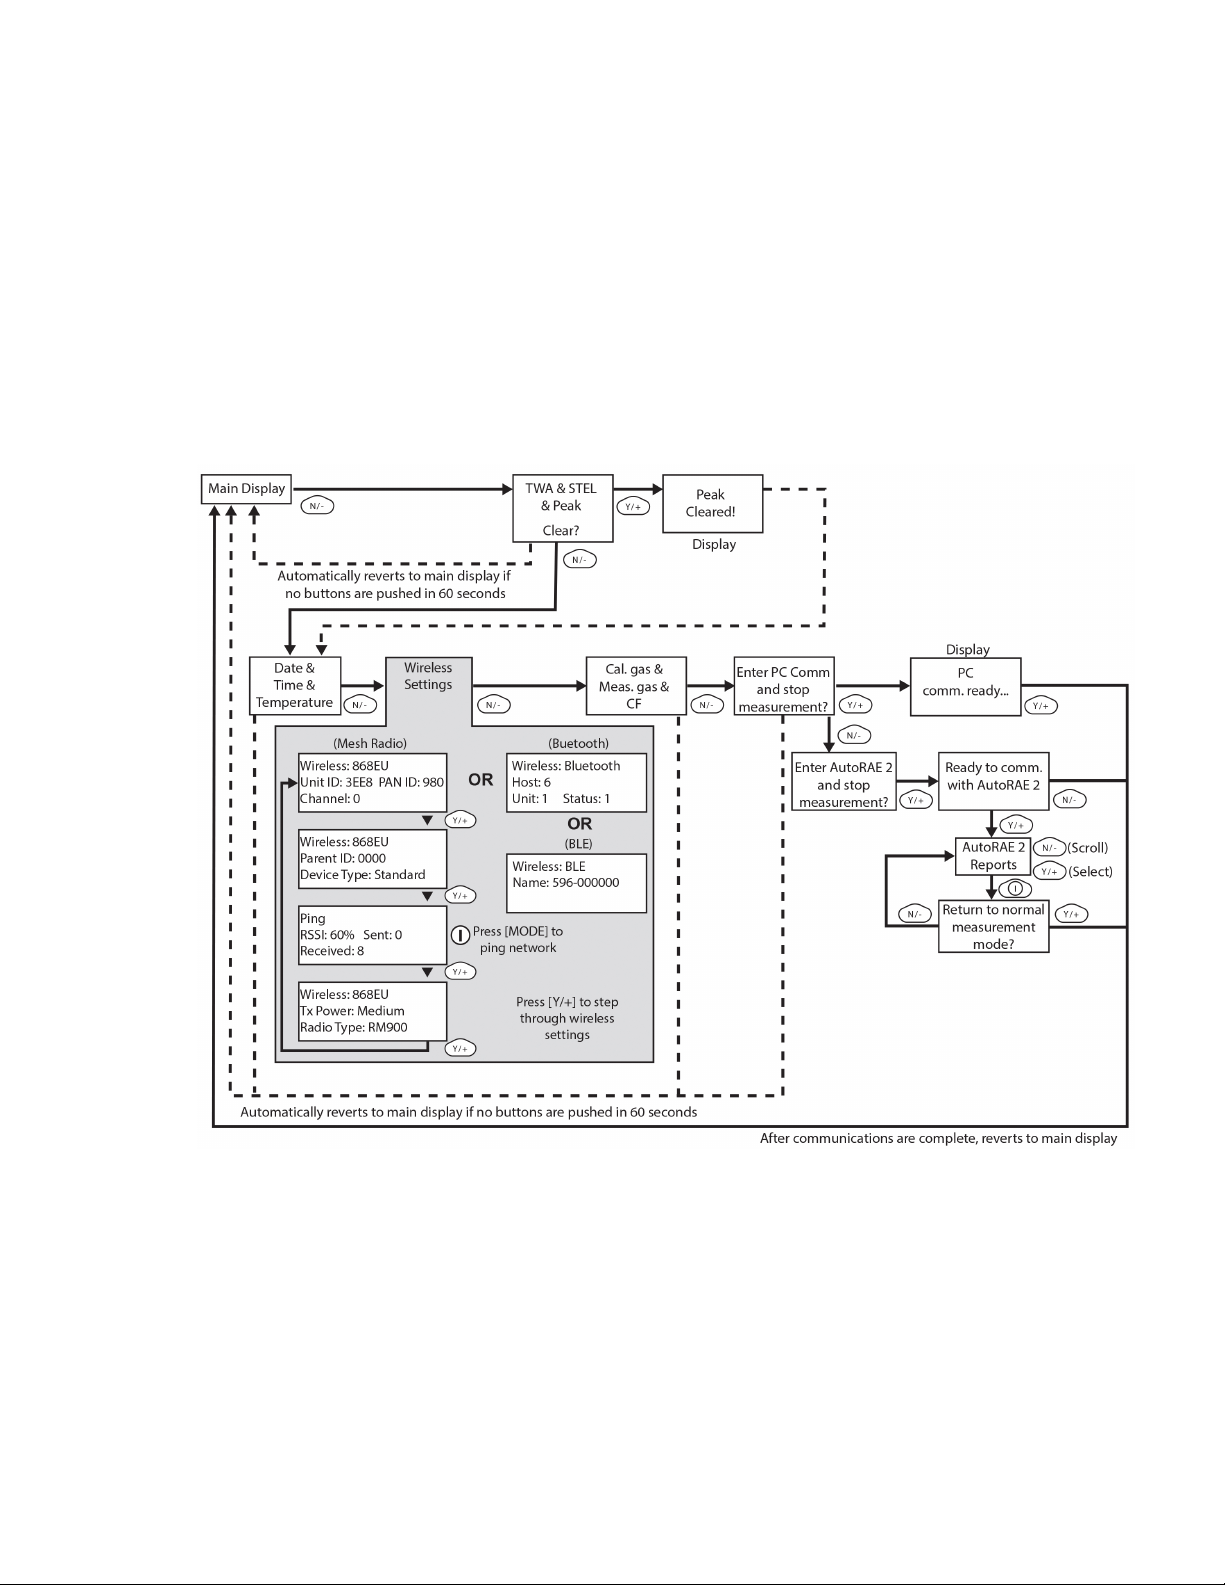
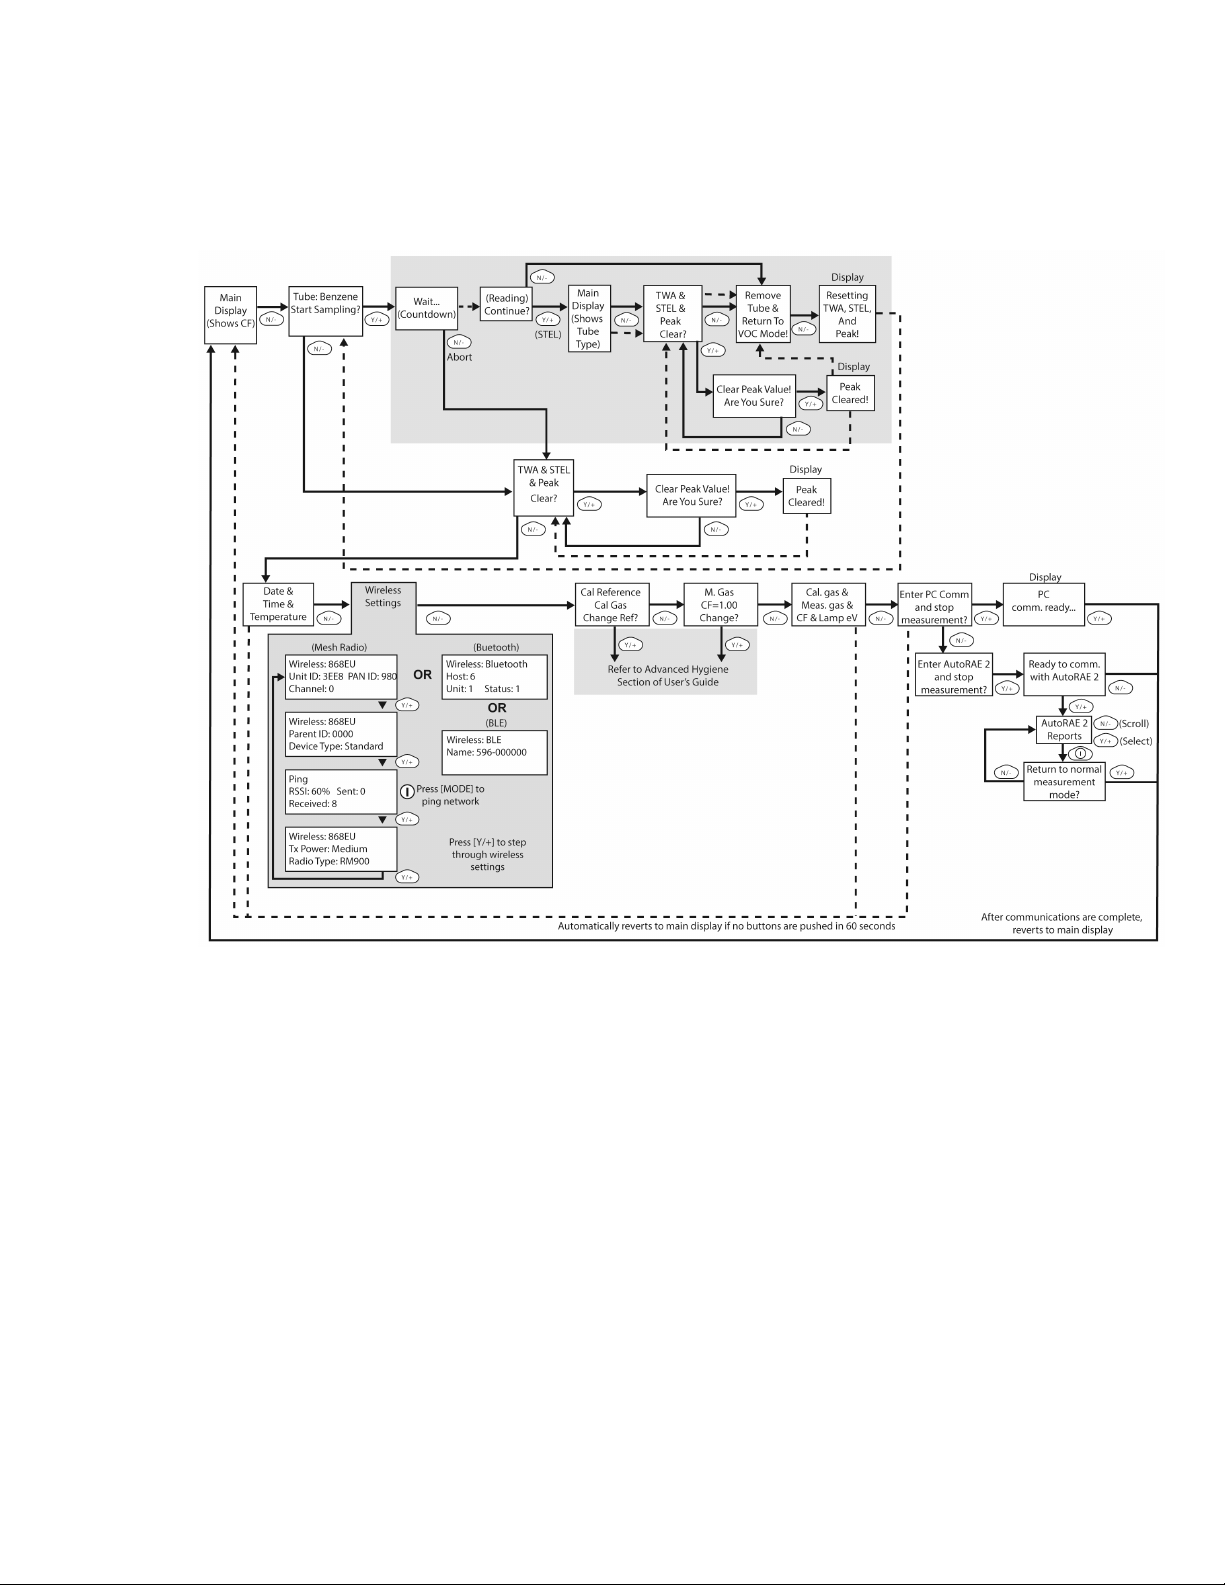
The diagram on the next page shows the basic flow of the UltraRAE 3000+’s functions. The area
with the gray field is the compound-specific (tube) mode, while the rest shows VOC mode. Navigate
through the steps by using the [Y/+] and [N/-] keys as shown in the diagram.
Note: If you use a password to access Programming Mode (see page 19), then the navigation
changes slightly, entering part of Advanced Hygiene Mode’s settings, as shown on page 75
.
27
Page 28
Handheld PID Monitors User’s Guide
Compound-Specific (Tube)
Note: Dashed line indicates automatic progression.
The default setting for your instrument is:
User Level: Basic
Operation Mode: Hygiene
This is outlined in detail on page 73.
The other options, covered later in this guide, are:
User Level: Advanced (page 75)
Operation Mode: Hygiene
User Level: Advanced (page 75)
Operation Mode: Search
Using ProRAE Studio II or Honeywell Safety Suite Device Configurator allows access to other
options. In addition, Diagnostic Mode (page 79) is available for service technicians.
28
Page 29

Handheld PID Monitors User’s Guide
10. Compound-Specific Operation – UltraRAE 3000+
10.1. Compound-Specific Measurement
The UltraRAE 3000+ can perform compound-specific measurement in addition to general VOC
measurement. This requires using a RAE-Sep separation tube (butadiene or benzene) and having
the UltraRAE 3000+ in Tube Mode, operating with a 9.8eV lamp.
10.2. Measurement Phases
To perform a compound-specific measurement, follow this order:
1. UltraRAE 3000+ is ready for sampling
2. Prepare the separation tube
3. Insert the separation tube
4. Start measurement
5. UltraRAE 3000+ displays and logs measurement
6. Remove the separation tube
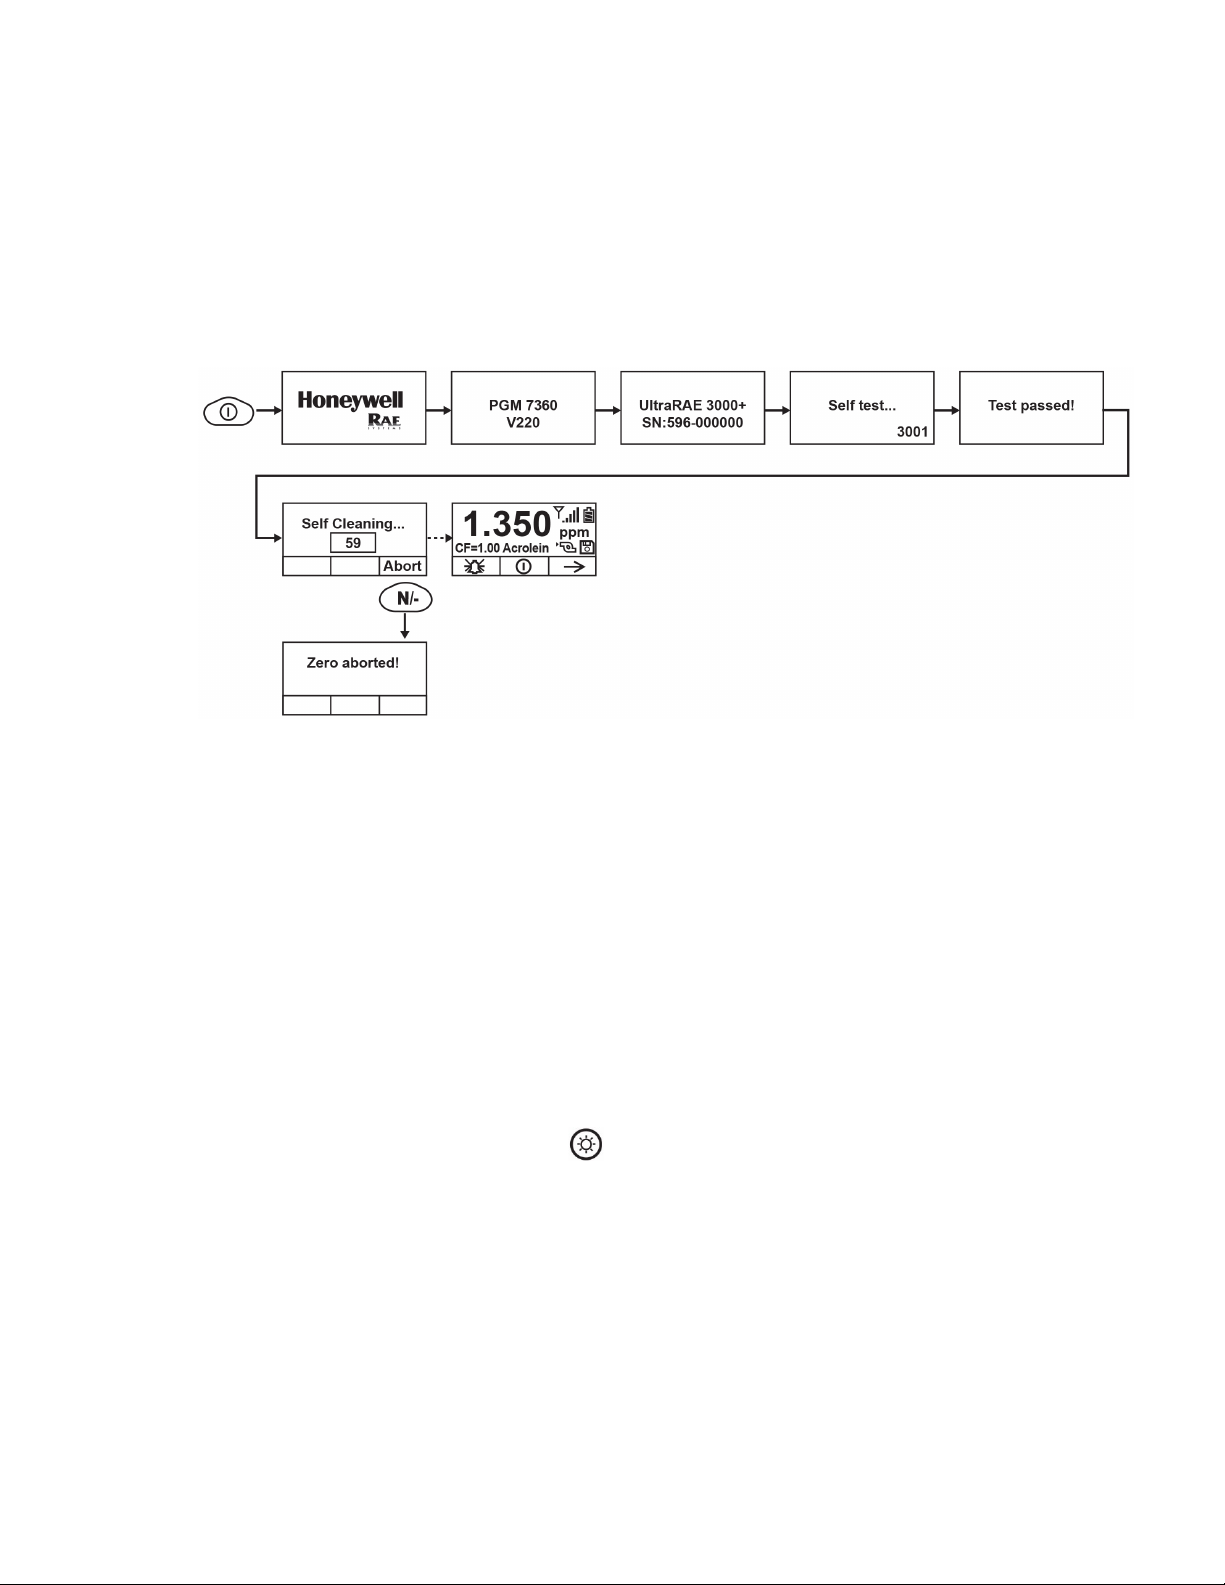
10.3. Performing A Measurement – UltraRAE 3000+
Before performing a compound-specific measurement for Benzene or Butadiene using a RAESep™ separation tube, make sure the UltraRAE 3000+ is in Tube Mode and that the appropriate
tube type is selected. The UltraRAE 3000+ only acts as a compound-specific measurement device
when it is equipped with a 9.8eV lamp. The UltraRAE 3000+ is designed to auto-sense the lamp
type. It can also be manually set to default to a 9.8eV lamp type.
Make sure the UltraRAE 3000+ is set to operate with your selected tube:
1. Enter Programming Mode.
2. Select Measurement.
3. Select Tube Selection.
4. Make a choice of Benzene or Butadiene.
5. Save your choice.
To begin measuring, turn on the UltraRAE 3000+. This screen is shown, which includes the CF
(correction factor) and measurement gas type for calibration reference:
Press [N/-] to advance. You will see this screen:
Do not begin sampling yet!
29
Page 30

Handheld PID Monitors User’s Guide
Before you start sampling, you must insert a RAE-Sep separation tube into the inlet/holder. Follow the
Separation Tube Preparation and Placing A Tube Into The UltraRAE 3000+ instructions before pressing
any buttons on the UltraRAE 3000+. Once the tube is in place, then proceed to measuring.
IMPORTANT!
Once a tube’s ends are broken off, the material inside is exposed. Therefore, use the tube for
sampling as soon as possible.
10.4. Separation Tube Preparation
CAUTION!
Wear hand and eye protection when breaking tube tips. Use caution in handling tubes with broken
ends. Keep away from children. RAE-Sep tubes should be disposed of according to local
regulations. See footnotes of data sheets for disposal information.
1. Open a package of RAE-Sep separation tubes and remove one.
2. Place the tip in the package’s tube tip breaker (the small hole on the front) and snap off the tip.
3. Turn the tube around and snap off the other end.
CAUTION!
Only use Honeywell RAE Systems tubes.
CAUTION!
30
Page 31

Handheld PID Monitors User’s Guide
Handle tubes with care. Tube ends are sharp after ends are broken off.
31
Page 32

Handheld PID Monitors User’s Guide
10.5. Inserting The Separation Tube
1. Unscrew the front of the sampling probe from the base.
2. Slip the tube into the rubber holder in the front portion. Make sure the arrow on the side of the tube
points toward the instrument.
3. Insert the other end of the tube into the middle of the base while turning the front portion to tighten it
onto the base’s threads.
IMPORTANT!
Do not overtighten any portion of the sampling assembly.
Note: When the UltraRAE 3000+ is used for VOC monitoring, no tube is inserted.
IMPORTANT!
To ensure that there are no leaks, periodically test the seals:
With the UltraRAE 3000+ running, place your finger over the end of the inlet probe. The alarm
should sound and the pump-stall icon should flash on the display. This indicates that all seals are
good. Stop the alarm by pressing [Y/+]. If the pump does not alarm or show the stalled-pump icon,
then check that all inlet parts are tight and inspect the O-ring for damage (replace it if necessary).
10.6. Measuring
Once the tube is in place, begin measuring by pressing [Y/+].
The display shows a countdown (60 seconds is shown here, but sampling time depends on the type of
separation tube selected and the temperature):
Note: You can abort the sampling by pressing [N/-] at any time.
32
Page 33

Handheld PID Monitors User’s Guide
Once the countdown is complete, the reading is shown:
Press [Y/+] to continue sampling with the tube for 15 minutes to establish a STEL reading, or press
[N/-] to return to the main menu.
WARNING!
At least 1/4 of the tube should still be yellow-orange at the bottom. If not, the STEL value is not
valid. Abort the measurement and change the tube. Then do a snapshot test instead of a STEL
test. Note: If the STEL is exceeded, the UltraRAE 3000+ goes into alarm.
If you press [N/-] to return to the main menu, which shows the tube type instead of the CF
(correction factor):
Press [N/-] to advance to this screen:
If you press [Y/+], you are asked, “Clear peak value! Are You Sure?” to confirm:
Press [Y/+] to clear the Peak value and exit to VOC operation.
33
Page 34

Handheld PID Monitors User’s Guide
If you press [N/-], this display is shown:
Remove the tube and put the inlet back together. Then press [N/-]. This display is shown:
After a few seconds, the UltraRAE 3000+ enters VOC mode and shows this display:
You can step through the rest of the steps by pressing [N/-] repeatedly until you reach the main
menu again.
34
Page 35

Handheld PID Monitors User’s Guide
Note: Dashed line indicates automatic progression.
11. VOC Operation – UltraRAE 3000+
11.1. Basic User Level/Hygiene Mode (Default Settings)
The instrument is programmed to operate in Basic User Level/Hygiene Mode as its default. This gives you the
most commonly needed features while requiring the fewest parameter adjustments.
Pressing [N/-] steps you from one screen to the next, and eventually return to the main display. If you do not
press a key within 60 seconds after entering a display, the instrument reverts to its main display.
Note: While viewing any of these screens, you can shut off your instrument by pressing [MODE].
Note: At the Average & Peak, Date & Time & Temperature, Calibration Gas & Measurement Gas &
Correction Factor, and PC Communications screens, the instrument automatically goes to the main display
after 60 seconds if you do not push a key to make a selection.
35
Page 36

Handheld PID Monitors User’s Guide
Message
Condition
Alarm Signal
HIGH
Gas exceeds “High Alarm” limit
3 beeps/flashes per second*
OVR
Gas exceeds measurement range
3 beeps/flashes per second*
MAX
Gas exceeds electronics’
maximum range
3 beeps/flashes per second*
LOW
Gas exceeds “Low Alarm” limit
2 beeps/flashes per second*
TWA
Gas exceeds “TWA” limit
1 Beep/flash per second*
STEL
Gas exceeds “STEL” limit
1 Beep/flash per second*
Pump icon
flashes
Pump failure
3 beeps/flashes per second
Lamp
PID lamp failure
3 beeps/flashes per second plus “Lamp”
message on display
Battery icon
flashes
Low battery
1 flash, 1 beep per minute plus battery icon
flashes on display
CAL
Calibration failed, or needs
calibration
1 beep/flash per second
NEG
Gas reading measures less than
number stored in calibration
1 beep/flash per second
11.2. Basic Operation – MiniRAE 3000+
The instrument is programmed to give you the most commonly needed information quickly.
Pressing [N/-] steps you from one screen to the next, and eventually return to the main display. If you do not
press a key within 60 seconds after entering a display, the instrument reverts to its main display.
Note: While viewing any of these screens, you can shut off your instrument by pressing [MODE].
Note: At the Average & Peak, Date & Time & Temperature, Calibration Gas & Measurement Gas &
Correction Factor, and PC Communications screens, the instrument automatically goes to the main display
after 60 seconds if you do not push a key to make a selection.
12. Alarm Signals
During each measurement period, the gas concentration is compared with the programmed alarm
limits (gas concentration alarm limit settings). If the concentration exceeds any of the preset limits,
the loud buzzer and red flashing LED are activated immediately to warn you of the alarm condition.
In addition, the instrument alarms if one of the following conditions occurs: battery voltage falls
below a preset voltage level, failure of the UV lamp, or pump stall.
12.1. Alarm Signal Summary
* MiniRAE 3000+, ppbRAE 3000+, and UltraRAE 3000+: Hygiene mode only. In Search mode, the
number of beeps per second (1 to 7) depends upon the concentration of the sampled gas. Faster
rates indicate higher concentrations.
36
Page 37

Handheld PID Monitors User’s Guide
Cal Gas
(Isobutylene)
Cal
Span
Unit
Low
High
MiniRAE Lite+
100
ppm
50
100
Cal Gas
(Isobutylene)
Cal
Span
Unit
Low
High
TWA
STEL
MiniRAE
3000+
100
ppm
50
100
10
25
Cal Gas
(Isobutylene)
Cal
Span
Unit
Low
High
TWA
STEL
ppbRAE
3000+
10
ppm
10
25
10
25
MiniRAE
3000+
100
ppm
50
100
10
25
MiniRAE
Lite+
100
ppm
50
100
10
25
Cal Gas
Cal
Span
Unit
Low
High
TWA
STEL
Isobutylene
100
ppm
50
100
10
25
Benzene
5
ppm 2 5
0.5
2.5
Butadiene
10
ppm 5 10 2 5
12.2. Preset Alarm Limits & Calibration
The instrument is factory calibrated with standard calibration gas, and is programmed with default
alarm limits. These settings can be changed in Programming Mode to align more precisely with
your standards.
MiniRAE Lite+
MiniRAE 3000+
ppbRAE 3000+
UltraRAE 3000+
12.3. Testing The Alarm
You can test the alarm whenever the main (Reading) display is shown. Press [Y/+], and the audible
and visible alarms are tested.
12.4. Integrated Sampling Pump
The instrument includes an integrated sampling pump. This diaphragm-type pump that provides a
450 to 550 cc per minute flow rate. Connecting a Teflon or metal tubing with 1/8" inside diameter to
the gas inlet port of the instrument, this pump can pull in air samples from 100' (30 m) horizontally
or vertically.
Note: In Search Mode, the pump turns on when a sample measurement is started, and turns off
when the sample is manually stopped.
If liquid or other objects are pulled into the inlet port filter, the instrument detects the obstruction and
immediately shuts down the pump. The alarm is activated and a flashing pump icon is displayed.
You should acknowledge the pump shutoff condition by clearing the obstruction and pressing the
[Y/+] key while in the main reading display to restart the pump.
37
Page 38

Handheld PID Monitors User’s Guide
12.5. Backlight
The LCD display is equipped with an LED backlight to assist in reading the display under poor
lighting conditions.
12.6. Datalogging
During datalogging, the instrument displays a disk icon to indicate that datalogging is enabled. The
instrument stores the measured gas concentration at the end of every sample period (when data
logging is enabled). In addition, the following information is stored: user ID, site ID, serial number,
last calibration date, and alarm limits. All data are retained (even after the unit is turned off) in nonvolatile memory so that it can be down- loaded later to a PC.
12.6.1. Datalogging event
When Datalogging is enabled, measurement readings are being saved. These data are stored in
“groups” or “events.” A new event is created and stored each time the instrument is turned on and
is set to automatic datalogging, or a configuration parameter is changed, or datalogging is
interrupted. The maximum time for one event is 24 hours or 28,800 points. If an event exceeds 24
hours, a new event is automatically created. Information, such as start time, user ID, site ID, gas
name, serial number, last calibration date, and alarm limits are recorded.
12.6.2. Datalogging sample
After an event is recorded, the unit records a shorter form of the data. When transferred to a PC
running ProRAE Studio II or Honeywell Safety Suite Device Configurator, this data is arranged with
a sample number, time, date, gas concentration, and other related information.
12.6.3. Auto/Manual/Snapshot Datalogging
The instrument has three datalog types:
Auto Default mode. Collects datalog information when the instrument is sampling.
Manual Datalogging occurs only when the instrument’s datalogging is manually started (see
page 65 for details).
Snapshot Datalogs only during snapshot (single-event capture, initiated by pressing [MODE])
sampling. See page 66 for details.
Note: You can only choose one datalog type to be active at a time.
38
Page 39

Handheld PID Monitors User’s Guide
13. Accessories
MiniRAE Lite+
The following accessories are included with the instrument:
• 10.6 eV lamp
• Flex-I-Probe
• External filter
• Green rubber boot
• Alkaline battery adapter
• Lamp cleaning kit
• Tool Kit
• Lithium-Ion (Li-Ion) battery, if specified
• Travel Charger, if specified
• Universal wall adapter, if specified
• Quick Start Guide
• Soft leather carrying case
MiniRAE 3000+ & ppbRAE 3000+
The following accessories are included with the instrument:
• AC Adapter (Battery Charger)
• Alkaline battery adapter
• External Filter
Hard-case kits also include these accessories:
• Calibration adapter
• Calibration regulator and Flow controller
UltraRAE 3000+
The following accessories are included with the instrument:
• AC Adapter (Battery Charger)
• Travel Charger
• Alkaline battery adapter
• External Filter
Hard-case kits also include these accessories:
• Calibration gas, if specified
• Calibration adapter
• Calibration regulator and flow controller
• Charger Stand (instead of Travel Charger)
39
Page 40

Handheld PID Monitors User’s Guide
14. Standard Kit & Accessories
14.1. AC Adapter (Battery Charger)
WARNING!
To reduce the risk of ignition of hazardous atmospheres, recharge battery only in area
known to be non-hazardous. Remove and replace battery only in area known to be nonhazardous.
Ne charger les batteries que dans emplacements designés non-dangereuses.
A battery charging circuit is built into the instrument cradle. It only needs a regular AC to 12 VDC adapter
(wall-mount transformer, part number 500-0114-000) to charge the instrument.
To charge the battery inside the instrument:
1. Power off the instrument.
2. Connect the AC adapter to the DC jack on the instrument’s cradle. If the instrument is off, it
automatically turns on.
3. While charging, the display message shows “Charging.” The Primary LED on the cradle
flashes green when charging.
4. When the battery is fully charged, the LED changes to glowing green continuously, and the
message “Fully charged” appears on the display. If there is a charging error, the LED glows
red continuously.
A completely discharged instrument can be charged to full capacity within 8 hours. Batteries drain
slowly even if an instrument is off. Therefore, if the instrument has been in storage or has not been
charged for several days or longer, check the charge before using it.
The factory-supplied battery is designed to last for 16 hours of normal operation (no alarm), for a
new battery under the optimum circumstances. As the battery becomes older or is subject to
adverse conditions (such as cold ambient temperature), its capacity will be significantly reduced.
14.2. Alkaline Battery Adapter
An alkaline battery adapter is supplied with each instrument. The adapter (part number 059-3052-
000) accepts four AA alkaline batteries (use only Duracell MN1500) and provides approximately 12
hours of operation. The adapter is intended to be used in emergency situations when there is no
time to charge the Li-ion battery pack.
To insert batteries into the adapter:
1. Remove the three Philips-head screws to open the compartment in the
adapter.
2. Insert four fresh AA batteries as indicated by the polarity (+/-) markings.
3. Replace the cover. Replace the three screws.
To install the adapter in the instrument:
1. Remove the Li-ion battery pack from the instrument by sliding the tab and
tilting out the battery.
2. Replace it with the alkaline battery adapter
3. Slide the tab back into place to secure the battery adapter.
IMPORTANT!
Alkaline batteries cannot be recharged. The instrument’s internal circuit detects alkaline batteries
and will not allow recharging. If you place the instrument in its cradle, the alkaline battery will not be
40
Page 41

Handheld PID Monitors User’s Guide
recharged. The internal charging circuit is designed to prevent damage to alkaline batteries and the
charging circuit when alkaline batteries are installed inside the instrument. If you try to charge an
alkaline batteries installed in the instrument, the instrument’s display will say, “Alkaline Battery,”
indicating that it will not charge the alkaline batteries.
Note: When replacing alkaline batteries, dispose of old ones properly.
WARNING!
To reduce the risk of ignition of hazardous atmospheres, recharge the battery only in areas known
to be non-hazardous. Remove and replace the battery only in areas known to be non-hazardous.
14.3. External Filter
WARNING!
Always use an external filter on the instrument. This prevents contaminants and debris from
clogging the sample pathway and protects the sensor from damage.
The external filter is made of PTFE (Teflon
dust or other particles from being sucked into the sensor manifold, which would cause extensive
damage to the instrument. It prolongs the operating life of the sensor. To install the external filter,
simply connect it to the instrument’s inlet tube.
) membrane with a 0.45 micron pore size to prevent
41
Page 42

Handheld PID Monitors User’s Guide
15. Optional Accessories
15.1. Calibration Adapter
The calibration adapter for the instrument is a simple 6-inch Tygon tubing with a metal
adapter on one end. During calibration, simply insert the metal adapter into the regular gas
inlet probe of the instrument and the tubing to the gas regulator on the gas bottle.
15.2. Calibration Regulator
The Calibration Regulator is used in the calibration process. It regulates the gas flow rate
from the Span gas cylinder into the gas inlet of the instrument during calibration process.
The maximum flow rate allowed by the flow controller is about 0.5L/min (500 cc per min.).
Alternatively, a demand-flow regulator or a Tedlar gas bag may be used to match the pump
flow precisely.
15.3. Organic Vapor Zeroing Kit
The Organic Vapor Zeroing Kit is used for filtering organic air contaminants that may affect the zero
calibration reading. To use the Organic Vapor Zeroing Kit, simply connect the filter to the inlet port
of the instrument.
15.4. AutoRAE 2 Automatic Test & Calibration System
The AutoRAE 2 Automatic Test and Calibration System \ portable gas monitors makes compliance
with monitor test and calibration requirements as easy as pressing a button. Simply cradle the
monitor and the system will take care of all calibration, testing, and recharging.
The AutoRAE 2 is a flexible, modular system that can be configured to meet your calibration
requirements effectively and efficiently. An AutoRAE 2 system can be as simple as a single cradle
deployed in standalone mode to calibrate one instrument at a time, or as powerful as a networked,
controller-based system supporting ten monitors and five distinct calibration gas cylinders.
42
Page 43

Handheld PID Monitors User’s Guide
Note: Dashed line indicates automatic progression.
16. Standard Two-Point Calibration (Zero & Span)
The following diagram shows the instrument’s calibrations in Basic/Hygiene mode.
43
Page 44

Handheld PID Monitors User’s Guide
Entering Calibration
1. Press and hold [MODE] and [N/-] until you see the Password screen.
2. In Basic User Level, you do not need a password to perform calibrations. Instead of inputting a
password, enter calibration by pressing [MODE].
Note: If you inadvertently press [Y/+] and change any of the numbers, simply press [MODE] and
you will be directed to the calibration menu.
The Calibration screen is now visible with Zero Calibration highlighted.
These are your options:
• Press [Y/+] to select the highlighted calibration (Zero Calib or Span Calib).
• Press [MODE] to exit calibration and return to the main display and resume measurement.
• Press [N/-] to toggle the highlighted calibration type.
44
Page 45

Handheld PID Monitors User’s Guide
16.1. Zero (Fresh Air) Calibration
This procedure determines the zero point of the sensor calibration curve. To perform a fresh air
calibration, use the calibration adapter to connect the instrument to a “fresh” air source such as
from a cylinder or Tedlar bag (optional accessory). The “fresh” air is clean, dry air without organic
impurities and an oxygen value of 20.9%. If such an air cylinder is not available, any clean ambient
air without detectable contaminants or a charcoal filter can be used.
At the Zero Calibration menu, you can proceed to perform a Zero calibration or bypass Zero
calibration and perform a Span calibration. You may also go back to the initial Calibration menu if
you want to exit calibration.
• Press [Y/+] to start calibration.
• Press [MODE] to quit and return to the main calibration display.
If you have pressed [Y/+] to enter Zero calibration, then you will see this message:
1. Start the flow of Zero calibration gas.
2. Press [Y/+] to start calibration.
Note: At this point, you may press [MODE] if you decide that you do not want to initiate
calibration. This will take you directly to the Calibration menu, highlighted for Span calibration.
3. Zero calibration starts a 60-second countdown and displays this message:
Zeroing...
During the zeroing process, the instrument performs the Zero calibration automatically and does
not require any action on your part.
Note: To abort the zeroing process at any time and proceed to Span calibration, press [N/-] at any
time while zeroing is being performed. You will see a confirmation message that says “Zero
aborted!” and then the Span calibration menu appears.
When Zero calibration is complete, you see this message:
Zeroing is done! Or Zeroing is done!
Reading = 0 ppb Reading = 0 ppm
The instrument will then show the Calibration menu on its display, with Span Calib highlighted.
16.1.1. Reflex PID Technology™
All handheld PID monitors after firmware version 2.20 benefit from our patented Reflex PID
Technology
at very low levels. One time each hour, Reflex PID™ Technology adjusts the zero point
automatically to ensure greater uniformity in readings, especially when detecting ultra-low levels
(ppb range) of VOCs. This one-minute operation is performed automatically, so precise readings
are assured without requiring the user to perform zeroing.
TM
. It provides several benefits, including enhanced stability and accuracy, particularly
45
Page 46

Handheld PID Monitors User’s Guide
Reflex PID technology is automatically enabled during each zero calibration process. For the
ppbRAE3000+, it performs a sensor noise level assessment to re-baseline zeroing of the
instrument and provide ultimate performance at sub-ppm level.
The instrument’s user can decide to abort this operation by pressing [N/-], should this process need
to be interrupted for a measurement.
46
Page 47

Handheld PID Monitors User’s Guide
16.2. Span Calibration
This procedure determines the second point of the sensor calibration curve for the sensor. A
cylinder of standard reference gas (span gas) fitted with a 500 cc/min. flow-limiting regulator or a
flow-matching regulator is the simplest way to perform this procedure. Choose the 500 cc/min.
regulator only if the flow rate matches or slightly exceeds the flow rate of the instrument pump.
Alternatively, the span gas can first be filled into a Tedlar bag or delivered through a demand-flow
regulator. Connect the calibration adapter to the inlet port of the instrument, and connect the tubing
to the regulator or Tedlar bag.
Another alternative is to use a regulator with >500 cc/min flow but allow the excess flow to escape
through a T or an open tube. In the latter method, the span gas flows out through an open tube
slightly wider than the probe, and the probe is inserted into the calibration tube.
At the Span Calibration menu, you perform a Span calibration. You may also go back to the Zero
calibration menu or to the initial Calibration menu if you want to exit calibration.
• Press [Y/+] to enter Span calibration.
• Press [N/-] to skip Span calibration and return to Zero calibration.
• Press [MODE] to exit Span calibration and return to the top calibration menu.
If you have pressed [Y/+] to enter Span calibration, then you will see the name of your Span gas
(the default is isobutylene) and the span value in parts per million (ppm). You will also see this
message that prompts you:
MiniRAE 3000+, ppbRAE
3000+, UltraRAE 3000+
1. Turn on your span calibration gas.
2. Press [Y/+] to initiate calibration.
Note: You may press [MODE] if you decide that you do not want to initiate calibration. This will
abort the span calibration and take you directly to the Calibration menu for Zero calibration.
3. Span calibration starts and displays this message:
Calibrating...
During the Span calibration process, there is a 30-second countdown and the instrument performs
the Span calibration automatically. It requires no actions on your part.
Note: If you want to abort the Span calibration process, press [N/-] at any time during the process.
You will see a confirmation message that says “Span is aborted!” and then the Zero calibration
menu appears. You can then proceed to perform a Zero calibration, perform a Span calibration, or
exit to the topmost Calibration menu.
MiniRAE Lite+
47
Page 48

Handheld PID Monitors User’s Guide
When Span calibration is complete, you see a message similar to this (the value is an example
only):
Span 1 is done!
Reading = 10.0 ppm
The instrument then exits Span calibration and shows the Zero calibration menu on its display.
Note: The reading should be very close to the span gas value.
16.3. Exiting Two-Point Calibration In Basic User Level
When you are done performing calibrations, press [MODE], which corresponds with “Back” on the
display.
You will see the following message:
Updating settings…
The instrument updates its settings and then returns to the main display. It begins or resumes
monitoring.
48
Page 49

Handheld PID Monitors User’s Guide
Note: Dashed line indicates automatic progression.
17. Three-Point Calibration
Note: This feature is not available on MiniRAE Lite+.
For enhanced accuracy, it is possible to perform a second Span calibration in addition to the Zero
and Span calibrations outlined in the previous section. Your instrument first must be set to allow
this third calibration. This requires using ProRAE Studio II or Honeywell Safety Suite Device
Configurator software and a PC, as well as a higher concentration of calibration gas. Follow the
instructions in the next section.
Note: Once the third calibration is set, you do not need to use ProRAE Studio II or Honeywell
Safety Suite Device Configurator to allow future 3-point calibrations. Also, you can only disable 3point calibration capability by using ProRAE Studio II or Honeywell Safety Suite Device
Configurator again.
Perform the Zero and Span calibrations. After the first Span calibration (Span 1) is completed, the
display a second Span calibration (Span 2) can be performed. The process is identical to the first
calibration. As in the Span 1 calibration, you may exit and return to the Zero calibration screen if
you choose not to perform this calibration or to abort it.
Note: If a bump test is available, it appears after the last calibration in the menu. See “Two-Point
Calibration,” page 43, for details. Also, refer to page 51 for details on how to perform a bump test.
49
Page 50

Handheld PID Monitors User’s Guide
Span 2 Calibration
The minimum value of Span 2 gas should be 1000 ppm. If the primary concern is accuracy at low
concentration, only using the 2-point calibration process with Span 1 set to 100 ppm is adequate.
The reading error at 10 ppm will be lower. If Span 1 is set to 10 ppm, the reading error under 100
ppm (or over 100ppm to 1000 ppm) will be higher. A cylinder of standard reference gas (span gas)
fitted with a 500 cc/min. flow-limiting regulator or a flow-matching regulator is the simplest way to
perform this procedure.
Note: This gas should be of a higher concentration than the gas used for Span 1 calibration.
Choose the 500 cc/min. regulator only if the flow rate matches or slightly exceeds the flow rate of
the instrument pump. Alternatively, the span gas can first be filled into a Tedlar bag or delivered
through a demand-flow regulator. Connect the calibration adapter to the inlet port of the instrument,
and connect the tubing to the regulator or Tedlar bag.
Another alternative is to use a regulator with >500 cc/min flow but allow the excess flow to escape
through a T or an open tube. In the latter method, the span gas flows out through an open tube
slightly wider than the probe, and the probe is inserted into the calibration tube.
At the Span Calibration menu, you perform a Span calibration. You may also go back to the Zero
calibration menu or to the initial Calibration menu if you want to exit calibration.
• Press [Y/+] to enter Span 2 calibration.
• Press [N/-] to skip Span calibration and return to Zero calibration.
• Press [MODE] to exit Span calibration and return to the top calibration menu.
If you have pressed [Y/+] to enter Span calibration, then you will see the name of your Span gas
(the default is isobutylene) and the span value in parts per million (ppm). You will also see this
message that prompts you:
Please apply gas...
1. Turn on your span calibration gas.
2. Press [Y/+] to initiate calibration.
Note: You may press [MODE] if you decide that you do not want to initiate calibration. This will
take you directly to the Calibration menu for Zero calibration.
3. Span calibration starts a 30-second countdown and displays this message:
Calibrating...
During the Span calibration process, the instrument performs the Span calibration automatically
and does not require any action on your part.
Note: If you want to abort the Span calibration process, press [N/-] at any time during the process.
You will see a confirmation message that says “Span is aborted!” and then the Zero calibration
menu will appear. You can then proceed to perform a Zero calibration, perform a Span calibration,
or exit to the topmost Calibration menu.
When Span calibration is complete, you will see a message similar to this (the value shown here is
for example only):
Span 2 is done!
Reading = 1000 ppm
The instrument then exits Span calibration and shows the Zero calibration menu on its display.
Note: The reading should be very close to the span gas value.
50
Page 51

Handheld PID Monitors User’s Guide
17.1. Exiting Three-Point Calibration
When you are done performing calibrations, press [MODE], which corresponds with “Back” on the
display. You will see the following message:
Updating settings…
The instrument updates its settings and then returns to the main display. It begins or resumes
monitoring.
18. Bump Test
RAE Systems recommends that a bump test be conducted prior to each day’s use. The purpose of
a bump test is to ensure that the instrument’s sensors respond to gas and all the alarms are
enabled and functional.
• The ppbRAE 3000+ must be calibrated if it does not pass a bump test when a new sensor is
installed, after sensor maintenance has been performed, or at least once every 180 days,
depending on use and sensor exposure to poisons and contaminants.
• Calibration and bump test intervals and procedures may vary due to national legislation and
company policy.
To perform a bump test (functional challenge), follow these steps:
1. Select “Bump.”
2. Install the calibration adapter and connect it to a source of calibration gas.
3. Verify that the displayed calibration value meets the concentration specified on the gas
cylinder.
4. Start the flow of calibration gas.
5. Press [Y/+] to start the bump test.
6. You can abort the calibration at any time during the countdown by pressing [N/-].
7. If the calibration is not aborted, the display shows reading and then tells you whether the bump
test passed or failed. If the bump test failed, then it automatically advances to the Calibration
screen.
A bump test can be performed either manually or using the AutoRAE 2 Automatic Test and
Calibration System. When a bump test is done manually, the instrument makes a pass/fail decision
based on sensor performance, but the user still has the responsibility to make sure all the alarms
are enabled and functional.
Note: Bump testing and calibration can be performed using an AutoRAE 2 Automatic Test &
Calibration System. An AutoRAE 2 bump test takes care of both the sensor and alarm tests.
Consult the AutoRAE 2 User’s guide for details.
The same gas is used for a bump test as for calibration. The instrument must be connected to a
cylinder of calibration gas with supplied tubing.
IMPORTANT!
If the instrument does not pass a bump test, perform a full calibration. If calibration also fails, the
PID sensor or lamp may require cleaning or replacement. If the instrument repeatedly fails to
calibrate, turn it off and refer it for servicing.
51
Page 52

Handheld PID Monitors User’s Guide
19. Programming Mode
On the MiniRAE 3000+, ppbRAE 3000+, or UltraRAE 3000+, Programming Mode can be entered
from either Hygiene Mode or Search Mode. If the current user mode is Basic, you must provide a 4digit password to enter. On the MiniRAE Lite+, there is only one mode.
19.1. Entering Programming Mode
1. Press and hold [MODE] and [N/-] until you see the Password screen.
2. Input the 4-digit password:
• Increase the number from 0 through 9 by pressing [Y/+].
• Step from digit to digit using [N/-].
• Press [MODE] when you are done.
If you make a mistake, you can cycle through the digits by pressing [N/-] and then using [Y/+] to
change the number in each position.
Note: The default password is 0000.
When you have successfully entered Programming Mode, you see this screen:
Note: The password can only be changed by connecting the instrument to a PC running ProRAE
Studio II or Honeywell Safety Suite Device Configurator software. Follow the instructions in ProRAE
Studio II or Honeywell Safety Suite Device Configurator to change it.The Calibration label is shown
and its icon is highlighted, but you can press [N/-] to step from one programming menu to the next,
with the name of the menu shown at the top of the display and the corresponding icon highlighted.
52
Page 53

Handheld PID Monitors User’s Guide
As you repeatedly press [N/-], the selection moves from left to right, and you see these screens:
MiniRAE 3000+, ppbRAE 3000+, UltraRAE 3000+
MiniRAE Lite+
Note: When you reach Monitor Setup and press [N/-], the menu cycles back to Calibration.
53
Page 54

Handheld PID Monitors User’s Guide
Calibration
Measurement
Alarm Setting
Datalog
Monitor Setup
Zero
Calibration *
Meas. Gas
High Alarm *
Clear Datalog *
Radio Power*
Span
Calibration *
Meas. Unit
Low Alarm *
Interval *
Op Mode
Bump *
Tube Selection
STEL Alarm
Data Selection *
Site ID
TWA Alarm
Datalog Type *
User ID
Alarm Mode *
User Mode
Buzzer & Light *
Date *
Time *
Pump Duty Cycle
Pump Speed
Temperature Unit
Language *
Real Time
Protocol
Power On Zero
Unit ID
LCD Contrast
Lamp ID
PAN ID
Mesh Channel
Mesh Interval
20. Programming Mode Menus
The Programming Mode allows anyone with the password to change the instrument’s settings,
calibrate the instrument, modify the sensor configuration, enter user information, etc. Programming
Mode has five menus. Each menu includes several sub-menus to perform additional programming
functions.
The table on the next shows the menus and sub-menus.
All entries are supported on MiniRAE 3000+, ppbRAE 3000+, and UltraRAE 3000+.
Entries marked with an asterisk ( * ) are supported on MiniRAE Lite+.
20.1. Exiting Programming Mode
Once you enter Programming Mode, the LCD displays the first menu, Calibration. Each
subsequent menu is accessed by pressing [N/-] repeatedly until the desired menu is displayed. To
enter a sub-menu of a menu, press [Y/+].
To exit Programming Mode and return to normal operation, press [MODE] once at any of the
programming menu displays. You will see “Updating Settings…” as changes are registered and the
mode changes.
54
Page 55

Handheld PID Monitors User’s Guide
20.2. Navigating Programming Mode Menus
Navigating through the Programming Mode menus is easy and consistent, using a single interface
format of “Select,” “Back” and “Next” at the top level. The three control buttons correspond to these
choices as shown:
Note: Pressing [MODE] in the Programming Mode’s top level causes the instrument to exit
Programming Mode and return to monitoring.
The three keys perform the following functions in Programming Mode:
Key Function in Programming Mode
[MODE]: Exit menu when pressed momentarily or exit data entry mode
[Y/+]: Increase alphanumerical value for data entry or confirm (yes) for a question
[N/-]: Provides a “no” response to a question
20.3. Reverse Direction – Menu Selection
Lists can be long, so rather than progressing in one direction through every item in the list before
“looping” back to the first item, you can change the scrolling direction.
To reverse direction: Press and hold [N/-] for 5 seconds. The direction arrow changes. Now when
you press [N/-], the menu items are scrolled through in the other direction.
Note: You can change direction anytime by pressing and holding [N/-] for 5 seconds.
55
Page 56

Handheld PID Monitors User’s Guide
MiniRAE 3000+, ppbRAE
3000+, UltraRAE
MiniRAE Lite+
20.4. Calibration
Two types of calibration are available: Zero (fresh air) and Span.
Select Zero or Span Calibration by pressing [N/+]. Once your choice is highlighted, press [Y/+].
20.4.1. Zero Calibration
The procedure for performing a zero calibration is covered on page 45.
Auto Zero can also be performed. Refer to page 19 for details.
20.4.2. Span Calibration
The procedure for performing a basic span calibration is covered on page 4343.
20.4.3. Bump Test
The procedure for performing a bump test is covered on page 51.
A bump test can be performed either manually or using the AutoRAE 2 Automatic Test and
Calibration System. When a bump test is done manually, the instrument makes a pass/fail decision
based on sensor performance, but the user still has the responsibility to make sure all the alarms
are enabled and functional.
Note: Bump testing and calibration can be performed using an AutoRAE 2 Automatic Test &
Calibration System. An AutoRAE 2 bump test takes care of both the sensor and alarm tests.
Consult the AutoRAE 2 User’s guide for details.
The same gas is used for a bump test as for calibration. The instrument must be connected to a
cylinder of calibration gas with supplied tubing.
IMPORTANT!
If the instrument does not pass a bump test, perform a full calibration. If calibration also fails, the
PID sensor or lamp may require cleaning or replacement. If the instrument repeatedly fails to
calibrate, turn it off and refer it for servicing.
56
Page 57

Handheld PID Monitors User’s Guide
Abbreviation
Unit
ppm
parts per million
ppb
parts per billion
mg/m3
milligrams per cubic meter
ug/m3
micrograms per cubic meter
20.5. Measurement
The sub-menus for Measurement are Measurement Gas and Measurement Unit.
20.5.1. Meas. Gas
Measurement gases are organized in four lists:
• My List is a customized list of gases that you create. It contains a maximum of 10 gases and
can only be built in ProRAE Studio II or Honeywell Safety Suite Device Configurator on a PC
and transferred to the instrument.
Note: The first gas in the list is always isobutylene (it cannot be removed from the list).
• Last Ten is a list of the last ten gases used by your instrument. The list is built automatically
and is only updated if the gas selected from Custom Gases or Library is not already in the Last
Ten. This ensures that there is no repetition.
• Gas Library is a library that consists of all the gases found in RAE Systems’ Technical Note
TN-106 (available online at www.raesystems.com).
• Custom Gases are gases with user-modified parameters. Using ProRAE Studio II or
Honeywell Safety Suite Device Configurator, all parameters defining a gas can be modified,
including the name, span value(s), correction factor, and default alarm limits.
1. Scroll through each list by pressing [N/-].
2. Press [Y/+] to select one (My List, Last Ten, Gas Library, or Custom Gases).
3. Once you are in one of the categories, press [N/-] to scroll through its list of options and [Y/+]
to select one. (If you press [MODE], you exit to the next submenu.)
4. Press [Y/+] to save your choice or [N/-] to undo your selection.
Press [MODE] to leave the sub-menu and return to the Programming Mode menus.
20.5.2. Meas. Unit
Standard available measurement units include:
• Scroll through the list by pressing [N/-].
• Select by pressing [Y/+].
• Save your selection by pressing [Y/+] or undo your selection by pressing [N/-].
Press [MODE] to leave the sub-menu and return to the Programming Mode menus.
57
Page 58

Handheld PID Monitors User’s Guide
58
Page 59

Handheld PID Monitors User’s Guide
20.5.3. Tube Selection (UltraRAE 3000+ only)
When operating the UltraRAE 3000+ in Compound Specific mode, the internal computer works
most effectively when it is told which type of separation tube is being used.
1. Scroll through the menu by pressing [N/-].
2. Press [Y/+] to make a selection.
3. Press [MODE] when you are done.
4. Press [Y/+] to save your choice or [N/-] to undo your selection.
59
Page 60

Handheld PID Monitors User’s Guide
MiniRAE 3000+, ppbRAE
3000+, UltraRAE
MiniRAE Lite+
20.5.4. Alarm Setting
During each measurement period, the gas concentration is compared with the programmed alarm
limits (gas concentration alarm limit settings: Low, High, TWA and STEL). If the concentration
exceeds any of the preset limits, the loud buzzer and red flashing LED are activated immediately to
warn of the alarm condition.
An alarm signal summary is shown on page 36.
In this menu, you can change the High and Low alarm limits, the STEL limit, and the TWA. Press
[Y/+] to to enter the Alarm Setting menu. Note: All settings are shown in ppm (parts per million), or
3
(milligrams per cubic meter), depending on your setting.
mg/m
1. Scroll through the Alarm Limit sub-menu using the [N/-] key until the display shows the
desired limit to be changed (High Alarm, Low Alarm, STEL Alarm, and TWA Alarm)
2. Press [Y/+] to select one of the alarm types. The display shows a flashing cursor on the left-
most digit of the previously stored alarm limit.
3. Press [Y/+] to increase each digit’s value.
4. Press [N/-] to advance to the next digit.
5. Again, use [Y/+] to increase the number.
Repeat this process until all numbers are entered.
Press [MODE] when you are done.
• Press [Y/+] to save the changes.
• Press [N/-] to undo the changes and revert to the previous settings.
When all alarm types have been changed or bypassed, press [MODE] to exit to the Programming
Menu.
20.5.5. High Alarm
You can change the High Alarm limit value. The value is typically set by the instrument to match the
value for the current calibration gas. It is expressed in parts per billion (ppb). Note: The default value
depends on the measurement gas.
To change the High Alarm value:
1. Press [Y/+] to increase each digit’s value.
2. Press [N/-] to advance to the next digit.
3. Again, use [Y/+] to increase the number.
Repeat this process until all numbers are entered.
60
Page 61

Handheld PID Monitors User’s Guide
When you have completed your selections, press [MODE]. You will see two choices: Save and Undo.
You have the opportunity to register the new settings or to change your mind and revert to your
previous settings.
• Press [Y/+] to save the changes.
• Press [N/-] to undo the changes and revert to the previous settings.
20.5.6. Low Alarm
You can change the Low Alarm limit value. The value is typically set by the instrument to match the
value for the current calibration gas. It is expressed in parts per billion (ppb). Note: The default
value depends on the measurement gas.
To change the Low Alarm value:
1. Press [Y/+] to increase each digit’s value.
2. Press [N/-] to advance to the next digit.
3. Again, use [Y/+] to increase the number.
Repeat this process until all numbers are entered.
When you have completed your selections, press [MODE]. You will see two choices: Save
and Undo. You can register the new settings or to change your mind and revert to your
previous settings.
• Press [Y/+] to save the changes.
• Press [N/-] to undo the changes and revert to the previous settings.
20.5.7. STEL Alarm
Note: This feature is not included on MiniRAE Lite+.
You can change the STEL Alarm limit value. The value is typically set by the instrument to
match the value for the calibration gas. It is expressed in parts per billion (ppb). Note: The
default value depends on the measurement gas.
To change the STEL Alarm value:
1. Press [Y/+] to increase each digit’s value.
2. Press [N/-] to advance to the next digit.
3. Again, use [Y/+] to increase the number.
Repeat this process until all numbers are entered.
When you have completed your selections, press [MODE]. You will see two choices: Save
and Undo. You can register the new settings or to change your mind and revert to your
previous settings.
• Press [Y/+] to save the changes.
• Press [N/-] to undo the changes and revert to the previous settings.
61
Page 62

Handheld PID Monitors User’s Guide
20.5.8. TWA Alarm
Note: This feature is not included on MiniRAE Lite+.
You can change the TWA (time-weighted average) Alarm limit value. The value is typically
set by the instrument to match the value for the calibration gas. It is expressed in parts per
billion (ppb).
Note: The default value depends on the measurement gas.
To change the TWA Alarm value:
1. Press [Y/+] to increase each digit’s value.
2. Press [N/-] to advance to the next digit.
3. Again, use [Y/+] to increase the number.
Repeat this process until all numbers are entered.
When you have completed your selections, press [MODE]. You will see two choices:
• Save
• Undo
You can register the new settings or to change your mind and revert to your previous
settings.
• Press [Y/+] to save the changes.
• Press [N/-] to undo the changes and revert to the previous settings.
20.5.9. Alarm Mode
There are two selectable alarm types:
Latched When the alarm is triggered, you can manually stop the alarm.
The latched setting only controls alarms for High Alarm, Low Alarm, STEL Alarm, and TWA
alarm.
Note: To clear an alarm when the instrument is set to “Latched,” press [Y/+] when the main
(Reading) display is shown.
Automatic Reset When the alarm condition is no longer present, the alarm stops and resets
itself.
1. Press [N/-] to step from one alarm type to the other.
2. Press [Y/+] to select an alarm type.
When you have completed your selections, press [MODE].
You will see two choices: Save and Undo. You have the opportunity to register the new
settings or to change your mind and revert to your previous settings.
• Press [Y/+] to save the changes.
• Press [N/-] to undo the changes and revert to the previous settings.
62
Page 63

Handheld PID Monitors User’s Guide
MiniRAE 3000+, ppbRAE
3000+, UltraRAE
MiniRAE Lite+
20.5.10. Buzzer & Light
The buzzer and light alarms can be programmed to be on or off individually or in
combination. Your choices are:
• Both on
• Light only
• Buzzer only
• Both off
1. Press [N/-] to step from one option to the next.
2. Press [Y/+] to make your selection (the dark circle in the “radio button” indicates your
selection).
3. When you have completed your selections, press [MODE].
You will see two choices: Save and Undo. You have the opportunity to register the new
settings or to change your mind and revert to your previous settings.
• Press [Y/+] to save the changes.
• Press [N/-] to undo the changes and revert to the previous settings.
20.6. Datalog
The instrument calculates and stores the concentration and ID of each sample taken. In the
datalog sub-menu, a user can perform the tasks and functions shown below.
1. Scroll through the Datalog sub-menu using the [N/-] key until the display shows the desired
parameter to be changed:
Clear Datalog
Interval
Data Selection
Datalog Type
2. Press [Y/+] to make your selection. Exit by pressing [MODE] for Back.
63
Page 64

Handheld PID Monitors User’s Guide
20.6.1. Clear Datalog
This erases all the data stored in the datalog.
Note: Once the datalog is cleared, the data cannot be recovered.
Press [Y/+] to clear the datalog. The display asks, “Are you sure?”
• Press [Y/+] if you want to clear the datalog. When it has been cleared, the display shows
“Datalog Cleared!”
• Press [N/-] if you do not want to clear the datalog.
The display changes, and you are taken to the next sub-menu, Interval.
20.6.2. Interval
Intervals are shown in seconds. The default value is 60 seconds. The maximum interval is
3600 seconds.
1. Press [Y/+] to increase each digit’s value.
2. Press [N/-] to advance to the next digit.
3. Again, use [Y/+] to increase the number.
Repeat this process until all numbers are entered.
When you have completed your selections, press [MODE].
You will see two choices: Save and Undo. You can register the new settings or to change
your mind and revert to your previous settings.
• Press [Y/+] to save the changes.
• Press [N/-] to undo the changes and revert to the previous settings.
20.6.3. Data Selection
Data Selection allows you to select which types of data are stored and made available when
you offload your datalog to a computer via ProRAE Studio II or Honeywell Safety Suite
Device Configurator software.
You can choose any or all of three types of data (you must choose at least one):
• Average
• Maximum
• Minimum
1. Press [N/-] to step from one option to the next. The highlighter indicates your choice.
2. Press [Y/+] to toggle your selection on or off (the check box indicates “on” with an “X”).
3. When you have completed your selections, press [MODE].
You will see two choices: Save and Undo. You can register the new settings or to change
your mind and revert to your previous settings.
• Press [Y/+] to save the changes.
• Press [N/-] to undo the changes and revert to the previous settings.
64
Page 65

Handheld PID Monitors User’s Guide
20.6.4. Datalog Type
The instrument has three datalog types:
Auto Default mode. Collects datalog information when the instrument
is sampling.
Manual Datalogging occurs only when the instrument’s datalogging is
manually started (see below for details).
Snapshot Datalogs only during single-event capture sampling.
Note: You can only choose one datalog type to be active at a time.
1. Press [N/-] to step from one option to the next.
2. Press [Y/+] to make your selection (the dark circle in the “radio button” indicates “on”).
3. When you have completed your selection, press [MODE].
You will see two choices: Save and Undo. You can register the new settings or to change
your mind and revert to your previous settings.
• Press [Y/+] to save the changes.
• Press [N/-] to undo the changes and revert to the previous settings.
20.6.5. Manual Datalog
When the instrument is set to Manual Datalog, you turn datalogging on and off by stepping
through the displays from the Main Display, and then pressing the keys to select datalog
on/off functions.
• When you reach the screen that says “Start Datalog?” press [Y/+] to start it. You see “Datalog
Started,” confirming that datalogging is now on.
• When you reach the screen that says “Stop Datalog?” press [Y/+] to stop it. You see “Datalog
Stopped,” confirming that datalogging is now off.
65
Page 66

Handheld PID Monitors User’s Guide
MiniRAE 3000+, ppbRAE 3000+,
MiniRAE Lite+
20.6.6. Snapshot Datalog
When the instrument is in Snapshot datalogging mode, it captures a single “snapshot” of the
data at the moment of your choosing. Whenever the instrument is on and it is set to
Snapshot, all you have to do is press [MODE] each time you want to capture a snapshot of
the data at that instant.
When you send the data to a computer using ProRAE Studio II or Honeywell Safety Suite
Device Configurator, the data snapshots are uniquely identified by time and other
parameters.
20.7. Monitor Setup
Many settings can be accessed in this menu, including setting the date and time and
adjusting the pump’s on/off duty cycle.
UltraRAE 3000+
Radio Power
The radio connection can be turned on or off. (The default value is off.)
1. Press [N/-] to step from one option to the next (on or off).
2. Press [Y/+] to make your selection (the dark circle in the “radio button” indicates that the
option is selected).
3. When you have completed your selection, press [MODE].
• Press [Y/+] to accept the new radio setting (on or off).
• Press [N/-] to discard the change and move to the next sub-menu.
20.7.1. Op Mode
Note: This feature is not included on MiniRAE Lite+.
Under Monitor Setup is “Op Mode.”
Press [Y/+] to select.
You see two options (one is highlighted):
Hygiene
Search
66
Page 67

Handheld PID Monitors User’s Guide
The current mode is indicated by a dark circle within the circle in front of either Hygiene or
Search.
1. Select Hygiene or Search by pressing [N/-]. The highlighting changes from one to the other
each time you press [N/-].
2. Press [Y/+] to select that mode for the instrument.
3. Press [MODE] when you want to register your selection to place the instrument in the
selected mode.
4. Press [Y/+] to commit the change and exit to the Monitor Setup screen, or press [N/-] to Undo
(exit to the Monitor Setup screen without changing the Mode).
20.7.2. Site ID
Enter an 8-digit alphanumeric/character Site ID in the programming mode. This Site ID is
included in the datalog report.
1. Press [Y/+] and the display shows the current site ID. Example: “RAE00001.” Note that the
left-most digit flashes to indicate it is the selected one.
2. Press [Y/+] to step through all 26 letters (A to Z) and 10 numerals (0 to 9).
Note: The last four digits must be numerals.
3. Press [N/-] to advance to the next digit. The next digit to the right flashes.
4. Repeat this process until all eight digits of the new site ID are entered.
Press [MODE] to exit.
If there is any change to the existing site ID, the display shows “Save?” Press [Y/+] to
accept the new site ID. Press [N/-] to discard the change and move to the next sub-menu.
20.7.3. User ID
Enter an 8-digit alphanumeric User ID in the programming mode. This User ID is included in
the datalog report.
1. Press [Y/+] and the display shows the current User ID. Example: “RAE00001.” Note that the
left-most digit flashes to indicate it is the selected one.
2. Press [Y/+] to step through all 26 letters (A to Z) and 10 numerals (0 to 9).
3. Press [N/-] to advance to the next digit. The next digit to the right flashes.
4. Repeat this process until all eight digits of the new User ID are entered.
Press [MODE] to exit.
If there is any change to the existing User ID, the display shows “Save” Press [Y/+] to
accept the new site ID. Press [N/-] to discard (undo) the change and move to the next submenu.
67
Page 68

Handheld PID Monitors User’s Guide
20.7.4. User Mode
Note: This feature is not included on MiniRAE Lite+.
The instrument has two user modes:
Basic Basic users can only see and use a basic set of functions.
Advanced Advanced users can see all screens and perform all available functions.
Note: The default value for User Mode is Basic.
To change the User Mode:
1. Press [N/-] to step from one option to the next. The highlighting changes each time you press
[N/-].
2. Press [Y/+] to make your selection (the dark circle in the “radio button” indicates “on”).
3. When you have completed your selection, press [MODE].
4. Press [Y/+] to accept the new User Mode. Press [N/-] to discard the change and move to the
next sub-menu.
20.7.5. Date
The Date is expressed as Month/Day/Year, with two digits for each.
1. Press [Y/+] and the display shows the current date. Note that the left-most digit flashes to
indicate it is selected.
2. Press [Y/+] to step through all 10 numerals (0 to 9).
3. Press [N/-] to advance to the next digit. The next digit to the right flashes.
4. Repeat this process until all six digits of the new date are entered.
5. Press [MODE] to exit.
• Press [Y/+] to save the new date.
• Press [N/-] to undo the change and move to the next sub-menu.
20.7.6. Time
The Time is expressed as Hours/Minutes/Seconds, with two digits for each. The time is in
24-hour (military) format.
1. Press [Y/+] and the display shows the current time. Note that the left-most digit flashes to
indicate it is selected.
2. Press [Y/+] to step through all 10 numerals (0 to 9).
3. Press [N/-] to advance to the next digit. The next digit to the right flashes.
4. Repeat this process until all six digits of the new time are entered.
5. Press [MODE] to exit.
• Press [Y/+] to save the new date.
• Press [N/-] to undo the change and move to the next sub-menu.
68
Page 69

Handheld PID Monitors User’s Guide
20.7.8. Duty Cycle
The pump’s duty cycle is the ratio of its on time to off time. The duty cycle ranges from 50%
to 100% (always on). Duty cycling is employed by the instrument to clean the PID. A lower
duty cycle has a greater effect on keeping the PID clean than a higher duty cycle.
Important! Pump duty cycling is interrupted when the instrument senses a gas. The pump’s
duty cycle is disabled when the measurement is greater than the low-alarm threshold and is
re-enabled when the reading falls below the low-alarm threshold. The range is 10 to 300
seconds, and the default value is 30.
1. Press [Y/+] to increase the value.
2. When you have completed your selection, press [MODE].
• Press [Y/+] to save the new duty cycle value.
• Press [N/-] to undo the change and move to the next sub-menu.
20.7.9. Temperature Unit
The temperature display can be switched between Fahrenheit and Celsius units.
1. Press [N/-] to step from one option to the next.
2. Press [Y/+] to make your selection (the dark circle in the “radio button” indicates “on”).
3. When you have completed your selection, press [MODE].
• Press [Y/+] to save the new temperature unit.
• Press [N/-] to undo the change and move to the next sub-menu.
20.7.10. Pump Speed
The pump can operate at two speeds, high and low. Running at low speed is quieter and
conserves a small amount of power. There is almost no difference in sampling accuracy.
1. Press [N/-] to step from one option to the next.
2. Press [Y/+] to make your selection (the dark circle in the “radio button” indicates “on”).
3. When you have completed your selection, press [MODE].
• Press [Y/+] to save the new temperature unit.
• Press [N/-] to undo the change and move to the next sub-menu.
20.7.11. Language
English is the default language, but other languages can be selected for the instrument.
1. Press [N/-] to step from one option to the next.
2. Press [Y/+] to make your selection (the dark circle in the “radio button” indicates “on”).
3. When you have completed your selection, press [MODE].
• Press [Y/+] to save your new language choice.
• Press [N/-] to undo it and return to the previous language selection.
69
Page 70

Handheld PID Monitors User’s Guide
20.7.12. Real Time Protocol
Note: This feature is not included on MiniRAE Lite+.
Real Time Protocol is the setting for data transmission.
The choices are:
P2M (cable) Point to multipoint. Data is transferred from the instrument to
multiple locations using a wired connection.
Default data rate: 19200 bps.
P2P (cable) Point to point. Data is transferred only between the instrument
and one other location, such as a computer. Default data rate:
9600 bps.
Wireless Data is transferred wirelessly and can be received by receivers.
1. Press [N/-] to step from one option to the next.
2. Press [Y/+] to make your selection (the dark circle in the “radio button” indicates “on”).
3. When you have completed your selection, press [MODE].
• Press [Y/+] to save the new real-time communications protocol.
• Press [N/-] to undo the change and move to the next sub-menu.
20.7.13. Power On Zero
Note: This is not recommended for ppbRAE3000+ or UltraRAE3000+.
Always make sure the instrument is turned on in VOC-free environment..When Power On Zero is
on, the instrument performs a zero calibration when it is turned on.
1. Press [N/-] to step from one option to the next.
2. Press [Y/+] to make your selection (the dark circle in the “radio button” indicates your
selection).
3. When you have completed your selection, press [MODE].
• Press [Y/+] to save the change.
• Press [N/-] to discard the change and move to the next sub-menu.
20.7.14. Unit ID
This three-digit number keeps data separated by instrument when more than one instrument
is used in a network. If multiple sensing units are attempting to communicate with the same
Host, then the units must all have a different Unit ID.
1. Press [Y/+] to step through all 10 numerals (0 to 9). If you pass the numeral you want, keep
pressing [Y/+]. After it counts up to 9, it starts counting up from 0 again.
2. Press [N/-] to advance to the next digit. The next digit to the right flashes.
3. Repeat this process until all three digits of the Unit ID are entered.
4. Press [MODE] when you are done.
• Press [Y/+] to save the change.
• Press [N/-] to discard the change and move to the next sub-menu
70
Page 71

Handheld PID Monitors User’s Guide
20.7.15. LCD Contrast
The display’s contrast can be increased or decreased from its default setting. You may not
need to ever change the default setting, but sometimes you can optimize the display to suit
extreme temperature and ambient brightness/darkness conditions.
• The minimum value is 20.
• The maximum value is 60.
1. Press [Y/+] to increase the value or [N/-] to decrease the value.
2. Press [MODE] to save your selection.
• Press [Y/+] to save your new contrast value.
• Press [N/-] to undo it and return to the previous value.
20.7.16. Lamp ID
The instrument does not automatically identify the type of lamp, so you must select a lamp
type manually.
1. Scroll through the menu by pressing [N/-].
2. Press [Y/+] to make a selection.
3. Press [MODE] when you are done.
4. Press [Y/+] to save your choice or [N/-] to undo your selection.
20.7.17. PAN ID
The instrument and any other devices that you want to interconnect wirelessly must have
the same PAN ID. You can set the PAN ID in the instrument or through ProRAE Studio II or
Honeywell Safety Suite Device Configurator.
1. Press [N/-] to advance through the digits from left to right.
2. Press [Y/+] to ] to advance through the numbers (1, 2, 3, etc.).
3. Press [MODE] to register your choice when you are done.
Note: PAN ID does not apply to BLE-equipped instruments.
20.7.18. Mesh Channel
Note: For mesh radio modems operating at 868MHz, only channel 0 is available. For other
frequencies, channels 1 through 10 are allowed.
1. Press [Y/+] to increase the number and [N/-] to advance to the next digit.
2. After moving to the last digit and making changes, press [MODE].
• Press [Y/+] to save the change.
• Press [N/-] to undo the change.
Note: Mesh Channel does not apply to BLE-equipped instruments.
71
Page 72

Handheld PID Monitors User’s Guide
20.7.19. Mesh Interval
Set the time interval at which the instrument’s mesh radio sends out a signal. This can range from
once every 10 seconds to once every four minutes (240 seconds). The transmission frequency is
user-adjustable, but a rate of at least once every 30 seconds is recommended.
Note: Shorter intervals reduce battery life.
1. Press [N/-] to step from one option to the next.
2. Press [Y/+] to make a selection.
3. When you are done, press [MODE].
Note: Mesh Interval does not apply to BLE-equipped instruments.
72
Page 73

Handheld PID Monitors User’s Guide
Note: Dashed line indicates automatic progression.
21. Hygiene Mode
Note: This feature is not included on MiniRAE Lite+.
The instrument usually operates in Hygiene Mode, which provides basic functionality.
However, it is possible to operate it in a second mode called Search Mode. Here are the
primary differences:
Hygiene Mode: Automatic measurements, continuously running and datalogging,
and calculates additional exposure values.
Search Mode: Manual start/stop of measurements and display of certain
exposure values.
21.1. Basic User Level & Hygiene Mode
The default setting is navigated in the following way:
Pressing [N/-] steps you from screen to screen. Options include clearing the Peak value and
turning on the instrument’s PC Communications for data transfer to a PC.
73
Page 74

Handheld PID Monitors User’s Guide
21.2. Entering Search Mode From Hygiene Mode
In order to change the instrument’s operational mode from Hygiene Mode to Search Mode,
you must enter the password-protected Programming Mode:
1. Hold [MODE] and [N/-] until you see the password screen.
2. Use [Y/+] to increment to the number you want for the first digit. (If you pass by the desired
number, press [Y/+] until it cycles through to 0 again. Then press [Y/+] until you reach the
desired number.)
3. Press [N/-] to advance to the next digit.
4. Again press [Y/+] to increment the number.
5. Press [N/-] to advance to the next digit.
Continue the process until all four numbers of the password have been input. Then press
[MODE] to proceed.
The screen changes to icons with the label “Calibration.”
1. Press [N/-] to advance to “Monitor Setup.”
2. Press [Y/+] to select Monitor Setup.
Under Monitor Setup, you will see “Op Mode.”
3. Press [Y/+] to select.
You will see:
Hygiene
Search
The current mode is indicated by a dark circle within the circle in front of either Hygiene or
Search.
1. Select Hygiene or Search by pressing [N/-].
2. Press [Y/+] to place the instrument into the selected mode.
3. Press [MODE] when you want to register your selection to place the instrument in the
selected mode.
4. Press [Y/+] to commit the change and exit to the Monitor Setup screen, or press [N/-] to Undo
(exit to the Monitor Setup screen without changing the Mode).
74
Page 75

Handheld PID Monitors User’s Guide
22. Advanced User Level (Hygiene Mode Or Search
Mode)
The User Mode called Advanced User Level allows a greater number of parameters to be
changed than Basic User Level. It can be used with either of the Operation Modes, Hygiene
Mode or Search Mode.
22.1. Advanced User Level & Hygiene Mode
With the instrument in Operation Mode: Hygiene Mode, enter User Mode: Advanced User Level
(refer to the section called Monitor Mode for instructions).
Once you are in Advanced User Level and Hygiene Mode together, you can change the calibration
reference and measurement gas, in addition to performing normal monitoring functions.
Pressing [N/-] progresses through the screens, while pressing [Y/+] selects options. Pressing
[MODE] makes menu choices when it is shown for “Done” or “Back.” Pressing and holding [Mode]
whenever the circle with a vertical line in the middle is shown activates the countdown to shutoff.
75
Page 76

Handheld PID Monitors User’s Guide
Note: Dashed line indicates automatic progression.
76
Page 77

Handheld PID Monitors User’s Guide
Note: Dashed line indicates automatic progression.
22.2. Basic User Level & Search Mode
With the instrument in Operation Mode: Search Mode, enter User Mode and select Basic User
Level (refer to the section called User Mode for instructions).
When the instrument is in Search Mode, it only samples when you activate sampling. When you
see the display that says, “Ready…Start sampling?” press [Y/+] to start. The pump turns on and the
instrument begins collecting data. To stop sampling, press [N/-] while the main display is showing.
You will see a new screen that says, “Stop sampling?” Press [Y/+] to stop sampling. Press [N/-] if
you want sampling to continue.
77
Page 78

Handheld PID Monitors User’s Guide
Note: Dashed line indicates automatic progression.
22.3. Advanced User Level & Search Mode
With the instrument in Operation Mode: Search Mode, enter User Mode and select Advanced User
Level (refer to the section called Monitor Mode for instructions). Operation is similar to Basic User
Level & Sampling Mode, but now allows you to change calibration and measurement reference
gases. Refer to the section on measurement gases for more details.
78
Page 79

Handheld PID Monitors User’s Guide
23. Diagnostic Mode
IMPORTANT!
Diagnostic Mode is designed for servicing and manufacturing, and therefore is not intended for
everyday use, even by advanced users. It provides raw data from sensors and about settings, but
only allows adjustment of pump stall parameters, which should only be changed by qualified
personnel.
Note: If the instrument is turned on in Diagnostic Mode and you switch to User Mode, datalog data
remains in raw count form. To change to standard readings, you must restart the instrument.
23.1.1. Entering Diagnostic Mode
Note: To enter Diagnostic Mode, you must begin with the instrument turned off.
Press and hold [Y/+] and [MODE] until the instrument starts.
The instrument goes through a brief startup, and then displays raw data for the PID sensor. These
numbers are raw sensor readings without calibration. The instrument is now in Diagnostic Mode.
Note: In Diagnostic Mode, the pump and lamp are normally on.
You can enter Programming Mode and calibrate the instrument as usual by pressing both [MODE]
and [N/-] for three seconds.
You can enter Monitoring Mode by pressing [MODE] and [Y/+] together for three seconds.
Once the instrument is started up in Diagnostic Mode, you can switch between Diagnostic Mode
and Monitoring Mode by pressing and holding [MODE] and [Y/+] simultaneously for two seconds.
In Diagnostic mode, you can step through parameter screens by pressing [MODE].
23.1.2. Adjusting The Pump Stall Threshold
If the gas inlet is blocked but the pump does not shut down, or the pump shuts down too easily with
a slight blockage, the pump stall threshold value may be set too high or too low.
Use the following steps to adjust the pump stall threshold:
23.1.3. Pump High
In Diagnostic Mode, press the [MODE] key until “Pump High” is displayed. The display shows the
maximum, minimum, and stall values for the pump at its high speed. Write down the “Max” reading.
Block the gas inlet and watch the pump current reading (labeled “I”) increase. Write down its
blocked reading. Note: If the pump current reading does not increase significantly (less than 10
counts), then there may be a leak in the gas inlet or the pump is weak or defective.
Add the two readings you wrote down. This is the average of the maximum block count and the
maximum idle count. Divide that number by 2. Use the [Y/+] or [N/-] key to increase or decrease the
stall value to equal that number.
Press the [MODE] key to exit this display.
79
Page 80

Handheld PID Monitors User’s Guide
25° C /
77° F
23.1.4. Testing The Humidity Sensor
1. Press [MODE] to step through the diagnostic screens until you reach a screen that says
“THP” (for “temperature, humidity, pressure,” although pressure is not supported) at the top.
There are three numbers for the humidity reading (“H”). The first number is the current
humidity reading from the sensor. The second is the reference number for 0% humidity, and
the third number is the reference for 100% humidity.
2. Fill a cup with warm water (>25° C/77° F).
3. Put a filter on the UltraRAE 3000+’s inlet probe.
4. Place the inlet probe over the warm water.
5. Cover the cup with your hand.
6. Wait a few seconds and check the high-humidity reading.
7. The humidity reading should be within ±10% of the 100% humidity reading. If it is not, then
the THP Sensor (part number 023-3011-000-FRU) should be replaced.
8. Check the low-humidity reading by connecting the inlet probe to a tank of zero gas (air at 0%
humidity).
9. Turn on the zero gas and wait a few seconds for the sensor reading to stabilize. It should
read within 10% of the low-reference number. If it does not, replace the THP sensor.
10. Once you have finished testing the humidity sensor, exit Diagnostic Mode by shutting down
the instrument (hold [MODE] through the countdown, and then release when it is off).
80
Page 81

Handheld PID Monitors User’s Guide
23.1.5. Pump Low
In Diagnostic Mode, press the [MODE] key until “Pump Low” is displayed. The display
shows the maximum, minimum, and stall values for the pump at its low speed. Write down
the “Max” reading.
Block the gas inlet and watch the pump current reading (labeled “I”) increase. Write down its
blocked reading. Note: If the pump current reading does not increase significantly (less than
10 counts), then there may be a leak in the gas inlet or the pump is weak or defective.
Add the two readings you wrote down. This is the average of the maximum block count and
the maximum idle count. Divide that number by 2. Use the [Y/+] or [N/-] key to increase or
decrease the stall value to equal that number.
Press the [MODE] key to exit this display.
23.1.6. Exiting Diagnostic Mode
You can exit Diagnostic Mode and go directly to Programming Mode or Monitor Mode as
outlined above, or you can exit Diagnostic Mode completely.
To exit Diagnostic Mode so that it cannot be re-entered without a restart:
Shut down the instrument. When it is off, restart it by holding the [MODE] key. Diagnostic
Mode cannot be entered until the instrument is restarted as outlined in “Entering Diagnostic
Mode.”
81
Page 82

Handheld PID Monitors User’s Guide
24. Transferring Data To & From A Computer
Once you have connected your instrument cradle to the PC, you can can transfer data,
including a download of the datalog to the computer and updates of firmware to the
instrument (should this ever be necessary).
24.1. Downloading The Datalog To A PC
1. Connect the data cable to the PC and the cradle.
2. Place the instrument into its cradle. The charging LED should be illuminated.
3. Start ProRAE Studio II or Honeywell Safety Suite Device Configurator on your PC.
4. Select “Operation” and select Setup Connection.
5. Select the COM port to establish a communication link between the PC and the instrument.
6. To receive the datalog in the PC, select “Downlog Datalog.”
7. When you see “Unit Information,” click OK.
During the data transfer, the display shows a progress bar.
When the transfer is done, you will see a screen with the datalog information. You can now
export this datalog for other use or printing.
24.2. Uploading Firmware To The instrument From A PC
Uploading new firmware to your instrument requires connecting the instrument and PC.
Follow these steps to make the connection:
1. Connect the data cable to the PC and the cradle.
2. Place the instrument into its cradle. The charging LED should be illuminated.
3. Start ProRAE Studio II or Honeywell Safety Suite Device Configurator on your PC.
4. With ProRAE Studio II, click the “Firmware” icon on the left,side. Then click “Run programmer” to open RAEProgrammer 4000.
5. From RAEProgrammer 4000, select “Open” and select the firmware to upgrade
6. Select the COM port to establish a communication link between the PC and the instrument.
7. Click “Start” button
Once communication is established, follow the instructions that accompany RAEProgrammer 4000
and the firmware to upload the new firmware to your instrument.
Note: Check for the latest updates to ProRAE Studio II or Honeywell Safety Suite Device
Configurator at www.raesystems.com.
82
Page 83

Handheld PID Monitors User’s Guide
25. Maintenance
The major maintenance items of the instrument are:
• Battery pack
• Sensor module
• PID lamp
• Sampling pump
• Inlet connectors and filters
Note: Maintenance should be performed by qualified personnel only.
Note: The printed circuit board of the instrument is connected to the battery pack even if the power
is turned off. Therefore, it is very important to disconnect the battery pack before servicing or
replacing any components inside the instrument. Severe damage to the printed circuit board or
battery may occur if the battery pack is not disconnected before servicing the unit.
25.1. Battery Charging & Replacement
When the display shows a flashing empty battery icon, the battery requires recharging. It is
recommended to recharge the instrument upon returning from fieldwork. A fully charged battery
runs a instrument for 16 hours continuously. The charging time is less than 8 hours for a fully
discharged battery. The battery may be replaced in the field (in areas known to be non-hazardous),
if required.
WARNING!
To reduce the risk of ignition of hazardous atmospheres, recharge battery only in area
known to be non-hazardous. Remove and replace battery only in areas known to be nonhazardous.
25.1.1. Replacing The Li-ion Battery
1. Turn off the instrument.
2. Located on the rear of the instrument is a battery tab. Slide it down to unlock the battery.
3. Remove the battery pack from the battery compartment by tilting it out.
4. Replace a fully charged spare battery pack inside the battery compartment. Make sure the
battery pack is oriented properly inside the compartment.
Slide the capture tab back up to its locked position.
83
Page 84

Handheld PID Monitors User’s Guide
25.1.2. Replacing The Alkaline Battery Adapter
An alkaline battery adapter is supplied with each instrument. The adapter (part number 059-3052-
000) accepts four AA alkaline batteries (use only Duracell MN1500) and provides approximately 12
hours of operation. The adapter is intended to be used in emergency situations when there is no
time to charge the Li-ion battery pack.
To insert batteries into the adapter:
1. Remove the three Philips-head screws to open the compartment.
2. Insert four fresh AA batteries as indicated by the polarity (+/-) markings.
3. Replace the cover. Replace the three screws.
To install the adapter in the instrument:
1. Remove the Li-ion battery pack from the battery compartment by sliding the tab and tilting out
the battery.
2. Replace it with the alkaline battery adapter
3. Slide the tab back into place to secure the battery adapter.
IMPORTANT!
Alkaline batteries cannot be recharged. The instrument’s internal circuit detects alkaline batteries
and will not allow recharging. If you place the instrument in its cradle, the alkaline battery will not be
recharged. The internal charging circuit is designed to prevent damage to alkaline batteries and the
charging circuit when alkaline batteries are installed inside the instrument.
Note: When replacing alkaline batteries, dispose of old ones properly.
WARNING!
To reduce the risk of ignition of hazardous atmospheres, recharge the battery only in areas known
to be non-hazardous. Remove and replace the battery only in areas known to be non-hazardous.
Note: The internal charging circuit is designed to prevent charging to alkaline batteries.
84
Page 85

Handheld PID Monitors User’s Guide
25.2. PID Sensor & Lamp Cleaning/Replacement
Sensor Components – MiniRAE 3000+, ppbRAE 3000+, MiniRAE Lite+
The sensor module is made of several components and is attached to the lamp-housing unit
as shown below.
85
Page 86

Handheld PID Monitors User’s Guide
Sensor Components – UltraRAE 3000+
The sensor module is made of several components and is attached to the lamp-housing unit
as shown below.
Note: The cleaning procedure is not normally needed. Clean the PID sensor module, the
lamp and the lamp housing only when one of the following has happened:
1. The reading is inaccurate even after calibration.
2. The reading is very sensitive to air moisture.
3. A chemical liquid has been sucked into the unit and damaged the unit.
Use of the external filter helps to prevent contamination of the sensor.
To access the sensor components and lamp, gently unscrew the lamp-housing cap, remove
the sensor adapter with the gas inlet probe and the metal filter all together. Then hold the
PID sensor and pull it straight out. A slight, gentle rocking motion helps release the sensor.
86
Page 87

Handheld PID Monitors User’s Guide
25.2.1. Cleaning The PID Sensor
Place the entire PID sensor module into GC grade methanol. It is highly recommended that
an ultrasound bath to be used to clean the sensor for at least 15 minutes. Then dry the
sensor thoroughly. Never touch the electrodes of the sensor by hand.
Also use a methanol-soaked cotton swab to wipe off the lamp housing where it contacts the
sensor when the sensor is installed.
Turn over the sensor so that the pins point up and the sensor cavity is visible. Examine the
sensor electrodes for any corrosion, damage, or bending out of alignment. The metal sensor
electrode “fingers” should be flat and straight. If necessary, carefully bend the sensor fingers
to ensure that they do not touch the Teflon portions and that they are parallel to each other.
Make sure that the nuts on the sensor pins are snug but not overtight. If the sensor is
corroded or otherwise damaged, it should be replaced.
25.2.2. Cleaning The Lamp Housing Or Changing The Lamp
If the lamp does not turn on, the instrument will display an error message to indicate
replacement of the lamp may be required.
1. If the lamp is operational, clean the lamp window surface and the lamp housing by wiping it
with GC grade methanol using a cotton swab using moderate pressure. After cleaning, hold
the lamp up to the light at an angle to detect any remaining film. Repeat the process until the
lamp window is clean. Never use water solutions to clean the lamp. Dry the lamp and the
lamp housing thoroughly after cleaning.
CAUTION: Never touch the window surface with the fingers or anything else that may
leave a film. Never use acetone or aqueous solutions.
2. If the lamp does not turn on, remove the lamp from the lamp housing. Place the lamp O-ring
onto the new lamp. Insert the new lamp, avoiding contact with the flat window surface.
3. Reinstall the PID sensor module.
4. Tighten the Lamp Housing Cap.
87
Page 88

Handheld PID Monitors User’s Guide
25.2.3. Determining The Lamp Type
Note: This feature is not included on the MiniRAE Lite+.
The monitor can accommodate two lamp values: 10.6eV (standard) and 9.8eV.
There are two ways to determine the lamp type.
1. Turn off the instrument and remove the lamp. Now look at the serial number. The following
identify the lamp type:
• 10.6eV SN:106 XXXXXXX
• 9.8eV SN:098 XXXXXXX
• 11.7eV SN:117 XXXXXXX
2. When the monitor is running, the lamp type is shown along with the calibration and
measurement gas and Correction Factor:
3. Note: This screen can be accessed from the reading screen by pressing [N/-] four times.
Programming The Lamp ID
The correct measurement gas library is used by the instrument when you ensure that the right lamp
value is programmed.
To manually select the Lamp ID:
1. Enter the Programming menu.
2. Select Monitor Setup.
3. Scroll down and select the Lamp ID sub-menu.
4. Press [N/-] to scroll down to the desired Lamp ID.
5. Press [Y/+] to select.
6. Press [MODE] to select Done.
7. Select “Save.”
8. Return to the main menu.
Recalibrate the instrument before returning it to service.
88
Page 89

Handheld PID Monitors User’s Guide
25.2.4. Sampling Pump
When approaching the end of the specified lifetime of the pump, it will consume higher amount of
energy and reduce its sample draw capability significantly. When this occurs, it is necessary to
replace or rebuild the pump. When checking the pump flow, make sure that the inlet connector is
tight and the inlet tubing is in good condition. Connect a flow meter to the gas inlet probe. The flow
rate should be above 450 cc/min when there is no air leakage.
If the pump is not working properly, refer the instrument to qualified service personnel for further
testing and, if necessary, pump repair or replacement.
25.2.5. Cleaning The Instrument
Occasional cleaning with a soft cloth is recommended. Do not use detergents or chemicals.
Visually inspect the contacts at the base of the instrument, on the battery, and on the Charger
Stand to make sure they are clean. If they are not, wipe them with a soft, dry cloth. Never use
solvents or cleaners.
25.3. Special Servicing Note
If the instrument needs to be serviced, contact either:
1. The Honeywell distributor from whom the instrument was purchased; they will return the
instrument on your behalf.
or
2. The Honeywell Technical Service Department. Before returning the instrument for service or
repair, obtain a Returned Material Authorization (RMA) number for proper tracking of your
equipment. This number needs to be on all documentation and posted on the outside of the
box in which the instrument is returned for service or upgrade. Packages without RMA
Numbers will be refused at the factory.
89
Page 90

Handheld PID Monitors User’s Guide
25.4. Crash Recovery
3G Firmware Crash Recovery Procedure:
1. Press [Y/+] and [MODE] and [N/-] keys simultaneously. Note: The display will be blank and
no LED will glow.
2. Use a USB cable to onnect the instrument to a PC using a Travel Charger or Charger Stand.
3. Connect the 12-volt DC power supply to the Travel Charger or Charger Stand.
4. Open RAEProgrammer 4000 in ProRAE Studio II.
Option 1 (only applicable only to a 64-bit Operating System):
• Verify correct COM Port prior to downloading
• Local disk(C) >> Program Files(x86) >> RAE Systems by Honeywell >>
ProRAE Studio II >> Programmer >> RAEProgrammer 4000 >>
RAEProgrammer4000.exe.
Option 2: Connect a known good instrument to the PC, open ProRAE Studio II, click on
“Auto Detect,” select “Firmware,” and click on “Run Programmer” under “Application
Firmware.” Disconnect the instrument and then connect the instrument that requires
recovery.
5. Load the Application Firmware.
Notes:
• On the instrument, no LEDs will turn on and the display will be blank during
downloading.
• Firmware download is in process when Duration time in Processing Information
section of RAE Programmer4000 is counting up.
When the instrument is turned on, RAEProgrammer 4000 will show a message that shows it has
loaded the application firmware.
90
Page 91

Handheld PID Monitors User’s Guide
Problem
Possible Reasons & Solutions
Cannot turn on power
Reasons: Discharged battery.
Solutions: Charge or replace battery.
Lost password
Solutions: Call Technical Support
Reading abnormally
Reasons: Dirty filter.
Calibrate the unit.
Reading abnormally
Reasons: Dirty filter.
Check for air leakage.
Buzzer
Reasons: Bad buzzer.
center.
Inlet flow too low
Reasons: Pump diaphragm damaged
or has debris.
+1 888-723-4800
“Lamp” message during
Reasons: Lamp drive circuit.
Replace UV lamp
26. Troubleshooting
after charging the
battery
High
Low
Inoperative
Defective battery.
Dirty sensor module.
Excessive moisture and
water condensation.
Incorrect calibration.
Solutions: Replace filter.
Blow-dry the sensor
module.
Dirty sensor module.
Weak or dirty lamp.
Incorrect calibration.
Solutions: Replace filter.
Remove Calibration Adapter.
Calibrate the unit.
Solutions: Check that buzzer is not
turned off.
Call authorized service
operation
Flow path leaks.
Solutions: Check flow path for leaks;
sensor module O-ring,
tube connectors, Teflon
tube compression fitting.
Call Technical Support at
+1 408-752-0723
or toll-free at
Weak or defective PID
lamp, defective.
Solutions: Turn the unit off and back
on.
91
Page 92

Handheld PID Monitors User’s Guide
27. Technical Support
To contact Honeywell Technical Support Team:
Brazil: +55 11 3309 1030
Canada: +1 800 663 4164
China: +86 21 5855 7305
Europe: +41 44 943 4380
India: +91 124 4752700
Japan: +81 3 6730 7320
Korea: +82 2 69090300
Latin America (Spanish): +57 1 64 0401 3
Middle East: +971 4 4505800
Russia/CIS: +7 495 796 9800
Singapore: +65 65803572
Taiwan: +886 3 5169284
USA: +1 888 749 8878
92
Page 93

Handheld PID Monitors User’s Guide
28. Controlled Part Of Manual
Intrinsic Safety:
US and Canada: Class I, Division 1, Groups A,B,C,D T4
Europe: ATEX (2460 Ex II 2G Ex ia IIC/IIB T4 Gb)
Sira 17ATEX2082X
Complies with EN60079-0:2013, EN60079-11:2012
IECEx CSA 10.0005 Ex ia IIC/IIB T4 Gb
Complies with IEC 60079-0:2011, IEC 60079-11:2011
Temperature: -20º C to 50º C (-4º to 122º F)
Humidity: 0% to 95% relative humidity (non-condensing)
29. Basic Operation
29.1. Turning The Instrument On
1. With the instrument turned off, press and hold [MODE].
2. When the display turns on, release the [MODE] key.
The instrument is now operating and performs self tests. Once the self tests are complete, the
display shows a graph or numerical gas reading. This indicates that the instrument is fully functional
and ready to use.
29.2. Turning The Instrument Off
1. Press and hold the Mode key for 3 seconds. A 5-second countdown to shutoff begins.
2. When you see “Unit off...” release your finger from the [MODE] key. The instrument is now off.
Note: You must hold your finger on the key for the entire shutoff process. If you remove your finger
from the key during the countdown, the shutoff operation is canceled and the instrument continues
normal operation.
93
Page 94

Handheld PID Monitors User’s Guide
Message
Condition
Alarm Signal
HIGH
Gas exceeds “High
Alarm” limit
3 beeps/flashes per second*
OVR
Gas exceeds
measurement range
3 beeps/flashes per second*
MAX
Gas exceeds
range
3 beeps/flashes per second*
LOW
Gas exceeds “Low
Alarm” limit
2 beeps/flashes per second*
TWA
Gas exceeds “TWA”
limit
1 Beep/flash per second*
STEL
Gas exceeds “STEL”
limit
1 Beep/flash per second*
Pump icon
flashes
Pump failure
3 beeps/flashes per second
Lamp
PID lamp failure
3 beeps/flashes per second plus
“Lamp” message on display
Battery icon
flashes
Low battery
1 flash, 1 beep per minute plus battery
icon flashes on display
CAL
Calibration failed, or
needs calibration
1 beep/flash per second
NEG
Gas reading
calibration
1 beep/flash per second
30. Alarm Signals
During each measurement period, the gas concentration is compared with the programmed alarm
limits (gas concentration alarm limit settings). If the concentration exceeds any of the preset limits,
the loud buzzer and red flashing LED are activated immediately to warn you of the alarm condition.
In addition, the instrument alarms if one of the following conditions occurs: battery voltage falls
below a preset voltage level, failure of the UV lamp, pump stall, or when the datalog memory is full.
30.1. Alarm Signal Summary
electronics’ maximum
measures less than
number stored in
94
Page 95

Handheld PID Monitors User’s Guide
Cal Gas
(Isobutylene)
Cal
Span
unit
Low
High
TWA
STEL
MiniRAE
Lite+
100
ppm
50
100
10
25
MiniRAE
3000+
100
ppm
50
100
10
25
ppbRAE
3000+
10
ppm
10
25
10
25
UltraRAE
(Isobutylene)
100
ppm
50
100
10
25
UltraRAE
(Benzene)
5
ppm 2 5
0.5
2.5
UltraRAE
(Butadiene)
10
ppm 5 10 2 5
Preset Alarm Limits & Calibration
The instrument is factory calibrated with standard calibration gas, and is programmed with
default alarm limits.
3000+
3000+
3000+
95
Page 96

Handheld PID Monitors User’s Guide
31. Charging The Battery
Always fully charge the battery before using the instrument. The instrument’s Li-ion/NiMH battery is
charged by placing the instrument in its cradle. Contacts on the bottom of the instrument meet the
cradle’s contacts, transferring power without other connections.
Note: Before setting the instrument into its Charger Stand or Travel Charger, visually inspect the
contacts to make sure they are clean. If they are not, wipe them with a soft cloth. Do not use
solvents or cleaners.
Follow this procedure to charge the instrument:
1. Plug the AC/DC adapter’s barrel connector into the instrument’s Charger Stand or Travel
Charger.
2. Plug the AC/DC adapter into the wall outlet.
3. Place the instrument into the cradle, press down, and lean it back. It locks in place and the
LED in the cradle glows.
Note: To release the instrument, press down and tilt the top out of the cradle and lift up.
The instrument begins charging automatically. The LED on the front of the cradle marked “Primary”
blinks during charging. During charging, the diagonal lines in the battery icon on the instrument’s
display are animated and you see the message “Charging...”
When the instrument’s battery is fully charged, the battery icon is no longer animated and shows a
full battery. The message “Fully charged!” is shown and the Primary LED on the cradle glows
continuously green.
Note: A spare Li-ion battery (059-3051-000) or NiMH(059-3054-000) can be charged by placing it
directly in the charging port on the back of the cradle. It can be charged at the same time as the
instrument. Press the battery in place, sliding it slightly toward the front of the cradle. This locks it in
the cradle. To release the battery, slide it forward again and tilt it up.
Note: An Alkaline Battery Adapter (part number 059-3052-000), which uses four AA alkaline
batteries (Duracell MN1500), may be substituted for the Li-Ion battery.
WARNING!
To reduce the risk of ignition of hazardous atmospheres, recharge and replace batteries
only in areas known to be non-hazardous. Remove and replace batteries only in areas
known to be non-hazardous.
31.1. Low Voltage Warning
When the battery’s charge falls below a preset voltage, the instrument warns you by beeping once
and flashing once every minute, and the battery icon blinks once per second. You should turn off
the instrument within 10 minutes and either recharge the battery by placing the instrument in its
cradle, or replace the battery with a fresh one with a full charge.
96
Page 97

Handheld PID Monitors User’s Guide
31.2. Clock Battery
An internal clock battery is mounted on one of the instrument’s printed circuit boards. This long-life
battery keeps settings in memory from being lost whenever the Li-ion, NiMH, or alkaline batteries
are removed. This backup battery should last approximately five years, and must be replaced by an
authorized RAE Systems service technician. It is not user-replaceable.
WARNING
To reduce the risk of ignition of hazardous atmospheres, recharge battery only in area
known to be non-hazardous. Remove and replace battery only in an area known to be nonhazardous.
31.3. Replacing Rechargeable Li-Ion or NiMH Battery
Caution: Turn off the instrument before removing or replacing the battery.
31.4. Alkaline Battery Adapter
An alkaline battery adapter is supplied with each instrument. The adapter (part number 059-3052-
000) accepts four AA alkaline batteries (use only Duracell MN1500).
Do not mix old and new batteries or different type batteries.
97
Page 98

Handheld PID Monitors User’s Guide
Problem
Possible Reasons & Solutions
Cannot turn on power
battery
Reasons: Discharged battery. Defective battery.
Solutions: Charge or replace battery.
Lost password
Solutions: Call Technical Support at
+1 888-723-4800
Reading abnormally
Reasons: Dirty filter.
Calibrate the unit.
Reading abnormally
Reasons: Dirty filter.
Check for air leakage.
Buzzer
Reasons: Bad buzzer.
Call authorized service center.
Inlet flow too low
Reasons: Pump diaphragm damaged or has debris.
or toll-free at +1 888-723-4800
“Lamp” message
Reasons: Lamp drive circuit.
Replace UV lamp
31.5. Troubleshooting
after charging the
High
Low
+1 408-752-0723 or toll-free at
Dirty sensor module.
Excessive moisture and
water condensation.
Incorrect calibration.
Solutions: Replace filter.
Blow-dry the sensor
module.
Dirty sensor module.
Weak or dirty lamp.
Incorrect calibration.
Solutions: Replace filter.
Remove Calibration
Adapter.
Calibrate the unit.
Inoperative
during operation
Solutions: Check that buzzer is not turned off.
Flow path leaks.
Solutions: Check flow path for leaks; sensor module O-
ring, tube connectors, Teflon tube
compression fitting.
Call Technical Support at +1 408-752-0723
Weak or defective PID lamp, defective.
Solutions: Turn the unit off and back on.
98
Page 99

Handheld PID Monitors User’s Guide
Lamp
Range
Resolution
10.6 eV
0.1 ppm to 5,000 ppm
0.1 ppm
32. Specifications
32.1. MiniRAE Lite+ Specifications
Size: 9.25" L x 3.6" W x 2.9" H
Weight: 28 oz with battery pack
Detector: Photoionization sensor with 10.6 eV UV lamp
Battery: Rechargeable Lithium-Ion battery pack
(snap in, field replaceable)
Alkaline battery holder (for 4 AA batteries)
Battery Charging: Less than 8 hours to full charge
Operating Hours: Non-wireless Up to 16 hours continuous operation with rechargeable battery
Up to 12 hours with alkaline battery
Wireless Up to 13 hours continuous operation with rechargeable battery
Display: Large dot matrix screen with backlight
Measurement range & resolution
Response time (T
Accuracy 10 to 2000 ppm: ±5% at calibration point.
(Isobutylene):
PID Detector: Easy access to lamp and sensor for cleaning and replacement
Calibration: Two-point field calibration of zero and standard reference gases
Patented Reflex PID™ technology
Inlet Probe: Flexible 5" tubing
Keypad: 1 operation key and 2 programming keys; 1 flashlight switch
Direct Readout: Instantaneous, peak value, and battery voltage
Datalogging: 260,000 points with time stamp, serial number, user ID, site ID, etc
Intrinsic Safety: US and Canada: Class I, Division 1, Groups A, B, C, D
IEC 60079-11:2011
or 059-3054-000 NiMH battery pack;
IIB: 059-3052-000 alkaline battery pack)
EM Interference: Highly resistant to EMI/RFI.
Alarm Setting: Separate alarm limit settings for Low Alarm and High Alarm
Alarm: Buzzer 95dB at 30cm and flashing red LEDs to indicate exceeded preset limits,
Alarm Type: Latching or automatic reset
Real-time Clock: Automatic date and time
Communication: Download instrument setup from PC via RS-232 with Travel Charger, or via USB
): 2 seconds
90
Europe: ATEX (2460 Ex II 2G Ex ia
IIC/IIB T4 Gb)
Sira 17ATEX2082X
Complies with EN60079-0: 2013,
EN60079-11:2012
IECEx CSA 10.0005 Ex ia IIC/IIB T4 Gb
Complies with IEC 60079-0: 2011,
(IIC: 059-3051-000 Li-ion battery pack
low battery voltage, or sensor failure
with optional Charger Stand
99
Page 100

Handheld PID Monitors User’s Guide
Lamp
Range
Resolution
10.6 eV
0 to 999.9 ppm
1,000 to 15,000 ppm
0.1 ppm
1ppm
9.8 eV
0.1 ppm to 5,000 ppm
0.1 ppm
11.7 eV
0.1 ppm to 2,000 ppm
0.1 ppm
Upload data to PC and download instrument setup from PC via USB on charging
station.
Enhanced datalogging capability through BLE module and mobile app
Sampling Pump: Internally integrated. Flow rate: 450 to 550 cc/min.
Temperature: -20º C to 50º C (-4º to 122º F)
Humidity: 0% to 95% relative humidity (non-condensing)
Housing (including Polycarbonate, splashproof and dustproof
rubber boot): Battery can be changed without removing rubber boot.
32.2. MiniRAE 3000+ Specifications
Size: 25.5 cm x 7.6 cm x 6.4 cm (9.25" L x 3.6" W x 2.9" H)
Weight: 738 g / 28 oz with battery pack
Detector: Photoionization sensor with 9.8, 10.6, or 11.7 eV UV lamp
Battery: A 3.7V rechargeable Lithium-Ion battery pack (snap in, field replaceable, at non-
hazardous location only)
Alkaline battery holder (for 4 AA batteries)
Battery Charging: Less than 8 hours to full charge
Operating Hours: Non-wireless Up to 16 hours continuous operation with rechargeable battery
Up to 12 hours with alkaline battery
Wireless Up to 13 hours continuous operation with rechargeable battery
Display: Large dot matrix screen with backlight
Measurement range & resolution
Response time (T
Accuracy 10 to 2,000 ppm: ±3% at calibration point.
(Isobutylene):
PID Detector: Easy access to lamp and sensor for cleaning and replacement
Correction Factors: Over 200 VOC gases built in (based on RAE Systems Technical Note TN-106)
Calibration: Two-point field calibration of zero and standard reference gases
Patented Reflex PID™ technology
Calibration Reference: Store up to 8 sets of calibration data, alarm limits and span values
Inlet Probe: Flexible 5" tubing
Radio module: BLE (2.4GHz),Bluetooth (2.4GHz) or RF module (, 868MHz or 915MHz)
Keypad: 1 operation key and 2 programming keys; 1 flashlight switch
Direct Readout: Instantaneous, average, STEL, TWA and peak value, and battery voltage
Intrinsic Safety: US and Canada: Class I, Division 1, Groups A,B, C, D
IEC 60079-11:2011
): 2 seconds
90
Europe: ATEX (2460 Ex II 2G Ex ia
IIC/IIB T4 Gb)
Sira 17ATEX2082X
Complies with EN60079-0: 2013,
EN60079-11:2012
IECEx CSA 10.0005 Ex ia IIC/IIB T4 Gb
Complies with IEC 60079-0: 2011,
(IIC: 059-3051-000 Li-ion battery pack
100
 Loading...