


Wireless Personal Four-Gas Monitors

Product Registration
Register your product online by visiting: http://www.raesystems.com/support/product-registration By registering your product, you can:
Receive notification of product upgrades or enhancements
Be alerted to Training classes in your area
Take advantage of RAE Systems special offers and promotions
© 2014 RAE Systems Inc.

|
|
|
Contents |
|
1. Standard Contents ........................................................................................................... |
5 |
|||
2. General Information........................................................................................................ |
6 |
|||
3. User Interface.................................................................................................................. |
7 |
|||
3.1. |
Display Overview................................................................................................. |
7 |
||
|
3.1.1. |
Status Indicator Icons.................................................................................... |
7 |
|
|
3.1.2. |
LCD Flip ....................................................................................................... |
8 |
|
|
3.1.3. |
Keys & Interface ........................................................................................... |
8 |
|
3.2. Screen Display For Various Numbers Of Active Sensors ................................... |
8 |
|||
3.3. |
Menus ................................................................................................................... |
9 |
||
4. Wireless Control And Submenus.................................................................................... |
9 |
|||
5. Battery........................................................................................................................... |
|
10 |
||
6. Turning The QRAE 3 On And Off ............................................................................... |
12 |
|||
7. Modes Of Operation ..................................................................................................... |
14 |
|||
8. Programming................................................................................................................. |
15 |
|||
8.1. Enter Programming In Basic Mode.................................................................... |
15 |
|||
8.2. Enter Programming In Advanced Mode ............................................................ |
17 |
|||
8.3. |
Menus And Submenus ....................................................................................... |
18 |
||
|
8.3.1. Editing And Selecting Parameters And Sensors ............................................. |
18 |
||
|
8.3.2. Calibration....................................................................................................... |
19 |
||
|
8.3.3. Measurement................................................................................................... |
21 |
||
|
8.3.4. Datalog............................................................................................................ |
24 |
||
|
8.3.5. Monitor............................................................................................................ |
25 |
||
|
8.3.6. Wireless........................................................................................................... |
27 |
||
9. Policy Enforcement....................................................................................................... |
29 |
|||
10. |
Calibration And Testing.............................................................................................. |
32 |
||
10.1. |
|
Manual Alarms Test ....................................................................................... |
32 |
|
10.2. |
|
Bump Testing And Calibration....................................................................... |
32 |
|
|
10.2.1. Bump (Functional) Testing ........................................................................... |
33 |
||
10.3. |
|
Zero Calibration.............................................................................................. |
34 |
|
|
10.3.1. Zero Calibration ............................................................................................ |
34 |
||
|
10.3.2. Single-Sensor Zero Calibration..................................................................... |
34 |
||
10.4. |
|
Span Calibration ............................................................................................. |
34 |
|
|
10.4.1. QRAE 3 Pumped Model ............................................................................... |
34 |
||
|
10.4.2. QRAE 3 Diffusion Model............................................................................. |
35 |
||
|
10.4.3 Multi-Sensor Span Calibration ...................................................................... |
36 |
||
|
10.4.4. Single-Sensor Span Calibration .................................................................... |
36 |
||
11. |
Datalog Transfer, Monitor Configuration, and Firmware Upgrades Via Computer .. |
37 |
||
12. |
Maintenance ................................................................................................................ |
38 |
||
13. |
Alarms Overview ........................................................................................................ |
40 |
||
14. |
Troubleshooting .......................................................................................................... |
44 |
||
15. |
Diagnostic Mode ......................................................................................................... |
44 |
||
16. |
Specifications .............................................................................................................. |
46 |
||
17. |
Controlled Part of the Manual for PGM-25xx/D ........................................................ |
50 |
||
18. |
Technical Support ....................................................................................................... |
61 |
||
19. |
RAE Systems Contacts ............................................................................................... |
61 |
||
WARNINGS
This Manual must be carefully read by all individuals who have or will have the responsibility of using, maintaining, or servicing this product. The product will perform as designed only if it is used, maintained, and serviced in accordance with the manufacturer’s instructions. The user should understand how to set the correct parameters and interpret the obtained results.
CAUTION!
Only use RAE Systems battery pack P/N G02-3004-000 (Li-ion, rechargeable)
Charge the instrument Li-ion battery using the appropriate RAE Systems charger and only outside hazardous areas
Use of non-RAE Systems components will void the warranty and can compromise the safe performance of this product
Warning: Substitution of components may impair intrinsic safety
SPECIAL CONDITIONS FOR SAFE USE
The PGM25xx/D multi-gas detector must be calibrated if it does not pass a bump test, when a new sensor has been installed, or at least once every 180 days, depending on use and sensor exposure to poisons and contaminants
No precautions against electrostatic discharge are necessary for portable equipment that has an enclosure made of plastic, metal or a combination of the two, except where a significant static-generating mechanism has been identified. Activities such as placing the item on a belt, operating a keypad or cleaning with a damp cloth, do not present a significant electrostatic risk. However, where a static-generating mechanism is identified, such as repeated brushing against clothing, then suitable precautions shall be taken, e.g., the use of anti-static footwear.
Note: Users are recommended to refer to ISA -RP12.13, Part II-1987 for general information on installation, operation, and maintenance of combustible gas detection instruments.
WARNINGS
ONLY THE COMBUSTIBLE GAS DETECTION PORTION OF THIS INSTRUMENT HAS BEEN ASSESSED FOR PERFORMANCE.
UNIQUMENT, LA PORTION POUR DÉTECTOR LES GAZ COMBUSTIBLES DE CET INSTRUMENT A ÉTÉ ÉVALUÉE.
1
CAUTION: BEFORE EACH DAY’S USAGE, SENSITIVITY OF THE
COMBUSTIBLE GAS SENSOR MUST BE TESTED ON A KNOWN CONCENTRATION OF METHANE GAS EQUIVALENT TO 20 TO 50% OF FULLSCALE CONCENTRATION. ACCURACY MUST BE WITHIN 0 AND +20% OF ACTUAL. ACCURACY MAY BE CORRECTED BY CALIBRATION PROCEDURE.
ATTENTION: AVANT CHAQUE UTILISATION JOURNALIERE VERIFIER LA SENSIBILITE AVEC UNE CONCENTRATION CONNUE DE METHANE EQUIVALENTE A 20-50% DE LA PLEINE ECHELLE. LA PRECISION DOIT ETRE COMPRISE ENTRE 0-20% DE LA VALEUR VRAIE ET PEUT ETRE CORRIGEE PARUNE PROCEDURE D’ETALONNAGE.
CAUTION: HIGH OFF-SCALE READINGS MAY INDICATE AN EXPLOSIVE CONCENTRATION.
ATTENTION: DES LECTURES SUPÉRIEURES A L’ÉCHELLE PEUVENT
INDIQUER DES CONCENTRATIONS EXPLOSIVES.
FCC Part 15 Statement
This device complies with Part 15 of the FCC rules. Operation is subject to the following two conditions: (1) This device may not cause harmful interference, and (2) this device must accept any interference received, including interference that may cause undesired operation.
2

Product Marking
The QRAE 3 (PGM25xx/D) is certified by IECEx, ATEX and CSA for US and Canada as intrinsically safe.
The PGM25xx/D is certified by IECEx, ATEX and CSA for US and Canada as intrinsically safe.
The PGM25xx/D contains the following marking: RAE SYSTEMS
3775 N. 1st. St., San Jose CA 95134, USA PGM25xx/D
Type PGM-25xx/ PGM-25xxD
Serial No/barcode: XXXX-XXXX-XX
IECEx XX 13.00xxX
Ex ia IIC T4 Ga (pending)
 0575
0575 II 1G SIRA 13 ATEX xxxxX
Ex ia IIC T4 Ga (pending)
12.2583152
Cl.I, Div 1, Grps A,B,C,D T4. Class I, Zone 0 AEX/Ex ia IIC T4 C22.2 No.152-M1984 ANSI/ISA-12.13.01-2000 Intrinsically safe/ Securite Intrinseque/Exia
Ambient temperature: -20ºC ≤ Tamb ≤ +50ºC Um: 20V
Battery Packs: G02-3004-000 (Li-ion rechargeable)
Warning:
Read User’s Manual for intrinsic safety precautions
Read and understand Manual before operating
3

Proper Product Disposal At End Of Life
The Waste Electrical and Electronic Equipment (WEEE) directive (2002/96/EC) is intended to promote recycling of electrical and electronic equipment and their components at end of life. This symbol (crossed-out wheeled bin) indicates separate collection of waste electrical and electronic equipment in the EU countries. This product may contain one or more Nickel-metal hydride (NiMH), Lithium-ion, or Alkaline batteries. Specific battery information is given in this user guide. Batteries must be recycled or disposed of properly.
At the end of its life, this product must undergo separate collection and recycling from general or household waste. Please use the return and collection system available in your country for the disposal of this product.
Sensor Specifications, Cross-Sensitivities, And Calibration Information
For information on sensor specifications, cross-sensitivities, and calibration information, refer to RAE Systems Technical Note TN-114: Sensor Specifications And Cross-Sensitivities (available for free download from www.raesystems.com). All specifications presented in this Technical Note reflect the performance of standalone sensors. Actual sensor characteristics may differ when the sensor is installed in different instruments. As sensor performance may change over time, specifications provided are for brand-new sensors.
Make Sure Firmware Is Up To Date
For best operation, make sure your monitor is running the latest firmware. Check www.raesystems.com for updates.
4

1. Standard Contents
The QRAE 3 is available in various user-specified configurations, each with the accessories shown below.
In addition to the instrument, the following are included:
Item |
Part Number |
|
|
Travel charger |
M02-3005-000 |
|
|
Travel charger for barrier charger (for ATEX/IECEx version) |
M02-3026-000 |
|
|
Barrier charger (for ATEX/IECEx version) |
M02-3011-000 |
|
|
AC adapter |
500-0036-102 |
|
|
External filter, 3 in package (pumped models) |
008-3022-003 |
|
|
PC cable |
410-0203-000 |
|
|
QRAE 3 CD |
M02-4008-000 |
|
|
Software CD (ProRAE Studio II) |
000-5007-001 |
|
|
QuickStart guide |
M02-4002-000 |
|
|
T calibration tube for pumped models |
M02-3008-000 |
|
|
Calibration cap for diffusion models |
M02-3009-000 |
|
|
Calibration tube for diffusion models |
M02-3010-000 |
|
|
Warranty card |
000-4008-001 |
|
|
Calibration and test certificate card |
700-0167-000 |
|
|
5
2. General Information
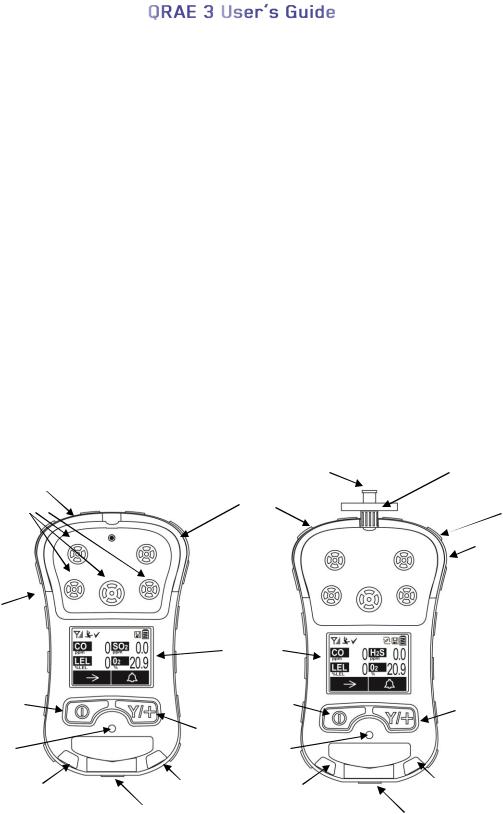
The QRAE 3 is a family of multi-threat gas detectors that combines continuous monitoring capabilities for toxic and combustible gases with Man Down Alarm functionality in one highly portable instrument. QRAE 3 monitors are available in pumped and diffusion versions and offer a selection of field-replaceable electrochemical and combustible sensors to fit a wide variety of applications. The QRAE 3’s wireless capability elevates worker protection to the next level by providing safety officers real-time access to instrument readings and alarm status from any location for better visibility and faster response.
2.1. Key Features
All-in-one continuous monitoring capabilities for oxygen, toxic and combustible gases, for a total of up to four threats at a time
Wireless access to real-time instrument readings and alarm status from any location
Unmistakable five-way local and remote wireless notification of alarm conditions, including Man Down Alarm
Large graphical display with easy-to-use, icon-driven user interface
Simple maintenance with easily accessible sensors and pump
QRAE 3 Diffusion |
QRAE 3 Pumped |
|
LEDs |
Gas inlet |
External filter |
|
|
|
Gas inlets |
LEDs |
LEDs |
|
||
|
|
Alligator clip (on back)
Alligator Clip
(on back)
|
|
Display |
|
|
MODE |
|
MODE |
Y/+ |
|
Key |
|
Key |
||
Y/+ |
Key |
|||
|
|
|||
|
|
|
||
Alarm |
Key |
Alarm |
|
|
Buzzer |
|
Buzzer |
|
|
|
|
|
||
LED |
LED |
LED |
LED |
|
|
|
|
||
|
Charging and |
|
Charging and |
|
|
Communicaion |
|
||
|
|
Communicaion |
||
|
Contacts |
|
||
|
|
Contacts |
||
|
|
|
6
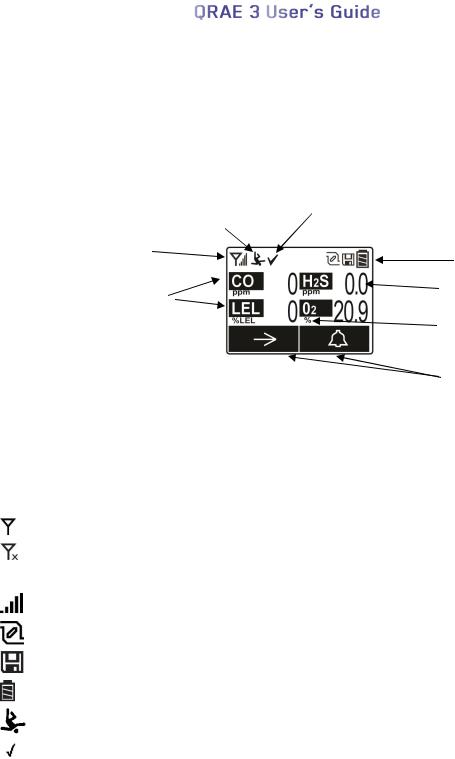
3. User Interface
The QRAE 3’s user interface consists of the display, LEDs, an alarm buzzer, and two keys.
3.1. Display Overview
The LCD display provides visual feedback that includes the sensor types, readings, battery condition, and other functions.
Calibration and bump test up to date
Man Down alarm on
Wireless radio status |
Pump, Datalog, and Battery |
|
and signal strength |
||
Status indicators |
||
|
||
Sensor type |
Reading value |
|
|
||
|
Unit of measure |
|
|
Soft keys (functions |
|
|
change by activity) |
3.1.1. Status Indicator Icons
Along the top of most screens are status indicators that tell you whether a function is operating and/or its strength or level.
Icon |
Function |
|
|
|
Wireless status: the radio is on (blinks when network connection is lost) |
|
|
|
Wireless status: the radio is off |
|
|
|
The instrument is not equipped with a radio (no icon) |
|
|
|
Wireless strength (0 to 5 bars) |
|
|
|
Pump status (only on pump-equipped models) |
|
|
|
Datalogging status (shown when datalogging is on, blank when off) |
|
|
|
Battery status (three segments show battery charge level) |
|
|
|
Man Down alarm enabled |
|
|
|
All sensors tested and calibrated tick mark (all sensors have been bump tested and |
|
calibrated; no sensor is overdue for a bump test or calibration according to the |
|
intervals configured on the instrument |
|
|
7
3.1.2. LCD Flip
The QRAE 3 senses its vertical/horizontal orientation, and can automatically flip the display180 degrees, making it easy to read if the QRAE 3 is upside down. (You can turn this feature on or off in Programming Mode, under “Monitor.”) As the QRAE 3 is tilted, the sensor detects its orientation and inverts the screen when it passes its horizontal position.
3.1.3. Keys & Interface
The QRAE 3 has two keys:
MODE Y/+
In addition to their labeled functions, the keys labeled [MODE] and [Y/+] act as “soft keys” that control different parameters and make different selections within the instrument’s menus. From menu to menu, each key controls a different parameter or makes a different selection.
Two panes along the bottom of the display are “mapped” to the keys. These change as menus change, but at all times the left pane corresponds to the [MODE] key, and the right pane corresponds to the [Y/+] key. Here are examples that show the relationships of the keys and functions:
In addition to the functions described above, either key can be used to manually activate display backlighting. Press a key when the backlighting is off to turn it on.
3.2. Screen Display For Various Numbers Of Active Sensors
The QRAE 3 family of instruments can accommodate from one to four sensors. In order to maximize readability and the amount of information shown, the display is automatically reconfigured, according to the number and types of sensors in the QRAE 3.
One sensor. |
Two sensors. |
Three sensors. |
Four sensors. |
8
3.3. Menus
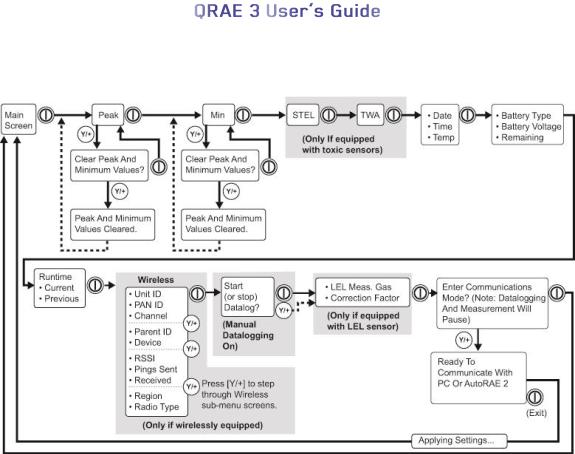
The reading menus are easy to step through by pressing the [MODE] and [Y/+] key.
4. Wireless Control And Submenus
When you step through the main menu, as shown in the previous diagram, there are four screens for wireless communication, containing information on wireless settings and status.
Note: These are only present if the QRAE 3 is equipped with a wireless module.
9

5. Battery
Always fully charge the battery before using the QRAE 3. Its Li-ion battery is charged by placing the QRAE 3 in its Travel Charger. Contacts on the bottom of the instrument meet the Travel Charger’s contact pins, transferring power.
Battery pack (P/N G02-3004-000) is used for QRAE 3.
Note: Before attaching the QRAE 3 to its Travel Charger, visually inspect the contacts to make sure they are clean. If they are not, wipe them with a soft, dry cloth. Do not use solvents or cleaners.
WARNING
To reduce the risk of ignition of hazardous atmospheres, recharge, remove or replace the battery only in an area known to be non-hazardous! Do not mix old and new batteries or batteries from different manufacturers.
Catch the lip of the Travel |
Tilt the Travel |
Click the latch |
Charger on the front of the |
Charger up |
into place |
QRAE 3 |
|
|
Next, put the plug from the power supply into the jack on the side of the Travel Charger.
Note: For ATEX/IECEx applications, plug the cord from the Barrier Box (P/N M02-3011-000) into the Travel Charger, and then plug the power adapter into the Barrier Box.
|
Barrier |
|
Box |
From Power |
|
Supply |
|
Non-ATEX/IECEx: Power supply plugged |
ATEX/IECEx: Barrier Box Between power |
directly into Travel Charger. |
supply and Travel Charger. |
Plug the other end of the charger into a power source (AC outlet or 12VDC mobile power port, depending on the model). When power is applied and the QRAE 3’s battery is charging, the LED glows red. The LED glows green when the battery is fully charged.
10
5.1. Replacing The Battery
To replace the QRAE 3 battery:
1.Remove the two screws that hold the battery compartment cover in place. Note: It is not necessary to remove the belt clip.
2.Remove the cover plate by tilting up the end closest to the belt clip and lifting off.
3.Slide the QRAE 3’s battery out of its compartment and into your hand.
4.Press a fully charged battery into the battery compartment and place it in the instrument. Pay careful attention to the direction of the battery so that the electrical contacts are on the bottom.
5.Replace the cover and tighten the two screws to secure the battery.
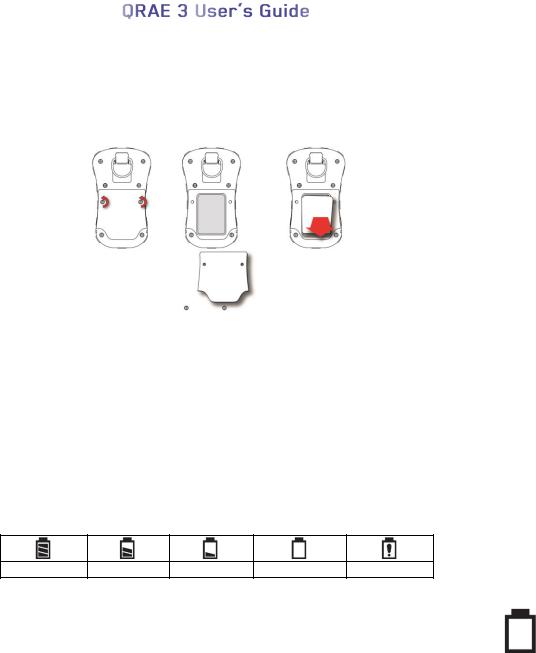
5.2.Battery States
The battery icon on the display shows how much charge is in the battery and alerts you to any charging problems.
Full charge 2/3 charge 1/3 charge Low charge Battery alert
When the battery’s charge falls below a preset voltage, the instrument warns you by beeping once and flashing once every minute, and the “empty battery” icon blinks on and off once per second. The instrument automatically powers down within 10 minutes, after which you will need to either recharge the battery, or replace it with a fully charged one.
11

6. Turning The QRAE 3 On And Off
6.1. Turning The QRAE 3 On
With the instrument turned off, press and hold the [MODE] key until the audible alarm stops, and then release.
When starting up, the QRAE 3 turns the backlight on and off, beeps once, blinks once, and vibrates once. A RAE Systems logo should appear first. During a normal startup, this is followed by a progression of screens that tell you the QRAE 3’s current settings:
Product name and model number, air flow type, and serial number
Application firmware version, build date, and build time
Installed sensors (including production/expiration/calibration date and alarm limit settings)
Current date, time, and temperature
User mode and operation mode
Battery type, voltage, shutoff voltage
Alarm mode and alarm settings
Datalog period (if it is activated) and interval
Policy Enforcement settings
Then the QRAE 3’s main reading screen appears. It takes 1 to 2 minutes for sensors to show a reading, so if any have not warmed up by the time the main screen is shown, you will see “- -” instead of a numerical value until the sensor provides data (typically less than 2 minutes). Then it displays instantaneous readings similar to the following screen (depending on the sensors installed) and is ready for use.
Note: If the battery is completely empty, then the display briefly shows the message “Battery Fully Discharged,” and the QRAE 3 shuts off. You should charge the battery or replace it with a fully charged battery before turning it on again.
IMPORTANT!
If a major error that prevents the QRAE 3 from functioning is found during startup, the message “Please Contact Service Department” is shown on the display. The instrument should be shut off and serviced.
6.2. Turning The QRAE 3 Off
Press and hold [MODE]. A 5-second countdown to shutoff begins. You must hold your finger on the key for the entire shutoff process until the QRAE 3 is powered off.
Caution: The alarm is very loud. During startup, you can mute most of the sound by holding a finger over the alarm port. Do not put tape over the alarm port to permanently mute it.
12
6.3. Testing Alarm Indicators
Under normal-operation mode and non-alarm conditions, the buzzer, vibration alarm, LED, and backlight can be tested at any time by pressing [Y/+] once.
IMPORTANT!
If any of the alarms do not respond to this test, check the Alarm Settings in Programming Mode. It is possible that any or all of the alarms have been turned off. If all of the alarms are turned on, but one or more of them (buzzer, LED lights, or vibration alarm) does not respond to this test, do not use the instrument. Contact your RAE Systems distributor for technical support.
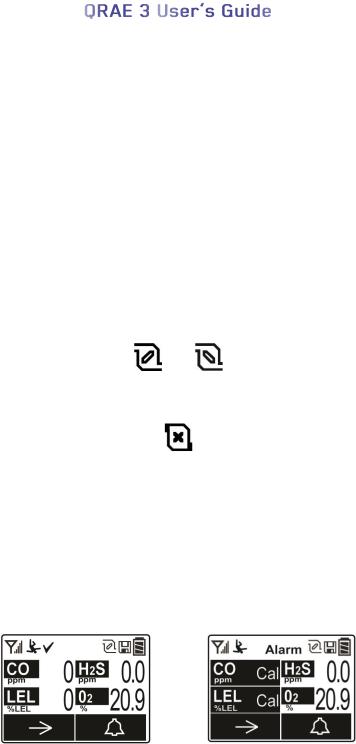
6.4. Pump Status
IMPORTANT!
During operation, make sure the probe inlet and the gas outlet are free of obstructions. Obstructions can cause premature wear on the pump, false readings, or pump stalling. During normal operation, the pump icon alternately shows inflow and outflow as shown here:
If there is a pump failure or obstruction that disrupts the pump, the alarm sounds and you see this icon blinking on and off:
Once the obstruction is removed, you can restart the pump by pressing the [Y/+] key. If the pump does not restart, and the pump stall alarm continues, consult the Troubleshooting section of this guide or contact your RAE Systems distributor for technical support.
Note: Pump Status is not indicated on diffusion QRAE 3s.
6.5. Calibration Status
If one or more sensors requires calibration, then the screen displays the word “Alarm” at the top and alternates between the sensor reading and the word “Cal” with a highlighted background:
Calibration is required if:
The sensor module has been replaced with one whose calibration is overdue.
The defined period of time between calibrations has been exceeded. (See Section 9 for information on policy enforcement.)
If you have changed the calibration gas type without recalibrating the instrument.
The sensor has failed a previous calibration.
13
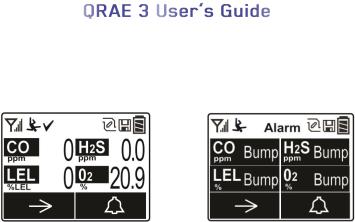
6.6. Bump Status
If one or more sensors requires a bump test, then the screen displays the word “Alarm” at the top and alternates between the sensor reading and the word “Bump” with a highlighted background:
A bump test is required if the defined period of time between bump tests has been exceeded. This interval is set by an administrator using ProRAE Studio II.
7. Modes Of Operation
The QRAE 3 has two user modes.
7.1. Basic User Mode
In Basic User Mode, some restrictions are applied, including password protection that guards against entering Programming Mode by unauthorized personnel.
7.2. Advanced User Mode
In Advanced User Mode, there are no access restrictions (you do not need a password), and the QRAE 3 provides the indications and data you need most for typical monitoring applications.
14
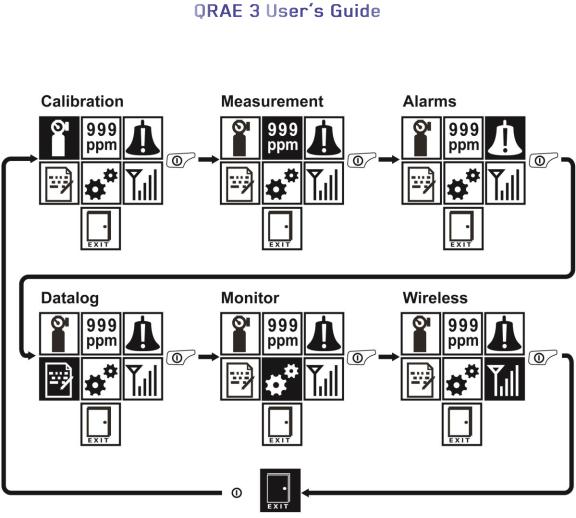
8. Programming
The menu in Programming Mode is to adjust settings, calibrate sensors, and initiate communication with a computer. It has the following submenus:
Calibration
Measurement
Alarms
Datalog
Monitor
Wireless
8.1. Enter Programming In Basic Mode
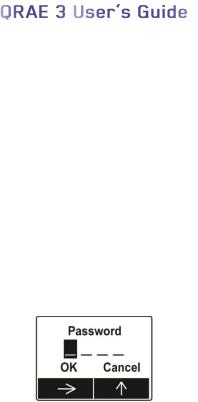
1.To enter Programming Mode, press and hold [MODE] and [Y/+] until you see the Password screen.
2.Input the 4-digit password:
Increase the number from 0 through 9 by pressing [Y/+].
Step from digit to digit using [MODE].
After inputting the password’s four digits, advance to “OK.”
Press [Y/+] to register the password and enter Programming Mode. Otherwise, advance to
“Cancel” then press “[Y/+].
If you make a mistake, you can cycle through the digits by pressing [MODE] and then using [Y/+] to change the number in each position.
Note: The default password is 0000.
Note: The password screen only appears when you enter the Programming Mode the first time after turning the instrument on in Basic Mode. If you have input the correct password, you do not have to input it again to enter Programming Mode until you turn the instrument off and on again.
15
Once you enter Programming Mode, the Calibration screen is shown. Press [MODE] to step through the programming screens.
To enter a menu and view or edit parameters in its submenus, press [Y/+].
16
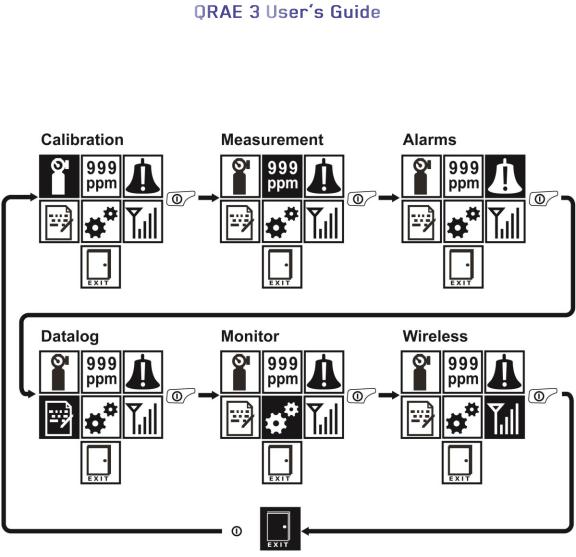
8.2. Enter Programming In Advanced Mode
1.To enter Programming Mode, press and hold [MODE] and [Y/+] until you see the Calibration screen. No password is necessary in Advanced Mode.
2.Press [MODE] to step through the programming screens.
To enter a menu and view or edit parameters in its submenus, press [Y/+].
17
8.3. Menus And Submenus
In Programming Mode, menus and submenus are organized as shown here:
|
|
|
|
|
|
Calibration |
Measurement |
Alarms |
Datalog |
Monitor |
Wireless* |
|
|
|
|
|
|
Multi Bump |
Sensor On/Off |
Alarm Limits |
Clear Datalog |
Date And Time |
Radio On/Off |
|
|
|
|
|
|
Multi Zero |
Meas. Unit |
Alarm Mode |
Interval |
Display |
PAN ID |
|
|
|
|
|
|
Multi Span |
LEL Meas. Gas |
Alarm Settings |
Sensor Selection |
Pump |
Channel |
|
|
|
|
Speed** |
|
|
|
|
|
|
|
Single Bump |
Exit |
Comfort Beep |
Data Selection |
Site ID |
Join Network |
|
|
|
|
|
|
Single Zero |
|
Man Down |
Datalog Type |
User ID |
Interval |
|
|
Alarm |
|
|
|
|
|
|
|
|
|
Single Span |
|
Exit |
Action When |
User Mode |
Off Network |
|
|
|
Full |
|
Alarm |
|
|
|
|
|
|
Set LEL Cal. |
|
|
Exit |
Zero At Start |
Factory Reset |
Gas |
|
|
|
|
|
|
|
|
|
|
|
Set Span Value |
|
|
|
Exit |
Exit |
|
|
|
|
|
|
Exit |
|
|
|
|
|
|
|
|
|
|
|
*Wirelessly equipped versions only.
**Pump-equipped version only.
8.3.1. Editing And Selecting Parameters And Sensors
There are a few basic ways to edit parameters, select sensors, and perform other activities in the QRAE 3. The actions performed by pressing keys always match 1-to-1 with the boxes along the bottom of the display and the two keys. Some parameters are edited by scrolling and selecting individual items (black bars behind white text act as highlighters).
Some include a choice via “radio keys,” where only one item in a list can be selected, while other menus use boxes for you to “check” with an “X,” and these allow for multiple items in a list to be selected. In all cases of editing, you can save or undo your choice.
18
 Loading...