

Page 1
User
Manual
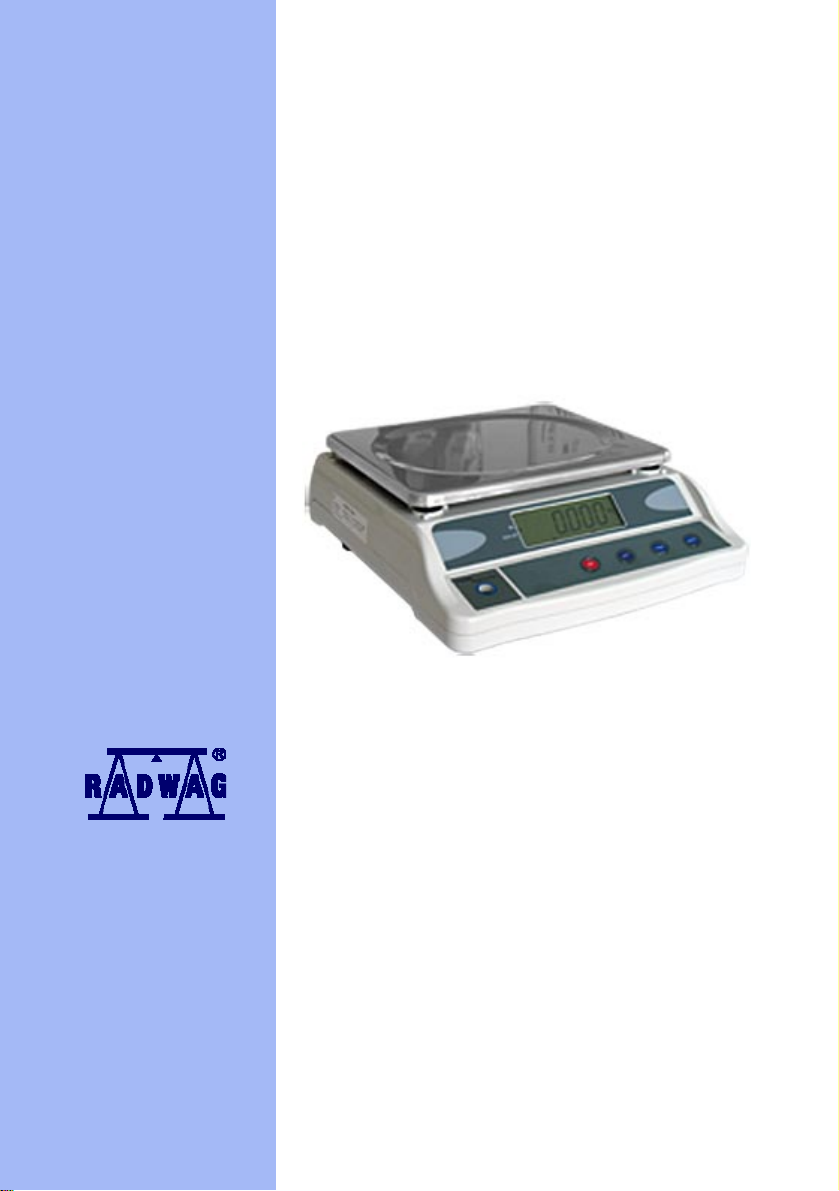
Table scales – WTC series
MANUFACTURER OF ELECTRONIC WEIGHING INSTRUMENTS
RADWAG 26 – 600 Bracka 28 street, POLAND
Radom, phone +48483848 800, phone/fax +4848 385 00 10,
Sales department +4848 366 80 06
www.radwag.com
MAY 2007
Page 2

Content
1. MAIN FUNCTIONS....................................................................................3
2. STRUCTURE............................................................................................. 4
2.1. Montage drawings ...............................................................................................4
2.2. Display window overlay .......................................................................................4
2.3. Indicators and pictograms ...................................................................................5
3. KEYS.........................................................................................................5
4. PREPARATION TO WORK...................................................................... 6
4.1. Switching on........................................................................................................6
4.2. Zeroing ................................................................................................................6
4.3. Tarring.................................................................................................................7
4.4. Switching between weighing units.......................................................................7
4.5. Warning level.......................................................................................................7
4.6. Backlight..............................................................................................................8
4.7. Battery save mode ..............................................................................................8
4.8. Filter ....................................................................................................................8
4.9. Output RS232C...................................................................................................8
4.10. Inserting digits ...................................................................................................9
5. BATTERY..................................................................................................9
6. USER RECOMMENDATIONS................................................................10
7. TECHNICAL PARAMETERS.................................................................. 10
- 2 -
Page 3

1. MAIN FUNCTIONS
• Zeroing after switch on
• Tare in whole measuring range
• Autozero
• Filter setting
• Change of measuring unit
• Battery save mode (LED)
• Low battery indication.
• Backlight operation
• Auto-switch off
• Simple calibration
• Interface RS232C.
Drawing 1. Structure F908
- 3 -
Page 4
2. STRUCTURE
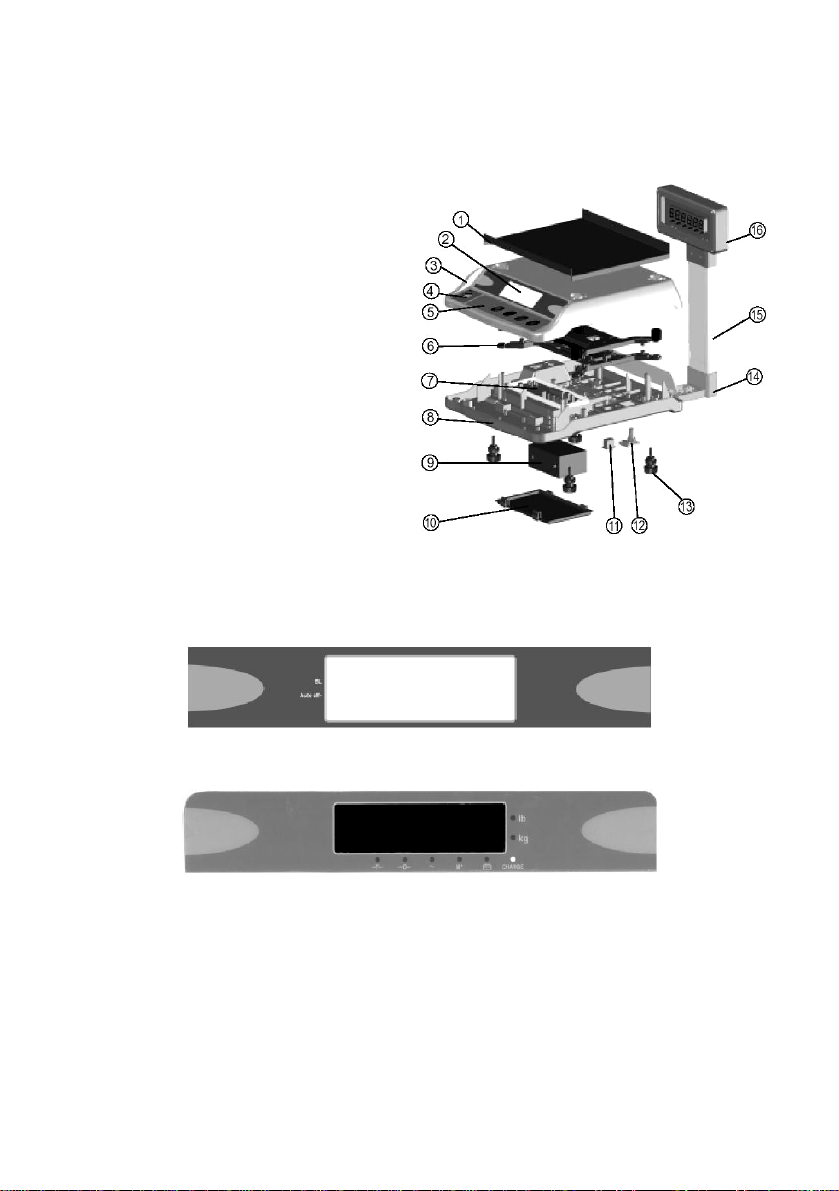
2.1. Montage drawings
1 – Weighing pan
2 – Operator display
3 – Cover layer
4 – Level
5 – Panel
6 – Load cell casing
7 – Printed PCB
8 – Base
9 – Battery
10 – Battery casing
11 – On/Off switch
12 – Power adapter socket
13 – Bearing support
14 – Pillar base
15 – Pillar
16 – Additional display
2.2. Display window overlay
DDrawing 2. Structure F908HD
Drawing 3 Display window for F908
Drawing. 4 Display window for F908HD
- 4 -
Page 5
2.3. Indicators and pictograms
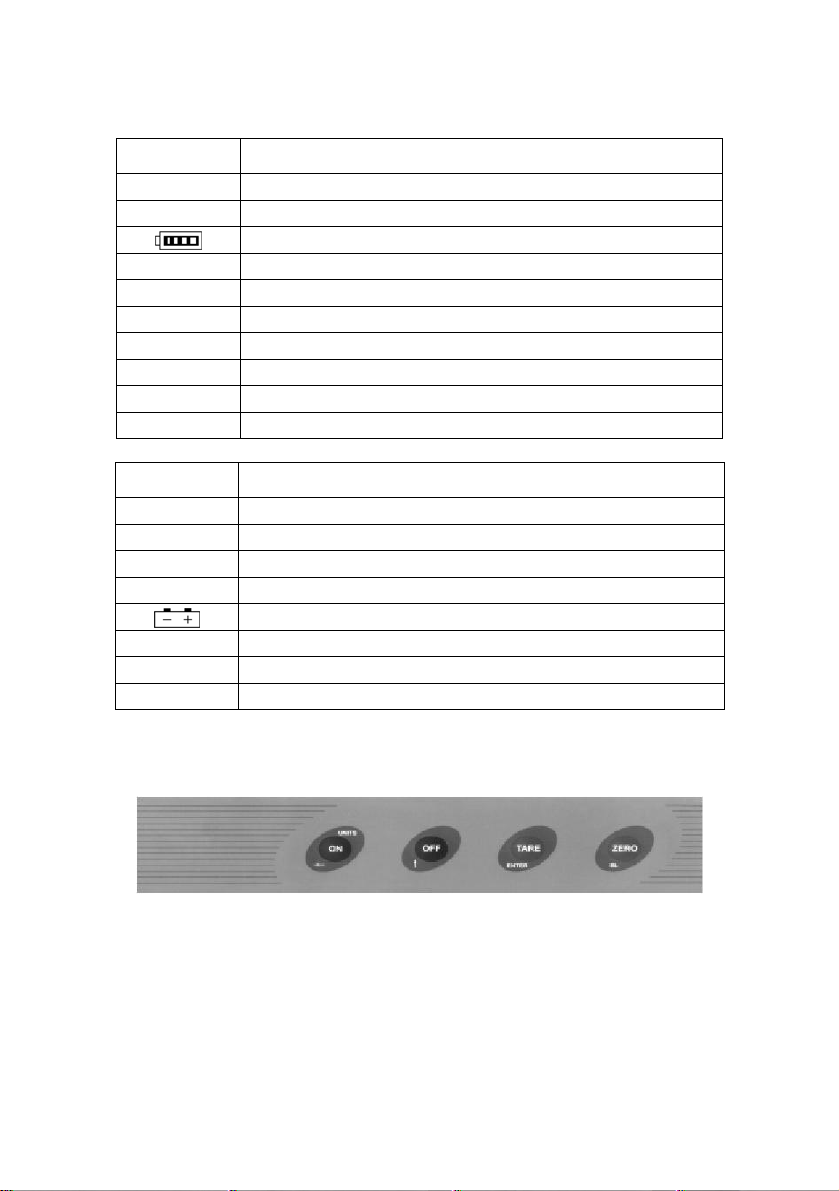
Indicator Description
→ 0 ←
Mass within ±0.25e
AC Power supply from A/C current
Low battery
lb Measuring unit – pounds
kg Measuring unit – kilograms
Auto Off Auto-switch off started
BL Backlight switched on
~ Stable measurement
G Gross mass
N Net mass
Pictogram Description
→ T ←
→ 0 ←
Tare applied
Mass within ±0.25e
AC Power supply from A/C current
~ Stable measurement
Power supply for batteries
lb Measuring unit – pounds
kg Measuring unit – kilograms
CHARGE Battery charging
3. KEYS
Drawing 5. Keys panel for scales F908
A. Button ON
- Switches on the power supply
- Switches between weighing units
- Choice of digit position in calibration mode
- 5 -
Page 6

B. Button OFF
- Switches off power supply
- Changes options in setting
- Change of digit value on each place
C. Button ZERO
- Zeroing
- Used while calibration process
- Switching off backlight function
D. Button TARE
- Tarring
- Used while calibration process
4. PREPARATION TO WORK
4.1. Switching on
1. Set bearing support, in order to level the scale.
2. In order to supply power by A/C current, plug the scale to mains. In case
D/C power supply is required, or charging the battery, switch the scale to “I”
position.
3. Press button ON, the display will show software version, backlight will be
switched on, following this, maximal capacity of the scale will be displayed
for one second. Next, the scale will move to normal weighing mode, with
indication of 0.00 on the display.
4. if indication „
battery.
4.2. Zeroing
Accessible, when pressing ZERO button takes place while the scale is in zone of
±2% of its maximal capacity.
Caution:
If marker „N” or „T” is displayed, zeroing is not accessible..
” or „ ” is visible on the display, please charge the
- 6 - - 7 -
Page 7
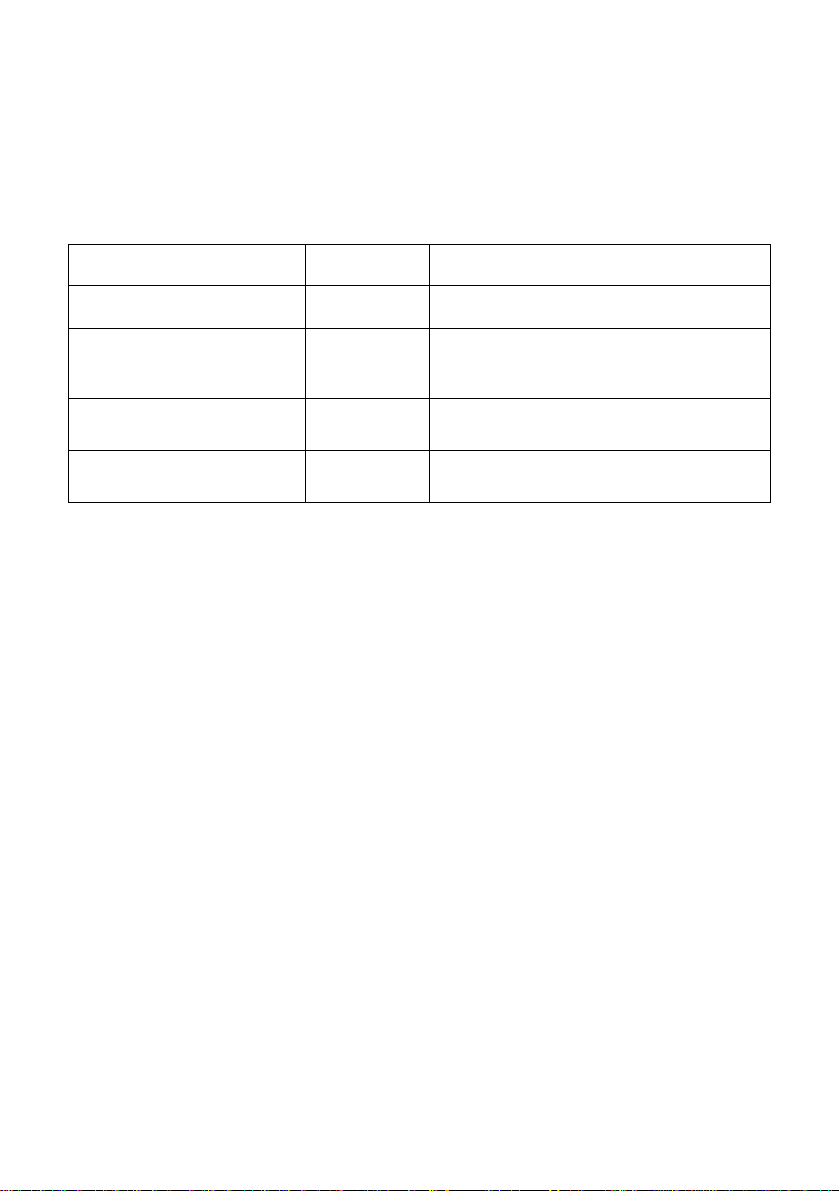
4.3. Tarring
Pressing button TARE, will cause appearance of „0” on the display. Additionally,
marker „N” or pictogram „T” will be displayed. Another pressing of TARE button, will
cancel tare value, and above mentioned indications and pictograms will no longer be
lit.
Function Indication Description
Place load on the weighing
pan
0.10 Tare value equals 0.1 kg
Press „TARE”
Take load off the weighing
pan
Press „TARE” again
0.00
-0.10
0.00
Scale is tarred. Marker „N” is visible, or
pictogram „T” is displayed.
Displays tare value with negative
(minus) sign
Result is zeroed. Tare markers
disappear.
4.4. Switching between weighing units
When function is not entered, press button „ON” in order to change measuring unit
from „kg” onto „lb”.
4.5. Warning level
1. Setting warning level.
If parameter F6 equals 1, than function of warning level can be set between 20e and
maximal weighing capacity. If while weighing, measured mass exceeds set threshold
value, scale gives beep signalization.
Caution:
Even if F8=0 (beep signal from keyboard) above function will be active.
Way of setting:
Press and hold button „ZERO” and press button „OFF”. 0000”0” will be displayed.
Insert proper value using buttons „OFF” and „ON”. Press „TARE” button to confirm
the setting. Software goes back to weighing mode.
Caution:
Set alarm value to less than 20e, so that alarm is not active.
Page 8

2. Setting overloading alarm.
Maximal value is set as (max + 9e). for scales with maximal capacity 6kg and
resolution e=1g, value of overloading alarm equals 6.009kg. Exceeding this value
causes displaying of „FULL” indication on the display and beep sound.
Caution:
Even if F8=0 (beep signal from keyboard) beep signal on exceeding maximal
capacity will not be heard.
4.6. Backlight
If backlight is switched off, press „ZERO” for three seconds so that it switches on.
Additionally, the cursor indicates on „BL” marking. When backlight is switched on,
press button „ZERO” for 3 seconds in order to switch it off.
Caution:
Independently on backlight setting, it will be switched on a second after plugging the
scale to mains.
4.7. Battery save mode
If F7 equals 1, scale will be automatically turned off after 4 minutes from stop of any
activity done on the scale (buttons, weighing). Result of this mode is equal to
pressing button „OFF” on the scale.
4.8. Filter
Parameter F3 can be set between values 1 to 3. in case of vibration or breeze
presence, filter should be set on 3. this will cause slow down of the scale operation
and obtaining result on the scale’s display (which is slower reaching stable result of
weighing process).
4.9. Output RS232C
Scale sends data in continuous transmission. Frame length is 16 characters. Frame
starts with character 02h. it is followed by status bits, space bar, 6 characters of mass
and 6 characters of tare.
Transmission is performed in 8 bits mode with 1 start bit and 1 stop bit, no parity
control.
Caution:
Speed of transmission is set for 1200 bits/s as factory setting. This speed can be
adjusted in calibration mode.
- 8 -
Page 9

4.10. Inserting digits
When inserting warning levels or while calibration, digits are inserted by buttons „×”
and „Õ”. Way of inserting digits:
- Press button „OFF” in order to move to edit mode (last digit starts flashing).
- Press button „ON”, in order to choose digit for change setting .
- pressing button „OFF”, scroll through accessible digits
0Æ1Æ2Æ3Æ4Æ5Æ6Æ7Æ8Æ9Æ0.
Instance:
Change of digit 03000 onto 12000:
• Press „OFF” in order enter edit mode. Last digit flashes - 0300”0”.
• Press „ON” three times to move to requested digit – 0”0”000
• Press „OFF” two times in order to set – 0”2”000
• Press „ON” in order to move to next digit – „0”2000
• Press „OFF” in order to set – „1”2000
• Press „TARE” in order to confirm the changes.
5. BATTERY
If low battery information is displayed, it means that power is too low for proper
operation of electronics of the scale. Battery should be charged. Using A/C power
adapter, please charge the battery. Charging can be done during operation of the
scale. If battery is not loaded while operating the scale, the electronics will be
switched off in a few minutes.
If the set is switched off just after plugging D/C power supply, it means that battery
was too low, and requires immediate charging.
If operation time on batteries got significantly shortened, open the battery casing,
disconnect its poles and replace the battery with new one.
If the scale was not used for a long period of time, please make sure the battery is
not connected.
- 9 -
Page 10
6. USER RECOMMENDATIONS
Scale should be placed on tough surface. It should not be used in dusted
area with big vibrations
while weighing please place the load on the central part of the weighing pan.
Do not use chemical agents causing corrosion
do not weigh loads which mass exceeds maximal scale capacity (including
tare value)
do not overload the weighing pan. Do not leave weighed loads on the
weighing pan for a long period of time. Do not hit the weighing pan.
if the indication does not change after placing the load or button „OFF” does
not work, while powering the scale from A/C power supply, switch the scale
off by main switch on/off button and switch it on again after a moment. This
will cause restart of the scale.
Turn off the power supply and unplug the power adapter from mains when
the scale is not operating. Not authorized access to the internal parts of the
scale is forbidden with thread of loosing warranty and verification. Contact
local sales for more information in such situation.
Re-calibration of the scale can be performed after 30 minutes heating period
of the instrument.
Caution:
Setting and calibration is not accessible directly for the user. If the user is willing to
change settings, please contact local sales or service.
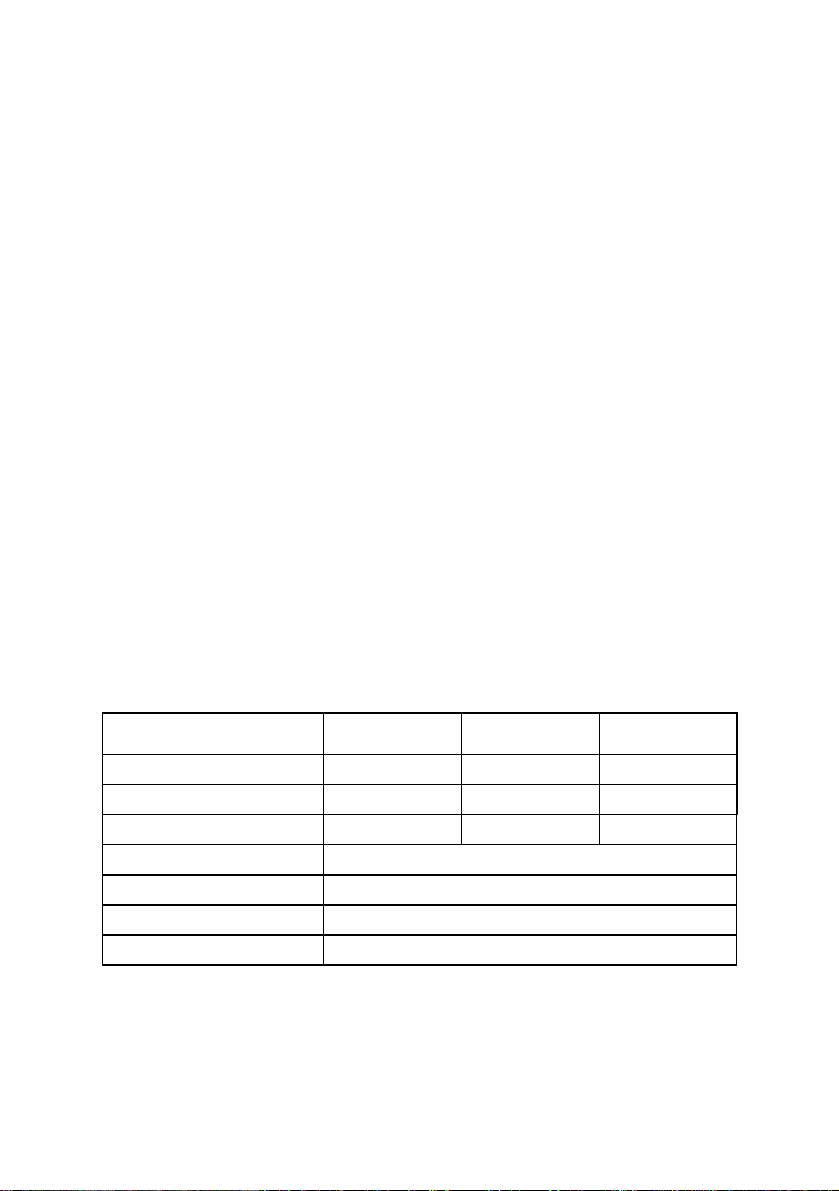
7. TECHNICAL PARAMETERS
Scale type: WTC/F 6 WTC/F 15 WTC/F 30
Maximal capacity 6 kg 15 kg 30 kg
Readability 1 g 1 g 2 g
Tare range -6 kg -15 kg -30 kg
Pan size 335×275 mm
Working temperature 0° - +40° C
Power supply 230V AC / 9V DC and batteries
Display LCD backlit
- 10 -
Page 11

MANUFACTURER
OF ELECTRONIC WEIGHING INSTRUMENTS
ZAKŁAD MECHANIKI PRECYZYJNEJ ,,RADWAG”
26 – 600 Radom, ul. Bracka 28
POLAND
+48 48 38 48 800, phone./fax. + 48 48 385 00 10
www.radwag.com
- 11 -
 Loading...