

Page 1

XMODS® Street Custom RC
Installation Difficulty: ADVANCED
Metal Bearings Upgrade Kit 60-440
Upgrade from standard plastic to metal ball bearings for reduced friction, greater precision, and better handling. Before
installing, turn off your vehicle and controller, then detach the car body.
Hint: Carefully count and set aside screws while disassembling so you can properly re-assemble later.
Upgrading the Metal Bearings for your XMODS
Use the lug wrench
1
supplied in your Starter Kit
to detach each of the lug
nuts and wheels.
Remove the screw on the
2
knuckle cap (or disk brake if
you have changed it on your
older EVO model). Carefully
unlatch the claw and pull out
the wheel shaft and knuckle
cap/disk brake.
Remove the bearings on both ends of
3
the wheel shaft. Wipe the grease off
the wheel shaft and install the metal
bearings. The grease ensures smooth
operation with the original bearings.
When you use the metal bearings,
grease is not necessary.
Align the drive shaft to the joint cup and
4
reassemble the wheel shafts with the drive shaft
installed into the knuckles. Then, replace the
knuckle caps/disk brakes and wheels. Unless you
have installed the All Wheel Drive kit, your front
wheels do not have a drive shaft/joint cup, so just
reassemble the front wheel shaft.
Take out the rear differential gear
6
unit, and replace the bearing on
both ends.
Install the differential gear
7
assembly into the rear drive
unit and insert the drive shafts
at both sides.
If you have installed the All
Wheel Drive kit, skip to Step 9.
Align the rear arm shaft to
8
their holes and replace the
rear drive unit. You might
find it easier to remove
the dampers, and reinstall
them after you attach the
rear drive unit.
If you have not installed
the All Wheel Drive kit,
this completes the procedure.
If you have installed the
9
All Wheel Drive kit:
10
Detach the center gear
and shaft and replace the
small bearing on the center
shaft with the small metal
bearing. Tweezers might
help with this step.
Place the center gear on the
center shaft. Lightly press and
rotate the center gear so the flat
side of the center shaft and the
center gear lock together.
Remove the two screws
5
that hold the rear drive
unit and detach it.
Remove the upper screw
first. Move the rear upper
arm and rear attachment
holder out of the way,
then, remove the lower
screw.
www.xmodsRC.com
11
12
Restore the center shaft and center gear into their
original positions and rotate so the front center gear
meshes with the shaft.
Align the rear arm shafts
to matching holes and
replace the rear drive unit.
You might find it easier
to remove the dampers
first. Reinstall them after
attaching the rear drive
unit.
1
Page 2
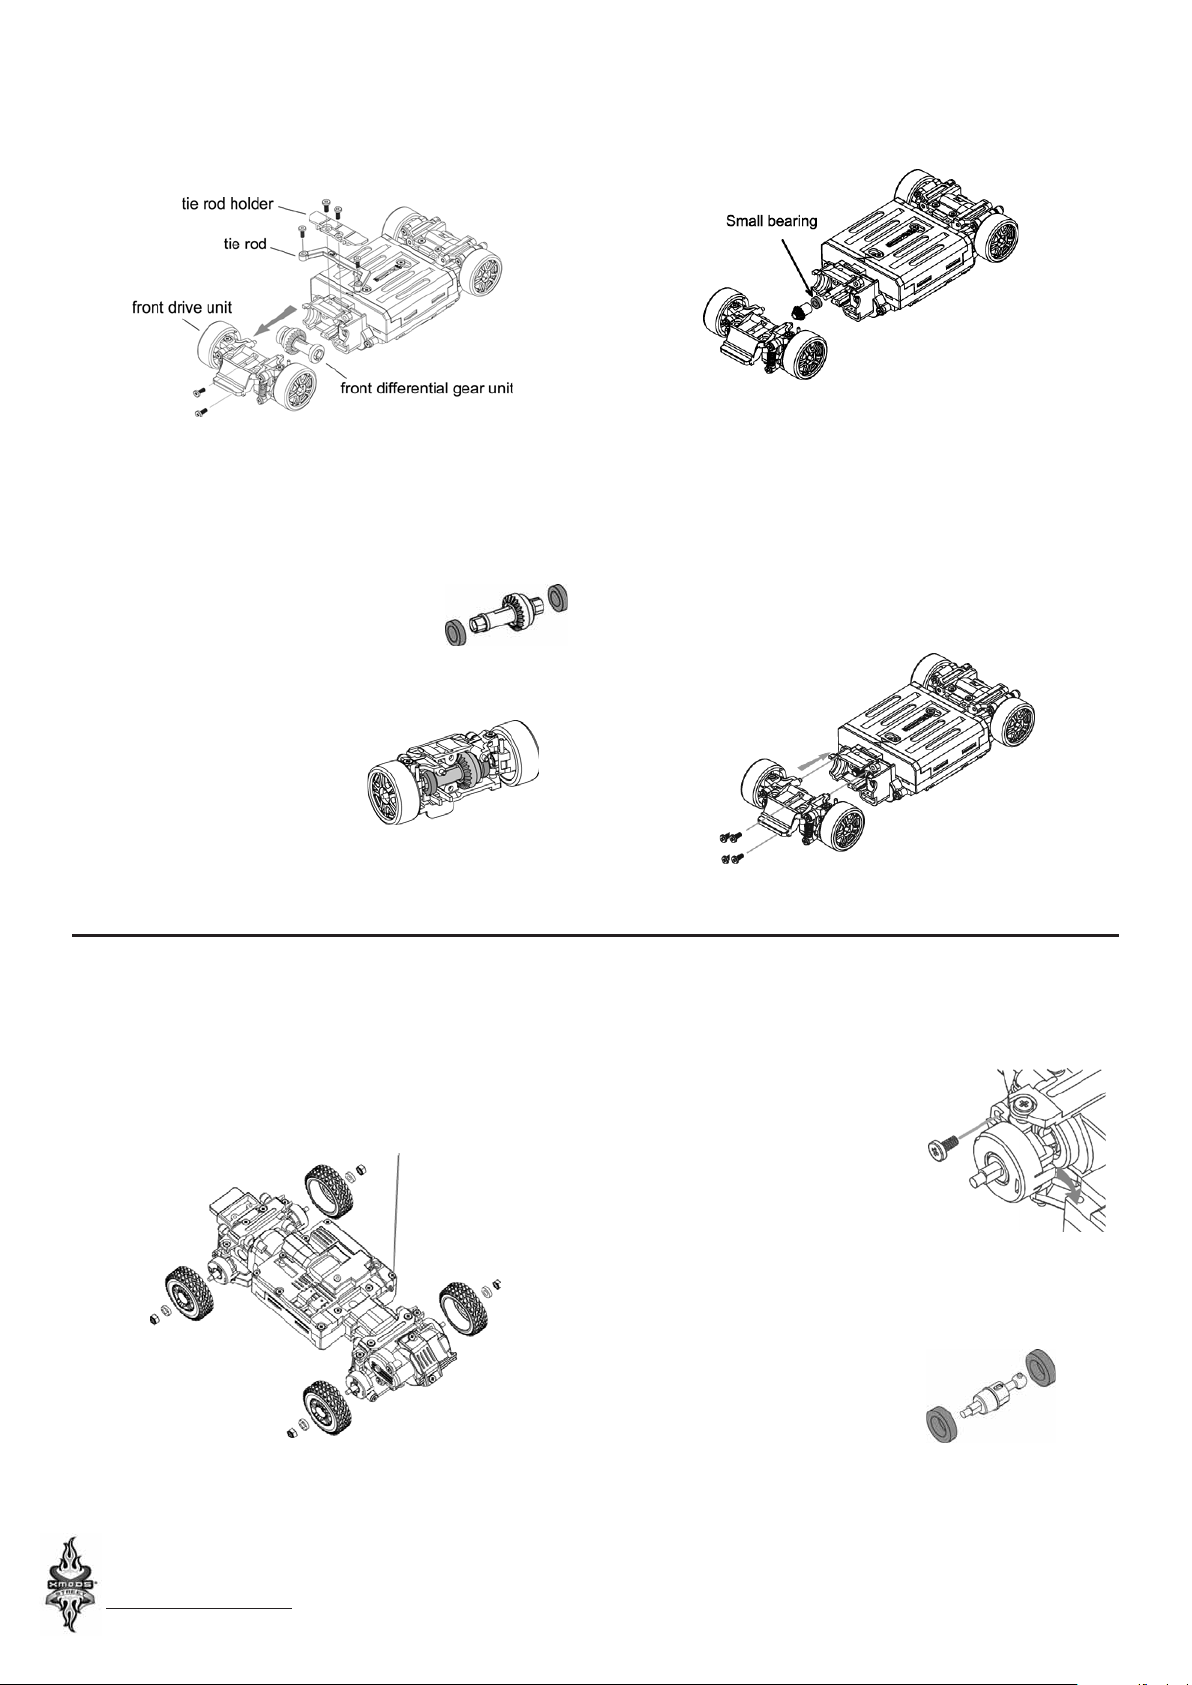
13
Loosen the two screws from the tie rod holder and
the screws on the tie rod to remove the tie rod
holder and tie rod. Loosen the two screws from the
front gear case to release the front drive unit and
detach the front gear case cover.
17
Place the center gear back onto the center shaft.
Lightly press and rotate the center gear so the flat
side of the center shaft and the center gear mesh.
14
15
16
Upgrading with Older XMODS® Truck Models
Replace the bearing on both sides of the differential
gear.
Attach the front drive shafts, as
shown in the illustration.
Detach the center gear
and the center shaft and
replace the small bearing
on the center shaft with
the new metal one.
Tweezers may be helpful
for this step.
18
19
Restore the center gear and shaft into their original
positions and rotate center gear so the rear center
gear meshes with the shaft.
Align the front arm shafts with the proper holes,
then attach the front drive unit—with differential
gear installed—to the chassis. Replace the tie rod
and tie rod holder.
Use the lug wrench supplied in your Starter Kit to
1
detach the lug nuts and wheels.
www.xmodsRC.com
Loosen and remove the
2
screw on the knuckle cap
(or disk brake if you have
changed it). Carefully
unlatch the claw on the
knuckle cap and pull out the
wheel shaft along with the
knuckle cap.
Remove the bearings on
3
both ends of the wheel
shaft. Wipe the grease off
the wheel shaft and install
the metal bearings. The
grease ensures smooth
operation with the original
bearings. When you use the metal bearings, grease
is not necessary.
2
Page 3

Align the drive shaft to the joint cup and
4
reassemble the wheel shafts with the drive shaft
installed into the knuckles. Then, replace the
knuckle caps/disk brakes and wheels. Unless you
have installed the All Wheel Drive kit, your front
wheels do not have a drive shaft/joint cup, so just
reassemble the front wheel shaft.
Remove the two screws on the motor connector
5
and the two screws on the motor cover and detach
the motor.
10
Re-assemble the motor, the motor holder, and the
motor connector. If you have NOT installed the
All Wheel Drive kit, this completes the upgrade.
Remove the two screws on the rear drive unit
6
to remove the rear gear case. Then, remove the
differential gear and the third gear.
Replace the bearing on its both ends of the
7
differential gear. If you have installed the All
Wheel Drive kit, skip to Step 11.
11
12
13
If you have installed the All Wheel Drive kit:
Remove the center gear and the center shaft and
replace the small bearing. Tweezers may be helpful
for this step.
Place the center gear back on
the center shaft. Lightly press
and rotate the center gear so the
flat side of the center shaft and
the center gear mesh.
Restore the center shaft with center gear into the
original position and rotate center gear so the front
center gear meshes with the shaft.
Align the drive shaft and restore the rear differential
8
gear unit as shown.
Align the shafts of the rear arms and re-assemble
9
the rear gear case.
www.xmodsRC.com
14
15
Reinstall the third gear, then align the drive shafts
and restore the rear differential gear unit as shown.
Align the shafts of the rear arms and reassemble
the rear gear case.
3
Page 4

16
Reassemble the motor and the motor holder. Route
the wire through the strain relief hook on the left
side.
20
Reattach the center gear to the center shaft. Lightly
press and rotate the center gear so the flat side of
the center shaft and the center gear mesh.
17
18
Remove two screws each from the tie rod holder
and the tie rod, then remove one screw to detach
the mud guard.
Tie rod holder
Tie rod
Mud guard
Remove the three screws on front gear case to
detach it.
21
22
23
Restore the center shaft with center gear to their
original positions, and rotate the center gear so the
rear center gear meshes with the shaft.
Take out the front differential gear unit and replace
the bearings on both sides of the gear.
Restore the front differential gear unit as shown in
the illustration.
24
Front gear case screws
19
Remove the front center
gear and the center shaft
and take out the small
bearing. Tweezers may be
helpful for this step.
25
Limited Warranty
This product is warranted by RadioShack against manufacturing defects in material and workmanship under normal use for ninety (90) days from the date of purchase from RadioShack company-owned stores and
authorized RadioShack franchisees and dealers. EXCEPT AS PROVIDED HEREIN, RadioShack MAKES NO EXPRESS WARRANTIES AND ANY IMPLIED WARRANTIES, INCLUDING THOSE OF MERCHANTABILITY
AND FITNESS FOR A PARTICULAR PURPOSE, ARE LIMITED IN DURATION TO THE DURATION OF THE WRITTEN LIMITED WARRANTIES CONTAINED HEREIN. EXCEPT AS PROVIDED HEREIN, RadioShack
SHALL HAVE NO LIABILITY OR RESPONSIBILITY TO CUSTOMER OR ANY OTHER PERSON OR ENTITY WITH RESPECT TO ANY LIABILITY, LOSS OR DAMAGE CAUSED DIRECTLY OR INDIRECTLY BY USE OR
PERFORMANCE OF THE PRODUCT OR ARISING OUT OF ANY BREACH OF THIS WARRANTY, INCLUDING, BUT NOT LIMITED TO, ANY DAMAGES RESULTING FROM INCONVENIENCE, LOSS OF TIME, DATA,
PROPERTY, REVENUE, OR PROFIT OR ANY INDIRECT, SPECIAL, INCIDENTAL, OR CONSEQUENTIAL DAMAGES, EVEN IF RadioShack HAS BEEN ADVISED OF THE POSSIBILITY OF SUCH DAMAGES.
Some states do not allow limitations on how long an implied warranty lasts or the exclusion or limitation of incidental or consequential damages, so the above limitations or exclusions may not apply to you.
In the event of a product defect during the warranty period, take the product and the RadioShack sales receipt as proof of purchase date to any RadioShack store. RadioShack will, at its option, unless otherwise
provided by law: (a) correct the defect by product repair without charge for parts and labor; (b) replace the product with one of the same or similar design; or (c) refund the purchase price. All replaced parts and
products, and products on which a refund is made, become the property of RadioShack. New or reconditioned parts and products may be used in the performance of warranty service. Repaired or replaced parts
and products are warranted for the remainder of the original warranty period. You will be charged for repair or replacement of the product made after the expiration of the warranty period.
This warranty does not cover: (a) damage or failure caused by or attributable to acts of God, abuse, accident, misuse, improper or abnormal usage, failure to follow instructions, improper installation or maintenance,
alteration, lightning or other incidence of excess voltage or current; (b) any repairs other than those provided by a RadioShack Authorized Service Facility; (c) consumables such as fuses or batteries; (d) cosmetic
damage; (e) transportation, shipping or insurance costs; or (f) costs of product removal, installation, set-up service adjustment or reinstallation.
This warranty gives you specific legal rights, and you may also have other rights which vary from state to state.
RadioShack Customer Relations
300 RadioShack Circle, Fort Worth, TX 76102 12/99
Align the front arm shafts to the proper holes and
reassemble the front gear case.
Reassemble the tie rod and tie rod holder, and then
the mud guard.
©2008 RadioShack Corporation. All Rights Reserved.
RadioShack and RadioShack.com are trademarks used by RadioShack Corporation.
www.xmodsRC.com
60-440
07A08
INS-3362-US-08
Printed in China
 Loading...