

43-725.fm Page 1 Tuesday, February 23, 1999 2:47 PM
900MHz Cordless Speakerphone
Cat. No. 43-725
OWNER’S MANUAL
Please read before using this equipment.
TAD-725
Digital Answering System
43-725.fm Page 2 Tuesday, February 23, 1999 2:47 PM
WARNING
: To reduce the risk of
fire or shock hazard, do not expose this product to rain or moisture.
CAUTION
RISK OF ELECTRIC SHOCK.
DO NOT OPEN.
CAUTION
ELECTRIC SHOCK, DO NOT REMOVE
COVER OR BACK. NO USER-SERVICEABLE PARTS INSIDE. REFER SERVICING TO QUALIFIE D PERSONNEL .
!
: TO REDUCE THE RISK OF
This symbol is intended to alert you to
the presence of uninsulated dangerous voltage within the product’s enclosure that might be of sufficient
magnitude to constitute a risk of electric shock. Do not open the product’s
case.
This symbol is intended to inform you
that important operating and maintenance instructions are included in the
literature accompanying this product.
Important:
Cordless phones such as
this one require AC power to operate.
When the AC power is off, you cannot
make or receive calls using your TAD-
725. To be safe, you should also have a
phone that does not need AC power t o
operate (not a cordless phone) so you
!
can still make and rec eive calls if there
is an AC power failure.
This telephone has been tested and
complies with all applicable FCC standards.
© 1999 Tandy Corporation.
COM-LOK and RadioShack are registered trademarks used by Tandy Corporation.
All Rights Reserved.
2

43-725.fm Page 3 Tuesday, February 23, 1999 2:47 PM
FEATURES
Your RadioShack TAD-725 Digital Answering System combines a 900MHz
cordless telephone unit and a digital
TAD (Telephone Answering Device).
The 900 MHz band means less interfer ence, clearer sound, and greater range
than 46/49 MHz cordless telephones.
The TAD stores up to 14 minutes of
messages on a computer chip and
records each message’s day and time.
This gives you advanced capabilities
over tape-based answering machines:
• You can delete individual mess ages
and save the rest.
• There are no tapes to bother with
and no tape mechanisms to wear
out.
The remote operation feature lets you
operate your TAD from a touch-tone
phone (or from a rotary phone with a
pocket tone dialer).
Super CCT Noise-Reduction Circuitry
— provides clear telephone conversations, giving yo u sound clarity c omparable to that of a corded phone.
Ringer Volume Control
— lets you select from four ringer tone/volume settings.
Volume Controls
— let you adjust the
volume you hear through the handset
and speakerphone.
Long Battery Life
— the supplied b attery pack (when fully char ged) provides
about 7
hours of talk time or 7 days of
standby time.
Security Access-Protection Code
—
helps preven t other cordless phone u sers from using you r phon e line wh ile th e
handset is off the base.
®
COM-LOK
— ensures that other cordless phone users cannot use your phone
line when the handset is on the base.
Telephone Features
10 Number Memory Dialing
you store 10 numbers ( 3 one-touch and
7 speed-dial) in memory for easy dialing.
— lets you send a paging sign al
Page
from the base to the handset to page
someone or locate the handset if you
misplace it.
40 Channels
— auto matical ly selec ts a
clear channel when you make or answer
a call. You can also manually change
channels during a call.
— lets
Tone/Pulse Dialing
— lets you use either type of servic e, and you can easily
switch from pulse to tone dialing for
long-distance, bank-by-phone, or other
special services.
3

43-725.fm Page 4 Tuesday, February 23, 1999 2:47 PM
TAD Features
Day/Time Stamp
and time each message was recorded.
Two Pre-recorded Mes sages
you the option of using one of two prerecorded outgoing m essages or record ing your own.
Announcement Only
an announcement for callers to hear,
without recording their messages.
Message Counter
ber of messages the TAD has recorded.
Programmable PIN
two-digit personal identification number
(PIN) for secure remote operation.
Call Screening
caller leaves a message so you can de cide whether or not to answer the call.
— records the day
— gives
— lets you play
— shows the num-
— you can set a
— lets you listen as a
Digital Volume Control
— lets you precisely adjust the speakerphone and
message playback.
Memo Recording
— lets you leave
messages for yoursel f or others in your
home or office. You can also record your
phone conversation.
Phone Pick-Up Detection
— stops recording when you pi ck up any p hone on
the same line as the T AD, and res ets to
answer the next call.
Adjustable Ring Number
— lets you
set the TAD to answer af ter th re e o r fiv e
rings.
Toll-Saver
— lets you avoid unnecessary charges when you call by long
distance to check your messages.
4

43-725.fm Page 5 Tuesday, February 23, 1999 2:47 PM
READ THIS BEFORE
INSTALLATION
We have designed your phone to conform to federal regulations, and you can
connect it to most telep hone li nes. How ever, each device that you connect to
the phone line draws power from the
phone line. We refer to this p ower draw
as the device’s
ber
, or REN. The REN is on the bottom
of the base.
If you are using more than o ne ph one o r
other device on the li ne, add up all the
RENs. If the total is more than five (three
in rural areas), your phones might not
ring. If ringer ope ration is impaired, remove a device from the line.
ringer equivalen ce num-
FCC STATEMENT
Your TAD-725 complies with Par t 68 of
FCC Rules
provide the FCC registration number
and the REN to your phone company.
These numbers are on the bottom of the
base.
You must not connect your phone to any
of the following:
• coin-operated systems
• party-line systems
• most electronic key phone systems
Note:
dard radio frequencies, as allocated by
the FCC. Even though the security
access-protection code prevents unauthorized use of your phone line, it is possible for other radio units operating on
similar frequencie s within a certain are a
to unintentionall y intercept your conv ersations and/or cause interference. This
lack of privacy can occur with any cordless phone.
. You must, upon request,
Your telephone oper ates on st an-
5

43-725.fm Page 6 Tuesday, February 23, 1999 2:47 PM
CONTENTS
Installation ............................................................................................................... 8
Mounting the Phone ........................................................................................... 8
On a Desk Top ............................................................................................. 8
On a Wall Plate or Wall ................................................................................ 9
Connecting and Charging the Battery Pack ..................................................... 10
Setting the Dialing Mode .................................................................................. 11
Turning the Base’s Ringer On and Off .............................................................. 12
Setting the Ringer Tone/Volume ....................................................................... 12
Setting the Number of Rings ............................................................................ 13
Setting the Day/Time ........................................................................................ 13
Telephone Operation ............................................................................................ 15
Making and Receiving Calls with the Handset ................................................. 15
Selecting the Channel ...................................................................................... 15
Setting the Handset Volume ............................................................................. 15
Answering Calls with the Speakerphone .......................................................... 15
Switching Between the Handset and Speakerphone ....................................... 16
Using Both the Handset and Speakerphone .................................................... 16
FLASH
REDIAL
................................... ...... ....... ...... ....... ...... ....... ...... ..................... 16
................................................................................................... 17
Using
Using
Using Tone Services on a Pulse Line ............................................................... 17
Paging .............................................................................................................. 17
Memory Dialing ................................................................................................. 18
Storing a Number in Memory ..................................................................... 18
Entering a Pause ....................................................................................... 19
Dialing a Memory Number ......................................................................... 19
Chain-Dialing Service Numbers ................................................................. 19
Testing Stored Emergency Numbers ......................................................... 19
Using a Headset ............................................................................................... 19
TAD Operation ....................................................................................................... 21
Selecting the Outgoing Message ...................................................................... 21
Recording/Deleting an Outgoing Message ....................................................... 21
Setting the Record Time ................................................................................... 21
Setting the TAD to Answer Calls ...................................................................... 22
Screening Calls ................................................................................................ 22
Recording Incoming Messages ........................................................................ 22
Recording a Memo ........................................................................................... 22
Recording a Conversation ................................................................................ 23
Playing Messages ............................................................................................ 23
Adjusting the TAD’s Volume ............................................................................. 24
6

43-725.fm Page 7 Tuesday, February 23, 1999 2:47 PM
Deleting Messages ........................................................................................... 24
Setting the Remote Operation PIN ................................................................... 24
Remote Operation .... ...... ...... .............................................. .............................. 25
Using the Toll-Saver ......................................................................................... 25
Using Remote Commands ............................................................................... 25
Troubleshooting ...................................................................... ................... ........... 27
Care and Maintenance .......................................................................................... 29
Replacing the Battery Pack .............................................................................. 30
The FCC Wants You to Know ........................................................................... 31
Lightning ......................... ................................ ................................. ................. 31
7
43-725.fm Page 8 Tuesday, February 23, 1999 2:47 PM
INSTALLATION
MOUNTING THE PHONE
You can place the T AD-72 5’s bas e on a
desk or table, mount it on a standard
wall plate, or mount it direc tly on a wall.
Choose a location that is:
• near an AC outlet
• near a modular telephone line jack
• out of the way of normal activities
• away from electrical machinery,
electrical applianc es, metal walls or
filing cabinets, wireless intercoms,
alarms, and room monitors
• away from other cordless phones
The base’s loca tion affects the phone’s
range. If you have a choice of several locations, try each to see which provides
the best performance.
Caution:
!
power source that supplies 9
volts DC and delivers at least 350 mA.
Its center tip must be set to positive and
its plug must fit t he TAD-725's
jack. The supplied AC adapter meets
these specifications. Using an adapter
that does not mee t these specifications
could damage the TAD-725 or the
adapter.
You must use a Cla ss 2
DC IN 9V
store. Or, you can let the phone
company update the wiring for you.
• The USOC number of th e jack to be
installed is RJ11C (RJ11W for a wall
plate).
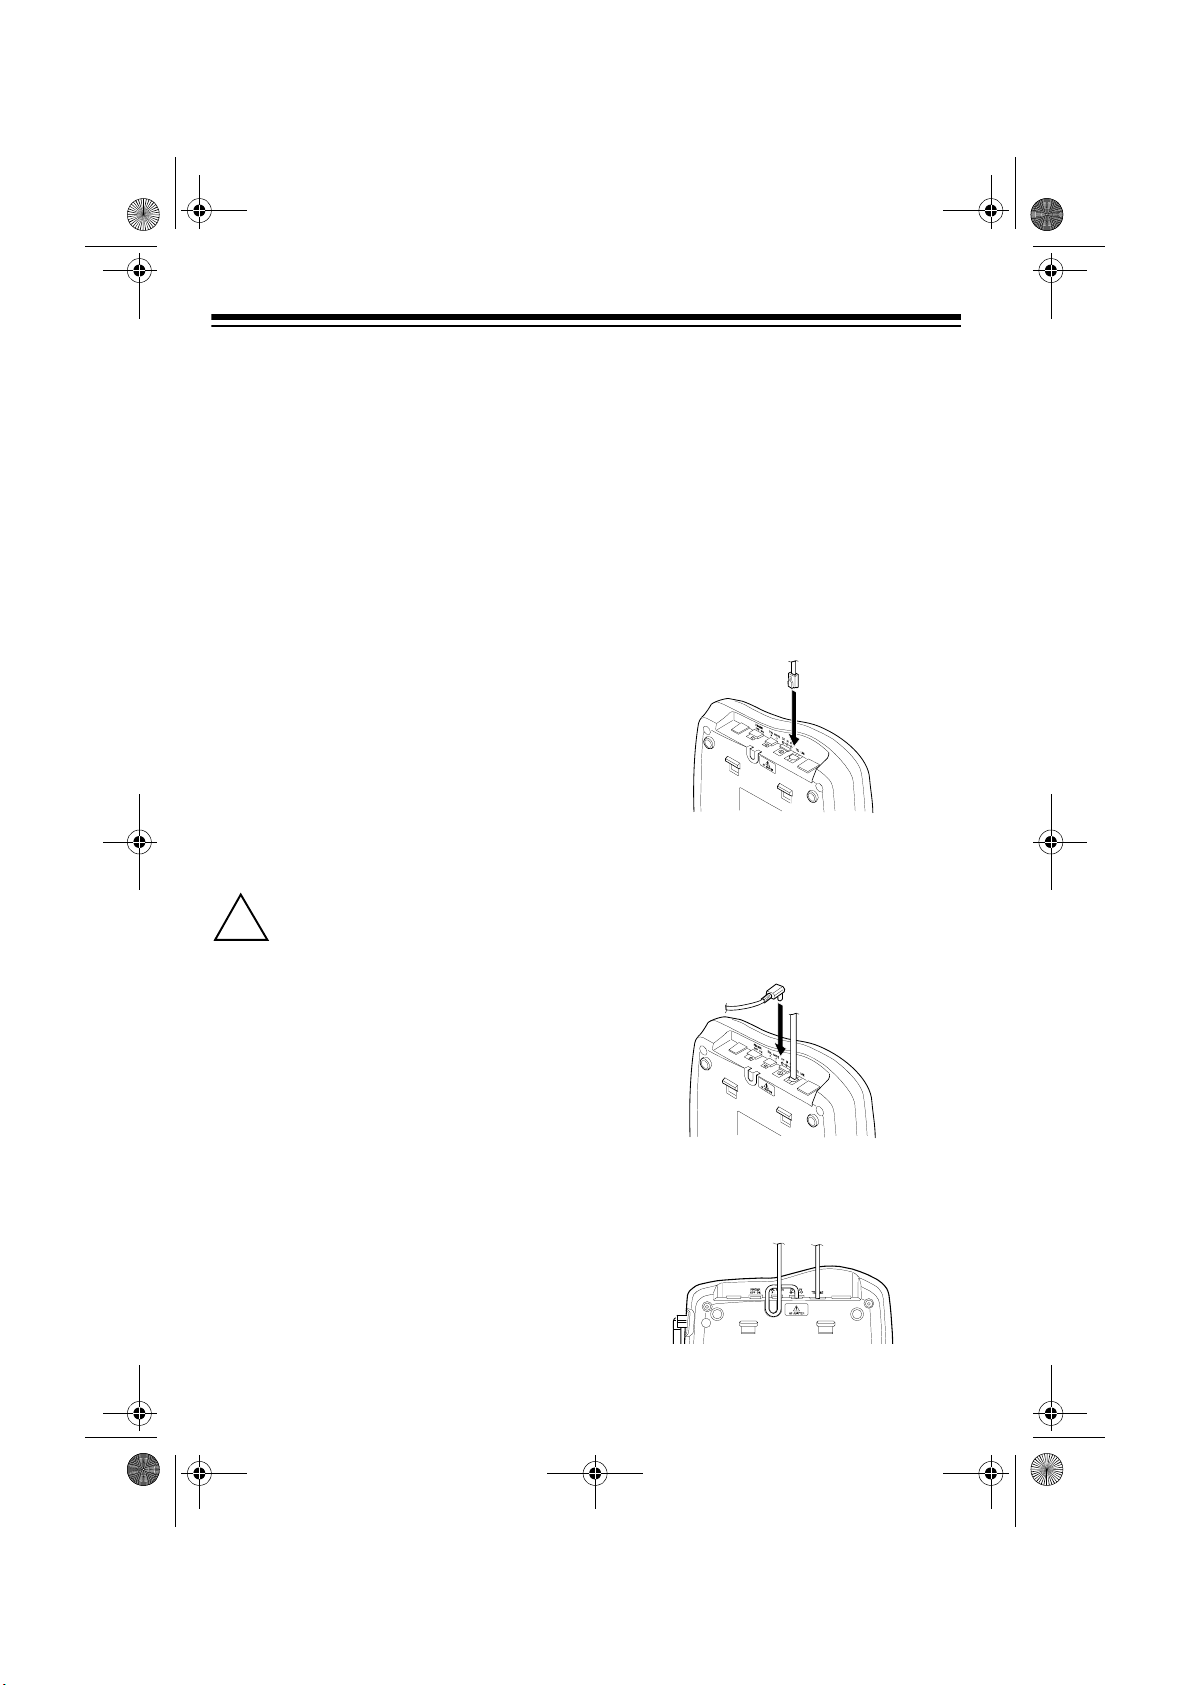
On a Desk Top
1. Plug one end of the supplied long
modular cord into the
on the back of the base.
2. Plug the modular cord’s other end
into a modular telephone line jack.
3. Insert the supplied AC adapter’s
barrel plug into the
the back of the base.
TEL LINE
DC IN 9V
jack on
jack
Notes:
8
• Your telephone connects di rectly to
a modular telephone line jack. If
your phone line jack is not a m odular jack, you can update the wiring
yourself, using jacks and adapters
available at your local RadioShack
4. Route the adapter’s cord through
the strain relief slot on the bot tom of
the base.
43-725.fm Page 9 Tuesday, February 23, 1999 2:47 PM
5. Plug the adapter into a s tandard AC
outlet.
6. Lift the base’s antenna to a vertical
position.
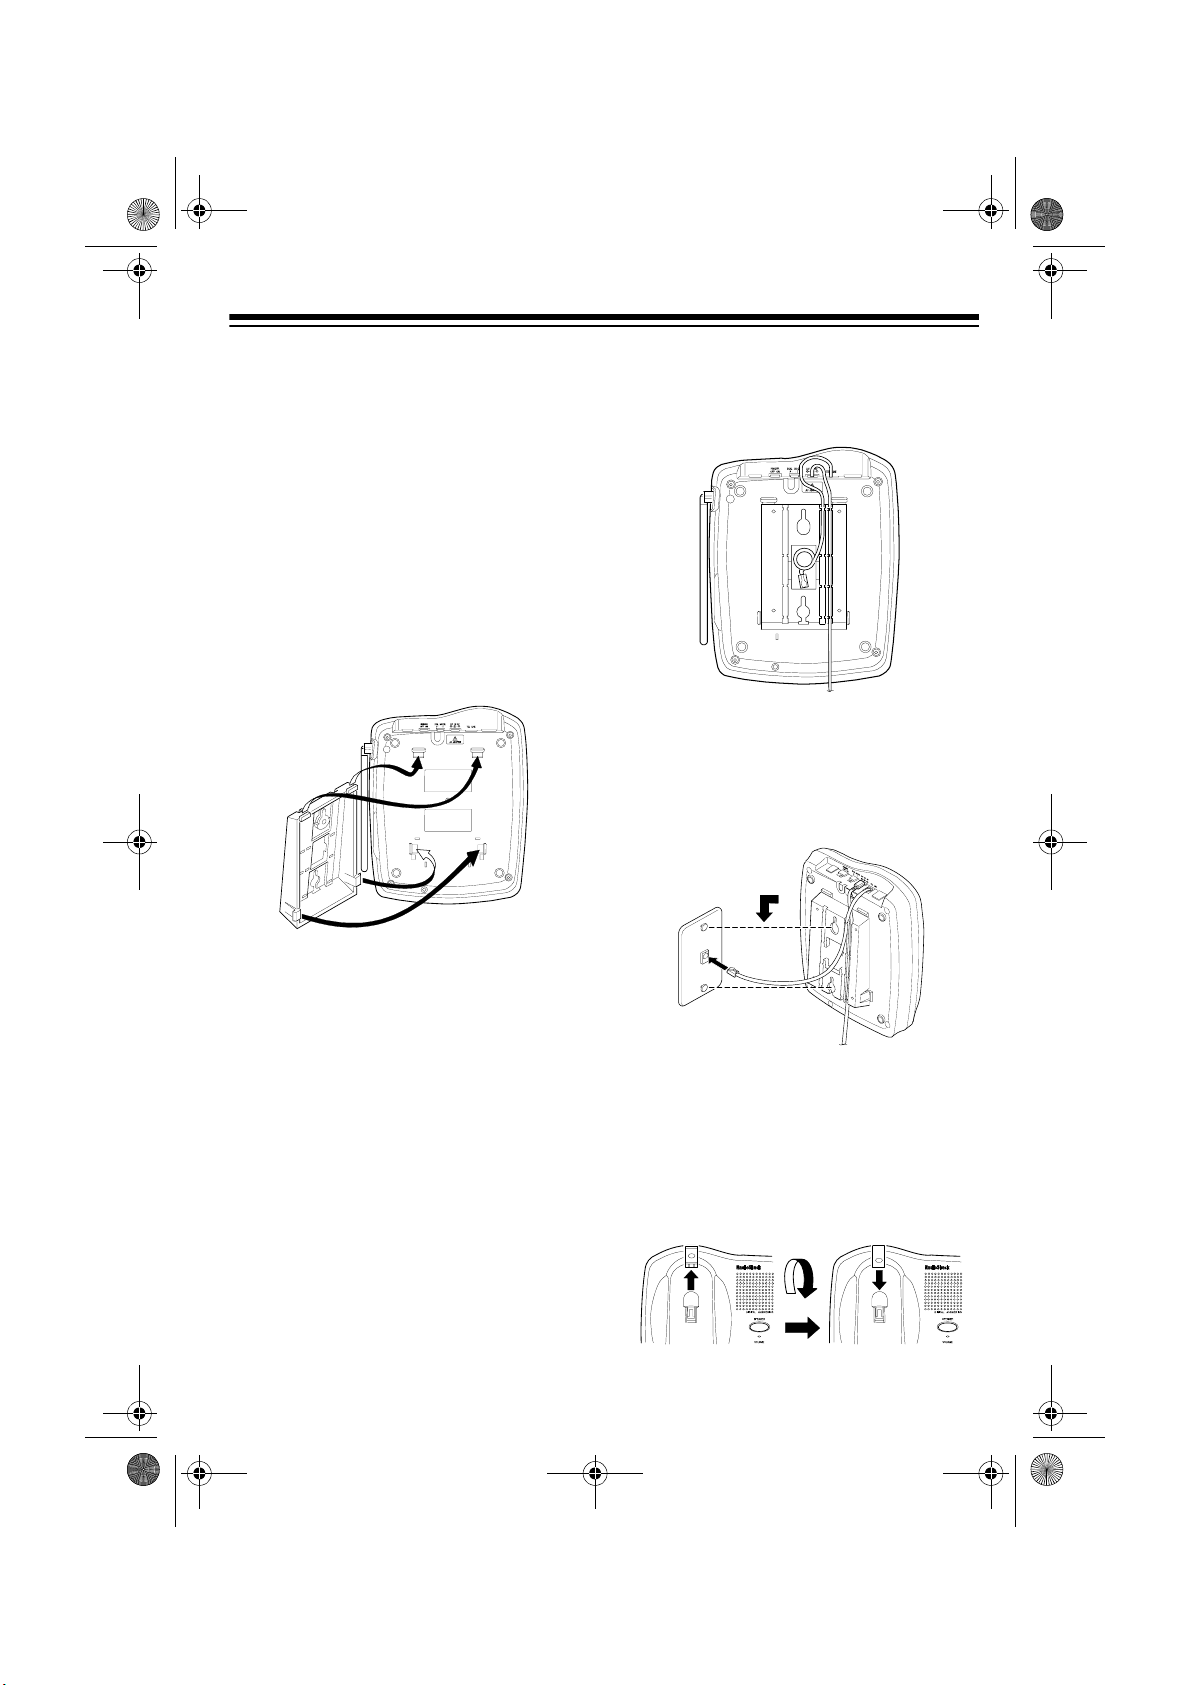
On a Wall Plate or Wall
1. Insert the two tabs at the top of the
narrow end of the supplied bracket
into the base’s upper tab slots as
shown, then press down on the
bracket’s latches and in ser t t hem into the lower slots.
4. Route the adapter and modular
cords through the grooves on the
bracket.
5. Plug the modular cord’s other end
into the wall plate jack, then align
the bracket’s ke yhole slots with the
wall plate studs and slide the base
downward to secure it.
2. Plug one end of the supplied short
modular cord in to the
TEL LINE
jack
on the back of the base as in “On a
Desk Top,” Step 1, on Page 8.
3. Insert the supplied AC adapter’s
barrel plug into t he
DC IN 9V
jack as
in “On a Desk Top,” Step 3, on Page
8.
6. Plug the adapter in to a s tandar d AC
outlet.
7. Press and lift out the handset holder, flip it over as shown, then snap it
back into place so it holds the handset.
9
100
8
43-725.fm Page 10 Tuesday, February 23, 1999 2:47 PM
8. Lift the base’s antenna to a vertical
position.
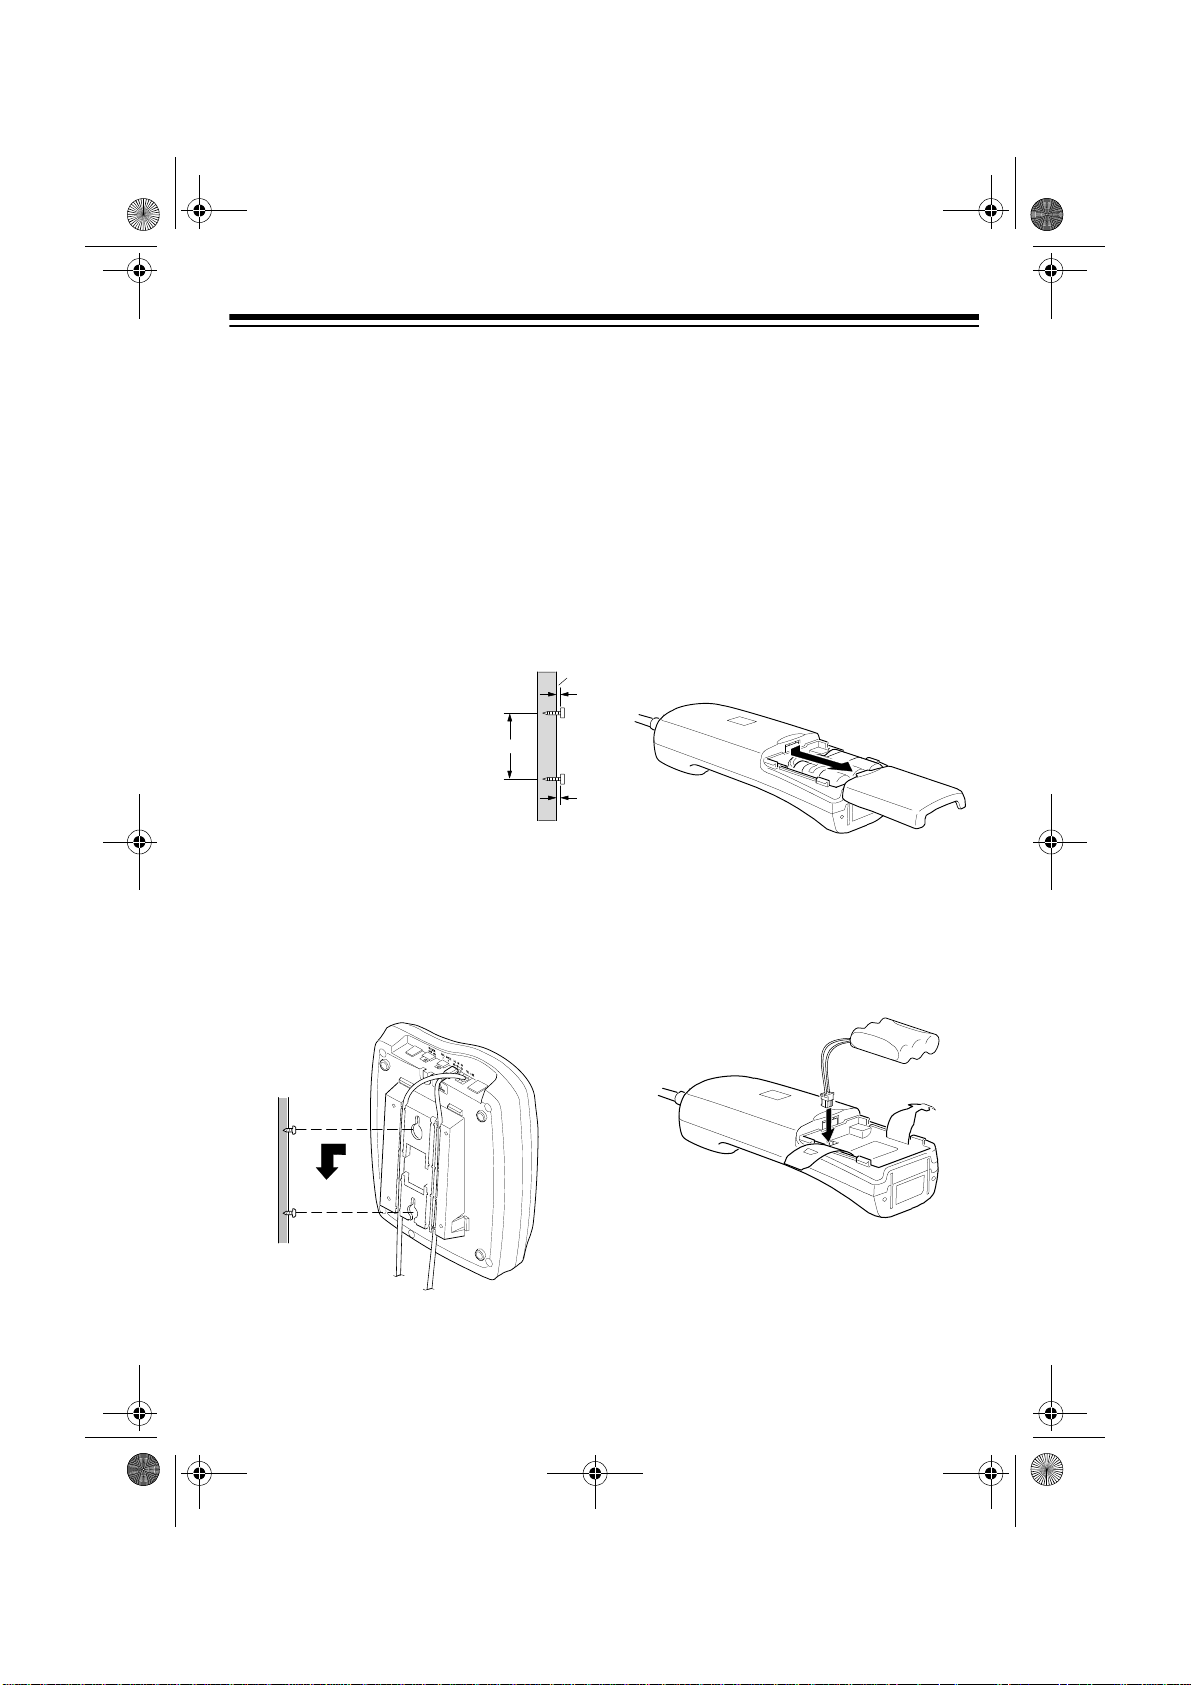
To mount the TAD directly on a
Note:
wall, you need two screws (not supplied)
with heads that fit i nto the keyhole slots
on the bottom of the base.
Follow the steps under “ On a Wa ll Plate
or Wall” on Page 9, then apply these additional instructions for placement on a
wall.
5
1. Drill two holes 3
16
/
inches (100 mm) apart.
Then thread a screw
into each hole, letting
the heads extend
5
about
/16 inch (8 mm)
from the wall.
2. Plug one end of the supplied long
modular cord into the TEL LINE jack
at the back of the base.
3. Align the bracket’s keyhole slots
with the mounting scr ews and slide
the base downward to secure it.
CONNECTING AND
CHARGING THE BATTERY
PACK
The TAD-725 comes with a rechargeable nickel-cadmium battery pack installed in the handset, but not
connected. Before using your phone,
you must connect the batt ery pa ck, the n
charge it for about 24 hours.
1. Press down and slid e off the batte ry
pack compartment cover.
2. Unfasten the plastic retainer strap
and lift the battery pack out of the
compartment. Plug the battery
pack’s connector into the socket in
the compartment. The co nne cto r f its
only one way.
3. Put the battery pack in the compartment and fasten the retainer strap.
4. Replace the cover.
10
 Loading...