

www.radioshack.com
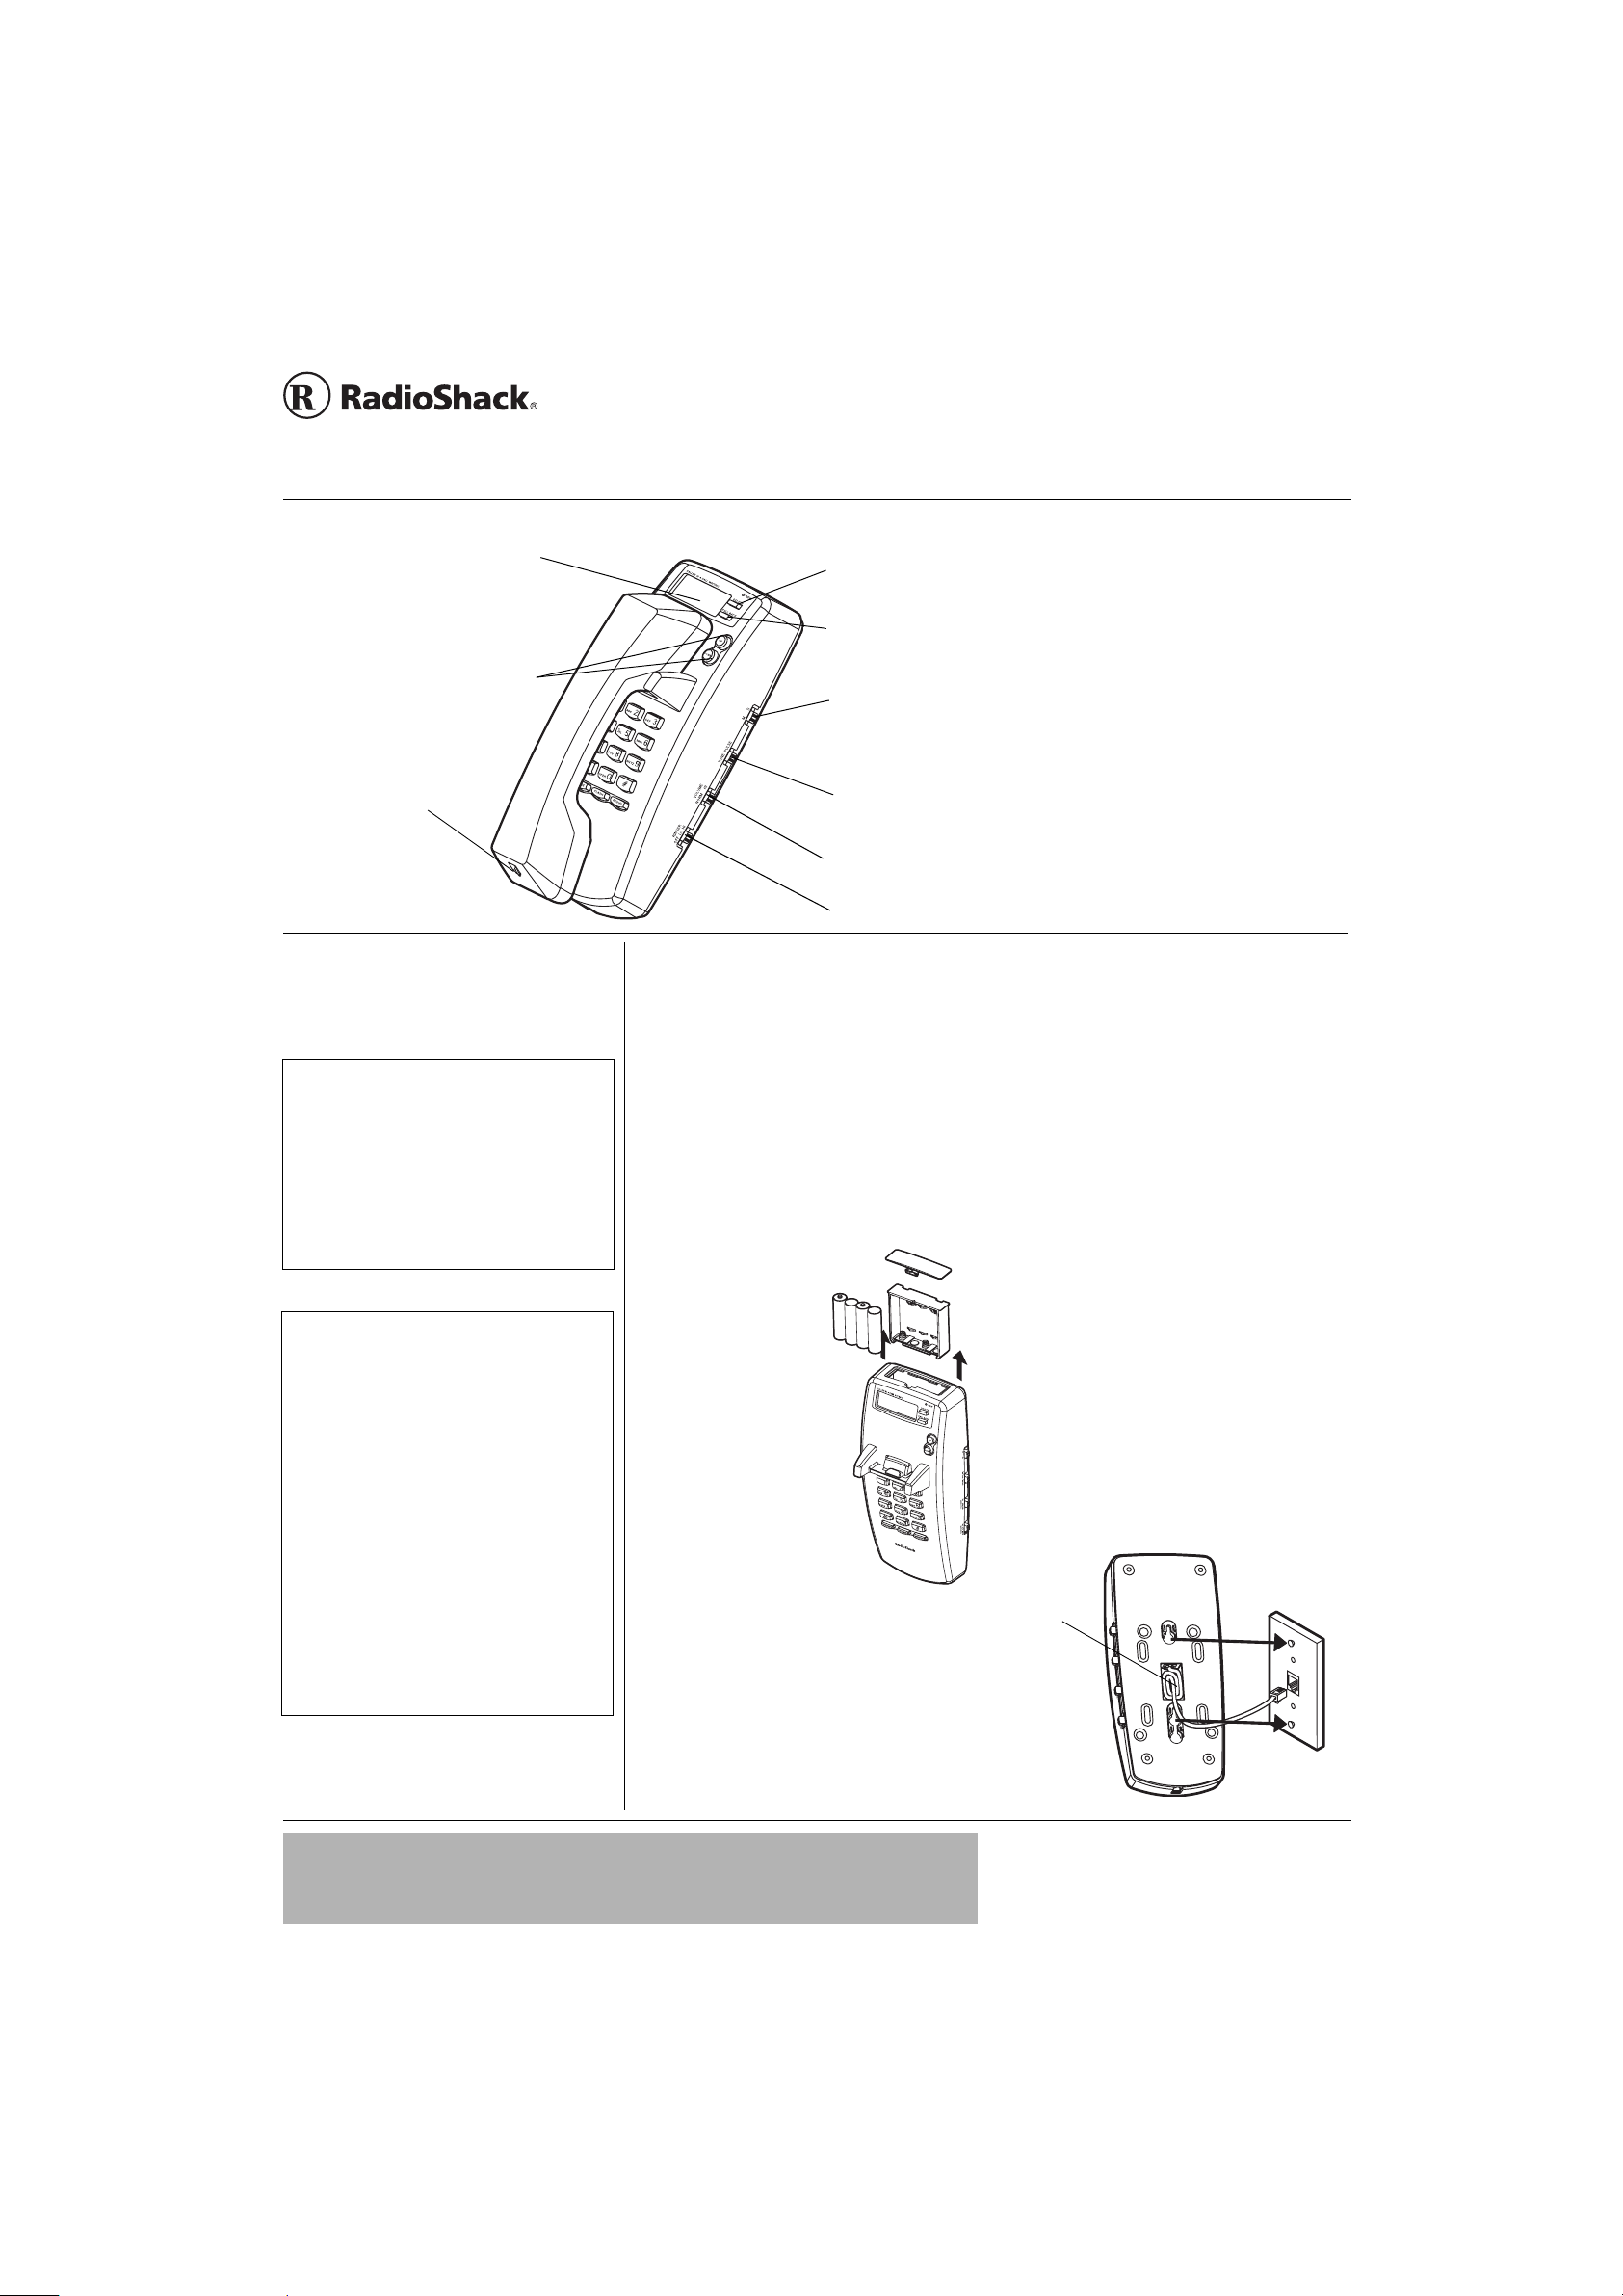
Liquid Crystal Display —
S
R
Heavy Duty Wall Phone
SM
with Caller ID/Call Waiting ID
OWNER’S MANUAL —
Please read before using this equipment.
Shows the
date and time, the number you dialed,
caller ID information, and elapsed talk
time.
UP/DOWN—PressUPorDOWN to
scroll through Caller ID records.
Handset Jack
Ô NOTE Ô
• TheUSOC number of the jackto be installed
is RJ11C (or RJ 11W for a wall plate jack).
• If your home has spec ially wired alarm
equipment connected to the telephone line,
ensure the installation of this system does
not disable your alarm equipment. If you
have questions about what willdisablealarm
equipment, consult your telephone company
or a qualified installer.
Ô BATTERY NOTES Ô
• Dispose of old batteries promptly and
properly.
• Do not burn or b ury batteries.
• Use only fresh batteries of the required size
and recommended type.
• Do not mix old and new batteries, different
types of batteries (standard, alkaline, or
rechargeable), or rechargeable batteries of
different capacities.
• If you do not plan to use the phone for two
weeks or longer, remove the batteries.
Batteries can leak chemicals that can
destroy electronic parts.
• If you do not replace the batteries within two
minutes, your Caller ID and telephone
memory information m a y be lost.
• During battery replacement, keep the line
cord plugged in to maintain Caller ID and
Speed Dialing Memories.
DELETE — Press to delete
the selected call record.
CALL BACK — Pr ess to
automatically dial the selected
caller ID record.
M/S (Mast er/S econd a ry) — Connect up to
four system modules to the same phone line,
so you can receive CID and Call Waiting
information at more than one phone on that
line. See Page 2.
TONE/PULSE — Slidetothe
desiredsettingto select toneor
pulse dialing.
VOLUME NORM/HI— Slidetot he desired setting to set
the handset volume to a comfortable level.
RINGER OFF/LO/HIGH — Slide to the desired setting
to set ringer volume or to disable the ringer.
Thank you for purchasingthe RadioShack
Heavy Duty Wall Phonewith Caller ID/Call
Waiting ID. It offers the latest in telephone
technology. In addition, the Caller ID
memory stores and displays up to 99 single
or 64 multiple incoming phone records.
PREPARATION
INSTALLING BATTERIES
Your phone requires four AA batteries (not
supplied) for power.
1. Lift the battery
compartmentdoor
from the top ofthe
base, then
remove the cover.
2. Insert four AA
batteries into the
compartment as
indicated by the
polarity symbols
(+ and –) marked
inside.
3. Replace the
battery
compartmentand
cover.
When the battery low icon appears on the
display or the display dims, replace the
batteries. Ô
SELECTING A LOCATION
Select a location for your telephone that is:
43-3905
• Not in theway of normalactivities in the
area
Your telephone connects directly to a
modular telephone line jack. If your
telephone wiring does not have a modular
jack, you can updatethe wiring yourself
using jacks and adapters (available at your
local RadioShack store), or have the
telephone company updatethe wiringfor
you. You must use compatible modular
jacks that are compliant with Part 68 of FCC
Rules and the requirements adopted by the
ACTA. The telephone cord and modular
plug provided is Part 68 compliantfor
connecting to the telephone company
network. Ô
MOUNTING AND
C
ONNECTING THE PHONE
You canmount your phone on a wall plate,
a wall, or place it on a desk or table.
On a Wall Plate or Wall
1. Plug one end of the supplied short
modular cord into the
back of the base. Route any excess
cord through the strain relief.
train
elief
LINE jack at the
• Near a telephone jack
IMPORTANT
If an icon appears at the end of a paragraph, go to the box on that pa ge with the cor responding icon
!
for pertinent information.
!
Ô —Note
© 2003 RadioShack Corporation.
RadioShack andRadioShack.com aretrademarks used by
All RightsReserved.
RadioShack Corporation.

Ô NOTE Ô
Connecting the Handset
Your local RadioShack store sells a variety of
longer coiled handset cords, which are
especially useful when you mount the phone
on a wall.
Using the Master/Secondary Setting
• If M is not set on at least one or more
phones, incoming calls might be
disconnected.
• If you connect only one system to a phone
line, set M/S to M.
• You can also connect other CID modules
that do not have the Call Waiting function to
the same phone line as your system, as long
as you do not connect more than four CID
modules total (including this phone).
• If you connect another type of CID module
that has Call Waiting (other than this system)
to the same phone line as your system, the
Call Waiting signal might be garbled or not
received.
Making a Call
If you dial a number over 15 digits, only the last
14 digits appear on the display.
Receiving a Call
• The NEW indicat or remains flashing until
you have reviewed all new calls.
• The number of new calls does not change
until all calls have been reviewed and
NEW CALL
counter then resets to
Timer
If you lift the handset and don’t dial a number,
the timer appears and starts to count up after
10 seconds.
appears. The system new call
0.
END OF
2. Plug the other end of the cord into a
wall plate jack.
3. Align the base’s keyhole slotswith the
wall plate studs and slide the phone
downward to secure it.
4. To mount the phone directly on a wall
(after mounting the phone on a wall
plate), drill two holes3
(83 mm) apart, one below the other.
5. Thread a screw intoeach hole, letting
the heads extend about 5mm from the
wall.
1
/4 inches
CONNECTING THE HANDSET
Plug one end ofthe supplied coiled cordinto
the handset’s modular jack. Then connect it
to the jack on the left bottom of the base. Ô
SET UP THE PHONE
1. Holddownboth UP andDOWN for about
four seconds until
ENTER LANGUAGE, then
ENG ESP FRA appear, with ENG flashing.
2. Press
3. Press
4. Press
5. Repeatstep 4 to setthe second and the
UP or DOWN toselect the desired
language, then press
confirm.
appear on the display,with 3 flashing.
contrast level (1-5), and press
to confirm. ENTER AREA CODE appears,
then
flashing.
number of the area code, and press
DELETE to confirm the selection.
third digits.
LCD CONTRAST and 1 2 3 4 5
UP or DOW N to select the
_ _ _ appears, with the first _
UP and DOWN to select the first
DELETE to
DELETE
SETTING THE RINGER
If you do not want to hear the phone ring,
slide
RINGER to OFF. You can still make
calls with the ringer off, and you can still
answer calls if you hear anotherphone on
the same phone linering. If you wantto hear
the phone ring, set
RINGER to HI or LO.
SETTING THE DIALING MODE
Slide TONE/PULSE tothe settingfor the type
of service you have. If you are not sure
which type you have,do this simple test.
1. Slide
TONE/PULSE to TONE.Liftthe
handset and listen for a dial tone.
• If the dial tone continues, you have
pulseservice.Settheswitchto
PULSE.
USING SPECIAL TONE
ERVICES
S
Some computer services require tone
signals for communications.If you have
pulse service, you can still simulate special
tone service by following these steps.
1. Connectto the special service using
pulse dialing.
2. When the special service answers,
press * to temporarilyswitch to tone
dialing.
3. When you complete the call, hang up
and change the settingback to
PULSE.
USING THE MASTER/
S
ECONDARY SETTING
M/S (Master/Secondary)lets you easily
connect up to four system modulesto the
same phone line, so CID and Call Waiting
information can be set to more than one
phone on that line.
1. Slide
2. Slide
3. Set one system to answer; set the
M/S to M.
M/S on all (up to three) other
systems to
others to off.
S. Ô
OPERATION
MAKING A CALL
1. Pick up the handset and wait for a dial
tone.
2. Use the keypad to enter the number
you wish to dial. The number appears
on the display. Ô
3. When you complete your call, hang up
the handset. A few seconds later, the
number disappears, and the display
returns to normal.
RECEIVING A CALL
When you receive a call, the phone rings
and the
the caller number appear on the display. To
answer the call, pick up the handset. Ô
NEW indicator flashes. CALL# and
2. Press any number except
phone requires that you dial an access
code (
9, for example)beforeyou dial an
outside number, do not press the
access code number.
• If the dialtone stops, you have touch-
tone service.Set the switch to
0.Ifyour
TONE.
TIMER
This phone is designed with a clock timer to
count the off-hook time in seconds, up to
one hour. The timer appears on the display
and starts to count up when you dial a
number or answer an incoming call. Ô
USING FLASH
FLASH performs the electronic equivalent of
a switchhook operation for special services,
2

such as Call Waiting. For example, if you
have Call Waiting, press
an incoming call without disconnecting the
current call. Press
the first call. Ô
FLASH to answer
FLASH again to return to
USING REDIAL
To redial thelast number you called, pick up
the handset and press
hear a dial tone. The number scrolls across
the display, and the phone automatically
dials it. Ô
REDIAL when you
USING PAUSE
Some telephone systemsrequire you to dial
an access code (9, for example) and wait for
a second dial tone before dialing an outside
number. When you manually dial anumber,
you can have your telephone pause
anywhere during the dialing sequence.
Simply press
When you redial a number, the telephone
pauses for about four seconds at the pause
entry. For longer pauses, press
again.
PAUSE at the desired location.
PAUSE
CALLER ID
OPERATION
If you subscribe to a Caller ID service, the
phone automatically displaysinformation
about calls you receive and stores the
informationinCallerIDmemory.Thesystem
can store up to 99 incoming phone numbers
or 64 incoming phone numbers with names
into call records.
Duringan incomingcall,the phone company
automatically sends the correct time
betweenthe first andsecondrings to update
your system’s display.
• If you do notpress a button withinabout
15 seconds, the system automatically
returns to the normal display.
CALL BACK FROM CALLER ID
EMORY
M
1. Press UP or DOWN tofind the number to
redial.
2. Press
3. Lift the handset, and the number is
Follow these steps to select one of the
options for Caller ID call back.
1. Press
2. Press
3. Press
4. Press
5. Pick up the handset, and the selected
CALL BACK twice. LIFT HANDSET or
PICK UP CALL appears.
redialed automatically. Ô
UP or DOWN to find the Caller ID
memory location to be redialed.
CALL BACK. The 7- or 11-digit
number flashes.
UP or DOWN to select one of the
four options (1–4).
Option1
1 + Area Code + 7–digit number
(11 digits)
Option2
1+7–digit number (8 digits)
Option3
Area Code + 7–digit number (10 digits)
Option4
7–digit number
CALL BACK again to confirm.
number is dialed automatically.
Ô NOTE Ô
Using Flash
• If you do not have any special phone
services, pressing FLASH might disconnect
the current call.
• Pressing FLASH does not hang up the
system.
Using Redial
The redial memory holds up to 32 digits, so
you can redial long distance as well as local
phone numbers.
Call Back from Caller ID Memory
Your telephone company m ay require a
different format for making out-of area (toll)
calls within your area code. See the next
section for the procedure to obtain the
applicable toll-call format for your phone
company.
Deleting Ca ll Records
• When the phone’s memory is full, it
automatically replaces the oldest call record
with the newest incoming call.
• If you do not press any button within about
15 seconds while
on the display, the phone automatically
returns to normal display and therecords are
not deleted.
ERASE ALL CALLS appears
REVIEWING CALL RECORDS
Repeatedly press UP or DOWN to reviewthe
new calls. After all new calls have been
reviewed,
To reviewall the records from oldest to
newest, repeatedly press
records from newest to oldest, repeatedly
press
memory,
• If an incorrect, invalidor incomplete
• If the name and number are not
• If the name and number are not
•
END OF NEW CALL appears.
UP. To review the
DOWN. Afterreviewing all records in
END OF LIST appears.
Caller ID signal is received,
appears on the display.
available due to the caller’s restriction,
LINE ERROR
PRIVATE CALL appears on the display.
available,
display.
-UNAVAILABLE- appearson the
RPT appears with a number if you have
received a call from the same phone
number more than once.
DELETING CALL RECORDS
You can select and delete an individual call
record, or all call records stored in the
system.
To delete a single call record, press
DOWN until the call record you want to
delete appears. Press
call record is deleted, and the system
automatically renumbers the remaining call
records.
To delete all of the call records after all new
calls have been reviewed, hold down
DELETE for about three seconds. ERASE ALL
CALLS
appears. Press DELETE. The system
deletes all call records.
and then
TOTAL : 00 NEW : 00 appears. Ô
DELETE twice. The
NO CALLS appears,
UP or
3

FCC STATEMENT
This phone is HearingAid compatible.
Your telephone complies with Part 68 of
FCC Rules and the requirements adopted
by the ACTA. On the [location of label] of
this product is a label with this product’s
FCC Product Identification number in the
format US:AAAEQ##TXXXX.If requested,
you must provide this information to the
telephone company.
• Note: You must not connect your
telephone to:
• coin-operated systems
• most electronic key telephone systems
• party-line systems
Connection to party line service is subject to
state tariffs. Contact the state publicutility
commission, public servicecommission, or
corporation commission for information.
We havedesigned your telephone to
conform to federal regulations, and you can
connectit to mosttelephonelines.However,
each telephone (and eachdevice,such as a
telephone or answering machine) that you
connect to the telephone line draws power
from the telephone line. We refer to this
power draw as the device's ringer
equivalence number, or REN on the bottom
of your telephone.
In the unlikelyevent that yourphone causes
problems on the phone line, the phone
company can temporarily discontinue your
service.If this happens,the phone company
attemptsto notify you in advance. If advance
notice is not practical, the phone company
notifies you as soon as possible and advises
you of your right to file a complaint with the
FCC.
Also, the phone company can make
changes to its lines, equipment, operations,
or procedures that could affecttheoperation
of this telephone. The telephone company
notifiesyou of these changesinadvance,so
you can takethe necessary steps to prevent
interruption of your telephone service.
SURGE PROTECTION
Your telephone has built-in protection
circuits to reduce the risk of damage from
surges in telephone line and power line
current. These protection circuits meet or
exceed the FCC requirements. However,
lightning striking the telephone or power
lines can damage your telephone.
Lightning damage is not common.
Nevertheless,if you live in an area that has
severe electrical storms, we suggest that
you unplug your phone when storms
approach to reduce the possibility of
damage.
If you use more than one phone or other
device on the line, add up all of the RENs. If
the totalis more than five (three in rural
areas), your telephones might not ring. If
ringer operation is impaired, remove a
device from the line.
Limited One-Year Warranty
This product is warranted by RadioShack against manufacturing defects in material and workmanship under normal use for one (1) year from the date of purchase from RadioShack company-owned stores and authorized RadioShack franchisees and dealers. EXCEPT AS PRO VIDED HEREIN, RadioShack MAKES NO EXPRESS
WARRANTIES AND ANY IMPLIED WARRANTIES, INCLUDING THOSE OF MERCHANTABILITYANDFITNESS
FOR A PARTICULARPUR POS E, ARE LIMITEDINDURATION TO THE DURATIONOF THE WRITTEN LIMITED
WARRANTIES CONTAINED HEREIN. EXCEPT AS PROVIDED HEREIN, RadioShack SHALL HAVE NO LIABILITY OR RESPONSIBILITY TO CUSTOMER OR ANY OTHER PERSON OR ENTITY WITH RESPECT TO ANY
LIABILITY, LOSS OR DAMAGE CAUSED DIRECTLY OR INDIRECTLY BY USE O R PERFORMANCE OF THE
PRODUCT OR ARISING OUT OF ANY BREACH OF THIS WARRANTY, INCLUDING, BUT NOT LIMITED TO,
ANY DAMAGES RESULTING FROM INCONVENIENCE, LOSS OF TIME, DATA, PROPERTY, REVENUE, OR
PROFIT OR ANY INDIRECT, SPECIAL, INCIDENTAL,OR CONSEQUENTIAL DAMAGES, EVEN IF RadioShack
HAS BEEN ADVISED OF THE POSSIBILITYOF SUCH DAMAGES.
Some states do not allow limitations on how long an implied warranty lasts or the exclusion or limitation of incidental or consequential damages, so the above limitations or exclusions may not apply to you.
In the event of a product defect during the warrantyperiod, take the product and the RadioShack sales receiptas
proof of purchase date to any RadioShack store. RadioShack will, at its option, unless otherwise provided by law:
(a) correct the defect by product repair without charge for parts and labor; (b) replace the product with one of the
same or similar design; or (c) refund the purchase price. All replaced parts and products, and products on which a
refund is made, become the property of RadioShack. New or reconditioned parts and products may be used in the
performance of warranty service. Repaired or replaced parts and products are warranted for the remainder of the
original warranty period. You will be charged for repair or replacement of the product made after the expiration of
the warranty period.
This warranty does not cover: (a) damage or failure caused by or attributable to acts of God, abuse, accident, misuse, improper or abnormal usage, failure to follow instructions, improper installation or maintenance, alteration,
lightning or other incidence of excess voltage or current; (b) any repairs other than those provided by a RadioShack Authorized Service Facility; (c) consumables such as fuses or batteries; (d) cosmetic damage; (e) transportation, shipping or insurance costs; or (f) costs of product removal, installation, set-up service adjustment or
reinstallation.
This warranty gives you specific legal rights, and you may also have other rights which vary from state to state.
RadioShack Customer Relations, 200 Taylor Street, 6th Floor,Fort Worth, TX 76102
12/99
RadioShack Corporation
Fort Worth,Texas 76102
43-3905
03A03
PrintedinChina
 Loading...