

Page 1

Extra Remote Se nsor
to 63-1030
Owner’s Manual
Please read before using this equipment.
Page 2

ˆ
Contents
Introduction ........................................ 4
Installing Batteries ............................ 5
Mounting the Sensor ........................ 8
Selecting a Location .................... 8
Using the Stand ........................... 9
On a Wall ................................... 10
Operation .......................................... 13
Changing the Display Channel ...... 13
Changing the Degree Format ........ 15
Resetting the Sensor ..................... 15
Care ................................................... 17
Specifications ................................... 18
©
2000 RadioShack Corporation. All Rights Reserved .
RadioShack and RadioShack.com are trademarks
used by RadioShack Corporation.
2
Page 3

FCC INFORMATION
This device complies with Part 15 of the
FCC Rules
following two conditions: (1) this device
may not cause harmful interference, and
(2) this device must accept any interference received, including interference that
may cause undesired operation.
This equipment complies with the limits
for a Class B digital d ev ice as s pec ifi ed i n
Part 15 of
vide reasonable protection against radio
and TV interference in a residential area.
However, your equipment might cause
TV or radio interference even when it is
operating properly. To eliminate interference, you can try one or more of the following corrective measures:
. Operation is subject to the
FCC Rules
. These limits pro-
3
Page 4

• reorient or relocate the receiving
antenna
• increase the distance between the
equipment and the radio or TV
Consult your local RadioShack store if
the problem still exists.
ˆ
Introduction
Your RadioShack Extra Remote Sensor
is designed for use with the RadioShack
Wireless Indoor/Outdoor Thermometer
with Indoor/Outdoor Hygrometer system
(Cat. No. 63-1030). Installation is easy,
with no wires to connect. You can mount
the remote sensor outdoors or in another
room (away from the system’s main unit),
4
Introduction
Page 5

or use its supplied wire stand for easy
viewing on a table or desktop.
INSTALLING BATTERIES
Your sensor requires two AA batteries
(not supplied) for power. For the b est performance and longest life, we recommend RadioShack alkaline batteries.
Cautions:
• Use only fresh batteries of the
required size and recommended
type.
• Do not mix old and new batteries,
different types of batteries (standard,
alkaline, or rechargeable), or
rechargeable batteries of different
capacities.
Introduction
5
Page 6
Note:
If you expect to use the remote
sensor in temperatures below –4°F
(–20°C), we recommend you use lithium
batteries.
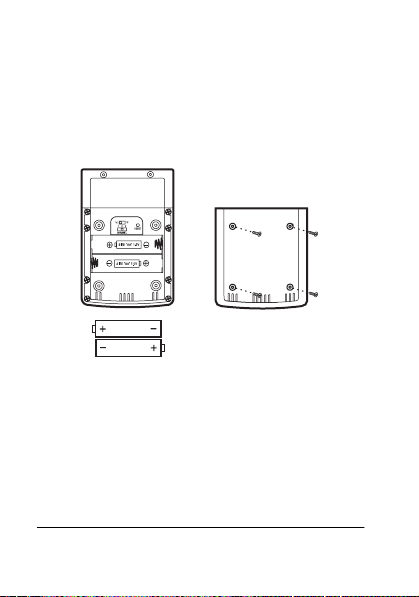
Follow these steps to install batteries.
1. Use a Phillips screwdriver to remove
the screws in the battery compartment cover, then lift off the cover.
2. Set
CHANNEL
and
°C/°F
inside the
compartment to the desired set-
6
Introduction
Page 7

tings. (See “Changing the Display
Channel” on Page 13 and “Changing
the Degree Format” on Page 15)
3. Place the batteries in the compartment as indicated by the polarity
symbols (+ and –) marked inside.
4. Use a pointed object (such as a
straightened paper clip) to press
RESET
and initialize the sensor’s
transmitter.
5. Replace the cover and secure it with
its screws.
When appears (on either the sensor
or under the sensor’s channel number on
the main unit) or the sensor stops operating properly, replace the batteries.
Introduction
7
Page 8

Warning:
promptly and properly. Do not burn or
bury them.
Dispose of old batteries
Caution:
sensor for a week or longer, remove the
batteries. Batteries can leak chemicals
that can destroy electronic parts.
If you do not plan to use the
MOUNTING THE SENSOR
You can place the rem ote sen sor on a flat
surface, or mount it on the wall using
screws (not supplied) and the supplied
bracket.
Selecting a Location
Choose a location for the remote sensor
that is within about 328 feet (100 m) of
the main unit. The remote sensor can be
placed either indoors or out.
8
Introduction
Page 9

The construction of your home or office
might affect the transmission range between the main unit and the remote sensor. If you have a choice of several
locations, t ry eac h to see w hich pr ovides
the best performance.
Caution:
where it will be:
Do not place the remote sensor
• in direct sunlight
• in water (it is weather-resistant, not
water-proof)
• near electrical appliances or heating
or air conditioning vents
Using the Stand
To set the remote sensor on a flat surface, insert the ends of the supplied wire
Introduction
9
Page 10
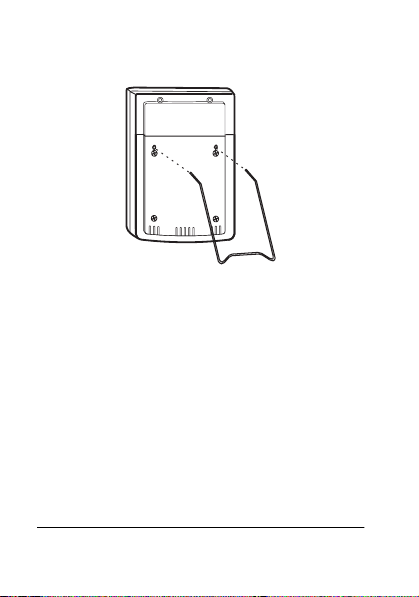
stand into the hole s on the bac k of the remote sensor.
On a Wall
1. Drill two holes 13/4 inches apart.
Then thread a screw into each hole,
letting the heads extend about
inch from the mounting surface.
1
4
/
10
Introduction
Page 11
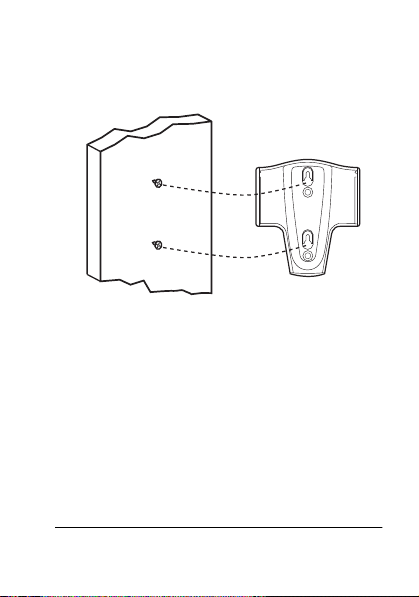
2. Align the keyhole sl ots on th e m ou nting bracket with the screws and slide
the bracket downward to secure it.
Introduction
11
Page 12
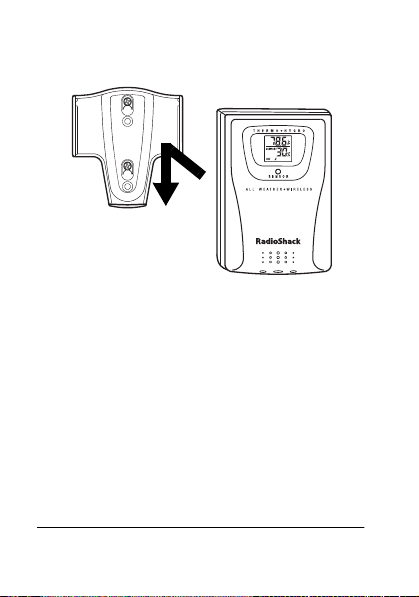
3. Slide the remote sensor into the
mounting bracket.
12
Introduction
Page 13
ˆ
Operation
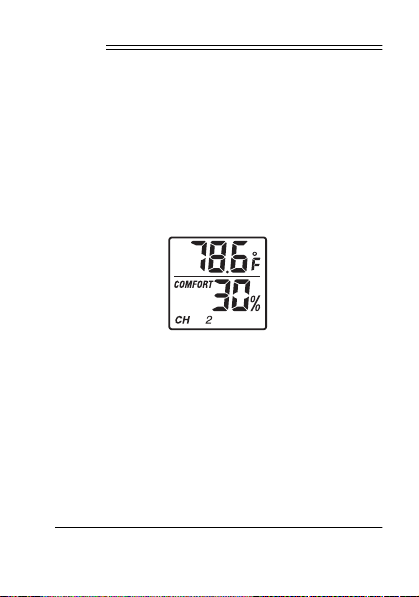
Once you install batteries in the remote
sensor, it displays the current temperature, humidity, and the channel number it
is set to, and starts transmitting signals
(to your Cat. No. 63-1030 system’s main
unit) about every 41 seconds .
CHANGING THE DISPLAY
CHANNEL
The Cat. No. 63-1030 system’s main unit
can display informati on f or u p to thre e d ifferent remote sensors.
Operation
13
Page 14
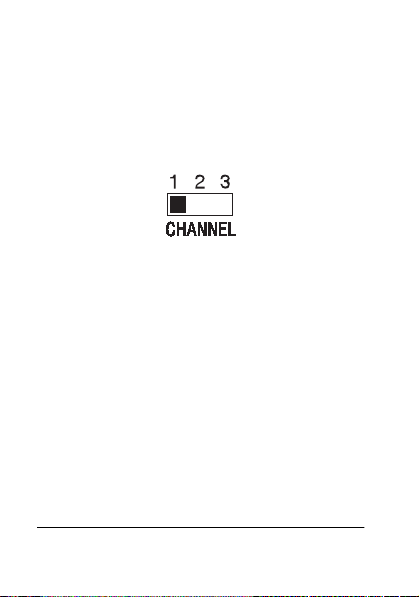
CHANNEL 1/2/3
Set
inside this remote
sensor’s battery compartment to a different setting than all other remote sensors
RESET
you are using. Then press
using a
pointed object (such as a straightened
paper clip).
Note:
If you set two or more remote sensors to use the same channel, the main
unit displays temperature and humidity
information for the remote sensor's signal
it received first.
14
Operation
Page 15

CHANGING THE DEGREE
FORMAT
To change t he displayed de gree format,
°C/°F
set
tery compartment to the desired setting.
inside the r emote sensor’ s bat-
RESETTING THE SENSOR
If the remote sensor stops operating
properly, use a pointed object (such as a
straightened paper clip) to press
This resets the displayed temperature
RESET
.
Operation
15
Page 16
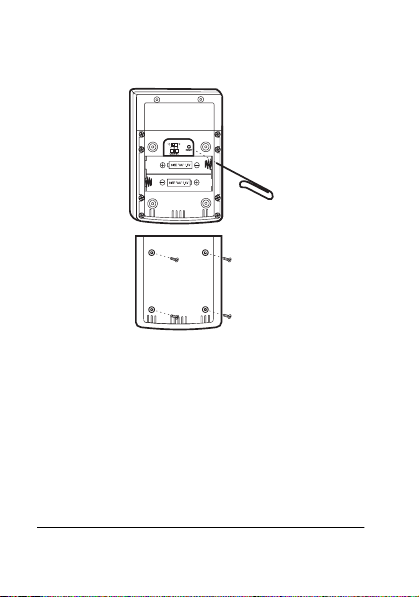
and humidity readings and re-initializes
the sensor’s transmitter.
16
Operation
Page 17

ˆ
Care
Keep the sensor dry; if it gets wet, wipe it
dry immediately. Use and store the sensor only in normal temperature environments. Handle the sensor carefully; do
not drop it. Keep the sensor away from
dust and dirt, and wipe it with a damp
cloth occasionally to keep it looking new.
Modifying or tampering with the sensor’s
internal components can cause a malfunction and invalidate its warranty. If
your sensor is not performing as it
should, take it to your local RadioShack
store for assistance.
Care
17
Page 18

ˆ
Specifications
Power ......................... 3V with 2 AA Batteries
Temperature Operating Range ... –4° to 140°F
(–20° to 60°C)
Relative Humidity
Operating Range ..................... 25%–90% RH
RF Transmission Frequency ........... 433 MHz
RF Transmission Range ........... 328 ft at sight
Resolution ............................................. 0.2°F
Approximate Sampling Cycle ...... 41 Seconds
Accuracy ...................... ±1.8° at 32° to 104° F
(100m at sight)
(0.1°C)
(0° to 40°C)
±3.6° at –40° to 122° F
(–40° to 50°C)
±5.4° at –58° to 158° F
(–50° to 70° C)
18
Specifications
Page 19

Weight (without batteries) ..................... 2.8 oz
(80 g)
Dimension s ......................... 4
1
/8 × 23/4 × 7/8 in
(105 × 70 × 21.5 mm)
Specifications are typical; individual units
might vary. Specifications are subject to
change and improvement without notice.
Specifications
19
Page 20

This product is war rant ed by Radi oSha ck ag ai nst ma nufa ct uring defe cts in mat eria l and
workmanshi p under normal use for one (1) year fr om the date of purc hase from RadioShack company-owned stores and authorized RadioShack franchisees and dealers.
EXCEPT AS PROVIDED HEREIN, RadioSha ck MAKES NO EXPRESS WARRANT IES
AND ANY IMPLIED WARRANTIES, INCLUDING THOSE OF MERCHANTABILITY AND
FITNESS FOR A PARTICULAR PURPOSE, ARE LIMITED IN DURATION TO THE DURATION OF THE WRITTEN LIMITED WARRANTIES CONTAINED HEREIN. EXCEPT
AS PROVIDED HEREIN, Ra dioSh ack SHAL L H AVE NO LIABILIT Y O R RESP O NSIBI LITY TO CUSTOMER OR ANY OTHER PERSON OR ENTITY WI TH RESPE CT TO ANY
LIABILITY, LOSS OR DAMAGE CAUSED DIRECTLY OR INDIRECTLY BY USE OR
PERFORMANCE OF THE PRODUCT OR ARISING OUT OF ANY BREACH OF THIS
WARRANTY, INCLUDING, BUT NOT LIMITED TO, ANY DAMAGES RESULTING
FROM INCONVENIENCE, LOSS OF TIME, DATA, PROPERTY, REVENUE, OR
PROFIT OR ANY INDIRECT, SPECIAL, INCIDENTAL, OR CONSEQUENTIAL DAMAGES, EVEN IF RadioShack HAS BEEN ADVI SED OF THE POSSIBILITY OF SUCH
DAMAGES.
Some states do not allow limitations on how long an implied warranty lasts or the exclusion or limitatio n of inc ide ntal or cons equ entia l dama ge s, so th e abov e limit ation s or exclusions may not apply to you.
In the event of a product defect during the war ranty period, take the product and the RadioShack sa les receipt as p roof of purchas e da t e to a ny RadioShack s tore. RadioSha c k
will, at its option, unless otherwise provided by law: (a) correct the defect by product repair without charge for parts and labor; (b) replace the product with one of the same or
similar design; or (c) refund the purchase price. All replaced parts and products, and
products on which a refund is made, become the property of RadioShack. New or reconditioned parts and products may be used in the performance of warranty service. Repaired or replaced parts and products are warranted for the remainder of the original
warranty per i od . You will be charged for r e pa ir or r e pl ac em e nt of the produc t m ade after
the expiration of the warranty period.
This warranty does not cover: (a) damage or failure caused by or attributable to acts of
God, abuse, accident, misuse, improper or abnormal usage, failure to follow instructions,
improper i nstallati on or maintena nce, alt eratio n, lightn ing or other incidenc e of ex cess
voltage or current; (b) any repairs other than those provided by a RadioShack Authorized
Service Facility; (c) consuma bles such as fuses or batteries ; (d) cosmetic d amage; (e)
transportat ion, s hippin g or in sura nce co sts; or (f) c osts of produ ct rem oval, insta llation ,
set-up service adjustment or reinstallation.
This warrant y gives you specif ic lega l rights, and you may also hav e othe r rights which
vary from state to state.
06A00
63-1031 Printed in China
Limited One-Year Warranty
RadioShack Customer Relation s, 200 Taylor Street, 6th Floor, Fort Worth, TX 76102
We Service What We Sell
12/99
 Loading...