

Page 1
$KI"&KIKV"6KOGT
YKVJ"%NQEM
63-938
"+/2146#06"
#
If an icon appears at the end of a
paragraph, go to the box on that
page with the corresponding icon
for pertinent information.
— Warning # — Important
Rý
.... — Caution
°°°°
#
— Hint
± — Note
±"016'"±"
• The default clock setting is 1:00,
1/01, SAT, 00:00.
• Each time a button is pressed,
the clock beeps.
OWNER’S MANUAL — Please read before using this equipment.
Thank you for purchasing the RadioShack Big Digit Timer. It
combines a simple design with advanced technology. You
can mount it on a wall, a metal surface, or place it on a desk
using the built-in stand.
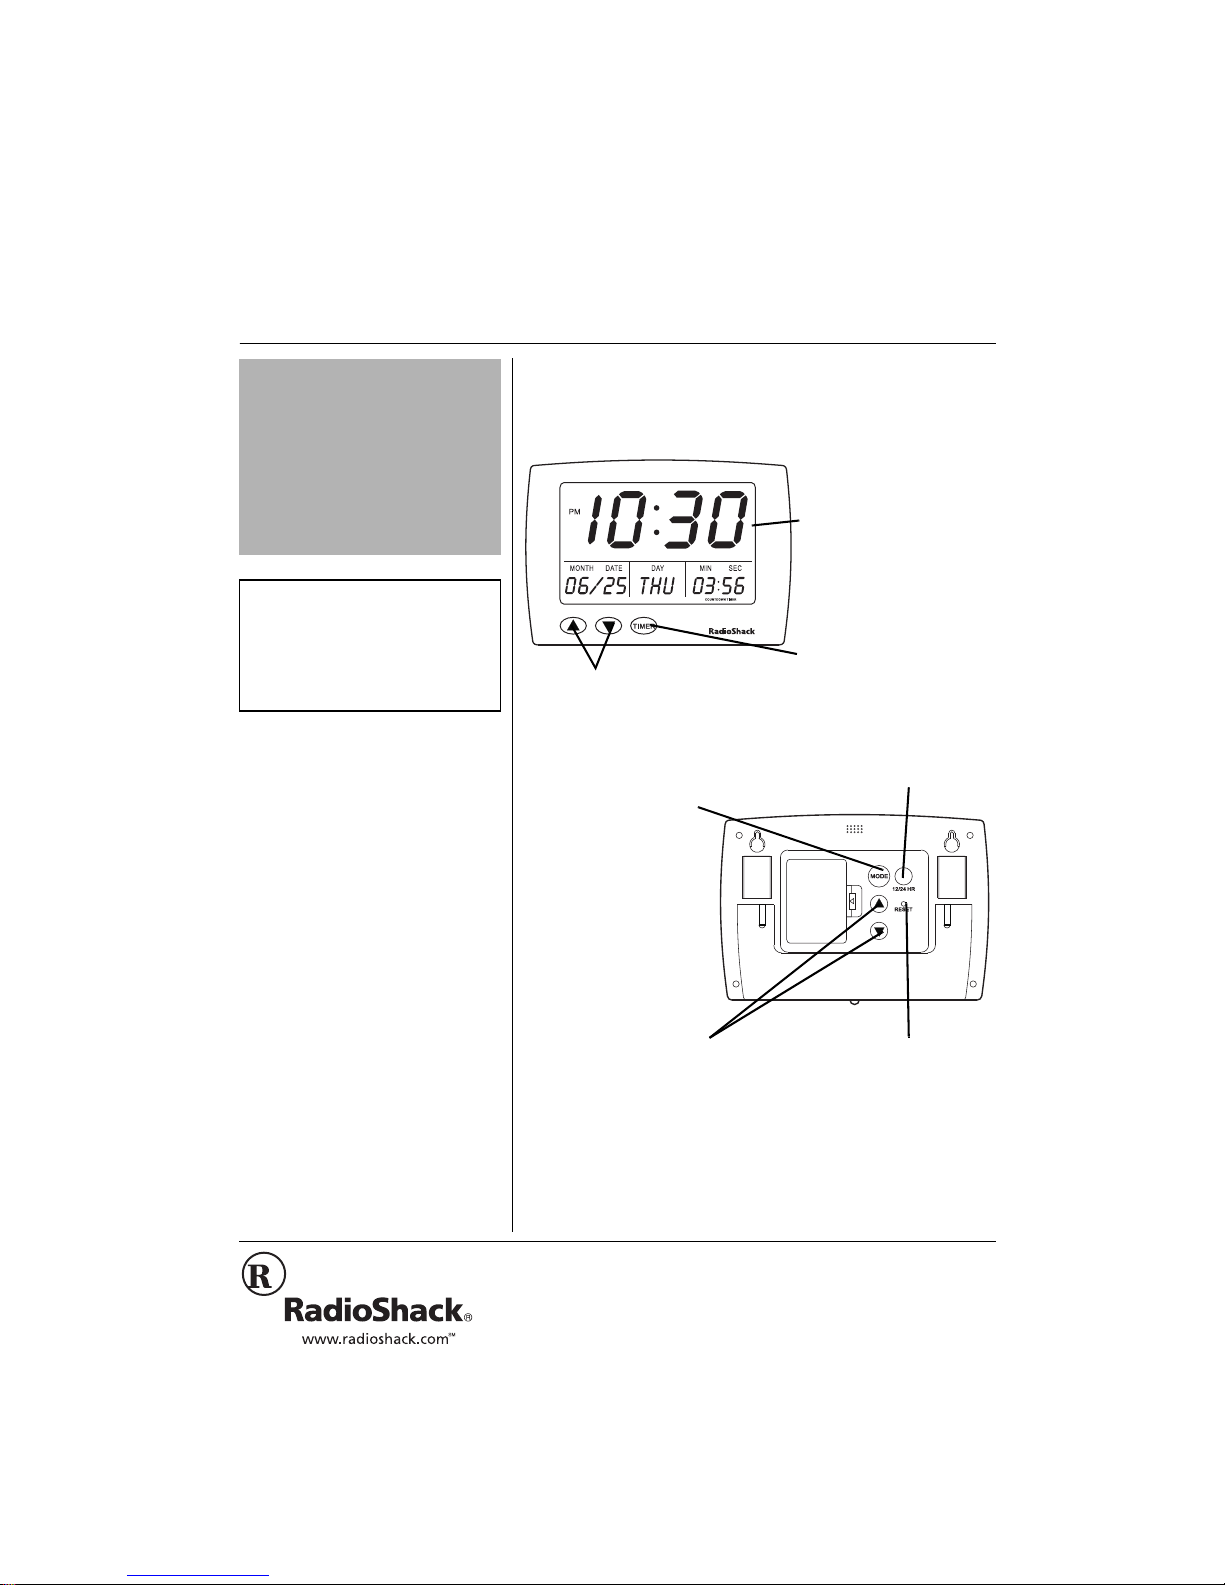
GGGG
HHHH
and
down to set the desired
timer minutes.
MODE — Press to alternate
between hour, minute, year,
month, and date when
setting the clock time.
Three-Way Mounting —
Lets you mount the clock
on a wall, attach it to a
metal surface, or stand it
on a desk or table.
— Press or hold
±
Large Liquid Crystal
Display — Lets you view
the month, date, day of the
week, time, and
countdown timer at the
same time.
TIMER — Counts down
from a specified number of
minutes (up to 99).
12/24 HR — View the
time in either a 12- or
24-hour format.
GGGG
Hý
Hý
and
— Press to set the
HýHý
hour, minutes, year, month,
and date values.
2002 RadioShack Corporation.
©
RadioShack and RadioShack.com are trademarks
All Rights Reserved.
used by RadioShack Corporation.
RESET — Erases
all stored
information.
Page 2
.
Installing the Batteries
Installing the Batteries
• Use only fresh batteries of the
• Do not mix old and new
• If you do not plan to use the
When replacing the batteries,
install the new ones within 1
minute of removing the old
batteries. Otherwise, the clock’s
year, month, date, day of week,
and time memory are lost.
Dispose of old batteries promptly
and properly. Do not burn or bury
them.
"%#76+10"
required size and
recommended type.
batteries, different types of
batteries (standard, alkaline, or
rechargeable), or rechargeable
batteries of different capacities.
timer/clock for a month or more,
remove the batteries. Batteries
can leak chemicals that can
destroy electronic parts.
"+/2146#06"
#
"9#40+0)
R
±"016'"±"
Do not press any buttons while
replacing batteries. If you do, the
stored time will be lost.
.
ý
R
+056#..+0)"6*'"$#66'4+'5
Your timer/clock requires three AAA batteries (not supplied)
for power. For the best performance and longest life, we
recommend RadioShack alkaline batteries.
1. Remove the battery compartment cover by pressing the
cover’s tab in the direction of the arrow and lifting the
cover.
2. Insert three batteries in the compartment as indicated
by the polarity symbols (+ and –) marked inside. The
clock beeps three times. The default month, date, day,
and time appear.
3. Replace the cover.
#
If the clock stops operating properly or the display dims,
replace the batteries.
Rý
±
#"
....
5'66+0)"6*'"'"#0&"6+/'
1. Press
"
2. Repeatedly press or hold down
the clock to set the hour. Press
between the 12- and 24- hour formats. In the 12-hour
time format,
3. Press
4. Repeat Steps 2 and 3 to set the minute, year, month,
and date. After setting the correct date, the clock
automatically sets the day of the week.
. The hour digits flash.
MODE
appears when it is a PM hour.
FCý
FCý
FCýFCý
. The minute digits flash.
MODE
or H on the back of
G
12/24 HR
to switch
±"016'"±"
• To reset the countdown timer
when it is running, press TIMER
to stop counting, then hold
down TIMER to reset the time to
00:00.
• To reset the countdown timer
when it is not running and the
display is not set to 00:00, hold
down TIMER to reset the time to
00:00.
2
5. Press
when you are finished setting the clock.
MODE
75+0)"6*'"%1706&190"
6+/'4
The countdown timer lets you set a specific time to count
down from (up to 99 minutes).
1. Repeatedly press or hold down
the timer until the desired countdown minu te s ap p ea r.
2. Press
press
alarm sounds for one minute. Press any key to stop the
alarm.
to start countdown. To stop countdown,
TIMER
again. When the timer reaches 00:00, an
TIMER
±
or H on the front of
G
Page 3

/1706+0)"6*'"%.1%-
75+0)"6*'"56#0&
You can set the clock on any level surface using the clock’s
built-in stand. Pull the stand out on the back of the clock as
far as it can go. Place the clock on the desk, shelf, or table.
75+0)"6*'"/#)0'65
The magnets on the back of the clock hold it on any metal
surface, such as a refrigerator, oven, or file cabinet. Simply
place the clock on a metal surface to mount it.
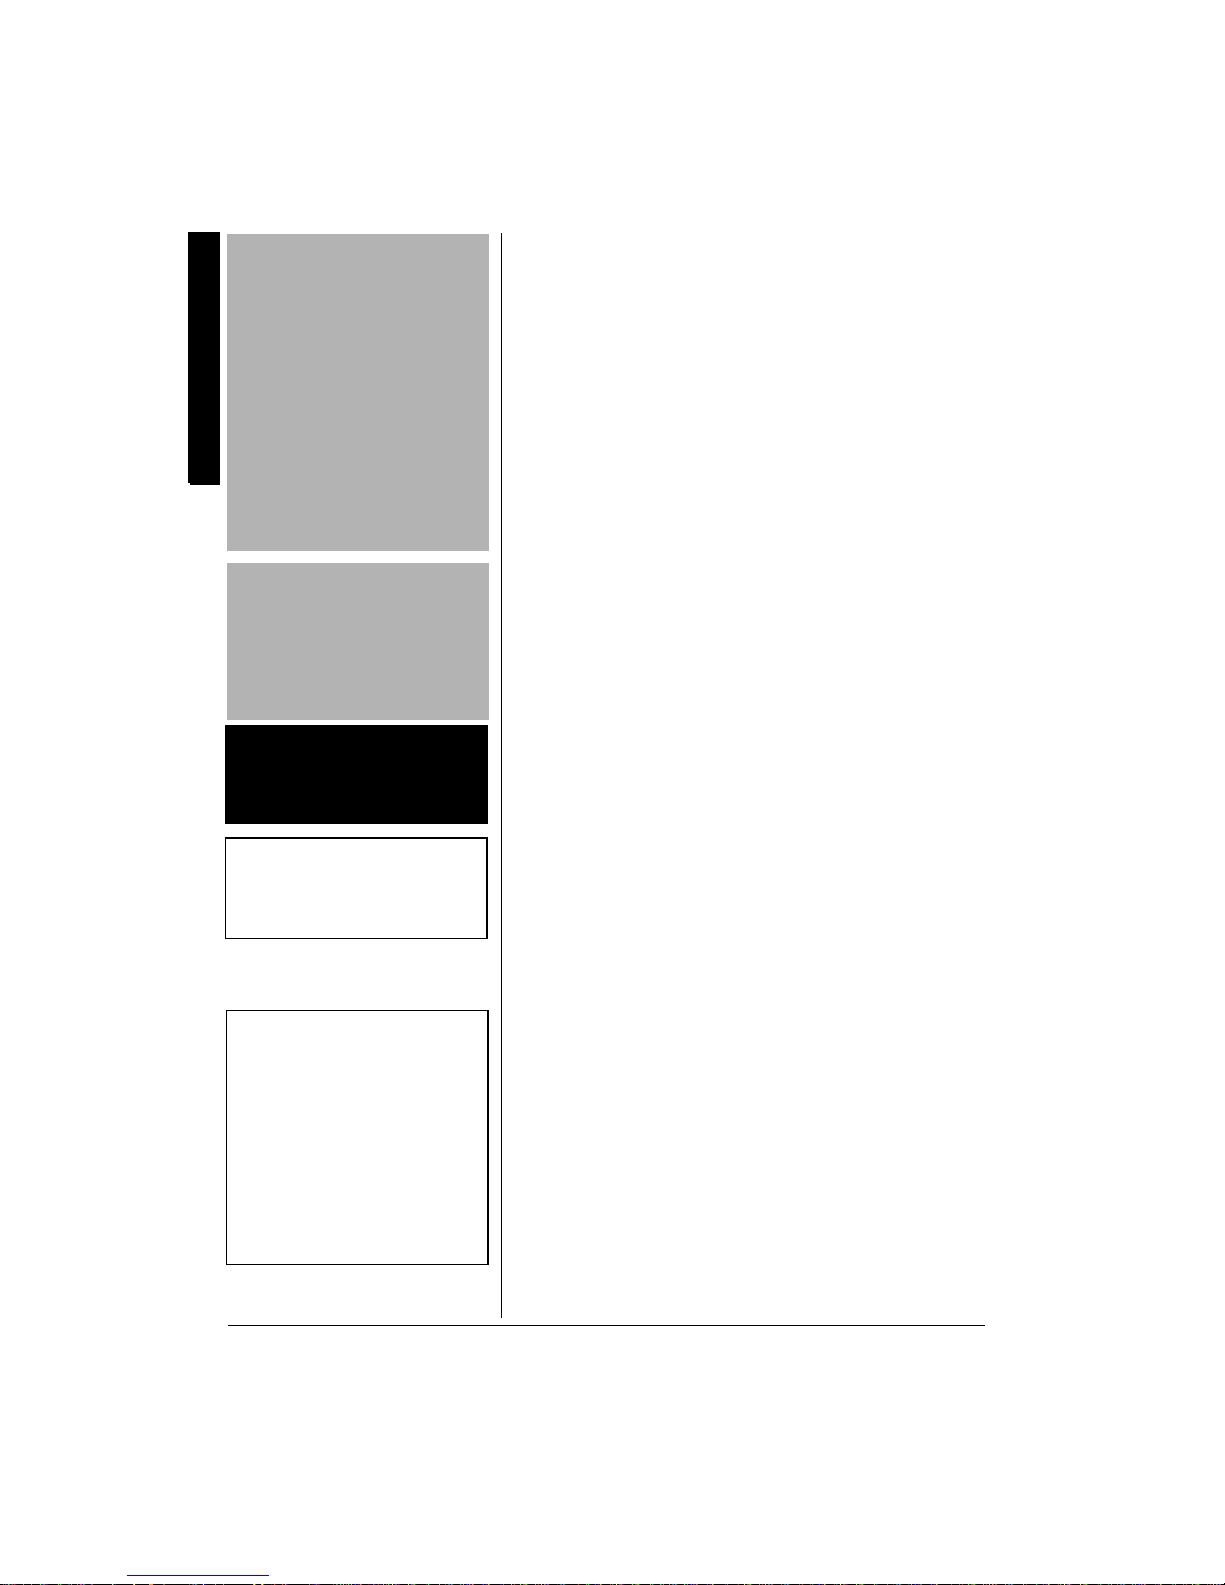
10"#"9#..
To mount the clock directly on a wall, you need two screws
(not supplied) with heads that fit the keyhole slots on the
back of the clock.
1. Drill two holes 49/16 inches (116 mm) apart.
2. Thread a screw into each hole, letting the heads extend
3. Align the clock’s keyhole slots with the screws and slide
1
/4 inch (6.5 mm) from the wall.
about
the clock downward to secure it.
Mounting the Clock
4'5'66+0)"6*'"%.1%-
If the clock displays segmented digits, does not work
properly, or locks up, you can reset it. To reset the clock,
use a pointed object, such as a straightened paper clip to
press
and time.
. The clock beeps three times. Reset the date
RESET
±
%#4'
Keep the clock dry; if it gets wet, wipe it dry immediately.
Use and store the clock only in normal temperature
environments. Handle the clock carefully; do not drop it.
Keep the clock away from dust and dirt, and wipe it with a
damp cloth occasionally to keep it looking new.
5'48+%'"#0&"4'2#+4
If your clock is not performing as it should, take it to your
local RadioShack store for assistance. Modifying or
tampering with the clock’s internal components can cause a
malfunction and might invalidate its warranty.
±"016'"±"
• Resetting the clock erases all
stored information.
3
Page 4

52'%+(+%#6+105
Power...............................................................Three AAA Batteries
Clock Accuracy
Operating Temperature ...................... 32
.......................................................±
F to 122°F (0°C to 50°C)
°
Battery Life.....................................................................5000 Hours
1
Dimensions (HWD) ................................4
/2 × 613/16 × 15/16 Inches
Weight (without batteries)........................................ 7.76 oz. (220 g)
Specifications are typical; individual units might vary. Specifications
are subject to change and improvement without notice.
0.67 Sec/Day
(114
× 173 × 24 mm)
This product is warranted by RadioShack against manufacturing defects in material
Limited One-Year Warranty
and workmanship under normal use for one (1) year from the date of purchase from
RadioShack company-owned stores and authorized RadioShack franchisees and
dealers. EXCEPT AS PROVIDED HEREIN, RadioShack MAKES NO EXPRESS
WARRANTIES AND ANY IMPLIED WARRANTIES, INCLUDING THOSE OF MERCHANTABILITY AND FITNESS FOR A PARTICULAR PURPOSE, ARE LIMITED IN
DURATION TO THE DURATION OF THE WRITTEN LIMITED WARRANTIES CONTAINED HEREIN. EXCEPT AS PROVIDED HEREIN, RadioShack SHALL HAVE NO
LIABILITY OR RESPONSIBILITY TO CUSTOMER OR ANY OTHER PERSON OR
ENTITY WITH RESPECT TO ANY LIABILITY, LOSS OR DAMAGE CAUSED DIRECTLY OR INDIRECTLY BY USE OR PERFORMANCE OF THE P RODUCT OR
ARISING OUT OF ANY BREACH OF THIS WARRANTY, INCLUDING, BUT NOT
LIMITED TO, ANY DAMAGES RESULTING FROM INCONVENIENCE, LOSS OF
TIME, DATA, PROPERTY, REVENUE, OR PROFIT OR ANY INDIRECT, SPECIAL,
INCIDENTAL, OR CONSEQUENTIAL DAMAGES, EVEN IF RadioShack HAS BEEN
ADVISED OF THE POSSIBILITY OF SUCH DAMAGES.
Some states do not allow limitations on how long an implied warranty lasts or the exclusion or limitation o f incident al or conse quential da mages, so t he above l imitations
or exclusions may not apply to you.
In the event of a product defect during the warranty period, take the product and the
RadioShack sales receipt as proof of purchase date to any RadioShack store.
RadioShack will, at its option, unless otherwise provided by law: (a) correct the defect
by product repair without charge for parts and labor; (b) replace the product with one
of the same or similar design; or (c) refund the purchase price. All replaced parts and
products, and products on which a refund is made, become the property of
RadioShack. New or reconditioned parts and products may be used in the performance of warranty service. Repaired or r eplace d par ts and produc ts are war ranted for
the remainder of the original warranty period. You will be charged for repair or replacement of the product made after the expiration of the warranty period.
This warranty does not cover: (a) damage or failure caused by or attributable to acts
of God, abuse, accident, misuse, improper or abnormal usage, failure to follow instructions, improper installa tion or maintenance, alteration, lightning or other incidence of excess voltage or curr ent; (b) any repairs other than th ose provided by a
RadioShack Authorized Service Facility; (c) consumables such as fuses or batteries;
(d) cosmetic damage; (e) transportation, shipping or insurance costs; or (f) costs of
product removal, installation, set-up service adjustment or reinstallation.
This warranty gives you specific legal rights, and you may also have other rights
which vary from state to state.
RadioShack Customer Relations, 200 Taylor Street, 6th Floor, Fort Worth, TX 76102
12/99
RadioShack Corporation
Fort Worth, Texas 76102
63-938
04A02
Printed in China
 Loading...