

Page 1
((SNOOZE))
CLOCK
8
9
ALARM
ZONE
#VQOKE"2TQLGEVKQP"%NQEM
63-987
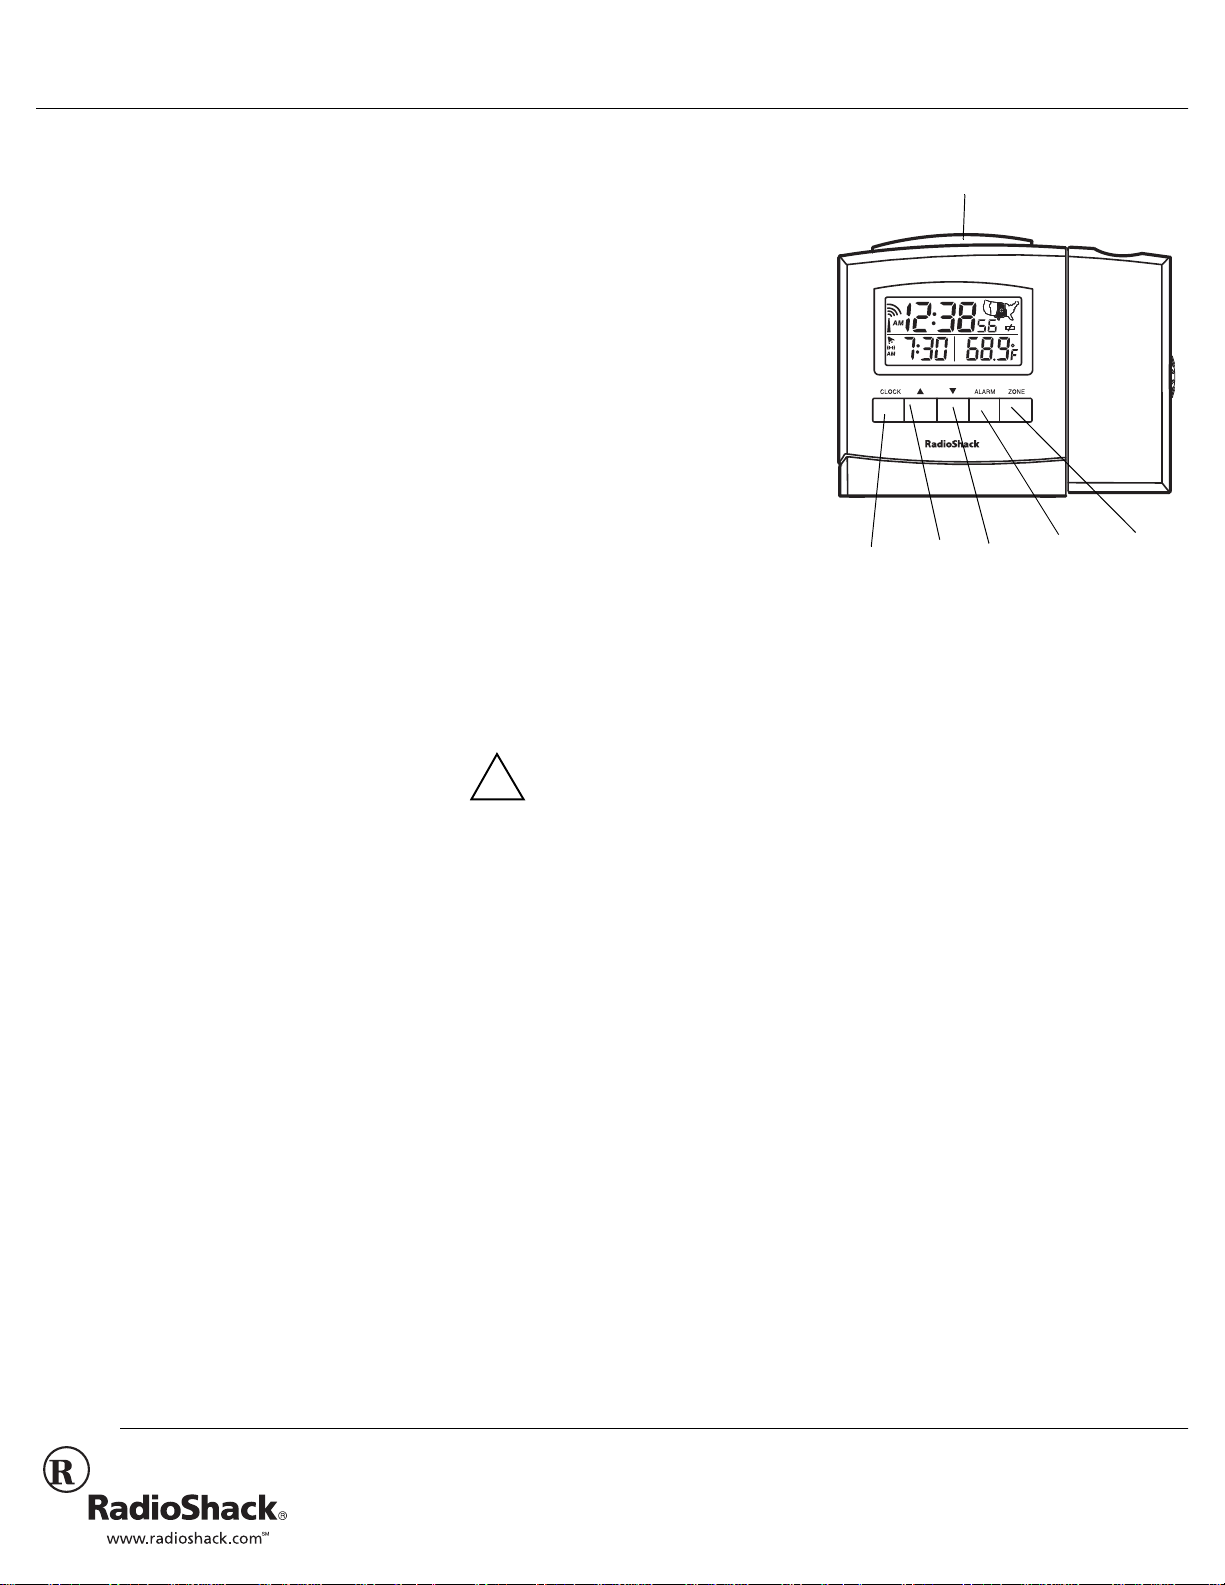
Your RadioShack Atomic Projection Clock
combines a simple design with advanced
technology. You can set the clock to project
the current time on a wall or the ceiling for
easy nightt ime viewing.
You can also set the clock to automatically
set the time and date, using a 60 kHz
longwave radio signal from radio station
WWVB. The clock checks the radio signal
several times each day and automatically
updates the time and date, providing the
most accurate time possible. Or, if you are
unable to receive the time-setting signal, you
can set the clock manually.
Large Liquid Crystal Display —
clock easy to read. The current time and
alarm time, the time zone you are in, and the
date and day of the week appear on the
display.
Adjustable Projector —
time on a wall or ceiling, rotate the image to
the desired angle, and focus the image for
clarity.
Three Languages —
of the week in English, French, or Span ish.
Display Backlight —
informati on on the screen, even in the dark.
Indoor Thermometer —
room’s temperature.
lets you project the
lets you review the day
lets you see all the
lets you monitor the
makes the
+056#..+0)"
$#66'4+'5
Your clock requires 2 AA batteries (not
supplied) for power. For the best
performance and longest life, we recommend
RadioShack alkaline batteries.
Cautions:
• Use only fresh batteries of the required
size and recommended type.
• Do not mix old and new batteries,
different types of batteries (standard,
alkaline, or rechargeable), or
rechargeable batteries of different
capacities.
1. Place your finger in the rec ess above the
battery compartmen t cover an d lift of f the
cover.
OWNER’S MANUAL — Please read before using this equipment.
2. Place the batteries in the compartment
as indicated by the polarity symbols (+
and –) marked inside.
3. Replace the cover.
When the display dims, the clock stops
ôôôô
operating properly, or
appears, replace the batteries.
Warning:
and properly. Do not burn or bury them.
Caution:
with batteries for a month or more, remove
the batteries. Batteries can leak chemicals
that can destroy electronic parts.
Note:
Dispose of old batteries promptly
If you do not plan to use the clock
Installing batteries resets the clock.
(low battery icon)
75+0)"#%"219'4
You can save battery power by using the
supplied 3V, 200 mA AC adapter to power
the projector. Be sure to install batteries to
power the clock, as the AC adapter does not
power the clock.
Cautions:
You must use a Class 2 p ower
source that supplies 3V DC
!
and delivers at least 200 mA.
Its center tip must be set to positive and
DC 3V
its plug must fit the clock's
The supplied adapter meets these
specifications. Using an adapter that
does not meet these spec ifications co uld
damage the clock or the adapter.
• Always connect the AC adapter to the
clock before you co nne ct i t to AC powe r.
When you finish, disconnect the adapter
from AC power before you disconnect it
from the clock.
1. Plug the AC adapter’s tip into the cloc k’ s
DC 3V
jack (in the recess on the bottom
of the clock).
2. Route the adapter’s co rd through th e slot
DC 3V
marked
3. Plug the AC adapter’s other end into a
standard AC outlet.
on the back of the clock.
jack.
$#5+%"12'4#6+10
As soon as you install the batteries, all
7Cý'(0&&
display segments briefly appear.
'Cý':
'Cý':
the seconds,
current indoor temperature appear.
For about 3 minutes after yo u connect pow er,
the clock scans for a radio signal and
flashes. When the clock receives a strong
signal, it automa tically sets t he time and d ate.
The clock checks the radio signal six times a
day, at about 2:00 AM, 3:00 AM, 4:00 AM,
9:00 AM, 3:00 PM, and 9:00 PM (as shown
on the clock).
Notes:
• On very cloudy and stormy days, the
signal might not be strong enough to
reset the clock. If the clock does not
receive a strong r adio signal, yo u can set
the time and date manually. (See
“Manually Setting the Time, Date, and
Language” on Page 2.)
• If the clock does not receive a strong
signal within about 2 minutes, it stops
scanning and looks for a signal again at
the next preprogrammed time.
The time zone
(Central), or
on the right of the screen. While the clock is
scanning for a signal, repeate dly pr ess
until the desired time zone is highlighted.
Your clock measures and displ ays the indoor
temperature between 23° and 122°F (–5° to
50°C). If the temperature goes above or
(January 1), and the
'Cý':'Cý':
FFFF
(Pacific),
;;;;
(Eastern) appears in the map
7Cý'(0&&
7Cý'(0&&7Cý'(0&&
CCCC
(Mountain),
÷
ZONE
,
9999
2002 RadioShack Corporation.
©
RadioShack and RadioShack.com are trademarks
All Rights Reserved.
used by RadioShack Corporation.
Page 2
below that range, the highest or lowest
temperature flashes.
To change the display language, see
“Manually Setting the Time, Date, and
Language” on Page2.
To display either the seconds or the day of
CLOCK
the week, press
To view the time in another time zone, press
ZONE
until the desired time zone is
highlighted.
.
%*'%-+0)"6*'"5+)0#."56#675
The clock disp lays these symb ols to indicate
the current or last status of radio signal
reception.
5[ODQN &GUETKRVKQP
The clock received a radio signal
strong enough to set the date and time
øý
within the last 72 hours.
The clock has not received a radio
signal strong enough to set the date
and time within the last 72 hours.
Reposition the clock before the
öý
designated signal check time, or set
the date and time manually.
Or, the displayed time has been
manually set.
Automatic time setting is turned off.
No
Indicator
-
ùý
Hold down
reset the clock.
The clock is receiving the radio signal
and the time/date sets shortly.
The clock is receiving a signal, but
reception is not strong enough to set
the clock.
8 until
appears, or
÷
/#07#..;"5'66+0)"6*'"
+/'."'."#0&".#0)7#)'
6
Important:
the manual setting. If you do not want this to
happen, hold down
disappears to turn off the automatic time
setting. To turn the automatic time setting
back on, hold down
until
Note:
minute, the clock returns to the currently set
time display.
1. Repeatedly press
2. Hold down
3. Repeatedly press (or hold down)
4. Press
A strong radio signal overrides
ZONE
until the time icon
8
for about 2 seconds
÷
appears, or reset the clock.
If you do not press a button for about 1
ZONE
to select the
desired time zone.
CLOCK
until the hour digits
flash.
8
9
to select the desired ho ur setting .
FC
FC
appears.
or
FCFC
CLOCK
. The minutes digits flash.
or
7C
7C
7C7C
5. Repeat Steps 3 a nd 4 to set the minutes,
year, month, date, and language.
CLOCK
6. Press
repeatedly press
weekday or second display.
to store your setting. Then
CLOCK
to select the
4'5'66+0)"6*'"%.1%-
RESET
Press
pointed object such as a straightened paper
clip to reset the clock. All display segments
briefly appear, then the clock scans for a
radio signal.
on the back of the clock with a
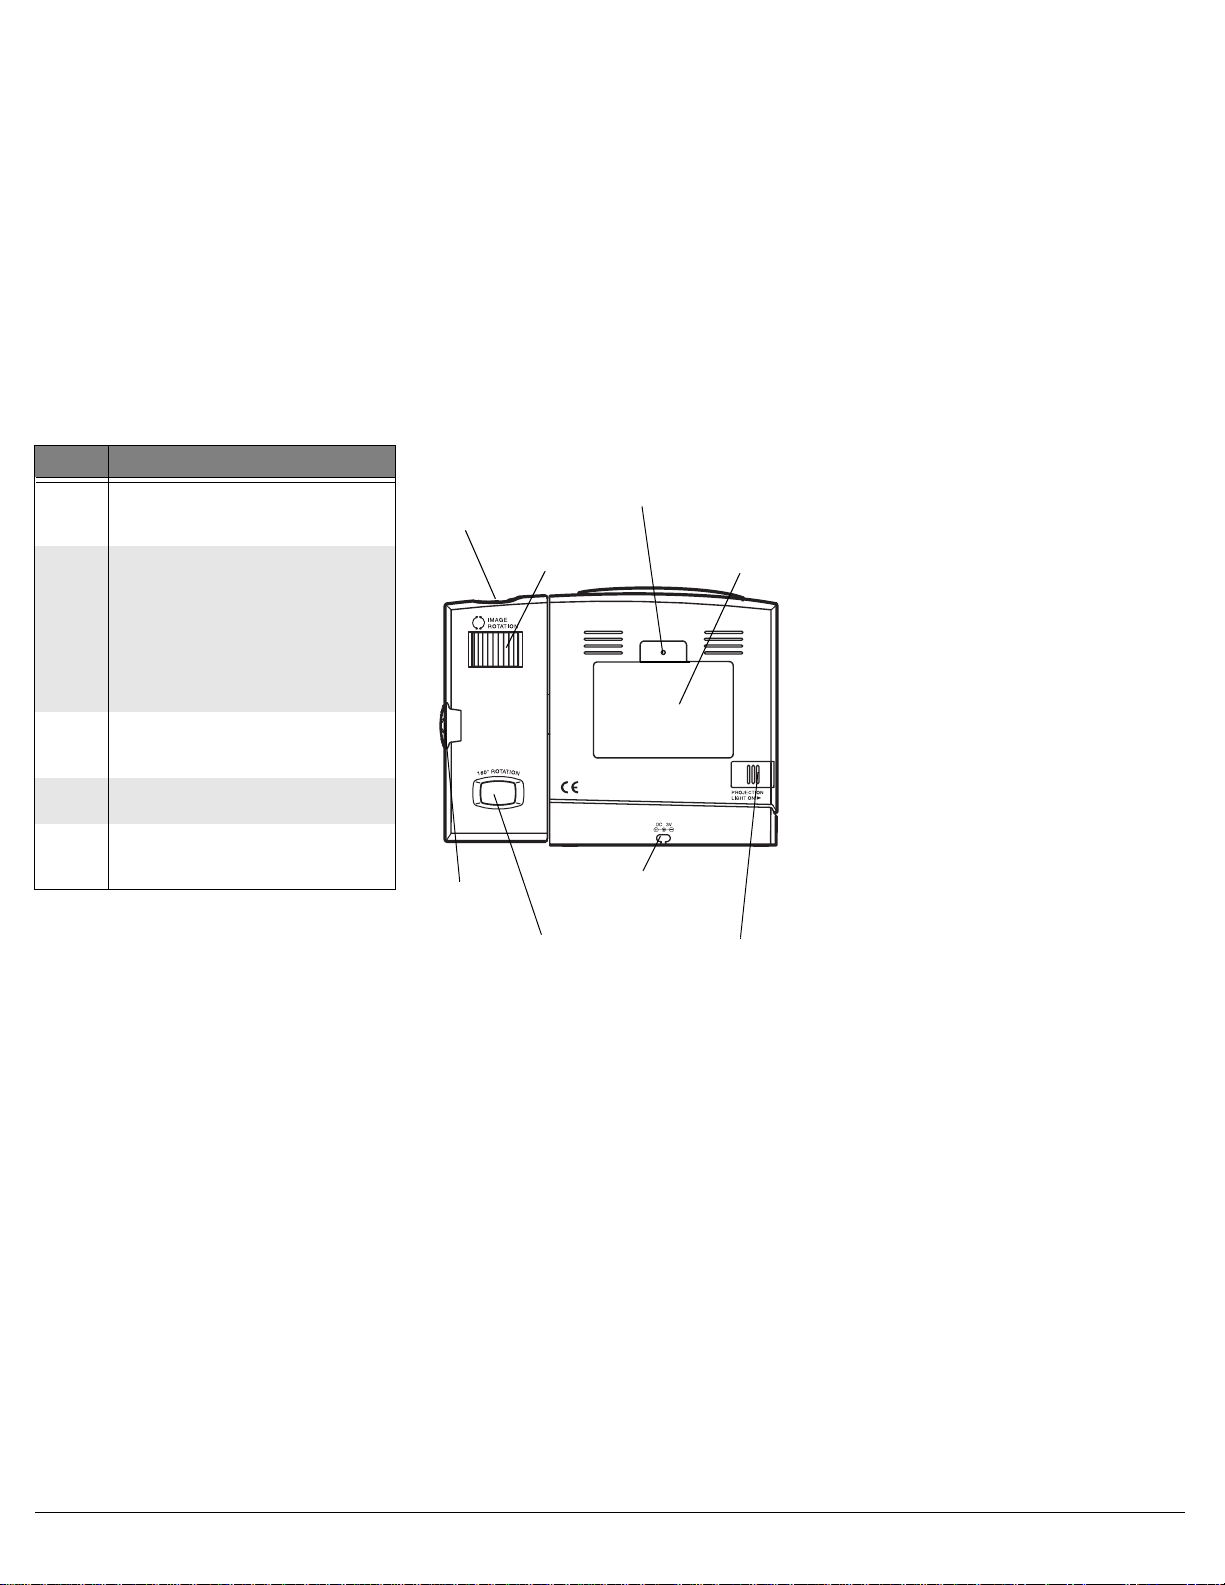
75+0)"6*'"
241,'%6+10".+)*6
You can use the clock’s projection light to
project the time on a wall or ceiling.
Projection
Light
IMAGE
ROTATION
FOCUS
°°°°
180
ROTATION
To project the time,
18 inches from the desired surface and
adjust the projection arm to the desired
angle. Then slide
the back of the clock in the direction of the
arrow to turn on the light.
Caution:
degrees in either direction. Do not force it
further.
Note:
when the clock is connected to AC power.
To focus the image,
side of the projection arm.
To rotate the image,
on the back of the clock.
To flip the image 180°,
The projection arm m oves abou t 90
PROJECTION LIGHT ON
RESET
Compartment
DC 3V
Adapter
Cord Slot
PROJECTION
place the clock at least
PROJECTION LIGHT ON
only operates
FOCUS
adjust
IMAGE ROTATION
turn
180° ROTATION
press
Battery
Cover
LIGHT ON
on
on the
To turn off the projection light,
PROJECTION LIGHT ON
arm.
With the projection light off (or when
powering the clock using batteries only),
can project the time by pressing
The projector lights for about 5 seconds then
automatically turns off.
toward the project ion
75+0)"6*'"#.#4/
5'66+0)"6*'"#.#4/"6+/'
Note:
If you do not press a button for about
30 seconds, the clock exits the alarm setup
mode. Start over at Step 1.
ALARM
1. Hold d own
flashes. é (alarm on) and
time) appear.
2. Repeatedly press or hold down
9
to select the alarm hour.
3. Press
4. Repeatedly press or hold down
5. Press
To view the alarm display at any time, press
ALARM
press
ALARM
9
to select the alarm minutes.
ALARM
The alarm time remains on the display.
. To return to the calendar display,
CLOCK
.
6740+0)"6*'"#.#4/"101
1
((
1. Press
.
ALARM
appears.
At the preset alarm time,
the display and the alarm beeps softly
every 2 seconds.
If you do not silence the alarm,
seconds, two quick b eeps sound e very 2
seconds and the alarm volume
increases. After 2 0 m ore seconds, three
quick beeps soun d ever y 2 se conds an d
the volume increases to its maximum
level. After another 20 seconds, the
alarm beeps continuousl y (abo ut f our
beeps per second) for about 1 minute.
After 2 minutes,
automatically. The first time this
happens, the snooze feature activates
and é continues flashing. In about 8
minutes, the alarm sounds again. If the
alarm turns off automatically a second
time, é remains on the display and the
alarm sounds again the next day at the
set alarm time.
until the alarm hour
. The alarm minutes flash.
to store the alarm setting.
to turn on the alarm.
the alarm turns off
slide
you
SNOOZE
û
é flashes on
(alarm
8
or
8
or
é
after 20
.
ýýýý
2
Page 3

2. Press
ALARM
to turn off the alarm. é
disappears.
75+0)"5011<'
When the alarm sounds, press
silence the alarm for about 8 minutes. é
flashes. After 8 minutes, the alarm sounds
again.
SNOOZE
to
%#4'
Keep the clock dry; if it gets wet, wipe it dry
immediately. Use and store the clock only in
normal temperature environments. Handle
the clock carefully; do not drop it. Keep the
clock away from dust and dirt, and wipe it
with a damp cloth occasionally to keep it
looking new.
Modifying or tampering with the clock’s
52'%+(+%#6+105
Batteries .... .. ............................. . Two AA Batteries
AC Adapter ................................................ 3V DC
Operating Temperature . 23° – 122°F (–5° – 50°C)
Snooze Time ............................... About 8 minutes
Accuracy ..................................
Dimensions ...................... 4.57
Weight (without batteries) ............... 8.47oz (240g)
internal components can cause a malfunction
and might invalidat e its warranty. If yo ur clock
is not performing as it should, take it to your
local RadioShack store for assistance.
Limited One-Year Warranty
This product is warranted by RadioShack against manufacturing defects in material and workmanship under normal use for one (1) year from the date of purchase from RadioShack company-owned stores and authorized RadioShack franchisees and dealers. EXCEPT AS
PROVIDED HEREIN, RadioShack MAKE S NO EXPRESS WARRANTIES AND ANY IMPLIED
WARRANTIES, INCLUDING THOSE OF MERCHANTABILITY AND FITNESS FOR A PARTICULAR PURPOSE, ARE LIMITED IN DURATION TO THE DURATION OF THE WRITTEN
LIMITED WARRANTIES CONTAINED HEREIN. EXCEPT AS PROVIDED HEREIN, RadioShack SHALL HAVE NO LIABILITY OR RESPONSIBILITY TO CUSTOMER OR ANY
OTHER PERSON OR ENTITY W ITH RESPECT TO ANY LIABILITY, LOSS OR DAMAGE
CAUSED DIRECTLY OR INDIRECTLY BY USE OR PERFORMANCE OF THE PRODUCT
OR ARISING OUT OF ANY BREACH OF THIS WARRANTY, INCLUDING, BUT NOT LIMITED TO, ANY DAMAGES RESULTING FROM INCONVENIENCE, LOSS OF TIME, DATA,
PROPERTY, REVENUE, OR PROFIT OR ANY INDIRECT, SPECIAL, INCIDENTAL, OR
CONSEQUENTIAL DAMAGES, EVEN IF RadioShack HAS BEE N ADVISED OF THE POSSIBILITY OF SUCH DAMAGES.
Some states do not allow limitations on how long an implied warranty lasts or the exclusion or
limitation of incidental or consequential damages, so the above limitations or exclusions may
not apply to you.
In the event of a product defect during the warranty period, take the product and the RadioShack sales receipt as proof of purchase date to an y Ra dioShack stor e. Radi o Shack w ill, at
its option, unless otherwise provided by law: (a) correct the defect by product repair without
charge for parts and labor; (b) r epl ace the prod uct wi th one of the s ame or si milar design; or (c)
refund the purchase price. All replaced parts and products, and products on which a refund is
made, become the property of RadioShack. New or reconditioned parts and products may be
used in the performance of warranty service. Repaired or replaced parts and products are warranted for the remainder of the original warranty period. You will be charged for repair or replacement of the product made after the expiration of the warranty period.
This warranty does not cover: (a) damage or failure caused by or attributable to acts of God,
abuse, accident, misuse, improper or abnormal usage, failure to follow instructions, improper
installation or maintenance, alteration, lightning or other incidence of excess voltage or current; (b) any repairs other than those provided by a RadioShack Authorized Service Facility;
(c) consumables such as fuses or batteries; (d) cosmetic damage; (e) transportation, shipping
or insurance costs; or (f) costs of pr oduct r emo val, install at ion, set- up se rvice adjustment or reinstallation.
This warranty gives you specific legal rights, and you may also have other rights which vary
from state to state.
RadioShack Customer Relations, 200 Taylor Street, 6th Floor, Fort Worth, TX 76102
Specifications are typical; individual units might
vary. Specifications are subject to change and
improvement without notice.
12/99
±
0.5 Second/Day
×
5.91 × 1.65 inch
× 150 ×
(116
42mm)
RadioShack Corporation
Fort Worth, Texas 76102
63-987
10A01
Printed in China
 Loading...