

Page 1
63-974A.fm Page 1 Thursday, January 6, 2000 1:47 PM
Cat. No. 63-974
OWNER’S MANUAL
Please read before using this equipment.
Travel Sleep Machine
with Talking LCD Clock
A
®
Page 2
63-974A.fm Page 2 Thursday, January 6, 2000 1:47 PM
FEATURES
Your RadioShack Travel Sleep Machine combines a simple design with advanced technology. You can set the clock to announce the
time every hour, which is handy in a dark
room, for example. You can also set the clock
to play soothing sounds to lull you to sleep.
The clock’s other features include:
Six Sleeping Sounds
— one of six different
soothing sounds (rain, train, ocean, wind,
brook, and night) lull you to sleep.
Countdown Timer
— you can set a time limit
on how long the sleep sounds play.
Voice Announcement
— lets you hear the
time with the touch of a button.
Alarm with Snooze
— sounds an alarm and
announces the alarm time when the alarm
goes off. You can silence the alarm and have
it sound again in about 5 minutes, so you can
sleep a while longer.
Adjustable Time Format
— you can set the
time in either the 12- or 24-hour format.
2000 Tandy Corporation.
©
RadioShack and Sleep Machine are registered
All Rights Reserved.
trademarks used by Tandy Corporation.
2
Page 3
63-974A.fm Page 3 Thursday, January 6, 2000 1:47 PM
Hourly Chime Function
— you can set the
clock to sound a chime and announce the time
hourly.
Backlight
— lights the display at the touch of
a button.
Slide Cover
— protects the front panel and
prevents you from accidentally changing a setting when it is packed in your suitcase (for example).
3
Page 4
63-974A.fm Page 4 Thursday, January 6, 2000 1:47 PM
PREPARATION
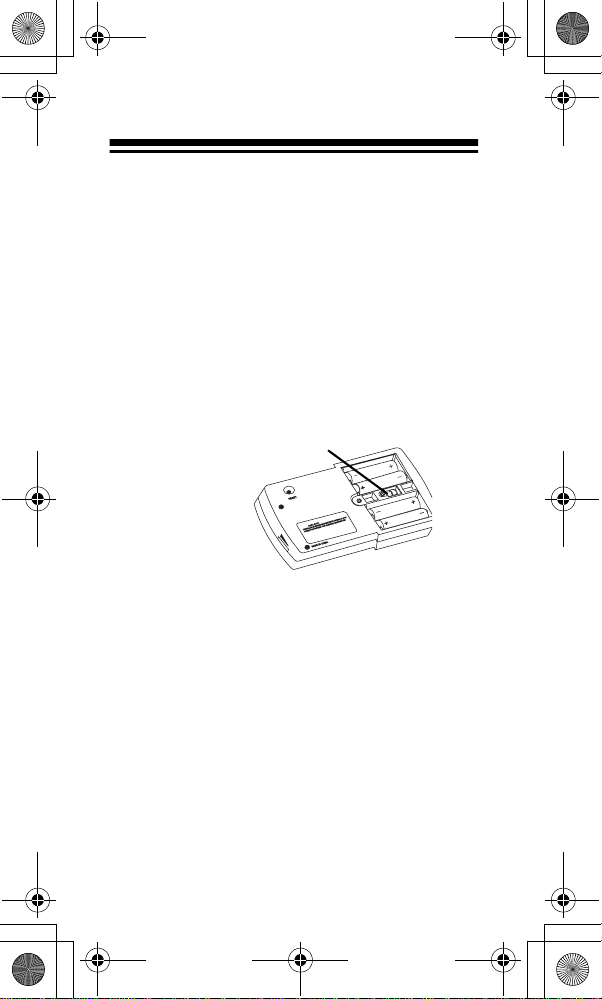
REMOVING THE BATTERY
INSULATION STRIP
Your alarm clock comes with an insulation
strip that helps preserve battery power during
shipping. Before using the alarm clock, remove the insulation strip from the button-cell
battery compartment (located inside the AA
battery compartment) by grasping and pulling
it out.
Button-Cell
Battery Compartment
USING THE PROTECTIVE
COVER
Your clock comes with a protective cover to
protect the controls while your clock is packed
in your suitcase (for example).
To change the time or alarm settings, slide the
cover open and flip it over, then align the cover’s sides with the grooves and slide the cover
over the back of the clock.
4
Page 5
63-974A.fm Page 5 Thursday, January 6, 2000 1:47 PM
USING THE STAND
To see the clock more easily, flip the stand (on
the battery compartment) out to prop up the
clock.
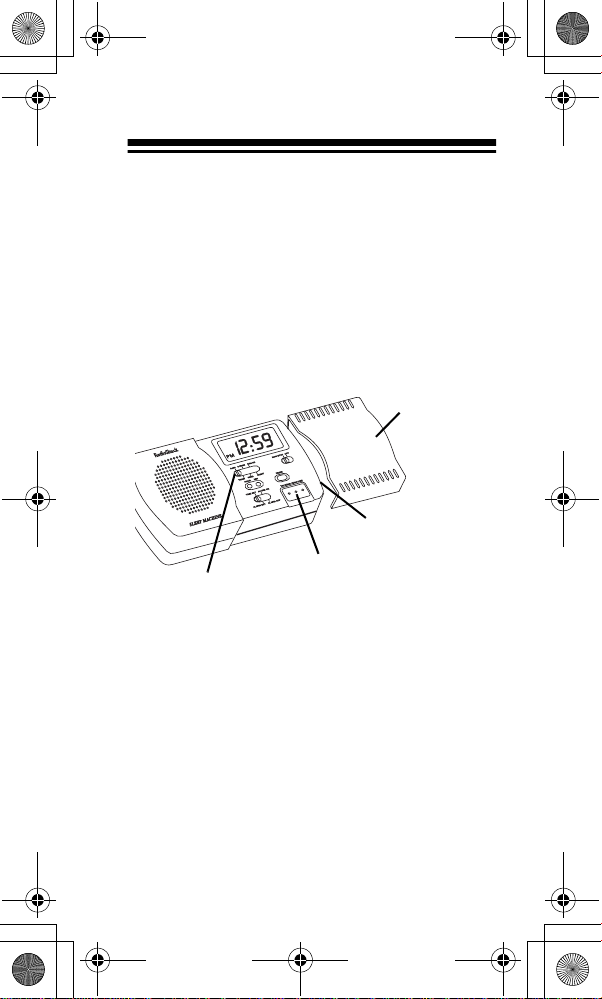
A QUICK LOOK AT THE
CLOCK
Protective
Cover
VOLUME (on side)
Soothing
Sounds
Soothing Sounds Switch
selection switch (RAIN, TRAIN, OCEAN,
WIND, BROOK, or NIGHT) to the desired setting to have the clock play any of these soothing sounds.
NON STOP/OFF
uously play, or turns the sounds off.
HOUR/MIN
and alarm time.
— press to set the desired time
TALKING/SNOOZE
— slide the sound
— sets the sounds to contin-
5
Page 6

63-974A.fm Page 6 Thursday, January 6, 2000 1:47 PM
— press to set the clock to play the de-
TIMER
sired sleep sound for up to an hour and a half.
TIME SET/ALARM SET/ALARM ON/ALARM
— slide to the desired setting to set the
OFF
time, set the alarm time, and turn the alarm on
and off.
TALKING/SNOOZE
to announce every hour.
VOLUME
level.
12/24
— rotate to set the desired listening
— sets the time format.
— press to set the clock
INSTALLING BATTERIES
Your clock comes with two 357A button-cell
batteries to power the LCD clock, and requires
four AA batteries (not supplied) to power its
other functions. For the best performance and
longest life, we recommend RadioShack alkaline batteries.
Cautions:
• Use only fresh batteries of the required
• Do not mix old and new batteries, differ-
6
size and recommended type.
ent types of batteries (alkaline, or
Page 7

63-974A.fm Page 7 Thursday, January 6, 2000 1:47 PM
rechargeable) or rechargeable batteries
of different capacities.
Stand
AA Battery
Compartment
1. Use a Phillips screwdriver to remove the
screw from the battery compartment
cover, then lift the cover to remove it.
2. Place the batteries in the compartment,
as indicated by the polarity symbols (+
and –) marked inside.
3. Replace the cover and secure it with the
screw.
When the sleep sounds become weak or distorted, replace the AA batteries.
Warning:
Dispose of old batteries promptly
and properly. Do not burn or bury them.
7
Page 8

63-974A.fm Page 8 Thursday, January 6, 2000 1:47 PM
Caution:
If you do not plan to use the clock for
more than a month, remove the batteries. Batteries can leak chemicals that can destroy
electronic parts.
SETTING THE TIME
1. Slide
2. Slide
3. Repeatedly press (or hold down)
4. Repeatedly press (or hold down)
5. Slide
TIME SET (ALARM SET/ALARM ON/
ALARM OFF)
to
TIME SET
. The clock
announces “Clock Setting,” and the display flashes.
(located inside the battery
12/24
compartment) to the desired time format
(12- or 24-hour format).
to
HOUR
set the hour. The clock announces the
hour as it advances.
If you select the 12-hour time for-
Note:
mat,
appears during PM hours.
PM
MIN
to
set the minutes. The clock announces the
minute as it advances.
TIME SET
to
ALARM OFF
to store
your setting.
To hear the current time at any time, press
TA LK IN G
. The display lights while the clock an-
nounces the time.
8
Page 9

63-974A.fm Page 9 Thursday, January 6, 2000 1:47 PM
OPERATION
USING THE ALARM
Follow these steps to set the alarm time.
1. Slide
2. Repeatedly press (or hold down)
3. To turn on the alarm, slide
At the set alarm time, the clock announces the
time and beeps three times, and the display
lights. The clock alternately repeats the alarm
time and then beeps for about 30 seconds.
The alarm then temporarily shuts off. If you do
not turn off the alarm, the alarm sounds for
about 30 seconds every 5 minutes.
ALARM SET (TIME SET/ALARM ON/
ALARM OFF)
to
ALARM SET
. The clock
announces the currently set alarm time,
the display flashes, and
appears
AL
between the hour and minute digits.
HOUR
then
to set the desired alarm time.
MIN
The clock announces the setting as it
advances.
ALARM SET
ALARM ON
. and the alarm time
appear on the display and the clock
announces the set alarm time. The display returns to the current time.
to
To silence the alarm, slide
ALARM OFF
. disappears.
ALARM SET
to
9
Page 10

63-974A.fm Page 10 Thursday, January 6, 2000 1:47 PM
Or, you can press
SNOOZE (TALKING)
to temporarily turn off the alarm. The alarm sounds
again in about 5 minutes. The snooze cycle
will repeat four more times if you do not turn
off the alarm.
To have the alarm sound again the next day,
slide
ALARM SET
to
ALARM ON
. appears.
SETTING THE CHIME
To have the clock sound a chime hourly, make
sure
TIME SET
TALKING (SNOOZE)
to
SET
ALARM OFF
is set to
TIME SET
. appears. Slide
.
To turn off the chime, slide
, then press
SET
TALKING
so disappears.
. Then press
TIME SET
to
TIME
TIME
SETTING THE SLEEP SOUND
You can choose from six soothing sounds
(rain, train, ocean, wind, brook, and night) to
lull you to sleep. Slide the sound selection
switch to the desired sleep sound. Then slide
NON STOP (OFF)
to
NON STOP
.
Rotate
10
VOLUME
to the desired listening level.
Page 11

63-974A.fm Page 11 Thursday, January 6, 2000 1:47 PM
To stop the sound, slide
NON STOP
to
OFF
.
Notes:
• For maximum battery life, we recommend
using the countdown timer for sleep
sounds (see “Using the Countdown
Timer”).
• If the sleep sounds do not sound or
become distorted, or the display dims,
use a sharp object (such as a straightened paper clip) to press
RESET
on the
back of the clock.
Using the Countdown Timer
You can set the countdown timer to automatically shut off the sleep sounds after 30, 60, or
90 minutes.
1. Set
ALARM OFF
2. Slide
TIME SET
NON STOP
to either
.
to
OFF
ALARM ON
.
3. Slide the sound selection switch to the
desired sound.
4. Repeatedly press
to set the count-
TIMER
down to the desired amount of time (30,
, or OF (off)).
60, 90
or
11
Page 12

63-974A.fm Page 12 Thursday, January 6, 2000 1:47 PM
The clock plays the selected sleeping sound
for the set amount of time. To stop the sound
sooner, press
TALKING
so the clock announces the time. To
so OF appears, or press
TIMER
reset the countdown timer, repeat Steps 3 and
4.
TROUBLESHOOTING
If your Sleep Machine is not working as it
should, these suggestions might help you
eliminate the problem. If the Sleep Machine
still does not operate properly, take it to your
local RadioShack store for assistance.
Problem Possible Solution
The sleep
sounds work, but
the clock does
not.
The clock works,
but the sleep
sounds do not.
12
Pull out the insulation strip.
See “Removing the Battery
Insulation Strip” on Page 4.
Replace the button-cell batteries. See “Replacing the
Button-Cell Batteries” on
Page 14.
Replace the AA batteries.
See “Installing Batteries”
on Page 6.
Page 13

63-974A.fm Page 13 Thursday, January 6, 2000 1:47 PM
Resetting the Sleep Machine
If you have tried the solutions recommended
on Page 12 and the Sleep Machine still works
improperly, use a pointed object (such as a
paper clip) and press
Machine.
chine’s memory is cleared.
12:00
appears and the Sleep Ma-
to reset the Sleep
RESET
CARE
To enjoy your Sleep Machine for a long time:
• Keep the Sleep Machine dry. If it gets wet,
wipe it dry immediately.
• Use and store the Sleep Machine only in
normal temperature environm en ts.
• Handle the Sleep Machine gently and
carefully. Do not drop it.
• Keep the Sleep Machine away from dust
and dirt.
• Wipe the Sleep Machine with a damp
cloth occasionally to keep it looking new.
Modifying or tampering with the Sleep Machine’s internal components can cause a malfunction and invalidate its warranty. If your
Sleep Machine is not performing as it should,
take it to your local RadioShack store for assistance.
13
Page 14

63-974A.fm Page 14 Thursday, January 6, 2000 1:47 PM
REPLACING THE BUTTONCELL BATTERIES
When the display dims or the clock stops operating properly, replace the 357A button-cell
batteries.
Warnings:
• Keep button-cell batteries away from children. Swallowing a button-cell battery can
be fatal.
• Dispose of old batteries promptly and
properly. Do not burn or bury them.
1. Use a Phillips screw driver to remove the
screw from the battery compartment
cover and remove the cover.
2. Remove the screw from the button-cell
battery compartment’s cover and remove
the cover.
3. Remove the old batteries and install the
new ones according to the polarity symbols (+ and –) marked inside.
4. Replace the button-cell battery compartment cover and secure it with its screw.
5. Replace the battery compartment cover
and secure it with its screw.
14
Page 15

63-974A.fm Page 15 Thursday, January 6, 2000 1:47 PM
SPECIFICATIONS
Power ............................ Two 357A batteries
Four AA batteries
Battery Life ....................... Alkaline 60 Hours
357A 180 Days
Accuracy .............................. ± 0.67 Sec/Day
7
Dimensions ..................... 5
Weight .................................................. 12 oz
Specifications are typical; individual units
might vary. Specifications are subject to
change and improvement without notice.
/8 × 35/16 × 11/4 in
(150 × 84 × 32 mm)
(259 g)
15
Page 16

63-974A.fm Page 16 Thursday, January 6, 2000 1:47 PM
Limited One-Year Warranty
This product is warranted by RadioShack against manufacturing defects in material and workmanship under normal use for one (1) year
from the date of purchase from RadioShack company-owned stores
and authorized RadioShack franchisees and dealers. EXCEPT AS
PROVIDED HEREIN, RadioShack MAKES NO EXPRESS WARRANTIES AND ANY IMPLIED WARRANTIES, INCLUDING THOSE
OF MERCHANTABILITY AND FITNESS FOR A PARTICULAR PURPOSE, ARE LIMITED IN DURATION TO THE DURATION OF THE
WRITTEN LIMITED WARRANTIES CONTAINED HEREIN. EXCEPT
AS PROVIDED HEREIN, RadioShack SHALL HAVE NO LIABILITY
OR RESPONSIBILITY TO CUSTOMER OR ANY OTHER PERSON
OR ENTITY WITH RESPECT TO ANY LIABILITY, LOSS OR DAMAGE CAUSED DIRECTLY OR INDIRECTLY BY USE OR PERFORMANCE OF THE PRODUCT OR ARISING OUT OF ANY BREACH
OF THIS WARRANTY, INCLUDING, BUT NOT LIMITED TO, ANY
DAMAGES RESULTING FROM INCONVENIENCE, LOSS OF TIME,
DATA, PROPERTY, REVENUE, OR PROFIT OR ANY INDIRECT,
SPECIAL, INCIDENTAL, OR CONSEQUENTIAL DAMAGES, EVEN
IF RadioShack HAS BEEN ADVISED OF THE POSSIBILITY OF
SUCH DAMAGES.
Some states do not allow limitations on how long an implied warranty
lasts or the exclusion or limitation of incidental or consequential damages, so the above limitations or exclusions may not apply to you.
In the event of a product defect during the warranty period, take the
product and the RadioShack sales receipt as proof of purchase date
to any RadioShack store. RadioShack will, at its option, unless otherwise provided by law: (a) correct the defect by product repair without
charge for parts and labor; (b) replace the product with one of the
same or similar design; or (c) refund the purchase price. All replaced
parts and products, and products on which a refund is made, become
the property of RadioShack. New or reconditioned parts and products
may be used in the performance of warranty service. Repaired or replaced parts and products are warranted for the remainder of the
original warranty period. You will be charged for repair or replacement of the product made after the expiration of the warranty period.
This warranty does not cover: (a) damage or failure caused by or attributable to acts of God, abuse, accident, misuse, improper or abnormal usage, failure to follow instructions, improper installation or
maintenance, alteration, lightning or other incidence of excess voltage or current; (b) any repairs other than those provided by a RadioShack Authorized Service Facility; (c) consumables such as fuses
or batteries; (d) cosmetic damage; (e) transportation, shipping or insurance costs; or (f) costs of product removal, installation, set-up service adjustment or reinstallation.
This warranty gives you specific legal rights, and you may also have
other rights which vary from state to state.
RadioShack Customer Relations, 200 Taylor Street,
6th Floor, Fort Worth, TX 76102
We Service What We Sell
12/99
03A00 Printed in Hong Kong
 Loading...