

Page 1
63-969.fm Page 1 Monday, September 27, 1999 9:19 AM
OWNER’S MANUAL
Please read before using this equipment.
Projection Clock
Cat. No. 63-969
Page 2
63-969.fm Page 2 Monday, September 27, 1999 9:19 AM
FEATURES
Your RadioShack Projection Clock combines a simple
design with advanced te chnology. You can set t he clock
so it projects the current time on a wall or the ceiling for
easy nighttime viewing. Its features include:
Adjustable Projection Light
— lets you project the time
on any location on a wall or c eiling. This lets you easily
see the time at night.
Large Liquid Crystal Display
— makes the cloc k easy
to read. The current tim e and alarm time, the tim e zone
you are in, and th e date and day of the week appear o n
the display.
Crescendo Alarm
— the alarm sounds a series of beeps
that gradually increase in volume.
Snooze Control
— temporarily silences the alarm for
about 8 minutes so you can sleep a little longer.
Display Backlight
— lets you see al l information on the
display even when it is dark.
Supplied AC Adapter
— lets you power th e cloc k’s pro-
jection light to help extend battery life.
Three Languages
— let you view the day of the week in
English, French, or Spanish.
1999 Tandy Corporation.
©
RadioShack is a registered trademark used by Tandy Corporation.
2
All Rights Reserved.
Page 3
63-969.fm Page 3 Monday, September 27, 1999 9:19 AM
Three Languages
— let you view the day of the week in
English, French, or Spanish.
:
WARNING
pose this product to rain or moisture.
CAUTION
DO NOT REMOVE COVER OR BACK. NO USER-SERVICEABLE P ARTS INSIDE. REFER SERVICING TO QUALIFIED PERSONNEL.
To reduce the risk of fire or shock hazard, do not ex-
CAUTION
RISK OF ELECTRIC SHOCK. DO NOT
: TO REDUCE THE RISK OF ELECTRIC SHOCK,
This symbol is intended to alert you to the presence of uninsulated dangerous voltage within the
product’s enclosure that might be of sufficient
magnitude to constitute a risk of electric shock.
Do not open the product’s case.
This symbol is intended to inform you that important operating and maintenance instructions are
!
included in the literature accompanying this product.
OPEN.
!
You need the supplied AC adapter and two AA bat-
Note:
teries (not supplied) to power the projection light.
3
Page 4
63-969.fm Page 4 Monday, September 27, 1999 9:19 AM
PREPARATION
INSTALLING BATTERIES
Your clock requires two AA batteries (not supplied) for
power. For the best performance and longest life, we recommend RadioShack alkaline batteries.
Cautions:
• Use only fresh batter ies of the requir ed size and rec ommended type.
• Do not mix old and new batteries, different types of
batteries (standard, alkaline, or rechargeable), or
rechargeable batteries of different capacities.
Follow these steps to install batteries.
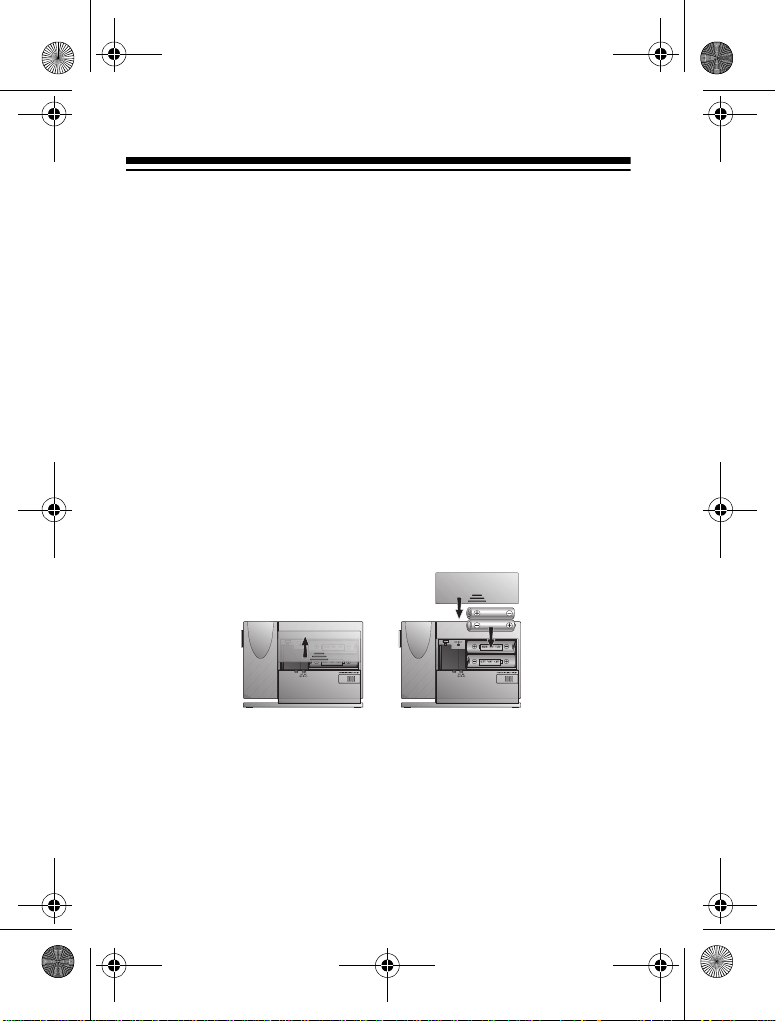
1. Slide the batter y compar tment cover in the direction
of the arrow to remove it.
2. Place the batteries in the compartmen t as indicated
by the polarity symbols (+ and –) marked inside.
4
Page 5
63-969.fm Page 5 Monday, September 27, 1999 9:19 AM
When you install batteries, all display segments
briefly appear. Then
the seconds di splay.
appears below DATE, indicating January 1. P (the
default time zone) appears above the zone indicator.
The clock is preset to display the day of the
Note:
week in English. To set the clock to display in another
language, see “Setting the Clock” on Page 7.
3. Replace the cover.
When
BATT appears or the clock stops operating proper-
ly, replace the batteries.
AM 12:00 appears, followed by
1 appears below MONTH and 1
Warning:
Do not burn or bury them.
Caution:
or more, remove the batteri es. Batteries ca n leak chemicals that can destroy electronic parts.
Dispose of old batteries promptly and properly.
If you do not plan to use the clock for a month
CONNECTING TO AC POWER
Your clock comes with an AC adapter so you can operate
the clock’s projector light continuously from AC power.
5
Page 6

!
63-969.fm Page 6 Monday, September 27, 1999 9:19 AM
Caution:
that supplies 3 volts DC and delivers at least
200 mA. Its center tip must be set to positive
and its plug must fit th e clock's
adapter meets these specifications. Using an adapter
that does not meet these specifications could damage
the clock or the adapter.
Follow these steps to connect the AC adapter to the
clock.
1. Slide the batter y compar tment cover in the direction
of the arrow to remove it.
2. Plug the AC adapter’s tip into the jack inside the battery compartment.
3. Route the adapter’s cord through the slot m ar ked
on the back of the clock.
3V
You must use a Class 2 po wer sour ce
jack. The supplie d
DC 3V
DC
4. Replace the cover.
5. Plug the AC adapter’s other end into a sta ndard AC
outlet.
6
Page 7

63-969.fm Page 7 Monday, September 27, 1999 9:19 AM
SETTING THE CLOCK
1. Repeatedly press
to select the time zone you
ZONE
are in (Pacific, Mountain, Central, or Eastern). As you
press
and a letter (
tral, or
, the time zone you select is highlighted
ZONE
P for Pacific, M for Mountain, C fo r C e n -
E for Eastern) appears above the zone indica-
tor.
2. Hold down
MODE/SET
3. Repeatedly press
each press. (Hold down
until the hour digit flashes.
. The hour advances by 1 with
+
to rapidly advance the
+
hour).
AM appears for AM hours and PM appear s for
Note:
PM hours.
4. Press
MODE/SET
5. Hold down or repeatedly press
6. Press
MODE/SET
7. Repea tedly press
8. Press
MODE/SET
. The minute digits flash.
to set the minute.
+
. The year digits flash.
to set the year.
+
. The current h our, minute, and day
of the week appear, and the month digit flashes.
9. Hold down or repeatedly press
10. Press
MODE/SET
. The date digit flashes.
to set the month.
+
11. R epeatedly press + to set the date.
7
Page 8

63-969.fm Page 8 Monday, September 27, 1999 9:19 AM
12. Press
MODE/SET
used for the day of the week (
French, or
. A letter repres enting the languag e
E for English, F for
S for Spanish) appears.
13. R epeatedly press + to select the desired language.
14. Press
MODE/SET
. The time, time zone, and date set-
tings appear.
8
Page 9

63-969.fm Page 9 Monday, September 27, 1999 9:19 AM
OPERATION
To switch between viewing the seconds d isplay and the
day of the week, press
MODE/SET
viewing the month/date and the alarm time, press
STOP/ALARM SET
.
To view the time in another time zo ne, repeatedly press
to highlight the zone you want. The time in that
ZONE
time zone appears.
. To switch between
ALARM
To light the display for about 5 seco nds, press
.
LIGHT
SNOOZE/
USING THE PROJECTION LIGHT
You can use the clock’s projection light to project the time
on a wall or ceiling.
To project the time, place the clock at least 18 inches
from the surface you are pr ojecting onto, adjust the projection arm to project light onto the surface where you
want to see the time, then slide
on the back of the clock in the direction of the arrow.
Projection Arm
PROJECTION LIGHT ON
PROJECTION
LIGHT ON
9
Page 10

63-969.fm Page 10 Monday, September 27, 1999 9:19 AM
Caution:
The projection arm m oves ab out 90 degr ees in
either direction. Do not force it.
To focus the time on the desired po sition, adjust
FOCUS
on the side of the projection arm.
To turn off the projection light, sli de
toward the projection arm.
ON
PROJECTION LIGHT
With the projection light off, y ou can also project th e time
by pressing
SNOOZE/LIGHT
. The projector lights for about
5 seconds then automatically turns off.
USING THE ALARM
Setting the Alarm Time
If you do not press a button within about 90 sec-
Note:
onds after you p ress ed the pr evio us bu tton , the clo ck exits its alarm setup mode. Start over at Step 1.
1. Hold down
ALARM STOP/ALARM SET
time and appear. The hour digit flashes.
until the alarm
2. Hold down or repeatedly press
. appears and the
+
alarm hour advances by 1 with each press.
10
Page 11

63-969.fm Page 11 Monday, September 27, 1999 9:19 AM
3. Press
ALARM STOP/ALARM SET
. The minute digit
flashes.
4. Hold down or repeatedly press
to set the alarm
+
minute.
5. Press
ALARM STOP/ALARM SET
. The alarm time
appears.
Notes:
• Repeatedly press
ALARM STOP/ALARM SET
to swit ch
between viewing the alarm ti me and the month and
date.
• The alarm sounds whether the alarm time is displayed or not.
Turning the Alarm On/Off
The alarm automatica lly turns o n when you set an ala rm
time. To manually turn on th e alarm, press
. appears.
OFF
At the set alarm time, the dis play lights for about 14 seconds, flashes, and the al arm sounds one soft beep
every 2 seconds.
ALARM ON/
After 20 second s, 2 quick b eeps so und every 2 seconds
and the volume increases slightly. After 20 more sec-
11
Page 12

63-969.fm Page 12 Monday, September 27, 1999 9:19 AM
onds, 3 quick beeps sound ev ery 2 second s and the volume increases again to its maximum level . After another
20 seconds, the beeping becomes continuous (about 4
beeps per second) and sounds for about 1 minute.
To silence the alarm, press
ALARM STOP/ALARM SET
remains on the d isplay and the ala rm sounds at the
set alarm time the next day. If you do not silence the
alarm, it automatical ly turns off after 2 minutes . The first
time this happens , the snooze feature activates and
continues to flash. In about 8 minu tes, the alarm sounds
again. If the alarm turns off autom atically a s econd time,
remains on the display and the alarm will not soun d
again until the set alarm time the next day.
When the alarm sounds, the projection light and
Note:
backlight turn on for about 14 seconds.
To turn off the alarm s o it does not sound the next day,
press
ALARM ON/OFF
. disappears.
Using SNOOZE/LIGHT
When the alarm sounds, yo u can press
to silence the alarm fo r about 8 minutes. fl ashes. After 8 minutes, the alarm sounds again.
SNOOZE/LIGHT
.
12
Page 13

63-969.fm Page 13 Monday, September 27, 1999 9:19 AM
CARE AND MAINTENANCE
Your RadioShack Projecti on Clock is an example of superior design and c raftsmanship. The following suggestions will help y ou car e for y our cloc k so y ou can e njoy it
for years.
Keep the clock dry. If it gets wet, wipe it dry immediately. Liquids mig ht contain minerals that
can corrode the electronic circuits.
Use and store the clock onl y i n no rm al temp erature environments. Temperature extremes
can shorten the life of ele ctronic devices , damage batteries, and distort or melt plastic parts.
Keep the clock away from dus t and dirt, which
can cause premature wear of parts.
Handle the clock gently and carefully. Dropping
it can damage circuit boards and cases and
can cause the clock to work improperly.
Use only fresh batteries of the required size
and recommended type. Batteries can leak
chemicals that dam age your clock’s electroni c
parts.
13
Page 14

63-969.fm Page 14 Monday, September 27, 1999 9:19 AM
Wipe the clock with a damp cloth occa sionally
to keep it looking new. Do not use harsh chemicals, cleaning solvents, or strong detergents to
clean the clock.
Modifying or tampering with the clock’s internal components can cause a malfunction and might invalidate its
warranty. If your clock is not performing as it should, take
it to your local RadioShack store for assistance.
RESETTING THE CLOCK
If the clock does not work properly o r locks up, you can
reset it. Open the battery compartment and use a pointed
object such as a str aightened paper clip to press
All display segmen ts briefly ap pear. Follo w the step s listed in “Setting the Clock” on Page 7 to set the clock again.
RESET
.
14
Page 15

63-969.fm Page 15 Monday, September 27, 1999 9:19 AM
SPECIFICATIONS
Operating Temperature ............................. 32°F to 109°F
(0°C to 43°C)
Power Sources:
Batteries ............................................................. 2 AA
AC Adapter .......... 3V DC/200 mA, Center Tip Positive
Snooze Time ......................................... About 8 Minutes
Accuracy .............................................
Dimensions (HWD) ....................... 4
(101.6
±
0.5 Second/Day
59/16 ✕ 15/8 Inches
✕
✕ 141.3 ✕ 41.3 mm)
Weight (Without Batteries) .................................... 8.5 oz
(241 g)
(Without AC Adapter)
Included Accessory ...................................... AC Adapter
Specifications are typical; individual units might vary.
Specifications are subject to change and improvement
without notice.
15
Page 16

63-969.fm Page 16 Monday, September 27, 1999 9:19 AM
Limited One-Year Warranty
This product is warranted by RadioShack against manufacturing defects in material
and workmanship under normal use for one (1) year from the date of purchase from
RadioShack compan y-owned stores and authorized RadioSha ck franchisees and
dealers. EXCEPT AS PROVIDED HEREIN, RadioShack MAKES NO EXPRESS
WARRANTIES AND ANY IMPLIED WARRANTIES, INCLUDING THOSE OF MERCHANTABILITY AND FITNESS FOR A PARTICULAR PURPOSE, ARE LIMITED
IN DURATION TO THE DURATION OF THE WRITTEN LIMITED WARRANTIES
CONTAINED HEREIN. EXCEPT AS PROVIDED HEREIN, RadioShack SHALL
HAVE NO LIABILITY OR RESPONSIBILITY TO CUSTOMER OR ANY OTHER
PERSON OR ENTITY WITH RESPECT TO ANY LIABILITY, LOSS OR DAMAGE
CAUSED DIRECTLY OR INDIRECTLY BY USE OR PERFORMANCE OF THE
PRODUCT OR ARISING OUT OF ANY BREACH OF THIS WARRANTY, INCLUDING, BUT NOT LIMITED TO, ANY DAMAGES RESULTING FROM INCONVENIENCE, LOSS OF TIME, DATA, PROPERTY, REVENUE, OR PROFIT OR ANY
INDIRECT, SPECIAL, INCIDENTAL, OR CONSEQUENTIAL DAMAGES, EVEN IF
RadioShack HAS BEEN ADVISED OF THE POSSIBILITY OF SUCH DAMAGES.
Some states do not allow the limitations on how long an implied warranty lasts or
the exclusion o f incidental or consequential d amages, so the above limitatio ns or
exclusions may not apply to you.
In the event of a product defect during the warranty period, take the product and the
RadioShack sales rece ipt as p roof of purcha se date to any RadioS hack sto re. RadioShack will, at its option, unless otherwise provided by law: (a) cor rect the de fect
by product repair w ithout charge for par ts and labor; (b) re place the product with
one of the same or sim ilar design; or (c) refund the purchase price. All repla ced
parts and products, an d produ cts on whi ch a refun d is ma de, becom e the pr operty
of RadioShack. New or reconditioned par ts and products ma y be used in the performance of warranty ser vice. Repaired or replaced parts and products are warranted for the remainder of the o riginal warranty period. You will be charged for
repair or replacemen t of the product ma de after the ex piration of the warranty period.
This warranty does not cover: (a ) damage or failure caused by or attributa ble to
acts of God, abuse, accident, misuse, improper or abnormal usage, failure to follow
instructions, impro per i nst all atio n or ma inte nan ce, a l ter atio n, li ght nin g o r ot her inci dence of excess voltage or cu rrent; (b) any r epairs other than those provid ed by a
RadioShack Authorize d Service Facilit y; (c) consumables such as fuses or batteries; (d) cosmetic damage; (e) transportation, s hipping or insurance costs; or (f)
costs of product removal, installation, set-up service adjustment or reinstallation.
This warranty gives you specific legal righ ts, and you may also have o ther rights
which vary from state to state.
RadioShack Customer Relations, 200 Taylor Street, 6th Floor, Fort Worth, TX
We Service What We Sell
76102
04/99
09A99 Printed in Hong Kong
 Loading...