

Page 1
© 2004 RadioShack Corporation.
All Rights Reserved.
RadioShack and RadioShack.com are trademarks used by RadioShack Corporation.
OWNER’S MANUAL — Please read before using this equipment.
Radio-Controlled Travel Alarm Clock
Your RadioShack Radio-Controlled Travel Alarm Clock combines a
simple design with advanced technology. The clock automatically
updates the time setting when its built-in antenna receives the
60 kHz longwave radio signal from station WWVB which broadcasts
the time according to the U.S. government’s atomic clock in Boulder,
Colorado. The cloc k checks this continuous signal seve ral times
each day, giving you th e most accurate time possible. Th e clock
comes with a carrying case, which makes it perfect for travel.
The clock’s other features include:
Four Time Zones — let you see the time for Pacific, Mountain , Ce n-
tral, or Eastern time zones.
Five Languages — let you view the day of the week in English,
French, German, Italian or Spanish.
Backlight — lets you light the display for about 8 seconds so you
can see the time in the dark.
Dual Display — displays the current time and date or the current
time and alarm time.
Low Battery Indicator — appears when the battery is weak.
Snooze Control — temporarily silences the alarm for about 8
minutes.
Built-In Antenna — receives periodic time updates from WWVB.
Built-In Stand — lets you place the clock on a flat surface for easy
viewing.
Crescendo Alarm — gradually increases in volume to gently
awaken you.
Easy-to-Use Controls — let you manually set the clock and the
alarm time if you are in an area that prevents good reception of
WWVB.
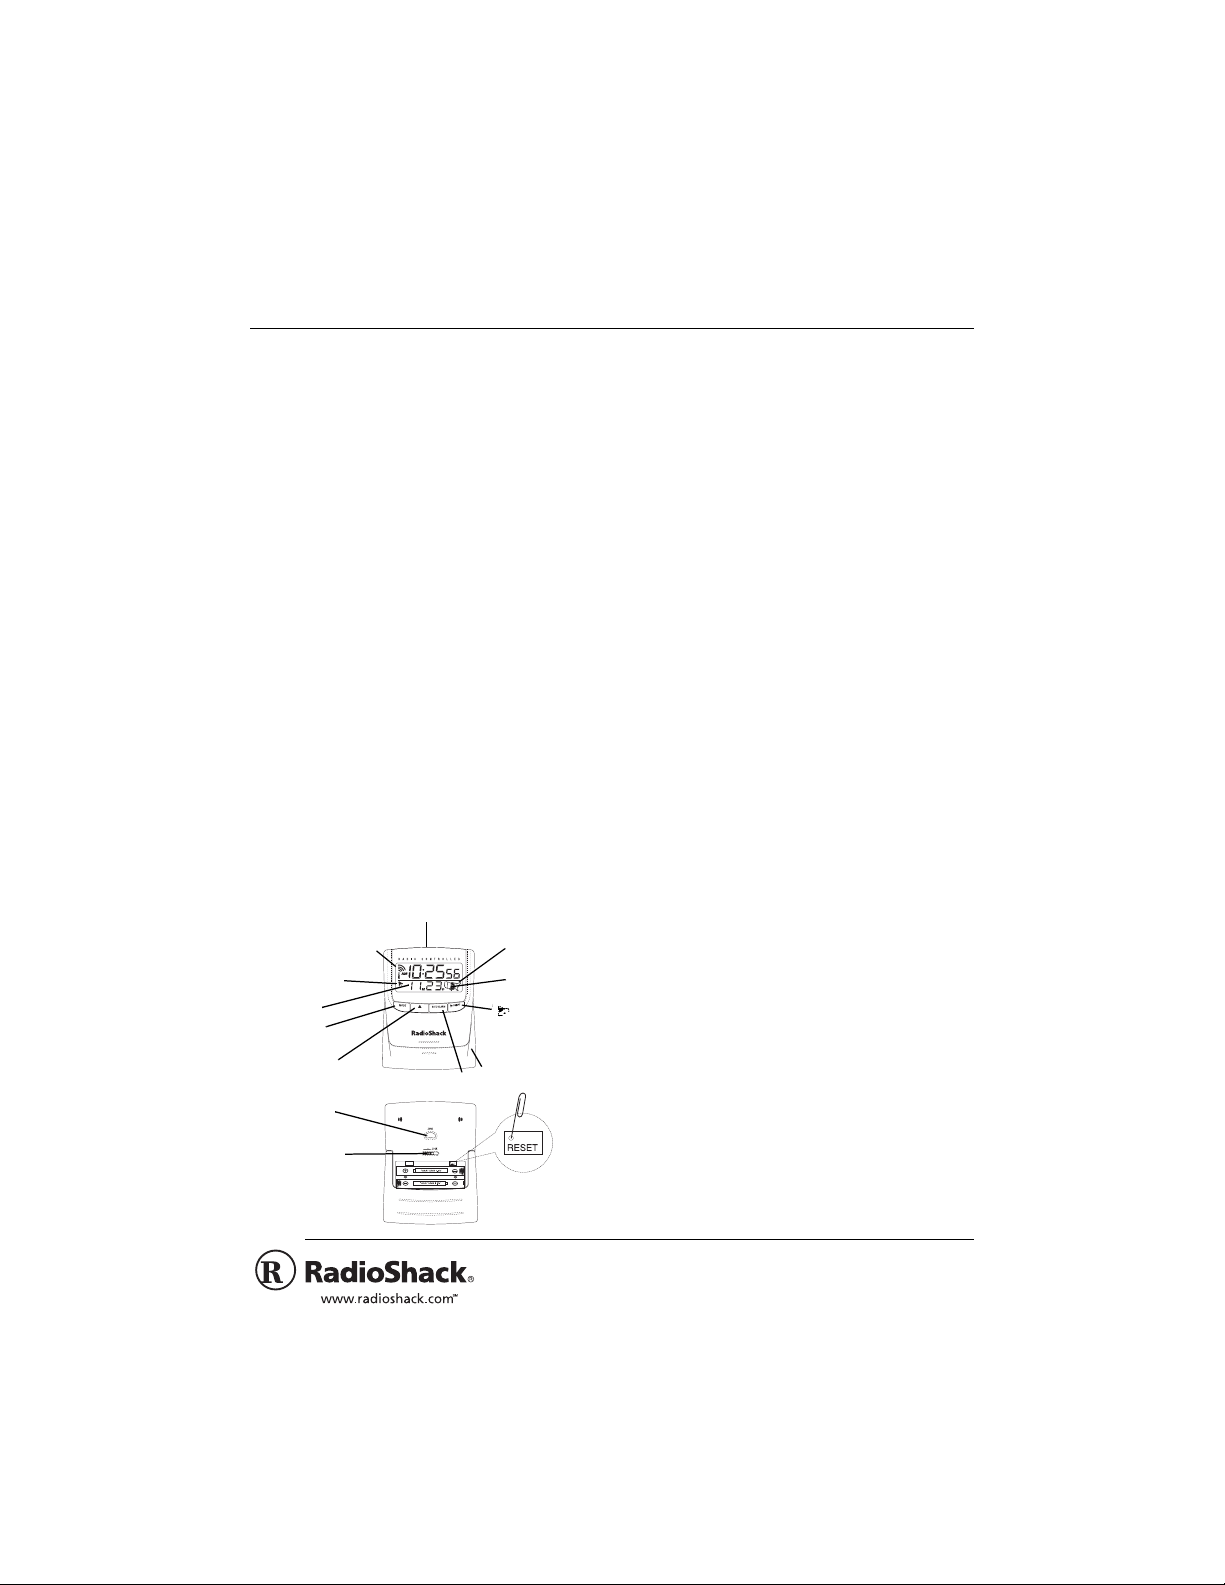
A QUICK LOOK AT THE CLOCK
INSTALLING BATTERIES
Your clock requires 2 AAA batteries (no t s up pli ed) for power. For the
best performance and longest life, we recommend RadioShack
alkaline batteries.
Cautions:
• Use only fresh batteries of the required size and recommended
type.
• Do not mix old and new batteries, different types of batteries
(standard, alkaline, or rechargeable), or rechargeable batteries
of different capacities.
Follow these steps to install batteries.
1. Lift the antenna stand up and slide the battery compartment
cover down to remove the cover.
2. Place the batteries in the compartment as indicated by the
polarity symbols (+ and –) marked inside.
3. Replace the cover .
When flashes, the display dims, or the clock stops operating
properly, replace the batteries.
Warning: Dispose of old batteries promptly and properly. Do not
burn or bury them.
Caution: If you do not plan to use the clock for a week or longer,
remove the batteries. Batteries can leak chemicals that can destroy
electronic parts.
Notes:
• If the clock does not operate after you install the batteries,
remove them and wait about five seconds until the display
clears. Then reinstall the batteries.
• The clock is set to automatically search for a radio signal to set
the time and date when y ou i ns t all the batteries. To set the cl oc k
manually, see “Manually Setting the Ti me , D ate, and L anguage”
on Page 2.
As soon as you install the batteries, all display segments briefly
appear. Then
PM 12:00, 1M, and 1D appear.
For about 2 minutes after you install the batteries, the clock scans
for the radio signal while the radio indicator and the United States
time zone map flash.
The clock also automatically shows a time zone. While the clock is
scanning for a signal, you can set it to show your time zone. To
change the time zone, repeatedly pre ss
ZONE until your time zone is
highlighted (
P = Pacific, C = Central, M = Mountain, or E = Eastern).
Antenna Stand
Radio Signal
Reception Status
Alarm On
Indicator
Date
Time Zone
Indicator
MODE
DATE/ALARM
ON/OFF
Time Zone
Map
Snooze/Backlight
ZONE
LOCK
Page 2
2
Note: You must reset the time zone each time you install batteries.
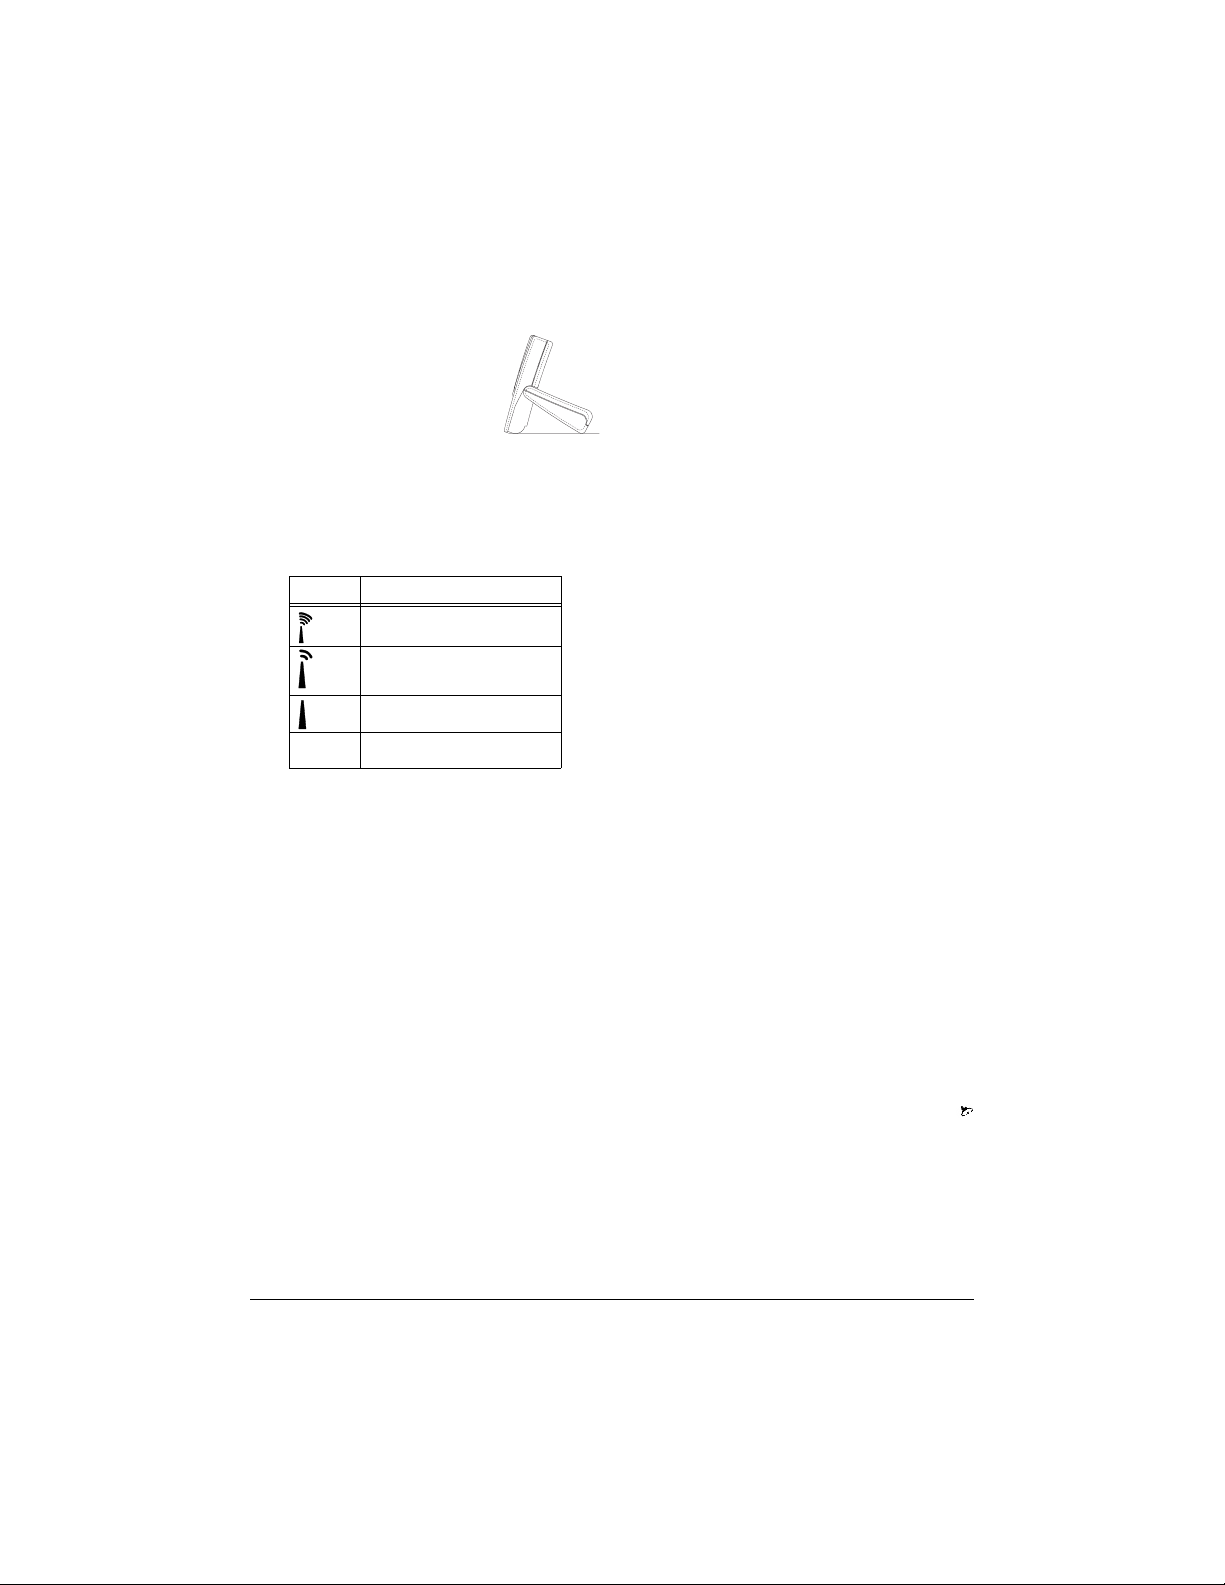
SETTING UP THE ANTENNA
The built-in antenna is located in the stand.
For the best reception, set the clock up on its
stand as shown here.
Note: Do not place the clock near a TV,
high-power cable, or metal table, since any of
these items could interfere with radio signal
reception.
CHECKING THE SIGNAL STATUS
The clock checks the time signal six times a day, at about 1:00 AM,
2:00 AM, 3:00 AM, 9:00 AM, 3:00 PM, and 9:00 PM. When it
receives a strong signal, it automatically sets the time and date.
These symbols appear on the clock’s display to indicate the current
(or last) status of the radio signal reception.
Notes:
• On cloudy days or during inclement weather, the signal might
not be strong enough to reset the clock.
• If the clock does not receive a strong signal within about 2
minutes, it stops scanning and looks for a signal again at the
next preset time.
USING AUTOMATIC TIME SETTING
To turn off automatic time setting, hold down ZONE for about 3
seconds until the radio indicator and the time zone map disappear.
The selected time zone indicator (central, for example) appears.
(You can now manually set the clock.)
To turn on automatic ti me s ett ing , hold down
for about 3 seconds
until the radio indicator and the tim e z one map fla sh . Whe n the radi o
receives a strong radio signal, the signal status and the time zone
map stop flashing.
MANUALLY SETTING THE TIME, DATE,
AND LANGUAGE
If you are in an area where the clock does not receive a good radio
signal, you can set the time and date manually.
Important: Good radio signal reception automatically overrides the
manual setting.
Note: When you travel to states that do not follow Daylight Saving
Time, either manually change the time zone, or temporarily turn off
automatic time setting.
1. Hold down
ZONE for about 3 seconds to turn off the automatic
time setting.
2. Repeatedly press
ZONE until you see the desired setting
(
P = Pacific, C = Central, M = Mountain, or E = Eastern).
3. Hold down
MODE until the hour digits flash, then repeatedly
press (or hold down)
to set the hour digits.
Note:
AM appears for AM time, and PM appears for PM time.
4. Press
MODE so the minute digits flash, then repeatedly press
(or hold down)
to set the minute digits.
5. Press
MODE so the last two digits of the year flash, and then
repeatedly press (or hold down)
to set the year digits.
6. Press
MODE. The hour, minute, and second appear. The month
digits flash.
7. Repeatedly press (or hold down)
to set the month digits.
8. Press
MODE. The day digits flash.
9. Repeatedly press (or hold down)
to set the date digits.
10. Press
MODE. A letter representing the language used for the
day of the week flashes.
11. Repeatedly press
until you see the desired language
(
E = English, D = German F = French, I = Italitan, or
S = Spanish).
12. Press
MODE to store the settings in memory.
Note: Due to the difference between UTC (Universal Coordinated
Time) and USA Pacific time, manually setting the clock on
December 31 may result in the wrong time/date. If this occurs,
please wait until January 1 and manually set it again. This anomaly
only occurs when t he clock is manually s et on December 31 and
does not otherwise effect the normal operation of this clock.
VIEWING THE TIME AND DATE
To toggle between the seconds display and the day of the week,
press
MODE.
To toggle between viewing the date and the alarm time, press
DATE/ALARM.
Viewing Time in Other Time Zones
To view the time and date in another time zone, repeatedly press
ZONE until the desired time zone appears.
USING THE ALARM
Setting the Alarm Time
1. Hold down DATE/ALARM until the alarm hour digits flash.
2. Repeatedly press (or hold down)
to set the hour digits.
appears.
3. Press
DATE/ALARM so the minute digits flash.
4. Use
to set the minute digits.
5. Press
DATE/ALARM to store the setting. The month an d day
remain on the display.
To toggle between the alarm time and the date, press
DATE/ALARM.
Display Status
Signal reception is strong enough to set
the clock’s time/date.
Signal reception is not strong enough to
set the clock. Reposition the clock for
the next signal reception time.
The clock has been manually set.
No
Indicator
The automatic time setting feature is off.
Page 3

3
Turning the Ala rm On/Off
To turn the alarm on or off, repeatedly press ON/OFF. appears when the alarm is on.
At the set alarm time, the display lights for about 8 seconds,
flashes, and the alarm sounds. The alarm cresce ndos an d increa ses
in frequency for up to 2 minutes.
If the alarm turns off automatically a second time,
remains on
the display and the alarm will not sound again until the set alarm
time the next day.
To silence the alarm before it automatically stops, press
DATE/
ALARM or ON/OFF
. remains on the display and the alarm
sounds at the set alarm time the next day.
USING SNOOZE
Note: You can only use snooze when the clock is set on its stand.
To silence the alarm for about 8 minutes, press
((TOUCH)) so
the clock beeps and the display lights.
flashes. You can repeat
this as desired.
USING THE BACKLIGHT
Note: You can only use the backlight when the clock is set on its
stand.
To light the display for about 8 seconds, gently press
((TOUCH)) so the clock rocks back on its stand and beeps.
LOCKING THE CONTROLS
You can lock the controls on your clock so you do not accidentally
change any settings.
To lock the controls, slide
LOCK in the direction of the arrow. To
unlock the controls, slide
LOCK away from the arrow.
CARE
To enjoy your RadioShack Radio-Controlled Travel Alarm Clock for
a long time:
• Keep the clock dry. If it gets wet, wipe it dry immediately.
• Use and store the clock only in normal temperature
environments.
• Handle the clock gently and carefully. Do not drop it.
• Keep the clock away from dust and dirt.
• Wipe the clock with a damp cloth occasionally to keep it looking
new.
Modifying or tampering with the clock’s internal components can
cause a malfunction and might inv alidat e its warrant y. If your c lock is
not performing as it shoul d, t ake it to your local RadioS hac k st ore for
assistance.
RESETTING THE CLOCK
If the display dims or the clock stops operating properly, remove the
battery compartment cover and press
RESET with a pointed object
(such as a straightened paper clip).
All display segments briefly appear, then the clock starts scanning
for the radio signal. Wait until the clock sets itself, or manually set
the clock (see “Manually Setting the Time, Date, and Language” on
Page 2).
SPECIFICATIONS
Power ................................................................................... 2 AAA batteries
Snooze ................................................................................ About 8 minutes
Dimensions (HWD) ...................... .................................... 3
7
/16 × 25/8 × 7/10 in
(88
× 67 × 18 mm)
Weight (without batteries) .................................................................... 2.4 oz
(68 g)
Specifications are typical; individual units might vary. Specifications are subject to change and improvement without notice.
Page 4

63-964
01A04
Printed in China
2004 RadioShack Corporation.
All Rights Reserved.
RadioShack and RadioShack.com are
trademarks used by RadioShack Corporation.
Limited One-Year Warranty
This product is warranted by Radio Shack against ma nufacturing defects in material and w orkmanship under normal us e fo r one (1 ) ye ar fr om the da t e of pu rch a se fr om Rad i oSh a c k com p a ny - ow ne d
stores and authorized RadioShack franchisees and dealers. EXCEPT AS PROVIDED HEREIN,
RadioShack MAKES NO EXPRESS WARRANTIES AND ANY IMPLIED WARRANTIES,
INCLUDING THOSE OF MERCHANTABILITY AND FITNESS FOR A PARTICULAR PURPOSE,
ARE LIMITED IN DURATION TO THE DURATION OF THE WRITTEN LIMITED WARRANTIES
CONTAINED HEREIN. EXCEPT AS PROVIDED HEREIN, RadioShack SHALL HAVE NO
LIABILITY OR RESPONSIBILITY TO CUSTOMER OR ANY OTHER PERSON OR ENTITY WITH
RESPECT TO ANY LIABILITY, LOSS OR DAMAGE CAUSED DIRECTLY OR INDIRECTLY BY
USE OR PERFORMANCE OF THE PRODUCT OR ARISING OUT OF ANY BREACH OF THIS
WARRANTY, INCLUDING, BUT NOT LIMITED TO, ANY DAMAGES RESULTING FROM
INCONVENIENCE, LOSS OF TIME, DATA, PROPERTY, REVENUE, OR PROFIT OR ANY
INDIRECT, SPECIAL, INCIDENTAL, OR CONSEQUENTIAL DAMAGES, EVEN IF RadioShack
HAS BEEN ADVISED OF THE POSSIBILITY OF SUCH DAMAGES.
Some states do not allow limitations on how long an implied warranty lasts or the exclusion or
limitation of incidental or consequential damages, so the above limitations or exclusions may not
apply to you.
In the event of a product def ect during the war ranty period, take th e product and t he RadioShac k
sales receipt as proof of purchase date to any RadioShack store. RadioShack will, at its option,
unless otherwise provided by law: (a) corre ct the defect by product repai r without charge for parts
and labor; (b) replace the product with one of the same or similar design; or (c) refund the pu rch ase
price. All replaced parts and products, and products on which a refund is made, become the
property of RadioShack. New or r econd itione d parts and produ cts may be used i n the perfor mance
of warranty service. Repaired or re place d parts and products are warranted for the remainder of the
original warranty period. You will be charged for repair or r epla c em ent of the pro du ct made after the
expiration of the warranty period.
This warranty does not cover: (a) damage o r fail ur e cau sed by or att ri bu table to acts of Go d, ab use,
accident, misuse, improper or abnormal usage, failure to follow instructions, improper installation or
maintenance, alteration, lig htning or other inci dence of excess voltage or current; (b) any r epairs
other than those provided by a RadioShack Authorized Service Facility; (c) consumables such a s
fuses or batteries; (d) cosmetic dama ge; (e ) transp ortation, s hipp ing or insu rance costs; or (f) costs
of product removal, installation, set-up service adjustment or reinstallation.
This warranty gives you specific legal rights, an d you may also have other rights which vary from
state to state.
RadioShack Customer Relations, 200 Taylor Street, 6th Floor, Fort Worth, TX 76102
We Service What We Sell 12/99
 Loading...