


12-2020.fm Page 1 Tuesday, May 23, 2000 6:56 PM
4-Way Electronic Crossover
OWNER’S MANUAL — Please read before using this equipment.
Your RadioShack 4-Way Electronic Crossover lets you get the best sound from your
auto sound system. It takes the full audio
range and splits it up into four smaller ranges. High frequencies are sent to the tweeters'
amplifier, middle-range frequencies are sent
to the mid-bass and mid-range speakers'
amplifier, and low frequencies are sent to the
subwoofer’s amplifier.
Since each speaker only gets the frequencies that it handles best, overall sound quality improves. The crossover even lets you
adjust the specific frequency ranges that
each speaker receives to precisely match its
capabilities.
The crossover's features include:
Remote Control
— lets you adjust the subwoofer output level and boost the crossover’s
BASS EQ
Subwoofer Equalizer
frequency level.
— lets you set the
bass equalizer to 30–100 Hz.
Mid-Bass, Mid-Range, and Tweeter (HighRange) Controls
— let you adjust the mid-
bass, mid-range, and tweeter output levels.
Crossover Point Selectors
— let you set
the frequency limits for the subwoofer, midbass, mid-range, and tweeter.
Automatic Power On
— the crossover turns
on when you turn on the vehicle's auto sound
system (when it is connected to a switched
power lead).
Low Input Selector
— lets you select oneline or two-line input to match your auto
sound system's line output.
A complete auto sound system using this
crossover should also include:
• a receiver/CD player/cassette deck that
has line-level outputs
• any combination of one subwoofer, two
mid-bass speakers, two mid-range
speakers, and two tweeters
• a separate power amplifier for each
speaker type or a power amplifier with
multiple input channels
INSTALLATION
You can easily connect this crossover. However, improper connections can damage
your crossover and other components in
your auto sound system and possibly your
vehicle's electrical system. Before you install
your crossover, read all the installation instructions in this owner's manual and follow
them carefully.
Before you begin, you should know which
wire is the power wire in your vehicle's electrical system and be sure your auto sound
system has line-level outputs.
Notes:
• Use audio patch cables with phono-type
connectors (available at your local
RadioShack store) to complete the
input/output connections.
• Be sure to correctly match the input and
output connections' polarity (left output
to left input, and right output to right
input).
2000 RadioShack Corporation. All Rights Reserved.
©
RadioShack and RadioShack.com are trademarks
used by RadioShack Corporation.
12-2020.fm Page 2 Tuesday, May 23, 2000 6:56 PM
• Use 18-gauge wire (available at your
local RadioShack store) to complete the
power connections.
Choosing a Mounting Location
Choose the mounting location for the crossover and its remote control first, but do not
mount them until you have connected the wiring and confirmed that the crossover operates
properly with your auto sound system. By
choosing the location first, you can later
mount the crossover and its remote control
without rerouting wires.
Choose a mounting location that:
• positions the crossover as near as possible to your auto sound system’s amplifier(s) (for example, if your auto sound
system’s amplifiers are in the trunk, you
should also mount the crossover in the
trunk)
It is important to keep the audio
Note:
cables as short as possible to reduce
noise and interference.
• does not interfere with the operation of
the vehicle
• is not directly in front of a heating vent
• allows drilling of mounting holes without
damaging other vehicle components
• allows convenient and safe routing of
wires
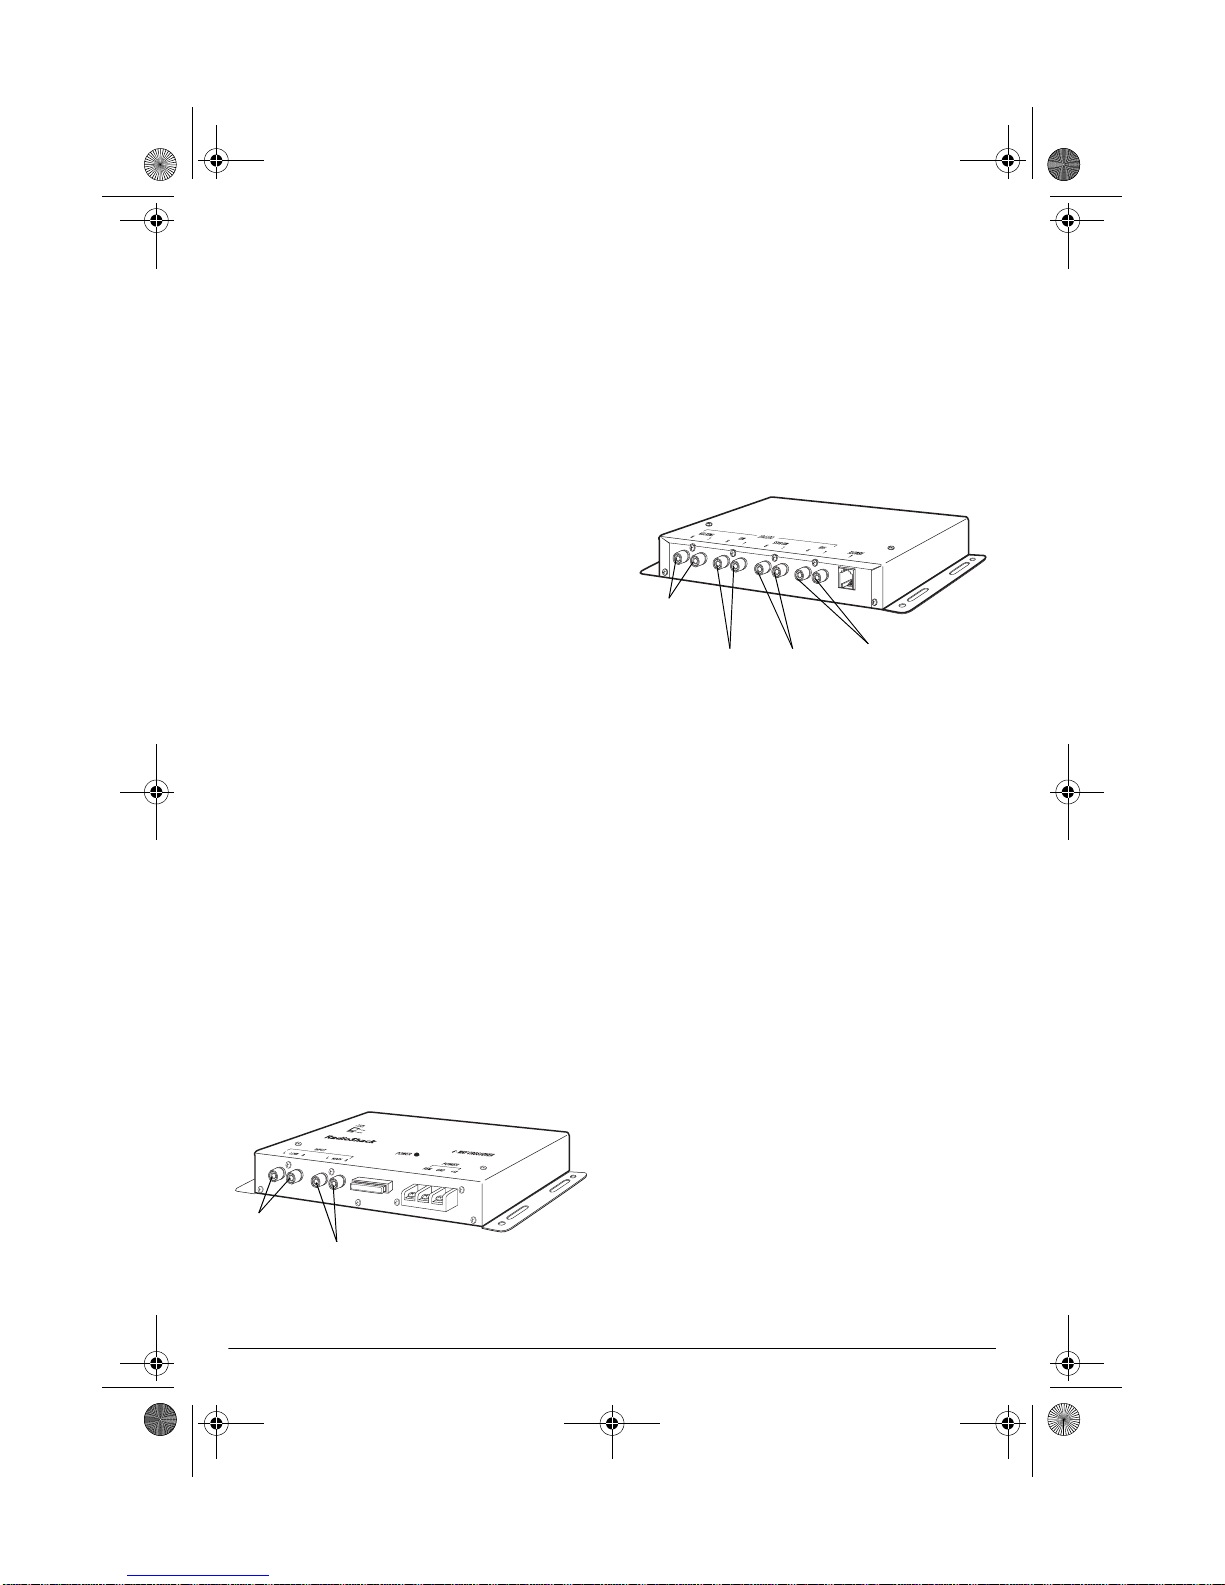
Connecting Inputs
over's
INPUT MAIN L
Then set
LOW INPUT
(left) and R (right) jacks.
to
.
OFF
If your auto sound system has two sets of line
output jacks, connect the front output jacks to
the crossover's
INPUT MAIN L
the rear output jacks to the crossover's
and R jacks. Then set
LOW L
.
ON
and R jacks and
INPUT
LOW INPUT
to
Connecting Outputs
Tweeter
Output
Jacks
Mid-Range
Output
Jacks
Mid-Bass
Output
Jacks
The crossover has four sets of output jacks —
(subwoofer),
SUB
(mid-range), and
MID BASS
TWEETER
These jacks connect to your auto sound
system's power amplifiers which are
connected to your system's speakers. The
subwoofer output typically requires the most
power and the largest amplifier. The midbass, mid-range, and tweeter outputs require
less power and smaller amplifiers.
Connect each pair of the crossover’s
(L and R) jacks to the appropriate amplifier
that drives that type of speaker. For example,
connect the crossover's
jacks to the amplifier that drives the mid-range
speakers.
Subwoofer
Output
Jacks
(mid-bass)
(high-range).
OUTPUT MID L
MID
OUTPUT
and
R
Low Input
Jacks
Main Input
Jacks
If your auto sound system has only one set of
line output jacks, connect them to the cross-
2
12-2020.fm Page 3 Tuesday, May 23, 2000 6:56 PM
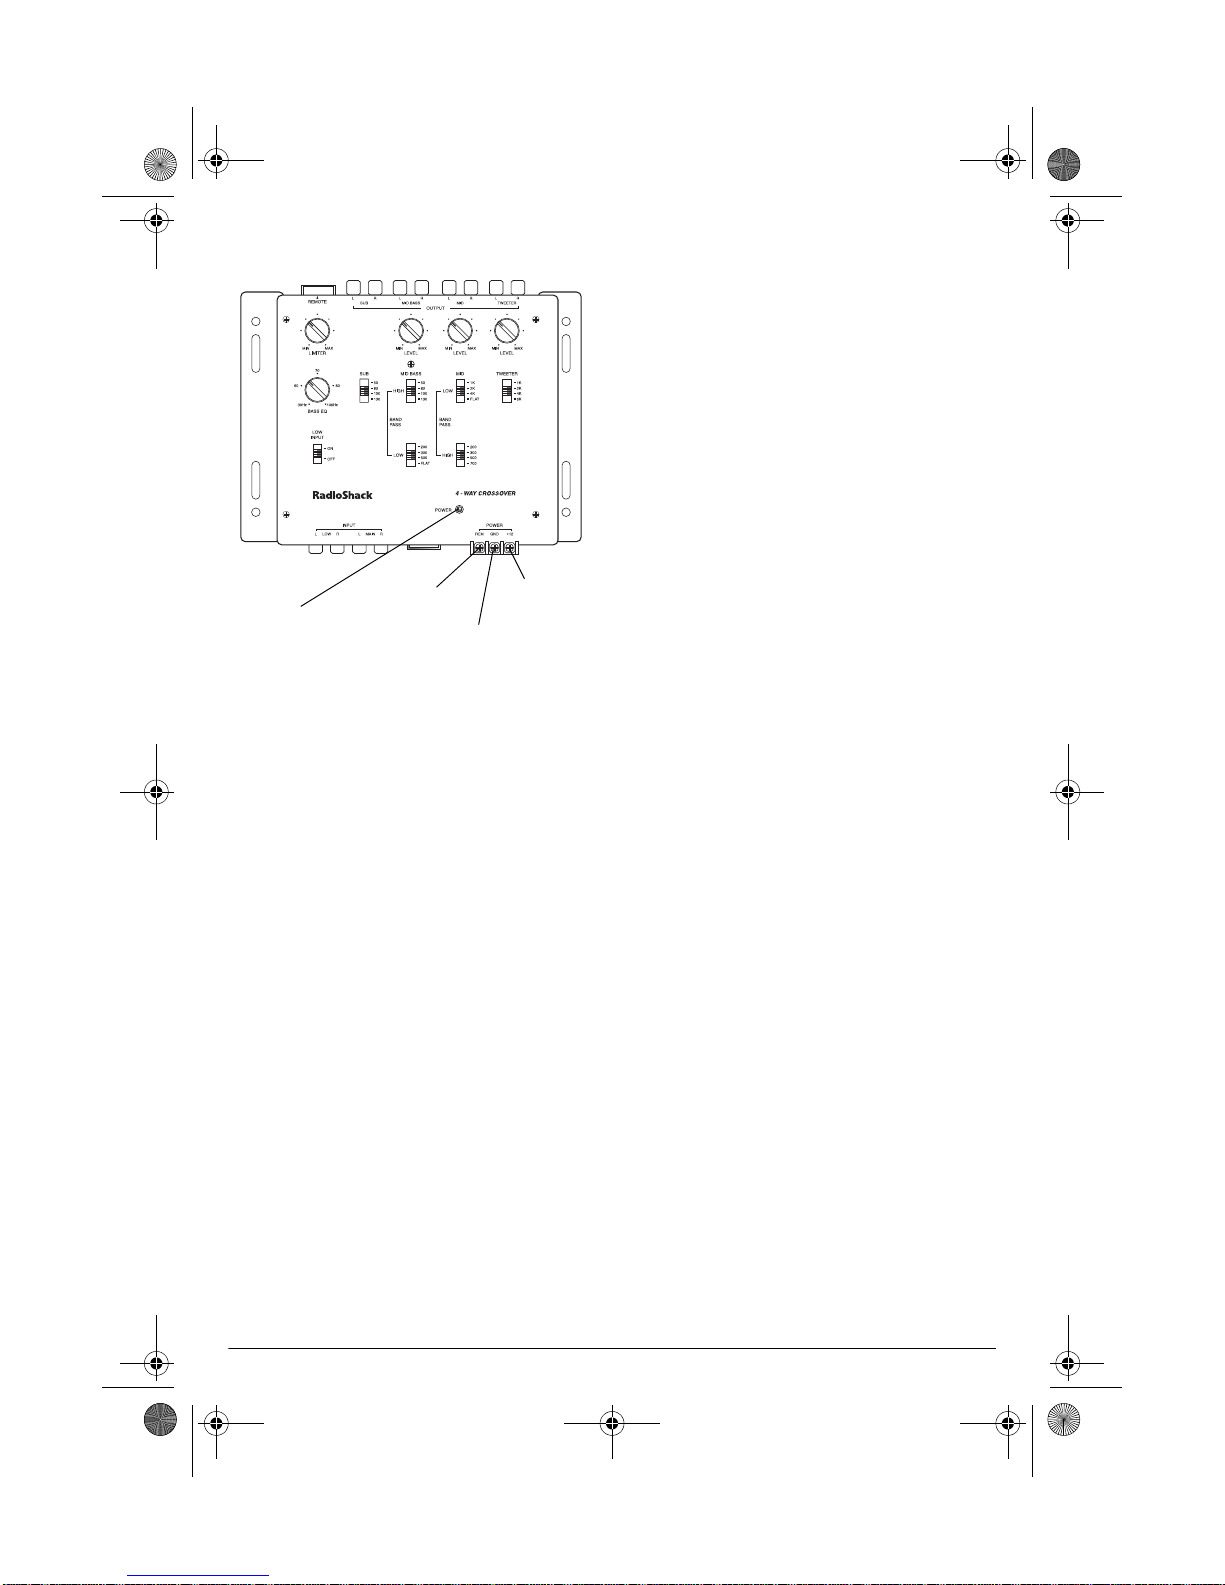
Connecting Power
Remote
Power
Power
Indicator
Terminal
Ground
Terminal
1. Disconnect the cable from your vehicle
battery’s negative (–) terminal. This
reduces the possibility of damage to your
crossover or auto sound system during
installation.
2. Connect the crossover's
terminal to a metal part of the vehicle's
frame.
GND
+12-Volt
Power
Terminal
(ground)
tery power only when you set the
vehicle’s ignition switch to ON or ACC.
With this type of connection, the crossover turns on when you set the ignition
switch to ON or ACC.
5. Reconnect the cable to your vehicle battery's negative terminal.
Connecting the Remote Control
With the supplied 16-foot-long remote wire,
connect one of the wire’s modular plugs to the
crossover’s
REMOTE
jack (next to the
OUTPUT
jacks). Connect the modular plug on the other
end of the wire to the modular connector on
the back of the remote control.
When you route the wire between the crossover and the remote control, avoid placing the
wire near moving parts or sharp edges. If your
crossover is in the trunk, you might be able to
route the wire along the wiring channel beneath the vehicle’s door facings by carefully
removing the molding that holds the carpet in
place. After you route the remote wire, replace
the molding.
Testing the Connections
Caution:
Do not connect the ground wire
to a non-metallic (plastic) part, or to any
part insulated from the vehicle's frame by
a non-metallic part.
3. Connect the crossover's
POWER
terminal directly to the vehicle
(12-volt)
+12
battery's positive (+) terminal.
4. Connect the crossover's
POWER
terminal to your auto sound sys-
REM
(remote)
tem's switched power lead. When you
turn on the auto sound system, the
POWER indicator lights and the crossover turns on.
If your auto sound system does not have
a switched power lead, connect the
POWER
terminal to a point in your vehi-
cle's fuse box that provides 12-volt bat-
REM
Follow these steps to check that the crossover
works with your auto sound system before
you adjust and mount the crossover and its remote control.
1. Turn on the auto sound system. The
crossover's POWER indicator lights.
2. Set the crossover’s three
OUTPUT LEVEL
controls to the midpoint. Then adjust the
auto sound system's volume to a comfortable level.
3. Play a cassette tape or CD that has a
wide dynamic range, or tune to a strong
FM station.
4. If the sound from any speaker is distorted
or has static (or if there is no sound from a
speaker), turn off your auto sound system
3
 Loading...