

Answering System • Caller ID
Cordless Phone
User’s Guide
43-327
Thank you for purchasing your new cordless phone from RadioShack. Please
read this user’s guide before installing, setting up, and using your new phone.

Contents
Package Contents .........................................................................................4
Features ...........................................................................................................4
Telephone Setup .............................................................................5
Contents
Telephone Base and Charger Installation ....................................................5
Battery Installation and Charging .................................................................6
Installation Options .......................................................................................8
Wall Mount Installation .............................................................................8
Telephone Base Layout ..................................................................................9
Handset Layout .............................................................................................10
Handset Ringer Volume ...............................................................................12
Telephone Base Ringer Volume ..................................................................12
Ringer Tone ...................................................................................................12
Key Tone ........................................................................................................12
LCD Language ..............................................................................................13
Set Date and Time........................................................................................13
Clear Voicemail .............................................................................................13
Home Area Code..........................................................................................14
Answering System Setup ..............................................................15
Number of Rings...........................................................................................15
Remote Code ...............................................................................................15
Message Alert Tone ......................................................................................15
Announcement .............................................................................................16
Record Your Own Announcement .........................................................16
Play Your Announcement .......................................................................16
Delete Your Announcement....................................................................17
Telephone Operation ....................................................................18
Make a Call ...................................................................................................18
Predial a Call .................................................................................................18
Answer a Call ................................................................................................18
End a Call ......................................................................................................18
Speakerphone...............................................................................................18
Volume ...........................................................................................................18
Mute ..............................................................................................................19
Ringer Mute ..............................................................................................19
Call Waiting ...................................................................................................19
Find Handset .................................................................................................19
Chain Dialing ................................................................................................19
Multiple Handset Use ...................................................................................20
Intercom ........................................................................................................20
Share an Outside Call ..................................................................................21
2

3
Contents
Directory ........................................................................................23
Store a Directory Entry .................................................................................23
Character Chart ............................................................................................24
Search the Directory .....................................................................................25
Alphabetical Search .....................................................................................25
Dial a Directory Entry ...................................................................................25
Edit a Directory Entry ...................................................................................26
Delete from the Directory .......................................................................26
Call Log .........................................................................................27
About Caller ID .............................................................................................27
About the Call Log .......................................................................................27
Missed Calls Indicator .................................................................................28
Review the Call Log .....................................................................................28
Make a Call Log Entry Ready to Dial ..........................................................29
Dial a Call Log Entry ....................................................................................29
Save a Call Log Entry to the Directory ........................................................29
Delete from the Call Log .............................................................................30
Call Log Display Screen Messages .............................................................30
Redial List ......................................................................................................31
Dial a Redial Entry ........................................................................................31
Delete from Redial .......................................................................................31
Answering System Operation .......................................................32
About the Answering System and Voicemail .............................................32
Message Capacity ....................................................................................32
Turn the Answering System On or Off ........................................................32
Call Screening ...............................................................................................33
Call Intercept.................................................................................................33
New Message Indication .............................................................................33
Message Playback ........................................................................................33
Delete All Messages .....................................................................................34
Record and Play Memos ..............................................................................35
Recording a Memo ..................................................................................35
Message Window Displays ..........................................................................35
Remote Access .............................................................................................36
Additional Information ..................................................................38
Handset Display Screen Messages .............................................................38
Handset and Telephone Base Indicators ....................................................40
Handset Lights .........................................................................................40
Telephone Base Lights ............................................................................40
Handset Icons ...........................................................................................40
Battery ...........................................................................................................41
Expanding your Telephone System ............................................................42
Add and Register a Handset (Optional) .................................................42
Replace a Handset ...................................................................................43
Troubleshooting............................................................................................44
Important Safety Instructions.......................................................................52
Operating Range ..........................................................................................53
Contents
Maintenance .................................................................................................54
About Cordless Telephones ........................................................................55
Specifications ................................................................................................55
FCC Information ...........................................................................................56
Limited Warranty ..........................................................................................57
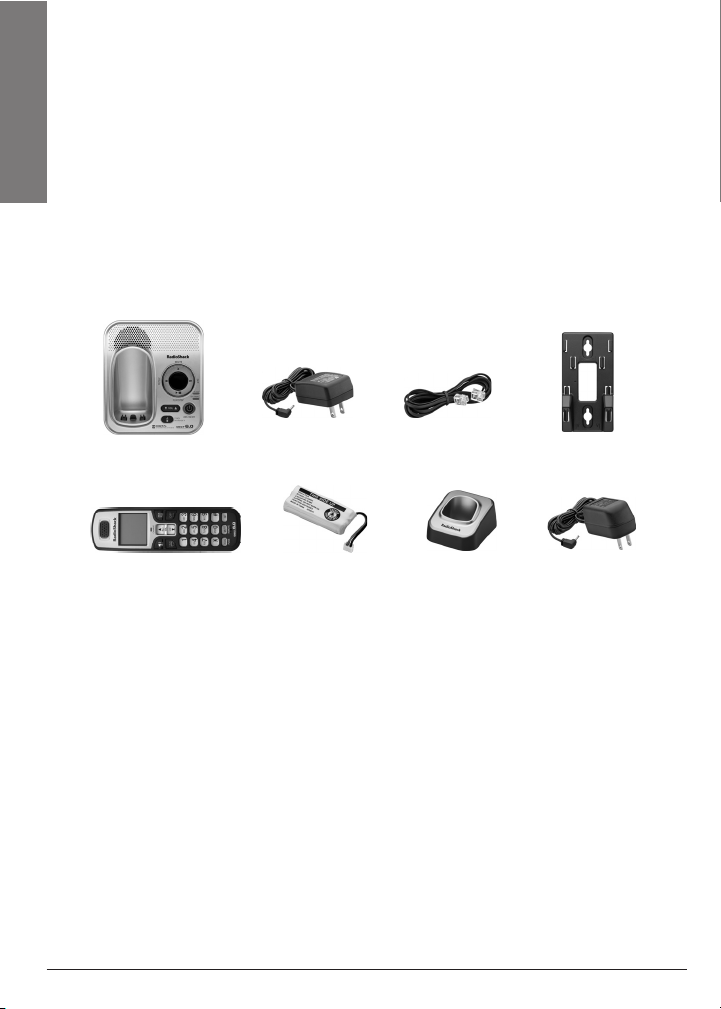
Package Contents
Telephone base
Handset (3)
Base AC
adapter
Handset battery
(3)
Telephone
line cord
Handset
charger (2)
Wall bracket
Charger AC
adapter (2)
Features
• DECT 6.0 transmission for secure calls
• Digital answering system records up to 14 minutes
• Messages can be accessed remotely from any Touch-Tone phone
• Caller ID / Call Waiting ID display shows who’s calling
•
Handset speakerphones enable you to carry on hands-free conversations
• 70 number phonebook
• Caller ID memory keeps information for up to 50 calls
• Intercom function enables you to communicate between handsets
• Backlit display and keypad for easy visibility
•
“Find Handset” button helps you locate the handset if it’s been misplaced
• Ringer and call volume control
• Last-number redial
4

5
Telephone Setup
Telephone Base and Charger Installation
Install the telephone base and chargers as shown below. Make sure that the
electrical outlet is not controlled by a wall switch.
n Notes:
• If you subscribe to digital subscriber line (DSL) high-speed Internet
service through your telephone line, you must install a DSL filter
between the telephone line cord and the telephone wall jack. The filter
prevents noise and caller ID problems caused by DSL interference.
Contact your DSL service provider for more information about DSL
filters.
• Use only the power adapters supplied with this product.
Telephone
base
adapter
Charger
adapter
DSL filter
(optional, not
included)
Telephone
base
Telephone
wall jack
Telephone
line cord
Telephone Setup
Charger

Battery Installation and Charging
Install the battery as shown below. For best performance, charge the
handset for at least 16 hours before use. When not in use, place the handset
in the telephone base or charger. See page 41 for battery operating times.
1. If the battery compartment cover is on the handset, press the
indentation and slide the cover to remove.
2. Plug the battery securely into the plug inside the handset battery
compartment, matching the color-coded label.
3. Place the battery with the label THIS SIDE UP facing up and the wires
inside the battery compartment.
4. Align the cover flat against the battery compartment, then slide it
towards the center of the handset until it clicks into place.
5. Charge the handset by placing it in the telephone base or charger. The
Telephone Setup
CHARGE light is on when the handset charges.
n Notes:
• When the screen shows LOW BATTERY, the backlight is off.
• If the handset will not be used for a long time, disconnect and remove
the battery to prevent possible leakage.
• To purchase replacement batteries, visit your local RadioShack store or
go to www.RadioShack.com.
Match with
color code label
Black wire
Red wire
6
7
Telephone Setup
Recycle Rechargeable Batteries
Placing rechargeable batteries in the trash can be harmful to the
environment. Instead, recycle old rechargeable batteries at your
local RadioShack store free of charge. RadioShack participates
in the RBRC© battery recycling program, and is committed to
preserving the environment and conserving natural resources.
Call 1-800-THE-SHACK (1-800-843-7422) for more information.
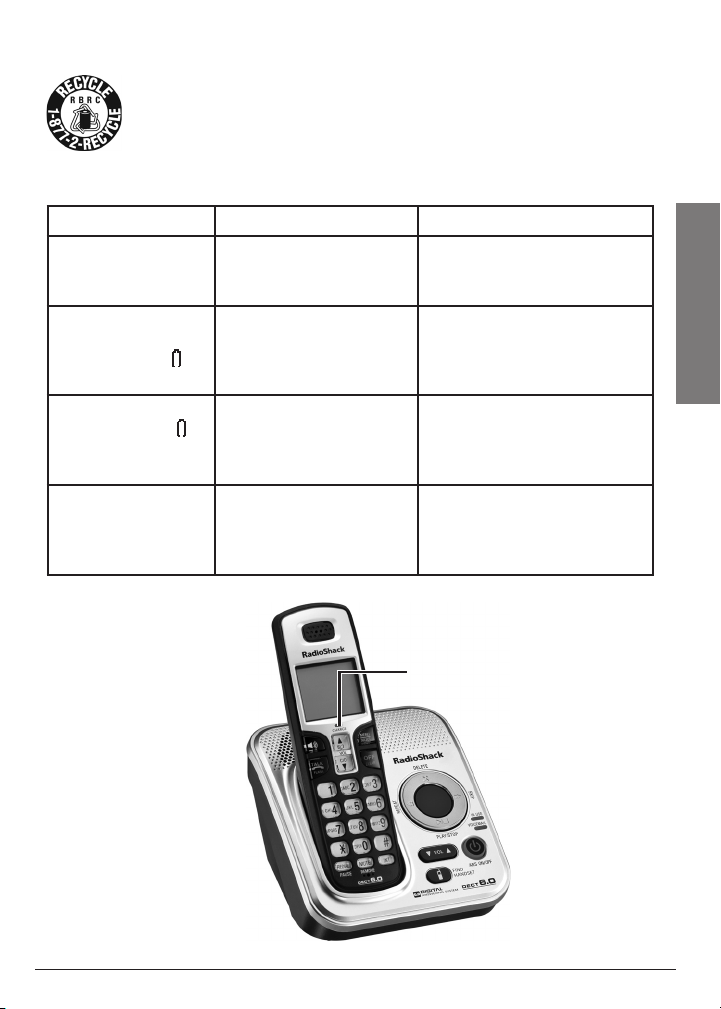
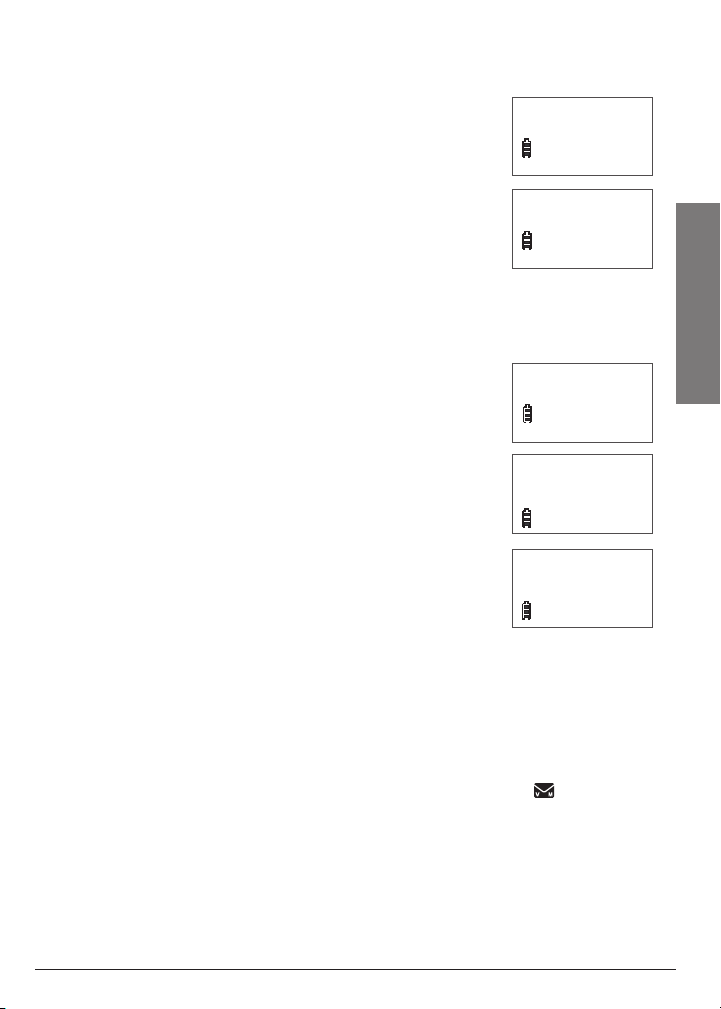
Battery indicators Battery status Action
The screen is
blank.
The screen
shows PLACE IN
CHARGER and
flashes.
The screen shows
LOW BATTERY,
flashes, and the
handset beeps.
The screen shows
HANDSET X.
Battery has no charge
and the handset
cannot be used.
Battery has very
little charge and the
handset cannot be
used.
Battery has enough
charge to be used for a
short time.
Battery is charged. To keep the battery
Charge until the screen
shows LOW BATTERY (at
least 10 minutes).
Charge until the screen
shows LOW BATTERY
(about four minutes).
Charge until the screen
shows HANDSET X (about
one hour).
charged, place it in the
telephone base or charger
when not in use.
CHARGE light
Installation Options
Your telephone base is now ready for table top use. If you want to mount
your telephone on a wall, use the provided wall bracket to connect with a
standard dual-stud telephone wall mounting plate. If you do not have this
mounting plate, you can purchase one from your local RadioShack store or
www.RadioShack.com. You might need professional assistance to install the
mounting plate.
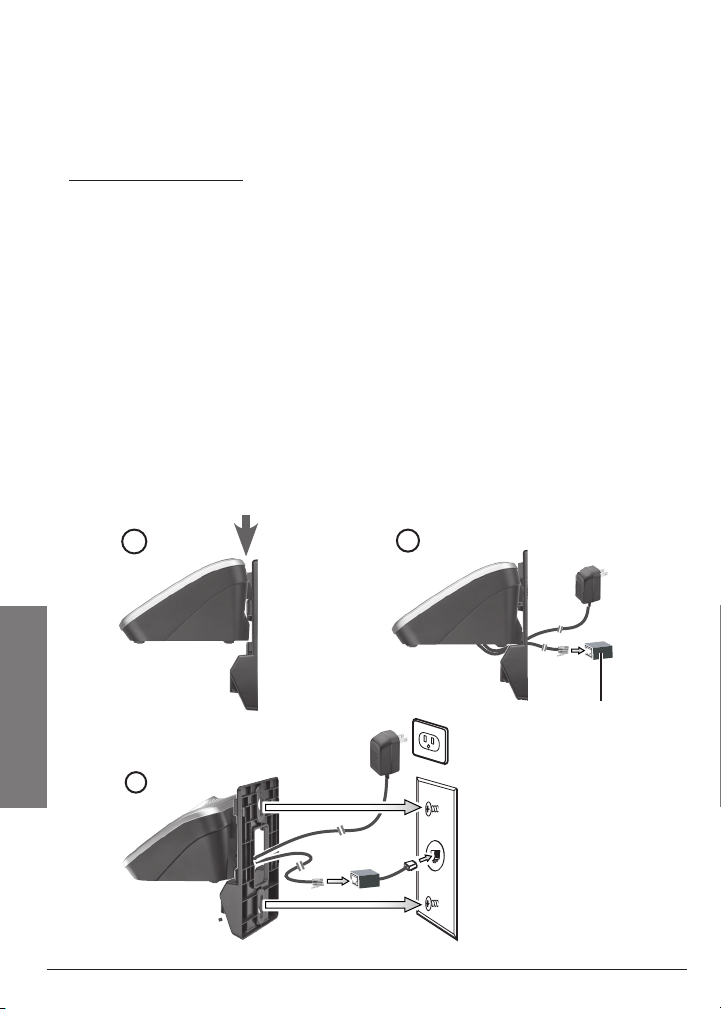
Wall Mount Installation
1. Position the telephone base as shown below. Insert the extended tabs
(marked B) of the wall bracket into the slots on the back of the telephone
base (marked B). Push the telephone base down until it clicks into place.
2. If you are using a DSL filter, plug the line cord into the filter now. Route
the telephone line cord (or DSL filter) through the wall bracket hole.
Route the power cord out of the bottom of the telephone.
3. Plug the telephone line cord (or DSL filter) into the wall jack. Plug the
power adapter into a power outlet not controlled by a wall switch.
4. Align the holes on the bracket with the standard wall plate and slide the
bracket down until it locks securely. Bundle the telephone line cord and
power adapter cord neatly with a twist tie.
1
Teleph one Operation
3
2
DSL filter
(optional, not
included)
8

9
Telephone Operation
Telephone Base Layout
X / DELETE
• Press to delete the message
currently playing.
• When the phone is not in
use, press twice to delete all
previously reviewed messages.
/ REPEAT
Press to repeat a message or
press twice to play previous.
/ PLAY / STOP
• Press to play messages.
• Press to stop message playback.
/ SKIP
Press to skip to the
next message.
Message window
Shows the number of messages and
other answering system information.
IN USE light
• Flashes when there is an incoming
call, or another telephone sharing
the same line is in use.
• On when the handset is in use.
FIND HANDSET
Press to page all
system handsets.
VOICEMAIL light
Flashes when you have new voicemail,
a service offered by your telephone
company.
ANS ON/OFF
Press to turn the answering system on
or off.
VOL
• Press to adjust the volume during
playback.
• When the phone is not in use, press
to adjust the telephone base ringer
volume.
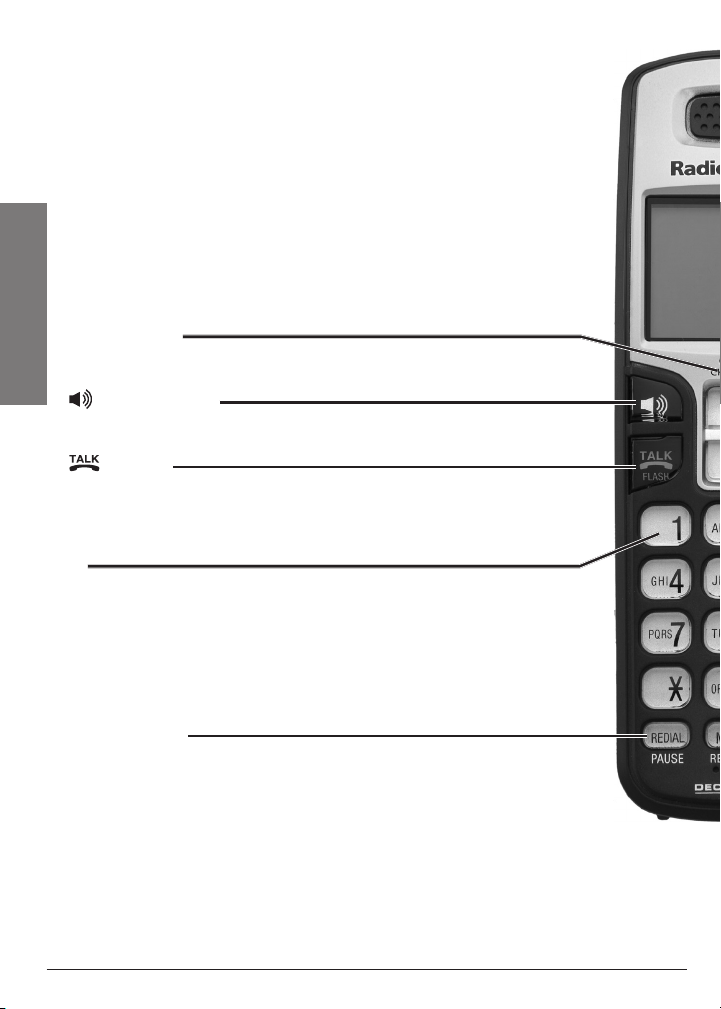
Handset Layout
CHARGE light
On when the handset is charging in the telephone base or charger.
Telephone Setup
(Speakerphone)
Press to switch between speakerphone and handset.
/ FLASH
• Press to make or answer a call.
• During a call, press to receive an incoming call when you receive a
call waiting alert.
1
While reviewing a call log entry, press repeatedly to add or remove
1 in front of the telephone number before dialing or saving it in the
directory.
REDIAL/PAUSE
• Press to review the redial list.
• While dialing or entering numbers into the directory, press and
hold to insert a dialing pause.
10
11
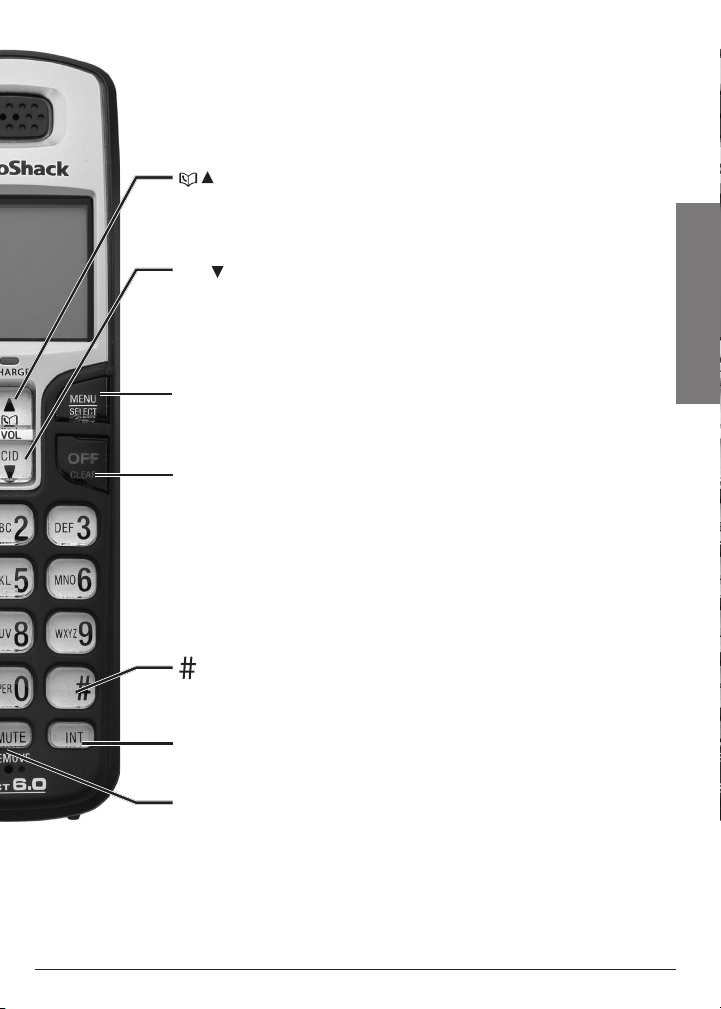
Telephone Setup
(Directory)
• Press to enter the directory when the telephone is not in use.
• While in a menu, press to scroll up.
• During a call, press to raise the listening volume.
CID (caller ID)
• Press to review the call log when the telephone is not in use.
• While in a menu, press to scroll down.
• During a call, press to lower the listening volume.
MENU/SELECT
• Press to show the menu.
• While in a menu, press to select an item, or save an entry or setting.
OFF/CLEAR
• During a call, press to hang up.
• While the handset is ringing, press to silence the ringer
temporarily.
• Press and hold while the telephone is not in use to erase the
missed calls indicator.
• During programming, press to exit without making changes.
Press to show other dialing options when reviewing a call log entry.
INT (intercom)
Press to initiate an intercom conversation or transfer a call.
MUTE/REMOVE
• While on a call, press to mute the microphone.
• While reviewing the call log or directory, press to delete an
individual entry.
• Press to delete digits when predialing.

Handset Ringer Volume
You can set the ringer volume or turn the ringer off.
>RINGER V OLUME
1. Press MENU/SELECT to show the menu.
2. Press or to select >RINGER VOLUME, then press
MENU/SELECT.
3. Press or to adjust the volume. A sample of
each ringer volume plays as you scroll through the
choices.
4. Press MENU/SELECT to confirm your selection.
>RINGER V OLUME
RINGER T ONE
RINGER T ONE
RINGER VO LUME
RINGER VO LUME
n Note: Setting the volume to the lowest level turns off the ringer. The
ringer off icon ( ) appears.
Telephone Base Ringer Volume
Telephone Setup
Press VOL or VOL on the telephone base to adjust the ringer volume
when the telephone is not in use. When you set the ringer volume to zero,
the base ringer is off and the system announces, “Base ringer is off.”
Ringer Tone
You can choose from different ringer tones.
1. Press MENU/SELECT to show the menu.
2. Press or to select >RINGER TONE, then press
MENU/SELECT.
3. Press or to select the desired ringer tone.
A sample of each ringer tone plays as you scroll
through the choices.
4. Press MENU/SELECT to confirm your selection.
If you turn off the ringer volume, you will not hear ringer
tone samples.
>RINGER T ONE
>RINGER T ONE
KEY TONE
KEY TONE
RINGER TO NE
RINGER TO NE
1
1
Key Tone
You can turn the key tone on or off.
1. Press MENU/SELECT to show the menu.
2. Press or to select >KEY TONE, then press
MENU/SELECT.
3. Press or to choose ON or OFF.
4. Press MENU/SELECT to confirm your selection.
12
>KEY TONE
>KEY TONE
LCD LANG UAGE
LCD LANG UAGE
KEY TONE
KEY TONE
ON
ON
13
Telephone Setup
LCD Language
You can select ENGLISH, FRANÇAIS or ESPAÑOL to
be used in all screen displays.
1. Press MENU/SELECT to show the menu.
2 Press or to select >LCD LANGUAGE, then
press MENU/SELECT.
3. Press or to scroll through the choices.
4. Press MENU/SELECT to confirm your selection.
>LCD LANG UAGE
>LCD LANG UAGE
SET DATE /TIME
SET DATE /TIME
LCD LANGUAGE
LCD LANGUAGE
ENGLISH
ENGLISH
Set Date and Time
The answering system announces the day and time of the message prior
to playing it. Before using the answering system, set the date and time as
follows.
1. Press MENU/SELECT to show the menu.
2. Press or to select >SET DATE/TIME, then press
MENU/SELECT.
3. Press the number keys (0-9) to enter a two-digit
number or press or until the screen displays
the correct value. Press MENU/SELECT to advance.
4. Repeat step 3 until the date and time are set.
n Notes:
• If you subscribe to caller ID service, the date and
time are set automatically with each incoming call.
The year must be correct so that the day of the week
can be calculated from the caller ID information.
• If the date and time are not set, the system announces,
“Time and day not set,” before each message plays.
>SET DATE /TIME
>SET DATE /TIME
CLR VOIC EMAIL
CLR VOIC EMAIL
SET DATE
SET DATE
12/25/08
12/25/08
SET TIME
SET TIME
03:18 AM
03:18 AM
Clear Voicemail
If you subscribe to voicemail service offered by your telephone company,
when you have new voicemail messages NEW VOICEMAIL and appear
on the handset, and the VOICEMAIL light on the telephone base flashes.
Contact your local telephone company for more information and assistance
about using your voicemail service.
After you have listened to all new voicemail messages, the indicators on
both the handset and telephone base turn off automatically.

Use the clear voicemail feature when the telephone indicates that there is
new voicemail but there is none (for example, when you have accessed your
voicemail while away from home). Clearing the voicemail waiting indicator
only turns off the indicators; it does not delete your voicemail messages. As
long as you have new voicemail messages, your local telephone company
continues to send the signal to turn on the indicators.
To manually turn off these indicators:
>CLR VOICEMAIL
1. Press MENU/SELECT to show the menu.
2. Press or to select >CLR VOICEMAIL, then
press MENU/SELECT. The screen shows TURN OFF
INDICATOR?
3. Press MENU/SELECT to confirm your selection.
>CLR VOICEMAIL
HOME AREA CODE
HOME AREA CODE
TURN OFF
TURN OFF
INDICATOR?
INDICATOR?
n Note: Your telephone service provider might alert
you to new messages with a stutter (broken) dial tone.
Telephone Setup
Contact your service provider for details.
Home Area Code
If you dial your local calls using only seven digits (area code not required),
you can program your home area code so that when you receive a call
within your local area, the telephone number is automatically stored without
the area code in the call log.
1. Press MENU/SELECT to show the menu.
2. Press or to select >HOME AREA CODE, then
press MENU/SELECT.
3. Use the dialing keys to enter the desired home area
code.
• Press MUTE/REMOVE to delete a digit.
• Press and hold MUTE/REMOVE to delete the
entire entry.
6. Press MENU/SELECT to confirm.
>HOME AREA CODE
>HOME AREA CODE
ANS. SYSTEM
ANS. SYSTEM
HOME AREA CODE
HOME AREA CODE
817
817
n Note: If in the future your telephone company requires you to dial the
area code when making a local call, delete the home area code you have
already programmed by pressing MUTE/REMOVE. After you have deleted
the programmed home area code, ___ appears.
14

15
Answering System Setup
Use a handset to change your answering system settings.
Number of Rings
You can choose from two, four, or six rings; or toll saver. With toll saver
selected, the answering system answers after two rings when you have
new messages, and after four rings when you have no new messages. This
enables you to check for new messages and avoid paying unnecessary long
distance charges if you are calling from out of your local area.
1. Press MENU/SELECT to show the menu.
2. Press MENU/SELECT to select >ANS. SYSTEM.
3. Press or to select >ANS SYS SETUP, then press MENU/SELECT.
4. Press or to select ># OF RINGS, then press MENU/SELECT.
5. Press or to choose from 2, 4, 6 or TOLL SAVER, then press
MENU/SELECT to confirm your selection.
Remote Code
A two-digit security code is required to access the answering system
remotely from any touch tone telephone. The preset code is 19. You can set
the code from 10 to 99.
1. Press MENU/SELECT to show the menu.
2. Press MENU/SELECT to select >ANS. SYSTEM.
3. Press or to select >ANS SYS SETUP, then press MENU/SELECT.
4. Press or to select >REMOTE CODE, then press MENU/SELECT.
5. Press or to change the code, then press MENU/SELECT to
confirm.
Syste m Setup
Answerin g
Message Alert Tone
This telephone can be set to beep every 10 seconds to alert you of new
messages. The tone stops when all new messages have been reviewed.
1. Press MENU/SELECT to show the menu.
2. Press MENU/SELECT to select >ANS. SYSTEM.
3. Press or to select >ANS SYS SETUP, then press MENU/SELECT.

4. Press or to select >MSG ALERT TONE, then press MENU/SELECT.
5. Press or to select ON or OFF, then press MENU/SELECT to
confirm your selection.
n Note: The answering system must be turned on for the message alert
tone to function.
Announcement
The telephone is preset with a greeting that answers calls with “Hello,
please leave a message after the tone.” You can use this preset
announcement, or replace it with your own.
Record Your Own Announcement
1. Press MENU/SELECT to show the menu.
2. Press MENU/SELECT to select >ANS. SYSTEM.
3. Press or to select >ANS SYS SETUP, then press MENU/SELECT.
4. Press or to select >ANNOUNCEMENT, then press MENU/SELECT.
The handset announces, “To play, press 2. To record, press 7.”
5. Press 7 to record. The handset announces, “Record after the tone.
Press 5 when you are done.”
6. After the tone, speak towards the microphone of the handset.
Answerin g
Syste m Setup
7. Press 5 when finished.
8. The answering system automatically plays back the newly recorded
announcement. Press 5 to stop the playback at anytime; 2 to replay the
recorded announcement; or 7 to record again if desired.
n Notes:
• Your announcement can be up to 90 seconds in length.
• Announcements shorter than two seconds are not recorded.
Play Your Announcement
1. Press MENU/SELECT to show the menu.
2. Press MENU/SELECT to select >ANS. SYSTEM.
3. Press or to select >ANS SYS SETUP, then press MENU/SELECT.
4. Press or to select >ANNOUNCEMENT, then press MENU/SELECT.
The handset announces, “To play, press 2. To record, press 7.”
5. Press 2 to play.
16

17
Answerin g
Syste m Setup
Delete Your Announcement
1. Press MENU/SELECT to show the menu.
2. Press MENU/SELECT to select >ANS. SYSTEM.
3. Press or to select >ANS SYS SETUP, then press MENU/SELECT.
4. Press or to select >ANNOUNCEMENT, then press MENU/SELECT.
The handset announces, “To play, press 2. To record, press 7.”
5. Press 3 to delete your own recorded announcement.
n Note: When your announcement is deleted, calls are answered with
the preset announcement.
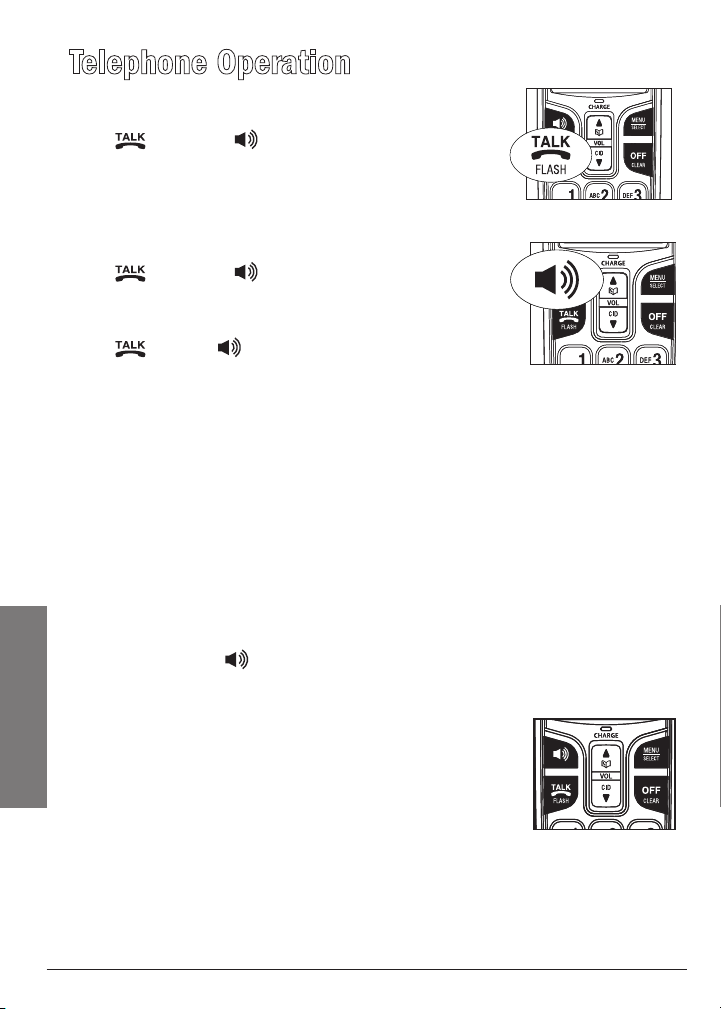
Telephone Operation
Make a Call
Press /FLASH or . You will hear a dial tone.
Dial the number.
Predial a Call
Dial the number.
Press /FLASH or .
Answer a Call
Press /FLASH, , or any of the dialing keys
(0-9, #, *).
n Notes:
• The screen shows the elapsed time as you talk (in hours, minutes and
seconds).
• When predialing (preview numbers before dialing), press
MUTE/REMOVE or OFF/CLEAR to backspace and delete; press
and hold REDIAL/PAUSE to insert a dialing pause ( p appears).
End a Call
Press OFF/CLEAR or put the handset in the telephone base or charger.
Speakerphone
During a call, press to switch between speakerphone and normal
handset use.
Volume
During a call, press VOL or VOL to adjust the
listening volume.
Teleph one Operation
18
 Loading...