

Page 1
%&)"-CTCQMG"5[UVGO
32-1 167
"+/2146#06"
#
If an icon appears at the end of a
paragraph, go to the box on that
page with the corresponding icon
for pertinent information.
— Warning # — Important
Rý
.... — Caution
WARNING:
shock hazard, do not expose this product to
rain or moisture.
CAUTION:
ELECTRICAL SHOCK, DO NOT REMOVE
COVER OR BACK. NO USER-SERVICEABLE
PARTS INSIDE. R EF ER SERVICING TO
QUALIFIED PERSONNEL.
constitute a risk of electric shock. Do not
constitute a risk of electric shock. Do not
open the product’s case
open the product’s case
To reduce the risk of fire or
.
CAUTION
.
RISK OF ELECTRIC SHOCK
DO NOT OPEN
TO REDUCE THE RISK OF
The lightning symbol is
The lightning symbol is
intended to alert you to the
intended to alert you to the
presence of uninsulated
presence of uninsulated
dangerous voltage within this
dangerous voltage within this
product’s enclosure that might
product’s enclosure that might
be of sufficient magnitude to
be of sufficient magnitude to
The exclamation symbol is
The exclamation symbol is
intended to inform you that
intended to inform you that
important operating and
important operating and
maintenance instructions are
maintenance instructions are
!
!
included in the literature
included in the literature
accompanying this product.
accompanying this product.
±
.
.
#
— Note
..
!
OWNER’S MANUAL — Please read before using this equipment.
CD/CDG Player — lets you play CDs, karaoke CDs, or
CDGs. 8× oversampling produces high quality sound.
Adjustable
Echo Control —
lets you enrich
the sound for a
concert hall
effect.
Loudness —
lets you
increase the
bass effect to
improve the
overall audio
Automatic
output.
Voice Control
(AUTO VOICE)
— lets you
replace the
prerecorded
original singer’s
voice with your
voice when you
use a CDG, so
5W Amp and
Full Range
Speaker —
produces
great quality
sound.
you can sing
solo.
Dual Microphone Jacks — let you sing duets or lead and
background vocals
20-Track Programmable Memory — lets you plan your own
performance by programming up to 20 CD tracks in the order
you want to hear them.
Your RadioShack CDG Karaoke System is one of the most
versatile karaoke systems available. It lets you be the “star”
as you sing along with your favorite recordings on a CD, or
a CDG (a compact disc wi th a g r aph ic trac k) , and hea r yo ur
voice with the music through the powerful built-in speaker.
Your karaoke system’s CD G c apa bil ity let s yo u co nn ect the
karaoke system to a TV or monitor and read the lyrics of
your favorite tunes as they scroll by in front of a still video
graphic, such as a picture or drawing related to the music.
Your karaoke system can also be used as a small PA
system for speaking at parties or other gatherings.
2002 RadioShack Corporation.
©
RadioShack and RadioShack.com are trademarks
All Rights Reserved.
used by RadioShack Corporation.
Page 2

%106'065
Important Safety Instructions ......................................................... 2
Connections ................................................................................... 4
Connecting Microphones ............................................................ 4
Connecting an External
Audio Component ....................................................................... 4
Connecting To a TV .................................................................... 4
Connecting Power ...................................................................... 4
Operation ....................................................................................... 5
Turning the System On/Off ......................................................... 5
Adjusting the Sound ................................................................... 5
PLA YING A CD/CDG ..................... ........................................ ..... 5
Skipping Tracks .......................................................................6
Search Play (CD ONLY).......................................................... 6
Programmed Play..................... ............................................... 6
Karaoke ..................................................................................... . 7
Singing Along
With A CD/CDG....................................................................... 7
Troubleshooting ............................................................................. 8
Care ............................................................................................... 9
CD/CDG Care Tips ..................................................................... 9
Service and Repair ........................................................................ 9
Specifications ............................................................................... 10
The Fcc Wants To Know .............................................................. 11
1
Page 3

+/2146#06"5#('6;"+05647%6+105
Careful attention is devoted to quality standards in the ma nufacture of your karaoke, and s af et y i s a
major factor in its design. However, safety is also your responsibility. This section lists important
information that will help y ou pr operly use and enjoy your kar aoke and accessories. R ead all the
included safety and operating instructions before using your karaoke. Follow them closely, and retain
them for future reference.
Heed Warnings — Follow all warnings on the product and in the operating instructions.
Cleaning — Unplug this pro duct from the wall outlet before cl eaning. Use only a damp cloth fo r
cleaning. Do not use liquid or aerosol cleaners.
Attachments — Do not use attachments/accessories not recommended by the product manufacturer,
as they might create a hazard.
Water and Moisture — Do not use this product near wat er (for example, near a bathtub, w ashbowl,
kitchen sink, or laundry tu b; in a w et b as ement; or near a swimming pool ) .
Accessories — Do not pla ce t his pr oduct on an unstable cart, st an d, trip od, br acket, or table. The
product may fall, caus ing serious injury to a child or adu lt, and serious damage to the pr oduct. Use
only with a cart, stand, trip od, bracket, or table recommended by the manufacture r or sold with the
product. Follow the manufacturer's instructions for mounting, and use a rec om mended mounting
accessory.
Carts — Move the product on a cart carefully. Quick s to ps, excessive force, and unev en surfaces
may cause the product/cart to overturn.
Ventilation — Slots and ope ni ngs in the cabinet provide ven tilat i on , en sur e reliable operation, and
protect from overheati ng. Do not block or cover these ope ni ngs, and do not place the prod uct on a
bed, sofa, rug, or other similar surface. Do not place the product in a built-in installation such as a
bookcase or rack unless i t pro vi des proper ventilation as sp ec ifi ed by the manufacturer.
Power Sources — Operate this product using only the power source indicated on its marking label. If
you are not sure of your hom e's power type, consult your pr oduct dealer or local power company.
Polarization — This product is equipped with a polarized AC line plug (a plug having one blade wider
than the other). This plug will fit in the power outlet only one way. This is a safety feature. If you
cannot insert the plug fully into the outlet, try reversing the plug. If the plug still doesn't fit, contact your
electrician to replace your obsolete outlet. Do not defe at the saf et y purpose of the polarized plug . If
you need an extension, use a polarized cord.
Power-Cord Protection —Route power-supply cords so they are not likely to be walked on or pinched
by items placed on or again st th em , paying particular attention to cords at plugs, convenience
receptacles, and the poi nt w her e t hey exit from the product.
Lightning — For added pr otection for this product during a lightning storm, or when it is lef t
unattended and unuse d fo r long periods of time, unplug it fro m the w al l out le t an d di sc onnect the
antenna or cable system. This will prevent damage to the product due to lightning and power-line
surges.
Overloading — Do not overload wall outlets, extension cords, or integral convenience receptacles, as
this can result in a risk of fire or electric shock.
2
Page 4

Objects and Liquids — Never push objects of any kind i nt o t hi s pr oduct through openings, a s they
may touch dangerous vol t age points or short out parts tha t coul d r esult in a fire or electric shock.
Never spill liquid of any kind on the product.
Servicing — Do not attem pt to ser vice this product yourself, as opening or removing cove rs ma y
expose you to dangerou s voltage or other hazards. Ref er all servicing to qualified ser vice personnel.
Damage Requiring Service — Unplug this product from the wall outlet and refer servicing to qualified
service personnel und er the following conditions:
• When the power-supp ly cor d or plug i s damaged.
• If liquid has been spilled or ob je ct s have fallen into the produc t .
• If the product has been exposed to rain or water.
• If the product does not operat e normally by following the operating instructions. Adju st onl y
those controls that are covered by the operating instructions, as an improper adjustment of other
controls may result in damage and will often require extensive work by a qualified technician to
restore the product to norm al operation.
• If the product has been drop ped or damaged in any way.
• When the product exhibits a distinct change in performance.
Replacement Parts — When replacement parts are req u ir ed, be sure the service technici an u ses
replacement parts spec i fied by t he m anufacturer or having the sam e characteristics as the origi nal
part. Unauthorized substitutions may result in fir e, elect r ic shock, or other hazards.
Safety Check — Upon c om ple ti on of service or repairs to this pr oduct, ask the service technic ia n to
perform safety checks to de te rm ine that the product is in proper operating condition.
Wall or Ceiling Mount — The product should be mounted to a wall or ceiling only as recommended by
the manufacturer.
Heat — The product shou ld be si tuated away from heat sourc es such as radiators, heat reg i st er s,
stoves, or other product s ( in cl ud in g am pl i f ie rs ) that pr oduce heat.
Power Lines — Locate an y outdoor antenna away from power lines.
Nonuse Periods — Unplug the product’s power cord when you will not use it for extended periods.
Outdoor Antenna Grounding — If an outside anten na or cable system is connected t o th e pr oduct,
ground the antenna or cable system so as to provide so m e pr ot ection against voltage su rge s and
built-up static charges. Article 810 of the National Electrical Code, A NSI /NF PA 70, provides
information about prope r gr ounding of the mast and supporting structure, grounding of the lead-in
wire to an antenna discha rg e unit, size of grounding conductors, location of antenna -d ischarge unit,
connection to grounding electrodes, and require m ents for the grounding electrode. See the example
below.
3
Page 5

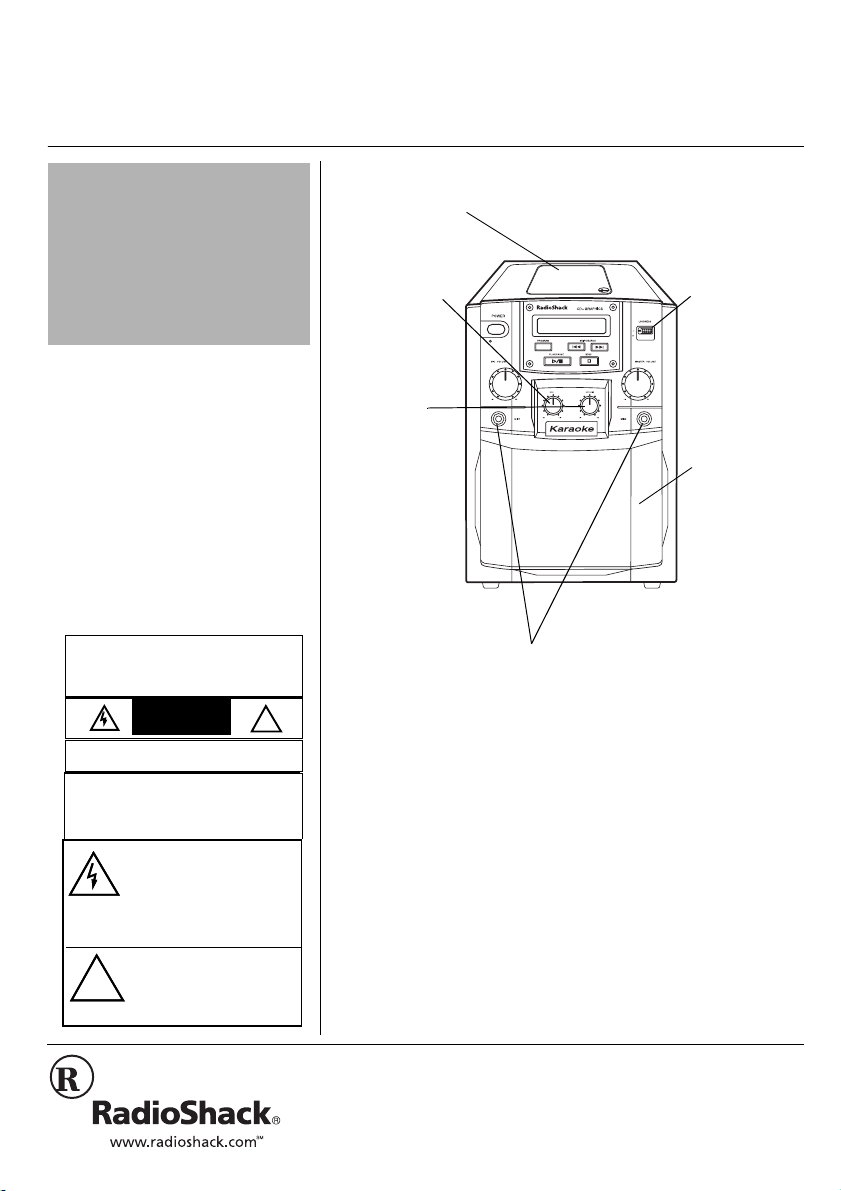
"9#40+0)"R"
R
To avoid electrical shock, do not
connect the system to AC power
until all other connections are
complete.
.
"%#76+10"
The supplied power cord has a
polarized plug that fits into the
outlet only one way. If the plug
does not fit properly, turn it over
and try again. Do not force it.
.
%100'%6+105
%100'%6+0)"/+%412*10'5
The system has two microphone jacks so you can use the
supplied microphone to sing along to your favorite
recordings, and connect an additional microphone (not
supplied) for duets, or lead and background vocals.
For the best performance , the additi onal mic rophone sh ould
be a unidirectional 600-ohm dynamic microphone with a
1
/4 inch (6.35-mm) plug and an ON/OFF switch.
Before you connect a microphone, always set
MIN
.
to
If you are connecting only one microphone, plug it into
MIC 1
. If you are adding a second microphone, plug it into
MIC 2
.
%100'%6+0)"#0"':6'40#."#7&+1"
1/210'06
%
You can broadcast the karaoke system’s sound through an
external audio component such as a PA system amplifier.
Connect the external audio component’s audio input jacks
to the karaoke system’s
AUX OUT R
and L jacks.
MIC VOLUME
"016'"±"
±
For TVs that do not have an audio/
video input jack, use a video RF
modulator. Connect the RF
modulator to VIDEO OUT and to
the TV’s 75-ohm VHF input
terminal, following the instructions
in the modulator’s owner’s manual.
4
%100'%6+0)"61"#"68
You can connect the CD/CDG karaoke system to a TV or
monitor and see the words and images produced by CDG.
Plug one end o f th e supplied cable in to
the other end into your TV’s VIDEO IN jack.
VIDEO OUT
±
jack and
%100'%6+0)"219'4
When you have made all other connections, plug your
system’s power cord into a standard AC outlet.
Rý
....
Page 6

12'4#6+10
6740+0)"6*'"5;56'/"1011((
To turn on the system, press
lights.
POWER
. The POWER LED
To turn off the system, press
POWER
. The POWER LED
turns off.
#&,756+0)"6*'"5170&"
MASTER VOLUME
system’s speaker, rotate
MAX
.
AUTO VOICE
volume of the prerecorded singer’s voice, adjust the
AUTO VOICE
ECHO
— To add an echo effect to your voic e while you si ng,
ECHO
adjust
MIC VOLUME
you are singing, rotate
LOUDNESS
treble effect, slide
— To control the volume from the
MASTER VOLUME
toward
MIN
(Automatic Voice Control) — To replace the
between
between
MIN
MIN
— To adjust volume of
MIC VOLUME
and
and
MAX
.
MAX
for the desired effect.
MIC 1
and
between
MIN
MIC 2
and
while
— To add or remove an extended bass and
LOUDNESS
to ON or
OFF
.
or
MAX
2.#;+0)"#"%&1%&)"
1. Press
2. Press
3. Place a CD/CDG in the compartment tray over the
4. Press
5. Press
The system automatically stops play at the end of the CD/
CDG’s last track. To stop it sooner, press
POWER
to turn on the system. The POWER
indicator lights.
OPEN/CLOSE
CD/CDG door.
center hub, with the label facing up.
OPEN/CLOSE
on the top of the unit to open the
±
±
again to close the CD/CDG
compartment. The total number of tracks and total
playing time appear.
PLAY/PAUSE
±
. The CD/CDG begins to play from
track 1, and the track’s elapsed playing time appears.
STOP
.
.
"016'"±"
±
• To temporarily stop play, press
PLAY/PAUSE.
elapsed time stops and the
track number flashes. To
resume play, press PLAY/
PAUSE again.
• Do not apply excessive force to
the CD/CDG door, or press the
door while a CD/CDG is playing.
• Never place anything except a
compact disk on the disk tray.
Foreign objects can damage the
player.
• Never place more than one disc
on the disc tray at a time.
• During playback, if the system is
subject to a sudden shock or
jolt, the speed of rotation might
change, or some noise might be
produced. This is not a
malfunction.
f
appears. The
5
Page 7

5MKRRKPI"6TCEMU
While the disc is stopp ed, you c an skip up or down to sele ct
a specific track by pressing
the selected track, press
PLAY/PAUSE
SKIP/SEARCH
) or -. To play
.
"016'"±"
±
C;CEHO
C;CEHO
•
• The 21st track you program
remains on the top left
C;CEHOC;CEHO
corner of the display until you
erase the programmed
sequence.
replaces the first programmed
track, and each additional track
you program replaces the next
successive track.
While a CD/CDG is playi ng, p r ess
SKIP/SEARCH
) once to
skip back to the beginning of the current track. Repeatedly
SKIP/SEARCH
press
of the desired track. Repeatedly press
) to search backward to the begi nning
SKIP/SEARCH
- to
search forward to the beginning of the desired track.
5GCTEJ"2NC["*%&"10.;+
Hold down
or backward during play. The CD plays rapidly and you can
hear the sound at a high speed. To return to normal play,
release
SKIP/SEARCH
SKIP/SEARCH
) or -ýto search rapidly forward
) or -.
2TQITCOOGF"2NC[
You can program the CD/CDG play er to play up to 20 trac ks
in any order you choose, and you can program the same
track to play more than once.
1. Press
2. Press
3. Press
4. Press
5. Repeat steps 3 and 4 to program up to 20 tracks.
STOP
. The system displays the total number of
tracks and the total playing time.
PROGRAM
C;CEHO
C;CEHO
.
C;CEHOC;CEHO
appears at the top of the
display, along with the track number.
F0&'
F0&'
the display.
programmed.
SKIP/SEARCH
represents the position number you
F0&'F0&'
±
) or -ýto select the desir ed track.
The track number appears.
PROGRAM
to store the selected track.
FFFFhýF0&'
hýF0&'
hýF0&'hýF0&'
appears in
±
6. Press
PLAY/PAUSE
to play the programmed tracks. The
first track number appears on the display with the
elapsed time of the track in play.
Programmed play automatically stops at the end of the
last programmed track. To stop the CD/CDG’s sooner,
STOP
press
.
To review the prog rammed sequenc e, while pl ay is stopped,
repeatedly press
PROGRAM
To replace a programmed track, press
.
PROGRAM
until the
position number of the track you want to replace appears.
Then repeat steps 3 an d 4 to s ele ct and s tore the new track.
6
Page 8

To erase a programmed sequence during programming,
STOP
C;CEHO
C;CEHO
press
.
C;CEHOC;CEHO
disappears.
To erase a programmed sequence after programming,
press
PROGRAM.
Then press
STOP
C;CEHOý
C;CEHOý
.
C;CEHOýC;CEHOý
disappears.
To erase a program me d s equ enc e a t a ny tim e, p r es s
CLOSE
, or press
POWER
.
OPEN/
-#4#1-'
When a microphone is plugged into
MIC 1
system mixes th e microphone output with recorded music
from CDs or CDGs. Rotate
listening level, and
AUTO VOICE
MIC VOLUME
for the best balance
between playback and microphone levels.
ECHO
Rotate
to add depth and richness to vocals.
5KPIKPI"#NQPI"9KVJ"#"%&1%&)"
1. Press POWER to turn on the system. The POWER
indicator turns on.
2. Load a CD/CDG in the CD compartment.
AUTO VOICE
3. Set
the music and original singer’s voice. Whenever you
sing along, the original singer’s voice is cancelled.
4. Press
5. Adjust
PLAY/PAUSE
MASTER VOLUME
6. Set the microphone’s
MIC VOLUME
to the desired position, to enjoy both
to start play.
to the desired level.
ON/OFF
switch to ON and rotate
to adjust the microphone’s volume.
MIC 2
or
, the
to a comfortable
7. Sing directly into the microphone along with the music.
ECHO
8. Adjust
9. When you finish, press
press
for the desired reverberation.
STOP
OPEN/CLOSE
to open the compartment door and
on the CD/CDG. Then
remove the CD.
10. Set each microphone’s
press
POWER
to turn off the system.
ON/OFF
switch to
OFF
, then
7
Page 9

6417$.'5*116+0)
If you have problems operatin g your C DG Karaok e System,
use this chart to determine the problem and possible
solutions. If you still have problems, contact your local
RadioShack store for assistance.
2TQDNGO 2QUUKDNG"%CWUG 5QNWVKQP
The karaoke
system does not
work.
No sound
No song lyrics
appear on screen.
CD skips or will
not play.
No power
MASTER VOLUME
or MIC VOLUME is
set to the low e s t
setting.
Video cable is not
connected properly to
the TV.
TV’s source selector
is not set to VIDEO.
The CD/CDG is
loaded upside down.
The CD/CDG is dirty
or defective.
Moisture has
condensed on the
pick up lens.
Make sure the power
cord is properly
plugged into an AC
outlet.
Adjust MASTER
VOLUME or MIC
VOLUME.
Connect the video
cable to VIDEO OUT
and to the TV’s
VIDEO IN.
Use your TV’s remote
control to select
VIDEO.
Reload the CD/CDG.
Clean the CD/CDG,
or try a different CD/
CDG.
Unplug the system
and wait 1 hour for
the moisture to
evaporate.
8
Page 10

%#4'
Keep the karaoke dry; if i t ge ts we t, w ip e it dry imm ed ia tely .
Use and store the karaoke only in normal temperature
environments. Handle the karaoke carefully; do not drop it.
Keep the karaoke a way from dust and dirt, an d wipe it with a
damp cloth occasionally to keep it looking new.
%&1%&)"%#4'"6+25
Even though a compact disc is durable, treat the CD s urface
with care.
Do not write on either side of the CD, particularly the nonlabel side. (Signals are read from the non-label side.)
Do not store CDs in high temperature or high humidity
areas. They might warp.
Keep CDs dry. A wa ter drop can act a s a l ens and affe ct the
laser beam’s focus.
Always handle a CD by the edges to avoid fingerprints.
Always keep it in its protective case or sleeve when it is not
in use. Fingerprints and scratches on the CDs surface can
prevent the laser beam from correctly reading the digital
information. If the CD gets scratched, use RadioShack
Scratch ‘n Fix to repair the disc.
....
.
"%#76+10"
You might permanently damage
your speaker by cleaning it with a
vacuum cleaner. Use a feather
duster or a soft loose cloth instead.
.
5'48+%'"#0&"4'2#+4
If your karaoke is not performing as it should, take it to your
local RadioShack store for assistance. Modifying or
tampering with the karaoke’s internal components can
cause a malfunction and might invalidate its warranty and
void your FCC authorization to operate it.
9
Page 11

52'%+(+%#6+105
Power Output (at 10% THD) ........................... 5 Watts per channel
CD Play Frequency Response (at +/-3dB) ............... 100-10000 Hz
Signal to Noise ...................................................................... 60 Db
Dynamic Range .................................................... More Than 80Db
Speaker ............................................ 4-inch mono speaker (8 ohm)
Microphone (Monaural) Impedance .................................. 600 ohm
Power Source ............................................... AC 120V, 60 Hz, 20W
3
Dimensions ...... 12
Weight .................................................................. 15 Ib. 7 oz. (7kg)
Included Accessories Microphone, RCA Plug Cable, CDG Karaoke
Disc
Specifications are typical, individual units might vary. Specifications
are subject to change and improvement without notice.
/16 × 91/16 × 77/8 Inches (310 × 230 × 200 mm)
10
Page 12

6*'"(%%"9#065"61"-019
This equipment has been tested and found to comply with
the limits for a Class B digital device, pursuant to Part 15 of
FCC Rules
the
reasonable protection against harmful interference in a
residential instal lation. T his equipmen t generates, uses, and
can radiate radio frequency energy and, if not installed and
used in accordance with the instructions, may cause
harmful interference to radio communications.
However, there is no guarantee that interference will not
occur in a particular installation. If this equipment does
cause harmful interference to radio or television reception,
which can be determined by turning the equipment off and
on, the user is encouraged to try to correct the interference
by one or more of the following measures:
• Reorient or relocate the receiving ant enna.
• Increase the separation between the equipment and
receiver.
• Connect the equipment into an outlet on a circuit
different from that to which the receiver is connected.
• Consult your loc al RadioShac k store or an experi enced
radio/TV technician for help.
. These limits are designed to provide
• If you cannot eliminate the interference, the FCC
requires that you stop using your
Changes or modificati ons not expressly appr oved by
RadioShack may cau se interfe r enc e and vo id the user’s
authority to operate the equipment.
This device complies with Part 15 of the FCC Rules.
Operation is subject to the following two conditions: (1) this
device may not cause harmful interference, and (2) this
device must accept any interference received, including
interference that may cause undesired operation.
Your karaoke is ETL listed to UL standards and meets all
applicable FCC requirements.
karaoke
.
11
Page 13

Limited Ninety-Day Warranty
This product is warranted by RadioShack aga inst manufacturi ng defects in mater ial and workman ship under normal us e for nine ty (90) days from the date of purchase fro m RadioShack companyowned stores and authorized RadioShack franchisees and dealers. EXCEPT AS PROVIDED
HEREIN, RadioShack MAKES NO EXPRESS WARRANTIES AND ANY IMPLIED WARRANTIES,
INCLUDING THOSE OF MERCHANTABILITY AND FITNESS FOR A PARTICULAR PURPOSE,
ARE LIMITED IN DURATION TO THE DURATION OF THE WRITTEN LIMITED WARRANTIES
CONTAINED HEREIN. EXCEPT AS PROVIDED HEREIN, RadioShack SHALL HAVE NO LIABILITY OR RESPONSIBILITY TO CUSTOMER OR ANY OTHER PERSON OR ENTITY WITH RESPECT TO ANY LIABILITY, LOSS OR DAMAGE CAUSED DIRECTLY OR INDIRECTLY BY USE
OR PERFORMANCE OF THE PRODUCT OR ARISING OUT OF ANY BREACH OF THIS WARRANTY, INCLUDING, BUT NOT LIMITED TO, ANY DAMAGES RESULTING FROM INCONVENIENCE, LOSS OF TIME, DATA, PROPERTY, REVENUE, OR PROFIT OR ANY INDIRECT,
SPECIAL, INCIDENT AL, OR CONSE QUENTIAL DAMAGES, EVEN I F RadioSha ck HAS BEEN ADVISED OF THE POSSIBILITY OF SUCH DAMAGES.
Some states do not allow limitations on how long an implied warranty lasts or the exclusion or limitation of incidental or consequential damages, so the above limitations or exclusions may not apply to
you.
In the event of a pro duct defect duri ng the warranty period, take the p roduct and the R adioShack
sales receipt as proof of purchase date to any RadioShack store. RadioShack will, at its option, unless otherwise provided by law: (a) correct the defect by product repair without charge for parts and
labor; (b) replac e the product with one of the same or s imilar design; or (c) refund the purchas e
price. All replaced parts an d produ cts, and p roducts on which a refund i s made, b ecome th e property of RadioShack. Ne w or recondit ioned parts and products may be used in the per formance of
warranty service. Rep aired or repl aced parts and p roducts are warr anted for the re mainder of t he
original warranty period. You will be charged for repair or replacement of the product made after the
expiration of the warranty period.
This warranty does not cover: (a) damage or failure caused by or attributable to acts of God, abuse,
accident, misuse, improper or ab norma l usage , failure to fol low in struction s, imprope r insta llatio n or
maintenance, alterati on, lightning or other incidence of excess vo ltage or current; (b) an y repairs
other than those provided by a RadioShack Authorized Service Facility; (c) consumables such as
fuses or batteries; (d) cosm etic dama ge; (e) transpo rtation, shipping o r insuran ce co sts; or (f) costs
of product removal, installation, set-up service adjustment or reinstallation.
This warranty gives yo u specific legal rights, and yo u may also have other rights which vary from
state to state.
RadioShack Customer Relations, 200 Taylor Street, 6th Floor, Fort Worth, TX 76102
12/99
RadioShack Corporati on
Fort Worth, Texas 76102
32-1167
07A02
Printed in China
 Loading...