

Page 1

16-420 .fm Page 1 Tuesda y, July 20, 1999 11:32 AM
Cat. No. 16-420
OWNER’S MANUAL
Please read before using this equipment.
Model 28 9" Co lo r TV
with Built-In VHS VCR
Page 2

g
y
g
g
g
y
y
g
y
g
y
y
g
y
16-420 .fm Page 2 Tuesda y, July 20, 1999 11:32 AM
FEATURES
Your RadioShack Model 28 9" Color TV with
Built-In VHS VCR combines a versatile color
TV/monitor and a VCR in one space-saving cabinet. The supplied AC and DC power cords let
you enjoy it in your home, office, car, RV, van, or
boat — almost anywhere! The Model 28 receives TV programs and plays video tapes. It
also records video tape s from TV programs or
an audio/video source you connect to it.
Please read this owner’s manual carefully. It has
been prepared to assist you with initial setup
procedures and to guide y ou in the Model 28’s
everyday operation.
Your Model 28 has these features.
Front Panel Video/Audio Input Jacks
— let
you quickly connect an audio/video device such
as a camcorder or video game without disconnecting other devices.
Bilin
ual On-Screen Menu
— displays instruc-
tions on the TV screen in English or Spanish.
179-Channel Capabilit
Locked Loop) Tuner
, Digital PLL (Phase-
— offers a broad range of
viewing choices and a clear, sharp picture.
Tuner Memor
Programmin
— automatically
stores all the active chann els in your area into
memory. You can also manually program the
tuner’s memory, making it easy to add new
channels when you move th e Model 28 to another area, or delete channels you do not want.
Remote C ontro l
— provides remote access to
most of the tape-motion and TV controls.
Two-Wa
Power
— lets you powe r the Model
28 from standard AC power (with the supplied
AC power cord) or your vehicle’s battery (with
the supplied DC power cord).
Channel Return
— lets you quickly switch between broadcasts on two different channels by
pressing a single button.
1-Year, 7-Event, Di
ital Timer
— lets you program the Model 2 8 to make up to s even unattended weekly, daily, or one-time recordings
within a 1-year period.
Toda
Timer Recordin
— lets you easily
record one program within the next 24 hours.
Game Mode Settin
— lets you quickly set the
Model 28 to the best video setting for viewing
video games.
Automatic/Manual Trackin
— adjusts the
tracking automatically for each tape you play.
You can also adjust the tracking manually.
Automatic Pla
back/Rewind/Eject
— makes
playback easy by automatically playing, rewinding, and ejecting a video cassette tape.
Sleep Timer
— lets you set the Model 28 to play
for the amount of time you select, then automatically turn off.
Auto Repeat
— lets you set the Model 28 to automatically repeat a tape when, during playback,
it reaches the end or a blank spot on the tape.
Rental Pla
— improves playback picture qual-
ity of worn tapes, such as rental tapes.
Dual-Speed Fast-Forward/Reverse with Visual Search and Time Search
— helps you
easily find a selection on the tape, and lets you
quickly move the tape through recorded material
you want to skip.
Freeze-Frame
— lets you temporarily stop the
action and view a single frame.
Dew Protection System
28 by preventing VCR operation in very humid
conditions.
— protects the Model
Di
ital Tape Counter with Memor
select and return to a specific point on the tape.
© 1996 Tandy Corporation.
RadioShack is a trademark used by Tandy Corporation.
All Rights Reserved.
— lets yo u
2
Page 3
CAUTION
16-420 .fm Page 3 Tuesda y, July 20, 1999 11:32 AM
Three Recording/Pla yback S pee ds — let you
choose the best recording speed for the desired
length and recording quality.
Earphone Jack — lets you connect an earphone (not supplied) to the Model 28.
Note: Y our Model 28’s remo te control requires
two AA batteries (not included) for operation.
For your records, we recommend you record the
serial number of the Model 28 here. The number
is on the back panel.
Serial Number ______________________
Note: Most material performed in public, such
as concerts, plays, and movies, or distributed on
prerecorded video tapes, is copyrighted. The
unauthorized recording or duplication of copyrighted material is a violation of the copyright
laws of most countries and such duplication may
result in fines and/or imprisonment. Note, however, that in the United States, it is not a violation
of U.S. copyright laws for a c onsum er t o reco rd
a broadcast television program for private (inhome) viewing.
Warning: To prevent fire or shock ha zard, do
not expose this product to rain or moisture.
RISK OF ELECTRIC SHOCK.
DO NOT OPEN.
CAUTION: TO REDUCE THE RISK OF
ELECTRIC SHOCK, DO NOT REMOVE
COVER OR BACK. NO USER -SERVICEABLE PARTS INSIDE. REFER SERVICING TO QUALIFIED PERSONNEL.
This symbol i s intended to alert you to the presence of uninsulated dangerous voltage within
the prod uct’s encl osure that mi ght be of sufficient magnitude to constitute a risk of electric
shock. Do not open the product’s case.
!
This symbol is intended to inform you that important operating and maintenance instructions
!
are included in the literature accompanying this
product.
3
Page 4
g
g
g
g
g
g
g
g
g
g
g
g
g
g
g
g
g
g
g
g
g
g
g
g
g
g
g
g
g
g
g
g
g
g
g
g
g
g
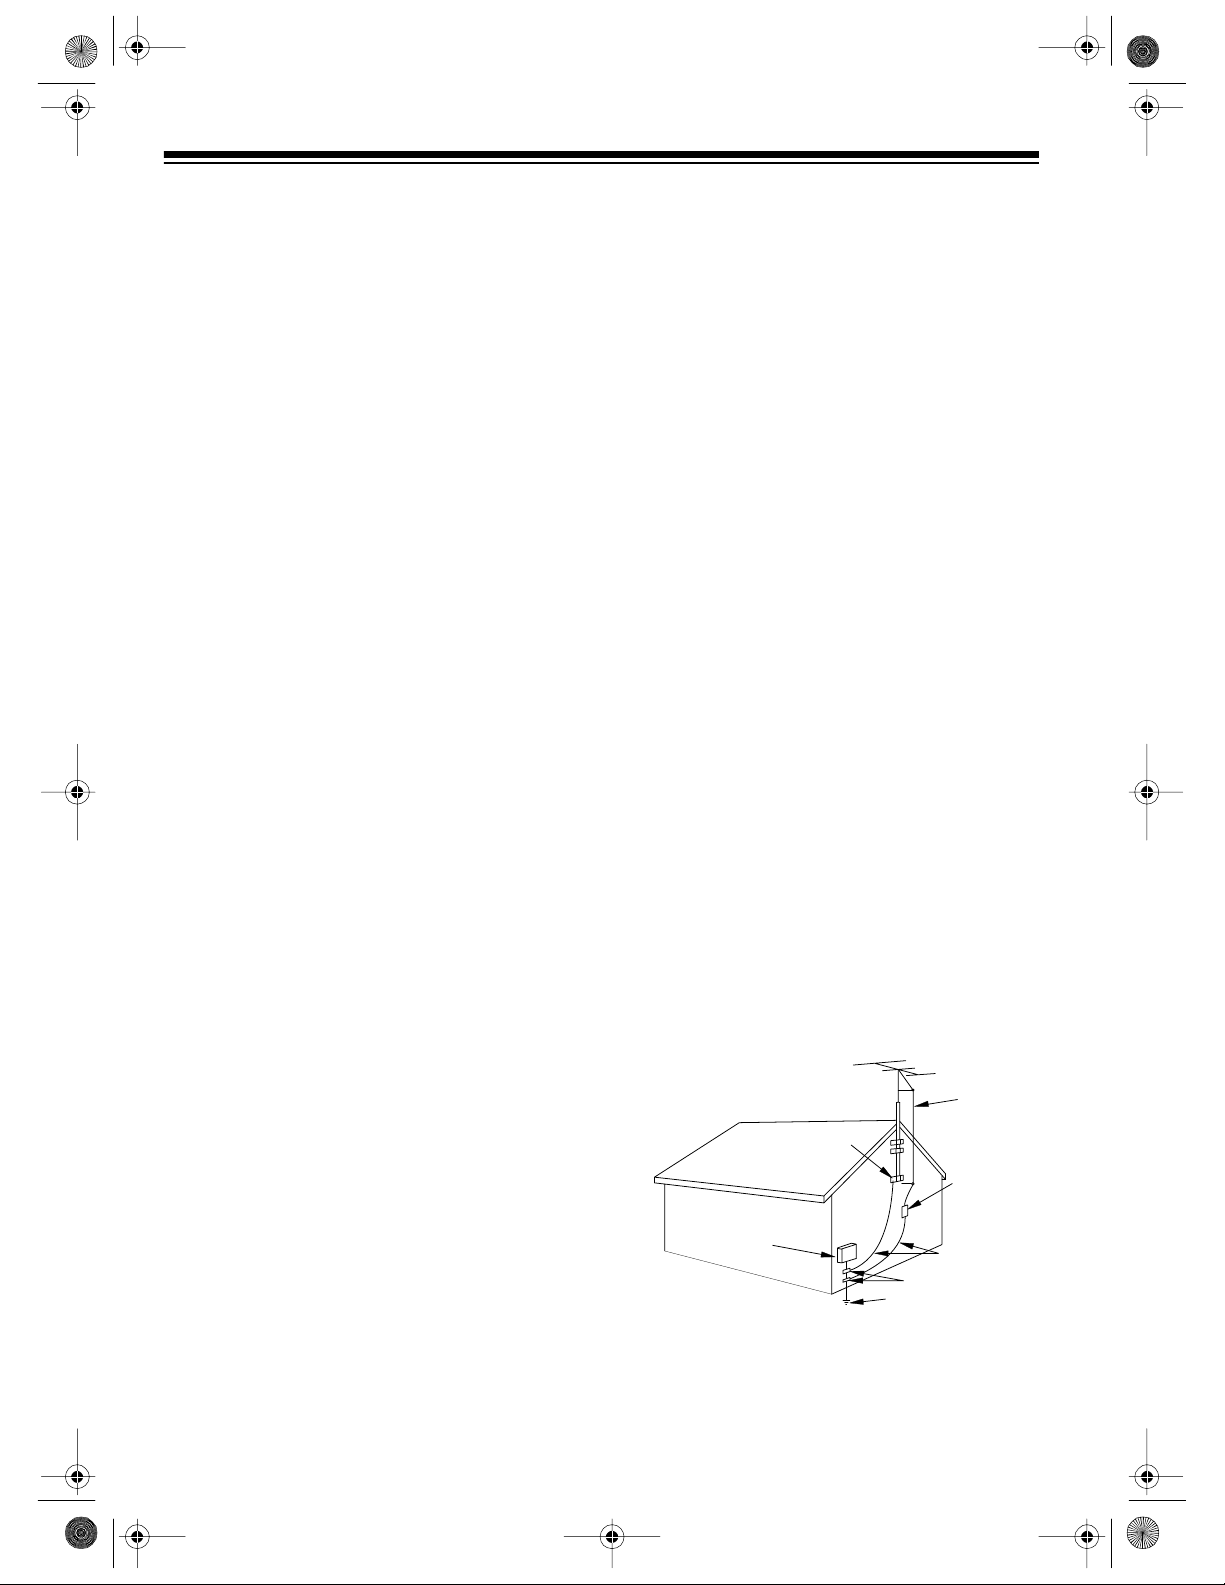
GROUND CLAM PS
NEC - NATI ON AL ELE CTRI CAL C ODE
EXAMPLE OF ANT ENNA GRO UNDING AS P ER
NATIONAL ELE CT RICAL CO DE
WIRE
DISCHARGE UNIT
(NEC SECTION 810-20)
GROUNDING CONDUCTORS
(NEC SECTION 810-21)
ELECTRODE SYSTEM
(NEC ART 250, PART H)
SERVICE
EQUIPMENT
CLAMP
ANTENNA
LEAD IN
ANTENNA
POWER SERVICE GROUNDI NG
GROUND
ELECTRIC
FIGURE A
16-420 .fm Page 4 Tuesda y, July 20, 1999 11:32 AM
IMPORTANT SAFEGUARDS AND PRECAUTIONS
1.
2.
3.
4.
5.
6.
7.
8.
9.
Read instructions
in
instructions should be read before the appli-
— All the safety and operat-
ance is operated.
Retain In struction s
in
instructions should be retained for future ref-
— The safety and operat-
erence.
Heed Warnings
ance and in the operatin
— All warnin
instructions should be
s on the appli-
adhered to.
Follow Instructions
— All operatin
and use
instruct ions should be followed.
Cleaning
let before cleanin
— Unplu
TV/VCR from the wall out-
. Do not use liquid cleaners or
aerosol clea ners. Use a damp cloth for cleanin
Attachments
— Do not use attachments not
recommended by the TV/VCR manufacturer as
they may cause hazar ds.
Water and Moisture
— Do not use this TV/VCR
near water-for example, near a bath tub, wash
bowl, kitchen sink, or laundry tub, in a wet basement, or near a swimmin
Accessories
— Do not place this TV/VCR on
pool.
an unstable cart, stand, tripod, bracket, or table.
The TV/VCR may fall, causin
someone and serious dama
serious injury to
e to the appliance.
Use only with a cart, stand, tripod, bracket, or
table recommended by the manufacturer or sold
with the TV/VCR. Any mountin
of the appliance
should follow the manufacturer’s instructions
and should use a mountin
accessory recommended by the manufacturer. An appliance and
cart combination should be moved with care.
Quick stops, excessive force, and uneven sur-
faces may cause an appliance and cart combination to overturn.
Ventilation
— Slots and openin
s in the cabinet
and the back or bottom are provided for ventilation and to ensure reliable operation of the TV/
VCR and to protect it from overheatin
openin
openin
s must not be blocked or covered. The
s should never be blocked by placin
. These
the TV/VCR on a bed, sofa, rug, or o ther s i m ilar
surface.
This TV/VCR should never be placed near or
over a radiator or heat re
ister. This TV/VCR
should not be placed in a built-in installation
such as a bookcase or rack unless proper ventilation is provided or the manufacturer’s instructions have been adhered t o.
Power Sources
10.
— This TV/VCR should be
operated only from the type of power source
indicated on the markin
label. If you are not
sure of the type of power supplied to your hom e,
consult your appliance dealer or local power
company. For TV/VCRs intended to operate
from battery power or other sources, refer to the
operatin
Grounding and Polarizat ion
11.
equipped with a polarized alternatin
line plu
other). This plu
instructions.
— This TV/VCR is
-current
(a plug having one blade wider than the
will fit into the power outl et only
one way. This is a safety feature. If you are
unable to insert the plu
.
reversin
fit, contact your electrician to replace your obso-
the plug. If the p lug should still fail to
fully into the outlet, try
lete outlet. Do not defeat the safety purpose of
the polarized plu
Power-Cord Protection
12.
.
— Power-supply cords
should be routed so they are not likely to be
walked on or pinched by items placed upon or
a
ainst them, paying particular attention to
cords at plu
s, convenience receptacles, and
the point where they exit from the appliance.
Outdoor Antenna Grounding
13.
— If an outside
antenna or cable sy stem is connected to t he TV/
VCR, be sure the antenna or cable system is
rounded so as to provide some protection
a
ainst voltage surges and built-up static
char
es. Section 810 of the National Electrical
Code, ANSI/NFPA No. 70-1984, provides information with respect to proper
mast and supportin
structure, grounding of the
lead-in wire to an antenna dischar
rounding of the
e unit, size of
rounding conductors, location of antenna-dis-
char
e unit, connect ion to grounding electrodes,
and requirements f or the
rounding electrode.
4
Page 5

g
g
g
g
g
g
g
g
g
g
g
g
g
g
g
g
g
g
g
g
g
g
g
g
g
g
g
16-420 .fm Page 5 Tuesda y, July 20, 1999 11:32 AM
Lightning
14.
VCR receiver durin
— For added protection for this TV/
a lightning storm, or when it
is left unattended and unused for l on
time, u nplu
it from the wall outlet and disconnect the antenna or cable system. This will prevent dama
power-line sur
Power Lines
15.
e to the TV/VCR due to lightning and
es.
— An outside antenna system
should not be located in the vicinity of overhead
power lines or other electric li
cuits, or where it can fall into such power lines or
circuits. When installin
an outside antenna system, extreme care should be taken to keep from
touchin
with them mi
Overloading
16.
such power lines or circuits as contact
ht be fatal.
— Do not overload wall outlets
and extension cords as this can result in a risk of
fire or electric shock.
Object and Liquid Entry
17.
— Never push objects
of any kind into this TV/VCR throu
as they may touch dan
erous voltage points or
short out parts that could result in a fire or electric shock. Never spill liquid of any kind on the
TV/VCR.
Servicing
18.
VCR yourself as openin
may expose you to dan
hazards . Refer all s ervicin
— Do not attempt to service this TV/
or removing covers
erous voltage or other
to qualified service
personnel.
Damage Requiring Service
19.
— Unplu
VCR from the wall outlet and refer servicin
qualified service personnel under the followin
conditions:
When the power- supply cord or plu
or frayed.
a. If liquid has been spilled or objects have
fallen into the TV/VCR.
b. If the TV/VCR has been exposed to rain or
water.
c. If the TV/VCR does not operate normally
by followin
the operating instru ctions. Adj ust
only those controls that are covered by the
operatin
instructions, as improper adjustment of other controls may result in dama
and will often require extensive work by a
qualified technician to restore the TV/VCR to
its normal operation.
d. If the TV/VCR has been dropped or the
cabinet has been dama
ed.
periods of
ht or power cir-
h openings
this TV/
to
is damaged
e. When the TV/VCR exhibits a distinct
chan
e in performance — this indicates a
need for servi ce.
Replacement Parts
20.
— When replacement parts
are required, be sure the service technician has
used replacement parts, specified by the manufacturer, that have the same characteristics as
the ori
inal part . Unauthorized substitutions may
result in fire, electric shock, injury to persons or
other hazards.
Safety Check
21.
— Upon completion of any service or repairs to this TV/VCR, ask the service
technician to perform routine safety checks to
determine that the TV/VCR is in proper operatin
condition.
Heat
22.
— This TV/VCR product should be situated away from heat sources such as radiators,
heat re
in
isters, stoves, or other products (includ-
amplifiers) that produce heat.
e
5
Page 6

16-420 .fm Page 6 Tuesda y, July 20, 1999 11:32 AM
OUTDOOR GROUNDING AND
POWER LINES
An outside antenna system should not be located in the vicinity of overhead power lines or other electric light or power circuits, or where it can
come into contact with power lines or circuits .
When installing an out side ant enna system, extreme care should be taken to keep from coming
into contact with power lines or ci rcuits; c ontac t
with them might be fatal.
SERVICE
1. Except as note d i n t his owner’s manual, do
not attempt to service this TV/VCR yourself. Instead, unplug it and contact a qualified service technician.
2. Be sure the service technician uses authorized replacement parts or their equivalents. Unauthorized parts may cause fire,
electrical shock, or other hazards.
3. Following any service or repair, be sure the
service technician performs safety checks
to certify that your TV/VCR is in safe operating order.
6
Page 7

16-420 .fm Page 7 Tuesda y, July 20, 1999 11:32 AM
CONTENTS
BEFORE YOU BEGIN..................................................................................................................... 9
Accessories................................................................................................................................ 9
Moisture Condensation............................................................................................................ 10
Using This Manual ................................................................................................................... 10
CONNECTIONS............................................................................................................................. 11
Choosing a Location ................................................................................................................ 11
Connecting the Supplied Antenna ........................................................................................... 11
Connecting an Outdoor Antenna ............................................................................................. 12
Connecting to a Cable System ................................................................................................ 12
Cable Channel Designations............................................................................................. 13
Connecting an External Device................................................................................................ 13
Connecting Power. ................................................................................................................... 13
Using the AC Power Cord................................................................................................. 13
Using the DC Power Cord................................................................................................. 14
Connecting an Optional Earphone.. ......................................................................................... 14
Listening Safely................................................................................................................. 14
SETUP............................................................................................................................................ 15
Front Panel .............................................................................................................................. 15
Remote Control.................. ................ ................. ................ .......... ................ ................. .......... 15
Installing Batteries............................................................................................................. 1 6
Using the Remote Control................................................................................................. 16
Setting the On-Screen Programming Language...................................................................... 17
Changing the On-Screen Programming Language........................................................... 17
Changing the Channels Stored in Memory........................................................................ 18
Adding/Erasing Channels ................................................................................................. 18
Selecting the Input Signal ...... ................... .............. ................... ................... ................... ........ 18
Setting the Clock...................................................................................................................... 19
BASIC TV OPERATION................................................................................................................. 2 0
Selecting Channels.................................................................................................................. 20
Viewing TV............. ................ ................. ................ .......... ................. ................ ...................... 20
Adjusting the Picture................................................................................................................ 2 0
Using Mute............................................................................................................................... 21
Using Channel Return.............................................................................................................. 21
Viewing an External Device..................................................................................................... 21
BASIC VCR OPERATION.............................................................................................................. 22
Loading a Video Tape.............................................................................................................. 22
Playing a Video Tape............................................................................................................... 22
Automatic Rewind/Eject..................................................................................................... 22
Changing the Tape’s Direction/Varying the Playback Speed................................................... 23
Visual Search .................................................................................................................... 2 3
Freeze-Frame .................................................................................................................... 23
Fast-Forward/Rewind........................................................................................................ 23
Tracking ................................................................................................................................... 23
Auto Tracking..................................................................................................................... 23
Adjusting the Tracking Manually.... .................................................................................... 23
7
Page 8

16-420 .fm Page 8 Tuesda y, July 20, 1999 11:32 AM
SPECIAL FUNCTIONS.................................................................................................................. 24
Things You See..... ................. ......... ................. ................ ................. ................ .......... ............. 24
On-Screen Displays .......................................................................................................... 24
Function Indicators............................................................................................................ 24
Using the Sleep Timer.............................................................................................................. 24
Using the Game Mode............................................................................................................. 25
Using the Counter.................................................................................................................... 25
Using Counter Return............................. ..... .. ..... .. ..... ..... ..... .... ..... ..... .. ..... .. ..... .. ..... ..... .. .... 25
Using Time Search................................................................................................................... 26
Using Automatic Repeat Playback........................................................................................... 26
Improving Playback of Older (Worn)/Damaged Tapes............................................................. 27
RECORDING ................................................................................................................................. 28
General Info r mation............... ......... ................. ................ ................. ......... ................. ............. 28
Recording/Playback Speeds ............................................................................................. 28
Tape Selection................................................................................................................... 28
Erase Prot ec tion................ ......... ................. ................. ................ ................. ......... ........... 28
Immediate Recording............................................................................................................... 29
One-Touch Recording (OTR)................................................................................................... 29
OTR Hints........................ ......... ................. ................ ................. ......... ................. ............. 30
Automatic Timer Recording (Timer Numbers 1-7)................................................................... 30
Setting the Automatic Timer.............................................................................................. 31
Checking/Changing Automatic Timers..................................................... .. ....... .......... ...... 32
Clearing an Automatic Timer ............................................................................................. 33
Today Timer Recording (Timer Number 8)................................... ....... ....... ..... ....... .. .......... ...... 33
Setting the Today Timer..................................................................................................... 33
Checking/Changing the Today Timer ................................................................................ 34
Clearing the Today Timer .................................................................................................. 34
Timer Recording Hints ............................................................................................................. 35
Dubbing (Copying) a Tape................................. .. ....... .......... ....... .. .......... ....... .. ....... .......... ...... 35
Connecting a Dubbing Source .......................................................................................... 35
Dubbing a Tape................................................................................................................. 36
ADDITIONAL INFORMATION ............ ......... ................. ................ ................. ......... ................. ...... 37
Troubleshooting Guide......................................................................................................... .... 37
Care and Maintenance............................................................................................................. 39
The FCC Wants You to Know........... ................. ......... ................. ................. ................ ........... 40
Replacing the DC Power Cord’s Fuse..................................................................................... 40
Servicing Your Model 28..................................................................... ....... ....... ..... ....... ....... .... 41
Cleaning the Video Heads.......................................................................... ....... ..... ....... .... 41
Storing Video Cassettes ...................................... ....... ..... ....... ....... ..... ....... ....... ....... ..... ....... .... 41
Degaussing.............................................................................................................................. 41
SPECIFICATIONS.......................................................................................................................... 42
8
Page 9
g
POWER
MUTE
EJECT
123
456
789
0 +100
CH
VOL
MONITOR
SLEEP
CHANNEL
RETURN
SELECT
ADD/
DELETE
MENU
C.RESET
C.MEMORY
REWIND PLAY F.FWD
RECORD STOP PAUSE/STILL
SPEED
16-420 .fm Page 9 Tuesda y, July 20, 1999 11:32 AM
BEFORE YOU BEGIN
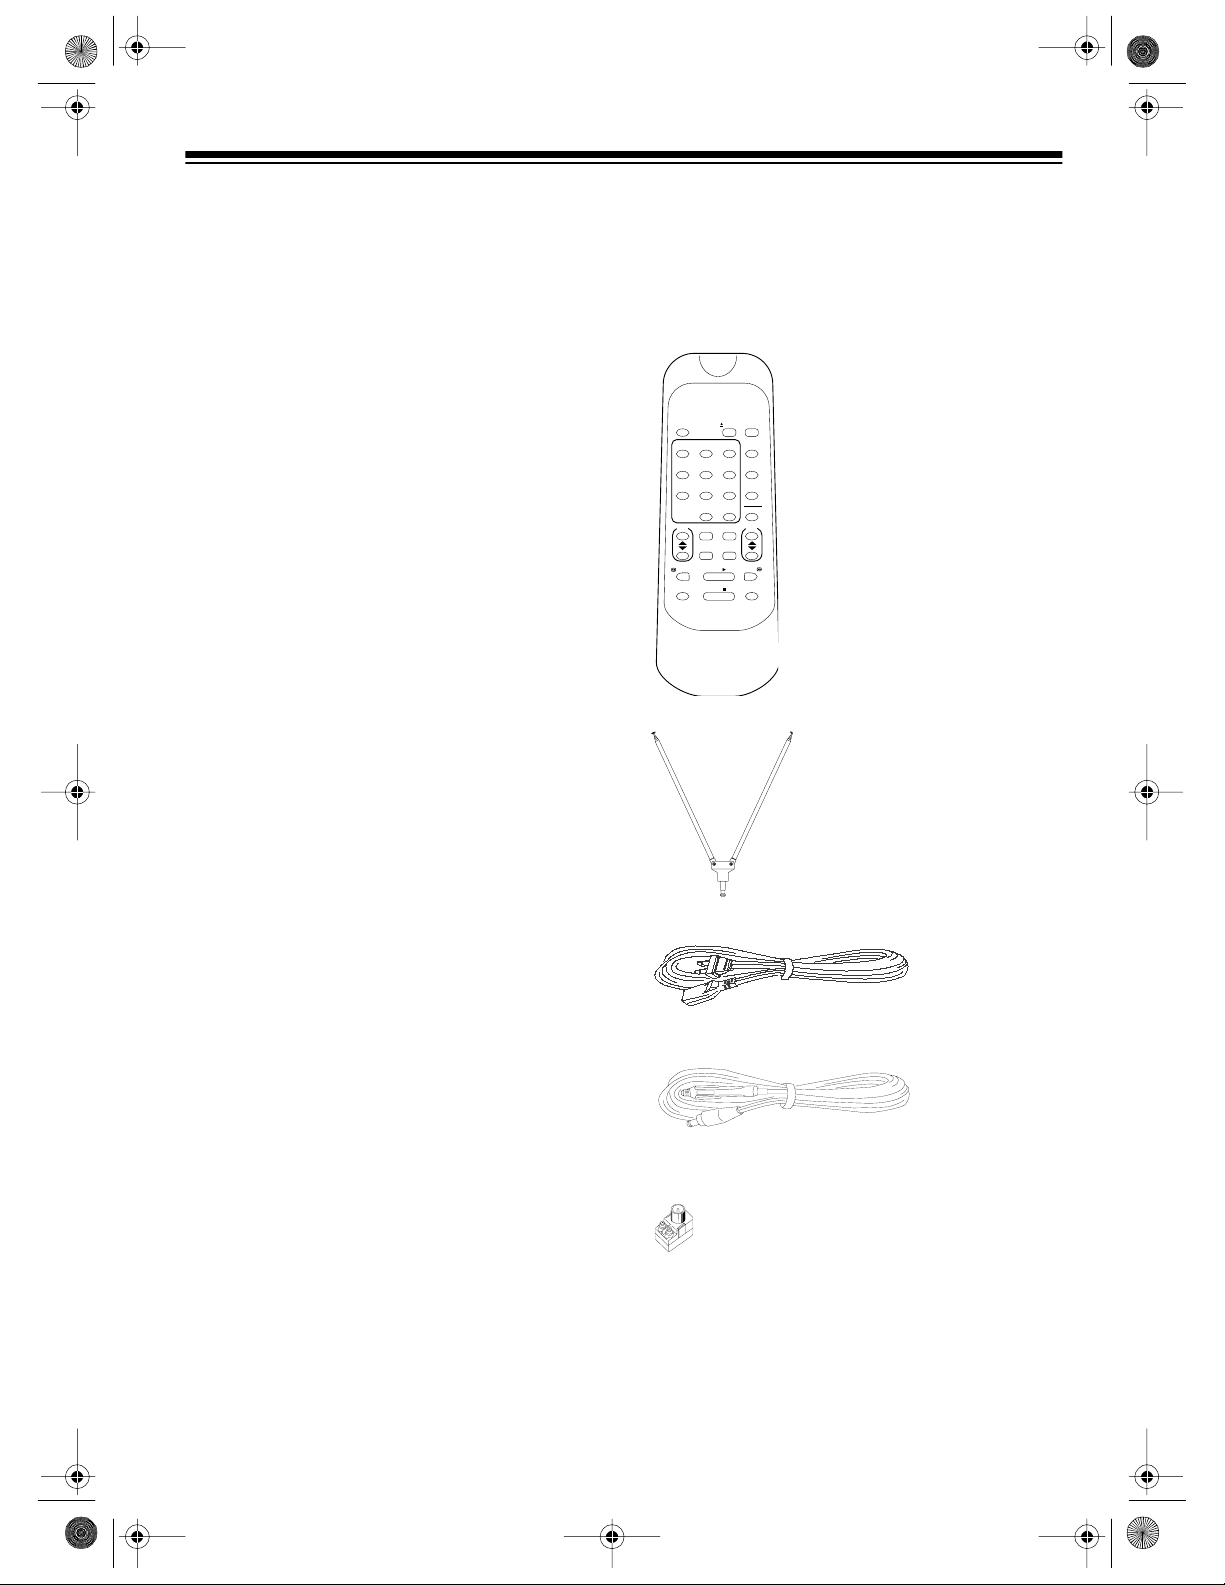
ACCESSORIES
Your Model 28 includes the following ac cessories. Be sure you have all of these i tems before you
store the packing material.
Remote Control
— controls most of
your Model 28’s functions.
UHF/VHF Dipole Antenna
— provides
adequate reception in most metropolitan
areas.
AC Power Cord
— lets you power the
Model 28 from standard AC power.
DC Power Cord
— lets you power the
Model 28 from your vehicle’s battery.
300-to-75-ohm Matchin
Transformer
— lets you connect a 300-ohm antenna
lead to your Model 28’s
ANT.
termi n al.
9
Page 10

16-420.fm Page 10 Tuesday, July 20, 1999 11:32 AM
MOISTURE CONDENSATION
Condensation inside th e Model 28’s VCR can
cause tape jams or video head damage. When
the Model 28’s automatic dew sensor senses
moisture,
the Model 28 will not play a tape.
DEW
If
move your Model 28 from a cold area to a warm
one, unplug the Model 28 a nd le t it sit f or abou t
2 hours, or until
you plug it in. This allows complete evaporation
of any moisture inside the Model 28.
DEW
appears on the TV screen and
appears on the TV screen, or when you
DEW
no longer appears when
USING THIS MANUAL
This manual i s organized i nto these m ajor s ections.
• “Connections” on Page 11 — describes the
connections required to begin using your
Model 28.
• “Setup” on Page 15 — includes procedures
for preparing and using the remote control,
setting the on-screen programming language, selecting the input signal, setting
the clock, and storing channels.
• “Basic TV Operation” o n Page 20 explains
how to select channels, watch TV using the
Model 28’s tuner, adjust the picture, mute
the sound, use the channel return feature,
and view an external device.
• “Basic VCR Operation” on Page 22 —
explains how to load and pla y a video t ape,
use the Model 28’s visual search and
freeze-frame features, fast-forward and
rewind a tape, and adjust the tracking manually.
• “Special Functions” on Page 24 —
describes the things y ou see on t he Model
28’s TV screen, h ow to use the Model 28’s
sleep timer, game mode, counter, time
search, and automatic repeat playback
functions, and improve playback of old or
damaged video tapes.
• “Recording” on Page 28 — describes the
different types of recordings and gives
instructions for making each.
• “Additional Information” on Page 37 —
includes a troubleshooting section, care
and maintenance procedures, FCC information, procedures for replacing the DC
power cord’s fuse, i nformation on servicing
your Model 28, cleaning the Model 28’s
video heads, storing video cassettes, and
degaussing.
• “Specifications” on Page 42 — lists the
Model 28’s specifications.
10
Page 11
16-420.fm Page 11 Tuesday, July 20, 1999 11:32 AM
CONNECTIONS
Before using your Model 28 for the first time,
read through this entire section to determine
which connections best m eet your needs. Then
follow the directions for com pl eting t he c onnections.
Notes:
• You can connect many different types of
audio/video systems such as a stereo
receiver/amplifier, a satellite receiver, or a
combination of a cable system and outside
antenna to your Model 28. These connections might require additional supplies that
are available from your local RadioShack
store.
• Disconnect powe r from the M odel 28 when
making connections. Do not connect the
Model 28’s power cord (AC or DC) until you
complete all other connections.
CHOOSING A LOCATION
Choose a location for your Model 28 where:
• Air flows freely on all sides of the Model 28.
• The power cord (AC or DC) is not in the
way of normal traffic.
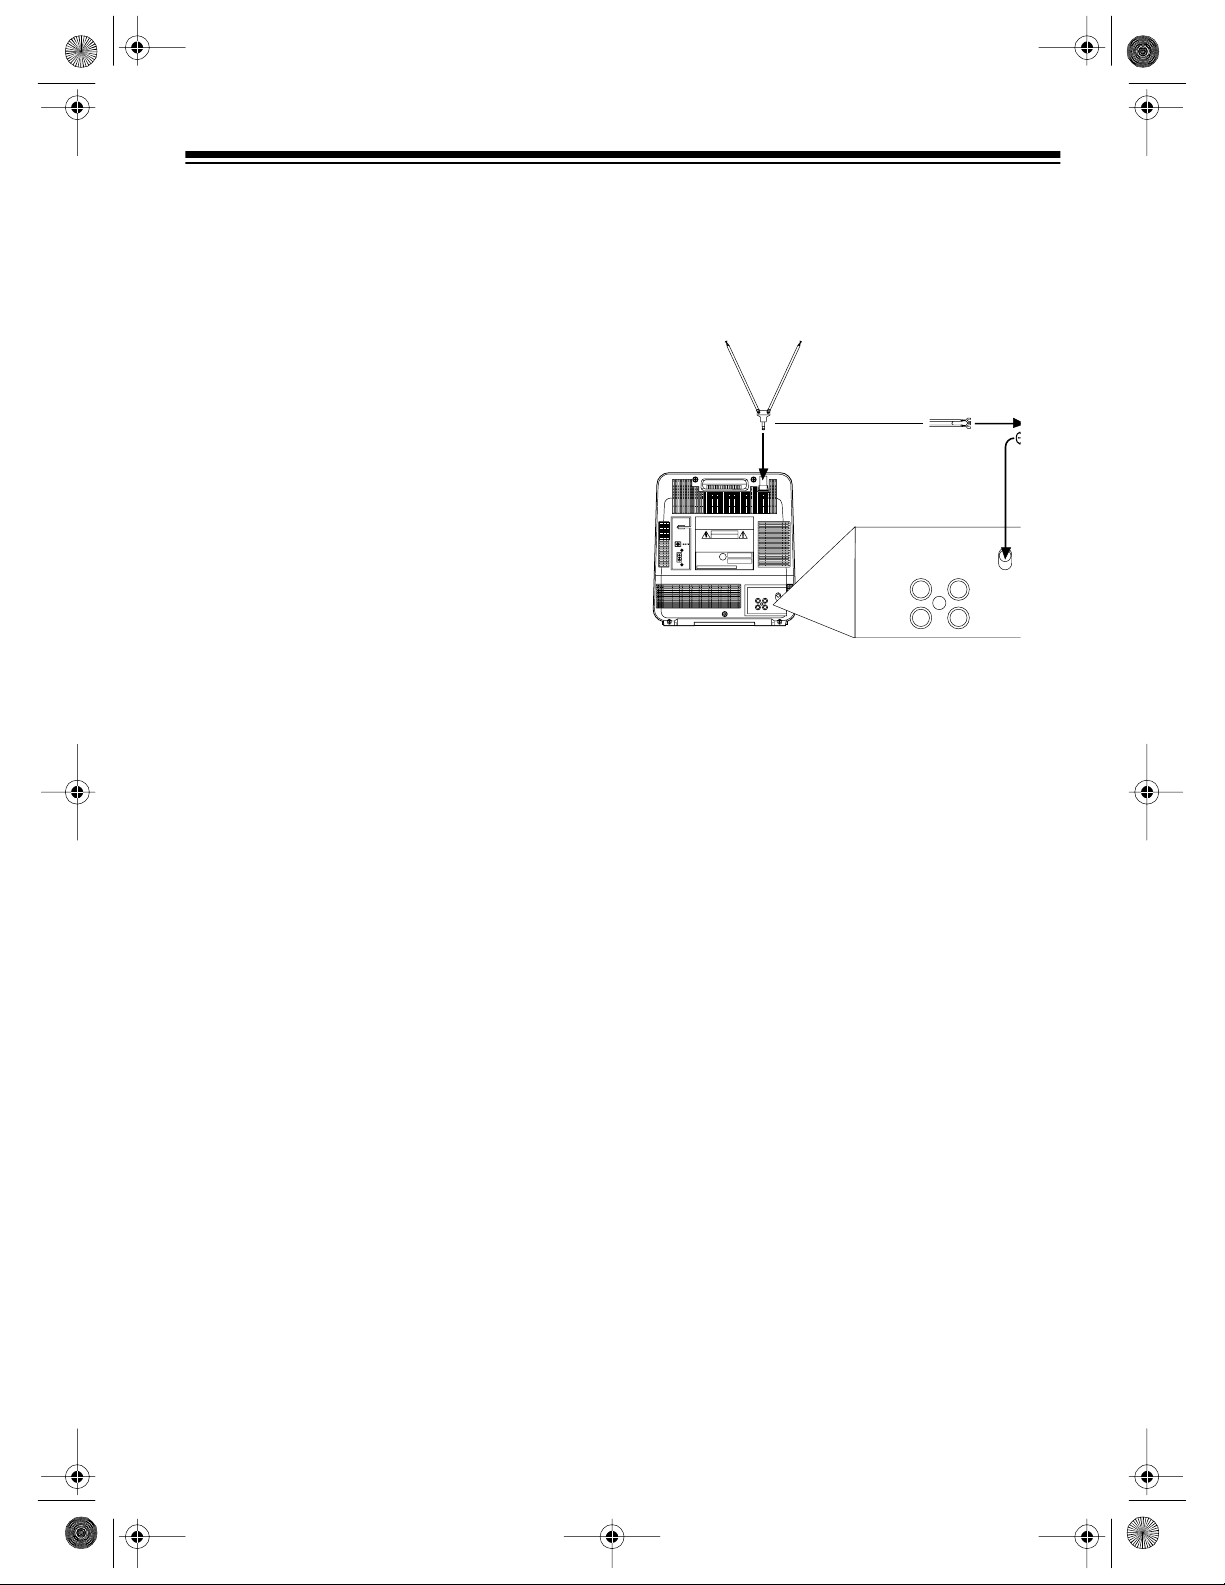
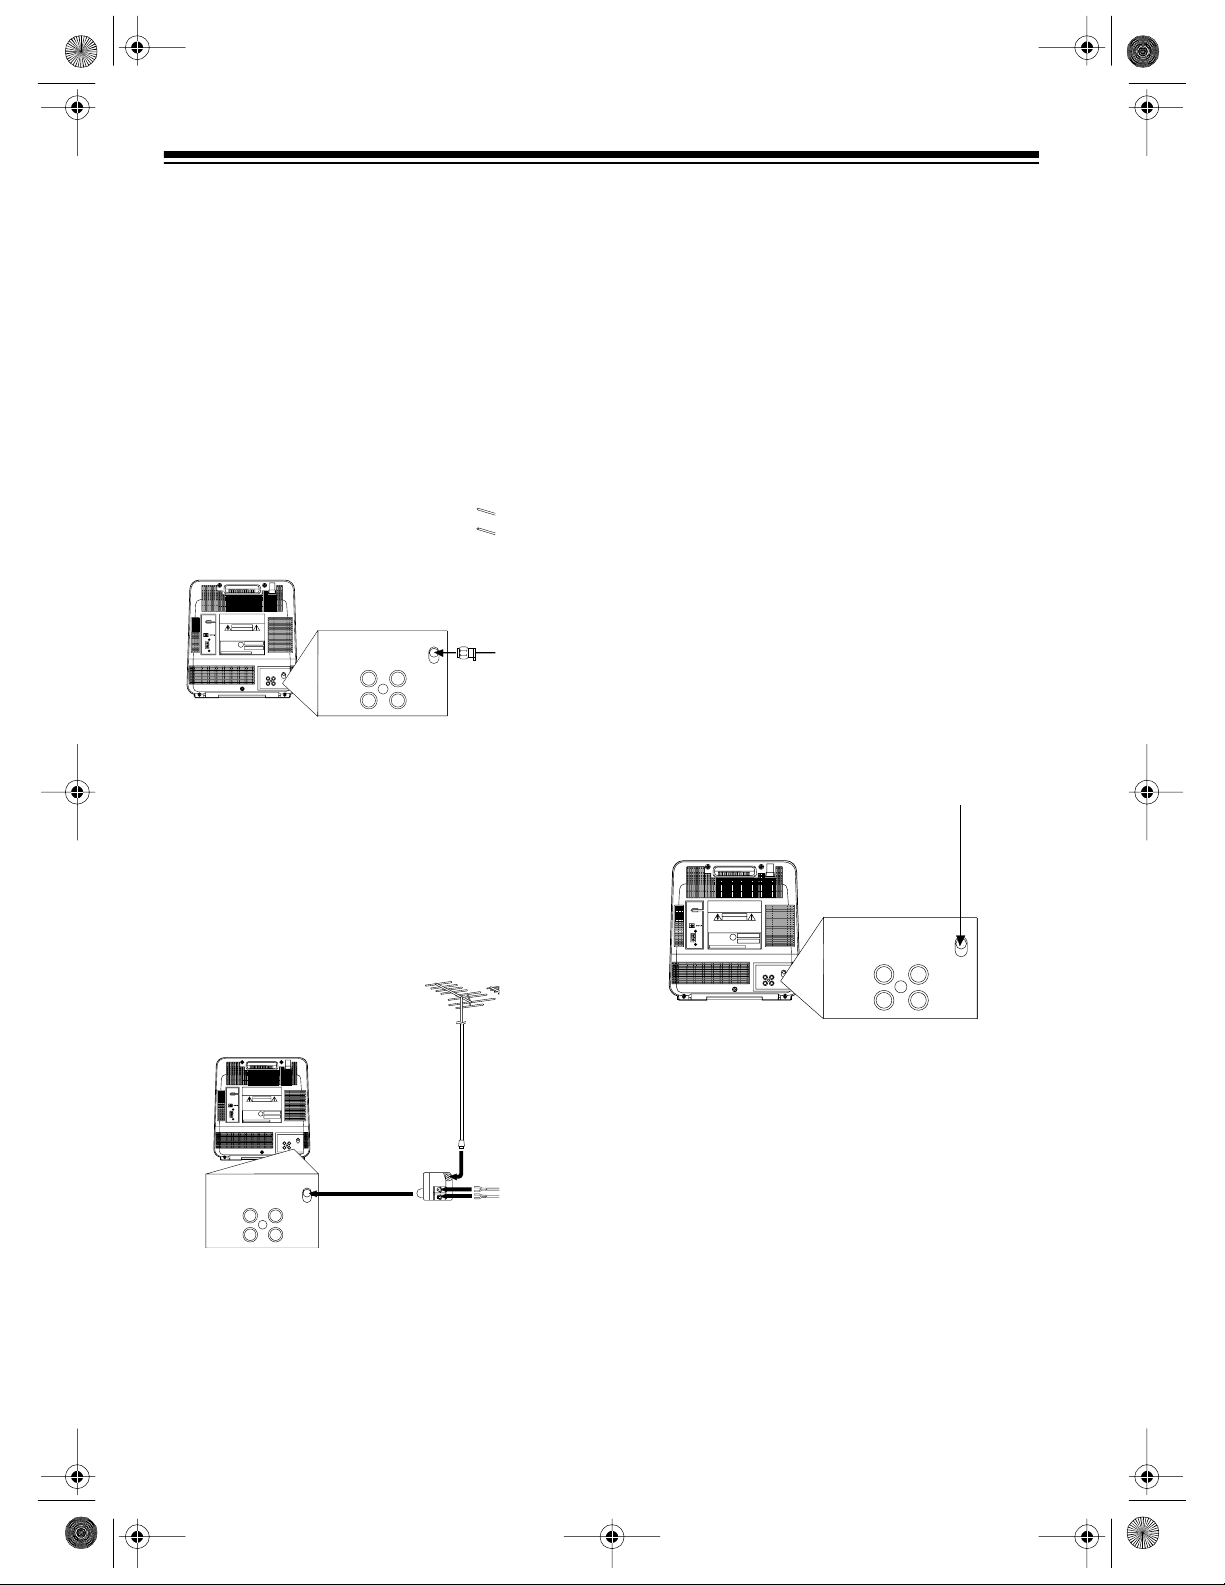
CONNECTING THE SUPPLIED
ANTENNA
Follow these steps to conne ct the supplied a ntenna.
DC 12V
AC
120V
ANT.
IN OUT
AUDIO
VIDEO
AUDIO
VIDEO
1. Insert the antenna ’s post into the s ock et on
top of the Model 28’s cabinet.
2. Connect both sides of the antenna’s cable
to the supplied 300-to-75-ohm matching
transformer.
3. Plug the 300-to-75-ohm matching transformer into the Model 28’s
ANT.
4. Fully extend the antenna and adjust it for
the best VHF reception.
IN
ANT.
OUT
terminal.
Note:
To improve UHF reception, shorten the
antenna.
11
Page 12
16-420.fm Page 12 Tuesday, July 20, 1999 11:32 AM
CONNECTING AN OUTDOOR
ANTENNA
The supplied antenna provides good reception
in most areas. But, for the best recept i on in al l
areas, use a high-quality outdoor antenna, available at your local RadioShack store.
• If the antenna us es 75-ohm coaxial cable,
connect the antenna’s cable direct ly to the
Model 28’s
DC 12V
AC
120V
• If the antenna uses 300-ohm cable, use the
supplied 300-to-75-ohm matching transformer to make the connection.
ANT.
terminal.
ANT.
IN
AUDIO
VIDEO
OUT
ANT.
IN OUT
AUDIO
VIDEO
CONNECTING TO A CABLE
SYSTEM
Note to the CATV system installer:
This reminder is provided to ca ll the CA TV system installer’s attention to Article 820-4 0 of the
National Electrical Code that provides guidelines for proper grounding and, in particular,
specifies that the cable ground shall be connected to the grounding system of the building, as
close to the point of cable entry as practical.
To receive cable channel s, connect the Model
28 to your local cable system as foll ows.
Caution:
rect connections to cable wires (connections
that do not go through the cable box). Check the
laws in your area before making any connections.
If you do not receive scrambled channels
you can connect the cable directly to the Model
28’s
Some areas have laws restricting di-
ANT.
termi nal.
,
• If you have sepa rate VHF and UHF antennas, connect the antenn a cables to a s plitter/combiner (such as RadioShack Cat. No.
15-1296). Then connect the splitter/combiner’s output to the
DC 12V
AC
120V
ANT.
IN OUT
AUDIO
VIDEO
ANT.
IN
OUT
AUDIO
VIDEO
ANT.
terminal.
Refer to your antenna’s installation instructions
for additional information.
DC 12V
AC
120V
ANT.
IN OUT
AUDIO
VIDEO
AUDIO
VIDEO
If you receive scrambled channels
ANT.
IN
OUT
, you must
connect the cable to the cable converter box,
then connect the cable converter box to the
Model 28’s
ANT.
terminal.
Set the Model 28 to the cable box’s output channel (3 or 4) and use the cable b ox to select the
channel.
12
Page 13
P
o
16-420.fm Page 13 Tuesday, July 20, 1999 11:32 AM
Cable Channel Designations
Your Model 28 c an receiv e up to 125 c able channels, displayed as 1-125. Channels 2-13 are the
same for VHF and cable TV, and cable companies usually number them as they appear on the
TV screen. For other channels, the cable service’s channel designations might not match the
channel nu mb ers that appear on t he T V sc reen.
For more information, contact your cable company. You still might have t o experiment to determine the proper cable channel designations
for your cable system.
CONNECTING AN EXTERNAL
DEVICE
You can connect another audio/video device
that has audio/video outputs, such as a VCR,
camcorder, or satellite receiver, to the Model 28
so you can view the source’s output on the Model 28. You can also connect a device that has
audio/video inputs, such as a TV/monitor or
VCR, to the Model 28 so you can view or record
the Model 28’s output on the device.
Always use video-quality shield ed cables
Note:
with phono connectors. Do not use standard audio patch cords.
Note:
If you connect external devices to both
sets of audio/video input jacks on your Model
28, the
VIDEO INPUT
AUDIO INPUT
and
jacks on
the front of the Model 28 have priority.
To connect an audio/video device’s inputs to the
Model 28, c onnect the
OUT
jacks on the back of the Model 28 to the
AUDIO OUT
and
VIDEO
corresponding audio and video input jacks on
the audio/video device.
To view the signals from the Model 28 on
Note:
a TV/monitor, set the TV/monitor to its video
mode.
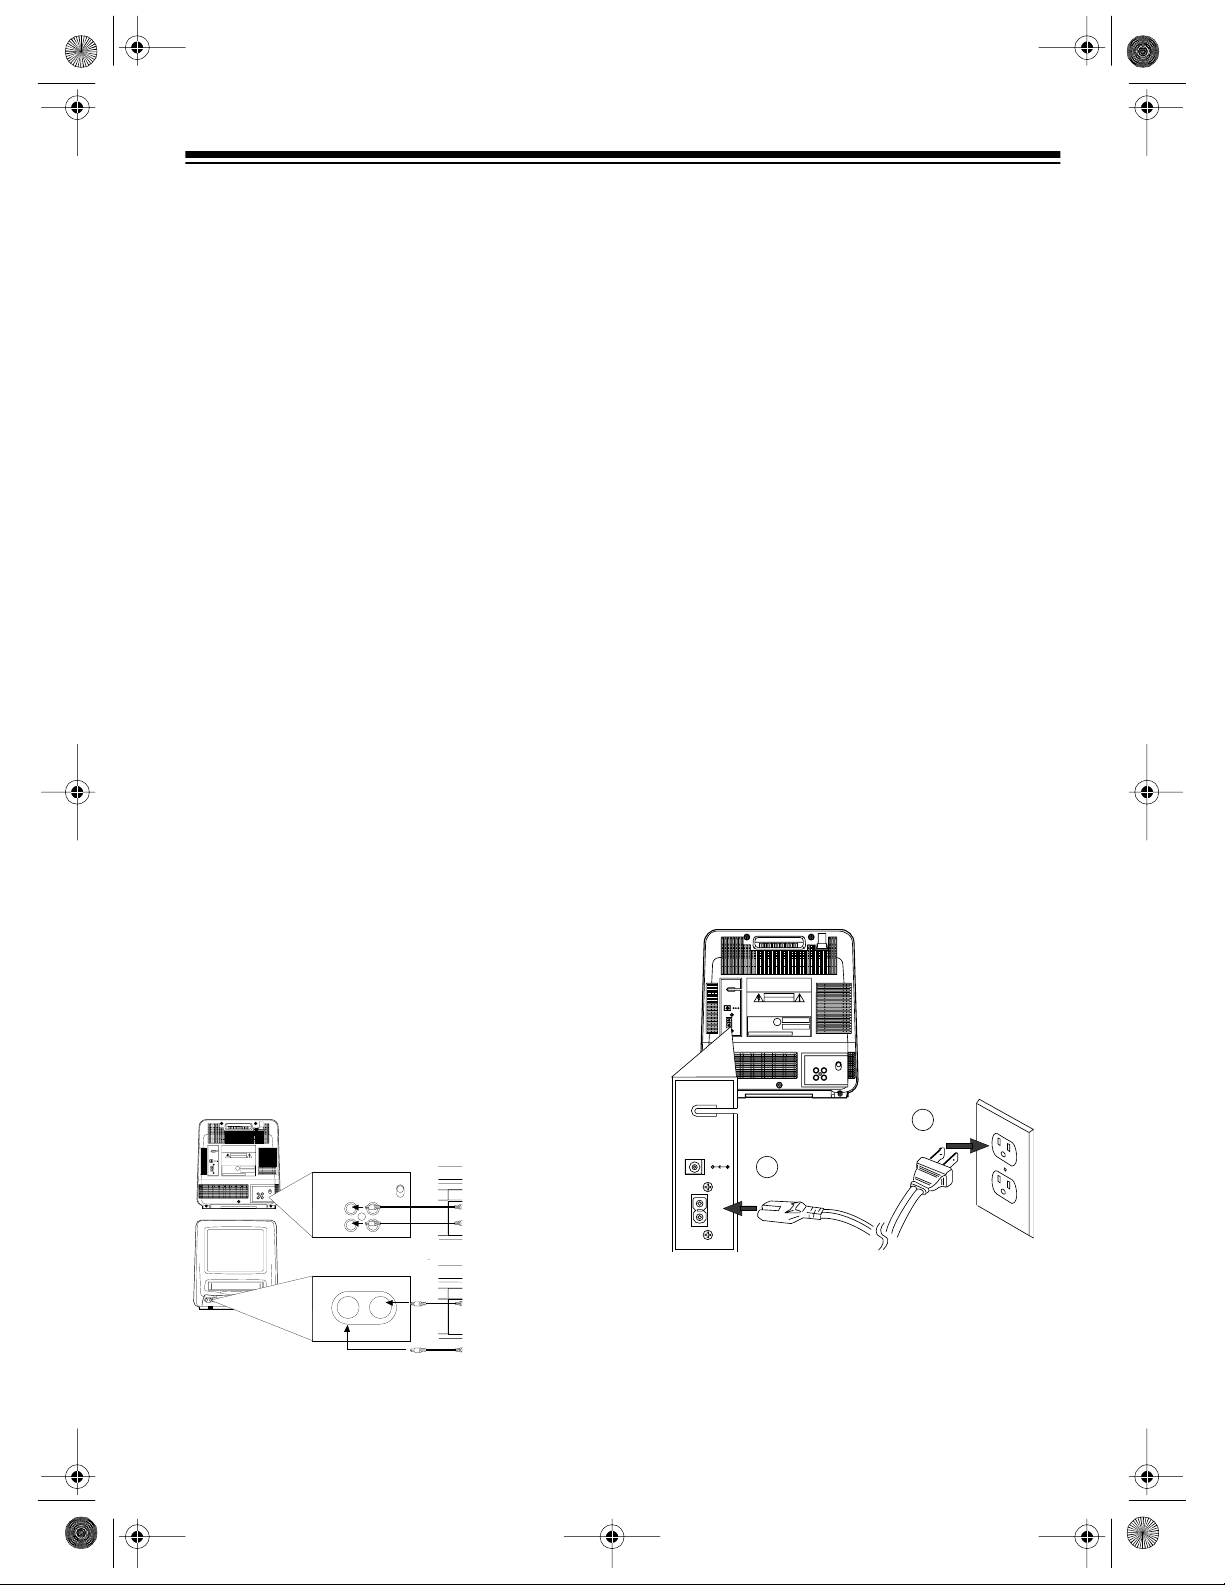
CONNECTING POWER
Using the AC Power Cord
Warning:
has a polarized plug. To prevent blade exposure, be sure the blades fit fully and easily into
the outlet. If you do not have a polarized outlet ,
have a qualified electrician install one before
you use the Model 28.
Plug the supplied AC powe r cord’s smaller end
into the Model 28’s
plug the other end into a standard AC outlet.
For your protection, the power cord
AC 120V
connector. Then
To connect an audio/video device’s outputs to
the Model 28, connect the device’s video and
audio outputs to the corresponding
AUDIO IN
and
or the
jacks on the back of the Model 28,
VIDEO INPUT
AUDIO INPUT
and
VIDEO IN
jacks on
the front of the Model 28.
INPUT
OUT
[Source (
ANT.
DC 12V
AC
120V
ANT.
IN OUT
AUDIO
VIDEO
AUDIO
VIDEO
IN
Audio/Video adapter c
X
Y
REC
TIMER REC
P/N b r O q a Y X
MONITOR
RECORD
POWER REWSTOP/EJECT PLAY F.FWD
VOLUME CHANNEL
OTR
VIDEOAUDIO
VIDEO AUDIO
DC 12V
AC
120V
DC 12V
AC
120V
ANT.
IN OUT
AUDIO
VIDEO
2
1
13
Page 14

16-420.fm Page 14 Tuesday, July 20, 1999 11:32 AM
Using the DC Power Cord
To power the Model 28 from your vehicle’s battery, plug the supplied DC power cord’s sm all
plug into the Model 28’s
the other end into the vehicle’s c igarette-lighter
socket.
DC 12V
AC
120V
Cautions:
• Do not operate your Model 28 while driving.
• Use only the supplied DC power cord.
• Make sure the ring on the tip of the cigarette-lighter socket is securely screwed in
before you insert it into the vehicle’s cigarette-lighter socket.
DC 12V
DC 12V
AC
120V
jack. Then plug
ANT.
IN OUT
AUDIO
VIDEO
T o Cigarette-Lighter Socket
• The fuse supplied with the DC power
cord helps protect y our vehicle’s electrical system and the Mode l 28. For information about replacing the fuse, see
“Replacing the DC Power Cord’s Fuse”
on Page 40.
CONNECTING AN OPTIONAL
EARPHONE
To view a video tape or TV program without disturbing others, plug an earphone w ith a
plug (not supplied) into the Model 28’s
PHONE
jack. This mutes the M odel 28’s speaker. Your local RadioShack store sells a wide
selection of earphones.
EARPHONE
HOME AUTO TWO WAY POWER
1
/8-inch
EAR-
MODEL 28
• Be sure the cigarette-lighter socket is free
of ashes and other debris.
• Always plug the DC power cord into the
Model 28 before you plug it into the cigarette-lighter socket. Always unplug it from
the cigarette-lighter socket before you
unplug it from the Model 28.
• If you use the Model 28 with the vehicle’s
engine turned off, protect the vehicle’s battery from completely discharging by running the engine for a few minutes. Unplug
the DC power cord as soon as you finish
using the Model 28.
Notes:
• When the DC power cord is plugged in,
the AC power cord is automatically disconnected. To use the Model 28 with AC
power, disconnect the DC power cord
from the Model 28.
14
Listening Safely
To protect your hearing, follow these guidelines
when you use an earphone.
• Set the volume to the lowes t setting befo re
you begin listening. After you put on the
earphone, adjust the volume to a comfortable level.
• Do not listen at extremely high volume levels. Extended high-volume listening can
lead to permanent hearing loss.
• Once you set the volume, do no t increase
it. Over time, your ears adapt to the volume
level, so a volume level that does not cause
discomfort might still damage your hearing.
Page 15

POWER
MUTE
EJECT
123
456
789
0 +100
CH
VOL
MONITOR
SLEEP
CHANNEL
RETURN
SELECT
ADD/
DELETE
MENU
C.RESET
C.MEMORY
REWIND PLAY F.FWD
RECORD STOP PAUSE/STILL
SPEED
16-420.fm Page 15 Tuesday, July 20, 1999 11:32 AM
SETUP
FRONT PANEL
The buttons on the M odel 28’s front panel control the TV and the VCR.
TIMER REC
REC
VIDEO AUDIO
POWER
INPUT
C / A
1. POWER
2. STOP/EJECT
3. REWIND
4. PLAY
5. F.FWD
6. REC/OTR
7. VOLUME /
8. CHANNEL /
9. MONITOR
REWINDSTOP/EJECT
r
hB
REC OTR
PLAY
LK
VOLUME
F.FWD
q
g
L
CHANNEL
K
MONITOR
REMOTE CONTROL
All the remote control’s
buttons have the same
functions as the buttons on the Model 28’s
front panel. In addition,
the number buttons let
you directly select
channels and menu
options.
15
Page 16

16-420.fm Page 16 Tuesday, July 20, 1999 11:32 AM
Installing Batteries
The remote control requires two AA batteries
(not supplied). For the longest operation and
best performance, we recommend alkaline batteries (such as RadioShack Cat. No. 23-557).
Cautions:
• Use only fresh batteries of the required size
and type.
• Never leave dead batteries in the remote
control.
• Dispose of dead batteries promptly and
properly; do not bury or burn them.
1. Press down on the battery compartment
cover and slide it in the direction of the
arrow to remove it.
Using the Remote Control
To use the remote control, aim the LED on the
front of the remote control toward the front of the
Model 28 and press the desired button(s).
HOME AUTO TWO WAY POWER
MODEL 28
2. Insert fresh batteries into the compartment, as indicated by the polarity symbols
(+ and –) m a rked insi de .
3. Replace the cover.
If the remote control does not work or op-
Note:
erates poorly, replace both batteries.
16
Page 17

16-420.fm Page 17 Tuesday, July 20, 1999 11:32 AM
SETTING THE ON-SCREEN
PROGRAMMING LANGUAGE
The first time you turn on the Model 28, the language selection menu automatically appears on
the TV screen. You can set the Model 28 to display on-screen menus in English or in Spanish.
After you select an on-screen programming language, the Model 28 automatically stores channels into memory.
Notes:
• The on-screen programming language
defaults to English.
• Make sure you hav e connected the Model
28 to your cable system or an antenna
before continuing (see “Connecting the
Supplied Antenna”on Page 11, “Connecting
an Outdoor Antenna” on Page 12, or “Connecting to a Cable System” on Page 12).
1. Press
POWER
VIDEO AUDIO
to turn on the Model 28.
REC
TIMER REC
POWER
STOP/EJECT
4. Repeatedly press
CH
or CH to
review the saved channels.
Notes:
• If a channel you wanted was not stored,
you can add t he channel. If a cha nnel you
did not want was stored, you can delete
the channel. See “Adding/Erasing Channels” on Page 18.
• To store different channels, see “Storing
Channels” on Page 18.
• The Model 28 retains stored channels
when you turn off the Model 28, or disconnect power for less than 30 seconds.
Changing the On-Screen
Programming Language
1. Press
2. Press
MENU
on the remote control to select
the main menu. The me nu appears on the
TV screen.
5
on the remote control to select the
language select m enu. The menu app ears
on the TV screen.
INPUT
2. To select the on-screen programming language, press
ESPANO L
select
control.
ON
appears on the TV screen next
1
to select
(Spanish) on the remote
ENGLIS H
or 2 to
to the language you selected.
- SELEC. IDIOMA -
1 ENGLISH
2 ESPAÑOL ON
3. Press
SELECT
. The Model 28 automatically
stores active channels (TV or CATV), then
it tunes to the lowest stored channel number.
- LANGUAGE SELECT -
1 ENGLISH ON
2 ESPAÑOL
3. To select the on-screen programming language, press
select
control.
ESPANOL
ON
appears on the TV screen next
1
to select
(Spanish) on the rem ote
ENGLISH
or 2 to
to the language you selected.
MENU
4. Press
to exit the menu.
17
Page 18

16-420.fm Page 18 Tuesday, July 20, 1999 11:32 AM
Changing the Channels Stored in
Memory
Although the Model 28 automatically stores all
active channels in your are a the first time you
turn it on, you can manually program the tuner’s
memory.
If you tune both TV (broadcast) and CATV
Note:
(cable TV) signals, you can store both types of
channels.
1. Press
2. Press
MENU
on the remote control to select
the main menu. The menu appears on the
TV screen.
4
on the remote control to select
CHANNEL SET UP
. The channel set up
menu appears on the TV screen.
4
3. Press
CHANNEL SET UP
on the remote control to select
. The channel set up
menu appears on the TV screen.
3
4. Press
ADD/DELETE CH
ADD/DELETE CH,
on the remote control to select
. The TV screen shows
the currently tuned
channel’s number, and the input source (TV
or CATV).
5. Repeatedly press
ADD/DELETE
on the
remote control until the channel number for
the channel changes to blue (to add the
channel) or to red (to delete the channel).
ADD/DELETE CH
23 ( TV )
3. Press
2
to select
AUTO PRESET.
The
Model 28’s tuner scans through the channels (TV or CATV) and stores all the active
channels in your area.
CH
and the currently
tuned channel number appear on the TV
screen. After scanning all the channels, the
tuner stops on the l owest-numbered active
channel.
4. To review the saved channels, repeatedly
CH
press
Note:
or CH .
You can directly select channels that are
not stored in the tuner’s memory by using the remote control’s number buttons. See “Selecting
Channels” on Page 20.
Adding/Erasing Channels
If a channel you want was not stored, or if a
channel you do not want was stored, follow
these steps to add or erase it.
CH
1. Press
keys on the remote control to enter the
channel number you want to add or erase.
Note:
0 – for example,
or CH or use the number
Precede a single-digit number with a
01, 02
, etc.
6. Press
MENU
on the remote control to save
the changes.
SELECTIN G TH E IN PUT SIG NAL
Depending on the type of input device (antenna
or cable) connected to your Model 28, you must
select the input signal (the source you want the
Model 28 to tune).
1. Press
2. Press
MENU
on the remote control to select
the main menu. The me nu appears on the
TV screen.
4
on the remote control to select
CHANNEL SET UP
. The menu appears
on the TV screen.
- CHANNEL SET UP -
1 TV/CATV [ TV ]
2 AUTO PRESET
3 ADD/DELETE CH
MENU
2. Press
on the remote control to select
the main menu. The menu appears on the
TV screen.
18
Page 19

16-420.fm Page 19 Tuesday, July 20, 1999 11:32 AM
3. Repeatedly press 1 to select the desired
input signal (TV or CATV).
• If you conn ected an antenna (not cable)
to the Model 28 and want t o receive up
to 68 VHF/UHF channels, or if you have
cable service and use a cable box, you
must select
TV
from the channel set up
menu.
• If you have c ab le serv ice and do not use
a cable box, you must select
CATV
from
the channel set up menu.
MENU
4. Press
to exit the menu.
SETTING THE CLOCK
You must set the clock accurately for proper automatic timer recording. We suggest you use a
TV or radio station as your time source.
Follow these steps to set the clock.
1. Press
2. Press
MENU
on the remote control to select
the main menu. The menu appears on the
TV screen.
3
on the remote control to select
SETTING CLOCK
screen appears, and
. The clock setting
--
under
MONTH
flashes.
- SETTING CLOCK -
MONTH DAY YEAR
- - / - - - - - HOUR MINUTE AM/PM
- - / - - - -
• If you enter an incorrect number, repeatedly press
SELECT
ADD/DELETE
to move back or
to move forward to the incorrect
number, then enter the correct number.
When you enter the month, day, and year,
the day of the week automatically app ears
on the TV s creen. For example, if you set
May 22, 1996,
WED
(Wednesday) appears
on the TV screen.
4. Use the number keys on the remote control
to enter the correc t hour and m inute as hh
mm. For example , to set 10:28, pre ss
2
, and 8.
1
5. Press
AM
for an AM hour or 2 for a PM hour.
or PM flashes.
1, 0
6. Review the entered information.
• If it is not correct, repeatedly press
DELETE
(to move backward) or
ADD/
SELECT
(to move forward) to the incorrect information, then enter the correct information.
MENU
• If it is correct, press
. The screen
disappears.
MENU
When you press
counting from
00
, the seconds begin
and the current time
appears on the TV screen for about 5 s econds, then disappears.
If the display shows abnormal infor-
Note:
mation or no information, unplug the pow er
cord (AC or DC) for about 1 minute. Then
plug it back in a nd repeat this procedure to
reset the clock.
,
3. Use the number keys on the remote control
to enter the correct month, day , and year as
mm dd yyyy. For example, to set May 22,
1996, press
0, 5, 2, 2, 1, 9, 9
, and 6.
Notes:
• Precede a single-digit number with a 0 —
01, 02
for example,
, etc.
19
Page 20

16-420.fm Page 20 Tuesday, July 20, 1999 11:32 AM
BASIC TV OPERATION
SELECTING CHANNELS
To select a channel, press CH or CH .
The tuner automatically advances to the next
channel stored in the tuner’s memory.
POWER
RECORD STOP PAUSE/STILL
You can also press
on the Model 28 to select channels.
EJECT
123
456
789
VOL
REWIND PLAY F.FWD
0 +100
MONITOR
SPEED
SLEEP
CHANNEL
RETURN
C.RESET
C.MEMORY
CHANNEL
MUTE
MENU
SELECT
ADD/
DELETE
CH
or
CHANNEL
Notes:
• Precede a single-digit number with a 0 —
for example,
01, 02
, etc.
• If you selected the CATV input signal (see
“Selecting the Input Signal” on Page 18),
+100
press
to enter a 3-digit number. Then
enter the second and third digits in the
channel number.
VIEWING TV
Follow these steps to view a broadcast using
the TV.
1. If necessary, press
POWER
Model 28.
2. If necessary, select the desired input signal
TV
CATV
or
(
).
3. Select the channel you want to watch.
4. If you are using the indoor antenna, extend
and rotate it to get the best reception.
To improve UHF reception, shorten
Note:
the indoor antenna.
to turn on the
K
MONITOR
CH
when the
Note:
LK
VOLUME
If you press
L
CHANNEL
CH
when the tun er is at th e
highest pr ogrammed ch annel or
tuner is at the lowest programmed channel, the
Model 28 enters the audio/video mode and
AUX
appears on the TV screen (see “Viewing an External Device” on Page 21). If you press
CH
or
again, the Model 28 tunes to the lowes t
CH
or highes t programmed channel.
You can also select channels directly using the
number keys on the remote control. You can
choose any channel in the tuner’s range, even if
you have not programmed the channel, there is
no broa dcast presen t, or the chan nel is scrambled (the tuner does not unscrambl e the channel ).
5. Repeatedly press
on the Model 28 (or
VOLUME
VOL
VOLUME
or
or
VOL
on the remote control) to adjust the volume
to your listening preferences . A bar graph
and a number appear on the TV scr een to
show the currently set volume.
To adjust the contrast, brightness, c olor,
Note:
tint, or sharpness, see “Adjusting the Picture.”
ADJUSTING THE PICTURE
Follow these steps to adjust the p icture’s contrast, brightness, color, tint, or sharpness.
MENU
1. Press
the main menu. The me nu appears on the
TV screen.
2. Press
PICTURE CONTROL. CONTRAST
bar appear on the TV screen.
on the remote control to select
2
on the remote control to select
and a
20
Page 21

16-420.fm Page 21 Tuesday, July 20, 1999 11:32 AM
USING MUTE
To temporarily turn off the Model 28’s sound,
MUTE
press
pear on the TV screen.
MUTE
.
and the volume level bar ap-
CONTRAST
[-] [+]
3. Repeatedly press
SELECT
within 5 seconds
until the setting you want to adjust appears
on the TV screen.
If you do not press
Note:
SELECT
within 5
seconds, the displayed setting disappears.
Simply repeat Steps 1-2 to redisplay the
setting.
4. Within 5 seconds, repeatedly press
CH
or
to adjust the displayed setting. A
bar graph appears on the TV screen to
show the current setting.
CONTRAST
BRIGHT
COLOR
TINT
CH
to decrease to increase
to decrease to increase
toward pale toward brilliant
toward purple toward green
CH
CH
To restore the sound to the previous level, press
MUTE
again. To restore the sound and change
its level, press
VOL
or
VOL
.
USING CHANNEL RETURN
The Model 28’s channel return function lets you
quickly switch between channels you tuned by
using the rem ot e control’s num ber buttons.
Repeatedly press
CHANNEL RETURN
switch from the channel
you are watching (or
AUX
) to the previous
channel you tuned (or
AUX),
and vice vers a.
to
POWER
RECORD STOP PAUSE/STILL
EJECT
123
456
789
VOL
REWIND PLAY F.FWD
0 +100
MONITOR
SPEED
SLEEP
CHANNEL
RETURN
SELECT
DELETE
C.RESET
C.MEMORY
MUTE
MENU
ADD/
CH
SHARPNESS
toward soft toward clear
Notes:
• To quickly change the displayed setting,
press and hold down
• If you do not press
CH
or CH .
CH
or CH within 5 seconds, the displayed setting disappears. Repeat Steps 1-3 to redisplay
the setting.
5. Either wait 5 seconds or press
MENU
the screen.
to exit
VIEWING AN EXTERNAL
DEVICE
To view the signal s from an ext ernal device connected to the audio/vid eo i nput jacks on the front
or back of the Mode l 28, do either of t he foll owing:
00
• Enter
buttons
• Select one channel higher than the hi ghest
programmed channel or o ne chann el lower
than the lowest programmed channel.
AUX
using the remot e control’s number
appears on the TV screen.
21
Page 22

16-420.fm Page 22 Tuesday, July 20, 1999 11:32 AM
BASIC VCR OPERATION
LOADING A VIDEO TAPE
Hold the cassette with the main label facing up
and the spine facing out from the Model 28.
Then insert the cassette into the cassette compartment and gently push the center of its spine
until the Model 28 draws it in.
The Model 28 automatically turns on. If the
erase-protection tab has been removed from the
cassette, playback automatically begins (see
“Erase Protection” on Page 28) and
pears on the TV screen. I f the erase-protec tion
tab is intact, the tape does not play and
appears on the TV screen.
Caution:
video cassette into the cassette co mpartment.
You might damage the Model 28’s internal
mechanisms.
Never insert anything except a VHS
PLAY
ap-
STOP
4. To stop playback before it automatically
stops at the end of the tape, press
EJECT
on the Model 28 or
remote control.
5. To eject the tape, press
on the Model 28 or
control.
When the Model 28 is off, you can press
Note:
STOP/EJECT
remote control to eject a tape. The Model 28
turns on, ejects the tape, then turns off.
on the Model 28 or
EJECT
STOP
STOP/EJECT
on the remote
EJECT
STOP/
on the
again
on the
Automatic Rewind/Eject
If the tape reaches the end before you press
STOP/EJECT
cally stops the tape, completely rewinds and
ejects it, then turns off.
Notes:
• The tape ejects o nly if
set to
Playback” on Page 26).
• If counter return is turned on (see “Using
Counter Return” on Page 25), the tape
stops at
and the Model 28 does not turn off.
EJECT
or
, the Model 28 automati-
REPEAT PLAY
OFF
(see “Using Automatic Repeat
0:00:00
and does not eject,
is
PLAYING A VIDEO TAPE
1. Load a video tape.
2. If playback does not automatically begin,
press
screen and the Model 28 plays the tape.
Note:
matically adjusts the tracking, but you can
manually adjust it if necessary (see “Adjusting the Tracking Manually” on Page 23).
3. Repeatedly press
on the remote control) to adjust the volume.
Note:
color, tint, or sharpness, see “Adjusting the
Picture” on Page 20.
22
PLAY
During playback, the Model 28 au to-
on the Model 28 (or
To adjust the contrast, brightness,
.
PLAY
appears on the TV
VOLUME
VOL
or
or
VOLUME
VOL
• The Model 28 ejects the tape and turns
itself off, but does not automatically rewind
the tape during one-touch recording, automatic timer recording, or today timer
recording (see “One-Touch Recording
(OTR)” on Page 29, “Automatic Timer
Recording (Timer Numbers 1-7)” on Page
30), and “Today Timer Recording (Timer
Number 8) on Page 33.
Page 23

16-420.fm Page 23 Tuesday, July 20, 1999 11:32 AM
CHANGING THE TAPE’S
DIRECTION/VARYING THE
PLAYBACK SPEED
You can use the buttons on the front of the Model 28 and remote control to change the tape’s direction and vary the playback speed.
Visual Search
Visual search lets you view recordings either
forward or backward at either a normal speed or
faster speed, so you can f ind a specific s ection
of the tape.
Note:
You can use normal spe ed search with
tapes recorded at any speed. Faster speed
search works only with tapes recorded at the LP
or SLP speed.
To search forward at normal speed during playback, press
normal speed during playback, press
once. Then, to search forward or backward at a
faster speed during playback, press
REWIND
To stop visual search and p lay the tape, press
PLAY
.
Note:
and the picture quality is lower than during normal playback. The search picture is best with
tapes recorded at the SLP speed.
F.FWD
once. To search backward at
REWIND
F.FWD
again.
During visual search, the so und is mut ed
or
Notes:
• During freeze-frame, the picture quality is
lower than during normal playback. The
picture quality is best with recordings made
at the SLP speed.
• If you leave the Model 28 in the freezeframe mode for 5 minutes, it auto matically
stops the tape to protect it.
Fast-Forward/Rewind
To advance the tape quickly when it is stopped,
F.FWD
press
To rewind the tape quickly when it is stopped,
press
Note:
tape’s sound while you fast-forward and rewind
it.
.
REWIND
You cannot view the tape or hear the
.
TRACKING
Auto Tracking
The Model 28 automatically adjusts tracking
when you play a tape. If different parts of the
tape were recorded at different speeds, the
Model 28 automatically readjusts the tracking at
the beginning of each recording.
Adjusting the Tracking Manually
Freeze-Frame
Freeze-frame lets you stop the tape to view a
single frame.
To freeze a frame during playback, press
PAUSE/STILL
at a time, repeatedly press
To return to the normal playback speed , press
PLAY
.
. To advance the picture one frame
PAUSE/STILL
.
If the Model 28’s picture is poor while playing a
tape, press and hold down
CHANNEL
tracking. Press
on the Model 28 at the same time to return to automatic tracking.
Note:
28 automatically resets to automatic tracking.
on the Model 28 (or CH or
on the remote control) to manually adjust the
CHANNEL
When you stop or eject a tape, the Model
CHANNEL
and
CHANNEL
or
CH
23
Page 24

16-420.fm Page 24 Tuesday, July 20, 1999 11:32 AM
SPECIAL FUNCTIONS
The following information describes some of
your Model 28’s special on-screen, display, and
search functions.
THINGS YOU SEE
On-Screen Displays
To view your Model 28’s current operating mode
and other information about your Model 28, re-
STOP
SELECT
during playback or while
SELECT
, you
peatedly press
watching TV. Each time you press
see this information on the TV screen in the follow ing order.
• Function indicator / tape speed / tape
counter
Function Indicators
When you press a function button (such as
STOP
), the selected function’s indicator appears
on the TV screen.
STOP
When you change the channel, the new channel
number appears on the TV screen for about 5
seconds.
If you play back a poor quality (worn) or
Note:
damaged tape, the function indicat or might not
appear on the TV screen.
USING THE SLEEP TIMER
SP COUNT 0:12:34
• Function indicator / tape speed / time /
channel
STOP 5:40 PM
05
SP
• No display
The function indicator and tape speed dis-
Note:
plays only stay on the TV screen for a few seconds, but the tape coun ter or time and channel
indicators remain on until you select another
function.
The Model 28’s sleep timer lets you set the Model 28 so it plays for a specific am ount of time
then automatically turns off.
Follow these steps to set the sleep timer.
1. Press
SLEEP 0 MINUTE
SLEEP
on the remote control.
appears on the TV
screen.
2. Within 5 seconds, repeatedly pres s
SLEEP
until the TV screen shows the desired sleep
time period. You can set the time in 30minute increments, up to 120 minutes.
SLEEP
If you do not press
Note:
seconds,
SLEEP
and the displayed time
period disappear. Press
SLEEP
within 5
once to
redisplay the time.
To cancel the sleep timer, repeatedly press
SLEEP
SLEEP 0 MINUTE
until
appears on the
TV screen.
24
Page 25

16-420.fm Page 25 Tuesday, July 20, 1999 11:32 AM
USING THE GAME MODE
The Model 28 has a preprogrammed picture
control setting for viewing video games or similar programs. This setting softens the contrast
and is easier on the eyes.
Follow these steps to turn on the game mode.
1. Press
2. Press
MENU
on the remote control to select
the main menu. The menu appears on the
TV screen.
7
on the remote control to select
USER’S SET UP
. The set up menu ap-
pears on the TV screen.
- SET UP -
1 GAME MODE [OFF]
2 RENTAL [OFF]
3 REPEAT PLAY [OFF]
or rewind through a blank section on the
tape. This is normal.
• To rese t the counter to 0:00:00, press
DELETE
on the remote control.
ADD/
Using Counter Return
Follow these steps to easily return to a selected
point on the tape.
COUNT
SELECT
and the
ADD/
(coun-
on the
1. During playback, repeatedly press
on the remote control until
COUNT
counter are displayed.
2. When you see the location on t he tape t hat
you want to return to later, press
DELETE
C.RESET/C.MEMORY
then
ter reset/counter memory) on the remote
control.
MEMORY
replaces
TV screen next to the counter.
3. Repeatedly press
GAME MODE
to
OFF
until
4. Press
Note:
If you manually change the picture control
appears (to turn off game mode).
MENU.
1
until ON appears next
(to turn on game mode) or
The set up menu disappears.
settings, the Model 28 automatically sets the
game mode to
OFF
.
USING THE COUNTER
Your Model 28’s counter shows how long a tape
has been running, in hours, minutes, and seconds. To display the counter, repeatedl y press
SELECT
on the remote control until
the counter appear at the bottom of the TV
screen.
Notes:
• Because the Model 28’s counter reads special signals recorded on the tape, the
counter might stop while you fast-forward
COUNT
and
MEMORY 0:02:26
3. To return to the location you selected in
Step 2, press
STOP
then
F.FWD
REWIND
or
The tape fast-forwards or rewinds and
automatically stops at
Notes:
0:00:00
.
• The tape usually stops exactly at
0:00:00
. However, depending on the
tape you use, it might stop a few secon ds
sooner or later.
• When the tape is stopped at or near
0:00:00
, you can continue to move it forward or backward from there.
• If you do not want the tape to stop at the
point you selected in Step 2, repeatedly
C.RESET/C.MEMORY
press
places
MEMORY
next to the counter on the
until
COUNT
TV screen.
.
re-
25
Page 26

16-420.fm Page 26 Tuesday, July 20, 1999 11:32 AM
USING TIME SEARCH
Your Model 28 lets you quickly move forward or
backward through recorded material on a tape.
For example, if you recorded three half-hour
programs on a tape and you want to see the
third program, you can set the Model 28 to
quickly move the tape past the first hour of recorded material.
Notes:
• You can move through up to 9 hours and 59
minutes of recorded material.
• You cannot view the tape or hear the tape’s
sound while you search it.
1. Press
2. Press
MENU
. The main menu appears on
the TV screen.
6
on the remote control to select
TIME SEARCH.
TIME SE AR CH
TIME SEARCH
- : - -
, and the hour digit flashes.
The TV screen shows
0:00
STOP
F.FWD
TIME
, the
.
4. To select the search direction, press
REWIND
or
tape in the direction you specified and
stops when it reaches the time you specified in Step 3.
The search time, displayed under
SEARCH
down as the Model 28 continues t o search.
When the counter reaches
Model 28 stops searching and playback
continues.
5. To cancel a time search, press
. The Model 28 searches the
on the TV screen, counts up or
USING AUTOMATIC REPEAT
PLAYBACK
Your Model 28 lets you automatically repeat
playback from the beginning to the end of a
tape, or from the beginning to a
ed) portion of a tape.
Note:
If the counter memory is activated (see
“Using Counter Return” on Page 25), the tape
automatically stops when the co unter returns to
0:00:0 0
, and automatic repeat does not work.
blank
(unrecord-
3. Use the number keys on the remote control
to enter the desired amount of time you
want to search as h mm. For example, to
search 2 hours and 30 minutes of recorded
mater i al, pre s s
Notes:
• If you are entering an hour number, do
not precede the number with a 0. If you
are entering a single-digit minute number, precede it with a 0 — for example,
01, 02
, etc.
• If you enter an incorrect hour, press
DELETE
hour, then enter the correct hour. If you
enter an incorrect minute, use t he number buttons to re-enter the minutes.
26
2, 3
, and 0.
ADD/
to move back to the incorrect
1. During playback, press
menu appears on the TV screen.
7
2. Press
on the remote control to select
USER’S SET UP
appears on the TV screen.
3. Repeatedly press
REPEAT PLAY
to
from the beginning to the end of the tape)
or until
from the beginning to a blank portion — of
at least 10 seconds in length — on the
tape).
Note:
to ON (see “Improving Playback of Older
(Worn)/Damaged Tapes” on Page 27), the
Model 28 might not display
PLAY
To cancel automatic repeat playback,
repeatedly press
to
BLANK
If you previously set
ALL
,
, or
REPEAT PLAY
3
appears (to repeat playback
BLANK
3
.
MENU
. The main
. The set up menu
ALL
until
(to repeat playback
appears next
RENTAL PL AY
REPEAT
.
OFF
until
appears next
Page 27

16-420.fm Page 27 Tuesday, July 20, 1999 11:32 AM
4. Press
Notes:
• If you select
• During automatic repeat playback, none of
MENU
. The set up menu disappears.
ALL
is set to automatic repeat playback even
after you turn it off. To turn off repeat play,
you must select
the buttons on the Model 28 work except
POWER
ber to set
you do not want to use automatic repeat
playback.
STOP/EJECT
and
REPEAT PLAY
or
OFF
BLANK
in Step 3.
, the Model 28
. Always remem-
to
OFF
when
IMPROVING PLAYBACK OF
OLDER (WORN)/DAMAGED
TAPES
You can set the Model 28 so it reduc es the onscreen noise you might see when you play back
older, partially demagnetized tapes (such as
tapes that are played often, like rental videos).
RENTAL PLAY
When
Note:
itself might not be as sharp.
1. Press
the TV screen.
2. Press
MENU.
The main menu appears on
7
on the remote control to select
USER’S SET UP
pears on the TV screen.
2
3. Press
. ON appears next to
- SET UP -
1 GAME MODE [OFF]
2 RENTAL [ON]
is ON, the image
. The set up menu ap-
RENTAL
.
3 REPEAT PLAY [OFF]
To cancel rental play, press 2 again.
appears next to
4. If you set
MENU
then press
RENTAL PLAY
screen.
If you set rental p lay to
MENU
.
If you select
Note:
after you turn off the Model 28. To turn off rental
play, you must select
RENTAL
.
RENTAL PLAY
PLAY
to start rental play.
appears on the TV
OFF
ON
, rental play stays on even
OFF
in Step 3.
to ON, press
, simply press
OFF
27
Page 28

16-420.fm Page 28 Tuesday, July 20, 1999 11:32 AM
RECORDING
GENERAL INFORMATION
You can use the following methods to record
with your Model 28.
• Immediate recording
• One-touch recording
• Automatic timer recording
• Today timer recording
• Dubbing
Notes:
• Your Model 28 automatically records the
audio signal and adjusts the sound level
while it records.
• The video tap e you use for recording must
have the erase-protection tab in place. If
the tab is removed, the Model 28 automatically ejects the tape if you try to record on it
(see “Erase Protection” on this page).
Recording/Playback Speeds
There are three VHS recording/playback
speeds: SP (short play), LP (long play), and SLP
(super long play).
Tape Selection
The quality of tape you use greatly affects
record/playback quality and the life of the Model
28. Use only video cassettes that display the official logo. High-grade tape has a better oxide coating that helps prevent dirty video heads
and gives the best results.
Although T-160 video cassettes offer the longest recording time, they contain thinner tape that
is more likely to jam. We suggest you use T-120
or shorter length tape.
The following chart shows the maximum recording times for different-length tapes at the three
recording speeds.
Tape
Length
T-60 1 hour
T-120 2 hours
T-160 2
SP LP SLP
2 hours
(60 min.)
(120 min.)
2
/
3
hours
(160 min.)
(120 min.)
4 hours
(240 min.)
1
/
3
5
hours
(320 min.)
3 hours
(180 min.)
6 hours
(360 min.)
8 hours
(480 min.)
SP (short play) is the fastest recording speed
and results in the highest quality picture, but
uses the most tape.
LP (long play) records m ore slowl y th an SP bu t
more quickly than SLP. LP provides a better
quality picture than SLP and uses less tape than
SP.
SLP (super long play) records more s lowly and
uses less tape, but the pictu re quality is not as
high as with a recording made at the SP speed.
Note:
The Model 28 plays back tapes at the
speed in which they were recorded.
28
Erase Protection
Video cassettes have an erase-protection tab to
prevent accidental erasure. To prevent recording on a tap e, break off the tab using a screwdriver. The cassette automatically ejects if you
try to record on the tape.
If you want to record on a video cass ette that
has had its tab removed, put a piece o f heavy
plas tic tape over the erase-prote ction tab hole.
Page 29

16-420.fm Page 29 Tuesday, July 20, 1999 11:32 AM
IMMEDIATE RECORDING
Notes:
• You cannot use the Model 28 to record one
program while watching another.
• If you want to record from a VCR or other
audio/video source with A/V outputs, see
“Dubbing (Copying) a Tape” on Page 35.
Follow these steps to record the program you
are watching.
1. Insert a bl ank cassette, or one that you want
to record over, into the cassette compartment. The Model 28 automatical l y turns on.
Note:
If a cassette was loaded when you
last turned off the Model 28, you must press
POWER
2. Repeatedly press
control until the desired recording speed
(
to turn on the Model 28.
SP, LP
, or
SLP
) appears on the TV screen.
SPEED
on the remote
Notes:
• You can press
PAUSE/STILL
to temporarily pause recording (during commercials, for example). To resume recording,
PAUSE/STILL
press
again or press
• When you pause the Model 28 while
recording, it displays five n marks below
PAUSE
on the TV screen. Each mark represents 1 minute. Whi le the Model 28 is
paused, a mark disappears after each
minute, one at a time, until one mark
remains. The last remaining mark
flashes for 1 minute before it disappears.
You can use these marks to see how
long the tape has been paused.
• If you pause t he Model 28 f or 5 minutes
while recording, it automatically resumes
recording to protect the video heads.
• To turn off the TV screen while recording,
MONITOR
press
5. Press
STOP
.
to stop recording.
REC
.
SP
3. Press
CH
or CH or use the remote
control’s number buttons to select the
desired channel.
4. Press
REC/OTR
RECORD
on the Model 28. The REC indica-
tor on the Model 28 turns on,
on the remote control or
REC
and the
recording speed appear on the TV screen
for a few seconds, and the Model 28
records what you see on the TV screen.
REC
SP
ONE-TOUCH RECORDING
(OTR)
One-touch recording lets you quickly set the
Model 28 to start recording immediately then
stop after a length of time you speci fy (from 30
minutes to 8 hours).
1. Insert a blank cassette, or one that you
want to record over, into the cassette compartment. The Model 28 automatically turns
on.
Note
: If a cassette was loaded when you
last turned off the Model 28, you must press
POWER
to turn on the Model 28.
29
Page 30

16-420.fm Page 30 Tuesday, July 20, 1999 11:32 AM
2. Repeatedly press
control until the desired recording speed
SP, LP
(
3. Press
control’s number buttons to select the
desired channel.
4. Press
Model 28 to begin recording. The REC indicator on the Model 28 turns on,
(0:30)
about 5 seconds, and the Model 28 records
what you see on the TV screen.
To change the displayed total recording
time, within 5 seconds repeatedly press
REC/OTR
increments.
Note:
seconds, the recording time disappears.
Simply press
the remaining recording time.
When you finish entering all OTR info rmation, the displayed information disappears
after 5 seconds.
SLP
, or
SP
CH
or CH or use the remote
REC/OTR
appear on the TV screen for
to advance the time in 30-minute
If you do not press
SPEED
) appears on the TV screen.
twice on the front of the
on the remote
OTR
REC/OTR
REC/OTR
again to redisplay
within 5
OTR Hints
• To ensure that you record all of the desired
program, you might want to set the recording stop time 30 minutes later than the
scheduled end of the program.
• You can program OTR information only
while a tape is recording . You cannot program OTR information if a tape is not
inserted in the Model 28, if the erasepro t ection tab on the tape is removed, or if
automatic timer recording is in progress.
and
• During OTR recording, the remaining
recording time is displayed on the TV
screen for 5 seconds.
• When the recording stop time is reached
during OTR recording, the Model 28 turns
off.
• To turn off the TV screen while recording,
MONITOR
press
• You can check automatic program timer
settings during OTR. See “Automatic Timer
Recording (Timer Numbers 1-7)” on this
page.
• Be sure the tape length you select for OTR
is long enough to record the entire program. Even though you can set the Model
28 to record for up to 8 hours, the actual
recording time is limited by the tape’s
length.
• To cancel OTR while the Model 28 is
recording, press
STOP
28 (or
.
STOP/EJECT
on the remote control).
on the Model
AUTOMATIC TIMER
RECORDING (TIMER
NUMBERS 1-7)
You can program the Model 28’s automatic timer to select a channel, start recording a broadcast on that channel at a time and tape speed
you set, then stop reco rding at a time you set.
You can set up to 7 automatic program timers to
record any combination of weekly, daily, or onetime broadcasts on t he same or different cha nnels.
You can set up the Model 28 to rec ord at any
time on a specific day you set within a 1-year period (ONCE), any time at the same time Monday
through Friday (DAILY), and any time the same
day every week (WEEKLY).
You cannot set an automatic timer record-
Note:
ing while you are recording a program.
30
Page 31

16-420.fm Page 31 Tuesday, July 20, 1999 11:32 AM
Setting the Automatic Timer
Before you start, be sure you set the Mod-
Note:
el 28’s clock to the correct date and time (see
“Setting the Clock” on Page 19). If you have not
yet set the clock, the Model 28 automatically enters the clock setting mode before it displays the
automatic timer program screen.
1. Insert a blank cassette, or one that you
want to record over, into the cassette compartment. The Model 28 automatically turns
on.
If a cassette was loaded when you
Note:
last turned off the Model 28, you must press
POWER
2. Press
the TV screen.
3. Press
TIMER PROGRAMMING
gram screen appears on the TV screen.
to turn on the Model 28.
MENU.
The main menu appears on
1
on the remote control to select
. The timer pro-
PROG. 1 2 3 4 5 6 7 8
DATE
START TIME
END TIME
CHANNEL
TAPE SPEED
This screen displays the following information about each timer program you set.
PROG.
•
Note:
(program number)
If you have not set any program
numbers, all program numbers flash. If
you already set any program numbers,
only the empty program numbers flash.
DATE
•
•
(month and day of the program)
START TIME
(start time of the pro-
gram)
END TIME
•
CHANNEL
•
TAPE SPEED
•
(stop time of the program)
(channel to record)
(tape speed during re-
cording.
4. Use the number buttons (1-7) on the
remote control to select the desired program number, then press
SELECT
.
• If you select a program number with a
program already assigned, you can
change any displayed i nformation. Or, if
it is correct, press
MENU
. The program
information disappears.
• If you select an empty program number,
a blank program screen appears. You
can add information to t he sc reen to program the timer.
Notes:
• If the clock setting screen appears
instead of the timer program screen, you
must first set the clock before you can
continue. For more information, see “Setting the Clock” on Page 19.
• Although program number 8 is displayed,
it is used for the today timer and you cannot select it in Step 4. For more information, see “To day Timer Recording (Timer
Number 8)” on Page 33.
1, 2
5. Press
, or 3 on the remote control to
select the desired program mode (ONCE,
DAILY (MON-FRI), or WEEKLY).
6. Use the number keys on the remote control
to enter the program’s month and day. For
example, press
0, 2, 1
, and 5 to set Febru-
ary 15.
Notes:
• Precede a single-digit number wi th a 0 –
01, 02
for example,
, etc.
• If you set a month and day that is before
the Model 28’s current clock date, the
Model 28 set s t he month and day for the
next year.
31
Page 32

p
16-420.fm Page 32 Tuesday, July 20, 1999 11:32 AM
7. Use the number keys on the remote control
to enter the program’s start hour and
minute. For example, press
1, 0, 2
, and 8 to
set 10:28.
1
8. Press
AM
or 2 on the remo te c ontrol to sel ec t
(1) or PM. (2).
9. Repeat Steps 7 and 8 to enter the stop
hour and minute.
10. Use the number keys on the remote control
to enter the channel numbe r. For example,
0
press
11. Press
and 7 to set channel 7.
1
(SP), 2 (LP), or 3 (
SLP
) on the
remote control to set the tape speed.
12. Double-check all the set information.
MENU
• If it is correct, press
to exit the
menu.
• If an entry is not correct, repeatedly press
SELECT
to move forwar d or
ADD/DELETE
to move back ward to the incorrect entry,
use the number keys to enter the correct
information, then press
MENU
. The Model
28 stores any settings you entered, and
the timer program screen di sappears.
Notes:
• If you press
ADD/DELETE
after selecting
the program number (the program number flashes), the Model 28 clears the
timer program screen and deletes any
settings you entered.
• After you make a t ape speed selection,
pressing
SELECT
causes the timer program screen to disappear and stores any
settings you entered.
13. To store other programs, repeat Steps 2-
12.
Im
ortant:
• You can turn on a nd operate the M odel 28
manually prior to the set recording times,
but the Model 28 makes automatic timer
recording(s) only if the power is off at the
set start time(s).
• Be sure the TIMER REC indicator turns on
when you turn off the Model 28. If it does
not, check your programming.
• If you set up the Model 28 to record a CATV
program through a cable box, be sure to
leave the cable box turned on and tuned to
the correct channel before the timer program starts.
Checking/Changing Automatic
Timers
1. Press
2. Press
3. Press
4. Use the number buttons (1-7) on the
5. Review all the displayed information.
POWER
MENU.
to turn on the Model 28.
The main menu appears on
the TV screen.
1
on the remote control to select
TIMER PROGRAMMING
. The timer pro-
gram screen appears on the TV screen.
remote control to select the desired program number, then press
PROG 1 2 3 4 5 6 7 8
DATE
START TIME
END TIME
CHANNEL
TAPE SPEED
SELECT
.
14. Press
POWER
TIMER REC indicator turns on to indicate
that the Model 28 is in the timer standby
mode.
to turn off the Model 28. The
MENU
• If it is correct, press
to exit the
menu.
• If an entry is not correct, repeatedly press
SELECT
to move forward or
ADD/DELETE
to move bac kward to the incorrect e ntry,
use the number keys to enter the correct
information, then press
MENU
. The Model
28 stores any settings you entered, and
the timer program screen disappears.
32
Page 33

16-420.fm Page 33 Tuesday, July 20, 1999 11:32 AM
Notes:
• If you press
ADD/DELETE
after selecting
the program number (the program number flashes), the Model 28 clears the
timer program screen and deletes any
settings you entered.
• After you make a t ape speed selection,
pressing
SELECT
causes the timer program screen to disappear and stores any
settings you entered.
6. Press
POWER
to turn off the Model 28. The
TIMER REC indicator turns on.
Clearing an Automatic Timer
1. Press
2. Press
3. Press
4. Use the number buttons (1-7) on the
POWER
MENU.
to turn on the Model 28.
The main menu appears on
the TV screen.
1
on the remote control to select
TIMER PROGRAMMING
. The timer pro-
gram screen appears on the TV screen.
Note: If the timer recording is already in
progress, press
control then press
MONITOR
STOP/EJECT
on the remote
on the
Model 28.
remote control to select the desired program number.
PROGRAM NUMBER 1
DATE 02/15 THU
START TIME 10:28 AM
END TIME 11:28 AM
CHANNEL 07
TAPE SPEED SP
TODAY TIMER RECORDING
(TIMER NUMBER 8)
The Model 28’s today timer (stored in program
timer number 8) lets you quickly program the
Model 28 to start and stop recordi ng within the
next 24 hours.
Note: You canno t set a today timer while you
are recording a program.
Setting the Today Timer
You must use the buttons on the front of the
Model 28 to set the today timer. You cannot use
the remote control.
Note: Before y ou start, be sure you set t he Model 28’s clock to the correct date and time (see
“Setting the Clock” on Page 19). If you have not
yet set the clock, the Model 28 automatically enters the clock setting mode before it displays the
today timer program screen.
1. Insert a blank cassette, or one you want to
record over, into the cassette compartment.
The Model 28 automatically turns on.
2. Press
MONITOR
. The today timer program
screen appears on the TV screen.
- TODAY TIMER -
DATE 02/15 THU
START TIME 10:28 AM
END TIME - - : - - - CHANNEL 07
TAPE SPEED SP
5. Press
ADD/DELETE
on the remote control
to clear the program timer.
6. To clear another p rogram timer, select the
timer number then press
ADD/DELETE
again to clear it.
MENU
7. Press
to exit the screen.
This screen displays the sam e information
as you see on the automatic timer program
screen (except the program number). The
current date appears on t he
the current time appears on the
TIME
line. The current start time hour
DATE
line and
START
flashes.
33
Page 34

p
16-420.fm Page 34 Tuesday, July 20, 1999 11:32 AM
3. Repeatedly press
NEL
to set the start hour. Then press
VOLUME
Note:
. The start minute flashes.
If you set an earlier start hour than
CHANNEL
or
CHAN-
the current hour, the Model 28 automatically changes the today timer ’s date to the
next day.
4. Repeatedly press
NEL
to set the start minute. Then press
VOLUME
. AM or PM flashes.
5. Repeatedly press
or PM. Then press
moves to th e
END TIME
CHANNEL
CHANNEL
VOLUME
line.
or
to set
CHAN-
. The cursor
6. Repeat Steps 3-5 to set the end hour and
minute. The current channel number flashes.
7. Repeatedly press
NEL
to select the channel number.
Then press
VOLUME
CHANNEL
or
. The current tape
CHAN-
speed flashes.
8. Repeatedly press
NEL
to select the tape speed (SP, LP, or
SLP
).
9. Press
VOLUME
CHANNEL
or
, then double-check all
CHAN-
the set information.
• If it is correct, press
MONITOR
.
• If an entry is not correct, repeatedly
press
VOLUME
to m ove to the inc orrect entry, use the buttons on the front o f
the Model 28 to enter the correct information, then press
10. Press
POWER
to turn off the Model 28. The
MONITOR
.
TIMER REC indicator turns on to indicate
that the Model 28 is in the timer standby
mode.
AM
• If you set up the Model 28 to record a CATV
program through a cable box, be sure to
leave the cable box turned on and tuned to
the correct channel before the timer program starts.
Checking/Changing the Today Timer
1. Press
2. Press
3. Double-check all the set information.
4. Press
POWER
MONITOR
to turn on the Model 28.
. The today timer program
screen appears on the TV screen.
- TODAY TIMER -
DATE 02/15 THU
START TIME 10:28 AM
END TIME 11:28 AM
CHANNEL 07
TAPE SPEED SP
• If it is correct, press
MONITOR
.
• If an entry is not correct, repeatedly
VOLUME
press
rect entry, repeatedly press
CHANNEL
and
information, then press
POWER
to turn off the Model 28. The
to move to the incor-
CHANNEL
to enter the correct
MONITOR
.
TIMER REC indicator turns on.
Clearing the Today Timer
1. Press
2. Press
POWER
MONITOR
to turn on the Model 28.
program screen.
to dis play the today t imer
Im
ortant:
• You can turn on and operate the Model 28
manually prior to the set start time, but the
Model 28 makes a today timer recording
only if the power is off at the set start time.
If the timer recording is already in progress,
press
3. Press
MONITOR
VOLUME
STOP/EJECT
then
. The Model 28 clears
.
the set today timer program.
4. Press
MONITOR
to exit the screen.
• Be sure the TIMER REC indicator turns on
when you turn off the Model 28. If it does
not, check your programming.
34
Page 35

16-420.fm Page 35 Tuesday, July 20, 1999 11:32 AM
TIMER RECORDING HINTS
• The Model 28 can record only one broadcast at a time. If you program the Model
28’s timer to record broadcasts on different
channels that start at the same time, the
Model 28 records the broadcast with the
lowest program number.
• If you set a t imer and turn off the Model 28
without loading a tape, the TIMER REC
indicator flashes.
• If you insert a tape with its erase-protection
tab removed and set a timer, the TIMER
REC indicator flashes and the tape ejects.
TIMER REC STANDBY
•
screen for 2 minutes before a set start time
if the Model 28 is still on. If this happe ns,
POWER
press
to turn it off.
• If there is a power failure or the Model 28 is
unplugged for more than 1 minute, the
clock setting and all timer settings are
cleared.
flashes on the TV
DUBBING (COPYING) A TAPE
The process of recording from one audio/video
devi ce to another is ca lle d
Connecting a D ubbing Source
You can use a VCR, camcorder, satellite receiver, or other device with A/V output s as the dubbing source, connect the dubbing source to the
Model 28, then use your Model 28 to record the
signal from the dubbing source.
Note:
Always use video-quality shielded cables
with phono-type connectors to connect a dubbing source to the Model 2 8. Do not use standard audio patch cords.
dubbing
VIDEO IN
AUDIO IN
TV/Monitor
.
ANT.
• If the today timer and an automatic timer
overlap, the today timer prog ram has priority . When the today timer program ends, the
Model 28 switches to record the remainder
of the automatic timer program.
• If automatic timers overlap, the one that
starts first has priority. When the first program ends, the Model 28 switches to
record the remainder of the second program.
• The TIMER REC indicator flashes after any
timer recording ends.
DC 12V
AC
120V
IN OUT
AUDIO
VIDEO
AUDIO
VIDEO
ANT.
ANT.
IN
OUT
VCR
VIDEO
OUT
VIDEO IN
AUDIO OUT
AUDIO IN
You can connect the audio and video outputs of
a dubbing source to the
VIDEO IN
jacks on the back of the Model 28 or to the
EO INPUT
AUDIO INPUT
and
jacks on the front of
and
AUDIO IN
VID-
the Model 28.
35
Page 36

16-420.fm Page 36 Tuesday, July 20, 1999 11:32 AM
Dubbing a Tape
For the best results while dubbin g, hold
Note:
the remote control close to the Model 28’s infrared window when you press a button. Otherwise, the remote control might affect the
dubbing source’s operation.
1. Prepare the dubbing source.
2. Insert a blank cassette, or one that you
want to record over, into the Model 28’s
cassette compartment. The Model 28 turns
on.
3. Enter
00
using the remote control’s number
buttons, or press
NEL
to select o ne channel higher than
CHANNEL
or
CHAN-
the highest programmed channel or one
channel lower than the lowest program m ed
channel.
AUX
appears on the Model 28’s
TV screen.
4. Repeatedly press
SPEED
on the remote
control until the desired recording speed
SP, LP
(
5. Press
RECORD
SLP
, or
REC/OTR
) appears.
on the Model 28 or
on the remote control to begin
recording.
6. Start the dubbing source.
7. To turn off the Model 28’s TV s creen, press
MONITOR
8. Press
EJECT
.
STOP
on the remote control or
STOP/
on the front of the Model 28 to stop
recording before it automatically stops at
the end of the tape. Then stop the dubb ing
source.
36
Page 37

gg
16-420.fm Page 37 Tuesday, July 20, 1999 11:32 AM
ADDITIONAL INFORMATION
TROUBLESHOOTING GUIDE
If you follow the instructions in this manual and still have trouble operating your Model 28, try the suggestions in this troubleshooting chart.
Problem Possible Cause Su
No power. The power cord (AC or DC) is
not connected.
Timer recording does not
work.
POWER
DC power cord is connected
when you want to use AC
power.
Fuse in DC power cord might
be blown.
The clock is not set correctly. Check the clock and reset it if
Tape not inserted or eraseprotection tab missing.
The program timer is not set
or is set incorrectly.
not pressed. Press
estion
Plug the AC power cord into
an AC outlet, or plug the DC
power cord into your vehicle’s
cigarette lighter.
POWER
Disconnect DC power cord
from Model 28.
Check fuse and replace if necessary (see “Replacing the
DC Power Cord’s Fuse” on
Page 40).
necessary.
Insert a tape, or place a piece of
strong tape over the erase-protect i on t ab ho l e. S ee “Era s e
Protection” on Page 28.
Set the program timer correctly.
.
Model 28 not turned off at
record set start time (TIMER
REC indicator not on).
Cannot record. The tape’s erase-protection
tab is missing.
Picture is poor on playback. The tracking is not properly
adjusted.
Video heads are dirty. The video heads must be
The video tape might be
faulty.
POWER
Press
el 28 (TIMER REC indicator
should be on).
Place a piece of strong tape
over the tab hole. See “Erase
Protection” on Page 28.
Adjust the tracking (see “Adjusting the Tracking Manually”
on Page 23) .
cleaned (see “Cleaning the
Video Heads” on Page 41).
Try another tape.
to turn of f Mod -
37
Page 38

16-420.fm Page 38 Tuesday, July 20, 1999 11:32 AM
Problem Possible Cause Suggestion
Operation buttons do not
work when power is on and a
casse tte is i n serted (
appears on the display).
Remote control buttons do
not work when the power is
on and a cassette is inserted.
Cannot record from the front/
back input jacks.
DEW
Dew protectio n system is activated.
The cassette might be
jammed.
The remote control’s batteries
might be weak.
Automatic repeat playback is
on (none of the buttons work
except
Connections are incorrect. Use shielded audio/video ca-
POWER
and
STOP
).
Unplug the Model 28 for about
DEW
2 hours or until
appear when you plug it in.
Then proceed with operation.
EJECT
Press
several times to release the
cassette.
Check the remote control’s
batteries and replace them if
necessary.
Set automatic repeat playback to
tomatic Repeat Playback” on
Page 26.
bles with phono-type connectors to connect the source
device to the Model 28’s front/
back input jacks. See “Connecting an External Device”
on Page 13) .
or
OFF
. See “Using Au-
does not
STOP/EJECT
Cannot see broadcast TV
programs using the Model
28’s tuner.
Picture or sound is not stable
during playback.
Model 28 not set to
Antenna/CATV connections
are incorrect.
Interference from electrical
and magnetic sources.
The tape might be faulty. Try anoth er tape.
AUX
. Set Model 28 to
“Viewing an External Device”
on Page 21) .
Recheck all connections. See
“Connections” on Page 11.
Keep your Model 28 away
from electrical and magnetic
appliances. Be sure to position it at least 8 inches away
from another TV or video
monitor.
AUX
(see
38
Page 39

16-420.fm Page 39 Tuesday, July 20, 1999 11:32 AM
CARE AND MAINTENANCE
Your RadioShack Model 28 9" Color TV with Built-in VHS VCR is an example of superior design and
craftsmanship. The following suggestions will help you care for your Model 28 so you can enjoy it for
years.
Keep the Model 28 dry. If it gets wet, wipe it dry immediately. Liquids can contain minerals that corrode electronic circuits.
Use and store the Model 28 only in normal temperature environments. Temperature
extremes can shorten the life of electronic de vices, damag e batteries, an d distort or
melt plastic parts.
Use only fresh batteries of the recommended size and type in the remote control. Always remove old or w eak bat teries. They ca n lea k c hem icals that can damage electronic circuits.
Handle the Model 28 gently and carefully. Dropping it can damage circuit boards and
cases, and cause it to work improperly.
Keep the Model 28 away from dust and dirt, which can cause premature wear of parts.
Wipe the Model 28 with a damp cloth occasionally to keep it looking new. Do not use
CLEANER
harsh chemicals, cleaning solvents, or strong detergents to clean it.
Modifying or tampering with the Model 28’s internal components can cause a malfunction and might
invalidate its warranty and void your FCC authorization to operate it. I f your Model 28 is not performing as it should, take it to your local RadioShack store for assistance.
39
Page 40

16-420.fm Page 40 Tuesday, July 20, 1999 11:32 AM
THE FCC WANTS YOU TO
KNOW
Your Model 28 might cause TV or radio interference even when it is operat ing properly. To determine whether your Model 28 is causing the
interference, turn off your Model 28. If the interference goes away, your Model 28 is causing
the interference. Try to eliminate the interference by:
• Moving your Model 28 away from the
receiver
• Connecting your Model 28 to an outlet that
is on a different electrical circuit from the
receiver
• Contacting you r local Rad ioShack s tore for
help
If you cannot eliminate the interference, the
FCC requires that you stop using your Model 28.
Caution:
the ring, be careful not to crush the tip.
Never use pliers or other tools t o retighten
the ring on the plug.
2. Pull the ring straight out, then remove the
metal tip and old fuse.
3. Check the fuse to see if it has blown. If it
has, replace it.
4. Replace the metal tip inside the ring , then
place the fuse inside the cigarette-lighter
plug and screw the ring back onto t he pl ug.
Make sure that the m et al tip is visibl e when
you reassemble the cigarette-lighter plug.
If you must use pliers to loosen
REPLACING THE DC POWER
CORD’S FUSE
If the Model 28 stops operating when the DC
power cord is connected, the fuse in the DC
power cord might be blown. If it is, follow these
steps to replace it with a 5-amp, 1
acting fuse (RadioShack Cat. No. 270-1011, not
supplied).
Caution:
ratings or defeating the fuse protection can
damage your Model 28, the DC power cord, and
the vehicle’s elect r ic al system.
1. Grasp the ring near t he tip of the plug, then
Using a fuse that does not meet these
carefully unscrew the ring by turning it
counterclockwise.
1
/4 x 1/4, fast-
40
Page 41

16-420.fm Page 41 Tuesday, July 20, 1999 11:32 AM
SERVICING YOUR MODEL 28
There are no user-serviceable parts inside your
Model 28. If you encounter a problem that you
cannot correct using this manual and its troubleshooting guide, take the M odel 28 t o your local
RadioShack store for assistance.
Cleaning the Video Heads
Dirty video heads cause the playback picture to
blur, even if the recorded signal is clear. However, video head cleaning is a delicate operation
that requires a trained technician. For more
head cleaning information, contact your local
RadioShack store.
Have the video heads cleaned only when picture quality is affected.
STORING VIDEO CASSETTES
Unless you are making a timer recording, eject
and store the cassette when you finish usi ng it.
This helps protect the cassette and the Model
28’s internal mechanisms from dust.
Place your video cassettes in their protective
boxes and store them in a cool, dry, dust-free
environment. Store the cassettes on end, not on
their sides. This prevents improper settling of
the cassette’s spools.
Note:
around the cassette’s spools after you play a
tape several times. This can cause the cassette
to improperly load and automatically eject when
you insert it. On most cassettes there is a brakerelease plunger on the bottom center of the cassette. Use the tip of a pen or pencil to press the
plunger. This loosens the tape.
Tape can become wound too tightly
Brake-Release
Plunger
DEGAUSSING
Your Model 28 has an automatic degauss circuit. The circuit functions each time you turn the
power off. However, strong magnetism from
nearby appliances might affect the Model 28’s
picture. If this happens, move the Model 28
away from the appliance. If the Model 28’s picture is still affected, turn the power off for 1
minute, then turn it back on. If the Model 28 ’s
picture is still affected, contact your local RadioShack store for assistance.
41
Page 42

16-420.fm Page 42 Tuesday, July 20, 1999 11:32 AM
SPECIFICATIONS
Television System..................................................................................NT SC Standard Color Signal
Playback System...................................................................Rotary Two-Head Helical Scan System
1
Tape Widt h ..............................................................................................................................
Tape Speed:
SP.................................................................................................1.31 Inch/sec. (33.35 mm/s)
LP .................................................................................................0.65 Inch/sec. (16.67 mm/s)
SLP............................................................................................... 0.43 Inch/sec. (11.12 mm/s)
Tuner Channels:
VHF.....................................................................................................................................2-13
UHF..................................................................................................................................14-69
CATV....................................................................................................................................125
Termi nals:
Antenna Input .........................................................................VHF/UHF 75 Ohms Unbalanced
Video Input/Output...................................................................... ................... .Phono connector
Audio Input/Output..........................................................................................Phono connector
Earphone
..................................................................................................................................................................1
/8-inch plug (3.5 mm)
/2 Inch
Power Requirements:
AC..........................................................................................................................120V, 60 Hz
DC....................................................................................................................................... 12V
Power Consumption:
AC................................................................................................................................70 Watts
DC................................................................................................................................65 Watts
1
Dimensions..................................................................................12
/4 x 1115/16 x 12 7/8 Inches (HWD)
(31.1 x 30.3 x 32.5 mm)
Weight......................................................................................................................Approx. 20.9 Lbs
(9.48 kg)
Included Accessories ................................................................................. UHF/V HF Dipole Antenna
AC Power Cord
DC Power Cord
300-to-75-ohm Matching Transformer
Remote Control
Specifications are typical; individual units might vary. Specifications are subject to change and improvement without notice.
42
Page 43

16-420.fm Page 43 Tuesday, July 20, 1999 11:32 AM
NOTES
43
Page 44

16-420.fm Page 44 Tuesday, July 20, 1999 11:32 AM
RadioShack Limited Warranty
This product is warranted against defects for 90 days from date of purchase from
RadioShack company-owned stores and authorized RadioShack franchisees and dealers. Within this period, we will repair it without charge for parts and labor. Simply bring
your Rad ioShack sales slip as proof of purchase date to any RadioShack store. Warranty does not cover transportation costs. Nor does it cover a product subjected to misuse or ac cidental damage.
EXCEPT AS PROVIDED HERE IN, RADIOSHACK MAKES NO EXPRES S WARRANTIES AND ANY IMPLIED WARRANTIES ARE LIMITED IN DURATI ON TO THE DURATION OF THE WRITTEN LIMITED WARRANTIES CONTAINED HEREIN. Some states
do not permit limitation or exclusion of implied warranties; therefore, the aforesaid limitatio n(s) or exclusion( s) may not apply to the purchaser.
This warranty gives you speci fic l egal rights and you ma y also have ot her rights which var y from
state to state.
We Service What We Sell
10/95
RadioShack
A Division of Tandy Corporation
Fort Worth, Texas 76102
B4616UOHHHHH
OEMN01066
1A6 Printed in Ma laysia
 Loading...