

Page 1
26-447.fm Page 1 Tuesday, June 22, 1999 10:02 AM
Cat. No.
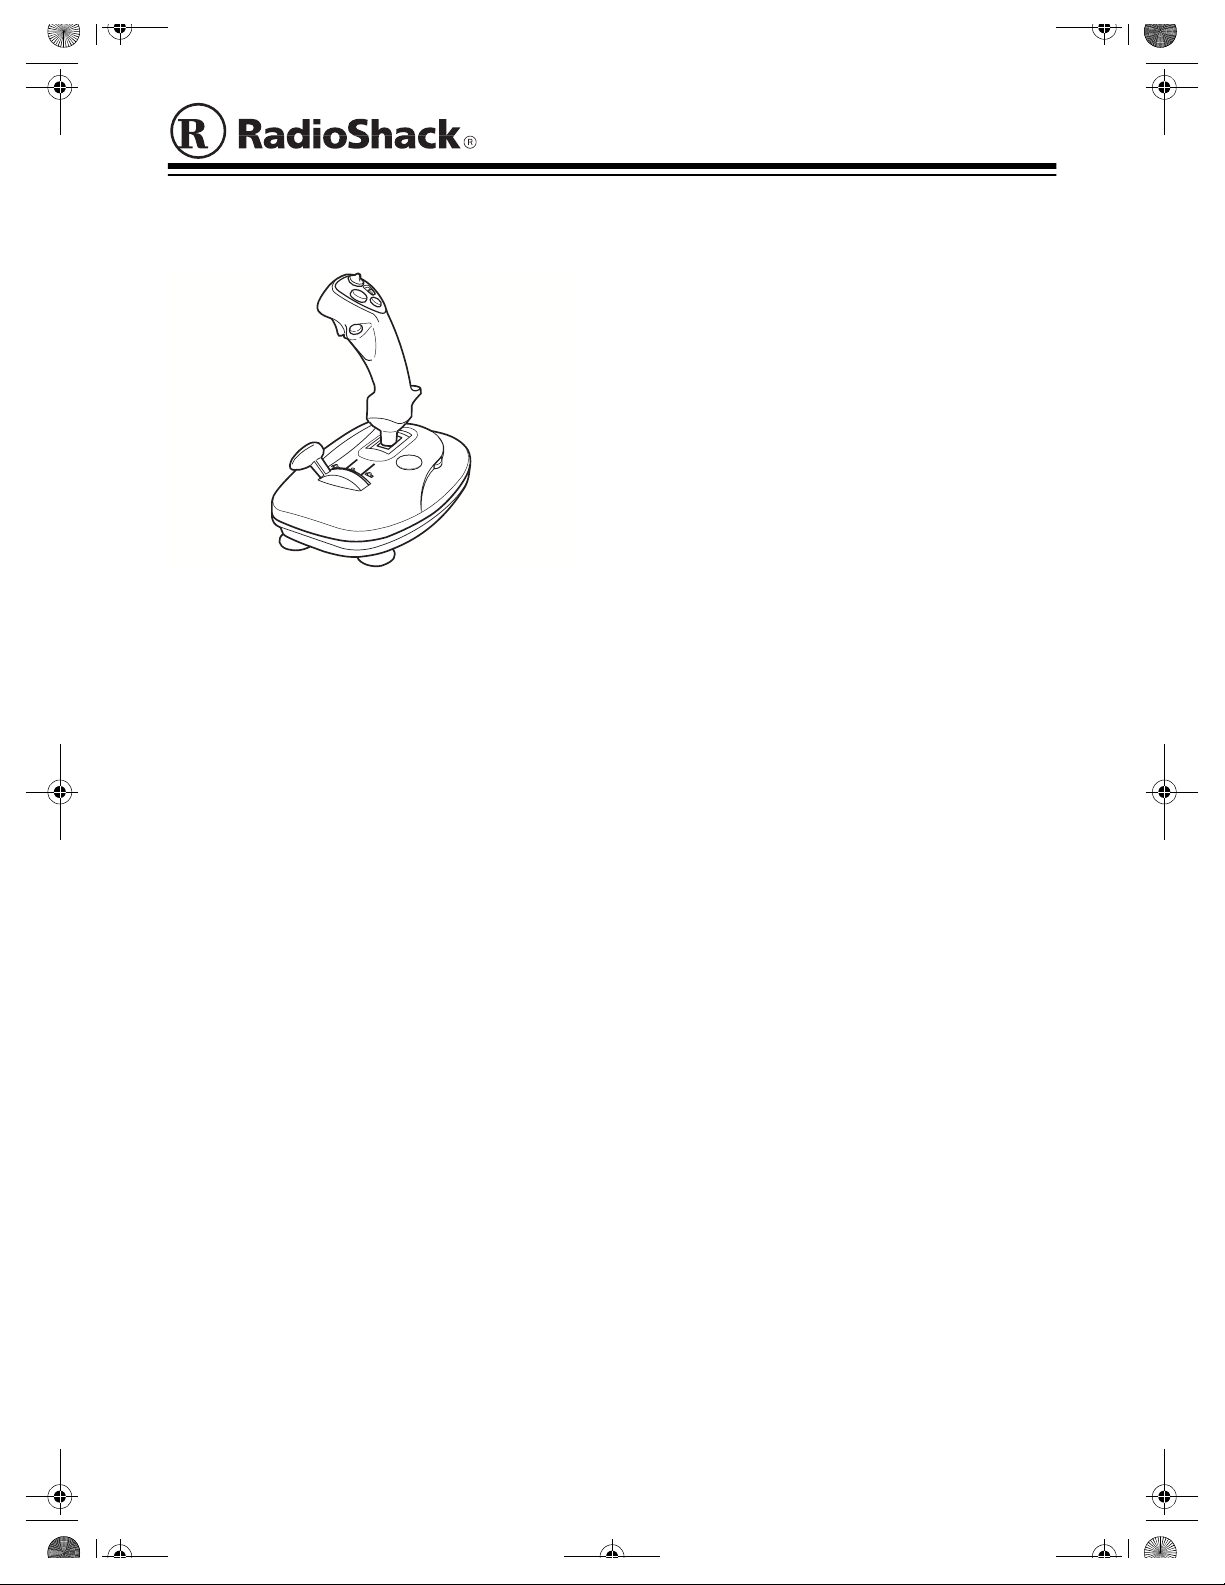
4-Fire Button Analog Joystick w/ Throttle and 4-Way Hat Switch
26-447
FEATURES
You can enjoy the fun an d versatility of your
new PC compatib le 4 -Fir e Bu tton A nalog Joy stick with your computer game software. It
gives you comfortable and accurate control for
any game software that requires a joystick.
Your joystick’s features include:
Four Fire Buttons
weapons, assign targets, select cockpits.
Turbo Speed Selector
speed options, 1 for a lower speed and 2 for a
higher speed.
— let you load/select
— gives you two t urbo
X-/Y-Axis Trim Controls
fine-tuning to center the joystick.
Four Suction-Cup Stabilizers
joystick firmly in place when the action gets
hot!
— give you extra
— keep the
COMPATIBILITY
Hardware
Your joystick work s with IB M® and compatible
PCs equipped with a joystick port, using the
industry-standar d 15-pin D submin iature connector.
Note
: Joystick ports are also available on
game cards and enhanced sound cards.
Software
You can use your joystick with any PC compatible software written to support a joystick.
Your joystick is completely compatible with
CH FLIGHTSTICK PRO
®
.
PREPARATION
Turbo Switch
turbo function easily.
Hat Switch (knob)
point of view outside the cockpit, change direction, or control altitude.
Hat Switch Selector
have the hat switch on or off depending on
your game’s software/hardware requirements.
Throttle Control (gear stick)
control over incre mental game functio ns such
as increasing and decreasing speed.
Throttle Selector
have the throttle switch on or off depending on
your game’s software/hardware requirements.
— lets you turn on or off the
— lets you change the
— offers the flex ibil ity t o
— gives you
— offers the flexibility to
© 1999 Tandy Corporation.
RadioShack is a registered trademark used by Tandy Corporation.
All Rights Reserved.
Connecting Your Joystic k
Cautions
• Turn off your computer's power before you
• When connecting or disconnecting your
• Do not pull or stretch your joystick's output
:
connect or disconnect your joystick from
the joystick port.
joystick, always grasp the connector and
not the cable.
cable.
Page 2
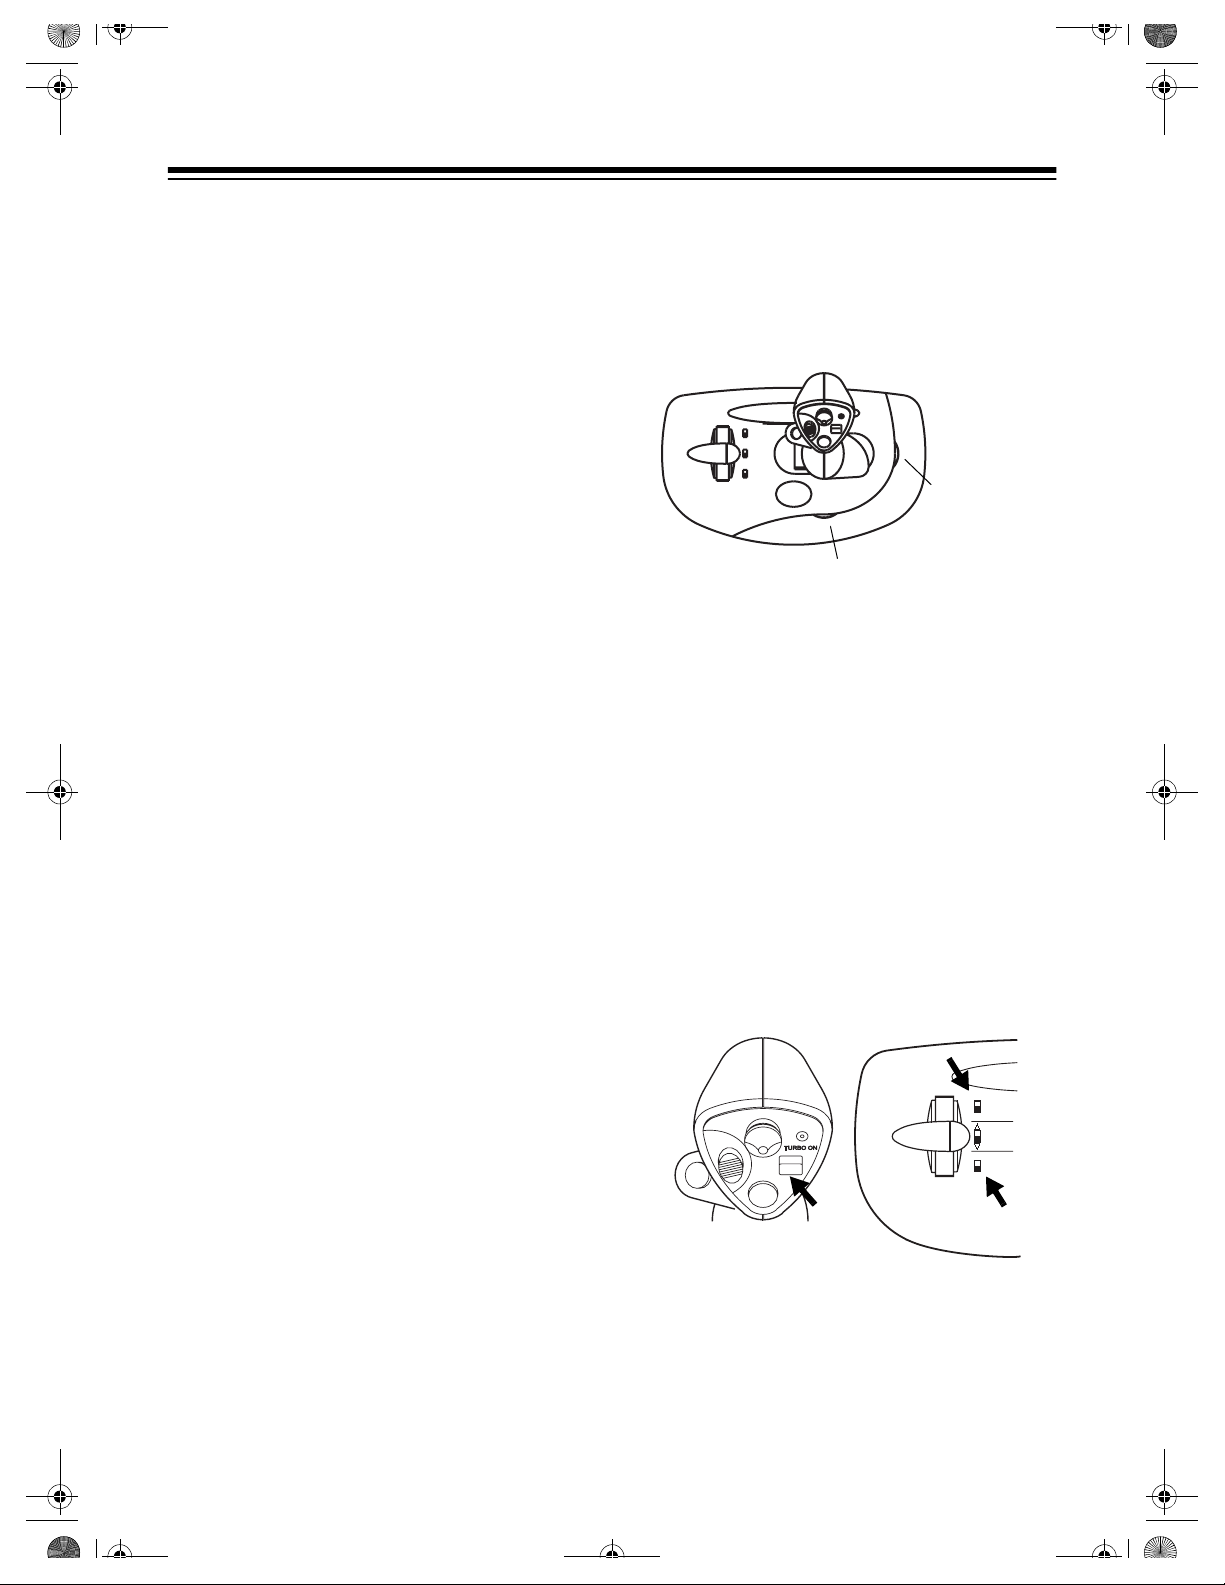
TURBO SPEED
ON
OFF
HAT
2
THROTTLE
OFF
1
ON
26-447.fm Page 2 Tuesday, June 22, 1999 10:02 AM
Follow these steps to connect your joystick.
1. Turn off your computer.
2. Plug your joystick's connector into the joystick port.
Note
: If you have two joystick ports, you can
use either port, A or B. Most softwa re, however, uses the top (A) port for the primary joystick. Refer to your software’s user’s manual.
3. Turn on your c omputer and run your software game program.
CENTERING THE JOYSTICK
Your joystick has a spring-loaded self-centering
system that retur ns the control stick to its ce nter
position w hen you release it . Before you use the
joystick for the first time, or after you have used
it for a while, this cent er po si tio n mi ght re qui re
fine-tuning.
Software-Controlled Joystick
Centering
Most joystick-compatible software includes a
calibration routine to automatically center a
joystick. If your so ftwar e has thi s ro uti ne, refer
to the application’s software manual for instructions on how to select the joystick as your
input device. Then follow the program's instruction screens (which generally appear
within the set-up portion of the program) to define the limits of the joystick's range.
Manual Joystick Centering
Use the X- and Y-axis trimmers to manually
center the joystick if your software does not include its own calibration rout ine, or if t he routine does not center the joystick.
X-Axis Trimmer
Y-Axis Trimmer
The X-axis trimmer adjusts left/right centering,
and the Y-axis trim mer adjusts up/down centering. Slowly slide each trimmer until your
software's display shows that your joystick is
centered.
Configuring/Centering the Joystick
in Windows® 95/98
1. From the
then click on
Start Menu
Control Panel
, select
2. Double-click on the joystick icon.
3. To configure the joystick with the hat
switch, select
swit c h
TURBO ON
THROTTLE
CH FLIGHTSTICK PRO
to ON,
HAT
to off.
Settings
.
, then
to ON and
,
If the software’s joystick-calibration routine
does not automatically center the joystick, see
“Manual Joystick Centering” to manually adjust the appropriate trimmer (X- or Y-axis).
4. Click on
5. Click on
Properties
Calibrate
.
and follow the instruc-
tions in th e windows that appear.
Page 3

26-447.fm Page 3 Tuesday, June 22, 1999 10:02 AM
OPERATION
The joystick comes with a range of control buttons (such as the fire buttons) that have different applications depending on your game
program. Check with your game’s software
guide to find out which fun ction s wo rk wi th th e
joystick’s buttons.
Fire Buttons
Caution
: Do not use excessive pressure on
the control stick or fire buttons.
Using the Throttle Control
The throttle control lets you adjust your aircraft or vehicle's speed without having to use
your keyboard, so yo u can ke ep your eyes o n
the screen.
Follow these steps to use the throttle control.
1. Set
2. Run your game software's joystick calibra-
THROTTLE
to ON.
tion program and set up for throttle use.
Hat Switch
Trigger-Style
Fire Button
(in front)
Using the Center Hat Switch
The center hat switch has several functions
based on your game software's features. Most
games set the hat switch as a directional viewer, but some games se t the switch to control
speed or direction.
Follow these steps to use the center hat
switch.
1. Set the
HAT
selector to ON.
2. Run your game software's joystick calibration program and set up for hat switch use.
3. During game play, push the center hat
switch knob up, down, left, or right
depending on your game's features.
CARE
To enjoy your joystick for a long time:
• Keep the joystick dry. If it gets wet, wipe it
dry immediately.
• Use and store the joys tick only in normal
temperature environments.
• Handle the joystick gently and carefully.
Don’t drop it.
• Keep the joystick away from dust and dirt.
• Wipe the joystick with a damp cloth occasionally to keep it looking new.
3. During game play, move the throttle gear
stick forward to increase your speed, or
backward to reduce it.
Increase Speed
Decrease Speed
Note
: The throttle control function can
Throttle Gear
change, depending o n the game you play.
Always read your game's user's manual.
Modifying or tamper ing with the joyst icks’s internal components can cause a malfunction
and invalidate its warranty. If your joystick is
not performing as it should, tak e it to your local RadioShack store for assistance.
Note
: Don't take your joystick apart (doing so
voids the warranty).
Page 4

26-447.fm Page 4 Tuesday, June 22, 1999 10:02 AM
This product is warrante d by RadioSha ck against manufac turing defects in material and work manship under normal u se for ninety ( 90) days fro m the date o f purchase fr om RadioShac k companyowned stores and authorized RadioShack franchisees and dealers. EXCEPT AS PROVIDED
HEREIN, RadioShack MAKES NO EXPRESS WARRANTIES AND ANY IMPLIED WARRANTIES,
INCLUDING THOSE OF MERCHANTABILITY AND FITNESS FOR A PARTICULAR PURPOSE,
ARE LIMITED IN DURATION TO THE DURATION OF THE WRITTEN LIMITED WARRANT IES
CONTAINED HEREIN. EXCEPT AS PROVIDED HEREIN, RadioShack SHALL HAVE NO LIABILITY OR RESPONSIBILITY TO CUSTOMER OR ANY OTHER PERSON OR ENTITY WITH RESPECT TO ANY LIABILITY, LOSS OR DAMAGE CAUSED DIRECTLY OR INDIRECTLY BY USE
OR PERFORMANCE OF THE PRODUCT OR ARISING OUT OF ANY BREACH OF THIS WARRANTY, INCLUDING, BUT NOT LIMITED TO, ANY DAMAGES RESULTING FROM INCONVENIENCE, LOSS OF TIME, DATA, PROPERTY, REVENUE, OR PROFIT OR ANY INDIRECT,
SPECIAL, INCIDENTAL , OR CONSEQUENTI AL DAMAGE S, EVEN IF RadioSh ack HAS BE EN ADVISED OF THE POSSIBILITY OF SUCH DAMAGES.
Some states do not allow the limitations on how long an implied warranty lasts or the exclusion of incidental or consequential damages, so the above limitations or exclusions may not apply to you.
In the event of a pr oduct defect durin g the warranty pe riod, take the pro duct and the RadioShack
sales receipt as proof of purchase date to any RadioShack store. RadioShack will, at its option, unless otherwise provid ed by law : ( a) correct the defect by pr odu ct r epa i r without charge for pa rts a nd
labor; (b) replace the product with one of the same or similar design; or (c) refund the purchase
price. All replace d parts a nd prod ucts, and p roducts o n which a refund is made, become t he property of RadioShack. New or recond itioned parts a nd products may be used in the performance of
warranty service. Re paired or repl aced parts and products are war ranted for the r emainder of the
original warranty period. You will be charged for repair or replacement of the product made after the
expiration of the warranty period.
This warranty does not cover: (a) damage or failure caused by or attributable to acts of God, abuse,
accident, misuse, i mproper or abnormal usag e, fa ilu re to fo ll ow instr uctions, improper ins tall at ion or
maintenance, altera tion, lightning or othe r incidence of excess voltage or current; (b ) any repairs
other than those provided by a RadioShack Authorized Service Facility; ( c) consumables such as
fuses or batteries; (d) cosmetic dam age; (e) tra nsportation , shipping or insurance costs; or (f) costs
of product removal, installation, set-up service adjustment or reinstallation.
This warranty give s you specific l egal rights, an d you may al so have other r ights which var y from
state to state.
RadioShack Customer Relations, 200 Taylor Street, 6th Floor, Fort Worth, TX 76102
Limited Ninety-Day Warranty
We Service Wh at We Sell
04/99
RadioShack
A Division of Tandy Corporation
Fort Worth, Texas 76102
26447-4123-00-01
06A99 Printed in China
 Loading...