

Page 1

26-442.fm Page 1 Friday, March 5, 1999 4:43 PM
Dual Wheel Scrolling Trackball
with Programmable Third Button
Cat. No. 26-442
OWNER’S MANUAL
Please read before using this equipment.
Page 2

26-442.fm Page 2 Friday, March 5, 1999 4:43 PM
FEATURES
Your RadioShack Dual Wheel Scroll
Trackball Mouse allows you to control
mouse movement and functions with
your fingertips. It was designed specifically to meet the needs of a new generation of PC users. You can scroll, zoom,
or click using the innovative vertical and
horizontal scroll wheels and programmable third button. The trackball lets yo u
more easily use many graphics, word
processing, and desktop publishing programs. Specially designed for Win-
dows
3.1 and Windows 95/98, the
mouse supports Netscape Navigator
and Microsoft
Explorer web browsers,
as well as many other popular applications, including Microsoft Office 97,
Word, Excel, Project, Access,
CorelDraw
, Photoshop, and AutoCAD.
(Check your software’s user’s manual
for compatibility.)
Your mouse’s features include:
Dual-Wheel Scrolling Technology —
lets you move the cursor vertically or
horizontally on the screen while the
mouse and your wrist remain stationary.
Microsoft IntelliMouse
Compatible
— supports basic Microsoft IntelliMouse
functions.
Zoom — magnifies fine text or high resolution graphics at the press of a button.
Enhanced Dual-Wheel Scroll Mode —
scroll functions work with any Window s
application and improve many software
applications that are not supported by
Microsoft IntelliMouse.
Auto Scroll — lets you scroll quickly
and easily through long and short documents and displays a scroll direction indicator.
Super High 520 DPI (dots per inch)
Resolution — supports 1024 × 768 res-
olution and higher, letting you move your
cursor fluidly across higher-resolution
displays.
Ergonomically Shaped Body — comfortably fits your hand and supports your
wrist for hours of use.
Programmable Third Button — you
can use the third button for a variety of
functions, including zoom and scroll.
Plus, you can assign it shortcuts to functions such as system default, backspace, close, delete, double click, enter,
escape, as well as function keys.
SYSTEM REQUIREMENTS
•IBM
• Hard drive with at least 350k bytes
• 3.5 inch floppy disk drive
• IBM PC DOS, MS-DOS 3.3 or later,
PC, XT, AT, PS/2, 486, Pentium, or compatible with one available PS/2 mouse port
of available space (if you plan to
automatically load the mouse driver
each time you boot up)
or Windows 3.1 or later
© 1999 Tandy Corporation.
RadioShack is a registered trademark used by Tandy Corporation.
All Rights Reserved.
2
Page 3

26-442.fm Page 3 Friday, March 5, 1999 4:43 PM
CONTENTS
Installation ......................... ............................................. ......................................... 4
Hardware ......................... ................................ ................................ ................... 4
Software ............................................................................................................. 4
Installing in Windows 95/98 ......................................................................... 4
Installing in Windows 3.1 ............................................................................. 4
Installing in DOS .......................................................................................... 5
Operating in Windows ............................................................................................ 6
Buttons Control Panel ........................................................................................ 6
Setting the Right- or Left-Handed Configuratio n ................. ... ... ................... 6
Setting the Double Click Speed ............................................................. .... .. 6
Pointer Control Panel ......................................................................................... 7
Motion Control Panel .......................................................................................... 7
Setting the Pointer Speed ......... ....................................... ... ... ... .... ... ............ 8
Setting the Pointer Trail ................................... ...................................... .... .. 8
Wheel Control Panel .......................................................................................... 8
Setting Wheel Properties ............................................................................. 8
Wheel Mode .......................................................................................... 8
Vertical Wheel ....................................................................................... 8
Setting the Scrolling Speed ...... .... ... ... ... .... ... ... ... ... .... ............................ 9
Horizontal Wheel ................................................................................... 9
Scrolling .................................... .......... .......... ......... .......... .......... .......... .. 9
Third Button Control Panel ..................................... ... ....................................... .. 9
Zoom ............................... .................... ................... ................... ................. .. 9
Auto Scroll ................ ... ....................................... ... ... ... .... ... ....................... 10
Others ........................................................................................................ 11
Using the Third Button ........................ ...................................... .... ... ... ... .... 11
General Control Panel ...................................................................................... 11
Checking the Driver Version ...................................................................... 11
Changing the Driver Version ...................................................................... 12
Operating in DOS .................................................................................................. 13
Care and Maintenance .......................................................................................... 14
Cleaning the Trackball ...................................................................................... 15
The FCC Wants You to Know ............................................................................... 16
Declaration of Conformity .......................................................... ... ... .... ... ... ....... 16
3
Page 4
26-442.fm Page 4 Friday, March 5, 1999 4:43 PM
INSTALLATION
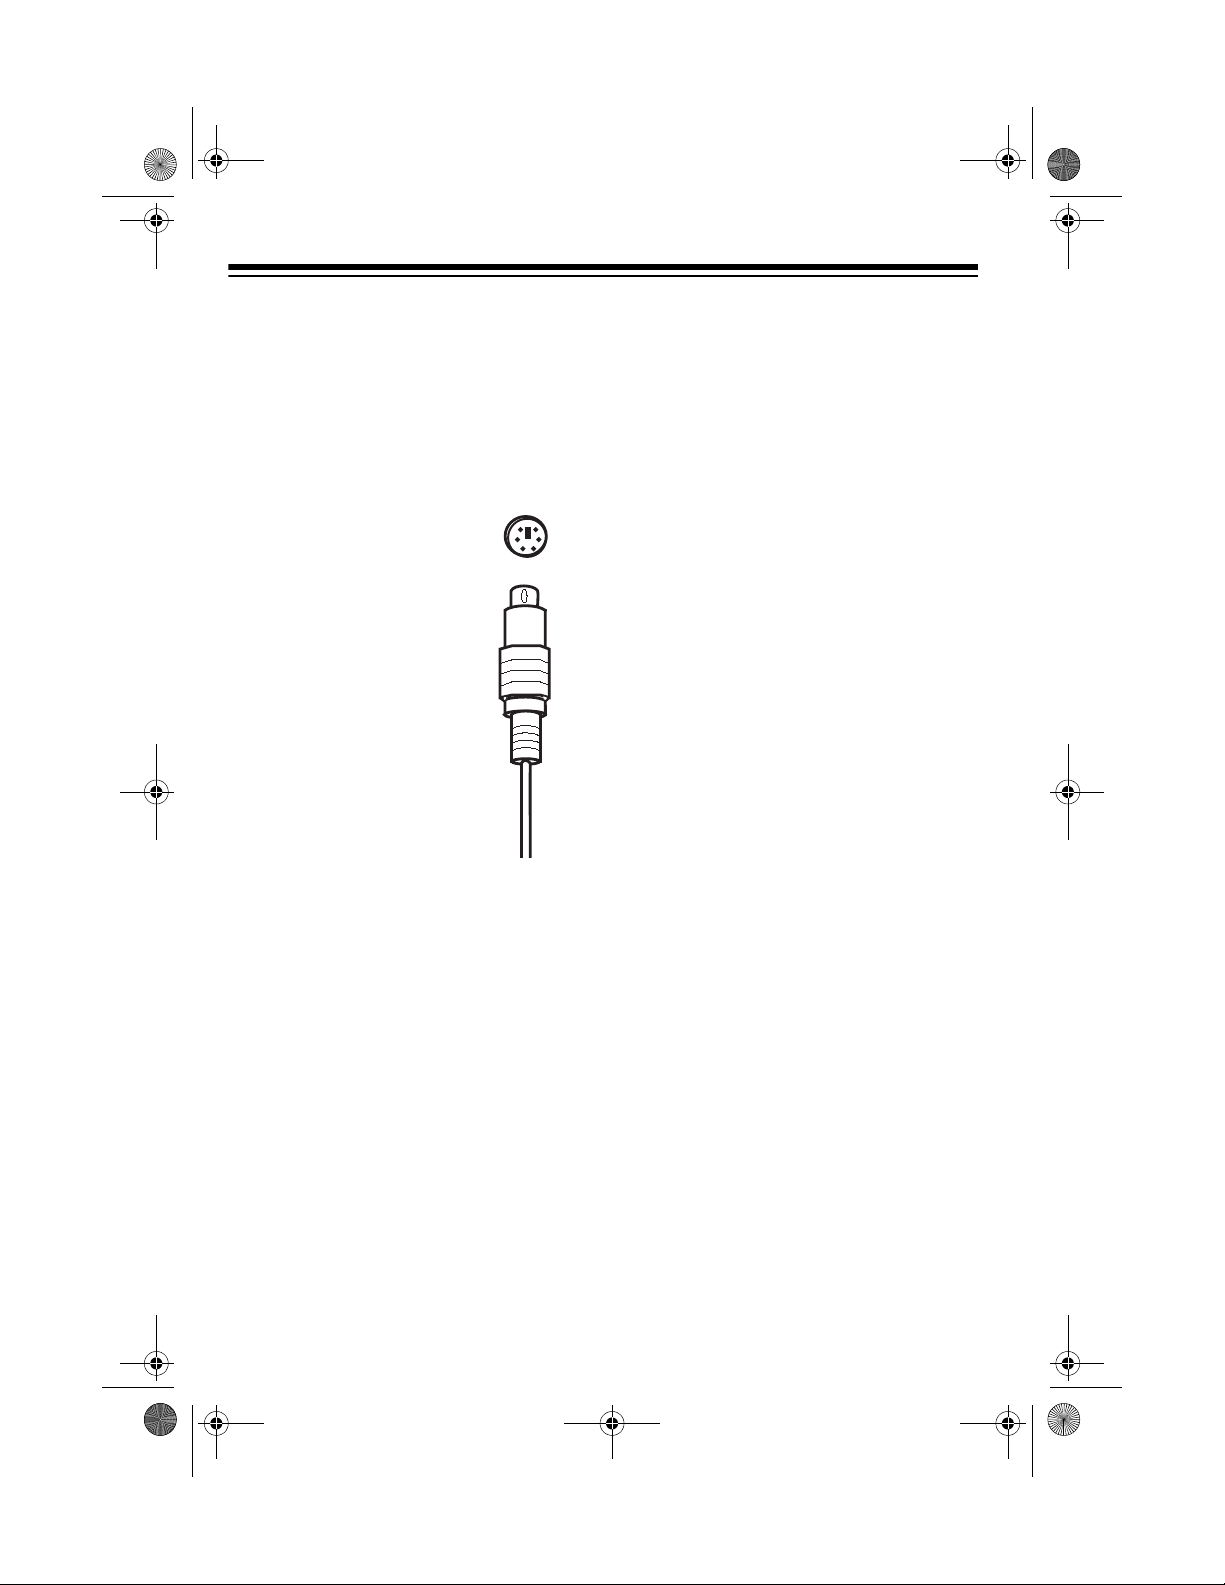
HARDWARE
Caution: Always turn off your computer
before connecting or disconnecting the
Dual Wheel Scroll Trackball Mouse, otherwise you could damage your computer or its PS/2 port.
Disconnect any mouse
you already have connected to the PS/2 port,
then plug the Dual
Wheel Scroll Trackball
Mouse’s 6-pin mini-DIN
plug into the PS/2 mouse
port.
Note: The Dual Wheel
Scroll Trackball Mouse
only works with a PS/2
mouse port. Do not use
the mouse with a serial
port adapter.
SOFTWARE
ple, if the software setup disk is in
drive A, type
4. Click
5. Choose the
6. Click
7. Select the directory where you want
8. Click
9. Restart your computer to complete
OK
window.
Next
to install the software.
Note: The default is set for the C:\
drive. To choose another drive, click
Browse
tory.
Next
the mouse’s driver.
the software installation.
a:\setup.)
.
button in the
PS/2
.
and find the desired direc-
to complete installation of
Setup
Installing in Windows 3.1
1. Insert the provided setup disk into
your computer’s floppy disk drive.
2. Click
, then click
File
Run
.
Caution: Before installing the 4D Scr ollWare, be sure to remove all other
mouse drivers and quit all applications.
Installing in Windows 95/98
1. Insert the provided setup disk into
your computer’s floppy disk drive.
2. Click on
click
Run
3. In the
<drive>:\setup. (For exam-
4
on the task bar, then
Start
.
Run
dialog box, type
3. In the
Run
dialog box, type
<drive>:\setup. (For exam-
ple, if the Dual Wheel Mouse set up
disk is in drive A, type
4. Click on the disk drive where you
want to install the software, then
click
installation.
to complete the software
Next
a:\setup.)
Page 5
26-442.fm Page 5 Friday, March 5, 1999 4:43 PM
Installing in DOS
Note: To ensure a successful DOS in-
stallation, boot up to DOS.
If Windows 3.1 loads automatically at
boot up
with the mouse’s software installation.
If Windows 95/98 loads automatically at
boot up
choose
start the computer in MS-DOS mode?
1. Insert the provided setup disk into
2. At the DOS prompt, type
3. Press
, exit Windows, then proceed
, select
Shut Down
from the task bar,
Start
, and then select
Re-
your computer’s floppy disk drive.
<drive>:\dos\install. (For
example, if the Dual Wheel Mouse
setup disk is in drive A, type
a:\dos\install.)
. A dialog box appears.
Enter
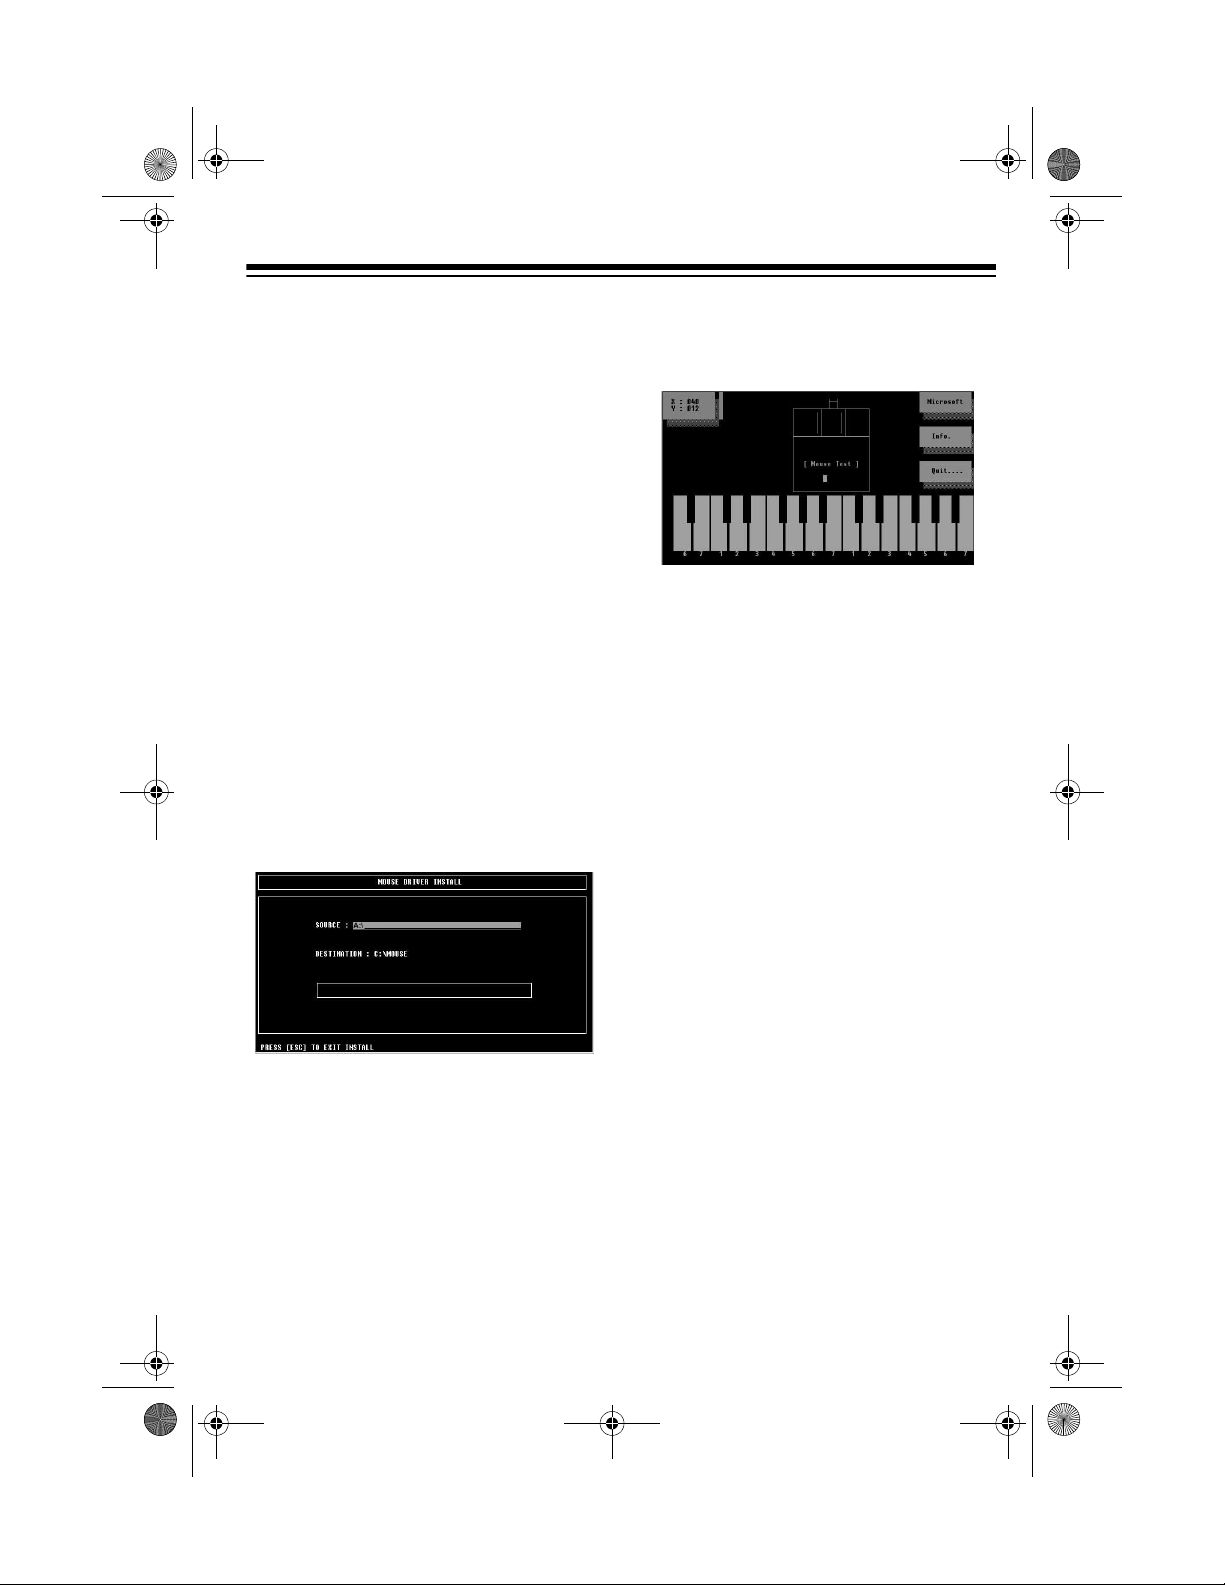
6. Move the cursor to a piano key to
test the mouse’s movement and buttons.
Note: Only the cursor function operates in DOS.
7. After testing the mouse, click
press
line appears,
on your keyboard. A dialog
Q
Do you want to
Quit
or
modify Autoexec.bat? Y/
N?
8. Type Y to edit your computer’s
Autoexec.bat file to include the command
c:\mouse\mouse to load
the mouse driver each time y ou turn
on or restart your computer.
4. In the dialog box, type
A:\DOS
after SOURCE:.
5. Press
twice more to begin the
Enter
mouse driver installation. The
mouse test screen appears.
Or, ty pe
ify the
Autoexec.bat
if you do not want to mod-
N
file.
5
Page 6
26-442.fm Page 6 Friday, March 5, 1999 4:43 PM
OPERATING IN WINDOWS
To launch the mouse’s 4D ScrollWare in
Windows 95/98
tem tray at the bottom right corner of the
computer screen. The
window opens and displays the tabs for
six program control panels.
, click on , in the sys-
Mouse Properties
To launch the mouse’s driver softwar e in
Windows 3.1
. The
V5.21
window opens and displays the tabs for
five program control panels.
Notes:
• The window always opens to the
Buttons
select any other panel by clicking on
its tab.
• After you select all the functions you
want in each control panel, click
at the bottom of the
ties
, click
Dual Wheel Mouse
Dual Wheel Mouse V5.21
control panel, but you can
OK
Mouse Proper-
window to confirm the settings.
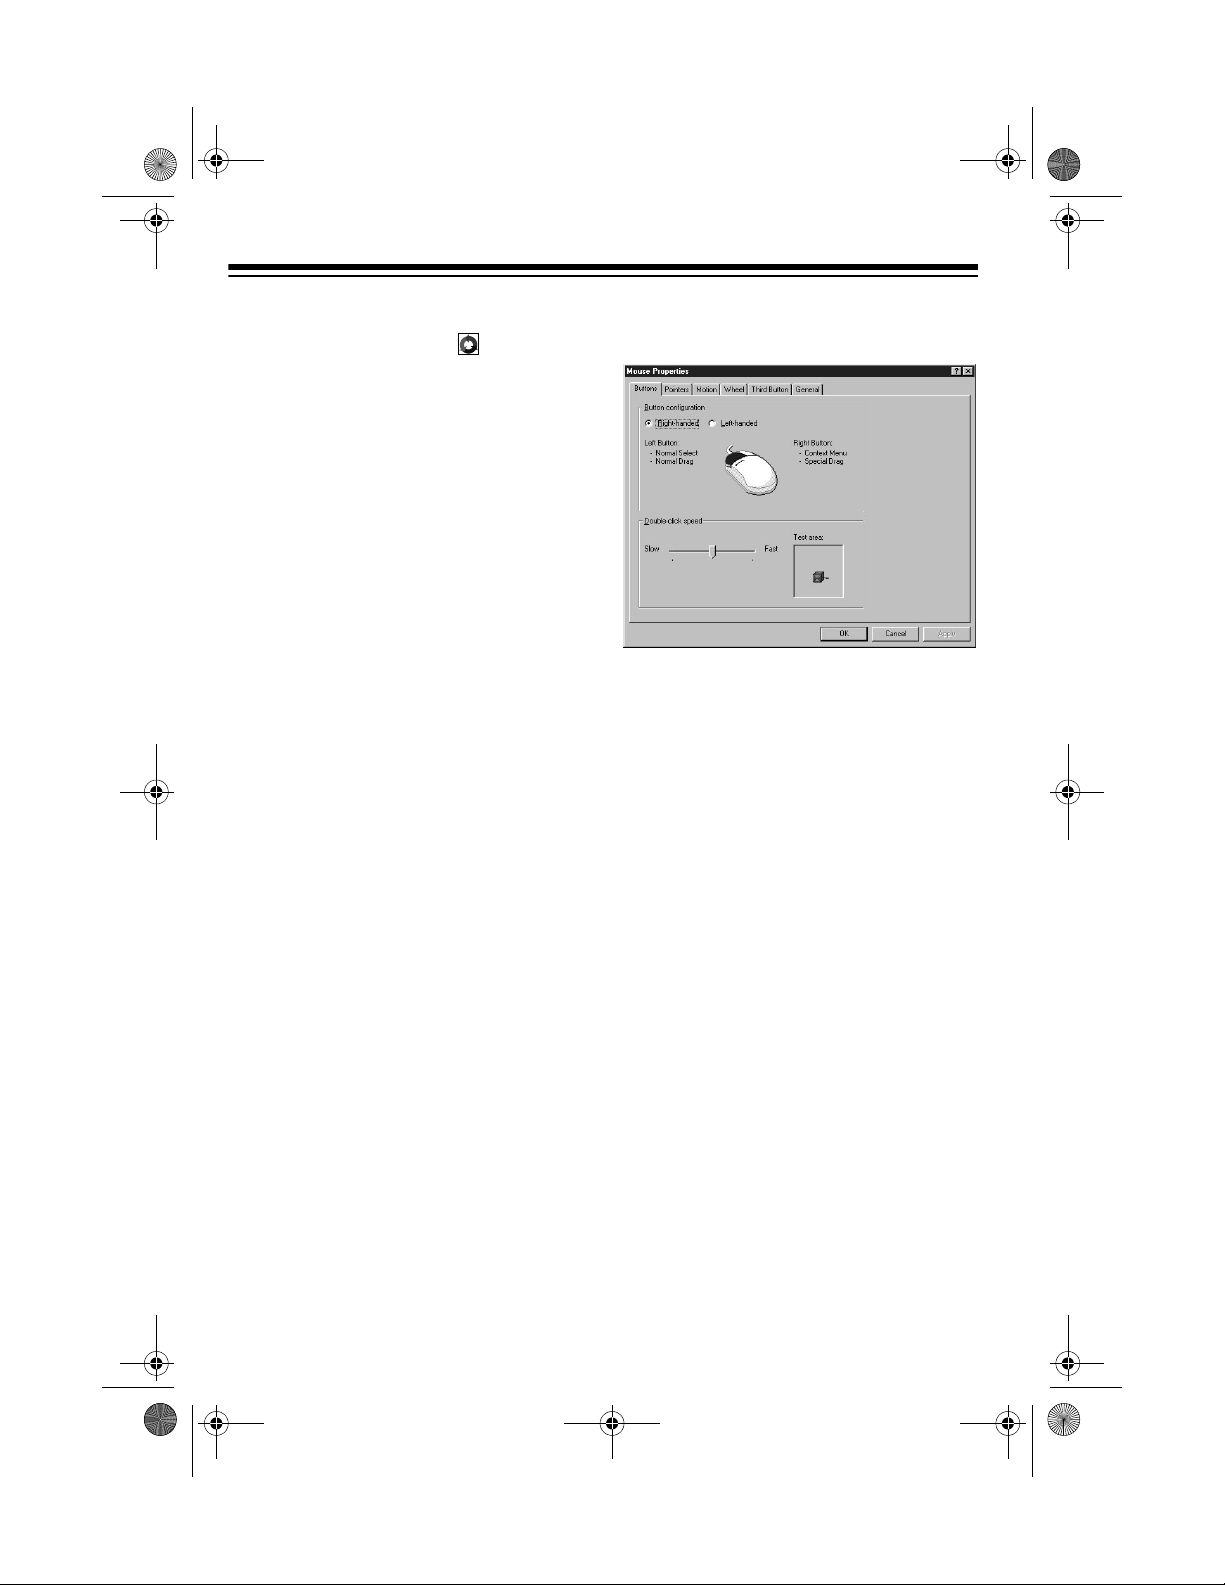
Setting the Right- or LeftHanded Configuration
The mouse’s default is for right-handed
users. To change the mouse configuration to left-handed use, click on
Button
handed
box. The right and left buttons then
switch functions.
To change back to a right-handed configuration, click on
in the
configuration dialog
Right-handed
Left-
.
BUTTONS CONTROL
PANEL
To adjust the right-handed or left-handed mouse button configuration and the
double-click speed, click on
The
Mouse Properties
with the
6
Buttons
control panel on top.
window displays
Buttons
Setting the Double Click Speed
You can adjust how the computer responds to the speed of your mouse’s
double clicks. To increase or decrease
.
the double-click speed, click on the
speed control bar and drag it toward
or toward
Slow
To test the setting, click on the box in
the
Test area
.
Fast
.
Page 7

26-442.fm Page 7 Friday, March 5, 1999 4:43 PM
POINTER CONTROL
PANEL
To change the pointer's appearance,
click on the
Pointer
In Windows 3.1
size and shade of your on-screen pointer.
Under
for the size you want. Under
or
black pointer button, or the gray pointer
button to select the shade you want.
Then click
Pointer Size
,
click on the white pointer button, the
OK
tab.
, you can change the
, click on the button
Pointer Col-
to set the pointer image.
the various icons that can be used. Click
to select the icon. Then click
Open
, followed by OK to set the cursor
As
shape.
Save
MOTION CONTROL
PANEL
You can adjust how fast or slow the
pointer appears to travel across the
screen as you move it, and how long or
short of a trail it creates.
In Windows 95/98
you want your on-screen pointer to appear in different situations.
Note: The
dows 95/98 is an advanced function requiring the installation of programs (not
included) that include pointer image options.
Double-click on the pointer image you
want to change from the
Browse
Pointers
dialog box appears displaying
, you can choose how
Control Panel in Win-
Scheme
list. A
To adjust the pointer speed and trail,
click on the
Motion
tab.
7
Page 8

26-442.fm Page 8 Friday, March 5, 1999 4:43 PM
Setting the Pointer Speed
Click on the
it toward
Slow
Pointer Speed
or
Fast
bar and drag
, as desired.
Setting the Pointer Trail
In Windows 95/98
button and slide it toward
Tra il
toward
Short
In Windows 3.1
slide the control toward
Note: To operate
dows 3.1
, you must first (if necessary)
set the display mode to
, click on the
.
, click
Show trails
Long
Show trails
or
Long
Short
in
.
VGA
Pointer
or
and
.
Win-
WHEEL CONTROL PANEL
You can use the vertical and horizontal
wheels to move the cursor around in
word processing and graphics applications without using your wrist or arm—
just move the wheels up or down, left or
right.
To disable this function, click
cal and Horizontal Wheel
Swap Verti-
again.
Wheel Mode
In Windows 95/98,
advantages of MS-IntelliMouse, plus the
ability to scroll vertically/horizontally in
programs, click on
function mode
.
To use only the MS IntelliMouse vertical
wheel functions, click on
Compatible
mode.
to have all the
Enhanced Dual Wheel
MS-IntelliMouse
Vertical Wheel
Setting Wheel Properties
For more versatility, you can change the
wheels’ properties to fit your needs.
To adjust the settings for the dual scroll
wheels, click on the
To swap the functions of the horizontal
and vertical wheels, click on
cal and Horizontal Wheel
8
Wheel
.
tab.
Swap Verti-
To reverse the vertical scroll direction,
click on
In Windows 95/98
wheel’s scrolling function, click on
able Scrolling Function
Reverse vertical scroll direction
, to disable the vertical
Dis-
.
.
Page 9

26-442.fm Page 9 Friday, March 5, 1999 4:43 PM
Setting the Scrolling Speed
To set the vertical scrolling speed, click
, then or to increase or de-
Scroll
crease the number of lines for each
scroll.
To scroll vertically exactly one page at a
time when you move the vertical wheel,
click on
Scroll one page per scroll unit
.
Horizontal Wheel
To reverse the horizontal scroll direction, click on
rection
In Windows 95/98
Reverse horizontal scroll di-
.
, to disable the hori-
zontal wheel’s scrolling function, click on
Disable Scrolling Function
.
Scrolling
Many applications use a scroll function
to move through menus and text. The
vertical and horizontal wheels make
scrolling easier on your hand and wrist
by letting you move the pointer or cursor
with just your finger tips.
To scroll up, rotate the vertical wheel upward. To scroll down, rotate the vertical
wheel downward.
To scroll left, rotate the horizontal wh eel
upward. To scroll right, rotate the horizontal wheel downward.
THIRD BUTTON CONTROL
PANEL
To use the third button on the mouse to
zoom, use auto scroll, or use other functions, click on the
Third Button
tab.
Horizontal
Wheel
Vertical
Wheel
Zoom
To activate the zoom function, click
, then
Zoom
Click
Settings
on the mouse. A magnified zoom box replaces the cursor. You can move the
small area of magnification anywhere on
the screen to view portions of text or
graphics.
.
Apply
, then click the third button
9
Page 10

26-442.fm Page 10 Friday, March 5, 1999 4:43 PM
You can increase the zoom box proportions by increasing the values in the
Width
and
Height
scroll bars.
Place the cursor on the area you want to
zoom, then press the third button.
Third
Button
To stretch the image vertically, rotate
the vertical wheel upward or downward.
To stretch the image horizontally, rotate
the horizontal wheel upward or downward.
To stop using zoom, click the left or right
mouse button.
Auto Scroll
To have the third button activate the
auto scroll function, click on
The auto scroll direction icon appears.
When using
Auto Scroll
tion that features a scroll bar, the auto
scroll icon ( ) indicates the direction
the document or image is scrolling.
When you use your mouse, the icon automatically changes appearance to indicate the direction the cursor is moving.
Note: The farther you move the mouse
without a pause, the faster the scrolling
speed.
To use the auto scroll function with Office 97 or Internet Explorer 3X/4X
and select
Others
System Default
drop-down menu.
The auto scroll icon appears in the
scrollbar (in MS-Word 97, for example)
or in the cell area (in Excel 97, for example).
Note: For more details, check
or
Internet Explorer 3/4.0
and search for the word “IntelliMouse.”
Auto Scroll
with an applica-
, click
in the
Office 97
on-line help,
.
In Windows 95/98
, to magnify or demagnify text or a graphic in a document,
place the cursor in an application that is
Microsoft Office 97
hold down
Ctrl
compatible. Then
on the keyboard, and rotate the vertical wheel upward or downward to zoom in or out.
10
To cancel
button.
Auto Scroll
, click any mouse
Page 11

26-442.fm Page 11 Friday, March 5, 1999 4:43 PM
Others
If you want to use the third button for
system functions or as a shortcut for a
command, you can assign a function
from the
To select a function, click on
Then select the function from the drop
down menu.
Others
menu.
Others
Using the Third Button
To perform the function you have set in
the third button panel, press the third
button (on the right side of the mouse).
To quit the third button function, press
the left or right mouse button.
GENERAL CONTROL
PANEL
We do not anticipate that you will have
any problems with your Dual Wheel
Scrolling Trackball; however, if the
mouse or cursor stop operating properly, try replacing the mouse driver as described in this section. If that does not
work, take the mouse to your local RadioShack store for assistance.
Caution: Unless you are
about which version mouse driver you
are using, we do not recommend that
you change your mouse driver. If you
select the wrong driver version, the
mouse cursor will not move.
.
Checking the Driver Version
If the mouse does not appear to be operating properly with certain software,
check that software’s user’s manual to
find the recommended mouse driver
version, then check to see which version
you are currently using.
To check which mouse driver version
you are using:
In Windows 95/98,
the mouse icon at the lower right of
the window. After 2 seconds, the mouse
version displays.
In Windows 3.1
Manager list of all software, which
should include Dual Wheel Mouse
V5.21.
In DOS
prompt. The connected mouse port and
the mouse version are displayed.
, type mouse\mouse at the C:\
move your cursor to
, check the Program
very
clear
11
Page 12

26-442.fm Page 12 Friday, March 5, 1999 4:43 PM
Changing the Driver Version
To change the mouse version:
In Windows 95
in the
click
Mouse Properties
Change
pears. Select the compatible mouse
driver version for Windows 95.
In Windows 98
1. From the
bar, go to
trol Panel
, click on the
General
tab
window, then
. A drop-down menu ap-
:
button on the task
Start
Settings
, then
and select
System Properties
Con-
.
7. The window shows the location of
the driver. Click
Next
.
8. Insert the supplied setup disk, then
click
9. In the
under
A:\win9598, then click
10. In the
dialog box, click
11. In the
Properties
.
OK
Copying Files . . .
Copy files from:
dialog box,
, type
.
OK
Update Device Driver Wizard
.
Finish
PS/2 Wheel Mouse V5.21
dialog box, click
Close
The correct mouse version is copied
to the Windows 98 system.
12. Close the
System Properties
windows and other windows opened
during this process.
.
2. Click
Device Manager
3. Double click
Mouse
V5.21 appears.
.
. PS2 Wheel
Mouse
4. Double click PS2 Wheel Mouse
V5.21. Select
then Update
Driver
Driver, then click Next.
5. Choose
ers in a specific location
Display a list of all the driv-
in order to
select the driver you want, then click
.
Next
6. Click
then
Show compatible hardware
.
Next
12
,
Page 13

26-442.fm Page 13 Friday, March 5, 1999 4:43 PM
OPERATING IN DOS
Once you install the Dual Wheel Scroll
Trackball Mouse and the mouse’s driver
software, you can use this mou se in the
DOS environment like you would any
other mouse.
Note: Your mouse’s 4D ScrollWare driver works only in a Windows environment, not in DOS. Only the cursor
movement function works in DOS.
13
Page 14

26-442.fm Page 14 Friday, March 5, 1999 4:43 PM
CARE AND MAINTENANCE
Your RadioShack Dual Wheel Scroll Trackball Mouse is an example of superior design and craftsmanship. The following suggestions will help you care for your mouse
so you can enjoy it for years.
Keep the mouse dry. If it gets wet, wipe it dry immediately. Liquids might
contain minerals that can corrode the electronic circuits.
Use and store the mouse only in normal temperature environments.
Temperature extremes can shorten the life of electronic devices, and
distort or melt plastic parts.
Keep the mouse away from dust and dirt, which can cause premature
wear of parts.
Handle the mouse gently and carefully. Dropping it can damage circuit
boards and cases and can cause the mouse to work improperly.
Wipe the mouse with a damp cloth occasionally to keep it looking new.
Do not use harsh chemic als, cleaning solvents , or strong deterge nts to
clean the mouse.
Modifying or tampering with the mouse’s internal components can cause a malfunction and might invalidate its warranty. If your mouse is not performing as it should,
take it to your local RadioShack store for assistance.
14
Page 15

26-442.fm Page 15 Friday, March 5, 1999 4:43 PM
CLEANING THE
TRACKBALL
The mouse might pick up some dust or
lint after prolonged use. If the cursor is
not moving smoothly on the sc reen, follow these steps to clean the trackball
and its housing.
1. Shut down and turn off your computer.
2. Insert a pointed object (such as a
straightened paper clip) into the dot
on the ball cap and turn the cap
counterclockwise about
detach it.
1
/4 inch to
5. Blow gently into the ball housing to
remove any dust or lint that might
have collected there.
6. Replace the trackball.
7. Align the tabs on the cap with the
holes on the ball housing, then turn
the cap clockwise to secure it.
3. Remove the trackball, as shown.
4. Use a soft dry cloth to wipe the ball.
Note: Never use cleaning fluid, sol-
vents, a tissue, or anything that
might leave lint.
15
Page 16

26-442.fm Page 16 Friday, March 5, 1999 4:43 PM
THE FCC WANTS YOU TO KNOW
This equipment has been tested and
found to comply with the limits for a
Class B digital device, pursuant to Part
15 of the
FCC Rules
. These limits are
designed to provide reasonable protection against harmful interference in a
residential installation. This equipment
generates, uses and can radiate radio
frequency energy and, if not installed
and used in accordance with the instructions, may cause harmful interference to
radio communications.
However, there is no guarantee that interference will not occur in a particular
installation. If this equipment does
cause harmful interference to radio or
television reception, which can be de te rmined by turning the equipment off and
on, the user is encouraged to try to correct the interference by one or more of
the following measures:
• Reorient or relocate the receiving
antenna.
DECLARATION OF
CONFORMITY
This device complies with Part 15 of the
FCC Rules
following two conditions: (1) this device
may not cause harmful interfer en ce, an d
(2) this device must accept any interference received, including interference
that may cause undesired operation.
Responsible Party: RadioShack
. Operation is subject to the
Product: Trackball Mouse
Model: 26-442
100 Throckmorton
Fort Worth, TX 76102
Phone: 817-415-3200
• Increase the separation between
the equipment and receiver.
• Connect the equipment into an outlet on a circuit different from that to
which the receiver is connected.
• Consult your local RadioShack store
or an experienced radio/TV technician for help.
Changes or modifications not expressly
approved by RadioShack may cause interference and void the user’s authority
to operate the equipment.
16
Page 17

26-442.fm Page 17 Friday, March 5, 1999 4:43 PM
NOTES
17
Page 18

26-442.fm Page 18 Friday, March 5, 1999 4:43 PM
18
Page 19

26-442.fm Page 19 Friday, March 5, 1999 4:43 PM
19
Page 20

26-442.fm Page 20 Friday, March 5, 1999 4:43 PM
Limited Ninety-Day Warranty
This product is warranted by RadioShack against manufacturing defects in material and workmanship under normal use for ninety (90) days from the date of purchase from RadioShack companyowned stores and authorized RadioShack franchisees and dealers. EXCEPT AS PROVIDED
HEREIN, RadioShack MAKES NO EXPRESS WARRANTIES AND ANY IMPLIED WARRANTIES,
INCLUDING THOSE OF MERCHANTABILITY AND FITNESS FOR A PARTICULAR PURPOSE,
ARE LIMITED IN DURATION TO THE DURATION OF THE WRITTEN LIMITED WARRANTIES
CONTAINED HEREIN. EXCEPT AS PROVIDED HEREIN, RadioShack SHALL HAVE NO LIABILITY OR RESPONSIBILITY TO CUSTOMER OR ANY OTHER PERSON OR ENTITY WITH RESPECT TO ANY LIABILITY, LOSS OR DAMAGE CAUSED DIRECTLY OR INDIRECTLY BY USE
OR PERFORMANCE OF THE PRODUCT OR ARISING OUT OF ANY BREACH OF THIS WARRANTY, INCLUDING, BUT NOT LIMITED TO, ANY DAMAGES RESULTING FROM INCONVENIENCE, LOSS OF TIME, DATA, PROPERTY, REVENUE, OR PROFIT OR ANY INDIRECT,
SPECIAL, INCIDENTAL, OR CONSEQUENTIAL DAMAGES, EVEN IF RadioShack HAS BEEN ADVISED OF THE POSSIBILITY OF SUCH DAMAGES.
Some states do not allow the limitatio ns on how long an implied warranty lasts or the exclusion of incidental or consequential damages, so the above limitations or exclusions may not apply to you.
In the event of a product defect during the warranty period, take the product and the RadioShack
sales receipt as proof of purchase date to any RadioShack store. RadioShack will, at its option, unless otherwise provided by law: (a) correct the defect by product repair without charge for parts and
labor; (b) replace the product with one of the same or similar design; or (c) refund the purchase
price. All replaced parts and products, and products on which a refund is made, become the property of RadioShack. New or reconditioned parts and products may be used in the performance of
warranty service. Repaired or replaced parts and products are warranted for the remainder of the
original warranty period. You will be charged for repair or replacement of the product made after the
expiration of the warranty period.
This warranty does not cover : (a) damage or failure caused by or attributable to acts of God, abuse,
accident, misuse, improper or abnormal usage, failure to follow instructions, improper installation or
maintenance, alteration, lightning or other incidence of excess voltage or current; (b) any repairs
other than those provided by a RadioShack Authorized Service Facility; (c) consumables such as
fuses or batteries; (d) cosmetic damage; (e) transportation, shipping or insurance costs; or (f) costs
of product removal, installation, set-up service adjustment or reinstallation.
This warranty gives you specific legal rights, and you may also have other rights which var y from
state to state.
RadioShack Customer Relations, Dept. W, 100 Throckmorton St., Suite 600, Fort Worth, TX 76102
We Service What We Sell
3/97
RadioShack
A Division of Tandy Corporation
Fort Worth, Texas 76102
03A99 Printed in Hong Kong
 Loading...