

Radio Shack 15-1975 Owner's Manual
working.fm Page 1 Tuesday, July 13, 1999 12:39 PM
Cat. No. 15-1975
OWNER’S MANUAL
Please read before using this equipment.
Audio/Video
Home Network

working.fm Page 2 Tuesday, July 13, 1999 12:39 PM
INTRODUCTION
Your RCA Audio/Video Home Network delivers cle ar stereo sound a nd
sharp color video images up to 500
feet away from the A/V source. Because it transmit s at a low frequency
(30 MHz), your Home Network can
share the same phone l ines as voice
and data signals, so you can still use
your phone, fax, or modem while you
enjoy broadcast, recorded, or satellite
programming on a TV anywhere in
your home!
Just connect the Home Network’s
transmitter to AC power, a phone line,
and an audio or vid eo source, and its
receiver to AC power, a phone line,
and a remote TV, audio receiver, or
powered speakers. When y ou tur n on
the components you connected, the
transmitter sends the signals from the
source to the receiver, so you can:
• watch VCR or DVD movies on
any TV in your home without r unning costly cable, moving your
VCR, or buying another one
• watch cable or satellite programming on any TV in your home
• listen to stereo music on powered
speakers inside or outside your
home
• receive computer images and
sound on a remot e TV ( add iti on al
equipment required)
• monitor your sl eeping baby, playing children, or sick family members, or see who i s outside your
door on your TV using a camcorder or miniatur e security ca mera
With additional equipment (not supplied), you can even use the Home
Network to show presentations from a
desktop or laptop compute r on a TV
screen or view TV program ming on a
computer’s monitor.
Your Home Network comes with an
infrared (IR) remote control emitter
that allows you to use an audio or video source’s remote c ontrol to control
the device from another room , even if
the device is not within line-of-sight of
the Home Network transmitter.
This equipment complies with
Note:
the limits for a Class A digital device
as specified in Part 15 of
FCC Rules.
These limits prov ide reasonable protection against radio and TV interference as long as you use the
equipment in a commerc ial area. The
equipment produces radio frequency
energy and can cause radio and TV
interference. If you use the equipment
in a residential area, you must correct
any interference problem at your own
expense.
RadioShack is a registered trademark used by Tandy Corporation.
2
©
1999 Tandy Corporation.
All Rights Reserved.

working.fm Page 3 Tuesday, July 13, 1999 12:39 PM
We have designed your Home Network to conform to federal regulations, and you ca n connect it to most
telephone lines. However, each device (such as a telephon e or answ ering machine) that you connec t to the
telephone line draws power from the
telephone line. We refer t o t his powe r
draw as the device’s ringer equivalence number, or REN. The REN is
on the bottom of your transm itter and
receiver.
If you use more than one phone or
other device on the line, add up all of
the RENs. If the total is more than five
(or three in rural areas), your telephones might not ring. If ringer operation is
impaired, remove a device from the
line.
Your Home Network complies with
Part 68 of
FCC Rules
. You must,
upon
request, provide the FCC regis tration
number and the REN to your telephone company. Both numbers are
on the bottom of th e transmitter and
receiver.
You must not connect your
Note:
Home Network to:
• coin-operated systems
• party-line systems
Your Home Network i s ETL listed to
UL standards and meets all applicable FCC standards.
WARNING:
shock hazard, do not expose this product to
rain or moisture.
CAUTION:
OF ELECTRIC SHOCK, DO NOT
REMOVE COVER OR BACK. NO USERSERVICEABLE PARTS INSIDE. REFER
SERVICING TO QUALIFIED PERSONNEL.
!
To reduce the risk of fire or
CAUTION
RISK OF ELECTRIC
SHOCK. DO NOT OPEN.
TO REDUCE THE RISK
This symbol is intended to alert
you to the presence of uninsulated dangerous voltage within
the product’s enclosure that
might be of sufficient magnitude
to constitute a risk of electric
shock. Do not open the product’s case.
This symbol is intended to inform you that important operating and maintenance
instructions are included in the
literature accompanying this
product.
!
For residential use only. Manufactured and sold under license fr om Inline Connection Corporation.
• most electronic key telephone
systems
•PBXs
3
working.fm Page 4 Tuesday, July 13, 1999 12:39 PM
A LOOK AT YOUR HOME NETWORK
The Audio/Video Home Network includes these items . Be su re yo u hav e
them all before you discard the box
and begin installation.
One Transmitter —
sends audio/video (A/V) signals from an A/V source
through the Home Network receiver
to a remote TV or audio receiver, and
relays remote control signals from the
Home Network receiver to the A/V
source
You can send A/V sig nals fr om
Note:
any of these sources:
•
— CD player, stereo
Audio
receiver or cassette deck
•
— VCR, cable TV, laser
Video
disc player, DVD, camcorder,
security camera, computer or satellite system
One Receiver
— relays A/V signals
from the Home Network transmitter to
the remote TV or au dio receiver, an d
sends remote control signals through
the transmitter to the A/V source
Two Power Adapters
— provide 15V
DC power to the transmitter and receiver
One Infrared Emitt er
— connects to
the transmitter and sends i nfrared remote control signals from the receive r
to A/V sources which are not within
“line-of-sight” of the transmitter
Two Phone Wires
— connect Home
Network units to your phone jacks
You need one or more AV cables
(available at your local RadioShack
store) to connect your Home Network. Refer to the instr uctions under
“Installation” on page 5 for the connection you need to make.
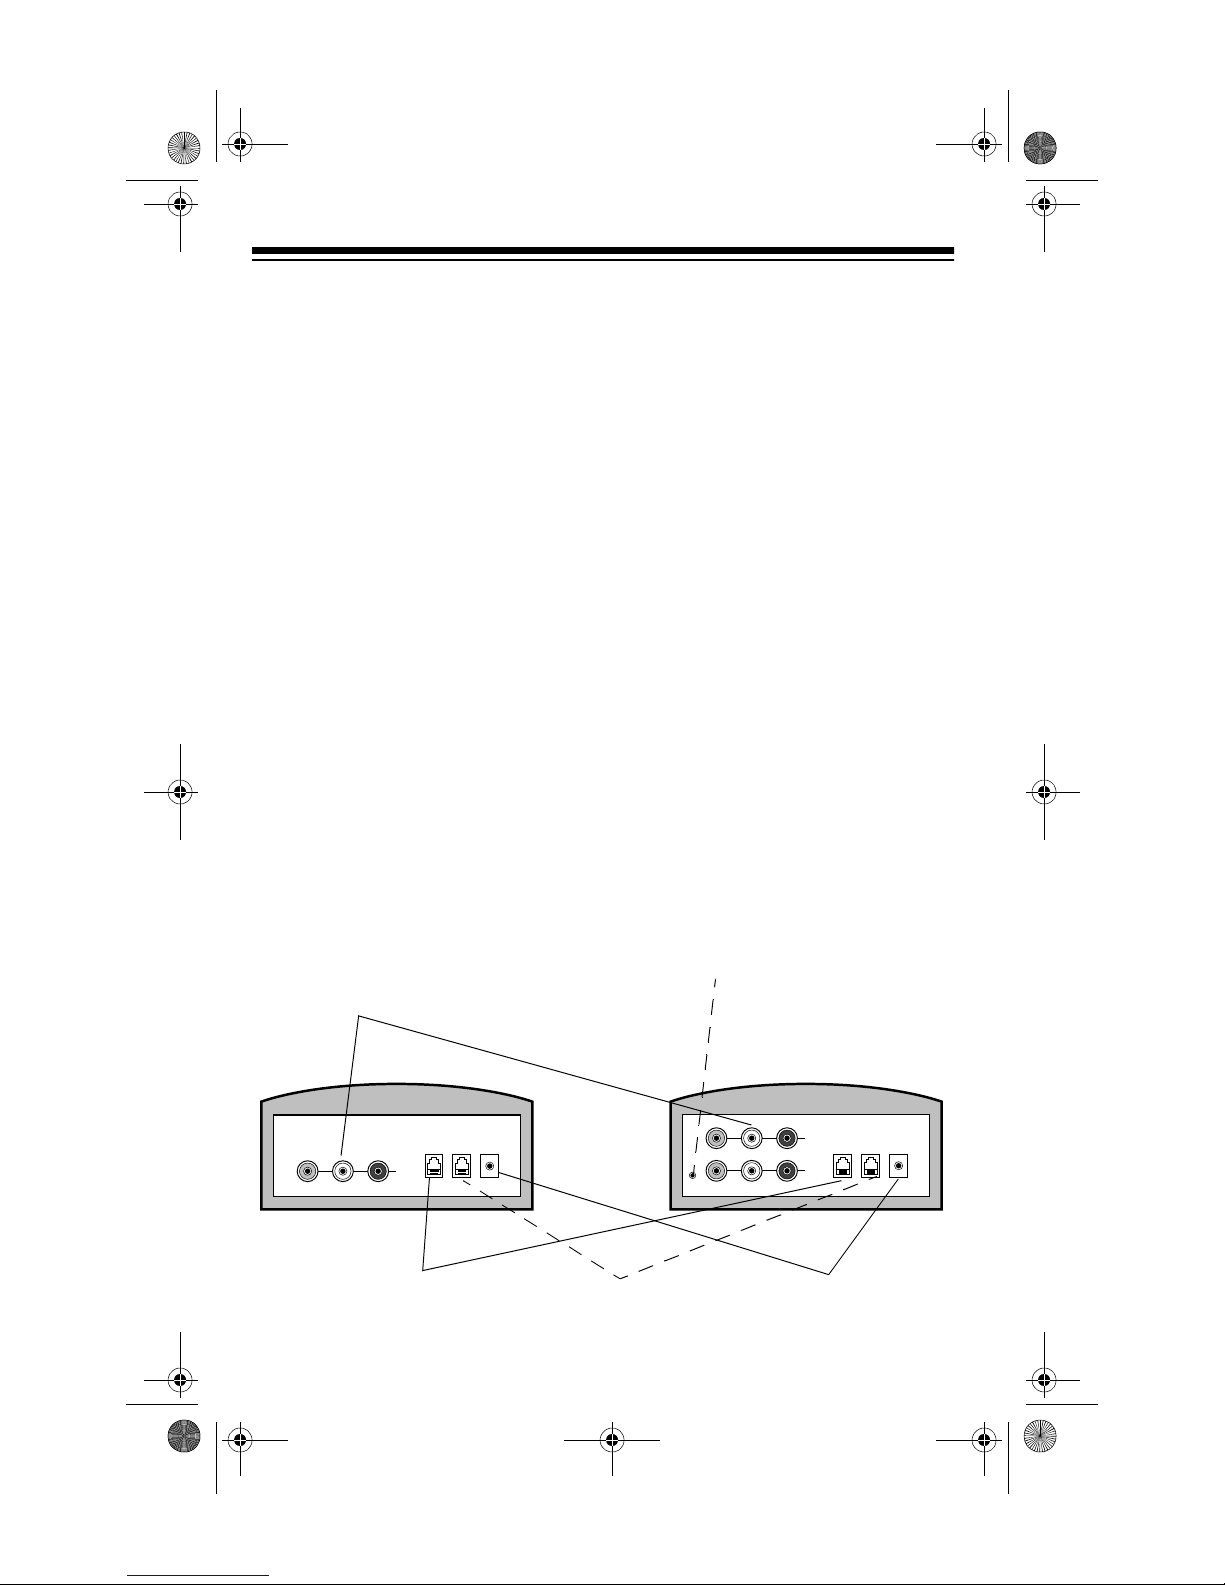
Audio/Video Jacks
— stereo
left and right jac ks and a single video jack to conn ect your
A/V components
PHONEINLINE
DC15V
OUT
300mA
VIDEO
Phone In
OUT
Left – AUDIO – Right
— connect
a telephone, fax, or
modem
4
IR
emitter
Line Out
— connect
to a modular phone
line jack
— connect the IR
OUT
PHONEINLINE
VIDEOIR
IN
Left – AUDIO – Right
DC 15V 300mA
connect the supplied
AC adapter
DC15V
OUT
300mA
—

working.fm Page 5 Tuesday, July 13, 1999 12:39 PM
INSTALLATION
For detailed installation instructions,
see “Connecting the Transmitter,”
“Connecting the IR Emitter” on
page 10, and “Connecting the Receiver” on page 10.
It’s this simple:
1. Connect the Home Network
transmitter to an audio/video
source, a phone ja ck, and an AC
outlet.
2. If desired, connect the IR emi tter
to the transmitter.
3. Connect the Home Network
receiver to the TV, computer, or
powered speakers in the remote
viewing or listening location, a
phone jack and an AC outlet.
4. Turn on the devices you connected to the transmitter and
receiver, and enjoy clear audio/
video at the remote location!
Important:
• The Home Network is designed
to connect direct ly to a TV’s linelevel outputs. If you want to connect it to an older
TV that has a
screw-on, coaxial “F” connector
(which allows VCR and cable
programming to be viewed on
channel 3 or 4), you need a video
RF modulator (available at your
local RadioShack store).
CONNECTING THE
TRANSMITTER
Refer to the illustrations of the connection you plan to use :
• “To Transmit Audio/Video from a
VCR” on page 7
• “To Transmit Audio/Video from a
Cable TV Hookup” on page 7
• “To Transmit Audio/Video from a
Satellite Receiver, DVD, or Laserdisc” on page8
• Home Network is not co mpatible
with Key Service Unit (KSU)
tiline phone systems
• If you have
line:
Many homes have more
than one incoming phone line.
Two common configurations are:
(1) separate lines on separate
jacks, each bearing a unique
number, or (2) two to three lines
wired into a single RJ11 jack. If
each line is separate, connect
both the transmitter and r eceiver
to the same line. If you have a
mixture of standard and RJ11
jacks, you mu st connect b oth the
transmitter and receiver to line 1.
more than 1 phone
mul-
.
• “To Transmit Audio/Video from a
Camcorder” on page 8
• “To Transmit Audio/Video from an
A/V Receiver” on page 9
• “To Transmit Audio from a Stereo
Receiver” on page 9
• “To Transmit Audio from a CD
Player or Cassette Deck” on
page 9
5

working.fm Page 6 Tuesday, July 13, 1999 12:39 PM
1. Connect an A/V cable from the
transmitter’s A/V jacks to the A/V
jacks on the bac k of your audio/
video source labeled LINE OUT,
A/V, or A/V OUT. Be sure the yellow, red and white plugs match
the yellow, red and white jacks on
both the audio/video source and
the transmitter.
Notes:
• If your
verter box
VCR or cable con-
has only one output
for audio (mono sound only),
connect the white plug to that
single audio outpu t and to the
transmitter’s
• If your A/V source
AUDIO LEFT
(VCR, satel-
jack.
lite receiver, DVD, or laserdisc
player)
has only one se t of A /V
output jacks and you want to
use it with a nearby TV, connect a coaxial cable (available
at your local RadioShack
store) from the OUT port on
your A/V source to the VHF/
UHF IN port on your TV. To
view cable transmissions on
that TV, connect your incomi ng
cable TV source to the IN port
on your A/V source.
to the Home Network receiver
at the remote site (see “Connecting Remote Speakers” on
page 13).
• The yellow video plug is not
used with
audio components
such as CD players, stereo
receivers or cassette decks.
• To tra nsmit audio/video from a
component connected to an
V receiver,
select that compo-
A/
nent to be the A/V receiver’s
output. Refer to your A/V
receiver’s manual for instructions.
2. Plug one end of the supplied
modular phone cord into the
transmitter’s
LINE OUT
jack and
the other end into a modular
phone line jack.
You can use the transmit-
Note:
PHONE IN
ter’s
jack to connect a
telephone, modem or fax.
3. Plug one end of the supplie d AC
adapter into the back of the transmitter and the other end into a
standard AC outlet. The power
indicator on the face of the transmitter lights.
•With some
might need to use the camcorder’s supplied adapter
patch cord.
• You can connect the Home
Network to your stereo
receiver to enjoy sound fr om a
CD player, cassette deck , or
. If you do this, you mu st
radio
also connect either powered
speakers or another amplifier
6
camcorders
, you
The other light-emitting
Note:
diodes (LEDs) on the transmitter’s face transmit infrared (IR)
signals to A/V source components. They never light.
 Loading...