

Page 1
14-518.fm Page 1 Tuesday, October 10, 2000 11:31 AM
AM/FM/CD/Cassette Portable
Owner’s Manual
Please read before using this equipment.
Page 2
14-518.fm Page 2 Tuesday, October 10, 2000 11:31 AM
ˆ
Features
Your RadioShack AM/FM/CD/Cassette Portable is an all-in-one music system with a
AM/FM stereo radio, a cassette recorder,
and a top-loading CD player. It is small and
portable so you can take it anywhere, indoors or out. Anywhere you go, at work or
play, you can listen to the radio, prerecorded
cassette tapes, or compact discs.
1
Dual 3
stereo sound.
Programmed Play —
system to pla y up to 16 tracks in any or der
you choose, and even program the same
track to play more than once.
Tone Control —
tween high and low tones.
Headphone Jack —
of headphones or stereo earphones for private listening.
Automatic Stop —
tape-handling parts by automatically stopping the tape when it reaches the end.
Dual-Source Recording —
from the CD player or radio.
Automatic Level Control —
adjusts the recording level.
Automatic Search Music System —
you quickly locate and play any track on a
CD.
Repeat Play —
a single track, all trac ks on a C D, or a n en tire
programmed sequence of tracks.
Two Power Options —
dard AC power (with the supplied AC power
/2-inch Speakers —
lets you program the
lets you set the balance be-
lets you connect a pair
protects the tape and
lets you continuously repeat
you can use stan-
provide quality
lets you record
automatically
lets
cord) or internal batteries (not supplied) to
power the player.
Important:
and prerecorded tapes is copyrighted. Unauthorized duplication of copyrighted material
is a violation of the copyright laws of most
countries and such duplication may result in
fines and/or imprisonment. Note, however,
that in the United States, it is not a violation
of U.S. copyright laws for a consumer to use
musical recordings for noncommercial (personal) use.
CDs that can be played on this CD player
have this mark on them:
The CD player’s advanced technology
makes it simple to operate. But, be sure you
read this Owner's Manual completely so you
can take advantage of all its advanced features.
This CD player is made and tested to meet
exacting safety standards. It meets FCC requirements and complies with safety performance standards of the U.S. Department of
Health and Human Services.
Warnings:
• This CD player employs a laser light
• The use of contro ls , a dj ust me nts , or pro-
Most material on compact discs
beam. Only a qualified service person
should remove the cover or attempt to
service this device, due to possible eye
injury.
cedures other than those specified
©
2000 RadioShack Corporation.
RadioShack and RadioShack.com are trademarks used by RadioShack Corporation.
2
All Rights Reserved.
Features
Page 3
14-518.fm Page 3 Tuesday, October 10, 2000 11:31 AM
herein might result in hazardous radiation exposure.
WARNING:
shock hazard, do not expose this product to rain
or moisture.
CAUTION:
ELECTRIC SHOCK, DO NOT REMOVE
COVER OR BACK. NO USER-SERVICEABLE PARTS INSIDE. REFER SERVICING
TO QUALIFIED PERSONNEL.
!
To reduce the risk of fire or
CAUTION
RISK OF ELECTRIC SHOCK.
DO NOT OPEN.
TO REDUCE THE RISK OF
This symbol is intended to alert
you to the presence of uninsulated dangerous voltage within
the product’s enclosure that might
be of sufficient magnitude to constitute a risk of electric shock. Do
not open the product’s case.
This symbol is intended to inform
you that important operating and
maintenance instructions are
included in the literature accompanying this product.
!
THE FCC WANTS YOU TO
KNOW
This equipment complies with the limits for a
Class B digital device as specified in Part 15
of
FCC Rules
able protection against radio and TV interference in a residential area. However, your
equipment might cause TV or radio interference even when it is operating properly. To
eliminate interference, you can try one or
more of the following cor rective meas ures:
• reorient or relocate the receiving
antenna
• increase the distance between the
equipment and the radio or TV
• use outlets on different electrical circuits
for the equipment and the radio or TV
Consult your local RadioShack store if the
problem still exists.
. These limits provide reason-
ˆ
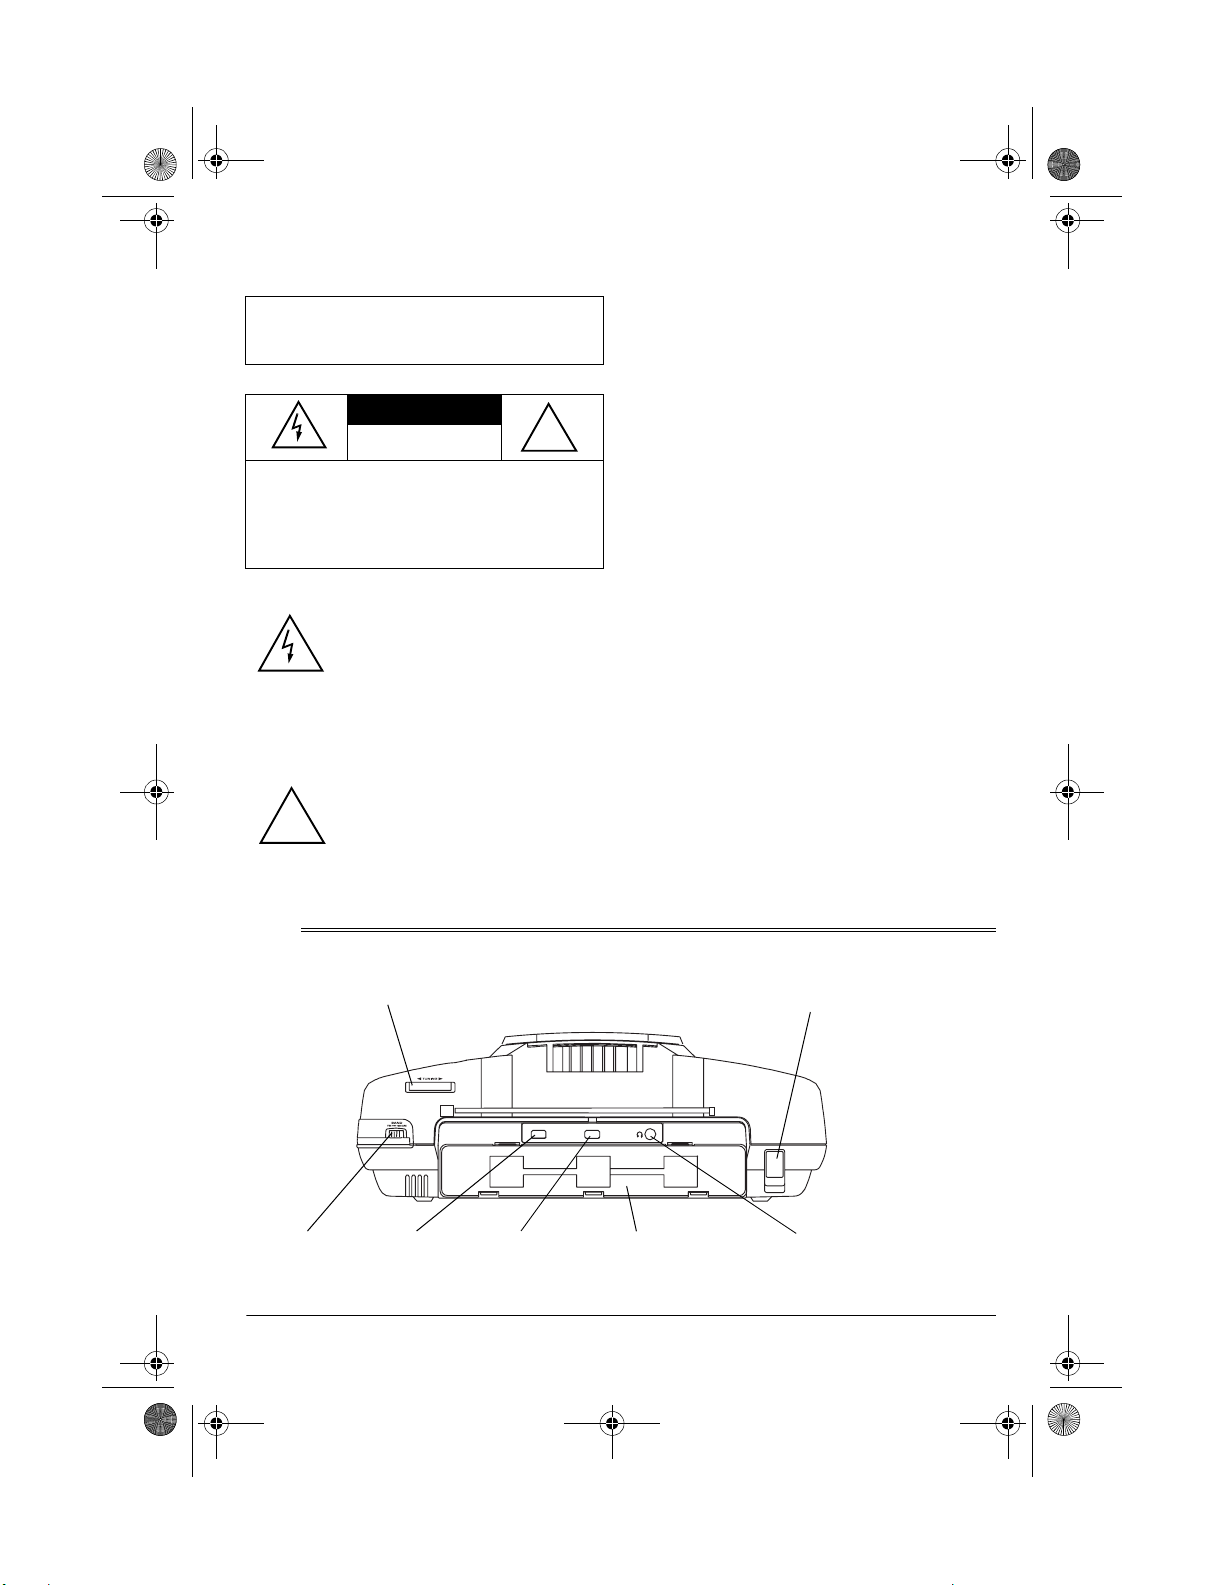
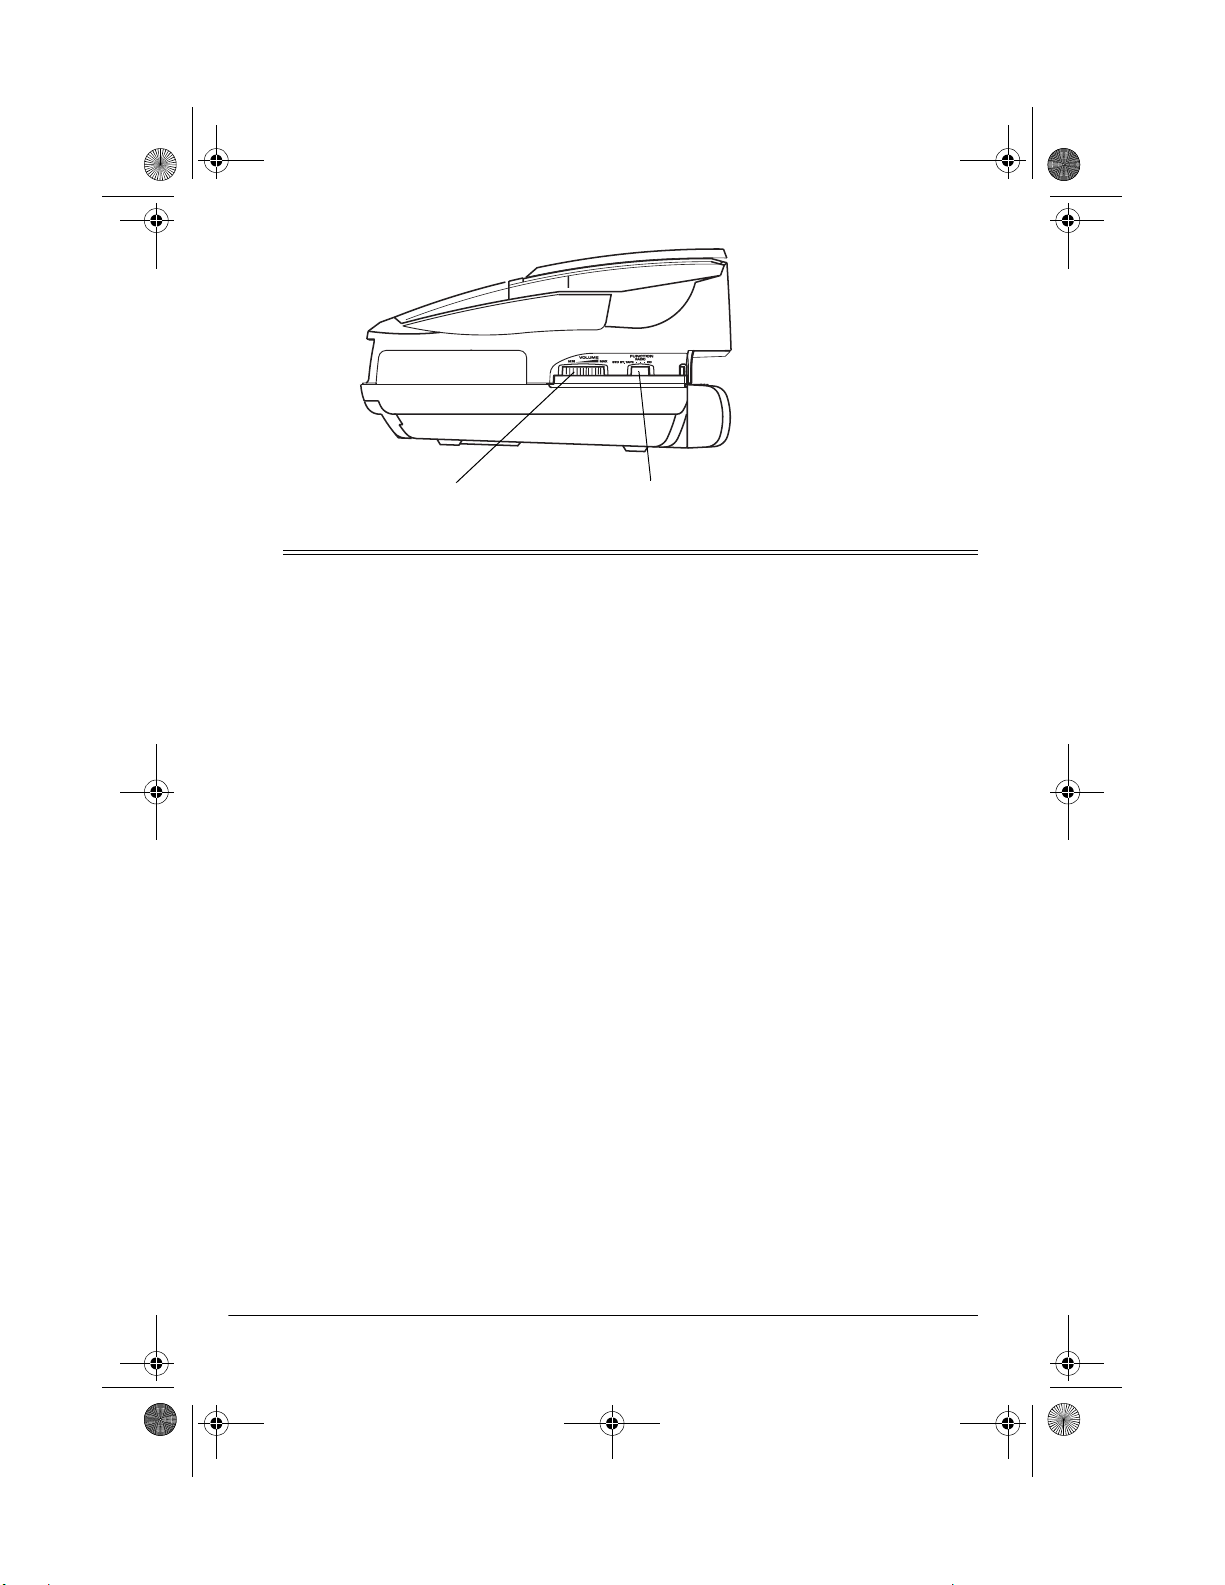
A Quick Look at Your System
TUNING
BAND TONE
FM MONO
BEAT CUT/
FM STEREO
A Quick Look at Your System
Battery
Compartment
AC Jack
Headphone
Jack
3
Page 4
14-518.fm Page 4 Tuesday, October 10, 2000 11:31 AM
VOLUME
ˆ
Preparation
CONNECTING POWER
You can power your system from either of
these sources:
• standard AC power, using the supplied
AC power cord
• internal battery powe r, us ing ei gh t C bat teries (not supplied)
CONNECTING AC POWER
Plug the supplied AC power cord into the AC
jack on the back of the system, then plug the
other end into a standard AC outlet.
Cautions:
• Always connect the AC power cord to
• Both ends of your system's power cord
the system before you connect it to AC
power. When you finish, disconnect the
power cord from AC power before you
disconnect it from the system.
are designed to fit only one way. If you
have difficulty connecting the power
cord to the AC jack or the plug into the
outlet, do not force it! Turn the power
cord and try again.
FUNCTION
Connecting the power cord to the system automatically discon nec ts the int ernal batteries.
INSTALLING BATTERIES
You can power your system with eight C batteries. For the best performance and longest
life, we recommend RadioShack alkaline
batteries.
Cautions:
• Use only f resh batteries of the required
size and recommended type.
• Do not mix old and new batteries, different types of batteries (standard, alkaline, or rechargeable), or rechargeable
batteries of different capacities.
Follow these steps to install batteries into the
system.
1. Press down the tabs on the battery compartment cover, and pull the cover to
remove it.
2. Place the batteries in the compartment
as indicated by the polarity symbols (+
and –) marked outside the compartment.
4
Preparation
Page 5

14-518.fm Page 5 Tuesday, October 10, 2000 11:31 AM
3. Replace th e cover.
When your system 's sound weakens or distorts, replace the batteries.
Cautions:
• Dispose of old batteries promptly and
properly. Do not burn or bury them.
• If you do not plan to use the system with
batteries for a month or more, or if you
plan to use only AC power, remove the
batteries. Batteries can leak chemicals
that can destroy electronic parts.
USING HEADPHONES/
EARPHONES
For private listening, you can connect stereo
headphones (not supplied) or an earphone
with a 1/8-inch (3.5-mm) plug into the .jack.
Your local RadioShack store carries a wide
selection of stereo headphones and earphones.
Note:
Connecting headphones or an earphone automatically disconnects the built-in
speaker.
Listening Safely
To protect your hearing, follow these guidelines when you use headphones or earphones.
• Set the volume to the lowest setting
before you begin listening. After you
begin listening, adjust the volume to a
comfortable level.
• Do not listen at extremely high volume
levels. Extended high-volume listening
can lead to permanent hearing loss.
• Once you set the volume, do not
increase it. Over time, your ears adapt
to the volume level, so a volume level
that does not cause discomfort might
still damage your hearing.
USING THE CARRYING
HANDLE
For easy carrying, pull out the portable handle under the cassette deck. When you finish, replace it.
ˆ
Radio Operation
FUNCTION
1. Set
2. Slide
3. Adjust
BAND
BEAT CUT/FM STEREO
FM stereo sound or to
monaural sound. When
CUT/FM STEREO
the FM ST./PROG indicator lights.
TUNING
Notes:
• For the best FM reception, fully
extend the telescoping antenna and
RADIO
to
to AM or FM. Set
to the desired station.
.
FM STEREO
to
FM MONO BEAT
is set to
FM MONO
FM STEREO
FM MONO
for
for
Radio Operation
,
swivel it to the position that produces
the best reception. For the best AM
reception, rotate the system to position the built-in AM antenna.
• If FM stereo reception gets weak
FM MONO BEAT CUT/FM STE-
while
REO
is set to
MONO BEAT CUT/FM STEREO
MONO
. The sound is no longer in ste-
reo, but reception should improve.
4. Adjust
VOLUME
FM STEREO
to a comfortable level.
, set
to
FM
FM
5
Page 6

14-518.fm Page 6 Tuesday, October 10, 2000 11:31 AM
5. Slide
ˆ
TONE
treble sounds or to
the bass sounds.
CD Player Operation
to
HIGH
to emphasize the
LOW
to emphasize
LOADING AND PLAYING A
CD
FUNCTION
1. Set
display, then
2. Open the CD door by lifting the tab on
the left of the door. Place a CD in the
center with label fac ing up, p ress i t down
over the hub to secure it, and then close
the door.
onds, then the total number of tracks
appears on the display.
3. Press .to play all the tracks in order,
starting with Track 1. The current track
number appears on the display and the
play/pause indicator (the dot to the right
of the track number) lights.
PROGRAM
FM ST./
PROG
Indicator
00
--
flashes for a couple of sec-
REPEAT
to CD.
appears.
--
flashes on the
(STOP)
6. To turn off the radio, set
STD BY.T APE
5. Adjust
Adjust
ble sounds or to
bass sounds.
6. The CD stops after playing the last
track. To stop play sooner, press . Wait
a few seconds for the CD to stop turning, then open the CD door and remove
the CD.
.
VOLUME
TONE
to
to a comfortable level.
HIGH
FUNCTION
to emphasize tre-
LOW
to emphasize
to
USING AUTOMATIC
SEARCH MUSIC SYSTEM
The automatic search music system lets you
quickly locate the beginning of any track on
the CD, including the current track.
If the CD is playing:
•Press .once to return the beginning
of the current track
•Press .twice to return the beginning
of the previous track
(PLAY/
PAUSE)
SKIP
SKIP
4. To tem porari ly pause th e CD, pres s
and the play/pause indicator flashes. To
resume play, press .again.
6
•Press .to skip to the beginning of
the next track
If the CD is stopped, r epe atedly pre ss or hold
down or until the display s hows th e
desired track number, then press . The
CD player starts playing the selected track.
To search backward or forward wit hin a trac k
while the CD is playing, hold down either
or . You hear the track play rapidly
and at a lower volume. Release the button to
resume normal play.
CD Player Operation
Page 7

14-518.fm Page 7 Tuesday, October 10, 2000 11:31 AM
USING REPEAT PLAY
The system lets you continuously repeat a
single track, all tracks on a CD, or an entire
programmed sequence of tracks.
To continuously repeat a single track, press
REPEAT
of the right digit of the track number flashes.
To continuously repeat all tracks on the CD,
press
front of the track number lights.
To continuously repeat an entire programmed sequence, first program the tracks
you want to play (see “Programming
Tracks”), press then
the repeat indicator lights.
To cancel repeat pla y duri ng pl ay , re pe ated ly
press
The CD player resumes normal play.
The repeat indicator remains lit after is
pressed. T o ca nc el r e pe at p l ay wh en t he CD
is stopped, press .again or
once so the repeat indicator in front
REPEAT
twice so the repeat indic ator in
REPEAT
REPEAT
until the indicator turns off.
REPEAT
twice, so
once.
PROGRAMMING TRACKS
You can program the system to play up to 16
tracks in any order you choose, and you can
program the same track to play more than
once.
Storing/Playing a Programmed
Sequence
1. With a CD loaded but not playing, press
PROGRAM
and the
2. Repeatedly press
appears.
3. To store the selected track, press
GRAM
the
. Pr flashes on the display
FM ST./PROG indicator flashes.
SKIP
.or
until the desired track number
. Pr flashes on the display and
FM ST./PROG indicator flashes.
SKIP
PRO-
CD Player Operation
4. Repeat Steps 2–3 to store up to 16
tracks.
Note:
If you try to store more than 16
tracks, the 17th track is not stored and
Pr
flashes on the display.
5. Press . to play the programmed
tracks. The first programmed track number appears and the play/pause indicator and the FM ST./PROG indicator
lights. The CD begins to play starting
with the first programmed track.
Reviewing a Programmed
Sequence
To review a programmed sequence, with
play stopped, press
have stored all the tracks in the sequence).
Otherwise, press
ST./PROG indicator flashes and the track
number of each stored track appears .
PROGRAM
PROGRAM
once (if you
twice. The FM
Erasing a Programmed Sequence
You can do any of the following to erase a
programmed sequence:
RADIO
FUNCTION
.
•Set
• Open the CD door with play stopped.
• Press with play stopped.
STD BY.TAPE
to
or
CD AND CD PLAYER TIPS
Even though a compact disc is durable, treat
the CD surface with care.
• Do not write on either side of the CD,
particularly the non-label side. Signals
are read from the non-label side.
• Do not store CDs in high temperature,
high-humidity locations. They might
warp.
• Keep CDs dry . A water dro p can act as a
lens and affect the laser beam’s focus.
7
Page 8

14-518.fm Page 8 Tuesday, October 10, 2000 11:31 AM
• Always handle a CD by the edges to
avoid fingerprints and always keep it in
its protective case or sleeve when it is
not in use. Fingerprints and scratches
on the CD’s surface can prevent the
laser beam from correctly reading the
digital information. If the CD gets
scratched, use RadioShack Scratch ‘n
Fix to repair the disc.
If the radio is subjected to a sudden shock or
jolt during play, the CD's rotation speed
might be briefly interrupte d. This is not a malfunction.
ˆ
Cassette Deck Operation
LOADING AND PLAYING A
TAPE
1. Slide
FUNCTION
STD BY.T AP E
to
.
Cautions:
• To avoid damaging the CD player, do
not place anything but a CD in the CD
compartment.
• Remove any loaded CD from the CD
compartment before moving the system
to avoid damaging the CD.
• Moving the radio suddenly from a cold
place to a warmer one can cause moisture to form on the CD player's pickup
lens and disrupt operation. If this happens, unplug the radio, then wait about
an hour before plugging it back in and
playing a CD.
4. Adjust
VOLUME
TONE
Adjust
sounds or to
sounds.
to a comfortable level.
HIGH
to
to increase treble
LOW
to increase bass
2. Press .to open the cassette door.
Load a cassette tape into the guides on
the door wit h the side you want to p lay
facing up and the exposed tape edge
facing you. Close the door.
(RECORD)
(PLAY)
(REWIND)
3. Press .to play the tape.
Note:
To temporarily pause play, press
. Press .again to resume play.
8
FORWARD)
(PAUSE)
(STOP/
EJECT)
(FAST
Cassette Deck Operation
5. The cassette deck automatically stops
the tape when it reaches the end. To
stop it sooner, press .
To fast forward when the tape is stopped,
press , or rewind by pressing .
RECORDING
Notes:
• The system’s Automatic Level Control
(ALC) automatically adjusts the recording level.
recording.
• Tape quality greatly affects the quality of
the recording. We recommend regular
length (60- or 90-minutes) cassette
tapes. We do not recommend long-play
cassette tapes such as C-120s because
they are thin and can tangle easily. For
VOLUME
has no effect on
Page 9

14-518.fm Page 9 Tuesday, October 10, 2000 11:31 AM
low-noise, wide-range recordings, use
normal bias tape.
• Before you load a cassette tape for
recording, turn the cassette's hub with
your finger or a pencil to move the tape
past its leader.
• Before recording, be sure the erase protection ta bs a re in pl ace on t he c asse tt e
tape you are using to record. See “Preventing Accidental Erasure” on Page10.
• If you try to record on a tape that has
had its erase protection tabs removed,
you cannot press . Do not force it, as
this can damage the mechanism.
Recording from the CD Player
FUNCTION
1. Set
2. Load the cassette you want to record on
into the cassette compartment. Load a
CD into the CD compartment.
3. If you want to begin recording on a different track besides the first, press
.on the CD pl ayer until the de sired
track number appears, then press .
The cassette deck starts recordin g and
the CD starts to play the first trac k or the
track you selected.
Notes:
• T o temporari ly paus e recordin g, press
on the cassette deck. Press
again to resume recording.
• If you also want to pause the CD
player, press . Press .again
to resume playing the CD.
to CD.
SKIP
5. To stop the CD player befo re it automatically stops, press .on the CD player.
Recording from the Radio
1. Follow Steps 1–4 in “Radio Operation”
on Page 5.
2. Insert a blank cassette tape, or one you
want to record over, into the cassette
compartment.
3. Press .on the cassette deck. The cassette deck starts recording from the
radio.
Notes:
• T o t emporarily pause recording, pres s
on the cassette deck. Press
again to resume recording.
• To reduce a whistling sound (called
an
AM beat
from an AM broadcast, slide
CUT
) heard during a recording
BEAT
to the position that produces the
best quality recording.
4. To stop recording before the tape
reaches the end, press on the cassette deck.
TAPE TIPS
Erasing a Cassette Tape
To erase a previously recorded tape, simply
record over it. To erase an entire side of a
cassette tape, set
not load a CD. Then start recording and let
the tape record to the end. Or, set
TAPE
to
and press .
FUNCTION
to CD and do
FUNCTION
SKIP
• If yo u hold dow n
.or .to
search within a track during recording, the cassette deck will record the
sound.
4. To stop recording before the tape
reaches the end, press .on the cassette deck.
Cassette Deck Operation
To quickly erase both sides of a cassette
tape, use a bulk tape eraser, available at
your local RadioShack store.
9
Page 10
14-518.fm Page 10 Tuesday, October 10, 2000 11:31 AM
Preventing Accidental Erasure
Cassette tapes have two erase-protection
tabs — one for each side. To protect a recording from being accidentally recorded
over or erased, use a screwdriver to remove
one or both erase-protection tabs.
If you want to record on a tape’s side after
you have removed the erase-protection tab,
place a pi ece of stro ng p las tic ta pe ov er t hat
side’s erase-protection hole. Be sure you
cover only the hole originally covered by the
erase-protection tab.
Note:
Removing erase-protection tabs does
not prevent a bulk eraser from erasing a cassette tape.
ˆ
Care and Maintenance
To enjoy your AM /FM/CD/Cassette Portable
for a long time:
• Keep the system dry. If it gets wet, wipe
it dry immediately.
• Use and store the system only in normal
temperature environm ent s.
• Handle the system gently and carefully.
Do not drop it.
• Keep the system away from dust and
dirt.
Restoring Tape Tension and
Sound Quality
After you play a cassette tape several times,
the tape might become tightly wound on the
reels. This can cause playback sound quality
to deteriorate.
To restore the sound quality , fas t-fo rw ard th e
tape from the beginning to the end of one
side, then co mpletely rewind it. T hen loosen
the tape reels by gentl y tapping each edge of
the cassette on a flat surface.
Caution:
sette when tapping it. Do not touch the exposed tape or allow any sharp objects near
the cassette.
Be careful not to damage the cas-
CLEANING THE
TAPE-HANDLING PARTS
Dirt, dust or particles of the tape's coating
can accumulate on the tape heads and other
parts that the tape touches. This can greatly
reduce the performance of the cassette player. After every 20 hours of tape player operation, use a RadioShack cassette deck
cleaning kit to clean the tape heads.
Your local RadioShack store sells a complete line of cassette deck cleaning supplies.
• Wipe the system with a damp cloth
occasionally to keep it looking new.
Modifying or tampering with the system’s internal com ponents can ca use a malfuncti on
and might invalidate its warranty. If your system is not performing as it should, take it to
your local Ra dioShack store for assistance.
10
Care and Maintenance
Page 11

14-518.fm Page 11 Tuesday, October 10, 2000 11:31 AM
ˆ
Specifications
GENERAL
Power Supply .............................................................................................................. ........ 120V AC 60 Hz
Tuning Range ..................................................................................................... AM 530 through 1710 kHz
Speaker size .................................................................................................................. 3
Dimensions (HWD) ............................................................................................ 5
(141.3 × 377.8 × 263.5 mm)
Weight ............................................................................................................................................ 81.13 oz
Included Accessor ie s ...................... ............. ......................... ......................... ...................... AC power cord
CD PLAYER
Number of Programmable Tracks ............................................................................................................ 16
Frequency Response ...................................................... .. .... .. .... ....... .. .... .. .... .. ....... 100 Hz – 20 kHz ±1 dB
Flat .................................................................................................................................. ............. . BPFA=70
Dynamic Range ................................................................... ...................................... .......................... 80 dB
Signal-to-Noise .................................................................................................................................... 60 dB
Distortion (measured at .12%)............................................................................................................. 0.05%
Channel Separation:
1 kHz............................................. ............ ......................... ............. ......................... .................... 50 dB
20 kHz................. .......................... ............ ......................... ............. ......................... .................... 35 dB
CASSETTE DECK
Wow and Flutter:
Limit ................................................................................................................................................ .3%
Measured ............................................................................................................................ .09 – .19%
Frequency Response, Limit:
R/P ........................................................................................................ 200 Hz ±4/-3 dB, 7 kHz ±3 dB
P/B ......................................................................................................... 125 Hz ±4 dB, 6.3 kHz ±6 dB
Frequency Response, Measured:
R/P ....................................................................................................................... –0.5/0 dB, –1/–2 dB
P/B .......................................... .......................... ......................... ............... –0.3/+0.1 dB, –1.3/–1.2 dB
Recording System .................................................................................................................... ....... AC Bias
Erase System .................................. ............. ......................... ......................... ............. ..................... Magnet
Power Output ......... ............. ......................... ......................... ......................... ...................................... 1.2W
or eight C batteries
FM 88 through 108 MHz
1
9
/2 inch (88.9 mm)
/16 × 147/8 × 103/8 Inches
(2.3 kg)
Specifications are typical; individual systems might vary. Specifications are subject to change and improvement without notice.
Specifications
11
Page 12

14-518.fm Page 12 Tuesday, October 10, 2000 11:31 AM
Limited Ninety-Day Warranty
This product is warrante d by RadioSha ck against manufac turing defect s in material and wor kmanship under normal u se for ninety ( 90) days fro m the date o f purchase fro m RadioShac k companyowned stores and authorized RadioShack franchisees and dealers. EXCEPT AS PROVIDED
HEREIN, RadioShack MAKES NO EXPRESS WARRANTIES AND ANY IMPLIED WARRANTIES,
INCLUDING THOSE OF MERCHANTABILITY AND FITNESS FOR A PARTICULAR PU RPOSE,
ARE LIMITED IN DURATION TO THE DURATION OF THE WRITTEN LIMITED WARRANTIES
CONTAINED HEREIN. EXCEPT AS PROVIDED HEREIN, RadioShack SHALL HAVE NO LIABILITY OR RESPONSIBILITY TO CUSTOMER OR ANY OTHER PERSON OR ENTITY WITH RESPECT TO ANY LIABILITY, LOSS OR DAMAGE CAUSED DIRECTLY OR INDIRECTLY BY USE
OR PERFORMANCE OF THE PRODUCT OR ARISING OUT OF ANY BREACH OF THIS WARRANTY, INCLUDING, BUT NOT LIMITED TO, ANY DAMAGES RESULTING FROM INCONVENIENCE, LOSS OF TIME, DATA, PROPERTY, REVENUE, OR PROFIT OR ANY INDIRECT,
SPECIAL, INCIDENTAL , OR CONSEQUENTIAL DAMAGES, EVEN IF RadioSh ack HAS BEEN ADVISED OF THE POSSIBILITY OF SUCH DAMAGES.
Some states do not allow limitations on how long an implied warranty lasts or the exclusion or limitation of incidental or consequential damages, so the above limitations or exclusions may not apply to
you.
In the event of a pr oduct defect durin g the warranty pe riod, take the pro duct and the RadioShack
sales receipt as proof of purchase date to any RadioShack store. RadioShack will, at its option, unless otherwise provid ed by la w : ( a) correct the defect by pr odu ct r epair without charge f or par ts a nd
labor; (b) replace the product wi th one of the same or similar design; or (c) refund the purch ase
price. All replace d parts a nd prod ucts, and p roducts o n which a refund is made, become th e property of RadioShack. New or recond itioned parts a nd products may be used in the performance of
warranty service. Re paired or replace d parts and pro ducts are warran ted for the rem ainder of the
original warranty period. You will be charged for repair or replacement of the product made after the
expiration of the warranty period.
This warranty does not cover: (a) damage or failure caused by or attributable to acts of God, abuse,
accident, misuse, i mproper or abnormal usag e, fa ilu re to fo ll ow instr ucti o ns, imp rop er installation or
maintenance, altera tion, lightning or othe r incidence of excess voltage or current; (b ) any repairs
other than those provided by a RadioShack Authorized Service Facility; ( c) consumables such as
fuses or batteries; (d) cosmetic dam age; (e) tra nsportation , shipping or insurance costs; or (f) costs
of product removal, installation, set-up service adjustment or reinstallation.
This warranty give s you specific l egal rights, an d you may al so have other r ights which var y from
state to state.
RadioShack Customer Relations, 200 Taylor Street, 6th Floor, Fort Worth, TX 76102
We Service Wh at We Sell
12/99
RadioShack Corporation
Fort Worth, Texas 76102
14-518
10A00
Printed in China
 Loading...