

Radio Shack 14-1189 Owner's Manual

www.radioshack.com
OWNER’S MANUAL —
Please read before using thi s e quipme nt.
™
&KIKVCN4GEQTFGT
YKVJ&KIKVCN2%.KPM
14-1189
PC Connectivity —
recorded messages to and from a PC to
store them or send them to your friends.
Voice Activated Recording (VOX) —
lets you set the recorder to automatically
record when it picks up sound and stop
after a few seconds of silence.
Three Recording Modes —
select from Long Play (LP), Extended
Play (EP), and Standard Play (SP).
Flash Memory —
no tapes to load or break.
lets you transfer
lets you
digital recording means
Included Accessories
• Voice Recorder Link Software
(CD-ROM)
• Carrying pouch
• USB cable
If an icon appears at the end of a paragraph, go to the box on that page with the
corresponding icon for pertinent information.
— Warning
R
R
RR
©
— Important
!
2002 RadioShack Corporation. All Rights Reserved.
RadioShack and RadioShack.com are trademarks
+/2146#06
— Caution
used by RadioShack Corporation.
°
°
°°
— Hint
— Note
±±±±
Thank you for
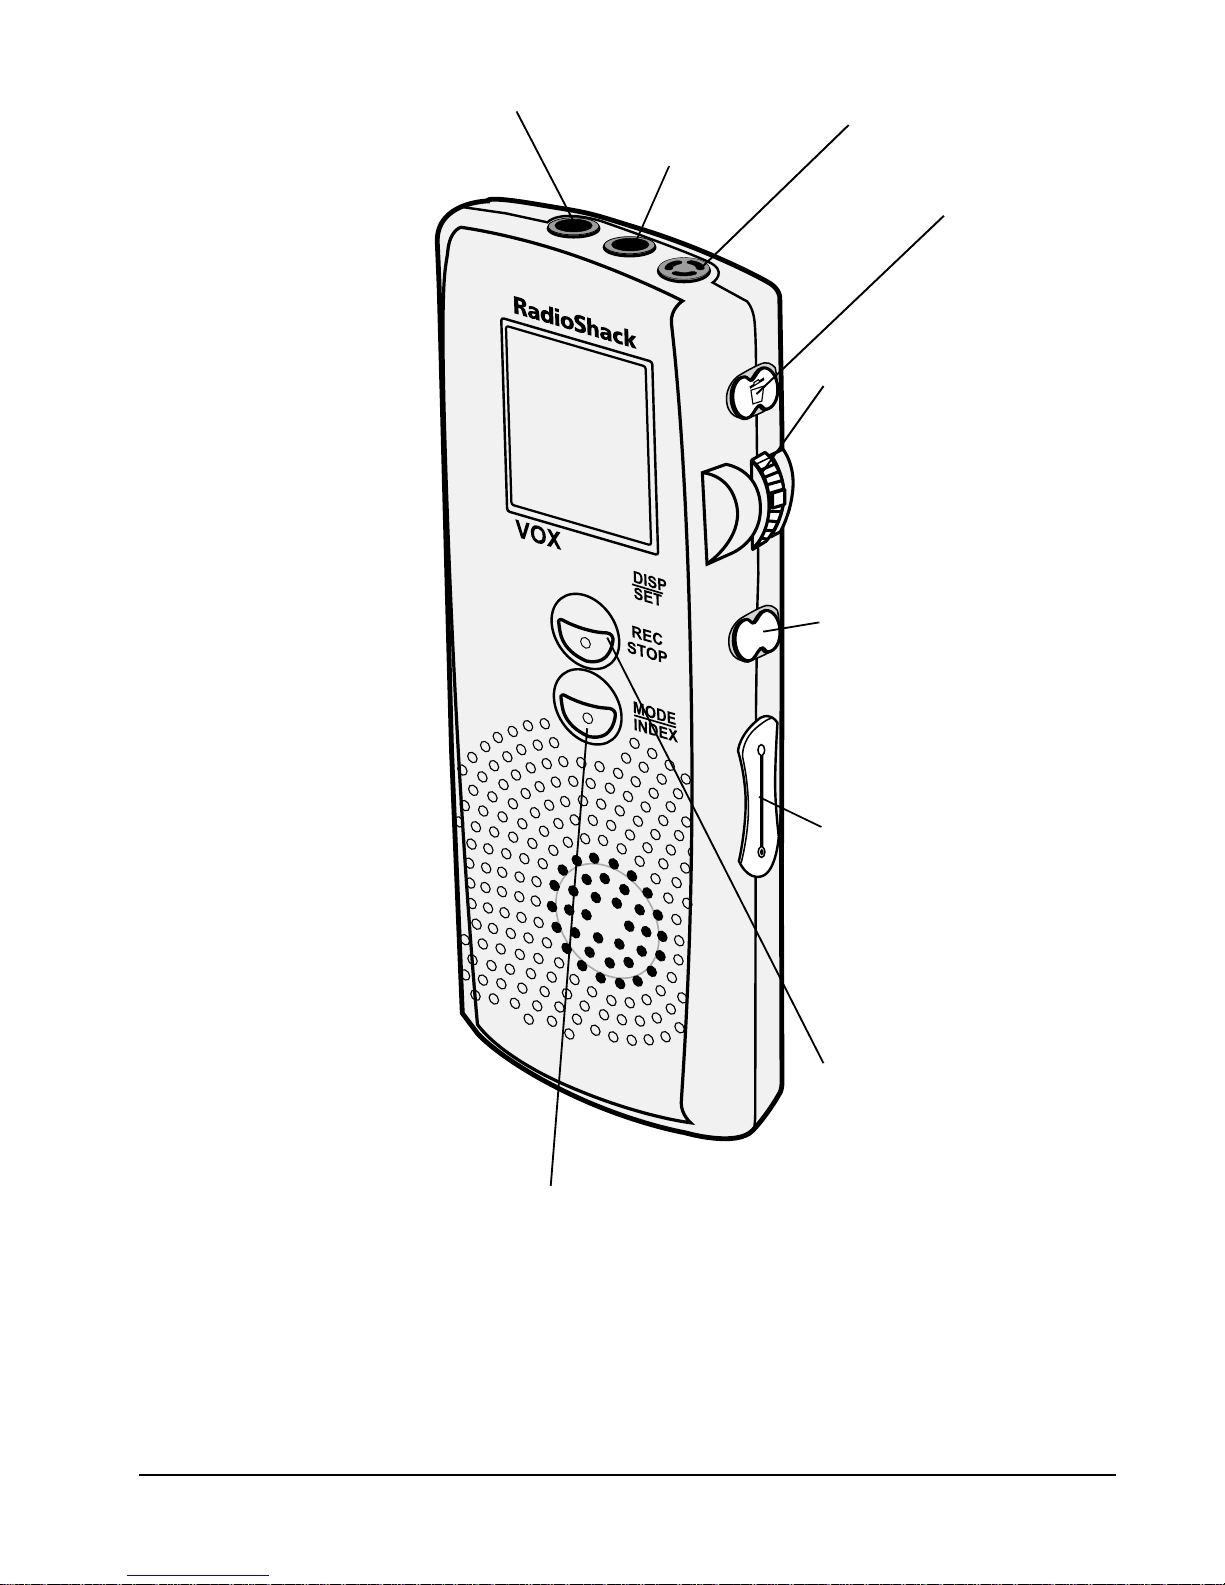
EAR Jack
Built-in Microphone
purchasing a
RadioShack
Digital Voice
Recorder. Your
recorder is not
only easy to use,
it is also so small
that you can take
it anywhere to
record voice
memos,
conversions, and
discussions.
Your recorder
MIC Jack
AAAA
—
erases
messages.
#
#
##
{
{
{{
—
starts or stops
playback, or locates
a message/index by
skipping forward or
backward.
DISP/SET —
to select information,
enter settings, and
,
,
,,
press
allows you to
record up to 396
messages with a
total duration of
234 minutes, and
organizes them
into 4 separate
folders. The
messages remain
intact even when
the batteries are
removed because
of the non-volatile
memory
change playback
speed.
++++
the volume output of
the speaker and
earphone and
settings.
REC/STOP —
or stops recording.
MODE/INDEX —
select the operation mode,
mark an index during
press to
VOL – —
adjusts
starts
employed.
2
recording, or mark a section to
repeat during playback.
+056#..+0)4'2.#%+0)
$
#66'4+'5
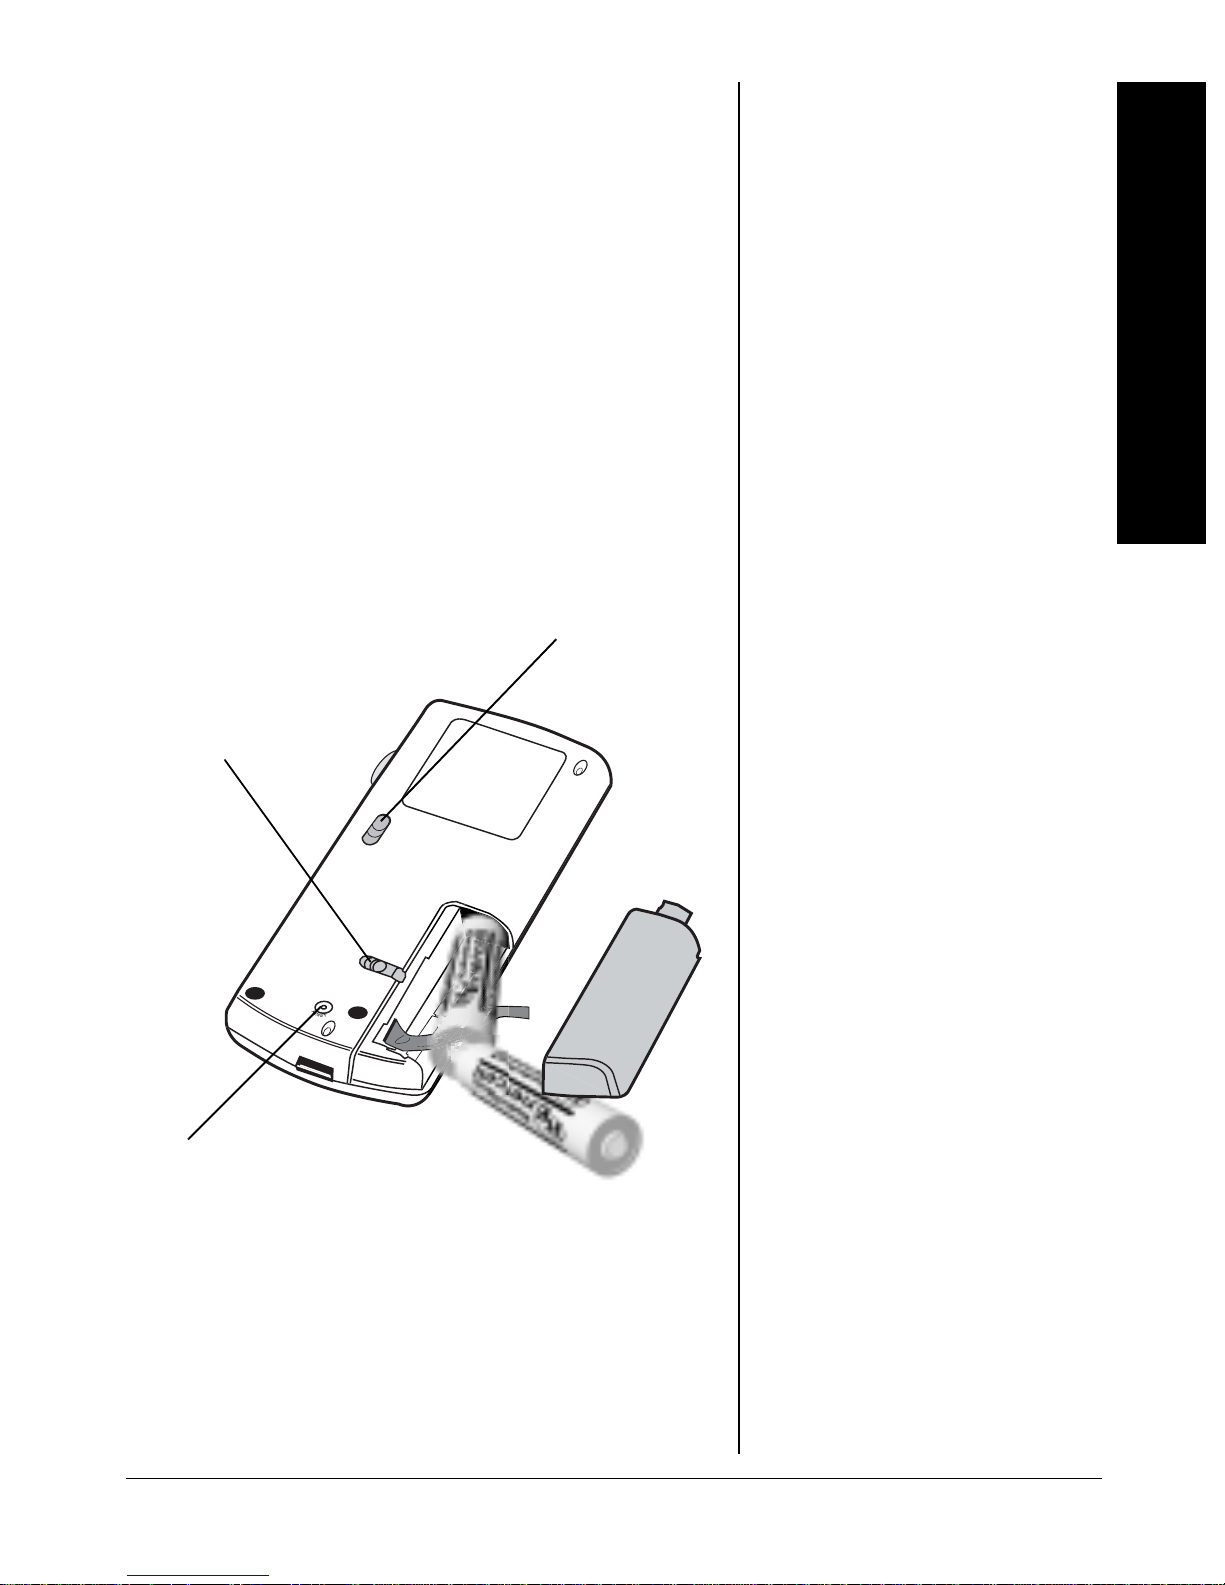
Your Digital Recorder requires two AAA
batteries for power (not supplied,
available at your local RadioShack or
online at www.radioshack.com).
1. Slide the battery compartment
latch to the left and hold it while
you slide the battery compartment
cover off.
LOCK —
Battery Compartment
Latch —
holds the
control buttons.
battery compartment
cover securely.
RESET —
returns all settings
to the default values.
2. Insert two AAA batteries (not
supplied, available from
RadioShack) on top of the ribbon
according to the polarity symbols
(+ and –) marked inside.
locks
%106'065
Installing/Replacing Batteries ... 3
Connecting Earphones ............ 4
Listening Safely .................... 4
Traffic Safety ........................ 5
Connecting an External
Microphone .............................. 5
Setting the Clock ...................... 6
Setting the Alarm ..................... 7
Programming the Recorder ...... 8
Locking/Unlocking the Recorder’s
Controls .................................. 10
Turning the Alarm ON/OFF .... 10
Recorder Mode Operations .... 11
Recording ............................... 12
Recording Manually ............ 12
Marking an Index During
Recording .......................... 13
Playing Messages .................. 14
Changing Playback Speed . 14
Playing a Message ............. 14
Locating an Index
in a Message ..................... 15
Fast-Forwarding/Rewinding 16
Section Repeat Playback .... 16
Intro-Scan ........................... 17
Erasing Messages ................. 17
Erasing a Single Message .. 17
Erasing All Messages in a
Folder ................................ 18
Connecting to a PC ................ 18
Installing Vo ice Recor de r Link 20
Installing a USB Driver ........ 21
Installing Sound Recorder and
Audio Compression ........... 22
Using Voice Recorder Link ..... 23
Uploading Messages
to Your PC .............................. 24
Downloading Messages to the
Recorder ................................ 24
Deleting Messages
from Your PC ......................... 25
Playing Messages
on Your PC ............................. 25
Resetting the Recorder .......... 26
Reformatting the Recorder ..... 26
Care ....................................... 26
Service and Repair ................ 26
Troubleshooting ..................... 27
Specifications ......................... 28
Installing/Replacing Batteries
3

3. Replace the battery compartment
cover and slide the latch to the
right to secure the cover.
9#40+0)
R
Dispose of old batteries
promptly and properly. Do
not burn or bury them.
%#76+10
• Use only fresh batt erie s
of the required size and
recommended type.
Connecting Earphones
• Do no mix old and new
batteries, different types
of batteries (standard,
alkaline, or
rechargeable), or
rechargeable batteries
of different capacities.
• If you do not plan to use
the recorder for a week
or longer, remove the
batteries. Batteries can
leak chemicals that can
destroy electronic parts.
R
The battery icon
current status of the batteries. When
flashes, or
becomes weak or distort e d, or the
recorder stops operating properly,
replace the batteries.
87JJ
87JJ
87JJ87JJ
indicates the
Z
appears, the sound
RRRR
±±±±
%100'%6+0)'#42*10'5
You can use a mono earphone (not
supplied, available at RadioShack) with
a1/8-inch (3.5 mm) mini-plug to listen to
your recording in private.
Insert the earphone’s plug into the
jack on the top side of the recorder. The
built-in speaker disconne cts
automatically.
.KUVGPKPI5CHGN[
To protect your hearing, follow these
EAR
016'
±
After replacing the
batteries, or sliding the
latch to the locked posit ion,
reset the clock and alarm
time if need. See “Setting
the Clock” on Page 6 and
“Setting the Alarm” on
Page 7.
4
±
guidelines when you use earphones.
• Set the volume to the lowest
setting before you begin listening.
After you begin listening, adjust the
volume to a comfortable level.
• Do not listen at extremely high
volume levels. Extended high-

volume listening can lead to
permanent hearing loss.
• Once you set the volume, do not
increase it. Over time, your ears
adapt to the volume level, so a
volume level that does not cause
discomfort might still damage your
hearing.
6TCHHKE5CHGV[
Do not wear earphones while operating
a motor vehicle or riding a bicycle. This
can create a traffic hazard and could be
illegal in some areas.
Even though some earphones let you
hear some outside sounds when
listening at normal volume levels, they
still can present a traffic hazard.
%100'%6+0)#0
'
:6'40#./+%412*10'
You can use a dynamic microphone
1
with a
supplied, available at RadioShack) to
extend the recording range.
Insert the microphone’s plug into the
recorder’s
/8-inch (3.5mm) plug (not
jack. The built-in
MIC
microphone disconnects automatically.
Connecting a Microphone
5

Setting the Clock
5'66+0)6*'%.1%-
Your recorder has two operating
modes: clock mode and recorder
mode. Clock mode is automatically
selected when the recorder is left idle
for 30 seconds, or when you reset the
016'
±
If you do not press a button
for more than 30 seconds,
the time display appears.
±
Set HOUR
recorder.
In clock mode, repeatedly press
to toggle between the year and the
SET
±±±±
DISP/
date view.
1. Make sure the controls are
unlocked.
2. While the clock appears, press and
hold
DISP/SET
for about two
seconds. The hour digits flash.
3. Repeatedly press or hold down
++++
VOL –
to adjust the hour.
FC
FC
FCFC
appears to indicate a PM hour.
Set MINUTE
Set YEAR
6
4. Press
DISP/SET
. The minute digits
flash.
5. Repeatedly press or hold down
++++
VOL –
6. Press
to adjust the minute.
DISP/SET
. The year flashes.
7. Repeatedly press or hold down
++++
VOL –
to adjust the year.

8. Press
flashes.
9. Repeatedly press or hold down
DISP/SET
. The month
Set MONTH
++++
VOL –
10. Press
11. Repeatedly press or hold down
++++
VOL –
12. Press
settings and resume normal
operation.
to adjust the month.
DISP/SET
to adjust the day.
DISP/SET
. The day flashes.
to save your
5'66+0)6*'#.#4/
You can set an alarm to sound every
day at a preset time.
Set DAY
1. Press
to display the alarm time.
appears.
2. Press and hold
clock mode for about two seconds.
The hour digits flash.
3. Repeatedly press or hold down
++++
VOL –
appears to indicate a PM hour.
4. Press
flash.
MODE/INDEX
to enter the hour.
DISP/SET
in clock mode
7B7HC
7B7HC
7B7HC7B7HC
DISP/SET
. The minute digits
in alarm
FC
FC
FCFC
Setting the Alarm
Set HOUR
Set AM/PM
Set MINUTES
7

5. Repeatedly press or hold down
016'
±
• You cannot program the
recorder while recording
or playing back
messages.
±
++++
VOL –
6. Press
setting.
the alarm time, the alarm
automatically turns on.
to enter the minute.
SET/DISP
appears. When you set
to store the
241)4#//+0)6*'
4
'%14&'4
You can set the active folder, recording
mode, MIC sensitivity, voice activated
recording (VOX) on/off, and button
press confirmation tone on/off.
1. In recorder mode (see “Recorder
±±±±
• If you do not press a
button for more than 30
seconds, the time
display returns.
•
IF
IF (Standard Play) —
IFIF
up to 126 min.
;F
;F (Extended Play) —
•
;F;F
up to 164 min.
•
BF
BF (Long Play) — up to
Programming the Recorder
BFBF
234 min.
Mode Operations” on Page 11),
hold down
appears and either
or
are available in each folder.
2. Repeatedly press
a folder (
3. Press
folder flashes to confirm it.
appears and either
flashes.
4. Repeatedly press
flashes. Up to 99 messages
^
DISP/SET
DISP/SET
[,\,]
when the desired
±±±±
until
[,\,]
++++
VOL –
, or
IF
IF,;F
;F
IFIF
;F;F
++++
VOL –
<?B;
<?B;
<?B;<?B;
,
to select
).
^
CE:;
CE:;
CE:;CE:;
or
BF
BF
BFBF
to set
8
the recording mode (
IF
IF,;F
;F
IFIF
;F;F
, or
BF
BF
BFBF
).

Recording time and quality differs
in each mode.
5. Press
recording mode flashes to confirm
it.
C?9
C?9C?9
or
6. Repeatedly press
microphone sensitivity (
).
Be
Be
BeBe
7. Press
microphone sensitivity flashes to
confirm it.
Ed
Ed
EdEd
8. Repeatedly press
DISP/SET
appears and either
C?9
flashes.
Be
Be
BeBe
±±±±
DISP/SET
LEN
LEN
LENLEN
or
E<<
E<<
E<<E<<
flashes.
when the desired
7kje
7kje,>_
7kje7kje
++++
VOL –
when the desired
appears and either
++++
VOL –
to set
7kje
7kje,>_
7kje7kje
to turn
>_
>_>_
>_
>_>_
or
016'
±
• 7kje
7kje (automatic) —
7kje7kje
microphone sensitivity is
adjusted automatically.
>_
>_ (high) — for
•
>_>_
conference recording.
Be
Be (low) — for dictation.
•
BeBe
±
on or off.
LEN
LEN
LENLEN
9. Press
setting flashes to confirm it.
(button press confirmation tone)
appears and either
flashes.
10. Repeatedly press
8;;F
8;;F
8;;F8;;F
11. Press
setting and resume normal
operation.
DISP/SET
on or off.
DISP/SET
when the desired
to confirm the
Ed
Ed
EdEd
++++
VOL –
or
8;;F
8;;F
8;;F8;;F
E<<
E<<
E<<E<<
to turn
Programming the Recorder
9
 Loading...