

Page 1
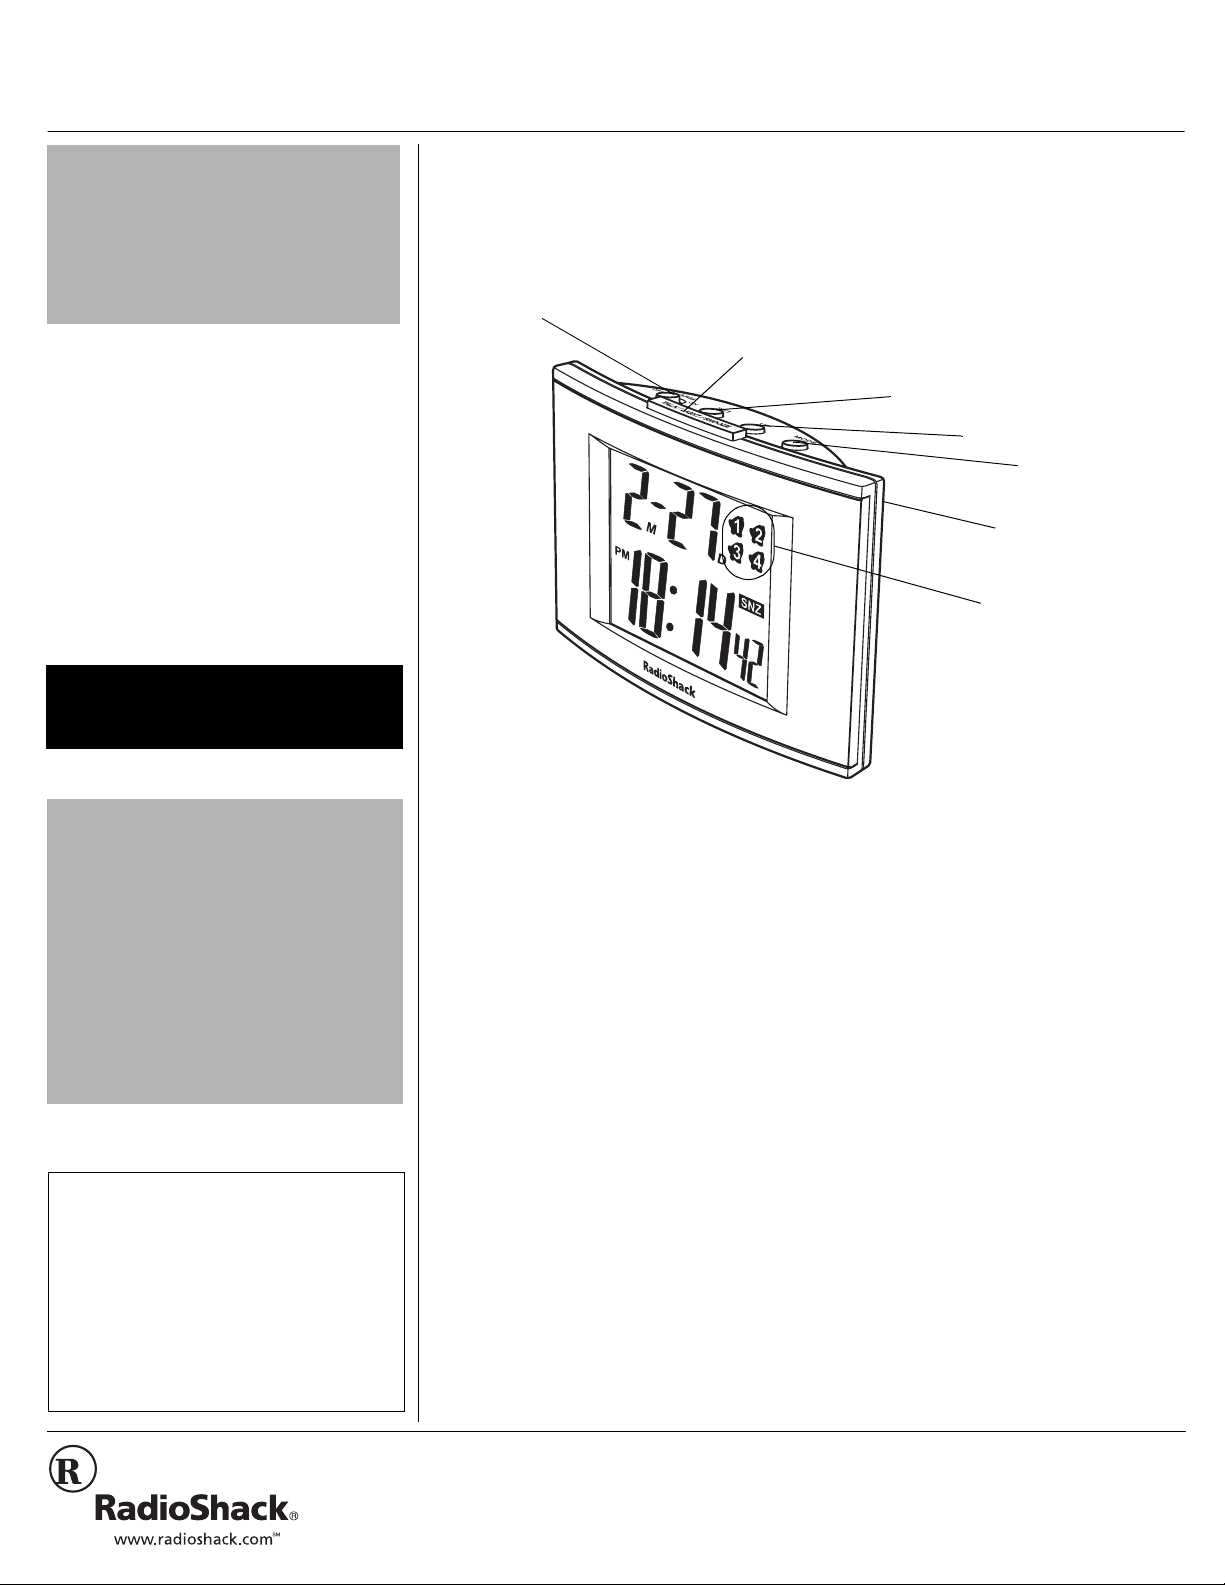
Four Daily Alarms —
let you set up to four
different alarms at
once, to remind you of
important events.
TALK/LIGHT/SNOOZE — Press to announce the date and time
whenever you like, to light the display for about 3 seconds so you
can see the time in the dark, or to turn off the alarm for about 8
minutes so you can get a little more sleep.
MODE
UP
SET
ALARM
OFF/ON
100-Year Calendar — displays
the calendar from 2000 to 2099.
VOLUME HI/LO
6CNMKPI"#NCTO"%NQEM
YKVJ"'."$CEMNKIJV"CPF"5PQQ\G
63-991
"+/2146#06"
#
If an icon appears at the end of a paragraph, go
to the box on that page with the corresponding
icon for pertinent information.
— Signifies a Warning
Rý
.... — Signifies a Caution
— Signifies Important text
#
"9#40+0)
ý
Dispose of old batteries promptly and properly.
Do not burn or bury them.
R
#
ý
R
"
OWNER’S MANUAL — Please read before using this equipment.
Thank you for purchasing a RadioShack Talking Alarm Clock. Your clock combines a simple
design with advanced technology. It is ideal for your bedroom, kitchen, office, or in almost any
room. You can set th e clo ck to annou nce the t ime, y ear, d ate, an d ala rm time. It e ven c ounts up
from a set time.
.
.
"%#76+10"
• Use only fresh batteries of the required size
and recommended type.
• Do not mix old and new batteries, different
types of batteries (standard, alkaline, or
rechargeable), or rechargeable batteries of
different capacities.
• Slide the battery compartment cover on the
back in the direction of the arrow to remove it.
• If you do not plan to use the clock for a month
or more, remove the batteries. Batteries can
leak chemicals that can destroy electronic
parts.
"016'"±"
±
• While setting the time, date, and alarm time,
if you do not press any key for more than 1
minute, the clock returns to the current time
display.
• The clock announces the time and date as
they advance on the display.
• The clock uses a 12-hour format.
appears at the left of the display for a PM
hour.
.
FC
FC
FCFC
+056#..+0)"$#66'4+'5
Your clock requires two AAA batteries (not
supplied) for power. For the best
performance and longest battery life, we
recommend RadioShack alkaline batteries.
.#
.#
.#.#
1. Insert two batteries in the compartment
as indicated by the polarity symbols
(+ and -) marked inside. The clock beeps
'C
'C, ':
':
'(0&&
twice. Then
2. Replace the cover.
If the clock’s sound weakens or the display
dims, replace the batteries.
'C'C
':':
, and
'(0&&
'(0&&'(0&&
Rý
appear.
.#
.#
.#.#
5'66+0)"6*'"6+/'.";'#4."/106*."#0&"'
1. Hold down
clock announces t he date then “time se t”
and “hour set,” and the hour digits flash.
2. Repeatedly pres s or hold dow n UP to set
the correct hour.
3. Press
announces “minute set” and the minute
digits flash.
4. Repeat Steps 2 and 3 to set the minutes,
year, month, and date.
SET
for about 3 seconds. The
SET
to store the hour. The clock
2002 RadioShack Corporation.
©
RadioShack and RadioShack.com are trademarks
All Rights Reserved.
used by RadioShack Corporation.
5. Press
5'66+0)"6*'"#.#4/"6+/'
The clock lets you set up to four daily alarms.
1. Repeatedly press
2. Hold down
MODE
to finish setting the clock.
The clock beeps once th en returns to the
time display.
MODE
until the clock
7B$
announces “alarm 1.”
current alarm number) appear.
SET
clock announces “al arm 1 set” an d “ho ur
7B$
7B$7B$
for about 3 seco nds. The
and
''''
(the
Page 2

AL.SET
set.”
flash.
3. Repeatedly pres s or hold dow n
the correct hour. The clock announces
the hour as it advances on the display.
4. Press
announces “minute set” and the minute
digits flash.
appears and the hour digi ts
SET
to store the hour. The clock
UP
to set
75+0)";174"%.1%-
UP
5. Repeatedly press or ho ld down
the correct min ute. The clock announce s
the minute as it advances on the display.
MODE
6. Press
time. The clock beeps once.
7. Repeat Steps 1–6 to set al arms 2, 3, and
4.
8. Repeatedly press
current time.
to finish setting the alarm
MODE
to return to the
to set
"016'"±"
±
• Do not press TALK/LIGHT/SNOOZE to
silence the alarm. Pressing TALK/LIGHT/
SNOOZE during the alarm time activates the
snooze function.
• If you do not press a key within about 30
seconds after turning on the alarm, the
current time automatically appears.
75+0)"81+%'"
00170%'/'06
#
To hear the time, press
The clock announces the current time, and
the display lights for about 3 seconds.
To hear the date and see the year, month,
and date, press
you press
announces “Today is the second,” and the
year, month, and date appear. Press
again while the clock displays the year,
month, and date, the clock announces the
current time.
SET
on December 2nd, the clock
TALK/L IGHT/SNOOZE
SET
once. For example, if
SET
6740+0)"6*'"#.#4/"10"#0&"
1
((
1. Repeatedly press
alarm setting appears.
2. Repeatedly press
on or off. When the alarm is turned on,
the clock announces “alarm (number)
on,” and
alarm number) appe ars. When the ala rm
is turned off, the clock annou nces “alar m
(number) off,” and the selected alarm
number disappears.
3. Repeatedly press
current time.
4. Set
alarm number appears.
5. At the preset alarm time, the clock
announces the time. For ex am pl e, if y ou
set alarm 1 to sound at 10:35 AM, the
clock repeatedly announces “Alarm 1,
good morning. It is 10:35 AM,” then
repeatedly soun ds a seri es of four b eeps
for about 1 minute. To silence the alarm
sooner, press any key.
Â
ALARM OFF/ON
MODE
until the desired
UP
to turn the alarm
(or the currently selected
MODE
to return to the
to ON. The selected
To turn off a specific alarm,
MODE
press
.
setting appears, press
alarm, then repeatedly press
return to the current time.
until the desired alarm
UP
6740+0)"6*'"*174.;"6+/'"
00170%'/'06"10"#0 &"
#
1
((
1. To set the clock to announce the time at
the beginning of each hour, press
when the current time appears. The
clock announces “hourly report on,” and
appears. At the beginning of each
UUUU
hour, the clock chimes and announces
the time.
2. To turn off the hourly report, press
again. The clock announces “hourly
report off,” and
disappears.
UUUU
#&,756+0)"6*'"81.7/'
VOLUME HI/LO
Slide
HI
toward
decrease the volume.
to increase the volume, or LO to
on the back of the clock
75+0)"5011<'
When the alarm sounds, press
SNOOZE
minutes. The backlight comes on and
appears.
After 8 minutes, the alarm sounds for 1
minute then automatically turns off.
To turn the alarm off sooner,
except
OFF/ON
To cancel the snooze function before it
begins,
to silence the alarm for about 8
press any key
TALK/LIGHT/SNOOZE
OFF
to
to turn off the snooze.
ALARM OFF/ON
slide
or slide
to
repeatedly
to turn off that
MODE
to
UP
UP
TALK/LIGHT/
Æ
ALARM
OFF
.
To turn off all the preset alarms so they
6.
do not sound again,
OFF
.
to
ALARM OFF/ON
set
2
Page 3

75+0)"6*'"56129#6%*
±
"016'"±"
• To reset the stopwatch to
&0&&ý&&
&0&&ý&&&0&&ý&&
&0&&ý&& during
use, press UP then SET while the timer is
running. The clock announces “all clear” and
the timer changes to
&0&&ý&&
&0&&ý&&&0&&ý&&
&0&&ý&&.
• To reset the stopwatch to
&0&&ý&&
&0&&ý&&&0&&ý&&
&0&&ý&& while
recording lap times, press UP then SET
twice while
0000 flashes. The clock announces
“All clear.”
• While the stopwatch is running, you can
press MODE to use the clock’s other
features.
The stopwatch counts elapsed time up to 23
hours, 59 min utes an d 59 s econds. When t he
timer reaches 23:59:59, it resets to 0:00 00
and begins counting up again.
MODE
1. Repeatedly press
announces “stopwatch.”
&0&&ý&&
&0&&ý&&
appear.
&0&&ý&&&0&&ý&&
UP
2. Press
The stopwatch starts and anno unces the
elapsed time in inc rem ents shown in the
table below and the display shows the
advancing time.
1 to 10 seconds Each second
11 seconds to 1 minute Every 10 seconds
1 to 10 minutes Every minute
10 minutes to 24 hours Every 10 minutes
to start the stopwatch timer.
'NCRUGF"6KOG" "#PPQWPEGOGPV
until the clock
I$M7J9>
I$M7J9>
I$M7J9>I$M7J9>
and
4'%14&+0)".#2"6+/'5
The clock’s lap function lets you freeze the
display, document the timed reading, then
return to the stopwatch timer to see the
advancing time. You can monitor lap times
continuously as long as the stopwatch
continues to run.
MODE
1. Repeatedly press
announces “stopwatch”. The stopwatch
display and
2. Press UP to start the stopwatch timer.
3. When the first lap is finished, press
The stopwatch display freezes, but the
stopwatch timer con tinues to run.
elapsed time flashes.
4. When you have documented the lap
time, press
show the advancing time on the
stopwatch timer.
S.WATCH
SET
. The display changes to
until the clock
appear.
SET
0000
in the
.
For example, the stopwatch announces
&0&+0ý&&ý
“5 minutes” if
Y o u also can press
to hear the voice announcement at any
time while the stopwatch is running.
3. To stop counting time, press
stopwatch timer stops and the display
freezes.
4. To restart the stopwatch timer, press UP.
The stopwatch timer continues from the
elapsed time in Step 2.
5. To stop the timer, press
reset it to
“all clear .”
&0&+0ý&&ý
&0&+0ý&&ý&0&+0ý&&ý
&0&&ý&&
&0&&ý&&
&0&&ý&&&0&&ý&&
appears.
TALK/LIGHT/SNOOZE
UP
. The
UP
. The clock announces
then
SET
to
%#4'
Keep the clock dry; if it gets wet, wipe it dry
immediately. Use and store the clock only in
normal temperature environments. Handle
the clock carefully; do not drop it. Keep the
clock away from dust and dirt, and wipe it
with a damp cloth occasionally to keep it
looking new.
5. Repeat Steps 3 and 4 for eac h additional
lap.
UP
6. Press
press
The clock announces “All clear.”
to stop the stopwatch. Then
SET
to reset the display to
4'5'66+0)"6*'"%.1%-
If the display dims or the clock stops working
properly, use a pointed object, such as a
straightened paper clip, to press
the back of the clock. All display segments
appear briefly, then the clock beeps twice
and 12:00 appears.
RESET
5'48+%'"#0&"4'2#+4
If your clock is not performing as it should,
take it to your local RadioShack store for
assistance. Modifying or tampering with the
clock’s internal components can cause a
malfunction and might invalidate its warranty.
&0&&ý&&
&0&&ý&&
&0&&ý&&&0&&ý&&
on
.
3
Page 4

Limited One-Year Warranty
This product is warran ted by RadioS hack aga inst m anufacturing defects i n material and workm anship under
normal use for one (1) year from the date of purchase
from RadioShack company-owned stores and authorized RadioShack franchisees and dealers. EXCEPT
AS PROVIDED HEREIN, RadioShack MAKES NO EXPRESS WARRANTIES AND ANY IMPLIED WARRANTIES, INCLUDING THOSE OF MERCHANTABILITY
AND FITNESS FOR A PARTICULAR PURPOSE, ARE
LIMITED IN DURATION TO THE DURATION OF THE
WRITTEN LIMITED WARRANTIES CONTAINED
HEREIN. EXCEPT AS PROVIDED HEREIN,
RadioShack SHALL HAVE NO LIABILITY OR RESPONSIBILITY TO CUSTOMER OR ANY OTHER
PERSON OR ENTITY WITH RESPECT TO ANY LIABILITY, LOSS OR DAMAGE CAUSED DIRECTLY OR
INDIRECTLY BY USE OR PERFORMANCE OF THE
PRODUCT OR ARISING OUT OF ANY BREACH OF
THIS WARRANTY, INCLUDING, BUT NOT LIMITED
TO, ANY DAMAGES RESULTING FROM INCONVENIENCE, LOSS OF TIME, DATA, PROPERTY, REVENUE, OR PROFIT OR ANY INDIRECT, SPECIAL,
INCIDENTAL, OR CONSEQUENTIAL DAMAGES,
EVEN IF RadioShack HAS BEEN ADVISED OF THE
POSSIBILITY OF SUCH DAMAGES.
Some states do not allow limitations on how long an implied warranty lasts or the exclusion or limitation of incidental or consequential damages, so the above
limitations or exclusions may not apply to you.
In the event of a produ ct de fect dur i ng t he warranty period, take the product and the RadioShack sales receipt
as proof of purchase date to any Radio Shack store.
RadioShack will, at its option, unless otherwise provided by law: (a) correct the defect by product re pair
without charge for parts and labor; (b) replace the product with one of the same or similar design; or (c) refund
the purchase price. All replaced parts and products,
and products on w hich a refund is made, become the
property of RadioShack. New or reconditioned parts
and products may be us ed in the perform ance of warranty service. Repair ed or re placed par ts and pro ducts
are warranted for the remainder of the original warranty
period. You will be charged for repair or replacement of
the product made after the expiration of the w arranty
period.
This warranty does not cover: (a) damage or failure
caused by or attributa ble to acts of God, abuse , accident, misuse, improper or abnormal usage, failure to
follow instructions, improper installation or maintenance, alteration, lightni n g or oth er in ciden ce o f exce ss
voltage or current; (b ) any repairs other th an tho se p rovided by a RadioShack Authorized Service Facility; (c)
consumables such as fuses or batteries; (d) cosmetic
damage; (e) transportation, shipping or insurance
costs; or (f) costs of produ ct removal, installation, setup service adjustment or reinstallation.
This warranty giv es you specific legal r ights, and you
may also have other rights which vary from state to
state.
RadioShack Customer Relations, 200 Taylor Street, 6th
Floor, Fort Worth, TX 76102
12/99
52'%+(+%#6+105
Power Source .................................... .................................... ............. .............................. Two AAA Batteries
Clock Accuracy .............................................................................................................. ± 0.67 Seconds/Day
Current Drain ................................... ............. .................................... ............ ........................ Less Than 6
Speaker Size ...................................................................................................................................... 28 mm
Operating Temperature ........................................................................................ 32° to 104° F (0° to 40° C)
Battery Life ........... ........................................................... ................................... ...................About 200 Days
Dimensions (HWD) .................. ......................... ...................... 4
1
/4 × 231/32 × 11/2 Inches (108
×
76 × 39 mm)
Weight (Without Batteries) ......................................................................................................... 3.5 oz (99 g)
Specifications are typical; individual units might vary. Specifications are subject to change and improvement
without notice.
µA
RadioShack Corporation
Fort Worth, Texas 76102
63-991
02A02
Printed in China
 Loading...