

Page 1

T8
USER MANUAL
WWW.RADIOMASTERRC.COM
Page 2

Introduction
Thank you for purchasing the RadioMaster T8 2.4g remote control system. The
system is powerful and versatile and can be used by beginners to professionals.
In order to ensure the correct and safe use of this product, please read this
manual carefully before use. The information contained in this manual is subject
to change without notice.
-RadioMaster team.
Safety Information
Many remote-control models are equipped with powerful motors and sharp
propellers. When using or maintaining models, proceed with caution. When
performing assembly or maintenance, make sure to disconnect the power to the
model and remove the propellers.
Do not operate the T8 remote-control system under the following conditions:
• In severe weather or strong wind conditions, such as rain, hail, snow, storms or
highly electromagnetic environments.
• In any situation where visibility is limited.
• In areas where people, property, high-voltage power lines, public roads,
vehicles or animals may be present.
• If you feel tired or unwell, or under the influence of drugs or alcohol.
• If the remote control or model seems to be damaged or not working properly.
• In areas with high 2.4GHz interference or where 2.4GHz radio is prohibited.
• When the battery voltage is too low.
• In areas where local regulations prohibit the use of aviation models.
Manual and firmware download
The T8 comes factory installed with special a T8 firmware for D8 and D16 use.
No firmware updates are required for this radio. Simply charge, Bind and go fly!
Visit www.radiomasterrc.com to learn about optional hardware accessories to
convert your T8 in to a T8 Pro!
1
Page 3

Remote control overview
SB 3 Pos Switch
SA 2 Pos Switch
Power Button
Neck Strap loop
TYPE-C USB
Fold out
finger rest
SD card slot
T8
Loud Speaker
Bind Button
SC 3 Pos Switch
SD 2 Pos Switch
Right GimbalLeftGimbal
Battery Status LEDs
DIY Antenna port
Trainer Port
Fold out
finger rest
2
Page 4

Charging Instructions
The T8 has a built in 1000mah 3.7v Battery. The built in USB-C charger will
charge your batteries by connecting the supplied USB-C cable to any suitable
USB power outlet. We suggest using a regular 2amp 5v USB power adapter.
Charge status and battery Level:
The 5 LEDS below the neck strap loop indicate the charging status. When the
LEDs light up from left to right the T8 is charging. Each of the 5 LEDs indicates
20% of the battery capacity. 5 LEDs shows 100% charge, 4 LEDs 80%, 3 LEDs
60%, 2 LEDs 40%, 1 LED 20%. When the radios power is low and the T8
requires charging all 5 battery status LEDs will flash at the same time. Please
recharge the batter before using the radio any further
Using your T8
Press and hold the Power button until you feel a vibration feedback. The radio is
now on. If the throttle or switches are not in the correct position the Power LED
will be RED. Please reset the switches to the correct position and move the
throttle to the lowest point. The Power LED will turn GREEN to indicate the radio
is now ready to use. To Turn off your T8 press and hold the power button until you
feel a vibration feedback and the radio will turn off. If the LED is RED when
turning off disconnect power to your model first.
Quick Guide to Understanding the Power Button LED colors.
GREEN: Radio is starting up or turned on and working normally.
RED on start: A switch(s) or the throttle must be moved to default position.
RED on shut down: The model or receiver is still connected, disconnect power to
the model to complete the shut down cycle of the radio.
The T8 has the follow settings by default and is ready to setup with the firmware
of your flight controller or receiver up to 8 channels. The default channel order is
AETR, please set accordingly in your flight controller software.
CH1 Aileron
CH2 Elevator
CH3 Throttle
CH4 Rudder
CH5 2 Position Switch SA
CH6 3 Position Switch SB
CH7 3 Position Switch SC
CH8 2 Position Switch SD
3
Page 5
Binding your T8
The T8 Uses a combination of Stick inputs and then pressing the Bind button to
bind to one of the following protocols: D8 / D16 v1 FCC / D16 v1 LBT / D16 v2
FCC / D16 v2 LBT
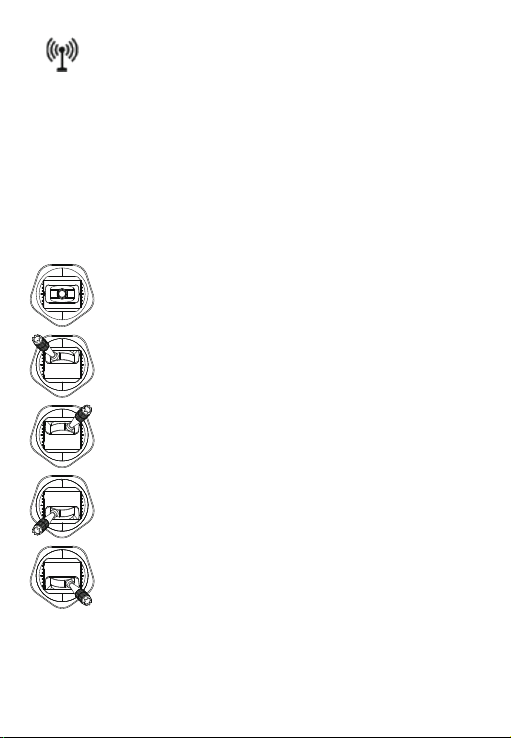
Hold the LEFT gimbal Stick in the positions shown below then press the bind
button for more than 1 second to bind the required Protocol. The Power button will
blink blue to indicate binding is in progress.
Once a model or receiver is bound you can change between various models using
the Stick positions below and pressing the bind button for more than 1 second. The
Power button will blink blue to indicate the protocol is changing. There is no need
to put the model or receiver in bind mode again if it was successfully bound
previously.
Stick Center – D8 Mode
Stick Top Left – D16 V1 FCC mode
Stick Top Right – D16 V1 LBT mode
Stick Bottom Left – D16 V2 FCC mode
Stick Bottom Right – D16 V2 LBT mode
Various different receivers and models will have different methods to place the
model or receiver in to bind mode. Please follow the instructions from the model or
receiver manufacturers user manual to initial the bind process.
4
Page 6
A Note on input sensitivity:
If your craft feels too sensitive to input you may need to set up EXPO. EXPO is a
function to soften the stick feeling in the center of the stick movements. This can
help settle down a drone that is very sensitive to stick movements. This is handled
in the flight-controller firmware and varies depending on the flight controller you are
using and may be called EXPO or RC EXPO. Please refer to the setup guide of
your specific drone or flight controller to set EXPO to your desired setting on the
models flight control system.
Specifications
Size: 160*130*45mm
Weight: 218g
Frequency: 2.400GHZ-2.480GHZ
RF Module: Multi-Protocol Module Compatible Single chip (CC2500)
Protocol Options: D8 / D16 v1 FCC / D16 v1 LBT / D16 v2 FCC / D16 v2 LBT
Transmission power: 20dbm
Antenna gain: 2db
Range: > 1km @ 20dbm (depending on the receiver)
Battery: Built in 3.7v 1000mah Lithium battery
Charging: Built in USB-C charging
Firmware: OpenTX T8 Edition (Special T8 Edition, non-configurable) *
Channels: Up to 8 channels (depending on the model / receiver)
Gimbal: High-precision quad bearing potentiometer sensor gimbal
Voice support: Yes (SD Card required)
Option Accessories: 128*64 LCD and OpenTX operation Clip on module
Requires Upgrading to OpenTX T8 Pro firmware
*Does not support or require OpenTX companion or user programming.
5
Page 7

EU Simple Declaration of Conformity
RadioMaster declares the radio equipment T8/T8 Pro is in compliance with
EU directives Directive 2014/53/EU. Full text of the declaration of conformity
is available at the following website www.radiomasterrc.com
Manufactured by
Shenzhen RadioMaster Co., Ltd
Address: 5/F,Building 9, De Zhi Gao Technology Park, Yang Tian Road
Bao'an District, Shenzhen, 518101, GuangDong, China
FCC ID: FCC ID: 2AV3G-T8
FCC Information
This equipment has been tested and found to comply with the limits for Part
15 of the FCC rules. This device complies with part 15 of the FCC rules.
Operation is subject to the following two conditions: (1) This device may not
cause harmful interference, and (2) this device must accept any interference
received, including interference that may cause undesired operation. Full text
of the declaration of conformity is available at the following website
www.radiomasterrc.com
CAUTION:
Changes or modifications not expressly approved by the party responsible for
compliance could void the user’s authority to operate the equipment. This
product contains a radio transmitter with wireless technology which has been
tested and found to be compliant with the applicable regulations governing a
radio transmitter in the 2.400GHz to 2.4835GHz frequency range.
Antenna Separation Distance
When operating your RadioMaster transmitter, please be sure to maintain a
separation distance of at least 20 cm between your body (excluding fingers,
hands, wrists, ankles and feet) and the antenna to meet RF exposure safety
requirements as determined by FCC regulations.
6
Page 8
简介
感谢您购买RadioMaster T8 2.4g遥控系统。 该系统用途广泛,可供初学者和专业
人士使用。 为了确保正确、安全地使用本产品,请在使用前仔细阅读本使用说明
书。 由于版本升级,已经进行了更改。 本手册中包含的信息如有更改,恕不另行
通知。
T8遥控器适用于所有类型的固定翼、滑翔机、直升机和多旋翼飞机。 可以根据使
用的航空器选择型号类型,并可以使用各种混合功能。
-RadioMaster 团队敬上.
安全须知
许多遥控模型都配备了强大的电机和锋利的螺旋桨。 使用模型时,请谨慎行事。
进行组装或维护时,请确保已断开模型的电源并卸下螺旋桨。
在以下情况下,请勿操作T8遥控系统:
• 在恶劣天气或强风条件下,例如雨,冰雹,下雪,暴风雨或电磁环境中。
• 在能见度有限的任何情况下。
• 在可能存在人员、财产、电力高压线、公共道路、有车辆或动物的区域。
• 如果您感到疲倦或不适,或在药物或酒精的影响下。
• 如果遥控器或模型似乎已损坏或无法正常工作。
• 在2.4GHz干扰较大的区域或禁止使用2.4GHz无线电的地方。
• 当电池电压太低而无法使用时。
• 在当地法规禁止使用航空模型的区域。
固件下载和升级
T8出厂时安装了专用的T8固件,供D8和D16使用。该无线电不需要固件更新。只
需充电,对频即可飞翔!
要了解有关将T8转换为T8 Pro的可选硬件配件的信息,请访问访问www.radiomasterrc.com
7
Page 9

警告!
T8出厂时预装最稳定的固件。 如果您有经验并且有信心更新系统固件,请仅更
新固件。 不正确的更新可能会导致遥控器无法操作。
遥控器概述
SC 三段开关SB 三段开关
SD 两段开关SA 两段开关
电源开关
挂带环
SD卡槽 DIY天线端口
TYPE-C USB
T8
扬声器
对频按键
右摇杆左摇杆
状态指示灯
DSC 教练插口
可折叠手指位可折叠手指位
8
Page 10

电源及充电注意事项
T8内置了1000mAh 3.7V Lipo电池以及USB-C充电功能。标称电池电压为3.7v,
最大充电电压为4.2v。
请定期检查电池的电压和状况,决不要在无人看守的情况下为其充电。 请务
必始终在远离可燃材料的安全区域中充电。 如果遥控器弄湿或以任何方式损
坏,请勿充电。
对于不按照安全规范使用或滥用本产品造成的一切不良后果,RadioMaster不
承担任何责任。
充电状态和电池电量:
遥控器下方的5个LED灯指示充电状态。当指示灯依次从左向右点亮时,T8正在
充电。 5个LED指示灯平均指示电池容量的20%。当T8遥控器电压低且需要充
电时,所有5个电池状态LED会同时闪烁。在进一步使用遥控器之前,请为遥控
器充电。
状态
指示灯
五个指示灯表示0-100%电量,平均每个指示灯表示20%电量
电量
指示灯由1-5循环闪烁,表示正在充电,充电完成后指示灯全部常亮
充电
20% 40% 60% 80% 100%
使用指南
开机:按住电源按钮,电源灯亮起,遥控器震动一次,系统开机。
电源按钮指示灯
绿色
油门不在最低,或开关不在默认位置
红色
请将油门拉到最低,所有开关复位到默认位置,电源
按钮指示灯变为绿色,此时可正常使用
关机: 按下电源按钮约,直到感觉到遥控器震动一次,松开手指,指示灯熄
灭,系统关机。
电源按钮指示灯
熄灭
如果使用具有双向回传的接收机,当遥控器依然可以收到接收机回
传时,表示接收机并未在遥控关机前断电,此时电源按钮指示灯显
红色
示红色,提醒用户接收机并未断电,如果失去遥控信号,将会导致
不可预料的危险发生,所以请务必在遥控关机前,关闭接收机的电
源,以保证安全。
状态表示
正常开机,可正常使用
状态表示
正常关机
9
Page 11
默认通道顺序:
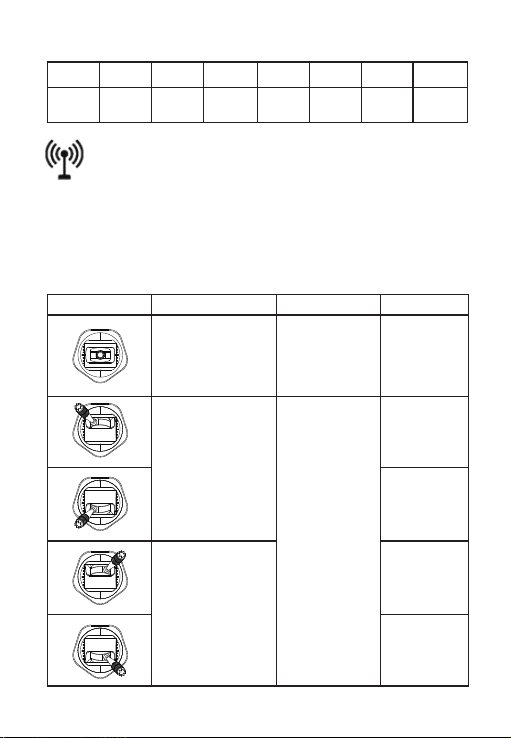
CH1 CH2 CH3 CH4 CH5 CH6 CH7 CH8
副翼横滚升降 油门俯仰方向
水平旋转SA2段开关SB3段开关SC3段开关SD2段开关
协议选择及对频指南
T8遥控器使用摇杆位置选择协议,遥控器背后的按钮进行对频。
将左侧的摇杆保持在下面所示的位置,然后按下对频按钮1秒钟以上,以绑定所
需的协议。电源按钮将闪烁蓝色,表示正在进行对频。
绑定模型或接收器后,您可以使用下面的“摇杆”位置并按住“对频”按钮1秒
钟以上,在各种模型之间进行切换。电源按钮将闪烁蓝色,表明协议正在更改。
如果先前已成功对频模型或接收机,则无需再次将接收机置于对频模式。
左摇杆位置 认证
FCC
LBT/EU
协议 版本
D8
V1
V2
D16
V1
V2
10
Page 12

各种不同的接收机和模型将具有不同的方法来将模型或接收器置于对频模式。请
按照模型或接收机造商提供的用户手册,对模型或接收机进行初始化对频过程。
关于输入灵敏度的注意事项:
如果您的操作对输入过于敏感,则可能需要设置EXPO。 EXPO是缓解摇杆中心处
一定范围的细腻感觉的功能。这可以帮助操控非常敏感的模型飞机。这是在模
型飞机的飞控系统中设置并处理的,并且根据所使用的飞控而有所不同,可能
称为EXPO或RC EXPO。请参阅特定无人机飞控的设置指南,以设置符合您操控手
感的EXPO。
技术指标
规格尺寸: 160*130*45mm
重量: 218g
传输频率: 2.400GHZ-2.480GHZ
发射器模块: 单芯片多协议高频模块(CC2500)
支持的协议: D8 / D16 v1 FCC / D16 v1 LBT / D16 v2 FCC / D16 v2 LBT
发射功率: 最大20dbm
天线增益: 2db
遥控距离: > 1km @ 20dbm
电池: 内置1000mAh 3.7V锂离子电池
充电接口: USB-TypeC充电接口
开源固件: OpenTX T8专用版本(无需软件或屏幕配置)*
DIY-Multiprotocol-TX-Module(高频模块)
通道数: 8个通道(取决于接收机)
可扩展配件: 128*64单色LCD显示器(附带导航设置按键以及微调按键,使用
扩展配件需将OpenTX系,更新为OpenTX T8 Pro版本专用固件
摇杆: 高精度电位器摇杆
以上含有*标的项目意为不支持或不需要OpenTX软件或用户设置。
保修及维修
如果您的遥控器硬件出现任何问题,请保留购买证明并与您购买T8遥控器的
零售商联系。
用户手册
有关T8详细用户手册,请访问https://www.radiomasterrc.com
11
Page 13

Visit our website to learn more
https://www.radiomasterrc.com/
Follow us on Facebook
https://www.facebook.com/radiomasterrc/
Follow us on Instagram
https://www.instagram.com/radiomasterrc/
 Loading...