

Page 1

Customer Satisfaction(顧客服務)
If you have any question,welcome to contact us.(如有疑問歡迎多加指教)
Sales/Manufacturer:TAIWAN
7F,No.108,Min-Chyuan Rd.,
Hsin-Tien,Taipei Hsien. Taiwan,R.O.C
Tel:+886-2-2219-1816 Fax:+886-2-2219-0655
http://www.planex.net
E-mail:service@planex.com.tw
地址:231台北縣新店市民權路108號7樓
電話:02-2219-1816 傳真:02-2219-0655
客服專線:0800-090-939
http://www.planex.com.tw
E-mail:service@planex.com.tw
Head office:JAPAN
12-7, Nihonbashi Ohdenmacho,
Chuo-Ku. Tokyo,103-0011
Tel:+81-3-5614-1011 Fax:81+3-5614-1018
http://www.planex.co.jp
E-mail:info-planex@planex.co.jp
Branch:SINGAPORE
No.1 Rochor Canal Road,
Sim Lim Square,#04-33
Singapore 188504
http://www.planex.net
E-mail:info-sales@pleanx.com.sg
Wireless
4 PortBroadband Router
BLW-04EX
Page 2

USER'S MANUAL
Wir
eless
4 PortBroadband Router
BLW-04EX
Page 3

BLW-04EX
BLW-04EX
Trademarks
Copyright @2002 PLANEX COMMUNICATIONS INC.
Contents subject to change without prior notice.
Pci is a registered trademark of PLANEX COMMUNICA
All other trademarks belong to their respective proprietors.
TIONS INC.
Copyright Statement
No part of this publication may be reproduced in any form or by any means
or used to make any derivative s uch as translation, transformation, or
adaptation without permission from PLANEX COMUNICATIONS INC.
FCC Warning
This equipment has been tested and found to comply with the limits for a
Class A digital device, pursuant to Part 15 of the FCC Rules. These limits
are designed to provide reasonable protection against harmful interference
when the equi pment is operated in a commercial environ ment. This
equipment generates, uses, and can radiate radio frequency energy and, if
not installed and used in accordance with this user's guide, may cause
harmful interferen ce to radio communications. H o w e v e r, there is no
guarantee that interference will not occur in a particular installation. If this
equipment does cause harmful interference to radio or television reception,
which can be determined by turning the equipment off and on, the user is
encouraged to try to correct the interference by one or more of the following
measures:
● Reorient or relocate the receiving antenna
● Increase the separation between the equipment and the receiver
● Connect the equipment into an outlet on a circuit different from the one
which the receiver is connected to
● Consult the dealer or an experienced radio/TV technician for help
Y
ou are cautioned that changes or modifications not expressly approved
by the party responsible for compliance could void your authority to
operate the equipment.
Warnings: Wear an antistatic wrist strap to take other suitable measures to
prevent electrostatic discharge whenever handling the equipment.
CE Mark Warning
This is a Class B product. In a domestic environment, this product may
cause radio interference in which case the user may be required to take
adequate measures.
Page 4

BLW-04EX
BLW-04EX
Chapter 1 Introduction
1 1
About the BLW-04EX ......................................
Features and Benefits.......................................
2
3
Applications.......................................................
Chapter 2 Installation
Package Contents............................................................
2
1
Installing the Access Point...............................
2
Hardware Description......................................
System Requirements.......................................
3
4
Connect the System..........................................
Basic Installation Procedure...........................
5
Chapter 3 CONFIGURING CLIENT PCS
3 1
TCP/IP Configuration ....................................
Chapter 4 CONFIGURING THE BLW-04EX
4 1
Navigating the Web Browser Interface.........
10
16
18
19
ADVANCED SETTING..................................
2
2
4 3
4
MISC Setting...................................................
4
2
Chapter 5 CONFIGURING CLIENT TCP/IP
37
48
54
3
5 1
Installing TCP/IP............................................
Setting Up TCP/IP to Work with ...................
5
6
6
8
9
9
2
the BLW-04EX..................................................
Appendix A
TROUBLESHOOTING....................................
Appendix B
CABLES ...........................................................
54
57
102
106
Appendix C
SPECIFICATIONS ...........................................
110
Making ConfigurationChanges.......................
4
Setup Wizard....................................................
2
19
20
Version:1.0 E Rev.A
Page 5

BLW-04EX
Chapter 1
Introduction
Congratulations on your purchase of a Barricade™ Wireless Cable/DSL
Broadband Router. PCI is proud to provide you with a powerful yet simple
communication device for connecting your local area network (LAN) to the
Internet. For those who want to surf the Internet at the lowest possible cost,
the BLW-04EX™ is the convenient, easy solution.
1 1
About the BLW-04EX
About the BLW-04EX
The BLW-04EX provides Internet access to multiple users by sharing a
single-user account. The BLW-04EX features a WAN interface that allows
you to connect either a DSL or cable modem. The BLW-04EX provides
extensive firewall protection services.
The BLW-04EX provides many cost-effective functions and management
benefits. It is simple to configure and can be up and running in minutes.
1 2
●Internet connection to DSL or cable modem via a 10/100 Mbps WAN port
●Local network connection via 10/100 Mbps Ethernet ports or 11 Mbps
Features and Benefits
wireless interface (supporting up to 128 mobile users)
● 8 0 2 . 11b Compl i ant – interop erab le wit h multiple vend ors
● Pr ovides s eamless roaming with in 802.11 b WLA N env ironm ent
●DHCP for dynamic IP configuration, and DNS for domain name mapping
●Firewall with Stateful Packet Inspection, client privileges, hacker
prevention, DoS, and NAT
●NAT also enables multi-user access with a single-user account, and virtual
server functionality (providing protected access to Internet services such
as web, mail, FTP, and Telnet)
●User-definable application sensing tunnel supports applications requiring
multiple connections
1
2
Page 6

BLW-04EX
BLW-04EX
●Parental controls allows the user to limit certain web sites
●Email alerts when the users network is being compromise
●Easy setup through a web browser on any operating system that supports
TCP/IP
● Compatible with all popular Internet applications
1 3
Applications
Many advanced applications are provided by the BLW-04EX, such as:
LAN Access
The BLW-04EX provides connectivity to 10/100 Mbps devices, making it
easy to create a network in small offices or homes.
Internet Access
This device supports Internet access through a DSL or cable connection.
Since many DSL providers us e PPPoE to establish communications with
end users, the BLW-04EX includes a built-in client for this proto col,
eliminating the need to install this service on your computer.
Shared IP Address
The BLW-04EX shares a single IP address with up to 253 users. Using only
one ISP account, multiple users on your network can simultaneously browse
the Internet.
Virtual Server
If you have a static IP address, you can set up the BLW-04EX to act as a
virtual host for network address translation. Remote users access various
services at your site using the static IP address. Then, depending on the
requested service (or port number), the BLW-04EX routes the request to the
appropriate server (at an internal network IP address). This secures your
network from direct attack b y hackers, and provides more flexible
management by allowing you to change internal network IP addresses
without affecting outside access to your network.
User-Definable Application Sensing Tunnel
You may define special applications that require multiple connections such
as Internet gaming, video conferencing, and Internet telephony. The BLW04EX will then sense the application type and open a multi-port tunnel for
it.
DMZ Hosts Support
Allows a networked computer t o be fully exposed to the Internet. This
function is used when th e special application sensing tunnel feature is
insufficient to allow an application to function correctly.
Security
The BLW-04EX supports security features t hat deny Internet access to
specified users, or drop requests for specific services. The B LW- 0 4 E X ’ s
firewall also blocks common hacker attacks, i ncluding IP Spoofing, Land
Attack, Ping of Death, IP with zero length, Smurf Attack, UDP port
loopback, Snork Attack, TCP null scan, and TCP SYN flooding.
3
4
Page 7

BLW-04EX
Chapter 2
Installation
Before installing the BLW-04EX™, verify that you have the items listed
under “Package Contents.” Also be sure that you have the necessary
cabling.
2
Package Contents
1
Package Contents
If any of th e items are miss ing or damaged , contact your local PCI
distributor.
● BLW-04EX Broadband Router
● Power adapter
● One CAT-5 Ethernet cable
● Four rubber feet
● Quick Installation Guide
● PCI Warranty Registration Card If possible, retain the carton and original
packing materials in case there is a need to return the product.
2
Hardware Description
2
Please fill out and return the Warranty Registration Card to PCI, or register
on PCI’s web site at www. p l a n e x . c o m . t w. The BLW-04EX Broadband
Router is covered by a limited lifetime warranty.
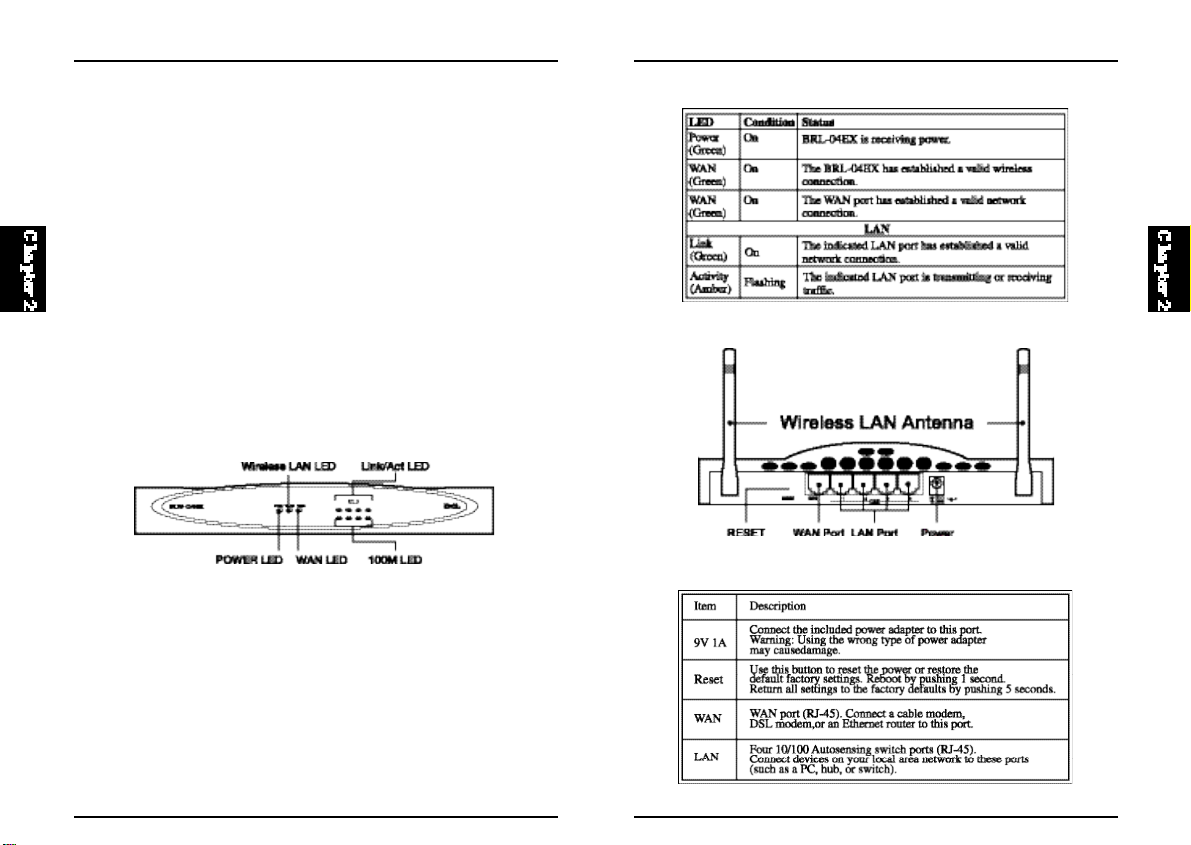
Hardware Description
The BLW-04EX Broadband Router may be connected to the Internet or to a
remote site using its RJ-45 WAN port. It may be connected directly to your
PC or to a l ocal area network using any of the four 10/100 autosensing
switch ports.
These RJ-45 ports auto-negotiate the operating speed (10/100 Mbps) and
the duplex mode (half/full duplex).
5
6
Page 8
BLW-04EX
BLW-04EX
Access speed to the Intern et depends o n your s ervice type. Full-rate
symmetric Digital Sub scriber Line (ADSL) provid es up to 8 Mbp s
downstream and 640 Kbps upstream; G.lite (or splitterless) ADSL provides
up to 1.5 M bps d ownstream and 512 Kbps upstream; Cable mod ems
provide up to 36 Mbps downstream and 2 Mbps upstream. However, you
should note that the actual rate provided by specific service providers may
vary dramatically from these upper limits.
Though Internet access speed is determined by the modem type connected
to your BLW-04EX, data passing between devices connected to your local
area network can run up to 100 Mbps over the Fast Ethernet ports.
The BLW-04EX includes LED indicators on the front panel that simplify
installation and network troubleshooting.
■Front Panel
2-1. Front Panel
LED Indicators
The BLW-04EX in clud es LED in dicators on the f ront p ane l th at
simplify installation and network troubleshooting.
■Rear Panel
2-2. Rear Panel
7
8
Page 9

BLW-04EX
BLW-04EX
1. Connect the LAN: You can connect the BLW-04EX to your PC, or to a
hub or switch. Run Ethernet cable from one of the LAN ports on the rear
of the BLW-04EX to your computer’s network adapter or to another
network device. You can also connect the BLW-04EX to your PC (using
a wireless client adapter) via radio signals. Position both antennas on the
back of the BLW-04EX into the desired positions. For m ore eff e c t i v e
coverage, you may want to position one antenna along the vertical axis
and th
9
10
Page 10
BLW-04EX
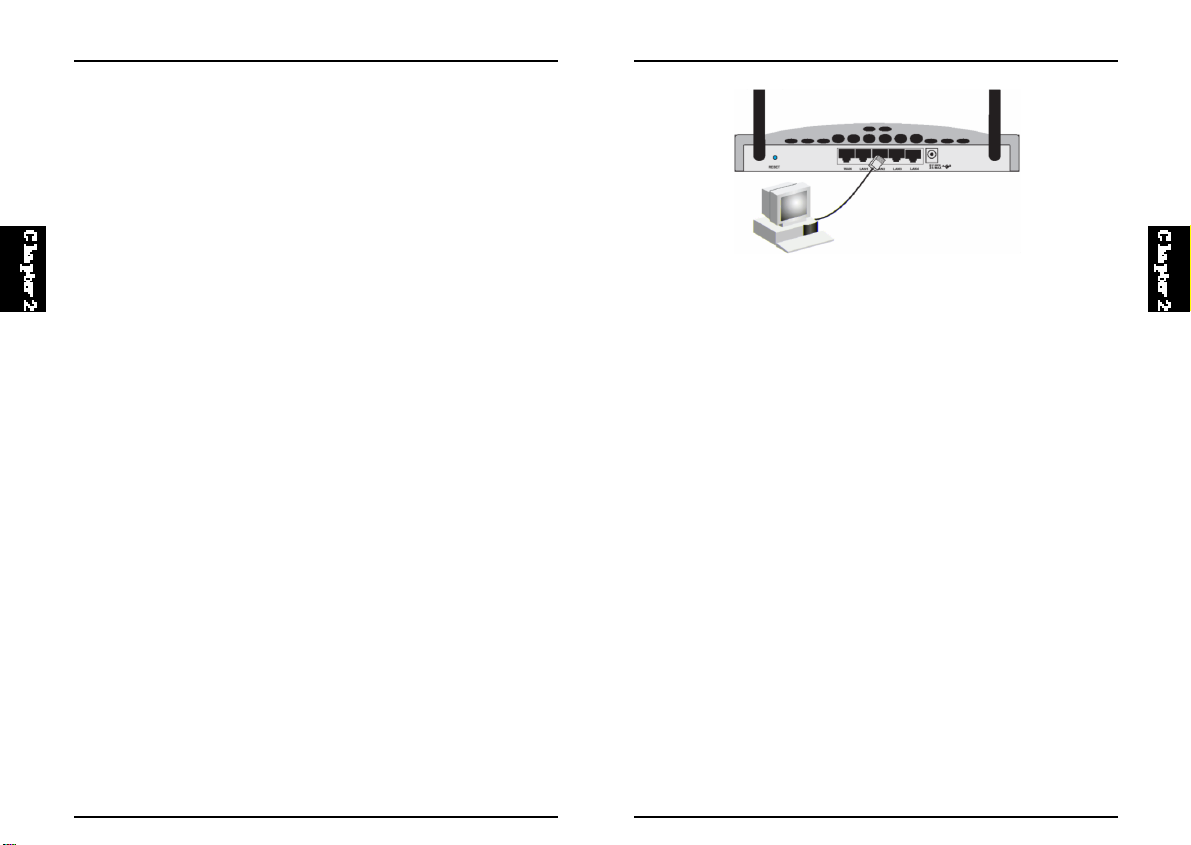
Attach to Your Network Using Ethernet Cabling
The four LAN ports on the BLW-04EX can auto-negotiate the connection
speed to 10 Mb ps Ethernet or 100 Mbp s Fast Ethernet, as well as the
transmission mode to half-duplex or full-duplex.(See Appendix B for details
on wiring.) Use twisted-pair cable to connect any of the four LAN ports on
the BLW-04EX to an Ethernet adapter on your PC. Otherwise, you can
cascade any of LAN ports on the BLW-04EX to an Ethernet hub or switch,
and then connect your PC or other network equipment to the hub or switch.
When i nserting an RJ-45 plug, be sure the tab on the plug clicks into
position to ensure that it is properly seated.
Wa r n i n g : Do not plug a phone jack connector into any RJ-45 port. This
may damage the BLW-04EX. Instead, use only twisted-pair cables with RJ45 connectors that conform with FCC standards.
BLW-04EX
2-4. Making LAN Connections
Attach to Your Network Using Radio Signals
Install a wireless network adapter in each computer that will be connected to
the Internet or your local network via radio signals. PCI currently off e r s
several wireless network cards, including the GW-DS110 Wireless PCI card
and the GW-NS11S Wireless PC card.
Notes:
1. Use 100-ohm shielded or unshielded twisted-pair cable with RJ-45
connectors for all connections. Use Category 3, 4 or 5 for connections
that operate at 10 Mbps, and Category 5 for connections that operate at
100 Mbps.
2. Make sure each twisted-pair cable does not exceed 100 meters (328 feet).
11
Rotate both antennas on the back of the BLW-04EX to the desired position.
For more effective coverage, position one antenna along the vertical axis
and the other along the horizontal axis. Try to place the BLW-04EX in a
position that is located in the center of your wireless network. Normally, the
higher you place the antenna, the better the performance. Ensure that the
BLW-04EX’s location provides optimal reception throughout your home or
office.
Computers equipped with a wireless adapter can communicate with each
other as an independent wireless LAN by configuring each computer to the
same radio channel. However, the BLW-04EX can provide access to your
wired/wireless LAN or to the Internet for all wireless workstations. Each
wireless PC in this network infrastructure can talk to any computer in the
wireless group via a radio link, or access other compu ters or network
resources in the wired LAN infrastructure or over the Internet via the BLW- 0 4 E X .
12
Page 11
BLW-04EX
The wireless infrastructure configuration not only extends the accessibility
of wireless PCs to the wired LAN, but also doubles the effective wireless
transmission range for wireless PCs by retransmitting incoming radio
signals through the BLW-04EX.
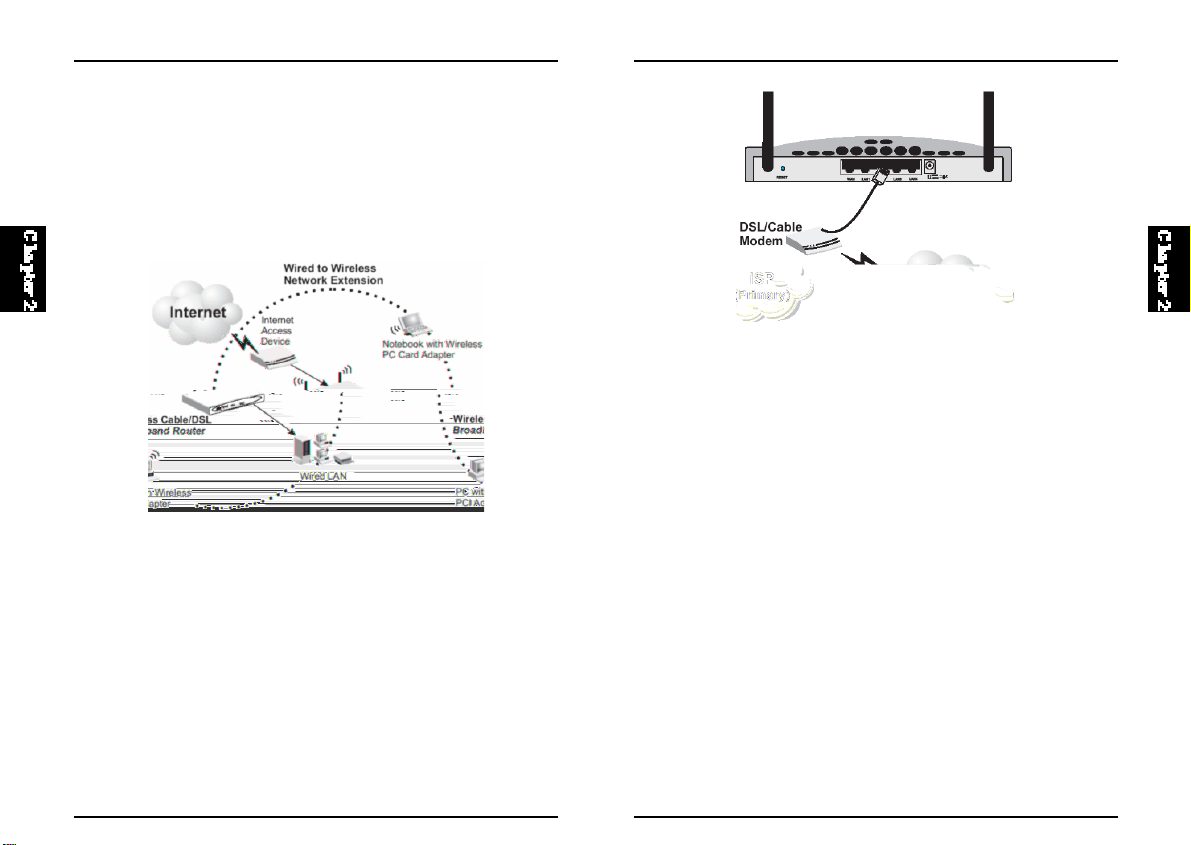
A wireless infrastructure can be used for access to a central database, or for
connection between mobile workers, as shown in the following figure:
2-5. Making WLAN Connections
Attach the BLW-04EX to the Internet
If Internet services are provided through an xDSL or cable modem, use
unshielded or shielded twisted-pair Ethernet cable (Category 3 or greater)
with RJ-45 plugs to connect the broadband modem directly to the WAN port
on the BLW-04EX.
BLW-04EX
2-6. Making WAN Connection
Note:
When con necting to the WAN po rt, u se 100-ohm Category 3, 4 o r 5
shielded or unshielded twisted-pair cable with RJ-45 connectors at both
ends for all connections.
Connecting the Power Adapter
Plug the power adapter into the power socket on the BLW-04EX, and the
other end into a power outlet. Check the indicator marked Power on the
front panel to be sure it is on. If the Power indicator does not light up, refer
to Troubleshooting in Appendix A.
13
14
Page 12

BLW-04EX
Chapter 3
CONFIGURING CLIENT PCS
3
TCP/IP Configuration
To access the Internet through the BLW-04EX, you must configure the
network settings of the computers on your LAN to use the same IP subnet
as the BLW-04EX. The default network settings for the BLW-04EX are:
IP Address: 192.168.1.1
Subnet Mask: 255.255.255.0
Note:
These settings may be changed to suit your network requirements, but you
must first configure at l east one computer as described in Chapter 5 to
access the BLW- 0 4 E X ’s web configuration interface. (See Chapter 4 for
information on configuring the BLW-04EX.)
If you have not previously configured TCP/IP for your computer, refer to
“Configuring Client TCP/IP” on page 5-1.
All PCs connected to the BLW-04EX must be in the same IP subnet as the
B LW-04EX. The default IP address of the BLW-04EX is 192.1 68.1. 1
(where x means 2–254) and the subnet mask is 255.255.255.0. You can set
the IP address for client PCs either by automatically obtaining an IP address
from the BLW- 0 4 E X ’s DHCP service or by manual configuration. See
“Setting Up TCP/IP to Work with the BLW-04EX” on page 5-5.
CONFIGURING CLIENT PCS
1
1615
Page 13

BLW-04EX
Chapter 4
CONIFIGURING THE BLW-04EX
After you have configured TCP/IP on a client computer, use a web browser
to configure the BLW-04EX. The BLW-04EX can be configured by any
Java-supp orted browser including Internet Explorer 4.0 or abov e, or
Netscape Navigator 4.0 or above. Using the web management interface, you
may configure the BLW-04EX and v iew statistics to monitor network
activity.
To access the BLW- 0 4 E X ’s management interface, enter the IP your web
browser address of the BLW-04EX in http://192.168.1.1
Note:
For s ome browsers , it may be n eces sary to includ e :80 80 after the
management IP address. For example:http://192.168.1.1:8080
Then click “LOGIN” (by default, there is no password).
17
18
Page 14
BLW-04EX
BLW-04EX
4
The BLW- 0 4 E X ’s management interface features a Setup Wizard and an
Advanced Setup section. Use the Setup Wizard if you want to quickly setup
the BLW-04EX for use with a cable modem or DSL modem.
Advanced setup supports more advanced functions like hacker attack
detection, IP and MAC address filtering, intrusion detection, virtual server
setup, virtual DMZ hosts, as well as other advanced functions.
Making Configuration Changes
Configurable parameters have a dialog box or a drop-down list. Once a
configuration change has been made on a page, be sure to click the “Apply”
or “Next” button at the bottom of the page to enable the new setting.
Note:
To ensure proper screen refresh after a command entry, be sure that Internet
Explorer 5.0 is configured as follows: Under the menu “To o l s / I n t e r n e t
Options/General/Temporary Internet Files/Settings,” the setting for “Check
for newer versions of stored pages” should be “Every visit to the page.”
Navigating the Web Browser Interfact
1
4
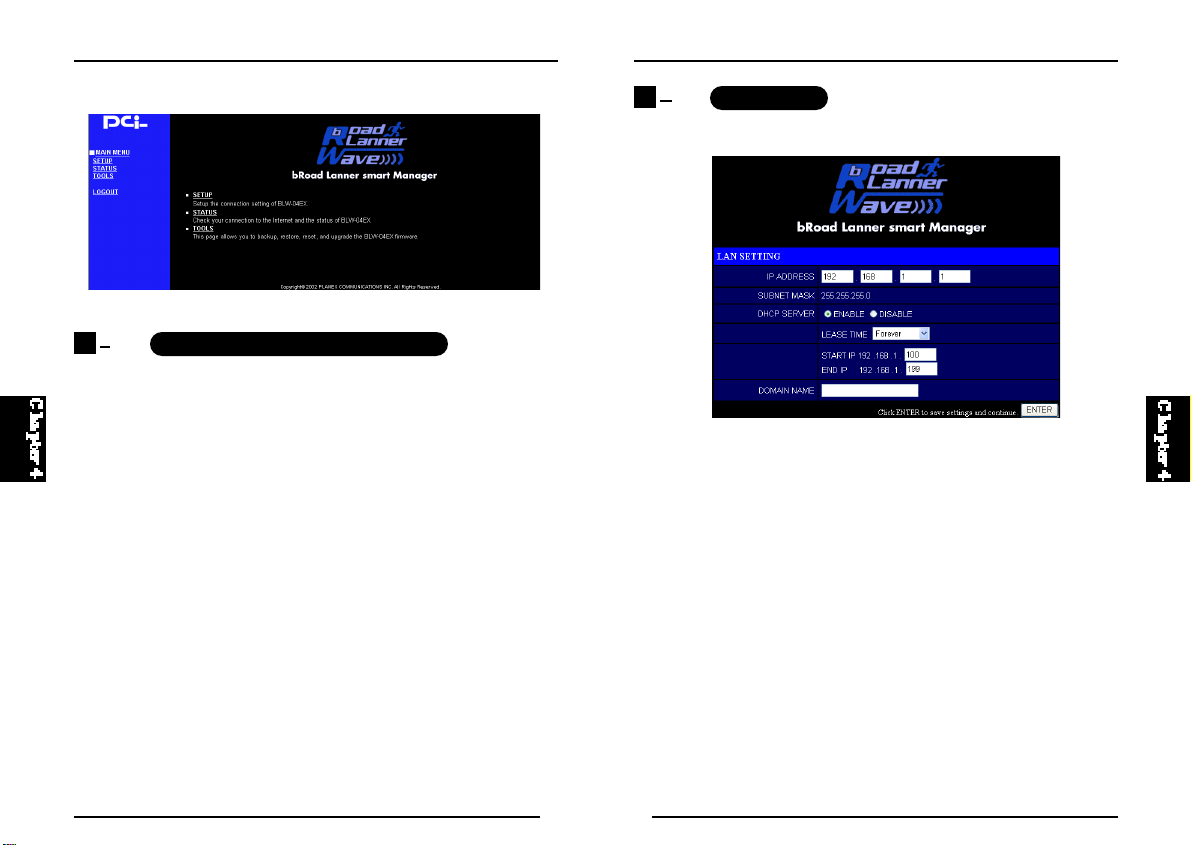
LAN
LAN IP
Use the LAN menu to configure the LAN IP address for the BLW- 0 4 E X
and to enable the DHCP server for dynamic client address allocation.
Set a period for the lease time if required. For home networks this may be
set to “Forever”, which means there is no time limit on the IP address lease.
IP Address Pool
A dynamic IP start address may be specified by the user, e.g. 192.168.1.100
(default value). Once this start IP address has been assigned, IP addresses
running from 192.168.1.100 to 192.168.1.199 will be part of the dynamic IP
ad dress p ool. I P addres ses from 192.168.1.2 to 19 2.168 .1.99 , and
192.168.1.200 to 192.168.1.254 will be available as static IP addresses.
Remember not to include the address of the BLW-04EX in the client address
pool. Also remember to configure your client PCs for dynamic IP address
allocation.
Setup Wizard
2
19
20
Page 15
BLW-04EX
BLW-04EX
Wireless Configuration
To configure the BLW-04EX as a wireless access point for wireless clients
(either stationary or roaming), all you need to do is define the radio channel,
the Service Set identifier (SSID), and encryption options.
You must specify a common radio channel and SSID (Service Set ID) to be
used by t he BLW-04EX and all of your wireless clients. Be sure you
configure all of your clients to the same values.
S S I D : The Service Set ID. This should be set to the same value as other
wireless devices in your network.
Note: The SSID is case sensitive and can consist of up to 32 alphanumeric
characters.
SETUP WIZARD
For accurate timing of client filtering and log events, you need to set the
time zone. Select your time zone from the dropdown list. Click “Next.”
Broadband Type
Select the type of broadband connection you have.
Cable Modem
Your ISP may have given you a host name. If so, enter it into this field.
21
22
Page 16
BLW-04EX
BLW-04EX
Click “Finish” to complete the setup. The Status page will open to allow
you to view the connection status, as well as other information. See “Status”
on page 64 for details.
Static IP xDSL
Some xDSL Internet Service Providers may assign a fixed (static) IP
address for your gateway. If you have been provided with this information,
choose this option and enter the assigned IP address, subnet mask, gateway
IP, and DNS IP addresses for the BLW-04EX.
Click “Finish” to complete the setup. The Status page will open to allow
you to view the connection status, as well as other information. See “Status”
on page 64 for details.
PPP over Ethernet
Enter the PPPoE user n ame and password assigned by your Service
Provider. The Service Name is normally optional, but may be required by
some service providers.
Leave the Maximum Transmission Unit (MTU) on the default value (1492)
unless you have a particular reason to change it.
Enter a Maximum Idle T ime (in minutes) to define a maximum period of
time for which the Internet connection is maintained during inactivity. If the
connection is inactive for longer than the Maximum Idle Time, it will be
dropped. Enable the Auto-reconnect option to automatically re-establish the
connection as soon as you attempt to access the Internet again.
23
24
Page 17
BLW-04EX
Bridge Mode
BLW-04EX
Use your BLW-04EX as a Bridge.
Basic Setting
Use the web management interface to define system parameters, manage
and control the BLW-04EX and its ports, or monitor network conditions.
The following table outlines the selections available from this program.
25
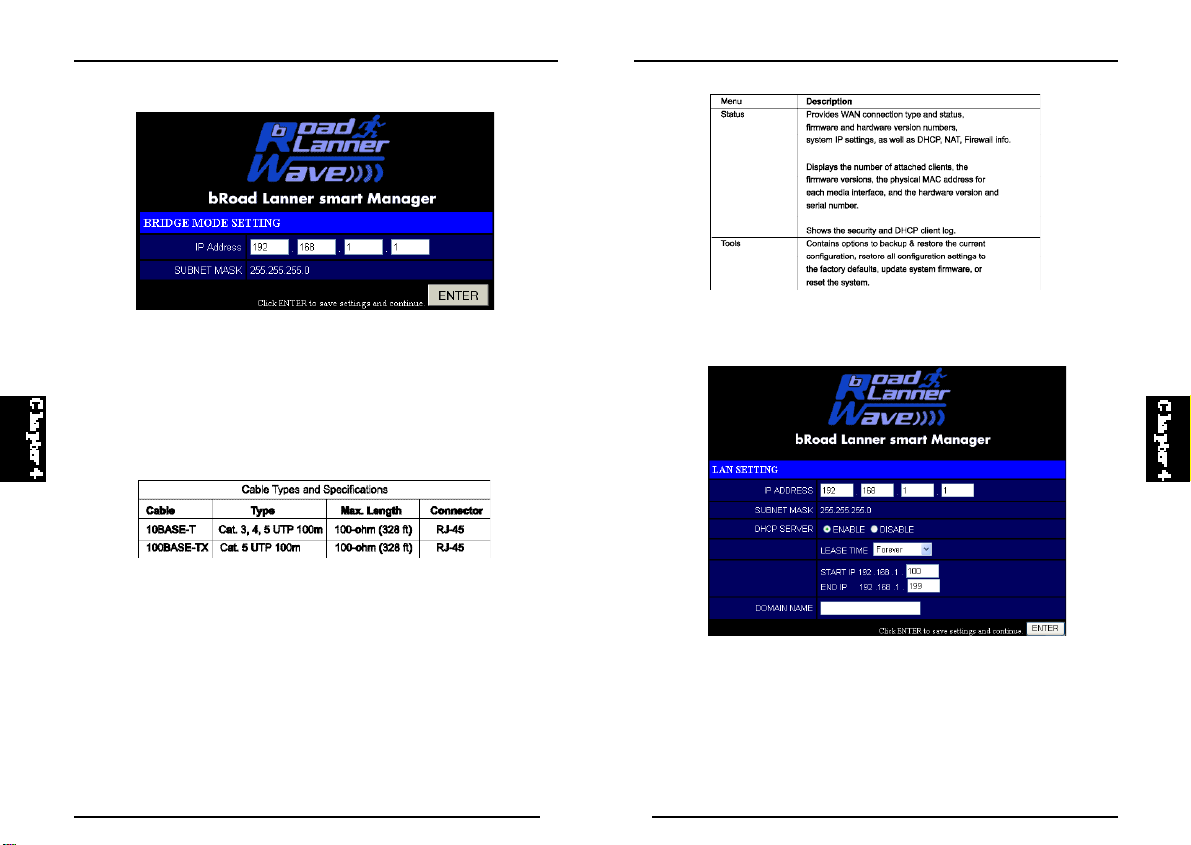
Basic Setting
LAN
LAN IP
Use the LAN menu to configure the LAN IP address for the BLW- 0 4 E X
and to enable the DHCP server for dynamic client address allocation.
Set a period for the lease time if required. For home networks this may be
set to “Forever”, which means there is no time limit on the IP address lease.
26
Page 18
BLW-04EX
BLW-04EX
IP Address Pool
A dynamic IP start address may be specified by the user, e.g. 192.168.1.100
(default value). Once this start IP address has been assigned, IP addresses
running from 192.168.1.100 to 192.168.1.199 will be part of the dynamic IP
add ress pool. IP addresses from 19 2.168 .1.2 to 192.16 8.1.9 9, and
192.168.1.200 to 192.168.1.254 will be available as static IP addresses.
Remember not to include the address of the BLW-04EX in the client address
pool. Also remember to configure your client PCs for dynamic IP address
allocation.
WAN
Specify the WAN connection type provided b y your Internet Service
P r o v i d e r, then click “More Configuration” to enter detailed configuration
parameters for the selected connection type.
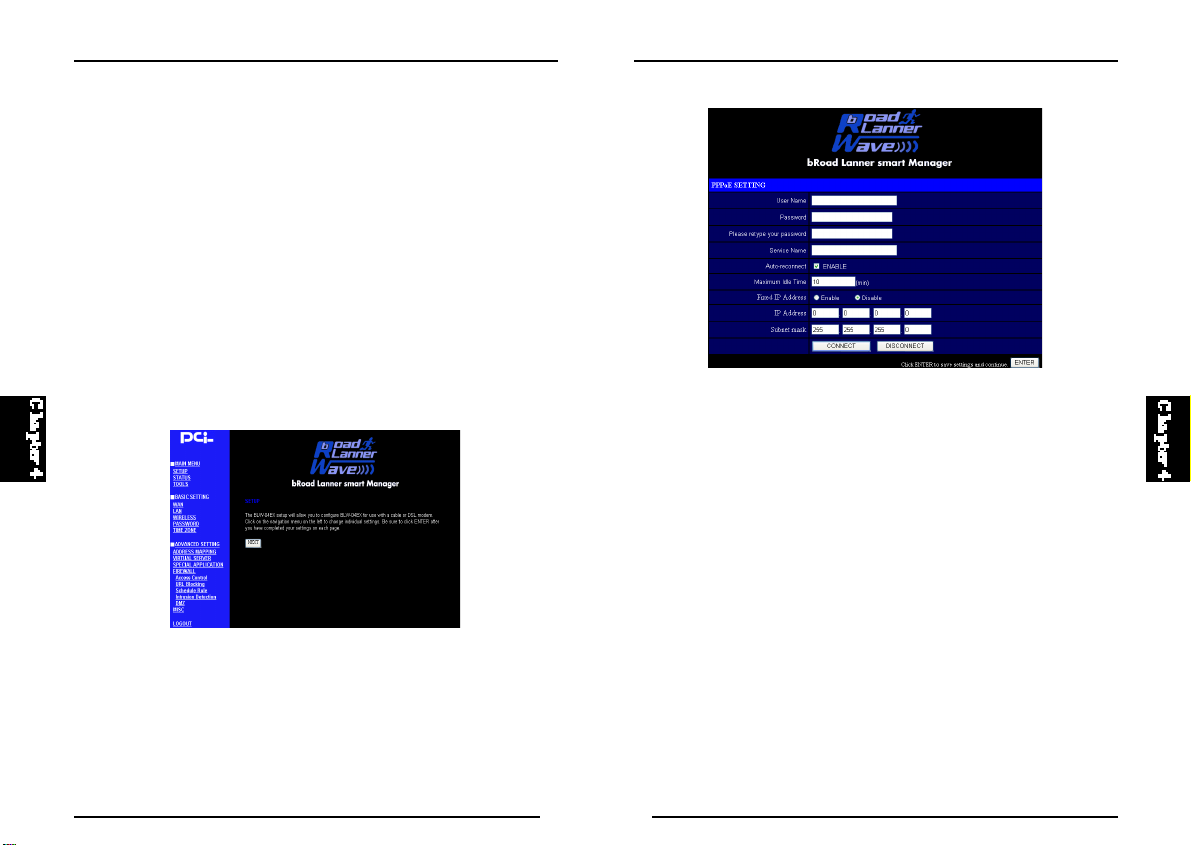
PPP over Ethernet
Enter the PPPoE user n ame and password assigned by your Service
Provider. The Service Name is normally optional, but may be required by
some service providers.
The MTU (Maximum Transmission Unit) governs the maximum size of the
data packets. Leave this on the default value (1492) unless you have a
particular reason to change it.
Enter a Maximum Idle T ime (in minutes) to define a maximum period of
time for which the Internet connection is maintained during inactivity. If the
connection is inactive for longer than the Maximum Idle Time, it will be
dropped. Enable the Auto-reconnect option to automatically re-establish the
connection when an application attempts to access the Internet again.
27
28
Page 19

BLW-04EX
BLW-04EX
Dynamic IP
The Host Name is optional, but may be required by some ISPs. The default
MAC address is set to the WAN’s physical interface on the BLW-04EX. Use
this address when registering for Internet service, and do not change it
unless required by yo ur ISP. If your ISP used the MAC address of an
Ethernet card as an identifier when first setting up your broadband account,
connect only the PC with the registered MAC address to the BLW- 0 4 E X
and click the “Clone MAC Address” button. This will replace the current
BLW-04EX MAC address with the already registered Ethernet card MAC
address.
If you are u nsure of which PC was originally set up by the broadband
technician, call your ISP and request they register a new MAC address for
your account. Register using the default BLW-04EX MAC address.
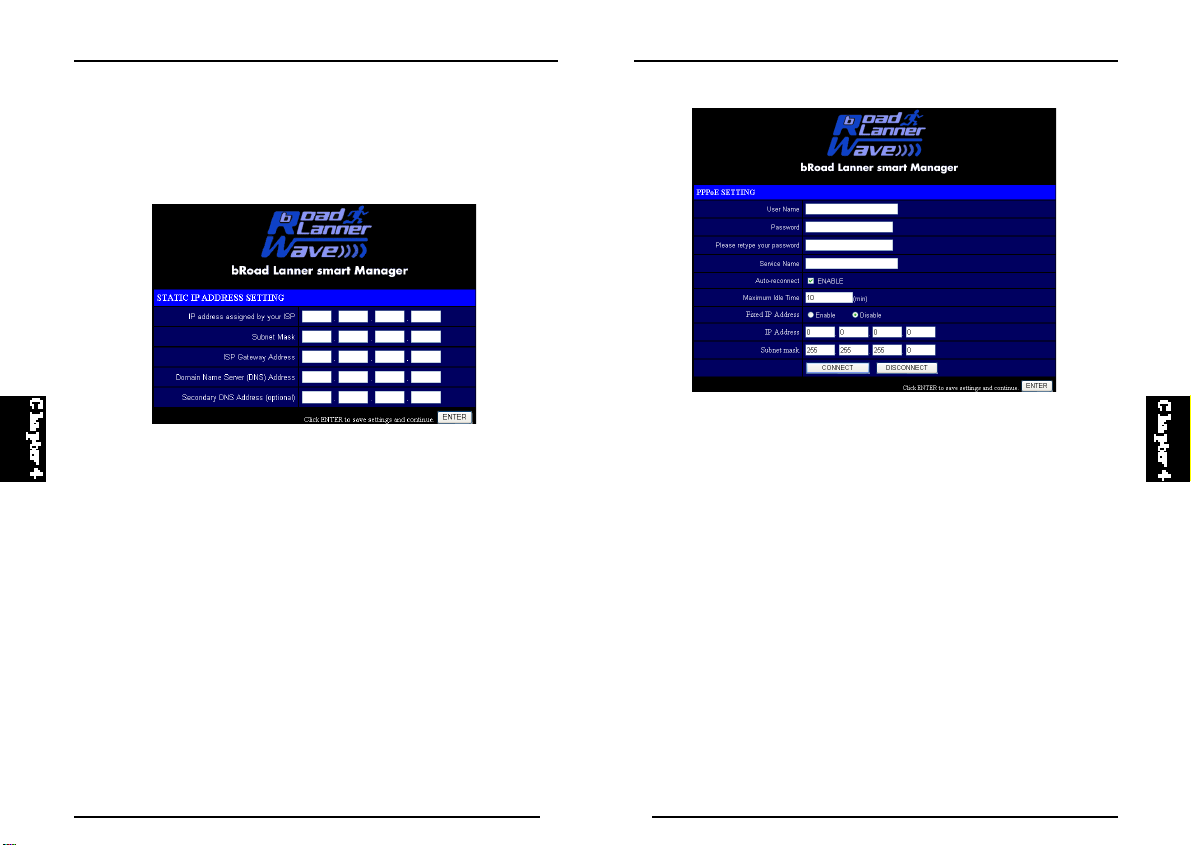
Static IP Address Setting
If your Internet Service Provider has assigned a fixed IP address, enter the
as signed address and subnet mask for the BLW-04EX, then enter the
gateway address of your ISP. You may need a fixed address if you want to
provide Internet services, such as a web server, or FTP server.
Bridge Mode
Use your BLW-04EX as a Bridge.
29
30
Page 20

BLW-04EX
BLW-04EX
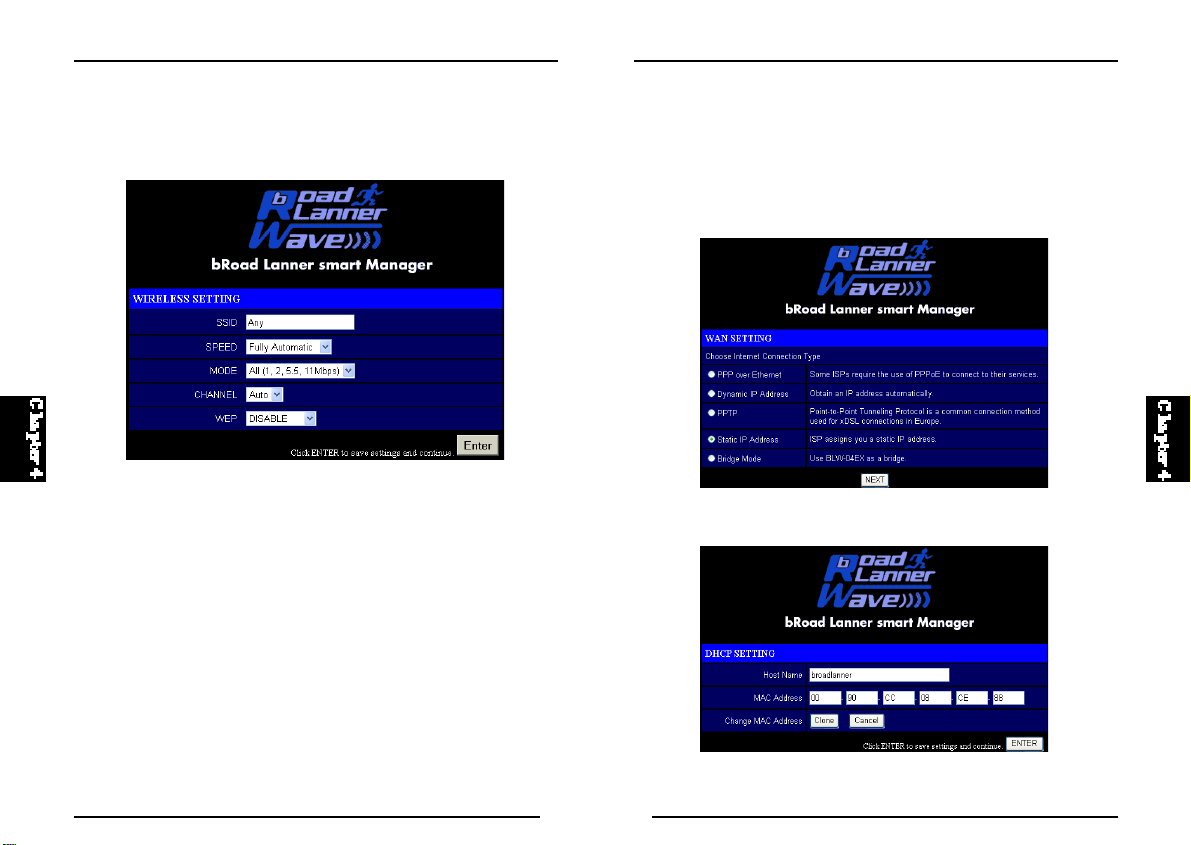
Wireless Configuration
To configure the BLW-04EX as a wireless access point for wireless clients
(either stationary or roaming), all you need to do is define the radio channel,
the Service Set identifier (SSID), and encryption options.
You must specify a common radio channel and SSID (Service Set ID) to be
used by t he BLW-04EX and all of your wireless clients. Be sure you
configure all of your clients to the same values.
S S I D : The Service Set ID. This should be set to the same value as other
wireless devices in your network.
Note: The SSID is case sensitive and can consist of up to 32 alphanumeric
characters.
Transmission Rate: Set the data rate transmitted from the BLW-04EX. The
lower the data rate, the longer the t ransmission distance. (Default: Fully
Automatic)
Basic Rate: Select “All (1, 2, 5.5, 11Mbps)” from the drop-down l ist to
optimize the data transfer speed for your network. (Default: 1, 2Mbps)
Channel: The radio channel through which the BLW-04EX communicates
to PCs in its BSS.
(Default: “Auto”)
Note:
The available channel settings are limited to local regulations, which
determine the number of channels that are available.
31
32
Page 21

BLW-04EX
Encryption
If you are transmitting sensitive data across wireless channels, you should
enable Wired Equivalent Privacy (WEP) encryption.
Encryption requires you to use the same set of encryption/decryption keys
for the BLW-04EX and all of your wireless clients. You can choose between
standard 64-bit or the more robust 128-bit encryption keys.
You can automatically generate encryption keys or you can manually enter
the keys. For automatic 64-bit security, you enter a passphrase that is used
to create four keys (as shown below). The automatic 128 -bit security
generates a single key by entering a passphrase.
BLW-04EX
If you use encryption, configure the same keys used for the BLW-04EX on
each of your wireless clients. Not e that the Wired Equivalent Privacy
(WEP) protects data transmitted between wireless nodes, b ut does not
protect any transmissions over your wired network or over the Internet.
33
34
Page 22

BLW-04EX
BLW-04EX
DNS
Domain Name Servers map numerical IP addresses to the equivalent
domain name (e.g., www.planex.com.tw). Your ISP should provide the IP
address of one or more domain name servers. Enter those addresses on this
screen.
Password Settings
Passwords can contain from 3–12 alphanumeric characters and are not case
sensitive.
If your password is lost, or you cannot gain access to the us er interface,
press the Reset button on the rear panel (holding it down for at least five
seconds) to restore the factory defaults (default is “0000”).
Time Zone
Sets the time zone for the BLW-04EX. This information is used for log
entries and client access control.
Use this menu to restrict access based on a password. By default, there is no
password. For security you should assign one before exposing the BLW-
04EX to the Internet.
35
36
Page 23

BLW-04EX
BLW-04EX
4
ADVANCED SETTING
3
Address Mapping
Allows one or more public IP addresses to be shared by multiple internal
users. Enter the Public IP address you wish to share into the “Global IP”
field. Enter a range of internal IPs that will share the global IP into the
“from” field.
Virtual Server
If you configure the BLW-04EX as a virtual server, remote users accessing
services such as web or FTP at your local site via public IP addresses can be
au tomaticall y redirected to local servers configu red with private IP
addresses. In other words, depending on the requested service (TCP/UDP
port number), the BLW-04EX redirects the external service request to the
appropriate internal server and port.
37
38
Page 24

BLW-04EX
BLW-04EX
The WAN interface should have a fixed IP address to properly utilize this
function. For example, if you set Type/Public Port to TCP/80 (HTTP or
web) and the Private IP/Port to 192.168.1.2/8080, then all HTTP requests
from outside users will be transferred to port 80 80 on 192. 168.1. 2.
Therefore, by just entering the IP Address provided by the ISP, Internet
users can access the service you provide at the internal address and port to
which the BLW-04EX redirects them.
Some of the more common TCP service ports include:
HTTP: 80, FTP: 21, Telnet: 23 and POP3: 110.
Security Settings Firewall
The firewall does not significantly affect system performance, so we advise
enabling it to protect your network us ers. Select “Enable” and click the
“APPLY” button to open the Firewall submenus.
The BLW- 0 4 E X ’s firewall can provide the access control of connected
client PCs, block common hacker attacks, including IP Spoofing, Land
Attack, Ping of Death, IP with zero length, Smurf Attack, UDP p ort
loopback, Snork Attack, TCP nul l scan, and TCP SYN flooding. The
firewall does not si gnificantly affect system performance, so we advise
leaving it enabled to protect your network users.
Note:
When y ou select the “Enable” radio button of the “Enable or disable
Firewall module function” field, be sure to press the “APPLY” button.
Access Control
Using this option allows you to specify different privileges for the client
PCs.
39
40
Page 25

BLW-04EX
BLW-04EX
The following items are included in the “Access Control” screen:
Note:
When y ou select the “Enable” radio button of the “Enable or disable
Firewall module function” field, be sure to press the “APPLY” button.
URL Blocking
Using t he above screen to block access to the Web sites specified in the
table.
41
42
Page 26

BLW-04EX
BLW-04EX
Schedule Rule
You can filter Internet access for local clients based on the “Rule Name,”
and time of day.
1. Click on “Add Schedule Rule”
2. Define t he appropriate settings for a schedule rule (as shown in the
following screen).
3. Click “OK” and then the “APPLY” button to save you r settings. (as
shown on previous page)
Intrusion Detection
The Intrusion Detection feature of the BLW-04EX limits the access of the
incoming traffic from the WAN port. When the SPI feature is turned on, all
the incoming packets will be blocked unless certain types of traffic types are
checked by the users. When the user checks certain types of traf fic, only the
particular type of traffic initiated from the Internal LAN will be allowed.
For example, if the user only checks “FTP service” from the Stateful Packet
Inspection heading, all the incoming traffic will be blocked except the FTP
connection initiated from the local LAN.
43
44
Page 27

BLW-04EX
BLW-04EX
● Stateful Packet Inspection
This option allows you to select different application types that are using
dynamic port numbers. If you need to use the Stateful Packet Inspection
(SPI) for blocking packets, check the radio button in the “Enable SPI and
Anti-DoS firewall protection” field and then check the inspection type that
you need, such as Packet Fragmentation, TCP Connection, UDP Session,
FTP Service, H.323 Service and TFTP Service.
● Hacker Prevention Feature
The BLW-04EX firewall i nspects packets at the application layer, and
maintains TCP and UDP session information, including timeouts and
number of active sessions, provides the ability to detect and prevent certain
types of network attacks such as DoS attacks.
Network attacks that deny access to a network device are called denial-ofservice (DoS) attacks. Denials of Service (DoS) attacks are aimed at devices
and networks with a connection to the Internet. Their goal is not to steal
information, but to disable a device or network so users no l onger have
access to network resource.
By using the above inspected information and timeout/threshold critieria,
the BLW-04EX provides the following DoS attack preventions: Ping of
Death (Ping flood) attack, SYN flood attack, IP fragment attack (Teardrop
Attack), Brute-force attack, Land Attack, IP Spoofing attack, IP with zero
length, TCP null scan (Port Scan Attack), UDP port loopback, Snork Attack
etc.
Note:
The firewall does not significantly affect system performance, so we advise
enabling the prevention features to protect your network users.
●When hackers attempt to enter your network, we can alert you by e-mail
Enter your E-mail address for alerting hacker access. Specify your E-mail
servers, user name and password.
●Connection Policy Enter the appropriate values for TCP/UDP sessions
●DoS Criteria and Port Scan Criteria Setup DoS and port scan criteria in the
spaces provided.
DMZ (Demilitarized Zone)
If you have a client PC that cannot run an Internet application properly from
behind the firewall, then you can open the client up to unrestricted two-way
Internet access. Enter the IP address of a DMZ host to this screen. Adding a
client to the DMZ (Demilitarized Zone) may expose your local network to a
variety of security risks, so only use this option as a last resort.
45
46
Page 28

BLW-04EX
BLW-04EX
4
MISC Setting
4
Allows a remote PC to configure, manage, and monitor the BLW- 0 4 E X
using a standard web browser. Check “Enable” and enter the IP address of
the remote host. Click “APPLY.”
Note:
If you specify an IP address of 0.0.0.0, any hos t can manage the BLW04EX.
● Main Menu
Tools
Use the “Tools” menu to backup the current configu ration, restore a
previously saved configuration, restore factory settings, update firmware,
and reset the BLW-04EX.
Configuration Tools
Choose a function and click.
Reset
Click “Apply” to reset the BLW-04EX. The reset will be complete when the
power LED stops blinking.
Note:
If you use the Reset button on the rear panel, the BLW-04EX performs a
power reset. If the button is held depressed for over 5 seconds, all the LEDs
will illuminate and the factory settings will be restored.
47
48
Page 29

BLW-04EX
BLW-04EX
RESTORY DEFAULT
You can click the Reset to Default button to reset the settings of this device
to the default values.
BACKUP/RESTORE
Backup allows you to save the BLW-04EX’s configuration to a file. You can
then check “Restore” to restore the saved backup configuration file.
“Restore to factory defaults” resets the Baricade to the original settings.
Firmware Upgrade
This tool permits easy downloading of the latest Firmware. Download the
upgrade file from the PCI website (www.planex.com.tw) and save it to your
hard drive. Browse for the file and then click “Apply”. Check the Status
page In formation section to con firm that the u pgrade proces s was
successful.
49
50
Page 30

BLW-04EX
Chapter 5
CONFIGURING CLIENT TCP/IP
Status
The Status screen displays WAN/LAN connection status, firmware, and
hardware version numbers, illegal attempts to access your network, as well
as information on DHCP clients connected to your network.
Status
The following items are included on this screen:
If you have not previously installed the TCP/IP protocols on your client
PCs, refer to the following section. If you need information on how to
con figure a TCP/IP address on a PC, refer to “Setting Up TCP/IP to
Work with the BLW-04EX” on page 5-5.
5
Windows 95/98/ME
1. Click “Start/Settings/Control Panel.”
2. Double-click the Network icon and s elect the “Configuration” tab in
the Network window.
3. Click the “Add” button.
4. Double-click “Protocol.”
Installing TCP/IP
1
51
52
Page 31

BLW-04EX
5. Select “Microsoft” in the manufacturers list. Select “TCP/IP” in the
Network Protocols list. Click the “OK” button to return to the Network
window.
6. The TCP/IP protocol will be listed in the Network window. Click “OK”
to complete the installation procedure and restart your PC to enable the
TCP/IP protocols. The operating system may prompt you to restart your
system. Click “Yes” and the computer will shut down and restart
Windows 2000
1. Click the “Start” button and choose “Settings ,” then click “Control
Panel.”
2. Double click the “Network and Dial-up Connections” icon, then “Local
Area Con nection” icon, and press the “Properties” button in the
“General” tab.
3. Click the “install...” button to add the network component to your PC.
4. Double click on “Protocol” to add the TCP/IP protocol.
BLW-04EX
5. Choose “Internet Protocol (TCP/IP)” in the Network Protocols. Click the
“OK” button to return to the Network window.
6. The TCP/IP protocol will be listed in the Network window. Click “OK”
to complete the install procedure.
53
54
Page 32

BLW-04EX
BLW-04EX
5
Setting Up TCP/IP to Workwith the BLW-04EX
2
Windows 95/98/ME
1. Click “Start/Settings/Control Panel.”
2. Double-click the Network icon. Highlight the TCP/IP line that has been
assigned to your network card on the “Configuration” tab of the Network
window.
3. Click the “Properties” button.
4. Y
ou may dynamically assign TCP/IP address settings to a client, or you
can manually config ure a client with address settings to meet your
specific network requirements. (Note that the default IP address of the
BLW-04EX is 192.168.1.1.)
Windows 2000
1. Click the “Start” button and choose “Settings,” then click “Control
Panel.”
2. Double click the “Network and Dial-up Connections” icon, then “Local
Area Connection” icon, an d press the “Properties” b utton in the
“General” tab.
3. Select the TCP/IP line that has been assigned to your network card in the
“Local Area Connection Properties” window.
4. Click the “Properties” button to set the TCP/IP protocol for the BLW- 0 4 E X .
5. You can dynamically assign TCP/IP address settings to a client, or you
can manually configure a client with address settings to meet your
specific network requirements. (Note that the default IP address of the
BLW-04EX is 192.168.1.1.)
55
56
Page 33

BLW-04EX
BLW-04EX
Windows XP
1. Click the “start” button and choose “Control Panel.”
2. Select the “Network and Internet Con nections” icon, then click the
“Network Connections” icon, and double click on the “LAN or High-
Speed Internet.”
3. Press the “Properties” button in the “General” tab.
4. Select the TCP/IP line that has been assigned to your network card in the
“Local Area Connection Properties” window.
5. Click the “Properties” button to set the TCP/IP protocol for the BLW- 0 4 E X .
6. Y
ou can dynamically assign TCP/IP address settings to a client, or you
can manually config ure a client with address settings to meet your
specific network requirements. (Note that the default IP address of the
BLW-04EX is 192.168.1.1.)
Configuring Your Computer with Windows 95/98/ME
You may find that the instructions here do not exactly match your version
of Windows. This is because these steps and screenshots were created in
Windows 98. Windows 95 and Windows Mi llennium Edition are very
similar, but not identical, to Windows 98.
Step 1. Configure TCP/IP Settings
After you have completed the hardware setup by connecting your devices,
you need to configure the computer to connect to the BLW-04EX. You need
to determine how your ISP issues your IP address. Many ISPs issue these
numbers automatically using a networking technology known as Dynamic
Host Control Protocol, or DHCP. Other ISPs will specify your IP address
and associated numbers, which you must enter manually. This is also known
as a s tatic IP address. How your ISP assigns your IP address determines
how you will configure your computer.
1. From the Windows desktop,click “Start/Settings/Control Panel.”
57
58
Page 34

BLW-04EX
BLW-04EX
2. Double-click the “Network” icon.
3. O n th e “Network ”window “C onfigu ration” tab, d ouble-click the
“TCP/IP” entry for your network card.
4. Click the “IP Address” tab.If “Obtain an IP address automatically” is
already checked, your computer is already configured for DHCP. C l i c k
“Cancel” to close each window, and skip to “Step 2. Disable HTTP Proxy”
on page 5-12.
59
60
Page 35

BLW-04EX
5. Make a note of t he current IP Address and Subnet Mask (a space is
provided on the next page).
6. Click the “Gateway” tab and record the numbers listed under “Installed
gateways.”
BLW-04EX
automatically.” Click “OK.”
9. Windows may need your Windows 95/98/ME CD to copy some files.
After it finishes copying, it will then prompt you to restart your system.
7. Click the “DNS Configuration” tab. Record the DNS servers listed under
“DNS Server Search Order.”
8. Click the “IP Address” tab and then check “Obtain an IP address
61
Click “Yes” and the computer will shut down and restart.
TCP/IP Configuration Setting
IP Address ____.____.____.____
Subnet Mask ____.____.____.____
Primary DNS Server ____.____.____.____
Secondary DNS Server ____.____.____.____
62
Page 36

BLW-04EX
BLW-04EX
Default Gateway ____.____.____.____
Step 2. Disable HTTP Proxy
You will need to verify t hat t he “HTTP Proxy” feature o f your web
browser is disabled. This is so that your web browser will be able to view
the configurat io n pa ges inside y our BLW- 04EX. T he follow ing
steps are fo r Internet E xplorer and for Netscape. Determine which
browser you use and follow the appropriate steps.
Internet Explorer
1. Open Internet Explorer. Click “Tools/Internet Options.”
2. In the “Internet Options” window, click the “Connections” tab. Click the
“LAN Settings” button.
3. Clear all the check boxes and click “OK”. Click “OK” again to close the
“Internet Options” window.
Netscape
1. Open Netscape. Click “Edit,” then click “Preferences.”
2. In the “Prefere nces” wi ndow, un der “Categ ory, ” doub le-cl ic k
“Advanced,” then click “Proxies. ” Check “Direct connection to the
63
64
Page 37

BLW-04EX
BLW-04EX
Internet.” Click “OK”.
3. Repeat these steps for each Windows 95/98/ME computer connected to
your BLW-04EX.
Step 3. Obtain IP Settings from Your BLW-04EX
Now that you have configured your computer to connect to your Wireless
Barricade, it needs to obtain new network settings. By releasing old IP
se ttings and renewing them with setting s from your BLW- 0 4 E X ,
you will also verify that you have configured your computer correctly.
1. Click “Start/Run.”
2. Type “WINIPCFG” and click “OK.” It may take a minute or two for the
“IP Configuration” window to appear.
3. From the dropdown menu, select your network card. Click “Release” and
then “Renew.” Verify that your IP address is now 192.168.1.xxx, your
Subnet Mask is 255.255.255.0 and your Default Gateway is 192.168. 2.1.
These values confirm that your BLW-04EX is functioning. Click “OK” to
65
66
Page 38

BLW-04EX
BLW-04EX
close the “IP Configuration” window.
Configuring Your Computer in Windows 2000
Step 1. Configure TCP/IP Settings
After you have completed the hardware setup, you need to configure your
computer t o connect to the BLW-04EX. You also need to determine how
your ISP issues your IP address . Many ISPs issue these address es
a u t o m a t i c a l l y, usi ng a networking technology known as Dynamic Hos t
Configuration Protocol, or DHCP. Other ISPs will specify your IP address
and associated numbers, which you must enter manually. This is also known
as a static IP address. How your ISP assigns your IP address determines
how you will configure your computer.
Here is what to do:
1. From the Windows desktop, click “Start/ Settings/Control Panel.”
2. Double-click the “Network and Dial-up Connections” icon.
3. Double-click the icon that corresponds to the connection to your BLW- 0 4 E X .
67
68
Page 39

BLW-04EX
BLW-04EX
5. Double-click “Internet Protocol (TCP/IP).”
6. All the information that you need to record is on the “Internet Protocol
(TCP/IP) Properties” screen. Use the table on the next page to record the
information. If “Obtain an IP address aut omatically” and “Obtain DNS
server address automatically” are already checked, your computer is
already configured for DHCP. Click “Cancel” to close each window, and
skip to “Step 2. Disable HTTP Proxy” on page 5-18.
7. Check “Obtain an IP address automatically” and check “Obtain DNS
server address automatically.” Click “OK.” Click “OK” or “Close” to
close each window.
4. Click “Properties.”
69
TCP/IP Configuration Setting
IP Address ____.____.____.____
Subnet Mask ____.____.____.____
Primary DNS Server ____.____.____.____
Secondary DNS Server ____.____.____.____
Default Gateway ____.____.____.____
Step 2. Disable HTTP Proxy
You will need to verify that the “HTTP Proxy” feature of your web
browser is disabled. This is so that your web browser will be able to view
the configuration pages inside the BLW-04EX. The following steps
are for Internet Explorer and for Netscape. Determine which browser you
70
Page 40

BLW-04EX
use and follow the appropriate steps.
Internet Explorer
1. Open Internet Explorer. Click “Tools/Internet Options.”
2. In the “Internet Options” window, click the “Connections” tab. Next,
click the “LAN Settings” button.
3. Clear all the checkboxes.
4. Click “OK,” and then click “OK” again to close the “Internet Options”
window.
BLW-04EX
Netscape
1. Open Netscape. Click “Edit,” then click “Preferences.”
2. In the “Preferen ces” window, u nder “Category” d ouble-clic k
“Advanced,” then click “Proxies.” Select “Direct connection to the
71
72
Page 41

BLW-04EX
BLW-04EX
2. In the “Command Promp t” window, type “IPCONFIG /RELEASE”
and press the <ENTER> key.
Internet.” Click “OK.”
Step 3. Obtain IP Settings From Your BLW-04EX
Now that you have configured your computer to connect to your BLW04EX, it needs to obtain new network settings. By releasing old IP settings
and renewing them with settings from your BLW-04EX, you will also verify
that you have configured your computer correctly.
1. From the Windows desktop, cl ick “Start/ Programs/ Access ories/
Command Prompt.”
73
3. Type “IPCONFIG /RENEW” and press the <ENTER> key. Verify that
your IP address is now 192.168. 1.xxx (2-254), your Subnet Mask is
255.255.255.0 and your Default Gateway is 192.168.1.1. These values
confirm that your BLW-04EX is functioning.
4. Type “EXIT” and press <ENTER>.
74
Page 42

BLW-04EX
BLW-04EX
Configuring Your Computer with Windows XP
Step 1. Configure TCP/IP Settings
After you have completed the hardware setup, you need to configure your
computer to connect to your BLW-04EX. You also need to determine how
your ISP issues yo ur I P addres s. Many ISPs iss ue thes e numbers
a u t o m a t i c a l l y, usi ng a networking technology known as Dynamic Hos t
Configuration Protocol, or DHCP. Other ISPs will specify your IP address
and associated numbers, which you must enter manually. This is also known
as a static IP address. How your ISP assigns your IP address determines
how you will configure your computer.
Here is what to do:
1. From the Windows desktop, click the “start” button. Choos e “Control
Panel.”
2. Select the “Network and Internet C onnections” icon, th en click the
“Network Connections” icon.
3. Double click on the “LAN or High-Speed Internet.”
75
76
Page 43

BLW-04EX
4. Click “Properties.”
BLW-04EX
5. Double-click “Internet Protocol (TCP/IP).”
6. All the information that you need to record is on the “Internet Protocol
(TCP/IP) Properties” dial og box. Use the spaces below to record the
information.
77
If “Obtain an IP address automatically” and “Obtain DNS server address
automatically” are already selected, your computer is already configured for
DHCP. Click “Cancel” to close each window, and skip to “Step 2. Disable
HTTP Proxy” on page 5-25.
7. Select “Obtain an IP address automatically” and then select “Obtain
DNS server address automatically.” Then click “OK.” Click “OK” or
“Close” to close each window.
TCP/IP Configuration Setting
IP Address ____.____.____.____
Subnet Mask ____.____.____.____
Primary DNS Server ____.____.____.____
Secondary DNS Server ____.____.____.____
Default Gateway ____.____.____.____
78
Page 44

BLW-04EX
BLW-04EX
Step 2. Disable HTTP Proxy
You will need to v erify th at the “HTTP Prox y” feat ure of your We b
browser is disabled. This is so that your Web browser will be able to view
the configurat io n pa ges inside y our BLW- 04EX. T he follow ing
steps are fo r Internet E xplorer and for Netscape. Determine which
browser you use and follow the appropriate steps.
Internet Explorer
1. Open Internet Explorer and click the stop button. Click “Tools,” then
“Internet Options.”
2. In the “Internet Options” window click the “Connections” tab. Next, click
the “LAN Settings...” button.
3. Clear all the checkboxes.
4. Click “OK,” and then click “OK” again to close the “Internet Options”
Windows.
Step 3. Obtain IP Settings From Your BLW-04EX
Now that you have configured your computer to connect to you r BLW04EX, it needs to obtain new network settings. By releasing any old IP
settings and renewing t hem with settings from your BLW-04EX, you will
also verify that you have configured your computer correctly.
1. From the Windows desktop, click the “Start” button, then “Programs,”
then “Accessories,” and then click “Command Prompt.”
79
80
Page 45

BLW-04EX
BLW-04EX
2. In the “Command Prompt” window, type “IPCONFIG /RELEASE” and
press the <ENTER> key.
3. Type “IPCONFIG /RENEW” and press the <ENTER> key. Verify that
your IP address is now 192.168.1.xxx (2-255), your Subnet Mask is
255.255.255.0 and your Default Gateway is 192.168.1.1. These values
confirm that your BLW-04EX is functioning.
4. Type “EXIT” and press <ENTER> to close t he “Command Prompt”
window.
Configuring Your Computer with Windows NT 4.0
Step 1. Configure TCP/IP Settings
After you have completed the hardware setup, you need to configure your
computer to connect to your BLW-04EX. You need to determine how your
ISP issues your IP address. Many ISPs issue these numbers automatically
using a networking technology known as Dynamic Host Configuratio n
Protocol, or DHCP. Other ISPs will specify your IP address and associated
numbers, which you must enter manually. This is known as a static or fixed
IP address. How your ISP assigns your IP address determines how you will
configure your computer.
Here is what to do:
1. From the Windows desktop click “Start/ Settings/Control Panel.”
81
82
Page 46

BLW-04EX
BLW-04EX
2. Double-click the “Network” icon.
3. Click on the “Protocols” tab.
5. Click on the “IP Address” tab.
6. In the “Adapter” dropdown list, be sure your Ethernet adapter is selected.
7. If “Obtai n an IP address automatically” is alread y checked, your
computer is already configured for DHCP. Click “Cancel” to close each
window, and skip to “Step 2. Disable HTTP Proxy” on page 5-32. In the
“TCP/IP Properties” dialog box, click the IP address tab to locate your IP
Address, Subnet Mask, and Default Gateway. Record these values in the
space provided below.
4. Double-click “TCP/ IP Protocol.”
83
84
Page 47

BLW-04EX
BLW-04EX
8. Click the “DNS” tab to see the primary and secondary DNS servers.
Record these values in the appropriate spaces below.
9. After writing down your IP settings, click the “IP address” tab. Check
“Obtain IP address automatically” and click “OK.” Click “OK” again to
close the “Network” window.
1 0 . Windows may copy files and will then p rompt y ou to restart your
system. Click “Yes” and your computer will shut down and restart.
TCP/IP Configuration Setting
IP Address ____.____.____.____
Subnet Mask ____.____.____.____
Primary DNS Server ____.____.____.____
Secondary DNS Server ____.____.____.____
Default Gateway ____.____.____.____
Step 2. Disable HTTP Proxy
You will need to verify t hat t he “HTTP Proxy” feature o f your web
browser is disabled. This is so that your web browser will be able to view
the BLW-0 4EX configuratio n pages. The f ollowing steps ar e for
Internet Explorer and for Netscape. Determine which b rowser you use
and follow the appropriate steps.
Internet Explorer
1. Open Internet Explorer. Click “Tools/Internet Options.”
2. In the “Internet Options” window, click the “Connections” tab. Next,
click “LAN Settings.”
3. Clear all the checkboxes.
4. Click “OK,” and then click “OK” again to close the “Internet Options”
window.
85
86
Page 48

BLW-04EX
BLW-04EX
Netscape
1. Open Netscape. Click “Edit,” then click “Preferences...”
2. In the “Prefe rences” w indow, under “Ca teg ory ” dou ble-click
“Advanced,” then click “Proxies.” Check “Direct connection to the
Internet.” Click “OK.”
Step 3. Obtain IP Settings From Your BLW-04EX
Now that you have configured your computer to connect to you r BLW04EX, it needs to obtain new network settings. By releasing old IP settings
and renewing them with settings from the BLW-04EX, you will also verify
that you have configured your computer correctly.
1. On the Windows desktop, click “Start/ Programs/Command Prompt.”
2. In the “Command Prompt” window, type “IPCONFIG / RELEASE” and
press the <ENTER> key.
87
88
Page 49

BLW-04EX
BLW-04EX
3. Type “IPCONFIG /RENEW” and press the <ENTER> key. Verify that
you r IP Addres s is n ow 192. 168. 1.xx x, y our Subn et Ma sk is
255.255.255.0 and your Default Gateway is 192.168.1.1. These values
confirm that the BLW-04EX is functioning.
4. Type “EXIT” and press <ENTER> to close t he “Command Prompt”
window.
Configuring Your Macintosh Computer
You may find that the instructions here do not exactly match your screen.
This is because these steps and screenshots were created using Mac OS 8.5.
Mac OS 7.x and above are all very similar, but may not be identical to Mac
OS 8.5.
Step 1. Configure TCP/IP Settings
After you have completed the hardware setup, you need to configure your
computer to connect to the BLW-04EX. You need to determine how your
ISP issues your IP address. Many ISPs issue these numbers automatically
using a networking technology known as Dynamic Host Configuration
Protocol, or DHCP. Other ISPs will specify your IP address and associated
numbers, which you must enter manually. This is also known as a static IP
address. How your ISP assigns your IP address determines how you will
configure your computer.
Here is what to do:
1. Pull down the Apple Menu. Click “Control Panels” and select TCP/IP.
2. In the TCP/IP dialog box, make sure that “Ethernet” is selected in the
“Connect Via:” field.
89
90
Page 50

BLW-04EX
BLW-04EX
If “Using DHCP Server” is already selected in the “Configure” field, your
computer is already configured for DHCP. Close the TCP/IP dialog box, and
skip to Step 2 Disable HTTP Proxy (bottom of this page).
3. All the information that you need to record is on the “TCP/IP” dialog
box. Use the space below to record the information.
4. After writing down your IP settings, select “Using DHCP Server” in the
“Configure” field and close the window.
5. Another box will appear asking whether you want to save your TCP/IP
settings. Click “Save”.
TCP/IP Configuration Setting
IP Address ____.____.____.____
Subnet Mask ____.____.____.____
Router ____.____.____.____
Name Server ____.____.____.____
Step 2. Disable HTTP Proxy
You will need to verify t hat t he “HTTP Proxy” feature o f your web
browser is disabled. This is so that your web browser will be able to view
the BLW-0 4EX configuratio n pages. The f ollowing steps ar e for
Internet Explorer and for Netscape. Determine which b rowser you use
and follow the appropriate steps.
Internet Explorer
1. Open Internet Explorer. Click “Edit/ Preferences.”
2. In the Internet Explorer “Preferences” window, under “Network,” select
“Proxies.”
3. Uncheck all checkboxes and click “OK.”
91
92
Page 51

BLW-04EX
BLW-04EX
Netscape
1. Open Netscape. Click “Edit/Preferences.”
2. In the column labeled “Category,” select “Advanced.” Un der the
“Advanced” category, select “Proxies.”
3. Select “Direct Connection to the Internet” and click “OK.”
Step 3. Obtain IP Settings From Your BLW-04EX
Now that you have configured your computer to connect to you r BLW04EX, it needs to obtain new network settings. By releasing old IP settings
and renewing them with settings from the BLW-04EX, you will also verify
that you have configured your computer correctly.
1. Pull down the Apple Menu. Click “Control Panels” and “TCP/IP.”
93
94
Page 52

BLW-04EX
2. In the TCP/IP window, your new settings will be shown. Verify that your
IP address is now 192.168.1.xxx, your Subnet Mask is 255.255.255.0 and
your Default Gateway is 192.168.1.1. These values confirm that your
BLW-04EX is functioning.
3. Close the TCP/IP window.
BLW-04EX
Dynamic IP Allocation via a DHCP Server
Check “Obtain an IP address automatically” on the IP Address tab. Do not
input any values under the Gateway tab, and check “Disable DNS” on the
“DNS Configuration” tab. These settings will be automatically configured
by the DHCP server. Click “OK” and reboot your system to implement the
changes.
95
96
Page 53

BLW-04EX
BLW-04EX
Manual IP Configuration
1. Check “Specify an IP address” on the IP Address tab. Enter an IP address
based on the default network 192.168.1.x (where x is between 2 and 254),
and use 255.255.255.0 for the subnet mask.
2. On the “Gateway” tab, add the IP address of the BLW-04EX (default:
192.168.1.1) in the “New gateway” field and click “Add.”
3. On the “DNS Configuration” tab, add the IP address for the BLW-04EX
and click “Add.” This automatically relays DNS requests to t he DNS
server(s) provided by your ISP. Otherwise, add specific DNS servers into
the “DNS Server Search Order” field and click “Add.”
4. After finishing TCP/IP setup, click “OK,” and then reboot the computer.
After that, set up other PCs on the LAN according to the procedures
described above.
Verifying Your TCP/IP Connection
After installing the TCP/IP communication protocols and configuring an IP
address in the same network as the BLW-04EX, use the “Ping” command to
check if your computer has successfully connected to the BLW-04EX. The
following example shows how the Ping procedure can be executed in an
MS-DOS window. First, execute the “Ping” command:
ping 192.168.1.1
If a message similar to the following appears:
Pinging 192.168.1.1 with 32 bytes of data:
Reply from 192.168.1.1: bytes=32 time=2ms TTL=64
a communication link between your computer and the BLW-04EX has been
successfully established.
If you get the following message,
Pinging 192.168.1.1 with 32 bytes of data:
Request timed out.
there may be something wrong in your installation procedure. Check the
following items in sequence:
1. Is the Ethernet cable correctly connected between the BLW-04EX and the
computer?
The LAN LED on the BLW-04EX and the Link LED of the network card
on your computer must be on.
2. Is TCP/IP properly configured on your computer?
If the IP address of the BLW-04EX is 192.168.1.1, the IP address of your
PC m ust be from 192.168.1.2 - 192.168.1.254 and the default gateway
must be 192.168.1.1.
If you can successfully Ping the BLW-04EX you are now read y to
connect to the Internet!
97
98
Page 54

BLW-04EX
Appendix A
TROUBLESHOOTING
This appendix describes common problems you may encounter and possible
solutions to them. The BLW-04EX can be easily monitored through panel
indicators to identify problems. If you cannot resolve any connection
problems after checking the indicators, then refer to the other sections in the
following table.
10099
Page 55

BLW-04EX
BLW-04EX
TROUBLESHOOTINGTROUBLESHOOTING
101
102
Page 56

BLW-04EX
Appendix B
CABLES
CABLES
Ethernet Cable
Specifications
Twisted-pair Cable
Caution: Do NOT plug a phone jack connector into any RJ-45 port. Use
only twisted-pair cables with RJ-45 connectors that conform with FCC
standards.
For 10BASE-T/100BASE-TX connections, a twisted-pair cable must have
two pairs of wires. Each wire pair is identified by different colors. For
example, one wire might be red and the other, red with white stripes. Also,
an RJ-45 connector must be attached to both ends of the cable.
104103
Page 57

BLW-04EX
BLW-04EX
CABLES
Figure B-1 illustrates how the pins on the RJ-45 connector are numbered.
Be sure to hold the connectors in the same orientation when attaching the
wires to the pins.
B-1. RJ-45 Connector Pin Numbers
Straight-through Cable
Pins 4, 5, 7, and 8 are not connected.
Crossover Cable
Pins 4, 5, 7, and 8 are not connected.
RJ-45 Port Pin Assignments
Pins 4, 5, 7, and 8 are not connected.
* The “+” and “-” signs represent the polarity of the wires that make up
each wire pair.
105
106
Page 58

BLW-04EX
Appendix C
Specifications
Standards
IEEE 802.3 10BaseT Ethernet
IEEE 802.3u 100BaseTX FastEthernet
WAN Interface
10BASE-T/100BASE-TX
LAN Interfaces
10BASE-T/100BASE-TX
4 RJ-45 ports
LAN data transfer rate is up to 10/20Mbps (10BaseT half/full duplex) or
100/200Mbps (100BaseTX with half/full duplex)
Management
Browser-based management
Both DHCP Server and Client provided
Advanced Features
Dynamic IP Address Configuration – DHCP, DNS
Firewall – Client privileges, hacker prevention, logging
Virtual Server via NAT & NAPT
Virtual Private Network – PPTP, L2TP, IPSec pass-through
Instrusion Detection, Email Alerting, Parental Control
Indicator Panel
LAN (Link, Activity), WAN (Link, Activity), Power
Dimensions
130 mm x 85 mm x 32 mm (5.12 x 3.35 x 1.26 in)
Weight
370 g (4.73 oz)
108107
Page 59

BLW-04EX
SPECIFICATIONS
Input Power
9 V 1A
Maximum Current
0.04A RMS max.@110V/240V
Power Consumption
5 Watts max. @ 100-240 VAC
Temperature
Operating 0 to 40°C (32 to 104°F)
Storage -40 to 70°C -40 to 158°F (-40 to 158°F)
Humidity
5% to 95% (noncondensing)
Compliances
CE Mark BSMI
Emissions
FCC Class B
VCCI Class B
BLW-04EX
109
110
 Loading...