


NATIONAL INTERAGENCY INCIDENT COMMUNICATIONS DIVISION
NIICD RADIOS ONLY 2007/J.Lopez
THALES 25 PORTABLE RADIO ( RACAL) ANALOG CHANNEL PROGRAMMING
RACAL ANALOG CHANNEL PROGRAMMING GUIDE
1.
Select a channel for program m ing by rotating the Channel Select Knob to one of the s ixteen rotary pos itions.
2.
Press the "
3.
Scroll up/down using the "O" and " " (
4.
Enter a 6-Digit Pas s word if requested and pres s the "
Note: NIFC passw ord is "000000".
5.
Scroll up/down and s elect "
6.
Scroll down and select "
Change the channel nam e/label using the keypad and pres s the "
Note: "ID" cannot be changed, it is automatically updated w hen programming a channel.
7.
Scroll down and select "
Select either "
Note: NIFC Default is "ANALOG" for all channels.
8.
Scroll down and select "
Select either "
Note: 25Khz= Wide-Band, 12.5khz= Narrow-Band.
Note: NIFC Default is "12.5 Khz" for Narrow-Band operation.
9.
Scroll down and select "
Select either "
Note: If Encryption is enabled, a key must be loaded first into the radio with the PC Programm er.
Note: NIFC Default is " DISABD"
10.
Scroll down and select "RX" and pres s "
Enter a valid RX frequency from 136-174 Mhz using the keypad and pres s the "
11.
Scroll down and select "
Select either "
Note: If "Noise" is sel ected, the pr ogr a m will proceed with the Squelch Adjust par ameter ( SQ=), sel ect a squel ch
setti ng a nd press "ENTER" when done; thi s setti ng opens the squelch with any corresponding anal og signa l. If
"CTCSS" i s sel ected, the pr ogr a m wi l l pr oceed with a SUB Audi bl e Tone menu, select a tone from the menu by
scrolli ng through and then press"ENTER"; thi s si tti ng wi l l open the squelch with any corresponding anal og signa l
that contains the cor rect " CTCSS" tone. If "DCS" is selected, the progr am wi l l pr oceed with the Di gi tal Coded
Squelch tone menu, select a tone from the menu by scrolling through and then press "ENTER"; this setting wi l l
open the squelch with any corr espondi ng a nalog signa l that contains the correct "DCS" tone. If "None" is selected,
squel ch will be open a t all ti mes (Constant Open Squel ch).
Note: NIFC Defaul t is "Noi se" with a "SQ" setti ng of 8.
ENTER
" key to bring up the Main Menu screen.
up/down arrow keys
ANALOG
25Khz
" or "
ENABLD
TAG
MODE
" or "
B/W
12.5Kh
ENCRPT
" or "
CHANEL
DIGITAL
DISABD
" and pres s the "
" and pres s the "
" and pres s the "
" and pres s the "
" and pres s the "
z" and press the "
" and pres s the "
" and pres s the "
ENTER
NOISE
", "
DCS
RX SQMD
" and pres s the "
", "
CTCSS
", or "
ENTER
ENTER
ENTER
" key.
ENTER
" key to program the
ENTER
ENTER
" key to program the
ENTER
ENTER
ENTER
" key to program the
ENTER
NONE
" and pres s the "
(See Figure 1)
) to select "
PROGRM
" key.
" key to program
(See Figure 3)
ENTER
" key.
" key.
" key to program
" key.
RX Frequency.(See Figure 6)
" key to program the
ENTER
" key.
" and pres s the "
ENTER
" key.
Channel Parameters.(See Figure 2)
" key when com plete.
Channel Mode.(See Figure 4)
Channel Bandwidth.(See Figure 4)
Encryption. (See Figure 5)
ENTER
" key.
RX Squelch Mode.(See Figure 7)
Figure 1
Figure 2
Figure 3
Figure 4
Figure 5
Figure 6
12.
Scroll down and select "TX" and pres s the "
Enter a valid TX frequency from 136-174 Mhz us ing the keypad and pres s the "
13.
Scroll down and select "
Select either "
Note: If "CTCSS" i s selected, the pr ogr am wi l l pr oceed wi th a Sub Audible Tone menu, select a tone from the menu
by scrolli ng through and press "ENTER" ; this sitting will include a " CTCSS" tone on the ana log transmit signal.
IF "DCS" i s sel ected, the pr ogr a m wi l l pr oceed with a Digital Coded Squelch menu, select a tone from the menu by
scrolli ng through and then press"ENTER"; thi s setti ng wil l i ncl ude a " DCS" tone on the a na l og transmi t si gnal .
If "None" is sel ected, no tones a re sent out on the a na l og transmi t signal.
DCS
", "
TX SQMD
CTCSS
" and pres s the "
", or "
NONE
ENTER
" key to program the
ENTER
" and pres s the "
" key to program the
ENTER
" key.
TX Frequency.(See Figure 8)
ENTER
" key.
TX Squelch Mode.(See Figure 9)
Note: NIFC Default is "None".
14.
Scroll down and select
Select either "
0.1
", "
0.5
", "
"LO PWR
1.0
", "
2.0
" and pres s "
", or "
5.0
" Watts for low power setting and pres s the "
ENTER
" to program the
Low Power Setting.(See Figure 10)
ENTER
" key.
Note: NIFC Default for Low Power is 1.0 Watts.
15.
Scroll down and select "
Select either "
0.1
", "
0.5
HI PWR
", "
1.0
" and pres s the "
", "
2.0
", or "
ENTER
" key to program the
5.0
" Watts for high power setting and press the"
High Power Setting.(See Figure 10)
ENTER
" key.
Note: NIFC Default for Hi Power is 2.0 Watts.
16.
If screen reads "
another channel us ing the channel select knob and continue program m ing other channels or pres s "
SAVE CHANNEL
", select "
YES
" to save. If not, channel information was stored and you can select
ESC
times to return to the m ain dis play.
RACAL ANALOG CHANNEL PROGRAMMING
Figure 7
Figure 8
Figure 9
" a few
Figure 10
Page 1 of 4

NATIONAL INTERAGENCY INCIDENT COMMUNICATIONS DIVISION
NIICD RADIOS ONLY 2007/J.Lopez
THALES 25 PORTABLE RADIO ( RACAL) SETTINGS/OPTIONS GUIDE
ADD/REMOVE CHANNEL FROM SCAN LIST
1.
Select a channel to be added to the Scan Lis t by using the Channel Select knob.
2. To Add Channel
dis play, indicating that the channel is in the scan list.
3. To Remove
Note: If the " " key is pressed to long, it will enable Zone Scan, w hich will scan other scan channels in different
zones/groups. The LCD will display a box around the " Z". If this happens, disable the function by pressing
and holding the " O " key for about 3 seconds.
SCAN/PRIORITY SCAN MODE
1. To Enable SCAN
The display will indicate that the radio is scanning.
2. To Enable PRI SCAN
The display will indicate that Priority Scan is enabled.
3. To Disable SCAN/PRI SCAN
Note: In order for Priority Scan to function properly, the user must add a priority scan channel.
(See Add Priority Scan Channel)
ADD PRIORITY SCAN CHANNEL
1.
Press the "
2.
Scroll down to "
3.
Scroll down to "
4.
Scroll down to "P1" and pres s the "
5.
Select theP1Channel by using the Channel select knob and press the "
6.
To add a second priority channelP2, s croll down to "P2" and pres s the "
by us ing the Channel Select Knob and the pres s the "
7.
Press the "
Note: In order for P2 channel to functi on pr operly, the user must enabl e the P 2 functi on under the scan opti ons.
Press the "ENTER" k ey to bri ng up the M a in M enu Screen. Select "SCAN" a nd pressthe "ENTER" k ey. Scroll down
to "PRIM ODE" and pressthe "ENTER" k ey. Select "PR1+2" to enabl e P2 scan function.
Once P2 scan functi on is enabl ed, when the ra di o is set to Pr i ority Sca n, the display wi ll i ndi cate that both Pr i or ity
Channels a re bei ng sca nned.
NIFC Default is P1 and P2 Disabled.
, briefly pres s and releas e the " " key, when releas ed a box " " will enclos e the "C" in the
(See Figure 1)
, briefly pres s and releas e the "O" key. The box " " will re rem oved from the "C" in the display.
, the 3-position toggle switch mus t be in the "B" position.
(See figure 2)
, the 3-Pos ition toggle switch must be in the "A" position.
(See Figure 3)
, the 3-position toggle switch mus t be in the "C" position.
ENTER
" key to bring up the Main Menu Screen.
PROGRM
SCAN
ESC
" key a few times to reach the main screen.
" and pres s the "
" and pres s the "
ENTER
ENTER
ENTER
" key.
" key.
" key.
ENTER
" key when done.
ENTER
" key when done.
ENTER
" key. Select theP2Channel
(See Figure 4)
Figure 1
Figure 2
Figure 3
Figure 4
CHANGING ZONES
1.
Press the "
2.
Scroll down to "
3.
Scroll down to "
4.
Scroll to the desired zone/group and pres s the "
Press the "
ENTER
" key to bring up the Main Menu Screen.
SELECT
ZONE
ESC
" key a few times to reach the main screen.
" and pres s the "
" and pres s the "
ENTER
ENTER
"key.
"key.
(See Figure 5)
ENTER
" key to select the zone.
Note: NIFC has a total of 16 available zones under the NIFC Bank.
Additional 3 zones are available under the Incident Bank.
NIFC Default is set to Bank "NIFC"
CHANGING BANKS
1.
Press the "
2.
Scroll down to "
3.
Scroll down to "
4.
Scroll to the desired bank and press the "
Press the "
Note: NIFC Default in "NIFC Bank".
DISABLE/ENABLE KEYPAD
1.
Press and hold the " " key while pres sing and holding the "
Dis play will show "
2.
Repeat the proces s , display shows "
3.
To Enable Keypad and Side buttons, repeat the proces s on more time and display will s how "
ENTER
" key to bring up the Main Menu Screen.
SELECT
BANK
ESC
" key a few times to reach the main screen.
" and pres s the "
" and pres s the "
ENTER
ENTER
ENTER
" key.
" key.
(See Figure 5)
" key to select a bank.
The "INCIDENT Bank" contains 3 additional zones available for programming or cloning.
(See Figures 6 & 7)
ENTER
" key.
Keys Disabled
", "
Side Enabled
". (Only the keypad is disabled, while all the side button are still enabled)
Keys Disabled",Side Disabled
". (Both the keypad and the side buttons are disabled)
Keys Enabled
, "
Side Enabled
Figure 5
Figure 6
Figure 7
".
RACAL RADIO SETTINGS/OPTIONS
Page 2 of 4
NATIONAL INTERAGENCY INCIDENT COMMUNICATIONS DIVISION
NIICD RADIOS ONLY 2007/J.Lopez
THALES 25 PORTABLE RADIO ( RACAL) CLONING INSTRUCTIONS
CLONING PROCEDURES
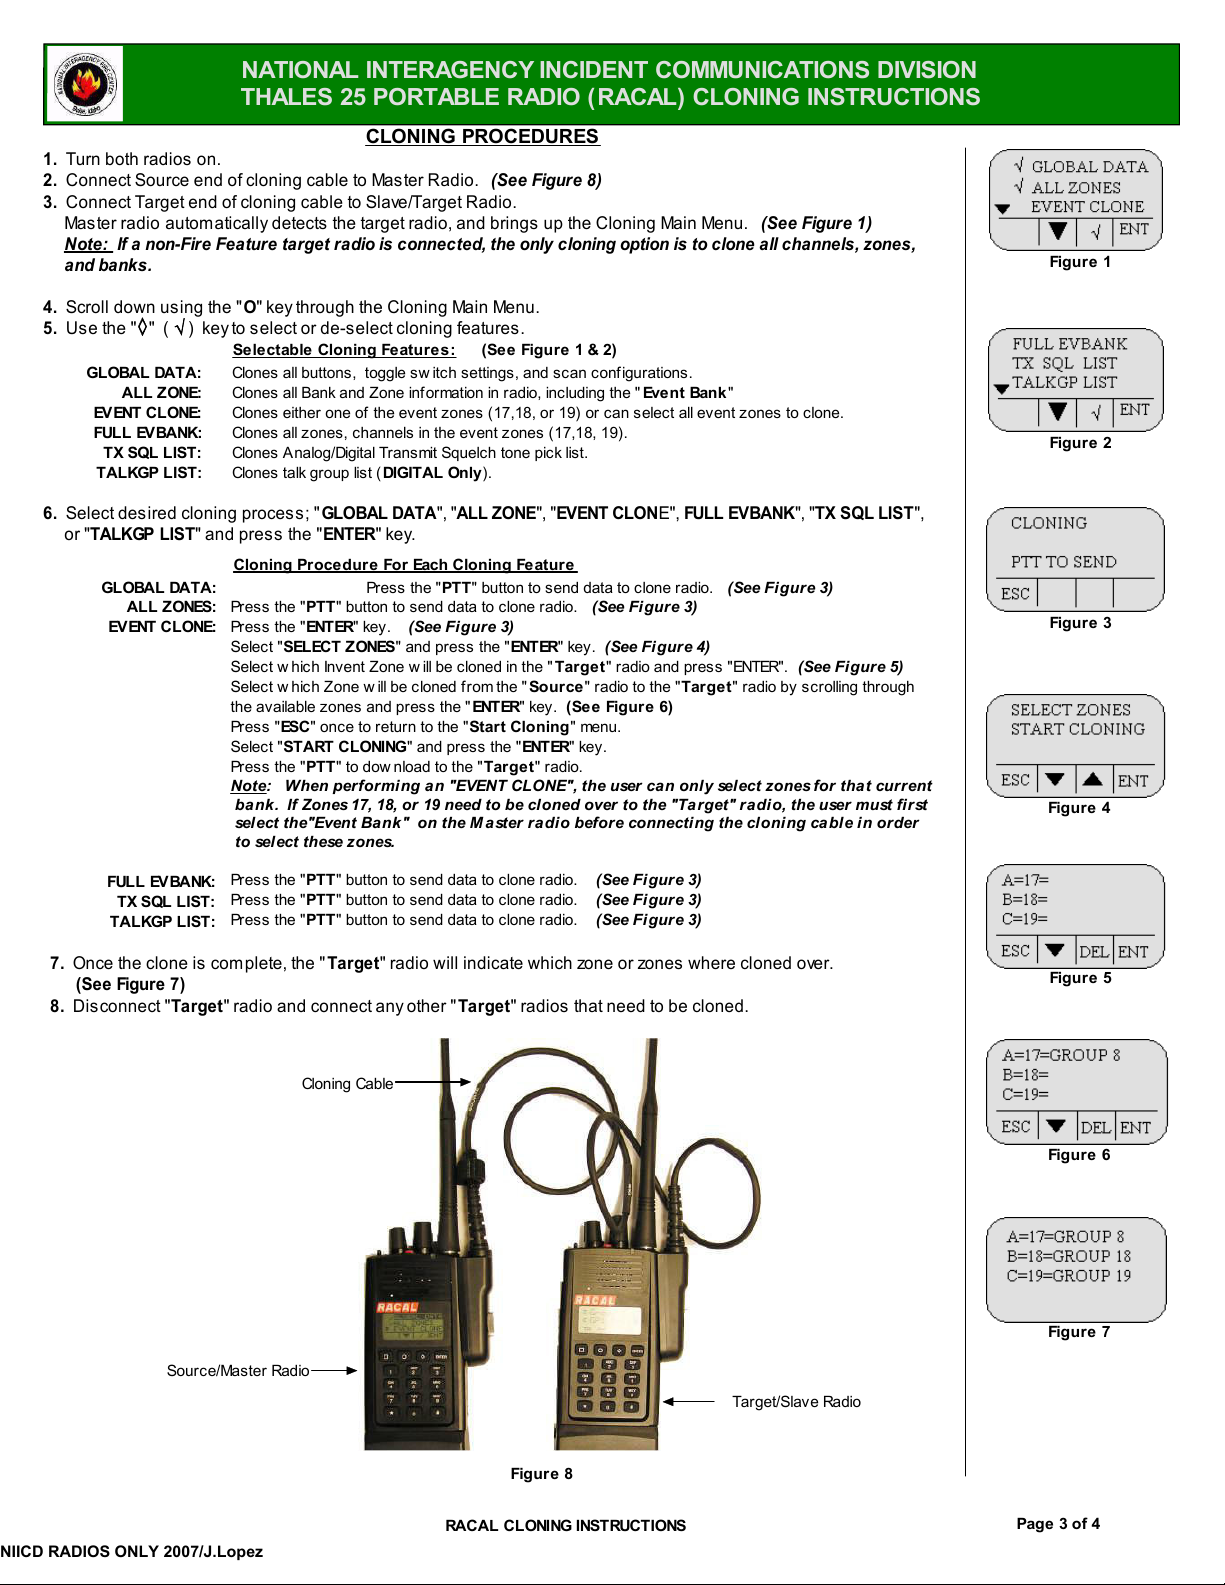
1.
Turn both radios on.
2.
Connect Source end of cloning cable to Master Radio.
3.
Connect Target end of cloning cable to Slave/Target Radio.
Mas ter radio automatically detects the target radio, and brings up the Cloning Main Menu.
Note: If a non-Fire Feature target radio is connected, the only cloning option is to clone all channels, zones,
and banks.
4.
Scroll down using the "O" key through the Cloning Main Menu.
5.
Use the " " () key to select or de-select cloning features.
Selectable Cloning Feature s : (See Figure 1 & 2)
GLOBAL DATA:
ALL ZONE:
EVENT CLONE:
FULL EVBANK:
TX SQL LIST:
TALKGP LIST:
6.
Select des ired cloning process; "
or "
TALKGP LIST
GLOBAL DATA:
ALL ZONES:
EVENT CLONE:
Clones all buttons, toggle sw itch settings, and scan configurations.
Clones all Bank and Zone information in radio, including the "
Clones either one of the ev ent zones (17,18, or 19) or can select all event z ones to c lone.
Clones all zones, channels in the event zones (17,18, 19).
Clones Analog/Digital Transmit Squelch tone pick list.
Clones talk group list (
DIGITAL Only
GLOBAL DATA
" and pres s the "
Cloning Procedure For Each Cloning Feature
Pres s the "
Pres s the "
Select "
Select w hich Invent Zone w ill be cloned in the "
Select w hich Zone w ill be cloned from the "
the available zones and press the "
Pres s "
Select "
Pres s the "
Note: When performi ng a n "EVENT CLONE", the user can only select zones for tha t curr ent
bank. If Zones 17, 18, or 19 need to be cl oned over to the "Ta rget" r a di o, the user must fi rst
select the"Event Bank" on the M a ster r adio before connecting the cloni ng cable i n order
to select these zones.
ENTER
" key.
PTT
ENTER
SELECT ZONES
ESC
START CLONING
PTT
Press the "
" button to send data to c lone radio.
" key.
(See Figure 3)
" and press the "
" onc e to return to the "
" to dow nload to the "
" and press the "
(See Figure 8)
).
", "
ALL ZONE
PTT
" button to s end data to c lone radio.
ENTER
Start Cloning
ENTER
Targe t
", "
EVENT CLON
" key.
Targe t
Source
" key.
(See Figure 6)
ENTER
" key.
" r adio.
(See Figure 3)
(See Figur e 4)
" r adio and press "ENTER".
" r adio to the "
" menu.
Event Bank
E",
FULL EVBANK
Targe t
(See Figure 1)
"
", "
TX SQL LIST
(See Figur e 3)
" r adio by scrolling through
(See Figur e 5)
Figure 1
Figure 2
",
Figure 3
Figure 4
FULL EVBANK:
TX SQL LIST:
TALKGP LIST:
7.
Once the clone is com plete, the "
Pres s the "
Pres s the "
Pres s the "
(See Figure 7)
8.
Dis connect "
Target
" radio and connect any other "
Source/Master Radio
PTT
" button to send data to c lone radio.
PTT
" button to send data to c lone radio.
PTT
" button to send data to c lone radio.
Target
" radio will indicate which zone or zones where cloned over.
Target
Cloning Cable
(See Fi gur e 3)
(See Fi gur e 3)
(See Fi gur e 3)
Figure 5
" radios that need to be cloned.
Figure 6
Figure 7
Target/Slave Radio
Figure 8
RACAL CLONING INSTRUCTIONS
Page 3 of 4

NATIONAL INTERAGENCY INCIDENT COMMUNICATIONS DIVISION
NIICD RADIOS ONLY 2007/J.Lopez
RACAL BASIC OPERATION AND RADIO CONTROLS
RACAL BASIC OPERATION AND RADIO CONTROLS
1.
Turn power ON by turning the ON/OFF Volume knob clockwis e.
A beep indicates the radio is operational. The LCD will indicate the current group and channel.
2.
Select a channel by turning the Channel Select Knob to one of the 16 available pos itions .
3.
Adjus t the volum e by pressing the Squelch Monitor Button to open the squelch and s et the volume to desired level.
Press the Squelch Monitor Button once more to close the squelch.
The radio is ready to receive on that current channel.
5.
To Transmit, press and hold the Pus h-To-Talk (
Note: The Transmit Indicator should light RED. If not, the battery may be low or the channel is busy.
6.
Paus e 1 Second and talk in a norm al voice into the microphone .
Note: Try to shield the microphone from wind and other loud background noises for clearer transmissions.
7.
Release the
PTT
to s top trans m itting and receive incoming trans m issions.
PTT
).
MICROPHONE
SPEAKER
LCD
KEYPAD
BROADBAND
ANTENNA
TOGGLESWITCH
A= PRI SCAN ON
B= SCA N ON
C= SCAN OFF
SQUELCH MONITOR
PUSH TO TALK ( PTT)
BATTERY RELEASE
AUXILIARY 1
VOLUME
CONTROL
EMERGENCY
BUTTON (Disabled)
Figure 1: RACAL Top V iew
CHANNEL
CONTROL
ANTENNA
PORT
LED
AUXILIARY 2
(Disabled)
AUXILIA RY 3
HI/LO POWER
Figure 2: RACAL Front Vie w
CLA MSHELL
Figure 3: RACAL Side Vie w
Page 4 of 4RACAL BASIC OPERATION ANDRADIO CONTROLS
 Loading...