

Rac RAC02 GPS User Manual

Introduction
Thank you for choosing the RAC02 GPS Digital CarCam. Please read these instructions
carefully before use.
Unpacking
Unpack the contents of the box and ensure the following components are present.
RAC02 GPS Digital CarCam
Mounting Bracket
GPS Module
Cigar Lighter Power Adaptor
USB Cable
4Gb TF Memory Card (Micro SD)
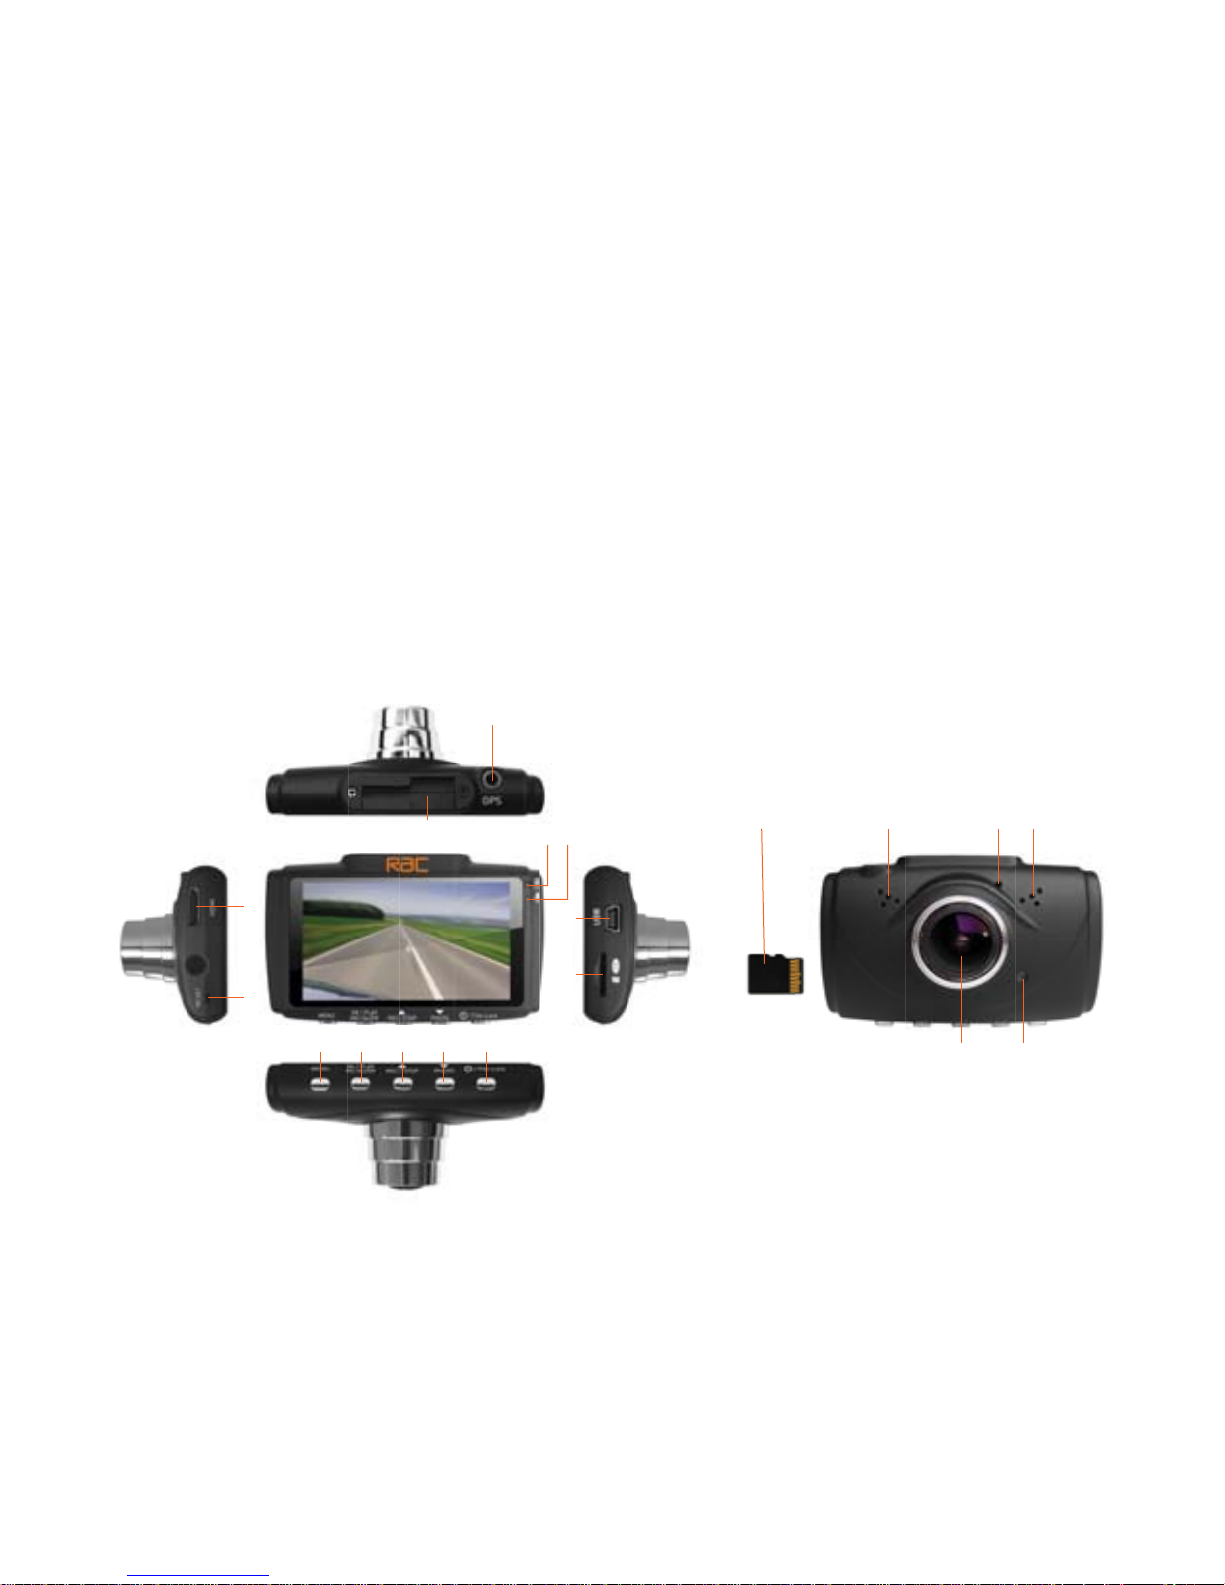
Identification of Controls
1. GPS interface
2. HDMI interface
3. Reset
4. Charging indicator light
5. MIC indicator light
6. USB interface
7. TF / microSD card slot
8. Menu
9. OK / Play & MIC On / Off
10. REC / Stop & UP
11. Photo & DOWN
12. POWER / File-Lock
13. Speaker hole
14. Microphone
15. Speaker hole
16. Camera (LENS)
17. REC indicator light
18. Holder
19. TF / microSD card
2
6
7
3
1319 1514
8
418 5
1
16 17
9 10 11 12

Preparing for Use
IMPORTANT: To get the best quality recordings when using this CarCam, always ensure
your windscreen is clean from dirt, smudges and fingerprints on both the inside and
outside of the windscreen. Such dirt and smudges can and will affect the quality of the
video recorded.
1. Insert the Memory Card into TF socket on the side of the CarCam. The exposed
contacts of the Memory Card should be placed into the slot facing the LENS of the
CarCam (see Identification of Controls).
2. Place the CarCam onto the Mounting Bracket and slide sideways to lock into place.
3. Connect the 3.5mm plug from the GPS Module into the socket marked GPS on the
underside of the camera. Place the GPS module next to the windscreen just above the
dashboard for optimum reception. Once you have determined the most suitable location,
remove the white protective film from the gel pad and place the pad directly to the
windscreen. This gel pad is both removable and reusable. Please keep the white
protective film to maintain the adhesiveness of the gel pad when not in use.
If for any reason the gel sheet pad loses its adhesiveness, wipe clean with a damp lint
free cloth and allow to dry naturally before replacing the white protective film. Do not
immerse the GPS Module in water.
4. Insert the Cigar Lighter Power Adaptor cable into the USB Socket on the side of the
CarCam.
5. Place the Mounting Bracket suction pad on the inside of the windscreen and lock into
place by lifting up the lever.
6. Remove the protective film from the front of the lens and the LCD screen.
Important: Ensure the Mounting Bracket is located in such a way as to not block your
field of view while driving, or affect your ability to operate or control the car safely while
driving. Never mount the CarCam in a position that could interfere with the operation
of any Air Bags in the event of a collision.

Switching On and Recording
The CarCam is designed in such a way that it will automatically switch on and start
recording the moment it detects a connection to the car electrical system via the cigar
lighter socket. It is important to note however that while some cars provide power to
the cigar lighter socket even when the car ignition is off, other cars require the ignition
to be ON before providing power to the cigar lighter socket.
1. Insert the free end of the Cigar Lighter Power Adaptor into the cigar lighter socket.
Note: if your car provides power to the cigar lighter socket even when the car ignition
is off, the CarCam will switch on and start recording immediately.
2. Switch on the car ignition. The CarCam will automatically switch on and start
recording.
3. If necessary, loosen the mounting bracket collar and adjust the CarCam to obtain the
optimum viewing angle. Tighten the collar to fix the CarCam securely.
4. The CarCam will continue to record for 10 seconds after the ignition is switched off
or when the adaptor is removed from the cigar lighter socket.
5. To STOP recording at any time, press the Rec/Stop button.
6. To switch OFF the CarCam, press and hold the for a few seconds.
7. To switch ON the CarCam (for example, when outside of the car) press and hold the
for a few seconds.
Note: The internal battery must be charged for the CarCam to operate without an
external power source (such as a cigar lighter socket or USB charger). Please refer to
SECTION “Charging the CarCam” for details.
Note: If the CarCam is switched on while connected to an external power source, it will
automatically start recording after switch on. If the CarCam is switched on without a
connection to an external power source (i.e. using the internal rechargeable battery
only), it will switch on but will NOT start recording automatically.

Setting the Time & Date
The CarCam has a Time & Date function which can be embedded onto all video footage
recorded for easy reference. To ensure the Time & Date is correct, adjust as follows:-
1. Switch on the CarCam by pressing and holding the button for a few seconds.
2. If the Car Cam is recording, press the Rec / Stop button to stop the recording.
3. Press the Menu button twice to enter the Setup Menu.
4. Press the button to select Date / Time then press OK.
5. Use the OK button to scroll through the Year, Month, Date, Hour, Minute & Second
options and the use the and buttons to adjust each option.
6. When the Time and Date is set correctly, press the Menu button to exit the menu.
GPS Function
The RAC02 GPS CarCam is equipped with a GPS module that allows you to record your
exact co-ordinates and speed and embed this information onto the recorded video. The
location information is displayed as Longitude and Latitude in Decimal Degrees using
the World Geodetic System 84 (WGS 84) datum.
Please note:
• The CarCam may need up to two minutes to initially lock onto the GPS signal.
• The GPS signal may be lost when driving through tunnels or covered spaces.
• When the GPS cable is connected, the satellite icon is displayed. Once the GPS signal
is locked, the satellite icon with 3 bars is displayed.
• GPS position and speed data is not displayed on the CarCam LCD display but
embedded in the video for reference during playback.
 Loading...