

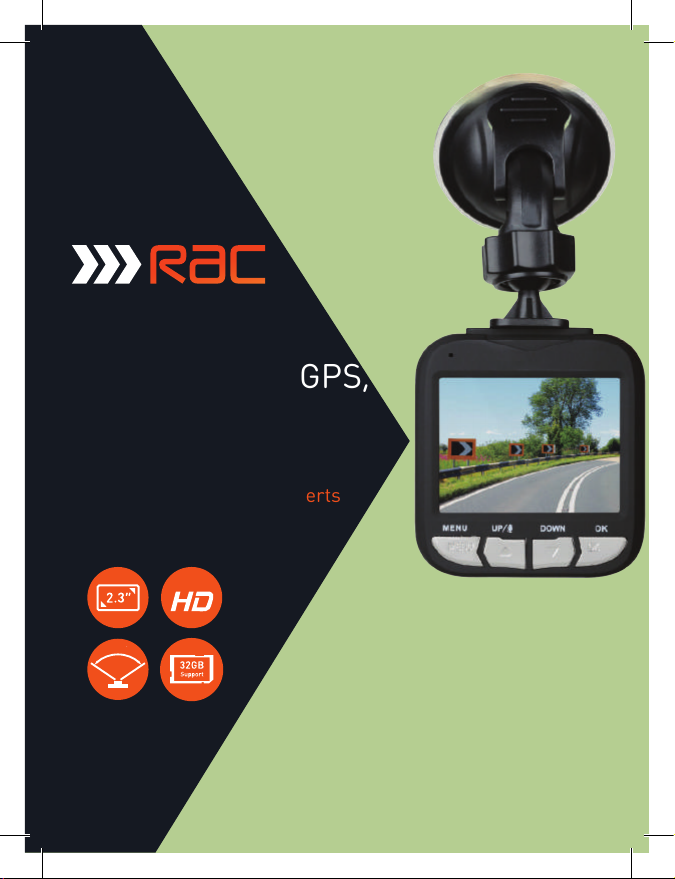
RAC 210 Full HD
Dash Cam with GPS,
Wi-Fi and Speed
Camera Alerts
Designed and tested by experts
INSTRUCTION MANUAL
Full
127°
FoV

Congratulations on
choosing the Forward
Facing RAC 210 Full HD
Dash Cam with GPS,
Wi-Fi and Speed Camera
Alert Function.
Please read these
instructions carefully
before use.

Contents
Product Features P01
Unpacking P01
Identification of Controls P02
Preparing for Use P03
Installing the Dash Cam P04
Connecting to Power P04
Powering the Dash Cam On / Off P05
Set the Date / Time P06
Mode Selection P06
Using the Dash Cam P06
Recording Screen P07
Emergency File Protection P07
Motion Detection P07
G-sensor Collision
Audio on/off
Video Menu Operation P08
Video Mode P09
General Settings Menu Options P10
General Settings P11
General Settings P12
GPS Settings Menu Options P13
Taking Pictures P14
Still Capture Screen P14
P08
P08
Zoom in / out P14
Playing Videos Mode P15
Playing Videos P15
Playing Videos screen
Viewing Pictures
GPS Function
GPS Abnormal Warning Condition P17
GPS Icon Indication
GPS Tracking Logger
Wi-Fi Function P18
Battery Warning and
Installation Notes
Caution
Warranty
Specification
Frequently Asked Questions P22
P15
P16
P16
P17
P18
P19
P20
P20
P21

RAC 210 Full HD Dash Cam
Product Features
› Full HD 1080p Dash Cam - records what happens on the road ahead
› 2 Megapixel CMOS Sensor
› 2.31” TFT Display - with screen saver function to avoid distractions whilst driving
› 127˚ Wide Angle F1.8 6G Lens
Built in Wi-Fi function - video can be streamed, downloaded and played back on a
›
a smart phone
Built in GPS function records speed and location›
Built in Speed Camera Alerts to notify the driver of upcoming speed and safety
›
cameras by way of an audio and visual alert, advising the distance to the speed
camera, the current speed limit and the current speed of the vehicle
› Supports up to 32GB Class10 Micro SD Card
› G-sensor Collision Recording Protection
› Motion Detection
› Seamless Loop Recording
Unpacking
Unpack the contents of the box and ensure the following components are present.
› RAC 210 Dash Cam
› Micro SD Card (pre installed into the RAC 210)
› Car Charger
› SD Card Reader
› Suction Pad
› Quick Start Guide
›
Carry Case
Windows Sticker
›
01
www.proofcam.com
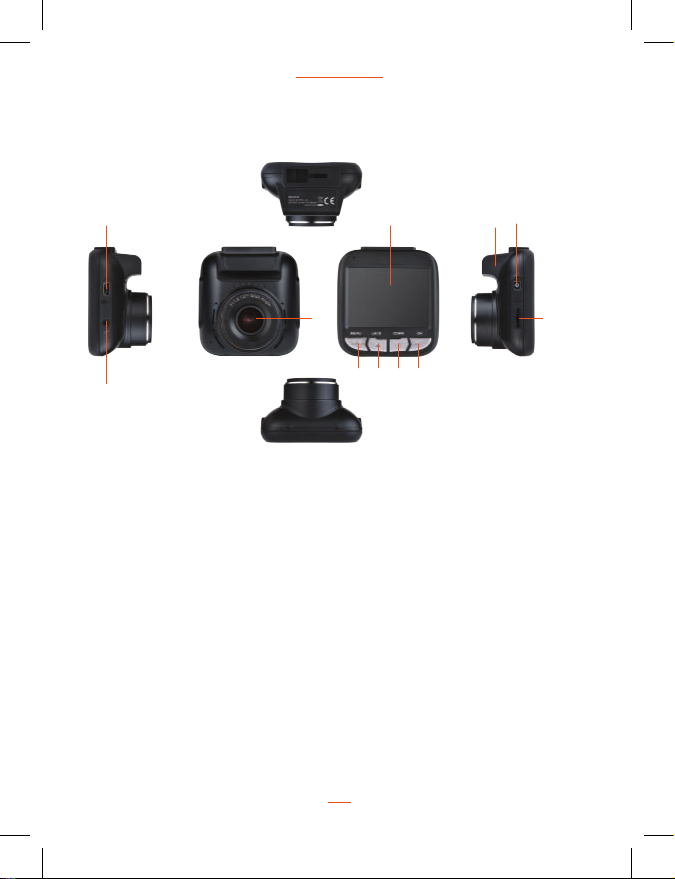
Identification of Controls
1
2
Controls:
1. USB Port for car charger
2. Rear camera (optional) port
3. Power/Reset button
4. Lens
5. Micro SD Card slot (pre installed)
6. LCD display
6
4
7 1098
7. Menu / Mode button
8. Up button
9. Down button
10. REC/OK button
11. GPS
11 3
5
02
RAC 210 Full HD Dash Cam
Preparing for Use
Battery Indicator and Charging
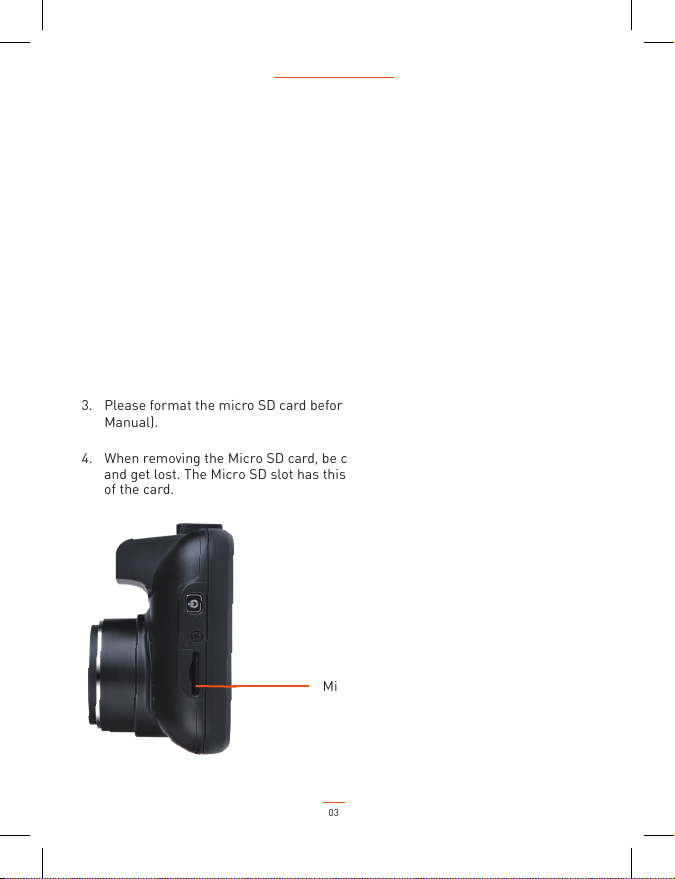
Inserting the Micro SD Card (included)
Follow the direction indicated on the Dash Cam to insert the Micro SD card,
a click sound is heard indicating the card is in position.
NOTE: For first use, the Micro SD card is pre installed.
To remove the Micro SD card, push to eject the Micro SD card out of the slot.
NOTE :
1. Do not remove or insert the Micro SD card when the Dash Cam is turned on.
This may damage the Micro SD card.
2. Please use a minimum Class 10 or higher rating Micro SD card, maximum
up to 32GB.
3. Please format the micro SD card before the first use (see instructions in this
Manual).
When removing the Micro SD card, be careful that the card may spring out
4.
and get lost. The Micro SD slot has this spring-out feature for easy removal
of the card.
Micro SD Card slot
03

www.proofcam.com
Installing the Dash Cam
1. Push the mount into the slot on the top of the Dash Cam, make sure the mount
securely locked in place.
is
2. Position the suction-cap on the windshield, and then press down the clamp on the
suction pad to secure it to the windshield. Make sure the suction pad is
securely locked in place.
3. Loosen the knob to swivel the Dash Cam vertically. Lock the knob, to confirm
that the Dash Cam is securely locked in place.
4. Rotate the Dash Cam 360° to secure the desired view if required.
Connecting to Power
Use only the supplied car charger for powering the Dash Cam.
1. Connect one end of the car charger to the USB port on the Dash Cam.
2.
Plug the other end of the car charger to the in car power socke of your vehicle.
Once the vehicle engine is started, the Dash Cam automatically turns on. It will
also turn off when the engine is turned off. (Note: Some vehicles have an in car
power supply that remains on, even if the engine is turned off. If this is the case,
you will need to manually turn the Dash Cam on and off, using the power button,
when you enter and leave the vehicle)
Note: Any excess cable can normally be tucked into the ceiling of the vehicle. We
have a video to advise on how best to fit the RAC 210 which is available at
www.proofcam.com and visit “Dash Cam Resources”. You can also search
“How to fit an RAC 210” on YouTube.
04
RAC 210 Full HD Dash Cam
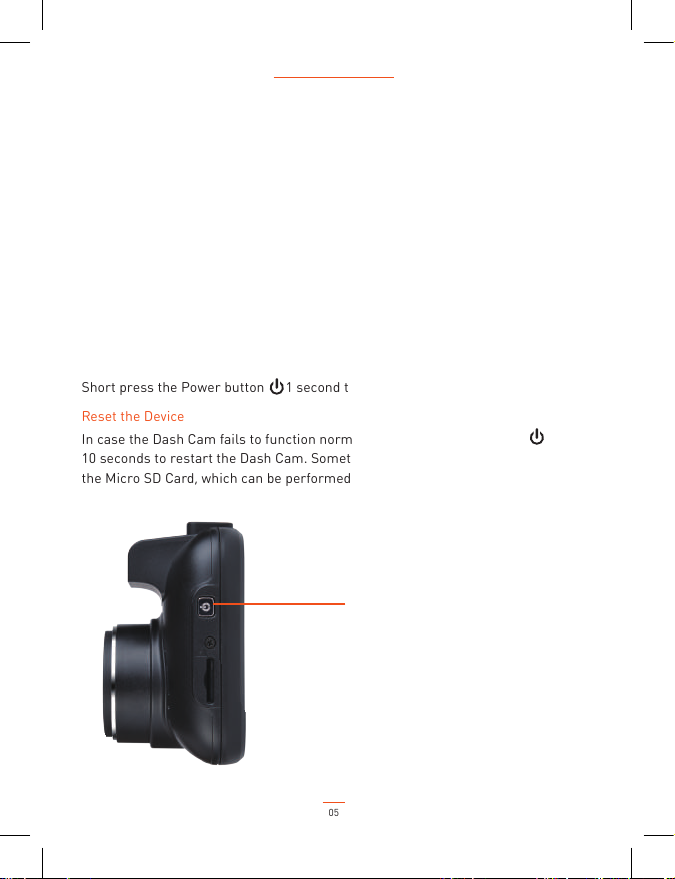
Powering the Dash Cam On / Off
Auto Power On / Off
Once the vehicle engine is started, the Dash Cam automatically turns on and starts
recording (must have the Micro SD Card installed). After the car engine is stopped,
the Dash Cam will automatically save the last recorded file and shutdown.
NOTE: If your vehicle in car power remains on after the car engine has been turned
off, you may need to remove the power lead, or turn the RAC 210 off using the power
button. This is because if the in car power remains on, the RAC 210 will not know that
the engine has turned off.
Manual Power On / Off and Reset
Manual Power On / Off
Short press the Power button 1 second to power the Dash Cam on and off.
Reset the Device
In case the Dash Cam fails to function normally, press the Power button for
10 seconds to restart the Dash Cam. Sometimes it is also necessary to format
the Micro SD Card, which can be performed from the menu settings.
Power and Reset button
05

www.proofcam.com
•
Set the Date / Time
Auto Update
The time and date will automatically update after the Dash Cam has recevied
a GPS signal. The letters GPS in the top left of the screen will turn from red to
green once a GPS signal has been acquired. You may need to adjust the time
zone settings in the menu if the displayed time is not correct.
Manual Update
Press REC button to stop recording;
Press Menu button to enter menu settings and the first menu;
Press Menu button twice to enter the third menu;
Press the Up / Down buttons to select Clock settings;
Press REC button to enter the Clock settings;
Press Up / Down buttons to change values, then when complete, press
REC button to return to the menu settings;
Press Menu button until the Dash Cam exits the menu function and
returns to the Home screen;
Press REC button to resume recording.
Mode Selection
The defualt setting is Video Mode . Long press Menu button to switch
to Still Capture Mode , press Menu button can switch to Front
camera Playback Mode , press Menu button can switch to Rear
camera Playback Mode , press Menu button can switch to Picture
viewing Mode .
.
Using the Dash Cam
Recording Videos
Before starting to record, please ensure that the Micro SD card (included) is
inserted. If you are using the Dash Cam for the first time it will be pre installed
in the slot. When using the Dash Cam in the UK, you will need to adjust the
“Protect Level” settings to LOW. Press REC button to start recording, the
video recording icon flashes on the screen. The recorded files are saved to
the Micro SD card. To stop recording, press REC button again. With the
car charger connected the Dash Cam will automatically turn on and start
recording when the car engine starts. When the engine stops, the Dash Cam
will automatically save the last file and turn off.
06

RAC 210 Full HD Dash Cam
Recording Screen
Recording status Resolution FPS Mode Memory status
GPS status
Remaining memory time System time System date
Battery status
Exposure Bias Value
Wi-Fi status
Protect video icon
Emergency File Protection
The RAC 210 records in segments onto the Micro SD card.
The RAC 210 uses ‘loop technology” – this means that when the Micro SD card
is full up, it will automatically overwrite the oldest videos and keep recording.
There is no need to erase files or adjust the settings.
The default segment duration is 3 minutes, which can be changed from the
menu settings. For example, 1 hour of recording would generate 20 x 3 minute
segments. During recording, press Menu button to protect the current
video, the lock icon appears on the screen, the current video clip will be
protected and cannot be replaced.
The reason for recording in segments is so that, when you connect the RAC 210
to your computer, or download files using the SD card reader, numerous files
will appear on the screen, each tagged with a date and time, with each file
representing a segment. This makes it easy to locate a specific file, rather than
having to scroll through hours of video.
Motion Detection
First, enter Menu Settings and activate Motion Detection function (the default setting
is Off, choose Low / Middle / High to activate the function);
07

www.proofcam.com
Second, set motion detection recording time in recording menu to select Motion
event Rec 5sec/10sec/30sec;
Third, Long press Up button to enter motion detection mode on video mode, the
motion detection icon appears on the right side of the screen and start count
backwards 10 seconds then standby for detection, it will recording automatically
once the Dash Cam detected any motion in front of lens within 2.5m. The recording
time depends on the Motion event REC time and the default setting is 5 second. The
Dash Cam will start next 5 second recording if any motion detected, press any button
can exist from motion detection mode and the icon will disappear from the screen.
G-sensor Collision Recording Protection (Protect Level)
When a collision is detected while recording, the current video segment will be protected
automatically and cannot be replaced until it is deleted from the SD card. However, if
there is an incident, and you do not want to risk the segment being overwritten, you should
always push the MENU button to protect the current segment.
Audio On / Off
During recording, press UP button to turn the microphone on and off.
Video Menu Operation
Press Menu button to enter menu setting, press Up / Down button to select sub
menu, then press REC button to enter the setting, press Up / Down button to select
the option, and then press REC button confirm. After finished the setting, press Menu
button third to exit menu setting.
Video Menu Options
08

RAC 210 Full HD Dash Cam
Video Mode
Function List Description Available Option
Setting for video resolution.
FHD 30fps
HD 30fps
Still Image Size
Audio Record
Set the photo resolution.
5M is the default one.
Setting for enabling automatic loop record
and the video clip time.
Off - The recording will stop when the SD
card is full.
1min / 3min / 5min – Select segment
recording time. For example, the
recording time is 3 minutes. If 21 minutes
of video is recorded, then 7 segments
each of 3 minutes in length will be created.
3min is the default one.
Setting the recording time for
detected motion in front while
standby.
Setting to enable / disable recording
and video voice.
On – Recording and Video has voice
and it’s the default one
Off – Recording and Video no
voice.
Manual compensation for low or bright
light levels. The more negative “-“ in scale,
the darker the recorded video appears. The
more positive “+”, the lighter the recorded
video appears. 0 is the neutral setting
for this option and is the default value.
3M / 5M / 8M / 12M
Off / 1min / 3min /
5min
5sec / 10sec / 30sec
On / Off
-2.0 / -1.66 / -1.33
/ -1 / -0.66 / -0.33 /
0 / +0.66 / +1 / +1 /
+1.33 / +1.66 / +2.0
09

www.proofcam.com
General Settings Menu Options
General Settings
Function List Description Available Option
Setting to enable / disable the beep sound.
On - Select this to enable audible system
beeps when setting the menu options.
This is the default setting for this option.
Off - Disables the audible system beeps.
Set the system date & time.
On / Off
YYYY MM DD
HH : MM : SS
10

RAC 210 Full HD Dash Cam
General Settings
Function List Description Available Option
Set the format of the date or no stamp
to show on the file.
DD MM YYYY is the default one.
Setting for the indication of date and
logo stamp on the video recorded.
Off - No date or logo is displayed on
the video.
Date - Only date is displayed on the
video.
Logo - Only logo is displayed on the
video.
Date+Logo - Date and logo is displayed
on the video. This is the default one.
Set the suitable frequency. 50 Hz / 60Hz
Manage the backlight and presentation
of the screen. It is advisable to enable
this feature to preserve battery power.
Off - Select to disable power saving for
the screen.
1min / 3min - The Dash Cam will
automatically shut down the screen
after 1min / 3min if no operation. 3min
is the default one
Note: If enabled, the Dash Cam continues
to record video even when the screen is
shut off.
Setting for the sensitivity of G-sensor to
detect collision to protect the recording
video.
Off - Disable the G-sensor function.
Low / Medium / High - The higher
sensitivity the collision will be detected
easier. The default setting is Low.
Setting for activating the motion detection
and the sensitivity.
Off: Disable the motion detection. It’s the
default setting.
Low / Middle / High On - Select to enable
the motion detection and the sensitivity
YYYY MM DD /
MM DD YYYY /
DD MM YYYY
Off / Date / Logo /
Date + Logo
Off / 1min / 3 min
Off / High / Middle /
Low
Off / Low / Middle /
High
11

www.proofcam.com
General Settings
Function List Description Available Option
GMT / GMT+01:00 /
GMT+02:00 / GMT+03:00
/ GMT+04:00 / GMT+05:00
/ GMT+06:00 / GMT+07:00
/ GMT+08:00 / GMT+09:00
/ GMT+10:00 / GMT+11:00
/ GMT+12:00 / GMT+13:00
/ GMT-01:00 / GMT-02:00
/ GMT-03:00 / GMT-04:00
/ GMT-05:00 / GMT-06:00
/ GMT-07:00 / GMT-08:00
/ GMT-09:00 / GMT-10:00
/ GMT-11:00 / GMT-12:00
YES / NO
Time Zone
Set the time zone so that the time will
be automatically changed to the time
zone’s time when it receive the GPS.
The default one is GMT.
This option sets the Dash Cam to
the original factory default settings.
Note: The wifi wouldn’t recovery to
the default off status.
Wifi Dash Cam
Format Card
Turn On / Off Wi-Fi hotspot. On / Off / Wifi Password
Formats the inserted micro SD card.
YES - Selecting this option completes
the format process.
NO - Select this to abort the format
and return to the previous menu.
Warning: ALL Videos and photos can’t
be recovered once the Micro SD card
is formatted.
This option displays the current
firmware number of the Dash Cam.
This information may be important
for service and support
communications.
12
YES / NO

RAC 210 Full HD Dash Cam
GPS Settings Menu Options
GPS Settings
Function List Description Available Option
Volume
Over Speed
Speed Finetune
Set the GPS volume.
Set the speed at which the over speed
warning tone. The default one is 70MPH.
Adjust the error data between the GPS
positioning shows the current speed and
each brand car dashboard display speed.
13
Off / Volume 1-8
Off / 40MPH–200MPH
-6 ~ +6

www.proofcam.com
Taking Picture
To take a picture make sure the Still Capture Mode is selected. Press the
REC/OK button to take a photo. Photos are saved on the Micro SD Card.
Still Capture Screen
Resolution
Still Zoom
Capture
Mode
Micro SD
Card
Status
Battery
Status
in / out
Zoom in / out
On the Still Capture Mode, press
and to zoom in / out.
1822
Remaining
Numbers to
Take Photo
14
xposure
E
20/ 02/ 2017
21 : 12 : 41
Value Date and Time

RAC 210 Full HD Dash Cam
Playing Videos Mode
Playing Videos
Long press Mode button and then short press Mode button switch to
videos view mode, press Up / Down button to select the video to play, press
REC button to playing mode, then press REC button again to start playing
video. Press REC button can pause the playing, press Mode button to
back videos view mode, then press Mode button three times to back video
recording mode.
Playing Videos screen
Play Video Screen
Normal
Parking
Emergency
Video Icon Video Name
Video Folder
Normal - Save the normal
traffic recording video, can
be recycled, can be deleted.
Parking - Save the motion
detection video, can be
recycled, can be deleted.
Emergency -Save manual
protected video and G-sensor
video, cannot auto recycled
and deleted
F/ FILE170412-030327F 12/04/2017 03:06:27 00:02:48
15
ate Time
D

www.proofcam.com
Viewing Pictures
to switch to picture viewing mode, press Up / Down button to select the
picture, then press REC/OK button to view picture, press Up / Down button
for viewing pictures one by one, press REC/OK button again can
return back to picture viewing mode.
View Picture Screen
Long press Mode button and then short press Mode button three times
F/ IMG170220-214020F 20/02/2017 21:40:20
Picture Picture Name Date & Time Picture Viewing Mode
GPS Function
This product built-in GPS module, power on and waiting for 1-5 minutes in outdoor,
when GPS word on preview screen turned green, it means that the signal has been
received, the recorded video can be tracked at this time.
16

RAC 210 Full HD Dash Cam
At this time, the recorded video will have the correct latitude, longitude and
speed displayed on the watermark.
GPS Abnormal Warning Condition
GPS Abnormal prompts caused may by:
› Adjacent lane spacing less than 50 meters.
› Fixed camera removed but still prompted (notify seller or online feedback).
› When the front corners have a fixed camera.
› Continuous speed point spacing is less than 100 meters.
› There is a fixed camera at the exit of the tunnel.
› Multi-viaduct overlap.
Above six cases the system may be false positives, please pay attention to
identification
Impact of satellite signal reception are:
› Basement or tunnel › Under the viaduct
› Around High-rises › In the jungle or valley
Above four cases the product may not receive satellite signals or weak signal,
Please pay attention to Dash Cam to regulations, in order to avoid security
accidents or be photographed.
GPS Icon Indication
When the Dash Cam received GPS signal, the LCD will display the following
subtitles when a speed point is detected during driving recording:
Indication:
› 'N': Indicating North.
› '383m': Indicating there are 383 meters from the speed point.
› '40': Indicating the current speed limit of 40MPH.
› '079MPH': Indicating that the current speed of 79MPH, has been speeding,
please safe driving.
17

www.proofcam.com
GPS Tracking Logger (ProofCam GPS Media
Player, PC player)
ProofCam GPS Media Player enables you to playback video files and view the speed
and location data for each video in real time and is available as a free download
from www.proofcam.com.
› Open www.proofcam.com in your mac / PC and follow the link to find
“ Dash Cam Resources” ;
› Download the software according to your computer’s system;
› Follow the guide to install and use it.
Note:
› The speed in GPS Media player would have a little different from the speed of
original video.
› Please regularly update the speed camera database from ProofCam website
to ensure the accurate speed camera reminding.
Wi-Fi Function
The camera has built in Wi-Fi which allows you to connect the Dash Cam to your
mobile phone / tablet via the App. The specific steps are as follows:
Install App on your mobile phone / tablet:
Android system can search keyword “AIT Wifi Cam Viewer” in Google play
to download and install the APP.
iSO systems can search keyword "wifi camera app" in app store to download
and install the APP.
Notes:
Please note that you cannot change any camera setting from the APP. To change any
camera settings, please use the menu functions on camera.
18

RAC 210 Full HD Dash Cam
Battery Warning and Installation Notes
› Always charge using the provided in car charger. Improper handling of the
battery may result in explosion.
› Never dismantle or pierce the battery or allow the battery to short-circuit.
› Batteries may explode if exposed to naked fire. Never dispose of batteries in a
fire.
› Dispose of used batteries observing local regulations.
› Never replace the battery on your own, have the dealer do it for you.
› This product should be installed near the rear view-mirror, at the centre of
windshield, if possible, for optimal viewing.
› A protective film on the lens
the protective film before using the Dash Cam.
› Do not touch the lens with your fingers. Finger grease may be left on the
lens and will result in unclear videos or snapshots. Clean the lens on a regular
basis.
› Do not attempt to disassemble or alter any part of the Dash Cam that is not
described in this guide.
THE LITIUM-ION BATTERY CONTAINED IN THE PRODUCT MUST BE
RECYCLED OR DISPOSED OF PROPERLY. USE RAC DASH CAM ONLY
WITH THE SUPPLIED DC POWER LEAD AND AC ADAPTER FOR BATTERY
CHARGING.
To recycle your RAC Dash Cam unit, please take it to your local recycling centre.
This product fully satisfies the requirements for CE marking when used in a
residential, commercial or light industrial environment.
This equipment complies with the essential requirements of EU Directive 99/5/EC.
Do not use this product on board aircraft, or in hospitals, without first
obtaining Permission.
will affect the video or photographic effect, remove
19

www.proofcam.com
Caution
› Due to local laws and vehicles safety considerations, do not operate the Dash
Cam while driving.
› Set up time and date accurately before you use this Dash Cam.
› This product gets warm when in use, this is normal.
› Do not place the Dash Cam near a heat source or directly expose it to flame or heat.
› Never place the Dash Cam in vicinity of equipments generating strong
electromagnetic fields. Exposure to strong magnetic fields may cause
malfunctions or data corruption and loss.
› The system is used only for non-commercial use, within the maximum limits
permitted by applicable law. Our company does not accept any responsibility for
any data loss during the operation.
› Improper use or operation of the product may result in damage of the product or
its accessories and void the warranty.
› Before you start using the system, it is assumed that you agree to the
above statement.
Warranty
This RAC Dash Cam is warranted to be free from defects in materials or
workmanship from one year from the date of purchase. Within this period, ProofCam
will repair or replace any part or parts that fail provided such failure is not deemed to
be as a result of misuse or damage caused. The warranty does not apply to cosmetic
damage not to consumables such as batteries or storage cards. At our option, we will
eithe
r repair or replace any cameras that are deemed to be eligible under the terms
of this warranty. Any damage or fault caused by accident, misuse, unauthorised
repair or interference or similar is not covered under this warranty.
If you have a camera that requires service under warranty, then in the first instance
you should return it to the retailer from whom it was purchased.
Should you have any general or technical questions on your RAC 210 Dash Cam,
please email us at customer@proofcam.com. We will endeavour to answer your mail
within 24 hours.
ProofCam Limited EC1V 7LQ
proofcam.com
You can also find general information, news, re
‘ProofCam’ Facebook page and Twitter feed.
views and competitions on our
20

RAC 210 Full HD Dash Cam
Specification
LCD Display 2.31 inch TFT LCD monitor
Image sensor 2MP CMOS
View angle 127°
Video Resolution 1920*1080 30fps / 1280*720 30fps /1280*720 60fps
Picture resolution 12M
Video format MOV
Picture format JPG
Memory Support Class 10 or higher rating Micro SD card,
GPS Built-in
Wi-Fi Built-in
Speed Camera Alerts Built-in
Microphone Built-in
Speaker
G-sensor
Power source
Interface
Operating temperature 0°~ 45° C
Dimensions
Weight
maximum up to 32GB
Built-in
Yes
In car charger
USB port, SD card slot, Rear Camera port
63*68*40mm (L*W*H)
80g
21

www.proofcam.com
Frequently Asked Questions
› Micro SD card does not display or cannot read.
·Make sure using class 10 (on or above) Micro SD card.
·Format Micro SD card in dash cam before using.
› Cannot power on or crash.
·Check the power connection ensure the indicator light of car charger turns
on, connect to the camera charging about 30 minutes.
·Remove the Micro SD card and reset the camera, then press power button
power on the camera.
› Automatically stops recording when recording.
·Check whether the video recorded in the camera playback mode is fully
protected.
·Make sure cycle recording function has been set, and Micro SD card has
been formatted.
› The camera preview screen has horizontal streak interference.
·According to the local power supply frequency, set the corresponding
50HZ or 60HZ.
·It is a normal phenomenon that in the event of generator power generation
may lead to horizontal streak more obvious.
› When computer plays recorded videos, the video is not coherent.
·Copy the recorded videos from Micro SD card to the computer hard drive.
·Replace the Micro SD card according to the actual situation.
› Time cannot be saved, the time cannot be set.
·If the battery out of power, the power has been exhausted and not
connected to the car charge system, time will be restored to factory settings,
the battery should be fully charged and then re-set it.
·If the problem remains, it is the battery is broken, need to contact the dealer
to replace the battery.
› The recorded video is fogged.
·Check the lens film is take off, or the lens or windscreen of vehicle may not
clean. If the problem remains, try to restart the camera. The problem is
still not resolved, then please contact our authorized dealers.
› When connect to Wi-Fi the camera temperature rise up is normal phenomenon.
22

Important:
It is your responsibility to make sure that you use the RAC Dash Cam in a safe
and responsible manner. Do not access functions or change settings whilst you
are driving, and the location and positioning of your RAC Dash Cam should not
interfere with the driver’s field of vision.
Please make sure that you drive in an appropriate way and in compliance with all
the laws and regulations. The RAC Dash Cam is not a driving aid and is designed
solely to provide a video record of your journey.
ProofCam accept no responsibility whatsoever for any failure of the equipment to
work correctly.
 Loading...