


User’s manual
GB NL |
F |
E |
D |
I |
|
|
|
|
|

|
DECLARATION OF CONFORMITY |
|
We , the undersigned |
|
|
|
|
|
Company: |
|
TE-GROUP nv |
|
|
|
Address: |
|
Kapelsestraat 61, 2950 Kapellen - BELGIUM |
|
|
|
declare, that the following equipment: |
||
|
|
|
Product Name: |
|
Quintezz Drive Control |
|
|
|
Product Type: |
|
GPS Early Warning System |
|
|
|
Conforms with the requirements of European Council Directive 89/336/EEC amended with 92/31/EEC

Illustration I
|
|
|
11 |
|
|
15 |
|
|
|
|
|
|
|
|
12 |
|
|
|
|
16 |
13 |
|
|
|
|
10 |
|
|
|
|
|
|
9 |
|
|
|
|
|
|
|
|
8 |
|
|
|
|
|
|
|
|
|
|
|
|
6 |
|
|
|
|
|
|
14 |
|
7 |
1 |
2 |
3 |
4 |
5 |
Illustration II

GB
NL
FR
ADDENDUM MANUAL PAGE GB-13
7.3 UPDATE YOUR QUINTEZZ DRIVE CONTROL
1.Close the site www.quintezz.com.
2.First of all, connect the USB cable to your computer.
3.Connect the Drive Control to the other end of the USB cable. DO NOT press the SETTING button as indicated in the PC software instruction window and the
user’s manual! When you have connected the Drive Control correctly, the display will show ‘DOWNLOAD’ and ‘Quintezz is linked’ will be shown on the screen of your computer.
4.Click on ‘Database’ and select the file ‘DriveControl.mdb’ that was saved on your desktop. The software will now start downloading the database into your Drive Control. !!! Do not unplug the Drive Control until ‘ALL DONE’ is shown on your computer!!!
5.Click on ‘Exit’.
6.Your Drive Control is now up-to-date and ready to use!
ADDENDUM HANDLEIDING PAGINA NL-39
7.3. UW QUINTEZZ DRIVE CONTROL UPDATEN
1.Sluit de website www.quintezz.com.
2.Sluit vervolgens eerst de USB kabel aan op uw computer.
3.Verbind uw Drive Control met het andere uiteinde van de USB kabel. Druk NIET op de “SETTING” toets zoals aangegeven in het PC software instructiescherm en de handleiding! Als u de Drive Control op de juiste manier aangesloten hebt, verschijnt op het scherm van het toestel “DOWNLOAD”. Op uw computer verschijnt de boodschap “QUINTEZZ is verbonden”.
4.Klik nu op “Databestanden” en selecteer het bestand “DriveControl.mdb”. De software wordt nu in uw Drive Control geladen. !!! De Drive Control niet ontkoppelen tot ‘Klaar’ op uw computer verschijnt!!!
5.Klik op “Exit”.
6.Uw Drive Control is nu volledig up-to-date en klaar voor gebruik!
ADDENDUM MODE D’EMPLOI PAGE FR-45
7.3. MISE À JOUR DE VOTRE QUINTEZZ DRIVE CONTROL
1.Fermez le site www.quintezz.fr.
2.Branchez le câble USB d’abord à votre ordinateur.
3.Branchez l’autre extrémité du cordon USB à votre Drive Control. N’appuyez PAS sur la touche « SETTING » comme indiqué dans la fenêtre d’instructions du logiciel et dans le mode d’emploi ! Si la procédure est bien exécutée, vous verrez « DOWNLOAD » s’afficher sur l’écran de votre Drive Control. « Quintezz est connecté » s’affiche sur l’écran de l’ordinateur.
4.Cliquez sur « Base de données » et sélectionnez le fichier « DriveControl.mdb » sur votre bureau. Maintenant le logiciel télécharge la base de données dans votre Drive Control. !!! Ne débranchez pas le Quintezz Drive Control avant que l’ordinateur indique « Prêt » !!!
5.Cliquez sur « Exit ».
6.Le Drive Control est maintenant mis à jour et prêt à utiliser!

EADDENDUM MANUAL DE INSTRUCCIONES PAGINA E-61
7.3 ACTUALIZAR SU QUINTEZZ DRIVE CONTROL
1.Cierre el sitio web www.quintezz.com.
2.Primero conecte el cable de USB a su ordenador.
3.Conecte el Drive Control al otro extremo del cable de USB. NO pulse el botón “SETTING” como indicado en la ventana de instrucción del software y en el manual de instrucciones! Después de haber conectado el Drive Control correctamente, aparecerá “DOWNLOAD” en la pantalla de su Drive Control y “QUINTEZZ se encuentra conectado” aparecerá en su ordenador.
4.Haga clic en “Bases de datos” y seleccione el archivo “DriveControl.mdb” que fue guardado en su escritorio (desktop). El software descargará la base de datos en su Drive Control. iii No desconecte el Drive Control antes de que aparezca
“Listo” en su ordenador!!!
5.Haga clic en “Exit”.
6.Su Drive Control está ahora actualizado y listo para el uso!
DADDENDUM BENUTZERHANDBUCH SEITE D-77
7.3 UPDATE DER BLITZERDATENBANK
1.Schließen Sie die Website www.quintezz.com.
2.Schliessen Sie das USB Kabel an den PC an.
3.Verbinden Sie das USB Kabel mit dem Drive Control. Drücken Sie NICHT die ‘SETTING‘ Taste wie es im PC SoftwareFenster und im Benutzerhandbuch angezeigt ist! Wenn Sie die Drive Control richtig verbunden haben, erscheint ‘DOWNLOAD‘ und ‘Quintezz ist verbunden‘ (Quintezz is linked) auf das Display.
4.Klicken Sie auf ‘Datenbank‘ und wählen Sie die file ‘DriveControl.mdb’ welche sie auf Ihr Festplatte zurückfinden. Die Software fängt jetzt an zu Downloaden auf Ihrer Drive Control. !!! BITTE NICHT DISCONNECTIEREN BIS ‘FERTIG’ (ALL
DONE) ERSCHEINT IM PC-SOFTWARE!!!
5.Klicken Sie auf ‘Exit’.
6.Ihr Drive Control ist jetzt aktualisiert und fertig zum Gebrauch!
IADDENDUM MANUALE DELL’UTENTE PAGINA I-94
7.3 AGGIORNAMENTO DEL VOSTRO QUINTEZZ DRIVE CONTROL
1.Chiudere il sito www.quintezz.com.
2.Prima di tutto, collegare il cavo USB al vostro computer.
3.Collegare il Drive Control all’altro terminale del cavo USB. NO premere sul tasto ‘SETTING’ come indicato nella finestra di istruzione del software e nel manuale dell’utente! Una volta collegato il Drive Control correttamente, il display mostra le scritte ‘DOWNLOAD’ e ‘Quintezz e’ collegato’ (Quintezz is linked) sullo schermo.
4.Cliccare su ‘Database’ e selezionare il file ‘DriveControl.mdb’, memorizzato sul desktop. Il software avvia quindi il download del database nel vostro Drive Control. !!! Non scollegare il Drive Control fino alla scritta ‘Fato’ (ALL DONE) sullo schermo di computer!!!
5.Cliccare su ‘Uscire’ (Exit) per uscire.
6.Il vostro Drive Control è ora aggiornato e pronto all’uso!

TABLE OF CONTENTS |
|
INTRODUCTION ......................................................................................................................................................................... |
.1 |
DESCRIPTION OF THE DRIVE CONTROL ....................................................................................................................................... |
.1 |
INSTALLATION IN THE CAR .......................................................................................................................................................... |
2 |
OPERATION OF THE DRIVE CONTROL IN THE CAR ....................................................................................................................... |
3 |
SETTINGS OF THE DRIVE CONTROL ............................................................................................................................................. |
4 |
ALERT SCREENS OF THE DRIVE CONTROL .................................................................................................................................... |
9 |
DEFAULT SETTINGS ................................................................................................................................................................... |
10 |
SPEED TRAPS ............................................................................................................................................................................ |
10 |
PC OPERATING FOR THE QUINTEZZ DRIVE CONTROL ................................................................................................................. |
12 |
MAINTENANCE, DIRECTIVES AND TIPS ...................................................................................................................................... |
15 |
GUARANTEE ............................................................................................................................................................................. |
15 |
INTRODUCTION
Congratulations!
You are now the proud owner of one of the world’s most advanced GPS products.
The Quintezz Drive Control is delivered as a GPS Locator for speed checks. It is possible to upgrade the device to a combined GPS Locator / Radar Detector / Laser Detector. The possession and use of a Radar / Laser Detector is forbidden in some countries. Please checkifradardetectionorlaserdetectionisallowedinyourcountry.TheDRIVECONTROLdoesnotgiveyoutherighttoexceedthe speed limits. Always make sure you drive carefully!
DESCRIPTION OF THE DRIVE CONTROL
1.1 GENERAL
The DRIVE CONTROL is a device that gives you information about your trip and warns you for unsafe situations. QUINTEZZ supplies a database for several countries with information about speed camera’s and/or dangerous locations. In addition you can save your own locations. A warning will be given at a distance of 600 meters of every location. For the information that is supplied by QUINTEZZ, you have some additional functions. The speed warning is depending from your speed and direction of driving. This means that you won’t get a warning if the camera is at the other side of the road. This also means that you will get a small warning in case of correct speed, but a big warning in case of speeding.
Besides this function, your QUINTEZZ DRIVE CONTROL shows you: Compass, an indication of your real speed, your battery voltage, the date and the time
-GB-1-

1.2 MEANING OF EACH PART IN THE BOX
See illustration I
1.Setting button: To enter the menu options and activate the download mode
2.Save button:
i.Allowstheusertomanuallyaddnewlocationswherefromnowonwarningswillbegivenindriving mode.
ii.Allows the user to manually delete locations.
iii.The user’s preference for each option can be set in setting mode.
3.Volume – button: To decrease the volume.
4.Volume + button: To increase the volume.
5.Red button:
i.To de-activate the Radar / Laser Detector once you access countries where the Radar / Laser Detector is not allowed: press this button briefly (not longer than 2 sec.!). If you press this button too long, the device will set to ‘illumination’ mode and the Radar / Laser Detector will NOT be switched off.
ii.To dim the display (long pressing, until you see ILLU: xxx).
6.PC – USB Port: For downloading data from your computer
7.Display
8.Speaker
9.Laser Detector lens – rear
10.Laser Detector lens – front
11.Radar Detector lens
12.DC 12V: Power port for cigarette plug
13.Lock switch for windshield bracket
14.Windshield bracket
15.Power cord
16.Velcro
Manual
CD with PC software
INSTALLATION IN THE CAR
2.1 DRIVE CONTROL
The QUINTEZZ DRIVE CONTROL is especially designed for use in the car. GPS signals are received through the built-in GPS antenna.
The following are some guidelines for mounting the detector :
•The unit may be positioned within 25° of horizontal without significantly degrading performance.
•The information display of the DRIVE CONTROL has to be clearly visible to the driver.
•Do not mount directly behind windshield wipers.
-GB-2-

•Mount the unit so that the control panel is plainly visible for the driver.
•Do not leave it in direct sunlight for long periods of time.
2.2MOUNTING TYPES
See Illustration II
We have provided 2 types of mounting methods.
2.2.1 DASHBOARD MOUNTING
The hook and loop fastener Velcro tape provided, may be used to mount your detector on a flat dashboard. The dashboard must be clean and dry for the fastener to adhere properly.
•Remove backing from the “LOOP (fuzzy)” piece and press firmly to the bottom of your unit.
•Clean dashboard with common rubbing alcohol to remove dirt and grease.
•Peel the backing from the hook side and press the unit into the desired position on the dashboard.
2.2.2WINDSHIELD MOUNTING
•Insert the supplied suction cups and cushion into each slot and windshield bracket.
•Slide the windshield bracket into the groove of the detector.
•Use the Lock switch (LOCK) to lock the windshield bracket.
•Locate the bracket on a clean windshield and press firmly on each suction cup.
2.3 POWER SUPPLY
TheDRIVECONTROLisdesignedtobeconnectedtothenormalelectricalcircuit(12Volts)ofthecar,whichhasanegativeearthing. See the manual of your car, if you are not sure about the polarity. After installation, the power cable is to be plugged into the
‘POWER Port’. Remove the cigarette lighter and insert the cigarette plug into this contact accordingly.
OPERATION OF THE DRIVE CONTROL IN THE CAR
3.1 AUTOMATIC TEST
After being switched on, the DRIVE CONTROL will perform an automatic self test. If you hear the audio text ‘FASTEN YOUR SEAT BELT, BE CAREFUL’, the test has been properly performed and the display will show:
 >
>  >
> 
3.2 LOOKING FOR SATELLITES
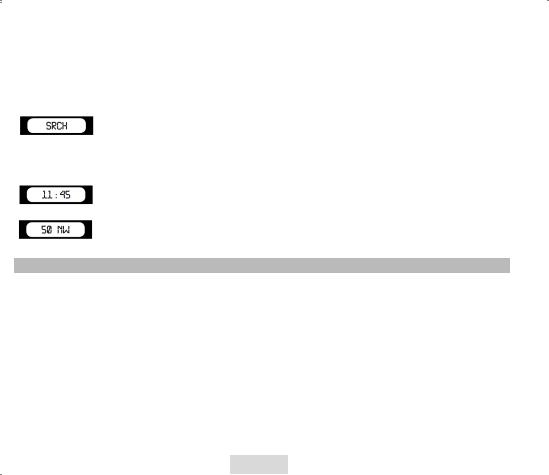
Oncetheautomatictesthasbeenperformed,theDRIVECONTROLwilltrytocontacttheGPSsatellites.Thedisplaywillshow‘SRCH’
-GB-3-
If the Radar / Laser Detector is installed, it will start working immediately. The GPS alarm will only be working after the connection to the satellites is established.
ATTENTION:
The first time the DRIVE CONTROL is switched ON, it can take about 15 minutes to catch the satellites. Obstacles in the direct environment and the moving of the car can extend the duration of the first connection to the satellites.
The DRIVE CONTROL will stay connected with 4 to 12 satellites. If the connection is shortly cut (for example when passing through flyunders and tunnels) the display will go to connection mode, showing
3.3 DRIVING MODE
The DRIVE CONTROL is the perfect solution to prevent you from speeding a few kilometers by accident. When the connection with the satellites is OK, you will see the following display, showing the time.
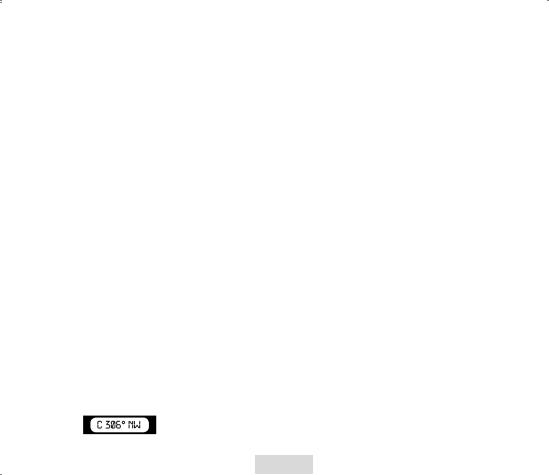
When the car is moving, the real speed and heading is shown.
SETTINGS OF THE DRIVE CONTROL
4.1 VOLUME SETTING
You can set the volume by the VOL – or VOL + key.
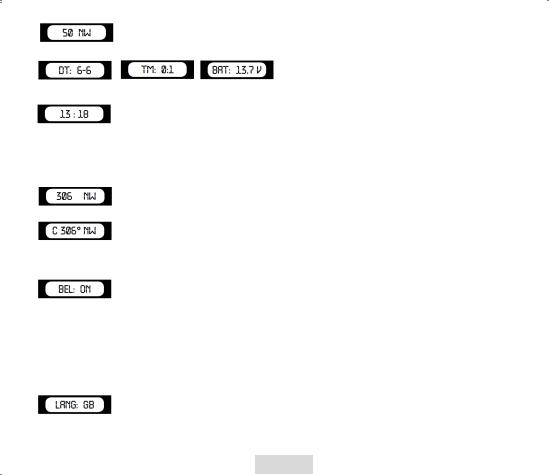
4.2 SETTING MENU
ThemenubuttonislocatedatthetopoftheDRIVECONTROLandindicatedwith“SETTING”.Bypressingthisbutton,youwillaccess the setting menu that contains the following choices:
1.Rlogic: 0 / 1 / 2 / 3 / 4 / CITY (visible when radar is on)
2.X/Ku: ON/OFF
3.K: ON/OFF
4.Ka: ON/OFF
5.Ka N: ON/OFF
6.MAX: Maximum speed for overspeed warning
7.Default / Details / Comfort: The screen information mode
8.Bell: ON / OFF
9.Lang: SP / FR / GB / D / I
-GB-4-

10.SN 0 (visible when radar is off)
11.ODO 0.0
12.AVG: 0
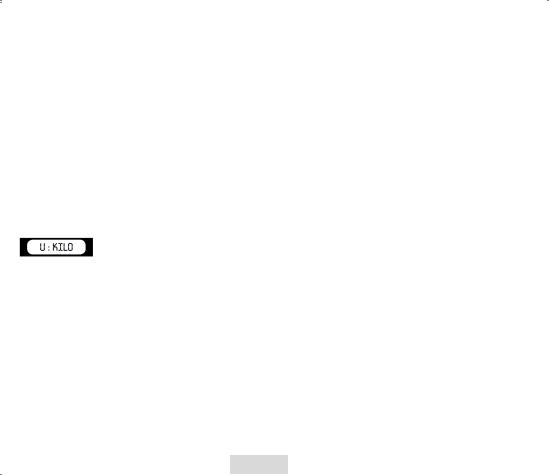
13.U: Kilo / Mile
14.GMT: 0
15.U1 …….Lat ……….Lon
16.Ver 03.1
17.DB: e.g. 9/11
Each submenu will be described in the following chapters.
-To scroll through the menu, press the SETTING button.
-To enter a selected menu, press the SETTING button.
-To save a selection, press the SAVE button.
If no button is pressed within 3 seconds, the unit exits the menu.
4.2.1 RLOGIC: 0 / 1 / 2 / 3 / 4 / CITY
This function will only be visible whenever the Radar Detector function is enabled. The Radar Logic setting determines at which speed the Radar Detector starts working.
-Logic0: The Radar Detector works always, so starting from 0 km/h.
-Logic1: The Radar Detector starts working when the driving speed exceeds 20 km/h.
-Logic2: The Radar Detector starts working when the driving speed exceeds 40 km/h.
-Logic3: The Radar Detector starts working when the driving speed exceeds 60 km/h.
-Logic4: The Radar Detector starts working when the driving speed exceeds the maximum speed chosen manually by you in the menu. (see chapter 4.2.5 ‘MAXIMUM SPEED’)
-CITY: The Radar Detector works always, but the sensitivity is reduced to eliminate most false sources so that the unit willnotalarmforweaksignals.Therearemanysourcesoffalsealarmsignalsnearcities.Thereareforinstanceseveral types of automatic doors that use the same signal as a radar. As soon as you have activated this CITY mode and you havesetthedisplayinformationmode(seechapter4.2.6‘DEFAULT/COMFORT/DETAILS…’)to‘Comfort’,the‘C’ofCITY is shown together with the heading of the compass:
E.g. Logic 2: WheneverdeRadarDetectorfunctionisactivatedandyouaredriving30km/h,theRadarDetectorisactivatedbutwill notgiveyouawarningassoonasitdetectsradarsignals.Assoonasyourdrivingspeedexceeds40km/hyouwillstartreceivingall
warnings. This function enables you to determine when the Radar Detector starts working in order to avoid false alarm signals.
If there is no connection between the GPS and the satellites, the Radar Detector will still work in RLogic0 setting, as long as it has been enabled.
-GB-5-
4.2.2 RADAR BAND: X/Ku
This option allows you to switch off the Radar Band ‘X/Ku’.
-Press the VOL + or VOL – button to switch this Radar Band ON or OFF.
-To confirm this setting, press SAVE.
4.2.3RADAR BAND: K
This option allows you to switch off the Radar Band ‘K’.
-Press the VOL + or VOL – button to switch this Radar Band ON or OFF.
-To confirm this setting, press SAVE.
4.2.4.1RADAR BAND: Ka / 4.2.4.2 RADAR BAND: Ka Narrow (Ka N)
This option allows you to switch off the Radar Band ‘Ka’ / ‘Ka N’.
-Press the VOL + or VOL – button to switch this Radar Band ON or OFF.
-To confirm this setting, press SAVE.
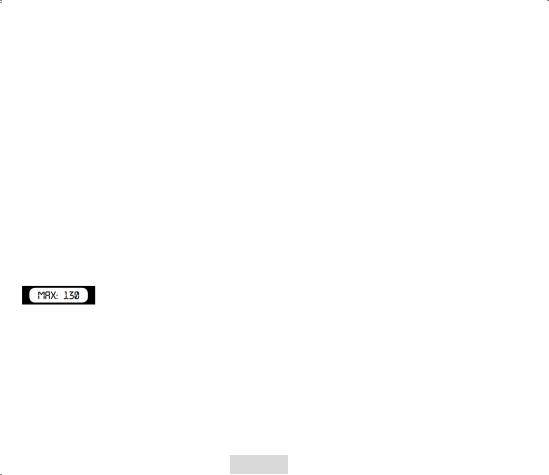
4.2.5MAXIMUM SPEED FOR OVERSPEED WARNING
The following display appears once the warning limit menu is accessed:
The maximum speed can be set by the user in this mode.
-Press the VOL + or VOL – button to set a maximum speed.
-If the user exceeds a maximum speed, a speed alert is displayed followed by a warning sound.
-To confirm the set warning limit, press SAVE.
4.2.6DEFAULT / COMFORT / DETAILS: THE DISPLAY INFORMATION MODE
The DRIVE CONTROL has a display. The information on the display depends on whether you are driving or not. This information can be selected:
Details display setting:
During driving the speed of the car and the heading are shown.
During non-moving the date, the trip time and the battery voltage are shown.
Default display setting:
During non-moving, the time is shown.
-GB-6-

During moving, the speed of the car and the heading are shown.
Comfort display setting:
During moving and non-moving, the heading of the compass is shown in degrees.
If you have set the RLogic function to ‘CITY’ (see chapter 4.2.1 ‘RLOGIC…’), the ‘C’ of City is also shown on the display.
4.2.7 BELL / EXTRA SOUND
The following display appears once the bell / extra sound menu is accessed:
This option allows you to partially switch off the sound.
-Press the VOL + or VOL – button to switch the sound ON or OFF.
-To confirm this setting, press SAVE.
If you have selected OFF, the following sounds will not be audible:
-Start-up message: Fasten your seat belt, be careful.
-Warnings for cameras, in case you are NOT speeding.
4.2.8LANGUAGE
The following display appears once the language menu is accessed:
-Press the VOL + or VOL – button to select the preferred language.
-To confirm this setting, press SAVE.
4.2.9SN 0 DISPLAY
This is only shown whenever the Radar Detector function is de-activated. To activate the Radar Detector, it needs to have the software enabled. To enable this software,you need to enter a secret code. The secret code consists of the last 4 digits of the serial number.
-GB-7-

First,youneedtoenterthefirstdigit.YoucansetthedigitwiththeVOL+andVOL–key.Toconfirmthedigit,youneedtopressthe red button. Once all 4 digits are confirmed, the Radar Detector will be switched on, or you will receive a message ‘SN Fail’.
To make sure your secret code remains secret, we suggest that you remove the last 4 digits from the serial number label, and store the information in a safe place.
4.2.10 0.0 INDICATION
When the product is not used, the display shows 0.0. This is the ODO meter. It shows the total traveled distance. To reset the Odometer to 0.0, press the red button.
4.2.11 AVG INDICATION
This display indicates the average speed of your trip after switching on the unit. When you switch off the unit, your average speed will automatically be reset.
4.2.12 U: KILO / MILE
The following display appears once the speed indication menu is accessed:
With this indication you can choose whether your speed needs to be indicated in Kilometers/hour or Miles/hour.
4.2.13 GMT SETTING
The satellites broadcast the time based on GMT (Greenwich mean time). This time is not changed automatically from summer into winter time. To adjust the time to your region / season, you have to increase or decrease the hours. E.g. to set the unit to Amsterdam / Brussels / Paris summertime, you have to set this to 2.
4.2.14 U1 LON ….. LATT ……
You can save your own locations into the DRIVE CONTROL. The DRIVE CONTROL will give a warning once you reach these locations.
In this menu, you can see the coordinates of your own stored locations.
4.2.15 SOFTWARE VERSION
The following display appears once the software version menu is accessed:
This display shows you the current version of the software.
4.2.16 DATE OF DATABASE
The following display appears once the date of database menu is accessed:
This display shows you the date when the database was last updated (DD/MM).
-GB-8-

ALERT SCREENS OF THE DRIVE CONTROL
The DRIVE CONTROL will show the following screen when you approach a speed camera. The following alert indicates a camera warning at a distance of 450 meter on the current road.
While driving, the DRIVE CONTROL will give a warning sound when you approach a camera, a dangerous location, a track control section or a user data location. The sound of this warning depends on what you have set up for the ‘bell / extra sound’. In case this setting has been switched OFF, there will only be a warning whenever the speed limit is exceeded. The maximum speed on the particular location will also be shown on the display. In case this setting is ON, there will be a warning for every camera.
The first warning will be given at a distance of 500 meters. The second warning (KEEP SAFETY DRIVING) will be heard at a distance of 300 meters.
5.1 CAMERA & TWO-WAY CAMERA
Thisalertindicatesacameraoratwo-waycamerawarningatadistanceof450meteronthecurrentroad.Pleasecheckyourspeed and slow down in case of overspeed. At a distance of 500 meter of the camera you will hear ‘CAMERA’ or ‘TWO WAY CAMERA’ and at a distance of 300 meter the DRIVE CONTROL will say ‘BE CAREFUL’.
5.2 DANGEROUS LOCATION, TRACK CONTROL & TRACK CONTROL END
track control |
dangerous location |
warning |
This alert indicates a dangerous location, a track control or a track control end at a distance of 450 meter on the current road. Please check your speed and slow down. At a distance of 500 meter of the location you will hear ‘DANGEROUS LOCATION’, ‘TRACK CONTROL’ or ‘TRACK CONTROL END’ and at a distance of 300 meter the DRIVE CONTROL will say ‘BE CAREFUL’.
5.3 A USER REGISTERED LOCATION
You can manually add and delete locations from the memory of the DRIVE CONTROL while driving. These locations are called ‘user data’ and can be exchanged with other people using the DRIVE CONTROL. The memory for user data has a capacity of 800 locations.
-GB-9-

How to add a location?
If you want to add a location manually, press the SAVE button at that location, while you are driving. The DRIVE CONTROL will confirm the saving of this location as indicated in the following display: (in this case the 3rd user location was saved).
How to delete a location?
Ifyouwanttodeleteamanuallyaddedlocation,presstheSAVE buttonattherespectivelocation.This needstobedone duringthe visual and audible alarm for this particular location. The location will be deleted and the DRIVE CONTROL will confirm the deleting of this location as indicated in the following display:
When you are driving, and when you are at a distance of 500 meter of a user’s location that has been saved in the memory of your DRIVE CONTROL, a warning will be shown and you will hear ‘DING DONG’ and ‘WATCH OUT’. When you are at a distance of 300 meter, the DRIVE CONTROL will repeat ‘DING DONG DING DONG’. The alert shown hereafter indicates a user point warning at a distance of 450 meter.
5.4 SPEED ALERT
There are two kinds of speed alert warnings showing the above display: ‘warning limit speed alert’ and ‘system limit speed alert’. In case of a ‘warning limit speed alert’, you will hear a ‘DING’ tone. In case of a ‘camera limit speed alert’, you will hear ‘TING TING TING’ with a loud, sharp tone.
DEFAULT SETTINGS
1.Warning limit: 130 km/h
2.Clockbell: ON
3.Language: English
4.Speed indication: Km/h
SPEED TRAPS
Police checks can be effected in many different ways. Frequently used speed-trap methods are radar speed cameras, laser guns, mobile radar speed cameras and track controls.
-GB-10-

6.1 HOW THE RADAR WORKS
Theactualprocessinvolvedindeterminingavehicle’sspeedisbasicallyasimpleone.Itinvolvesdirectingabeamofmicrowaveenergy at an approaching target vehicle. A portion of this beam is reflected by the target and is received by the radar unit that originally transmittedthesignal.Thereflectedsignalisshiftedinfrequencybyanamountproportionaltothespeedofthetargetvehicle.
This phenomenon is known as the Doppler effect. The radar unit determines the target vehicle speed from the difference in frequency between the reflected signal and original signal.
To activate the Radar Detector, please read chapter 4.2.9 ‘SN 0 Display’. To de-activate the Radar Detector press the red button briefly (not longer than 2 sec.!). If you press this button too long, the device will set to ‘illumination’ mode and the Radar Detector will NOT be switched off.
6.2 RADAR FREQUENCIES
The QUINTEZZ DRIVE CONTROL can detect 5 radar bands with 14 different frequencies and includes Instant ON radar and POP radar.
X band: 9.41 Ghz, 9.9 Ghz, 10.5 Ghz, 10.525 Ghz, 10.6 Ghz Ku band: 13.450 Ghz,
K band: 24.1 Ghz, 24.125, 24.15 Ghz
Ka narrow-band: 34.0 Ghz, 34.3 Ghz, 34.36 Ghz Ka wide-band: 34.7 Ghz, 35.5 Ghz
POP detection
6.3 LASER DETECTION
Laser detection is another kind of signal that can be detected. Laser Speed Guns use pulses of infrared laser light to measure speed of target by timing each pulses over time as it is reflected back to the gun.
6.4 LASER RANGE
The effective range of clocking distance by a laser gun is less than 1 km. The operator of the laser gun is instructed to target on the number plate. So, mount your laser detector as low as possible in the car. The QUINTEZZ DRIVE CONTROL offers the possibility to detect a laser from front as well as from behind.
If the Laser Detector is activated by reflection signals from the laser beam to a vehicle in front of you, then you still have time to react on the laser check.
IftheLaserDetectorisactivatedbyalaserbeamthatispointedonyourcar,thenyourspeedisalreadymeasuredduringthelaseralarm.
6.5 OTHER SPEED CHECKS
ThereareacoupleofotherchecksthatcannotbedetectedbyRadarorLaserDetectors.Thesechecksincludedigitalvideorecording, loops within the road and optical speed checks. These checks have to be detected by GPS.
ARadarDetectorisabletodetectseveralofthesetraps,butnotallofthem.Thenewgenerationofradarspeedtrapsisincreasingly difficulttodetectbymeansofaRadarDetector.Furthermore,theRadarDetectorisforbiddeninmanycountries.Falsealarmsoccur on a regular basis with each and every Radar Detector.
-GB-11-

The DRIVE CONTROL is the perfect solution. This advanced GPS device signals overspeed, camera locations and offers additionally an electronic compass, trip time and an ODO-meter.
YoucanactivatetheRadar/Laserdetectionupdateincountrieswherethisisallowed.TheRadar/LaserDetectorcanbesettoswitch off at speeds that are lower than 30 or 50 km/h to avoid false alarms.
PC OPERATING FOR THE QUINTEZZ DRIVE CONTROL
7.1. INSTALLING THE QUINTEZZ SOFTWARE
1.Insert the CD into the CD-ROM network drive.
2.Choose the language and click on ‘Next’.
3.Click on ‘Next’ ‘Install’.
4.As soon as you have installed the Quintezz software, an icon ‘Drive Control Easy Update’ will appear on the desktop of your computer.
-GB-12-
7.2. DOWNLOAD DATABSE CAMERA LOCATIONS
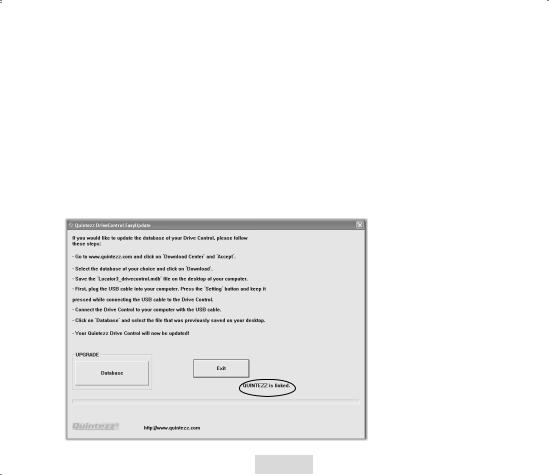
1.Clickontheicon‘Drive Control Easy Update’,createdduringtheinstallationof theQuintezzsoftware(seestep1).
2.Go to www.quintezz.com and choose English as language.
3.Click on ‘Download Center’.
4.Click on ‘Accept’ to accept the Quintezz juridical statement.
5.Select the database of your choice.
6.Click on ‘Download’ to confirm your choice.
7.Save the file ‘DriveControl.mdb’ on your desktop.
8.In a few moments the message ‘Download complete’ will appear on your screen. Click on ‘Close’.
7.3.UPDATE YOUR QUINTEZZ DRIVE CONTROL
1.Close the site www.quintezz.com.
2.First of all, connect the USB cable to your computer.
3.TakeyourDriveControlandpressthebutton‘SETTING’.NowkeepthisbuttonpressedwhileconnectingtheDriveControlto the other end of the USB cable. When you have connected the Drive Control correctly, the display will show ‘DOWNLOAD’ and ‘Quintezz is linked’ will be shown on the screen of your computer. If the button ‘SETTING’ was not pressed while connecting the USB cable to the Drive Control, the software will not be able to start downloading the database. In this case you will have to try again, starting from step 3.
-GB-13-

4.Click on ‘Database’ and select the file ‘DriveControl.mdb’ that was saved on your desktop. The software will now start downloading the database into your Drive Control.
!!! Do not unplug the Drive Control until ‘ALL DONE’ is shown on your screen!!!
5.Click on ‘Exit’.
6.Your Drive Control is now up-to-date and ready to use!
-GB-14-

MAINTENANCE, DIRECTIVES AND TIPS
8.1 REPLACING THE FUSE
There is a fuse in the cigarette plug of the DRIVE CONTROL. To replace the fuse, you need to loosen the screw cap of the cigarette plug. Always make sure you replace the fuse with one of equal value.
8.2 ENVIRONMENT
The DRIVE CONTROL is a very advanced GPS-system that is composed with high-quality components. Extreme low and high temperatures, heavy shocks, etc. should be avoided. Do not expose the DRIVE CONTROL to direct sunlight.
8.3 THEFT
QUINTEZZappliancesarealsoattractivetopeoplewithnotsogoodintentions.Inordertopreventtheft,weadviseyounottoleave your DRIVE CONTROL unattended in your car.
GUARANTEE
QUINTEZZ is a registered trademark of TE-Group NV.
The QUINTEZZ brand stands for superior product quality and outstanding customer service. That is why QUINTEZZ warrants this product against all defects in material and workmanship for a period of two (2) years from the date of original purchase of the product. The conditions of this limited guarantee and the extent of responsibility of QUINTEZZ under this limited guarantee are as follows:
•Thisguaranteeislimitedtotheoriginalpurchaseroftheproductandisnottransferabletoanysubsequentpurchaser/ end user.
•Duringthelimitedguaranteeperiod,thesoleresponsibilityofQUINTEZZwillbelimitedtorepairorreplace,atitsoption, anydefectivepartsoftheproductifthisisneededbecauseofmalfunctionorfailureundernormaluseandconditions.No charge shall be made to the customer for parts and/or repair labor.
•Theproductmustbeshippedtoanauthorizedservicecenterinitsoriginalandcompletepackaging,withtransportation charges prepaid. QUINTEZZ will not assume responsibility for any losses or damages during transportation.
•Toobtainrepairorreplacementwithin thetermsofthisguarantee,thecustomermustprovide (a)aproofofpurchase (e.g. dated bill of sale); (b) a written specification of the defect(s); (c) a return address and phone number.
•Thislimitedguaranteedoesnotcoverandisvoidwithrespecttothefollowing:(a)Productswhichhavebeensubjected to improper installation, unauthorized repair, improper maintenance, unauthorized modifications or other acts which are not the fault of QUINTEZZ; (b) Products which have been subjected to misuse, abuse, neglect, improper handling andstorage,anaccidentorphysicaldamage;(c)Productswhichhavebeensubjectedtofire,water,excessivehumidity, sand,dirt,extremechangesintemperatureorotherconditionswhicharebeyondthecontrolofQUINTEZZ;(d)Products which have been used with non-QUINTEZZ approved accessories; (e) Products which have the serial number altered, defaced or removed; (f) Products which have been opened, altered, repaired or modified by any unauthorized service center.
-GB-15-
•Excluded from any guarantee are consumable items which may need replacing due to normal wear and tear, such as batteries, ear cushions, decorative parts and other accessories.
•This limited guarantee gives you specific legal rights, and you may also have other rights which vary from country to country.
•Excluded from the guarantee are eg.: problems with your PC or Internet, damage to your car and fines.
If there are any problems or uncertainties, you can ask your questions through info@quintezz.com.
-GB-16-

INHOUDSTAFEL |
|
INLEIDING ................................................................................................................................................................................ |
17 |
BESCHRIJVING VAN DE DRIVE CONTROL ................................................................................................................................... |
17 |
INSTALLATIE IN DE WAGEN ....................................................................................................................................................... |
18 |
WERKING VAN DE DRIVE CONTROL IN DE WAGEN .................................................................................................................... |
19 |
INSTELLINGEN VAN DE DRIVE CONTROL ................................................................................................................................... |
20 |
WAARSCHUWINGSSCHERMEN VAN DE DRIVE CONTROL ........................................................................................................... |
25 |
STANDAARDINSTELLINGEN ....................................................................................................................................................... |
26 |
SNELHEIDSCONTROLES ............................................................................................................................................................. |
27 |
WERKING VAN DE QUINTEZZ DRIVE CONTROL MET DE PC ....................................................................................................... |
28 |
ONDERHOUD, AANWIJZINGEN EN TIPS .................................................................................................................................... |
31 |
GARANTIE ................................................................................................................................................................................ |
31 |
INLEIDING |
|
Proficiat!
U bent zojuist eigenaar geworden van één van ‘s werelds meest geavanceerde GPS producten. Het toestel wordt geleverd als een GPS waarschuwingssysteem. Het is mogelijk het toestel te upgraden naar een gecombineerd GPS waarschuwingssysteem Locator/ Radar Detector / Laser Detector. Het gebruik en het bezit van radardetectoren is in verschillende landen strafbaar. Gelieve na te gaan of radardetectie of laserdetectie in uw land toegelaten is.
De DRIVE CONTROL geeft u geen recht tot overdreven snelheid. Zorg ervoor steeds voorzichtig te rijden!
BESCHRIJVING VAN DE DRIVE CONTROL
1.1 ALGEMEEN
De DRIVE CONTROL is een apparaat dat u informatie geeft over uw trip en u waarschuwt voor gevaarlijke situaties. QUINTEZZ voorziet een gegevensbank voor meerdere landen met informatie over flitspalen en/of gevaarlijke locaties. Bovendien kunt u uw eigen locaties opslaan. Een waarschuwing zal telkens gegeven worden op 600 meter afstand van elke locatie. Voor de informatie die door QUINTEZZ wordt voorzien, heeft u meerdere mogelijkheden. De snelheidswaarschuwing hangt af van uw snelheid en rijrichting. Dit betekent dat u geen waarschuwing krijgt als de camera zich aan de andere kant van de weg bevindt. Dit betekent eveneens dat u een kleine waarschuwing krijgt bij correcte snelheid en een grote in het geval van een snelheidsoverschrijding.
Naast deze functie toont uw QUINTEZZ DRIVE CONTROL u ook: een kompas, een indicatie van uw werkelijke snelheid, uw batterijvoltage, de datum en de tijd.
-NL-17-

1.2 BETEKENIS VAN ELK ONDERDEEL IN DE DOOS
Zie illustratie I
1.Setting toets: Om het menu te doorlopen en de download optie te activeren
2.Save toets:
i.Laatdegebruikertoemanueelnieuwelocatiestoetevoegenwaarvanafnuwaarschuwingenzullen gegeven worden tijdens het rijden
ii.Laat de gebruiker toe manueel locaties te verwijderen
iii.Laat de gebruiker toe zijn voorkeur voor iedere optie in setting mode te regelen
3.Volume – toets: Om het volume verlagen
4.Volume + toets: Om het volume verhogen
5.Rode toets:
i.Om de Radar / Laser Detector uit te schakelen zodra u landen binnenrijdt waar de Radar / Laser Detector niet toegelaten is: druk kort op deze knop (niet langer dan 2 sec.!). Als u de rode knop te lang ingedrukt houdt, zal het toestel automatisch naar ‘illuminatie’ modus overschakelen en de Radar / Laser Detector zal dan NIET uitgeschakeld zijn.
ii.Om het scherm te dimmen (lang ingedrukt houden tot ILLI.xxx verschijnt).
6.PC – USB Poort: Om gegevens van uw computer te downloaden
7.Scherm
8.Luidspreker
9.Laser Detector lens – achterkant
10.Laser Detector lens – voorkant
11.Radar Detector lens
12.DC 12V: Stroomaansluiting voor de sigarenplug
13.Vergrendelknop voor bevestigingsklem voorruit
14.Bevestigingsklem voorruit
15.Voedingskabel
16.Velcro
Handleiding
CD met PC software
INSTALLATIE IN DE WAGEN
2.1 DRIVE CONTROL
DeQUINTEZZDRIVECONTROLisspeciaalontworpenvoorgebruikindewagen.GPSsignalenwordenontvangendoordeingebouwde
GPS antenne.
Hier volgen enkele richtlijnen voor de plaatsing van de detector:
•Plaats het toestel zo waterpas mogelijk. Een maximum horizontale afwijking van 25° zal geen noemenswaardige invloed hebben op de werking van het toestel.
•Het scherm van de DRIVE CONTROL dient duidelijk zichtbaar te zijn voor de bestuurder.
-NL-18-

•Plaats het toestel niet rechtstreeks achter de ruitenwissers.
•Plaats het toestel zo dat het controlepaneel goed zichtbaar is voor de bestuurder.
•Stel het toestel niet te lang bloot aan rechtstreeks zonlicht.
2.2.BEVESTIGINGSMOGELIJKHEDEN
Zie Illustratie II
U kan het apparaat op 2 manieren bevestigen.
2.2.1. BEVESTIGING OP HET DASHBOARD
De bijgeleverde Velcro-strippen kunnen gebruikt worden om uw detector op een vlak dashboard te bevestigen. Het dashboard moet schoon en droog zijn om een goede hechting te garanderen.
•Verwijder de achterkant van de krulzijde van de klittenband en druk hard aan op de onderkant van het toestel.
•Maak het dashboard schoon.
•Verwijder de achterkant van de haakzijde van de klittenband en druk het toestel in de gewenste positie op het dashboard.
2.2.2.INSTALLATIE TEGEN DE VOORRUIT
•Breng de zuignappen en het nopje in de uitsparingen van de bevestigingshaak.
•Schuif de bevestigingsklem in de gleuf van de detector.
•Gebruik de vergrendelknop (LOCK) om de bevestigingsklem te vergrendelen.
•Breng het geheel nu aan tegen de voorruit d.m.v. de zuignappen en druk stevig aan.
2.3 VOEDING
DeDRIVECONTROLisontworpenomophetnormaleelektrischecircuit(12Volt)vandewagenaangeslotenteworden,datnegatief geaard is. Raadpleeg de handleiding van uw wagen indien u niet zeker bent van de polariteit.
Na installatie dient de voedingskabel in de aansluiting ‘POWER’ gestoken te worden. Vervolgens verwijdert u de sigarenaansteker en steekt u de sigarenplug in dit contact.
WERKING VAN DE DRIVE CONTROL IN DE WAGEN
3.1 AUTOMATISCHE TEST
Na het inschakelen, voert de DRIVE CONTROL een automatische zelftest uit. Als u de tekst ‘FASTEN YOUR SEATBELT, BE CAREFUL’ hoort, is deze test goed uitgevoerd en verschijnt het volgende scherm:
 >
>  >
> 
-NL-19-

3.2 ZOEKEN NAAR SATELLIETEN
Na de automatische test, zoekt de DRIVE CONTROL verbinding met de GPS satellieten. Op het scherm verschijnt ‘SRCH’ (Search).
Zodra de Radar / Laser detector geïnstalleerd is, zal deze onmiddellijk beginnen werken. Het GPS alarm zal pas beginnen werken nadat er een verbinding gemaakt is met de satellieten.
LET OP:
De eerste keer dat de DRIVE CONTROL ingeschakeld wordt, kan het ongeveer 15 minuten duren om de satellieten te vinden. Obstakels in de directe omgeving en het bewegen van de wagen kunnen deze eerste inschakeltijd vertragen.
De DRIVE CONTROL houdt verbinding met 4 tot 12 satellieten. Ingeval de verbinding kort wegvalt (bijvoorbeeld door viaducten of tunnels) zal deze overgaan naar ‘connection mode’ en verschijnt ‘SRCH’ op het scherm.
3.3 DRIVING MODE
De DRIVE CONTROL is de perfecte oplossing om te voorkomen dat u per ongeluk enkele kilometers te snel rijdt. Wanneer de verbinding met de satellieten goed is, verschijnt het volgende scherm, met weergave van de tijd.
Wanneer de wagen beweegt, wordt de werkelijke snelheid getoond.
INSTELLINGEN VAN DE DRIVE CONTROL
4.1 VOLUME
U kunt het volume instellen met behulp van de VOL – en VOL + toetsen.
4.2 SETTING MENU
De menutoets bevindt zich bovenaan de DRIVE CONTROL en wordt aangeduid met SETTING. Wanneer u op deze toets drukt, begeeft u zich naar het instelmenu dat de volgende opties bevat:
•Rlogic: 0 / 1 / 2 / 3 / 4 / CITY (zichtbaar wanneer de radar aangeschakeld is)
•X/Ku: ON/OFF
•K: ON/OFF
-NL-20-
•Ka: ON/OFF
•Ka N: ON/OFF
•MAX: Maximumsnelheid als waarschuwingslimiet
•Default / Details / Comfort: Gebruik en aanpassing van de informatie op het scherm
•Bel: ON / OFF
•Lang: SP / FR / GB / D / I
•SN 0 (zichtbaar wanneer de radar uitgeschakeld is)
•ODO 0.0
•AVG: 0
•U: Kilo / Mile
•GMT: 0
•U1 …….Lat ……….Lon
•Ver 03.1
•DB: e.g. 9/11
Elk submenu zal in de volgende hoofdstukken beschreven worden.
-Om het menu te doorlopen, drukt u op de SETTING toets.
-Om een submenu te selecteren, drukt u op de SETTING toets.
-Om een selectie te bewaren, drukt u op de SAVE toets.
Indien binnen de 3 seconden geen toets wordt ingedrukt, verlaat het toestel het menu.
4.2.1 RLOGIC: 0 / 1 / 2 / 3 / 4 / CITY
Deze functie zal alleen zichtbaar zijn als de Radar Detector functie aangeschakeld is. De Radar Logic instelling bepaalt bij welke snelheid de Radar Detector begint te werken.
-Logic0: De Radar Detector zal altijd werken, dus vanaf 0 km/h.
-Logic1: De Radar Detector zal beginnen werken wanneer de snelheid 20 km/h overschrijdt.
-Logic2: De Radar Detector zal beginnen werken wanneer de snelheid 40 km/h overschrijdt.
-Logic3: De Radar Detector zal beginnen werken wanneer de snelheid 60 km/h overschreden wordt.
-Logic4: De Radar Detector zal beginnen werken wanneer de maximumsnelheid, door u gekozen in het menu, overschreden wordt. (zie hoofdstuk 4.2.5 ‘WAARSCHUWINGSLIMIET’)
-CITY: De Radar Detector werkt de hele tijd, maar is minder gevoelig geworden zodat de meeste valse alarmen uitgeschakeld worden en het toestel niet reageert op een zwak signaal. In en om steden zijn talrijke bronnen van valse radarsignalen. Zo gebruiken enkele types automatische deuren hetzelfde signaal als een radar. De bedoeling van de stadsfunctie is de gevoeligheid te beperken om te vermijden dat de detector op de meeste valse bronnen reageert. Zodra u de CITY modus geactiveerd hebt en u hebt ‘Comfort’ gekozen als scherminstelling (zie hoofdstuk 4.2.6 ‘DEFAULT / COMFORT/ DETAILS…’) zal de ‘C’ van CITY samen met de richting van het kompas afgebeeld worden:
-NL-21-
Voorbeeld Logic 2: Wanneer u de Radar Detector functie geactiveerd hebt en u rijdt 30 km/u, dan is de Radar Detector wel degelijk aangeschakeld,maarzaldezegeenwaarschuwinggeven,zodraerradarsignalenopgevangenworden.Zodrausnellerdan40km/u begintterijden,zaluwelallewaarschuwingenontvangen.OpdiemanierkanuzelfbepalenvanafwelkesnelheiddeRadarDetector mag beginnen werken, zodat vals alarm al minder voorkomt.
Als er geen verbinding gemaakt is tussen de GPS en de satellieten, zal de Radar Detector blijven werken in de instelling RLogicO zolang de Radar Detector aangeschakeld is.
4.2.2 X/Ku
Deze optie laat u toe de Radar Band ‘X/Ku’ uit te schakelen;
-Druk op de VOL + of VOL – toets om deze radar band aanof uit te schakelen.
-Om te bevestigen, drukt u op SAVE.
4.2.3K
Deze optie laat u toe de Radar Band ‘K’ uit te schakelen:
-Druk op de VOL + of VOL – toets om deze radar band aanof uit te schakelen.
-Om te bevestigen, drukt u op SAVE.
4.2.4.1Ka / 4.2.4.2 Ka Narrow (Ka N)
Deze optie laat u toe de Radar Band ‘Ka’ / ‘Ka N’ uit te schakelen:
-Druk op de VOL + of VOL – toets om deze radar band aanof uit te schakelen.
-Om te bevestigen, drukt u op SAVE.
4.2.5WAARSCHUWINGSLIMIET
Het volgende scherm wordt getoond van zodra u het waarschuwingslimiet submenu selecteert:
In dit submenu kan de gebruiker een maximumsnelheid instellen.
-Druk op de VOL – of VOL+ toets om de maximumsnelheid in te stellen.
-Indien de gebruiker deze maximumsnelheid overschrijdt, zal een snelheidsalarm getoond worden gevolgd door een alarmsignaal.
-Om de ingestelde waarschuwingslimiet te bevestigen, drukt u op SAVE.
4.2.6DEFAULT / COMFORT / DETAILS: GEBRUIK VAN DE INFORMATIE OP HET SCHERM
De DRIVE CONTROL heeft een scherm. De informatie op het scherm verandert naargelang u aan het rijden bent of stilstaat.
Deze informatie kan geselecteerd worden:
‘Details’ scherm instelling:
Tijdens het rijden worden de snelheid van de wagen en de rijrichting weergegeven:
-NL-22-
Bij stilstand worden de datum, de reistijd en het voltage van de batterij weergegeven:
‘Default’ scherm instelling:
Bij stilstand wordt de tijd weergegeven.
Tijdens het rijden worden de snelheid van de wagen en de rijrichting weergegeven
.
‘Comfort’ scherm instelling:
Bij rijden en stilstand wordt de richting van het kompas afgebeeld in graden.
AlsudeRlogicfunctieingesteldhebtop‘CITY’,(ziehoofdstuk4.2.1RLogic…)wordtderichtingvanhetkompasende‘C’vanCITYafgebeeld.
4.2.7 BEL / EXTRA GELUID
Het volgende scherm wordt getoond zodra u het submenu bel / extra geluid selecteert:
Deze optie maakt het mogelijk om het geluid gedeeltelijk uit te schakelen.
-Druk op de VOL – of VOL+ toets om het geluid aan of uit te schakelen.
-Om de instelling te bevestigen, drukt u op SAVE.
Indien u kiest voor UIT, zullen de volgende geluiden niet hoorbaar zijn:
-Opstartboodschap: FASTEN YOUR SEATBELT, BE CAREFUL.
-Waarschuwingen voor camera’s, indien u GEEN snelheidsovertreding begaat.
4.2.8TAAL
Het volgende scherm wordt getoond zodra u het taal submenu selecteert:
-Druk op de VOL + of VOL – toets om de gewenste taal te selecteren.
-Om de instelling te bevestigen, drukt u op SAVE.
-NL-23-
4.2.9 SN 0
DitschermwordtenkelgetoondwanneerdeRadarDetectorgedeactiveerdis.OmdeRadarDetectorteactiveren,moetdesoftware geïnstalleerd worden. Om de software te installeren, heeft u een geheime code nodig. De geheime code bestaat uit de laatste 4 cijfers van het serienummer.
VoerheteerstecijferinmetbehulpvandeVOL–enVOL+toetsen.Omeencijfertebevestigen,dientuderodeknopintedrukken. Als alle cijfers bevestigd zijn, zal de Radar Detector aangeschakeld worden. Is dit niet het geval, dan zal u de melding ‘SN Fail’ krijgen.
Omzekertezijndatuwgeheimecodeookdaadwerkelijkgeheimblijft,stellenwevoordatudelaatste4cijfersvanhetserienummer verwijdert en opbergt op een veilige plaats.
4.2.10 0.0 WEERGAVE
Als het product niet gebruikt wordt, staat er op het scherm 0.0. De ODO-meter toont de totale afstand afgelegd vanaf een door de gebruiker gekozen moment. Om de ODO-meter terug op 0 te zetten, drukt u op de rode knop, wanneer u zich in dit submenu bevindt.
4.2.11 AVG WEERGAVE
Dit scherm geeft de gemiddelde snelheid weer van uw traject nadat het toestel aangeschakeld werd.
Als u het toestel uitschakelt, zal de gemiddelde snelheid automatisch terug op 0 gezet worden.
4.2.12 U: KILO / MILE
Het volgende scherm wordt getoond zodra u het snelheidsweergave submenu selecteert:
Met deze weergave kunt u kiezen of uw snelheid weergegeven dient te worden in Kilometer/uur of Mijl/uur.
4.2.13 GMT
De satellieten zenden de tijd uit gebaseerd op GMT (Greenwich Mean Time). Deze tijd verandert niet automatisch van zomernaar wintertijd.Omdetijdaantepassenaanuwregio/seizoen,dientuhetuurteverzetten.BijvoorbeeldvoorzomertijdinAmsterdam/ Brussel/Parijs kiest u 2.
4.2.14 U1 LON ….. LATT ……
Zoals eerder vermeld, kunt u uw eigen locaties bewaren in de DRIVE CONTROL. De DRIVE CONTROL zal dan een waarschuwing geven zodra u deze punten bereikt. In dit menu kunt u de coördinaten terugvinden van de locaties die u zelf ingegeven heeft.
4.2.15 SOFTWAREVERSIE
Het volgende scherm verschijnt zodra u het submenu softwareversie selecteert:
.
Dit scherm geeft de huidige softwareversie weer.
-NL-24-

4.2.16 DATUM DATABASE
Het volgende scherm verschijnt zodra u het submenu databasedatum selecteert.
Dit scherm geeft weer wanneer de database laatst geüpdate werd (DD/MM).
WAARSCHUWINGSSCHERMEN VAN DE DRIVE CONTROL
DeDRIVECONTROLgeefthetvolgendeschermweerzodraueensnelheidscameranadert.Hetalarmduidtopdeaanwezigheidvan een camera op 450 meter afstand op de huidige weg.
Tijdens het rijden zal de DRIVE CONTROL een alarmsignaal produceren zodra u een camera, een gevaarlijke locatie, een trajectcontrolesectieofeengebruikerslocatienadert.Hetgeluidvandezewaarschuwingwordtbepaalddoordetoondieugekozen heeft in het menu ‘bel/extra geluid’. Indien deze functie uitgeschakeld is, zal er enkel een waarschuwing verschijnen zodra de maximaal toegelaten snelheid overschreden wordt. De maximaal toegelaten snelheid op die bepaalde locatie zal ook weergegeven worden op het scherm. Indien deze functie aangeschakeld is, zal er een waarschuwing komen voor elke camera.
Deeerstewaarschuwingzalgegevenwordenopeenafstandvan500meter.Detweedewaarschuwing(KEEPSAFETYDRIVING)komt er op een afstand van 300 meter.
5.1 CAMERA & TWEERICHTINGSCAMERA
Dit alarm waarschuwt voor een camera of tweerichtingscamera op een afstand van 450 meter op de huidige weg. Gelieve uw snelheid aan te passen en te vertragen indien u te snel rijdt. Op een afstand van 500 meter hoort u ‘CAMERA’ of ‘TWO WAY CAMERA’ en op een afstand van 300 meter ‘BE CAREFUL’.
5.2 GEVAARLIJKE LOCATIE, TRAJECTCONTROLE & EINDE TRAJECTCONTROLE
> |
|
> |
trajectcontrole |
gevaarlijke locatie |
waarschuwing |
Dit alarm geefteenwaarschuwing weervoor eengevaarlijkelocatie,eentrajectcontrole enheteinde van eentrajectcontrolesectie opeenafstandvan450meteropdehuidigeweg.Gelieveuwsnelheidtecontrolerenentevertragen.Op500meterafstandvande locatie, hoort u ‘DANGEROUS LOCATION’, ‘TRACK CONTROL’ of ‘TRACK CONTROL END’ en op 300 meter ‘BE CAREFUL’.
-NL-25-
 Loading...