

Quinny TM 06620 Curbb, Curbb 06620 User Manual
Spanish Guide Included
Guía en español incluida
TM
06620
User Guide
Guía del Usuario

Contents
T
M
i
Warnings 1
Features 2
Before You Begin 2
Wearing & Adjusting Carrier 3
Securing the Child 4
Checklist 5
Removing the Child 5
Care & Maintenance 6
Warnings
T
M
• SMALL CHILDREN CAN FALL THROUGH A LEG OPENING. FOLLOW INSTRUCTIONS FOR USE.
• Only use this carrier for children between 8-LBS (3.6-kg) and 20-LBS (9.1-kg).
• CHILD ALWAYS MUST FACE TOWARDS YOU.
• Keep instructions for future use.
• Read all instructions before assembling and using the soft carrier.
• Check to assure all buckles, snaps, straps, and adjustments are secure before each use.
• Proper placement of child in product including leg placement.
• When placing a baby in the carrier, the baby’s right and left leg should extend through the bottom leg
openings.
• For proper placement, the baby’s head should rest on the adult’s shoulder.
•
DO NOT place a baby into the carrier before the carrier is properly positioned and secured to the caregiver.
•
DO NOT wear this carrier near an open flame or while participating in an activity that could potentially
injure a baby.
• DO NOT lean over with straight legs as that may cause a baby to fall from the carrier. Crouching or
leaning with bent knees will help keep baby secure.
• The carrier should only be used to carry a baby on your hip. NEVER use the carrier to carry a baby on
your back or in front of you.
• Carriers are meant to be used while walking or standing. NEVER wear a carrier while engaged in
fast-paced or rigorous activity such as running, biking, jogging, or operating a motorized vehicle.
•
DO NOT place a baby in a carrier that is not being worn, or leave a baby unattended in a loose carrier.
• If baby should fall asleep in the carrier, turn baby’s head to the side. This will ensure that the baby can
breathe easily. Always keep some distance between the baby’s face and the adult’s body to ensure
easy breathing.
• To avoid the possibility of baby being pinched, make sure that their skin, fingers, etc. are out of the
way when snapping or locking the buckles.
• The correct fitting of the adjustment straps is vital for the safety of your child. For this also see the
label on the inside of the carrier strap.
•
DO NOT wear carrier if you are pregnant.
WARNING – FALL HAZARD
1
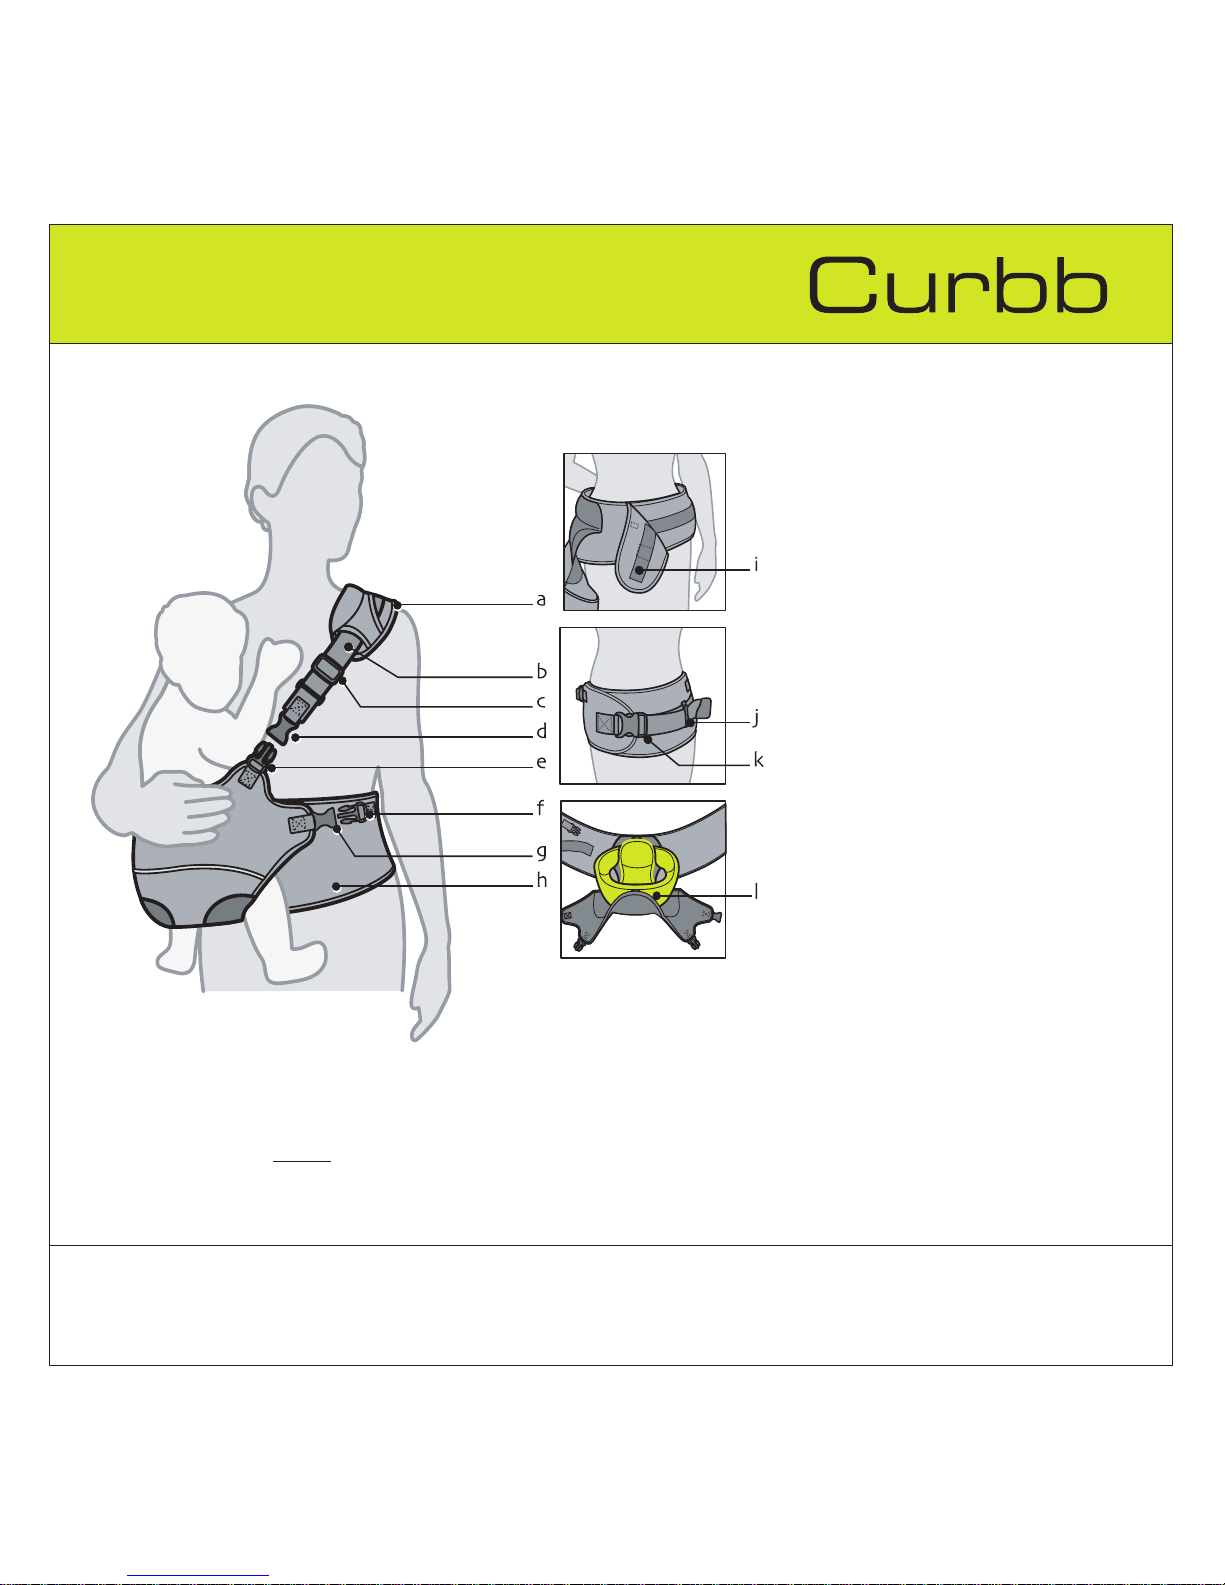
Features
Before You Begin
TMT
2
a. Shoulder protector
b. Shoulder strap
c. Sliding part to adjust length of
shoulder strap
d. Shoulder clasp, female
e. Shoulder clasp, male
f. Seat clasp, male
g. Seat clasp, female
h. Hip strap
i. Adhesive patch
j. Hip str ap clip
k. Hip clasp
l. Seat inser t, with sof t padding
• Keep these instructions f or future use.
• Lay out and identify all parts.
• Do not return this product to the
place of purchase. If any parts are
missing, call Consumer Relations at
(800) 951-4113. Or visit our website
at www.quinny.com.
• Include the model number and manufacture date and a brief description
of the part.
The manufacturing date
code is on the back of the wash
and care label.
Before You Begin
• This infant carrier is designed to carry a child on the left or right hip.
• The child should be able to support his/her own head.
• The child should alway
s sit with his/her stomach towards you.
NOTE: Weight range is from 8-LBS to approximately 20-LBS (3.6-kg. to 9.1-kg).
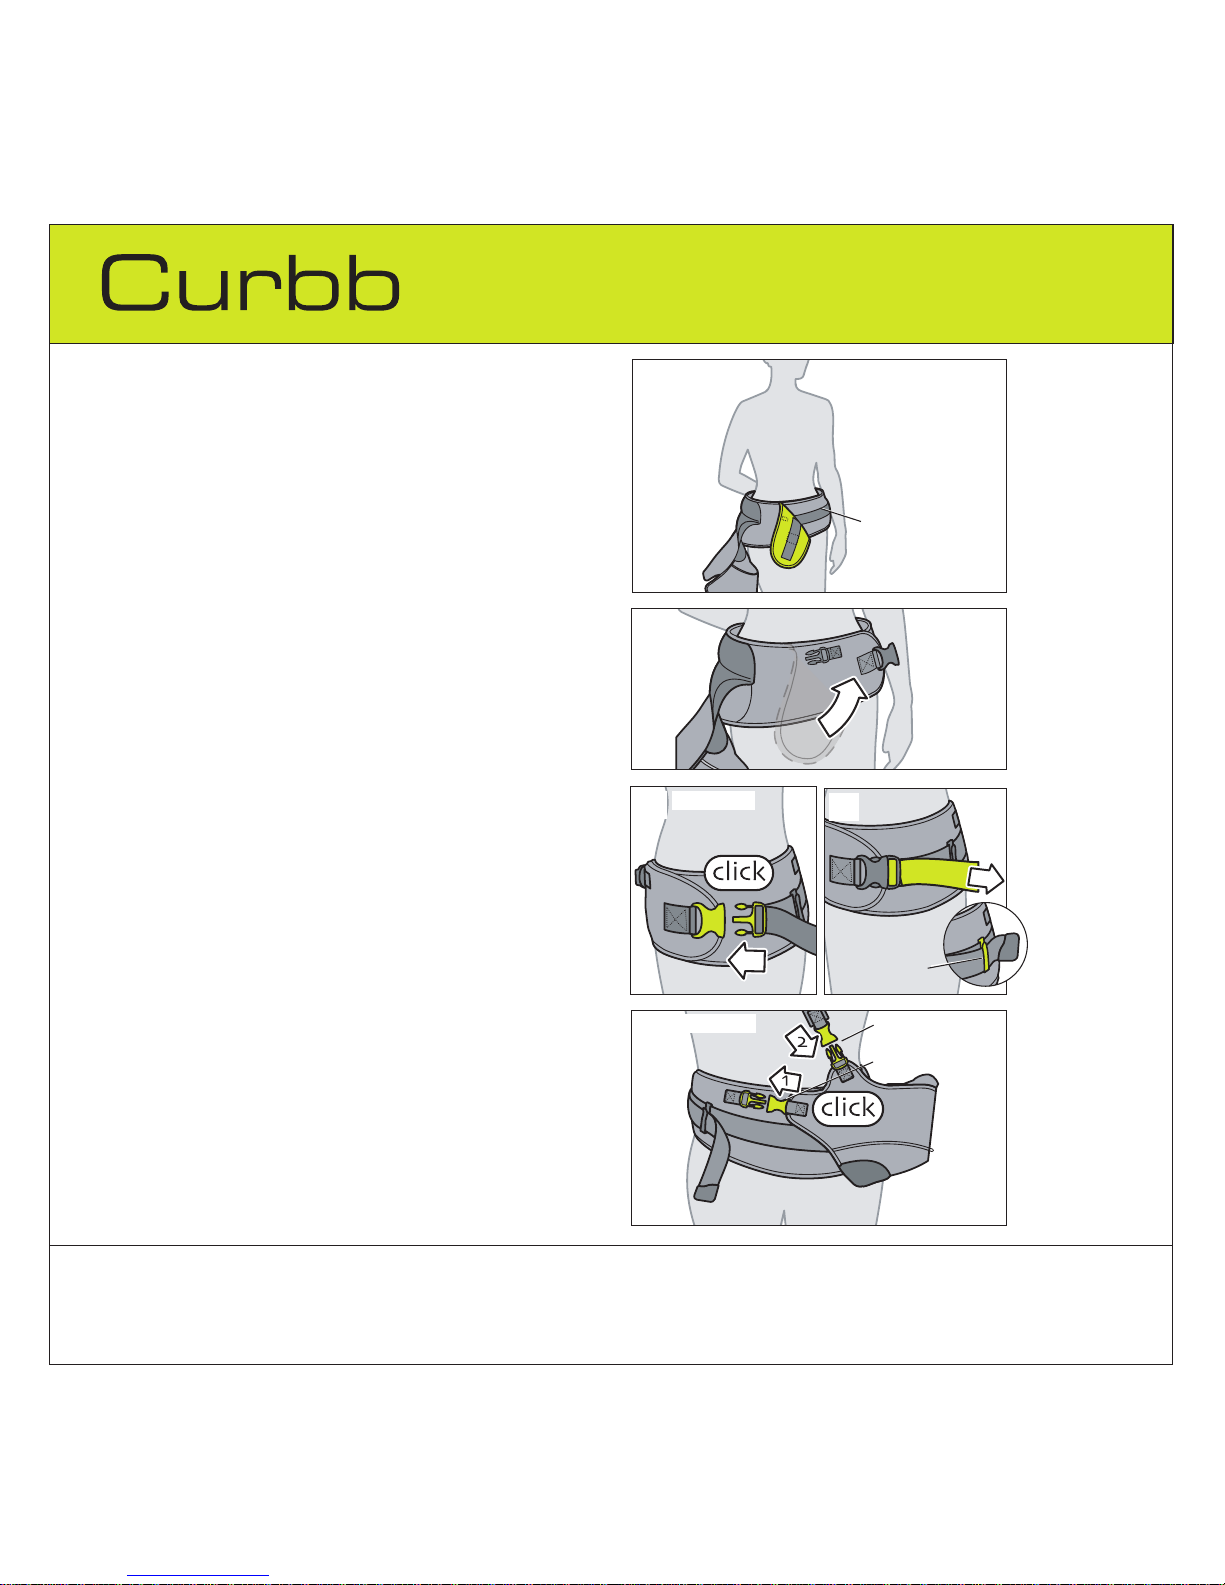
Wearing & Adjusting Carrier Securing the Child
TMT
3
4 On the back, fasten both the seat clasp (1) and the
shoulder clasp (2)
(Figure 4). Do this before the child is
put in the carrier.
1 Wrap the hip strap around the hips (Figure 1).
NOTES:
• Make sure that the hip strap is not twisted.
• The adhesive patch should be on the left to carry the
child on the right hip (or on the right to carry the child
on the left hip).
• The examples show the carrier being worn on the left
shoulder to carry the child on the right hip.
To adjust fit to the adult:
2 Pull the hip strap tight and secure adhesive patch (Figure 2).
3 Fasten the hip clasp (it will click) (Figure 3). Tighten the
strap securely
(Figure 3a). Put strap end thr ough strap
clip.
NOTE: If the hip strap is fitted properly, the child will sit at
the front, top of the hip bone.
Adhesive Patch
Side View
Back View
1
2
3
3a
4
Strap Clip
Shoulder Clasp
Seat Clasp
Securing the Child
T
M
4
WARNING
• When placing a baby in the carrier, the baby’s right and left leg should extend through the
bottom leg openings.
• For proper placement, the baby’s head should rest on the adult’s shoulder.
• To avoid the possibility of baby being pinched, make sure that their skin, fingers, etc. are out
of the way when snapping or locking the buckles.
• Always make sure there is enough room around your baby’s face such that air flow is not
obstructed.
NOTE: The examples show the carrier being worn on the
left shoulder to carry the child on the right hip.
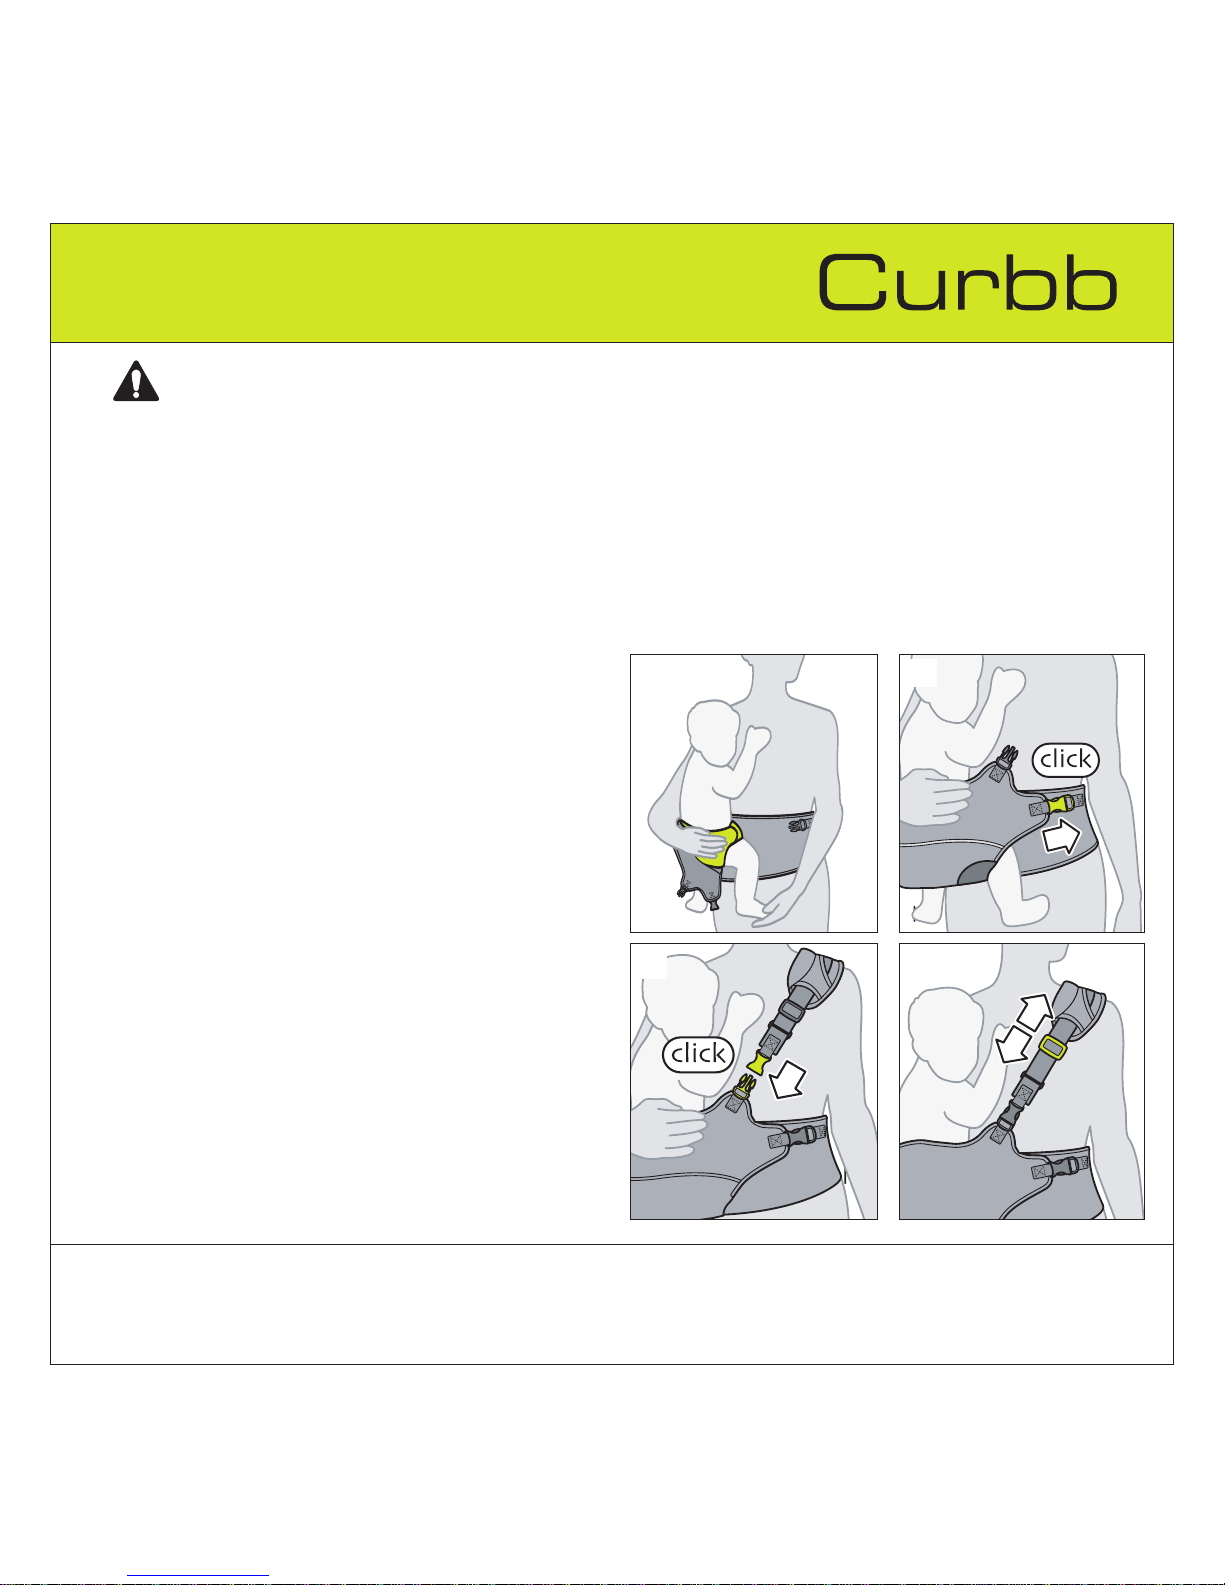
1 Sit down. Lift the child up and place him/her on the hip on
which the seat is positioned. Put the child’s legs through
the leg openings in the seat insert (Figure 1).
2 Make sure that the child is sitting in the middle and fasten
the front seat clasp on the hip strap
(Figure 2).
3 Place the shoulder strap over the shoulder. Att ach the
front shoulder clasp to the shoulder strap
(Figure 3).
NOTE:
If the carrier is placed on the right hip, place the
shoulder strap over the left shoulder and if the child is to
be carried on the lef t, the strap over the right shoulder.
NOTES:
•
Make sur e that the shoulder strap is not twisted.
• Check that the shoulder strap is the right length, if
necessary adjust with the sliding part on the shoulder
strap
(Figure 3a).
• The shoulder protector should always be in the center of
the shoulder.
To secure child in the carrier:
1
3
2
3a
 Loading...