


CV080
User Guide
Guide d’utilisation
TM


French Guide Included Guide français inclus

Contents
Contenu
TM
English User Guide:
Warnings |
1 |
Parts List |
2 |
Assembly |
3 |
To Use |
4-9 |
Care and Maintenance |
10 |
Replaceable Parts |
10 |
Warranty |
10 |
Guide françai
Avertissements |
i |
Liste des pièces |
1 |
Assemblage |
2 |
Mode d’emploi |
3-8 |
Soin et Entretien |
9 |
Pièces de rechange |
9 |
Garantie |
9 |
i

TM |
Warnings |
|
|
 WARNING
FOR THE SAFETY OF YOUR CHILD, PLEASE READ THE FOLLOWING WARNINGS AND ASSEMBLY INSTRUCTIONS AND KEEP FOR FUTURE REFERENCE.
•Adult assembly required. CAUTION: Keep small parts away from children during assembly.
•NEVER LEAVE CHILD UNATTENDED. ALWAYS keep child in view when in stroller.
•AVOID SERIOUS INJURY from falling or sliding out. ALWAYS use seat belt. Check frequently to make sure it is secure.
•ALWAYS keep fingers away from moving parts, when folding, unfolding or adjusting stroller to prevent finger entrapment.
•ALWAYS make sure stroller is FULLY OPEN AND LOCKED before using.
•ALWAYS use the brakes when stroller is stopped.
•ALWAYS remove protective material and poly bags and dispose before assembly.
•NEVER use stroller on stairs or escalators.
•NEVER rollerblade with stroller.
•NEVER allow children to play with or hang onto the stroller.
•NEVER allow children to climb into the stroller unassisted. Stroller may tip over and injure child.
•NEVER place or hang parcels, bags or accessories on the handle or canopy. The stroller may tip over or the canopy may collapse.
•This product will become unstable if a parcel bag or rack is used when there is no provision for one.
•This product may become unstable if a parcel bag, other than the one recommended by the manufacturer is used.
•This product will become unstable if the manufacturer’s recommended load is exceeded.
•DO NOT carry additional children, goods or accessories in or on this product except as recommended in the manufacturer’s instructions.
•NEVER place more than 5-LBS. (2.27-kg) in the storage basket. If weight is exceeded, hazardous unstable conditions may exist.
•STROLLER is only for use with children up to 50-LBS. (22.7-kg), and WHEN SEATED, the midpoint of the child’s head is at or below the top of the stroller seat.
•ONLY use this stroller with ONE child at a time.
•STROLLER is for use with children who can sit up unassisted, and is NOT recommended for newborns.
1
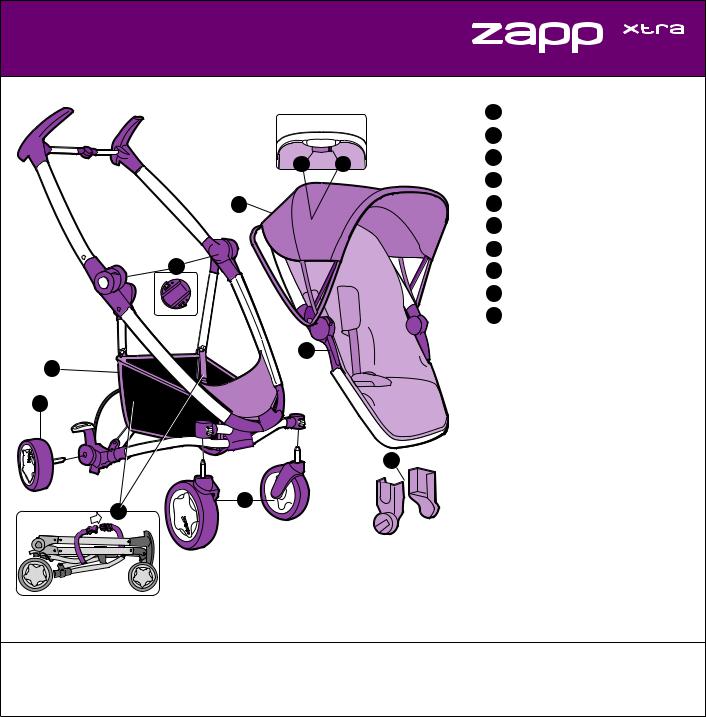
Parts List
TM
Rear View |
|
A Shopping basket, preassembled |
||
|
|
|
||
|
|
|
B Rear wheels, preassembled (2) |
|
H |
I |
|
C Front wheels (2) |
|
|
|
|
||
|
|
|
D Seat adapters, preassembled (2) |
|
E |
|
|
E |
Canopy |
|
|
|
F |
Seat |
|
|
|
G Maxi-Cosi Mico® Infant Car Seat Adapters* (2) |
|
D |
|
|
H Seat recline button (on left) |
|
|
|
|
||
|
|
|
I Seat removal tab (on right) |
|
|
|
|
J |
Transport strap |
F |
|
|
|
|
A |
|
|
* Maxi-Cosi Mico® Infant Car Seat sold |
|
|
|
|
||
B |
|
|
separately. |
|
|
|
• Lay out and identify all parts. |
||
|
|
|
||
|
|
|
• Do not return this product to the place |
|
|
|
G |
of purchase. If any parts are missing, call |
|
|
|
Consumer Relations at (800) 951-4113. |
||
|
|
|
||
|
|
|
Or visit our website at www.quinny.com. |
|
C |
|
|
• Include the model number and |
|
J |
|
|
manufacture date (found on the back |
|
|
|
|
||
|
|
|
of the stroller) and a brief description |
|
|
|
|
of the part. |
|
|
|
|
• Keep these instructions for future use. |
|
2
TM |
Assembly |
|
|
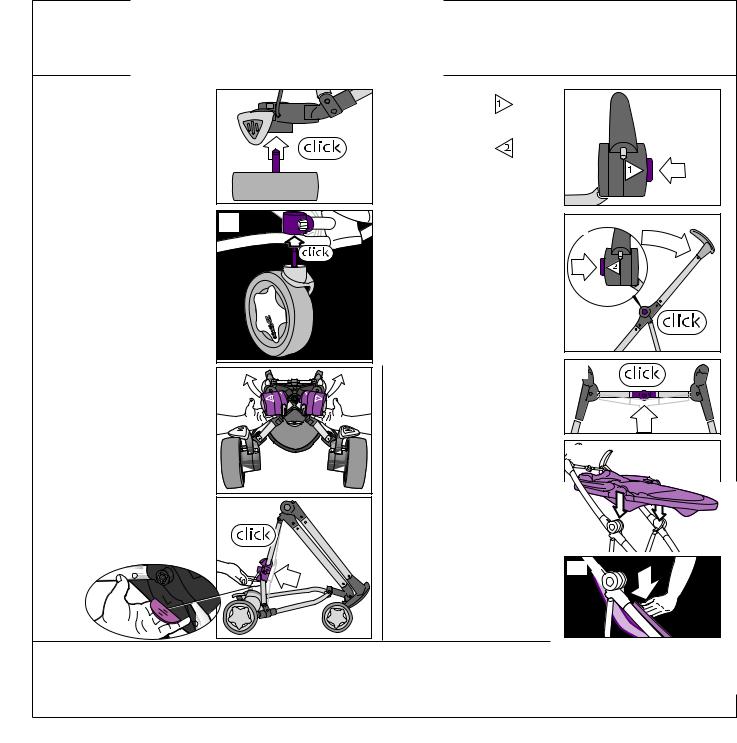
1 Install Rear
Wheels
Insert the rear wheel axle into the frame until you hear a “click” (Figure 1). Repeat for other rear wheel. Pull to confirm it is assembled securely.
2 Install Front
Wheels
Position front wheel with Zapp logo facing outward. Insert front wheel until you hear “click” (Figure 2). Repeat for other front wheel. Pull to confirm it is assembled securely.
3 Unfold Stroller Frame
Unfasten transport strap (see parts list image). Gently lift on the sides of the stroller (Figure 3).
Pull out on grey pedal until you hear a “click” (Figure 3a).
1 |
Push in on button |
(Figure |
|
||
|
3b). |
|
|
Push in on button |
while |
|
lifting up on the handles until |
|
|
they click into place (Figure |
|
|
3c). |
|
2 |
|
|
|
Extend the handle crossbar |
|
|
into the horizontal position until |
|
|
you hear a “click” (Figure 3d). |
|
3 |
|
|
4 Attach Seat |
|
Lower seat onto frame until it |
|
clicks into place (Figure 4). |
3a |
Push down on seat pan until it |
|
clicks (Figure 4a). |
NOTE: Seat adapters are pre-assembled on frame and must always be in place to attach seat. See page 5 for more information. CAUTION: Stroller frame must be in open and in use position to install seat adapters and seat.
3b 
3c |
3d |
4
4a 


3
To Use |
|
|
|
TM |
|
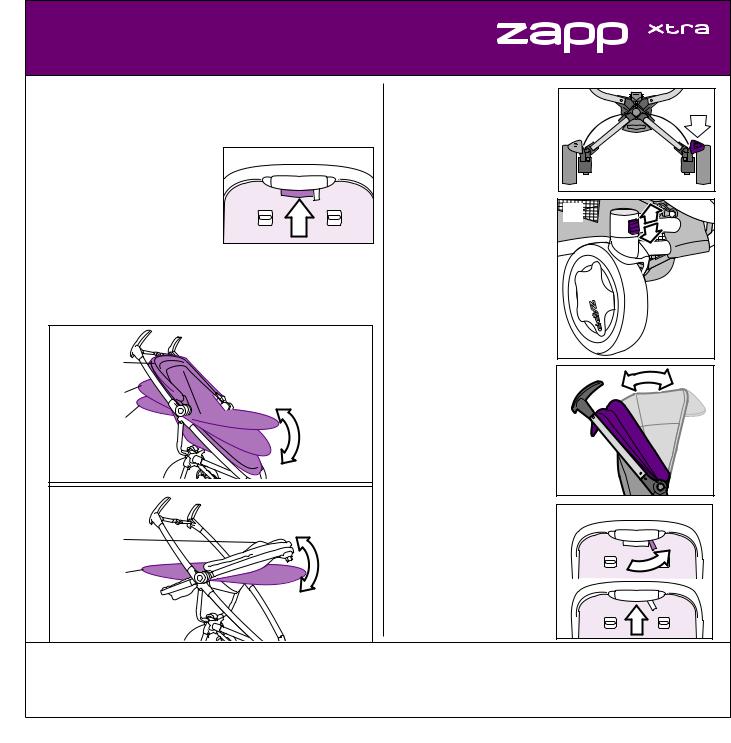
NOTES: The seat can be positioned facing forward or facing |
6 Parking Brake |
6 |
|||
handlebar. The seat is suitable for children from 6 months to |
|
Always use the parking brake, |
|
||
age 4 (maximum 50-LBS. / 22.73-kg). |
|
|
|||
|
even when standing still for |
|
|||
|
|
|
|
|
|
5 |
Reclining Seat |
5 |
|
only a few moments! Push |
|
|
down on the red pedal to set |
|
|||
|
Locate grey button behind |
|
|
||
|
|
|
the parking brake (Figure 6). |
|
|
|
seat/canopy. Squeeze button |
|
|
|
|
|
|
|
Push the opposite pedal to |
|
|
|
and recline seat to desired |
|
|
|
|
|
|
|
release the parking brake. |
|
|
|
position (Figure 5). |
|
|
7 |
|
|
|
|
|
||
|
Facing forward: There are |
|
7 |
Swivel Wheel |
|
|
three positions: upright, |
|
|
||
|
|
|
TIP: Lock the swivel wheel |
|
|
|
semi-reclined and reclined |
|
|
|
|
|
|
|
when using the stroller in |
|
|
|
(Figure 5a). |
|
|
|
|
|
|
|
a straight direction for a |
|
|
|
Facing handlebar: There are |
|
|
|
|
|
|
|
long period. |
|
|
|
two positions: semi-reclined and |
|
|
|
|
|
|
|
To lock, push the swivel |
|
|
|
reclined (Figure 5b). |
|
|
|
|
|
|
|
wheel lock downward and |
|
|
|
|
|
|
|
|
|
5a |
|
|
turn the front wheel until |
|
|
|
|
|
you hear a “click” (Figure 7). |
|
|
UPRIGHT |
|
|
To unlock, push the swivel |
|
|
|
|
wheel lock upward. |
8 |
|
|
SEMI- |
|
|
||
|
|
|
|
|
|
|
RECLINED |
|
8 Canopy |
|
|
|
|
|
|
||
|
RECLINED |
|
|
The canopy can be adjusted |
|
|
|
|
|
to three different positions: |
|
|
|
|
|
folded back, folded out and |
|
|
|
|
|
extended (Figure 8). |
|
|
|
|
|
NOTE: The canopy cannot |
|
|
5b |
|
|
be removed. |
|
|
|
|
|
|
|
9 |
Removing Seat |
9 |
SEMI- |
It is necessary to remove the |
|
RECLINED |
seat from the frame when |
|
|
|
|
|
preparing to use the car |
|
RECLINED |
seat adapters or to fold the |
|
|
stroller. |
|
|
Locate grey tab behind seat |
|
|
(Figure 9). |
|
4 |
|
|

TM |
To Use |
|
|
9 continued |
|
|
|
|
9a |
Rotate release tab outward, then squeeze recline button in all the way (Figure 9).
Lift seat off frame (Figure 9a). NOTE: To flatten the seat once it is removed from frame, push in seat pan from behind seat.
10 Seat Adapters
NOTE: Seat adapters are pre-assembled on frame and must always be in place to attach seat. Seat adapters should only be removed when using the infant car seat adapters.
To remove adapters, swivel grey tabs and slide adapters off (Figures 10-10a).
To reattach seat adapters, open stroller frame, lift up on grey tab to expose slots, align slots with frame, slide adapters in and push down on grey tabs (Figures 10-10a).
NOTES: Seat adapter labeled 1 fits into frame hub labeled 1. Seat adapter labeled 2 fits into frame hub labeled 2. Numbered adapters and frame hubs match up only when frame is in the open and in-use position.
10
10a
Grey
Tab
11Fold Stroller
NOTE: Seat must be removed to fold stroller. Apply parking brake.
Push release button  (Figure 11). The button will stay pressed by itself.
Push release button  while at the same time pushing the handlebars forward (Figure 11a). Pull up on cross bar to fold if necessary.
Locate grey pedal. Push down on pedal and slide pedal towards front wheels
(Figure 11b).
Push forward to fold
(Figure 11c).
Fasten transport straps around top of frame (Figure 11d).
11c |
11 |
11a |
11b |
11d
5

To Use
TM
12Removing the Wheels |
12 |
12a |
Press the release button and pull the rear wheel |
|
|
out of the frame (Figure 12). |
|
|
Press the release button and pull the front wheel |
|
|
off of the frame (Figure 12a). |
|
|
• NEVER LEAVE CHILD UNATTENDED.
WARNING • AVOID SERIOUS INJURY from falling or sliding out. Always use seat belt. Check frequently to make sure it is secure. Belts must be threaded exactly as shown.
• Failure to follow these instructions could result in the serious injury or death of your child.
13To Use Restraint System |
13 |
13a |
13b |
Place your child in the stroller, with the crotch strap |
|
|
|
between the child’s legs. Fit clips together. Slide clips |
|
|
|
into buckle until you hear a “click” (Figure 13). |
|
|
|
Tighten straps snugly around your child (Figure |
|
|
|
13a). |
|
|
|
To tighten strap, slide buckles down (Figure 13b). |
|
|
|
To loosen strap, slide buckles up (Figure 13b). |
|
|
|
14Adjust Restraint Height |
14 |
|
|
The shoulder straps have three height positions
for your growing child. Push each anchor through Anchors
the seat back and into the desired slot (Figure 14). Be sure the anchor lays flat against the seat back.
WARNING |
• For proper installation of the restraint system, make sure both anchors lay |
• NEVER use stroller without BOTH restraint and crotch straps. |
|
|
flat against the seat back. |
6
 Loading...