

Quinny Buzz 01638 User Manual
Spanish Guide Included
Guía en español incluida
01638
User Guide
Guía del Usuario
TM

Contents
TM T
i
Warnings 1
Parts List 2
Assembly 3-5
To Use 5-7
Install Infant Car Seat 8
Care and Maintenance 9
Replaceable Parts 9
Warranty 9
Advertencias 10
Lista de piezas 11
Armado 12-14
Cómo utilizar 14-16
Instalación del autoasiento para bebé 17
Cuidado y mantenimiento 18
Piezas reemplazables 18
Garantía 18
Guía en español:
English User Guide:
Warnings
TM
FOR THE SAFETY OF YOUR CHILD, PLEASE READ THE FOLLOWING WARNINGS AND ASSEMBLY INSTRUCTIONS AND KEEP FOR FUTURE REFERENCE.
• Adult assembly required. The product contains small parts which are for adult assembly only.
• NEVER LEAVE CHILD UNATTENDED. ALWAYS keep child in view when in stroller.
• AVOID SERIOUS INJURY from falling or sliding out. ALWAYS use seat belt. Check frequently to make sure it
is secure.
• ALWAYS keep fingers away from moving parts, when folding, unfolding or adjusting stroller to prevent fin-
ger entrapment.
• ALWAYS make sure stroller is FULLY OPEN AND LOCKED before using.
• ALWAYS use the brakes when stroller is stopped.
• ALWAYS remove protective material and poly bags and dispose before assembly.
• NEVER use stroller on stairs or escalators.
• NEVER allow children to play with or hang onto the stroller.
• NEVER allow children to climb into the stroller unassisted. Stroller may tip over and injure child.
• NEVER place or hang parcels, bags or accessories on the handle or canopy. The stroller may tip over or the
canopy may collapse.
• This product will become unstable if a parcel bag or rack is used when there is no provision for one.
• This product may become unstable if a parcel bag, other than the one recommended by the manufacturer is
used.
• This product will become unstable if the manufacturer’s recommended load is exceeded.
• DO NOT carry additional children, goods or accessories in or on this product except as recommended in the
manufacturer’s instructions.
• NEVER place more than 11-LBS. (5-kg) in the storage basket. If weight is exceeded, hazardous unstable
conditions may exist.
• STROLLER is only for use with children up to 50-LBS. (22.73-kg), and WHEN SEATED, the midpoint of the
child’s head is at or below the top of the stroller seat.
• ONLY use this stroller with ONE child at a time.
• STROLLER is for use with children who can sit up unassisted, and is NOT recommended for newborns.
• Keep tires at recommended pressure of 35-psi.
WARNING
1
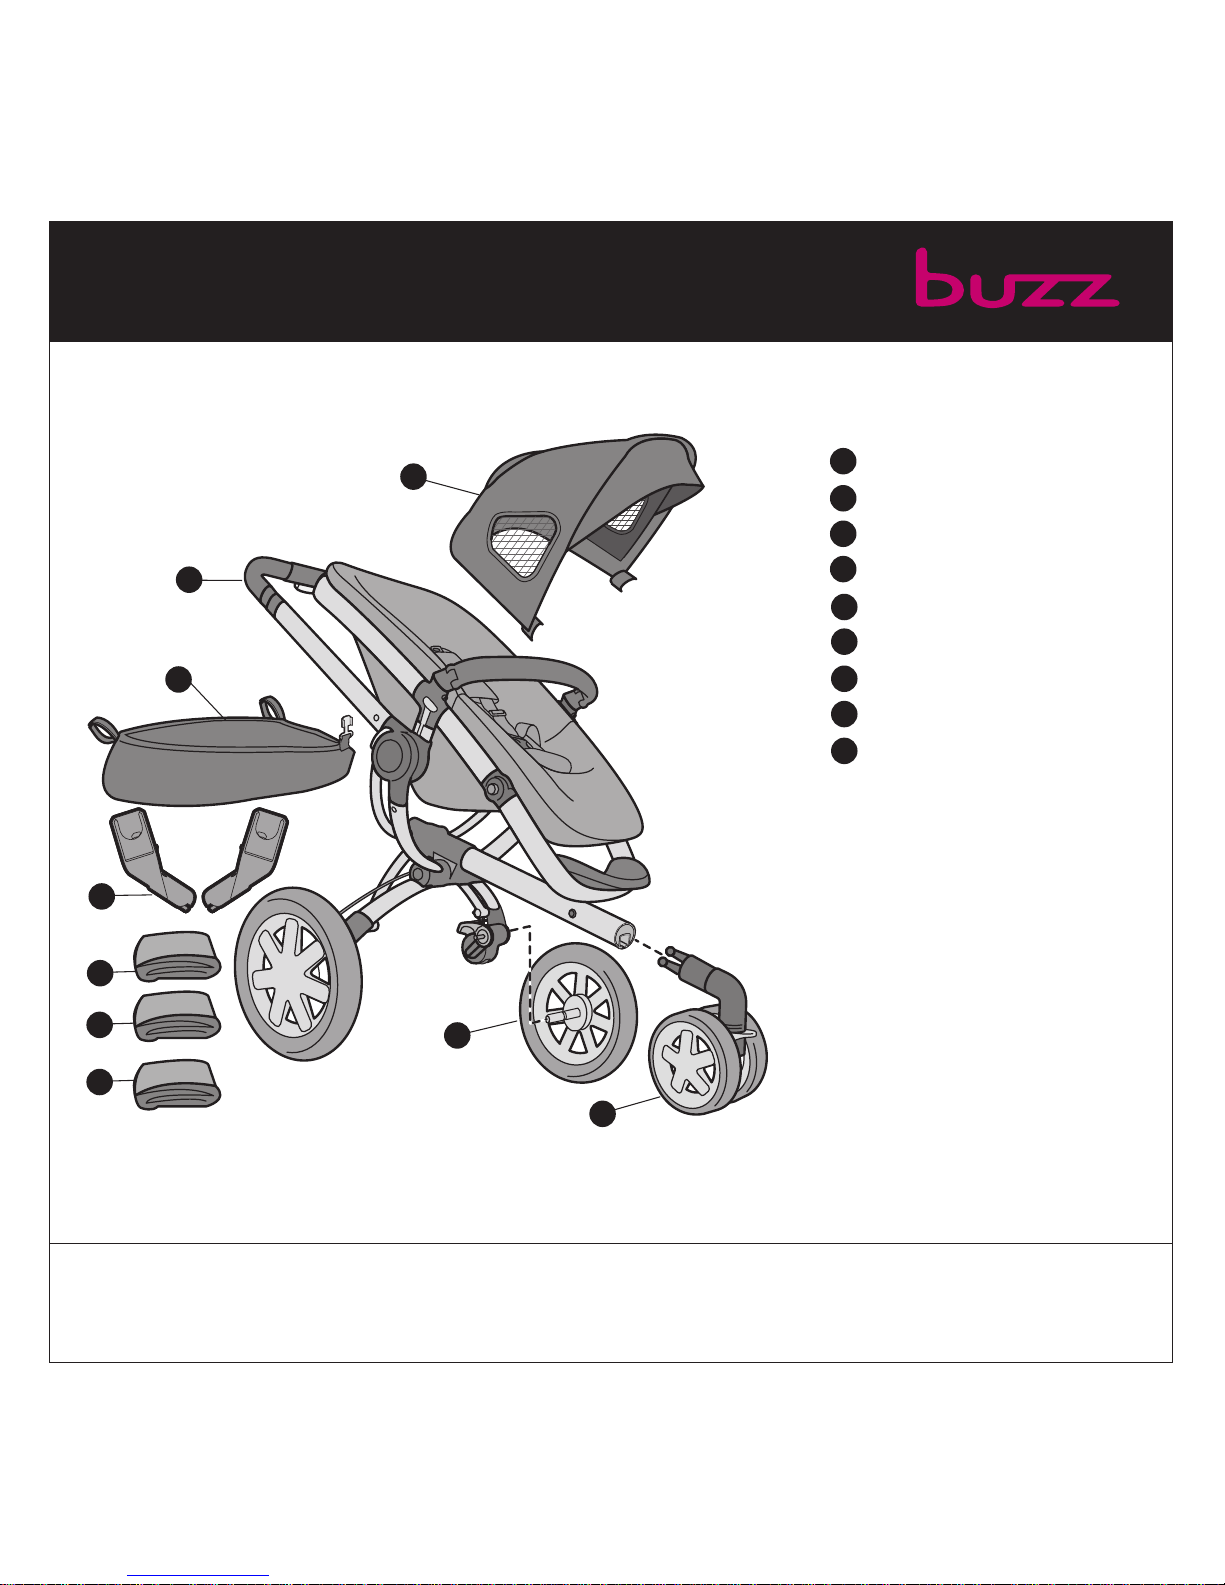
Parts List W
TM
2
Rear wheels (2)
Front wheel assembly
Adjustable height handle
Canopy
Shopping basket
Car seat adapters* (2)
Rain cover
Bug net
Wind guard
A
B
C
E
F
G
D
H
I
*Maxi-Cosi
®
car seat and Dreami
TM
sold separately.
• Keep these instructions for future use.
• Lay out and identify all parts.
• Donot return this product to the
place of purchase. If any parts are
missing, call Consumer Relations at
(800) 951-4113. Or visit our website
at www.quinny.com.
• Include the model number and
manufacture date (found on the
bottom rail of stroller).
A
B
D
C
E
F
G
H
I
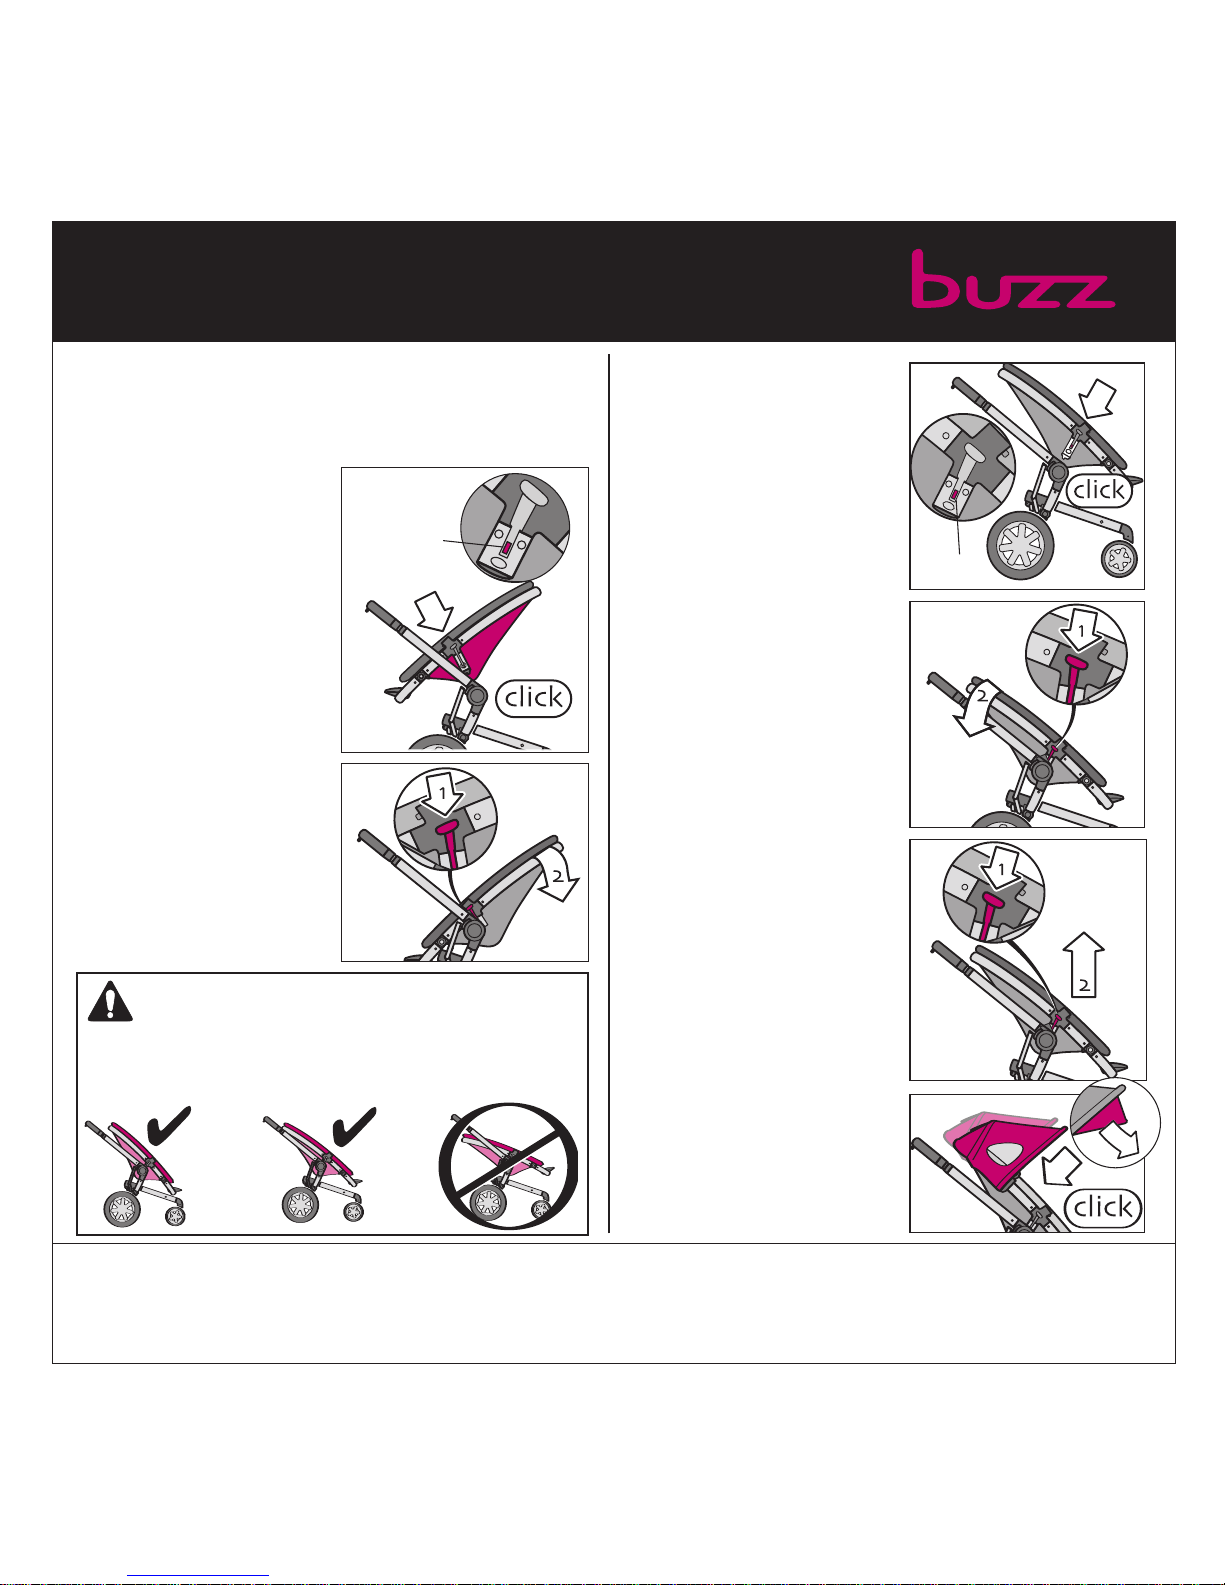
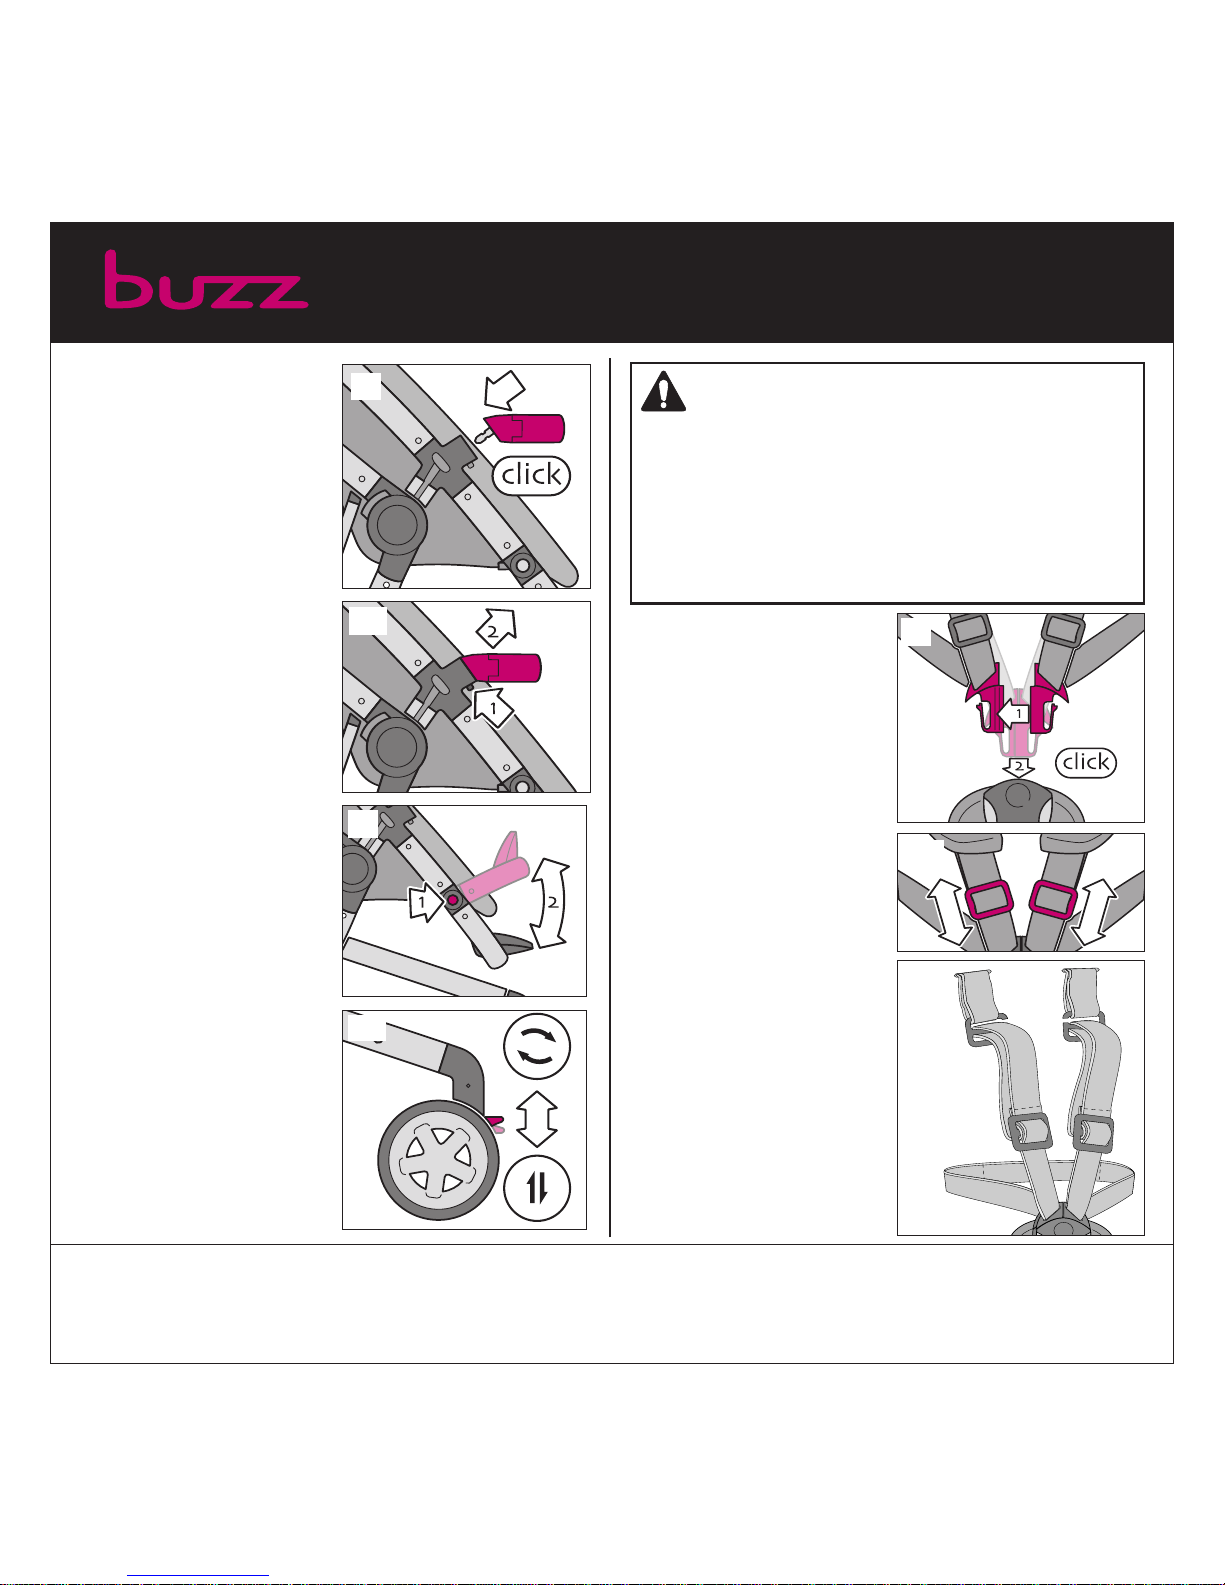
Assembly
TMT
1 Install Rear Wheels
Press the button in while
sliding the rear wheel axle
into the frame until you
hear a “click” (Figure 1).
Repeat for other rear
wheel. Pull to confirm it is
assembled securely.
3
3 Install Front Wheel
Assembly
Squeeze the front wheel
fork while inserting it into
the frame tube. Push front
wheel fork into frame tube
until you hear a “click”
(Figure 3).
Pull to confirm
it is assembled securely.
2 Attach Shopping
Basket
Slide tab into tube at
the front center (Figure
2). Secur e an adhesive
strap around frame
above each rear wheel
(Figure 2a).
2
3
4
4a
4 Unfold Stroller
Unfasten the transport
hook and push the handlebar upward
(Figure 4).
The frame will unfold
itself. The handlebar will
lock into place with a
“click”
(Figure 4a).
2a
5 Adjust Handlebar
Height
Squeeze the adjustment
button and slide the handlebar to desired height
(Figure 5). The handlebar
will click into place.
5
6 Parking Brake
Always use the par king
brake, even when standing
still for only a few moments!
Push down on the red
pedal (P) behind the rear
wheel to set the parking
brake
(Figure 6). Push the
opposite pedal to release
the parking brake.
6
NOTE: The BuzzTMframe has a
unique mechanism that enables
the automatic unfolding of the
frame. The temperature can
effect the functioning of this
mechanism. In cold or frosty
weather, the Buzz
TM
may unfold
more slowly than usual (at
room temperature).
1
Assembly T
TMT
7 Attach Seat Facing
Handlebar
Slide both sides of the
seat into the frame until
you hear each side click
and the RED INDIC ATOR
IS NOT VISIBLE on the
seat release buttons
(Figure 7).
4
8
8a
Adjust Recline
The rear-facing seat can
be adjusted to two positions; a sitting position
and a semi-reclining position. Do not recline the
seat fully. Push the buttons on both sides downward and tilt the seat to
the desired position
(Figure 7a).
NOTES: The seat can be positioned facing backward or for-
ward. The Buzz
TM
seat is suitable for children from 6 months to
age 4 (maximum 50-LBS. / 22.73-kg). If your child is unable to
sit up unassisted, use the semi-reclined position only.
WARNING
DO NOT use when red
indicator is visible (Figures 7 & 8).
DO NOT use
with seat in this position.
Red
Indicator
7
7a
8 Attach Seat Facing
Forward
Slide both sides of the seat
into the frame until you
hear each side click and the
RED INDIC ATOR IS NOT
VISIBLE on the seat release
buttons
(Figure 8).
Adjust Recline
The forward-facing seat can
be adjusted to two positions; a sitting position and
a semi-reclining position.
Push the buttons on both
sides downward and tilt the
seat to the desired position
(Figure 8a).
9 To Remove Seat
Push the buttons on both
sides downward and lift
the seat from the frame
(Figure 9).
10Canopy
Clip each side of the
canopy onto the frame
until it clicks into place
(Figure 10). NOTE: Height
of canopy may be adjusted
by sliding it up and down
the frame
(Figure 10).
The sunshade may be
pulled f
orward.
Red
Indicator
9
10
UPRIGHT
RECLINED WRONG
To Use
TMT
5
11 Safety Bar
Insert safety bar into
openings on seat until
you hear each side click
(Figure 11).
To Remove Safety
Bar
Press buttons under each
side of safety bar and
pull the bar off the seat
(Figure 11a).
IMPORTANT : Always
secure the child with the
restraining straps.
12Footrest
Toadjust the footrest
up, pull footrest to the
desired position.
To
adjust down, press the
buttons on both sides
and adjust to the desired
position
(Figure 12).
13Swivel Wheel
Lock the swivel wheel when
using the stroller in a
straight direction for a
long period.
To lock, push
the lock lever downward
and turn the front wheel
into the backward position
until you hear a “click”
(Figure 13). To unlock,
push the lock lever upward.
11
11a
12
13
14To Use Restraint
System
Place your child
in the stroller, with the
crotch strap between the
child’s legs. Fit clips
together. Slide clips into
buckle until you hear a
“click”
(Figure 14).
To tighten strap, slide
buckles down
(Figure 14a).
To loosen strap, slide
buckles up
(Figure 14a).
Tighten straps snugly
around your child
(Figure 14a).
WARNING
• NEVER LEAVE CHILD UNATTENDED.
• AVOID SERIOUS INJURY from falling or sliding out.
Always use seat belt. Check frequently to make sure it
is secure. Belts must be threaded exactly as shown
(Fig. 14b).
• Failure to follow these instructions could result in the
serious injury or death of your child.
14
14a
14b
 Loading...