

Page 1
Quick Heal Technologies Ltd. www.quickheal.com
Quick Heal Home Security
User Guide
Page 2

Copyright & License Information
Copyright © 2019 Quick Heal Technologies Ltd. All Rights Reserved.
No part of this publication may be reproduced, duplicated, or modified in any form or
incorporated into any information retrieval system, electronic or any other media or
transmitted in any form without prior permission of Quick Heal Technologies Ltd., Reg. Office:
Marvel Edge, Office No. 7010 C & D, 7th Floor, Viman Nagar, Pune 411014.
License Terms
Installation and usage of QHHS is subject to user’s unconditional acceptance of the Quick Heal
end-user license terms and conditions.
To read the license terms, visit www.quickheal.com/eula and check the End-User License
Agreement for your product.
Warranty
On purchase of a new QHHS device, we warranty this product against manufacturing defects for
one full year from the date of purchase, unless specified otherwise.
The adaptor carries a 6-month warranty from the date of purchase. Please save your receipt as
proof of purchase to claim the warranty.
The warranty does not apply:
If the product has been misused, disassembled or modified, used at high voltage, operated
in inappropriate environmental conditions, warranty void sticker is tampered, not
maintained well or has been subjected to any other similar situations.
In case the product is damaged due to natural calamities including lightning, flood,
earthquake or fire.
A defect arising out of any failure to follow the instructions as mentioned either in the
manual or product specification.
In case repairs are carried out by unauthorized personnel or unauthorized source.
License Validity
The license key of QHHS is valid for one year only. On expiry, you need to renew the license for
continued protection to your devices. To renew your license, contact +91-9272202525. For
more details on renewal, contact: https://www.quickheal.co.in/quick-heal-product-renew.
2
Page 3
About This Document
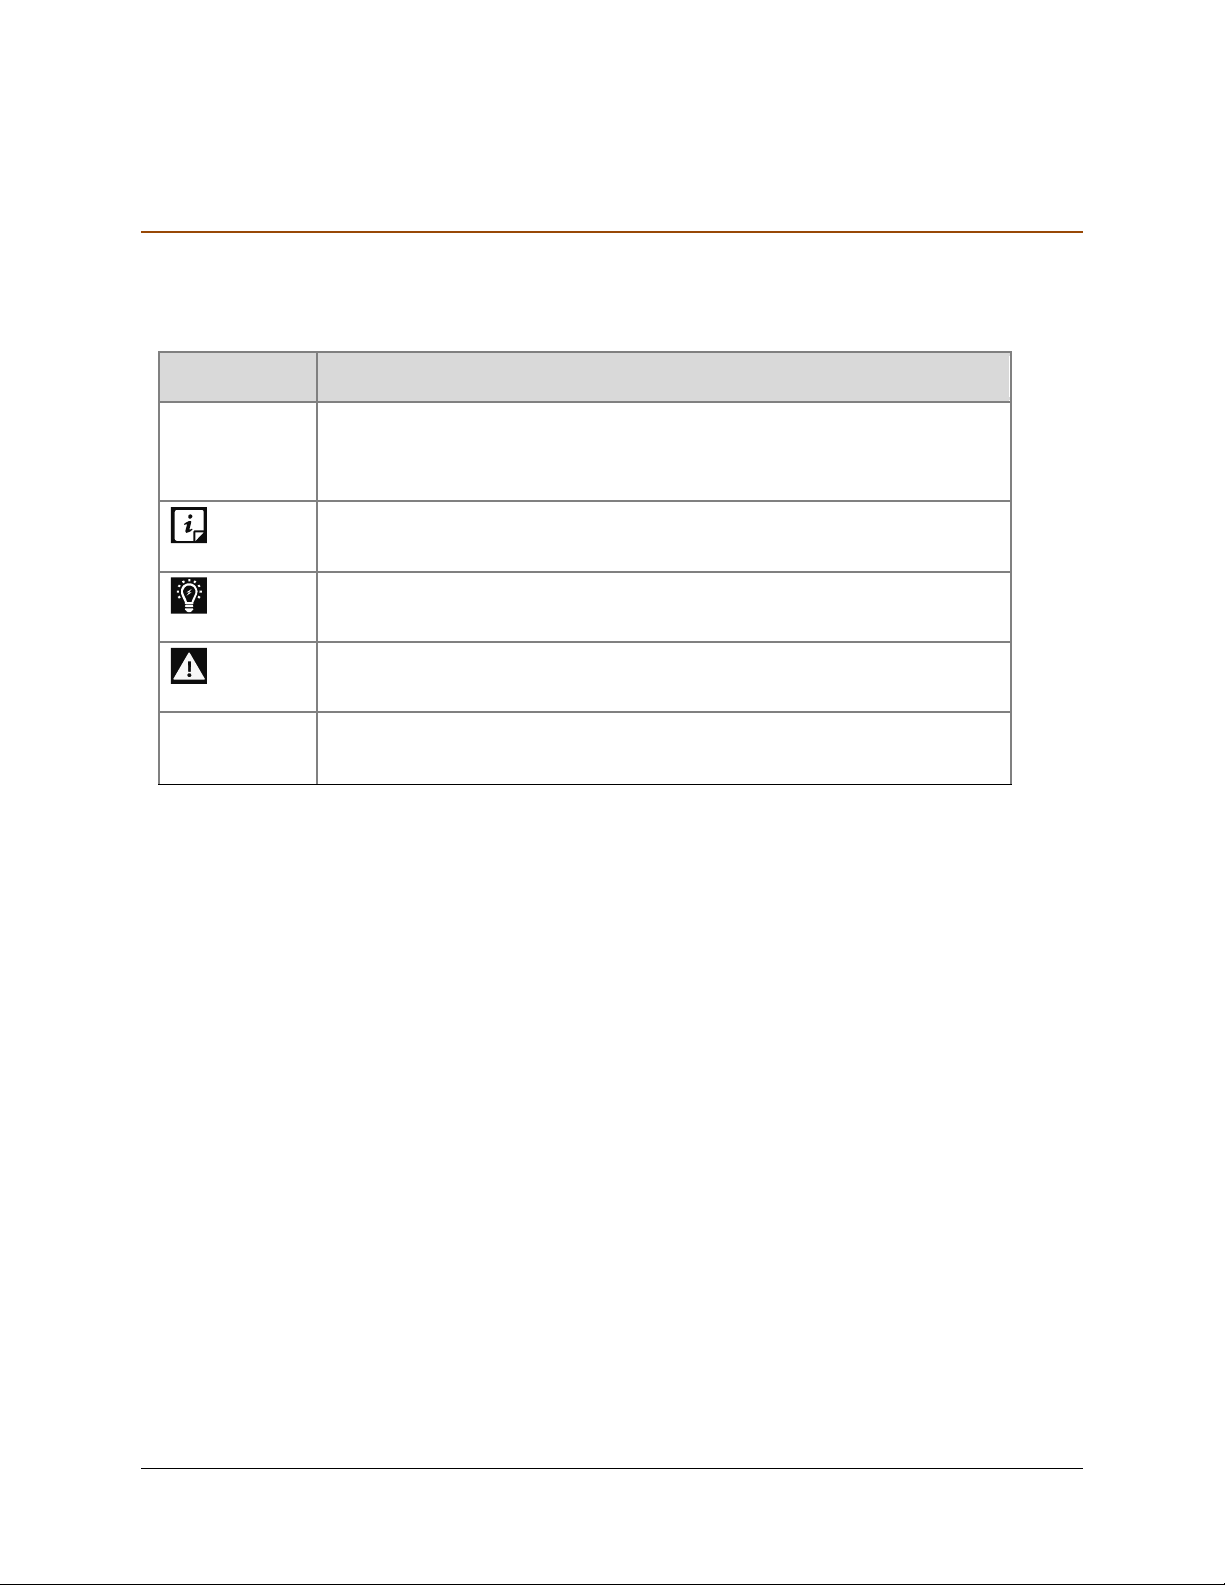
Convention
Meaning
Bold Font
Anything highlighted in bold indicates that it is a menu title, window
title, check box, drop-down menu, dialog, button names, hyperlinks,
and so on.
This is a symbol used for a note. Note supplements important points
or highlights information related to the topic being discussed.
This is a symbol used for a tip. Tip helps users to apply the techniques
and procedures to achieve a task in an easy way.
This is a symbol used for warning or caution. This is an advice either
to avoid loss of data or damage to hardware.
<Step 1>
<Step 2>
The instruction mentioned in the numbered list indicates actions that
you need to perform.
This guide covers all the information required to use Quick Heal Home Security. The following
table lists the conventions that we followed to prepare this guide.
3
Page 4
Terminologies
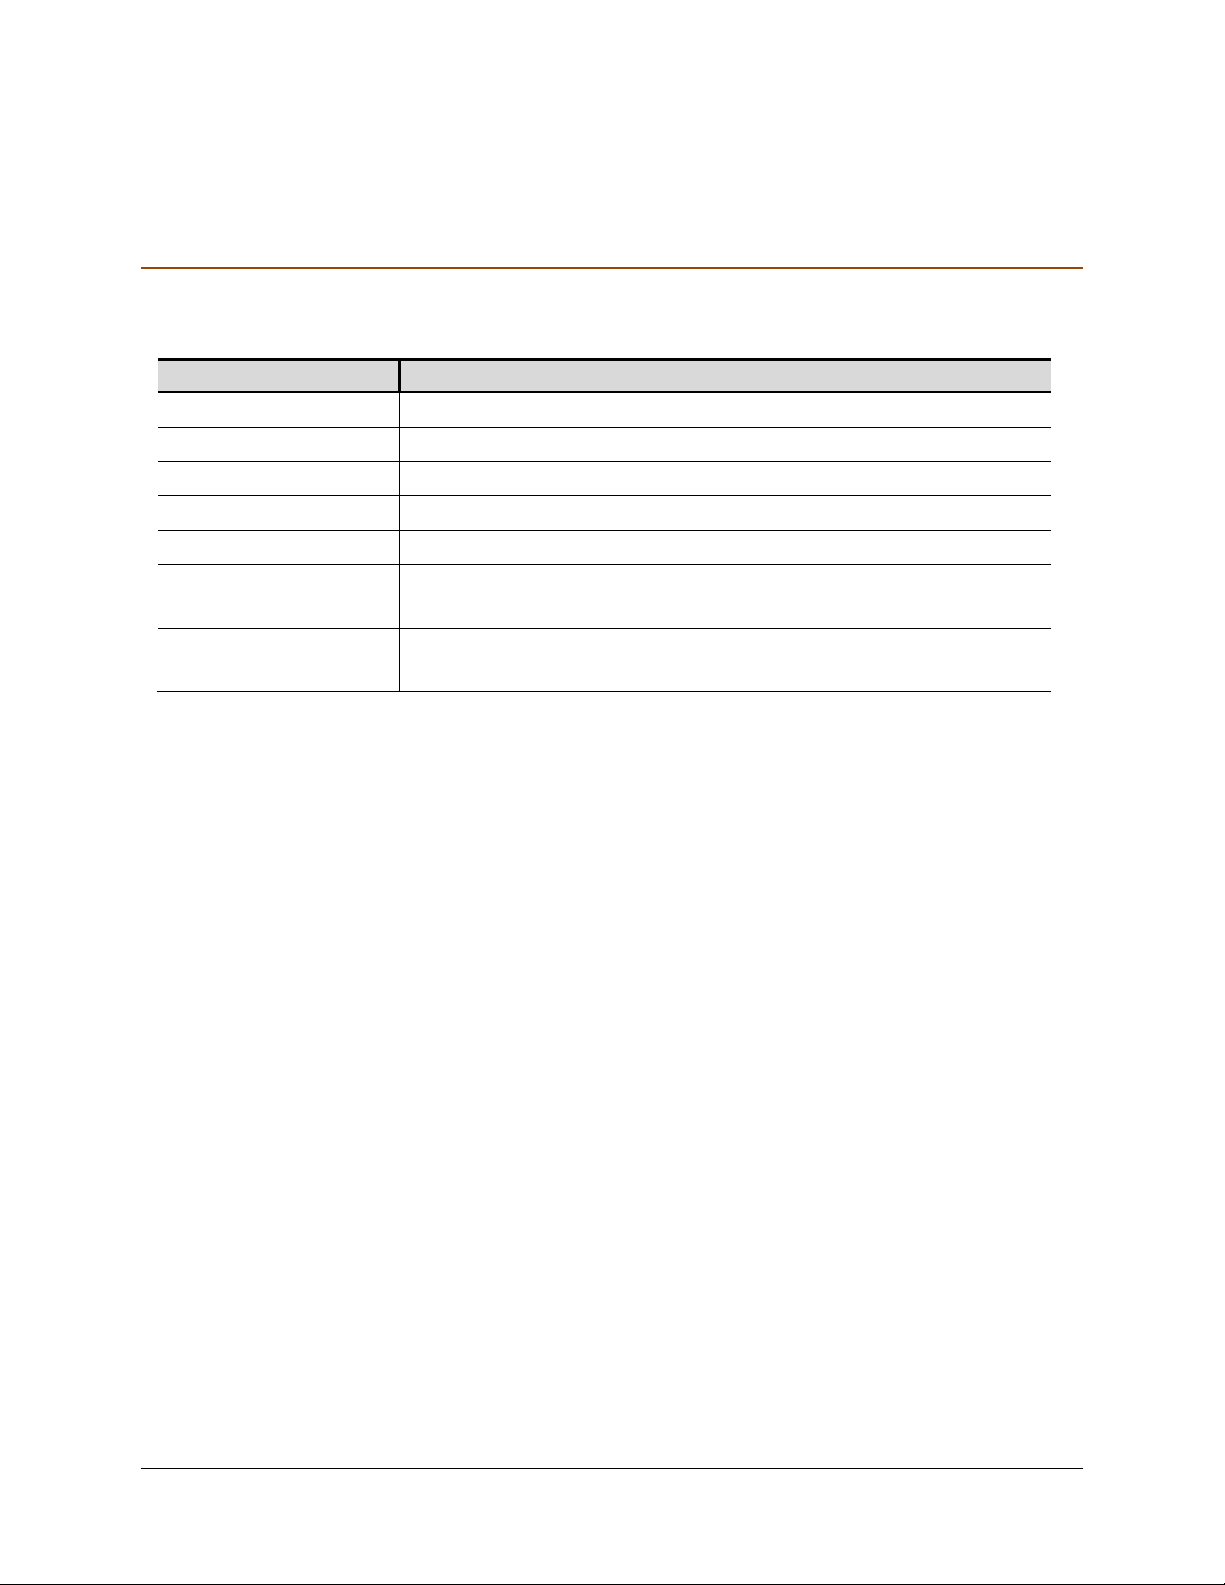
Terminology
Definition
QHHS
Quick Heal Home Security
Home SSID
Home Wi-Fi network
SSID
Service Set Identifier (Internet access point)
QHHS device/router
Quick Heal Home Security router
IoT
Internet of Things or computing devices
IoT devices
Smart devices connected with one another and controlled
through Internet.
QHHS app
Mobile-based app that helps you to manage various features of
QHHS.
This table describes some of the technical terminologies.
4
Page 5

Contents
1. Introducing Quick Heal Home Security ............................................................. 8
Introducing Quick Heal Home Security ..................................................................................... 8
QHHS features ........................................................................................................................... 9
Physical interface of the QHHS router .................................................................................... 10
Technical specifications .......................................................................................................... 10
Compatible browsers .............................................................................................................. 11
Workflow of the QHHS router ................................................................................................ 12
QHHS app ................................................................................................................................ 13
2. Unboxing and Registering QHHS ..................................................................... 14
Unboxing through QHHS app .................................................................................................. 14
Connecting to the Internet ............................................................................................... 15
Connecting to the Internet through Internet modem .................................................. 16
Connecting to the Internet through Mobile Internet dongle ....................................... 23
Registering QHHS .............................................................................................................. 25
Configuring the settings afresh .................................................................................... 30
Creating a home network ................................................................................................. 31
Getting started with the QHHS device on your smartphone ........................................... 37
Unboxing using the QHHS portal ............................................................................................ 37
Connecting to the Internet ............................................................................................... 38
Connecting to the Internet through Internet modem .................................................. 39
Connecting to the Internet through Mobile Internet dongle ....................................... 42
Registering QHHS .............................................................................................................. 43
Configuring the settings afresh .................................................................................... 49
Creating a home network ................................................................................................. 50
Getting started with the QHHS device from portal .......................................................... 54
3. Dashboard ...................................................................................................... 55
Notifications ............................................................................................................................ 57
Menus ..................................................................................................................................... 58
Need Help ............................................................................................................................... 58
4. Devices ........................................................................................................... 59
Type of devices ....................................................................................................................... 59
Pending Home Devices list ...................................................................................................... 60
5
Page 6

Contents
Allowed Home Devices list ...................................................................................................... 61
Guest Sessions list ................................................................................................................... 61
Declined Home Devices list ..................................................................................................... 62
Adding a Home Device (Interactive Devices/Connected Things) ........................................... 62
Approving the device request ........................................................................................... 62
Adding a device manually ................................................................................................. 63
Adding the device from the Declined Home Devices list ................................................. 64
Setting Full Access ................................................................................................................... 65
Setting Restricted Access ........................................................................................................ 65
Restricting web content by category ................................................................................ 65
Allowing access to specific websites ............................................................................ 66
Restricting specific websites ............................................................................................. 67
Scheduling Internet access ............................................................................................... 68
Limiting Internet data usage ............................................................................................. 68
Restricting Internet access to IoT devices ........................................................................ 69
Guest Sessions ........................................................................................................................ 70
Adding guest session ......................................................................................................... 70
Editing device information ...................................................................................................... 71
5. Settings ........................................................................................................... 72
Network .................................................................................................................................. 72
Configuring Home Network .............................................................................................. 72
Home Security Internet ..................................................................................................... 73
Configuring Home Security Internet Settings ............................................................... 73
Mobile Internet dongle or portable router Settings ..................................................... 73
Advanced Setting .............................................................................................................. 74
Configuring Advanced settings .................................................................................... 74
Security ................................................................................................................................... 74
Configuring Security .......................................................................................................... 75
System ..................................................................................................................................... 75
Reset Admin Password ..................................................................................................... 75
Set Your Billing Cycle ......................................................................................................... 76
Set Language ..................................................................................................................... 76
Email Address to Get Notifications ................................................................................... 76
Backup & Restore .............................................................................................................. 76
Factory Reset .................................................................................................................... 77
Firmware Upgrade ............................................................................................................ 77
6
Page 7

Contents
Telemetry .......................................................................................................................... 78
Reboot ............................................................................................................................... 78
6. Support ........................................................................................................... 79
Support Contacts .................................................................................................................... 79
7
Page 8
Chapter
1
Introducing Quick Heal Home Security
This chapter includes the following sections.
Introducing Quick Heal Home Security
QHHS features
Physical Interface of the QHHS router
Technical specifications
Compatible browsers
Workflow of the QHHS router
QHHS app
Introducing Quick Heal Home Security
We are increasingly getting dependent on the Internet for our day-to-day activities such as
communications, financial transactions, entertainment, official work, business, and a host of
other activities.
The online world is full of phishing threats, frauds, malwares and other malicious content. With
the advent of IoT (Internet of Things), you can control your home devices from anywhere in the
world. However, IoT devices are susceptible to damage, invasion of privacy, data loss, and
harmful interference along with our other connected devices.
Quick Heal Home Security (QHHS) is a device that secures your connected devices in the most
efficient manner. QHHS protects your connected devices from IDS/ IPS threats, malicious and
infected websites. At the same time, QHHS lets you control access to the Internet usage in your
home. With QHHS, you can create separate Wi-Fi networks both for home users and guest
users. You can allow certain users in the Home network and others in guest users network. This
helps you to keep your Wi-Fi secure from any unauthorized access and prevents your devices
and gadgets from being compromised. At the same time, you can control which users would be
using how much Internet data.
8
Page 9

Introducing Quick Heal Home Security
Features
Benefits
Separate Network
Create separate networks for Home users and Guest users. Allow
different users and policies to different networks.
Device Control
Identify and block suspicious or undesired Internet activities by
any device.
Web Protection
Block harmful websites that are not suitable for your connected
users.
Internet Security
QHHS filters and stops the attacks that try to infiltrate your Home
network through the Internet or infected devices connected on
Wi-Fi.
Schedule Internet
Access
Set schedules (days and time) for your children to access the
Internet at home. The access can be regulated separately per
device.
Intrusion Prevention
QHHS protects all connected devices in your Home network from
security vulnerabilities.
Web Activity Report
Get the data about your children’s or other users’ activity on the
Internet, such as websites accessed, and the devices used.
QHHS app
Helps you to manage various features remotely.
Quick Heal Home Security helps you to create a safe digital environment in the following ways.
Create your unique home SSID Internet network and set password for accessing Home
network.
Create separate Wi-Fi networks for your home users and guest users.
Restrict devices and Internet access and usage for any user as required.
Allow access of Internet to your users within a scheduled time slot.
Keep away unauthorized devices from your network.
Prevent intrusion attempts.
Protect your connected devices against malware and other potential threats.
Regulate access to online content based on categories, or individual websites.
QHHS features
The following table describes the key features of Quick Heal Home Security.
9
Page 10
Introducing Quick Heal Home Security
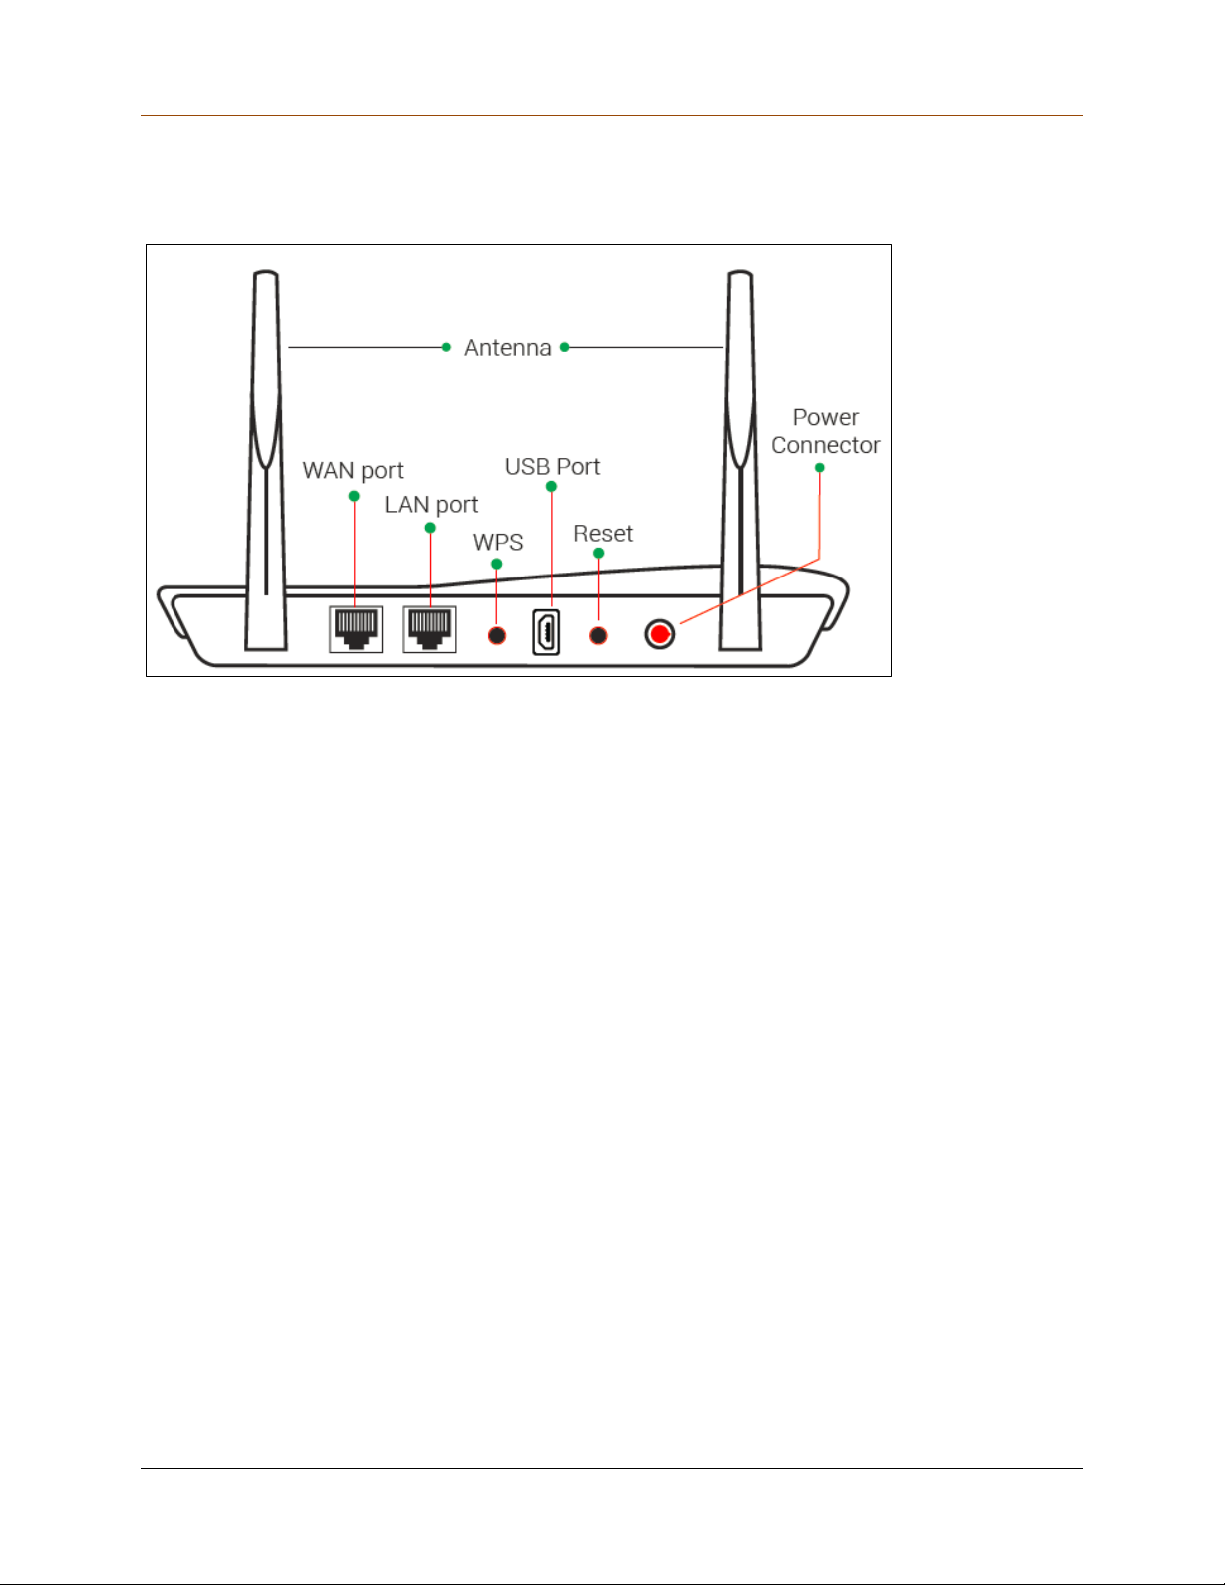
Physical interface of the QHHS router
Following is an illustration of the QHHS router.
Note:
This screenshot is suggestive and the actual device interface may vary slightly.
The reset button when pressed for about 5-6 seconds will reset the QHHS router settings to
factory defaults.
Technical specifications
General
Product Model: HM1S
Wi-Fi: 2.4 GHz, 802.11 b/g/n
Antenna Qty: 2
WPS button
Reset Push Button
LAN port: Allows to connect with the Ethernet LAN cable.
WAN port: Allows to connect with the WAN cable.
USB port: Allows to plug in the Internet dongle.
10
Page 11
Introducing Quick Heal Home Security
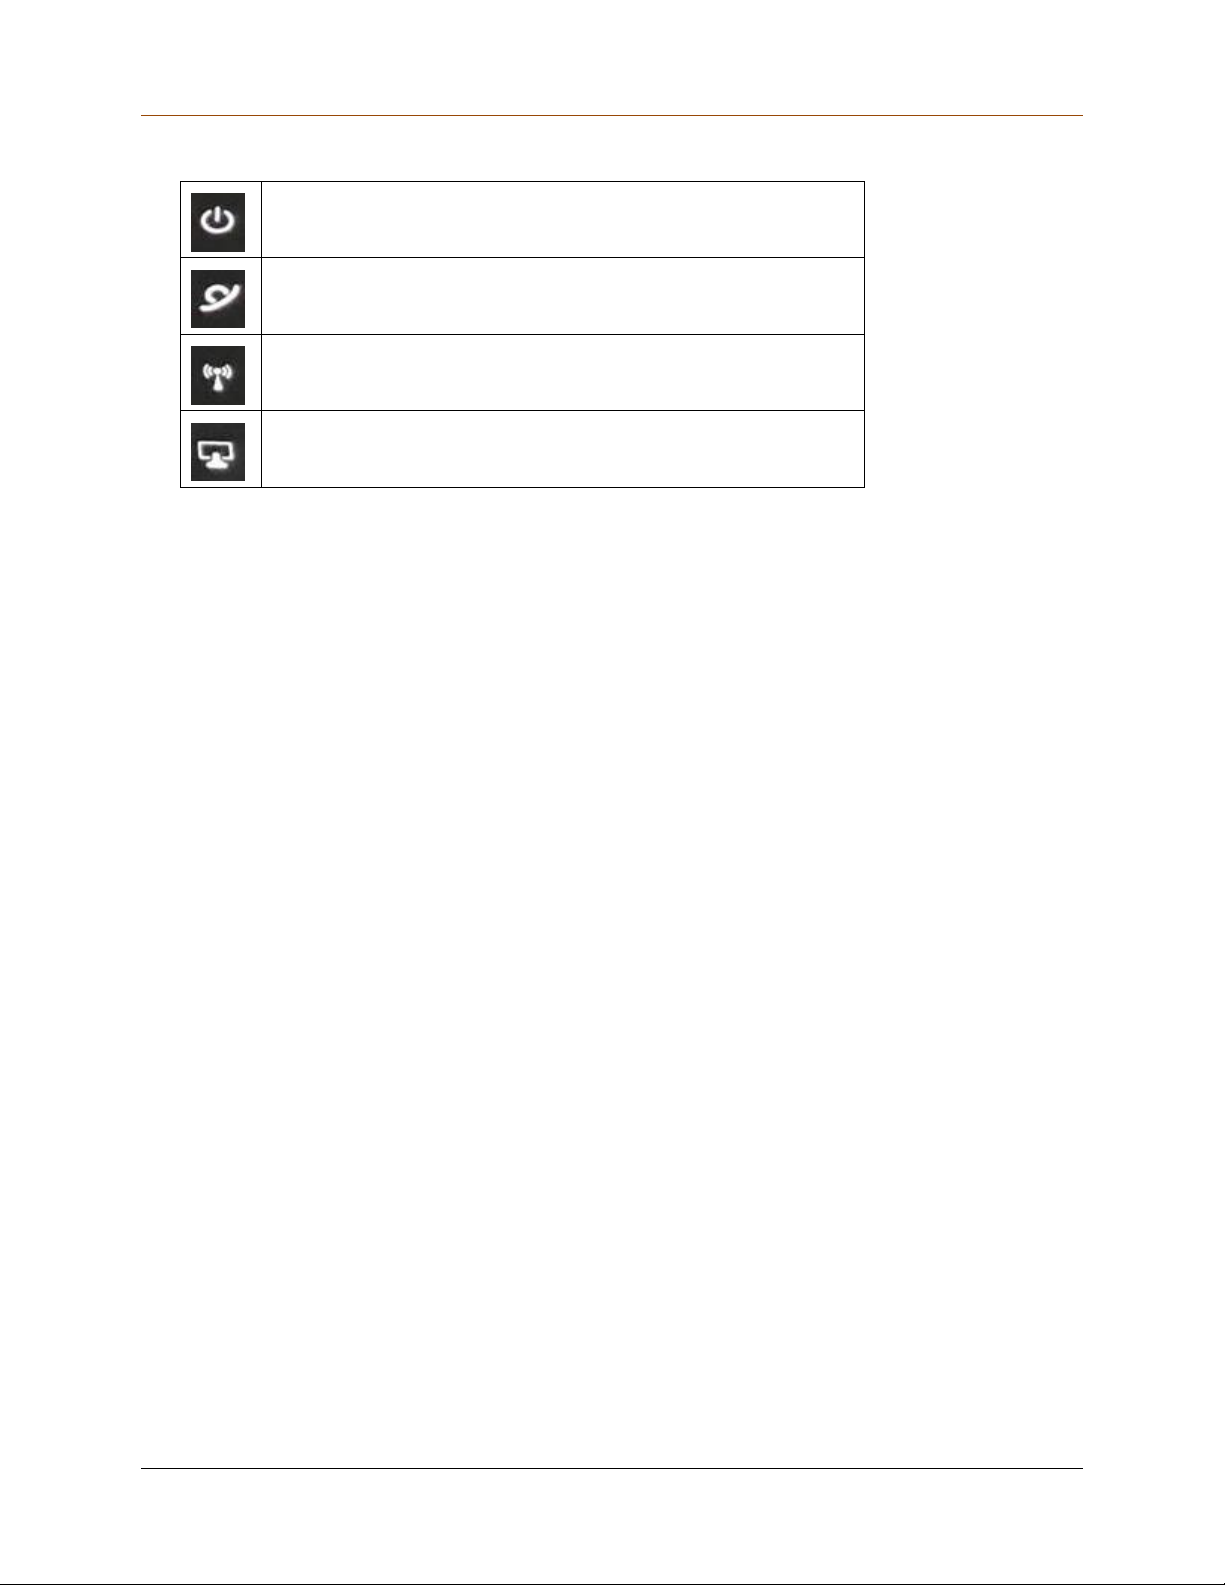
Power: Shows ON/OFF status.
Internet: Indicates Internet connection.
Wi-Fi: Indicates connectivity.
Service: Indicates Home Security is ready.
LED indicators:
Encryption Algorithm: WPA2-PSK
Compliance Standards: IEEE 802.1x, UPnP, Wi-Fi Certified
Certification: FCC
Environmental Parameters
Power Adapter: 12V, 1A
Operating Temperature: 0° – 40°C
Storage Temperature: -40° – 70°C
Humidity: 5% – 90% (non-condensing)
Dimensions
Length: 199.96 mm
Depth: 129.98 mm
Height: 29.75 mm
Net Weight: 197 gm
Compatible browsers
QHHS will run on any of the following browsers.
Internet Explorer 10 or later
Firefox 58 or later
Chrome 64 or later
Safari 10 or later
Opera 46 or later
11
Page 12
Introducing Quick Heal Home Security
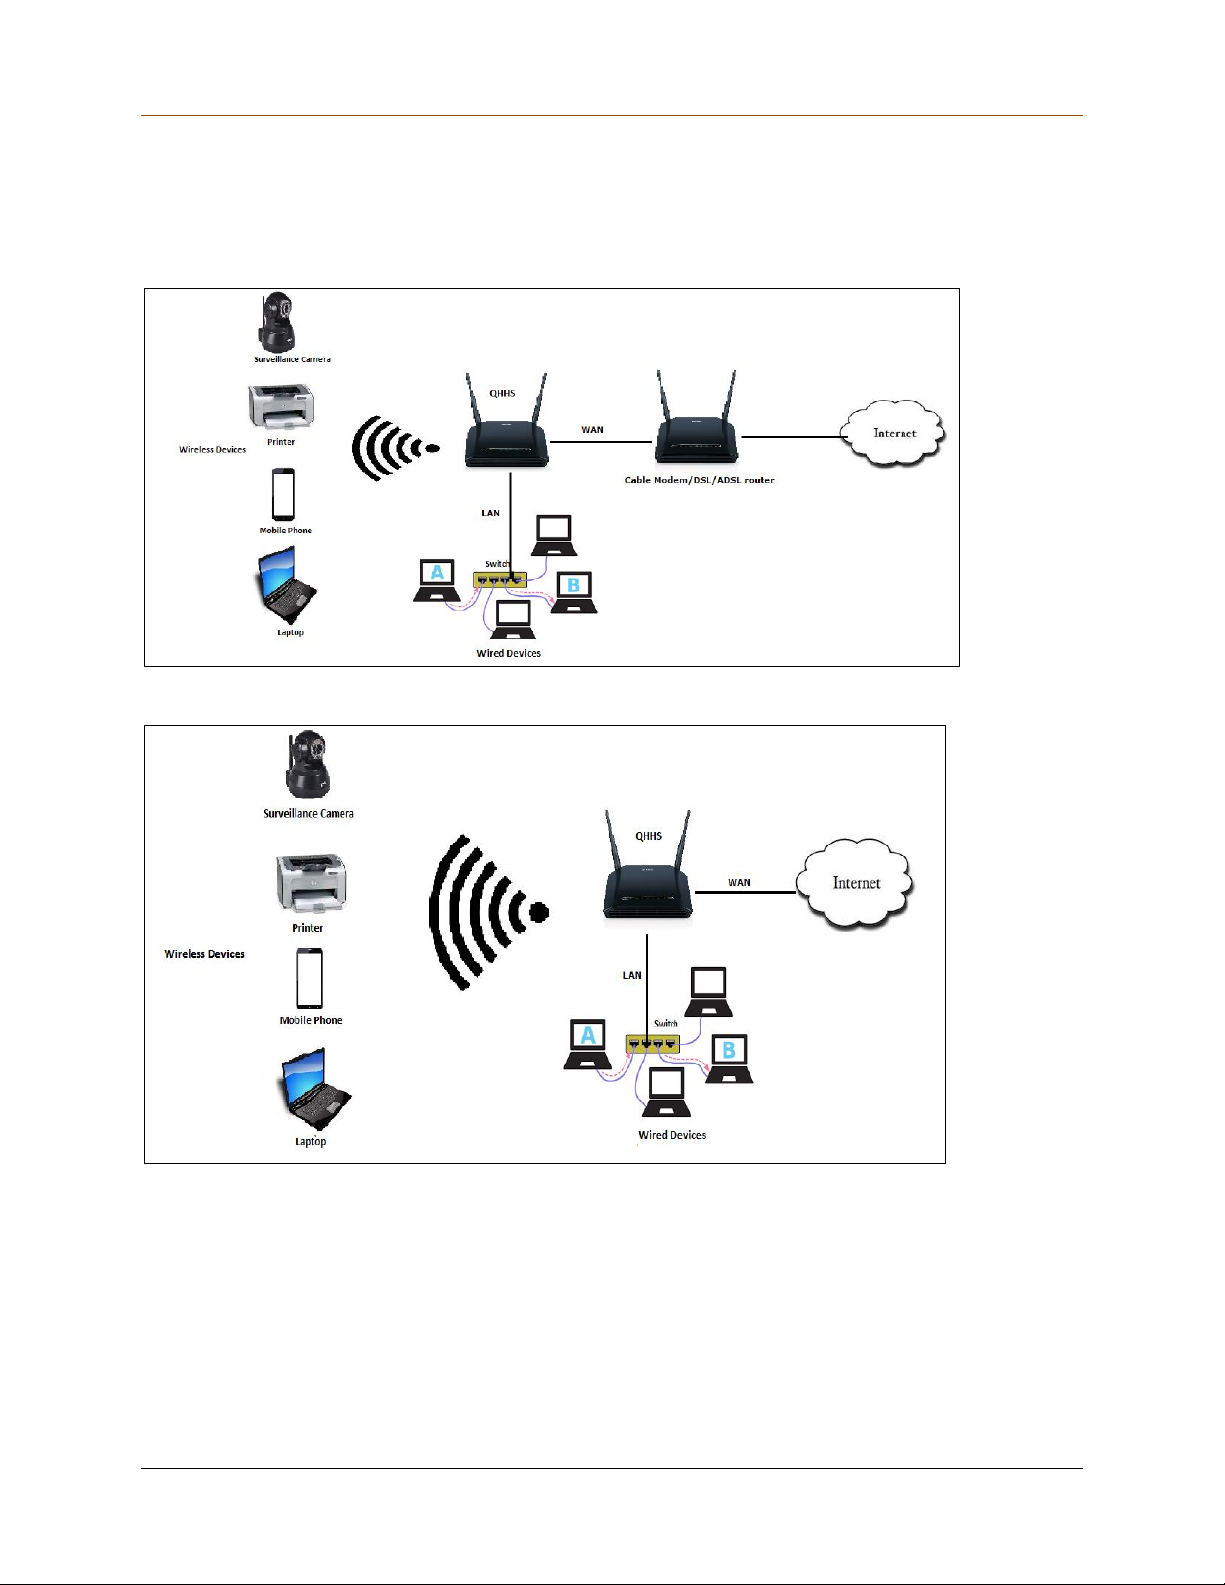
Workflow of the QHHS router
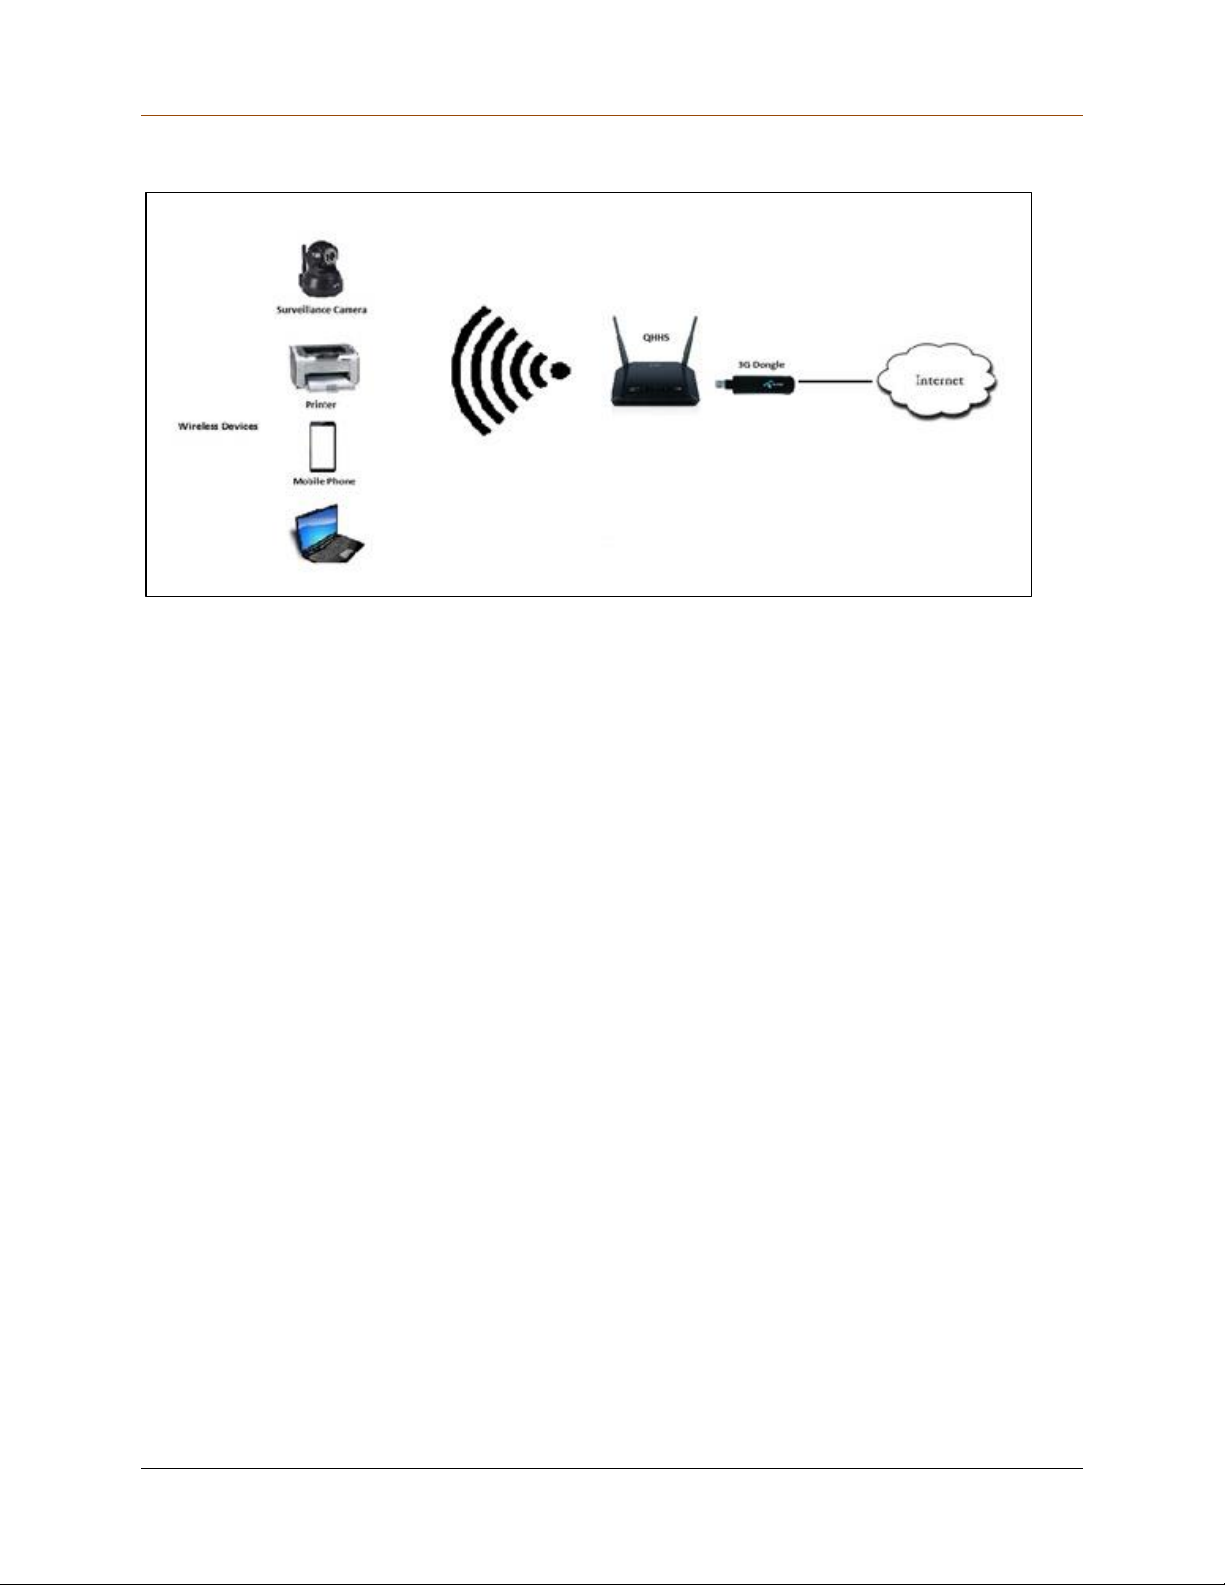
Quick Heal Home Security router can be connected in any one of the following ways:
Internet through Cable Modem/DSL/ADSL router
Internet through Ethernet (WAN)
12
Page 13
Introducing Quick Heal Home Security
Internet through USB, mobile internet dongle, or portable router
QHHS app
Quick Heal Home Security app is a mobile-based application and can help you to configure and
manage various features through mobile. The app allows you to manage the features while you
are on the go.
QHHS app is supported on smartphones and tablets with Android version 5.0 and later. You can
download the QHHS mobile app from Google Play store.
13
Page 14

Chapter
2
Unboxing and Registering QHHS
To do unboxing and register the QHHS device, follow these steps.
Switch on the QHHS device.
Connect the QHHS device to the Internet.
Check the connection lights on the QHHS device. Wait until all the connection lights turn on.
Follow the unboxing process as described in the following sections.
You can do unboxing through QHHS app or QHHS portal. We encourage you to do unboxing
through QHHS app, as it is fast and easy.
Unboxing through QHHS app
Go to Google Play.
Download and install QHHS app on Android supported smartphone.
Open the QHHS app on your smartphone.
Make sure that you are connected to the default Internet network: HS-Unbox. To connect
to the network HS-Unbox, you have to enter a password. The password is printed on the
back of the QHHS device.
During unboxing, you will create a new network. After the unboxing is complete, you must
connect to the new network that you create. Note that the default network HS-Unbox will
disappear from the network list.
14
Page 15
Unboxing and Registering QHHS
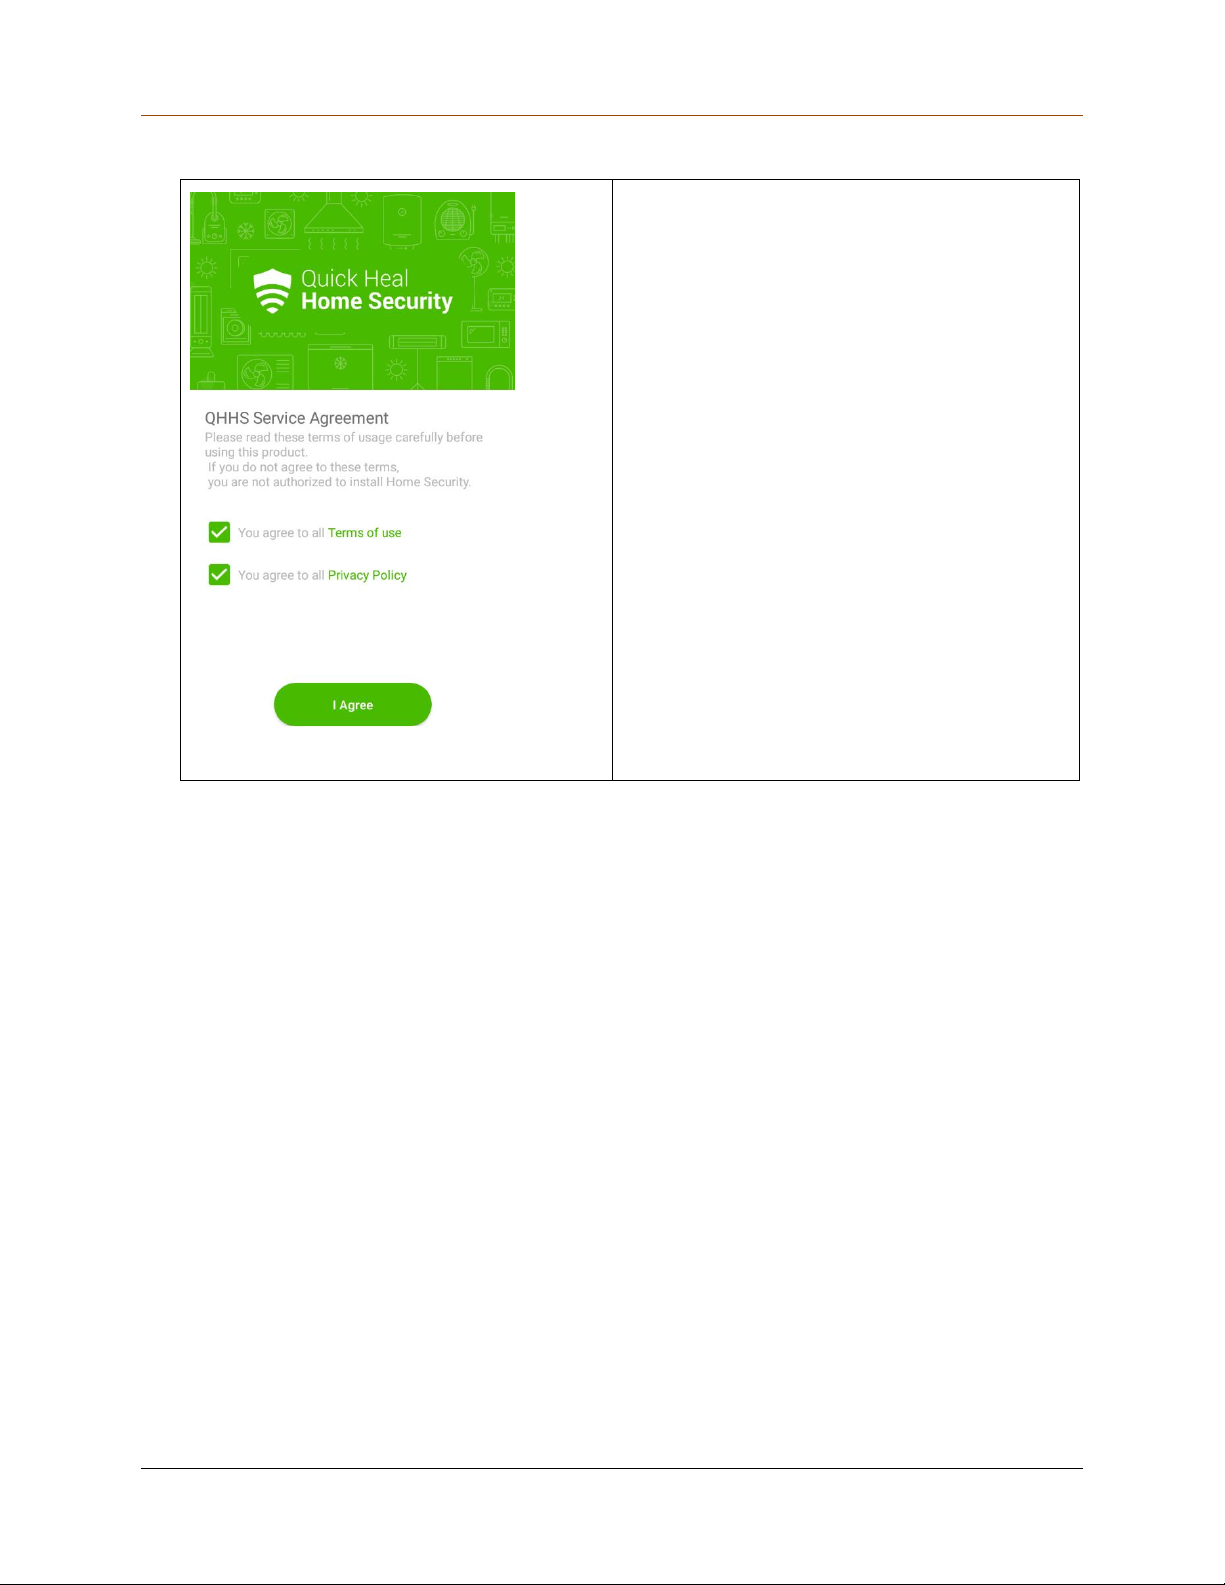
On the first screen, the license agreement
and privacy policy appear. Read them
carefully.
Tap I Agree to accept the license
agreement and privacy policy.
Connecting to the Internet
You can connect to the Internet, either through Internet modem or mobile internet dongle
(portable router).
15
Page 16
Unboxing and Registering QHHS
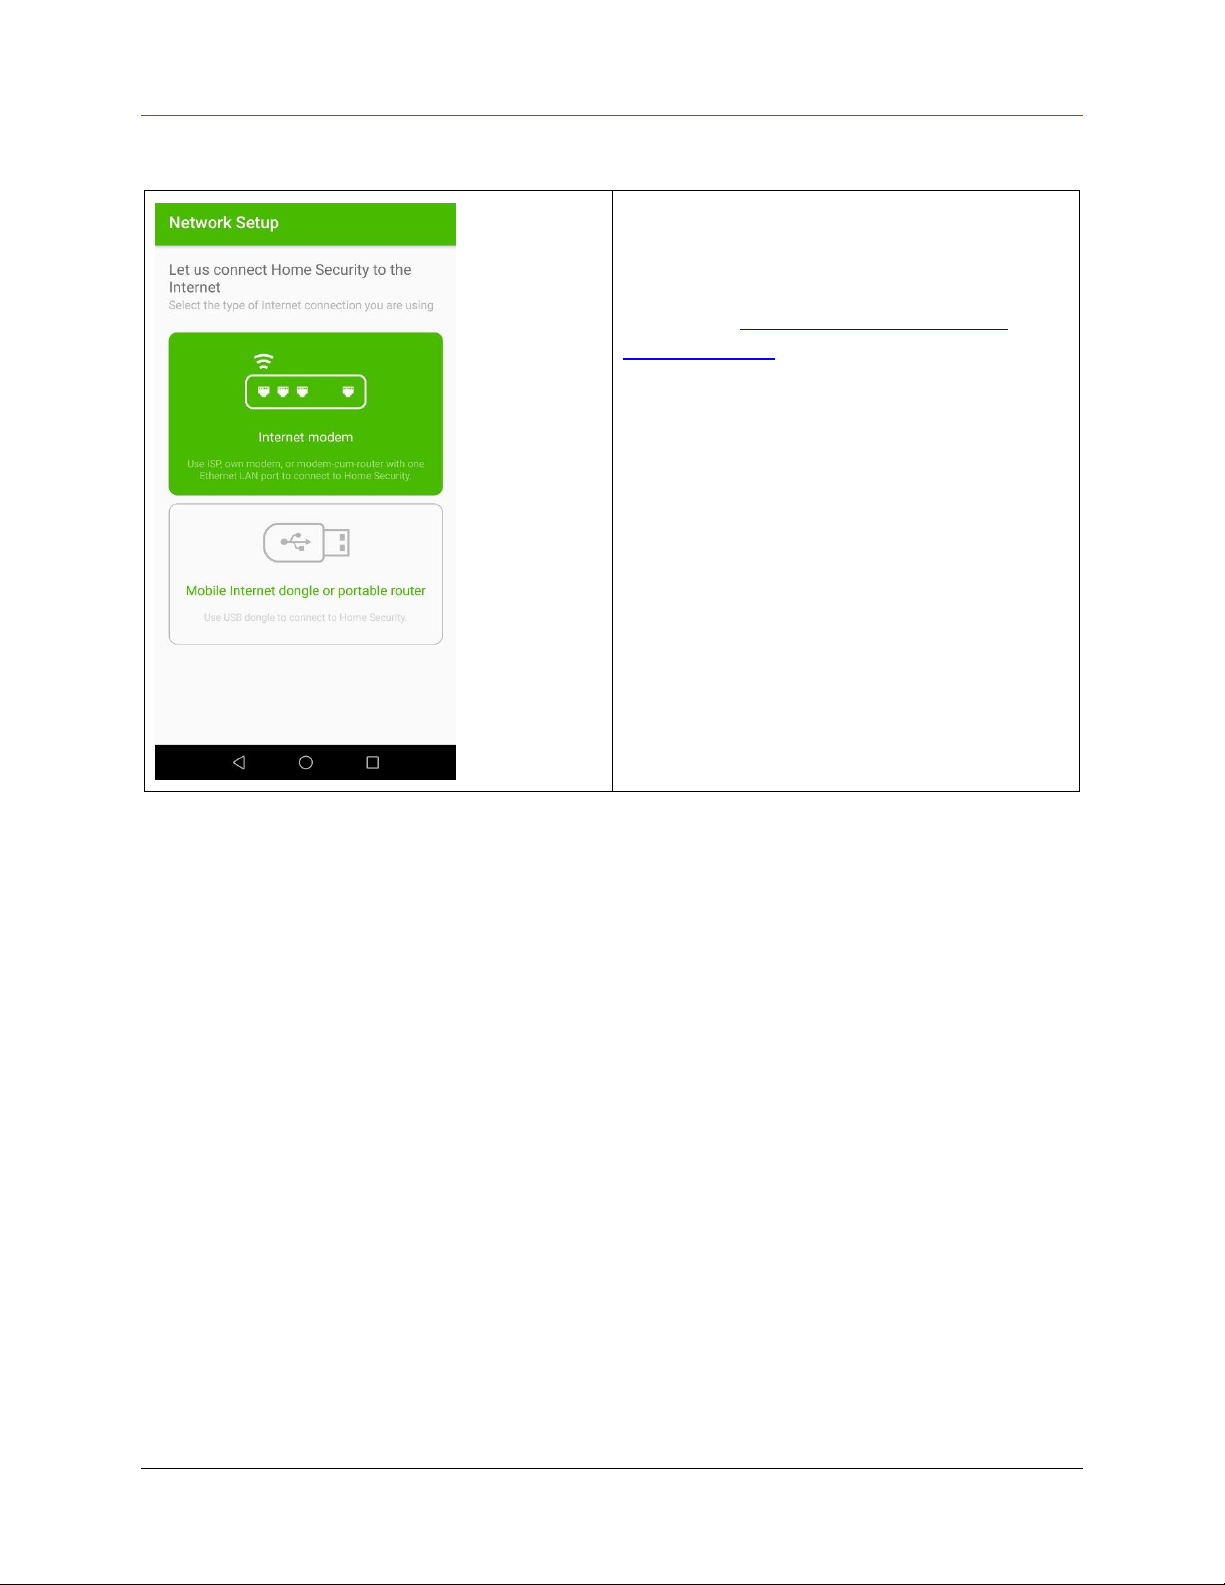
In this example, connection is being
processed through Internet modem.
If you want to connect through mobile
dongle, see Connecting through Mobile
Internet dongle.
Connecting to the Internet through Internet modem
16
Page 17
Unboxing and Registering QHHS
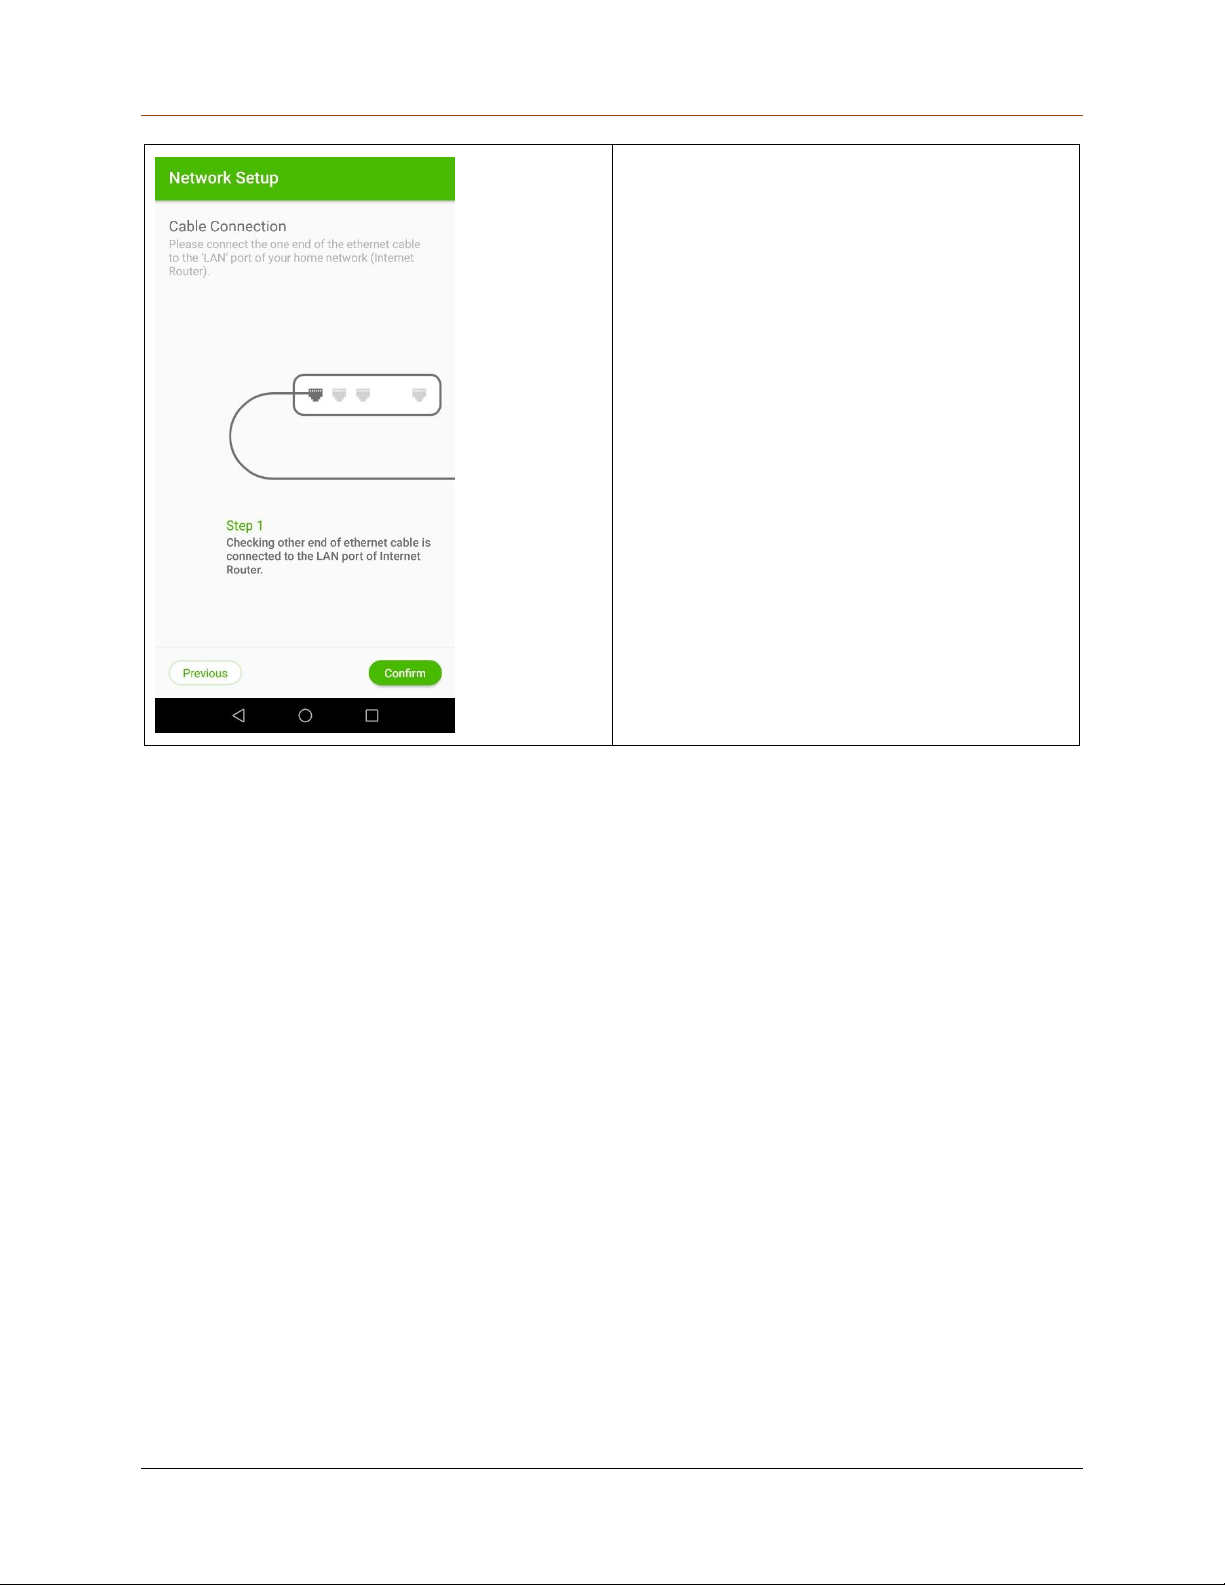
If you select the Internet modem, a cable
connection validation screen appears.
Read the on-screen message carefully.
Tap Confirm.
17
Page 18
Unboxing and Registering QHHS
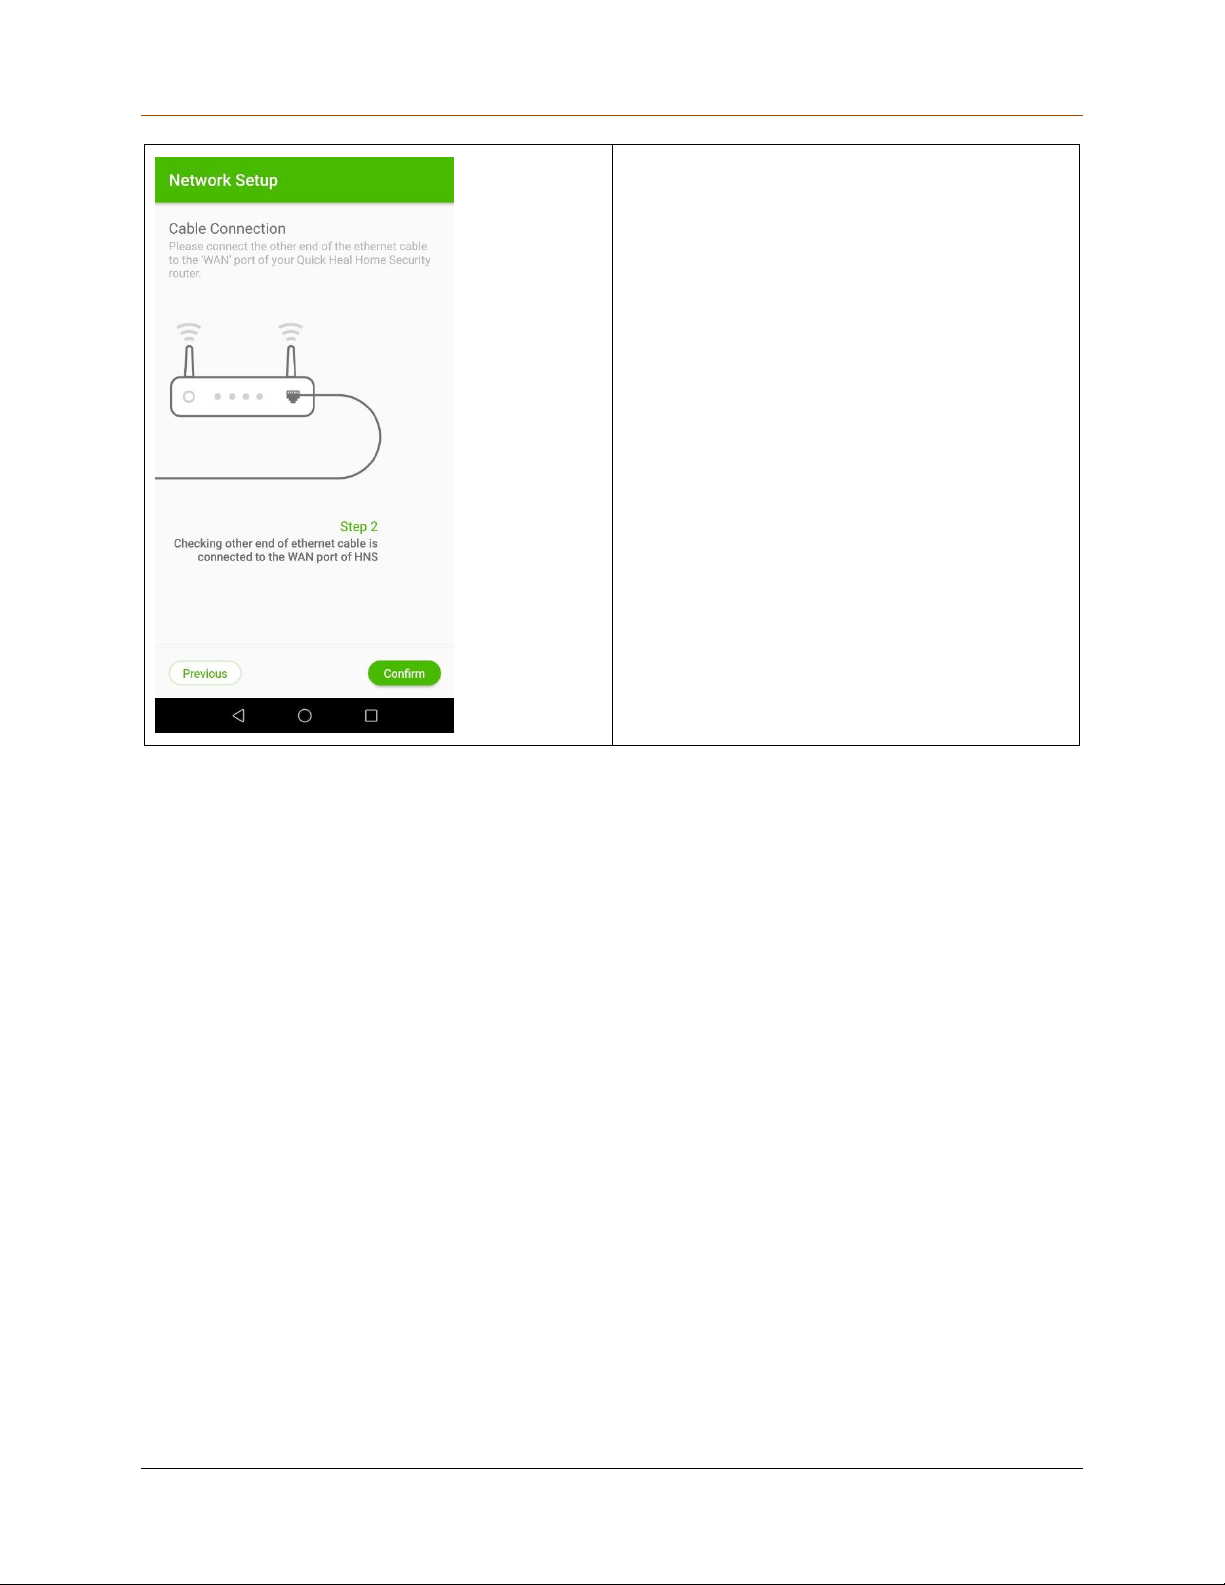
Read the on-screen message carefully.
Tap Confirm.
Note: If your Internet connection is good,
step 1 and step 2 move ahead faster.
18
Page 19
Unboxing and Registering QHHS
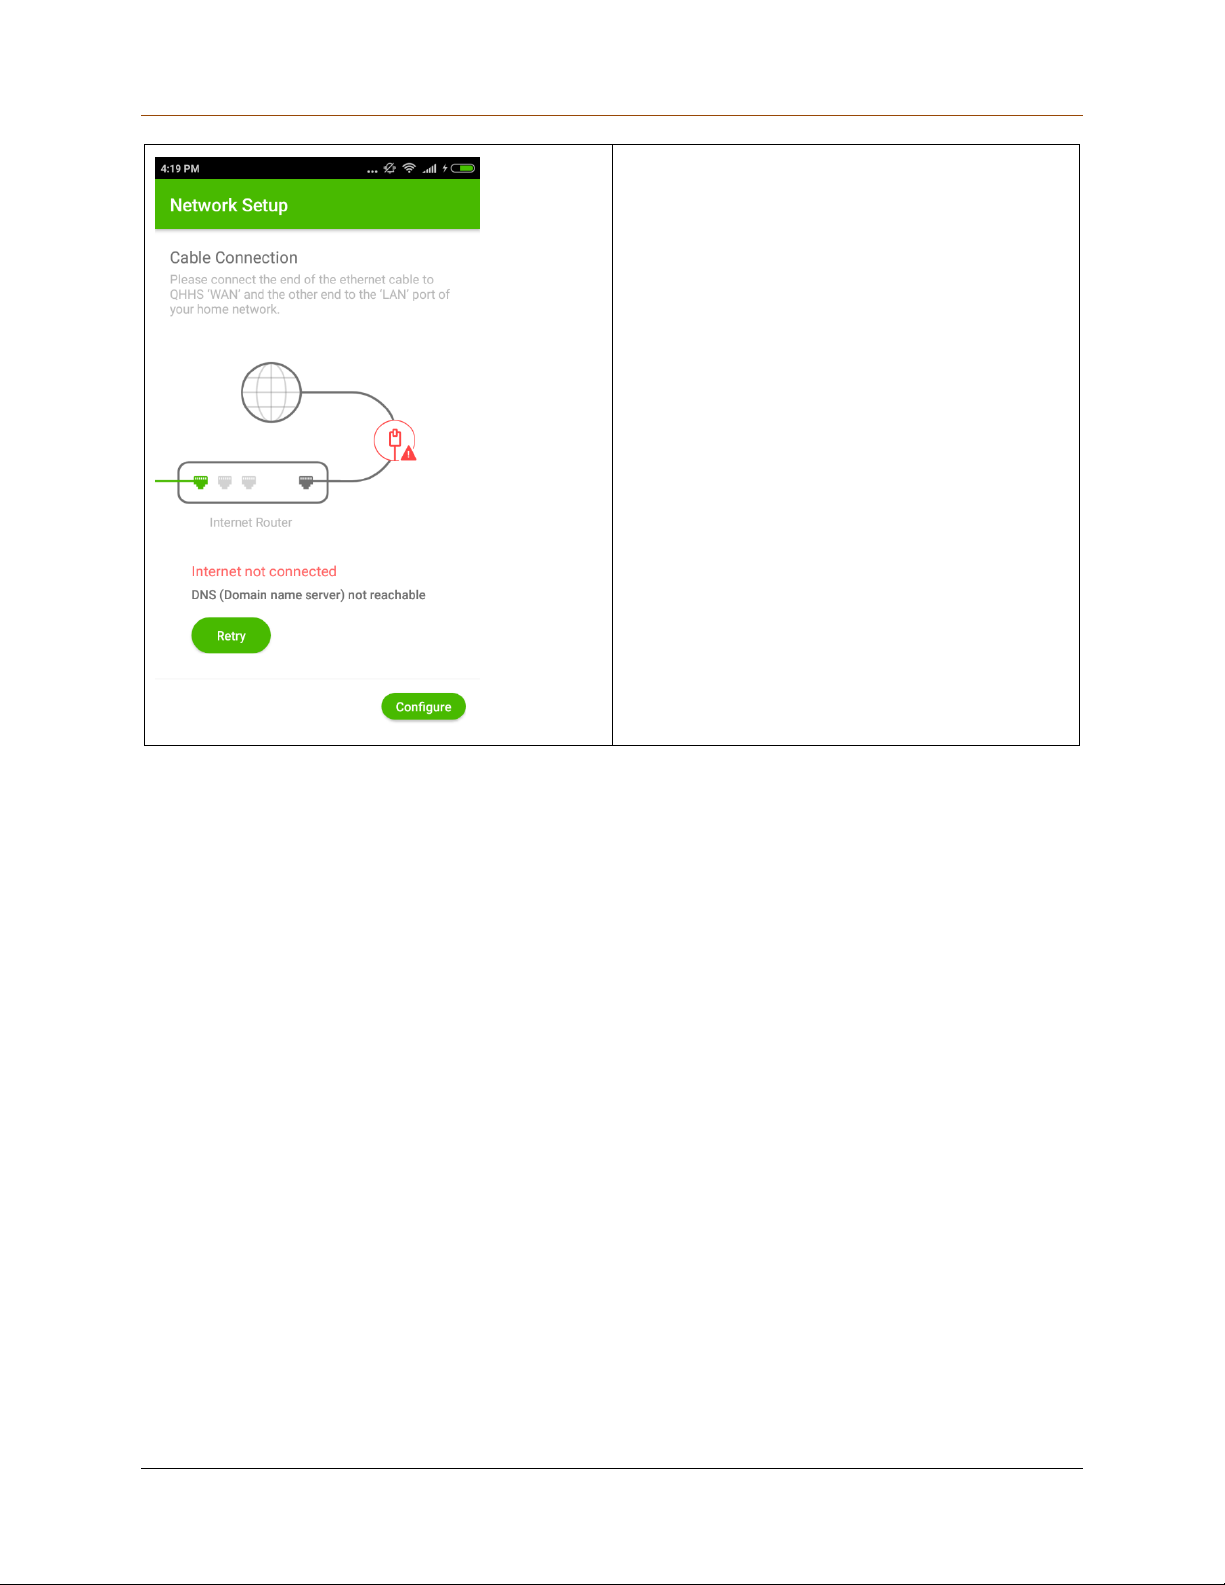
If your network does not get the IP address,
an error message appears. You need to
configure the IP information.
Tap Retry to check the connection or tap
Configure to configure the IP address
manually to get connection.
19
Page 20
Unboxing and Registering QHHS
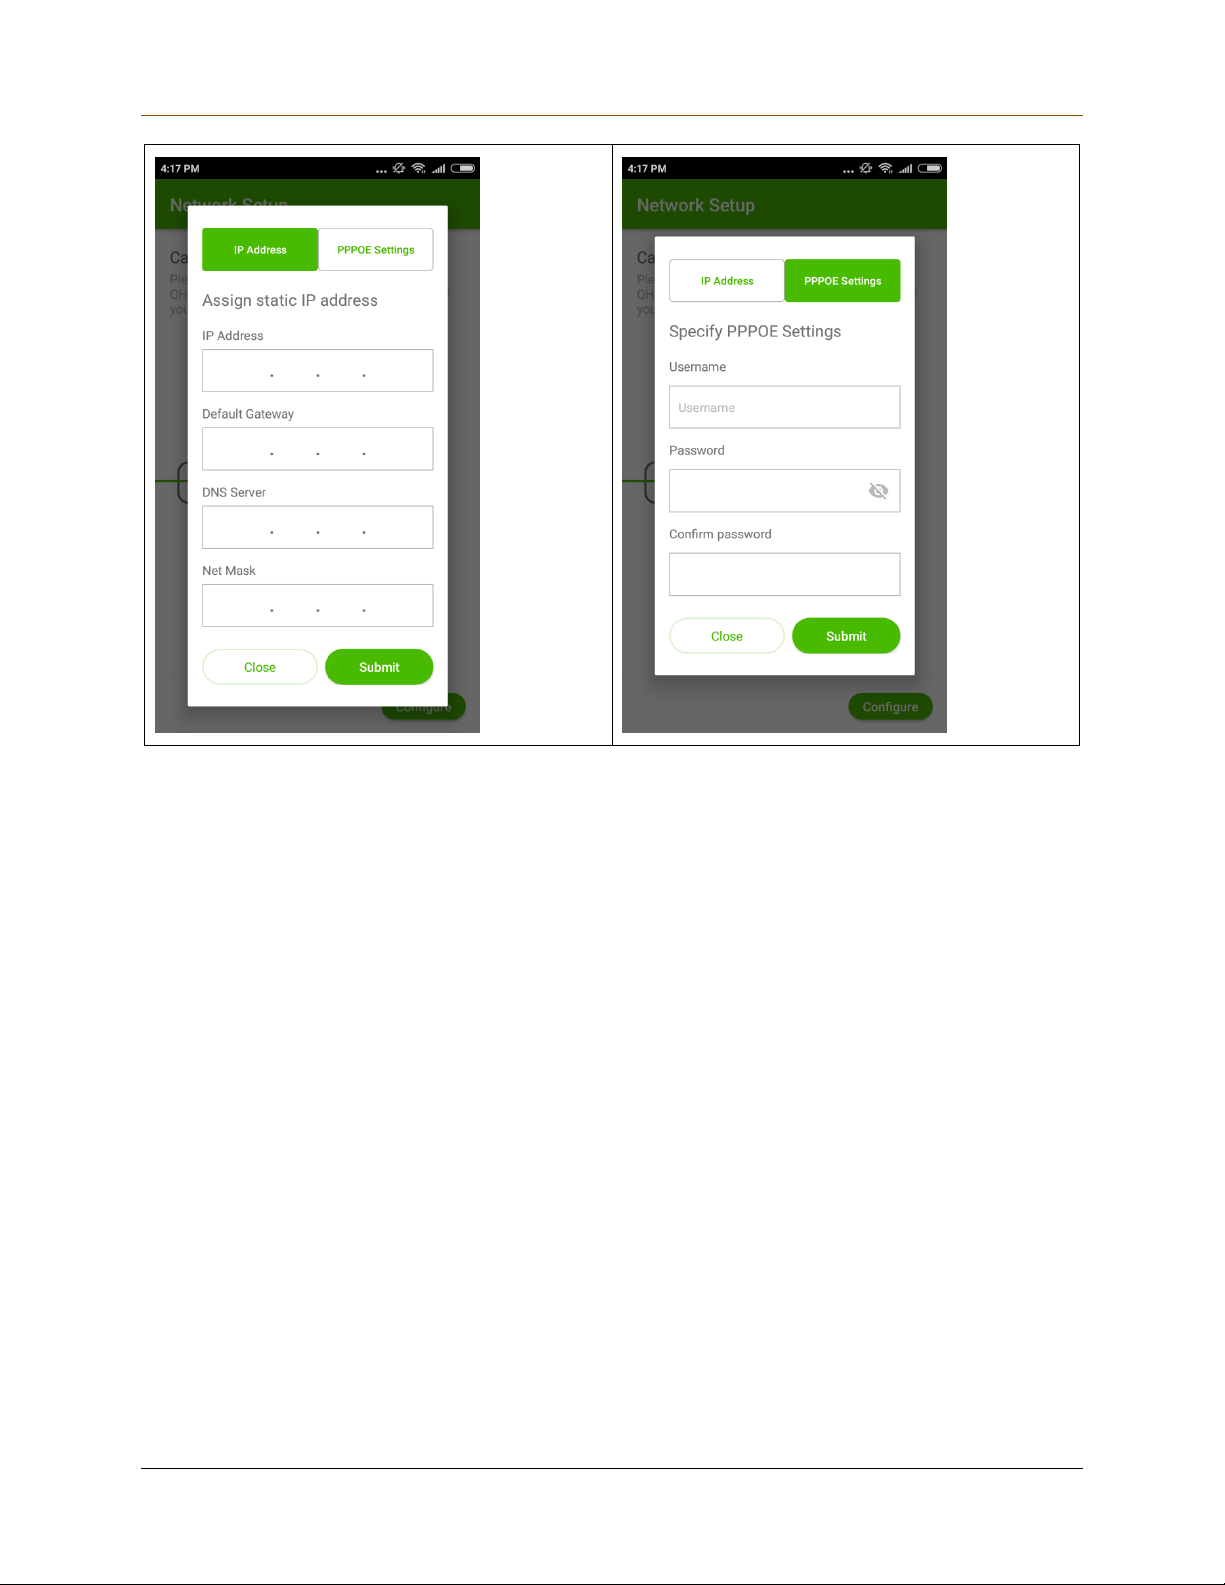
Enter either IP address or PPPoE settings, if you have, and click Submit.
20
Page 21
Unboxing and Registering QHHS
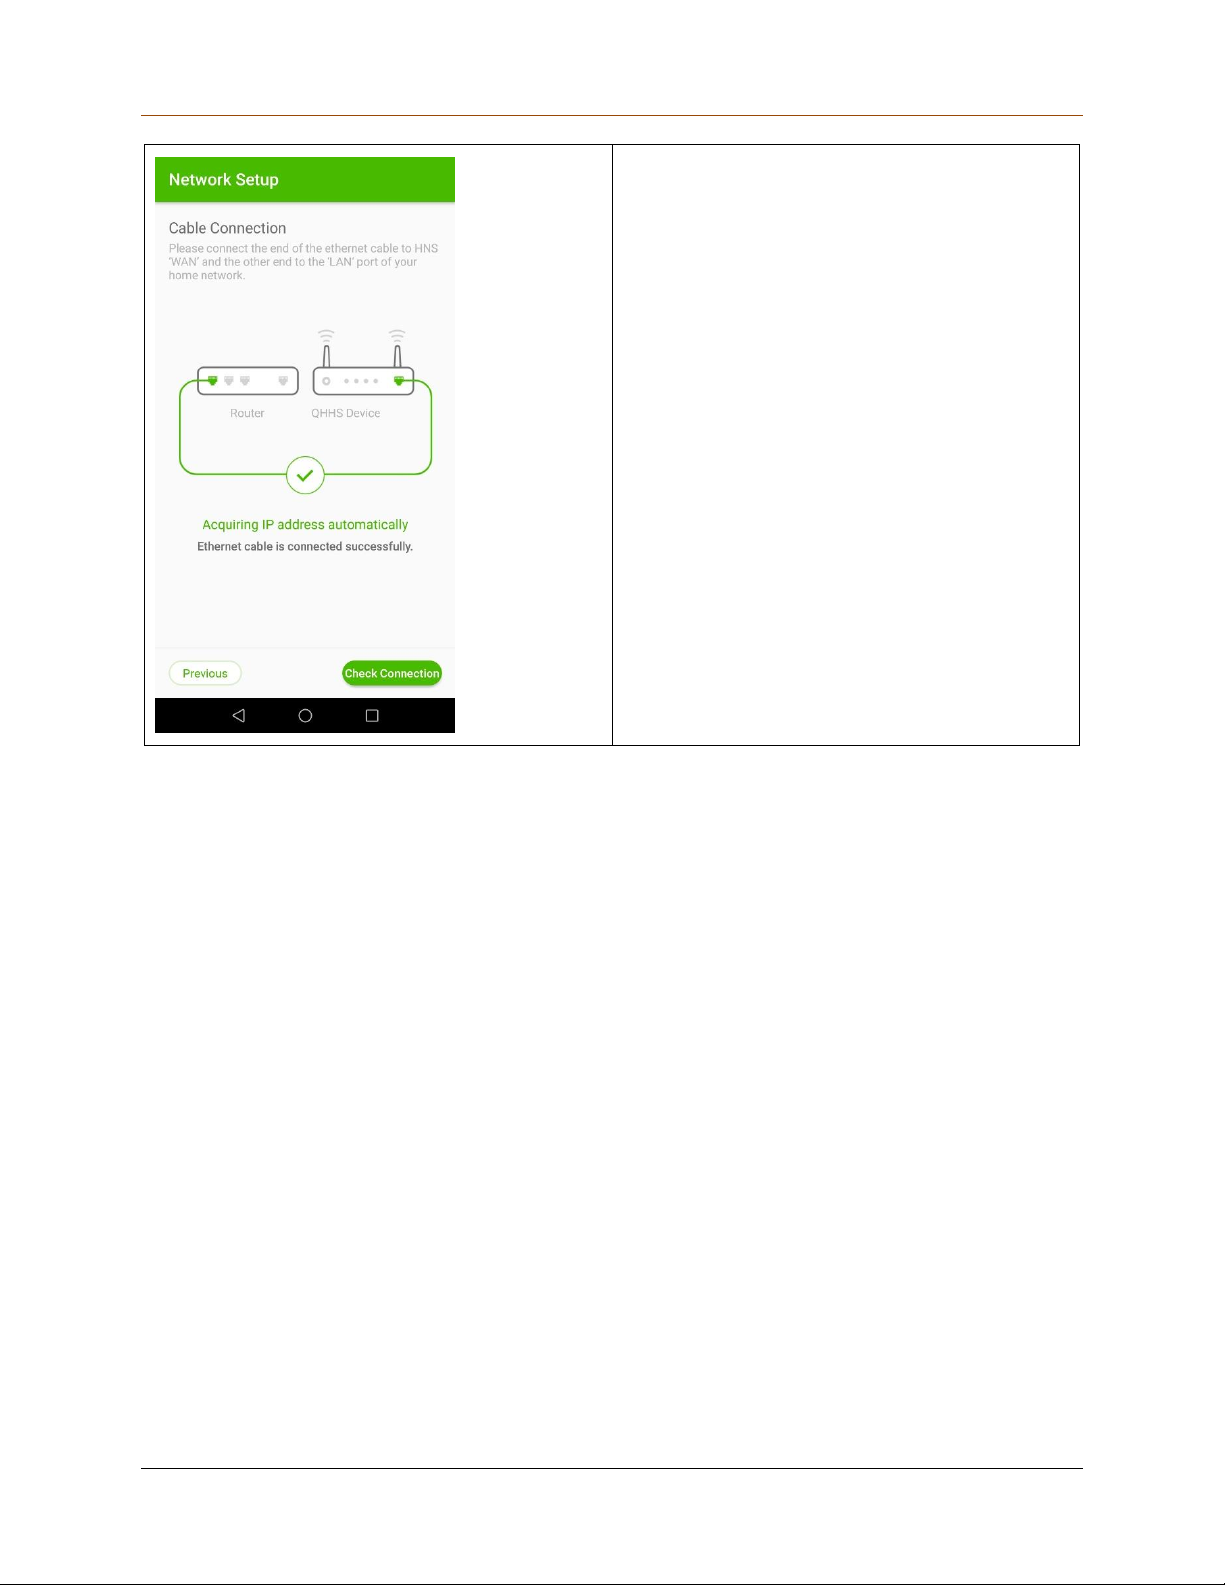
Upon connecting to the router successfully, a
message appears.
Tap Check Connection to go to the next
screen.
21
Page 22
Unboxing and Registering QHHS
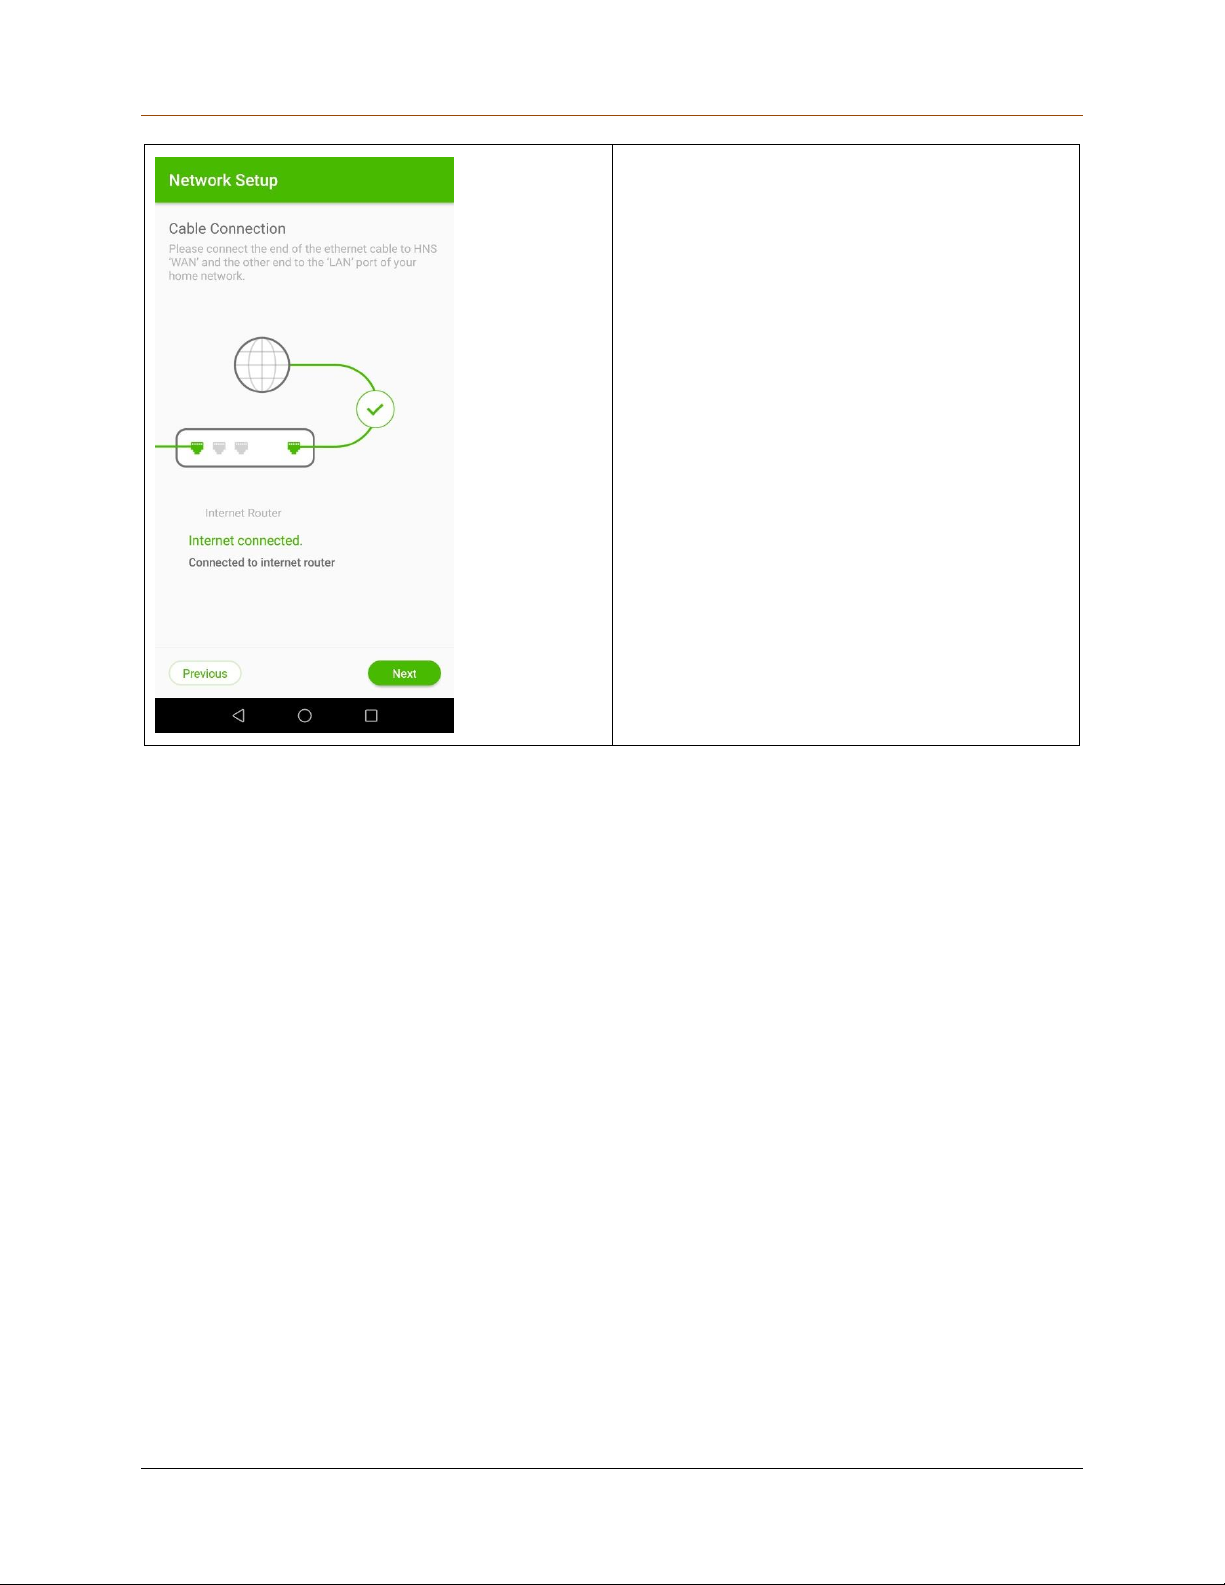
Upon connecting to the Internet successfully,
a message appears.
Tap Next.
22
Page 23
Unboxing and Registering QHHS
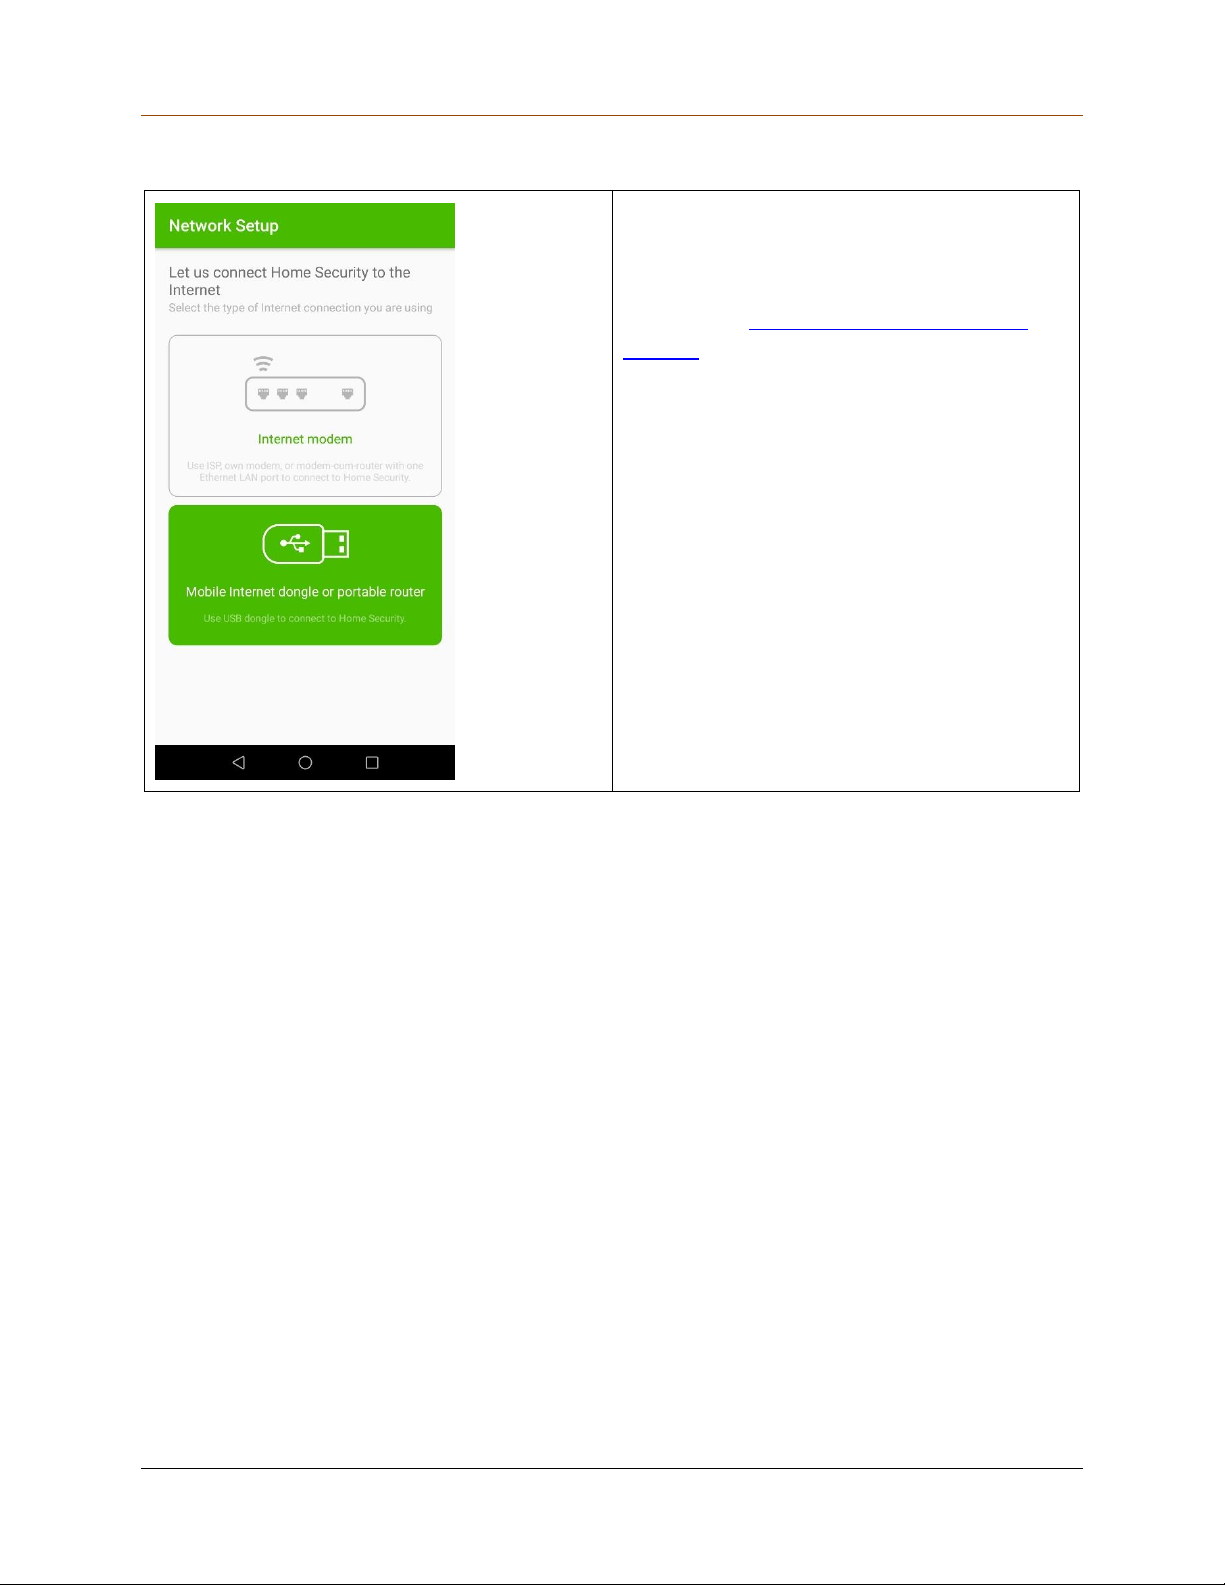
In this example, connection is being
processed through Mobile Internet dongle.
If you want to connect through Internet
modem, see Connecting through Internet
modem.
Connecting to the Internet through Mobile Internet dongle
23
Page 24
Unboxing and Registering QHHS
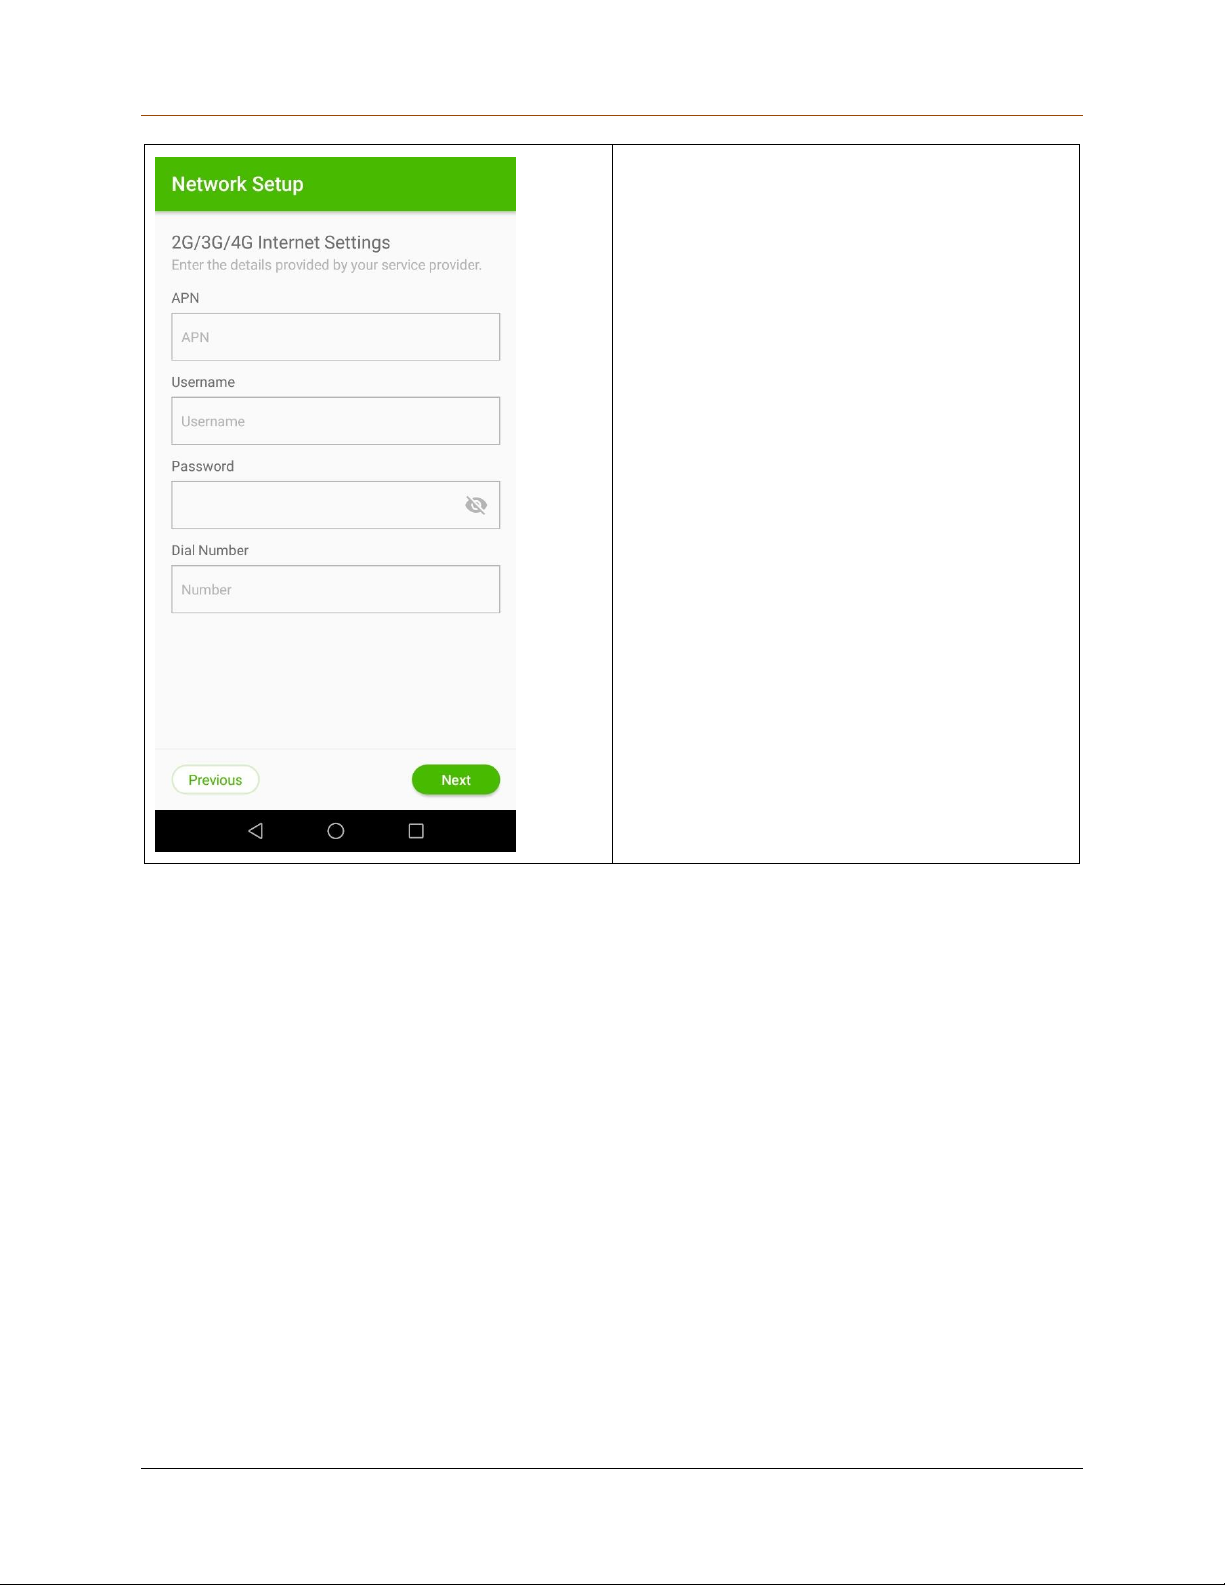
If you select the Mobile Internet dongle
(portable router), an Internet setting details
screen appears.
Enter the required information in
relevant fields and tap Next.
24
Page 25
Unboxing and Registering QHHS
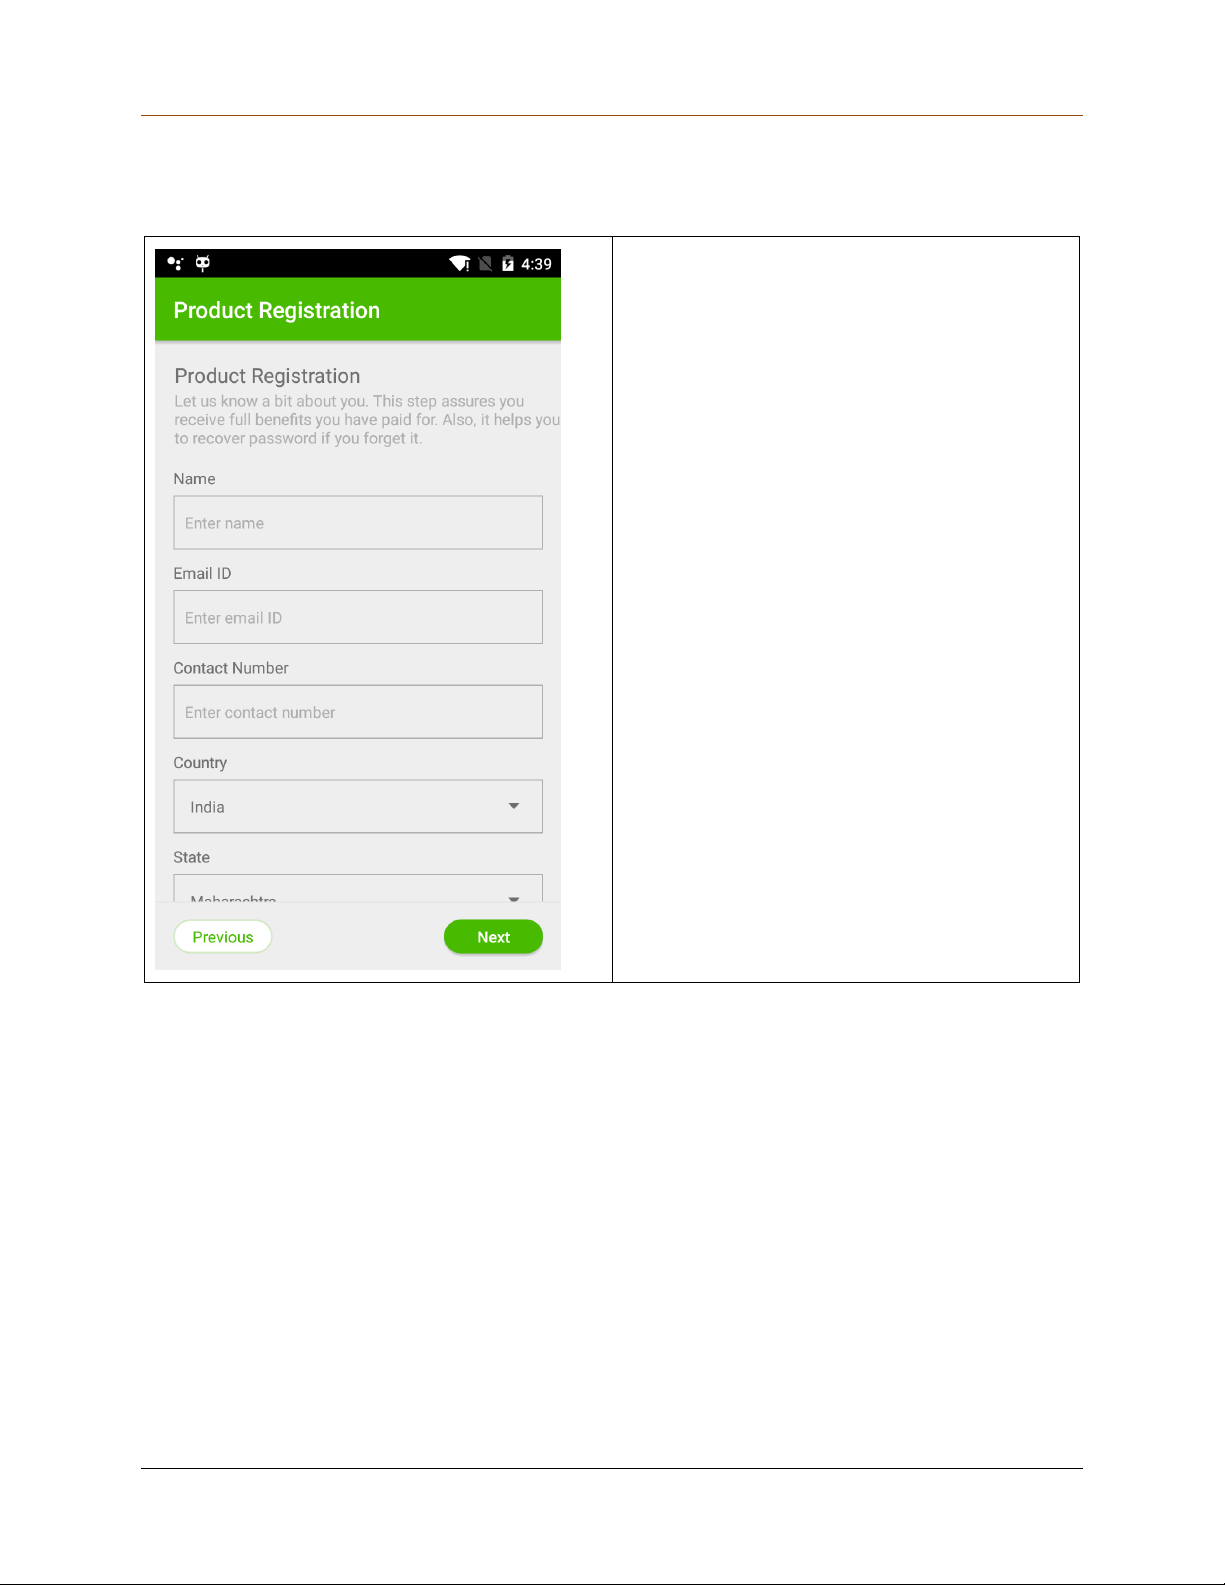
Enter the information in relevant fields
and tap Next.
Registering QHHS
The Product Registration screen appears.
25
Page 26
Unboxing and Registering QHHS
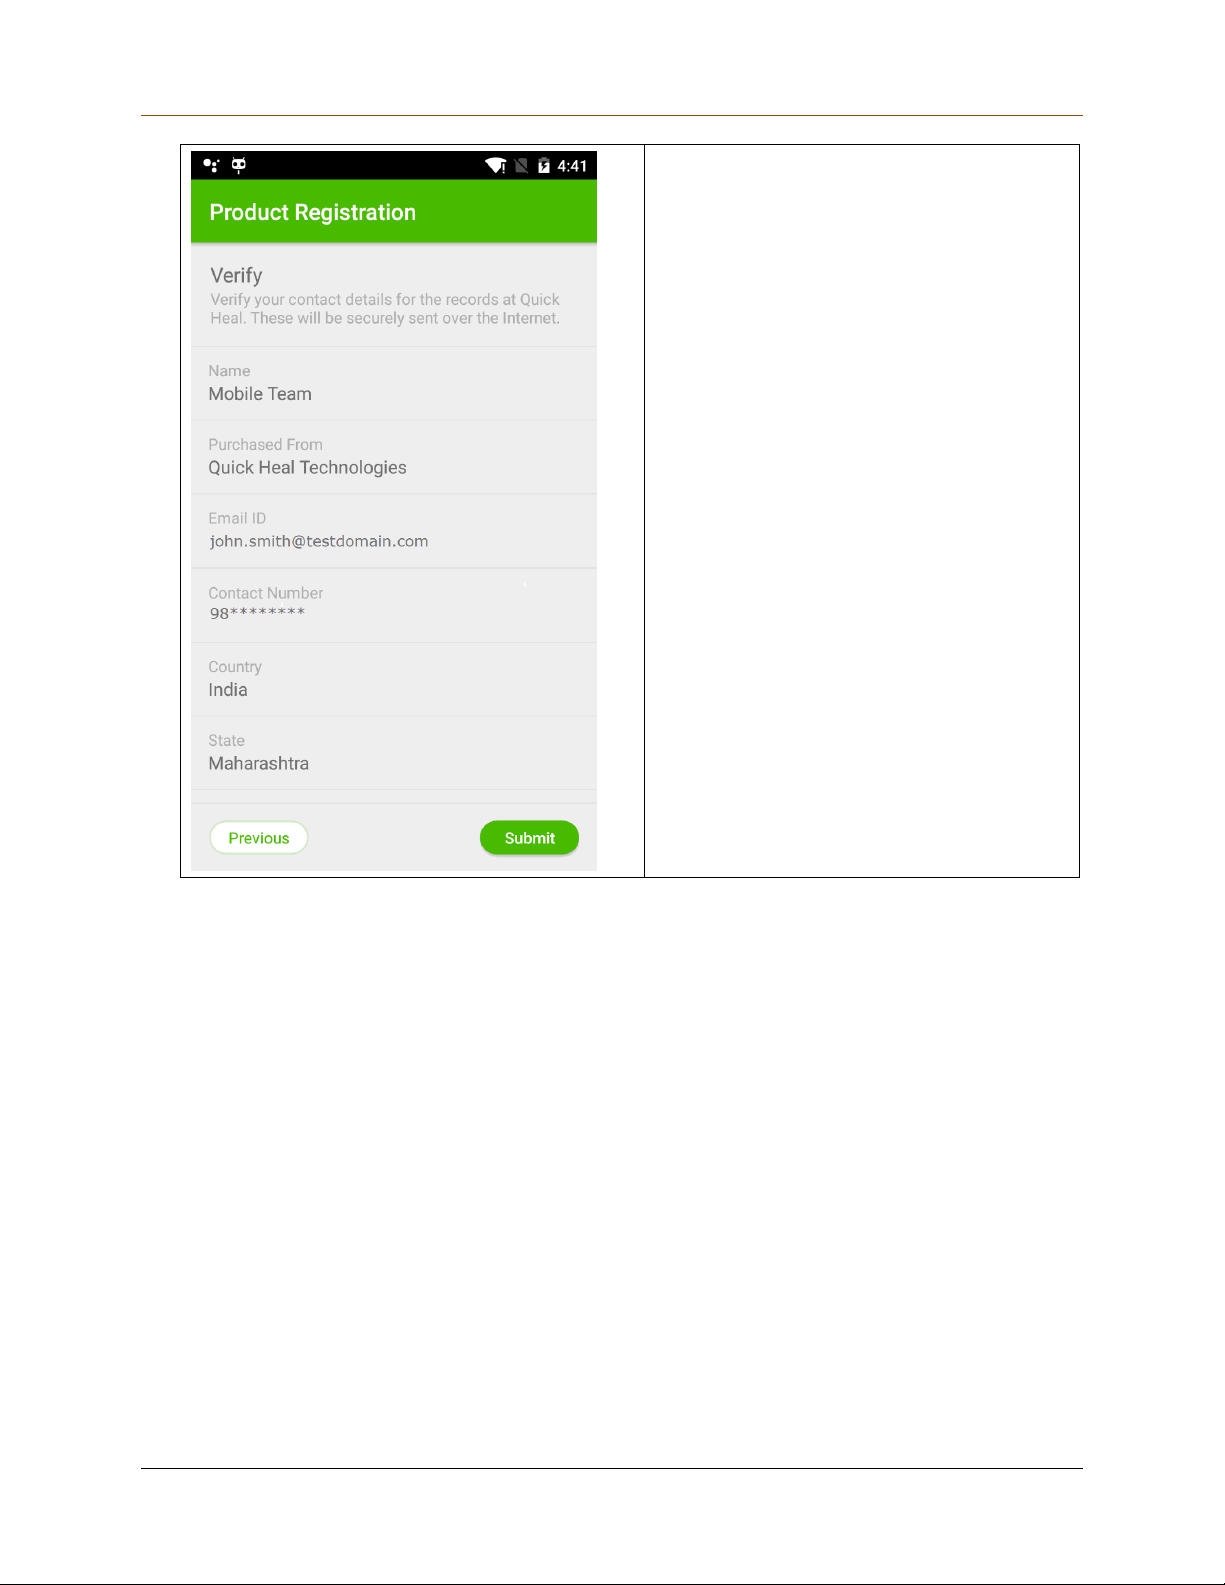
A summary of the information that you
entered appears. Verify the information
carefully.
Tap Submit.
26
Page 27
Unboxing and Registering QHHS
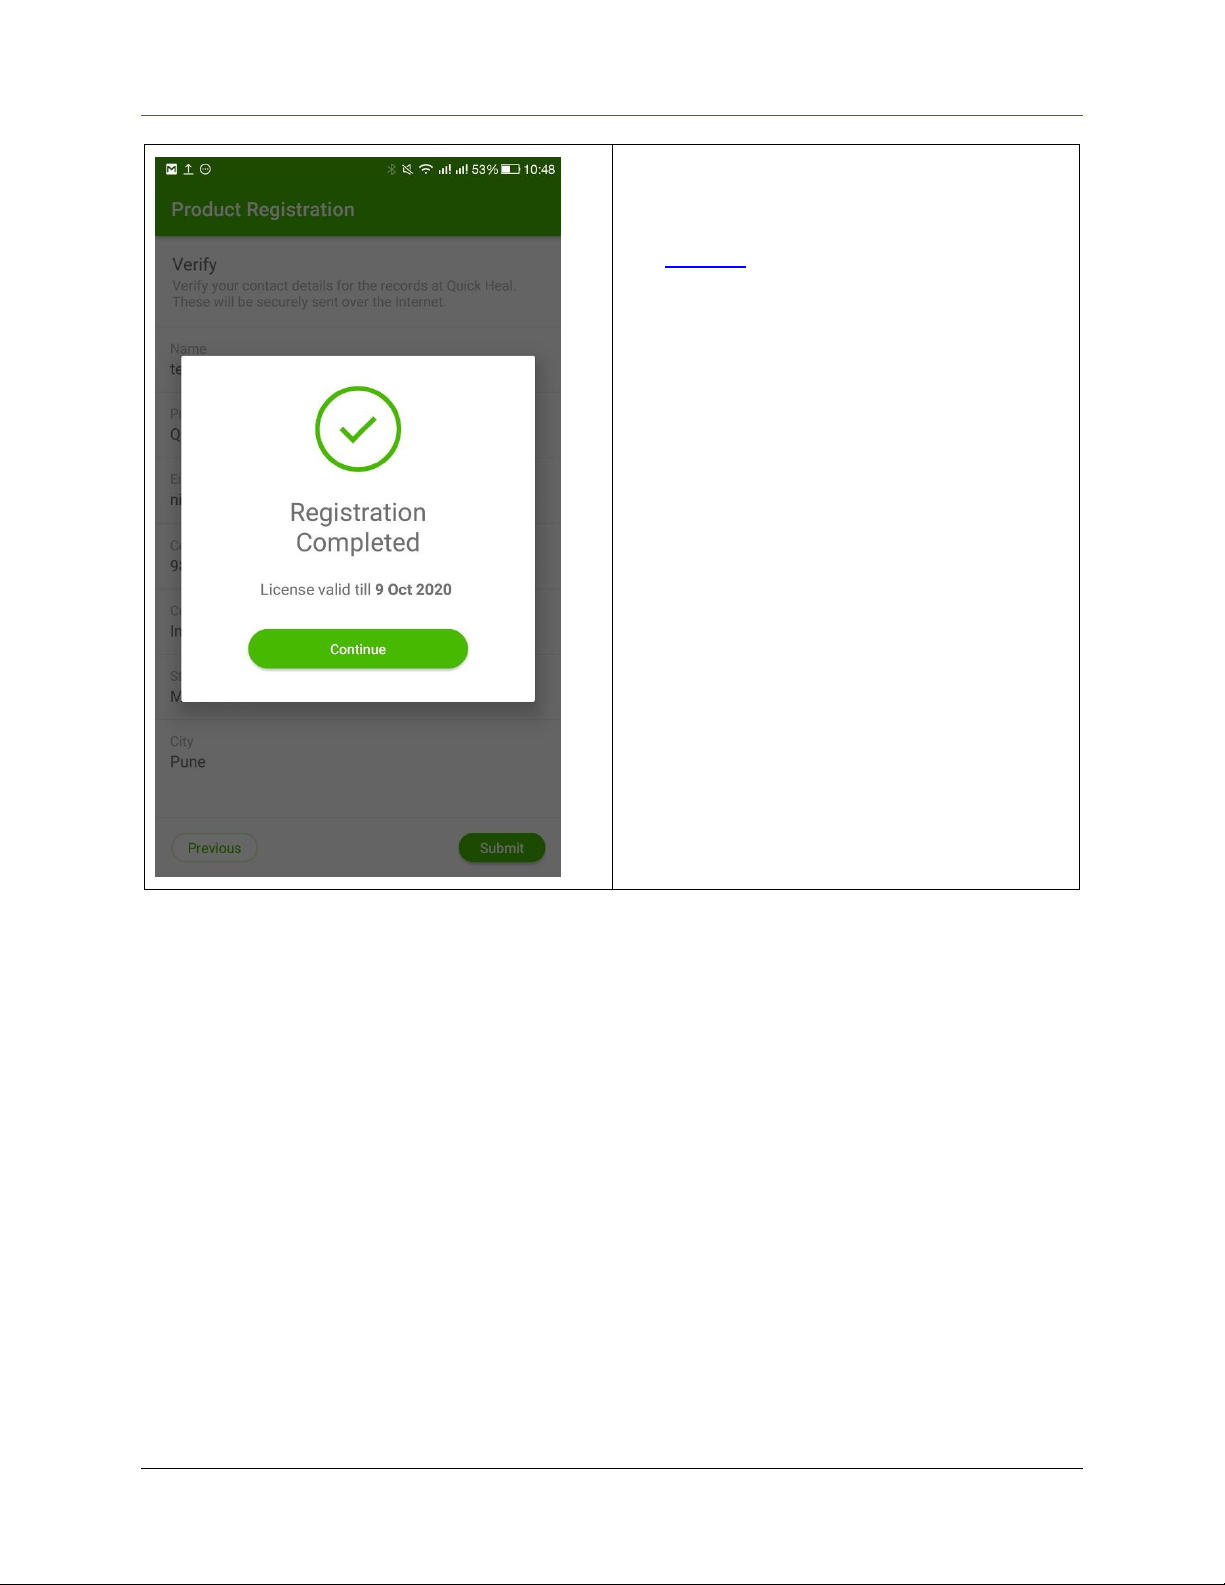
A success message appears.
Tap Continue.
The network screen appears.
27
Page 28
Unboxing and Registering QHHS
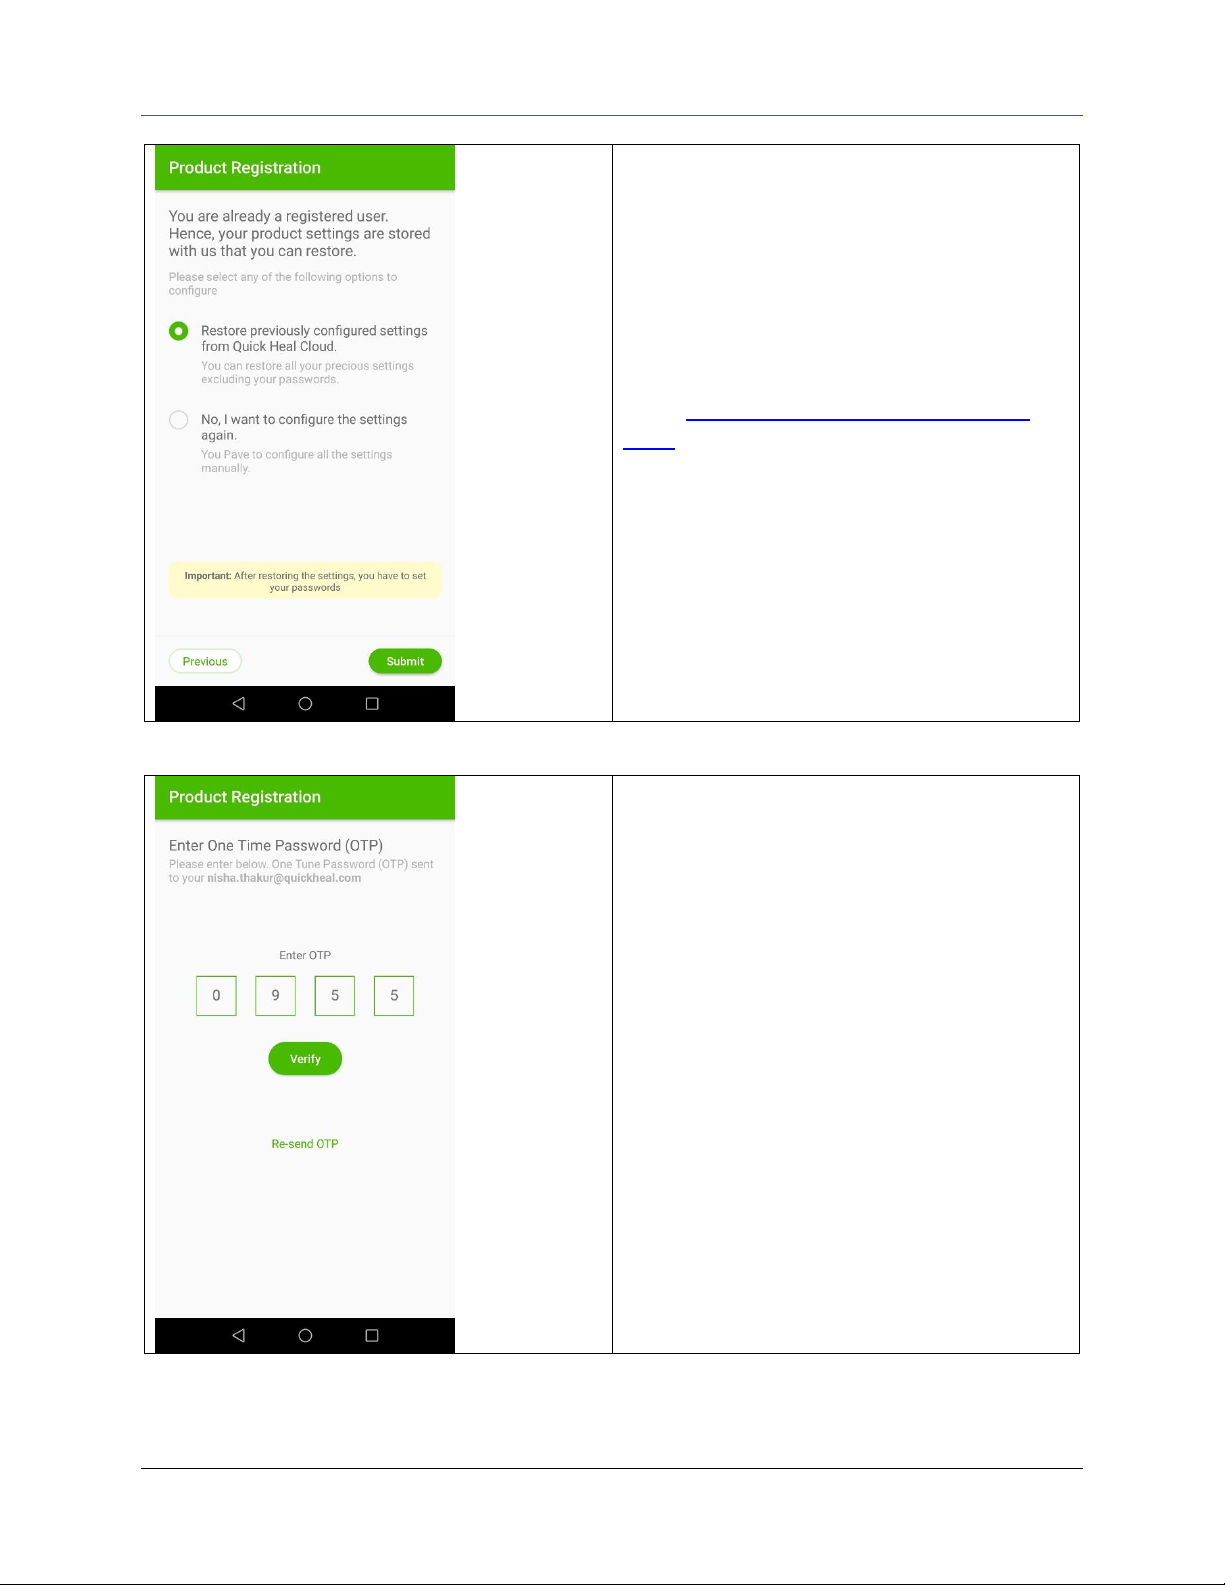
If you have previously registered with the
QHHS device, you can restore your settings.
Select Restore previously configured
settings from Quick Heal Cloud and tap
Submit.
If you want to register the product afresh,
select No, I want to configure the settings
again.
A One-Time Password (OTP) is sent to your
registered mobile number and email address.
Enter the OTP on the Product
Registration screen and tap Verify.
28
Page 29
Unboxing and Registering QHHS
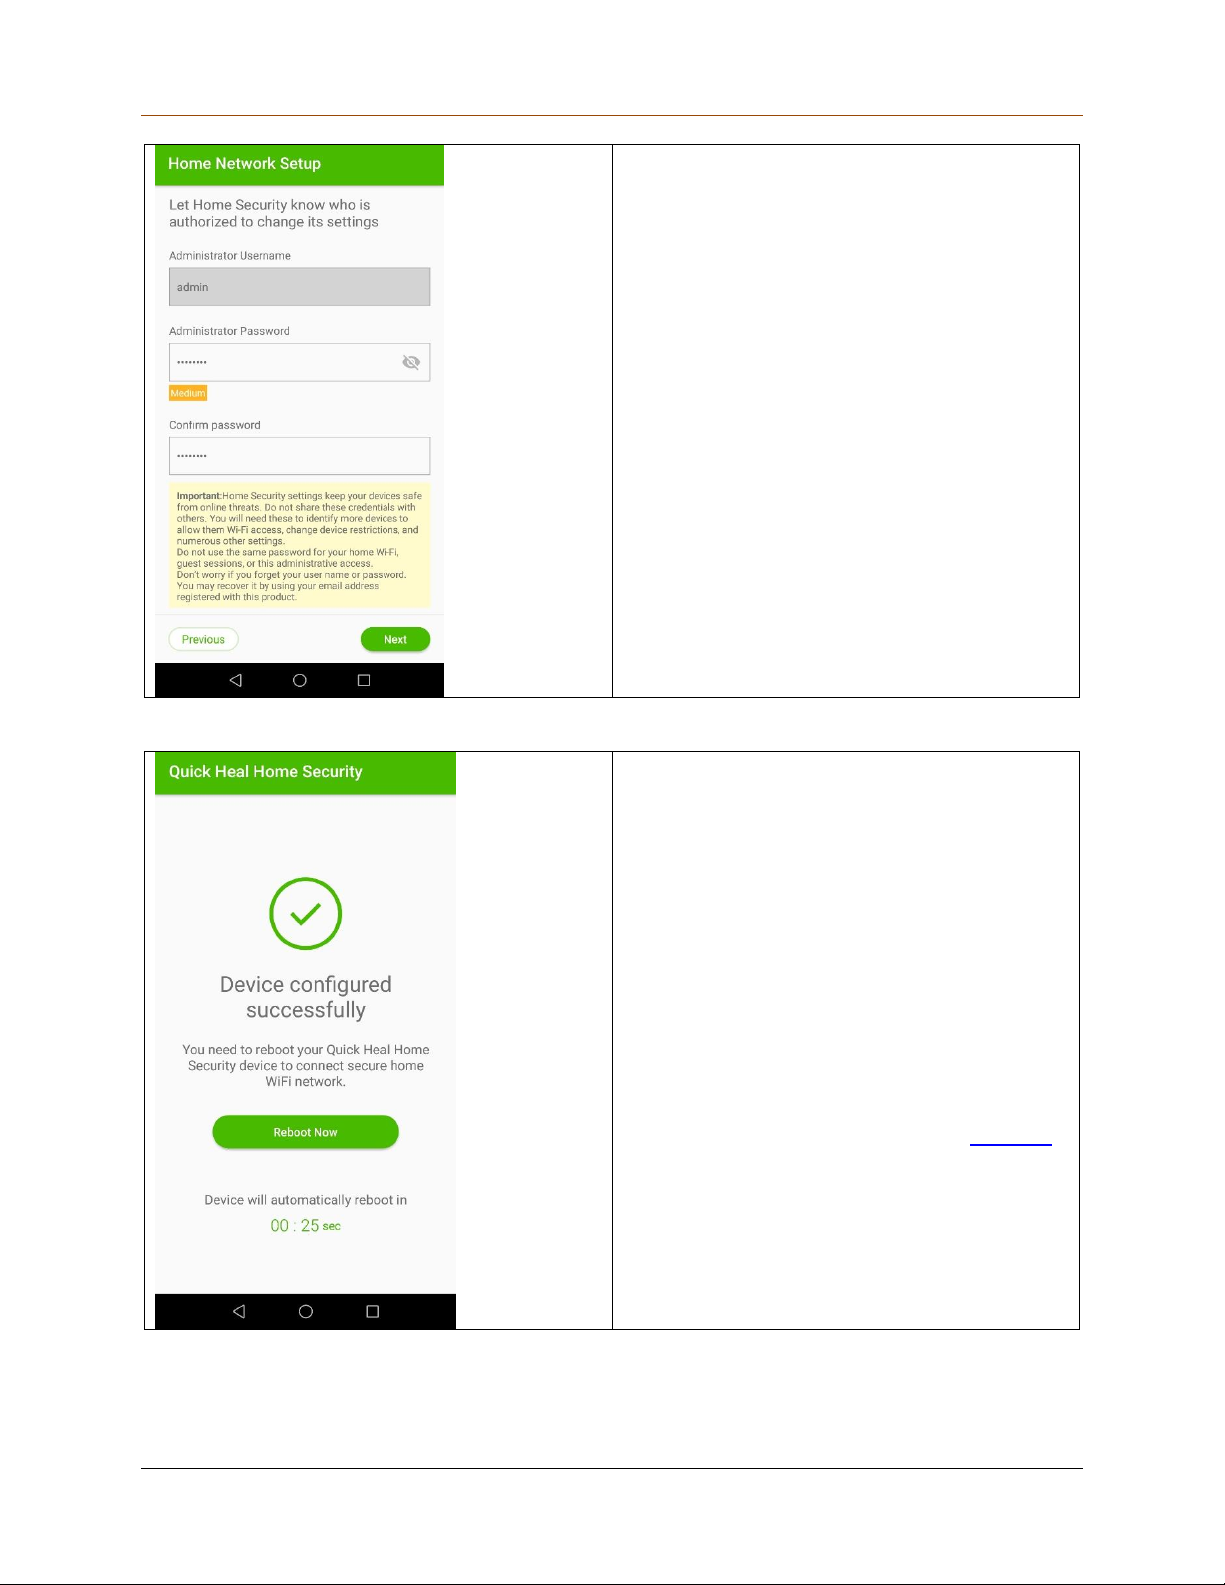
Set a password for the admin user.
“admin” will be your username that you
cannot change. The password must be at
least 8 characters long.
Tips: Create a strong password with a
combination of numbers, letters, and
other characters.
Tap Next.
If the configuration is done successfully, the
success message screen appears. You must
reboot the device to get started.
Tap Reboot Now.
It may take a few minutes to reboot.
Tips: Check the connection lights on the
QHHS device. Wait until all the connection
lights turn on.
After all the connection lights on the QHHS
device turn on, connect to the new network
that you create.
If there is any issue in connecting the
network, switch off the power of the QHHS
device and then switch the device on again.
29
Page 30
Unboxing and Registering QHHS
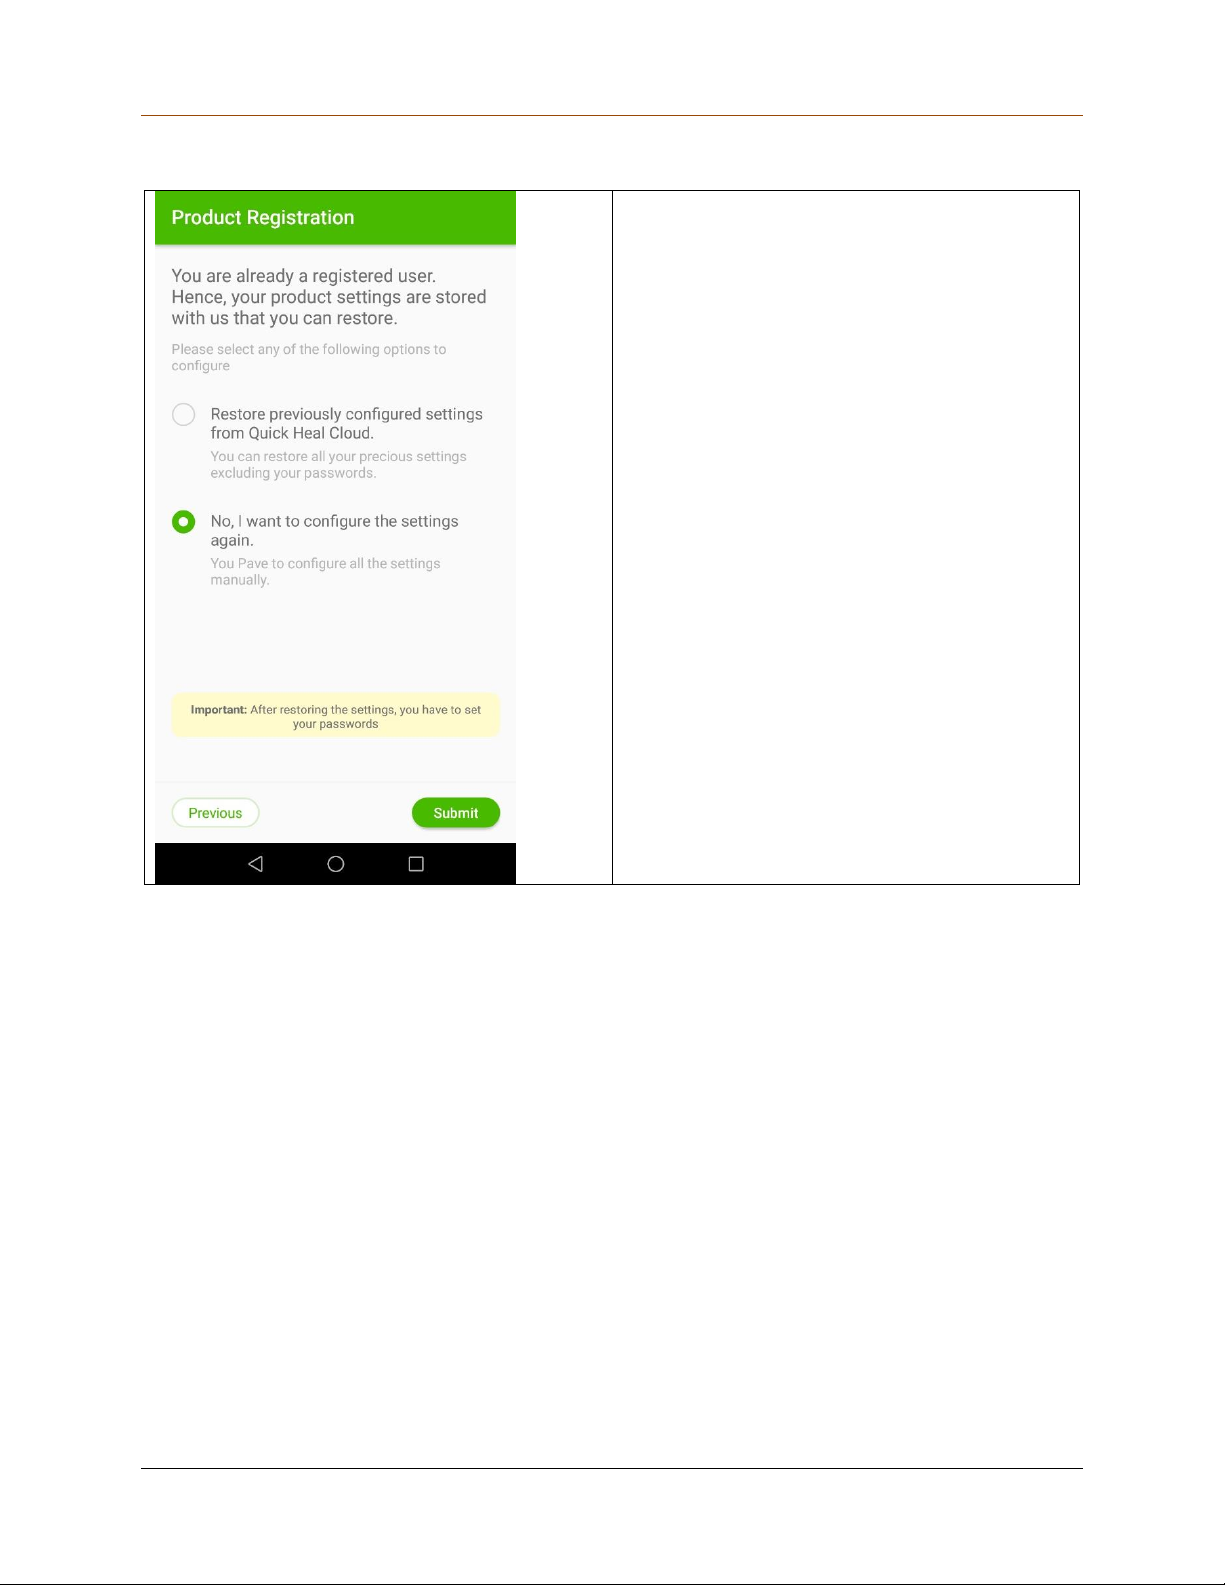
If you want to configure your setting
afresh, select No, I want to configure the
settings again and tap Submit.
Configuring the settings afresh
30
Page 31
Unboxing and Registering QHHS
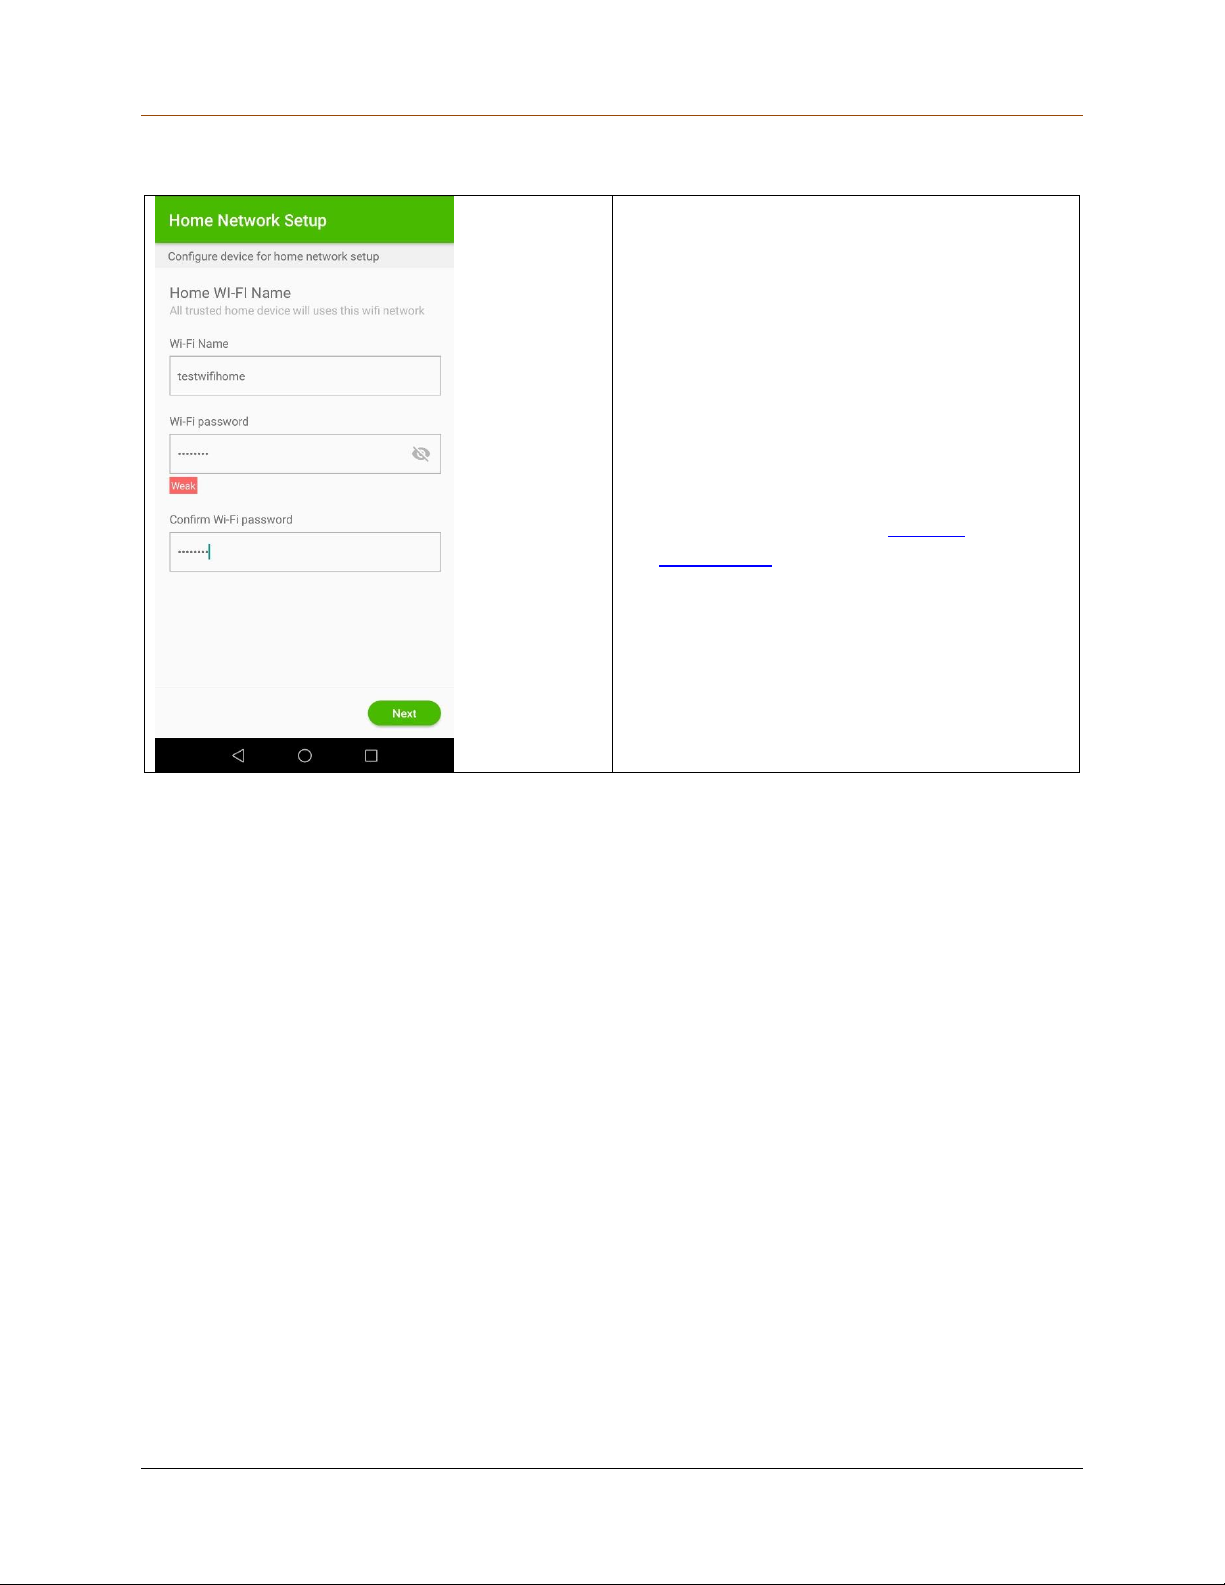
Enter a name for your Wi-Fi network and
the password for that network.
You need to connect to this Wi-Fi
network to access Internet from the
QHHS device.
Note that the default network HS-Unbox
will disappear from the network list.
Tap Next.
Tips: Name your network carefully and
note it down. After the product
registration completes successfully,
connect all home devices to this secure
network through QHHS device.
Creating a home network
31
Page 32
Unboxing and Registering QHHS
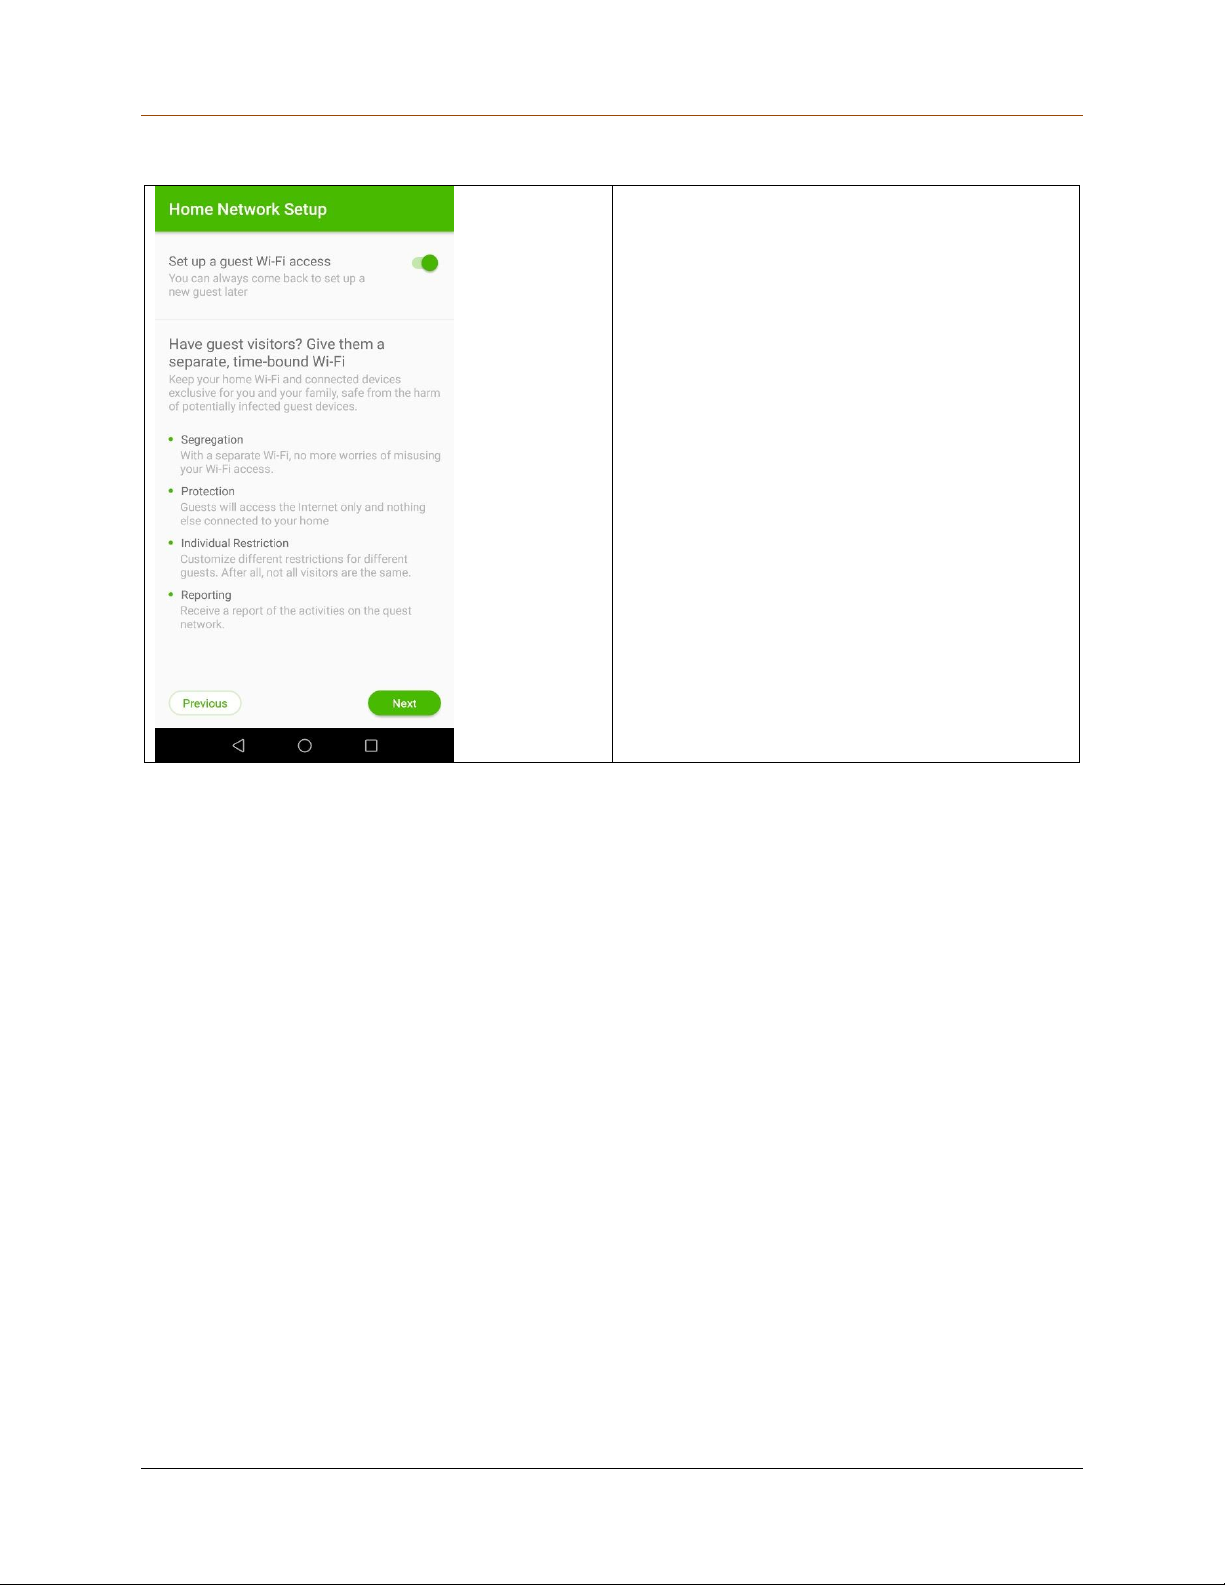
You can set up a guest session for the users
who would connect to your network. You
may set this session later also.
Tap Next.
32
Page 33
Unboxing and Registering QHHS
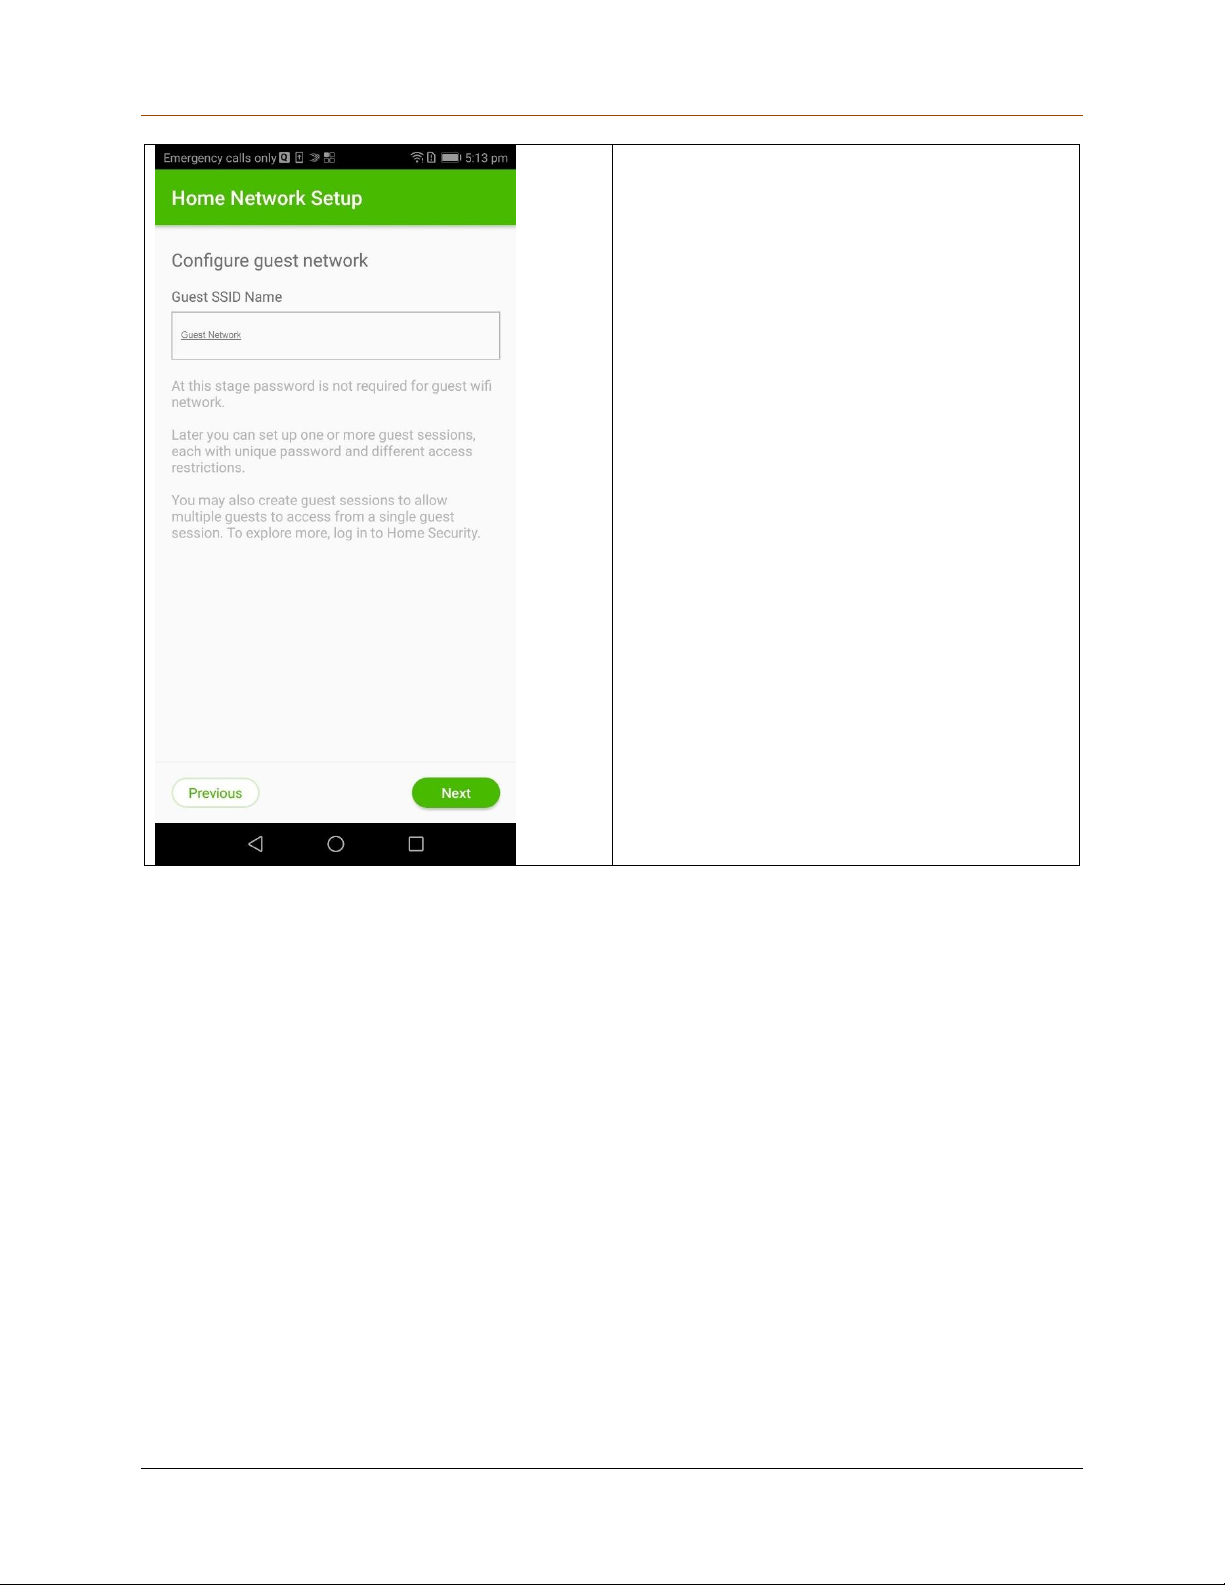
Create a guest network name.
This guest network name will be the
network for your guests to access
Internet from the QHHS device. You can
add any guest to this network.
Tap Next.
33
Page 34
Unboxing and Registering QHHS
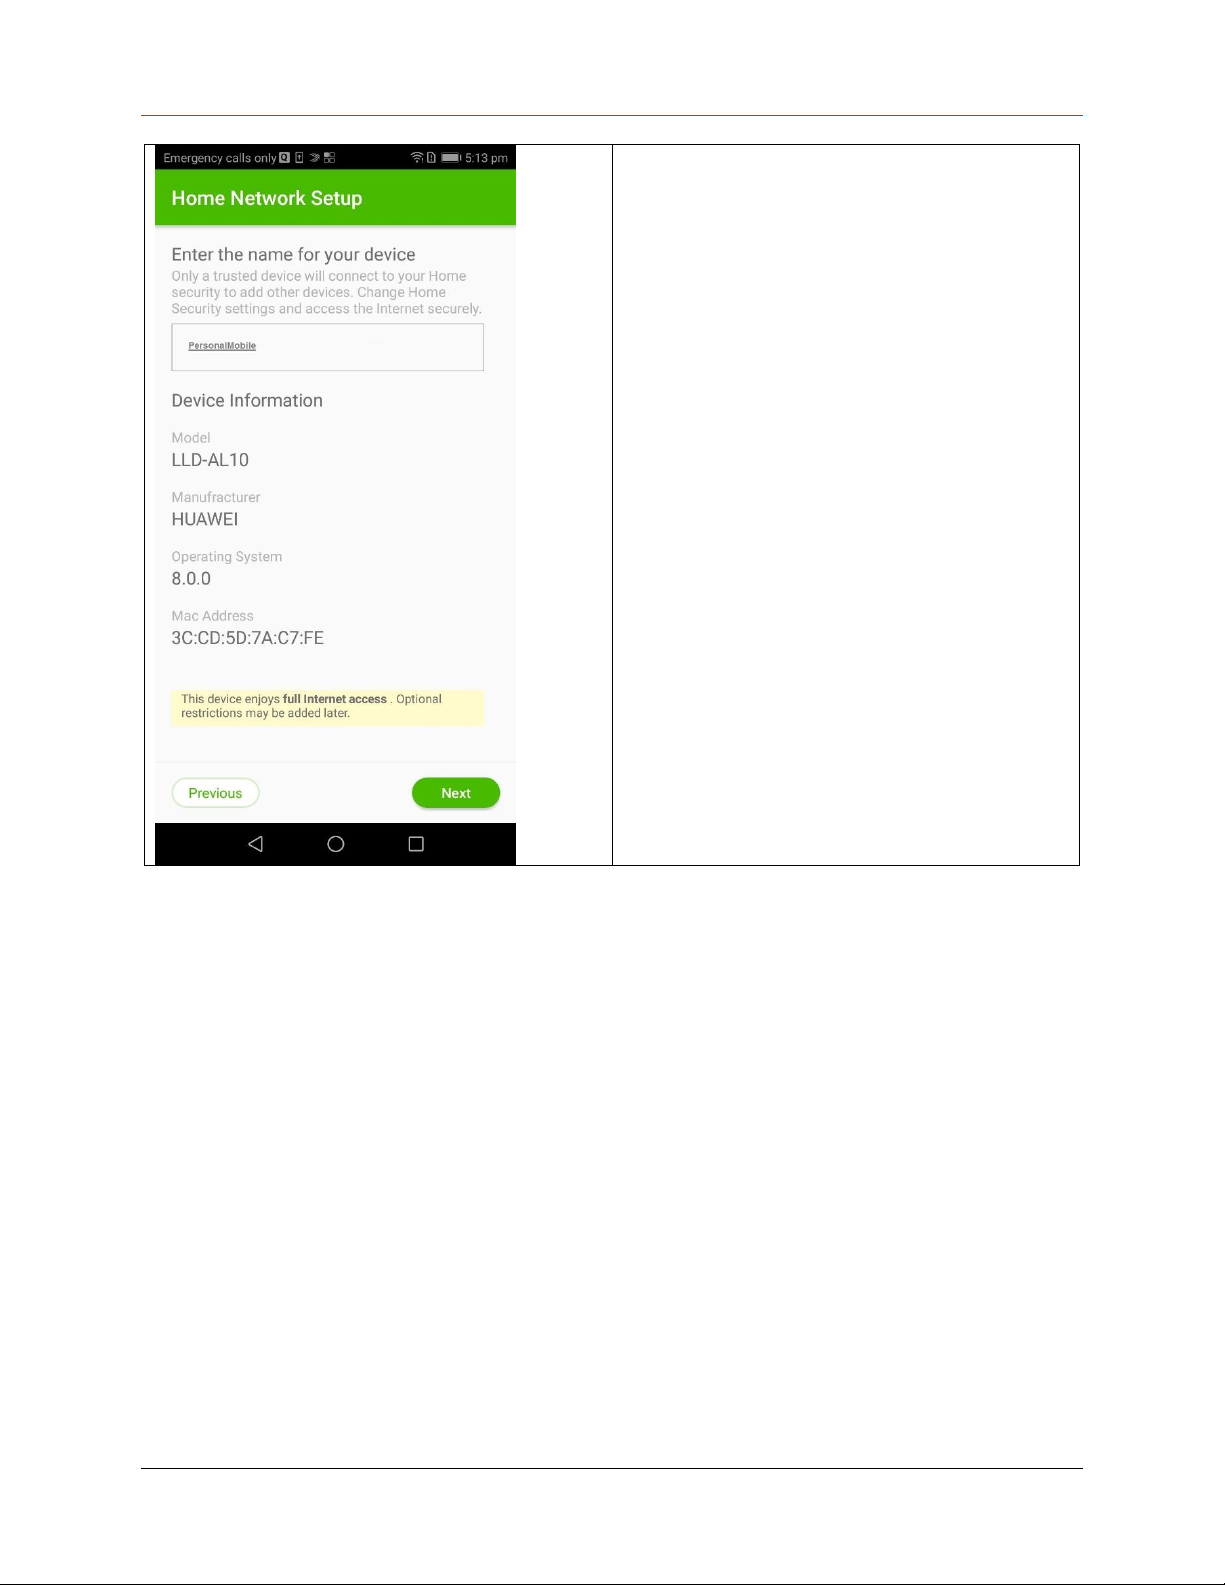
Enter a device name here.
Tips:
Do not add any special characters (" ' ` * ;
> / \) or spaces while you write the device
name. If you use multiple words for the
device name, write them as a single term.
Example: “OfficeMobile” or
“Office_Mobile”.
Take care while writing the device name.
The device name should not be duplicate.
34
Page 35
Unboxing and Registering QHHS
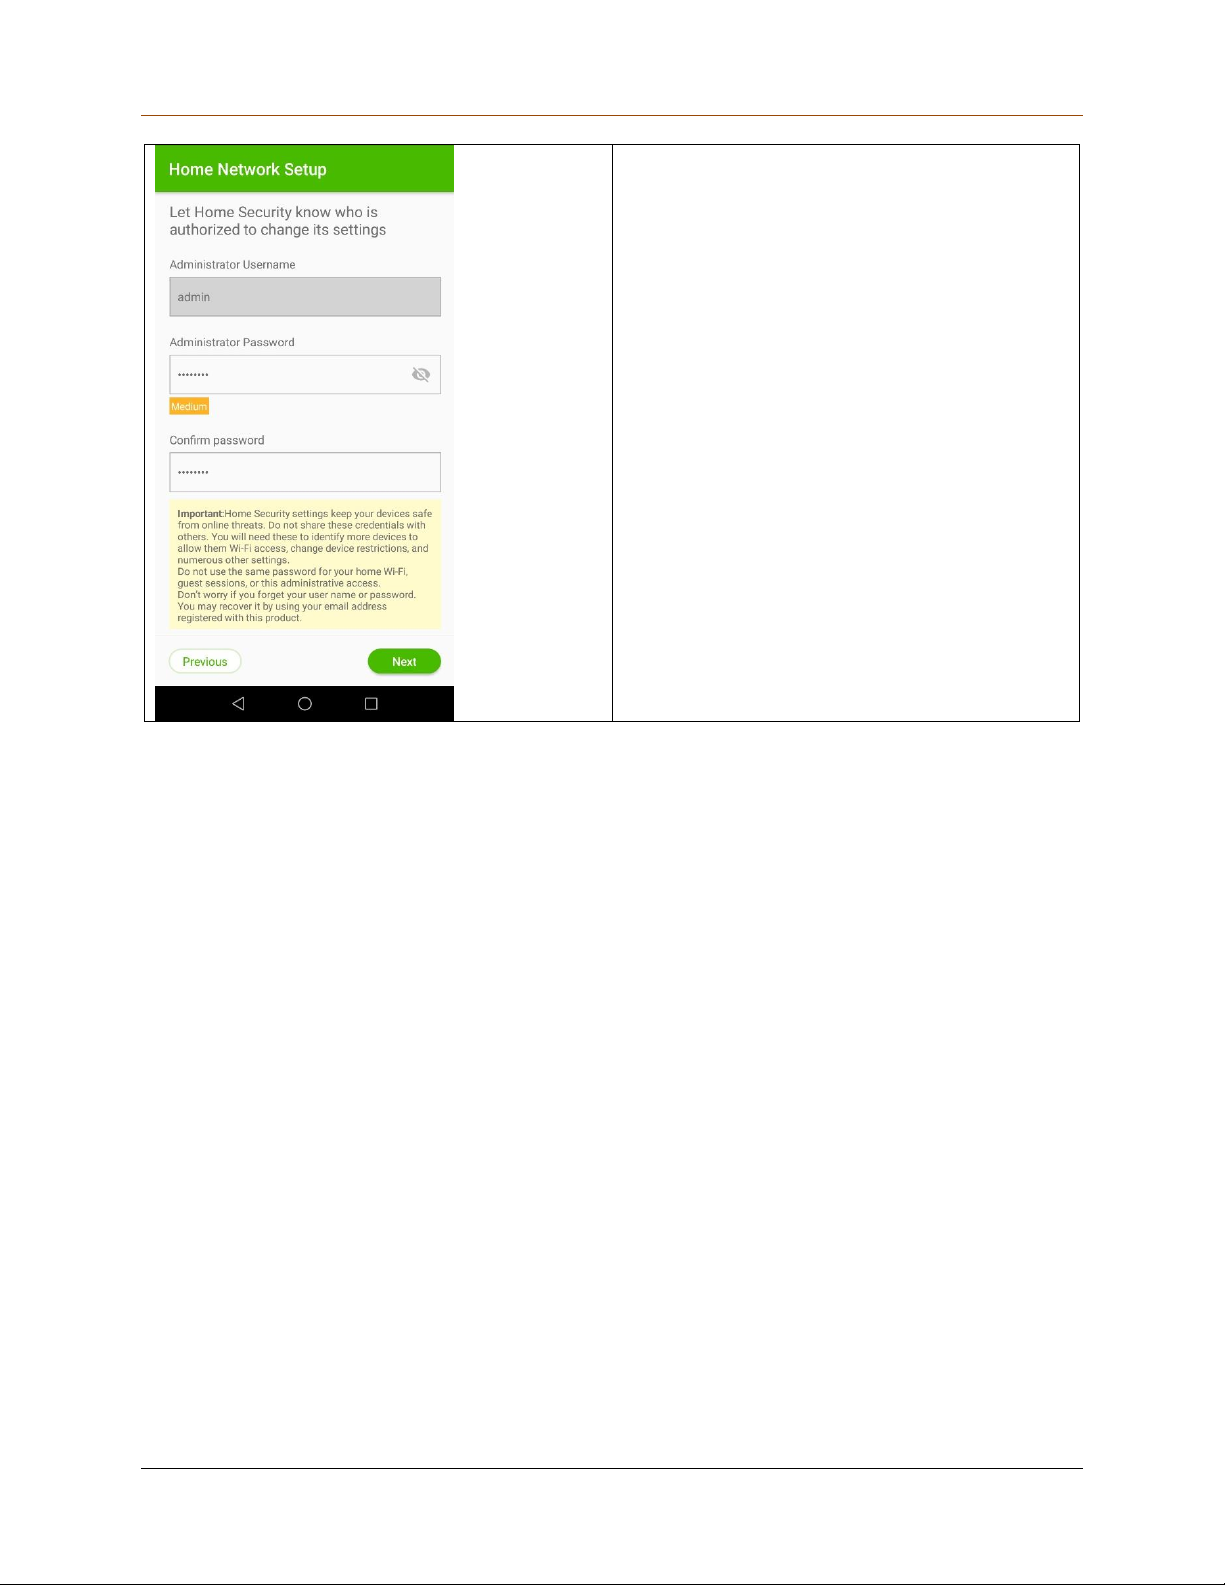
Set a password for the admin user.
“admin” will be your username that you
cannot change. The password must be at
least 8 characters long.
Tap Next.
Tip: Create a strong password with a
combination of numbers, letters, and
other characters.
35
Page 36
Unboxing and Registering QHHS
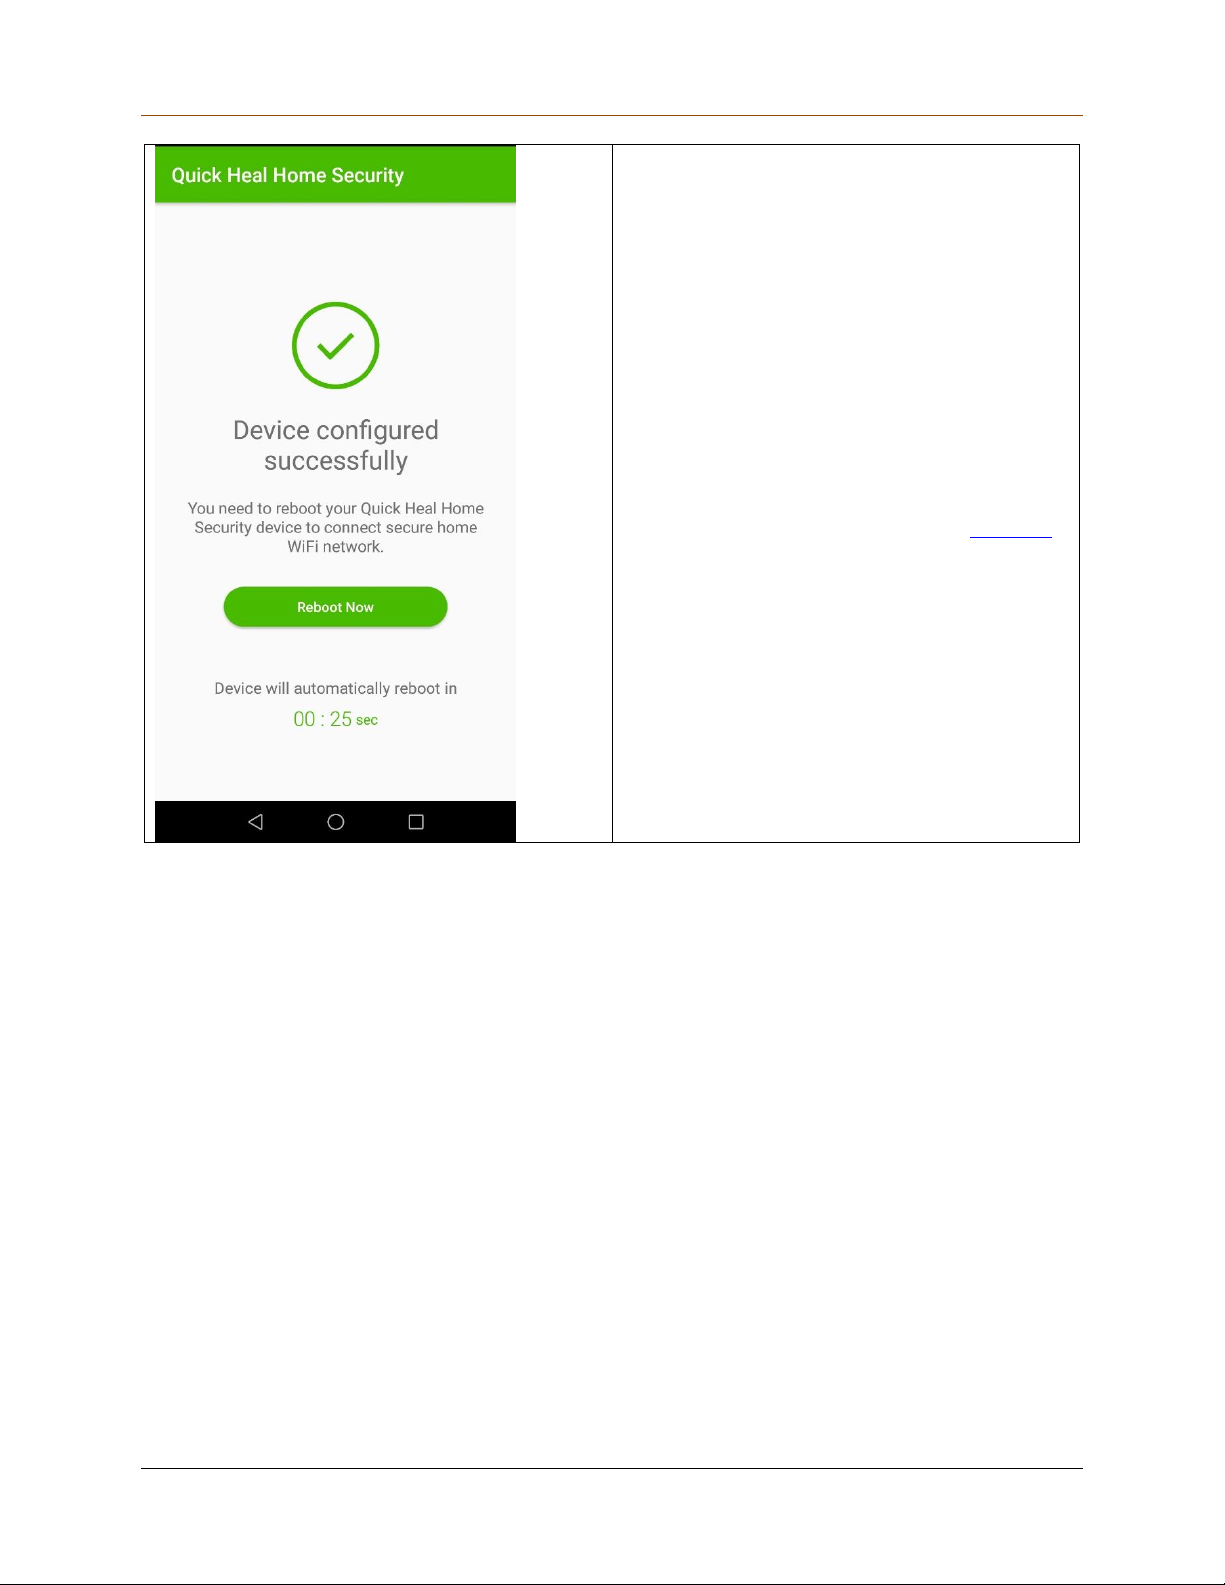
If the configuration is done successfully, the
success message screen appears. You must
reboot the device to get started.
Tap Reboot Now.
It may take a few minutes to reboot.
Tips: Check the connection lights on the
QHHS device. Wait until all the connection
lights turn on.
After all the connection lights on the QHHS
device turn on, connect to the new network
that you created to secure your device
through QHHS device.
If there is any issue in connecting the
network, switch off the power of the QHHS
device and then switch the device on again.
36
Page 37
Unboxing and Registering QHHS
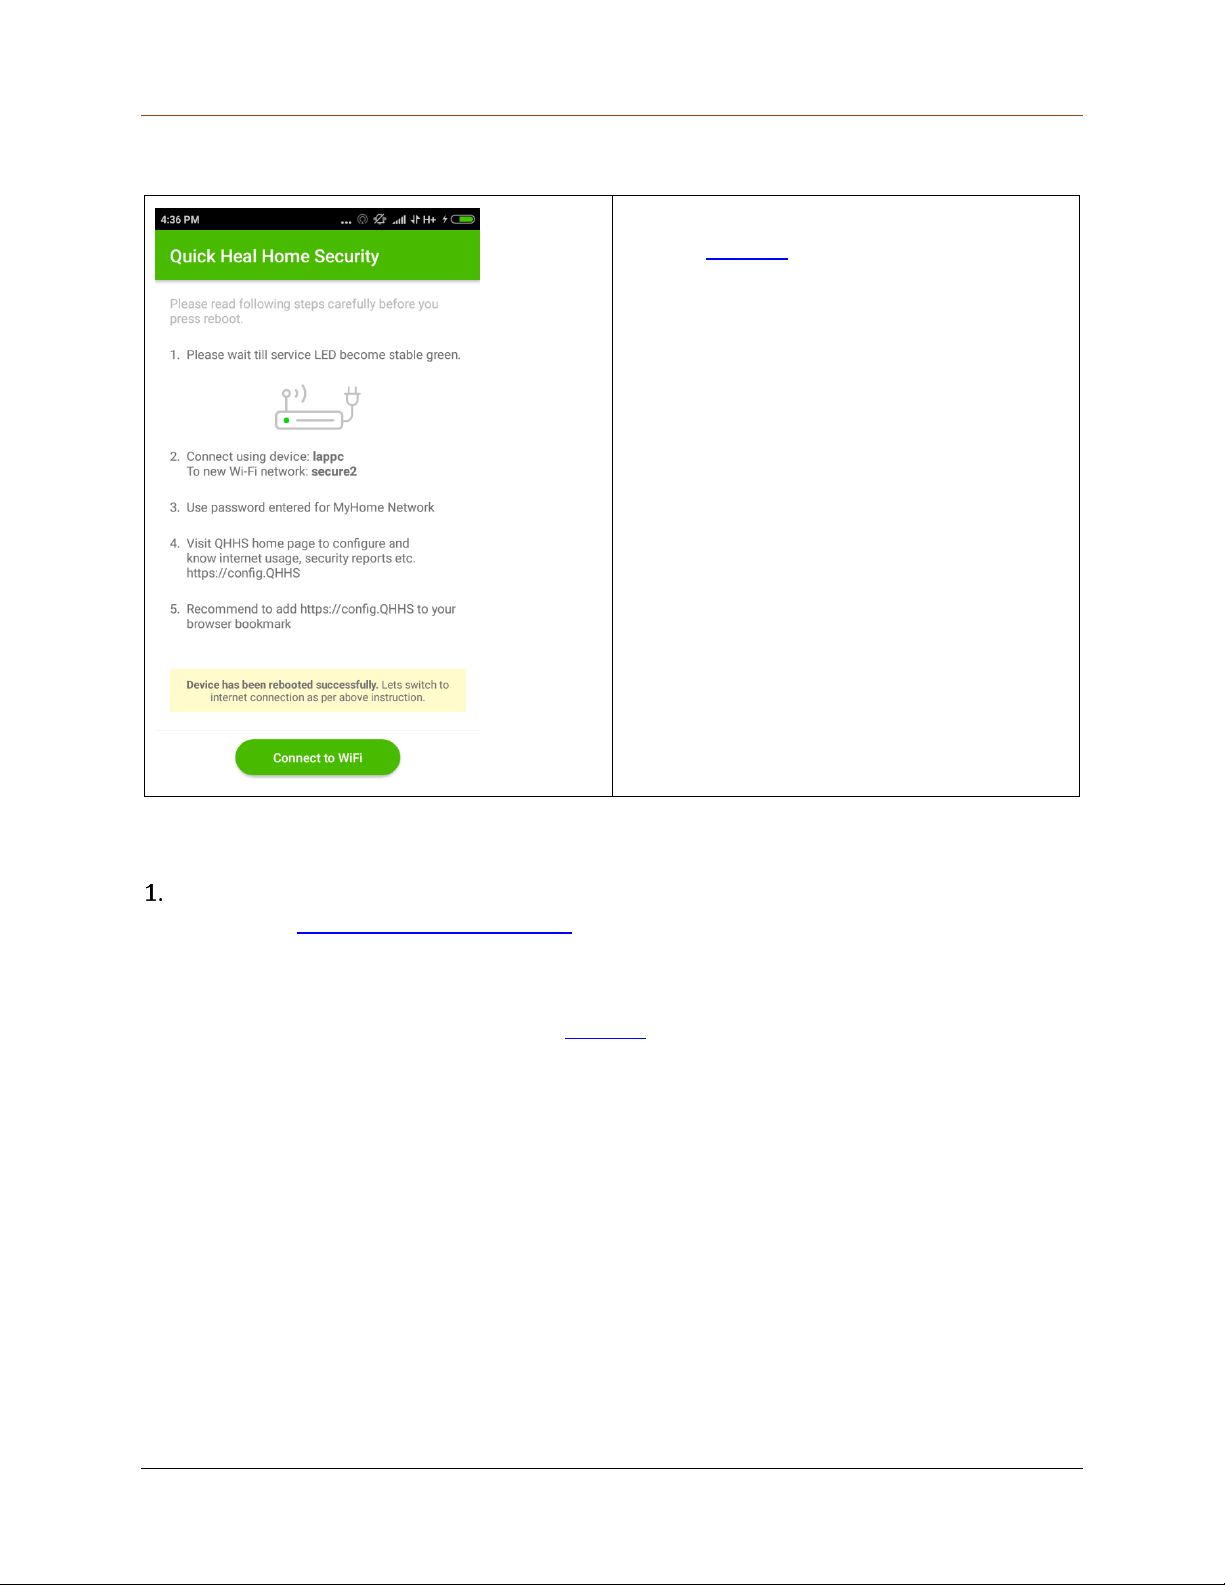
Tap Connect to WiFi to connect to the
new network that you created.
Open the QHHS app on your smartphone.
On the first login page, enter your
credentials. Tap Log In.
The Dashboard appears and you can start
managing all the connected devices.
Getting started with the QHHS device on your smartphone
Unboxing using the QHHS portal
On your computer, connect to the default Internet network HS-Unbox, open a browser, and
run the link https://myhs.quickheal.com.
To connect to the network HS-Unbox, you have to enter a password. The password is
printed on the back of the QHHS device.
During unboxing, you will create a new network. After the unboxing is complete, you must
connect to the new network that you create. Note that the default network HS-Unbox will
disappear from the network list.
37
Page 38
Unboxing and Registering QHHS
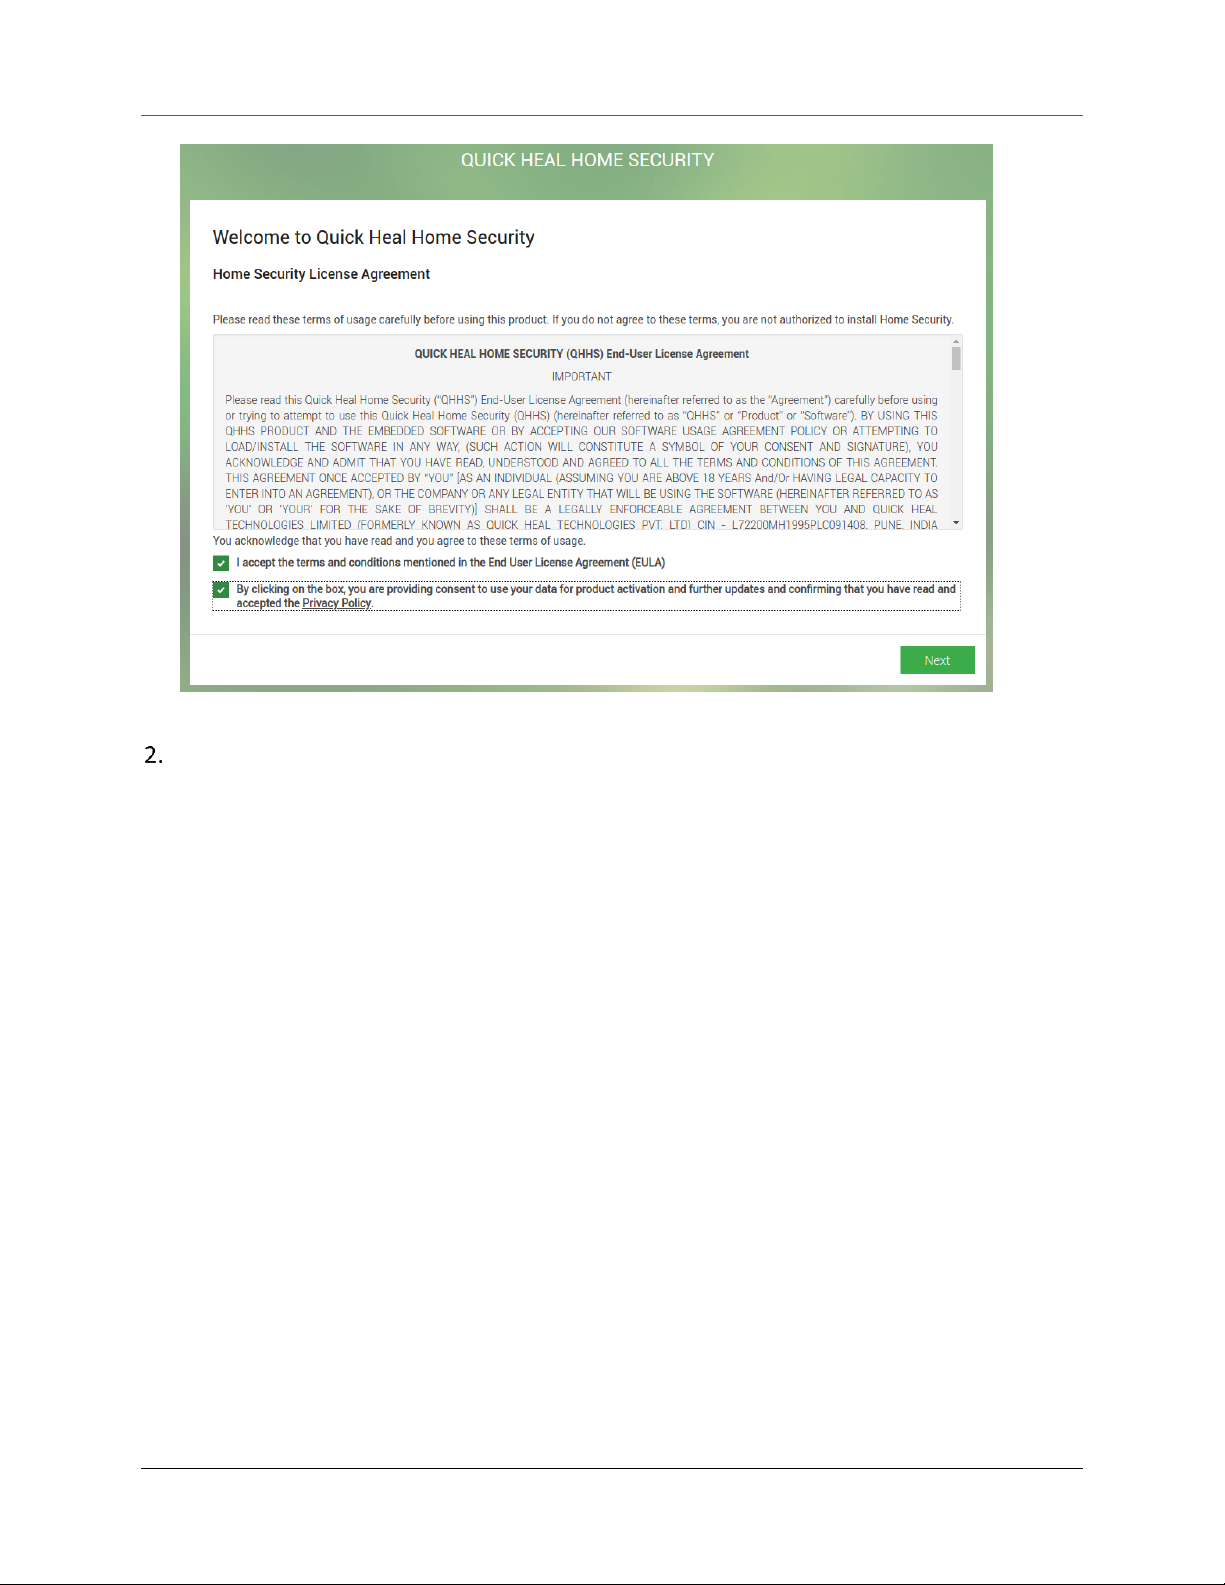
On the first screen, the license agreement and privacy policy appear. Read them carefully.
Click Next to accept the license agreement and privacy policy.
Connecting to the Internet
You can connect to the Internet, either through Internet modem or mobile internet dongle
(portable router).
38
Page 39
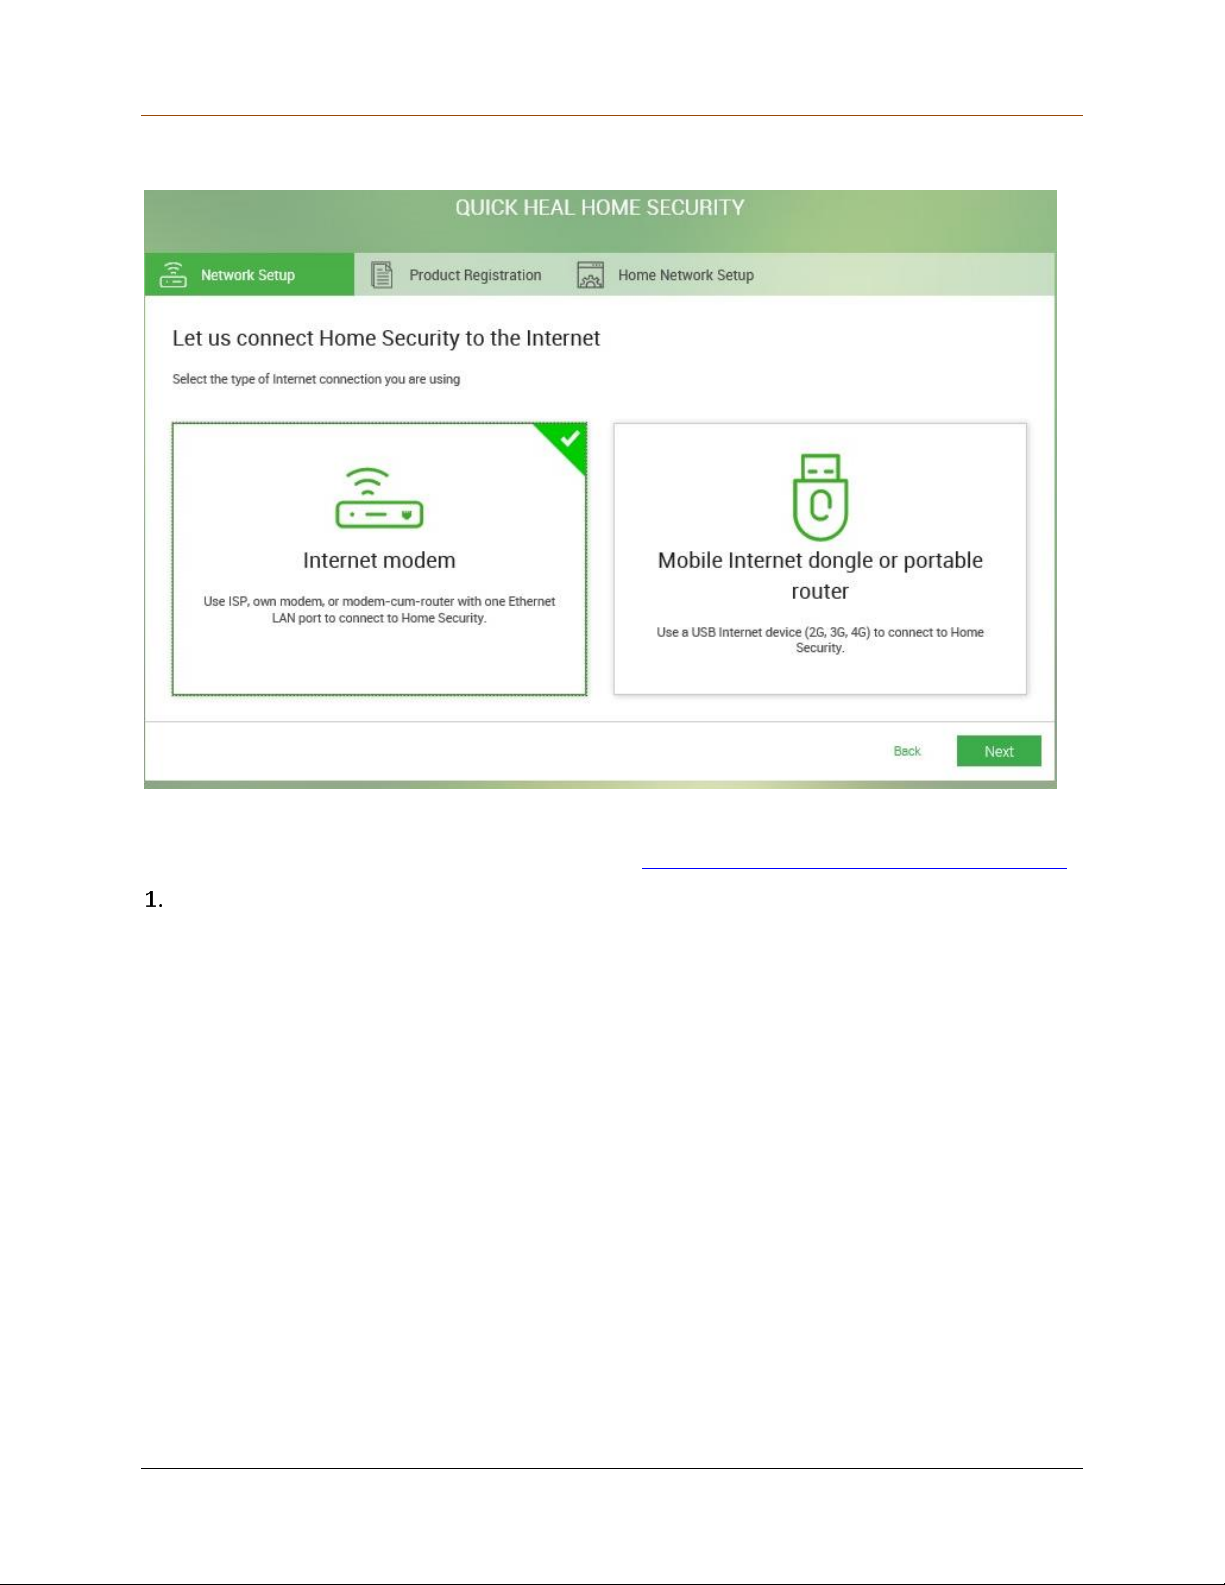
Unboxing and Registering QHHS
Connecting to the Internet through Internet modem
In this example, connection is being processed through Internet modem.
If you want to connect through mobile dongle, see Connecting through Mobile Internet dongle.
Click Next.
If your network does not get the IP address, an error message appears. You need to
configure the IP information.
39
Page 40
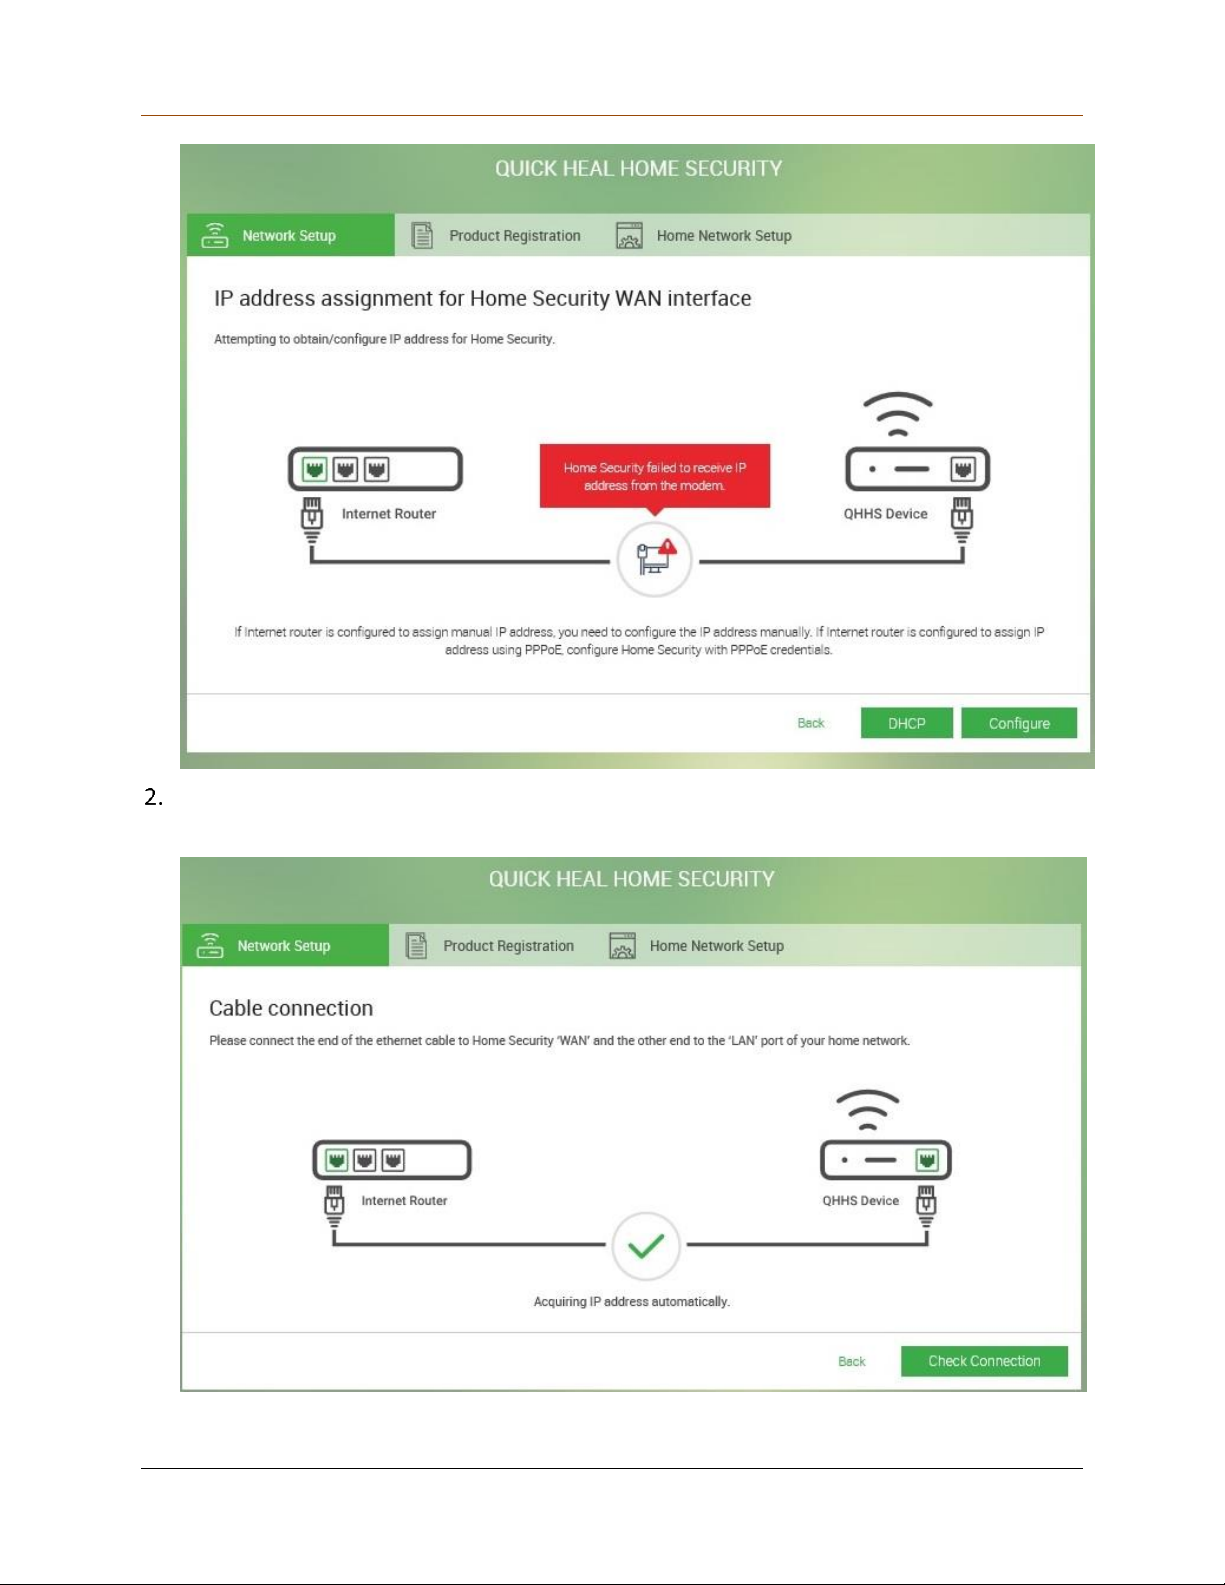
Unboxing and Registering QHHS
Click DHCP to obtain an IP address for your Internet connection.
The DHCP option helps you to fetch the network connection automatically.
40
Page 41
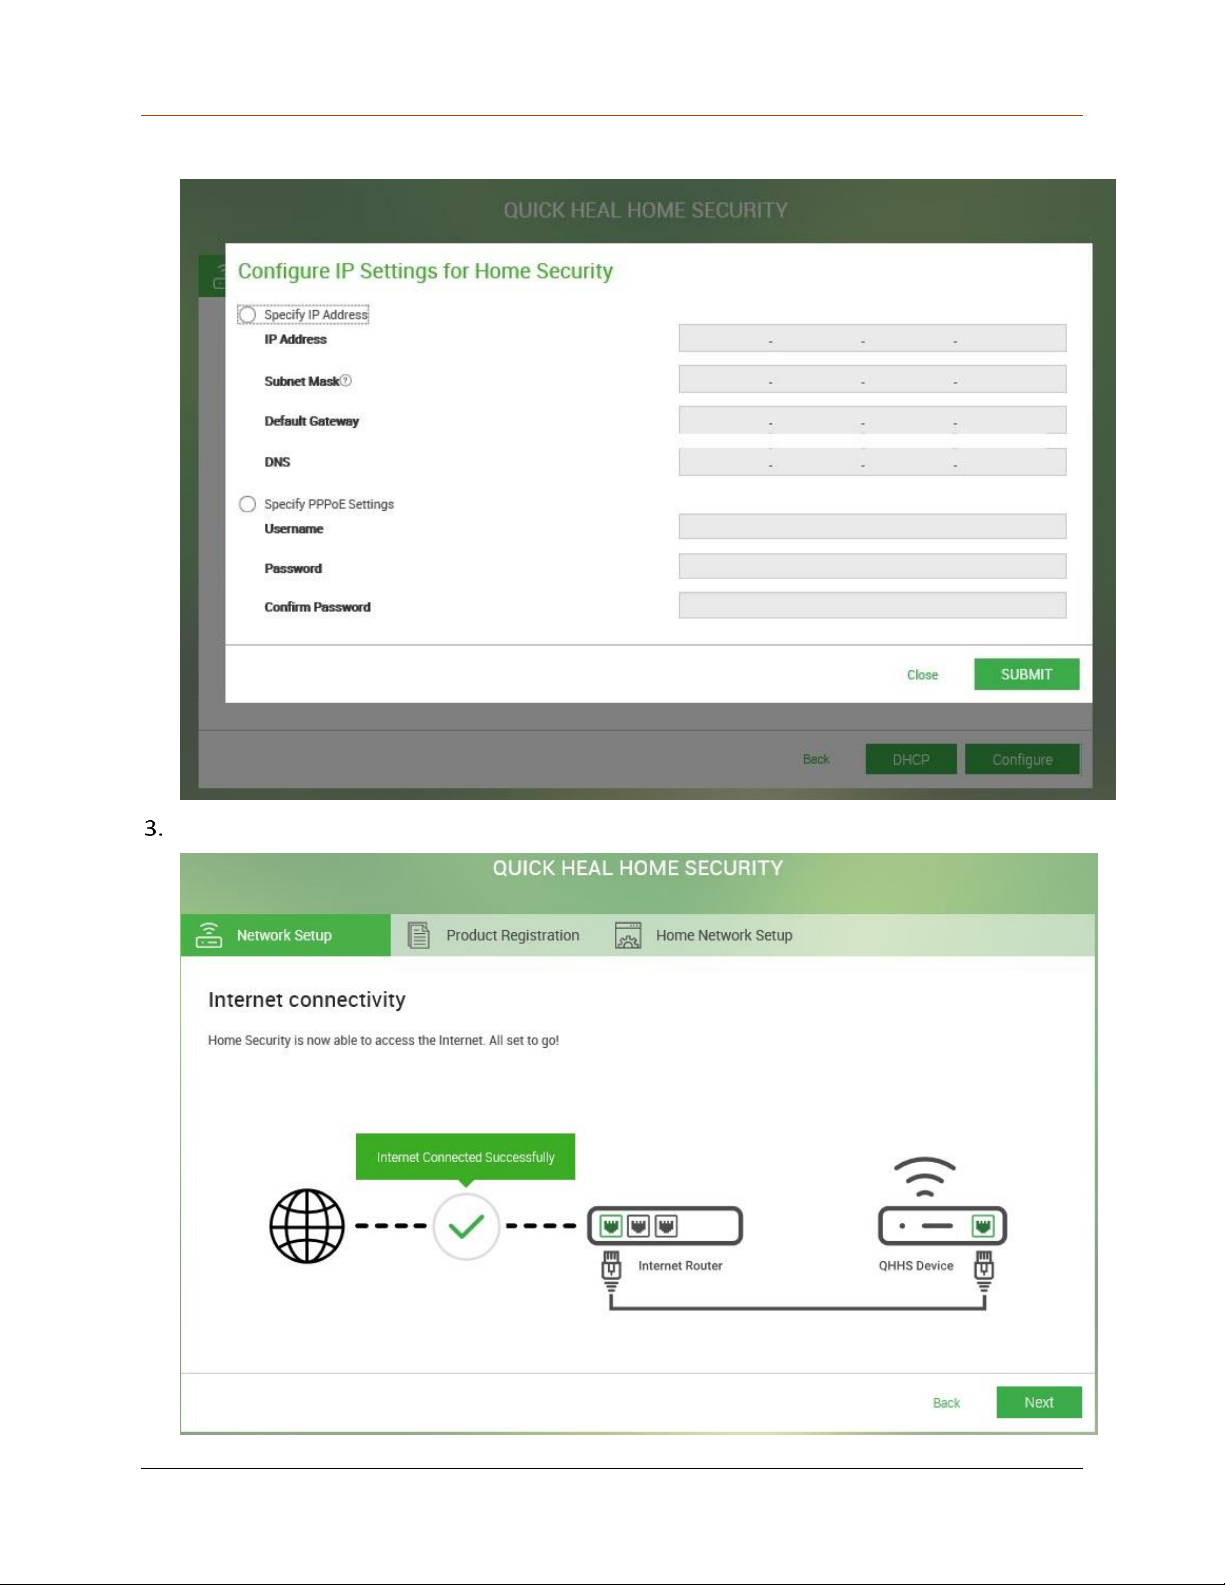
Unboxing and Registering QHHS
Alternatively, click Configure to configure the IP address manually.
Enter either IP address or PPPoE settings, if you have, and click SUBMIT.
41
Page 42
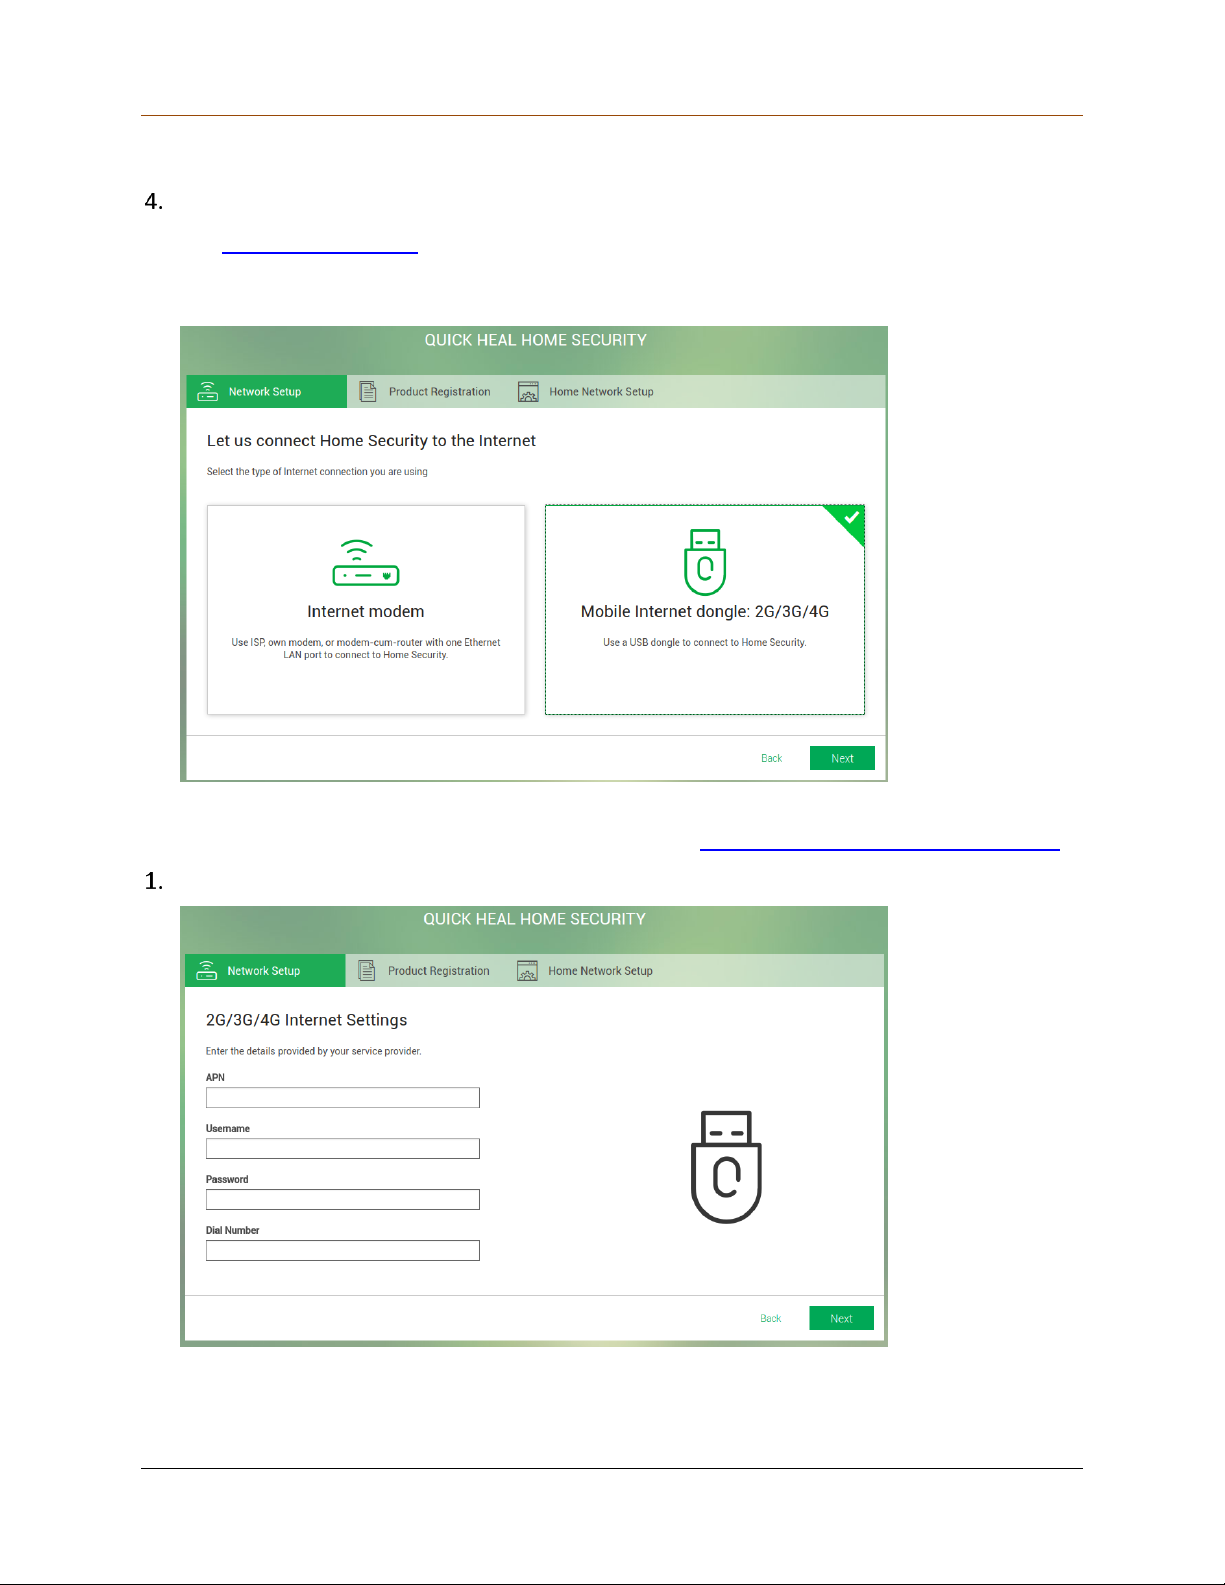
Unboxing and Registering QHHS
Upon connecting to the Internet successfully, a message appears.
Click Next.
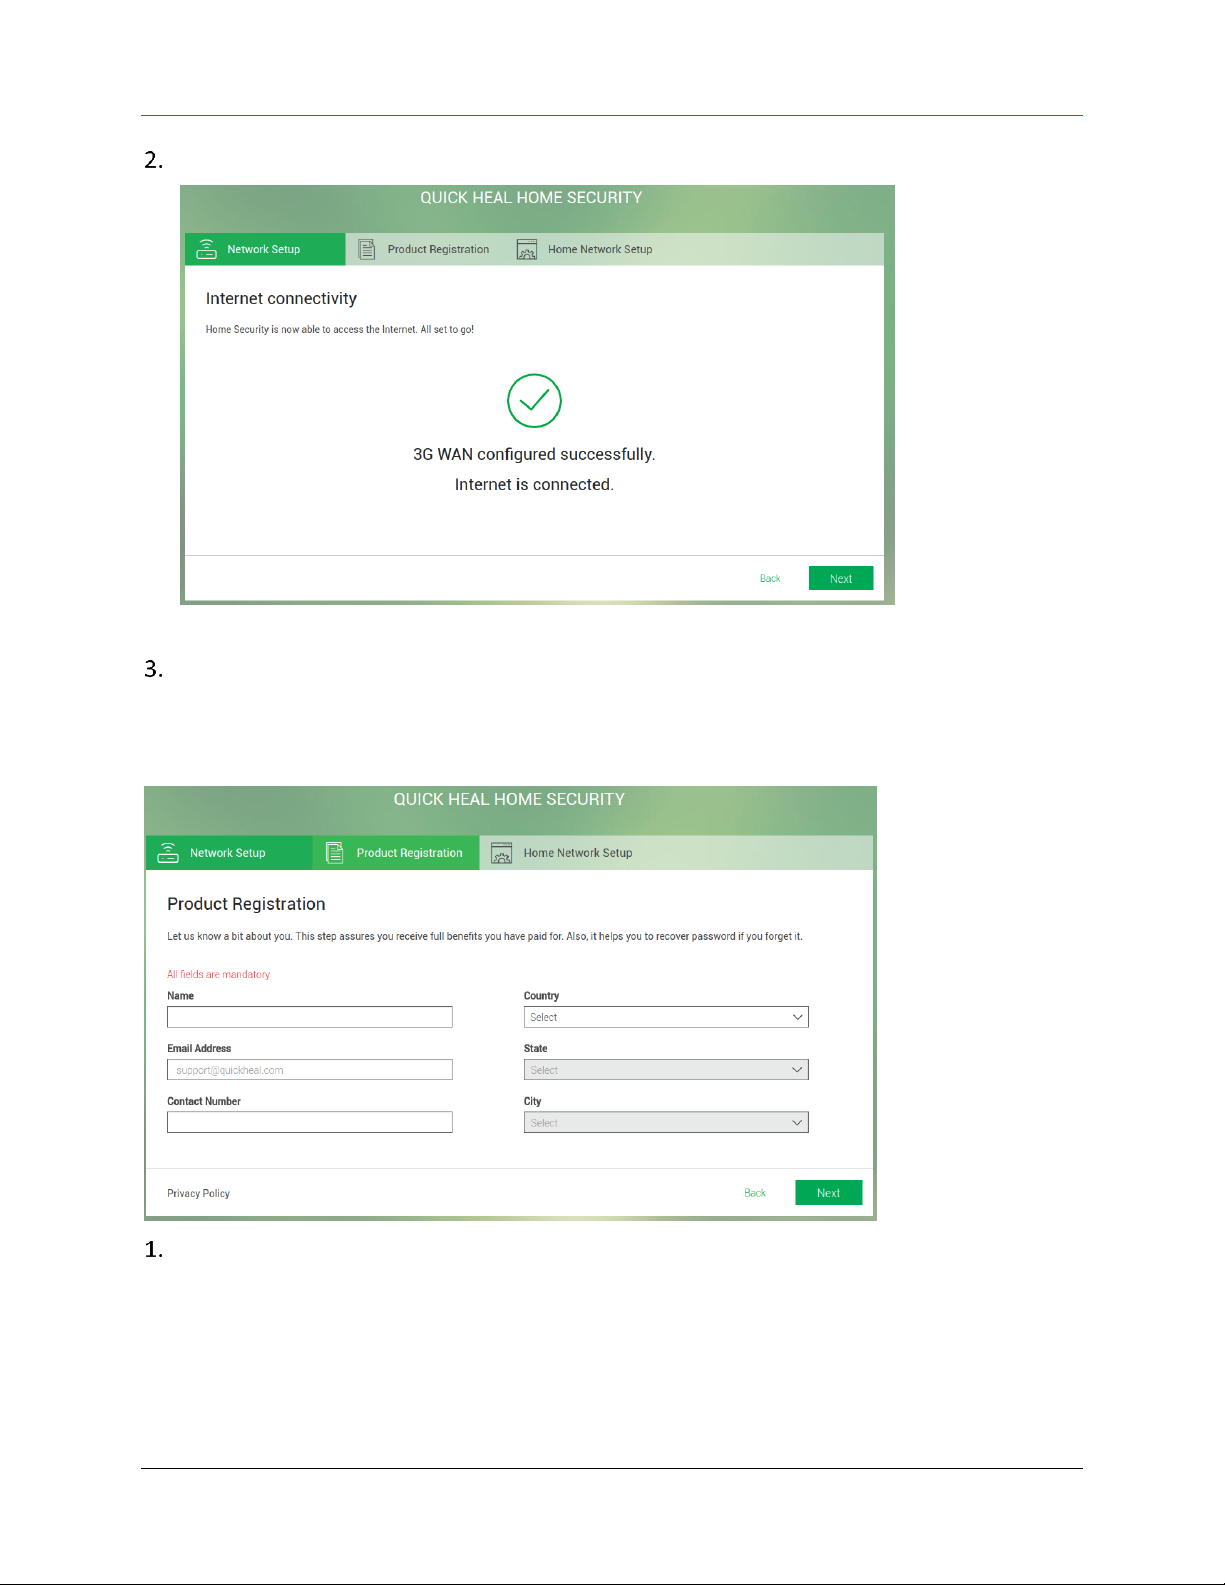
The product registration screen appears.
Connecting to the Internet through Mobile Internet dongle
In this example, connection is being processed through Mobile Internet dongle.
If you want to connect through Internet modem, see Connecting through Internet modem.
Click Next.
If you select the Mobile Internet dongle (portable router), an Internet setting details screen
appears.
42
Page 43
Unboxing and Registering QHHS
Enter the required information in relevant fields and click Next.
Upon connecting to the Internet successfully, a message appears.
Click Next.
Registering QHHS
The Product Registration screen appears.
Enter the information in relevant fields and click Next.
43
Page 44
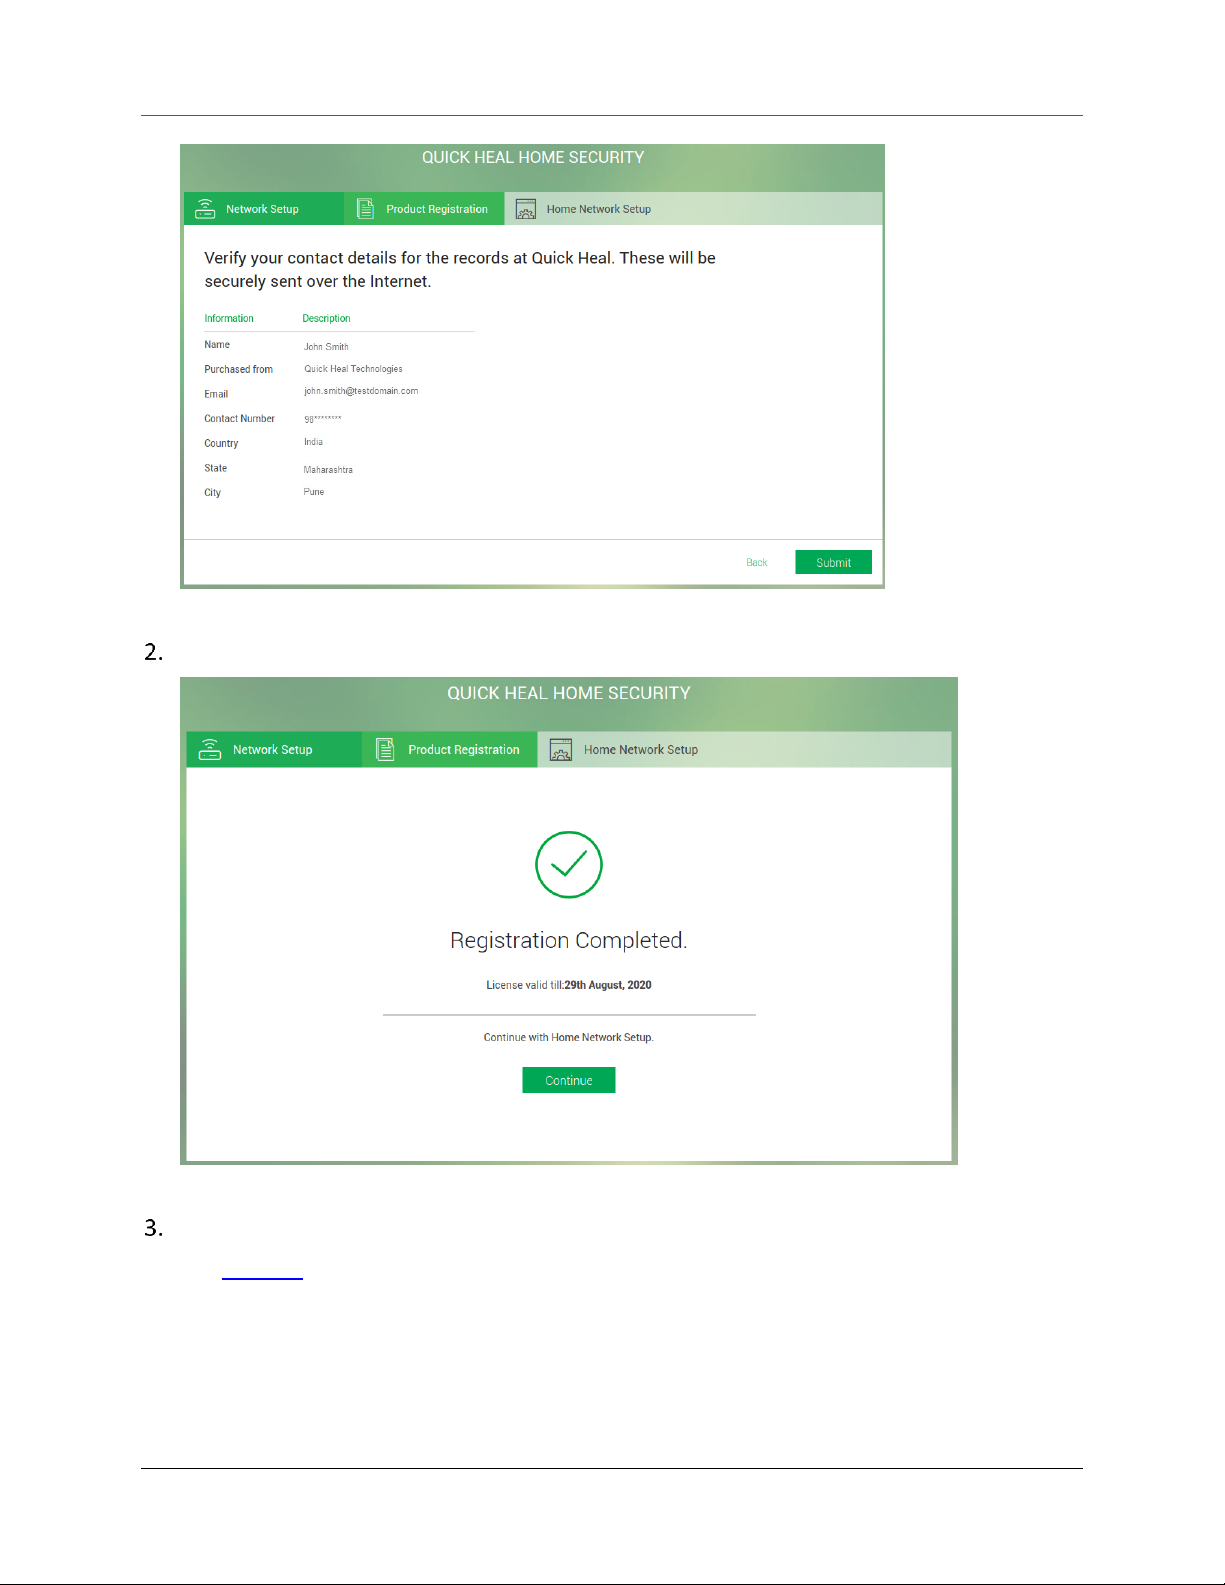
Unboxing and Registering QHHS
A summary of the information that you entered appears. Verify the information carefully.
Click Submit.
A success message appears.
Click Continue.
The network screen appears.
44
Page 45
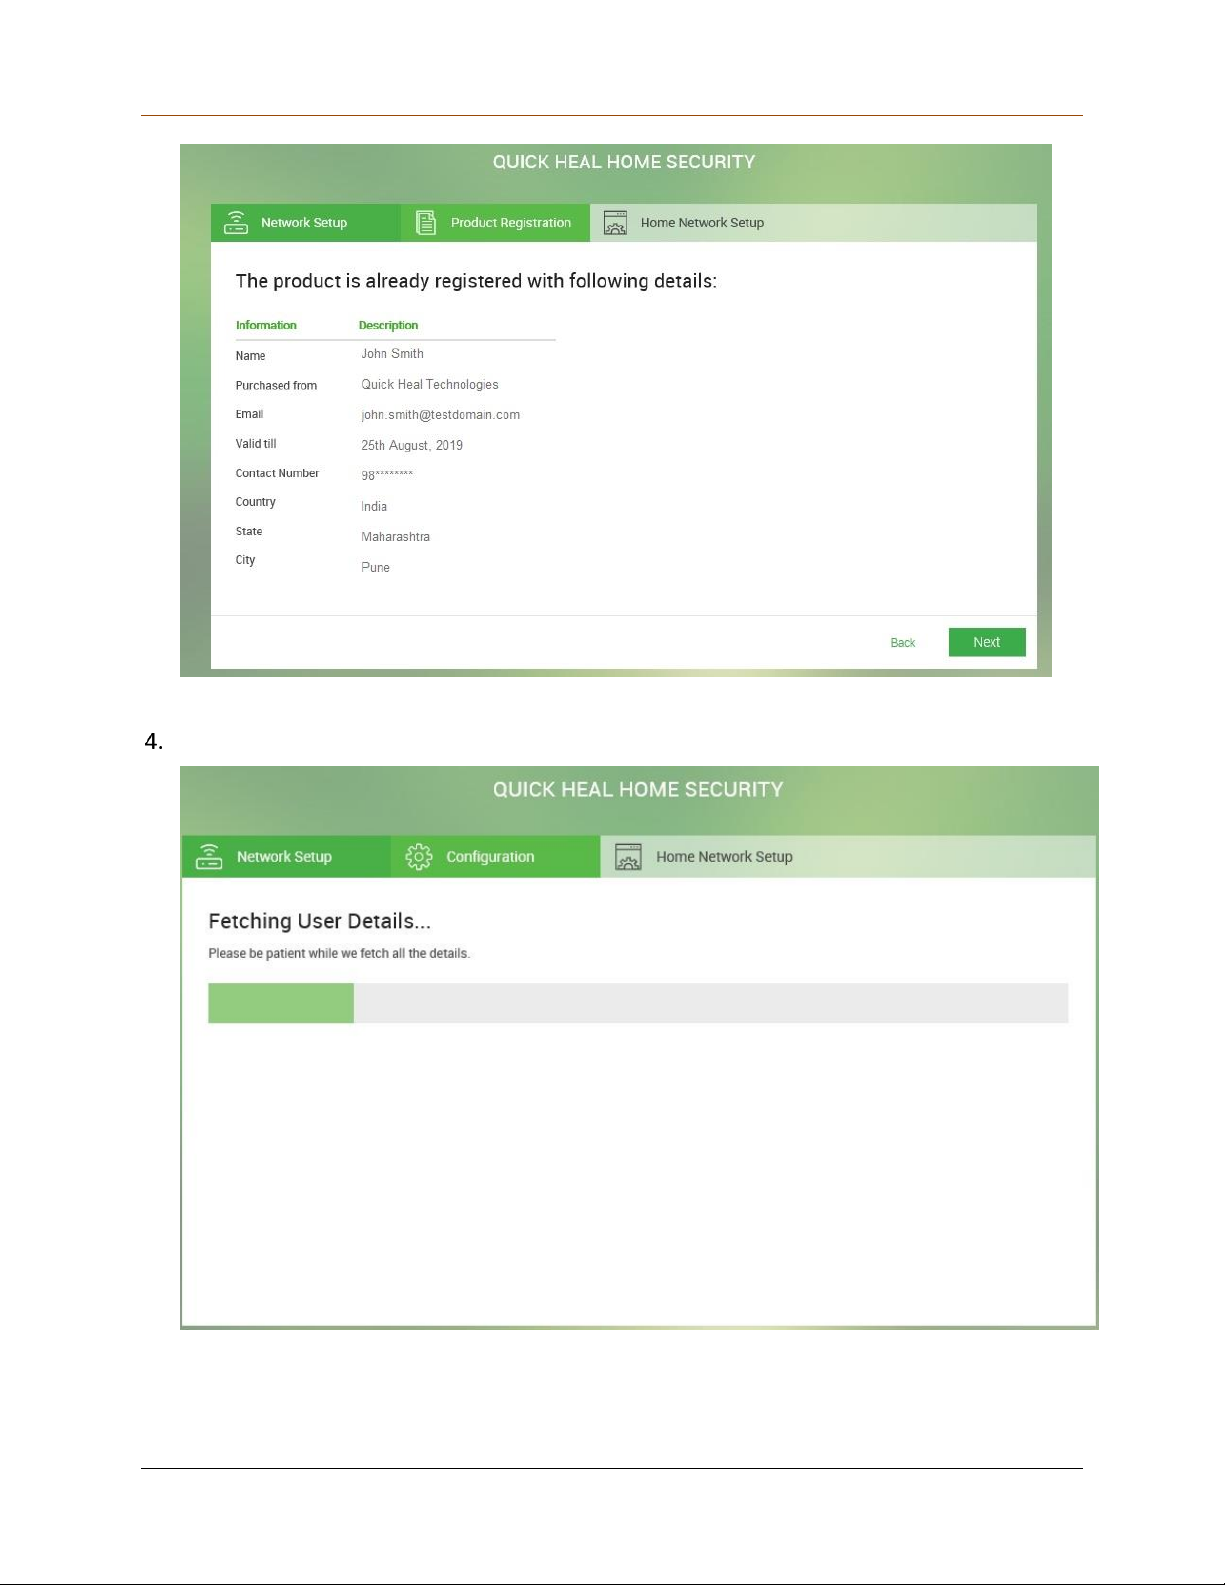
Unboxing and Registering QHHS
If you have previously registered with the QHHS device, the user information appears.
Click Next.
The data of your previous settings is fetched.
45
Page 46
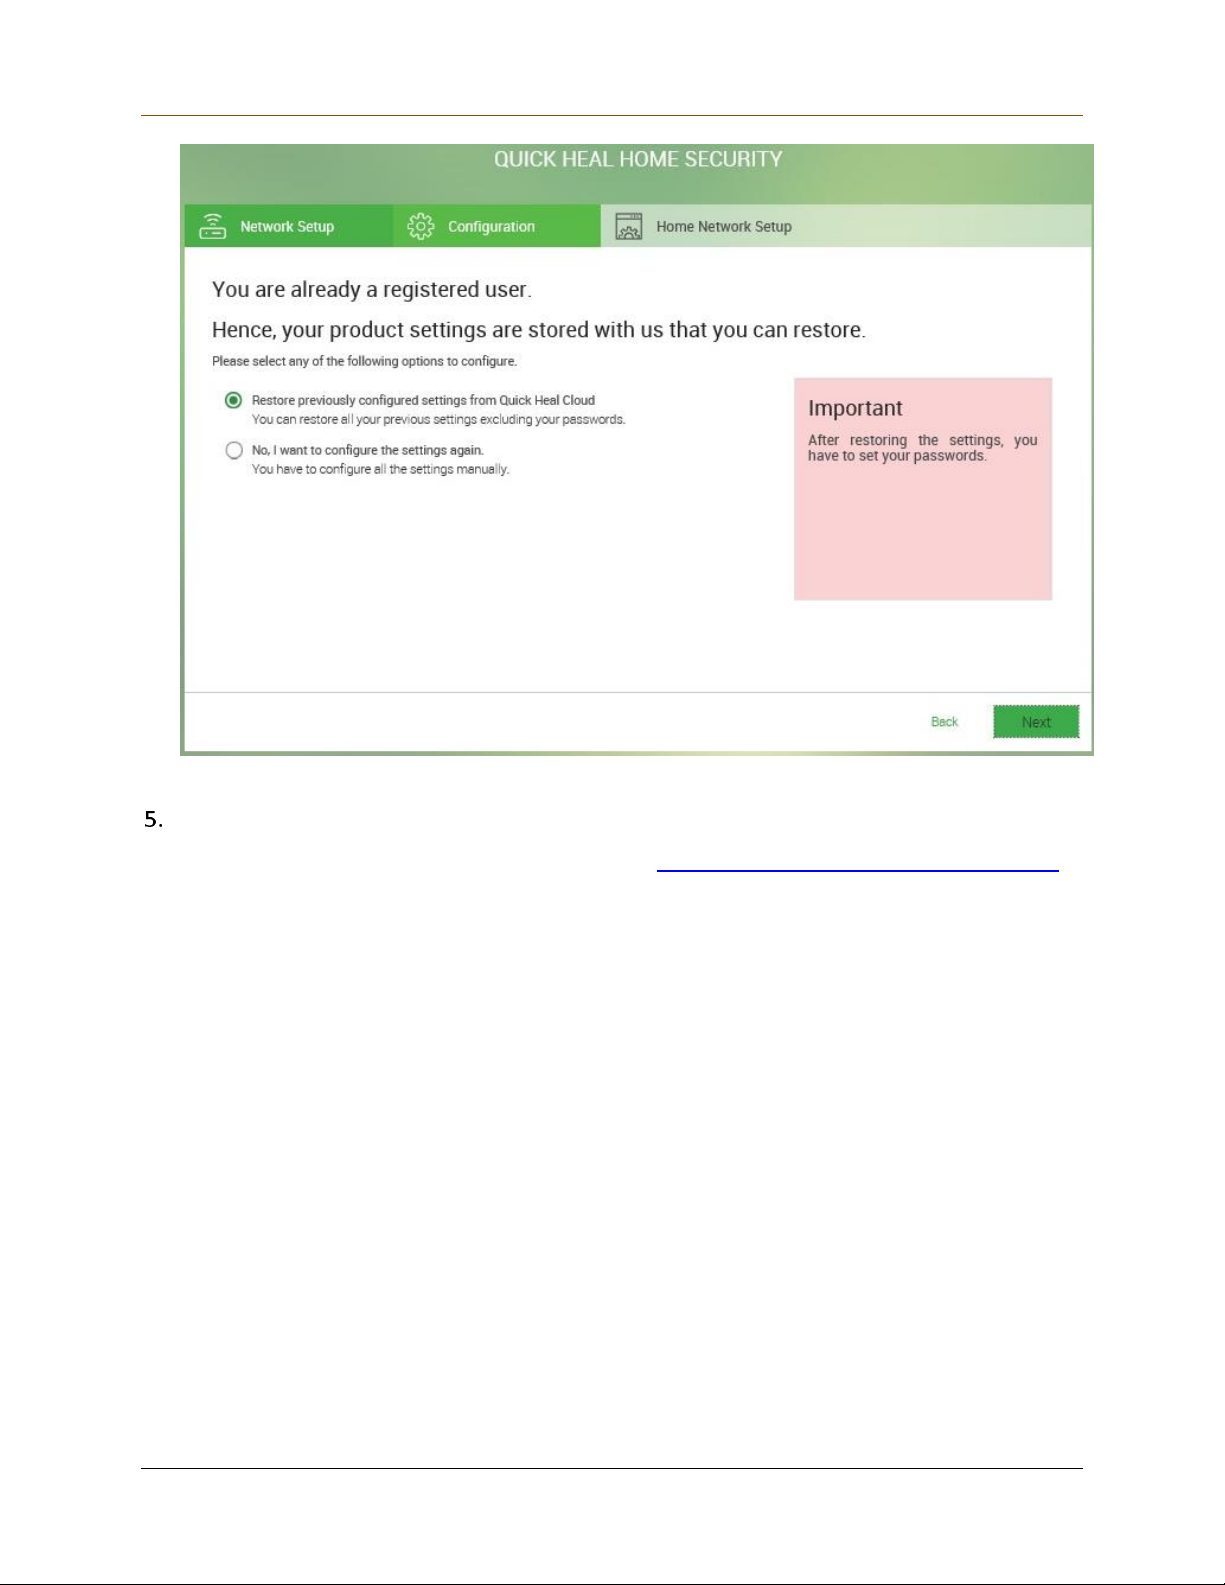
Unboxing and Registering QHHS
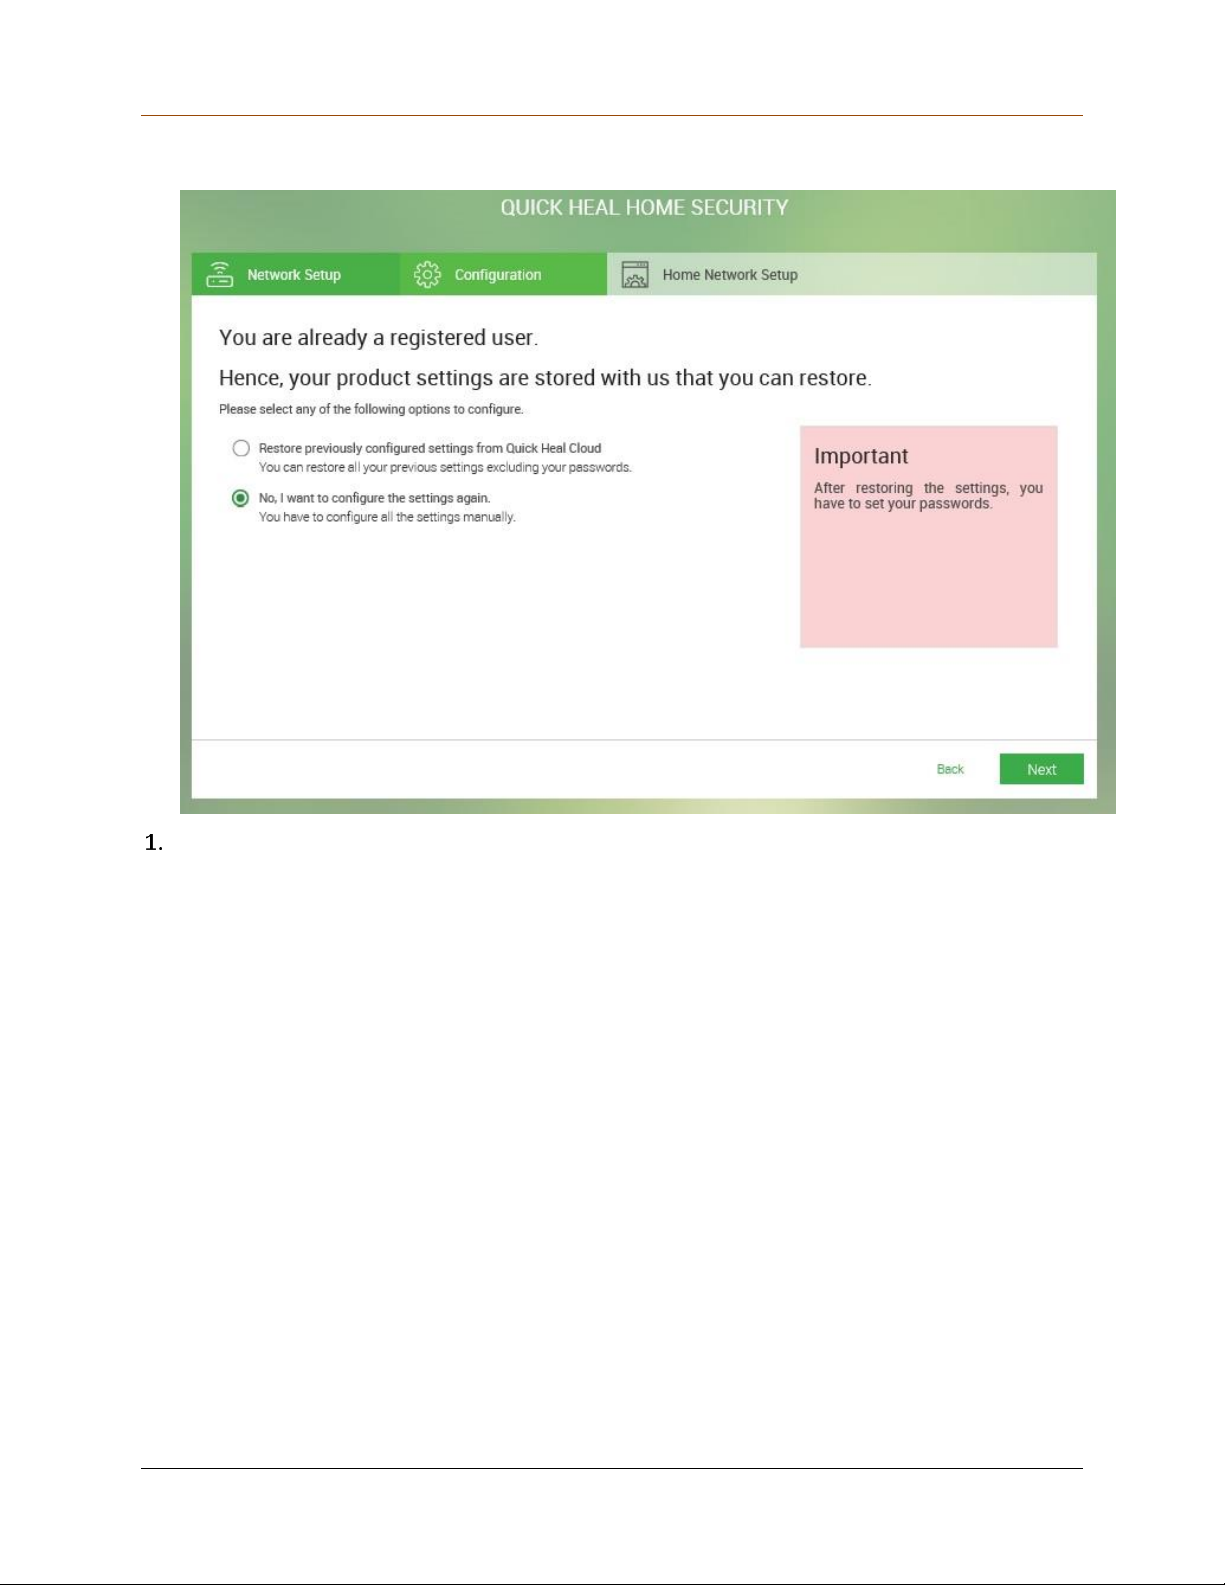
If you have previously registered with the QHHS device, you can restore your settings.
Select Restore previously configured settings from Quick Heal Cloud and click Next.
If you want to register the product afresh, select No, I want to configure the settings again.
46
Page 47
Unboxing and Registering QHHS
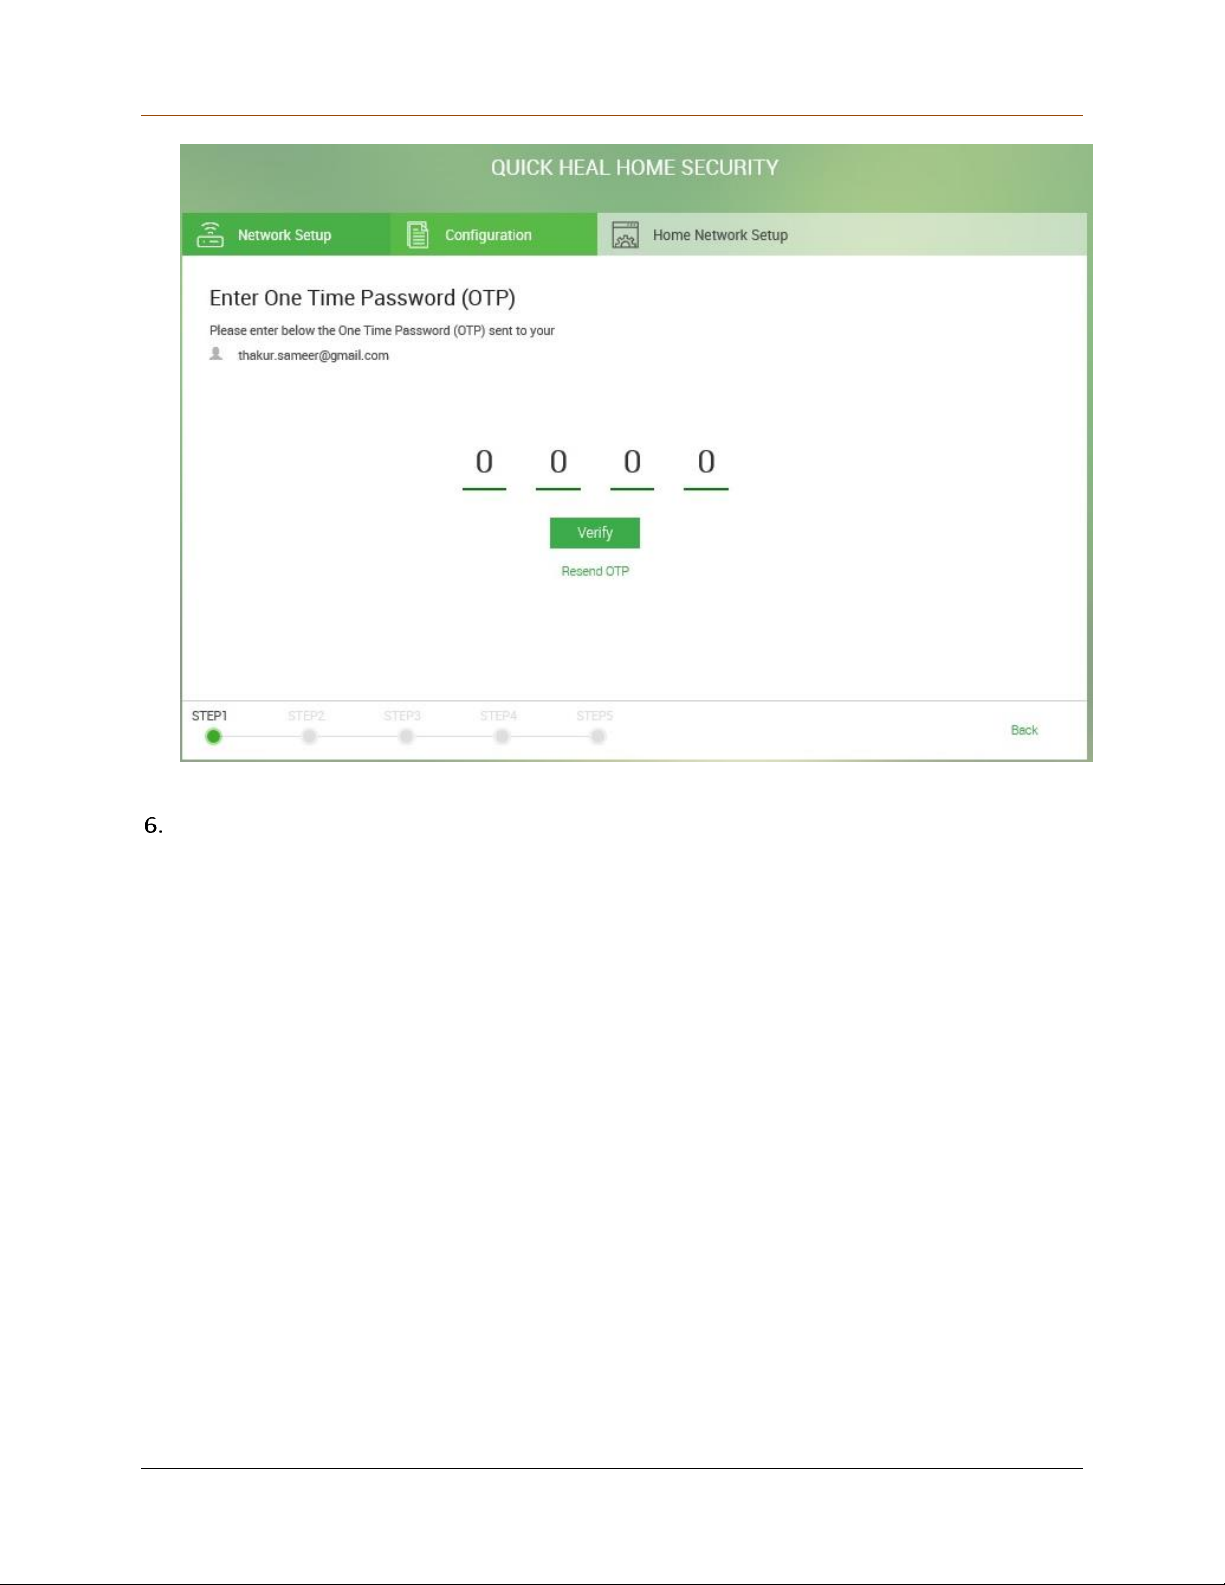
A One-Time Password (OTP) is sent to your registered mobile number and email address.
Enter the OTP on the Product Registration screen and click Verify.
47
Page 48
Unboxing and Registering QHHS
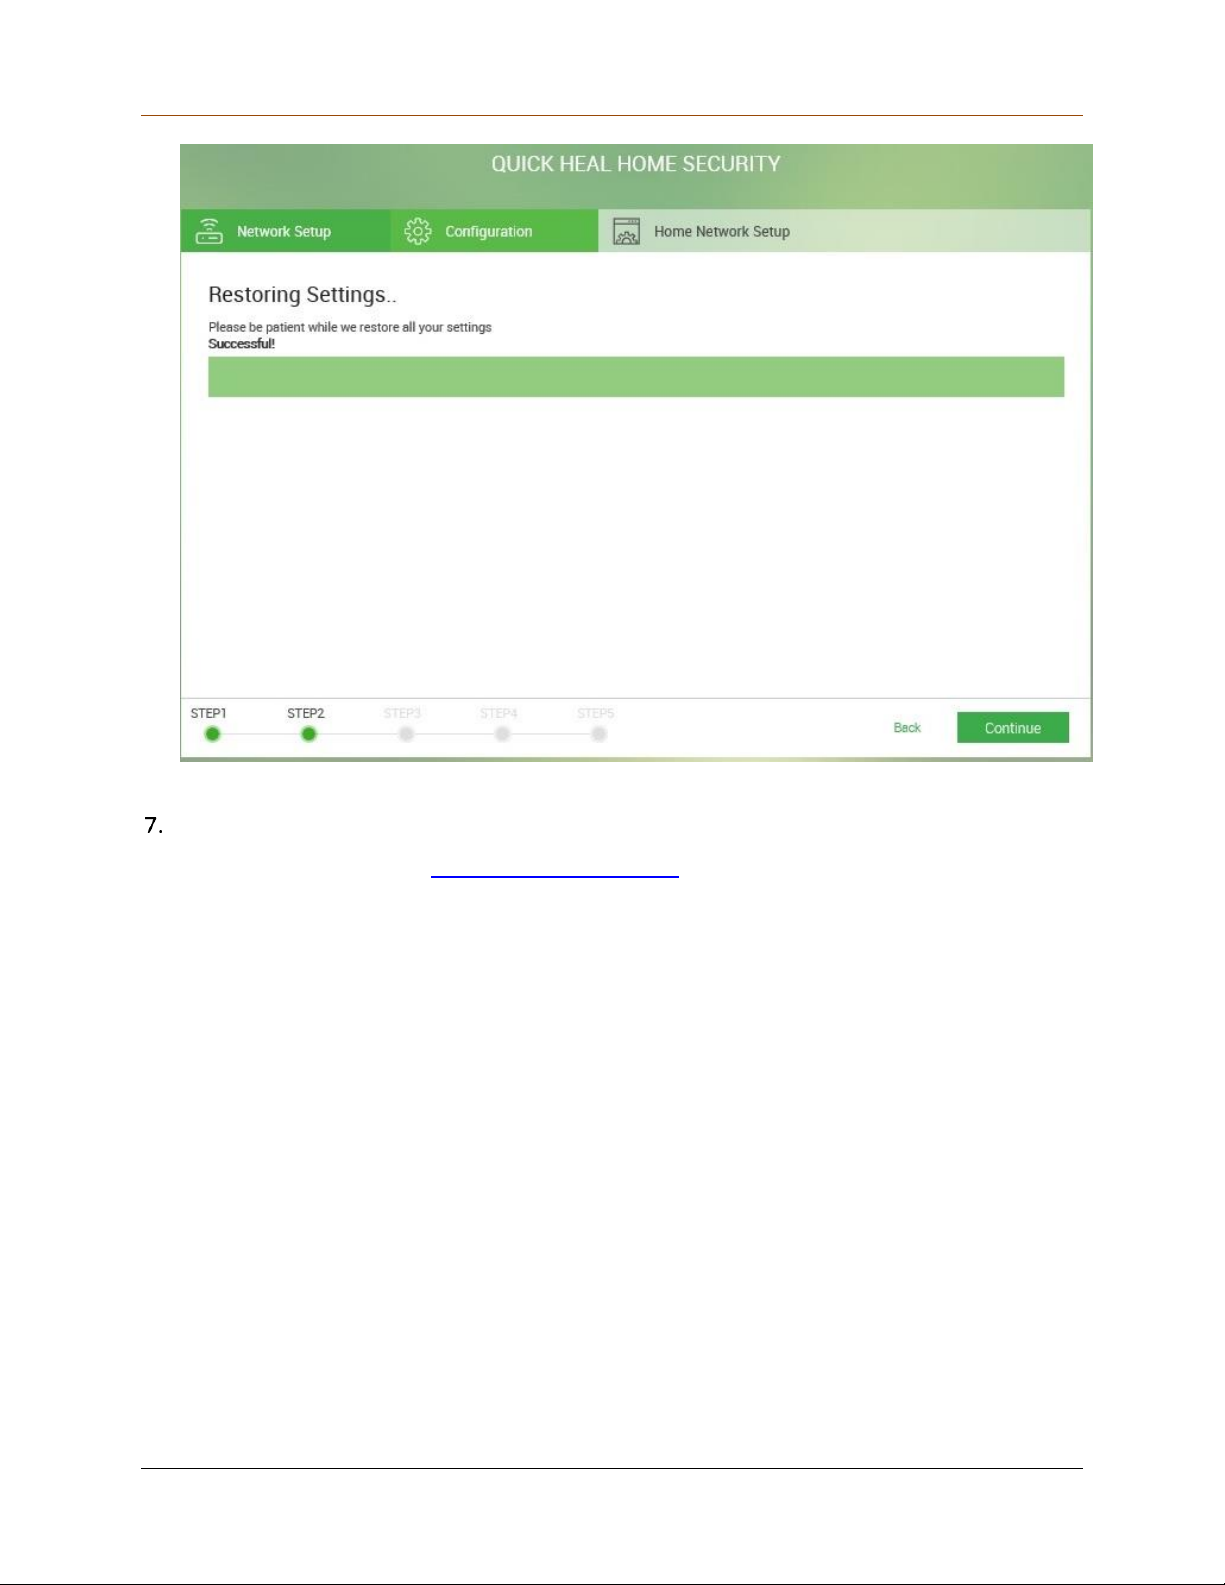
Your previous settings are restored.
Click Continue.
You are redirected to the Creating a home network screen.
48
Page 49
Unboxing and Registering QHHS
Configuring the settings afresh
If you want to register the product afresh, select No, I want to configure the settings again
and click Next.
49
Page 50
Unboxing and Registering QHHS
Creating a home network
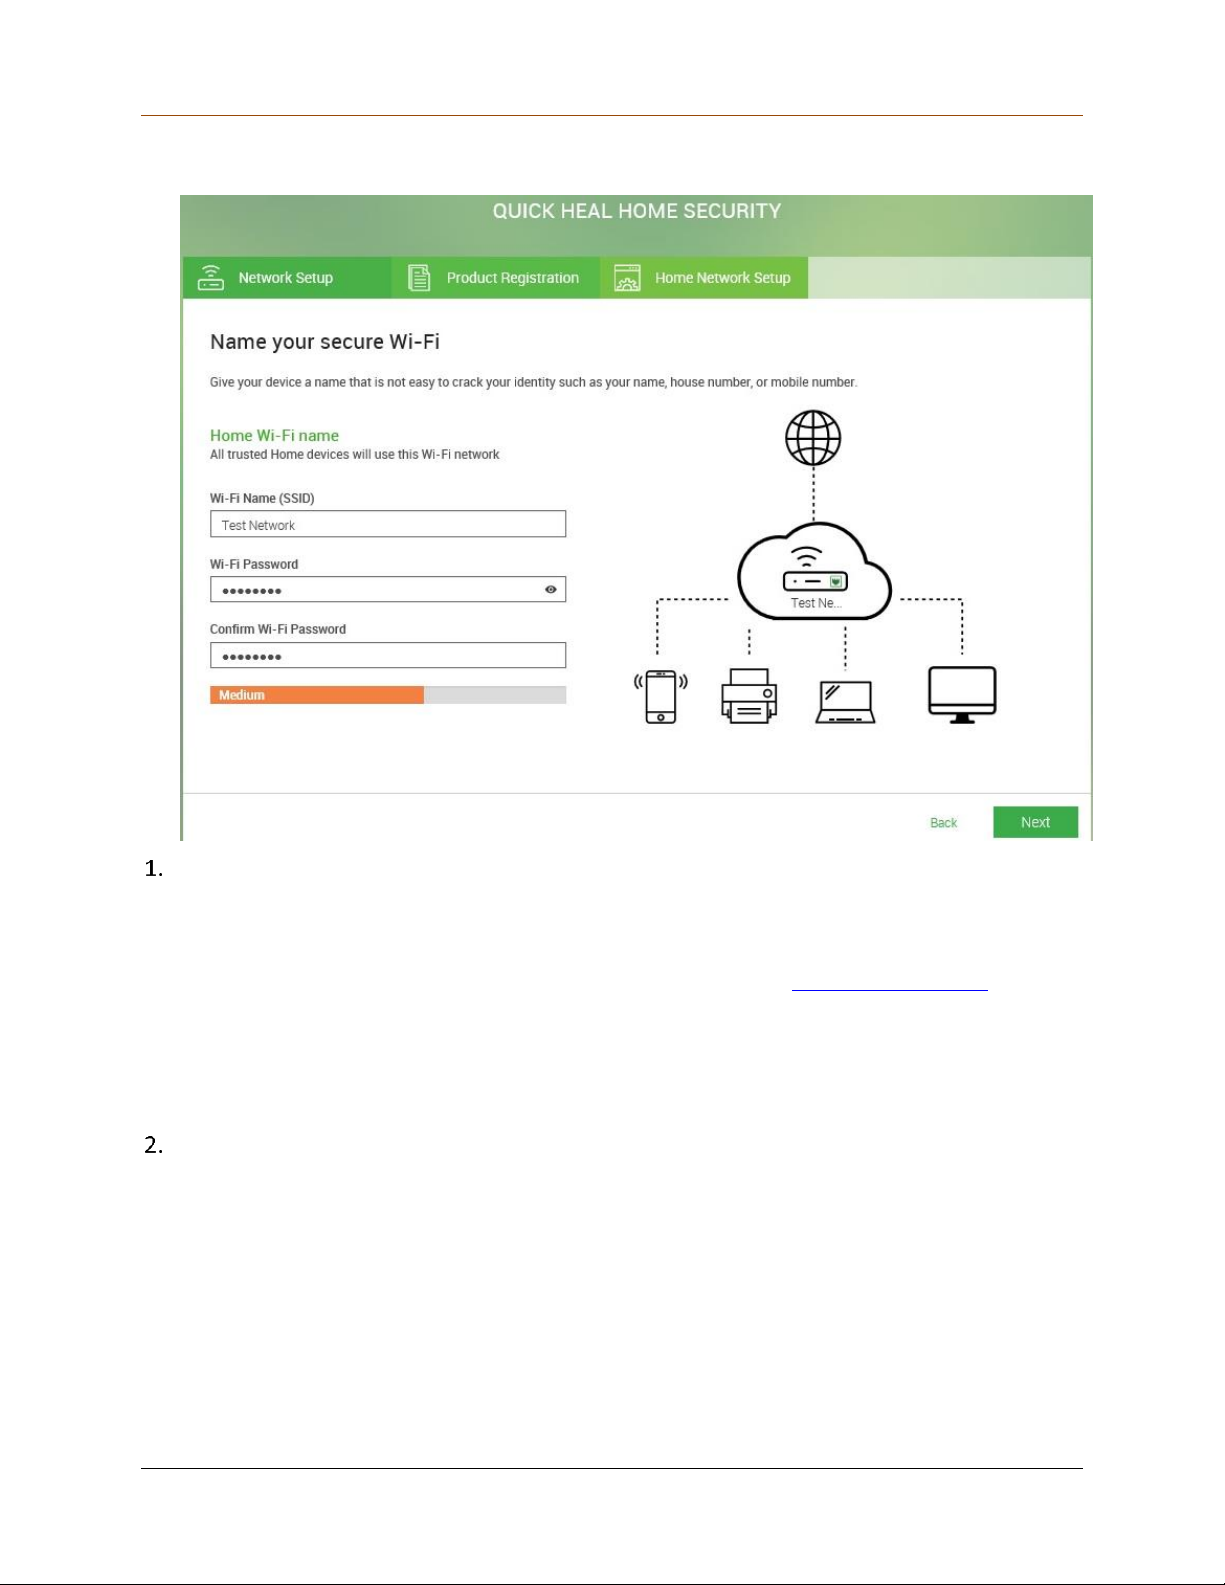
Enter a name for your Wi-Fi network and the password for that network.
You need to connect to this Wi-Fi network to access Internet from the QHHS device.
Note that the default network HS-Unbox will disappear from the network list.
Tips: Name your network carefully and note it down. After the product registration
completes successfully, connect all home devices to this secure network through QHHS
device.
If you have restored your previous settings, you do not need to create new Wi-Fi-SSID
network name.
Click Next.
50
Page 51
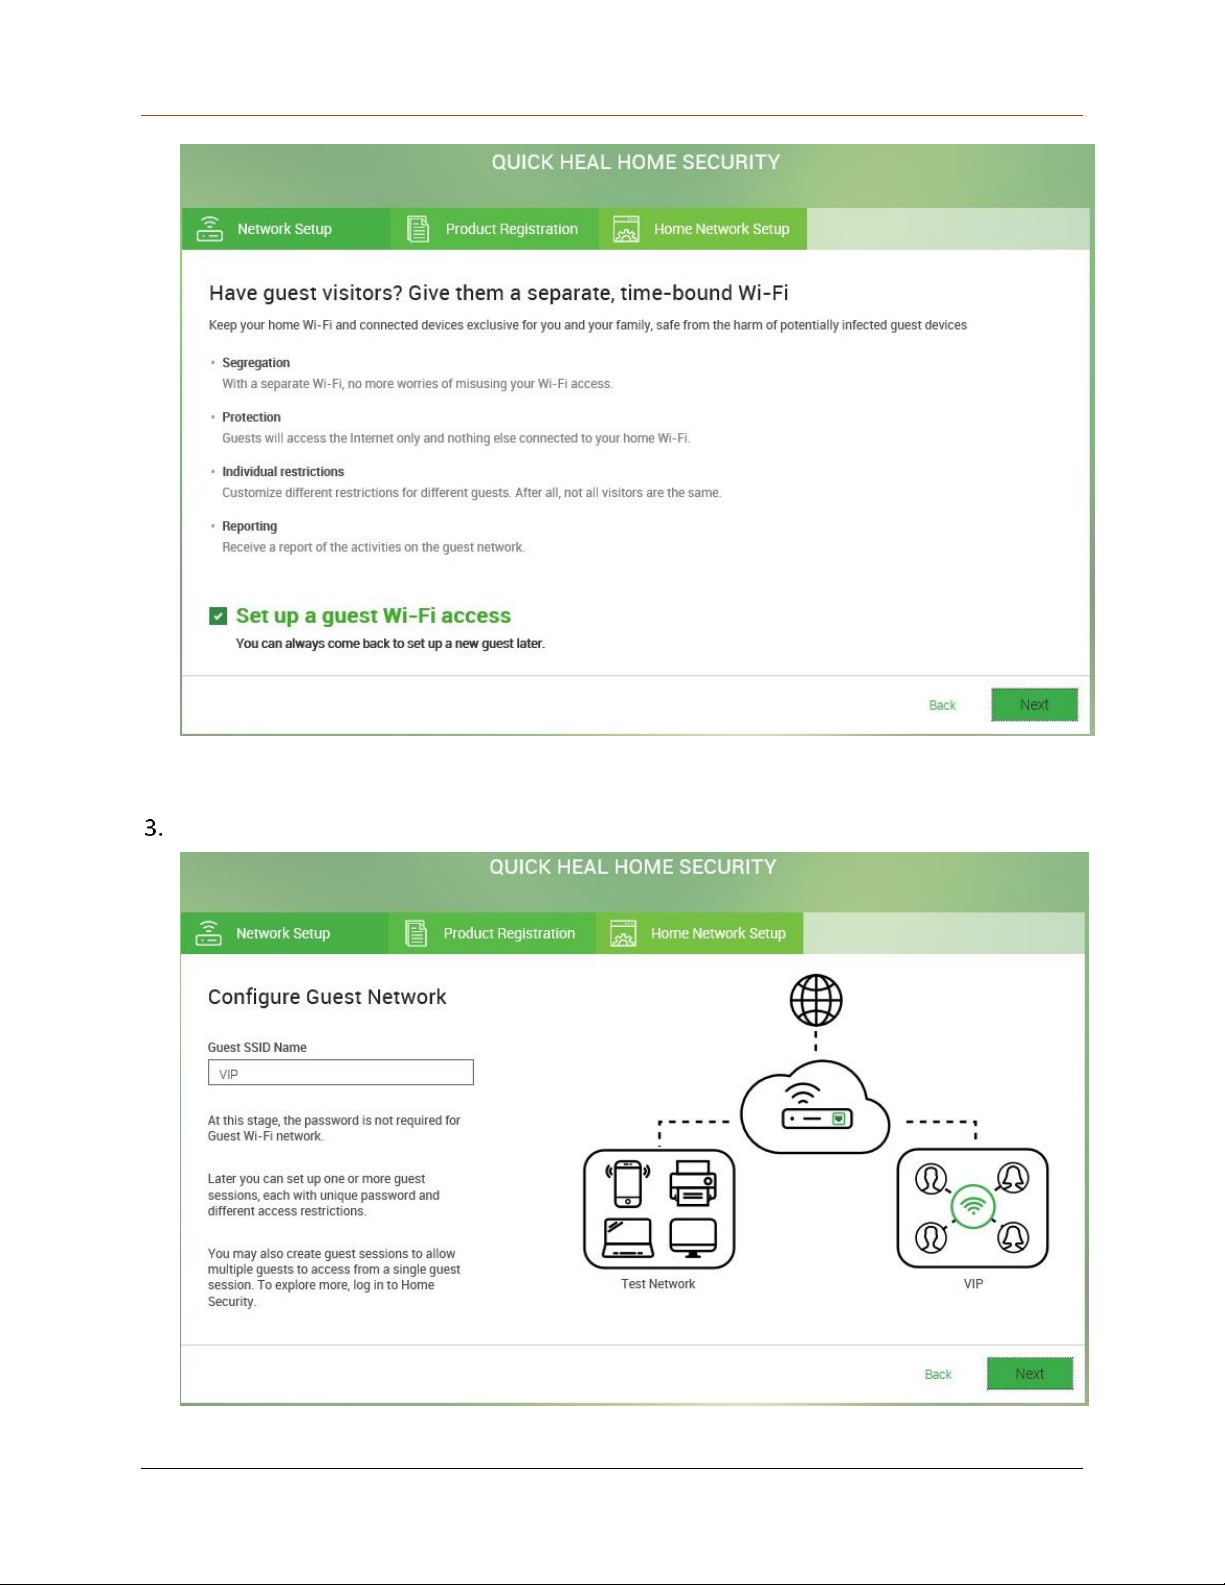
Unboxing and Registering QHHS
You can set up a guest session for the users who would connect to your network. You may
set this session later also.
Click Next.
51
Page 52
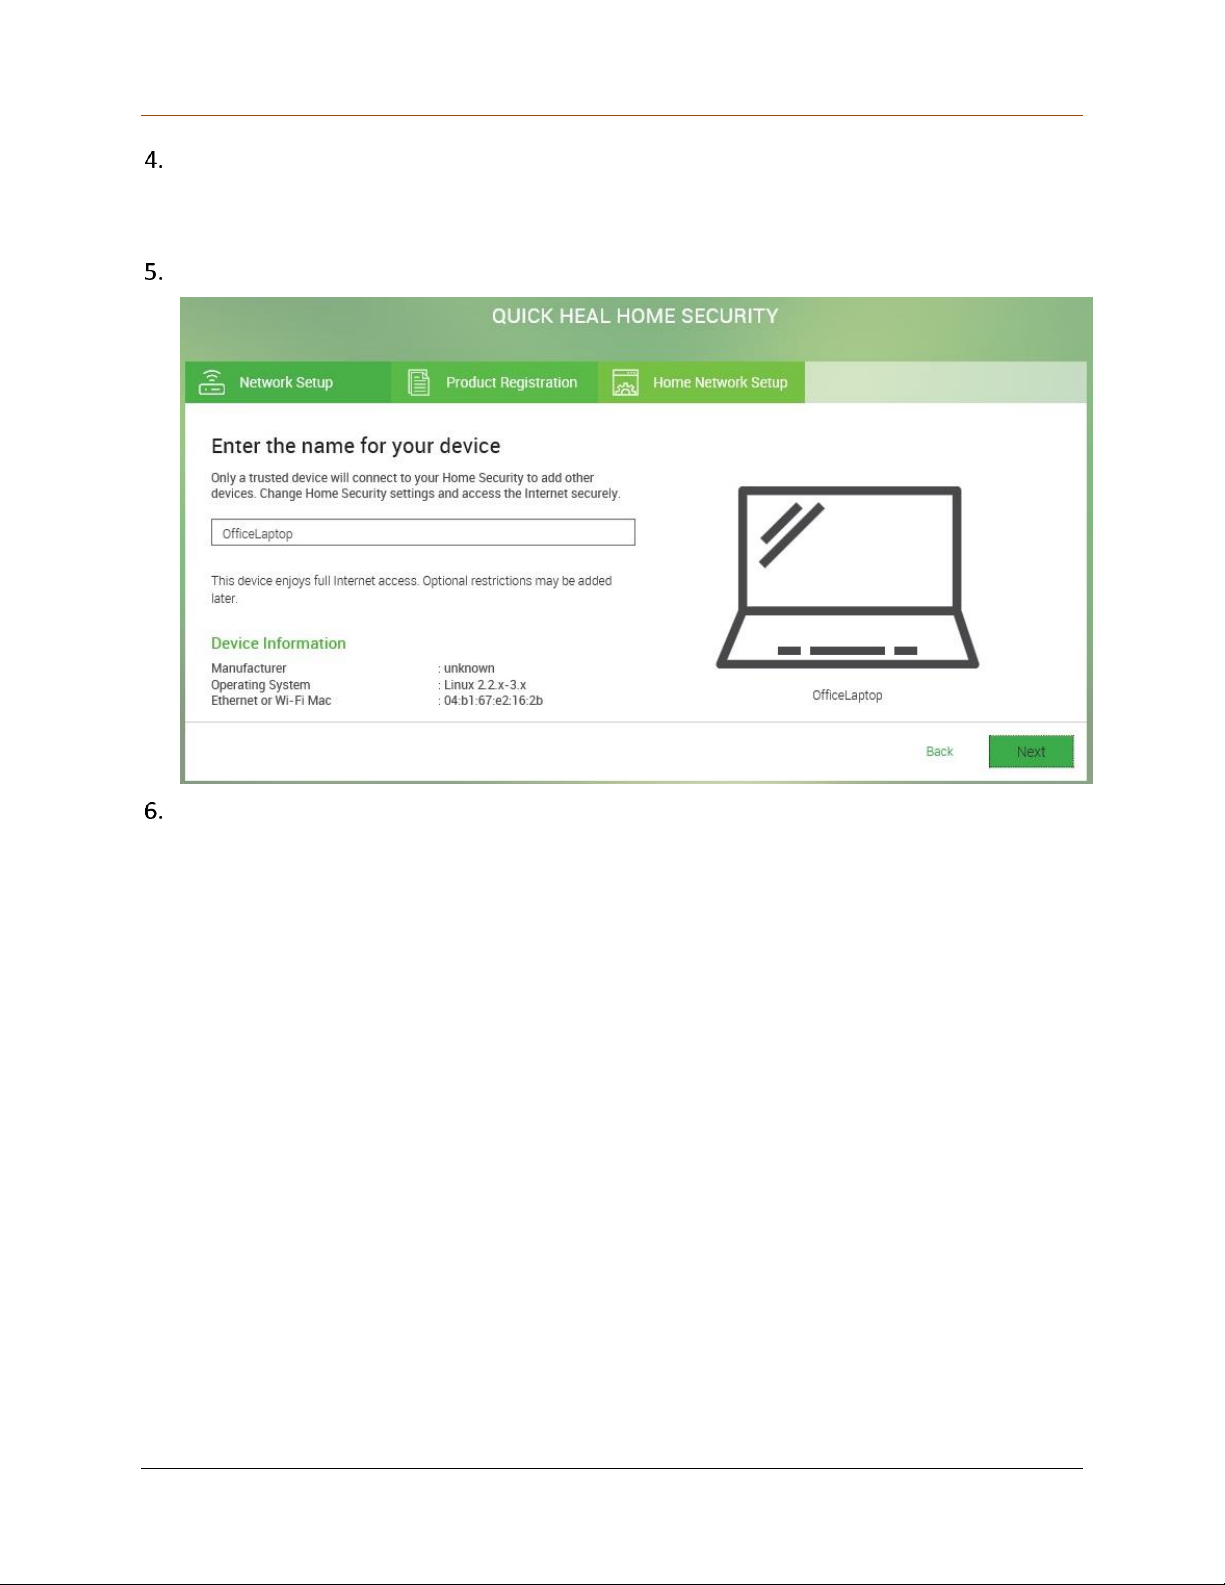
Unboxing and Registering QHHS
Create a guest network name.
This guest network name will be your network for the guests to access Internet from the
QHHS device. You can add any guest to this network.
Click Next.
Enter a device name here.
Tips:
Do not add any special characters (" ' ` * ; > / \) or spaces while you write the device
name. If you use multiple words for the device name, write them as a single term.
Example: “OfficeMobile” or “Office_Mobile”.
Take care while writing the device name. The device name should not be duplicate.
52
Page 53
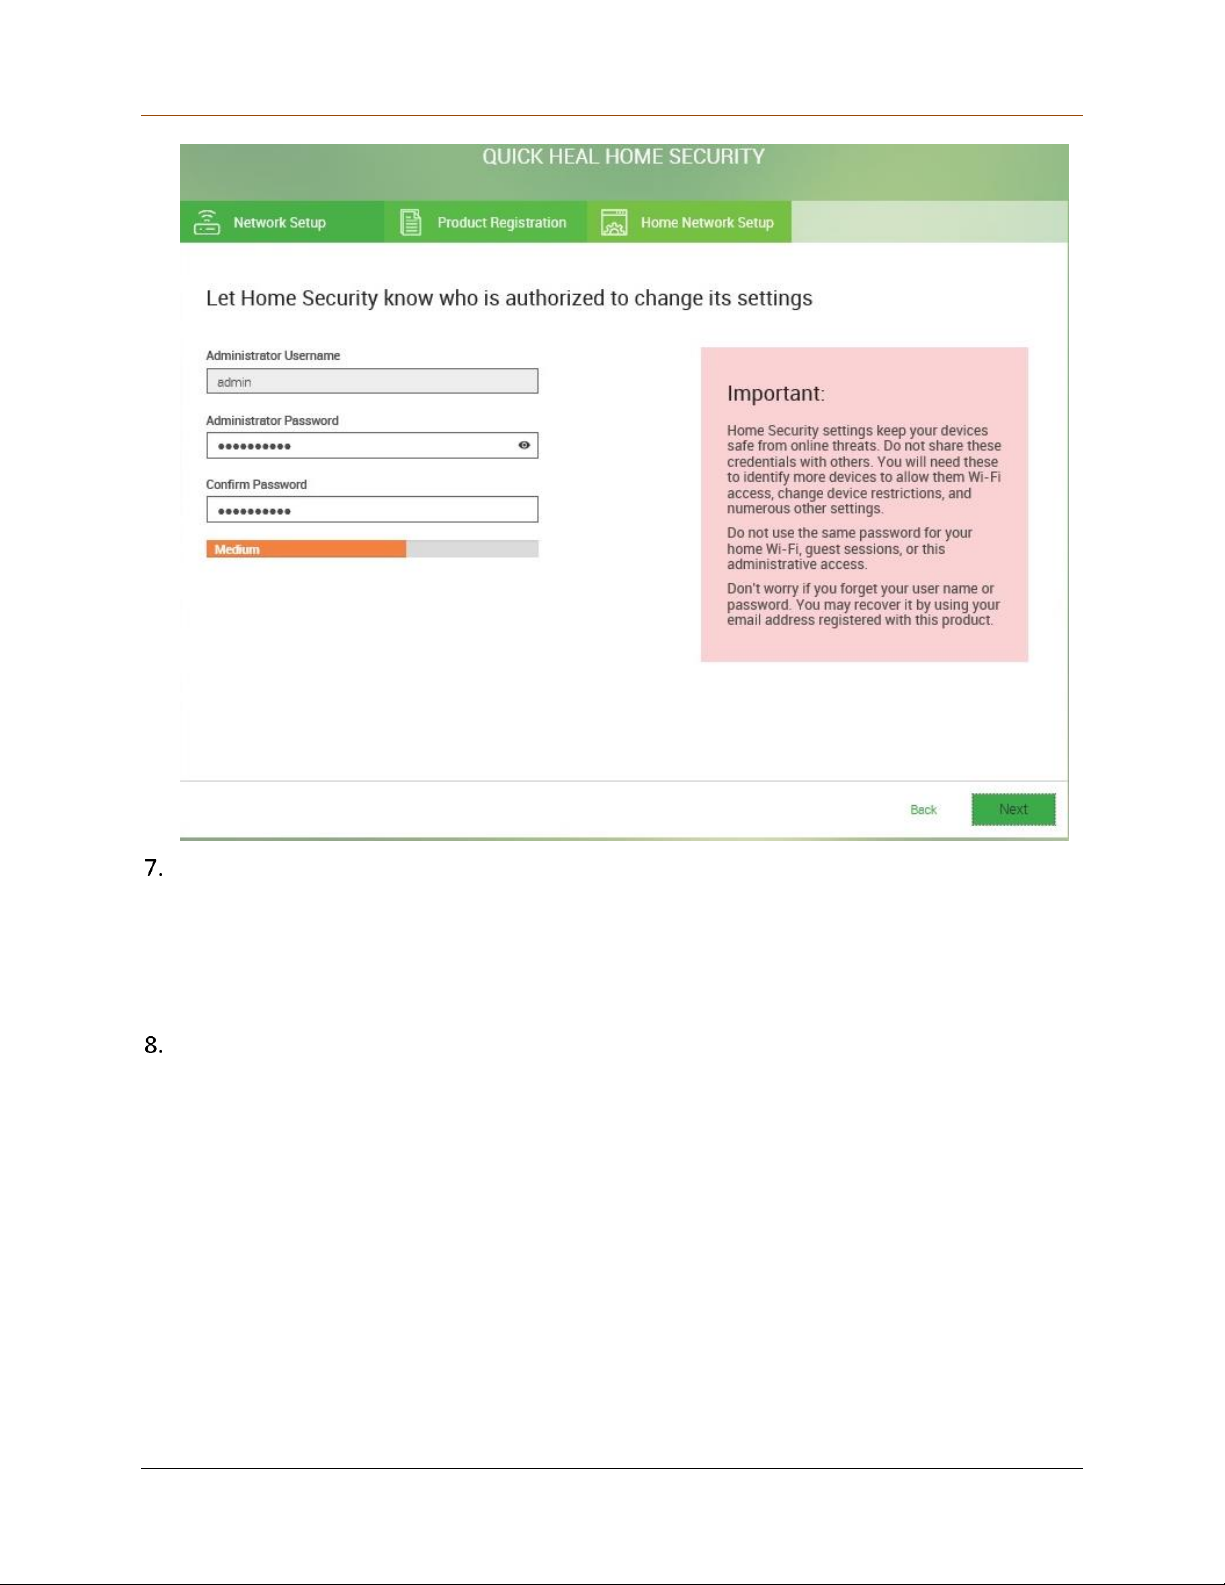
Unboxing and Registering QHHS
Set a password for the admin user.
“admin” will be your username that you cannot change. The password must be at least 8
characters long.
Tips: Create a strong password with a combination of numbers, letters, and other
characters.
Click Next.
53
Page 54
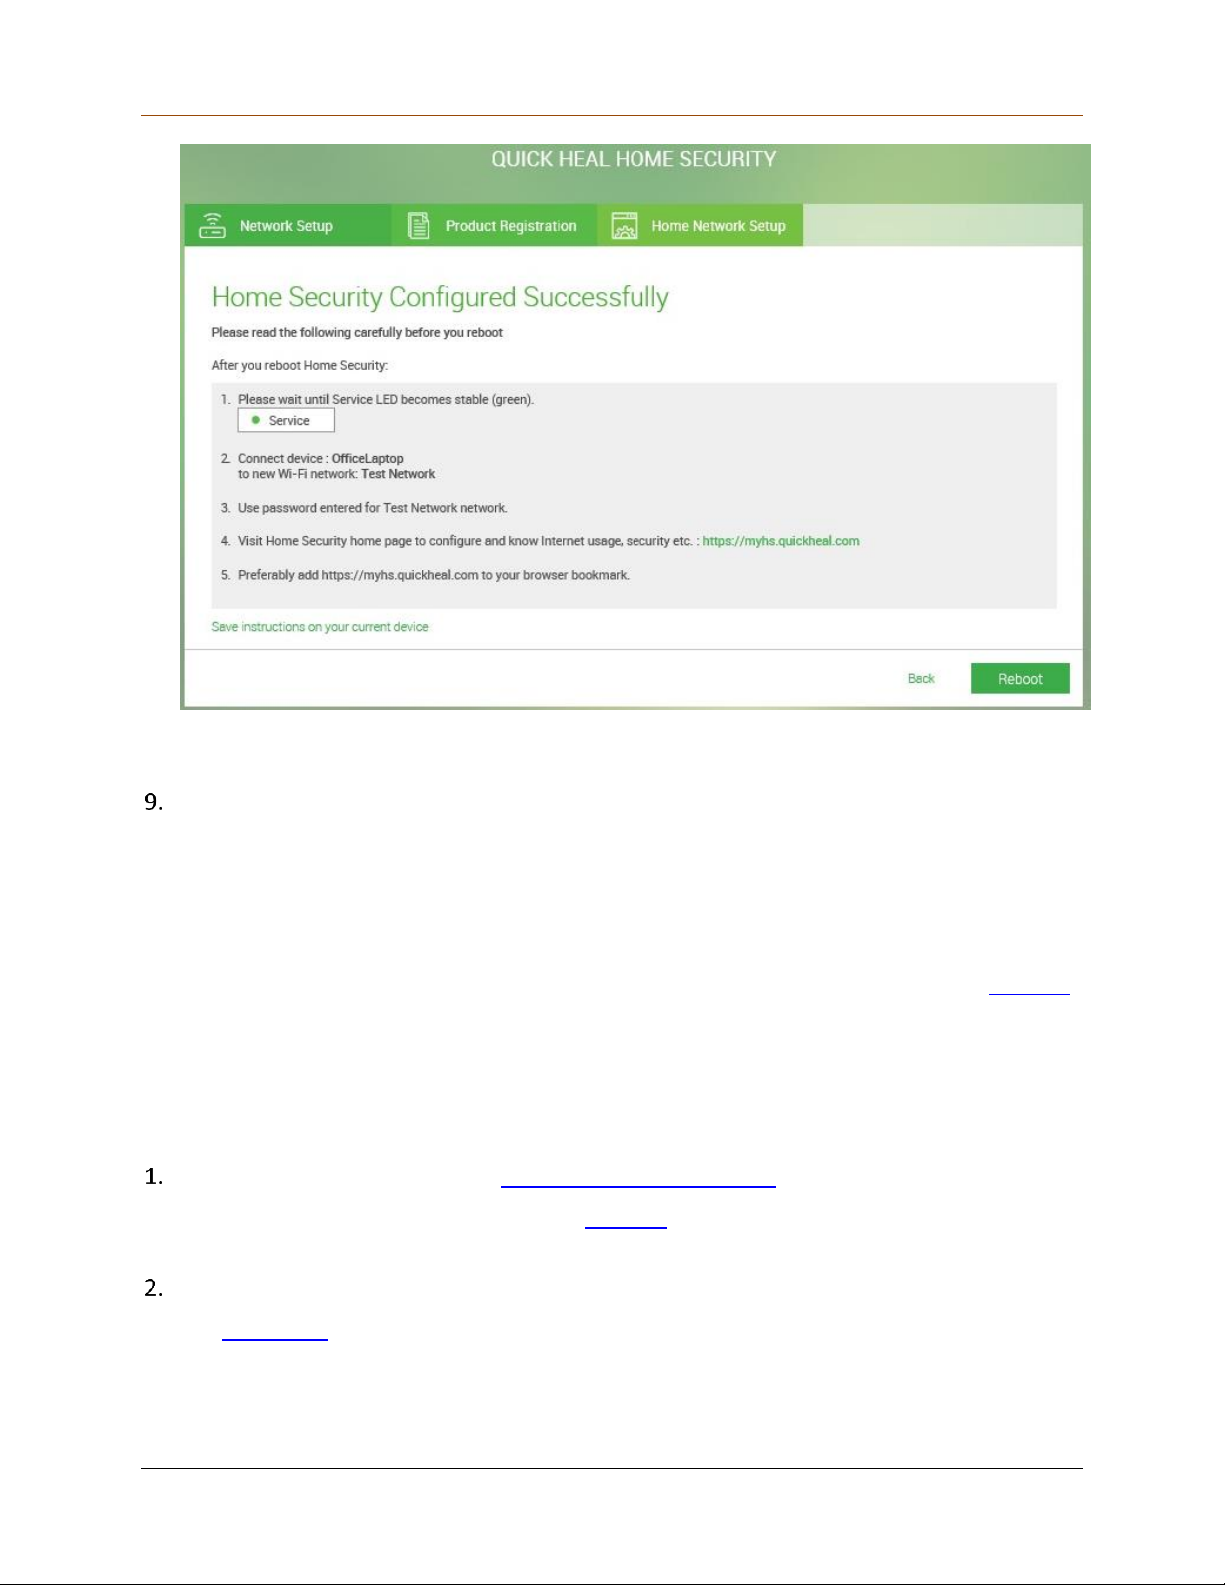
Unboxing and Registering QHHS
If the configuration is done successfully, the success message screen appears. You must
reboot the device to get started.
Click Reboot.
It may take a few minutes to reboot.
Tips:
Check the connection lights on the QHHS device. Wait until all the connection lights turn
on.
Once all the connection lights on the QHHS device turn on, connect to the new network
that you created to secure your connected devices through QHHS device.
If there is any issue in connecting the network, switch off the power of the QHHS device
and then switch the device on again.
Getting started with the QHHS device from portal
Open a browser and run the link https://myhs.quickheal.com.
Make sure that you are connected to the network that you created. Your default network
HS-Unbox will disappear from the network list.
On the first login page, enter your credentials. Click Log In.
The Dashboard appears and you can start managing all the connected devices.
54
Page 55
Section
Description
Internet Data
Consumed
Displays the Internet data consumed by all the connected devices for a
billing cycle or for the current day.
During Billing Cycle: Select this option to view the Internet data usage
of all the connected devices during the billing cycle for the current
month.
Today: Select this option to view the Internet data usage of all the
connected devices for the current day.
Total Data
Used
Displays the total Internet data consumed by all the devices.
Downloads
Shows the total Internet data downloaded by the connected devices.
Uploads
Shows the total Internet data uploaded by the connected devices.
Chapter
3
Dashboard
After successful registration, log on to the QHHS web portal to manage the QHHS router,
connected devices, home/guest Internet, IoT devices, and view reports.
To log on to the QHHS Web portal,
Run the link https://myhs.quickheal.com on your browser.
Enter the Username and Password for Administrator in the relevant text boxes and click
Login.
To go to a section, click on that section. To view the dashboard, click Dashboard.
The dashboard of Quick Heal Home Security displays how much Internet data has been
consumed, Websites accessed by the home or guest users or the connected things, and security
status.
The following table includes a summary of the data consumed by all the devices and security
status.
55
Page 56

Dashboard
Section
Description
Internet Data
Consumed >
Webpages
Accessed
Shows the total number of visits to the Web pages by all home or guest
users or connected things. You can view the top five webpages visited.
Under this option, the following columns are available for Home Device,
Guest Session, and Connected Things:
Category Name: This column shows the category of the websites that
was accessed by the home or guest users or connected things.
You can block a category or a website, if required. To block the
websites, click on a category. The list of the websites appears. Select
the websites and click Block now. The blocked websites are added in
the restricted category.
Unique Websites: This column shows the number of the unique
websites accessed by the home or guest users or connected things.
Internet Data
Consumed >
Internet Data
Consumed
Shows total Internet data consumed by top 5 home devices, guest
sessions, or connected things.
Access by Device: Under Home Device, you can view the names of the
devices that are consuming Internet data.
To get the details which websites a device has visited and how often,
click on a device. You can block a device to access a website, if
required. On the list of the visited URLs, select the URLs and click
Block now. The blocked websites are added in the restricted category.
Username: Under Guest Session and Connected Things, you can view
which users or devices have consumed how much Internet data.
Data Consumed: This column shows the Internet data consumed by a
user of device.
Internet access: Shows if access to the Internet connection to the
users or devices are allowed. You can block access by clicking the
toggle bar.
Show more: This option helps to expand the result for Internet data
usage.
Security
This section displays the details of the websites blocked by QHHS for
various settings such as malicious attacks, phishing attacks, IPS attacks,
and firewall attacks. Security is classified in the following sections:
Web Security: Shows the blocked websites that were suspicious for
being malicious.
Intrusion Prevention: Shows the blocked websites that were
suspicious for intrusion attacks.
56
Page 57

Dashboard
Section
Description
Genuine Web: Shows the details about the DNSSEC of the websites,
whether the websites are reliable. The complete process takes place
at the background of the application without user intervention.
o Verified Genuine: The DNSSEC verifies and gives positive result
about the website.
o Verification unavailable: The DNS is unable to verify and provides
the result.
o Verification failed: The DNS fails to verify the URLs.
Access attempts: Shows the information and the device types (home,
guest, and connected things) that tried to access any IoT device for
which access was blocked.
Notifications
The notification pane is displayed on the upper-right corner of the dashboard. This notification
pane displays the following information:
Home Security Update Details: Indicates the status about security and firmware updates.
Security Updates: Shows if security updates for QHHS are available.
Firmware Updates: Shows if firmware updates for QHHS are available.
If the update is available, the Update option appears. To update QHHS, click Update.
Internet connection details: Indicates whether the Internet connection is available.
Green icon indicates that the Internet is available. Red icon indicates that QHHS is not
connected to the Internet.
Internet connection details dialog includes information about how long the Internet was up,
and shows the IP Address, Default Gateway, and DNS server.
Notifications: The notification bell is visible only when any notification is available.
Notifications show if any device is pending for approval, if you exceeded Internet usage, and
so on.
Information section: This section includes the following information:
About Us: This section displays the current product version, product license details such
as serial number and MAC address of the QHHS device.
o License Detail: With this option, you can view the license agreement and license
validity.
o Renew Now: With this option, you can renew the license of Quick Heal Home
Security.
Help: Displays the online help of QHHS.
Support: Displays the options to contact with the Support team and other options:
57
Page 58

Dashboard
o Product Information: Before submitting a support ticket, you should visit the Forum
or FAQs. It is most possible that you may get answers to your queries.
o Email Support: With this option, you can submit your query to the technical expert
or send an email to the Support team.
o Diagnostic Report: If you want to have detailed analysis of Quick Heal Home Security
logs, you can either send your logs to the Support team or download the log data to
your system and send it to the Support team.
o Remote Support & Configuration: With this option, you can connect with support
team to get help on a technical issue.
o Live Chart Support: With this option, you can chat with our support team to get help
online.
o Phone Support: With phone support, you can contact our India-based Support team.
Contact number: +18001217377.
Timing: Monday – Saturday, 8:00 AM to 11.00 PM. Sunday, 9:00 AM to 07.00 PM.
Logout: Helps you to log out from QHHS.
Menus
The menus are available on the left side of the dashboard. Quick Heal Home Security includes
the following menus:
Dashboard: Shows the status of the Internet data used by different devices in the network
and the applied security.
Devices: With the Devices menu, you can identify new devices, assign restrictions, create
guest sessions, and so on.
Settings: With the Settings menu, you can configure network, security, and system settings.
Need Help
The Need Help link is available on the login page of QHHS on the upper right side. Using this
option, you can open the online Help that includes the information about QHHS features. This
option is also available on all the pages of the QHHS portal on upper-right side of the page.
58
Page 59
Chapter
4
Devices
This chapter includes the following sections:
Type of devices
Pending Home Devices list
Allowed Home Devices list
Guest Sessions list
Declined Home Devices list
Adding a Home Device (Interactive Devices/Connected Things)
Setting Full Access
Setting Restricted Internet access
Guest sessions
Editing device information
Type of devices
The Devices section allows you to manage all the trusted home devices, guest devices, and
connected things. Quick Heal Home Security differentiates the devices in two categories to
apply appropriate and smart protection.
Interactive Devices: QHHS supports the following interactive devices – PCs, smartphones,
tablets, iPads, and so on.
Connected things: QHHS supports the following connected things – smart devices such as smart
TV, air conditioner, refrigerator, washing machine, and so on.
The Devices page displays the number of devices pending for approval, number of authorized
home and guest devices, and the devices that have been declined connection to your network
as described in the following table.
59
Page 60

Devices
Section/Button
Description
Pending Home
Devices
Shows the number of devices that are pending for approval.
To view the list of all devices pending for approval, click the Pending
Home Devices tab.
Allowed Home
Devices
Shows the number of home or IoT devices that have been allowed to
connect to your network.
To view the list of allowed devices, click the Allowed Home Devices
tab.
Guest Sessions
Shows the number of users that have been allowed to connect to the
Guest session.
To view the list of session, click the Guest Sessions tab.
Declined Home
Devices
Shows the number of home devices for which request to connect to
your Home network has been rejected.
To view the list of devices, click the Declined Home Devices tab.
Add Device
Helps to add new devices to a network.
Allow Guest
Helps to create new guest sessions with username and password to
connect to a network.
Column
Description
Device Name
Displays the name of the devices that try to connect to QHHS.
Manufacturer
Displays the name of the manufacturer of the device.
MAC Address
Displays the MAC address of the device that has requested for approval.
Action
Displays the action that is to be carried out on the device. Options are as
follows:
Pending Home Devices list
In this section, the list of the devices that tried to connect to your network is displayed. You can
allow or disallow the request to the devices. If any unauthorized device tries to connect to
QHHS, you can choose to decline and also decline all the notifications coming from that device.
The declined devices will be displayed in the Declined Home Devices list.
The Declined option is beneficial in case you need a confirmation or you want to allow any of
the devices to request a connection in future. Until then, no further notifications will be shown
on the QHHS dashboard.
If you remove a device from the Declined Home Devices list, the devices will be removed from
the dashboard. When the users try to connect to QHHS, a request to list the same device will
appear under pending devices list.
The list shows the following information.
60
Page 61

Devices
Column
Description
Allow: Click this option to accept the device request and provide
QHHS access. You are directed to the page where you can add the
new device.
Decline: If you do not want the device to connect to Home Security,
click Decline.
Column
Description
Devices
column
This list allows you to sort the devices based on various logics as such
how many devices are in the list, how many devices are connected,
how many devices are disconnected, and how many connected things
are in the list.
Device setting summary: To get the details of a device setting, click
the device name. To edit the device settings, click Edit on the Device
Settings Summary dialog.
Access
Restriction
Shows the information about the Home network restriction on the
device.
Unrestricted: The devices have unrestricted access to Home network.
Restricted: The devices have restricted access to Home network.
Internet
Allowed
Shows whether the Internet access is available to the device.
If required, you can turn off the Internet access with the toggle bar.
Remove
You can use this option to remove the authenticated home device from
the list.
Column
Description
Session
username
Displays the name of the guest session.
Guest session summary: To see the summary of a guest session, click the
guest session. To edit the guest session settings, click Edit on the Guest
session summary dialog.
Access
Restriction
Shows the status of Internet restrictions applied on the guest session.
Duration
Shows the duration of the guest session.
Allowed Home Devices list
The Allowed Home Devices list displays the list of the devices that have been authenticated and
are allowed to connect to the QHHS router. The list shows the following information.
Guest Sessions list
The Guest Session list shows all the added guest sessions to the QHHS portal.
61
Page 62

Devices
Column
Description
Internet
Allowed
Shows the connectivity of Internet access to the guest session.
Shows whether the Internet access is available to the guest session.
If required, you can turn off the Internet access with the toggle bar.
Remove
You can use this option to remove the guest session.
Column
Description
Device name
Displays the name of the devices that were declined to connect to the
Home network.
Manufacturer
Displays the name of the device manufacturer.
MAC Address
Displays the MAC address of the device.
Action
Displays the action that you can carry out on the device.
Allow: You can use this option to authenticate and allow the
declined home device to connect to QHHS.
Remove
The Remove icon helps to remove a device from the declined home
devices list.
Note: If a device is removed from the list, the same device can again send
a request for approval to connect to the network.
Declined Home Devices list
This list displays the name of the devices that were declined access to the Home network. The
list shows the following information.
Adding a Home Device (Interactive Devices/Connected Things)
Adding a device is a one-time process for the device that you want to connect with QHHS. You
can add the devices in any of the following ways.
Approving the device request: You receive a request for approval from a device and you
need to approve the request of the device to connect to the home Wi-Fi from dashboard.
Adding a device manually: You manually add the device to the QHHS portal.
Adding the device from the Declined Home Devices list: You can select a device from the
Declined Home Device list and approve its request.
Approving the device request
To approve the request from the device,
As a user, try to connect your device to the QHHS Wi-Fi network by entering your Wi-Fi
credentials. At first, the device is connected but Internet will not be accessible.
On the QHHS dashboard, a notification will be displayed for the device requesting an
approval from the Administrator.
62
Page 63

Devices
You can click on the notification icon or view the Pending Home Devices list to get more
information about the devices that try to connect to QHHS.
To authenticate a device, click the Allow button available next to that device.
You are directed to the page, where you can add the device with its settings.
Select the device type, which can be either of the following types:
Interactive Devices: Computers, smartphones, tablets, iPads, and so on.
Connected Things (IoT device): Network connected smart refrigerators, washing
machines, TVs, air conditioners, and so on.
Enter the Device Name.
Click Next.
The Configure device access restriction page is displayed.
Select an option from the page:
Full Access: This option is selected by default. If this policy is selected, the authorized
device will have Full Access of Internet.
Restricted Access: If this policy is applied to a device, the device will have restricted
access.
Click Next.
A confirmation page is displayed with the summary of all the settings and restrictions
applied on the device.
Click Save and then click OK.
The device is added as an authorized home device and can access the Internet as per the
defined policy.
Adding a device manually
You can add a new device manually to your Home network. After a device is added to the
trusted list, it will start using the home Internet on the device through the QHHS router.
To add a new device manually,
1. Log on to the QHHS Web portal https://myhs.quickheal.com and click the Devices menu.
2. On the default page, under the Identify a device for your home network section, click the
Add Device button. If you are on some other page such as Pending Home Devices, Allowed
Home Devices, Guest Sessions, Declined Home Devices, a plus (+) button appears. Click the
plus button and then select Add Device.
The device categories page is displayed.
3. Select whether the device is an interactive device or a connected thing.
4. Type the Device Name and MAC Address, and then click Next.
63
Page 64

Devices
Make sure you keep the MAC address of the device ready with you.
The Configure device access restriction page is displayed.
5. Select any one of the following access policies :
Full Access: This option is selected by default. If you select this option, the user will
access the Internet on the device without any restriction.
Restricted Access: If you select this policy, the user will have restricted access on the
device.
6. Click Next.
A confirmation page is displayed with the summary of all the settings and restrictions
applied on the device.
7. Click Save and then click OK.
The device is added as an authorized home device and can access your QHHS Internet as
per the defined policy.
Adding the device from the Declined Home Devices list
To allow and add the device from the Declined Home Devices list,
Log on to the QHHS Web portal https://myhs.quickheal.com.
Click the Devices menu and then click Declined Home Devices. A plus (+) button also
appears at the footer. You can click the plus button to add a new device, if required.
A list of declined devices is displayed.
Click the Allow button available next to the device that you want to allow access your home
Internet.
You are directed to the add devices page.
Enter the Device Name and verify MAC Address, and then click Next.
The Configure device access restriction page is displayed.
Select any one of the following restriction options:
Full Access: This option is selected by default. If you select this option, the user will
access the Internet on the device without any restriction.
Restricted Access: If you select this policy, the user will have restricted access on the
device.
Click Next.
A confirmation page is displayed with the summary of all the settings and restrictions
applied on the device.
Click Save and then click OK.
64
Page 65

Devices
The device is added as an authorized home device and can access your QHHS Internet as
per the defined access policy.
Setting Full Access
You can allow complete access to a device. Make sure that you allow full access to the devices
that you trust.
Log on to the QHHS Web portal https://myhs.quickheal.com.
Click the Devices menu and then click the Add Device button under a network and then
select the device type.
Make sure that you have selected Interactive Devices or Connected Things as appropriate.
Enter the Device Name and MAC Address, and click Next.
The Configure device access restriction page is displayed.
Select Full Access and click Next.
A confirmation summary will appear.
Click Save to apply your settings.
Setting Restricted Access
The Internet access policies of QHHS allow you to restrict the Internet usage to the users and
devices. You can restrict websites by categories or URLs, website domain, and schedule Internet
access time and usage limit.
This section includes the following topics.
Restrict web content by category
Restrict specific websites
Schedule Internet access
Limit Internet data usage
Restricting Internet access to IoT devices
Restricting web content by category
With this feature, you can restrict access to the users and devices by categories to keep your
children and other users cyber-safe. You can restrict access to unwanted websites such as adult,
social networking, or gaming sites. If you restrict a website category, all the websites under that
category will be blocked.
If you want to allow certain websites from a blocked category, you can enlist such websites in
the exclusion list by using the Enter Website button.
To restrict the websites by categories,
Log on to the QHHS Web portal https://myhs.quickheal.com.
65
Page 66
Devices
If any option is not selected on this page and you click Next, the device will be
added to the unrestricted devices list.
Click the Devices menu and then click the Add Device button under a network and then
select the device type.
Enter the Device Name and MAC Address, and click Next.
The Configure device access restriction page is displayed.
Select the option Restricted Access and click Next.
The Internet Access Restrictions page is displayed.
Select the Restrict web content by category check box.
The Restrict web content by category page is displayed.
Select the age group from the Age maturity of the user list.
A list of website categories is displayed that is blocked based on the age group that you
selected. Each of these groups has a set of security policies defined in QHHS.
The age group shows the predefined content type that is blocked according to the age of
the users. For example:
Adults: Have access to all content types.
Teenagers: Websites such as porn, social networking, gaming, and so on are blocked.
Young Children: Websites such as porn and violence are blocked.
After selecting the age maturity of your users, you can further change the security settings
of each group according to your requirement.
To customize the predefined settings, you can move the toggle bar under the Deny/Allow
column to that website category.
Note: Gray color indicates that the web category is blocked. Green color indicates that the
web category is accessible.
You can create a whitelist of the websites to give the users access even to the websites
from the restricted category. For example, if you have blocked Social Networking category
but you can allow access to Facebook. To add a website in the whitelist, click the Enter
Website button. To know about how to create a whitelist, see Allowing access to specific
websites.
To save the settings, click Save.
If you want to restore the default settings, click Restore default.
Allowing access to specific websites
You can allow certain webpages or websites even if their website category is blocked. To allow
access to specific websites,
66
Page 67

Devices
On the Restrict web content by category page, click Enter Website.
On the Enter websites that you want to allow page, type the name of the website in the
text box.
To allow entire website, select the Allow entire website check box, and click Add.
The website is added to the whitelist. The list shows the following information:
Allowed websites: Displays a list of all whitelisted websites.
Entire website allowed: You can use the toggle bar to allow or block the entire website.
Note:
Green color indicates that the entire website is allowed and the grey indicates that the
entire website is not accessible.
Remove: You can remove the whitelisted website from the list using this option.
After adding the website to the whitelist, click Save.
Restricting specific websites
With this feature, you can block access to specific websites. This option is helpful when you
want to restrict access to certain websites or if you have a shorter list of websites to restrict.
This option is helpful when a website does not fall in a selected category or you have restricted
a websites category yet a certain website is still accessible.
To restrict access to specific websites,
Log on to the QHHS Web portal https://myhs.quickheal.com.
Click the Devices menu and then click the Add Device button under a network and then
select the device type.
Enter the Device Name and MAC Address, and click Next.
The Configure device access restriction page is displayed.
Select the option Restricted Access and click Next.
The Internet Access Restrictions page is displayed.
Select the Restrict specific websites check box.
On the Restrict the device from accessing certain websites page, type the name of the
website in the text box.
To block the entire website along with its subdomains, select the Block entire website
check box and click ADD. The webpage will be added to the blacklist. The list shows the
following information:
Blocked website: Displays a list of all blocked websites.
Block entire website: You can use the toggle bar to block or allow the entire website.
Note:
67
Page 68

Devices
Green color indicates that the entire website is allowed and the grey indicates that the
entire website is not accessible.
Remove: You can remove the blocked website from the list using this option.
Click Save.
The webpage is added to the blocked websites list and the Internet Access Restrictions page
is displayed.
Scheduling Internet access
The Schedule Internet access feature helps you to define Internet access time to the home
users. You can select the day and time slot to allow or block the Internet access.
To schedule the Internet access schedule for new user device,
Log on to the QHHS Web portal https://myhs.quickheal.com.
Click the Devices menu and then click the Add Device button under a network and then
select the device type.
Enter the Device Name and MAC Address, and click Next.
The Configure device access restriction page is displayed.
Select the option Restricted Access and click Next.
The Internet Access Restrictions page is displayed.
Select the Schedule Internet access check box to set the time slot for Internet access.
A one-week calendar is displayed.
Click on the cells to allow the days and time to access the Internet.
When you select the cells, the total number of hours is displayed at the bottom.
Allowed time: The allowed Internet access time is shown in green color.
Blocked time: The blocked Internet access time is shown in white color.
To save the Internet access schedule, click Save.
Limiting Internet data usage
Setting up Internet data usage helps you to monitor and control the Internet usage of the Home
network. You can set Internet usage limit in MB/GB, set Internet usage duration, set
notifications for Internet usage, and also configure the action that needs to be taken when the
set Internet usage limit is exceeded.
To set up the Internet usage limit for new user device,
Log on to the QHHS Web portal https://myhs.quickheal.com.
Click the Devices menu and then click the Add Device button under a network and then
select the device type.
68
Page 69

Devices
Make sure that you have selected Interactive Devices or Connected Things as per your
preference.
Enter the Device Name and MAC Address, and click Next.
The Configure device access restriction page is displayed.
Select Restricted Access and click Next.
The Internet Access Restrictions page is displayed.
Select Limit Internet data usage and click Next.
On the Limit Internet Data Usage page, enter the following information:
Select the connected things type such as Connected AC, Connected TV, and so on. (This
option will appear if you have selected the Connected Things option for the device
type.)
Enter the usage limit in MB or GB in Specify usage limit (download + upload) text box.
Select the period for data usage limit from the available options such as Daily, Weekly,
or Monthly as required.
Notify about Internet usage: You can set the notifications to receive when the Internet
usage limit is exceeded. The options are as follows:
o Notify when usage reaches 80% of the limit: Select this option if you want to
receive notification when 80% of the set Internet usage limit is reached.
o Notify when the usage limit is reached: Select this option, if you want to receive the
notification when the set Internet usage limit is reached.
Specify an action to be taken when the allowed limit is reached. The available options are as
follows:
Block Internet: Select this option, when you want to block the Internet access as the set
Internet usage limit is reached.
Allow additional grace data: Select this option to set a grace Internet data usage, which
the user can use even after the set Internet usage limit is reached. When the grace
Internet data is consumed, the Internet access will be blocked.
o Enter the grace Internet data in MB or GB.
Click Save.
The Internet access limit is saved and the Internet Access Restrictions page is displayed.
Restricting Internet access to IoT devices
IoT (Internet of Things) devices are known as smart devices or connected things and run on
operating systems. With Quick Heal Home Security, you can manage them also.
To manage the connected things,
Log on to the QHHS Web portal https://myhs.quickheal.com.
69
Page 70

Devices
The password must contain a minimum of 8 characters.
Click the Devices menu.
Click the Allowed Home Devices link.
On the Allowed Home Devices page, a list of connected things is displayed. You can block
Internet access to these connected things using the toggle bar from the Internet Allowed
column.
The access restriction is saved.
Guest Sessions
Guest session allows QHHS Internet access to the guest devices. You can add a guest session
and give permission to multiple devices to access the Home network. Also, to have a restricted
Internet usage, you can allot specific time period after which the guest session will no longer be
accessible.
Adding guest session
To add guest session, you must create a guest session username as follows:
Log on to the QHHS Web portal https://myhs.quickheal.com.
Click the Devices menu and then click the Allow Guest button.
The Set up a Guest Session page is displayed.
Enter the user name for the guest session name in the Specify session name text box.
Enter the guest session password and then confirm the password.
Specify the number of devices that can connect to the guest session. You can add up to 25
devices. Drag and adjust the bar or directly add the number of users in the text box.
In the Specify guest session validity section, select the required options:
Permanent: Select this option to allow permanent Internet access to the devices of
guest session.
Valid up to: Select this option to provide Internet access to the guest devices for specific
number of hours. Select the number of hours from the options list box.
Valid up to a specified date and time in the future: Select this option to provide
Internet access to the guest devices for a specific date and time in future.
o Select the date from the calendar and mention the timing. QHHS supports 24-hours
format.
To save the settings, click Next.
Internet settings page is displayed.
Apply the Internet access policy as required.
70
Page 71

Devices
To know about how to configure Internet access policy, see Setting Restricted Internet
access.
If you do not apply any restrictions, all the devices of guest session will have no restrictions.
To save the settings, click Save.
Editing device information
At times, you may need to change the configuration and policies of the QHHS devices (Home,
Guest devices, and connected things).
To edit the device information,
Log on to the QHHS Web portal https://myhs.quickheal.com.
Click the Devices menu and click Allowed Home Devices.
Select the appropriate category from the list, such as All Devices, Connected Devices,
Disconnected Devices, and Connected Things (IoT devices). You can do the following things:
Allow/Block Internet access: You can allow or block Internet access to a device by using
the toggle bar under Internet Allowed.
Remove device: You can remove a device from the list by using the Remove icon.
To edit further settings, click on a device name from the Allowed Home Devices list.
The Device Settings Summary dialog is displayed.
Click the Edit button.
The Identify a device for use in home page is displayed. Make the required changes and
click Next.
Internet Access Restrictions page is displayed.
Select the appropriate options and click Next.
If any Internet restriction policies are selected, make the desired changes.
To know about how to configure Internet restriction policies, see Setting Restricted Internet
access.
To save the edited settings, click Save.
71
Page 72

The password must contain a minimum of 8 characters.
Chapter
5
Settings
Using the Settings page, you can make changes to the network, security, and system settings
that you had initially set while registering the QHHS device. Also, you can allow or block access
to the guest Wi-Fi network. QHHS provides the following settings:
Network
Security
System
Network
The Network Settings section allows you to configure the Home Network LAN, Home Security
Internet, and Advanced Settings. You can change the SSID Internet network, home Wi-Fi
password, and Guest Wi-Fi SSID/network name. You can also enable or disable the guest Wi-Fi
session and add or edit the guest session SSID Internet network from this page.
Configuring Home Network
With this option, you can configure the home Wi-Fi network password and guest Wi-Fi network.
To enter or change the Home Network or Guest Wi-Fi SSID Internet network,
Log on to the QHHS Web portal https://myhs.quickheal.com.
Click the Settings menu and then click Network.
For Home Wi-Fi Network, enter the Home Wi-Fi Network Name (SSID), Password, and
then confirm the password.
All the devices will use the same name and password to connect to QHHS.
For Guest Wi-Fi Network, enter the Guest Wi-Fi Network Name (SSID).
All the authorized guest devices will use this Wi-Fi network.
72
Page 73

Settings
You can also disable the Guest Wi-Fi Network not to allow any guest device to your
network.
Note: After changing the Home/Guest SSID Internet network, reconnect the device to
the new SSID Internet network.
Click Save.
On confirmation dialog, click OK.
After updating the Home network LAN, you may need to reconnect the Wi-Fi devices.
Home Security Internet
This section allows you to make changes in the Internet settings for router and USB dongle.
Configuring Home Security Internet Settings
To configure Home Internet network settings,
Log on to the QHHS Web portal https://myhs.quickheal.com.
Click the Settings menu and then select Network > Home Security Internet.
If the Internet is connected using a modem/router, select the option for IP address under
the Home Security Internet Settings section as follows:
Obtain Home Security Internet IP address automatically (if there is a DHCP server
available): This is a recommended option and helps to automatically obtain the Home
Security Internet IP address.
Manually specify Home Security Internet IP address settings: This option allows you to
set up the IP address manually. Enter the IP address, subnet mask, default gateway, and
DNS address as required.
You are provided these settings by your ISP (Internet Service Provider). Enter the
following details:
o IP Address: Enter the IP address here.
o Subnet Mask: Enter the subnet mask IP address here.
o Default Gateway: Enter default gateway IP address here.
o DNS: Enter the DNS IP address here.
PPPoE Configuration (Point-to-Point Protocol over Ethernet):You can use this option to
connect to the Internet. You simply need to provide your user credentials and it will get
connected automatically.
Click Save.
Mobile Internet dongle or portable router Settings
In this section, you can configure the Mobile Internet dongle or portable router access.
73
Page 74

Settings
To configure the Mobile Internet dongle or portable router settings,
Log on to the QHHS Web portal https://myhs.quickheal.com.
Click the Settings menu and then select Network > Home Security Internet.
On the Home Security Internet page, click the radio button to enable the Mobile Internet
dongle or portable router setting option.
Add the information for the following.
APN: Enter the APN.
Username: Enter the user name.
Password: Enter the Password.
Dial Number: Enter the number.
Click Save.
Advanced Setting
The Advanced Settings section allows you to make changes in the Network IP subnet and
wireless range settings.
Network IP Subnet: This is the range of subnet from which the connected devices get the IP
address.
Wi-Fi Settings: Allows you to set frequency and wireless access range.
Configuring Advanced settings
To configure the Advanced Settings,
Log on to the QHHS Web portal https://myhs.quickheal.com.
Click the Settings menu and then select Network > Advanced Settings.
Under Network IP Subnet, select an IP subnet.
Configure the Wi-Fi Settings as required:
Automatic: Select this option to select the Wi-Fi settings automatically.
Manual: Select this option to configure the channel.
Under Transmit Power, select the percentage of the maximum reach of your Wi-Fi signal.
Click Save.
Security
Security helps you to configure the network and browsing security and phishing protection.
74
Page 75

Settings
Configuring Security
To configure or change the network security settings for all Home and guest devices,
Log on to the QHHS Web portal https://myhs.quickheal.com.
Click the Settings menu and then click Security.
On the Security page, configure the network and browsing security settings as follows:
IPS/IDS: With this option, you can activate the intrusion detection and prevention for all
Home and guest devices.
Use the toggle bar to enable or disable the intrusion detection and prevention. By
default, it is turned on.
Device to Device Access Restriction: With this option, you can restrict the connected
things from communicating with one another.
Use the toggle bar to enable or disable the device to device access restriction. By
default, it is turned on.
Browsing Protection: Browsing security provides a complete protection from cyber
threats. It protects your devices from various kinds of malicious, phishing, and
fraudulent attempts.
Use the toggle bar to enable or disable the browsing protection for malicious, phishing,
and fraudulent websites. By default, it is turned on.
Phishing Protection: Phishing protection prevents phishing attempts and restricts the
devices from accessing the phishing websites.
Use the toggle bar to enable or disable the phishing protection. By default, it is turned
on.
System
With System, you can reset the admin password, set billing cycle, change time zone, set email
address to receive notification, backup and restore devices, factory reset, upgrade firmware,
and reboot the device.
Reset Admin Password
The admin password is the password that you use for logging on to the QHHS Web portal.
To change the admin password,
Log on to the QHHS Web portal https://myhs.quickheal.com.
Click the Settings menu and then click System.
In the Reset admin password section, enter old password, new password, and re-enter the
new password.
75
Page 76
Settings
The password must contain a minimum of 8 characters.
Click Save.
Set Your Billing Cycle
This option helps to set your billing cycle.
To set your billing cycle,
Log on to the QHHS Web portal https://myhs.quickheal.com.
Click the Settings menu and then click System.
In the Set your billing cycle section, select the start date and end date, and then click Save.
Set Language
This option helps you to set the language of the web content.
To set language,
Log on to the QHHS Web portal https://myhs.quickheal.com.
Click the Settings menu and then click System.
In the Set Language section, select a language and then click Save.
Email Address to Get Notifications
You can add your email address to receive notifications about Internet data usage to it.
To add or change the email address to receive notifications,
Log on to the QHHS Web portal https://myhs.quickheal.com.
Click the Settings menu and then click System.
In the Email Address to Get Notifications section, add the email address and click Save, or
click Edit, add the email address, and then click Save.
Backup & Restore
With Backup and Restore option, you will be able to back up all the device configurations
settings and when required restore them back.
To take a backup or restore the backup of the device settings,
Log on to the QHHS Web portal https://myhs.quickheal.com.
Click the Settings menu and then click System.
In the Backup & Restore section, follow one of the processes as per requirement:
To take the backup, click Backup. The backup is stored on your computer.
To restore the backup, browse and select the file that contains the restored data by
clicking Choose File. Then click Restore.
76
Page 77

Settings
The use of Firmware Upgrade may result in loss of connectivity and/or
configured settings.
Factory Reset
With Factory Reset option, you can reset the QHHS settings to default settings. All the user data
and your settings, except the product registration information, are removed. Hence, it is
advisable to use this option only when it is required.
To perform a factory reset,
Log on to the QHHS Web portal https://myhs.quickheal.com.
Click the Settings menu and then click System.
In the Factory Reset section, click Reset.
Confirm your action.
Alternatively, you can long press the Reset button on the device to factory reset.
Note: It may take a few minutes to reset. After factory reset, the network that you created
will be removed. You need to do unboxing through the default network: HS-Unbox.
Tips:
Check the connection lights on the QHHS device. Wait until all the connection lights turn
on.
Once all the connection lights on the QHHS device turn on, connect to the default
network HS-Unbox, open the browser and run the link https://myhs.quickheal.com.
Follow the unboxing process to register QHHS once again.
If there is any issue in connecting the network, switch off the power of the QHS device
and then switch the device on again.
Firmware Upgrade
The Firmware Upgrade section shows the available system upgrade and the current version of
the system.
If there is any upgrade available, the system will be upgraded automatically. If there is a
difference between available system upgrade and the current version of the system, you can
upgrade the system manually.
To upgrade the system,
Log on to the QHHS Web portal https://myhs.quickheal.com.
Click the Settings menu and then click System.
In the Firmware Upgrade section, click Update.
On the confirmation dialog, click Yes.
77
Page 78

Settings
Telemetry
Telemetry continuously collects your device settings and user preferences. You may enable or
disable as per your preference.
To enable or disable,
Log on to the QHHS Web portal https://myhs.quickheal.com.
Click the Settings menu and then click System.
In the Telemetry section, click Enable or Disable.
Reboot
The Reboot option helps to restart the QHHS router. In this process, all the connected devices
in your Home network are disconnected and will reconnect after the QHHS router restarts.
To perform a reboot,
Log on to the QHHS Web portal https://myhs.quickheal.com.
Click the Settings menu and then click System.
In the Reboot section, click Reboot.
On the confirmation dialog, click Yes.
78
Page 79
Chapter
6
Support
Quick Heal provides extensive technical support for the registered users. It is recommended
that you have all the necessary details with you during the support call to receive efficient
support from the Quick Heal support executives.
To see the support options, follow these steps:
Log on to the QHHS Web portal https://myhs.quickheal.com.
On top right corner, click on the information section, and then click Support.
The Support page includes the following options.
Product Information: Visit Forums includes online forum where you can search your query
to get an appropriate answer. Visit FAQ includes most frequently asked questions. When
you visit this web page, click your product. You can see the FAQ list.
Email Support: Using this option, you can submit a ticket for your query online or send us
an email. We will send an appropriate answer at the earliest.
Diagnostic Report: If you doubt you have detected some virus, you can send this report to
us.
Remote Support & Configuration: Using this option, you can connect with us to get help
from our support team on a technical issue.
Live Chat Support: Using this option, you can connect with us live to get your issues
resolved.
Support Contacts
Toll Free Number: 1800 121 7377
Email: [email protected]
For chat support, please visit https://www.quickheal.co.in/quick-heal-support-center.
For more support, please visit https://www.quickheal.co.in/contact.
79
Page 80

Support
Head Office Contact Details
Quick Heal Technologies Ltd.
(Formerly Known as Quick Heal Technologies Pvt. Ltd.)
Reg. Office: Marvel Edge, Office No. 7010 C & D, 7th Floor,
Viman Nagar, Pune 411014.
Phone: +91 20 6681 3232
Website: https://www.quickheal.co.in
80
 Loading...