

Page 1

DL4300 Appliance
User Guide
Page 2

Table of Contents
Introduction to DL Appliance.................................................................................................................13
Deployment architecture................................................................................................................ 13
Smart Agent........................................................................................................................... 15
DL Appliance Core.................................................................................................................15
Snapshot process.................................................................................................................. 15
Replication of disaster recovery site or service provider....................................................... 16
Recovery................................................................................................................................ 16
Product features.............................................................................................................................16
Understanding repositories.................................................................................................... 17
Deduplication in Rapid Recovery.......................................................................................... 18
Understanding encryption keys..............................................................................................19
Replication with Rapid Recovery........................................................................................... 20
Retention and archiving......................................................................................................... 24
Virtualization and cloud..........................................................................................................25
Alerts and event management...............................................................................................26
License portal.........................................................................................................................26
Web console.......................................................................................................................... 26
Service management APIs.................................................................................................... 26
Working with the DL Appliance Core....................................................................................................27
Running the Appliance Configuration Wizard............................................................................... 27
Understanding the Rapid Recovery Core Console....................................................................... 28
Accessing the Rapid Recovery Core Console...................................................................... 28
Understanding the Quick Start Guide....................................................................................28
Hiding the Quick Start Guide......................................................................................... 30
Navigating the Rapid Recovery Core Console......................................................................31
Understanding the left navigation area.......................................................................... 32
Viewing the Rapid Recovery Core Console Home page...............................................32
Viewing the Protected Machines menu................................................................................. 36
Viewing summary information for a protected machine.................................................38
Viewing recovery points for a machine..........................................................................39
Viewing events for a protected machine........................................................................40
Viewing reports for a protected machine....................................................................... 42
Viewing replicated machines from the navigation menu....................................................... 42
Viewing the Recovery Points Only menu.............................................................................. 42
Viewing the Custom Groups menu........................................................................................43
Using the Error dialog box.....................................................................................................43
DL4300 Appliance
2
Page 3

Core settings..................................................................................................................................43
Rapid Recovery Core settings............................................................................................... 44
Configuring Core general settings................................................................................. 48
Configuring update settings........................................................................................... 48
Understanding nightly jobs............................................................................................. 50
Modifying transfer queue settings.................................................................................. 53
Adjusting client timeout settings.....................................................................................54
Understanding deduplication cache and storage locations............................................55
Configuring Replay engine settings............................................................................... 58
Configuring deployment settings.................................................................................... 60
Configuring database connection settings..................................................................... 61
Modifying local database connection settings............................................................... 63
Managing SMTP server settings....................................................................................63
Managing Cloud configuration settings..........................................................................64
Managing report settings................................................................................................64
Managing Core SQL attachability settings.....................................................................65
Understanding Core jobs............................................................................................... 66
Managing licenses..........................................................................................................74
Understanding SNMP settings....................................................................................... 78
Configuring vSphere settings......................................................................................... 80
Backing up and restoring Core settings................................................................................ 81
Core-level tools...................................................................................................................... 82
Understanding system information for the Core............................................................ 83
Accessing Core logs...................................................................................................... 85
Roadmap for configuring the Core................................................................................................ 86
Repositories................................................................................................................................... 86
Managing a DVM repository.................................................................................................. 86
Creating a DVM repository.............................................................................................87
Expanding repository......................................................................................................90
Viewing or modifying repository details......................................................................... 92
Adding a storage location to an existing DVM repository.............................................. 93
About checking the integrity of DVM repositories..........................................................96
Checking a repository.................................................................................................... 97
About the Repository Optimization Job......................................................................... 97
Running the Check Repository Job on a DVM repository........................................... 100
Managing security........................................................................................................................101
Applying or removing encryption from a protected machine............................................... 102
Associating an encryption key with a protected machine............................................ 102
DL4300 Appliance
3
Page 4

Applying an encryption key from the Protected Machines page..................................103
Disassociating an encryption key from a protected machine.......................................104
Managing encryption keys................................................................................................... 105
Adding an encryption key............................................................................................ 107
Importing an encryption key.........................................................................................108
Unlocking an encryption key........................................................................................ 109
Locking an encryption key........................................................................................... 110
Editing an encryption key.............................................................................................110
Changing an encryption key passphrase.....................................................................111
Exporting an encryption key.........................................................................................111
Removing an encryption key........................................................................................112
Changing encryption key types....................................................................................112
Managing cloud accounts............................................................................................................113
About cloud accounts.......................................................................................................... 114
Adding a cloud account....................................................................................................... 114
Editing a cloud account....................................................................................................... 116
Configuring cloud account settings......................................................................................116
Removing a cloud account.................................................................................................. 117
Archiving.......................................................................................................................................117
Understanding archives....................................................................................................... 117
Creating an archive..............................................................................................................118
Archiving to a cloud..................................................................................................... 121
Editing a scheduled archive.................................................................................................122
Pausing or resuming a scheduled archive.......................................................................... 124
Forcing an archive job......................................................................................................... 124
Checking an archive............................................................................................................ 125
Attaching an archive............................................................................................................ 126
Importing an archive............................................................................................................ 128
Events.......................................................................................................................................... 130
Rapid Recovery events........................................................................................................131
Viewing events using tasks, alerts, and journal.................................................................. 131
Viewing tasks............................................................................................................... 131
Viewing alerts............................................................................................................... 133
Viewing all events........................................................................................................ 134
Understanding email notifications........................................................................................ 134
Configuring an email server......................................................................................... 135
Configuring an email notification template................................................................... 136
Notification groups, SMTP settings and notification templates for system events...............138
DL4300 Appliance
4
Page 5

Configuring notification groups............................................................................................ 139
About configuring repetition reduction................................................................................. 142
Configuring repetition reduction................................................................................... 143
Configuring event retention..................................................................................................143
Rapid Appliance Self Recovery................................................................................................... 144
Creating the RASR USB key...............................................................................................144
Executing RASR.................................................................................................................. 145
The Local Mount Utility................................................................................................................146
About the Local Mount Utility...............................................................................................146
Working with Rapid Recovery Core machines in the Local Mount Utility............................ 147
Adding a Core machine to the Local Mount Utility...................................................... 147
Changing the Local Mount Utility options.................................................................... 148
Editing Core connection settings in the Local Mount Utility.........................................149
Reconnecting to a Core............................................................................................... 150
Removing a Rapid Recovery Core machine from the Local Mount Utility................... 150
Working with protected machines in the Local Mount Utility............................................... 150
Mounting a recovery point using the Local Mount Utility............................................. 151
Exploring a mounted recovery point using the Local Mount Utility.............................. 152
Refreshing recovery points.......................................................................................... 152
Dismounting individual recovery points using the Local Mount Utility..........................152
Dismounting all recovery points from a single Rapid Recovery Core or protected
machine................................................................................................................................................153
Dismounting all mounted recovery points using the Local Mount Utility...................... 153
Using the Local Mount Utility tray menu............................................................................. 154
Managing Your Appliance................................................................................................................... 155
Monitoring status of the Appliance.............................................................................................. 155
Windows backup..........................................................................................................................155
Backup Status...................................................................................................................... 156
Windows Backup Policy.......................................................................................................157
Provisioning storage.................................................................................................................... 158
Deleting space allocation for a virtual disk..................................................................................160
Recovery and Update Utility........................................................................................................160
Upgrading your Appliance....................................................................................................160
Repairing your Appliance.....................................................................................................161
Protecting workstations and servers................................................................................................... 162
Protecting machines.................................................................................................................... 162
About protecting machines with Rapid Recovery................................................................162
About protecting Linux machines with Rapid Recovery...............................................163
About managing Exchange and SQL servers in Rapid Recovery Core.......................163
DL4300 Appliance
5
Page 6

About protecting server clusters.................................................................................. 164
Support for dynamic and basic volumes......................................................................165
Understanding the Rapid Recovery Agent software installer.......................................166
Deploying Agent to multiple machines simultaneously from the Core Console........... 166
Deploying the Rapid Recovery Agent software to one or more machines...................167
Modifying deploy settings............................................................................................. 171
Understanding protection schedules............................................................................172
Protecting a machine................................................................................................... 173
Managing protected machines..................................................................................... 185
About protecting multiple machines............................................................................. 203
Settings and functions for protected Exchange servers.............................................. 220
Settings and functions for protected SQL servers....................................................... 224
Understanding Rapid Snap for Virtual......................................................................... 227
Protecting vCenter/ESXi virtual machines without the Rapid Recovery Agent............ 230
Accessing protected machine diagnostics...........................................................................235
Downloading and viewing the log file for a protected machine....................................236
Downloading and viewing the log file for a protected machine....................................236
Viewing machine status and other details................................................................... 237
Managing machines.....................................................................................................................238
Removing a machine........................................................................................................... 238
Canceling operations on a machine.................................................................................... 238
Viewing license information on a machine.......................................................................... 239
VM export.....................................................................................................................................239
About exporting to virtual machines with Rapid Recovery.................................................. 239
Performing a one-time ESXi export............................................................................. 241
Performing a continual (Virtual Standby) ESXi export................................................. 242
Performing a one-time VMware Workstation export.................................................... 245
Performing a continual (Virtual Standby) VMware Workstation export........................ 246
Performing a one-time Hyper-V export........................................................................ 249
Performing a continual (Virtual Standby) Hyper-V export............................................250
Performing a one-time VirtualBox export..................................................................... 252
Performing a continual (Virtual Standby) VirtualBox export.........................................253
Managing exports.................................................................................................................255
Exporting data to an ESXi virtual machine.................................................................. 257
Exporting data to a VirtualBox virtual machine............................................................261
Exporting data to a VMware Workstation virtual machine........................................... 265
Exporting data to a Hyper-V virtual machine............................................................... 268
Managing aging data................................................................................................................... 273
DL4300 Appliance
6
Page 7

About Rapid Recovery data retention and archiving........................................................... 273
Managing retention policies................................................................................................. 273
Configuring Core default retention policy settings....................................................... 274
Customizing retention policy settings for a protected machine....................................276
Forcing rollup for a protected machine........................................................................ 278
Replication....................................................................................................................................279
Replication with Rapid Recovery......................................................................................... 279
Recovery point chains and orphans.................................................................................... 282
When replication begins.......................................................................................................283
Determining your seeding needs and strategy....................................................................283
Performance considerations for replicated data transfer.....................................................285
About replication and encrypted recovery points.........................................................286
About retention policies for replication......................................................................... 286
Replicating to a self-managed target Core..........................................................................287
Viewing incoming and outgoing replication......................................................................... 291
Configuring replication......................................................................................................... 293
Replicating to a third-party target Core............................................................................... 294
Submitting a replication request to a third-party service provider................................295
Reviewing a replication request from a customer........................................................298
Approving a replication request................................................................................... 298
Denying a replication request...................................................................................... 299
Ignoring a replication request from a customer........................................................... 299
Adding a machine to existing replication............................................................................. 299
Consuming the seed drive on a target Core....................................................................... 302
Abandoning a seed drive............................................................................................. 304
Managing replication settings.............................................................................................. 304
Scheduling replication.................................................................................................. 305
Using the Copy function to create a seed drive.......................................................... 306
Monitoring replication................................................................................................... 308
Pausing and resuming replication................................................................................310
Forcing replication........................................................................................................ 311
Managing settings for outgoing replication.................................................................. 311
Changing target Core settings..................................................................................... 312
Setting replication priority for a protected machine......................................................313
Removing replication............................................................................................................313
Removing outgoing replication from the source Core..................................................314
Removing incoming replication from the target Core...................................................314
Recovering replicated data.................................................................................................. 315
DL4300 Appliance
7
Page 8

Recovering data...................................................................................................................................316
Managing recovery...................................................................................................................... 316
Snapshots and recovery points................................................................................................... 316
Managing snapshots and recovery points........................................................................... 316
Viewing the recovery points page of a protected machine..................................................317
Understanding recovery point status indicators........................................................... 318
Mounting a recovery point................................................................................................... 319
Dismounting recovery points................................................................................................320
Working with Linux recovery points.....................................................................................321
Mounting a recovery point volume on a Linux machine.............................................. 321
Unmounting a recovery point on a Linux machine...................................................... 323
Forcing a snapshot.............................................................................................................. 323
Removing recovery points................................................................................................... 324
Deleting an orphaned recovery point chain.........................................................................325
Migrating recovery points manually to a different repository............................................... 325
Restoring data..............................................................................................................................326
About restoring data with Rapid Recovery.......................................................................... 326
Understanding Live Recovery.............................................................................................. 327
Restoring data from recovery points................................................................................... 327
About restoring volumes from a recovery point...................................................................328
Restoring volumes from a recovery point.................................................................... 329
Restoring a directory or file using Windows Explorer.................................................. 331
Restoring a directory or file and preserving permissions using Windows Explorer...... 332
Performing a restore for clusters and cluster nodes........................................................... 332
Restoring from an attached archive.................................................................................... 333
Understanding bare metal restore for Windows machines......................................................... 334
Bare metal restore for Windows machines..........................................................................334
Performing a bare metal restore for Windows machines.............................................335
About performing a bare metal restore using the Restore Machine Wizard................ 337
Understanding boot CD creation for Windows machines.................................................... 340
Understanding driver injection in a boot CD................................................................ 341
Creating a boot CD ISO image....................................................................................341
Transferring the boot CD ISO image to media............................................................ 343
Loading the boot CD and starting the target machine................................................. 343
Using the Universal Recovery Console for a BMR............................................................. 344
About the Universal Recovery Console tools.............................................................. 344
Loading drivers using the Universal Recovery Console.............................................. 345
Selecting a recovery point and initiating a BMR.......................................................... 346
DL4300 Appliance
8
Page 9

About disk mapping for a bare metal restore.............................................................. 347
Performing a BMR from an archive............................................................................. 349
Loading drivers to the operating system......................................................................351
Performing a bare metal restore for Linux machines.......................................................... 352
Prerequisites for performing a bare metal restore for a Linux machine.......................354
Managing a Linux boot image..................................................................................... 354
Managing Linux partitions............................................................................................ 356
Launching a bare metal restore for Linux.................................................................... 359
Restoring volumes for a Linux machine using the command line................................361
Verifying a bare metal restore............................................................................................. 362
Viewing the recovery progress.....................................................................................363
Starting a restored target server..................................................................................363
Troubleshooting connections to the Universal Recovery Console...............................363
Repairing boot problems.............................................................................................. 364
Verifying the bare metal restore from the command line.............................................364
Generating and viewing reports.......................................................................................................... 367
About Rapid Recovery reports.................................................................................................... 367
Generating a report from the Core Console........................................................................369
Generating a Core report on demand..........................................................................369
Generating a protected machine report on demand.................................................... 372
Managing scheduled reports from the Core Console..........................................................373
Scheduling a report......................................................................................................374
Modifying a report schedule.........................................................................................377
Pausing, resuming, or deleting a scheduled report..................................................... 377
Using the Reports menu...................................................................................................... 378
Using the Reports toolbar.................................................................................................... 379
Understanding the Job report.............................................................................................. 381
Understanding the Job Summary report..............................................................................381
Understanding the Failure report......................................................................................... 382
Understanding the Summary report.....................................................................................382
Understanding the Repository report...................................................................................383
The Central Management Console............................................................................................. 384
Understanding the Rapid Recovery Central Management Console....................................384
Configuring the Rapid Recovery Central Management Console.........................................386
Adding a Core to the Central Management Console...................................................386
Configuring Core settings in the Central Management Console..................................387
Adding a Core group to the Central Management Console.........................................388
Configuring Core group settings.................................................................................. 389
DL4300 Appliance
9
Page 10

Configuring Core group access................................................................................... 390
Understanding Central Management Console core reports................................................ 390
Generating a report from the Central Management Console.......................................391
Core Console references.................................................................................................................... 393
Viewing the Core Console user interface....................................................................................393
Viewing the Protected Machines pane........................................................................................403
Viewing events for a protected machine............................................................................. 406
Viewing the More menu for a protected machine................................................................408
Understanding the Rapid Recovery PowerShell module.................................................................... 410
Prerequisites for using PowerShell............................................................................................. 411
powershell.exe.config...........................................................................................................411
Launching PowerShell and importing the module............................................................... 411
Working with commands and cmdlets.........................................................................................412
Rapid Recovery PowerShell module cmdlets............................................................................. 412
Edit-EsxiVirtualStandby........................................................................................................416
Edit-HyperVVirtualStandby...................................................................................................417
Edit-ScheduledArchive......................................................................................................... 419
Edit-VBVirtualStandby.......................................................................................................... 421
Edit-VMVirtualStandby......................................................................................................... 423
Get-ActiveJobs..................................................................................................................... 424
Get-Clusters......................................................................................................................... 426
Get-CompletedJobs..............................................................................................................427
Get-ExchangeMailStores......................................................................................................428
Get-Failed.............................................................................................................................429
Get-FailedJobs..................................................................................................................... 430
Get-Mounts...........................................................................................................................432
Get-Passed...........................................................................................................................433
Get-ProtectedServers...........................................................................................................434
Get-ProtectionGroups...........................................................................................................434
Get-QueuedJobs.................................................................................................................. 435
Get-RecoveryPoints............................................................................................................. 437
Get-ReplicatedServers......................................................................................................... 438
Get-Repositories...................................................................................................................439
Get-ScheduledArchives........................................................................................................439
Get-SqlDatabases................................................................................................................ 440
Get-UnprotectedVolumes.....................................................................................................441
Get-VirtualizedServers......................................................................................................... 442
Get-Volumes.........................................................................................................................443
DL4300 Appliance
10
Page 11

New-Base............................................................................................................................. 444
New-CloudAccount...............................................................................................................445
New-EncryptionKey.............................................................................................................. 446
New-EsxiVirtualStandby.......................................................................................................447
New-HyperVVirtualStandby..................................................................................................449
New-Mount........................................................................................................................... 451
Resume-Replication............................................................................................................. 453
New-Repository.................................................................................................................... 453
New-ScheduledArchive........................................................................................................ 455
New-Snapshot...................................................................................................................... 457
New-VBVirtualStandby.........................................................................................................458
New-VMVirtualStandby........................................................................................................ 460
Push-Replication.................................................................................................................. 461
Push-Rollup.......................................................................................................................... 462
Remove-Agent......................................................................................................................463
Remove-Mount..................................................................................................................... 464
Remove-Mounts................................................................................................................... 465
Remove-RecoveryPoints......................................................................................................466
Remove-Repository..............................................................................................................467
Remove-ScheduledArchive..................................................................................................468
Remove-VirtualStandby........................................................................................................469
Resume-Replication............................................................................................................. 470
Resume-Snapshot................................................................................................................471
Resume-VirtualStandby........................................................................................................472
Resume-VMExport............................................................................................................... 473
Start-Archive.........................................................................................................................474
Start-AttachabilityCheck....................................................................................................... 475
Start-ChecksumCheck..........................................................................................................476
Start-EsxiExport....................................................................................................................477
Start-HypervExport............................................................................................................... 479
Start-LogTruncation..............................................................................................................481
Start-MountabilityCheck....................................................................................................... 482
Start-Protect......................................................................................................................... 483
Start-ProtectCluster.............................................................................................................. 484
Start-RepositoryCheck......................................................................................................... 486
Start-RestoreArchive............................................................................................................ 487
Start-ScheduledArchive........................................................................................................488
Start-VBExport......................................................................................................................489
DL4300 Appliance
11
Page 12

Start-VirtualStandby............................................................................................................. 491
Start-VMExport..................................................................................................................... 492
Stop-ActiveJobs....................................................................................................................494
Suspend-Replication............................................................................................................ 495
Suspend-RepositoryActivity..................................................................................................497
Suspend-ScheduledArchive................................................................................................. 498
Suspend-Snapshot...............................................................................................................498
Suspend-VirtualStandby.......................................................................................................499
Suspend-VMExport.............................................................................................................. 500
Update-Repository................................................................................................................501
Localization.................................................................................................................................. 502
Qualifiers...................................................................................................................................... 502
Extending Rapid Recovery jobs using scripting..................................................................................504
Using PowerShell scripts in Rapid Recovery.............................................................................. 504
Qualifiers.............................................................................................................................. 505
Input Parameters for PowerShell Scripting................................................................................. 506
Sample PowerShell scripts..........................................................................................................518
PreTransferScript.ps1...........................................................................................................518
PostTransferScript.ps1.........................................................................................................518
PreExportScript.ps1..............................................................................................................519
PostExportScript.ps1............................................................................................................ 519
PreNightlyJobScript.ps1....................................................................................................... 520
PostNightlyJobScript.ps1......................................................................................................521
Using Bourne Shell scripting in Rapid Recovery........................................................................ 523
Input parameters for Bourne Shell scripting................................................................................524
Sample Bourne Shell scripts....................................................................................................... 526
PreTransferScript.sh.............................................................................................................527
PostTransferScript.sh........................................................................................................... 527
PostExportScript.sh.............................................................................................................. 527
Rapid Recovery APIs.......................................................................................................................... 528
Intended audience....................................................................................................................... 528
Working with Rapid Recovery REST APIs..................................................................................528
Downloading and viewing Core and Agent APIs........................................................................ 528
Recommended additional reading............................................................................................... 531
About Quest.........................................................................................................................................532
Glossary............................................................................................................................................... 533
DL4300 Appliance
12
Page 13

Introduction to DL Appliance
The DL Appliance with Rapid Recovery software is a backup, replication, and recovery solution that offers nearzero recovery time objectives and recovery point objectives. Rapid Recovery offers data protection, disaster
recovery, data migration and data management .You have the flexibility of performing bare-metal restore (to
similar or dissimilar hardware), and you can restore backups to physical or virtual machines, regardless of origin.
With Rapid Recovery you can replicate to one or more targets for added redundancy and security.
Your appliance sets a new standard for unified data protection by combining backup, replication, and recovery
in a single solution that is engineered to be the fastest and most reliable backup for protecting virtual machines
(VM), physical machines, and cloud environments.Your appliance is capable of handling up to petabytes of
data with built-in global deduplication, compression, encryption, and replication to any private or public cloud
infrastructure. Server applications and data can be recovered in minutes for data retention and compliance.
Your appliance supports multi-hypervisor environments on VMware vSphere and Microsoft Hyper-V private and
public clouds.
Rapid Recovery offers:
• Flexibility. You can perform universal recovery to multiple platforms, including restoring from physical to virtual, virtual to
physical, virtual to virtual, and physical to physical.
• Cloud integration. You can archive and replicate to the cloud, using cloud storage vendors that support both proprietary
and open-source platforms.
• Intelligent deduplication. You can reduce storage requirements by storing data once, and referencing it thereafter (once
per repository or encryption domain).
• Instant recovery. Our Live Recovery feature allows you to access critical data first, while remaining restore operations
complete in parallel.
• File-level recovery. You can recover data at the file level on-premise, from a remote location, or from the cloud.
•
Virtual support. Enhanced support for virtualization includes agentless protection and autodiscovery for VMware
ESXi™ 5 and higher, and export to Microsoft® Hyper-V® cluster-shared volumes.
®
See the following resources for more information about Rapid Recovery.
• The Dell Rapid Recovery product support website at https://support.software.dell.com/rapid-recovery/
• The documentation website at https://support.software.dell.com/rapid-recovery/release-notes-guides/ and http://
www.dell.com/support/home/.
Deployment architecture
Your appliance is a scalable backup and recovery product that is flexibly deployed within the enterprise or as a
service delivered by a managed service provider. The type of deployment depends on the size and requirements
of the customer. Preparing to deploy your appliance involves planning the network storage topology, core
hardware and disaster recovery infrastructure, and security.
The deployment architecture consists of local and remote components. The remote components may be optional
for those environments that do not require leveraging a disaster recovery site or a managed service provider for
off-site recovery. A basic local deployment consists of a backup server called the Core and one or more protected
DL4300 Appliance
Deployment architecture
13
Page 14
machines. The off-site component is enabled using replication that provides full recovery capabilities in the DR
site. The Core uses base images and incremental snapshots to compile recovery points of protected machines.
Additionally, your appliance is application-aware because it can detect the presence of Microsoft Exchange and
SQL and their respective databases and log files, and then automatically group these volumes with dependency
for comprehensive protection and effective recovery. This ensures that you never have incomplete backups when
you are performing recoveries. Backups are performed by using application-aware block-level snapshots. Your
appliance can also perform log truncation of the protected Microsoft Exchange and SQL servers.
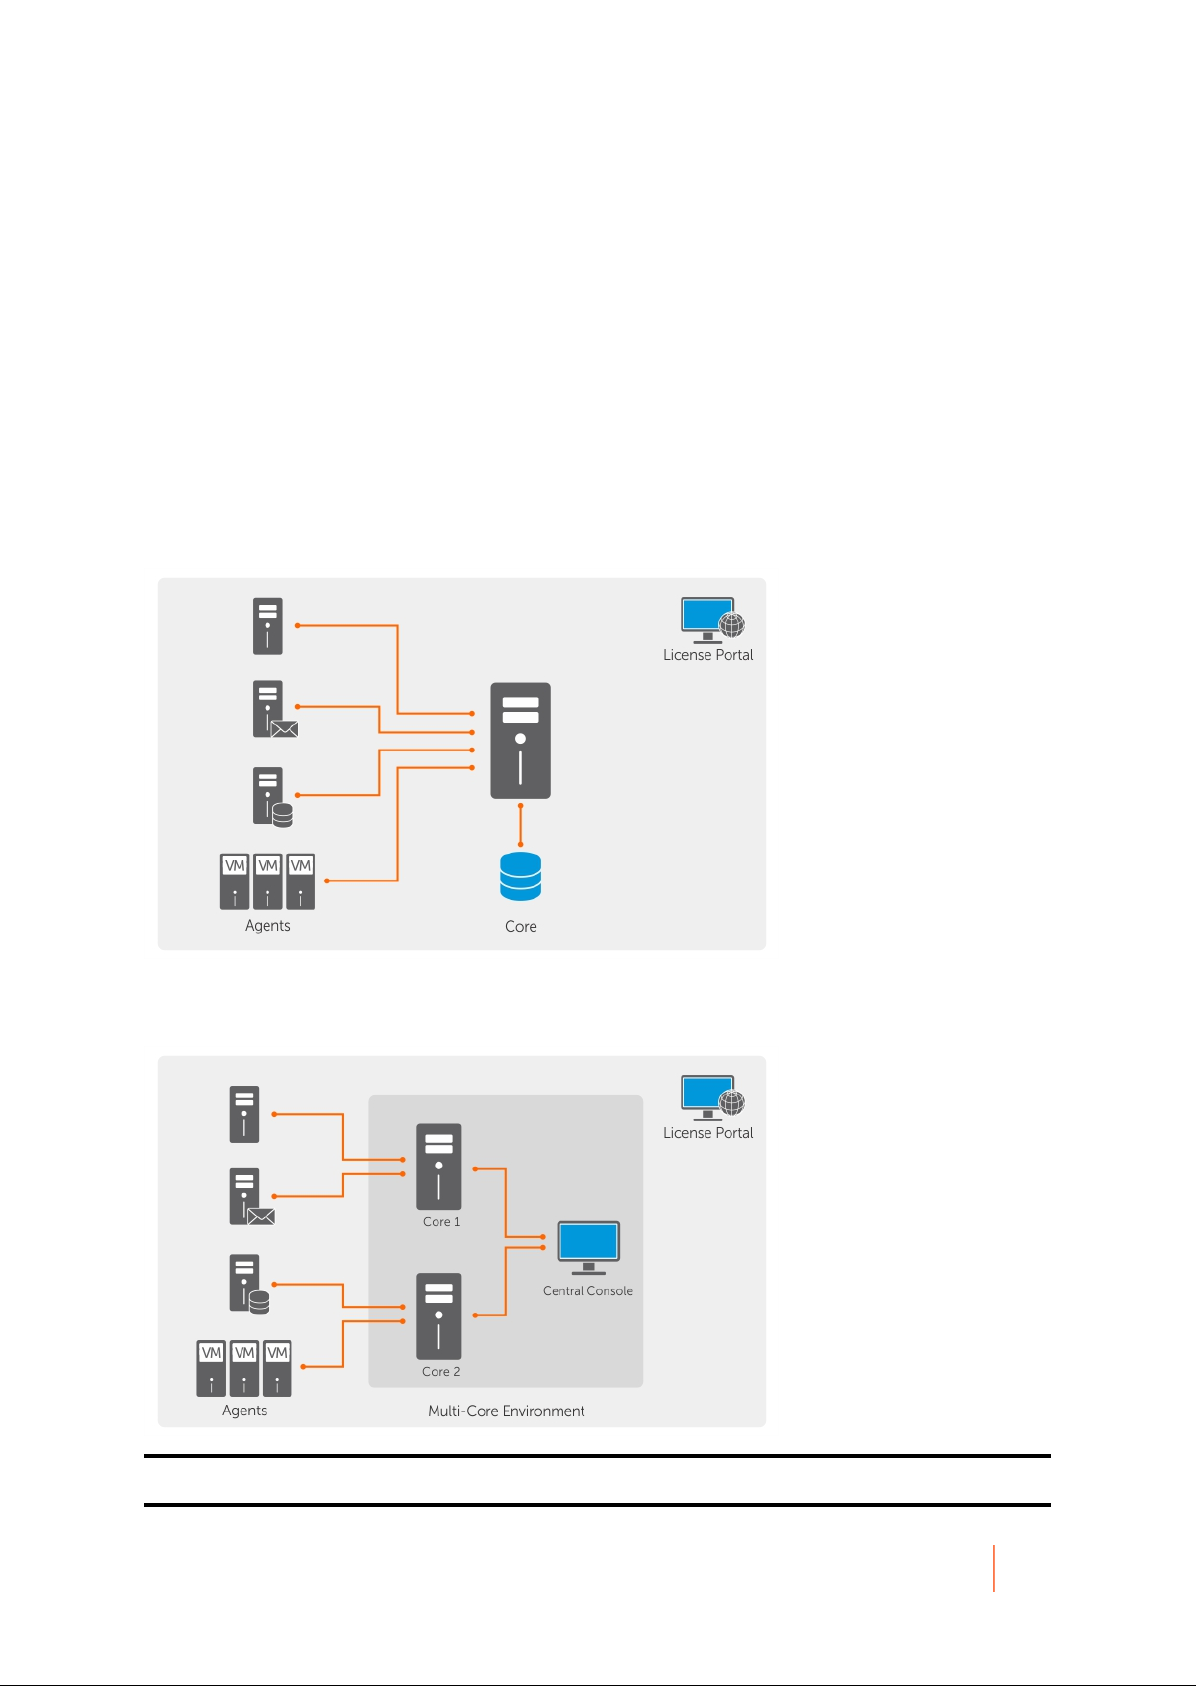
The following diagram depicts a simple deployment. In this diagram, AppAsure agent software is installed on
machines such as a file server, email server, database server, or virtual machines and connect to and are
protected by a single Core, which also consists of the central repository. The License Portal manages license
subscriptions, groups and users for the protected machines and cores in your environment. The License Portal
allows users to log in, activate accounts, download software, and deploy protected machines and cores per your
license for your environment.
Figure 1. Basic deployment architecture
You can also deploy multiple Cores as shown in the following diagram. A central console manages multiple cores.
Figure 2. Multi—Core deployment architecture
DL4300 Appliance
Deployment architecture
14
Page 15

Parent topic
Smart Agent
Smart Agent tracks the changed blocks on the disk volume and then snaps an image of the changed blocks at
a predefined interval of protection. The incremental forever block-level snapshots approach prevents repeated
copying of the same data from the protected machine to the Core. The Rapid Recovery Smart Agent is installed
on the machines that are protected by the Rapid Recovery Core.
The Smart Agent is application-aware and it detects the type of application that is installed and also the location of
the data. It automatically groups data volumes with dependency, such as databases, and then logs them together
for effective protection and rapid recovery. After the Rapid Recovery Agent software is configured, it uses smart
technology to keep track of changed blocks on the protected disk volumes. When the snapshot is ready, it is
rapidly transferred to the Core using intelligent multi-threaded, socket-based connections. To preserve CPU
bandwidth and memory on the protected machines, the smart agent does not encrypt or deduplicate the data at
the source and protected machines are paired with a Core for protection.
Parent topic
DL Appliance Core
The Core is the central component of the deployment architecture. The Core stores and manages all of the
machine backups and provides core services for backup, recovery, and retention; replication, archival, and
management. The Core is a self-contained network-addressable computer that runs a 64-bit of Microsoft
Windows operating system. Your appliance performs target-based inline compression, encryption, and
deduplication of the data received from the protected machine. The Core then stores the snapshot backups in
repositories such as, Storage Area Network (SAN) or Direct Attached Storage (DAS).
The repository can also reside on internal storage within the Core. The Core is managed by accessing the
following URL from a Web browser: https://CORENAME:8006/apprecovery/admin. Internally, all core services
are accessible through REST APIs. The Core services can be accessed from within the core or directly over the
Internet from any application that can send an HTTP/HTTPS request and receive an HTTP/HTTPS response. All
API operations are performed over SSL and mutually authenticated using X.509 v3 certificates.
Cores are paired with other cores for replication.
Parent topic
Snapshot process
A snapshot is when a base image is transferred from a protected machine to the Core. Snapshots capture and
store the state of a disk volume at a given point in time while the applications that generate the data are still
in use. In Rapid Recovery, you can force a snapshot, temporarily pause snapshots, and view lists of current
recovery points in the repository as well as delete them if needed. Recovery points are used to restore protected
machines or to mount to a local file system. The snapshots that are captured by Rapid Recovery are done so at
the block level and are application aware. This means that all open transactions and rolling transaction logs are
completed and caches are flushed to disk before creating the snapshot.
Rapid Recovery uses a low-level volume filter driver, which attaches to the mounted volumes and then tracks
all block-level changes for the next impending snapshot. Microsoft Volume Shadow Services (VSS) is used to
facilitate application crash consistent snapshots.
Parent topic
DL4300 Appliance
Snapshot process
15
Page 16

Replication of disaster recovery site or service provider
The replication process requires a paired source-target relationship between two cores. The source core copies
the recovery points of the protected machines and then asynchronously and continuously transmits them to
a target core at a remote disaster recovery site. The off-site location can be a company-owned data center
(self-managed core) or a third-party managed service provider’s (MSP’s) location, or cloud environment. When
replicating to a MSP, you can use built-in workflows that let you request connections and receive automatic
feedback notifications. For the initial transfer of data, you can perform data seeding using external media, which is
useful for large sets of data or sites with slow links.
In the case of a severe outage, your appliance supports failover and failback in replicated environments. In case
of a comprehensive outage, the target core in the secondary site can recover instances from replicated protected
machines and immediately commence protection on the failed-over machines. After the primary site is restored,
the replicated core can fail-back data from the recovered instances back to protected machines at the primary
site.
Parent topic
Recovery
Recovery can be performed in the local site or the replicated remote site. After the deployment is in steady state
with local protection and optional replication, the Core allows you to perform recovery using Verified Recovery,
Universal Recovery, or Live Recovery.
Parent topic
Product features
You can manage protection and recovery of critical data using the following features and functionality:
• Repository
• Deduplication in Rapid Recovery
• Encryption
• Replication
• Retention and archiving
• Virtualization And Cloud
• Alerts and Event Management
• License portal
• Web console
• Service Management APIs
Parent topic
DL4300 Appliance
Product features
16
Page 17

Understanding repositories
A repository is a central location in which backup snapshot data captured from your protected workstations and
server is stored and managed. Data is saved to a repository in the form of recovery points.
A repository can reside on different storage technologies, including Storage Area Network (SAN), Direct Attached
Storage (DAS), or Network Attached Storage (NAS).
NOTE: Store repositories for Rapid Recovery Core on primary storage devices. Speed for the storage
volume is the most critical factor. Archival storage devices such as Data Domain are not supported due
to performance limitations. Similarly, do not store repositories on NAS filers that tier to the cloud, as these
devices tend to have performance limitations when used as primary storage.
DAS offers the highest data bandwidth and fastest access rate, and is easy to implement. For optimum
results, use DAS with Redundant Array of Independent Disks (RAID) 6 storage. For more information, see Dell
Knowledge Base article 118153, Repository Options: Direct Attached Storage, Storage Area Network or Network
Attached Storage.
The storage location for any repository should always be in a subdirectory that you specify (for example, E:
\Repository), never in the root of a volume (for example, E:\).
The Rapid Recovery repository format uses Deduplication Volume Manager (DVM). DVM repositories support
multiple volumes, up to 255 repositories on a single Core, and the use of extents. You can create DVM
repositories on machines with Windows operating systems only. You can use this repository type when using new
Rapid Recovery installations. You can specify the size of a DVM repository upon creation, and can add extents
later.
DL4300 Appliance
Understanding repositories
17
Page 18

DVM Repository features and attributes include:
• Supports recovery from Rapid Recovery 6.x archives and recovery points
• Supports storage locations on Windows OS only. Repository volume can be local (on storage attached to the Core
server), or on a storage location on a Common Internet File System (CIFS) shared location.
• Supported storage types include Storage Area Network (SAN), Direct Attached Storage (DAS), or Network Attached
Storage (NAS)
• Requires 8GB RAM, preferably Error Checking and Correction (ECC) memory
• Requires quad core processor on Core machine (this long-standing requirement is now enforced)
• Supports multiple DVM repositories per host
• No additional services required; DVM repository uses native Core services for communication with Core and for tracking
events
• Each DVM repository supports up to 4096 repository extents (also called storage locations)
• Fixed size; DVM repository requires you to specify the repository size on a volume. The size that you specify cannot
exceed the size of the volume. Each volume you define as a storage location must have a minimum of 1GB of free space
available on it.
• Repository storage location can be a simple or dynamic disk, with speed the most important factor
• Can use standard encryption keys created and managed in the Core Console (Core-based encryption)
• Deduplicates data across the entire repository (or across encryption domains within each repository, if encryption keys
are used)
• Uses a dedicated, resizeable DVM deduplication cache, with a configurable storage location in Core settings
• Optimized for writing data, storing snapshot data in a repository local to the Core, with all data processed through the
Core
• Cannot be renamed after creation
• New repositories of this type can be created using REST APIs, the Rapid Recovery Command Line Management Utility
(cmdutil.exe), or Windows PowerShell® cmdlet
When you create a DVM repository, the Rapid Recovery Core pre-allocates the storage space required for
the data and metadata in the specified location. The minimum DVM repository size is 1GB, which for practical
purposes is generally too small except for testing.
Since DVM deduplication requires a primary and secondary cache, ensure the storage space you reserve is twice
the size of your deduplication cache. For example, if you have 1.5GB reserved in the DVM deduplication cache
settings on the Core, reserve 3GB on the cache volume. The default installation path for the cache is on the C
drive. For more information, see Understanding deduplication cache and storage locations.
You can create multiple independent repositories associated with a single Core, up to 255 DVM repositories.
Repositories can span across different storage technologies.
You can further increase the size of a DVM repository by adding new file extents or specifications. An extended
repository can contain up to 4096 extents that span across different storage technologies.
For more information on working with DVM repositories, see Managing a DVM repository.
Parent topic
Deduplication in Rapid Recovery
Deduplication is a data compression technique that reduces both storage requirements and network load. The
process involves physically storing unique blocks of data only once on disk. In Rapid Recovery, when any unique
data block occurs a second time within a repository, instead of storing the data again, a virtual reference to the
data is stored.
DL4300 Appliance
Deduplication in Rapid Recovery
18
Page 19

Deduplication occurs in backup snapshots captured by Rapid Recovery Core. Backup information is deduplicated
within a single repository. It cannot be deduplicated across multiple repositories.
Rapid Recovery release 6.0.2 uses target-based deduplication for all DVM repositories. In this model, information
is transferred to the DVM repository (the target), and is then deduplicated from the repository.
For the most part, deduplication takes place inline (during the transfer of backup information).
For maximum gains, Rapid Recovery now also offers deduplication that occurs as post-processing. Postprocessing is sometimes called pass-through deduplication. Using this model, data in the repository are compared
to references in the DVM data cache. If a block of data in the repository has already been saved, then each
additional occurrence of that data is replaced with a pointer or reference to the data.
This post-processing can save space on your repository storage volume, particularly if the deduplication cache
was filled and then the cache was subsequently increased to take advantage of additional deduplication. This
type of deduplication takes place when performing a repository optimization job. This feature is unique to DVM
repositories, and is also called duplicate block reclamation.
For more information about the repository optimization job, see About the Repository Optimization Job. For more
information on performing this task, see Optimizing a DVM repository.
Thus, Rapid Recovery takes advantage of all types of deduplication described here: target-based deduplication,
inline deduplication, and post-processing deduplication.
For more information on where the references to unique blocks are stored for DVM repositories, see
Understanding deduplication cache and storage locations.
Parent topic
Understanding encryption keys
The Rapid Recovery Core can encrypt snapshot data for all volumes within any repository using encryption keys
that you define and manage from the Core Console.
Instead of encrypting the entire repository, Rapid Recovery lets you specify an encryption key for one or more
machines protected on a single Rapid Recovery Core. Each active encryption key creates an encryption domain.
There is no limit to the number of encryption keys you can create on the Core.
In a multi-tenant environment (when a single Core hosts multiple encryption domains), data is partitioned and
deduplicated within each encryption domain. As a result, Dell recommends using a single encryption key for
multiple protected machines if you want to maximize the benefits of deduplication among a set of protected
machines.
You can also share encryption keys between Cores using one of three methods. One method is to export an
encryption key as a file from one Rapid Recovery Core and import it to another Core. A second method is to
archive data secured with an encryption key, and then import that archived data into another Rapid Recovery
Core. The third method is to replicate recovery points from a protected machine using an encryption key. After
you replicate protected machines, the encryption keys used in the source Core appear as replicated encryption
keys in the target Core.
In all cases, once imported, any encryption key appears in the Core with a state of Locked. To access data from
a locked encryption key, you must unlock it. For information about importing, exporting, locking or unlocking
encryption keys, see the topic Managing encryption keys.
DL4300 Appliance
Understanding encryption keys
19
Page 20

Key security concepts and considerations include:
• Encryption is performed using 256 Bit Advanced Encryption Standard (AES) in Cipher Block Chaining (CBC) mode that
is compliant with SHA-3.
• Deduplication operates within an encryption domain to ensure privacy.
• Encryption is performed without impact on performance.
• You can apply a single encryption key to any number of protected machines, but any protected machine can only have
one encryption key applied at a time.
• You can add, remove, import, export, modify, and delete encryption keys that are configured on the Rapid Recovery
Core.
CAUTION: Rapid Recovery takes a new snapshot whenever you apply an encryption key to a
protected machine. A new snapshot is also triggered after you disassociate an encryption key for a
protected machine.
Encryption keys generated from the Rapid Recovery Core are text files that contain four parameters, as described
in the following table:
Table 1. Components of an encryption key
The Name describes the value equivalent to the key name given when adding a key in the RR Core console. The
key consists of 107 randomly generated English alphabetic, numeric, and mathematical operator characters. The
ID consists of 26 randomly generated upper-case and lower-case English characters. The Comment contains the
text of the key description entered when the key was created.
Component Description
Name This value is equivalent to the key name given when
adding a key in the Rapid Recovery Core Console.
Key This parameter consists of 107 randomly generated
English alphabetic, numeric, and mathematical
operator characters.
ID The key ID consists of 26 randomly generated
upper-case and lower-case English characters.
Comment The comment contains the text of the key description
entered when the key was created.
Parent topic
Replication with Rapid Recovery
This section provides conceptual and procedural information to help you understand and configure replication in
Rapid Recovery.
Replication is the process of copying recovery points from one Rapid Recovery Core and transmitting them
to another Rapid Recovery Core for disaster recovery purposes. The process requires a paired source-target
relationship between two or more Cores.
The source Core copies the recovery points of selected protected machines, and then asynchronously and
continually transmits that snapshot data to the target Core.
Unless you change the default behavior by setting a replication schedule, the Core starts a replication job
immediately after completion of every backup snapshot, checksum check, attachability check, and the nightly
jobs. For more information, see Scheduling replication.
DL4300 Appliance
Replication with Rapid Recovery
20
Page 21
For optimum data security, administrators usually use a target Core at a remote disaster recovery site. You can
configure outbound replication to a company-owned data center or remote disaster recovery site (that is, a “selfmanaged” target Core). Or, you can configure outbound replication to a third-party managed service provider
(MSP) or cloud provider that hosts off-site backup and disaster recovery services. When replicating to a thirdparty target Core, you can use built-in work flows that let you request connections and receive automatic feedback
notifications.
Replication is managed on a per-protected-machine basis. Any machine (or all machines) protected or replicated
on a source Core can be configured to replicate to a target Core.
Possible scenarios for replication include:
• Replication to a local location. The target Core is located in a local data center or on-site location, and replication is
maintained at all times. In this configuration, the loss of the Core would not prevent a recovery.
• Replication to an off-site location. The target Core is located at an off-site disaster recovery facility for recovery in the
event of a loss.
• Mutual replication. Two data centers in two different locations each contain a Core and are protecting machines and
serving as the off-site disaster recovery backup for each other. In this scenario, each Core replicates the protected
machines to the Core that is located in the other data center.
• Hosted and cloud replication. Rapid Recovery MSP partners maintain multiple target Cores in a data center or a public
cloud. On each of these Cores, the MSP partner lets one or more of their customers replicate recovery points from a
source Core on the customer’s site to the MSP’s target Core for a fee.
NOTE: In this scenario, customers only have access to their own data.
Possible replication configurations include:
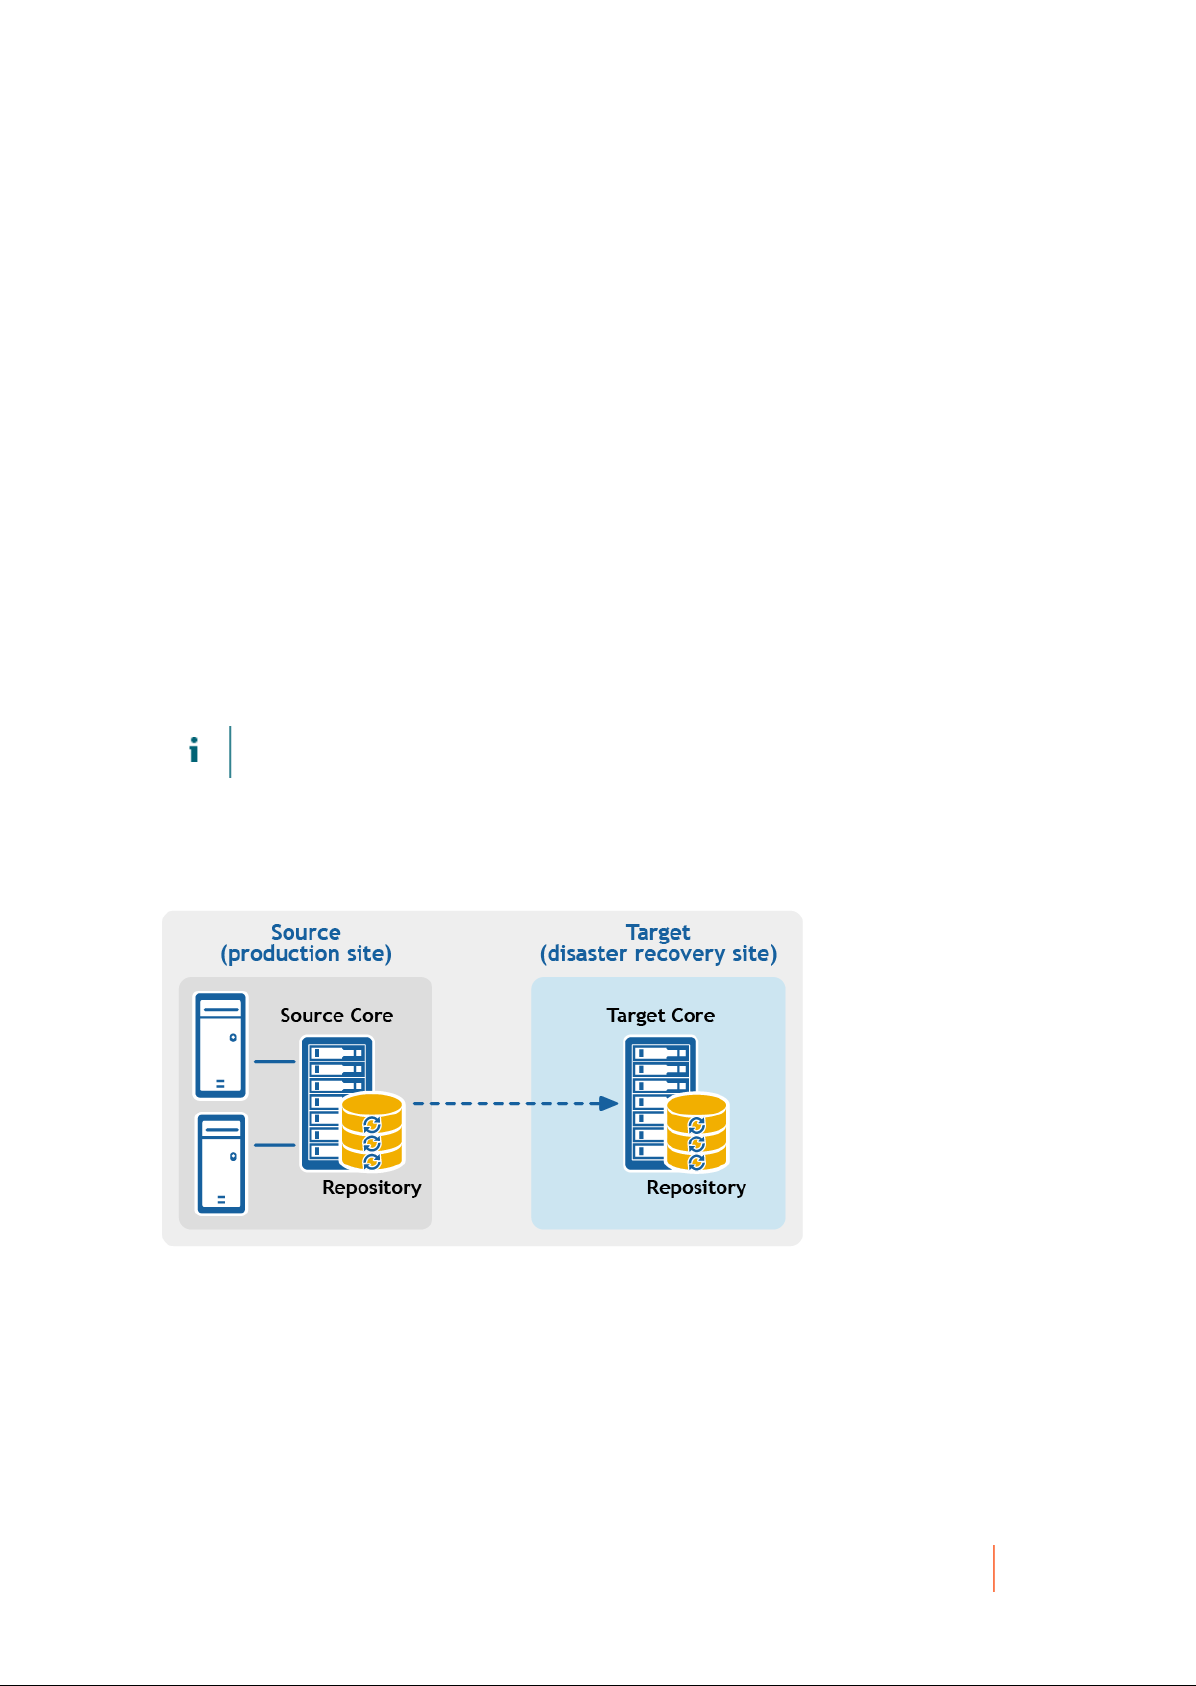
• Point-to-point replication. Replicates one or more protected machines from a single source Core to a single target Core.
Figure 3. Point-to-point replication configuration
• Multipoint-to-point replication. Replicates protected machines from multiple source Cores to a single target Core.
DL4300 Appliance
Replication with Rapid Recovery
21
Page 22
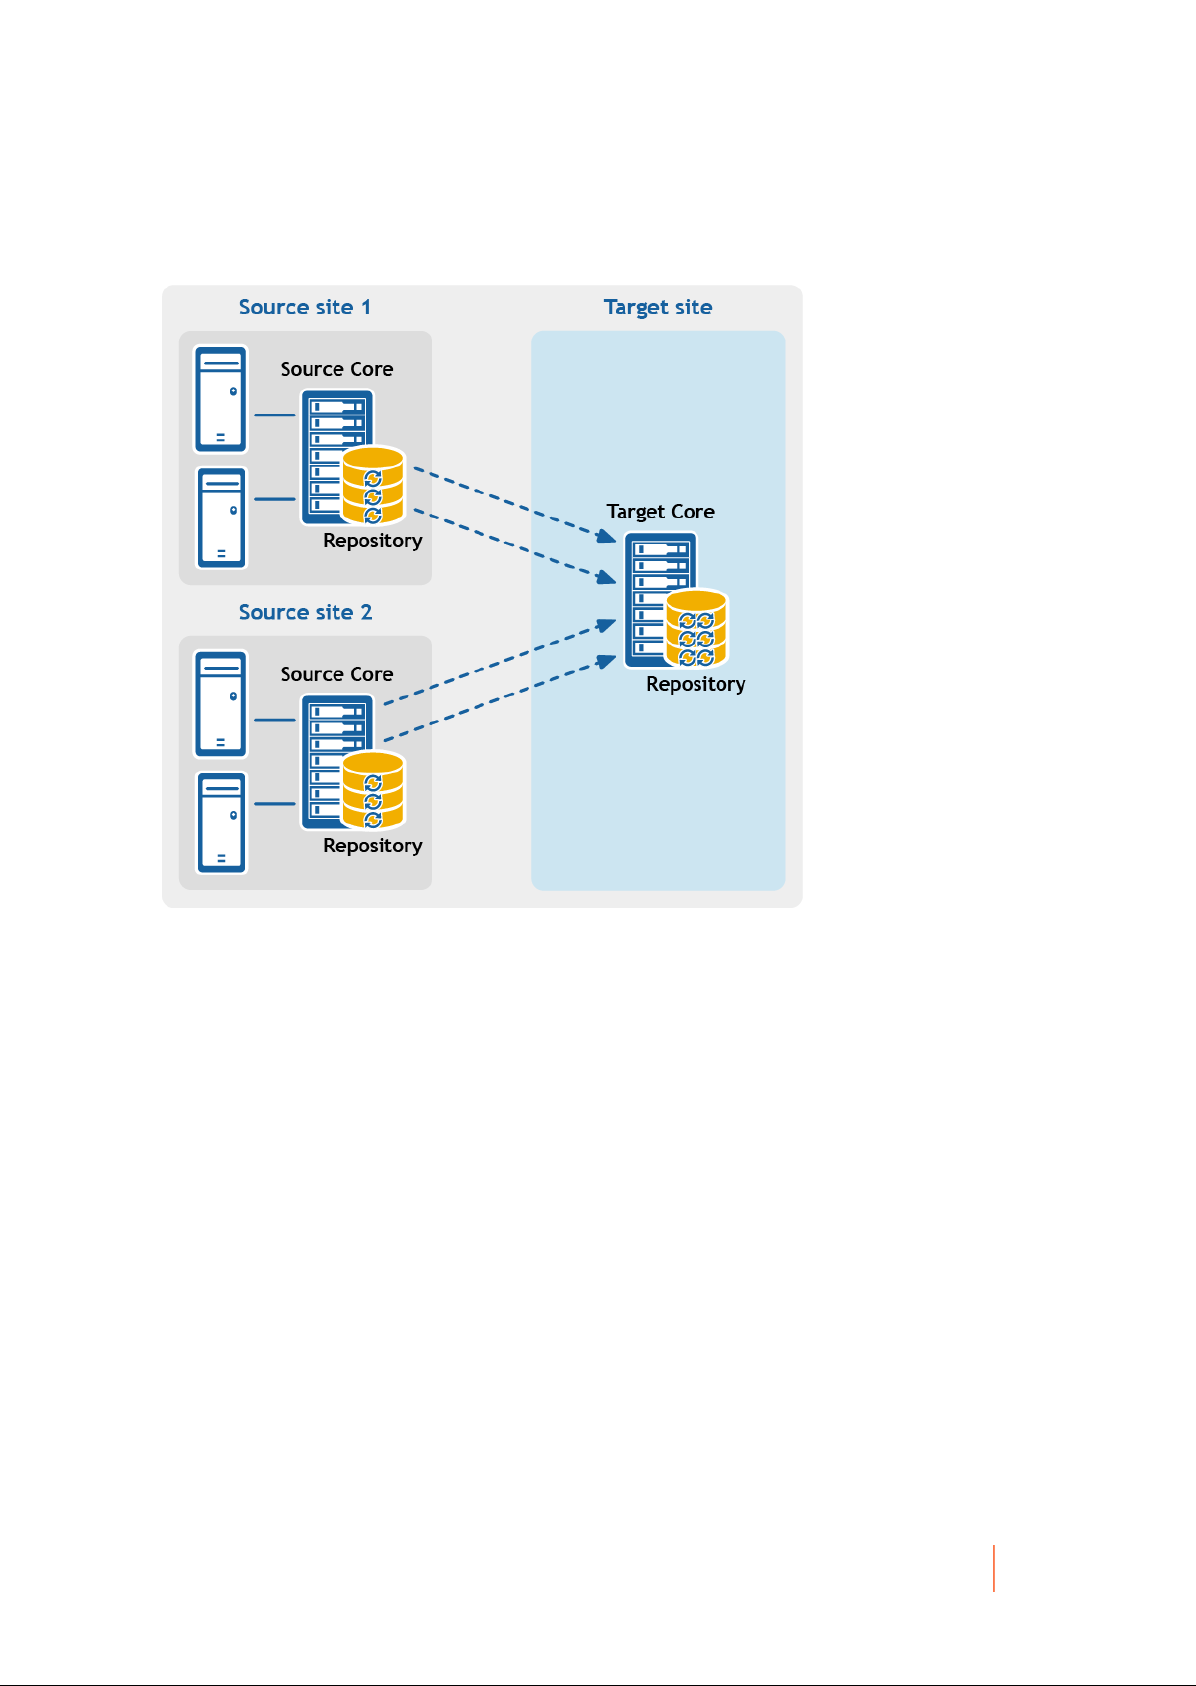
Figure 4. Multipoint-to-point replication configuration
• Point-to-multipoint replication. Replicates one or more protected machines from a single source Core to more than one
target Core.
DL4300 Appliance
Replication with Rapid Recovery
22
Page 23
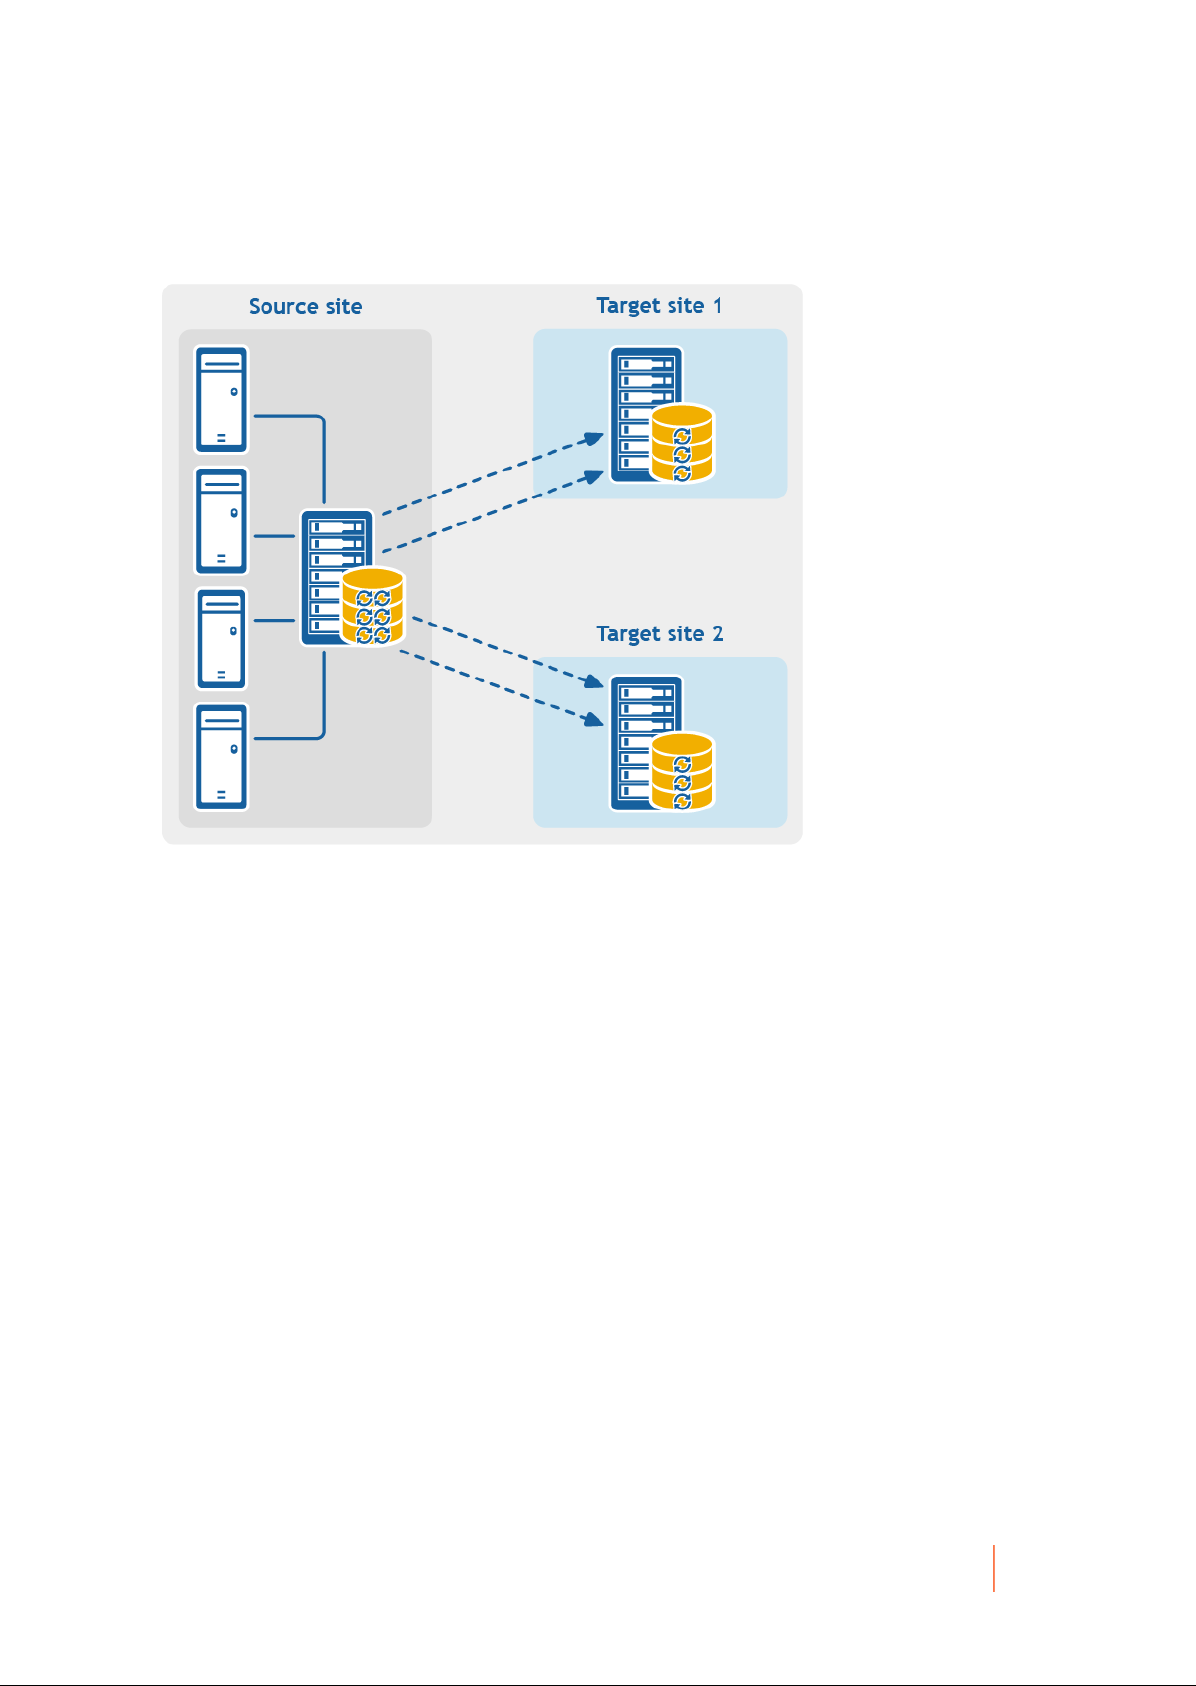
Figure 5. Point-to-multipoint replication configuration
• Multi-hop replication. Replicates one or more protected machines from one target Core to another target Core, producing
additional failover or recovery options on the replicated Core.
DL4300 Appliance
Replication with Rapid Recovery
23
Page 24
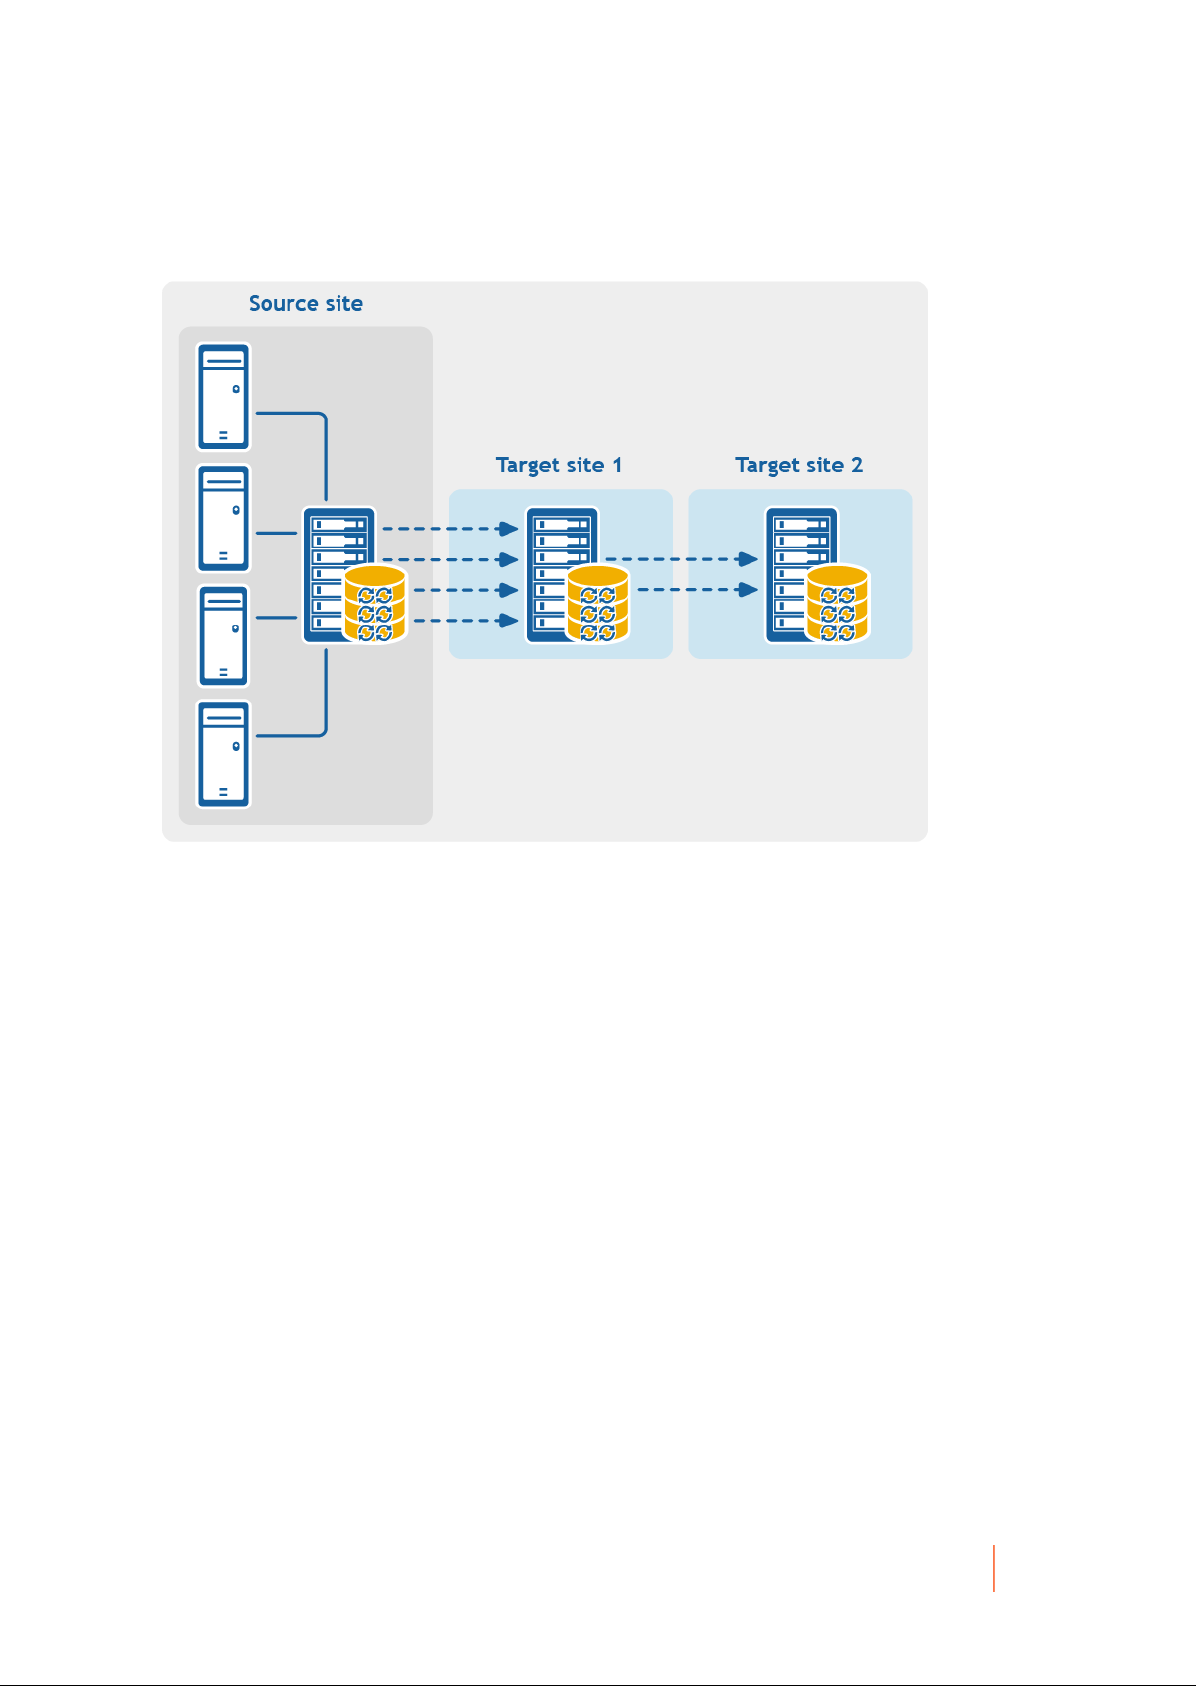
Figure 6. Multi-hop replication configuration
If using Dell Data Protection backup appliances such as the DL1x00 or DL4x00 series, the target Core to
which you replicate must have a valid software license configured. These hardware appliances include a
replication target license with purchase. Check for your license key in the welcome email message you
received when purchased the appliance. For assistance, visit the Licensing Assistance website at https://
Parent topic
Retention and archiving
In your appliance, backup and retention policies are flexible and, therefore, easily configurable. The ability to tailor
retention polices to the needs of an organization not only helps to meet compliance requirements, but does so
without compromising on RTO.
Retention policies enforce the periods of time in which backups are stored on short-term (fast and expensive)
media. Sometimes certain business and technical requirements mandate extended retention of these backups,
but use of fast storage is cost prohibitive. Therefore, this requirement creates a need for long-term (slow and
cheap) storage. Businesses often use long-term storage for archiving both compliance and non-compliance data.
The archive feature supports extended retentions for compliance and non-compliance data, it can also be used for
seeding replication data to a target core.
DL4300 Appliance
Retention and archiving
24
Page 25
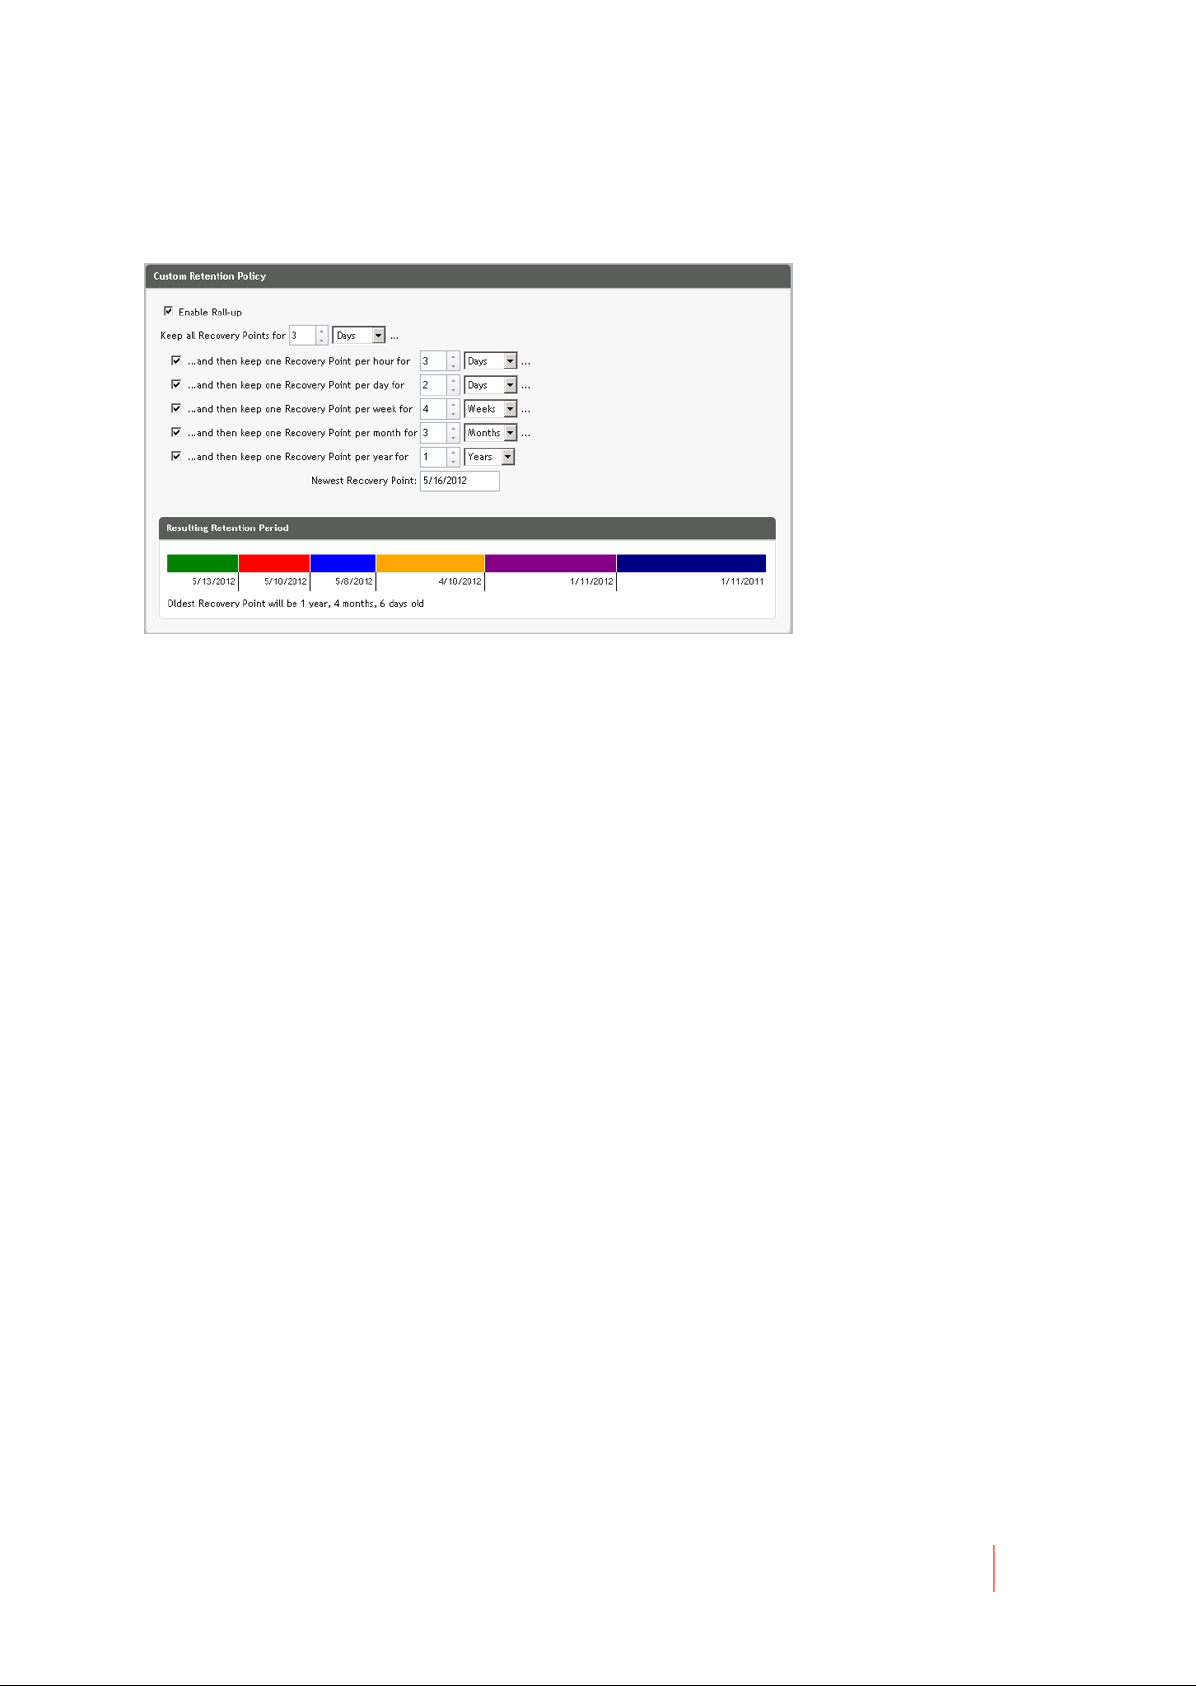
Figure 7. Custom retention policy
In your appliance, retention policies can be customized to specify the length of time a backup recovery point is
maintained. As the age of the recovery points approaches the end of their retention period, the recovery points
age out and are removed from the retention pool. Typically, this process becomes inefficient and eventually
fails as the amount of data and the period of retention start grows rapidly. Your appliance solves the big data
problem by managing the retention of large amounts of data with complex retention policies and performing rollup
operations for aging data using efficient metadata operations.
Backups can be performed with an interval of a few minutes. As these backups age over days, months, and
years, retention policies manage the aging and deletion of old backups. A simple waterfall method defines the
aging process. The levels within the waterfall are defined in minutes, hours, days, weeks, months, and years. The
retention policy is enforced by the nightly rollup process.
For long-term archiving, your appliance provides the ability to create an archive of the source or target core on
any removable media. The archive is internally optimized and all data in the archive is compressed, encrypted,
and deduplicated. If the total size of the archive is larger than the space available on the removable media, the
archive spans across multiple devices based on the available space on the media. The archive also can be locked
with a passphrase. Recovery from an archive does not require a new core; any core can ingest the archive and
recover data if the administrator has the passphrase and the encryption keys.
Parent topic
Virtualization and cloud
The Core is cloud-ready, which allows you to leverage the compute capacity of the cloud for recovery.
Your appliance can export any protected or replicated machine to a virtual machine, such as licensed versions
of VMware or Hyper-V. You can perform a one-time virtual export, or you can establish a virtual standby VM by
establishing a continuous virtual export. With continuous exports, the virtual machine is incrementally updated
after every snapshot. The incremental updates are very fast and provide standby clones that are ready to be
powered up with a click of a button. The supported virtual machine export types are VMware Workstation/Server
on a folder; direct export to a vSphere/VMware ESX(i) host; export to Oracle VirtualBox; and export to Microsoft
Hyper-V Server on Windows Server 2008 (x64), 2008 R2, 2012 (x64), and 2012 R2 (including support for Hyper-V
generation 2 VMs)
Additionally, you can now archive your repository data to the cloud using Microsoft Azure, Amazon S3,
Rackspace Cloud Block Storage, or other OpenStack-based cloud services.
Parent topic
DL4300 Appliance
Virtualization and cloud
25
Page 26

Alerts and event management
In addition to HTTP REST API, your appliance also includes an extensive set of features for event logging
and notification using e-mail, Syslog, or Windows Event Log. email notifications can be used to alert users or
groups of the health or status of different events in response to an alert. The Syslog and Windows Event Log
methods are used for centralized logging to a repository in multi-operating system environment. In Windows-only
environments, only the Windows Event Log is used.
Parent topic
License portal
The License Portal provides easy-to-use tools for managing license entitlements. You can download, activate,
view, and manage license keys and create a company profile to track your license assets. Additionally, the portal
enables service providers and re-sellers to track and manage their customer licenses.
Parent topic
Web console
Your appliance features a new web-based central console that manages distributed cores from one central
location. MSPs and enterprise customers with multiple distributed cores can deploy the central console to get a
unified view for central management. The central console provides the ability to organize the managed cores in
hierarchical organizational units. These organizational units can represent business units, locations, or customers
for MSPs with role-based access. The central console can also run reports across managed cores.
Parent topic
Service management APIs
Your appliance comes bundled with a service management API and provides programmatic access to all of
the functionality available through the Central Management Console. The service management API is a REST
API. All the API operations are performed over SSL and are mutually authenticated using X.509 v3 certificates.
The management service can be accessed from within the environment or directly over the Internet from any
application that can send and receive an HTTPS request and response. This approach facilitates easy integration
with any web application such as relationship management methodology (RMM) tools or billing systems. Also
included is an SDK client for PowerShell scripting.
Parent topic
DL4300 Appliance
Service management APIs
26
Page 27

Working with the DL Appliance Core
Running the Appliance Configuration Wizard
Use the Appliance Configuration Wizard to set network settings, registration, host settings, alerts and monitoring,
access and management, appliance backups, storage provisioning, and update options.
To run the Appliance Configuration Wizard:
1. Sign in to the appliance using your administrator credentials.
2. In the Welcome screen, click Next.
3. In the License Agreement screen, accept the license agreement and click Next.
4. In the Network Settings screen, set the IPv4, IPv6, Nic, and Enable Nic teaming network settings that are
appropriate for your network environment and click Next.
5. In the IPv4 screen, set the IPv4, Nic, IP Address, Subnet Mask, Gateway, and Primary DNS values that are
appropriate for your IPv4 network environment and click Next.
6. In the IPv6 screen, set the IPv6, Nic, IP Address, Subnet Prefix Length, Gateway, and Primary DNS values
that are appropriate for your IPv6 network environment and click Next.
7. In the Registration screen, register your appliance by entering the License number and email address, or
select use trial license and click Next.
8. In the Host Settings screen, view or enter a different host name. Additionally you can join this system to a
domain. Click Next.
9. In the Alerts and Monitoring screen, Enable system SNMP alerts, Enable software SNMP alerts, or
select Software Alerts for Notification via email and enter values that are appropriate for your network
environment. Click Next.
10. In the SMTP Server Settings screen, configure your SMTP email server by entering values that are
appropriate for your email environment and click Next.
11. In the Access and Management screen, select the Enable Remote Desktop, Enable Windows Firewall,
Enable IE Enhanced Security, Enable Windows Updates, Use Proxy Server as appropriate for your
appliance environment and click Next.
12. In the Appliance Backup screen, select the backup frequency for the appliance by selecting Daily, Weekly,
or Monthly and click Next.
13. In the Storage Provisioning screen, enter the Repository Name and Size configuration options for storage.
Additionally, select to allocate a portion of your storage for virtual standby, archives, or other purposes.
Click Next.
14. In the Retention Policy screen, enter a value in the Keep all recovery points for and complete the other data
retention policy data appropriate for your environment and click Next.
15. In the Update Options screen, select the desired options to keep the appliance software and Rapid
Recovery Core software updated and click Next.
Parent topic
DL4300 Appliance
Running the Appliance Configuration Wizard
27
Page 28

Understanding the Rapid Recovery Core Console
This section describes the different elements of the Rapid Recovery Core Console user interface (UI).
Parent topic
Accessing the Rapid Recovery Core Console
Complete the following steps to access the Rapid Recovery Core Console.
• Perform one of the following to access the Rapid Recovery Core Console:
1. Log in locally to your Rapid Recovery Core server, and then double click the Core Console icon.
2. Or, type one of the following URLs in your web browser:
▪ https://<yourCoreServerName>:8006/apprecovery/admin/ or
▪ https://<yourCoreServerIPaddress>:8006/apprecovery/admin/
NOTE: Because the Rapid Recovery Core Console UI depends JavaScript, the web browser you
use to access the Core Console must have JavaScript enabled.
NOTE: If you have changed the default port for the Rapid Recovery service, update the port in
the preceding URL accordingly.
Parent topic
Understanding the Quick Start Guide
The Quick Start Guide is a feature that provides you with a guided flow of suggested tasks for configuring and
using Rapid Recovery Core.
The Quick Start Guide appears automatically the first time you upgrade to or install the Rapid Recovery Core and
navigate to the Core Console. Click Start Guide on the Welcome page of the guide to see the various suggested
configuration tasks. Navigate through the guide using the Skip Step and Back options. When you have seen the
last suggested task, click Finish to close the guide.
You can launch the Quick Start Guide again at any time from the Help menu in the Core Console. You can also
choose to hide the Welcome page in the Quick Start Guide.
Unless you hide it, the Quick Start Guide reappears each time you log in to the Rapid Recovery Core Console
and access the Home page. For more information, see Hiding the Quick Start Guide.
You are not required to perform the steps suggested by the guide. You can simply view the suggested tasks,
navigating through them using the Skip Step and Back options. Optionally, to hide the guide at any point, click Exit
Guide.
If you choose to perform any configuration tasks suggested by the Quick Start Guide, follow the prompts indicated
in any step of the guide, and the appropriate wizard or relevant area in the user interface appears. Procedures to
complete each task suggested by the guide is described in this document, as indicated in the table below.
NOTE: Not all configuration tasks suggested by the Quick Start Guide are required for all users. You must
understand which tasks you want to accomplish for your specific needs.
DL4300 Appliance
Understanding the Quick Start Guide
28
Page 29

The Quick Start Guide addresses the following configuration tasks:
Table 2. Quick Start Guide configuration tasks
Function Short Description Result of Selecting Task, Link to
Procedure
Protection Protecting a single machine,
protecting a server cluster, or
protecting multiple machines
using bulk protect
Replication Setting up replication from a
primary (source) Core to a
secondary (target) Core
Click Protect or select Protect
Machine from the drop-down
menu to open the Protect Machine
Wizard. For information on
completing the Protect Machine
Wizard, see Protecting a machine.
Select Protect Cluster from the
drop-down menu to open the
Connect to Cluster dialog box. For
more information on protecting a
cluster, see Protecting a cluster.
Select Bulk Protect from the dropdown menu to open the Protect
Multiple Machines Wizard. For
information on completing the
Protect Multiple Machines Wizard,
see About protecting multiple
machines.
Click Replication to open the
Replication page. Prompts
you to add a target Core
using the Replication Wizard.
For information on using the
Replication Wizard to set up
replication on a self-managed
Core, see Replicating to a self-
managed target Core. For general
information on replication, see
Configuring replication.
Virtual Export Performing a one-time export or
establishing continual export from
a protected machine to a virtual
machine
Configuration Allows you to set up additional
configuration for the Rapid
Recovery Core
Click Export to perform an export
of data from your protected
machine to a virtual machine. You
can either perform a one-time
export, or set up virtual standby
for continual export to a VM. For
information on virtual exports,
see About exporting to virtual
machines with Rapid Recovery.
Click More to see additional
functions you can configure or
manage. Functions includes
archives; mounts; boot CDs;
repositories; encryption keys;
cloud accounts; file search;
retention policies; notifications;
reports; logs; and more.
DL4300 Appliance
Understanding the Quick Start Guide
29
Page 30

Function Short Description Result of Selecting Task, Link to
Procedure
Configuration: Encryption Adding or importing encryption
keys that you can use for one or
more protected machines
Configuration: Notifications Setting up notifications for events,
warnings and alerts
Configuration: Retention Viewing or changing the— default
retention policy for the Core
Click Encryption keys to manage
security for protected data by
adding or importing encryption
keys. You can apply encryption
keys to one or more protected
machines. Encryption is described
in the topic Understanding
encryption keys.
Click Events to specify notification
groups for events, warnings,
and alerts. To send these by
email, you must also establish
SMTP server settings. For more
information on managing events,
see the topic Events, including
the topics Configuring notification
groups and Configuring an email
server.
Click Retention Policy to open
the Retention Policy page for
the Core. From here you can
define how long to keep a
recovery point before rolling it
up. For conceptual information
about retention policies, see
the topic Managing aging data.
For procedural information, see
Managing retention policies.
Restore Restoring data from a recovery
point on the Core
Parent topic
Click Restore to open the Restore
Machine Wizard. For information
on restoring data, see the topic
About restoring volumes from a
recovery point.
Hiding the Quick Start Guide
The Quick Start Guide appears automatically the first time you upgrade to or install
the Rapid Recovery Core.
It also appears when you select Quick Start Guide from the Help drop-down menu, and each time you access the
Home page on the Core Console.
Use the procedure below to hide the Quick Start Guide.
• From the Rapid Recovery Core Console, if you are viewing the Welcome page of the Quick Start Guide, do the following:
• If you want to hide the Welcome page of the Quick Start Guide, select Don't show again.
DL4300 Appliance
Hiding the Quick Start Guide
30
Page 31

NOTE: This option will hide the Welcome page the next time the Start Guide is opened, and
every time, until you upgrade the Rapid Recovery Core.
NOTE: If you choose to hide this page, and want to access advanced options in the future, then
select Back in the wizard to see this hidden page.
• If you want to hide the Quick Start Guide for this session, then click Close.
The Quick Start Guide closes. The next time you access the Home page on the Core Console, the
Quick Start Guide reappears.
You can also open the Quick Start Guide from the Help menu.
• From any page in the Quick Start Guide click Exit Guide.
The Quick Start Guide closes. If you select this option, you can still open the Quick Start Guide from the
Help menu.
Parent topic
Navigating the Rapid Recovery Core Console
When you log into the Core Console, and any time you click the Home icon, the Home page appears. The
Home page gives you a view of your Rapid Recovery Core, with two options. In the main viewing area, the default
content is the new Core dashboard, which displays a set of real-time reports on your system. Default dashboard
reports include recent transfer job status, per machine transfer, a repository overview, and connectivity state for
protected, replicated, and recovery points-only machines. Or you can switch to the classic Summary Tables view.
In this view, the title of the page shows the display name of your Rapid Recovery Core, and you can see summary
tables showing protected machines, repositories, and recent alerts. For more information, see Understanding the
Home page (summary tables view) and Understanding the Core dashboard, respectively.
On the Home page (and on every page in the Core Console), the left navigation area shows the items that are
protected on your Core. You can navigate to other pages in the UI by doing one of the following:
• Clicking the corresponding icon from the icon bar in the left navigation area. The options accessible from the icon bar
include Replication, Virtual Standby, Events, Settings, and More.
•
Expanding the (More) menu on the icon bar, and then selecting a destination
• Clicking a button or menu option from the button bar. Buttons include Protect, Restore, Archive, and Replicate.
When you select an item from the left navigation area, the focus of the Core Console changes to display summary
information about that item. For example, if you click the name of a protected machine, the Core console displays
information about that machine only, rather than the Core. In this example, the display name of the protected
machine appears as the title of the page. A submenu appears to the right, letting you view specific information
about the protected machine. The menu options include: Summary, Recovery Points, Events, Settings, Reports,
and More.
To return to viewing information about the Core, including dashboard reports, or a summary view of multiple
protected or replicated machines, click on the Home icon on the top left of the UI. On the Home page, you
can toggle between the dashboard view and the summary page view by clicking the red link at the top right of the
page.
DL4300 Appliance
Navigating the Rapid Recovery Core Console
31
Page 32

You can use the title at the top of the Core Console to provide context for the information you are viewing in the
Core. For example:
• Any time you see the display name or IP address of the Core as the page title, you are viewing summary information
about the Core.
• If the title is Dashboard, you are viewing the Core dashboard.
• If you see the display name or IP address of a protected machine, or a Summary pane at the top of a page, you are
viewing information about a single machine protected by or replicated in the Core.
• If you see the title Protected Machines, you are viewing information about all of the machines protected in the Rapid
Recovery Core.
• If you see the title Machines replicated from..., you are viewing information about all of the machines replicated in the
Rapid Recovery Core.
• If you see the page title Recovery Points Only, you are viewing information about all of the recover points-only machines
on this Core.
For information about the features and functions available from each page, see the appropriate section below.
For more information about viewing protected machines, see Viewing the Protected Machines menu. For more
information on managing protected machines, see Managing protected machines.
For more information about viewing replicated machines, see Viewing incoming and outgoing replication.
For more information about viewing recovery-points only machines, see Viewing the Recovery Points Only menu
Parent topic
Understanding the left navigation area
The left navigation area of the Core Console appears on the left side of that user interface. The contents of this
navigation area may differ based on the type of objects protected in your Rapid Recovery Core.
The left navigation area always contains the following:
• Icon bar. For navigation among the main pages of the Core Console.
• Text filter. The text filter is a text field that lets you filter the items displayed in the various menus that appear below it.
Clicking the arrow to the right of the text filter expands and collapses each of the menus appearing below it.
Following these elements, the left navigation area typically displays menus to help you navigate, filter, and view
the objects protected on your Core. This includes protected machines, replicated machines, and so on.
Each menu is context-sensitive; that is, each menu only appears in the Core Console if it is relevant. For example,
if you protect at least one machine, the Protected Machines menu appears, and so on.
For more information, see the left navigation area tables in Viewing the Core Console user interface.
Parent topic
Viewing the Rapid Recovery Core Console Home page
Each time you log into the Rapid Recovery Core Console, or each time you click on the Home icon in the
icon bar, the Home page appears.
The Home page of the Core Console offers a new dashboard view, and the familiar summary tables view. The
dashboard is the default view.
You can toggle between views on the Home page by clicking the red link at the top right of the Home page.
DL4300 Appliance
Viewing the Rapid Recovery Core Console Home page
32
Page 33

From the Home page, and every other page of the Core Console, you can navigate to the functions you want by
using the left navigation area.
For more information, see the following topics:
• Understanding the left navigation area
• Understanding the Core dashboard
• Understanding the Home page (summary tables view)
Parent topic
Understanding the Home page (summary tables view)
The Home page is only applicable to the Core. In the dashboard view, it shows real-time graphical reports.
When you switch to the summary tables view, the Home page displays all of the machines the Core protects or
replicates, the repositories associated with your Core, and alerts for machines on this Core.
The view of each pane on the Home page can be expanded or contracted. For example, if you click the
(contract view) icon at the top right-hand side of the Protected Machines pane, the view of protected machines
contracts, and only the name of the pane is visible. To expand the view to see all protected machines again, click
the (expand view) icon.
The following table describes the various elements on the Home page when in the summary tables view.
Table 3. Home page options
UI Element Description
Protected Machines The Protected Machines pane lists the machines
that this Core protects. This pane appears
regardless of whether any machines have been
added to your Core for protection.
This section includes the following information for
each protected machine:
• Machine type. An icon shows whether the machine
is a physical machine, virtual machine, or a
protected cluster.
• Status. Colored circles in the Status column show
whether the protected machine is accessible,
paused, or offline and unreachable.
• Display Name. The display name or IP address of
the protected machine.
• Repository Name. The name of the repository
storing the recovery points for that machine.
• Last Snapshot. The date and time on which Rapid
Recovery took the most recent recovery point
snapshot for that machine.
• Recovery Points. The number of recovery points
stored in the repository and space usage for each
protected machine.
• Version. The version of the Rapid Recovery Agent
software installed on that machine.
DL4300 Appliance
Viewing the Rapid Recovery Core Console Home page
33
Page 34

UI Element Description
If you click on a specific machine name shown in this
pane, a Summary page appears, showing summary
information for the selected machine. For more
information on what you can accomplish on the
Summary page, see Viewing summary information
for a protected machine.
Replicated Machines The Replicated Machines pane lists any machines
that this Core replicates from another Core. This
pane does not appear unless your Core replicates
machines from another Core.
This section includes the following information for
each replicated machine:
• Machine type. An icon shows whether the machine
is a physical machine, virtual machine, or a
protected cluster.
• Status. Colored circles in the Status column show
whether the replicated machine is accessible,
paused, or offline and unreachable.
• Display Name. The display name or IP address of
the replicated machine.
• Replication Name. The display name of the
originating source Core for any machines you
replicate on this target Core. You can define this
name when setting up replication.
• Repository Name. The name of the repository
storing the recovery points for that machine.
• Last Replicated Snapshot. The date and time on
which Rapid Recovery took the most recent replica
of the original protected machine.
• Recovery Points. The number of recovery points
stored in the repository and space usage for each
replicated machine.
• Version. The version of the Rapid Recovery Agent
software installed on that machine.
If you click on a specific machine name shown in
this pane, the Summary page appears, showing
summary information for that replicated machine.
Recovery Points Only Machines The Recovery Points Only Machines pane lists
any machines that were removed from protection
or replication, if the recovery points have been
retained. These machines can be used for file-level
recovery, but cannot be used for bare metal restore,
for restoring entire volumes, or for adding snapshot
data. This pane does not appear unless you have
any machines that meet this definition.
DL4300 Appliance
Viewing the Rapid Recovery Core Console Home page
34
Page 35

UI Element Description
This section includes the following information for
each recovery points only machine:
• Machine type. An icon shows whether the machine
is a physical machine, virtual machine, or a
protected cluster.
• Status. Colored circles in the Status column show
whether the recovery points only machine is
accessible, paused, or offline and unreachable.
• Display Name. The display name or IP address of
the machine for which you kept recovery points.
• Repository Name. The name of the repository
storing the remaining recovery points for that
machine.
• Recovery Points. The number of recovery points
stored in the repository and space usage for each
recovery points-only machine.
If you click on a specific machine name shown in this
pane, the Summary page appears for this recovery
points only machine.
DVM Repositories This pane appears for the DL1000, regardless of
whether any DVM repositories have been created.
This pane does not appear unless your Core has
one or more DVM repository.
It includes the following information for each DVM
repository:
• Type. An icon depicts a repository.
• Status. Colored circles in the Status column show
whether the repository is mounted and can accept
recovery point transfers, or is unreachable, or in an
error state.
• Repository Name. The display name of the
repository.
• Space Usage.The total amount of space used in the
repository, and the size of the storage volume or
extent.
• Protected Data. The amount of used space in the
repository.
• Machines. The number of machines for which the
repository stores recovery points.
• Recovery Points. The number of recovery points
stored in the repository.
• Compression Ratio. The rate at which the repository
compresses the protected data to save space.
For more information, see
Understanding repositories.
DL4300 Appliance
Viewing the Rapid Recovery Core Console Home page
35
Page 36

UI Element Description
Alerts This section lists the important alerts for the Core
and every machine it protects. The section includes
the following information:
• Icons. The column of icons indicates the nature of
the alert. These include informational messages,
errors
• Date. Displays the date and time of when Rapid
Recovery issued the alert.
• Message. Describes the alert.
You can also see these details on
the Core Events page. For more
information, see Viewing events
using tasks, alerts, and journal.
Parent topic
Understanding the Core dashboard
The Core dashboard displays of a set of real-time graphical reports of data relevant to your Core and the
machines you protect. The dashboard includes the following reports:
• Transfer Job. This report shows all snapshot data transfers (including base images and incremental snapshots) that
completed in the last 24 hours. Snapshots include base images and incremental snapshots. This dashboard report
appears as a circle graph.
• Transfer Job per Machine. This job shows, by protected machine, the number of successful and failed transfer jobs in the
last 24 hours. This dashboard report appears as a line graph.
• Repository. This report shows the repositories associated with your Core. It shows the number of repositories, how many
machines are protected in each, the number of recovery points and the percentage of compression or deduplication. This
report is refreshed every minute.
• Machine Connectivity. This report shows the connectivity state of machines protected and replicated on your Core. It also
shows connectivity for data on recovery points-only machine .
You can collapse or expand the view of any reports on the dashboard by clicking the up or down arrow in the
header of the report. Some dashboard reports (machine connectivity and repository) have a plus sign next to the
arrow, from which you can add another protected machine or another repository, respectively.
You can also drag and drop to move the location of one of the reports elsewhere on the dashboard, to order the
reports in a manner most effective for your use.
Parent topic
Viewing the Protected Machines menu
In the Rapid Recovery user interface, a Protected Machines menu appears in the left navigation area. As with
all menu labels in the navigation area, the label for this menu appears in all upper-case letters. By default, this
menu is fully expanded, and shows a list of any machines that are protected by this Core. If you have any server
clusters protected, then they are included in this list.
You can collapse or expand the view for protected machines and server clusters in your Core by clicking the
arrow on the left side of this menu.
DL4300 Appliance
Viewing the Protected Machines menu
36
Page 37

The Protected Machines menu includes a drop-down menu on the right side which lists functions that can be
performed on all protected machines. Click the arrow to the right of Protected Machines to see the menu and to
perform any of the following:
• Force an incremental snapshot for all machines
• Force a base image for all machines
• Pause protection for all machines (if protection is active)
• Resume protection for all machines (if protection is paused)
• Refresh metadata for all protected machines
• Remove all machines from protection on the Core
Each machine listed under the Protected Machines menu also has a drop-down menu that controls functions only
for that machine. From the drop-down menu for any machine, you can perform the following:
• Force an incremental snapshot for the selected machine
• Pause protection for the selected machine (if protection is active)
• Resume protection (if protection is paused)
• Refresh metadata
• Remove the selected machine from protection on the Core
• Navigate to the Summary page for the selected machine
• Navigate to the Recovery Points page for the selected machine
• Navigate to the Events page for the selected machine
• Navigate to the Settings page for the selected machine
• Generate reports specific to that machine
• Access more functions specific to the selected machine, including system information, mounts, retention policy,
notifications, or a machine-specific log
• Create a custom label that displays in the Protected Machines list
If you are managing server clusters from the Rapid Recovery Core, the cluster also appears in the left navigation
menu. From the drop-down menu for any cluster, you can also:
• Navigate to the Protected Nodes page for the selected cluster
If you click the arrow to the left of the Protected Machines menu, the list of protected machines and server
clusters contracts, and no machines are listed. Clicking again on this arrow causes the list of machines to expand
again.
Clicking any machine name in the Protected Machines menu opens the Summary page for that machine. For
more information on what you can accomplish on the Summary page, see Viewing summary information for a
protected machine.
Finally, clicking directly on the Protected Machines menu causes the Protected Machines page to appear in the
main content area, with a single pane showing protected machines on this Core. For more information on what
you can accomplish on the Protected Machines pane of the Protected Machines page, see Viewing the Protected
Machines pane.
NOTE: From the Protected Machines page, you can return to a view from the Core perspective by clicking
the Home icon in the icon bar.
Parent topic
DL4300 Appliance
Viewing the Protected Machines menu
37
Page 38

Viewing summary information for a protected machine
When you click the name of a protected machine in the Core Console, the Summary page appears. On this page,
at minimum, is a Summary pane, and a Volumes pane. If a machine is added to replication, a Replication pane
also appears.
If you have one or more protected Exchange servers, you will also see an Exchange Server Information pane that
contains information about your protected Exchange server.
If you have one or more protected SQL servers, you will also see a SQL Server Information pane that contains
information about your protected SQL servers.
At the top of his page is a menu of actions you can perform on the protected machine. Below it, at minimum,
appears a Summary pane, and a Volumes pane. If a machine is added to replication, a Replication pane also
appears.
When displaying information for a protected machine—on the Summary page and all other views—there is a
menu at the top of the page with functions you can perform. This menu appears immediately below the name of
the protected machine.
Parent topic
See also: Viewing the Summary pane
See also: Viewing Volumes on a protected machine
See also: Viewing replication information
See also: Viewing the Exchange Server Information pane
See also: Viewing the SQL Server Information pane
Viewing the Summary pane
The Summary pane contains summary information about the protected machine, including the host name, date
and time of the last snapshot, date and time of the next scheduled snapshot, encryption key information, and
version information for the Rapid Recovery Agent software. There is also a link to a detailed System Information
page for the machine.
Parent topic
Viewing Volumes on a protected machine
For any protected machine, from the Summary page, in the Volumes pane, you can perform the following actions
for any of the volumes listed:
• Set or modify a protection schedule for a selected volume. Protection schedules are typically established when you first
protect a machine. For more information about modifying a protection schedule, see Modifying protection schedules.
• Force a base image or snapshot. Snapshots typically occur based on the protection schedule. However, at any time, you
can force a base image or an incremental snapshot for selected volumes. For more information, see Forcing a snapshot.
Parent topic
Viewing replication information
The Replication pane contains summary information about the replicated machine, including the replication name,
the state of replication, progress, and available space.
Parent topic
Viewing the Exchange Server Information pane
The Exchange Server Information pane appears only for protected machines that are Exchange servers.
DL4300 Appliance
Viewing summary information for a protected machine
38
Page 39

This pane contains summary information about the protected Exchange server, including the installed version of
Microsoft Exchange, the path in which Exchange is installed, and the path defined for Exchange mailbox data.
The Mail Stores grid shows the Exchange Database (EDB) name, the path of the EDB file, the path in which the
log files are stored, the log prefix, the system path, the Database Availability Group (DAG), and the mail store
type.
Parent topic
Viewing the SQL Server Information pane
The SQL Server Information pane appears only for protected machines that are SQL Servers.
This pane contains summary information about the protected SQL Servers. You can expand the database
information to see detail for each table in the database. You can also see the database or table name and the
database path.
Parent topic
Viewing recovery points for a machine
The Recovery Points page shows a list of the recovery points collected for that protected machine as well as
pertinent machine and repository data. On this page, you can mount, export, and restore specific recovery points,
as well as delete recovery points.
The page is divided into two panes: Recovery Points Summary and Recovery Points. The Summary pane does
not include any actionable links. It displays the following data for the machine.
Table 4. Recovery Points Summary pane data
UI Element Description
Total Recovery Points The number of recovery points collected for this
particular protected machine.
Total Protected Data The amount of data from the protected machine that
is stored in the repository.
Repository The name of the repository in which Rapid Recovery
stores the recovery points for this protected
machine.
Repository Status The progress bar displays the percentage of the
total space used in the repository. The amount of
data used and the total size of the repository appear
below the progress bar.
For more information, see Viewing the Protected Machines pane.
Parent topic
DL4300 Appliance
Viewing recovery points for a machine
39
Page 40

Viewing events for a protected machine
On the Events page, you can view the jobs that occurred or are in progress for the protected machine you
selected. Buttons at the top of the page let you navigate to lists of jobs in each of the three categories of activities:
• Tasks. A job that the Rapid Recovery must perform to operate successfully.
• Alerts. A notification related to a task or event that includes errors and warning.
• Journal. A composite of all protected machine tasks and alerts.
The following table includes descriptions of each element on the Events page.
Table 5. Events page elements
UI Element Description
Search keyword Lets you search for a specific item within each
category. Available for tasks only.
From To narrow your results, you can enter a date at
which to begin searching. Available for tasks only.
To To narrow your results, you can enter a date at
which to stop searching. Available for tasks only.
Status icons Each icon represents a different job status. For
alerts and tasks, clicking one of the icons lets you
filter the list by that status, essentially generating a
report. Clicking the icon a second time removes the
filter for that status. You can filter by more than one
status. Statuses include:
• Active. A job that is in progress.
• Queued. A job that is waiting for another job to
complete before it can initiate.
• Waiting. A job waiting for your approval or
completion, such as a seed drive. (For more
information about seed drives, see Replication.)
• Complete. A job that completed successfully.
• Failed. A job that failed and did not complete.
Service icon This button adds services jobs to the list of jobs.
When you click this icon, a smaller service icon
appears on each status icon, which lets you filter by
service jobs that have those statuses (if any exist).
Examples of services jobs include deleting index
files or removing a machine from protection.
DL4300 Appliance
Viewing events for a protected machine
40
Page 41

UI Element Description
Export type drop-down list The drop-down list includes the formats to which you
can export the event report. Available for tasks only.
It includes the following formats:
• PDF
• HTML
• CSV
• XLS
• XLSX
(Export icon)
Converts the event report to the format you selected.
Available for tasks only.
Page selection Event reports can include several jobs across
multiple pages. The numbers and arrows at the
bottom of the Events page let you navigate the
additional pages of the report.
The Events page displays all events in a table. The following table lists the information shown for each item.
Table 6. Detailed information for the Event summary table
UI Element Description
Status Shows the status for the task, alert, or journal item.
Available for alerts or journal items, click the header
to filter the results by status.
Name Name is available for tasks only. This text field
lists the task type that completed for this protected
machine. Examples include transfer of volumes,
maintaining repository, rolling up, performing
mountability checks, performing checksum checks,
and so on.
Start Time Available for tasks, alerts, and journal items. Shows
the date and time when the job or task began.
End Time Available for tasks only. Shows the date and time
when the task completed.
Available for tasks only. Opens the Monitor Active
Job Details
Task dialog box, so you can view details of the
specific job or task. These details include an ID for
the job, rate at which the core transferred data (if
relevant), elapsed time for the job to complete, total
work in amount of gigabytes, and any child tasks
associated with the job.
Message Available for alerts and journal items. This text
field provides a descriptive message of the alert or
journal item.
Parent topic
DL4300 Appliance
Viewing events for a protected machine
41
Page 42

Viewing reports for a protected machine
The Reports drop-down menu lets you generate reports on demand for the selected protected machine.
The Job report provides a report on the status of successful jobs and failed jobs for the selected machine. Failed
jobs can be further viewed in a Failure report. For more information on this report type, see Understanding the Job
report.
The Failure report provides information on failed and canceled Core jobs for the specified machine. For more
information on this report type, see Understanding the Failure report.
For more information about generating these reports, see Generating a Core report on demand.
Parent topic
Viewing replicated machines from the navigation menu
If your Core replicates machines from another Rapid Recovery Core, the display name of the source Core
appears as a collapsible menu in the left navigation of the Core Console. As with all menu labels in the navigation
area, this replicated machines menu name appears in all upper-case letters, below the Protected Machines menu.
By default, the replicated machines menu is fully expanded, and lists all machines originating from that source
Core that are replicated on your target Core.
You can collapse or expand the view of replicated machines from that source Core by clicking the arrow on the
left side of this menu.
Each replicated machines menu includes a drop-down menu on the right side, which includes functions you can
perform simultaneously on all of the replicated machines originating from that Core. Click the arrow to the right
of replicated machines menu to see a drop-down list of functions you can perform. These actions include the
following:
• Pause replication. If replication is currently active, it stops the action until you resume it.
• Resume replication. If replication has been paused, it begins replicating again.
• Force replication. Replicates on demand, rather than at a scheduled time.
• Remove replication. Removes the replication relationship between the source core and your target core. Optionally, you
can delete the recovery points stored in this Core. For more information, see Removing replication.
Clicking directly on name of the source Core in the navigation menu causes the Machines replicated from [Source
Core Name] page to appear in the main content area. For more information on what you can accomplish on that
page, see Viewing incoming and outgoing replication.
Parent topic
See also: Pausing and resuming replication
See also: Forcing replication
See also: Removing replication
Viewing the Recovery Points Only menu
The Recovery Points Only menu appears in the left navigation area if one of the following is true:
• if your Rapid Recovery Core retains some recovery points from a machine that was previously protected
• if you removed replication but retained the recovery points.
DL4300 Appliance
Viewing the Recovery Points Only menu
42
Page 43

As with all menu labels in the navigation area, the label for this menu appears in all upper-case letters.
You can collapse or expand the view of recovery points-only machines by clicking the arrow on the left side of this
menu.
The menu includes a drop-down menu on the right side which lists functions that can be performed on all recovery
points-only machines simultaneously. In this case, the only function you can perform is to remove recovery points
from the Core.
CAUTION: This action removes all of the recovery points-only machines in your Rapid Recovery Core,
permanently deleting them and precluding you from restoring information from those recovery points from
this Core.
Parent topic
Viewing the Custom Groups menu
The custom groups menu appears in the left navigation area only if you have defined one or more custom groups.
As with all menu labels in the navigation area, the label for this menu appears in all upper-case letters.
You can collapse or expand the view of items in this menu by clicking the arrow on its left side.
The custom groups menu includes a drop-down menu on the right side which lists functions that can be
performed simultaneously on all of the like items in that group.
For more information, see Understanding custom groups.
Parent topic
Using the Error dialog box
When an error occurs in the Rapid RecoveryRapid Recovery Core Console user interface, such as trying to
enter an invalid parameter, an Error dialog box appears. The dialog box typically indicates the cause of the error,
includes some links to provide more information about the error, and includes a Close button. You must close the
Error dialog box before you continue, but you may want to view more information about the error.
In the Error dialog box, choose from the following options:
User interface errors that cause the Error dialog box to appear are not tracked in Rapid Recovery events tab,
since they are simply validation or data entry errors. However, when you click the Search Knowledge Base
option for any error, then the URL link provided for that error is recorded to the CoreAppRecovery.log file. You
can search the log for the text string “KB article url generated” to see the URL for each error that was viewed in
a browser. For more information on downloading or viewing Core error logs, see the topics Downloading and
viewing the Core log file or Accessing Core logs, respectively.
Parent topic
Core settings
This section describes how to manage and change the settings for your Rapid Recovery Core from the
Settings icon.
Parent topic
DL4300 Appliance
Core settings
43
Page 44

Rapid Recovery Core settings
The Rapid Recovery Core settings are configured by default for optimum performance for most users. These
settings affect the performance of the Rapid Recovery Core, or in some cases the display of information in the
Rapid Recovery Core Console. From the icon bar, click (Settings) to access Core settings. A list of all
Core settings appears on the left. You can click on the title for any of the settings from this list to jump to the full
configuration for that setting on the right. Or you can scroll down through all the Core settings on the right to see
all configuration options. For more information, see Rapid Recovery Core settings.
You can also access Core tools such as viewing a summary of system information, or downloading Core log files.
For more information, see Core-level tools.
The comprehensive set of Rapid Recovery Core settings that you can configure is described in the following table.
Table 7. Rapid Recovery Core configurable settings
Configuration Setting Description
Backup and restore Core configuration Rapid Recovery lets you back up Core configuration
settings to an XML file. If you have a backup file, you
can use it to restore or migrate Core settings.
For more information about backing up and restoring
Core settings, see Backing up and restoring Core
settings.
General General settings include configuration options
that apply generally to the Rapid Recovery Core,
including display options and ports for the web
server and for the Rapid Recovery service.
For more information about the general settings for
Rapid Recovery Core, including how to configure
these settings, see Configuring Core general
settings.
Updates Update settings controls aspects of the Automatic
Update feature, which checks for updated versions
of Rapid Recovery software.
For more information about settings for updating the
Rapid Recovery Core, including how to configure
these settings, see Configuring update settings.
Nightly jobs Nightly jobs settings are automated tasks which
the Core performs on a daily basis. You can
configure the time the jobs begin and which jobs are
performed. Dell recommends scheduling the jobs
outside of normal business hours to reduce load on
the system when demand for resources is high.
For more information, see Understanding nightly
jobs, Configuring nightly jobs for the Core, and
Customizing nightly jobs for a protected machine.
Transfer queue Transfer queue settings control the number of times
transfer operations are attempted if jobs fail due to
unavailability of resources. You can establish the
DL4300 Appliance
Rapid Recovery Core settings
44
Page 45

Configuration Setting Description
maximum number of concurrent transfers and the
maximum number of retries for transferring data.
For more information about transfer queue settings,
see Modifying transfer queue settings.
Client timeout Client timeout settings determine the length of time
before that specific connection requests or read and
write operations should be attempted before timing
out.
For more information about client timeout settings,
see Adjusting client timeout settings.
DVM Deduplication cache Deduplication ensures that unique blocks of
information are stored only once in your repository,
creating references to repeated data blocks. The
references are stored in a deduplication cache. If
encryption keys are used, then deduplication occurs
within each encryption domain.
DVM deduplication cache settings let you configure
the size and specify the locations for the primary
and secondary cache, as well as the location for the
metadata cache.
For more information about deduplication cache,
see Understanding deduplication cache and storage
locations. For information on adjusting the settings,
see Configuring DVM deduplication cache settings.
Replay Engine Replay engine settings control information regarding
the communication channel for the Replay engine,
such as IP addresses and timeout settings, to help
adjust the performance specific to your network
needs.
For more information about engine settings for Rapid
Recovery, see Configuring Replay engine settings.
Deploy Deploy settings let you set options for deploying the
Rapid Recovery Agent software from your Core to
the machines you want to protect.
For more information about configuring deployment
settings, see Configuring deployment settings.
Database connection Rapid Recovery stores transactional information
in a MongoDB service database that is installed
locally by default on the Core machine. You can
configure these settings to change how long
information is retained in the database, or to change
the connection pool size to allow for more or fewer
concurrent connections.
For more information about establishing or modifying
database connection settings for the service
database, see Configuring database connection
settings.
DL4300 Appliance
Rapid Recovery Core settings
45
Page 46

Configuration Setting Description
Local database Rapid Recovery displays information about Core
tasks, events, and alerts on the Events page. Rapid
Recovery stores this transactional information in a
MongoDB service database that is installed locally
on the same machine as the Rapid Recovery Core.
You can configure credential information (username
and password) for the local Mongo service database
using the Local database settings. For more
information on adjusting local database settings, see
Modifying local database connection settings.
SMTP server Configure simple mail transfer protocol (SMTP)
server settings for the Core, you can also to send
Core event information by email.
For more information about configuring an SMTP
email server, see Configuring an email server.
NOTE: To send event information by
email, you must also configure notification
group settings. For more information on
specifying events to receive email alerts, see
Configuring notification groups.
Cloud configuration The Cloud Configuration settings let you specify
configuration settings for supported cloud storage
accounts. These settings do not create cloud
accounts. Instead, they associate existing cloud
storage accounts with your Rapid Recovery Core to
facilitate actions such as archiving Rapid Recovery
information.
For more information about managing cloud storage
account information in the Rapid Recovery Core,
see Managing cloud accounts.
Reports Report settings include a single configuration
parameter that allows you to select the font used
when a report is generated from the Rapid Recovery
Core.
For more information about changing report settings,
see Managing report settings.
Attachability Attachability settings let you specify whether to
perform SQL attachability checks on the protected
machine, or whether to use the SQL Server instance
on the Core. If specifying SQL on the Core, you
must provide credential information.
For more information about managing SQL
attachability settings for the Core, see Managing
Core SQL attachability settings.
Jobs Core jobs are automatically created whenever you
initiate operations such as replication. You can
specify settings for each job using the Jobs core
settings.
DL4300 Appliance
Rapid Recovery Core settings
46
Page 47

Configuration Setting Description
You can configure the number of jobs to execute at
one time. In case network or other communication
errors prevent any job from succeeding the first
time, you can set how many times a job should be
attempted using the Try count setting.
For more information about Core jobs, which jobs
are available, and how to configure them, see Core
job settings.
Licensing From the Core console, Rapid Recovery lets you
change the license associated with your Core, limit
the number of daily snapshots, view license pool
information, and contact the license server.
For more information about managing licenses from
the Core, see Managing licenses.
For more information about managing licenses, see
the Dell Data Protection | Rapid Recovery License
Portal Guide.
NOTE: The Dell Data Protection | Rapid
Recovery License Portal has a different
release cycle than Rapid Recovery software.
For the latest product documentation, see the
Dell Technical Documentation website.
SNMP configuration Simple Network Management Protocol (SNMP) is
a protocol for managing devices on an IP network.
You can configure the Rapid Recovery Core as an
SNMP agent. The Core then can report information
such as alerts, repository status, and protected
machines.
For more information on using SNMP with Rapid
Recovery, see Understanding SNMP settings.
vSphere vSphere Core settings apply only for users of the
agentless protection of virtual machines. If using
a vSphere host, these settings include connection
settings that apply to the VMs.
For more information on vSphere settings for
VMware or ESXi agentless protection, see
Configuring vSphere settings.
Log Uploads When this option is set to Yes, Rapid Recovery Core
uploads log files to Dell for analysis in its on-going
effort to improve overall product quality. This setting
is optional.
Parent topic
DL4300 Appliance
Rapid Recovery Core settings
47
Page 48

Configuring Core general settings
General settings for the Rapid Recovery Core include the Core display name, the web server port, service port,
and the locale (the Core console display language).
1. Navigate to the Rapid Recovery Core Console.
2.
On the icon bar, click (Settings), and then do one of the following:
• From the list of Core settings on the left side of the Settings page, click General.
• Scroll down on the right side of the Settings page until you can see the General heading.
The General core settings appear.
3. Click on the general setting you want to change.
The setting you selected becomes editable, as a text field or a drop-down menu.
4. Enter the configuration information as described in the following table.
Table 8. General Settings information
Text Box Description
Display name Enter a new display name for the Core. This is the
name that will display in the Rapid Recovery Core
Console. You can enter up to 64 characters.
Web server port Enter a port number for the Web server. The default
port is 8006.
Service port Enter a port number for the Rapid Recovery Core
service. The default port is 8006.
Locale From the Locale drop-down list, select the language
you want to display.
You can choose from English, French, German,
Japanese, Korean, Portuguese, Simplified Chinese,
and Spanish.
NOTE: If changing the languages, confirm
the message indicating that the Rapid
Recovery Core service must restart before
the updated language can display in the Core
Console. You can restart this service from the
Windows Task Manager.
5.
For each setting, when satisfied with your changes, click to save the change and exit edit mode, or
click to exit edit mode without saving.
Parent topic
Configuring update settings
Rapid Recovery includes the Automatic Update feature. When installing the Rapid Recovery Core, you can
choose whether to automatically update the Rapid Recovery Core software when new updates are available, and
how frequently the system should check for updates.
DL4300 Appliance
Configuring update settings
48
Page 49

Rapid Recovery release numbers typically include four chunks of information, separated by decimal points:
the major release number, minor release number, revision, and build number. For example, the first rebranded
release of Rapid Recovery was 6.0.1.609. The next release was 6.0.2.142.
The Auto Update feature compares all digits in a release number. If you enable automatic update, the Core
software is only updated without intervention when the major and minor release numbers are identical. For
example, automatic update would occur from Core version 6.0.1.609 to 6.0.2.142 (both start with 6.0). On the
same machine, the Core would not update automatically from 6.0.2.142 to 6.1.1.XXX, because the digits after the
first decimal are not equal. Instead, you are notified (by a banner at the top of the Core Console) that an update to
the Core software is available. This notification gives you an opportunity to review release notes, and determine if
updating to the latest Core version is appropriate for your needs.
NOTE: For information on installing Rapid Recovery Core software, see the Dell Data Protection | Rapid
Recovery Installation and Upgrade Guide.
You can view and change the settings the system uses to check for updates at any time.
CAUTION: When using replication, configuring your system to install updates automatically could result
in upgrading the source core before the target core, which may result in replication failure or the inability
to set up new replication between cores. For replication users, Dell recommends administrators apply
automatic upgrades only to the target Core, and then manually upgrade the source Core, and lastly
upgrade the protected machines.
Complete the steps in this procedure to configure update settings.
1. Navigate to the Rapid Recovery Core Console.
2.
On the icon bar, click (Settings), and then do one of the following:
• From the list of Core settings on the left side of the Settings page, click Updates.
• Scroll down on the right side of the Settings page until you can see the Updates heading.
The Updates core settings appear.
3. Click on the setting you want to change.
The setting you selected becomes editable.
4. Enter the configuration information as described in the following table.
Table 9. Update settings information
Text Box Description
Check for new updates Select how frequently Rapid Recovery checks for
and installs updates. You can choose from the
following options:
• Never
• Daily
• Weekly
• Monthly
If you choose automatic updates,
after the selected threshold of time
passes, if an update is available, it
is installed after nightly jobs have
completed.
DL4300 Appliance
Configuring update settings
49
Page 50

Text Box Description
Install updates Specify the handling of available updates by
choosing one of the following options:
• Never check for updates
• Notify me about updates, but do not install them
automatically
• Automatically install updates
Status The status indicates whether any new updates are
available.
Last check The Last check field indicates the date and time the
system last checked for an update.
Click Check Now to immediately verify whether a
software update is available. This check occurs
regardless of the frequency you have set.
5.
For each setting, when satisfied with your changes, click to save the change and exit edit mode, or
click to exit edit mode without saving.
Parent topic
Understanding nightly jobs
Nightly jobs are daily automated tasks that occur at a predetermined time outside of normal business hours.
These jobs are memory-intensive, and include various integrity checks and data consolidation tasks that are best
conducted when the Rapid Recovery Core is less active.
All the nightly jobs, and the scope for which they can be applied, are described in the following table. Nightly jobs
can be managed at the Core level (which applies to all machines protected on the Core). Those nightly jobs which
can also be applied for a specific protected machine list the scope as "Protected machine."
Table 10. Nightly jobs information
Job Name Scope Description
N/A This control opens the Nightly
Change
Nightly jobs time All This setting represents the time
Jobs dialog box, where you
can enable, disable, or change
settings for each nightly job.
that nightly jobs are scheduled to
start running. Dell recommends
configuring your Core to run
nightly jobs during a time of low
activity.
The default time is 12:00 AM.
Rollup Core or protected machine Applies the retention policy to your
backed-up data by combining or
"rolling up" recovery points on the
schedule dictated in the policy.
You can customize the policy on
DL4300 Appliance
Understanding nightly jobs
50
Page 51

Job Name Scope Description
the Core, which applies by default
to all protected machines. By
default, the rollup job is run for the
whole Core; or click to define
which protected machines to roll
up using the Core policy.
For more information about using
a retention policy on a protected
machine that differs from the
default policy set in the Core,
see Customizing retention policy
settings for a protected machine.
Check attachability of SQL
databases
Protected machine Checks the integrity of recovery
points containing SQL databases.
Process:
• Mount the latest recovery point
for protection groups containing
databases.
• Connect to the database from
SQL Server.
• Open the database.
• Close the database.
• Dismount the recovery point.
To enable this nightly
check, specify a
SQL Server instance
to use to perform
attachability checks
for SQL Server
databases on
protected machines.
NOTE: This option
does not appear if you
are not protecting a
SQL Server in your
Core.
Download logs from protected
machines
Consolidate VMware snapshots
for protected virtual machines
Core Downloads logs for protected
machines to the Core, so they can
be sent to a logging server.
Core or protected machine This nightly job is relevant if you
use native VMware APIs to protect
machines without the Rapid
Recovery Agent software.
You should periodically
consolidate VMware snapshots.
Enabling this nightly job lets you
perform these consolidations
DL4300 Appliance
Understanding nightly jobs
51
Page 52

Job Name Scope Description
on a daily basis. This nightly
job contains one parameter,
Maximum simultaneous
consolidations, which must be set
to a number between 1 and 100.
Check integrity of recovery points Core or protected machine Checks the integrity of recovery
points for each protected
machine. By default, the Check
integrity of recovery
points option is not enabled.
Process:
• Mount the latest recovery point
for every protection group.
• Enumerate the files and folders
for each volume.
• Examines the recovery points
to ensure that they are valid.
• Dismount the recovery point.
Check checksum of Exchange
databases
Truncate SQL logs (simple
recovery model only)
Truncate Exchange logs Protected machine Maintains the size of Exchange
Protected machine Checks the integrity of recovery
points containing Exchange
Database (EDB) files.
NOTE: This option does
not appear if you are not
protecting an Exchange
Server in your Core.
Protected machine Maintains the size of SQL Server
logs by truncating the database
transaction log to match the last
recovery point.
NOTE: This option does
not appear if you are not
protecting a SQL Server in
your Core.
logs, by truncating the exchange
database transaction log to match
the last recovery point.
NOTE: This option does
not appear if you are not
protecting an Exchange
server in your Core.
Log repository statistics Core Sends repository statistics to a
logging server.
Delete old events and jobs Core Maintains the scale of the events
database by removing old
DL4300 Appliance
Understanding nightly jobs
52
Page 53

Job Name Scope Description
events. The number of days is
configurable, defaulting to 30
days.
Parent topic
Configuring nightly jobs for the Core
When any nightly job option is enabled on the Rapid Recovery Core, the selected job executes once daily at the
time specified for all machines that are protected by the Core. Conversely, if you disable any nightly job at the
Core level, the specified job no longer executes for all machines protected by the Core.
NOTE: If the scope of a nightly job, as described in the topic Understanding nightly jobs, includes protected
machines, you can configure that nightly job to apply only for one or more specific protected machines
individually. For more information about applying nightly job settings specific to a protected machine, see
Customizing nightly jobs for a protected machine.
Because nightly jobs are memory-intensive, Dell recommends configuring your Core to execute them during a
time of low activity. The default schedule to run nightly jobs is 12:00 am. If another time is more suitable, change
this setting in the Nightly Jobs Time field using this procedure.
1. Navigate to the Rapid Recovery Core Console.
2.
On the icon bar, click (Settings), and then do one of the following:
• From the list of Core settings on the left side of the Settings page, click Nightly Jobs.
• Scroll down on the right side of the Settings page until you can see the Nightly Jobs heading.
The Nightly jobs Core settings appear.
3.
To change any nightly job, or to change the time that nightly jobs begin to execute, click Change.
The Nightly Jobs dialog box displays.
4. If you want to change the time nightly jobs execute, enter a new time in the Nightly job times field.
5. In the first column, click to select each nightly jobs option you want to set for the Core. Click any selected
option to clear it.
6. Click OK.
The Nightly Jobs dialog box closes and your nightly jobs settings for the Core are saved.
Parent topic
Modifying transfer queue settings
Transfer queue settings are Core-level settings that establish the maximum number of concurrent transfers and
the maximum number of retries for transferring data.
Complete the steps in this procedure to modify transfer queue settings.
1. Navigate to the Rapid Recovery Core Console.
2.
On the icon bar, click (Settings), and then do one of the following:
• From the list of Core settings on the left side of the Settings page, click Transfer Queue.
• Scroll down on the right side of the Settings page until you can see the Transfer Queue heading.
DL4300 Appliance
Modifying transfer queue settings
53
Page 54

The Transfer Queue core settings appear.
3. Click on the setting you want to change.
The setting you selected becomes editable.
4. Enter the configuration information as described in the following table.
Table 11. Transfer queue settings information
Text Box Description
Maximum Concurrent Transfers Enter a value to update the number of concurrent
transfers.
Set a number from 1 to 60. The smaller the number,
the lesser the load on network and other system
resources. As the number of agents that are
processed increases, so does the load on the
system.
Maximum Retries Enter a value to set the maximum number of
attempts before canceling the transfer operation.
Set a number from 1 to 60.
5.
For each setting, when satisfied with your changes, click to save the change and exit edit mode, or
click to exit edit mode without saving.
Parent topic
Adjusting client timeout settings
Client timeout settings control the length of time that various operations are attempted before the operation times
out.
NOTE: Dell recommends leaving default timeout settings unless you experience specific issues in your
environment, and you are advised by a Dell Support representative to modify the settings.
Complete the steps in this procedure to adjust client timeout settings.
1. Navigate to the Rapid Recovery Core Console.
2.
On the icon bar, click (Settings), and then do one of the following:
• From the list of Core settings on the left side of the Settings page, click Client Timeout.
• Scroll down on the right side of the Settings page until you can see the Client Timeout heading.
The Client Timeout core settings appear.
3. Click on the setting you want to change.
The setting you selected becomes editable.
4. Enter the configuration information as described in the following table.
Table 12. Client timeout settings information
Setting Description
Connection Timeout Controls the timeout for the connection between the
Core and protected machines when sending data
across the hypertext transfer protocol (http).
DL4300 Appliance
Adjusting client timeout settings
54
Page 55

Setting Description
Enter the amount of time you want to lapse before a
connection timeout occurs. Uses HH:MM:SS format.
NOTE: The default setting is 0:05:00 or five
minutes.
Read/Write Timeout Controls the timeout for the connection between
the Core and protected machines when reading
or writing stream data across http. An example is
receiving changed data blocks from a protected
machine to the Core for an incremental snapshot.
Enter the amount of time you want to lapse before
a timeout occurs during a read/write event. Uses
HH:MM:SS format.
NOTE: The default setting is 0:05:00 or five
minutes.
Connection UI Timeout Controls the timeout for the connection between the
graphic user interface and the Rapid Recovery Core
service across http.
Enter the amount of time you want to lapse before
a connection UI timeout occurs. Uses HH:MM:SS
format.
NOTE: The default setting is 0:05:00 or five
minutes.
Read/Write UI Timeout Controls the timeout for the connection for reading
and writing data streams between the graphic user
interface and the Rapid Recovery Core service
across http.
Enter the amount of time you want to lapse before
a timeout occurs during read or write events. Uses
HH:MM:SS format.
NOTE: The default setting is 0:05:00 or five
minutes.
6.
For each setting, when satisfied with your changes, click to save the change and exit edit mode, or
click to exit edit mode without saving.
Parent topic
Understanding deduplication cache and storage locations
Global deduplication reduces the amount of disk storage space required for data your Core backs up. Each
repository is deduplicated, storing each unique block once physically on disk, and using virtual references
or pointers to those blocks in subsequent backups. To identify duplicate blocks, Rapid Recovery includes a
deduplication cache for deduplication volume manager (DVM) repositories. The cache holds references to unique
blocks.
By default, for DVM repositories, this deduplication cache is 1.5GB. This size is sufficient for many repositories.
Until this cache is exceeded, your data is deduplicated across the repository. Once the amount of redundant
information is so great that the deduplication cache is full, your repository can no longer take full advantage of
DL4300 Appliance
Understanding deduplication cache and storage locations
55
Page 56

further deduplication for newly added data. The amount of data saved in your repository before the deduplication
cache fills varies by the type of data being backed up, and is different for every user.
You can increase the size of the DVM deduplication cache by changing the deduplication cache setting in the
Rapid Recovery Core. For more information on how to increase the cache size, see the topic Configuring DVM
deduplication cache settings.
When you increase the DVM deduplication cache size, there are two factors to consider: disk space and RAM
usage.
Disk space. Two copies of the DVM deduplication cache are stored on disk: a primary cache, and a secondary
cache which is a parallel copy. Thus, if using the default cache size of 1.5GB for a DVM repository, 3GB of
disk storage is used in your system. As you increase the cache size, the amount of disk space used remains
proportionally twice the size of the cache. To ensure proper and fault-resistant performance, the Core dynamically
changes the priority of these caches. Both are required, the only difference being that the cache designated as
primary is saved first.
RAM usage. When the Rapid Recovery Core starts, it loads the deduplication cache to RAM. The size of the
cache therefore affects memory usage for your system. The total amount of RAM the Core uses depends on
many factors. These factors include which operations are running, the number of users, the number of protected
machines, and the size of the deduplication cache. Each operation the Core performs (transfer, replication, rollup,
and so on) consumes more RAM. Once an operation is finished, memory consumption decreases accordingly.
However, administrators should consider the highest RAM load requirement for efficient operations.
Default settings for the Rapid Recovery Core place the primary cache, secondary cache, and the metadata cache
for DVM repositories in the AppRecovery directory. This folder is installed on the Core machine.
NOTE: Depending on your settings, the AppRecovery directory may not be visible on the Rapid Recovery
Core. To see this directory, you may need to change the Folder Options control panel to show hidden files,
folders, and drives.
Assuming the Rapid Recovery Core is installed on the C drive, these locations are typically as follows:
Table 13. Default storage locations for DVM deduplication cache settings
Setting Default Storage Location
Primary Cache Location C:\ProgramData\AppRecovery\RepositoryMetaData
\PrimaryCache
Secondary Cache Location C:\ProgramData\AppRecovery\RepositoryMetaData
\SecondaryCache
Metadata Cache Location C:\ProgramData\AppRecovery\RepositoryMetaData
\CacheMetadata
You can change the storage location of these caches. For example, for increased fault tolerance, you can change
location of your secondary cache to a different physical drive than the primary cache, assuming the Rapid
Recovery Core has access to the location.
For more information on how to change storage locations for any of these settings, see the topic Configuring DVM
deduplication cache settings.
Dell recommends that you plan for deduplication storage separately. Deduplication only occurs in a single
repository (not across multiple repositories). If using Core-based encryption, deduplication is further limited to the
data protected by a single key, since for security purposes each key serves a single encryption domain.
For more information about deduplication, see Deduplication in Rapid Recovery.
Parent topic
DL4300 Appliance
Understanding deduplication cache and storage locations
56
Page 57

Configuring DVM deduplication cache settings
Complete the steps in this procedure to configure deduplication cache settings for DVM repositories.
1. Navigate to the Rapid Recovery Core Console.
2.
On the icon bar, click (Settings), and then do one of the following:
• From the list of Core settings on the left side of the Settings page, click DVM Deduplication Cache. This setting
only appears if your Core has one or more DVM repositories.
• Scroll down on the right side of the Settings page until you can see the DVM Deduplication Cache heading.
The DVM Deduplication Cache core settings appear.
3. If you want to restore default DVM deduplication cache settings at any time, do the following:
a. At the top of the deduplication cache settings area, click Restore Default.
The Restore Default dialog box appears
b. Click Yes to confirm the restore.
4. Click the setting you want to change.
The setting you selected becomes editable.
5. To change individual deduplication cache settings, enter the configuration information as described in the
following table.
Table 14. DVM deduplication cache settings information
Setting Description
Restore Default
default locations, which are described for each
setting.
Primary cache location If you want to change the primary cache location
for DVM repositories, then in the Primary Cache
Location text box, type the path for a storage
location accessible to the Core.
The default location is:
C:\ProgramData\AppRecovery
\RepositoryMetaData\PrimaryCache
Since the primary and secondary caches are the
same size, collective storage for these two caches
requires twice the amount of space as the amount
allocated for the deduplication cache size. For
example, if you specify the default amount of 1.5GB
for the deduplication cache size, ensure that each
of the two storage locations have at least 1.5GB. In
particular, if both locations belong to the same drive
(for example, the C drive), there must be at least
3.0GB of free disk space.
Secondary cache location If you want to change the secondary cache location
for DVM repositories, then in the Secondary Cache
Location text box, type the path for a storage
location accessible to the Core.
The default location is:
This control resets DVM cache locations to system
DL4300 Appliance
Understanding deduplication cache and storage locations
57
Page 58

Setting Description
C:\ProgramData\AppRecovery
\RepositoryMetaData\SecondaryCache
Cache metadata location If you want to change the cache metadata location
for DVM repositories, then in the Cache Metadata
Location text box, type the path for a storage
location accessible to the Core.
The default location is:
C:\ProgramData\AppRecovery
\RepositoryMetaData\CacheMetadata
Deduplication cache size (GB) If you want to change the deduplication cache size
for DVM repositories, then in the Deduplication
Cache Size text box, enter a new amount (in GB).
The default location is:
C:\ProgramData\AppRecovery
\RepositoryMetaData\SecondaryCache
The minimum cache size setting is 1.5GB.
Additionally, the cache size cannot exceed 50
percent of the installed RAM.
6.
For each setting, when satisfied with your changes, click to save the change and exit edit mode, or
click to exit edit mode without saving.
Parent topic
Configuring Replay engine settings
You can configure information regarding the Replay engine, which is the communication channel for Rapid
Recovery. These settings determine Core settings to provide effective communication.
In general, Dell recommends using default settings. In some cases, you may be directed by Dell Support to
modify these settings to help adjust the performance specific to your network needs.
Complete the steps in this procedure to configure Replay engine settings.
1. Navigate to the Rapid Recovery Core Console.
2.
On the icon bar, click (Settings), and then do one of the following:
• From the list of Core settings on the left side of the Settings page, click Replay Engine.
• Scroll down on the right side of the Settings page until you can see the Replay Engine heading.
The Replay Engine core settings appear.
3. Click on the setting you want to change.
The setting you selected becomes editable.
4. Enter the configuration information as described in the following table.
DL4300 Appliance
Configuring Replay engine settings
58
Page 59

Table 15. Replay engine settings information
Text Box Description
IP Address The Core uses this IP address when performing
mount and restore for a recovery point, to allow
feedback between protected machines and the
Сore.
The IP address for the Replay engine automatically
populates with the IP address of the Core machine.
If you manually enter the server IP address, then
this value is used in cases where the protected
machine cannot resolve the automatically provided
IP address.
You do not need to set this value manually unless
you are having issues with protected machines
being able to communicate with the Core.
Preferable Port Enter a port number or accept the default setting.
The default port is 8007.
The port is used to specify the communication
channel for the Replay engine.
Port in use Represents the port that is in use for the Replay
engine configuration.
Allow port auto-assigning Click for allow for automatic TCP port assignment.
Admin Group Enter a new name for the administration group. The
default name is BUILTIN\Administrators.
Minimum Async I/O Length Enter a value or choose the default setting. It
describes the minimum asynchronous input/output
length.
The default setting is 65536.
Read Timeout Enter a read timeout value or choose the default
setting. The default setting is 00:05:00.
Write Timeout Enter a write timeout value or choose the default
setting. The default setting is 00:05:00.
Receive Buffer Size Enter an inbound buffer size or accept the default
setting. The default setting is 8192.
Send Buffer Size Enter an outbound buffer size or accept the default
setting. The default setting is 8192.
No Delay It is recommended that you leave this check box
unchecked as doing otherwise will impact network
efficiency. If you determine that you need to modify
DL4300 Appliance
Configuring Replay engine settings
59
Page 60

Text Box Description
this setting, contact Dell Support for guidance in
doing so.
5.
For each setting, when satisfied with your changes, click to save the change and exit edit mode, or
click to exit edit mode without saving.
Parent topic
Configuring deployment settings
Rapid Recovery lets you download installers from the Rapid Recovery Core to machines you want to protect.
You can configure settings related to the deployment of the Rapid Recovery Agent software from your Core to the
machines you want to protect.
Complete the steps in this procedure to configure deployment settings.
1. Navigate to the Rapid Recovery Core Console.
2.
On the icon bar, click (Settings), and then do one of the following:
• From the list of Core settings on the left side of the Settings page, click Deploy.
• Scroll down on the right side of the Settings page until you can see the Deploy heading.
The Deploy core settings appear.
3. Click on the setting you want to change.
The setting you selected becomes editable.
4. Enter the configuration information as described in the following table.
Table 16. Deployment settings information
Text Box Description
Agent installer name The default filename is Agent-Web.exe. If you wish
to change this file name for any reason, you can use
this setting to specify a new name of the Core Web
Installer executable file. This file streams a download
of the latest version of the Rapid Recovery Core
installer, which runs directly from the Web and lets
you pause and resume the process as needed.
Core address Enter the address of your Core server. This typically
consists of the protocol, the name of your core
server and port, and the directory where the Core
files reside.
For example, if your server is Sample, this setting is
https://sample:8006/apprecovery/admin/Core
Failed receive timeout The amount of time deployment of the Agent
software should be attempted before timing out.
The default setting is 00:25:00 or twenty-five
minutes. If you wish to change this setting, enter
the length of time you want the system to attempt to
DL4300 Appliance
Configuring deployment settings
60
Page 61

Text Box Description
deploy the Agent software before a timeout occurs
during read or write events. Uses HH:MM:SS format.
Maximum parallel installs This setting controls the maximum number of
deployments of the Agent software for the Core to
attempt at one time.
The default setting is 100.
5.
For each setting, when satisfied with your changes, click to save the change and exit edit mode, or
click to exit edit mode without saving.
Parent topic
Configuring database connection settings
Rapid Recovery displays information about Core tasks, events, and alerts on the Events page. Rapid Recovery
stores this transactional information in a MongoDB service database that is installed locally by default on the
Core machine. You can configure these settings to change how long information is retained in the database, or to
change the connection pool size to allow for more or fewer concurrent connections.
If using a second Rapid Recovery Core, you can configure the database connection settings on the first Core to
point to the second Core machine. In this way, the event data for both Cores will be stored in the MongoDB on the
second Core.
Alternatively, you can configure the database connection settings on the Core to point to another machine that
has a separately installed MongoDB which is accessible over the network to the Rapid Recovery Core. The
event transaction data for your Core is then saved to that service database, not locally. For more information
about establishing or modifying database connection settings for the service database, see Configuring database
connection settings.
NOTE: For more information about viewing event information from the Rapid Recovery Core, see Viewing
events using tasks, alerts, and journal.
Customers can choose to specify installation of the MongoDB service database on another machine accessible
on the network to the Rapid Recovery Core. If the service database for your Rapid Recovery Core is installed on
a machine other than the machine hosting the Rapid Recovery Core, you must provide database credentials (a
user name and password) in these settings.
Complete the steps in this procedure to modify the database connection settings for the service database used by
the Rapid Recovery Core.
1. Navigate to the Rapid Recovery Core Console.
2.
On the icon bar, click (Settings), and then do one of the following:
• From the list of Core settings on the left side of the Settings page, click Database Connection.
• Scroll down on the right side of the Settings page until you can see the Database Connection heading.
The Database Connection core settings appear.
3. From the top of the Database Connection settings area, you can do the following:
• Click Test Connection to verify your settings.
Testing the connection is recommended when you change any of the database connection settings.
• Click Restore Default to restore all default database connection settings.
DL4300 Appliance
Configuring database connection settings
61
Page 62

You are prompted to confirm this action, which results in abandoning any customized database
connection settings.
4. Click on the setting you want to change.
The setting you selected becomes editable.
5. Enter the configuration information as described in the following table.
Table 17. Database connection settings information
Descriptions of the connection settings available on the Settings page for the Rapid Recovery Core.
Text Box Description
Host name Enter a host name for the database connection.
NOTE: When localhost is the parameter
specified as the host, the MongoDB is
installed locally on the machine hosting the
Core.
Port Enter a port number for the database connection.
NOTE: The default setting is 27017.
User name Enter the name of a user with administrative
privileges to the MongoDB service database.
NOTE: If the host name parameter is
localhost, this field is not required.
Password Enter the password associated with the user name
you specified.
NOTE: If the host name parameter is
localhost, this field is not required.
Retention period (day) Enter the number of days to retain the event and job
history in the service database.
Maximum connection pool size Sets the maximum number of database connections
cached to allow dynamic reuse.
NOTE: The default setting is 100.
Minimum connection pool size Sets the minimum number of database connections
cached to allow dynamic reuse.
NOTE: The default setting is 0.
6.
For each setting, when satisfied with your changes, click to save the change and exit edit mode, or
click to exit edit mode without saving.
Parent topic
DL4300 Appliance
Configuring database connection settings
62
Page 63

Modifying local database connection settings
You can view system events related to the Rapid Recovery Core on the Events page. The Rapid Recovery Core
stores this transactional information in a MongoDB service database. By default, this database is installed locally
on the Core machine, and the hostname in the database connection settings defaults to localhost. In this situation,
the loopback interface bypasses local network interface hardware, and database credentials are not required.
Optionally, to increase security, you can explicitly specify database credentials (a user name and password) for
the MongoDB database used by the Rapid Recovery Core.
NOTE: For more information about viewing event information from the Rapid Recovery Core, see
Viewing events using tasks, alerts, and journal. For information about database connection settings, see
Configuring database connection settings.
Complete the steps in this procedure to modify the local database connection settings to specify database
credentials.
1. Navigate to the Rapid Recovery Core Console.
2.
On the icon bar, click (Settings), and then do one of the following:
• From the list of Core settings on the left side of the Settings page, click Local Database Settings.
• Scroll down on the right side of the Settings page until you can see the Local Database Settings heading.
The Local Database core settings appear.
3. Click on the setting you want to change.
The setting you selected becomes editable.
4. Enter the appropriate credentials for connecting to the service database, as described in the following table.
Table 18. Local database settings information
Text Box Description
User name Enter the name of a user with administrative
privileges to the MongoDB service database.
Password Enter the password associated with the user name
you specified.
5.
For each setting, when satisfied with your changes, click to save the change and exit edit mode, or
click to exit edit mode without saving.
Parent topic
Managing SMTP server settings
If you configure simple mail transfer protocol (SMTP) server settings for the Core, you can send task, event, and
alert notifications by email.
Information about configuring an SMTP email server is described in the topic Configuring an email server.
NOTE: To send event information by email, you must also configure notification group settings. For more
information on specifying events to receive email alerts, see Configuring notification groups.
Parent topic
DL4300 Appliance
Managing SMTP server settings
63
Page 64

Managing Cloud configuration settings
In Rapid Recovery, you can associate storage accounts you have with Cloud storage providers with your Rapid
Recovery Core. This lets you archive information from protected machines when the data ages out.
Rapid Recovery integrates with Amazon™ S3, Microsoft Azure, and managed cloud providers using OpenStack
open source technology.
For more information about managing cloud storage account information in the Rapid Recovery Core, see
Managing cloud accounts.
Parent topic
Managing report settings
You can generate reports for the Rapid Recovery Core or for protected machines. For information on the reports
you can generate, see Generating and viewing reports.
Complete the steps in this procedure to manage report settings for Core reports.
1. Navigate to the Rapid Recovery Core Console.
2.
On the icon bar, click (Settings), and then do one of the following:
• From the list of Core settings on the left side of the Settings page, click Reports.
• Scroll down on the right side of the Settings page until you can see the Reports heading.
The Reports core settings appear. Report settings are described in the following table.
Option Description
Restore Default This option restores all report settings to the default
settings. Defaults are listed below for each setting.
Font This option controls the default font used for reports.
The default is Trebuchet MS typeface. You can
change this font to any typeface available to your
system.
Paper size This option controls the default paper size for
printing reports. The default is A4. You can choose
from the following paper sizes:
• Letter
• Tabloid
• Ledger
• Legal
• A3
• A4
• Executive
• B4
• C3Envelope
• C4Envelope
DL4300 Appliance
Managing report settings
64
Page 65

Option Description
Page orientation This option controls the page orientation for exported
reports. The default orientation is Portrait. You can
choose from the following layout options:
• Portrait
• Landscape
3. To change any of the settings for Reports, click in the appropriate setting field.
The setting field appears as a configurable drop-down menu.
4. Click the drop-down menu, and select one of the values available.
For example, in the Font field, click Times New Roman.
5.
For each setting, when satisfied with your changes, click to save the change and exit edit mode, or
click to exit edit mode without saving.
The option you selected now appears as the new setting for the selected Reports parameter.
Parent topic
Managing Core SQL attachability settings
SQL attachability checks occur as part of the Rapid Recovery nightly jobs. To ease licensing costs, Rapid
Recovery gives you two options for performing attachability checks: using a licensed instance of SQL Server
installed on the Rapid Recovery Core machine or using the instance of SQL Server already installed on your
protected machine. This second option is now the default setting. However, if your protected machine is already
exerted during the time when the nightly jobs occur, consider performing the checks with an instance of SQL
Server on the Core.
In summary, the process of managing Core SQL attachability settings involves the following tasks:
• Mount the latest recovery point for protection groups containing databases.
• Connect to the database from SQL Server.
• Open the database.
• Close the database.
• Dismount the recovery point.
To enable this nightly check, specify a SQL Server instance to use to perform
attachability checks for SQL Server databases on protected machines.
NOTE: This option does not appear if you are not protecting a SQL Server in your Core.
To configure the Core to perform SQL attachability checks as part of the nightly jobs, complete the following
steps.
DL4300 Appliance
Managing Core SQL attachability settings
65
Page 66

NOTE: If you select the default option to use the instance of SQL Server installed on the protected
machine, that SQL Server instance will manage SQL attachability for all protected SQL machines. If you
do not want this setting to apply to all protected SQL machines, select Use SQL Server on the Core. To
perform attachability checks on the Core, you must install or use a licensed version of SQL Server on the
Core machine.
1. Navigate to the Rapid Recovery Core Console.
2.
On the icon bar, click (Settings), and then do one of the following:
• From the list of Core settings on the left side of the Settings page, click Attachability.
• Scroll down on the right side of the Settings page until you can see the Attachability heading.
3. To use the SQL Server instance installed on the protected SQL Server machine, select Use SQL Server on
the protected machine. This is the default option.
4. To use the SQL Server instance installed on the Rapid Recovery Core, select Use SQL Server on the Core,
and then enter the authentication information as described in the following table.
Table 19. SQL Server credentials information
Descriptions of the information required for authenticating a connection to SQL Server.
Text Box Description
SQL Server From the SQL Server drop-down menu, select the
appropriate SQL Server instance from the Core
server.
Credential Type Select the appropriate authentication method for
your credentials from the following options:
• Windows
• SQL
User Name Specify a user name for accessing the SQL Server
on the Core based on your selected credential type.
Password Specify a password for accessing the SQL Server on
the Core based on your selected credential type.
5. Click Test Connection.
NOTE: If you entered the credentials incorrectly, a message displays to alert you that the credentials
failed. Correct the credential information and test the connection again.
6. After you are satisfied with your changes, click Apply.
Parent topic
Understanding Core jobs
Core jobs are processes that the Rapid Recovery Core performs to support its operations, including backing up to
recovery points, replicating data, archiving data, exporting data to VMs, maintaining repositories, and so on. Core
DL4300 Appliance
Understanding Core jobs
66
Page 67

jobs are initiated automatically for some operations, such as replicating or archiving on an established schedule.
You can also invoke some jobs on demand from various elements on the Core Console.
• When viewing or editing Core job settings, each Core job has two parameters: Maximum concurrent jobs and Try count.
◦ The Maximum concurrent jobs parameter determines how many jobs of that type can be run at the same time.
◦ The Try count parameter determines how many times the job should be tried before abandoning the job, if network
or other communication errors prevent the job from succeeding the first time.
• In the Core Jobs table, the Settings column indicates if the job listed is included in Core job settings by default or must be
explicitly added.
The following table describes the primary Core jobs available and their functions.
Table 20. Core jobs
Job Name Description Maximum
Concurrent Jobs
Check attachability
of SQL databases
in snapshots
Lets the Core
check the
consistency of
1 0 Default
SQL databases
and ensures that
all supporting
MDF (data) and
LDF (log) files are
available in the
backup snapshot.
Process:
• Mount the
latest recovery
point for
protection
groups
containing SQL
databases.
• Mount the
database. If
performing
attachability
from the
protected SQL
server, mount
Try Count Settings
DL4300 Appliance
Understanding Core jobs
67
Page 68

Job Name Description Maximum
Concurrent Jobs
using UNC
path.
• Connect to the
database from
SQL Server.
• Perform the
attachability
check.
• Perform
cleanup
operations.
• Close the
database.
• Dismount the
database.
• Dismount the
recovery point.
Try Count Settings
Check checksum
of Exchange
databases
Check mountability
of Exchange
databases
Checks the
integrity of recovery
points containing
Exchange
databases.
Process:
• Mount the
latest recovery
point for
protection
groups
containing SQL
databases.
• Connect to the
database from
SQL Server.
• Open the
database.
• Close the
database.
• Dismount the
recovery point.
Checks that
Exchange
databases are
mountable.
1 0 Default
1 0 Default
Replicate protected
machines data from
remote source
Transfers a copy
of recovery points
for a protected
3 0 Default
DL4300 Appliance
Understanding Core jobs
68
Page 69

Job Name Description Maximum
Concurrent Jobs
machine from a
source Core to
a target Core.
This job runs on
the target Core
receiving the
incoming replicated
recovery points.
Try Count Settings
Replicate protected
machines data to
remote target
Roll up recovery
points
Check recovery
points
Transfers a copy
of recovery points
for a protected
machine from a
source Core (on
which they were
originally saved)
to a target Core.
This job runs on the
source Core and
controls outgoing
replication.
Applies the
retention policy to
your backed-up
data by combining
or "rolling up"
recovery points
on the schedule
defined in the
retention policy.
Checks the integrity
of recovery points.
1 3 Default
1 0 Default
1 0 Add
Delete all recovery
points
Delete chain of
recovery points
Delete range of
recovery points
Deletes the full set
of recovery points
on a protected
machine.
Deletes a complete
recovery point
chain on a
protected machine.
Deletes a set of
recovery points
on a protected
machine, by
recovery point
identifier or date
range.
1 0 Add
1 0 Add
1 0 Add
DL4300 Appliance
Understanding Core jobs
69
Page 70

Job Name Description Maximum
Concurrent Jobs
Try Count Settings
Deploy Agent
software to
machines
Deploys Rapid
Recovery Agent
software to the
specified machine
or machines.
Download
Exchange libraries
Downloads
Microsoft Exchange
libraries from the
protected machine
to the Core
machine at path C:
\ProgramData
\AppRecovery
\ExchangeLibraries.
Export to archive Creates backup in
the specified path
with an archive
of the selected
recovery points.
Process:
• Mount
recovery
points.
• Write data to
backups.
• Dismount the
recovery point.
1 0 Add
1 0 Add
1 0 Add
Export to virtual
machine
Exports data
from specified
recovery point of
protected machine
to destination
path as a virtual
machine. Process:
• Mount
recovery point.
• Create virtual
machine from
the recovery
point data in
the destination
path.
• Dismount the
recovery point.
Import archives Imports recovery
point from the
specified backup
1 0 Add
1 0 Add
DL4300 Appliance
Understanding Core jobs
70
Page 71

Job Name Description Maximum
Concurrent Jobs
on a previously
created Core
archive.
Try Count Settings
Maintain repository Performs a check
of the repository.
Process:
• Check
repository file
system.
• Mount
recovery point.
• Recalculate
deduplication
cache for
repository.
• Load recovery
points from
repository.
Mount recovery
point snapshots
Performs mount of
recovery point to
the specified path.
Protect ESX
®
virtual machines
Adds all specified
virtual machines
to agentless
protection.
Job is performed
immediately after
adding agentless
protection of one
or more VMs to
the Core using the
Protect Multiple
Machines Wizard.
Job sets ID
number for each
specified VM,
writes information
about the Core
to a configuration
file, and retrieves
metadata from the
file.
1 0 Add
1 0 Add
1 0 Add
Restore from
recovery point
Performs a restore
from a recovery
point to a specified
1 0 Add
DL4300 Appliance
Understanding Core jobs
71
Page 72

Job Name Description Maximum
Concurrent Jobs
target machine.
Process:
• Mount
recovery point.
• Write all data
from the
recovery point
to the specified
machine.
• Dismount the
recovery point.
Try Count Settings
Uploading logs Uploads logs to
1 0 Add
specified server.
Some Core jobs are included in Settings. The Jobs settings let you specify how many concurrent jobs of the same
type the Core can run, and how many retries should be attempted if the first job attempt fails.
For more information about these Settings, see Core job settings.
For information on adding jobs to Core Settings, see Adding Core jobs to settings.
For information on editing settings for jobs in the Settings list, see Editing Core job settings.
Parent topic
Core job settings
When you select (Settings) from the icon bar, you can access settings for some Core jobs. The Jobs area
on the Core settings page lets you determine two settings for each job type listed:
1. The maximum number of jobs of this type for the Core to attempt at one time. This must be set to a value
between 1 to 50.
2. The number of times a job should be attempted if a network or other communication error prevents the job
from succeeding the first time. This must be set to a value between 0 to 10.
Several jobs are automatically included in Core settings. These jobs include a value of "Default" in the Settings
column (as shown in the topic Understanding Core jobs).
You can add some other jobs to settings if you want to configure those settings to control the maximum number of
jobs or retries for those functions. These jobs include a value of "Add" in the Settings column. For information on
how to add these jobs to the Settings table, see Adding Core jobs to settings.
Core jobs not available in Settings do not provide the ability to set these two parameters.
For jobs that are listed in settings, you can edit existing settings. This lets you customize the two parameters,
delete a job type from the job settings list, or restore default settings. For detailed information, see the topic
Editing Core job settings.
Parent topic
DL4300 Appliance
Understanding Core jobs
72
Page 73

Adding Core jobs to settings
Core job settings let you define, for each job type, the maximum number of jobs for the Core to attempt at one
time, and how many times that job should be retried if the first attempt failed.
Each Core job type has default values for these two parameters, as described in the topic Core job settings. This
list also indicates which of the job types are included in the Core settings by default.
Adding a Core job to settings lets you change these parameters for the job type you added.
Complete the steps in the following procedure to add a job to Core settings.
1. Navigate to the Rapid Recovery Core Console.
2.
On the icon bar, click (Settings), and then do one of the following:
• From the list of Core settings on the left side of the Settings page, click Jobs.
• Scroll down on the right side of the Settings page until you can see the Jobs heading.
The Jobs core settings appear.
3.
On the Core Settings page, under Jobs, click Add.
The Job Settings dialog box appears.
4. In the Job Settings dialog box, from the Jobs field, select the name of a job you want to add to the Core
settings.
These jobs are described in the topic Core job settings.
5. To set the maximum number of jobs for the Core to attempt at one time, in the Maximum concurrent jobs
text box, enter a new value between 1 to 50.
6. To set the number of attempts the Core should make before abandoning the job, in the Try count text box,
enter a new value between 0 and 10.
7. Click Save.
The Job Settings dialog box closes, and your new job settings are applied.
Parent topic
Editing Core job settings
Core job settings let you define, for each job type, the maximum number of jobs for the Core to attempt at one
time, and how many times that job should be retried if the first attempt failed.
Each Core job type has default values for these two parameters, as described in the topic Understanding Core
jobs. This list also indicates which of the job types are included in the Core settings by default. When you edit
Core job settings, you can accomplish the following:
• You can customize the settings for each Core job type.
• You can delete a job type from the list of Core settings. This feature is not available if the job type is included in settings
by default.
NOTE: Deleting a job from Core settings simply removes the job type from this list. To edit Core
settings for that job type again in the future, you can add it to the list as described in the topic Adding
Core jobs to settings.
• You can restore the settings for any job type to the default settings.
NOTE: Although you can only use this feature for the job types included in Core settings by default,
you can set other job types to defaults by removing them from the list and adding them again.
DL4300 Appliance
Understanding Core jobs
73
Page 74

Complete the steps in the following procedure to edit the settings of a job.
1. Navigate to the Rapid Recovery Core Console.
2.
On the icon bar, click (Settings), and then do one of the following:
• From the list of Core settings on the left side of the Settings page, click Jobs.
• Scroll down on the right side of the Settings page until you can see the Jobs heading.
The Jobs core settings appear.
3.
From the Job grid, select a job you want to remove from the list. From the drop-down menu for that job,
select Delete.
The job is removed from the list.
4.
From the Job grid, select a job from the list for which you want to reset settings. From the drop-down
menu for that job, select Reset to defaults.
The job settings for this job are reset to default settings.
5.
From the Job grid, select a job you want to change. From the drop-down menu for that job, select Edit.
6. The Job Settings: [JobName] dialog box opens.
7. To change the maximum number of jobs for the Core to attempt at one time, in the Maximum concurrent
jobs text box, enter a new value between 1 to 50.
8. To change the setting for the number of additional attempts the Core should make before abandoning the
job, in the Try count text box, enter a new value between 0 and 10.
9. Click Save.
The Job Settings dialog box closes, and your new job settings are applied.
Parent topic
Managing licenses
Many Rapid Recovery Core users start with a trial license, which has limited capabilities. A trial license is valid
for 14 days, and can be extended one time by the group administrator to a 28-day license. Once the trial period
expires, the Rapid Recovery Core stops taking snapshots until you obtain and register a valid non-trial license.
NOTE: For information about entering license key or file information (for example, to update or change a
trial license to a valid long-term license), see Updating or changing a license.
Licenses are validated using license files or license keys.
License files are text files that end with the .lic file extension. Examples of license files include the following:
• License files can appear as nine characters in length, consisting of three groups of Arabic numbers, each separated by a
hyphen; for example, 123-456-789.lic.
• Software-based licenses can appear in the format Software-<Group name>.lic, with the group named after the customer
name or account; for example, Software-YourCompany.lic.
• Dell appliance licenses can appear in the format <Appliance Series>-<Group name>.lic, with the group named after
customer name account; for example, DL4X00 Series-YourCompany.lic.
License keys are 30 characters in length, consisting of six groups of English alphanumeric characters, each
separated by a hyphen. For example, a sample license key format is ABC12-DEF3G-H45IJ-6K78L-9MN10-
OPQ11.
Rapid Recovery lets you manage licenses or contact the license server directly from the Core Console by
selecting (Settings) from the icon bar and clicking Licensing.
DL4300 Appliance
Managing licenses
74
Page 75

The Licensing settings include the following information:
License Details:
•
Change License. Lets you change an existing license associated with the Core by uploading a license file or
entering a license key.
•
Add License. This option is available only for Dell backup appliances and lets you upload a license file or entering a
license key.
•
License Portal Group. This option opens the license portal for group management.
• License type. Types of licenses include Trial, Subscription, or Enterprise. For more information, see the topic About Dell
Data Protection | Rapid Recovery License Portal Software License Types in the Dell Data Protection | Rapid Recovery
License Portal User Guide.
• License status. Indicates the status of the license. An active status ensures snapshots can continue as scheduled. If
the license is blocked, or expired, or if the Core has not been able to communicate with the Dell Data Protection | Rapid
Recovery License Portal past the grace period, snapshots are paused until the license status is corrected.
License Constraints:
• Maximum snapshots per day. Indicates the number of backups that are limited by the specific license.
License Pool:
• Pool size. The license pool is the number of non-trial licenses available to allocate across groups and subgroups in
the Dell Data Protection | Rapid Recovery License Portal. The size of the pool determines how many licenses can be
allocated. For more information, see the topic Understanding License Pools in the Dell Data Protection | Rapid Recovery
License Portal User Guide.
• Protected by this Core. Indicates the number of machines from the license pool that are protected by this core.
• Total protected in group. Indicates the total number of machines protected within the same license group as this Core.
License Server. These settings apply to standard (phone home) licenses. These settings are not applicable for
appliances and other non-phone-home licenses:
• License server address. Displays an active URL for the license server associated with this Core.
• Last response from the licensing server. Indicates whether the last attempted communication with the license server
portal was successful.
• Last contact with licensing server. Displays the date and time of the last successful contact with the licensing server.
• Next attempt to contact the licensing server. Indicates the next scheduled date and time to attempt communication with
the licensing server.
• Contact Now. This button contacts the license server on demand. Use this option after making changes to your license
configuration, to register changes immediately rather than waiting for the next scheduled attempt.
For more information on licenses, see the Dell Data Protection | Rapid Recovery License Portal User Guide.
For more information on adding or changing a license key or file, see Updating or changing a license.
For more information on contacting the license portal server, see Contacting the Dell Data Protection | Rapid
Recovery License Portal server
You can also view licensing information for a single protected machine. For more information, see Viewing license
information on a machine.
Parent topic
DL4300 Appliance
Managing licenses
75
Page 76

Updating or changing a license
After you upgrade or purchase a long-term Rapid Recovery license, you receive by email either a license file or a
license key.
Complete the steps in this procedure to upgrade your trial license or change your existing license, and associate it
with the Rapid Recovery Core Console.
NOTE: Users of Dell backup appliances can also add licenses to the Core if necessary. For more
information, see Adding a license.
NOTE: For information about obtaining a license key, or for details about using the license portal to
download software, register appliances, manage license subscriptions and license groups, and generate
license portal reports, see the Dell Data Protection | Rapid Recovery License Portal User Guide.
If you just installed a new Core, and are being asked to choose a license file or key, skip to Step 5.
1. Navigate to the Rapid Recovery Core Console.
2.
On the icon bar, click (Settings).
3. Scroll down on the right side of the Settings page until you can see the Licensing heading.
The Core settings for licensing appear.
4. To update or change the existing license associated with your Core, at the top of the License Details core
settings area, click Change License.
The Change License dialog box appears.
5. To enter a license key or upload a license file, do one of the following:
a. If you want to manually enter the license key, in the Change License dialog box, type the key
carefully, and then click Continue.
The dialog box closes, and the license file you selected is authenticated, and that license is associated
with your Core.
b. If you want to upload a license file, in the Change License dialog box, click Choose File.
In the File Upload dialog box, navigate through the file system and locate the new license file you
want to use. For example, locate Software-YourCompany.lic.
c. Click the license file, and then click Open.
The File Upload dialog box closes. The selected license file appears in the Change License dialog
box.
d. In the Change License dialog box, click Continue.
The dialog box closes, and the license file you selected is authenticated, and that license is associated
with your Core.
6. Scroll down on the right side of the Settings page until you can see the License Server heading.
The Licensing core settings appear.
7. In the License Server area, click Contact Now.
Once the license is applied to the license server, any associated protected machines automatically update
with the new license.
Parent topic
Adding a license
Dell backup appliance owners can add one or more licenses to the Rapid Recovery Core Console.
DL4300 Appliance
Managing licenses
76
Page 77

Once you have upgraded or purchased your Rapid Recovery license, you receive by email either a license file or
a license key.
You can also update or change an existing license on the Core Console. For more information, see Updating or
changing a license.
NOTE: Only Dell backup appliance users see the Add Appliance button.
NOTE: For information about obtaining a license key, see the Dell Data Protection | Rapid Recovery
License Portal User Guide.
1. Navigate to the Rapid Recovery Core Console.
2.
On the icon bar, click (Settings).
3. Scroll down on the right side of the Settings page until you can see the Licensing heading.
The Core settings for licensing appear.
4. To add a license and associate it with your Core, at the top of the License Details core settings area, click
Add License. In the Add License dialog box, do one of the following:
a. If you want to manually enter the license key, in the Change License dialog box, type the key
carefully, and then click Continue.
The dialog box closes, and the license file you selected is authenticated, and that license is associated
with your Core.
b. If you want to upload a license file, in the Change License dialog box, click Choose File.
In the File Upload dialog box, navigate through the file system and locate the new license file you
want to use. For example, locate Software-YourCompany.lic.
c. Click the license file, and then click Open.
The File Upload dialog box closes. The selected license file appears in the Change License dialog
box.
d. In the Change License dialog box, click Continue.
The dialog box closes, and the license file you selected is authenticated, and that license is associated
with your Core.
5. Scroll down on the right side of the Settings page until you can see the License Server heading.
The Licensing core settings appear.
6. In the License Server area, click Contact Now.
Once the license is applied to the license server, any associated protected machines automatically update
with the new license.
Parent topic
Contacting the Dell Data Protection | Rapid Recovery License Portal server
The Rapid Recovery Core Console frequently contacts the portal server to remain current with any changes made
in the Dell Data Protection | Rapid Recovery License Portal.
For non-trial licenses, the Rapid Recovery Core contacts the license portal once every hour. If the Core cannot
reach the license portal after a 10-day grace period, the Core stops taking snapshots.
Typically, communication with the license portal server occurs automatically at designated intervals; however, you
can initiate communication on-demand.
DL4300 Appliance
Managing licenses
77
Page 78

Complete the steps in this procedure to contact the license portal server.
1. Navigate to the Rapid Recovery Core Console.
2. On the icon bar, click Settings, and then scroll down on the right side of the Settings page until you can see
the License Server heading.
3. From the License Server area, click Contact Now.
Parent topic
Understanding SNMP settings
Simple Network Management Protocol (SNMP) is a protocol for managing devices on an IP network. SNMP is
used primarily to monitor devices on a network for conditions that require attention. This protocol uses software
components (agents) to report information to administrative computers (managers). An SNMP agent handles the
manager's requests to get or set certain parameters. The SNMP agent can send traps (notifications about specific
events) to the manager.
Data objects that the SNMP agents manage are organized into a Management Information Base (MIB) file that
contains Object Identifiers (OIDs). Each OID identifies a variable that can be read or set using SNMP.
Rapid Recovery includes support for SNMP version 1.0.
You can configure the Rapid Recovery Core as an SNMP agent. The Core then can report information such as
alerts, repository status, and protected machines. An SNMP host can read this information using a standalone
application called an SNMP browser. You can install the SNMP browser on any machine accessible over the
network to the Rapid Recovery Core.
To ensure the Core SNMP event notifications can be received by the SNMP browser, verify that the notification
options for a notification group are properly configured to notify by SNMP trap.
NOTE: You can use the default group, or create a custom notification group. The process is identical.
Open the notification group, select the Notification Options tab, and ensure the Notify by SNMP trap option is
enabled. The notification group specifies trap number 1 by default. If necessary, you can change the trap number
to ensure that it matches the setting that the SNMP browser expects.
For more information and specific details about configuring notification options, see Configuring notification
groups.
Alternatively, you can download a MIB file from the Rapid Recovery Core. This file is readable using an SNMP
browser in a more user-friendly fashion than data it receives directly from the Core.
This section includes the following topics:
• Configuring SNMP settings
• Downloading the SNMP MIB file
Parent topic
Configuring SNMP settings
Use the SNMP settings to control communication between the Core and the SNMP browser. This includes the
SNMP port, trap receiver port, and the host name for the trap receiver.
DL4300 Appliance
Understanding SNMP settings
78
Page 79

Use this procedure to configure SNMP settings for the Core.
1. Navigate to the Rapid Recovery Core Console.
2.
On the icon bar, click (Settings), and then do one of the following:
• From the list of Core settings on the left side of the Settings page, click SNMP Configuration.
• Scroll down on the right side of the Settings page until you can see the SNMP Configuration heading.
The SNMP Configuration settings appear.
3. Modify the SNMP settings as described in the following table.
Table 21. SNMP connection settings information
Text Box Description
Incoming port Enter a port number for the SNMP connection.
NOTE: The default setting is 8161.
Trap receiver port Enter a port number for the trap receiver.
The default setting is 162.
Trap receiver host name Enter a host name for the SNMP connection.
NOTE: The default host name is localhost.
4.
For each setting, when satisfied with your changes, click to save the change and exit edit mode, or
click to exit edit mode without saving.
Parent topic
Downloading the SNMP MIB file
The Simple Network Management Protocol is used to monitor devices on a network for conditions that require
attention. When the Rapid Recovery Core is set as an SNMP agent, the Core report information such as alerts,
repository status, and protected machines. This information can be read by an SNMP host using a standalone
application called an SNMP browser.
Data objects managed by SNMP agents are organized into a Management Information Base (MIB) file that
contains Object Identifiers (OIDs). Each OID identifies a variable that can be read or set using SNMP.
You can download a MIB file from the Rapid Recovery Core. This file, named dell-aa-core.mib, can then be read
by an SNMP browser in a more user-friendly fashion than data it receives directly from the Core.
Use this procedure to download the SNMP MIB file from the Rapid Recovery Core.
1. Navigate to the Rapid Recovery Core Console.
2.
On the icon bar, click (More) and then click Downloads.
The Downloads page appears.
3. Scroll down to the Other Files pane.
4. To download the MIB file, click the SNMP MIB file download link.
DL4300 Appliance
Understanding SNMP settings
79
Page 80

The SNMP Configuration settings appear.
5. In the Opening dell-aa-core.mib dialog box, do one of the following:
• To open the log file, select Open with, then select an SNMP browser application for viewing the text-based MIB file,
and finally click OK.
The dell-aa-core.mib file opens in the selected application.
• To save the file locally, select Save File and click OK.
The dell-aa-core.mib file saves to your Downloads folder. It can be opened using an SNMP browser or
a text editor.
Parent topic
Configuring vSphere settings
VMware vSphere is a suite of virtualization software, from which you can manage ESXi or vCenter Server virtual
machines. If using vSphere, you no longer need to load the Rapid Recovery Agent software onto individual VMs
to protect them. This is called the agentless protection feature, which applies only to virtual machines.
Use this procedure to configure vSphere settings for the Core.
1. Navigate to the Rapid Recovery Core Console.
2.
On the icon bar, click (Settings), and then do one of the following:
• From the list of Core settings on the left side of the Settings page, click vSphere.
• Scroll down on the right side of the Settings page until you can see the vSphere heading.
The vSphere settings appear.
3. Modify the vSphere settings as described in the following table.
Table 22. vSphere Core settings information
UI Element UI Type Description
Connection lifetime Spin box Establishes duration of time
before a timeout for the
connection with the ESXi server.
Uses HH:MM:SS format.
NOTE: The default setting
is 00:10:00 or ten minutes.
Maximum simultaneous
consolidations
Maximum retries Text field Sets the maximum number of
Text field Sets the maximum number of
simultaneous consolidations for
protected virtual machines.
NOTE: The default setting
is 0.
attempts for connection to a virtual
disk or read and write operations
before a timeout.
NOTE: The default setting
is 10.
DL4300 Appliance
Configuring vSphere settings
80
Page 81

UI Element UI Type Description
Allow parallel restore Boolean (check box) When this option is checked,
enables parallel restore for an
agentless virtual machine.
When this option is cleared, this
function is disabled.
NOTE: The default setting
is No (cleared).
4. For each setting, when satisfied with your changes, click the check mark to save the change and exit edit
mode, or click X to exit edit mode without saving.
Parent topic
Backing up and restoring Core settings
You can back up Core setting information to a file, and later restore these settings if you have problems with the
Core machine or if you want to migrate those settings to a different machine. Information that gets backed up
includes repository metadata (such as the repository name, data path, and metadata path); machines protected in
the Core; replication relationships (targets and sources); which machines are configured for virtual standby; and
information about encryption keys.
This process restores the configuration settings only, not the data. Security information (such as authentication
credentials) is not stored in the configuration file. There is no security risk to saving a Core configuration file.
NOTE: You must first back up Core setting information before you can use this process to restore Core
settings.
Use this procedure to back up and restore Core settings.
1. Navigate to the Rapid Recovery Core Console.
2.
On the icon bar, click (Settings).
The Settings page appears. At the top of the Settings pane, above the categories of settings, you see two
buttons, Back Up Settings and Restore Settings.
3. If you want to back up Core settings, proceed to Step 4. If you want to restore Core settings, proceed to
Step 6.
4. To back up the current settings in an XML file, from the top of the Settings page, click Back Up Settings.
The Back Up Core Configuration dialog box appears.
5. In the Local path text box, type a directory path accessible locally to the Core machine where you want to
store core settings as an XML file, and then click Back Up.
For example, type C:\Users\Your_User_Name\Documents\AA5CoreSettings and then click Back
Up.
A file named AppRecoveryCoreConfigurationBackup.xml is saved to the local destination you specified.
6. To restore Core settings from a backup XML file saved previously using this method, perform the following
steps.
NOTE: When you restore the Core configuration settings, the Rapid Recovery Core service restarts.
a. From the top of the Settings page, click Restore.
The Restore Core Configuration dialog box appears.
DL4300 Appliance
Backing up and restoring Core settings
81
Page 82

b. In the local path text box, enter the local path of the location where you stored the core
configuration settings.
For example, type C:\Users\Your_User_Name\Documents\AA5CoreSettings.
c. If you do not want to restore repository information, proceed to Step g.
d. Optionally, if you want to restore repository information as configured in the backup file, select
Restore Repositories and then click Restore.
The Restore Repositories dialog box appears.
If you choose to restore repository information from the backed-up configuration data, then any
repositories configured when the Core settings were saved appear for verification. By default, each
existing repository is selected.
e. Verify the repository information you want to restore. If multiple repositories appear in the lists for
verification, and you only wish to restore information for some of them, then clear the selection for
each repository you do not want.
f. When you are satisfied with the selection of repositories you want to restore, click Save.
The Restore Repositories dialog box closes.
g. In the Restore Repositories dialog box, click Restore.
The Restore Repositories dialog box closes, and the restore process begins. An alert appears
indicating that the repository service configuration has changed.
h. If any configuration settings could not be restored you will see an error message. Review the
details of the error to see if any action is required on your part. For more information, see Viewing
events using tasks, alerts, and journal. To continue, click Close to clear the error dialog box.
i. After restoring the configuration, verify the following:
▪ Unlock all encryption keys. For more information, see Unlocking an encryption key.
▪ If virtual standby is configured to continually update a VM to a network destination, you must specify the
network credentials in the virtual standby settings before a successful synchronization. For more information,
see VM export.
▪ If scheduled archive is configured to archive to a cloud storage account, you must specify credentials so
the Core can connect to the cloud account. For more information on linking the Core with a cloud storage
account, see Adding a cloud account.
▪ If replication is set up and you want to restore to a target Core, verify the target Core settings (particularly
the host) on the source Core. For more information, if managing your own Core, see Replicating to a self-
managed target Core. If replicating to a Core managed by a third party, see Replicating to a third-party target
Core.
▪ If the SQL attachability check is configured, and if the SQL Server instance performing the check is on the
Core machine, then specify the SQL credentials in Attachability settings. For more information, see Managing
Core SQL attachability settings.
Verify that the Replay Engine configuration was restored, and update the settings if they were not to
ensure effective communication. For more information, see Configuring Replay engine settings.
Parent topic
Core-level tools
In addition to configuring Core settings, you can also use the Core-level tools described in the following table.
Table 23. Other Core-level tools
UI Element Description
System information Rapid Recovery lets you view information about
the Rapid Recovery Core that includes system
DL4300 Appliance
Core-level tools
82
Page 83

UI Element Description
information, local and mounted volumes, and Replay
engine connections.
For more information on the information displayed
on the System information page, see Understanding
system information for the Core.
For more information on how to view System
information, see Viewing system information for the
Core.
Downloading Core log files Information about various activities for the Rapid
Recovery Core are saved to the Core log file. To
diagnose possible issues, you can download and
view logs for your Rapid Recovery Core. For more
information on accessing and viewing the Core logs,
see Accessing Core logs.
Each protected machine also saves a log of activity.
This log can be uploaded to the Core if you select
the nightly job called Downloading the logs from the
protected machines. For more information about
nightly jobs, see Understanding nightly jobs. For
more information about how to configure nightly job
settings for the Core, see Configuring nightly jobs
for the Core. For more information about configuring
nightly jobs for specific protected machines, see
Customizing nightly jobs for a protected machine.
Parent topic
Understanding system information for the Core
Rapid Recovery lets you view information about the Rapid Recovery Core. You can view general information,
information about local volumes, and information about mounted volumes.
In the General pane, you can see the information described in the following table.
Table 24. System information
UI Element Description
Host name The machine name of your Rapid Recovery Core.
OS version The version of the operating system installed on the
Rapid Recovery Core.
OS architecture Lists the underlying structure and design of the
machine hosting your Rapid Recovery Core.
Potentially includes chipset and lists 64-bit system.
Rapid Recovery Core supports 64-bit systems only.
Memory (physical) Lists the amount of Random Access Memory
installed on the Core machine.
DL4300 Appliance
Understanding system information for the Core
83
Page 84

UI Element Description
Display name Shows the display name of the Core, which
is configurable (see Configuring Core general
settings).
Fully qualified domain name Shows the fully qualified domain name for the Core
machine.
Metadata cache location Shows the path of the metadata cache location.
For more information, see Understanding
deduplication cache and storage locations.
Primary cache location Shows the path of the primary deduplication cache
location.
For more information, see Understanding
deduplication cache and storage locations.
Secondary cache location Shows the path of the secondary deduplication
cache location.
For more information, see Understanding
deduplication cache and storage locations.
The Volumes pane includes the following information about storage volumes for the Core machine: Name, device
ID, file system, raw capacity, formatted capacity, used capacity, and mount points.
The Replay Engine Connections pane displays detailed information about currently mounted recovery points. You
can view the local end point, remote end point, mounted image agent ID, mounted image ID, and the mounted
image display name. You can see if the mount is writable, view the authenticated user, bytes read, and bytes
written.
You can dismount recovery points that are mounted locally on a Core from the Mounts page. For more
information about dismounting recovery points, see Dismounting recovery points.
For more information, see Viewing system information for the Core.
Parent topic
Viewing system information for the Core
System information for the Core includes general information, information about local volumes, and information
about mounted volumes for the Core. For a detailed description of the information available on this page, see
Understanding system information for the Core.
Complete the steps in this procedure to view system information for the Core.
NOTE: You can also see system information for a specific protected machine. For more information, see
Viewing system information for a protected machine.
1. Navigate to the Rapid Recovery Core Console.
2.
On the icon bar, click (More) and then click System Information.
The System information page appears.
Parent topic
DL4300 Appliance
Understanding system information for the Core
84
Page 85

Accessing Core logs
Information about various activities for the Rapid Recovery Core are saved to the Core log file. This file,
AppRecovery.log, is stored by default in the path C:\ProgramData\AppRecovery\Logs.
NOTE: Depending on your settings, the AppRecovery directory may not be visible on the Rapid Recovery
Core. To see this directory, you may need to change the Folder Options control panel to show hidden files,
folders, and drives. If these settings include the option to hide extensions for known file types, the Core log
file may appear as AppRecovery with no .log extension.
The core log includes information about completed Core jobs, connection failures, results of attempts on the
part of the Core to contact the License Portal, and other information. Each statement stored in the Core log file
is preceded by one of four qualifiers: INFO, DEBUG, ERROR, and WARN. These qualifiers help categorize the
nature of information stored in the log when diagnosing an issue.
NOTE: Similarly, a log file is also stored on each protected machine containing information relating to
its attempts at communicating with the Core. For more information about machine logs, see Accessing
protected machine diagnostics.
The ability to access logs can be useful when troubleshooting an issue or working with Dell Rapid Recovery
support. To access logs, see the following procedures:
• Downloading and viewing the Core log file
• Downloading and viewing the log file for a protected machine
Parent topic
Downloading and viewing the Core log file
If you encounter any errors or issues with the Core, you can download the Core logs to view them or to share
them with your Dell Support representative.
1.
From the Rapid Recovery Core Console, on the icon bar, click (More) and then click Core Log.
2.
On the Download Core Log page, click Click here to begin the download.
3. If prompted to open or save the CoreAppRecovery.log file, click Save.
4. If you see the Opening CoreAppRecovery.log dialog box, do one of the following:
• To open the log file, select Open with, then select an application (such as Notepad) for viewing the text-based log
file, and finally click OK.
The CoreAppRecovery.log file opens in the selected application.
• To save the file locally, select Save File and click OK.
The CoreAppRecovery.log file saves to your Downloads folder. It can be opened using any text
editor.
Parent topic
See also: Downloading and viewing the Core log file
See also: Downloading and viewing the log file for a protected machine
DL4300 Appliance
Accessing Core logs
85
Page 86

Roadmap for configuring the Core
Configuration includes tasks such as creating and configuring the repository for storing backup snapshots,
defining encryption keys for securing protected data, and setting up alerts and notifications. After you complete
the configuration of the Core, you can then protect agents and perform recovery.
Configuring the Core involves understanding certain concepts and performing the following initial operations:
• Create a repository
• Configure encryption keys
• Configure event notification
• Configure retention policy
• Configure SQL attachability
Parent topic
Repositories
This section describes how to work with repositories. It discusses the deduplication volume manager repository
and describes its features and attributes. It describes types of deduplication used in Rapid Recovery, and how
deduplication is used throughout the application. Then this section describes how to manage DVM repositories,
including creating a repository, viewing and editing its details, and deleting a repository. You can learn how to
open a repository from one Core on another Core. Finally, this section describes how to migrate recovery points
manually from one repository to another.
Parent topic
Managing a DVM repository
Before you can use Rapid Recovery, you need to set up one or more repositories on the Rapid Recovery Core.
A repository stores your protected data; more specifically, it stores the snapshots that are captured from the
protected machines in your environment.
Managing a DVM repository involves the following operations:
1. Creating a DVM repository. Before creating a repository, consider the appropriate technology type.
For information about repositories, see Understanding repositories.
For information about creating a DVM repository, see Creating a DVM repository.
2. Adding a new storage location. For more information on adding a new storage location to a DVM repository,
see Adding a storage location to an existing DVM repository.
3. Modifying repository settings. For more information about modifying repository settings for a repository, see
Viewing or modifying repository details
4. Checking a repository. For more information about checking a DVM repository, see Checking a repository.
5. Performing a repository optimization job. For more information about the repository optimization job, see
About the Repository Optimization Job. For steps to optimize an existing DVM repository, see Optimizing a
DVM repository.
6. Deleting a repository. For more information about deleting a repository, see Deleting a repository.
DL4300 Appliance
Managing a DVM repository
86
Page 87

Parent topic
Creating a DVM repository
This process describes how to create a repository on your Core using the Deduplication Volume Manager (DVM)
repository technology.
• You must have administrative access to the machine on which you want to create a DVM repository.
• This repository type requires a minimum of 150GB of storage space available on the volume you define as the storage
location.
• The storage location for a DVM repository must be on a local drive attached to the Core server.
• The Core server can be any DL series appliance (including the DL1000) or can be any software-based Windows server
meeting system requirements.
NOTE: It is recommended to create the repository through Appliance tab. For more information, see
Provisioning storage section.
Complete the following steps to create a DVM repository.
1. Navigate to the Rapid Recovery Core Console.
2.
On the icon bar, click (More), and then select Repositories.
The Repositories page appears.
On the Repositories page, the DVM Repositories pane appears.
3. At the top of the page, click Add New DVM Repository.
The Add New Repository dialog box appears.
4. Enter the information as described in the following table.
Table 25. Add New Repository settings
Text Box Description
Repository Name Enter the display name of the repository.
By default, this text box consists of the word
Repository and a number, which corresponds to the
number of repositories for this Core. For example,
if this is the first repository, the default name is
Repository 1. Change the name as needed.
Repository names must contain between 1 and 40
alphanumeric characters, including spaces. Do not
use prohibited characters or prohibited phrases .
Concurrent Operations Define the number of concurrent requests you want
the repository to support. By default the value is 64.
Comments Optionally, enter a descriptive note about this
repository. You can enter up to 254 characters. For
example, type DVM Repository 2.
5. Click Add Storage Location to define the specific storage location or volume for the repository. This volume
should be a primary storage location.
DL4300 Appliance
Creating a DVM repository
87
Page 88

CAUTION: Define a dedicated folder within the root for the storage location for your repository. Do not
specify the root location. For example, use E:\Repository\, not E:\. If the repository that you are
creating in this step is later removed, all files at the storage location of your repository are deleted. If
you define your storage location at the root, all other files in the volume (e.g., E:\) are deleted, which
could result in catastrophic data loss.
The Add Storage Location dialog box appears.
6. Click Add Storage Location to define the specific storage location or volume for the repository. This volume
should be a primary storage location.
7. In the Storage Location area, specify how to add the file for the storage location. You can choose to add
a locally attached storage volume (such as direct attached storage, a storage area network, or network
attached storage). You could also specify a storage volume on a Common Internet File System (CIFS)
shared location.
• Select Add file on local disk to specify a local machine, and then enter the information as described in the following
table.
Table 26. Local disk settings
Text Box Description
Data path Enter the location for storing the protected data.
For example, type X:\Repository\Data.
When specifying the path, use only alphanumeric
characters, the hyphen, and the period (only to
separate host names and domains). You can use
the backslash character only to define levels in
the path. Do not use spaces. No other symbols or
punctuation characters are permitted.
Metadata path Enter the location for storing the protected metadata.
For example, type X:\Repository\Metadata.
When specifying the path, use only alphanumeric
characters, the hyphen, and the period (only to
separate host names and domains). You can use
the backslash character only to define levels in
the path. Do not use spaces. No other symbols or
punctuation characters are permitted.
• Or, select Add file on CIFS share to specify a network share location, and then enter the information as described
in the following table.
Table 27. CIFS share credentials
Text Box Description
UNC path Enter the path for the network share location.
If this location is at the root, define a dedicated folder
name (for example, Repository).
The path must begin with \\. When specifying the
path, use only alphanumeric characters, the hyphen,
and the period (only to separate host names and
domains). The letters a to z are case-insensitive. Do
not use spaces. No other symbols or punctuation
characters are permitted.
DL4300 Appliance
Creating a DVM repository
88
Page 89

Text Box Description
User name Specify a user name for accessing the network
share location.
Password Specify a password for accessing the network share
location.
8. In the Storage Configuration area, click More Details and enter the details for the storage location as
described in the following table.
Table 28. Storage configuration details
Text Box Description
Size Set the size or capacity for the storage location. The
minimum size is 1 GB. The default is 250 GB. You
can choose from the following:
• GB
• TB
NOTE: The size that you specify cannot
exceed the size of the volume.
If the storage location is a New
Technology File System (NTFS)
volume using Windows XP or
Windows 7, the file size limit is 16
TB.
If the storage location is a NTFS
volume using Windows 8, 8.1,
Windows 10, or Windows Server
2012, 2012 R2, the file size limit is
256 TB.
NOTE: For Rapid Recovery to validate
the operating system, Windows
Management Instrumentation (WMI)
must be installed on the intended
storage location.
Write caching policy The write caching policy controls how the Windows
Cache Manager is used in the repository and helps
to tune the repository for optimal performance on
different configurations.
Set the value to one of the following:
• On
• Off
• Sync
If set to On, which is the default,
Windows controls the caching. This
is appropriate for Windows 10, and
DL4300 Appliance
Creating a DVM repository
89
Page 90

Text Box Description
for versions of Windows Server
2012 and later.
NOTE: Setting the write caching policy
to On could result in faster performance.
If you are using Windows Server 2008
SP2 or Windows Server 2008 R2 SP2,
the recommended setting is Off.
If set to Off, Rapid Recovery
controls the caching.
If set to Sync, Windows controls the
caching as well as the synchronous
input/output.
Bytes per sector Specify the number of bytes you want each sector to
include. The default value is 512.
Average bytes per record Specify the average number of bytes per record. The
default value is 8192.
9. Click Save.
The Add Storage Location dialog box closes and your settings are saved. The Add New Repository dialog
box shows your new storage location.
10. Optionally, repeat Step 6 through Step 9 to add additional storage locations for the repository.
11. When all of the storage locations you want to create for the repository at this time have been defined, in the
Add New Repository dialog box, click Create.
The Add New Repository dialog box closes, and your changes are applied. The Repositories page appears,
showing your newly added repository in the DVM Repositories summary table.
Parent topic
Expanding repository
The Expand Repository feature is available on all DL models (1300, 4300, 4000), except DL 1000. The type of
license applied restricts the repository size. To expand the repository using unused internal storage and storage
on external enclosure, update the license. To change the license key, see Updating or changing a license section.
To expand the existing repository:
1. Click Appliance > Provisioning.
2.
In the Repositories section, click → Expand Existing Repository, next to the repository that you want
to expand.
DL4300 Appliance
Expanding repository
90
Page 91
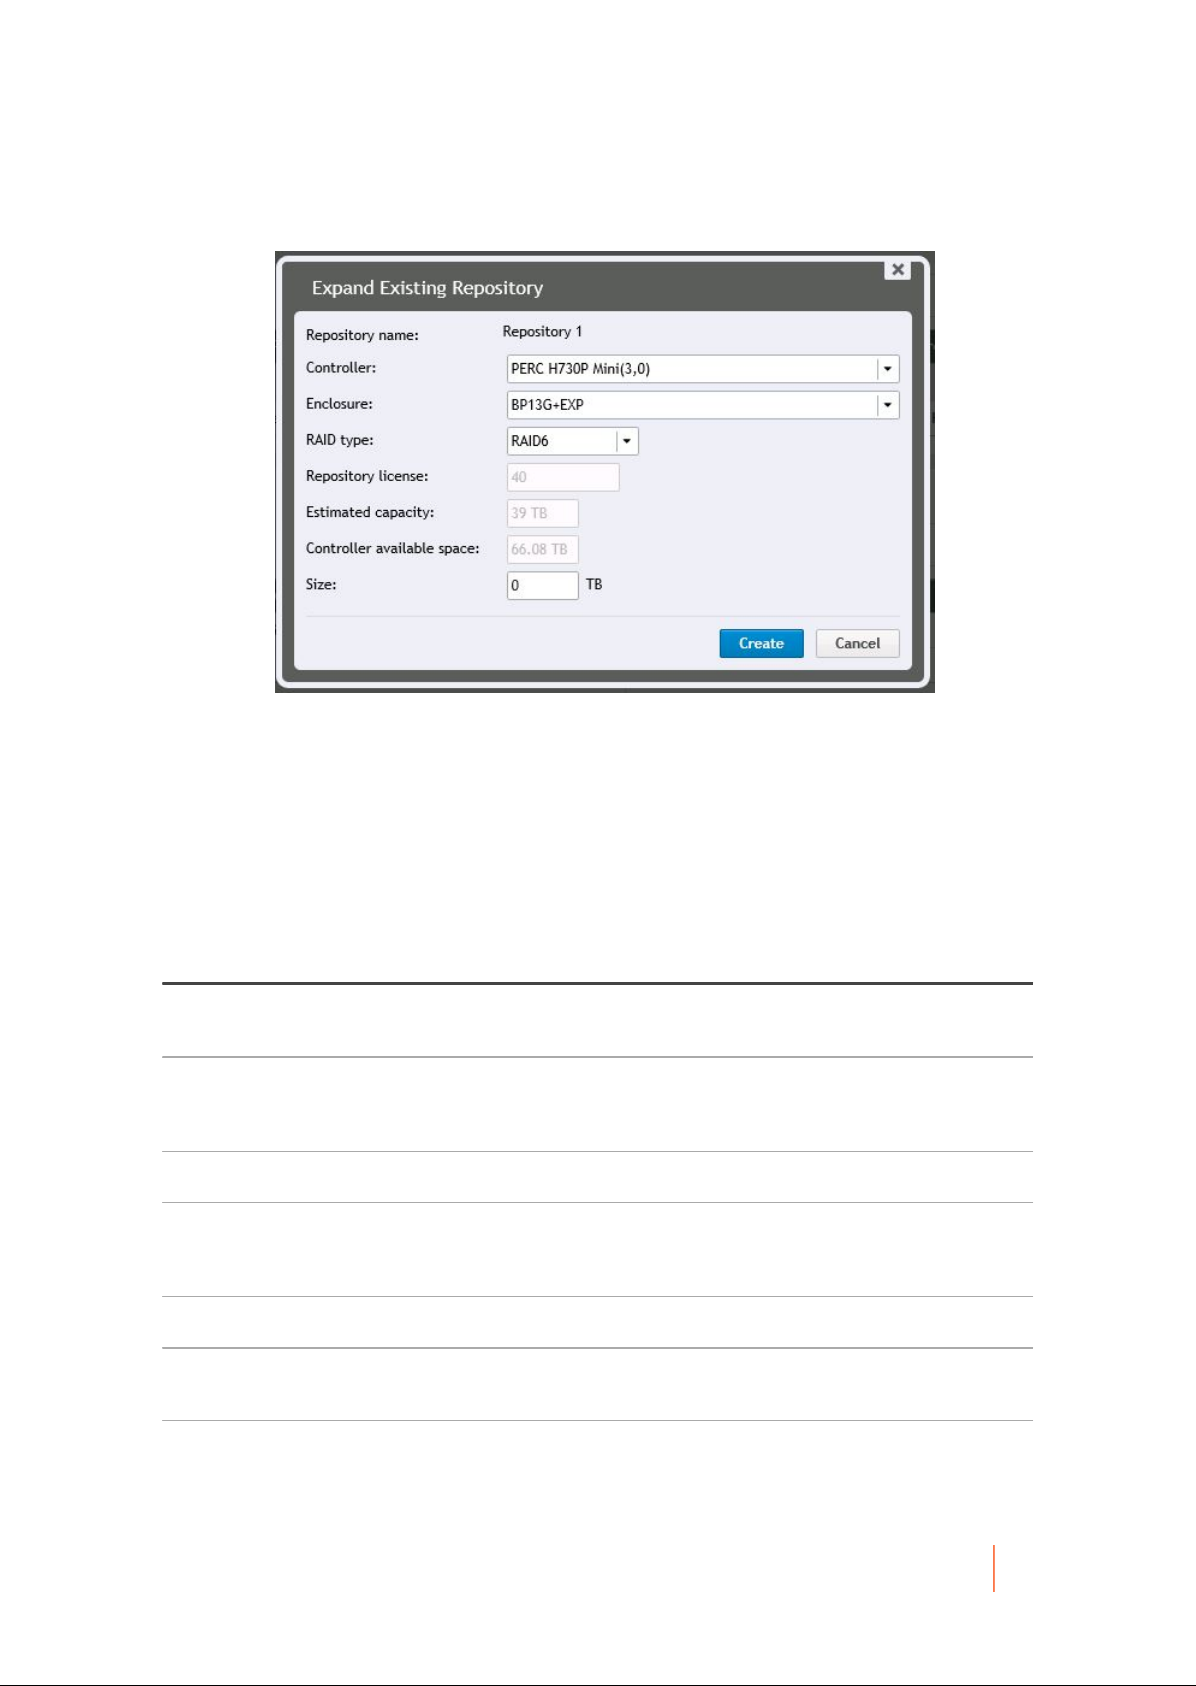
The Expand Existing Repository dialog box is
displayed.
3. In the Expand Existing Repository box, specify the following information:
Table 29. Expanding existing repository
Enter the details as described here. In the Repository name box, enter the name of the repository that has to be
expanded is displayed. In the Controller box, select the appropriate storage controller depending on whether you
are creating repository on internal storage or on direct-attached storage enclosure. In the Enclosure box, select
the appropriate storage enclosure. In the RAID type box, select the appropriate RAID configuration. You have
the following options for RAID configurations: 1, 5, or 6. In the Repository license box, the repository license is
displayed. In the Estimated capacity box, the estimated capacity available for creating a repository is displayed.
The Controller available space displays the available space on the controller. In the Size box, enter the size of the
repository that has to be created.
Text Box Description
Repository name The name of the repository that has to be expanded
is displayed.
Controller Select the appropriate storage controller depending
on whether you are creating repository on internal
storage or on direct-attached storage enclosure.
Enclosure Select the appropriate storage enclosure.
RAID type Select the appropriate RAID configuration. You have
the following options for RAID configurations: 1, 5, or
6.
Repository license The repository license is displayed.
Estimated capacity Displays the estimated capacity available for
creating a repository.
Controller available space Displays the available space on the controller.
DL4300 Appliance
Expanding repository
91
Page 92

Text Box Description
Size Enter the size of the repository that has to be
created.
4. Click Create.
A new storage location is added to the existing repository.
The repository is expanded to the specified size.
Parent topic
Viewing or modifying repository details
1. Navigate to the Rapid Recovery Core Console.
2.
On the icon bar, click (More), and then select Repositories.
The Repositories page appears.
The DVM Repositories pane appears.
3. From the Repositories page menu, you can perform the following general actions:
Option Description
Add New DVM Repository Add a new DVM repository.
Open Existing DVM Repository Open an existing DVM repository from another Core,
which changes ownership of the repository to this
Core.
For more information, see Opening an existing DVM
repository.
Refresh View or refresh the list of repositories.
4.
In the DVM Repositories pane, from the drop-down menu for any DVM repository, you can perform the
following additional actions:
Option Description
Add Storage Location Extend the existing repository by adding a storage
location
NOTE: When extending a DVM repository
volume, first pause protection. Then extend
the volume, and finally, resume protection.
This action prevents a rare error that can
occur only when extending a volume
simultaneous with a specific transfer phase.
Check Perform a repository check
DL4300 Appliance
Viewing or modifying repository details
92
Page 93

Option Description
Settings View or modify repository settings. These settings
include:
• Viewing the repository name
• Viewing or changing the maximum concurrent
operations
• Viewing or changing a description for the repository
• Enabling or disabling deduplication
• Enabling or disabling compression for data stored in
the repository
Perform Optimization Job Perform a repository optimization job
Delete Delete a repository
NOTE: When extending a DVM repository volume, first pause protection. Then extend the volume,
and finally, resume protection. This action prevents a rare error that can occur when extending at a
specific transfer phase.
You can perform the following general actions from the Repositories page:
• View or refresh the list of repositories
• Add a new repository
• Open an existing repository from another Core, which changes ownership to this repository
Parent topic
Adding a storage location to an existing DVM repository
NOTE: It’s recommended that you expand the repository through Appliance tab. For more information, see
Expanding repository
Adding a storage location to a DVM repository lets you define where you want the repository or volume to be
stored.
Complete the steps in the following procedure to specify the storage location for the repository or volume.
1. Navigate to the Rapid Recovery Core Console.
2.
On the icon bar, click (More), and then select Repositories.
The Repositories page appears.
The DVM Repositories pane appears.
3. In the repositories summary table, from the row representing the DVM repository for which you want to add
a storage location, click Settings and select Add Storage Location.
The Add Storage Location dialog box displays.
4. Specify how to add the file for the storage location. You can choose to add the file on the local disk or on a
CIFS share.
• Select Add file on local disk to specify a local machine and then enter the information as described in the following
table.
DL4300 Appliance
Adding a storage location to an existing DVM repository
93
Page 94

Table 30. Local disk settings
Text Box Description
Data Path Enter the location for storing the protected data.
For example, type X:\Repository\Data.
The same limitations to the path apply; use only
alphanumeric characters, hyphen, or period, with no
spaces or special characters.
Metadata Path Enter the location for storing the protected metadata.
For example, type X:\Repository\Metadata.
When specifying the path, use only alphanumeric
characters, the hyphen, and the period (only to
separate host names and domains). The letters a to
z are case-insensitive. Do not use spaces. No other
symbols or punctuation characters are permitted.
• Or, select Add file on CIFS share to specify a network share location and then enter the information as described in
the following table.
Table 31. CIFS share credentials
Text Box Description
UNC Path Enter the path for the network share location.
If this location is at the root, define a dedicated folder
name (for example, Repository).
The path must begin with \\. When specifying the
path, use only alphanumeric characters, the hyphen,
and the period (only to separate host names and
domains). The letters a to z are case-insensitive. Do
not use spaces. No other symbols or punctuation
characters are permitted.
User Name Specify a user name for accessing the network
share location.
Password Specify a password for accessing the network share
location.
5. In the Storage Configuration pane, click More Details and enter the details for the storage location as
described in the following table.
Table 32. Storage location details
Text Box Description
Size Set the size or capacity for the storage location.The
default size is 250 GB. You can choose from the
following:
• GB
• TB
DL4300 Appliance
Adding a storage location to an existing DVM repository
94
Page 95

Text Box Description
NOTE: The minimum size is 1 GB. The
size that you specify cannot exceed the
size of the volume.
If the storage location is a New
Technology File System (NTFS)
volume using Windows XP or
Windows 7, the file size limit is 16
TB.
If the storage location is a NTFS
volume using Windows 8, 8.1 or
Windows Server 2012, 2012 R2,
the file size limit is 256 TB.
NOTE: For Rapid Recovery to validate
the operating system, Windows
Management Instrumentation (WMI)
must be installed on the intended
storage location.
Write Caching Policy The write caching policy controls how the Windows
Cache Manager is used in the repository and helps
to tune the repository for optimal performance on
different configurations.
Set the value to one of the following:
• On
• Off
• Sync
If set to On, which is the default,
Windows controls the caching. This
is appropriate for Windows 10, and
for versions of Windows Server
2012 and later.
NOTE: Setting the write caching policy
to On could result in faster performance.
If you are using Windows Server 2008
SP2 or Windows Server 2008 R2 SP2,
the recommended setting is Off.
If set to Off, Rapid Recovery
controls the caching.
If set to Sync, Windows controls the
caching as well as the synchronous
input/output.
Bytes per Sector Specify the number of bytes you want each sector to
include. The default value is 512.
DL4300 Appliance
Adding a storage location to an existing DVM repository
95
Page 96

Text Box Description
Average Bytes per Record Specify the average number of bytes per record. The
default value is 8192.
6. Optionally, if you want to perform the repository optimization job for the selected repository, select Run
Repository Optimization Job for [Repository name].
Dell recommends performing the Repository Optimization Job when adding storage locations to an existing
repository. This job optimizes the free space by applying deduplication to data stored in the repository.
Based on factors such as the size of your repository, amount of data in your repository, available network
bandwidth, and existing load on the input and output of your system, performing a Repository Optimization
Job could take a substantial amount of time and bandwidth in your environment.
For more information about the repository optimization job, see About the Repository Optimization Job.
7. Click Save.
The dialog box closes and the storage location is saved. In the repositories summary table, the storage
location you created is visible if you expand the repository details.
Parent topic
About checking the integrity of DVM repositories
Rapid Recovery Core, users can to set disparate retention policies between source and target Cores. For
replication to work properly with different retention policies, the target Core must have the same software version
(or newer) than the source Core.
NOTE: The Cores must share the same three digits for the release number (for example, both start with
6.0.1.xxxx, or 5.4.3.xxxx). The build number (represented by xxxx) can be different only if the target Core is
newer.
Administrators can now configure rollup on a target Core at a different rate than on the source Core. Similarly, you
can now define a custom retention policy for any replicated machine. For example, you can roll up recovery points
in the target Core at a faster rate and with less granularity than on the source Core, saving space. Or you can
roll up recovery points for any selected replicated machine at a slower rate in the target Core, maintaining more
granularity, which may be useful for compliance purposes. For more information on using a retention policy that
differs from the default in the Core, see Customizing retention policy settings for a protected machine.
If your Core has been upgraded at any point from AppAssure 5.3.x and you used replication, you must run this job
before you can configure dissimilar retention policies between the source Core and a target Core, or configure a
custom retention policy on a replicated machine.
You will not see or be able to run this job unless you have one or more eligible repositories (created prior to 5.4.x
and not yet performed).
Running this job verifies the integrity of all data stored in the specified repository, ensuring you can recover data
from each snapshot or base image. If the integrity check discovers any issue with data in your repository, the job
ceases immediately. The event details for that job on the Core prompt you to contact Dell Support, so you can
schedule time to work with a Support representative to perform additional procedures to identify and remediate
data inconsistencies.
CAUTION: Running this job is expected to take an extended period of time. The amount of time differs
based on the amount and type of data in your repository, and on the underlying storage system. While the
job is running, no other transactions can be performed in that repository, including transfers (snapshot and
base image backups, and replication), nightly jobs, and so on.
You can perform other operations in other repositories while this job is running.
About checking the integrity of DVM repositories
DL4300 Appliance
96
Page 97

NOTE: This job checks the integrity of all of the contents within a repository. For information about the
Integrity Check job, which you can use to ensure that a repository is mountable and usable, see
Checking a repository.
Parent topic
Checking a repository
Rapid Recovery lets you perform a diagnostic check of a DVM repository volume when errors occur. Core errors
could be the result of it being improperly shut down, a hardware failure, or other environmental, lower IP stack
factors that can be exposed in Rapid Recovery functionality.
NOTE: This procedure should only be performed for diagnostic purposes. For example, run this check in
the event of hardware failure, improper shutdown of the Core, or failure when importing a repository.
1. Navigate to the Rapid Recovery Core Console.
2.
On the icon bar, click (More), and then select Repositories.
The Repositories page appears.
The DVM Repositories pane appears.
3. To check a DVM repository, in the DVM Repositories pane, in any row of the summary table representing a
DVM repository, click and then select Check.
The Check Repository dialog box appears.
4. In the Check Repository dialog box, confirm that you understand that all active tasks associated with this
repository will be canceled and that you want to proceed.
Active jobs are canceled and the Check Repository Job starts.
5. Optionally, can you track the status of the job by clicking the Running tasks drop-down menu in the button
bar, and selecting the Maintaining repository job.
Parent topic
About the Repository Optimization Job
When using a DVM repository, the data you capture in each snapshot is deduplicated. This deduplication occurs
incrementally, as snapshots are saved to the repository. One occurrence of each string of information is saved
to the repository. When an information string is duplicated, a reference to the original string in the deduplication
cache is used, saving storage space in the repository.
If the DVM deduplication cache is filled, only snapshot data that is already referenced in the cache is
deduplicated. As deduplication occurs, the cache continues to update with new unique values, overwriting the
oldest values in the cache. This results in less than optimal deduplication.
For more information about deduplication, see Understanding deduplication cache and storage locations.
You can choose to increase your DVM duplication cache before it is full, which ensures continued optimal
deduplication of your data in that repository. For more information, see Configuring DVM deduplication cache
settings.
You can also increase your deduplication cache after it is full. If you want to reclaim space in the repository
after increasing your cache, you can optimize the repository. This action forces a comparison of the data in your
snapshots to the information in the deduplication cache. If any repeated strings are found in the repository, that
data is replaced with references to the data, which saves storage space in the repository. This is sometimes
referred to as off-line deduplication, since this deduplication process occurs upon your request, instead of
incrementally as snapshot data is transferred.
The optimization process is processor-intensive. The amount of time it takes to run this job depends on several
factors. These factors include the size of your repository; the amount of data in your repository; available network
DL4300 Appliance
About the Repository Optimization Job
97
Page 98

bandwidth; and existing load on the input and output of your system. The more data in your repository, the longer
this job runs.
The following actions are superseded or canceled when the Repository Optimization Job is occurring.
• Delete Recovery Points Job
• Maintain Repository Job
• Check Repository Integrity Job
The following actions are superseded or canceled when the optimization job is occurring.
• Delete All Recovery Points Job
• Delete Recovery Points Chain Job
• Maintain Repository Job
• Delete Recovery Points Job Base
• Check Repository Integrity Job
For steps on optimizing an existing DVM repository, see Optimizing a DVM repository.
You can interrupt the repository optimization job for a limited time if required. For more information, see
Interrupting or Resuming the Repository Optimization Job.
Parent topic
Optimizing a DVM repository
You must have a DVM repostiory in your Core to perform this procedure.
You can perform offline deduplication of data saved to an existing DVM repository. This is accomplished by
launching the Repository Optimization Job.
NOTE: Dell recommends performing the Optimize Repository job only after increasing your deduplication
cache size. This action lets you reclaim repository space and more effectively use the DVM deduplication
cache.
Complete the steps in this procedure to optimize a DVM repository.
1. Navigate to the Rapid Recovery Core Console.
2.
On the icon bar, click (More ), and then select Repositories.
The Repositories page appears.
3.
In the DVM Repositories pane, from the row representing the repository you want to optimize, click and
then select Perform Optimization Job.
A warning prompt appears asking you to confirm the optimization.
4. Click to confirm the optimization.
The optimization job takes precedence over most other jobs. If necessary, you can interrupt an optimization
job in progress. For more information on interrupting or resuming this job, see Interrupting or Resuming the
Repository Optimization Job.
Parent topic
DL4300 Appliance
About the Repository Optimization Job
98
Page 99

Interrupting or Resuming the Repository Optimization Job
When you initiate the Optimize Repository Job, the selected DVM repository is deduplicated. This deduplication
optimization is a processor-intensive job intended to save space in the repository. For more information, see
About the Repository Optimization Job.
Once this job has been initiated, you can interrupt the job using the following procedure. This pauses
deduplication. If you have already interrupted a optimization, you can resume the process using this procedure.
NOTE: This procedure applies only to DVM repositories and only when the repository optimization job has
been initiated.
Complete the steps in this procedure to interrupt or resume a repository optimization job.
1. Navigate to the Rapid Recovery Core Console.
2.
On the icon bar, click (More), and then select Repositories.
The Repositories page appears.
The DVM Repositories pane appears.
3. If you want to interrupt an optimization job, do the following:
a.
In the repositories summary table, from the row representing the appropriate repository, click
and then select Interrupt Optimization Job.
A warning prompt appears asking you to confirm the interruption.
b. Click to confirm the optimization.
4. If you want to resume an interrupted optimization job, do the following:
a.
In the repositories summary table, from the row representing the appropriate repository, click
and then select Continue Optimization Job.
A warning prompt appears asking you to confirm the interruption.
b. In the dialog box, select the option Continue job from the interrupted point, and then click Yes.
The dialog box closes, and the repository optimization job resumes from the point where it was last
interrupted.
Parent topic
Opening an existing DVM repository
As the primary repository technology for Rapid Recovery, the DVM repository contains snapshot data (in the form
of recovery points) from the machines protected on a specific Rapid Recovery Core. You can open an existing
repository from one Core (for example, Core A) on a second Core (Core B).
NOTE: Opening a repository from another Core changes ownership of the repository. When you open an
existing repository, the information is then accessible only to the second Core.
In the case of a DVM repository, the original Core (Core A) must not be in current use. For example, the machine
must be turned off, not accessible to the network, or the Core services must be stopped.
The repository can be on a shared network location, or on a storage device accessible to the second Core.
Complete the following procedure to open an existing repository.
1. Navigate to the Rapid Recovery Core Console.
2.
On the icon bar, click (More), and then select Repositories.
The Repositories page appears.
DL4300 Appliance
About the Repository Optimization Job
99
Page 100

The DVM Repositories pane also appears.
3. To open an existing DVM repository, at the top of the page, click Open Existing DVM Repository.
The Open Existing DVM Repository dialog box appears.
4. In the Open Existing DVM Repository dialog box, enter the following information for the repository you want
to open, and then click Open.
Table 33. Open Existing DVM Repository options
Text Box Description
Path The path for the repository (for example,
D:\work\machine for a local path, or \
\10.10.99.155\repositories by IP address,
or \\servername\sharename for a network path).
User name If the repository has a network path, enter the user
name for logging in to the network share.
Password If the repository has a network path, enter the
password for logging in to the network share.
The dialog box closes, and the selected repository is added to your current Core.
Parent topic
Deleting a repository
Complete the steps in this procedure to delete a repository.
1. Navigate to the Rapid Recovery Core Console.
2.
On the icon bar, click (More), and then select Repositories.
The Repositories page appears.
On the Repositories page, the DVM Repositories pane appears.
3.
In the repositories summary table, from the row representing the repository you want to delete, click to
expand the drop-down menu, and then select Delete.
A warning message appears to confirm deletion.
4. Click Yes to confirm the deletion of the repository.
CAUTION: When a repository is deleted, the data contained in the repository is discarded and cannot
be recovered.
Parent topic
Running the Check Repository Job on a DVM repository
Perform this procedure to check the integrity of an entire DVM repository. This is recommended for replicated
target cores when upgrading from AppAssure 5.3.x to release 5.4. During the execution of the integrity check,
which can be lengthy, no other actions can be performed in the repository.
If you have multiple DVM repositories for a target Core, perform this process once for each repository.
DL4300 Appliance
Running the Check Repository Job on a DVM repository
100
 Loading...