

Page 1

User’s Guide
StorNext Timecode-Based
Partial File Retrieval 1.0.1
6-66957-02 Rev A
Page 2

Document Title, 6-66957-02 Rev A, January 2011, Product of USA.
Quantum Corporation provides this publication “as is” without warranty of any kind, either express or
implied, including but not limited to the implied warranties of merchantability or fitness for a particular
purpose. Quantum Corporation may revise this publication from time to time without notice.
COPYRIGHT STATEMENT
© 2011 Quantum Corporation. All rights reserved.
Your right to copy this manual is limited by copyright law. Making copies or adaptations without prior
written authorization of Quantum Corporation is prohibited by law and constitutes a punishable
violation of the law.
TRADEMARK STATEMENT
Quantum, the Quantum logo, DLT, DLTtape, the DLTtape logo, Scalar, and StorNext are registered
trademarks of Quantum Corporation, registered in the U.S. and other countries.
Backup. Recovery. Archive. It’s What We Do., the DLT logo, DLTSage, DXi, DXi-Series, Dynamic
Powerdown, FastSense, FlexLink, GoVault, MediaShield, Optyon, Pocket-sized. Well-armored, SDLT,
SiteCare, SmartVerify, StorageCare, Super DLTtape, SuperLoader, and Vision are trademarks of Quantum.
LTO and Ultrium are trademarks of HP, IBM, and Quantum in the U.S. and other countries. All other
trademarks are the property of their respective companies.
Specifications are subject to change without notice.
ii Quantum Timecode-Based Partial File Retrieval 1.0.1 User’s Guide
Page 3

Contents
Chapter 1 Introduction to Timecode-Based Partial File Retrieval 1
Chapter 2 How Timecode-Based Partial File Retrieval Works 3
Partial File Retrieval Indexer. . . . . . . . . . . . . . . . . . . . . . . . . . . . . . . . . . 3
Partial File Retrieval Service . . . . . . . . . . . . . . . . . . . . . . . . . . . . . . . . . . 4
Folder Structure . . . . . . . . . . . . . . . . . . . . . . . . . . . . . . . . . . . . 4
Issuing a Request . . . . . . . . . . . . . . . . . . . . . . . . . . . . . . . . . . . 5
Monitoring Requests. . . . . . . . . . . . . . . . . . . . . . . . . . . . . . . . . 5
PFR Workflow . . . . . . . . . . . . . . . . . . . . . . . . . . . . . . . . . . . . . . . . . . . . 6
Chapter 3 Installation 11
Installation Components and Install Options. . . . . . . . . . . . . . . . . . . . 11
Upgrading from an Earlier Version . . . . . . . . . . . . . . . . . . . . . . . . . . . 12
Uninstalling a Previous Version . . . . . . . . . . . . . . . . . . . . . . . . 12
Installing v1.0.1 . . . . . . . . . . . . . . . . . . . . . . . . . . . . . . . . . . . 13
Quantum Timecode-Based Partial File Retrieval 1.0.1 User’s Guide iii
Page 4

Contents
Prerequisites . . . . . . . . . . . . . . . . . . . . . . . . . . . . . . . . . . . . . . . . . . . . 13
Supported Platforms. . . . . . . . . . . . . . . . . . . . . . . . . . . . . . . . 13
StorNext . . . . . . . . . . . . . . . . . . . . . . . . . . . . . . . . . . . . . . . . . 14
VMWare . . . . . . . . . . . . . . . . . . . . . . . . . . . . . . . . . . . . . . . . . 14
Bonjour. . . . . . . . . . . . . . . . . . . . . . . . . . . . . . . . . . . . . . . . . . 15
User Accounts. . . . . . . . . . . . . . . . . . . . . . . . . . . . . . . . . . . . . 15
.NET . . . . . . . . . . . . . . . . . . . . . . . . . . . . . . . . . . . . . . . . . . . . 16
Sharing the StorNext File System . . . . . . . . . . . . . . . . . . . . . . 18
Installation . . . . . . . . . . . . . . . . . . . . . . . . . . . . . . . . . . . . . . . . . . . . . 19
Chapter 4 Configuration 21
SNAPI / PFR Linux Component Configuration . . . . . . . . . . . . . . . . . . . 21
Ensuring that the VM is running. . . . . . . . . . . . . . . . . . . . . . . 21
Optional Step: Advanced Network Configuration . . . . . . . . . . 24
Showing the VM and its GUI. . . . . . . . . . . . . . . . . . . . . . . . . . 27
Setting the Location of StorNext Storage Manager. . . . . . . . . 28
Network Configuration . . . . . . . . . . . . . . . . . . . . . . . . . . . . . . 29
Primary Configuration . . . . . . . . . . . . . . . . . . . . . . . . . . . . . . . . . . . . . 32
Welcome. . . . . . . . . . . . . . . . . . . . . . . . . . . . . . . . . . . . . . . . . 33
Archive . . . . . . . . . . . . . . . . . . . . . . . . . . . . . . . . . . . . . . . . . . 33
Job Results Folder . . . . . . . . . . . . . . . . . . . . . . . . . . . . . . . . . . 34
Work Folders. . . . . . . . . . . . . . . . . . . . . . . . . . . . . . . . . . . . . . 35
Transfer Engines . . . . . . . . . . . . . . . . . . . . . . . . . . . . . . . . . . . 36
Indexer . . . . . . . . . . . . . . . . . . . . . . . . . . . . . . . . . . . . . . . . . . 37
Summary . . . . . . . . . . . . . . . . . . . . . . . . . . . . . . . . . . . . . . . . 38
Complete . . . . . . . . . . . . . . . . . . . . . . . . . . . . . . . . . . . . . . . . 39
Indexer Configuration and Monitoring . . . . . . . . . . . . . . . . . . . . . . . . 40
Configuration . . . . . . . . . . . . . . . . . . . . . . . . . . . . . . . . . . . . . 41
Monitoring . . . . . . . . . . . . . . . . . . . . . . . . . . . . . . . . . . . . . . . 42
Licence Process . . . . . . . . . . . . . . . . . . . . . . . . . . . . . . . . . . . . . . . . . . 42
Chapter 5 Using the Status GUI Application 45
Anatomy of Status GUI . . . . . . . . . . . . . . . . . . . . . . . . . . . . . . . . . . . . 45
Manipulating the Retrievals. . . . . . . . . . . . . . . . . . . . . . . . . . . . . . . . . 46
iv Quantum Timecode-Based Partial File Retrieval 1.0.1 User’s Guide
Page 5

Contents
Chapter 6 Request EDL Format 47
Sample . . . . . . . . . . . . . . . . . . . . . . . . . . . . . . . . . . . . . . . . . . . . . . . . 47
Notes. . . . . . . . . . . . . . . . . . . . . . . . . . . . . . . . . . . . . . . . . . . . . . . . . . 48
Chapter 7 Performance and Scalability 49
Performance . . . . . . . . . . . . . . . . . . . . . . . . . . . . . . . . . . . . . . . . . . . . 49
Indexer . . . . . . . . . . . . . . . . . . . . . . . . . . . . . . . . . . . . . . . . . . 49
Note on Existing Archives . . . . . . . . . . . . . . . . . . . . . . . . . . . . 50
Partial File Retrieval via Index from Tape. . . . . . . . . . . . . . . . . 50
Very Short Partial Retrievals . . . . . . . . . . . . . . . . . . . . . . . . . . 50
Longer Partial Retrievals . . . . . . . . . . . . . . . . . . . . . . . . . . . . . 51
File and Folder Structure Limitations . . . . . . . . . . . . . . . . . . . . . . . . . . 51
Quantum PFR Indexer . . . . . . . . . . . . . . . . . . . . . . . . . . . . . . . 51
Quantum PFR Server . . . . . . . . . . . . . . . . . . . . . . . . . . . . . . . . 52
Scalability . . . . . . . . . . . . . . . . . . . . . . . . . . . . . . . . . . . . . . . . . . . . . . 52
Distributing the Load . . . . . . . . . . . . . . . . . . . . . . . . . . . . . . . 52
Dedicated Tape Drives. . . . . . . . . . . . . . . . . . . . . . . . . . . . . . . 52
Suggested Platform . . . . . . . . . . . . . . . . . . . . . . . . . . . . . . . . 53
Quantum Timecode-Based Partial File Retrieval 1.0.1 User’s Guide v
Page 6

Contents
vi Quantum Timecode-Based Partial File Retrieval 1.0.1 User’s Guide
Page 7

Figures
Figure 1 PFR Steps 1 - 2 . . . . . . . . . . . . . . . . . . . . . . . . . . . . . . . . . . 6
Figure 2 PFR Steps 3 - 5 . . . . . . . . . . . . . . . . . . . . . . . . . . . . . . . . . . 7
Figure 3 PFR Steps 6 - 7 . . . . . . . . . . . . . . . . . . . . . . . . . . . . . . . . . . 8
Figure 4 PFR Steps 8 - 9 . . . . . . . . . . . . . . . . . . . . . . . . . . . . . . . . . . 9
Figure 5 Server Manager . . . . . . . . . . . . . . . . . . . . . . . . . . . . . . . . 16
Figure 6 Add Features . . . . . . . . . . . . . . . . . . . . . . . . . . . . . . . . . . 17
Figure 7 Install .NET Framework . . . . . . . . . . . . . . . . . . . . . . . . . . . 18
Figure 8 PFR Installer . . . . . . . . . . . . . . . . . . . . . . . . . . . . . . . . . . . 19
Figure 9 VMWare Login . . . . . . . . . . . . . . . . . . . . . . . . . . . . . . . . . 22
Figure 10 Virtual Machine Settings. . . . . . . . . . . . . . . . . . . . . . . . . . 23
Figure 11 Virtual Machine Inventory . . . . . . . . . . . . . . . . . . . . . . . . 24
Figure 12 Summary Tab . . . . . . . . . . . . . . . . . . . . . . . . . . . . . . . . . . 25
Figure 13 Network Adapter Configuration . . . . . . . . . . . . . . . . . . . . 26
Figure 14 Console Tab . . . . . . . . . . . . . . . . . . . . . . . . . . . . . . . . . . . 27
Figure 15 PFR GUI. . . . . . . . . . . . . . . . . . . . . . . . . . . . . . . . . . . . . . . 28
Figure 16 Edit SNAPI Configuration File . . . . . . . . . . . . . . . . . . . . . . 29
Figure 17 Network Settings Screen. . . . . . . . . . . . . . . . . . . . . . . . . . 30
Figure 18 Edit Network Settings Address Tab. . . . . . . . . . . . . . . . . . 31
Figure 19 Edit Network Settings Overview Tab. . . . . . . . . . . . . . . . . 32
Figure 20 Welcome Screen . . . . . . . . . . . . . . . . . . . . . . . . . . . . . . . . 33
Figure 21 Archive Screen . . . . . . . . . . . . . . . . . . . . . . . . . . . . . . . . . 34
Figure 22 Job Results Screen . . . . . . . . . . . . . . . . . . . . . . . . . . . . . . 35
Quantum Timecode-Based Partial File Retrieval 1.0.1 User’s Guide vii
Page 8

Figures
Figure 23 Work Folders Screen . . . . . . . . . . . . . . . . . . . . . . . . . . . . . 36
Figure 24 Transfer Engines Screen . . . . . . . . . . . . . . . . . . . . . . . . . . 37
Figure 25 PFR Indexer Screen . . . . . . . . . . . . . . . . . . . . . . . . . . . . . . 38
Figure 26 Summary Screen. . . . . . . . . . . . . . . . . . . . . . . . . . . . . . . . 39
Figure 27 Complete Screen. . . . . . . . . . . . . . . . . . . . . . . . . . . . . . . . 40
Figure 28 PFR Index Configuration . . . . . . . . . . . . . . . . . . . . . . . . . . 41
Figure 29 Indexer Log Window. . . . . . . . . . . . . . . . . . . . . . . . . . . . . 42
Figure 30 Status GUI Screen . . . . . . . . . . . . . . . . . . . . . . . . . . . . . . . 46
viii Quantum Timecode-Based Partial File Retrieval 1.0.1 User’s Guide
Page 9

Chapter 1
Introduction to Timecode-
Based Partial File Retrieval
Quantum Timecode-Based Partial File Retrieval (PFR) allows you to
quickly retrieve and utilize segments of large media files—rather than
the entire file— based on timecode parameters.
Segments of large media files that have been archived to tape using
Quantum StorNext Storage Manager can be requested using a simple
XML request file. Quantum Partial File Retrieval instructs StorNext to
retrieve only the necessary portion from tape, and then presents that
segment as a complete MXF or QuickTime file.
If the file has not yet been truncated by StorNext Storage Manager, the
result will still be the same. However, in this case the Partial File will be
generated directly from the complete media file on disk.
The Quantum Partial File Retrieval feature requires a dedicated
Windows-based server on which to run. For larger scale installations, the
Quantum Partial File Retrieval functionality can be distributed across
multiple Windows server machines.
Quantum Timecode-Based Partial File Retrieval 1.0.1 User’s Guide 1
Page 10

Chapter 1: Introduction to Timecode-Based Partial File Retrieval
Note: Partial File Retrieval is designed to work exclusively with
QuickTime and MXF video files, which makes PFR suitable for
applications which reference video by timecode.
The QuickTime or MXF wrapper for a retrieved file will be reconstructed during the Partial File Retrieval process, and as
such retrieved files will not be byte-for-byte replicas of the
original. However, the video frames and audio samples in the
retrieved files are not transcoded and therefore there is no
generation loss from the retrieval process. The only exception
to this is for retrieving MPEG Long GOP video (for example
Sony XDCAM HD 50), where a small number of frames are
transcoded at the start and end of the retrieval in order to
reconstruct a coherent GOP structure.
2 Quantum Timecode-Based Partial File Retrieval 1.0.1 User’s Guide
Page 11

How Timecode-Based Partial
Quantum Timecode-Based Partial File Retrieval consists of two primary
components: an indexer which indexes media files before they are
archived to tape and truncated, and a Partial File Retrieval service that
performs the requested retrievals.
Partial File Retrieval Indexer
Chapter 2
File Retrieval Works
The Partial File Retrieval Indexer looks for new media to appear in
StorNext Storage Manager. When it finds a new media file it generates
an index for it, in effect mapping timecode values in the original media
file to byte offsets. This allows subsequent timecode- based requests to
retrieve only the necessary portions of a large media file from tape.
The index files, which are written as QuickTime reference files, are
generated in a parallel folder structure on the managed storage. The
two file locations below represent a MXF based media file and its
associated index file.
//StorNext/snfs1/Media/Project/Movie.mxf
//StorNext/snfs1/PFR‐INDEX/Media/Project/Movie.mov
Quantum Timecode-Based Partial File Retrieval 1.0.1 User’s Guide 3
Page 12

Chapter 2: How Timecode-Based Partial File Retrieval Works
Partial File Retrieval Service
Note: The index files do not contain any content themselves, and are
therefore very small in comparison with the files they index.
It is important that the indexed files themselves are never
truncated.
The Indexer does not attempt to index files that it thinks might
be currently in-record. Therefore, the first time the indexer
encounters the file, there may be some delay before a
particular file is indexed while the indexer is trying to establish
if the file is currently being written to.
Partial File Retrieval Service
Folder Structure Within the Quantum Partial File Retrieval Configuration Tool, it is
possible to set up multiple sets of folders for different request types. For
example, a set of folders for news requests might look like this:
//StorNext/snfs1/Requests/News
//StorNext/snfs1/Requests/News/PFR‐REQUEST
//StorNext/snfs1/Requests/News/success
//StorNext/snfs1/Requests/News/fail
The configuration tool creates these folders for you and allows you to
set an output format: QuickTime Movie or MXF.
The four folders shown in the example are used in the following
manner:
1 The parent folder (in this case
extract will be placed once retrieved and created;
2 The
3 Once the request has been completed, the XML request file will be
4 Quantum Timecode-Based Partial File Retrieval 1.0.1 User’s Guide
PFR-REQUEST
request file;
moved to the
folder is the location to place the XML-formatted
success
folder;
News
) is where the resultant file
Page 13

Chapter 2: How Timecode-Based Partial File Retrieval Works
Partial File Retrieval Service
4 If an error occurred in retrieving the partial file, the XML request file
will be moved to the
fail
folder.
Issuing a Request A Partial File Retrieval request is issued in the form of a small XML file,
the format of which can be seen in the example later in this User Guide.
The XML file simply describes a movie (via a full UNC path) with an in
and out timecode value.
Quantum PFR will handle a number of the requests simultaneously with
the overall retrieval performance dependant upon the quantity of tape
drives available.
The number of tape drives limits how many requests can be processed
simultaneously. Once all tape drives are busy, additional requests will be
queued until a tape drive becomes available.
Monitoring Requests Requests will be processed automatically once the request file is
detected. The Partial File Retrieval service automatically detects the XML
request file, appends the processed request to the queue of pending
requests, and processes them in the order received. XML request files
are moved to the
status of the request.
success
or
fail
folder as appropriate based on the
Use the PFR status GUI to monitor requests, cancel pending or active
requests or change the priority of the pending requests.
Quantum Timecode-Based Partial File Retrieval 1.0.1 User’s Guide 5
Page 14
Chapter 2: How Timecode-Based Partial File Retrieval Works
Index
XX
PFR-Request
1
2
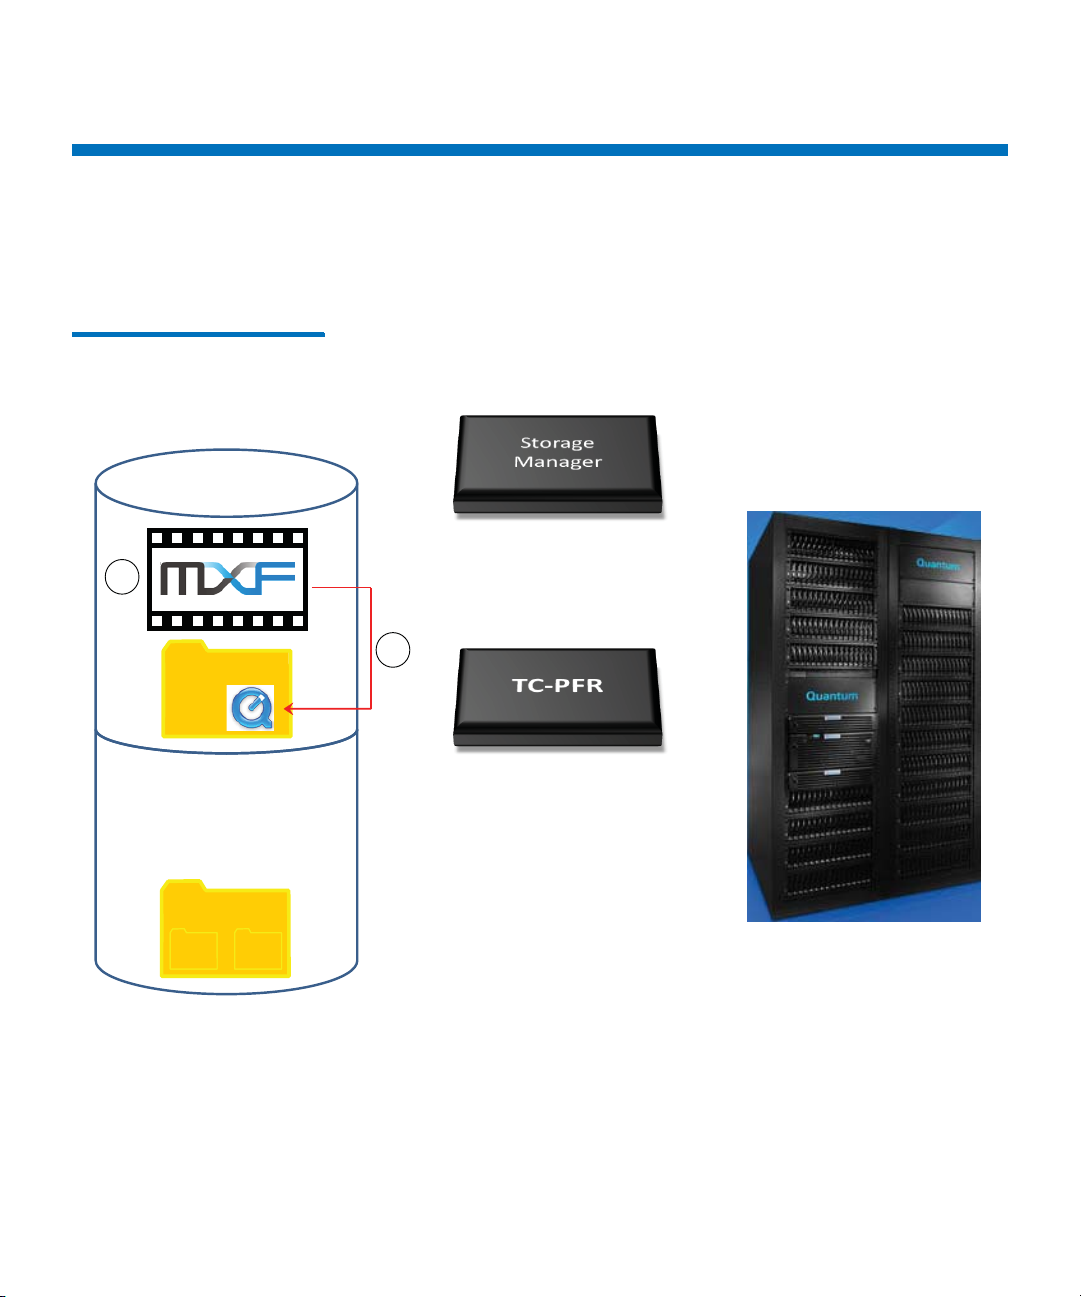
PFR Workflow
PFR Workflow
This section illustrates the steps involved in the retrieval process. Circled
numbers in the illustrations correspond to the step number.
Figure 1 PFR Steps 1 - 2
6 Quantum Timecode-Based Partial File Retrieval 1.0.1 User’s Guide
Step 1: An MXF (or QuickTime) file is written into the managed file
system.
Step 2: Frames are read from this new file and converted into a
QuickTime reference index file.
Page 15
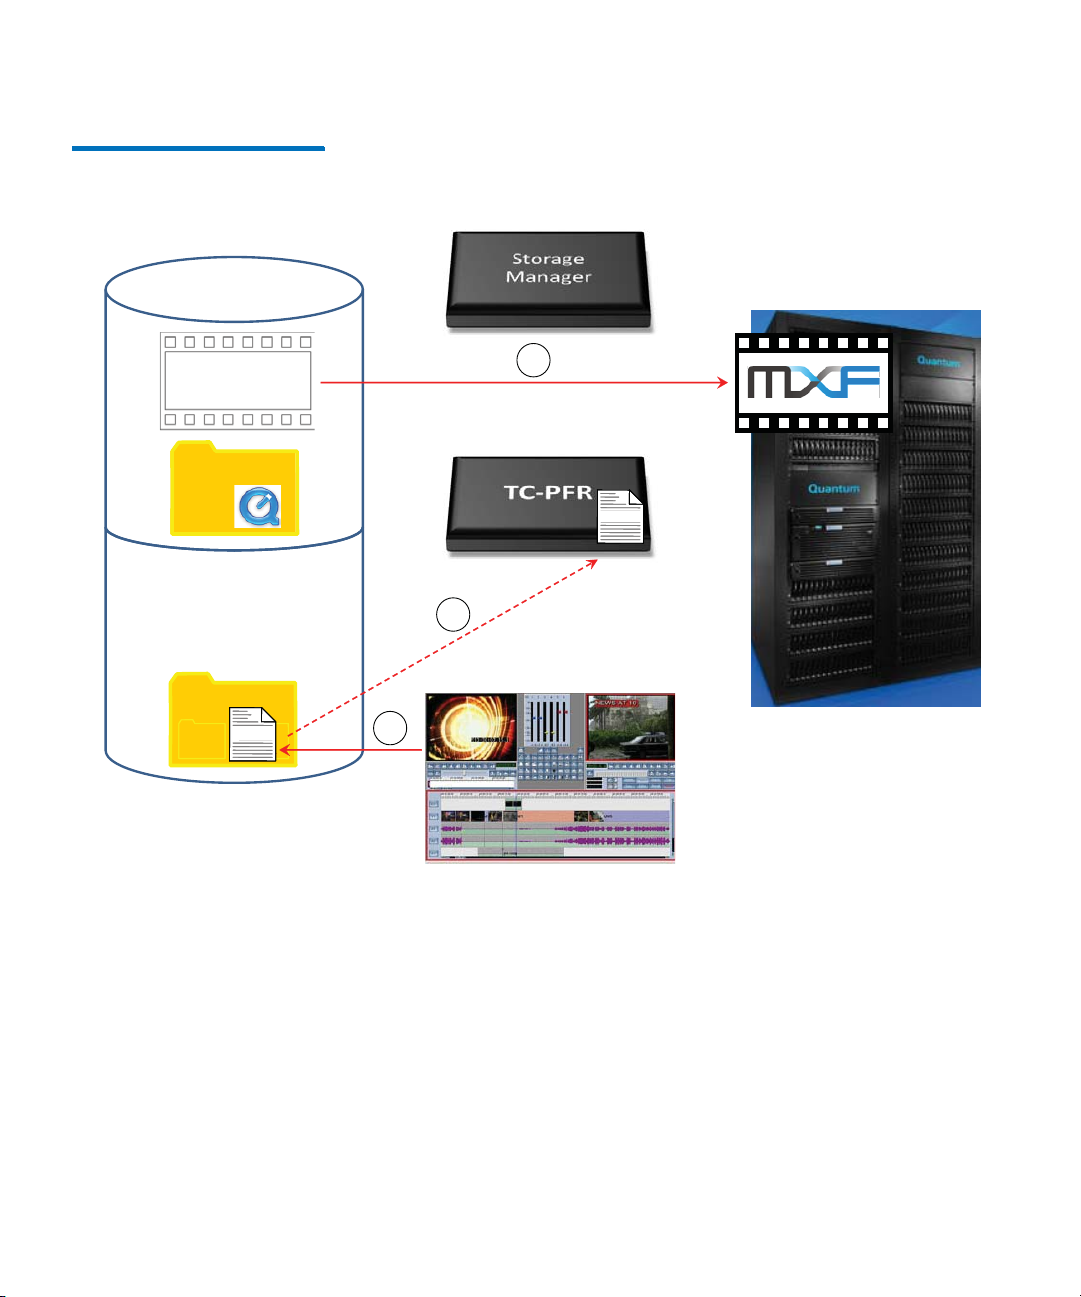
Figure 2 PFR Steps 3 - 5
Index
XX
PFR-Request
3
4
5
<xml><xml><xml>
<xml><xml><xml>
Chapter 2: How Timecode-Based Partial File Retrieval Works
PFR Workflow
Step 3: Some time later, according to the policies that have been
configured, the Storage Manager copies the file to the tape archive and
truncates the file on disk.
Step 4: A third-party media asset management (MAM) system
generates an XML request for a partial file and writes it into the request
folder.
Step 5: PFR picks up the request XML and starts to parse it.
Quantum Timecode-Based Partial File Retrieval 1.0.1 User’s Guide 7
Page 16
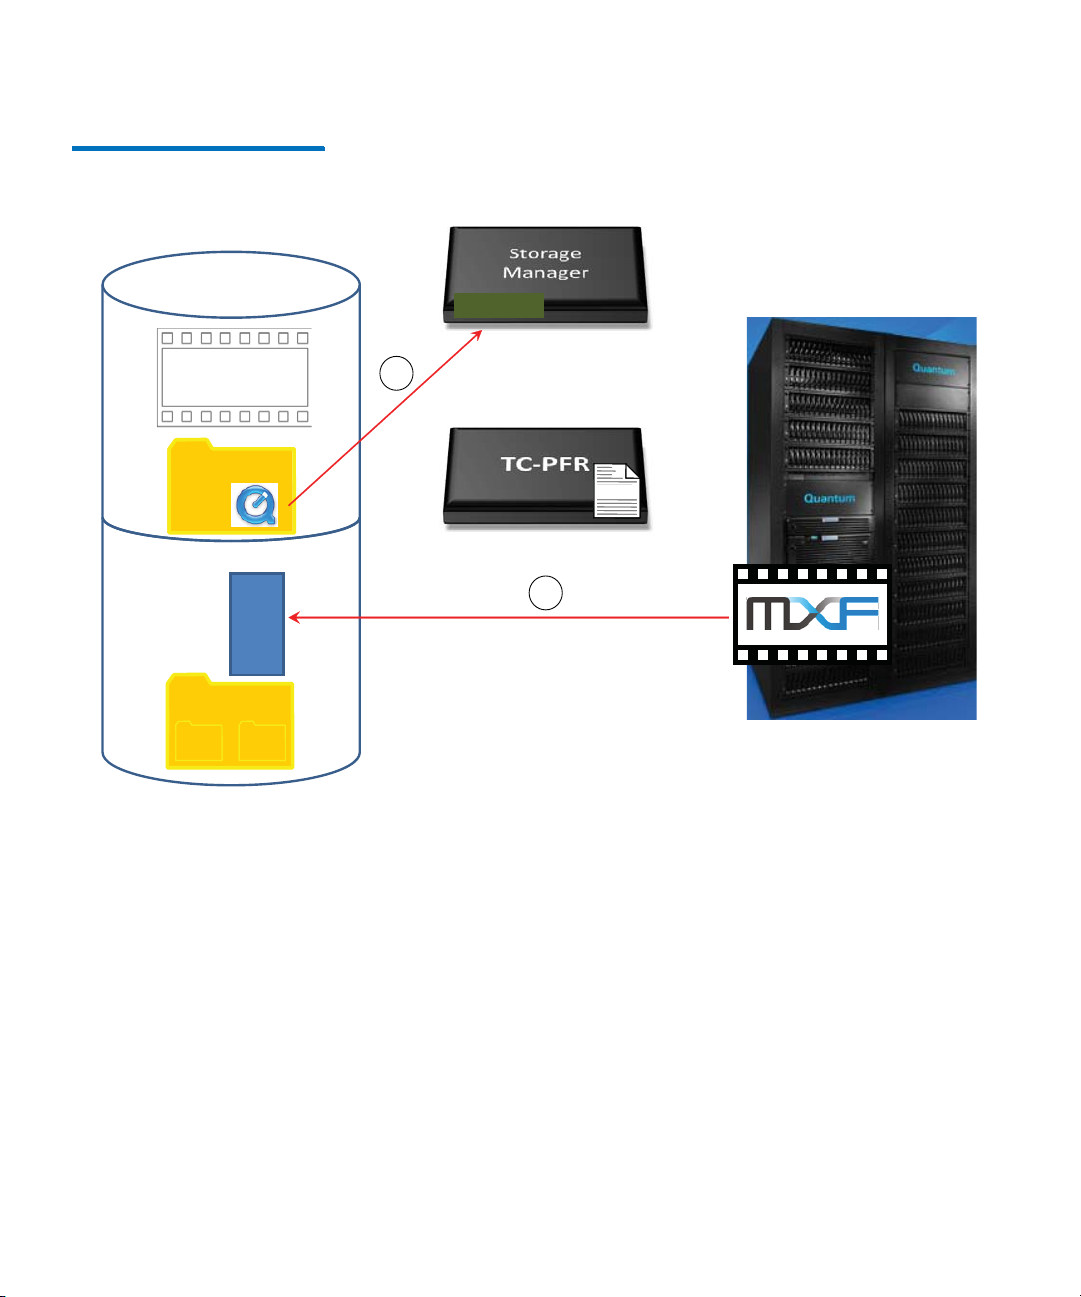
Chapter 2: How Timecode-Based Partial File Retrieval Works
Index
XX
PFR-Request
<xml><xml><xml>
01101011010
6
7
PFR Workflow
Figure 3 PFR Steps 6 - 7
Step 6: PFR locates the required frames in the index file and converts
these to byte offset data for Storage Manager.
Step 7: Storage Manager performs a partial restore from tape, and
writes a temporary file to the destination directory.
8 Quantum Timecode-Based Partial File Retrieval 1.0.1 User’s Guide
Page 17
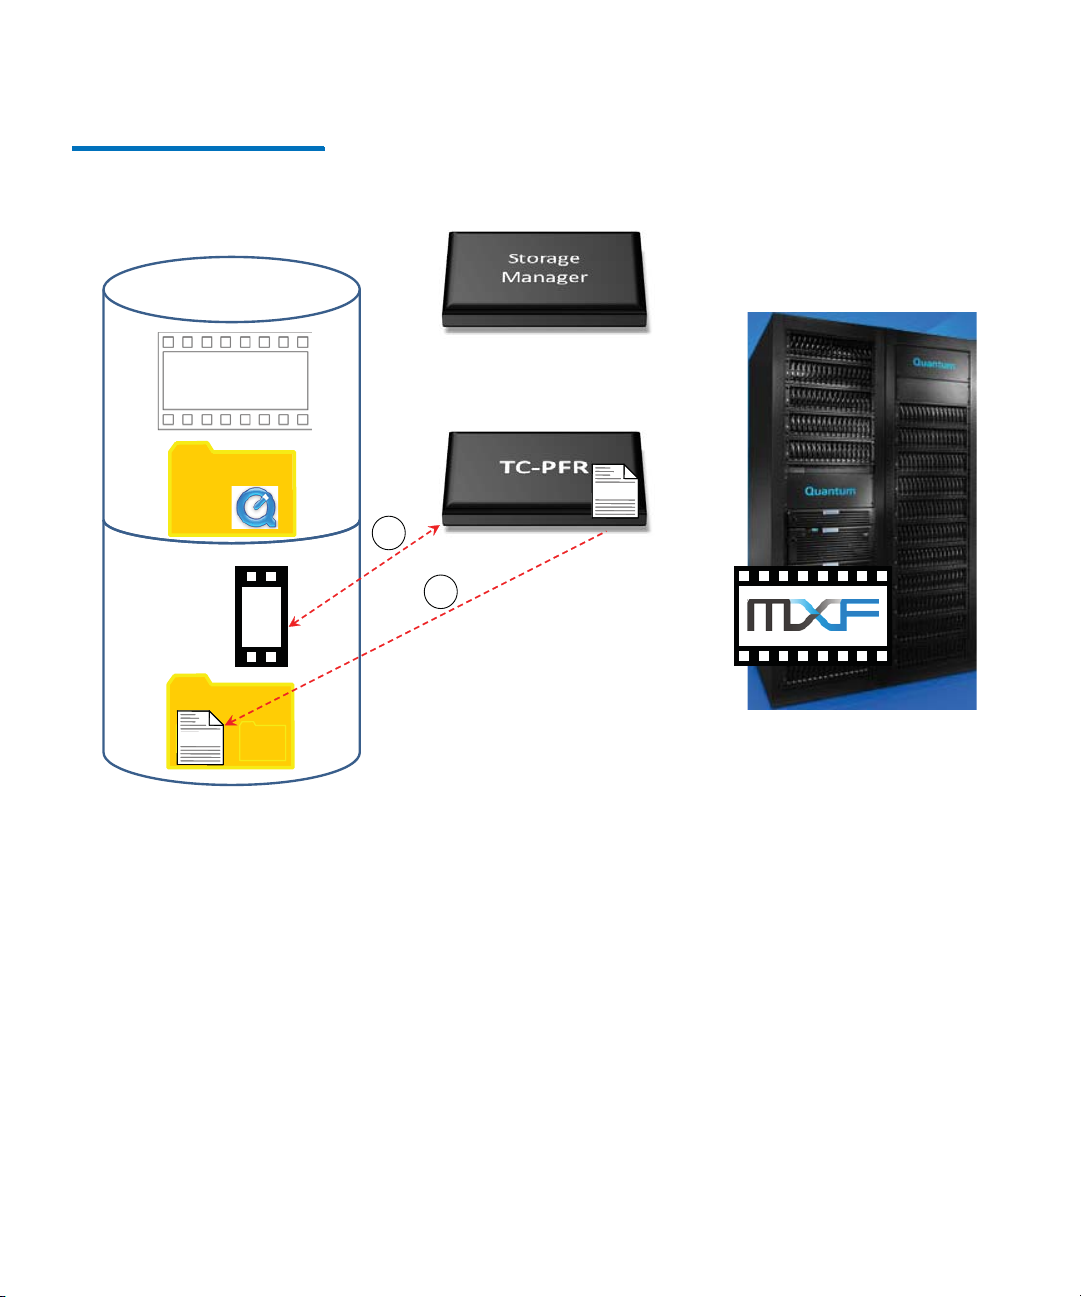
Figure 4 PFR Steps 8 - 9
Index
XX
PFR-Request
<xml><xml><xml>
8
9
<xml><xml><xml>
Chapter 2: How Timecode-Based Partial File Retrieval Works
PFR Workflow
Step 8: PFR then immediately rewraps this temporary file back into a
valid MXF or QuickTime file.
Step 9: The request XML is dropped into the success folder to indicate
that a successful restore has occurred.
Quantum Timecode-Based Partial File Retrieval 1.0.1 User’s Guide 9
Page 18

Chapter 2: How Timecode-Based Partial File Retrieval Works
PFR Workflow
10 Quantum Timecode-Based Partial File Retrieval 1.0.1 User’s Guide
Page 19

Installation
Installation Components and Install Options
Quantum Partial File Retrieval consists of the following software
components:
• PFR Control Server and Configuration GUI: This is the core of the
system and the tool that configures it
• PFR Transfer Engine: This is the engine that retrieves and creates
the partial file
• PFR Status GUI: This is the user application which allows
monitoring and modifying the queue of pending and in-progress
retrievals
Chapter 3
• Index Engine and Configuration / Status GUI: This is the service
that indexes media files before they are truncated
• Virtual Machine (VM) with SNAPI and PFR Linux Component:
This is the interface to the StorNext API (SNAPI)
A typical installation of Quantum Partial File Retrieval installs all of the
above components on a single Windows-based server machine. This is
fine for most installations, but for larger installations the components
can be distributed as follows:
• PFR Server: Includes "PFR Control Server and Configuration GUI" and
"VM w/ SNAPI and PFR Linux Component"
Quantum Timecode-Based Partial File Retrieval 1.0.1 User’s Guide 11
Page 20

Chapter 3: Installation
Upgrading from an Earlier Version
• PFR Client (aka Status GUI): Allows the PFR queues to be remotely
managed
• PFR Indexer: Includes "Index Engine and Configuration / Status
GUI". Would most likely be installed on its own on a separate
machine when additional performance is required.
• PFR Transfer Engine: Again, would most likely be installed on its
own on a separate machine when additional performance is
required.
Upgrading from an Earlier Version
Uninstalling a Previous Version
Prior to installing Quantum Partial File Retrieval v1.0.1, any v1.0.0
version must be uninstalled.
Note: Uninstalling PFR does not remove any of the index files that
were generated with an earlier version, nor does it remove the
existing PFR configuration.
To uninstall v1.0.0, find the PFR Components to uninstall:
• On Windows Server 2003 SP2, from the Control Panel select Add or
Remove Programs
• On Windows Server 2008 R2, from the Control Panel select
Uninstall a Program
In either case, select the PFR Component(s) and uninstall them. If the
original installation was a Full install, there will be only one item to
uninstall, labeled “PFR”. If the original installation was performed by
installing the component parts, uninstall any instances of “PFR Client”,
“PFR Server”, “PFR Engine” and “PFR Indexer”.
Once the component(s) have been uninstalled, it is recommended that
the Server is re-booted to remove any temporary files, before installing
v1.0.1 (see below).
12 Quantum Timecode-Based Partial File Retrieval 1.0.1 User’s Guide
Page 21

Chapter 3: Installation
Prerequisites
Note: The prerequisites for v1.0.1 are the same as those for v1.0.0. All
component parts of Quantum PFR must be upgraded to the
same version.
Installing v1.0.1 Installing v1.0.1 should be performed as detailed below. Once
installation is complete, it is important to run the PFR Configuration Tool
right through to re-save the Configuration.
Be sure to check the Maximum Simultaneous Transfers value. This
value may need to be re-entered with the newer version of the software.
Prerequisites
Supported Platforms At this time Timecode-based Partial File Retrieval is supported only on
the following platforms.
The PFR server and transfer engine can be installed on the following
platforms:
• Windows 2003 Server R2 SP2 32-bit and 64-bit
• Windows 2008 Server R2 64-bit
PFR clients (Status GUI) can be installed and run on the the following
platforms:
• Windows 2003 Server R2 SP2 32-bit and 64-bit
• Windows 2008 Server R2 64-bit
•Windows XP
•Windows Vista
•Windows 7
Quantum Timecode-Based Partial File Retrieval 1.0.1 User’s Guide 13
Page 22

Chapter 3: Installation
Prerequisites
StorNext The StorNext metadata controller must have Storage Manager and
StorNext API (SNAPI) installed.
The PFR server must have the StorNext client software installed, and the
client must be at the same StorNext revision level as the metadata
controller (MDC).
File systems containing PFR video data must be mounted Read/Write as
drive letters on the PFR Server. For details about installing and
configuring the Windows client, see the
StorNext Installation Guide
Sharing the StorNext File System
Each StorNext file system that will be used by PFR must be “shared” via
Standard Windows server message block (SMB) protocol.
In Windows Explorer, right-click on each StorNext file system drive letter
and share the drive. The permissions of each share must be explicitly set
to “Full Control” since the default value is Read-Only.
.
VMWare The "VM w/ SNAPI and PFR Linux Component" is actually a small piece of
Linux software that provides the communications link between the PFR
Server and the StorNext API. This is hosted in VMWare Server on the PFR
Server machine.
VMWare Server should be installed and running prior to installing the
Quantum PFR Components. You can find VMWare Server here:
http://www.vmware.com/products/server/
Note: When installing separate components on separate machines
for performance reasons, VMWare Server is required only on
the Server machine onto which the PFR Server is installed.
14 Quantum Timecode-Based Partial File Retrieval 1.0.1 User’s Guide
Page 23

Chapter 3: Installation
Prerequisites
Note: The VMware server configuration may have to be changed
after installation to make sure the “standard” virtual machine
store is pointing to “C:\Virtual Machines.” By default, the
VMWare installer chooses the biggest drive for the “standard”
virtual machine store, which is often the StorNext system. If
this is not changed, the PFR Installer cannot automate
registering and starting the “VM w/ SNAPI and PFR Linux
Component”.
Note: On some systems that already have an instance of Apache web
server already installed, the VMware web service may fail to
start. For this reason we recommend installing on a machine
that has no web server software already running.
Bonjour Bonjour, also known as zero-configuration networking, enables
automatic discovery of computers, devices, and services on IP networks.
Bonjour uses industry-standard IP protocols to allow devices to
automatically discover each other without needing to enter IP addresses
or configure DNS servers.
Quantum Partial File Retrieval uses Bonjour in order to discover the "VM
w/ SNAPI and PFR Linux Component". Bonjour should be installed prior
to installing Quantum Partial File Retrieval components. You can find
Bonjour here:
http://support.apple.com/downloads/Bonjour_for_Windows
Note: When installing separate components on separate machines
for performance reasons, Bonjour is required only on the
machine(s) onto which the PFR Server and PFR Transfer Engine
are installed.
User Accounts The PFR Control Server and the PFR Transfer Engine both require a
specific user to be specified to run the Services. This user must have full
read and write access to the StorNext storage in order to perform partial
file retrievals. The same user is used for both components.
Quantum Timecode-Based Partial File Retrieval 1.0.1 User’s Guide 15
Page 24

Chapter 3: Installation
Prerequisites
If you are performing an installation where some components are
installed onto separate server machines, the user must be available on
both the machine which has PFR Control Server and the machine which
has the PFR Transfer Engine installed onto it.
.NET This installation step is necessary only on Windows Server 2008. (This
operating system comes with .NET installed but disabled.) Before
beginning the PFR installation, you must enable the .NET feature.
1 Launch the Windows Server Manager.
Figure 5 Server Manager
16 Quantum Timecode-Based Partial File Retrieval 1.0.1 User’s Guide
Page 25

Figure 6 Add Features
Chapter 3: Installation
Prerequisites
2 Go to Features and then click Add Features.
Quantum Timecode-Based Partial File Retrieval 1.0.1 User’s Guide 17
Page 26

Chapter 3: Installation
Prerequisites
Figure 7 Install .NET
Framework
3 Select .NET Framework and then click Install.
Sharing the StorNext File System
The StorNext file system should be shared via SMB (standard Windows
share). The security attributes of the Windows share on the file system
must be set to “Full Control.”
18 Quantum Timecode-Based Partial File Retrieval 1.0.1 User’s Guide
Page 27

Installation
Figure 8 PFR Installer
Chapter 3: Installation
Installation
The installation starts with an options screen that allows either a "Full
Install" or any of the individual components to be installed:
Select any of the options and press the Install button, and then follow
the installation instructions to complete the installation. The "normal"
installation will be completely performed by selecting "Full Install".
Note: During the installation process you will be asked for a PFR User
Name and password: once for the PFR Server installation and
once for the PFR Engine installation. Enter the User Account
information that was created during the prerequisites stage.
During the PFR Server installation the installer copies, registers and
starts the "VM w/ SNAPI and PFR Linux Component". Since this Virtual
Machine image is very large, this can take quite a long time to complete.
This is completely normal.
Quantum Timecode-Based Partial File Retrieval 1.0.1 User’s Guide 19
Page 28

Chapter 3: Installation
Installation
20 Quantum Timecode-Based Partial File Retrieval 1.0.1 User’s Guide
Page 29

Configuration
Most of the Quantum Partial File Retrieval configuration is handled via a
single configuration tool (the Primary Configuration). However, an initial
manual configuration step is required before this is run.
In addition, since the PFR Indexer can be installed on a separate
machine, this element is also configured separately (although it can be
called from the main configuration application if both are installed on
the same machine).
SNAPI / PFR Linux Component Configuration
Chapter 4
The connection between the PFR Server and the StorNext API (SNAPI) is
accomplished via a small Linux application that resides in a Virtual
Machine, hosted on the same machine that runs the PFR Server. This
requires configuration before it can be used for the first time.
Ensuring that the VM is running
Quantum Timecode-Based Partial File Retrieval 1.0.1 User’s Guide 21
The Virtual Machine will be installed and launched by the PFR Server
installer. To launch the Virtual Machine Manager and to ensure that the
VM is running, launch the VMWare Server Home Page. There should be
Page 30

Chapter 4: Configuration
SNAPI / PFR Linux Component Configuration
a shortcut to this on the desktop (created when VMWare Server was
installed). Alternatively, point your web browser at the following URL:
https://localhost:8333
This will request the following login screen from within your web
browser.
Note: You may be warned by your web browser that this site does
Figure 9 VMWare Login
not have a valid certificate. You should ignore this warning and
continue to the site.
Type the username and password for an account on the current
machine which has Administrative privileges.
It is necessary to manually configure VMWare Server to automatically
start/stop the virtual machines when the Windows host OS starts/shuts
down.
To d o t h is :
1 Click the computer name in the Inventory tab (not the name of the
virtual machine), and select the Summary tab.
22 Quantum Timecode-Based Partial File Retrieval 1.0.1 User’s Guide
Page 31

Figure 10 Virtual Machine
Settings
Chapter 4: Configuration
SNAPI / PFR Linux Component Configuration
2 Click Edit Virtual Machine Startup/Shutdown Settings (on the far
right near the bottom).
3 Check the box beside Allow virtual machines to start and stop
automatically with the system, and in the Default Shutdown
Delay box, select Suspend.
4 Highlight the virtual machine in the Startup Order list and click
Move Up to put it in "Any Order".
5 Click OK to close the window.
Quantum Timecode-Based Partial File Retrieval 1.0.1 User’s Guide 23
Page 32

Chapter 4: Configuration
SNAPI / PFR Linux Component Configuration
In the Inventory that appears on the left, there should be an item called
"Linux_SNAPI". This is the name of the Virtual Machine that runs the "VM
w/ SNAPI and PFR Linux Component". It will appear as follows:
Figure 11 Virtual Machine
Inventory
Select the Linux_SNAPI item and ensure that it is running. If it is not,
start it using the green Play button at the top of the screen.
Optional Step: Advanced Network Configuration
This optional step is required only for multiple instances of PFR. If you
do not perform this step, proceed to
Showing the VM and its GUI on
page 27.
For simplicity of configuration, the SNAPI / PFR Virtual Machine is
configured with a fixed Network Card MAC Address. For most scenarios,
this configuration will simply work, but in environments where there is
more than one Quantum StorNext PFR installation on the network, the
following steps are required to ensure that there is not a clash of
Network Card MAC Addresses.
For simple configurations where there will never be multiple Quantum
StorNext PFR systems installed on the same network, skip this section
and continue from
Showing the VM and its GUI on page 27.
However, if there is to be more than one installation of Quantum
StorNext PFR on the network, perform the following steps.
24 Quantum Timecode-Based Partial File Retrieval 1.0.1 User’s Guide
Page 33

Figure 12 Summary Tab
Chapter 4: Configuration
SNAPI / PFR Linux Component Configuration
1 Continuing from above, select the Summary tab for the
Linux_SNAPI:
Quantum Timecode-Based Partial File Retrieval 1.0.1 User’s Guide 25
Page 34

Chapter 4: Configuration
SNAPI / PFR Linux Component Configuration
2 Press the down arrow to the left of Network Adapter 1 and select
Edit to display the Network Adapter Configuration window.
Figure 13 Network Adapter
Configuration
3 The MAC Address shown in the figure (00:50:56:23:01:82) is the
default MAC Address for the SNAPI / Linux Virtual Machine. Where
there are multiple Quantum PFR Installations on the same network,
these MAC addresses must be unique. Quantum suggests achieving
this by setting the last digit of the MAC Address to a different value
for each Virtual Machine (83, 84, 85 etc).
Change this MAC Address so that it ends in the next unused value
(for example 83) and then press OK. Continue with the
configuration.
26 Quantum Timecode-Based Partial File Retrieval 1.0.1 User’s Guide
Page 35

Chapter 4: Configuration
SNAPI / PFR Linux Component Configuration
Showing the VM and its GUI
Figure 14 Console Tab
1 Continuing from above, select the Console Tab for the Linux_SNAPI:
2 Click in the black area of the screen to launch the console. The first
time the console is run, it will not be running the GUI and you will
be placed at a terminal window with the following prompt:
Linux_SNAPIlogon:
3 Type "root" and when prompted for a password, enter "pfr" (both
without the quotation marks).
Quantum Timecode-Based Partial File Retrieval 1.0.1 User’s Guide 27
Page 36

Chapter 4: Configuration
SNAPI / PFR Linux Component Configuration
4 After logging in, type "init 5" to launch the GUI:
Figure 15 PFR GUI
Setting the Location of StorNext Storage Manager
The first task in setting up the Virtual Machine is to tell the Linux
application where the StorNext server is located.
An icon at the bottom of the GUI screen provides a shortcut to the
settings: Click this icon to edit the StorNext API Configuration File
(snapi.cfg).
28 Quantum Timecode-Based Partial File Retrieval 1.0.1 User’s Guide
Page 37

Figure 16 Edit SNAPI
Configuration File
Chapter 4: Configuration
SNAPI / PFR Linux Component Configuration
1 The parameter to change (serverName) is highlighted in the
illustration above. Change this to the host that is running the
StorNext server. There are additional instructions in the
configuration file itself.
2 Save the changes by clicking Save, and then close the editor.
Network Configuration Network Configuration is necessary to provide the Virtual Machine with
a MAC address and an IP Address.
As with the SNAPI configuration, there is a shortcut to Network Settings
at the bottom of the console (see opposite):
Click this shortcut to launch the Network Settings application.
Quantum Timecode-Based Partial File Retrieval 1.0.1 User’s Guide 29
Page 38

Chapter 4: Configuration
SNAPI / PFR Linux Component Configuration
Figure 17 Network Settings
Screen
Optional Step: Advanced Network Configuration
This optional step is required only for multiple instances of PFR. If you
do not perform this step, continue with network configuration by
proceeding to
For a simple network configuration, there will be a single entry in the list
shown in the figure. However, if you followed the earlier Advanced
Network Configuration section in order to generate a unique MAC
Address, there will be two entries shown: one for the new MAC Address
and one for the original MAC Address which is no longer present. (The
details are shown in the lower panel for the selected item).
Delete the entry for the old MAC Address, which will be marked “No
hwinfo” and will not show an actual MAC Address, leaving only the
entry for the MAC Address you created earlier.
30 Quantum Timecode-Based Partial File Retrieval 1.0.1 User’s Guide
Editing Network Settings.
Page 39

Figure 18 Edit Network
Settings Address Tab
Chapter 4: Configuration
SNAPI / PFR Linux Component Configuration
Editing Network Settings
Continue with the steps below.
1 Click the Edit button to configure the network.
2 Set up the network settings according to the requirements of your
network configuration. If you are not using DHCP, the specific
settings are outside of the scope of this User Guide. Please consult
your Network Administrator.
Quantum Timecode-Based Partial File Retrieval 1.0.1 User’s Guide 31
Page 40

Chapter 4: Configuration
Primary Configuration
Figure 19 Edit Network
Settings Overview Tab
3 Click Next to configure. A configuration overview appears.
4 Restart the virtual machine.
Primary Configuration
The main wizard-based tool guides you through the process of setting
up the application. Configuration should only take a few minutes.
32 Quantum Timecode-Based Partial File Retrieval 1.0.1 User’s Guide
Page 41

Chapter 4: Configuration
Primary Configuration
Welcome Use the Welcome screen to select the server's logging level.
Figure 20 Welcome Screen
Press Next to continue.
Archive The Archive pane allows you to enter the machine on which the storage
resides (the archive host) and the SNFS share on this storage that will be
used for access to this storage. These can either be typed in manually or,
better, looked up using the "..." buttons.
Quantum Timecode-Based Partial File Retrieval 1.0.1 User’s Guide 33
Page 42

Chapter 4: Configuration
Primary Configuration
Figure 21 Archive Screen
The SNAPI Host should be populated automatically. If it does not
populate automatically, ensure that the SNAPI application is running in
the Virtual Machine and that Bonjour is installed and running (see
Chapter 3, Installation).
The path where the file system has been mounted on the StorNext
system (e.g. stornext/snfs1).
Press Next to continue.
Job Results Folder It is possible to create up to twenty Job Results Folders for the
application, each for different roles within your organization (for
example, News, Sports and Current Affairs). This page allows you to set
up the first of these folders.
34 Quantum Timecode-Based Partial File Retrieval 1.0.1 User’s Guide
Page 43

Figure 22 Job Results Screen
Chapter 4: Configuration
Primary Configuration
The Name is simply a friendly Name that is displayed in the Status GUI,
while the Location is the UNC path to the parent location of the folder
set (see
Folder Structure on page 4).
Finally, select the desired File Type for this Job Result: either MXF (the
default,) or QuickTime. Note that this setting will generate partial files
of the specified type, irrespective of the source file format.
Press Next to continue.
Work Folders At this stage most of the configuration has been completed. The Work
Folders page provides a summary of the Archive and Job Results folders
that have been set up so far. From this point you can do the following:
•Use the Add Directory button to add an additional Job Results
folder (up to a maximum of 20), or Edit or Remove to change or
delete previously configured folders
•Use Import License to import a permanent license (which replaces
the 30-day temporary license provided upon initial installation)
Quantum Timecode-Based Partial File Retrieval 1.0.1 User’s Guide 35
Page 44

Chapter 4: Configuration
Primary Configuration
Figure 23 Work Folders Screen
Press Next to continue.
Transfer Engines In a standard installation where everything is installed onto a single
machine, there will be only a single Transfer Engine, located on the
current machine (localhost). This will be configured automatically and
no further configuration is necessary.
However, in more extensive installations where Transfer Engines have
been installed on separate Windows server machines, this is the place to
specify the location of the separate machines.
36 Quantum Timecode-Based Partial File Retrieval 1.0.1 User’s Guide
Page 45

Figure 24 Transfer Engines
Screen
Chapter 4: Configuration
Primary Configuration
This window also allows you to specify the number of simultaneous
transfers that should be attempted at once. The value entered here
should not exceed the number of tape drives available to perform
restores.
Press the Next to continue.
Indexer Configuring the Indexer is accomplished using a separate application
since the indexer might be physically present on a different Windows
server machine. However, in case it is present on this machine it can be
launched here for convenience. Please see the next section (Indexer
Configuration and Monitoring) for more details.
Note that the Indexer configuration can also be launched separately.
Quantum Timecode-Based Partial File Retrieval 1.0.1 User’s Guide 37
Page 46

Chapter 4: Configuration
Primary Configuration
Figure 25 PFR Indexer Screen
Press the Indexer button to launch the indexer configuration. Once
complete (or if skipped), press Next to continue.
Summary This page provides a final check before saving and committing the
current configuration.
Caution: Saving the configuration restarts all Partial File Restore
services and will therefore terminate any in-progress
retrievals.
38 Quantum Timecode-Based Partial File Retrieval 1.0.1 User’s Guide
Page 47

Figure 26 Summary Screen
Chapter 4: Configuration
Primary Configuration
Press Next to continue and save the current configuration.
Complete The final page indicates whether the configuration has been saved (or
else provides details of any problems).
Quantum Timecode-Based Partial File Retrieval 1.0.1 User’s Guide 39
Page 48

Chapter 4: Configuration
Indexer Configuration and Monitoring
Figure 27 Complete Screen
Indexer Configuration and Monitoring
The Indexer is implemented as a Windows Service. The configuration
and monitoring of the service are combined into this application.
Note: The Indexer service continues to run in the background, even
when this application is not running.
This application can be launched either via the main configuration tool
(if they are on the same Windows server machine,) or via the Start
button.
40 Quantum Timecode-Based Partial File Retrieval 1.0.1 User’s Guide
Page 49

Chapter 4: Configuration
Indexer Configuration and Monitoring
Configuration This application contains two tabs: one for configuration and one for
monitoring. The second tab is for the configuration (settings):
Figure 28 PFR Index
Configuration
On this screen you can do the following:
• Set one or more Archive Locations for which you would like to
create indexes. To make changes, you can use the Add and Remove
buttons on the right, or right-click with the mouse on the Archive
Locations list. Ideally, the locations entered here will only contain
media files.
• Set the Log (logging) level.
•Set the Scan Interval (in minutes). 60 minutes is the recommended
interval, but the figure is a balance between speed of indexing and
the load the indexer puts onto the storage. there is no benefit in
creating indexes as soon as possible as long as they are created
before the files are truncated by StorNext Storage Manager.
•The Listen Port is the TCP/IP port that this application and the
Indexer Service use to communicate on. The default TCP/IP port is
515, and this should not be changed.
After any changes have been made, click Apply to save and commit
your changes.
Quantum Timecode-Based Partial File Retrieval 1.0.1 User’s Guide 41
Page 50

Chapter 4: Configuration
Licence Process
Monitoring The Indexer tool also allows monitoring of the indexing process. As the
Indexer Service scans the configured Archive Locations, log messages
are written to the Log Window:
Figure 29 Indexer Log Window
It is also be possible to stop / start the Indexer Service using the toolbar
buttons near the top of this screen.
Licence Process
When the Quantum PFR Configuration tool is first run, it installs a 30day evaluation licence. This licence is permanently attached to the PFR
Server Machine and will not be reset by reinstalling Quantum PFR.
At the time the evaluation licence is generated, a token file is also
generated and placed onto the Windows Desktop. This file is called
“<PFRSERVER> PFR Product Token.txt”, where <PFRSERVER> is the
machine name of the Windows Server running the PFR Server.
In order to obtain a permanent licence, you must send this PFR Product
Token file to your Quantum representative, who will provide you with
the corresponding permanent licence. Once you have the permanent
42 Quantum Timecode-Based Partial File Retrieval 1.0.1 User’s Guide
Page 51

Chapter 4: Configuration
Licence Process
licence file (whose filename ends in .LIC), place it on the Windows
Desktop alongside the token and use the “Import Licence” button from
the PFR Configuration Tool to browse to the Windows Desktop and
import the licence into Quantum PFR.
Quantum Timecode-Based Partial File Retrieval 1.0.1 User’s Guide 43
Page 52

Chapter 4: Configuration
Licence Process
44 Quantum Timecode-Based Partial File Retrieval 1.0.1 User’s Guide
Page 53

By default, the PFR Services should handle all retrieval requests
automatically. However, should you wish to monitor the process,
manipulate the pending requests or look at the log files, this can all be
done using the Status GUI application.
Anatomy of Status GUI
Chapter 5
Using the Status GUI
Application
The left side of the Status GUI screen lists the PFR source requests, which
are the XML request files that have not yet been processed, categorized
according to the folder sets defined in the configuration.
On the right are the destinations: one tab (along the bottom) for each
configured folder set. The entries on the right represent pending, inprogress and complete (or failed) retrievals.
Quantum Timecode-Based Partial File Retrieval 1.0.1 User’s Guide 45
Page 54

Chapter 5: Using the Status GUI Application
Manipulating the Retrievals
Figure 30 Status GUI Screen
Manipulating the Retrievals
The following actions can be performed on retrievals using the Status
GUI. In the following descriptions, any action will reflect the selected
transfer.
• Prioritization. Using the set of five buttons below the Destination
Servers, a pending transfer can be given high or lower priority by
moving the pending transfer to the top, up, down or bottom of the
list. All high priority transfers will take place before all standard
priority transfers.
• Delete. Using the trash icon in the bottom right, pending transfers
can be removed. That also cancels active retrievals and deletes any
complete transfers (it will remove the partial file).
• View Log File. From the Help menu it is possible to view the current
log file. If the Status GUI is run on the same machine which runs the
main PFR services, this will be the log file which also contains all of
the retrieval information.
46 Quantum Timecode-Based Partial File Retrieval 1.0.1 User’s Guide
Page 55

Sample
Chapter 6
Request EDL Format
The following example Request XML file should provide sufficient details
to allow for creating requests.
Quantum does not recommend “hand creating” XML files. XML files
should be created by a MAM or similar application.
<?xmlversion="1.0"encoding="utf‐8"?>
<MarquisEDLversion="2.0">
<FrameRate>DF</FrameRate>
<ClipList>
<Clip>
<UID>ID1234567891</UID>
<Title>MyFirstPFR</Title>
<File>//MyServer/SNFS1/Dir1/Dir2/MySourceClipFile.mxf</File>
<Start>10:01:30;10</Start>
<End>10:02:15;09</End>
<NumberVideoTracks>1</NumberVideoTracks>
<NumberAudioTracks>4</NumberAudioTracks>
</Clip>
</ClipList>
</MarquisEDL>
Quantum Timecode-Based Partial File Retrieval 1.0.1 User’s Guide 47
Page 56

Chapter 6: Request EDL Format
Notes
Notes
FrameRate
Clip
UID
Title
File
Start
End
“25” : PAL
“DF” : NTSC Drop Frame
“NDF” : NTSC Non Drop Frame
“50” : 50 frames per second
“60NDF” : 60 frames per second
“60DF” : 59.94 frames per second
“24NDF” : 24 frames per second
“24DF” : 23.976 frames per second
There can only be one clip provided
A unique ID for the source clip, but otherwise not used
Name of the (partial) output file
The full UNC path to the source file on the StorNext managed
storage
Start timecode of partial clip to be retrieved
End timecode of partial clip (inclusive - e.g. timecode of last
frame of partial clip)
NumberVideoTracks
NumberAudioTracks
48 Quantum Timecode-Based Partial File Retrieval 1.0.1 User’s Guide
Number of video tracks in source clip. Should always be “1”
Number of audio tracks in source clip
Page 57

Performance
Chapter 7
Performance and Scalability
The performance of Quantum PFR will be affected by a number of
factors, and the interactions are complex. This chapter provides some
guidelines, but actual performance depends largely upon the
environment in which it is run.
Indexer The Quantum PFR Indexer usually starts to index a file within two or
three hours of it being written, although the StorNext policy should be
set to truncate files no sooner than 24 hours.
The performance of the indexer is influenced by a number of factors,
including:
• The file wrapper type - MXF files require a greater effort to index
than QuickTime files
• The size and duration of the files. Of course, longer files will take
longer to index, but a longer file can be indexed more efficiently
than a number of smaller files of the same total size / duration.
Based upon the recommended hardware listed in Suggested Platform
on page 53, tests have shown that the Quantum PFR Indexer can index a
Quantum Timecode-Based Partial File Retrieval 1.0.1 User’s Guide 49
Page 58

Chapter 7: Performance and Scalability
Performance
24GB MXF file in approximately 6 minutes. This would equate to 5.4 TB
or 120 hours of HD material at 100 Mb/s in a 24 hour period.
Note on Existing Archives
Partial File Retrieval via Index from Tape
There is no requirement to index files before they can be retrieved by
Quantum PFR. Where no index file yet exists, Quantum PFR retrieves the
whole file from tape and then extracts the required partial file from the
whole file.
This whole file would then be indexed before it was truncated again,
meaning that the index would be available for subsequent requests.
While this is less efficient than a strictly partial retrieval from tape, it
does allow Quantum PFR to begin to operate on an existing archive
straight away.
Like the Quantum PFR Indexer, there are a number of factors that affect
the performance of the retrieval from tape:
• There is a fixed overhead for the tape handling, working on worst
case assumption that each retrieval requires unloading the previous
tape and loading the new tape. A slightly conservative estimate
value of three minutes is assumed for this process.
• There is an additional overhead of approximately 30 seconds for
Quantum PFR to submit the request to Storage Manager, detect the
completion of the partial file, generate headers for the partial file
and tidy up at the end of the transfer.
• Retrieval from Tape to Spinning Disk (which is very fast).
• Subsequent creation of the partial file.
Taking into consideration the overheads, the average sustained data
rate for the re-wrapping the partial file (averaged over 24 hours) would
be no less than 100 Mb/s.
Very Short Partial Retrievals
50 Quantum Timecode-Based Partial File Retrieval 1.0.1 User’s Guide
With very small retrievals, the tape handling overhead tends to be the
largest part of the time taken to perform a partial file retrieval. In this
case, the total capacity of the system tends towards being limited by the
total number of retrievals requested. Assuming approximately four
minutes of overhead per transfer, when the transfers are very short
Page 59

Chapter 7: Performance and Scalability
File and Folder Structure Limitations
there will be a limit of approximately 15 transfers per hour or 360
transfers per day, per tape drive in the system available for restores.
Longer Partial Retrievals
With longer retrievals where the tape handling overhead is smaller than
the time to create the partial file, it should be possible to drive the
system in such a way that the tape system is kept busy getting ready for
the next restore, while the previous partial file creation is being
performed. Therefore, with longer partial retrievals, the limiting factor
becomes the network bandwidth averaged over 24 hours (100 Mb/s).
Based upon a 100 Mb/s averaged network bandwidth, the point at
which the tape handling overhead becomes smaller than the partial file
creation would be approximately 3GB for the partial file.
This would equate to approximately 1TB of material being retrieved
within 24 hours, which would equate to approximately 20 hours of HD
material at 100 Mb/s.
100Mb/s is a very conservative estimate based on averaging the total
system performance over a 24 hour period, assuming a mix of long and
short retrievals. The peak re-wrapping performance would be expected
to be several times faster than this average, showing a relative
improvement in total performance for longer retrievals.
File and Folder Structure Limitations
Quantum PFR Indexer The Quantum PFR Indexer maintains a memory image of the indexed
folder and file structure during the indexing process. This will scale to
millions of files and folders.
Note that the implementation of the Quantum PFR Indexer is geared
around there not being a huge number of files per folder (less that
5,000). A very large number of files in each folder is more processor
intensive to index than the same number of files, spread between a
larger number of folders and will have a small detrimental impact upon
indexing performance.
Quantum Timecode-Based Partial File Retrieval 1.0.1 User’s Guide 51
Page 60

Chapter 7: Performance and Scalability
Scalability
Quantum PFR Server The Quantum PFR Server does not hold information about the files and
folders to be restored, and is therefore unaffected by the size of the
archive.
Scalability
Quantum PFR performance for both the Indexer and the Retrieval
Process is determined largely by the available network bandwidth.
Standard Windows Server monitoring tools (such as Resource Monitor
in Server 2008R2) can be used to establish whether the storage
connection bandwidth is being fully utilized a large percentage of the
time.
There are several ways in which the Quantum PFR system can be
expanded in order to enhance performance.
Distributing the Load • Installing the Quantum PFR Indexer onto a separate machine
separates the indexing network bandwidth from the partial file
retrieval network bandwidth. This would be beneficial if there is a
large amount of new material being added to the system.
• Installing an additional Quantum PFR Transfer Engine on separate
hardware also spreads the load of the retrieval bandwidth. This
would be beneficial when there is a large number of partial
retrievals being performed.
Dedicated Tape Drives As long as network bandwidth is not a limiting factor and retrievals are
from different tapes, greater throughput of the Quantum PFR system
will be obtained by adding more Tape Drives to the system, dedicated to
retrievals.
52 Quantum Timecode-Based Partial File Retrieval 1.0.1 User’s Guide
Page 61

Suggested Platform • Windows server 2008 R2 (64 bit)
• ≥ 2 CPUs with ≥ 2GHz clock speed
• ≥ 4GB RAM
• ≥ 8GB RAM for archive of > 1,000,000 files
• ≥ 20GB available local disk space after the pre-requisites have been
loaded
• ≥ 2Gb/s Fibre-Channel connection to SAN
• Ethernet NIC for PFR status GUI access
Chapter 7: Performance and Scalability
Scalability
Quantum Timecode-Based Partial File Retrieval 1.0.1 User’s Guide 53
Page 62

Chapter 7: Performance and Scalability
Scalability
54 Quantum Timecode-Based Partial File Retrieval 1.0.1 User’s Guide
 Loading...