

Page 1
QUALCOMM Globalstar
GSP-1600 Tri-Mode Phone
User Guide
Page 2

This guide is based on the production version of the QUALCOMM Globalstar
GSP-1600 Tri-Mode. Software changes may have occurred after this printing.
QUALCOMM reserves the right to make changes in technical and product
specifications without prior notice.
5775 Morehouse Drive, San Diego, CA 92121-1714
Copyright© 1999-2000 QUALCOMM® Incorporated
This technology was exported from the United States Government. Diversion
QUALCOMM® is a registered trademark of QUALCOMM Incorporated.
Digital by QUALCOMM® is a registered trademark of QUALCOMM Incorporated.
SMART KEY™ is a trademark of QUALCOMM Incorporated.
Globalstar™ is a trademark of Loral Qualcomm Satellite Services, Inc.
All other trademarks and registered trademarks are the property of their respective
QUALCOMM Incorporated
Document Number 80-98153-2EN Rev-
All rights reserved
contrary to U.S. law prohibited.
owners.
Printed in the United States of America
Page 3

Contents
Cautions and Warnings .........................................................................vii
Getting Started .................................. ........................................................1
Understanding your phone ...................................................................1
Contacting customer service .................................................................1
Solving problems ....................................................................................1
Understanding this guide ......................................................................1
Manually selecting call mode ..................................................... ..... ......2
Preparing for satellite calls ...................................................................2
Making satellite calls ............................................................................4
Making cellular calls .............................................................................4
Making data calls ..................................................................................5
Receiving satellite or cellular calls .......................................................5
Ending calls ............................................................................................6
Displaying your phone number .............................................................6
Phone Basics ...............................................................................................7
Phone features and keypad ...................................................................7
Display indicators ..................................................................................9
Security module ............ ...... ..... ...... ..... .................................................10
Antenna basics ..................................................................................... 10
Information key ...................................................................................10
Calling Basics ...........................................................................................11
Turning the phone on ..........................................................................11
Turning the phone off ..........................................................................11
Standby mode .....................................................................................11
Power save mode .................................................................................12
Entering numbers ................................................................................12
Making emergency calls ......................................................................13
Redialing a call ....................................................................................13
Muting a call ........................................................................................13
Possible service provider services .......................................................13
Menu Basics ..............................................................................................15
Accessing main menu ..........................................................................16
Navigating and using menus ..............................................................16
Phone Book Menu ...................................................................................17
Entering letters and other characters ................................................17
Entering pauses ...................................................................................18
Saving entries ......................................................................................18
Finding entries ............................... ..... .................................................19
Editing entries .....................................................................................20
Erasing entries ....................................................................................20
Making entries secret ..........................................................................20
Viewing numbers .................................................................................21
Prepending numbers ...........................................................................21
Sending tones .......................................................................................21
Speed dialing ........................................................................................22
One-touch dialing ................................................................................22
iii
Page 4

Call History Menu ....................... ............................................................23
Accessing call history list ........................................................... ..... ....23
Viewing call history details ............................................................. ....24
Messages Menu ........................................................................................25
Voice messages ......................... ...... ..... ...... ...... ..... ................................25
Text messages ......................................................................................26
Features Menu .........................................................................................29
Key Guard ............................................................................................29
Scratchpad ...........................................................................................29
Data ......................................................................................................30
Call Information Menu .......................... .................................................31
Last Call ...............................................................................................31
Home Calls .......................................... ...... ...... .....................................31
Roam Calls .............. ...... ...... .................................................................31
Recent Calls .........................................................................................32
Data Calls ............................................................................................ 32
All Calls ................................................................................................32
Resetting call counters ........................................................................33
Security Menu ........................................................................................35
Lock code ..............................................................................................35
Locking the phone ................................................................................35
Restricting the phone ..........................................................................36
Entering a new lock code .....................................................................36
Entering priority numbers ..................................................................36
Erasing call history list .......................................................................37
Erasing phone book entries .................................................................37
Erasing SMS messages .......................................................................37
Resetting preferences ..........................................................................38
Entering PIN ........................................................................................38
Preferences Menu ................................. .................................................39
Sounds ..................................................................................................39
Display .................................................................................................42
SMS Time .............................................................................................45
Language .............................................................................................. 46
Alerts ....................................................................................................46
Calling ..................................................................................................47
System Menu ............................................................................................51
Status ...................................................................................................51
Find Home ............................................................................................52
Version .................................................................................................52
Service Provider Select ........................................................................52
Service Provider ...................................................................................55
Territory ...............................................................................................55
Manual Mode .......................................................................................56
Auto Mode ............................................................................................56
NAM Select ......................................... ...... ...... ..... ................................57
My Numbers ........................................................................................58
iv
Page 5

Battery Care and Maintenance ............................................................59
Battery .................................................................................................59
Battery care and charging ...................................................................59
Battery chargers ..................................................................................60
Low battery ..........................................................................................60
Battery removal ...................................................................................61
Battery replacement ............................................................................61
Safety Information ..................................................................................63
Exposure to radio frequency signals ...................................................63
Antenna care ........................................................................................63
Phone operation ...................................................................................63
Driving .................................................................................................64
Electronic devices ........................................... .....................................64
Aircraft .................................................................................................65
Blasting areas ......................................................................................65
Potentially explosive atmospheres .....................................................65
For vehicles equipped with an air bag ................................................65
Battery care .........................................................................................65
Other safety issues ............................. ...... ...... ..... ...... ..... .....................66
Accessories ................................................................................................67
Battery .................................................................................................67
Leather case .........................................................................................67
AC wall charger ...................................................................................67
Universal travel charger .....................................................................67
Cigarette lighter adapter ....................................................................67
Data cables ...........................................................................................67
Hands-free car kit ................................................................................68
Troubleshooting ......................................................................................69
v
Page 6

vi
Page 7

Cautions and Warnings
Caution
Caution
Note
Warning
Only use the batteries, antennas, and chargers provided by
QUALCOMM. The use of any other type may be dangerous.
Warning
Allow only authorized personnel to service the phone and its
accessories. Unauthorized service can invalidate the warranty.
Any changes or modifications to this equipment not expressly
approved in this document could void your warranty and your
authority t o operate this equipment.
Avoid exposing the phone and accessories to rain or other
liquids. If the phone gets wet, turn the power off immediately
and remove the battery pack . See Battery Care and Mainte nance,
page 59, for more information.
When using the QUALCO MM Globalstar Tri -Mode Phone near a
television or radio, the phone can cause interference. Regulatory
agencies in your area, such as the United States Federal
Communications Commission (FCC) or Canadian Industry
Canada (IC), can require you to stop using the phone if such
interference cannot be elimina ted. If you need assistance, contact
your satellite or cellular service provider.
vii
Page 8

Cautions and Warnings
viii
Page 9

Getting Started
It is very important that you read this section because your tri-mode phone
is unique – it combines satellite technology and cellular technology in one
phone. For more detailed information on usage, refer to the other sections
in this guide. If you need further assistance, see Solving problems, page 1.
Understanding your phone
Consider your phone as “two phones in one” because it requires operation
in two distinct ways to make and receive two different types of calls:
■ Satellite calls – Calls made via satellite. This is known as Globalstar
satellite mode.
■ Cellular calls – Call s made by cellular phone t echnology. There are two
cellular modes: digital mode and analog mode.
Tip
The calling mode has probably been preset on your phone. To
view or change the current setting, set your mode preference (see
Auto Mode, page 56) so the mode is automatically selected when
you turn your phone on (see Manual Mode, page56).
Contacting customer service
You may have different service providers for Globalstar sa tellite service
and cellular service. Contact the appropriate service provider for customer
service.
Solving problems
If you have problems using your phone, see Troubleshooting, page 69. If you
still have trouble, contact your satellite or cellular service provider.
Understanding this guide
These conventions or representations are used in this guide:
Type of Ac tion Example Action
Key Presses
Using SMART
KEY™ options
Scrolling Scroll to select
Press .
Press and hold .
Press book.
“yes” or “no.”
Press key briefly.
Press key for more than one
second.
Press the SMART KEY button
under the appropriate
option on the screen.
Press either the volume
buttons on the side of the
phone or and .
1
Page 10
Getting Started
Manually selecting call mode
When you are ready to make a call, you can quickly select the call mode you
prefer. You can select G lobalstar, cel lular (digital or ana log), or Auto Mode.
If you select Auto Mode, the phone looks for service as specified by the Auto
Mode setting (see Auto Mode, page 56).
To manually select a call mode:
■ Press and hold to display the mode menu, and press the menu
number of the appropriate call mode.
Preparing for satellite calls
■ If the security module is not properly installed, you can only make calls
to emergency numbers an d you cannot receive calls. Your satellite
service provider instal ls and maintains the security module (see
Security module, page 10, for more information).
■ Charge and properly install the battery. See Battery Care and
Maintenance, page 59.
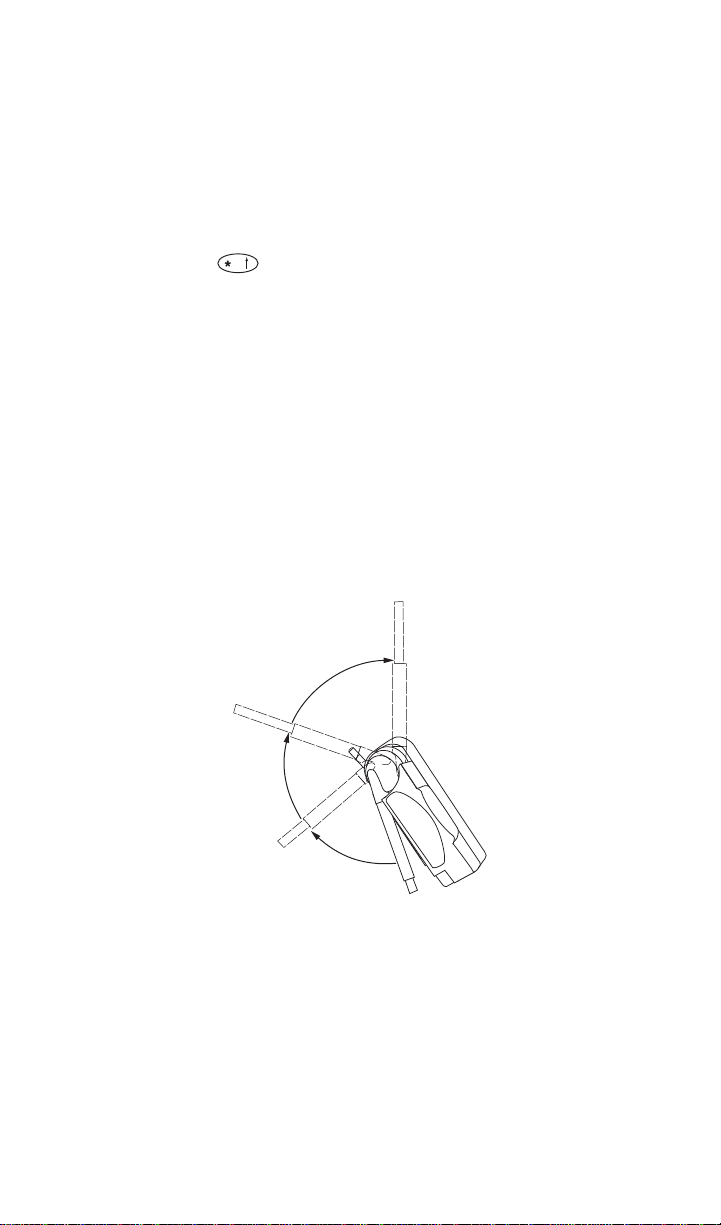
■ Rotate the Globalstar satellite antenna located on the back of the
phone (see Phone features and keypad, page 7). The ante nna will
automatically extend as you rotate it and automatically retract when
stored.
2
Page 11
Getting Started
Note
■ Move the antenna to its optimal position (pointing straight up to the
sky) until it sets into one of three positions. You cannot make or
receive a satellite call with the Global star satellite antenna stored.
The following shows right and wrong antenna positions when
making satellite calls:
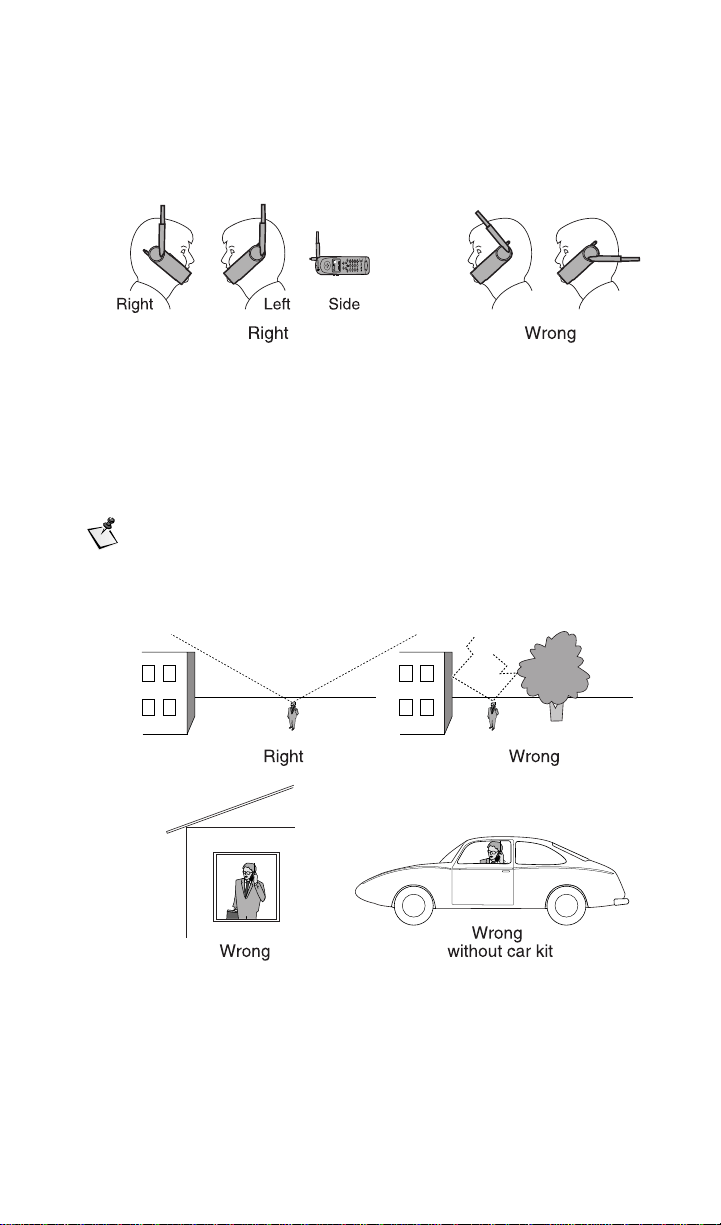
■ Position yourself outdoors so that you can see the whole sky to
prevent dropped calls. If a call is dropped, a fade alert sounds if that
feature is turned on (see Fade, page 46). For best performance, move
away from tall obsta cles such a s buildings or trees. If y ou can see the
whole sky, the satell ites w ill h ave a c lear view of y ou an d the pho ne.
The phone will not operate inside a building or a vehicle unless you
are using the car kit.
You can make cellular calls in all of the following locations.
3
Page 12

Getting Started
Note
Note
Making satellite ca lls
1. Rotate the satellite antenna (see Preparing for satellite call s, page 2).
2. Press and hold to turn your phone on.
3. Select call mode, if necessary (see Manually selecting call mode,
page 2).
The roaming indicator ( ) usually displays immediately if the
network roams to find a satellite service provider. Occasionally,
the roaming indicator displays after you press , and you
may not see the indicator.
4. Enter the phone number that you want to call (see Entering numbers,
page 12). To make international calls, see International dialing,
page 13.
When using the keypa d or viewing the screen in Globalstar
satellite mode, keep the antenna pointing up to maintain service.
5. Press . A message di splays if the phone is locked, if the phone
number is restricted, or if there is another problem.
Making cellular calls
1. Press and hold to turn your phone on.
2. Select call mode, if necessary (see Manually selecting call mode,
page 2).
3. Fully extend the cellular antenna.
4
Page 13

Getting Started
Note
4. Enter the phone number that you want to call (see Entering numbers,
page 12).
5. Press . A message di splays if the phone is locked, if the phone
number is restricted, or if there is another problem.
Making data calls
If your satellite service provider offers Globalstar packet data service, you
can make data calls in Globalstar mode. The QUALCOMM Globalstar
packet data kit allows you to access the Internet or other networks with
packet data service.
You need the data cable that connects your computer or Palm™ handheld
to your tri-mode phone, and you need to set up your computer or Palm
handheld. See the QUALCOMM Globalstar packet data kit user
documentation that comes with your data cable for more inform ation on
connecting and setting up your computer to your tri-mode phone.
You can then use your computer to send and receive email, use TelNet or
FTP, or browse the Internet. See your satellite service provider for more
information.
Receiving satellite or cellular calls
To receive a satellite or cellular call
1. Turn your phone on.
2. Rotate the Globalstar antenna or extend the cellular antenna to find
service.
When you receive a call, the phone rin g s, the indicator light flashes,
and “Incoming Call” flashes on the screen until you answer the call.
To receive satellite calls, the satellite antenna must also be
rotated with a view of the whole sky. You can position the phone
on its side for better stability:
i
Info Clr
| menu | | book |
GLOBALSTAR
258
abc def
147
Pwr
0
jkl mno
+
tuv
ghi
pqrs wxyz
*
369
#
EndSend
5
Page 14

Getting Started
Note
If you miss a call, you can press either ok to return to
standby mode or view to display the call history list for
details about the missed call.
3. To answer a call, do one of the followin g:
■ Press .
■ From standby mode, press any key except or if Any-Key
Answer is set to “on” (see Any-Key Answer, page 45).
Ending calls
■ Press . The total time of the call briefly displays. You can also
obtain the total time of each call in the call history list.
Displaying your phone number
■ The currently registered phone number briefly displays when you turn
your phone on or press from standby mode.
■ To display all three phone numbers (NAMs), press menu and
then press for My Numbers. (See My Numbers, page58.)
6
Page 15
Learn about these topics in this section:
■ Phone features and keypad
■ Display indicators
■ Security mo du le
■ Antenna basics
■ Information key
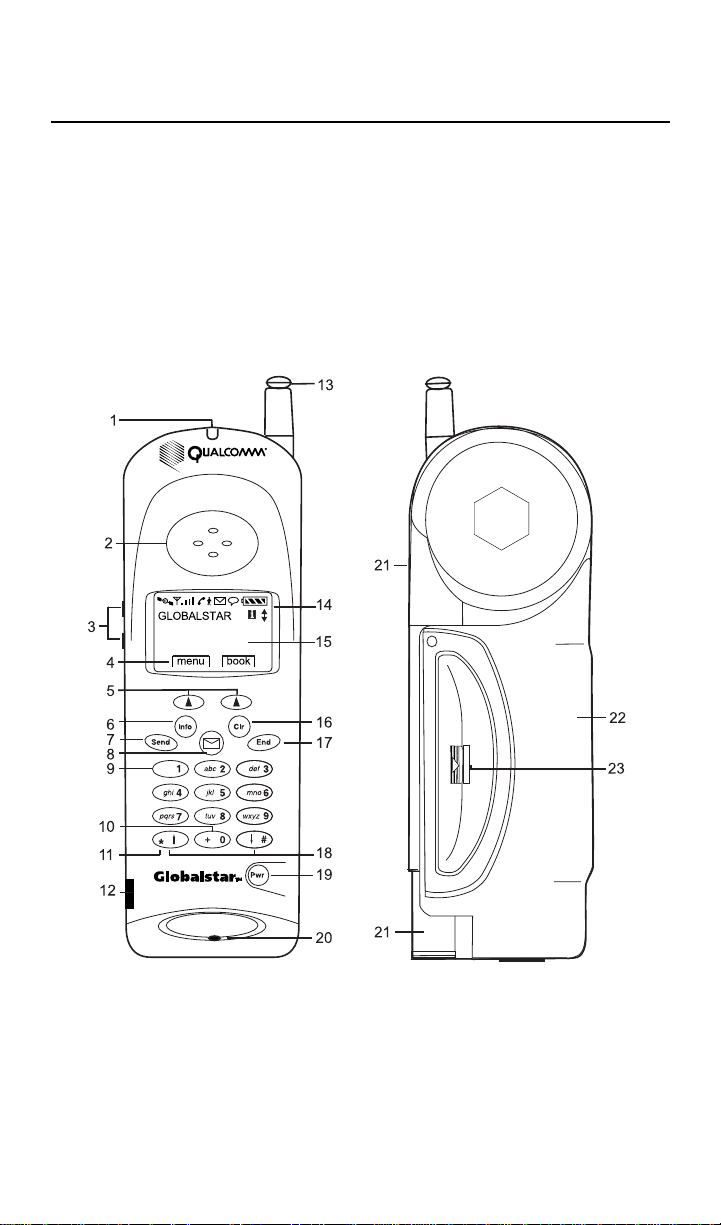
Phone features and keypad
Phone Basics
1. Light indicator – Flashes when turning phone on, when receiving
incoming calls, or when receiving t ext or voice mail mess ages.
2. Earpiece
7
Page 16

Phone Basics
3. Volume buttons – Adjust ringer volume when not on a call. Scroll
through the menu items if a scroll arrow displays. Scroll through call
history and phone book. Move the cursor when editing alphabetic
characters or digits.
4. SMART KEY options – Select the option on the screen by pressing the
SMART KEY below it.
5. SMART KEY buttons– Press the SMART KEY to select the
appropriate option on the screen.
6. Information key – Insert pauses and hyphens. Additional help is
available if displays on the screen (for example, when the phone
registers and displays, press for service provider information
and the current phone number).
7. Send key – Originate or answer a call. Also used for features such as
call waiting.
8. Message key – Access text messages and voice mail notifications. See
Messages Menu, page25.
9. Punctuation key – Add punctuation or spaces when entering letters.
10. International dialing or plus (+)key – Make international calls (see
International dialing, page13).
11. Mode select – Press and hold to manually select Globalstar satellite,
digital, analog, or auto mode (see Manual Mode, page 56).
12. Security module – Required to activate phone for Globalstar satellite
service (see Security module, page 10).
13. Cellular an tenna
14. Display indicators – Show phone and battery status (see Display
indicators, page 9).
15. Screen
16. Clear key – Delete characters (see Entering numbers, page 12, and
Entering letters and other characters, page 17). Return to previous
screen.
17. End key – End a call. If not on a call, return to standby mode.
18. Scroll keys – Scroll through menu items if a scroll arrow displays on the
screen. Move cursor.
19. Power key – Turn the phon e on or off.
20. Microphone
21. Globalstar satellite antenna (see Preparing for satellite calls, page 2).
22. Battery
23. Battery releas e latch
8
Page 17
Phone Basics
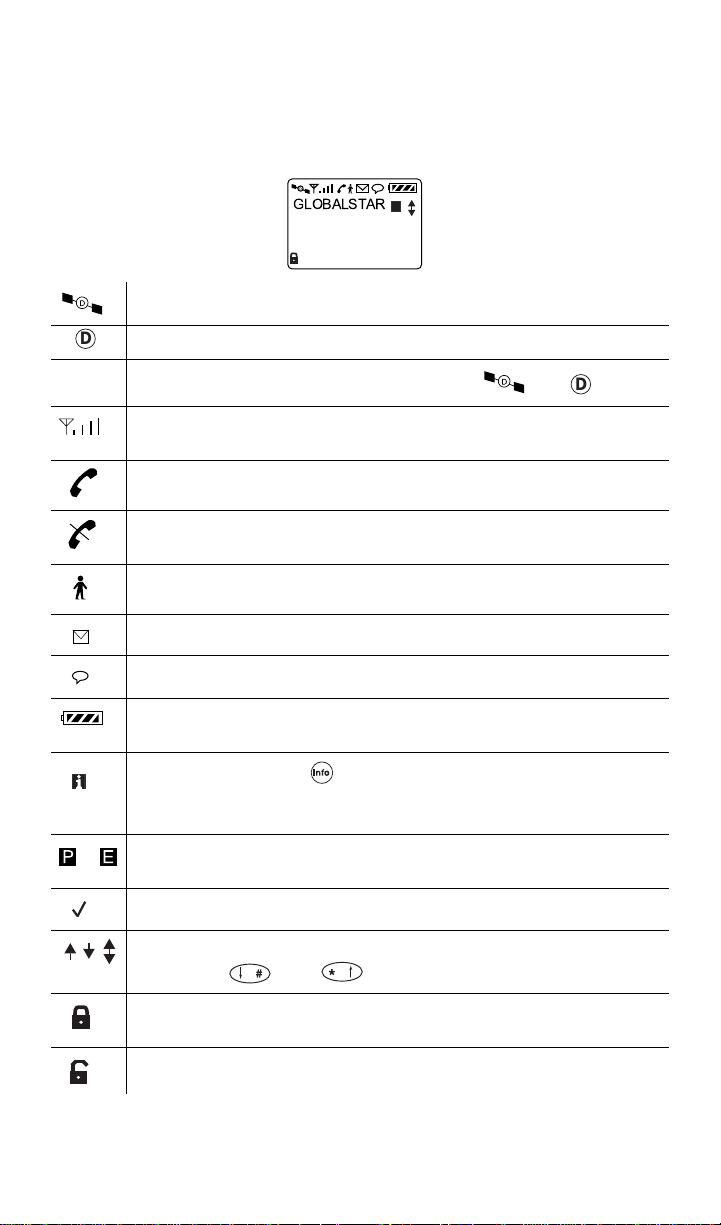
Display indicators
The indicators on the screen show the status of the phone and the battery
charge level at a qu ick glance.
GLOBALSTAR
i
Phone operating in Globalstar satellite mode
D
Phone operating in digital mode
Phone operating in analog mode if neither nor display
Signal strength ranging from a strong signal (four lines) to an
extremely weak signal (one line)
Call in progress
No service available. If service is unavailable, the phone sounds
a beep when you try to make a call.
Roaming – found service outside home area
Text message received
Voice mail notification received
Battery charge. Ranges betwe en four diagonal bars (full charge)
to one bar (minimal charge) to no bars and b linki ng (no c harge).
Help available; pr ess . For example, displays wh en the phone
is registered and service provider information and the current
phone number.
Designates additional level of call privacy (digital) or encryption
(Globalstar)
Designates the menu option currently selected
D
Indicates that you can scroll between screens using the volume
icon_
buttons or and
Indicates that either the selected text message is locked or the
keypad is locked
Indicates that the text message is unlocked
9
Page 18

Phone Basics
Caution
Note
Security module
The security module activates your phone when in Globalstar satellite
mode. It is located on the lower left side of the front of the phone. The
security module that comes with your phone works only with that phone
and is not interchangeable.
Do not remove the security module.
When in Globalstar satellite mode, the security module must be properly
installed to make o r receive calls. If i t is not properl y installed, you ca n only
make calls to emergency numbers.
If you use the same phone number (or NAM) for both Globalstar
satellite and cell ular calls , the se curi ty modu le may also hav e to
be installed for non-emergency cellula r calls.
For more information, conta ct your satellite service provider, who installs
and maintains the security module.
Antenna basics
Phone perfor mance depend s on the s trength of t he signal it r eceives. A s you
fully extend the cellular antenna or rotate the Globalstar satellite antenna,
the signal strength indicator shows the strength of the signal received in
that particular antenn a position. You c annot make or rece ive a satellite c all
with the Globalstar satellite antenna stored.
It is important to use the antennas properly for the best performance.
Follow these guidelines for the Globalstar satellite and cellular antennas:
■ Never hold the phone by the antenna.
■ Do not use the phone if either antenna is damaged, unless you are
using the phone with the car kit’s antenna.
For more information on how to use the antennas, see Preparing for
satellite calls, page 2, and Making cellular calls, page 4.
Information key
The Info (Information) key has several different functions:
■ Provides help if displays on the screen.
■ When the phone registers and displays on the screen, press for
service provider information and the current phone number.
■ Displays your current phone number while on a call.
■ Insert pauses and hyphens when entering a phone number.
10
Page 19
Calling Basics
Note
Note
Learn about these topics in this section:
■ Turning the phone on and off
■ Standby and power save modes
■ Entering numbers
■ Making emergency calls, redialing, and muting
■ Possible service provider services (international dialing, call waiting,
three-way calling, a nd ca ller ID)
Turning the phone on
1. Make sure that the battery is charged and properly installed (see
Battery chargers, page 60, and Battery replacement, page 61).
2. Press and hold until the indicator light illuminates (about one
second). The phone is now in standby mode (see Standby mode,
page 11) and starts looking for service. The message that displays on
the screen depends on the service mode s elected (see Manua l Mode,
page 56 or Auto Mode, page 56).
3. Press any key to stop animation, if desired.
Turning the phone off
1. Press and hold until “Powering Off” displays.
2. Release .
If you press for less than one second, the phone does not turn
off.
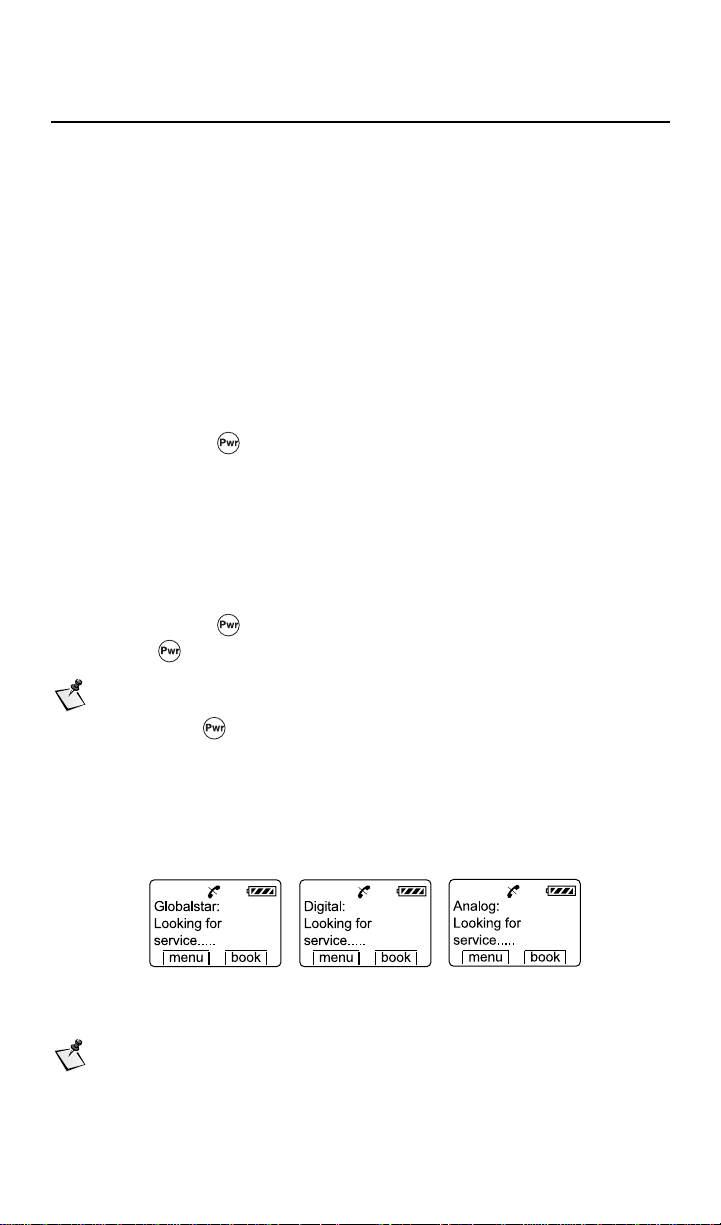
Standby mode
After you turn the phone on, it is in standby mode while it looks for service.
The following screens show the message that displays when looking for
service depending on the service mode selected (see Manual Mode, page 56):
After your phone finds service, your banner, the date and time, and the
appropriate icon s display.
The date and time may not be available in all modes of service.
11
Page 20
Calling Basics
Note
Note
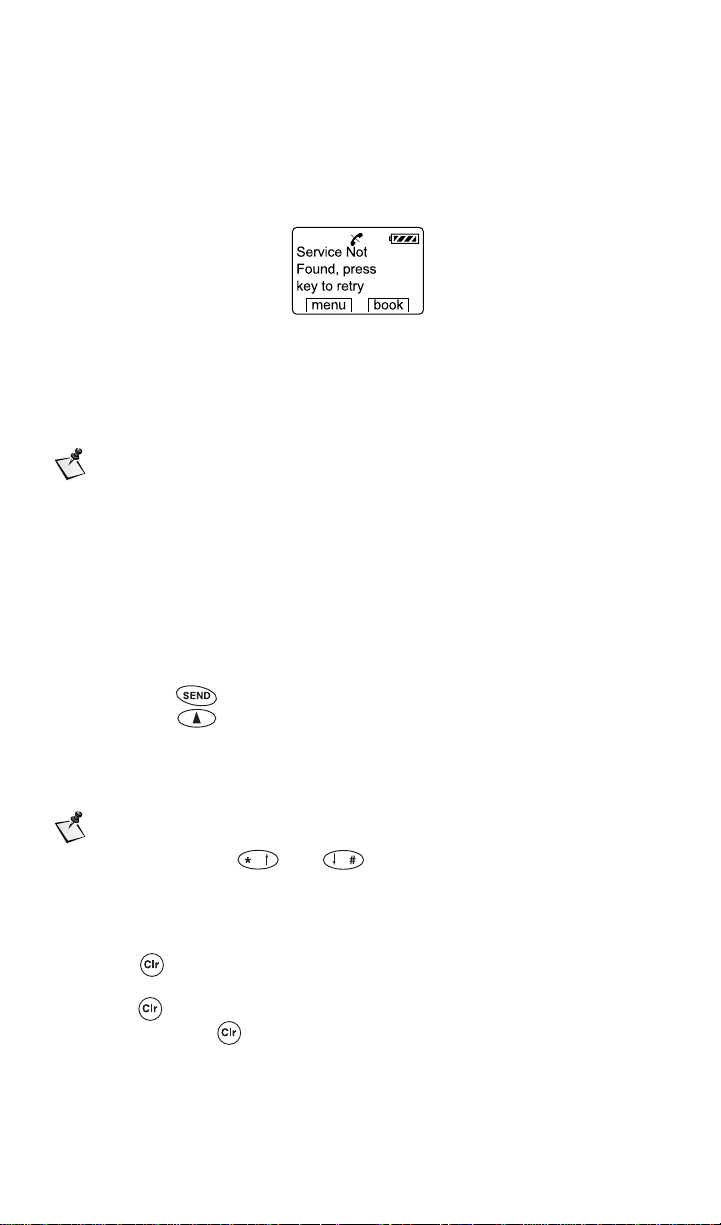
Power save mode
If your phone does not find service while in standby mode, it switches to
power save mode. Power save mode maximizes battery life by periodically
looking for service. The following message displays when your phone is in
power save mode:
To return to standby mode, press any key.
Entering numbers
You can enter up to 32 numbers and other characters (hyp hens and pauses).
All 32 characters do not always display on certain screens and
may be replaced by periods (...). To display the entire number,
use the View # option in the Phone Book menu (see Finding
entries, page19) or the Call History menu (see Viewing call
history details, page 24).
To enter numbers
1. From standby mode, enter the numbers.
2. Do one of the followi ng:
■ Press to place the call.
■ Press save to save the number in the phone book.
To edit numbers
■ Move the cursor by pressing the volume buttons.
You cannot use or to move the cursor when
entering or editing numbers because these keys are used to enter
# or *.
To delete numbers
■ Press to delete one previous character at a time.
■ Position the cursor over a number (press the volume buttons), and
press to delete.
■ Press and hold to delete the entire entry.
12
Page 21
Calling Basics
Making emergency calls
Locking or restricting the phone does not prevent you from making calls to
emergency numbers. Contact your satellite or cellular service provider for
emergency numbers.
To make an emergency call
1. Enter the emergency number (for example, 911) .
2. Press .
Redialing a call
To redial the last outgoing number
■ Press .
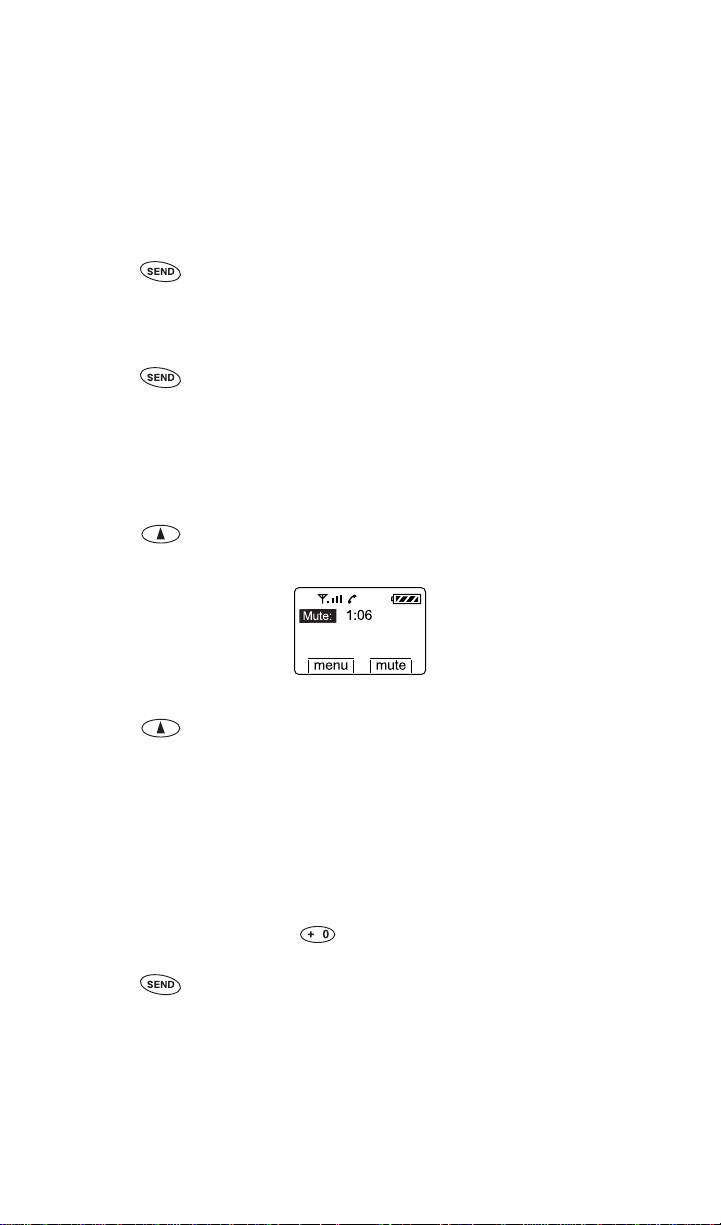
Muting a call
While you are on a call, you can mute the microphone so that the caller
cannot hear you.
To turn mute on
■ Press mute. The word “Mute” replaces the word “Time” on the
screen until you end the call or turn mute off.
To turn mute off
■ Press mute. The word “Time” replaces the word “M ute” on the
screen.
Possible service provider services
International dialing
To make international calls in Globalstar satellite mode
1. Enter the international access code, the country code, and t he phone
number.
Shortcut: Press and hold until a plus (+) displays on the screen,
and then enter the country code and phone number.
2. Press .
If international dialing is suppor ted in your network, co ntact your satellite
service provider for more information.
13
Page 22

Calling Basics
Note
Call waiting
Call waiting lets you know that you are receiving an incoming call by
sounding a beep. For instructions on how to use call waiting, contact your
satellite or cellular service provider.
Three-way calling
Three-way calling allows you to talk to two callers at the same time. For
instructions on how to us e three-way calling, con t act your satellite or
cellular service provider.
Caller ID
Caller ID displays an incoming call’s phone number on the screen, if
available. If the phone number of the caller ma tches one stored in your
phone book, the name also displays with the number.
For more information on caller ID, contact your satellite or cellular service
provider.
“Flash hook” is sometimes referred to when using call waiting,
three-way calling, or caller ID. This means quickly press and
release .
14
Page 23

Menu Basics
Learn how to access and na vigate th rough th e phone m enus i n this sect ion.
The phone menus are designed so that you can easily access and navigate
through them. The following road map shows the various menus on the
main menu, which is accessed by pressing menu.
15
Page 24
Menu Basics
Accessing main menu
1. Turn the phone on. The phone is now in standby mode (see Standby
mode, page 11).
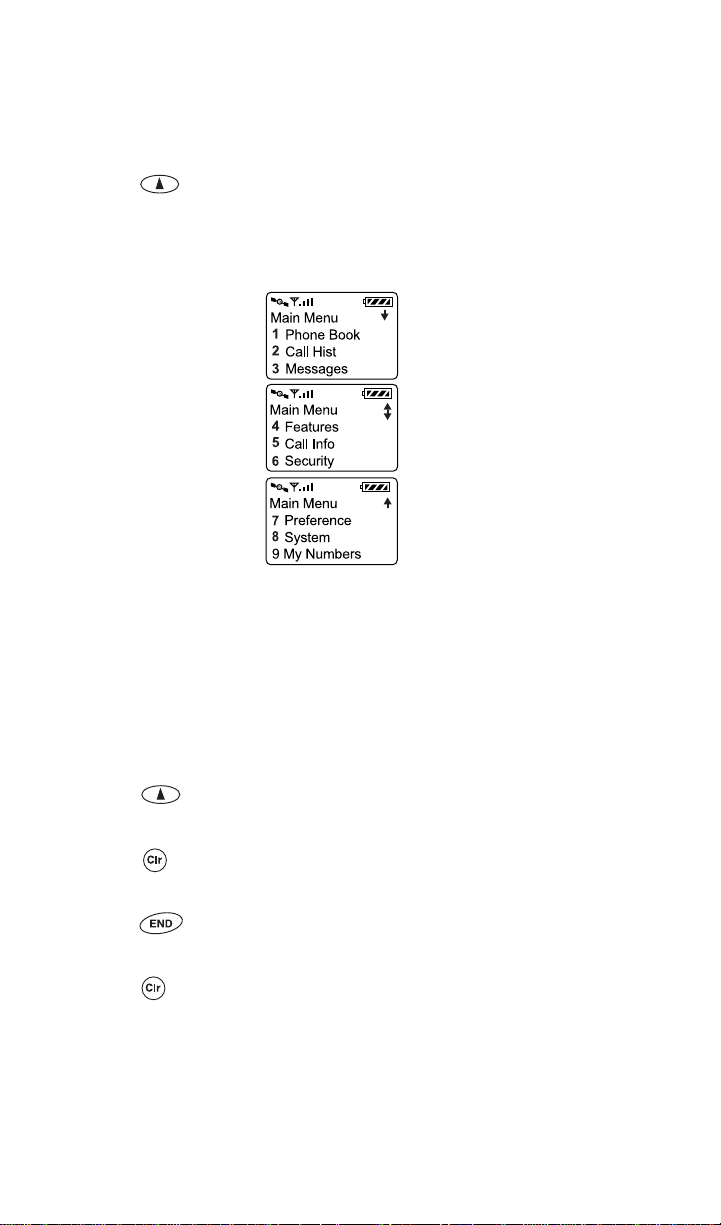
2. Press menu and the first three main menu items display. If scroll
arrows display on the screen, you can scroll betwe en screens to access
additional menu options.
Each main menu item is explained in sequential order in separate
sections of this guide.
page 17
page 23
page 25
page 29
page 31
page 35
page 39
page 51
page 58
Navigating and using menus
To navigate the menus
■ To access additional menu items when a scroll arrow displays on the
screen, press the scroll keys.
■ To select a menu item, press the corresponding number.
To save changes or a setting
■ Press ok.
To return to previous screen without saving changes
■ Press .
To return to standby mode without saving changes (if
■ Press .
To return to standby mode without saving changes (if on a call)
■ Press repeatedly.
16
not
on a call)
Page 25
Phone Book Menu
Learn about using the phone book, entering letters and other characters,
entering pauses, speed dialing, and one-touch dialing in this section.
Entering letters and other characters
To enter letters and other characters
1. Press a key repeatedly to disp lay the letters in uppercase, then
lowercase, and finally the number. For example, if you repeatedly press
, the following characters display:
DEFdef3
2. Do one of the followi ng:
■ Enter the next character if it is on a different key.
■ If the next character is on the same key, move the cursor forward
by pressing or the down volume button.
3. Press ok after you enter the name.
To edit letters and other characters
■ Move the cursor by pressing or or by pressing the volume
buttons.
To delete letters and other characters
■ Position the cursor over a letter or character, and press to delete.
■ Press to delete previous letters or characters one at a time.
■ Press and hold to delete the entire entry.
To enter spaces
■ Press or the down volume button.
To enter punctuation or spaces
■ Press repeatedly, and the punctuation or space displays in the
following order :
– <space> @ & ( ) : . ‘ # * , 1
17
Page 26
Phone Book Menu
Note
Entering pauses
When using automated phone services, such as voice mail or online
banking, you can use pauses when entering a series of numbers. You can
also enter pauses manually, or you can sa v e pauses in phone book entries.
Each pause counts as one character. There are two types of pauses:
■ Hard Pause – Stops until you press resume to send the rest of the
number sequence.
■ Timed Pause – Stops for two seconds and then resumes automatically.
If Auto Hyphen is set to “on” and you manually enter pauses,
Auto Hyphen is temporarily set to “off.” (See Auto Hyphens,
page 43 and Manual Hyphens, page 43.)
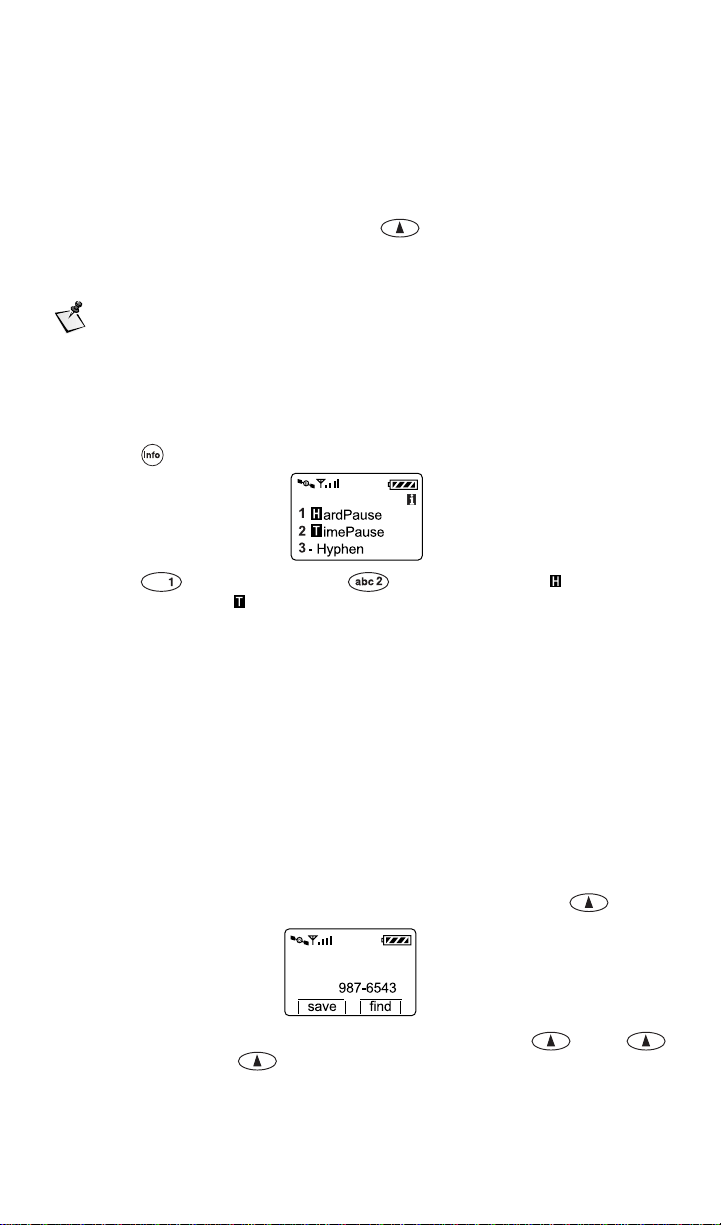
To enter pauses when entering numbers
1. Press and the following displays on the screen:
2. Press for Hard Pause or for Timed Pause. displays for
hard pauses and displays for timed pauses.
3. Continue entering numbers.
Saving entries
The phone saves up to 99 entries. Each entry contains a name (up to 12
characters) and phone number (up to 32 numbers) stored in location
numbers 1 through 99. See Entering numbers, page 12.
You can also save pauses in phone book entries when automated phone
services, such as voice mail or online banking, require personal
identification or account numbers. See Entering pauses, page 18.
To save entries
1. Do one of the followi ng:
■ Enter a phone number from standby mode and press save.
■ Select a number on the call history list, and press view,
options, and save.
18
Page 27

Phone Book Menu
Note
■ Enter a number into the scratchpad, and press options and
save (see Scratchpad, page 29).
■ Select a number on the screen, such as Caller ID, and press
save.
2. Enter a name and press ok.
3. Do one of the following to select a location number:
■ If the phone book is not full, you are asked to accept an empty
location. You can either:
❑ Press ok to accept the empty locati on.
❑ Enter a location number of your choice and press ok.
❑ Scroll to select an empty location and press ok.
■ If the phone book is full, enter a location number that you want to
reuse and replace with the new information. You will lose the old
information.
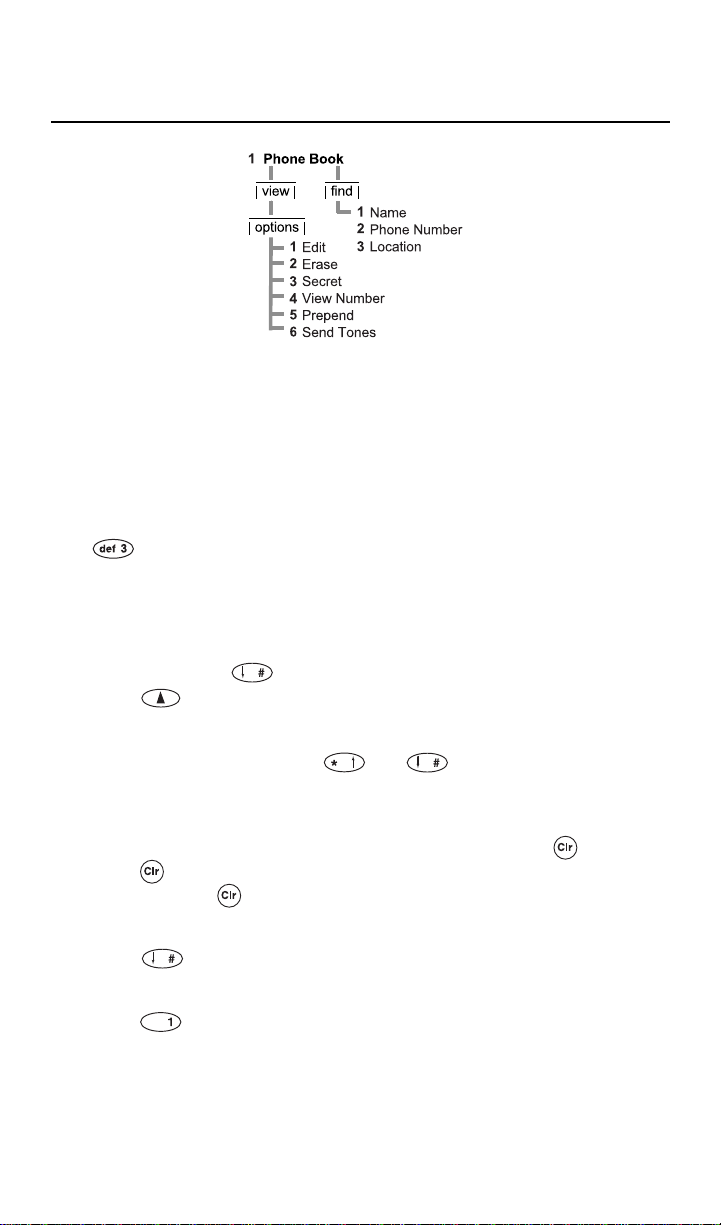
Finding entries
You can find entries by n ame , pho ne num ber, o r lo catio n num be r. Yo u c an
also quickly advance to groups of ten entries or scroll through each entry
one at a time.
To find an entry
1. From standby mode, press book.
2. Do one of the followi ng:
■ Scroll through each entry one at a time.
■ To advance to groups of ten entries, enter 1 through 9. (For
example, if you enter 6, location number 60 is selected. If 60 is
empty, the previous filled location is selected.)
■ To find specific entries:
❑ Press find.
❑ Press for Name, for Phone #, or for
Location.
❑ Enter one or more characters.
Searches ignore differences between upper- and lowercase
letters.
❑ Press find and, if necessary, scroll through the entries.
❑ Press view to see the entry.
❑ Do one of the following:
– Press to call the number.
– Press options to edit, erase, make secret, view
number, prepend (add), or send tones.
19
Page 28

Phone Book Menu
Note
Editing entries
1. From standby mode, press book.
2. Find the entry and press view.
3. Press options.
4. Press to Edit.
5. Press to edit Name, to edit Phone #, or to edit
Location.
6. Edit the name or phon e n umb er an d pr es s ok, or do one of the
following to edit a location number:
■ Press ok to use the same location number.
■ Enter a location number of your choice and press ok.
■ Scroll to select an empty location and press ok.
Erasing entries
1. From standby mode, press book.
2. Find the entry and press view.
3. Press options.
4. Press to Erase.
5. Press ok.
Making entries secret
To prevent a phone number from displaying on the screen, you can make
the entry “Secret.” To view or change a secret entry, you must use your lock
code. (See Lock code, page 35.)
When receiving an incoming call, caller ID prevents the nam e
from displaying if the entry in your phone book is secret.
To make an entry secret or nonsecret
1. From standby mode, press book.
2. Find the entry you want to make secret.
3. Press view.
4. Press options.
5. Press and scroll to select:
■ Yes – Makes the entry secret
■ No – Makes the entry nonsecret
6. Press ok.
20
Page 29

Phone Book Menu
Note
To view or change a secret entry
1. From standby mode, press book.
2. Find the secret entry and ente r your lock code.
3. Press ok to accept any changes you make.
Viewing numbers
You can view an entry’s entire phone number. When viewing a number, you
can also prepend (add) numbers at the beginning of a phone number and
save those changes.
To view numbers
1. From standby mode, press book.
2. Find the entry and press view.
3. Press options.
4. Press for View #.
5. Do one of the followi ng:
■ Press ok to return to the previous menu.
■ Press to return to standby mode.
Prepending number s
You can permanently prepend (add) numbers, such as an area code or
country code, at the begi nning of a phone number i n an existing phone book
entry.
To prepend (add) numbers
1. From standby mode, press book.
2. Find the entry and press view.
3. Press options.
4. Press for Prepend. The phone number displays.
5. Enter the numbers.
6. Press save.
Sending tones
You can send DTMF (dual tone multi-frequency) tones over the air when
using automated phone services, such as voice mail or online banking. To
send tones, you must be on a call. You can send tones by manually entering
numbers or sendi ng nu mber s stor ed in you r phon e book. Y ou c an als o sen d
tones for numbers entered in the scratchpad (see Scratchpad, page 29).
The length of the key beep, the sound you hear when pressing the
keys, affects the DTMF tones in analog mode. Check your key
beep length before sending tones (see Key Beep Length, page 41).
21
Page 30

Phone Book Menu
To send tones manually
■ While on a call, enter the appropriate numbers. The tones associated
with the numbers are immediately sent over the air.
To send tones saved in your phone book
1. While on a call, press book.
2. Find an entry and press view.
3. Press options.
4. Press for Send Tones. The tones associated with the nu mbers are
immediatel y sent over the air.
Speed dialing
You can speed dial a phone number if you know the location number of the
phone book entry. You can speed dial any of the 99 location numbers unless
the phone is restricted (see Restricting the phone, page 36). If you restrict
the phone, only the first nine phone book locations are available for speed
dial.
To speed dial a phone number
1. Enter the location number.
2. Press .
One-touch dialing
If you set one-touch dial to “on,” you can dial any of the 99 location numbers
without pressing . To set one-touch dial, see One-Touch Dial , page 48.
To one-touch dial a location number
1. Set one-touch dial to “on” (see One-Touch Dial, page 48).
2. Press and hold the location number. For double-digit locations, press
and release the first digit, and then press and hold the second digit. For
example:
■ Press and hold for location number 3.
■ Press and then press and hold for location number 32.
22
Page 31

Call History Menu
Call History (Call Hist)
2
| view |
You can access a call history list of the last ten incoming or outgoing
satellite or cellular calls (numbe red 0 to 9) and view details ab out each call
type:
■ Called By Incoming calls, if caller ID is available (see Caller
ID, page 14)
■ Call To Outgoing calls
■ Added Scratchpad entries (see Scratchpad, page 29)
■ Missed Unanswered incoming calls, if caller ID is available
■ Caller ID Caller ID information received
■ Call Waiting Call-waiting information received during a call
The most recent call is numbered 0 and displays at the top of the list and
the oldest call at the bottom (separated by a dashed line). When the lis t is
full, a new call takes the first position in the list and the oldest call is
deleted. The list is saved after you turn the phone off.
Names display in th e cal l history list if the caller’s ph one n umb er i s stored
in the phone book . If mo re t han one name m atc hes a ca ll ba ck num ber, the
entry with the lowest phone book location number displays.
Accessing call history list
1. From standby mode, press menu.
2. Press for Call History.
3. Press the scroll keys to access the last ten calls. For example:
4. Scroll down to select a call from the most recent t o the oldest calls, or
scroll up to select a call from the oldest to the most recent.
5. Do one of the followi ng:
■ To call the number, press .
■ To save the number in your phone book, press view and
save (see Saving entries, page 18).
■ To exit call history wi th ou t calli ng or stor i ng a num be r, pr e ss
or .
23
Page 32

Call History Menu
Viewing call history details
1. Scroll to select a call on the list.
2. Press view.
Call To
John
987-6543
| options |
3. Press options and select one of the foll owing:
■ Date/Time – Display the date and time of the call.
■ Duration – Display the duration of the call.
■ Save – Save the number in your phone book.
■ View # – View the entire number.
■ Send – Make a call to the number.
■ Send Tones – Send DTMF tones while on a call. (For more
information on DTMF tones, see Sending tones, page 21.)
■ Prepend – Add numbers, such as an area code or country code, at
the beginning of the phone nu mber and save it in your phone book.
2
24
Page 33

Messages Menu
Learn about retrieving SMS (short message service) messages in this
section. SMS includes both text and voice mail notification messages.
Contact your satellite or cellular service providers for information
regarding the availability of text and voice mail notifications.
You can retrieve text messages and voice mail notifications from satellite or
cellular service provider voice mail systems. When the phone is turned on
and you receive SMS messages, the phone alerts you by flashing the
indicator light, sounding a beep, and displaying the text message indicator
or voice mail notification indicator on the screen. The text message
and voice mail notification indicators display until all messages are read.
When you read a me ssage, new me ssages are accessed b efore old mes sages.
If the message contains a call back number matching one in your phone
book, the corresponding name displays in place of the number. If more than
one name matche s a call back numbe r, the entry wi th the lowest pho ne book
location number displays.
Voice messages
If someone leaves you a voice mail message, your phone receives a voice
mail notification and alerts you. You can then access the voice mail
notification. (Service providers may provide different details about the
message.) To hear the voice mail message, call your voice mail system.
If you have one or more voice mail systems, the total number of voice mail
messages receiv ed by all systems dis plays on the scre en. For example, if y ou
have two voice mail systems and you receive two voice mail messages from
one system and two f r om the other system, the total number of voice mail
notifications displays under “Old”:
If new voice mail messages are received, the total number of voice mail
notifications is updated.
To access voice mail notifications
1. From standby mode, press . The total number of voice mail
messages received displays under “Old.”
2. Press voice. The voice mail notification displays either a call
back number or a name if the call back number matches one in the
phone book. If more than one name matches a call back number, the
entry with the lowest phone book location number displays.
25
Page 34

Messages Menu
3. Do one of the followi ng:
■ Press next to read the next voice mail notificati on.
■ Press view to display more detail, if available, which
automatically scrolls on the screen and pauses so you can read it.
Press a scroll key to manually scroll.
To call your voice mail system
1. Press .
2. Press voice.
3. Press next to find the voice mail notification you want.
4. Press view.
5. Press . The ph one number for the voice mail system displays, if
available. Go to Step 6. If it does not display, the message “No Voice
Mail Number received” displays, and you must manually enter the
voice mail phon e number.
6. If necessary, prepend (add) digits before the voice mail phone number.
For example, if you are out of the area of your voice mail phone number,
prepend the area code or country code.
7. Press again.
8. Follow the voice mail system instructions to retrieve your messages.
To erase voice message notifications
1. Press .
2. Press voice.
3. Press next to find the voice mail notification you want.
4. Press view.
5. Press erase to erase the message.
6. Press ok.
Text messages
Text messages can include call back numbers, messages, urgency stamps,
time and date stamps, and po ssibly names if the c all back num ber mat ches
one in the phone book . The phone stores as ma ny text messages as ava ilable
memory allows. For mo re information on managing phone memory, see
Storing text messages, page 27.
To access text messages
1. Press . The number of new and old text messages displays.
2. Press text. The newest unread messages disp lay first followed by
the newest read me ssages, if any. Th e number of messag es under “Old”
is the number of messages you accessed.
26
Page 35

Messages Menu
Note
3. Do one of the followi ng:
■ Press next to read the next message.
■ Press view to display more detail, if available, which
automatically scrolls on the screen and pauses so you can read it.
Press a scroll key to manually scroll.
To call back numbers in text messages
1. Press .
2. Press text.
3. Press next to find the message you want.
4. Press view.
5. Press . The call back number displays, if available.
6. If necessary, prepend (add) digits before the call back number. For
example, if you are out of the area of the phone number, prep end the
area code or country code.
7. Press again.
To erase text messages
1. Press .
2. Press text. A text message displays.
3. Press view to display more detail, if available, which
automatically scrolls on the screen and pauses so that you can read it.
Press a scroll key to manually scroll.
4. Scroll to the bottom of the message and press options.
5. Press for Erase.
You can erase a text message even if it is locked.
6. Press ok to erase the message.
Storing text me ssages
Text messages are saved until you erase them or until the phone memory is
full. If more than 75% of t he phone’s memo ry is full, a mes sage displays the
amount of memory used:
When the phone is out of memory, the oldest unlocked messag es are
automatically deleted as necessary to receive new messages.
To prevent messages from being deleted, you can lock them. However, if all
messages are locked when a new message is received and the phone is out
of memory, the n ew messag e is lost. Th e networ k may tr y to delive r it later .
27
Page 36

Messages Menu
To avoid running out of memory
■ Erase locked or unlocked messages that you no longer need. When the
phone is out of me mory and all text messages are locked, it no longer
accepts new messages and this message displays:
The network may try to deliver lost messages later.
Locking and unlocking text messages
To prevent messages from being automatically deleted if the phone is out of
memory, you can lock them. You can manually erase a text message even if
it is locked.
To lock or unlock text messages
1. Press .
2. Press text. The newest text message displays.
3. Press view to display more detail, if available, which
automatically scrolls on the screen and pauses so that you can read it.
Press a scroll key to manually scroll.
4. Scroll to the bottom of the message and press options.
5. Press for Lock or for Unlock.
The lock indicator or the unlock indicator displays to the left of
the SMART KEY options.
28
Page 37

Features Menu
Note
Key G uard
The key guard locks the p hone keys to prevent ac cidental u se. If you rec eive
an incoming call when the key guard is on, you can answer the call by
pressing . The key beeps are silenced when the keyguard is set to “on.”
To turn the key guard on
■ Shortcut: From standby mode, press and hold . The lock indicator
and “KeyGuard On” displays.
To turn the key guard off
■ Press .
You can also lock your phone to prevent unauthorized use. See
Locking the phon e, p ag e 35.
Scratchpad
You can enter n umbers on the s cratchpad to add to call histo ry, save to your
phone book, or send tones over the air for automated phone services, such
as voice mail or banking online. To add to call history or save to your phone
book, you can be on a call or in standby mode. To send tones, you must be
on a call.
To access the scratchpad
1. From standby mode, press menu.
2. Press for Features.
3. Press for Scratchpad.
4. Enter numbers.
5. Press options.
6. Press:
■ to AddToHist; the number is added to call history.
■ to Save to your phone book (see Saving entries, page 18).
■ to Send Tones; the tones are imme diately se nt over the air.
29
Page 38

Features Menu
Data
With this feature, you can set the baud rate when making data calls. The
baud rate is the speed at which the phone communicates the data to or from
the attached terminal equipment (for example, your computer or Palm™
handheld).
To set the baud rate:
1. From standby mode, press menu.
2. Press for Features
3. Press for Data.
4. Scroll to select baud rate 9600, 19200, 38400, 57600, and 115200.
5. Press ok.
See the QUALCOMM Globalstar packet data kit user documentation that
comes with your data cable for more information on making data calls.
30
Page 39

Call Information Menu
The Call Information menu contains counters that allow you to track the
number of calls and airtime for billing purposes.
Last Call
Last Call displays the duration of the last call in minutes and seconds. If
Call History is empty, “None” displays on the screen.
To display last call information
1. From standby mode, press menu.
2. Press for Call Information.
3. Press for Last Call.
4. Press ok.
Home Calls
Home Calls display s the numbe r and duration of all incom ing and outgo ing
calls made in your home service area. You can reset this counter to zero (see
Resetting call counters, page 33).
To display home calls information
1. From standby mode, press menu.
2. Press for Call Information.
3. Press for Home Calls.
4. Press ok.
Roam Calls
Roam Calls displays the number and duration of roam calls. Roaming
occurs when you move out of your home service area. You can reset this
counter to zero (see Resetting call counters, page 33).
To display roam calls information
1. From standby mode, press menu.
2. Press for Call Information.
3. Press for Roam Calls.
4. Press ok.
31
Page 40

Call Information Menu
Recent Calls
Recent Calls displays the number and duration of calls made or received
since resetting the counter. You can reset this counter to zero (see Resetting
call counters, page 33).
To display recent calls information
1. From standby mode, press menu.
2. Press for Call Information.
3. Press for RecentCall.
4. Press ok.
Data Calls
Data Calls displays the number of bytes received or transmitted and the
duration of data calls made since resetting the counter.
To display data calls information
1. From standby mode, press menu.
2. Press for Call Information.
3. Press for Data Calls.
4. Scroll to view the number of bytes received or transmitted and the
duration of the calls.
5. Press ok.
See the QUALCOMM Globalstar packet data kit user documentation that
comes with your data cable for more information on making data calls.
All Calls
All Calls displays the number and duration of all calls (bo th voice and data)
for the lifetime of your phone. You cannot reset this counter.
To display all calls information
1. From standby mode, press menu.
2. Press for Call Information.
3. Press for All Calls.
4. Press ok.
32
Page 41

Call Information Menu
Note
Resetting call counters
You can only reset the Home Calls, Roam Calls, Recent Calls, and Data
Calls counters to zero. You can also undo the counter reset, bu t you must do
it before you press ok, which confirms resetting the counter.
To reset the counter to zero
1. Press zero.
After you press ok, you cannot undo the counter reset.
2. Press ok.
To undo the counter reset
■ Press undo.
33
Page 42

Call Information Menu
34
Page 43

Security Menu
Lock code
When you access the Security menu for the first time, enter the lock code
supplied by your satellite or cellular service provider. If you forget your lock
code, contact your satellite or cellular service provider.
Locking the phone
You can lock the phone so that you can only make calls to priority numbers
and emergency num bers and receive calls. There are no shortcuts for
dialing emergency numbers or priority numbers when your phone is locked.
All other functions are locked. To unlock the phone, use the lock code, the
same one that you use to access the Security menu.
To lock the phone
1. From standby mode, press menu.
2. Press for Security an d enter your lock code.
3. Press for Lock Phone.
4. Scroll to select one of these options:
■ Never – The phone can not be lo cked.
■ Now – Immediately locks the phone for one time only.
■ On Power Up – Locks the phone every time you turn the phone on.
To unlock the phone
1. Press unlock.
2. Enter your lock code to return to the main menu. (Use the same lock
code used to access the Security menu.)
35
Page 44

Security Menu
Restricting the phone
When you restrict your phone, you can only make calls to emergency
numbers, priority numbers, and phone book locations 1 to 9. You cannot
make changes to the phon e book when you restrict your phone.
To restrict the phone
1. From standby mode, press menu.
2. Press for Security an d enter your lock code.
3. Press for Restricted.
4. Scroll to select one of these options:
■ Yes – Make calls to emergency numbers, priority numbers, and
phone book locations 1 to 9 only. There are no shortcuts for dialing
emergency numbers or priority numbers unless you add them to
your phone book.
■ No – Make calls to any number.
Entering a new lock code
The lock code is used to access the Security menu and unlock your phone.
Contact your satellite or cellular service provider for information about
entering a new lock code.
Entering priority numbers
You can call priority numbers when the phone is locked or restricted. You
can store up to three priority numbers (up to 32 digits each).
To enter a priority number
1. From standby mode, press menu.
2. Press for Security an d enter your lock code.
3. Press for Priority #.
4. Scroll to Priority#1, Pri ority#2, or Priority#3.
5. Press edit.
6. Enter the phone nu mb er .
7. Press ok.
36
Page 45

Security Menu
Erasing call history list
To erase the entire call history list
1. From standby mode, press menu.
2. Press for Security an d enter your lock code.
3. Press for Erase Call.
4. Press ok.
5. Press ok to erase the entire call history list, or press if you
do not want to erase it.
Erasing phone book entries
To erase all entries in the phone book
1. From standby mode, press menu.
2. Press for Security an d enter your lock code.
3. Press for Erase Book.
4. Press ok.
5. Press ok to erase all entries in the phone book, or press if
you do not want to erase them.
Erasing SMS mes sages
You can erase all SMS (sh ort me ssag e serv ice) messa ges, wh ich in clude all
locked or unlocked text messages and all voice mail notification messages.
1. From standby mode, press menu.
2. Press for Security an d enter your lock code.
3. Press for Erase SMS (short message service).
4. Press ok.
5. Press ok to erase all messag es , or pr ess if you do not want
to erase them.
37
Page 46

Security Menu
Resetting preferences
You can reset all preferences to the original settings (defaults) that were
previously set by your satellite or cellular service provider. These
preferences include those described in Preferences Menu, page 39, with
these exceptions:
■ The banner is not reset.
■ The Service Provider Preferred and Prohibited Lists are deleted (see
Service Provider Select, page 52).
■ The lock code is not reset.
■ The phone book, cal l history, or SMS messages are not erased.
To reset preferences
1. From standby mode, press menu.
2. Press for Security an d enter your lock code.
3. Press for Reset Prefs.
4. Press ok.
5. Press ok when prompted to reset all preferences.
Entering PIN
When making analog calls, your cellular service provider may support the
use of your own PIN (personal identification number) for verification before
connecting your ca ll.
If you want to be prompted for your PIN before making analog calls, set
Send PIN accordingly (see Send PIN, page 49). Contact your cellular service
provider for more information .
Each PIN is associated with a different phone number, or NAM (number
assignment module). When you e nter a PIN, it becomes as sociated with the
currently select ed phone numbe r, so be sure to select th e appropriate phone
number before entering your PIN.
To enter your PIN
1. Select the appropriate phone number (NAM) (see NAM Select,
page 57).
2. From standby mode, press menu.
3. Press for Security an d enter your lock code.
4. Press for Enter PIN.
5. Enter the four-digit PIN.
6. Press save.
38
Page 47

Preferences Menu
Sounds
You can set ringer type, ringer volume, earpiece volume, key beep sound,
key beep volume, key beep length, and mute stereo.
Ringer Type
You can change the ringer for incoming calls to one of eight different rings
or songs.
To set the ringer type
1. From standby mode, press menu.
2. Press for Preferences.
3. Press for Sounds.
4. Press for Ringer Type.
5. Scroll to select the ringer type or song.
6. Press ok.
Ringer Volume
Do one of the followi ng from standby mo de:
■ Press the volume buttons.
■ Press menu.
❑ Press for Preferences.
❑ Press for Sounds.
❑ Press for Ringer Vol.
39
Page 48

Preferences Menu
Note
❑ Scroll to select the volume level from 1 (lowest) to 9 (highest) or
Silent to turn the ringer off. While in standby mode, “-Ringer Off-”
alternates on the screen with the time.
❑ Press ok.
To silence the ringer when receiving a call
■ Press .
Earpiece Volume
You can adjust the earpiece volu me to one that is comfo rta ble for y ou. You
can adjust the volume wh ile on a call or from standby mode . If you are using
the car kit, this feature adjusts the speaker volume or the privacy handset
volume, depending on which one you use.
To adjust the earpiece volume
■ While on a call, press the volume buttons.
■ From standby mode:
a. Press menu.
b. Press for Preferences.
c. Press for Sounds.
d. Press for EarpiecVol.
e. Scroll to select the volume level from 1 (lowest) to 9 (highest).
f. Press ok.
Key Beep Sound
You can set the key beep, the sound you hear when pressing the keys, to
either a tone or a click.
To adjust the key beep sound
1. From standby mode, press menu.
2. Press for Preferences.
3. Press for Sounds.
4. Press for KeyBeepSound.
5. Scroll to select “tone” or “click.”
If you select “click” and you are on a call, ke ys pressed for voice
mail sound as “tones.” Other keys pressed in menus sound as
“clicks.”
6. Press ok.
40
Page 49

Preferences Menu
Note
Key Beep Volume
You can adjust the volume of the key beep, the sound you hear when
pressing the keys.
To adjust the key beep volume
1. From standby mode, press menu.
2. Press for Preferences.
3. Press for Sounds.
4. Press for KeyBeepVol.
5. Scroll to select the volume level from 1 (lowest) to 9 (highest) or Silent
to turn the key beep off.
6. Press ok.
Key Bee p Length
You can set the length of the key beep, the sound you hear when pressing
the keys. The standard key beep is short and fixed in length. The custom
key beep sounds as long as you press a key.
Using the standard key beep setting is recommended unless a service or
device, such as an answering machine, requires a custom key beep.
In analog mode, th e key beep length affe cts the DTMF tones us ed
for sending tones ov er the network for au tomated phone servic es,
such as voice mail or online banking. Select the appropriate key
beep length before sending tones (see Sending tones, page 21).
To set the key beep length
1. From standby mode, press menu.
2. Press for Preferences.
3. Press for Sounds.
4. Press for KeyBeepLen.
5. Scroll to select one of the following:
■ Standard – Key beep is short and fixed in length.
■ Custom – Key beep sounds as long as you press a key.
6. Press ok.
Mute Stereo
To use this feature, the car kit mute line must be connected to the stereo
mute line. (Conta ct your service provi der or car kit instal ler for more
information on implementing this in your vehicle.) While using the car kit,
you can set this feature to automatically mute the stereo in your vehicle so
you cannot hear it. This occurs when you receive incoming calls or press
when making calls.
41
Page 50

Preferences Menu
Note
To mute the stereo
1. Be sure that the car kit mute line is connected to the stereo mute line.
2. From standby mode, press menu.
3. Press for Preferences.
4. Press for Sounds.
5. Press for Mute Stereo.
6. Scroll to select “yes” or “no.”
7. Press ok.
Display
You can set the backlight, edit the banner, display the time, set the auto
hyphen feature, and set the Globalstar time zone.
Backlight
You can set the screen and keypad backlighting to maximize battery life.
To set the backlight
1. From standby mode, press menu.
2. Press for Preferences.
3. Press for Display.
4. Press for Backlight.
5. Scroll to select one of the following:
■ Always Off – The backlight is always off, which significantly
increases battery life.
■ 7 Seconds – Turns the backlight off 7 seconds after the last key
press.
■ 15 Seconds – Turns t he ba ck li g h t off 15 se c onds af ter t he la st ke y
press.
■ 30 Seconds – Turns t he ba ck li g h t off 30 se c onds af ter t he la st ke y
press.
■ Always On – The backlight is always on, which significantly
decreases battery li fe.
6. Press ok.
To turn the backlight on
■ Press any key.
If this feature is set to “Always Off,” pressing any key does not
turn the backlight on. You must select a different setting.
42
Page 51

Preferences Menu
Banner
You can enter a banner or personal greeting (up to 12 characters), such as
a company name or a personal remi nder. The bann er displays when you
turn the phone on.
To edit the banner
1. From standby mode, press menu.
2. Press for Preferences.
3. Press for Display.
4. Press for Banner.
5. Press edit. See Entering numbers, page 12.
6. Press ok to confirm banner changes.
7. Do one of the followi ng:
■ Press ok to return to standby mode.
■ Press edit to change the banner.
Auto Hyphens
You can use this feature to automatically insert hyphens when you enter
phone numbers. As the following example shows, hyphens are inserted
automatically when numbers are entered:
# – ### – ### – ####
You can also manually enter hyphens (see Manual Hyphens, page43).
To set auto hyphen
1. From standby mode, press menu.
2. Press for Preferences.
3. Press for Display.
4. Press for AutoHyphen.
5. Scroll to select “yes” or “no.”
6. Press ok.
Manual Hyphens
You can manually enter hyphens from standby mode or when editing phone
numbers in the phone book. You can also set Auto Hyphen to “on” so that
hyphens are automatically entered (see Auto Hyphens, page 43). Each
hyphen counts as one character.
To manually enter a hyphen
1. Press and the following displays on the screen:
2. Press to display a hyphen on the screen.
43
Page 52

Preferences Menu
Show Time
You can set the time format using this feature. Initially, while in Globalstar
satellite mode, UTC (universal coordinated time) displays. While in digital
or analog mode, local time displays where available. To change the time
zone that is used to display time while in Globalstar satellite mode, see
Globalstar Time Zone, page44.
To set the time format
1. From standby mode, press menu.
2. Press for Preferences.
3. Press for Display.
4. Press for Show Time.
5. Scroll to select one of the following:
■ 12 hour – Time displays in 12-hour format
■ 24 hour – Time displays in 24-hour format
■ UTC (universal coor dinated time) – 2 4-hour time scale maintained
by the Bureau International de L’Heure
■ Off – Time does not display
6. Press ok.
Globalstar Time Zone
When in Globalstar satellite mode, this feature allows you to select the
display of a different time zone instead of UTC (universal coordinated time)
time. The time zone remains selected until you change it and is only valid
for Globalstar satellite mode. You can also choose UTC plus or minus any
hour if your time zone is unavailable.
The time zones for selection include the following:
European GMT Greenwich Mean Time same as UTC
BST British Summer Time UTC + 1 hour
IST Irish Summer Time UTC + 1 hour
WET Western Europe Time same as UTC
WEST Western Europe Summer Time UTC + 1 hour
CET Central Europe Time UTC + 1 hour
CEST Central Europe Summer Time UTC + 2 hours
EET Eastern Europe Time UTC + 2 hours
EEST Eastern Europe Summer Time UTC + 3 hours
MSK Moscow Time UTC + 3 hours
MSD Moscow Summer Time UTC + 4 hours
44
Page 53

Preferences Menu
U.S. and
Canada
To select a different time zone
1. From standby mode, press menu.
2. Press for Preferences.
3. Press for Display.
4. Press for G* TimeZone.
5. Scroll to select the appr opriate time zone.
6. Press ok.
AST Atlantic Standard Time UTC – 4 hours
ADT Atlantic Daylight Saving Time UTC – 3 hours
EST Eastern Standard Time UTC – 5 hours
EDT Eastern Daylight Saving Time UTC – 4 hours
CST Central Standard Time UTC – 6 hours
CDT Central Daylight Saving Time UTC – 5 hours
MST Mountain Standard Time UTC – 7 hours
MDT Mountain Daylight Saving Time UTC – 6 hours
PST Pacific Standard Time UTC – 8 hours
PDT Pacific Daylight Saving Time UTC – 7 hours
HST Hawaiian Standard Time UTC – 10 hours
AKST Alaska Standard Time UTC – 9 hours
AKDT Alaska Daylight Saving Time UTC – 8 hours
SMS Time
With this feature, you can adjust the time stamp displayed for SMS
messages (probably UTC, or universal coordinated time) to one you select
with the Globalstar Time Zone feature.
To set the SMS time stamp
1. From standby mode, press menu.
2. Press for Preferences.
3. Press for Display.
4. Press for SMS Time.
45
Page 54

Preferences Menu
5. Scroll to select one of the following:
■ As received – Time displays as received, probably in UTC format
■ Adjust – Adjusts one selected under Globalstar Time Zone (see
Globalstar Time Zone, page44)
6. Press ok.
Language
You can select the language displayed on your phone’s screen.
To set the language
1. From standby mode, press menu.
2. Press for Preferences.
3. Press for Display.
4. Press for Language.
5. Scroll to select English, Esp añol, Français, or P o rtuguês.
6. Press ok.
Alerts
For your convenience, you can set alerts that sound a tone.
Fade
The fade alert sounds a tone when any network drops a call.
To set the fade alert
1. From standby mode, press menu.
2. Press for Preferences.
3. Press for Alerts.
4. Press for Fade.
5. Scroll to select “on” or “off.”
6. Press ok.
Minute
The minute alert sounds a t one ten second s before the end of every minu te.
To set the minute alert
1. From standby mode, press menu.
2. Press for Preferences.
3. Press for Alerts.
4. Press for Minute.
5. Scroll to select “on” or “off.”
6. Press ok.
46
Page 55

Preferences Menu
Service Change
This alert sounds a tone and di spla y s a me ss age w he n t he ph one en ter s o r
leaves service.
To set the service change alert
1. From standby mode, press menu.
2. Press for Preferences.
3. Press for Alerts.
4. Press for Service.
5. Scroll to select “on” or “off.”
6. Press ok.
New Message
The new message a lert sou nds a tone w hen you receive a new tex t message
or voice mail notification.
To set the new message alert
1. From standby mode, press menu.
2. Press for Preferences.
3. Press for Alerts.
4. Press for New Message.
5. Scroll to select one of the following:
■ Off – Phone does not sound a beep when a n ew messag e is receiv ed
■ Once – Phone sounds one beep when a new message is received
■ Periodic – Phone sounds a beep periodically when a new message
is received until you retrieve the message by pressing
6. Press ok.
Calling
You can set the Calling features to automatically answer the phone or
redial a busy number. You can als o set one-touc h dial or any -key answ er to
“on.”
Auto Answer
You can set the number of times the phone rings before it automatically
answers a call. If you us e th is featu re, your phone’s ri nger i s autom atically
set to Standard.
To set auto answer
1. From standby mode, press menu.
2. Press for Preferences.
3. Press for Calling.
4. Press for AutoAnswer.
47
Page 56

Preferences Menu
5. Scroll to select one of the following:
■ Off – Phone does not automatically answer
■ After 1 ring – Phone automatically answers after 1 ring
■ After 2 rings – Phone automatically answers after 2 rings
■ Car kit only 1 r i ng – Ph one automaticall y a nsw e rs w he n ins t all ed
in the car kit after 1 ring
■ Car kit only 2 rings – Phone automatically answers when installed
in the car kit after 2 rings
6. Press ok. If you select an option other than “off,” the message
“-Auto Answer-” alternates on the screen with the time while in
standby mode.
Auto R ed ial
You can use this feature to set the time interval in which the phone
automatically redials a number when the network is busy or unavailable,
but not when the phone line is busy. While the phone is in standby mode,
the phone automatically redials at that interval until the call connects or
you press . If you change service, auto redial sto ps.
To set auto redial
1. From standby mode, press menu.
2. Press for Preferences.
3. Press for Calling.
4. Press for Auto Redial.
5. Scroll to select one of the following:
■ Off – Do not automatically redial
■ Every 10 seconds – Automatically redial every 10 seconds
■ Every 30 seconds – Automatically redial every 30 seconds
■ Every 60 seconds – Automatically redial every 60 seconds
6. Press ok.
One-Touch Dial
If you set one-touch dial to “on,” you can dial any of the 99 phone book
location numbers without pressing .
To set one-touch dial
1. From standby mode, press menu.
2. Press for Preferences.
3. Press for Calling.
4. Press for One-Touch Dial.
5. Scroll to select “yes” or “no.”
6. Press ok.
See One-touch dialing, page22, for more information.
48
Page 57

Preferences Menu
Note
Any-Key Answer
With this feature, you can press any key to answer an incoming call while
in standby mode, except or . If this feature is not set to “yes,” press
to answer calls.
To set any-key answer
1. From standby mode, press menu.
2. Press for Preferences.
3. Press for Calling.
4. Press for AnyKeyAnsw.
5. Scroll to select “yes” or “no.”
6. Press ok.
Send PIN
If your cellular service provider supports this feature, you can use a PIN
(personal identification number) for verification before connecting analog
calls.
To enter your own PIN, see Entering PIN, page 38. Contact your cellular
service provider for more information.
Each PIN is asso ciated with a different NAM (n umber assignment module),
or phone number. When you enter a PIN, it becomes associated with the
currently selected NAM, so be sure to select the appropriate NAM before
setting Send PIN (see NAM Select, page 57).
To set Send PIN
1. From standby mode, press menu.
Be sure to select the appropriate NAM before setting Send PIN
(see NAM Select, page 57).
2. Press for Preferences.
3. Press for Calling.
4. Press for Send PIN.
5. Scroll to select one of the following:
■ Never – Does not prompt you for or send a PIN
■ Prompt – Prompts you for a PIN after you enter the phone number
6. Press ok.
49
Page 58

Preferences Menu
50
Page 59

System Menu
Status
When your phone is in Globalstar satellite mode, this feature provides
status for the state of the phone’s Globalstar satellite antenna, car kit,
security module, battery, memory, lock, and self-test:
■ J Indicates a good condition or ready for use
■ L Indicates a faulty condition or not ready for use
■ – Indicates not in use
To access status information
1. From standby mode, press menu.
2. Press for System.
3. Press for Status:
■ Antenna Up – If J displays, the Globalstar satellite antenna is
rotated properly. If the antenna is rotated and
your satellite service provider.
■ Car Kit – If J displays, the car kit is operating properly. If L
displays, reconnect t he phone in the cradle or contact the
installation technician.
■ Battery – If J displays, the battery is installed properly. If L
displays, remove and r eplace y our batter y or co ntact your satellite
service provider.
■ Security – If J displays, the valid security module is inserted
properly. (There may be a brief delay in displaying
displays, contact your satellite service provider.
■ Memory – If J displ ays, ther e is e nough avai lable ph one mem ory.
L displays, delete text messages and voice mail notifications.
If
L displays, contact
J.) If L
51
Page 60

System Menu
■ Unlocked – If J displays, the satellite or cellular service provider
has not locked your phone. If
L displays, contact your service
provider.
■ Self-test – If J displays, the phone has made a successful self-te st.
L displays, contact your sate llite or cellular service provider.
If
4. Press or .
Find Home
With this feature, you can quickly find your home satellite service provider.
The phone disconnects and attempts to find your home satellite service
provider, if available. If not, the p hone attempts to find service based on
your Auto Mode se le c tio n (se e A uto Mode, page 56). This feature is helpfu l
if you want to stop roaming.
To force the phone to find home
1. From standby mode, press menu.
2. Press for System.
3. Press for Find Home.
4. Press ok.
Version
This feature displays the v ersi on nu mbe r of t he softw are i nstal le d on y ou r
phone.
To display the software version number
1. From standby mode, press menu.
2. Press for System.
3. Press for Version.
4. Scroll to read the information.
5. Press or .
Service Provider Select
This feature allows you to select satellite service providers and force service
provider selection. Three lists are used to select satellite service providers:
■ Known List – Shows all of the known satellite service providers that
you can add to the Preferred or Prohibited Lists. This list is
programmed by the satellite service provider. New sat ellite service
providers are automatically added as they become available.
■ Preferred List – Shows your preferred order of priority for satellite
service provider s. Always shows the home satellite serv ice provider
highlighted first on the screen. The number to the left of the satellite
service provider name identifies the order of priority.
52
Page 61

System Menu
Note
■ Prohibited List – Shows the satellite service providers in alphabetical
order that you choose not to use. You cannot add the home satellite
service provider to this list.
You cannot add or delete your home service provider from any
list.
When you look at the Known List, satellite service providers you have
placed on other lists display as follows:
■ Satellite ser vice prov iders pla ced on the P referred List are high lighte d.
■ Satellite service providers placed on the Prohibited List are crossed
out.
■ Satellite ser vice provid ers placed on both the P referre d and Prohib ited
Lists are highlighted and crossed out.
Registering phone
Registration means your phone is looking for s ervice and obtains service
after network approval. If the service change alert is set to “on,” the alert
sounds a tone and display s a menu when the pho ne enters or le aves service.
(See Service Change, page 47.) After your phone is registered and an
displays on the scre en, press for service provider information and the
current phone numb er .
Changes made to the Preferred or Prohibited Lists do not take effect until
the phone is registered again with the network. To register the phone, do
one of the follow ing:
■ Turn the phone on and off
■ Find your home satellite service provider (see Find Home, page 52)
■ Force service provider selection (see Force Service Provider Selection,
page 55)
If you add the currently regi stered satellite se rvice provider to the
Prohibited List, the phone will automatically reregister.
Viewing lists
To view the Known, Preferred, or Prohibited Lists
1. From standby mode, press menu.
2. Press for System.
3. Press for SP (service provider) Select.
4. Press for Known List, for Prefr List, or for Prohb
List.
53
Page 62

System Menu
5. Press view to display the satellite service provider’s MCC (mobile
country code) and MNC (mobile network code).
■ If the satellite service provider is on the Preferred List, the
preferred location number displays (Pref Loc).
■ If the satellite service provider is on the Prohibited List, “yes”
displays (Prohib).
■ If the satellite serv ice provider is on both th e Preferred and the
Prohibited Lists, the prefer red location num ber and “yes” display s.
6. Press ok.
Adding to lists
To add to the Preferred or Prohibited Lists
1. From standby mode, press menu.
2. Press for System.
3. Press for SP (service provider) Select.
4. Press for Known List.
5. Scroll to select a satellite service provider.
6. Press edit.
7. Press for Preferred or for Prohibited.
8. Press ok.
9. Reregister your phone (see Registering phone, page 53).
Editing lists
To edit (reorder or delete) from the Preferred List
1. From standby mode, press menu.
2. Press for System.
3. Press for SP (service provider) Select.
4. Press for Prefr List.
5. Scroll to select a satellite service provider.
6. Press edit.
7. Do one of the followi ng:
■ Press for Reorder, scroll to move the selected satellite service
provider to a new position, and press ok.
■ Press for Delete, and press ok to delete the selected
satellite service provider from the list.
8. Press ok.
9. Reregister your phone (see Registering phone, page 53).
Erasing from Prohibited List
1. From standby mode, press menu.
2. Press for System.
3. Press for SP (service provider) Select.
54
Page 63

System Menu
4. Press for Prohb List.
5. Scroll to select a satellite service provider.
6. Press erase.
7. Press ok.
8. Reregister your phone (see Registering phone, page 53).
Force Service Provider Selection
This feature for ces the p hone to r egist er with a satelli te servi ce pro vider in
the following order of priority:
1. The phone attempts to register with your home satellite service
provider.
2. The phone attempts to register with satellite service providers on the
Preferred List.
3. The phone attempts to register with satellite service providers on the
Known List.
To force satellite service provider selection
1. From standby mode, press menu.
2. Press for System.
3. Press for SP (service provider) Select.
4. Press for Force SPS (service provider selection).
5. Press ok.
Service Provider
To display the current satellite service provider’s name
1. From standby mode, press menu.
2. Press for System.
3. Press for SrvcPrvder.
4. Press or .
Territory
This feature displays the current satellite service provider’s MCC (mobile
country code) and MNC (mobile network code).
To display the territory information
1. From standby mode, press menu.
2. Press for System.
3. Press for Territory.
4. Press or .
55
Page 64

System Menu
Manual Mode
The phone operates in Globalstar satellite, digital, or analog mode. You can
manually select one of these modes or select auto mode by using this
feature. Auto mode means that the phone automatically selects a mode
based on your auto mode setting (see Auto Mode, page 56).
The mode you select remains selected until you turn the phone off, and then
it resets to your auto mode setting. If one of the modes is currently
unavailable, it will not display on the screen.
To manually select a mode
1. Shortcut: From standby mode, press and hold . The following
displays:
2. Press:
■ to select Auto Mode. The message “Initiating Automatic
System Acquisition” displays.
■ for Globalstar satellite mode. The message “Initiating
Globalstar System Acquisition” displays.
■ for Digital mode. The message “Initiating Digital System
Acquisition” displays.
■ for Analog mode. The message “Initiating Analog System
Acquisition” displays.
Auto Mode
You can set each phone number (or NAM) to automatically look for service
using one or more modes in the order of priority that you specify:
■ GStar only – Look for Globalstar satellite service only.
■ Cell only – Look for c ellular servic e only. For cellu lar service (cell o nly),
you choose between digital or analog using the Cell Pref menu.
■ GStar Pref – Attempt to look for Globalstar satellite service first and
cellular service last.
■ Cell Pref – Attempt to look for cellular service first and Globalstar
satellite service last.
To set auto mode
1. Select the appropriate NAM (see NAM Select, page 57).
2. From standby mode, press menu.
3. Press for System.
4. Press for Auto Mode
56
Page 65

System Menu
5. Scroll to select one of the following:
■ GStar Only – Look for Globalstar satellite service only. Press
ok, and the phone returns to standby mode.
■ Cell Only – Look for cellular service only. Press ok, and the
Cell Pref menu displays. Go to Step 6.
■ GStar Pref – Look for Globalstar satellite service first and either
digital or analog m ode last. Press ok, and the Cell Pref menu
displays. Go to Step 6.
■ Cell Pref – Look for ce llular servic e first and Glob alstar last. Press
ok, and the Cell Pref menu displays. Go to Step 6.
6. If the Cell Pref menu displays, scroll to select one of the following:
■ Analg Only – Prefer analog service only
■ Digtl Only – Prefer d igital service only
■ Digtl Pref – Prefer digital service over analog
■ Analg Pref – Prefer analog service over digital
7. Press ok.
NAM Select
The phone allows one Globalstar NAM (number assignment module), or
phone number, and tw o different cellular-only NAMs . The NAMs are
entered into the phone by your service providers. (See My Numbers,
page 58, to display the NAMs entered.)
Before making or receiving calls, you must activate a NAM, but only one
can be active at a time. With this feature, you can access these options:
■ Auto NAM – Automatically switches NAMs, if appropriate, during
system searches to look for home area service.
■ Set NAM – Manually sets the NAM.
■ Set System – Sets your system preference for each NAM. Set Sys tem
only affects cellular service. It does not affect Globalstar service.
Your service pr ovider can configur e the Globalstar NAM for both Gl obalstar
and cellular service (digital and analog). In Globalstar mode, the phone
always uses the Globalstar NAM. In cellular mode, the phone uses the
selected cellular NAM (NAM1, NAM2, or G*NAM).
To set Auto NAM
1. From standby mode, press menu.
2. Press for System.
3. Press for NAM Select.
4. Press for Auto NAM.
5. Scroll to select “yes” or “no.”
6. Press ok.
57
Page 66

System Menu
To set the NAM
1. From standby mode with Auto NAM set to “no,” press menu.
2. Press for System.
3. Press for NAM Select.
4. Press for Set NAM.
5. Scroll to select the NAM.
6. Press ok.
To set the system
1. Select the appropriate NAM (see NAM Select, page 57).
2. From standby mode, press menu.
3. Press for System.
4. Press for NAM Select.
5. Press for Set System.
6. Scroll to select one of the following:
■ Automatic – Use home system, but if not found use another system
■ No Roaming – Use only the home system
■ A only – Use cellular “A” system only
■ B only – Use cellular “B” system only
My Numbers
You can display your three phone numbers (NAMs) and service provider
name. (The NAMs are entered by your service provider. See NAM Select,
page 57.)
To display your three phone numbers
1. From standby mode, press menu
2. Press for My Numbers.
3. Scroll to select one of the following:
■ PhoneNo 1 – Displays cellular phone number
■ PhoneNo 2 – Displays cellular phone number
■ PhoneNo G* – Displays Globalstar satellite phone number
58
Page 67

Battery Care and Maintenance
Learn about battery care, battery charging, and battery removal and
replacement in this s ection.
Battery
The phone comes w ith a r echa rgeab le ba ttery that i s locat ed on the ba ck o f
the phone:
The following is typical battery performance:
Service Mode Talk Time Standby Time
Globalstar satellite 3.5 hours 9 hours
Digital 4.5 hours 72 hours
Analog 2.5 hours 14 hours
Battery care and charging
The battery charge level indicator is shown at the top right of the screen
and ranges between four diagonal bars (full charge) to one bar (minimal
charge). If the indicator has one blinking bar, the battery has no charge.
Fully charge the battery immediately after purchasing the phone to
maximize the talk and standby times. The battery does not need to be
completely drained before you recharge it. See Low battery, page 60, for
more information.
Follow these guidelines for batteries:
■ Only use QUALCOMM batteries and chargers designed for your phone.
Do not use any other battery or charger. You cannot overcharge
QUALCOMM batteries with QUALCOMM chargers.
■ To maximize battery life, set the backlight option to “off” (see
Backlight, page 42).
59
Page 68

Battery Care and Maintenance
Note
■ To prevent damage, do not charge the battery in temperatures less
than +32 °F (0 °C) or greater than +104 °F (+40 °C). Do not use the
battery in temperatures less than –4 °F (–20 °C) or greater than
+140 °F (+60 °C).
■ Do not use the battery charger in direct sunlight or in places with
excessive humidity, such as a bathroom.
■ Keep the metal contacts at the top end of the battery clean.
■ Never dispose of the battery in a fire or tra sh co mpactor.
■ Do not try to disassemble or sho rt circuit the battery.
■ Recharge the battery if the phone has not been used for several months.
■ Do not store batteries in places where temperatures are below –22 °F
(–30 °C) or above +140 °F (+60 °C).
Battery chargers
Charge the batteries with the AC wall charger, universal travel charger, or
cigarette lighter adapter (see Accessories, page 67).
When using the AC wall charger, plug the charger into the power
source first, and then into the phone.
You can use the phone while charging the battery. However, it will charge
more quickly if the phone is turned off. The battery does not need to be
completely drained before you recharge it.
The universal travel charger allows you to charge the battery while it i s
attached to the phone whether the phone is turned on or off. You can also
charge another battery at the same time.
After you connect the phone to one of the chargers, check the charging
status:
■ If the battery is charging, a message displays and the bars on the
battery indicator flash in sequence.
■ If the phone is turned off, a message displays on the screen when
charging is complete.
The typical charge time to 90% charge level for the universal travel charger,
cigarette lighter adapter, or AC wall charger is 2-1/2 hours.
Low battery
The phone alerts you when the battery is low. To turn off the battery alert,
set the ringer volume to zero (0).
■ The battery indicator flashes.
■ The phone beeps three times (if you are on a call, the phone continues
to beep every minute).
■ The message “Low Battery! Recharge Battery Soon” displays on the
screen.
60
Page 69

Battery Care and Maintenance
If the battery level gets too low, the phone turns off and loses any function
in progress. Before turning off, the phone alerts you with five beeps and the
message “Low Battery, Turning Off Phone Now” displays on the screen.
Battery removal
1. Turn the power off to avoid losing data.
2. Press and hold the battery release latch in the direction of the arrow to
release it from th e phone.
Battery replacement
1. If a battery is already installed, turn the power off to prevent losing
data and then remove the battery.
2. Insert the new replacement battery by lining up the positioning tabs
(see arrows) and rotating it into place.
3. Press down on the battery until it locks.
61
Page 70

Battery Care and Maintenance
62
Page 71

Safety Informatio n
Learn the safety information for wireless handheld phones in this section.
Exposure to radio frequency signals
Your wireless handheld portable telephone is a low power radio transmitter
and receiver. When it is ON, it receives and also sends out radio frequency
(RF) signals.
In August, 1996, the Federal Communications Commissions (FCC) adopted
RF exposure guidelines with safety levels for hand-held wireless phones.
Those guide lines are consist ent wi th t he saf ety s tandard s pr eviou sly se t by
both U.S. and international standards bodies:
■ ANSI C95.1 (1992)
■ NCRP Report 86 (1986)
■ ICNIRP (1996)
Those standards w ere ba se d o n co mpr ehensive and periodic ev al uati ons of
the relevant scientific literature. For example, over 120 scientists,
engineers, and physicians from universities, government health agencies,
and industry reviewed the available body of research to develop the ANSI
Standard (C95.1).
The design of your phone complies with the FCC guidelines (and those
standards).
Antenna care
1
2
3
Use only the supplied or an approved replacement antenna. Unauthorized
antennas, modifications , or att achments c ould damag e the phone and may
violate FCC regulations.
Phone operation
Normal POSITION: Hold the phone as you would any other telephone
with the antenna pointed up and over your shoulder.
TIPS ON EFFICIENT OPERATION: For your phone to operate most
efficiently:
■ Extend your antenna fully.
■ Do not touch the antenna unnecessarily when the phone is in use.
Contact with the antenna affects call quality and may cause the phone
to operate at a higher power level than otherwise needed.
1. American National Standards Institute
2. National Council on Radiation Protection and Measurements
3. International Comm ission on Non-Ionizing Radiation Protection
63
Page 72

Safety Information
Driving
Check the laws and regulations on the use of wireless telephones in the
areas where you drive. Always obey them. Also, if using your phone while
driving, please:
■ Give full attention to driving – driving safely is your first
responsibility;
■ Use hands-free operation, if available;
■ Pull off the road and park before makin g or answe ring a ca ll if drivi ng
conditions so require.
Electronic devices
Most modern electronic equipment is shielded from RF signals. However,
certain electron ic equipment may not be shielded against the RF signals
from your wireless phone.
Pacemakers
The Health Industry Manufacturers Association recommends that a
minimum separation of six ( 6”) inches be maintained between a handheld
wireless phone and a pacemaker to avoid potential interference with the
pacemaker. These recommendations are consistent with the independent
research by and recommendations of Wireless Technology Research.
Persons with pacemakers:
■ Should ALWAYS keep the phone more than six inches from their
pacemaker when the phone is turned ON;
■ Should not carry the phone in a breast pocket;
■ Should use the ear opposite the pacemaker to minimize the potential
for interference.
■ If you have any reason to suspect that interference is taking place, turn
your phone OFF immediately.
Hearing aids
Some digital wi re le ss pho nes may interfere w ith some hearing aids. I n t he
event of such interference, you may want to consult your service provider.
Other medical devices
If you use any other personal medical device, consult the manufacturer of
your device to determine if they are adequately shielded from external RF
energy. Your physician may be able to assist you in obtaining this
information.
Turn your phone OFF in health care facilities when any regulations posted
in these areas instruc t yo u to do so . Ho spit a ls or health care facilities ma y
be using equipment that cou ld be sensitive to external RF ene rgy.
64
Page 73

Safety Informat ion
Vehicles
RF signals may affect improperly installed or inadequately shielded
electronic systems in motor vehicles . Che ck with the manufacturer or its
representative regarding your vehicle. You should also consult the
manufacturer of any equipment that has been added to your vehicle.
Posted facilities
Turn your phone OFF in any facility where posted notices so require.
Aircraft
FCC regulations prohibit using your phone while in the air.
Switch OFF your phone before boarding an aircraft.
Blasting areas
To avoid interfering with blasting operations, turn your phone OFF when
in a “blasting area” or in areas posted: “Turn off two-way radio”. Obey all
signs and instructions.
Pote ntially explosi ve at mosphe res
Turn your phone OFF when in any area with a potentially explosive
atmosphere and obey all signs and inst ructions. Spar ks in such are as could
cause an explosion or fire resulting in bodily injury or even death.
Areas with a potentially explosive atmosphere are often but not always
clearly marked. They include fueling areas such as gasoline stations; below
deck on boats; fuel or chemical transfer or storage facilities; vehicles using
liquefied petroleum gas (such as propane or butane); areas where the air
contains chemicals or particles, such as grain, dust, or metal powders; and
any other area where you would normally be advised to turn off your vehicle
engine.
For vehicles equipped with an air bag
An air bag inflates with great force. DO NOT place objects, including both
installed or portable wireless equipment, in the area over the ai r bag or in
the air bag deployment area. If in-vehicle wireless equipment is improperly
installed and the air bag inflates, serious injury could result.
Battery care
The phone’s battery stores a large amount of energy when fully charged. If
the battery is punctured, crushed, s everely overheated, or charged in a
non-QUALCOMM charger, this energy can be released suddenly and result
in potential in jury. D o not o ver heat t he bat tery by leav ing i t on a heat er or
in the sun, and do not dispose of the battery in a trash compactor or
incinerator. Use only charging accessories manufactured by QUALCOMM,
and discontinue use of the battery if it becomes damaged.
65
Page 74

Safety Information
Other safety issues
In order to avoid the potential for confusing th e phone as a weapon, the
phone features a distinctive flame orange band at the tip of the antenna,
which is a convention used by manufacturers of various devices and is
familiar to safety officers in the country of manufacture and other
countries. Do not remove or cover the band, and avoid using or handling
the phone in a threatening manner or so as to suggest that the phone is a
weapon.
66
Page 75

Accessories
Caution
The optional accessories described in this section are available from your
satellite or cellular service provider.
Allow only authorized personnel to service the accessories.
Unauthorized service can invalidate the warranty.
Battery
An extra battery allows yo u to have a charged ba ttery availa ble at al l times.
Leather case
A leather case with a wrist strap protects your phone and provides carrying
convenience.
AC wall charger
The North American and European version AC wall chargers supply power
to the phone and fast charge the battery while it is attached to the phone.
Both chargers operate at 110V and 220V.
Universal travel charger
The universal travel charger allows you to charge a battery attached to the
phone. At the same time, you can charge a battery detached from the phone
and installed in the univ e rs al tra ve l cha r ge r . Thre e opt io nal plugs are
available to adapt the universal travel charger for use in different
countries.
Cigarette lighter adapter
The cigarette lighter adapter supports both U.S. and European vehicles.
For European vehicles, insert the adapter into the sleeve.
Plug the adapter into your vehicle’s cigarette lighter to supply power to the
phone (with or without the battery attached). You can also fast charge the
battery at the same time.
Data cables
Various data cable s or adaptors are avail able that allow you to c onnect your
phone directly to IBM® PC-compatible computers , Apple® Macintosh®
computers, Palm™ handheld, or UNIX®-based computers. See the
QUALCOMM Globalstar packet data kit user documentation that comes
with your data cable fo r more information.
67
Page 76

Accessories
Caution
Hands-free car kit
With the QUALCO MM Globalstar Hands-Free Car Kit, you can adapt your
phone for hands-free operation in your vehicle. For more information, see
the QUALCOMM Globalstar hands-free car kit user documentation.
Allow only authorized pe rson ne l t o i nsta ll or s erv ice th e ca r kit .
Faulty installation or service can be dangerous and can
invalidate the warr a nt y.
68
Page 77

Troubleshooting
If you have a problem with your phone that you cannot solve by following
these troubleshooting tips, contact your satellite or cellular service
provider. (You may have diffe rent service provide rs for Global star sa tellite
service and cellular service.)
Problem Solution
Turning the phone on
Charging the battery
Battery draining quickly
■ Hold for more than one second.
■ Check the battery installation.
■ Recharge or replace the battery.
■ Install only QUALCOMM batteries.
■ Check that the battery contacts are
clean and dry.
■ Check the charger connection.
■ If the battery does not charge at first,
remove the charger plug from the
phone, wait ten seconds, and then
reinsert the plug.
■ Check the battery temperature. If it is
too warm, allow it to cool before
recharging it.
■ Replace the battery if it is several
years old.
■ Check that your Globalstar satellite
antenna is pointing straight up and
has a clear view of the sky to conserve
battery life.
■ Set the backlight option to “off” (see
Backlight, page 42).
■ Replace the battery if it is several
years old.
■ Check the battery temp erature. If
temperatures are too warm or too cold,
battery life is decreased.
69
Page 78

Troubleshooting
Problem Solution
Making calls ■ Rotate or fully extend the appropriate
antenna.
■ In Globalstar satellite mode, be sure
the satellite antenna has a clear view
of the sky.
■ Check that you selected the correct
service mode:
Globalstar: Press and hold to
display the mode menu, and press
for Globalstar.
Cellular: Press and hold to
display the mode menu, and press
for Digital or for Analog.
■ Remove all service providers from the
Prohibited List (see Erasing from
Prohibited List, page 54).
■ If “Service Not Found” displays, check
the auto preference and mode
selection settings (see Auto Mode,
page 56, and Manual Mode, page 56).
■ Check the signal strength indicator.
■ Check that the security module is
properly installed. If the security
module was removed, turn the phone
off and on.
■ If “Calling is Restricted” displays,
check the Restrict Phone setting
under the Security menu.
70
Page 79

Troubleshooting
Problem Solution
Receiving calls ■ Check that the phone is turned on.
■ Check that the ringer is loud enough.
■ Rotate or fully extend the appropriate
antenna.
■ In Globalstar satellite mode, be sure
that the satellite antenna has a clear
view of the sky.
■ Check that you selected the correct
service mode:
Globalstar: Press and hold to
display the mode menu, and press
for Globalstar.
Cellular: Press and hold to
display the mode menu, and press
for Digital or for Analog.
■ Remove all service providers from the
Prohibited List (see Erasing from
Prohibited List, page 54).
■ Check the signal strength indicator.
■ Check that the security module is
properly installed. If the security
module was removed, turn the phone
off and on.
Losing calls
Remembering your lock code
or PIN (personal
identification number)
■ In Globalstar satellite mode, be sure
that your satellite antenna is pointing
straight up when placed next to your
head and when using the keypad or
viewing the screen.
■ In Globalstar satellite mode, be sure
that the satellite antenna has a clear
view of the sky.
■ Rotate or fully extend the appropriate
antenna.
■ Check the signal strength indicator.
■ Contact your satellite or cellular
service provider for the lock code for
the Security menu or phon e lock
feature.
■ Contact your cellular service provider
for the PIN used t o ma ke analog calls.
71
Page 80

Troubleshooting
72
Page 81

Index
A
AC wall charger 67
accessories 67
adaptors, data 67
air bag safety 65
alerts 46
fade 46
minute 46
new message 47
service change 47
all calls 32
analog mode indicator 9
answering calls 5, 6
antenna 10
cellular 4
safety 63
satellite 2, 3
any-key answer 49
auto answer 47
auto hyphen
pauses 18
auto hyphens 43
auto mode 56
auto NAM 57
B
backlight, settings 42
banner 43
battery
charge indicator 59
charge time 60
charger indicator 9
chargers 60
charging 59
decrease life 42
guidelines 59
increase life 42
low charge 60
removal 61
replacement 61
typical performance 59
C
call history
accessing 23
call types 23
erasing 37
viewing details 24
call in progress indicator 9
call information menu 31
all calls 32
data calls 32
home calls 31
last call 31
recent calls 32
roam calls 31
call waiting 14
caller ID 14
calls
emergency 13
making cellular calls 4
making satellite calls 4
missed 6
redialing 13
cellular antenna 10
extending 4
cellular mode 1, 56
charger
universal travel 67
wall 67
charging battery 59, 60
check mark indicator 9
cigarette lighter adapter 67
clear key 16
defined 8
counter
resetting 33
undo resetting 33
D
data cables 67
data calls 32
adaptors 67
data cables 67
making 5
set baud rate 30
deleting
letters 17
numbers 12
digital mode indicator 9
displaying phone number 6
driving safety 64
DTMF tones 21, 24
Index-1
Page 82

E
earpiece volume 40
editing
banner 43
letters 17
numbers 12
phone book entries 20
electronic devices 64
emergency calls 13
encryption 9
end key 16
defined 8
ending calls 6
entering
hyphens 43
letters 17
numbers 12
pauses 18
priority numbers 36
punctuation 17
spaces 17
erasing
all phone book entries 37
all SMS messages 37
call history list 37
phone book entries 20
F
fade alert 46
features menu 29
key guard 29
scratchpad 29
find home 52
finding phone book entries 19
force service provider selection 55
G
Globalstar satellite mode 1, 56
Globalstar time zone 44, 45
H
hands-free car kit 68
hard pauses 18
hearing aids 64
home calls 31
hyphens
entering automatically 43
entering manually 43
I
indicator
analog mode 9
battery charge 9
call in progress 9
check mark 9
digital mode 9
light, defined 7
locked message 9
no service 9
roaming 9
satellite mode 9
scroll arrows 9
signal strength 9
text message 9
unlocked message 9
voice message 9
information key 8, 10
international dialing 13
K
key beep length 41
key beep sound 40
key beep volume 41
key guard 29
key presses 1
keypad 7
known list 52, 53
L
language 46
last call 31
lists
known 52
preferred 52
prohibited 53
lock code, about 35
lock code, changing 36
locked message indicator 9
locking messages 27, 28
locking phone 35
M
main menu 16
manual mode 56
shortcut 2
medical devices 64
memory 27, 28
text message 27
menu
call history 23
call information 31
features 29
messages 25
my numbers 58
phone book 17
Index-2
Page 83

preferences 39
security 35
system 51
messages 25
call back numbers 27
calling voice mail system 26
erasing text 27
locking 27, 28
storing 27
text 26
unlocking 28
voice mail notifications 25
messages menu 25
minute alert 46
mode
cellular 1, 56
power save 12
satellite 1, 56
standby 11
mute phone 13
mute stereo 41, 42
my numbers 58
N
NAM Select
setting auto NAM 57
setting NAM 58
setting system 58
navigating menus 16
new message alert 47
no service indicator 9
numbers
deleting 12
editing 12
entering 12
O
one-touch dial
setting 48
using 22
one-touch dialing
setting 48
P
pacemakers 64
pauses 18
entering 18
phone book
editing entrie s 20
erasing all entries 37
erasing entries 20
finding entries 19
nonsecret entries 20
saving entries 18
secret entries 20
view or change secret en tries 21
viewing numbers 21
phone book menu 17
phone lock 35
phone number, displaying 6
PIN
entering 38
sending 49
plus key dialing 13
power save mode 12
preferences menu 39
alerts 46
calling 47
display 42
sounds 39
preferred list 52
adding 54
deleting 54
editing 54
reordering 54
viewing 53
prepend 21
priority numbers 36
privacy 9
prohibited lis t 53
adding 54
erasing 54
viewing 53
R
radio frequency 63
receiving ca lls 5
recent calls 32
redial
auto 48
manual 13
registering phone 53
removing battery 61
reordering preferred list 54
replacing battery 61
resetting call counters 33
resetting preferences 38
restricting phone 36
ringer silencing 40
ringer type 39
ringer volume 39
roam calls 31
roaming 4, 52
indicator 9
Index-3
Page 84

S
safety
air bags 65
aircraft 65
antenna 63
blasting areas 65
driving 64
electronic devices 64
explosive atmospheres 65
hearing aids 64
hospitals 64
medical devices 64
pacemakers 64
radio frequency 63
satellite an tenna 2, 3, 10
satellite calls
making 4
preparing for 2
satellite mode 1, 56
satellite mode indicato r 9
saving menu changes 16
scratchpad 29
scroll arrows 9
scroll keys 1, 8
secret entries 20
security menu 35
enter PIN 38
erase call history 37
erase phone book 37
erase SMS messages 37
lock phone 35
new code 36
priority numbers 36
resetting preferences 38
restricted 36
unlock phone 35
security module 2, 10
sending PIN 49
sending tones 21
call history 24
manually 22
phone book 22
scratchpad 29
service alert 47
service provider
accessing information 55
force selection 55
select 52
show time 44
signal strength indicator 9
silence ringer 40
SMART KEY buttons 8
SMART KEY options 1, 8
SMS messages
about 25
erasing entries 37
SMS time 45
software version 52
sound 39
speed dialing 22
standby mode 11
standby time 59
status 51
stereo muting 41, 42
system menu 51
auto mode 56
find home 52
manual mode 56
NAM select 57
service provider 55
service provider sele ct 52
status 51
territory 55
version 52
T
talk time 59
territory 55
text message indicator 9
three-way calling 14
time
showing 44
SMS 45
time zone, Globalstar 44, 45
timed pauses 18
tones
DTMF 21
sending 21
sending by phon e book 22
sending manually 22
turning phone on 11
U
undo counter 33
universal travel charger 67
unlocked message indicator 9
unlocking messa ges 28
unlocking phone 35
Index-4
Page 85

V
version 52
voice mail 26
voice mail notifications 25
voice message indicator 9
voice messages 25
volume butto ns 8
W
wall charger 67
Index-5
Page 86

Index-6
 Loading...