

Page 1

Eudora® Email 7.1
Quick Start Guide
for Windows
1
Page 2

Quick Start Guide
for Windows
This Quick Start Guide shows how to install and configure the Eudora® software. It also
provides keystroke shortcuts and basic email procedures such as sending and receiving
messages.
TIP: The best way to use this Quick Start Guide is to PRINT it and keep it nearby when
installing, configuring, and using Eudora.
Finding Information
You can find more information about Eudora in the Eudora Email 7.1 User Manual for
Windows. The manual is available in Portable Document Format (PDF) on the Eudora web
site.
To access the manual
1. Go to the Eudora web site: www.eudora.com.
2. At the top of the page, choose Support (one of the blue boxes).
3. From the list, choose Eudora Manuals.
4. Under Eudora 7.1 for Windows, right-click User Manual.
The context menu opens.
5. Choose Save Target As.../Save As.
The Save As window opens.
6. Save the manual in the directory of your choice.
The manual topics are linked. When you see a topic associated with a page number in the
table of contents, index, or cross-reference, click the topic or page number and that topic
appears.
2
Page 3

Quick Start Guide for Windows
If you prefer, you can print the PDF manual. From the File menu in Acrobat Reader, choose
Print.
If you need help while using Eudora, go to the Help menu and choose a topic. Context
sensitive help is available by pressing F1 or clicking
need information on.
and selecting the option or field you
System Requirements
To install and use Eudora, you must have the following.
• PC running Microsoft Windows 98/2000/ME/XP or above. It is recommended that
you have the latest service pack for each operating system
• A mail account with an Internet Service Provider (ISP) that uses SMTP and POP3
or IMAP4 protocols
• Access to your mail account via a TCP/IP (Internet) network connection or via PPP
dial-up networking through a modem
Getting Started
Before you can successfully install Eudora, you need to know the following basic information
about your email account. Either your ISP or your email administrator can provide you with this
information.
• Email address
This is the email address that has been assigned to you by your ISP or your
organization. It is the address other people use to send you email. An example
email address is jim@myfirm.com
Record your Email address here.
• User name
This is the name you use to log into your email account. Your ISP or organization
provides it. It is generally, but not necessarily, the name that appears before the at
sign (@) in your email address (in the example above, "jim" is the user name).
3
Page 4

Quick Start Guide for Windows
Record your user name here.
• Mail account password
This password lets you access your email account. Your ISP or organization
provides it. Keep this password private.
• Incoming mail server name
Your incoming email account resides on a computer at your ISP or within your
organization. Your incoming mail server name is the full name of that computer (for
example, pop3mail.myfirm.com).
Record your incoming mail server name here.
•POP or IMAP
This is the protocol that your incoming mail server uses. Your incoming mail server
uses one of the following two Internet protocols, POP or IMAP, for storing and
forwarding your mail. Ask your ISP or your email administrator which one it uses.
NOTE: If you are setting up an IMAP account, it may require an IMAP Mailbox
Location Prefix. Obtain this from your ISP or your email administrator. Otherwise,
leave the following box blank.
If applicable, record your IMAP Mailbox Location Prefix here.
• Outgoing Mail Server Name
This server, an SMTP server, receives and processes all of your outgoing mail. It
also resides on a computer at your ISP or within your organization. The server
name is often the same as your incoming mail server name. Your SMTP server
name is the full name of that computer (for example, smtp.myfirm.com).
Record your SMTP Server name here (if known).
4
Page 5

Quick Start Guide for Windows
Installing Eudora
After you have recorded the previous information, you are ready to install, configure, choose
a Eudora mode, and register your copy of Eudora.
If you are installing over a previous version of Eudora, all of your messages, mailboxes,
folders, filters, and settings are maintained as long as you install Eudora in the same location
as your previous version.
To install Eudora
1. Exit any applications you are running including toolbars, memory management
programs, screen savers, and virus protection programs.
2. Double-click on the software archive to start the Setup program.
Installation begins, and you can see the InstallShield extract the Eudora files.
3. Read the Eudora Welcome window, then click Next.
4. Read the Software License Agreement and if you agree to the terms, click Yes.
5. If you want to install all components (if included), click Next. Otherwise, click the
components you do not want to install to deselect them. Click Next.
6. Specify a directory in which to install Eudora. If you are installing Eudora over your
current version of Eudora, choose your current Eudora directory to retain your
settings. If you are installing Eudora for the first time, you can choose any directory
you want. Click Next.
7. Specify a directory in which to store Eudora data files, such as mail, settings, and
address books. By default, Eudora will choose the User’s Application Data Folder.
You can choose any directory you want by selecting Custom Data Folder. If you are
upgrading a previous version, Eudora will default to the data folder used when
Eudora was last installed. Click Next.
Eudora is installed in the destination directory.
8. You are prompted to create a shortcut to open Eudora from your desktop. If you
don’t have a Eudora icon (from a previous version of Eudora) on your desktop, click
Yes.
5
Page 6
Quick Start Guide for Windows
9. When the installation is complete, you are prompted to view the Eudora README
file and visit the Eudora Premium Services web page. Click Finish to complete the
installation, view the README, and open the Premium Services web page. The
README gives you important information concerning this version of Eudora. The
Premium Services page provides links to other products that may enhance your
email experience.
Opening and Configuring Eudora
After you have successfully installed Eudora, you must configure your email account using the
information you entered in the Getting Started section of this guide. Eudora installs in a 30 day
Trial of Paid mode, reverting to Sponsored mode (with ads) 30 days after the first time you
launch the program, unless you enter a Paid mode registration code.
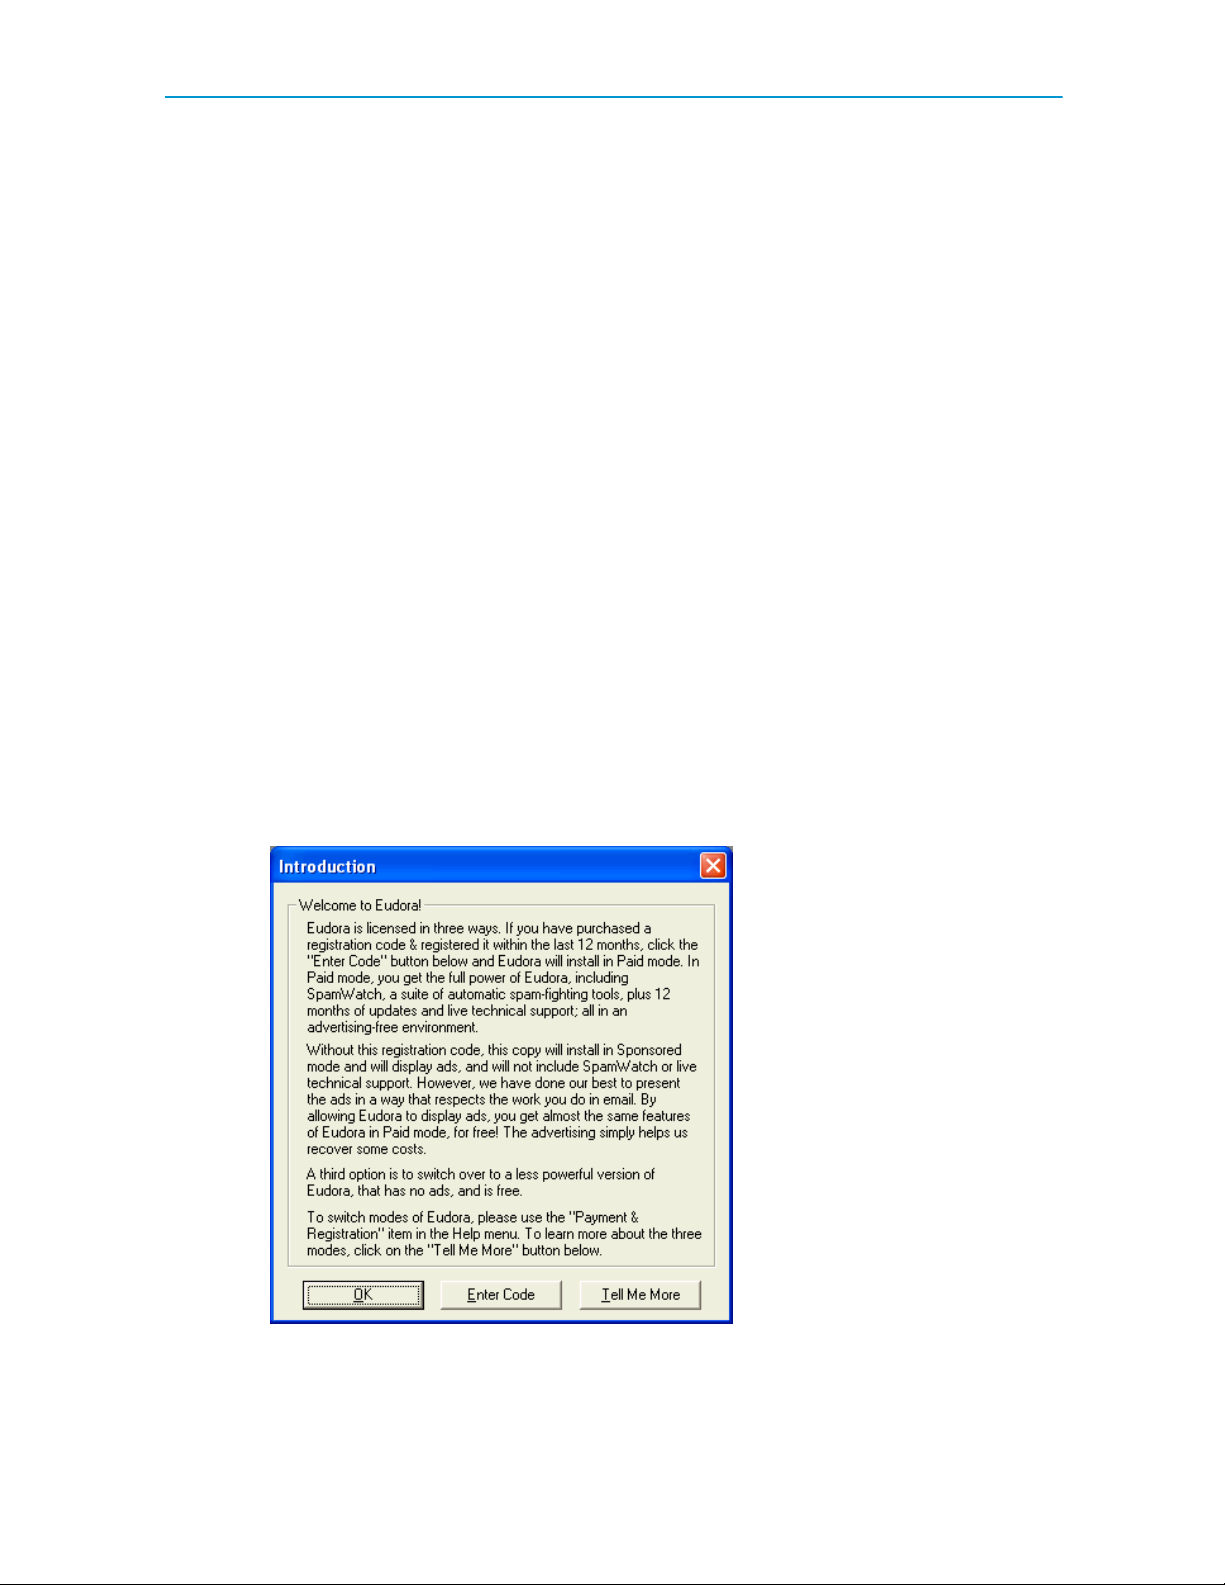
To open and configure Eudora
1. Open Eudora from the Start menu or click the Eudora icon on your desktop. The
first time you launch Eudora (unless you installed Eudora 7.1 over an older copy of
Eudora, in which case, the settings from the older copy are imported automatically
into Eudora 7.1), the Introduction window appears.
Introduction window
2. In the Introduction window, you can do the following:
• For more information about Eudora’s three modes, click Tell Me More.
6
Page 7

Quick Start Guide for Windows
A web site appears displaying information about Eudora’s three modes of
operation. Also, see
Operating Eudora in One of Three Modes on page 10.
• To use Eudora in Paid mode and having a Paid mode registration number, click
Enter Code.
A dialog box appears for you to enter your registration code.
• To use Eudora in Sponsored mode, click OK. Go to the next step.
The SpamWatch feature in Eudora 7.1 operates only in Paid mode. A prompt
appears asking you to buy Eudora if you want to use the SpamWatch feature.
SpamWatch prompt
3. In the Important Notice dialog box, do one or both of the following:
• To buy Eudora, click Pay Now.
A web site appears for you to enter registration and payment information.
• To get more information about SpamWatch, click Tell Me More.
A web site appears displaying information about SpamWatch.
4. To continue configuring Eudora in Sponsored mode without SpamWatch, click OK.
The Welcome window appears prompting you to begin setting up your account.
Subsequent windows appear allowing you to enter the information you provided in
the Getting Started section of this document.
5. To get started, click Next.
The New Account Wizard Account Settings window appears.
7
Page 8

Quick Start Guide for Windows
New Account Wizard window - Account Settings
6. Choose one of the following methods to set up your account.
• Create a brand new e-mail account—Choose this method to set up a new
account if you are not familiar with Eudora or other email programs. You are
prompted to enter one item of information per dialog box.
• Import settings from an existing e-mail account—Choose this method if you
want to import your settings, mail, and address book from Microsoft ® Outlook
Express™ 4.0 and 5.0, Outlook™ 98, Outlook 2000 or Netscape Messenger™
4.x versions into Eudora. For more information, go to:
http://www.eudora.com/techsupport/kb/1507hq.html
• Use an ACAP server to get your settings—Choose this method to instruct
Eudora to attempt to get your settings from an ACAP server. To get your settings
from an ACAP server, make sure you are connected to the Internet. Your email
administrator or ISP can provide you information as to whether an ACAP-based
setup is available to you.
If you choose the ACAP option and click Next, the Auto Configure window
appears. Click Next again to instruct Eudora to try to get your account settings
from the ACAP server. If the attempt fails, click Back and try one of the other
options.
• Skip directly to advanced account setup—Choose this method if you are
familiar with Eudora or other email programs. An Account Settings window
appears with two tabbed panels. You enter all of your Eudora information on
these panels.
8
Page 9

Quick Start Guide for Windows
If in the Account Settings window you choose to create a brand new email account and click
Next, the New Account Wizard begins walking you through the fields for which you need to
enter setup information.
You need to supply the following items in the windows of the New Account Wizard (click Next
after filling out each window):
• Your Name—Enter your name as you would like it to appear in the From field of all
of your outgoing messages from this email account, indicating to your recipients who
the mail is from.
• Email Address—Enter the email address that has been assigned to you by your ISP
or your email administrator. This is the address that other people will use to send you
email. Email addresses are generally of the form username@domainname, and
rmonte@myfirm.com for example.
• User Name—Enter the name that you will use to log in to this email account. This
name is provided by your ISP or your email administrator, and it usually consists of
the text that appears before the at sign (@) in your return email address. In the
example rmonte@myfirm.com, the login name is rmonte.
• Incoming Email Server—All of your incoming email messages are delivered to your
incoming email account, which resides on a computer that runs your incoming email
server. Once your messages arrive at your mail account, Eudora retrieves them to
your computer. Your incoming email server must use one of the two Internet-mail
communications protocols: POP or IMAP. If you are not sure which protocol it uses,
choose POP; you can always change this later. In the edit box, type the full name of
the computer that runs your incoming email server (for example,
server.myfirm.com).
If you chose IMAP in the previous setup panel, an IMAP Mailbox Location Prefix may be
required to indicate the location of your personal mailboxes on the IMAP server. If so, enter
the location prefix as given to you by your ISP or email administrator. If the information is not
required, leave the field blank. Now click Next. When you click Finish in the final window, your
new IMAP email account is set up.
If you chose POP in the previous setup window, click Finish in the final window, and your new
POP email account is set up.
Once you have completed setting up your account via the New Account Wizard, you are now
ready to receive messages. However, you may need to take an additional step to send
messages.
9
Page 10

Quick Start Guide for Windows
• Outgoing Email Server—All of your outgoing email messages are sent through a
specific server, usually an SMTP server. However, your outgoing server may be the
same as your incoming server. If you’re not sure what your outgoing server’s name
is, use the incoming server’s name.
If the computer that runs your POP or IMAP server also runs an SMTP server, then no
additional setup action is required. If your SMTP server runs on a different computer from the
one running your POP or IMAP server, then consult your ISP or email administrator to help
you set up the SMTP server. If you ever wish to change the settings of your email account, you
can do so from the Options windows (under the Tools menu).
Also, you can change these settings in the Account Settings dialog, which is accessed from
the Personalities window. This window lets you create alternate email accounts and edit the
settings in those accounts.
Once you have configured Eudora, you are ready to begin sending and receiving messages.
However, you may want to change the Eudora operating mode and register your copy of
Eudora. See
Opening and Configuring Eudora on page 6.
Operating Eudora in One of Three Modes
You can choose one of three operating modes on how you wish to use Eudora. They are as
follows:
• Paid mode—This mode provides the full-feature Eudora desktop email client
without advertising, and limited person-to-person technical support.
• Sponsored mode—This mode provides the full-featured Eudora desktop email
client at no charge, supported by sponsors' advertising. It includes all of the features
that are in the Paid mode except for BossWatch, Indexed Search, and SpamWatch.
• Light mode—This is an upgrade to the freeware version formerly known as Eudora
Light. It includes fewer features than the other modes and may include a sponsor
image or logo.
NOTE: For more information on technical support options see Technical Support on page 18,
and http://www.eudora.com/techsupport/options/ on the Eudora web site.
10
Page 11

Quick Start Guide for Windows
Changing Eudora Modes
If you would like to change the operating mode, for example to Sponsored mode, you can do
so right in the Eudora program.
To change the Eudora operating mode after you install Eudora 7.1
1. From the Help menu, choose Payment & Registration.
The Payment and Registration window appears.
Payment and Registration Window
2. In the Which Eudora is right for you? section:
• To use Eudora in Sponsored mode, click Sponsored Mode (free, with ads).
Eudora displays the ad window.
• To use Eudora in Paid mode, click Paid Mode (costs money, no ads).
Eudora displays the Eudora web site for you to purchase Eudora, or if you have
previously entered a Paid code that is valid for this version, Eudora switches to
Paid mode .
• To use Eudora in Light mode, click Light Mode (free, fewer features).
11
Page 12

Quick Start Guide for Windows
Eudora changes to Light mode by shutting down certain features. The features
that are disabled are listed in the Downgrading to Eudora Light dialog box.
3. In the Keeping Current section:
• To register, click Register with Us.
Eudora displays a web site where you can enter registration information. See
the next section for more information.
• To add or change your profile, click Profile.
Eudora displays a web site where you can provide information about yourself to
help in customizing which ads would be of interest to you.
• To find the most current version of Eudora, click Find the Latest Versions.
The Eudora web site displays where you can retrieve the latest version of
Eudora and lets you know if there is a cost to upgrade.
NOTE: You can tell which mode you are in because that button is depressed. To
find out more information about the modes, click Go to the Eudora web site for
more information.
4. To exit the dialog box, click Close.
Registering Eudora
If you are using Eudora in Paid mode, you need to register to be eligible for technical support
Also, you need to be registered to upgrade to newer version of Eudora and stay in Paid mode.
If you don’t register or use Eudora in Sponsored or Light mode, you are not eligible for
technical support.
NOTE: If you switch from one mode to another, you must register in that mode even though
you registered in your previous mode. For example, if you are a Paid mode registered user,
and you wish to get a refund and use Sponsored mode, you must reregister in Sponsored
mode.
To register your copy of Eudora:
1. From the Help menu, choose Payment & Registration.
The Payment & Registration window appears.
2. In the Keeping Current section, click Register with Us.
12
Page 13

Quick Start Guide for Windows
Eudora takes you to Eudora’s registration web page.
3. Enter your information, click Register.
An email will be sent to you confirming your registration.
Creating and Sending a Message
Writing and sending a message
1. From the Message menu, choose New Message.
2. Type an email address in the To field.
3. Press Tab to move the cursor to the Subject field.
4. Type the subject of your message (optional, but recommended).
5. Press Tab and type in the Cc field email address (optional).
6. Press Tab and type in the Bcc field email address (optional).
7. Press Tab and type in the body of the message.
8. After completing the message, click Send.
TIP: You can type multiple addresses in the To, Cc, and Bcc fields, as long as you separate
them with commas.
Also, you can save a message without sending it by selecting Save from the File menu. Your
message is saved in the Out mailbox. It can be reopened and edited at any time prior to
sending it.
Checking for and Receiving Mail
You can manually check for mail or set up Eudora to automatically check for mail.
Checking mail manually
1. From the File menu, choose Check Mail.
2. If Eudora asks for your password, type it in the Password dialog box and click OK
(server passwords are usually case-sensitive).
13
Page 14

Quick Start Guide for Windows
3. If there is no mail for you, a "no mail" alert appears. Click OK.
4. If you have new mail, Eudora transfers the messages one by one and then displays
a "new mail" alert. Click OK.
5. New messages are delivered to your In mailbox. This mailbox opens automatically
and your new message summaries are added to the end of the mailbox list.
6. Double-click a message summary to open the message, or single-click a message
summary to view the message in the lower preview pane.
Checking mail automatically
1. From the Tools menu, choose Options. Then, click the Checking Mail category
icon.
2. Enter a number of minutes in the field Check for mail every ___ minutes to turn
on automatic mail checking. In the text box, type the number of minutes between
automatic mail checks (15 is the recommended interval).
3. To save your changes and close the Options window, click OK.
Eudora automatically checks for mail at the interval you have requested.
Replying to a Message
To reply to a message
1. Choose or open the message you want to reply to.
2. From the Message menu, choose Reply to display a new composition window.
Eudora completes the To, From, and Subject fields based on the original message.
3. Remove those parts of the original text that you don’t want to include in your reply
and type in your own text.
4. When you finish your response, click Send.
14
Page 15

Quick Start Guide for Windows
Forwarding a Message
To forward a message
1. Choose or open the message you want to forward.
2. From the Message menu, choose Forward to display a new composition window.
Eudora completes the Subject field based on the original message and transfers
the header and body of the original message to the new message body.
3. Type the addresses of the people you want to forward the message to in the To
field.
4. The existing text may be edited, and more text may be added to the message.
5. After editing the message, click Send to forward it.
Redirecting a Message
Eudora’s Redirect command lets you pass on a received message that was intended for
someone else, allowing that person to reply directly to the original sender.
To redirect a message
1. Choose or open the message you want to redirect.
2. From the Message menu, choose Redirect to display a new composition window.
Eudora completes the From field with the address of the originator, followed in
parentheses by the words "by way of" and your name and/or email address. The
Subject field and message body are also completed based on the original
message.
3. Type the addresses of the people to whom you wish to redirect the message in the
To field.
4. The existing text may be edited, and more text may be added to the message.
5. Once the editing is completed, click Send.
NOTE: Email courtesy suggests that you not do much editing of the message you’re
redirecting. If you must add comments, put them in brackets [ ] with your initials, like this: [Don:
Please reply to this right away. SD]
15
Page 16

Quick Start Guide for Windows
Shortcuts
The shortcut keys for Eudora functions are the following:
Press these keys This will happen...
Ctrl + 0 (zero) Opens Out mailbox
Ctrl + 1 Opens In mailbox
Ctrl + 6 Checks spelling
Ctrl + ’ Pastes as quotation
Ctrl + . Removes one level of excerpt bars
Ctrl + > Adds one level of excerpt bars
Ctrl + , Finishes address book entry (nickname)
Ctrl + A Selects all
Ctrl + B Makes text bold
Ctrl + C Copies selection to clipboard
Ctrl + D Deletes a message
Ctrl + E Sends immediately or queue for delivery
Ctrl + F Opens Find Messages window
Ctrl + Shift + F Opens Find Text dialog box
Ctrl + G Find text again
Ctrl + H Attaches file
Ctrl + I Makes text italic
Ctrl + J Filters messages manually OR moves messages to the
Junk mailbox
Ctrl + Shift + J Filters messages out of the Junk mailbox to the designated
mailbox
Ctrl + K Makes address book entry (nickname)
Ctrl + L Opens Address Book
Ctrl + M Checks mail
Ctrl + N Opens a new message
Ctrl + O Opens file
Ctrl + P Prints a message
Ctrl + Q Quits Eudora
16
Page 17

Quick Start Guide for Windows
Press these keys This will happen...
Ctrl + R Replies to the message
Ctrl + Shift + R Replies to all
Ctrl + S Saves current window
Ctrl + T Sends queued messages
Ctrl + U Underlines text
Ctrl + V Pastes from the clipboard
Ctrl + W Closes one mailbox at a time (message or window)
Ctrl + Shift + W Closes all open mailboxes (messages or windows)
Ctrl + X Cuts (deletes what’s selected and puts it on the clipboard)
Ctrl + Y Opens Directory Services
Ctrl + Z Undoes the last operation
Ctrl + Shift + Z Redoes the last undone operation
Ctrl + Tab Goes through all open mailboxes
arrows Moves from one message to another in a mailbox (depends
on your Miscellaneous options
[Tools>Options>Miscellaneous])
Enter Selects the outlined button in any dialog, alert, or window,
or open the selected messages or URL
Esc Stops any operation currently in progress
F1 Displays Help
Shift + F1 Turns on the context sensitive help
F2 Renames the selected item in a tool window (e.g., the
Mailboxes window or the Address Book)
F3 Finds again
F5 Refreshes the view in the File Browser window
F6 Toggles the focus between the parts of a split window.
F7 Shows or hides one half of a split window (current window
only): in composition windows, shows/hides the message
header; in mailbox windows, shows/hides the message
preview pane (if it is set to display)
Page Up, Page Down Scrolls up or down through the window
Home Scrolls to the beginning of the mailbox window or to the
beginning of the line in a message
End Scrolls to the end of the mailbox window or to the end of
the line in a message
17
Page 18

Quick Start Guide for Windows
Technical Support
For information on Eudora’s basic functions, refer to the procedures provided in this guide and
to your online help, which you can access from the Eudora Help menu.
Many common issues can be solved by visiting the Eudora technical support web site
www.eudora.com/techsupport/win. The technical support web site provides online answers to
your technical questions about QUALCOMM’s Eudora software products. Go to the Technical
Support web site to get valuable “how to” information and step-by-step interactive tutorials
www.eudora.com/techsupport/tutorials. Also, you will be able to retrieve most current Eudora
products and documentation. (Sponsored and Light mode users may use the Eudora web site
technical support and tutorials.)
In addition, you can learn from other Eudora users by searching the archives or posting a
question to the
helping one another.
Eudora User Forums. The forums are a free online community of Eudora users
If you still need help after reviewing all of the available materials: the User Manual, this Quick
Start Guide, the README files, the Online Help, and the Technical Support Web Site, contact
your ISP or email administrator, or the Eudora Technical Support group. Before you call
technical support, you need to register your copy of Eudora in Paid mode. Be sure to register
as soon as possible to avoid any delays in receiving technical support.
Person to person support by phone or email is available to Paid mode users who have a valid
registration code. Eudora tech support reps are available Monday - Friday from 8 A.M. to 5
P.M. Pacific Time using the following phone number and email address:
Phone: (858) 658-1292 (Paid mode users only)
Email: eudora-support@qualcomm.com (Paid mode users only) When sending email,
make sure to include your Paid Mode registration code in the Subject field or in the body of
your message.
18
Page 19

Quick Start Guide for Windows
Copyright © 2006 QUALCOMM Incorporated, San Diego, CA 92121. All rights reserved.
Export of this technology may be controlled by the United States Government. Diversion
contrary to U.S. law prohibited.
QUALCOMM, Eudora, Eudora Pro, Eudora Light, and QChat are registered trademarks of
QUALCOMM Incorporated.
PureVoice, SmartRate, MoodWatch, WorldMail, Eudora Internet Mail Server, and the Eudora
logo are trademarks of QUALCOMM Incorporated.
QuickTime is a trademark used under license, registered in the U.S. and other countries. All
other trademarks are property of their respective owners.
September 2006
80-48360-5 Rev B
19
 Loading...