

Page 1

Qualcast
1300W Lawn Rake and Scarifier
(Model: YT6702)
Instruction Manual
3565683
After Service Support
Helpline No.: 0333 2000 336
Web site: http://www.homebasespares.co.uk
WARNING! Important-Please read these instructions fully before starting assembly.
These instructions contain important information that will help you get the best from your
product, ensuring it is assembled correctly and safely. If you need help or have damaged or
missing parts, call the Customer Helpline on
0333 2000 336.
Oct 2014
Page 2

CONTENTS
GENERAL POWER TOOLS SAFETY WARNINGS…………………………………………….....….3
Work Area Safety…………………………………………………………………………...……3
Electrical Safety…………………………………………………………………………………..3
Personal Safety……………………………………………………………………………………4
Power Tool Use and Care………………………………………………………………..….…4
Service………………………………………………………………………………………..…....5
SPECIAL SAFETY INSTRUCTIONS FOR LAWN RAKE AND SCARIFIER………….…………...…5
SYMBOLS …………………………………………………………………………………………..…...9
DIAGRAM…………………………………………………………………………………………...…12
PARTS LIST………………………………………………………………………………………...…....13
INTENDED USE……………………………………………………………………………….......……14
ASSEMBLY………………………………………………………………………………………..…….14
Handle Bar Assembly…………………………………………………………………..………15
Grass Catcher Assembly……………………………………………………………….…….16
Cable Routing…………………………………………………………………………………..17
Cutting Depth Adjustment………………………………………………………….………..18
Power Connection…………………………………………………………………….……….19
OPERATION………………………………………………………………………………….….……..20
Starting and Stopping………………………………………………………………….……..20
General Operation…………………………………………………………………….………20
Scarifying……………………….………………………………………………………….……..22
Raking……………………………………….…………………………………………….………22
CLEANING AND MANTENIANCE …………………………………………………………..........22
Service and Storage………………………….………………………………………….…….23
Replacing/Changing Cutting Device……………………………………………............23
After Use………………………………………………………………………………….……...24
Grass Catcher…………………………………………………………………………….…….24
Transportation…………………………………………………………………………….…….25
TECHNICAL DATA…………………………………………………………………………….…......25
GUARANTEE ………………………………………………………………………………….………26
TROUBLESHOOTING ……….…………………………………………………………….….……...27
RECYCLING AND DISPOSAL…………………………………………………………….….……..27
PLUG REPLACEMENT………………………………………………………………………….…….28
2
Page 3

E
e
eba
c
w
nPro
o
K
u
u
K
s
e
Pplu
r
e
D
a
Dcor
a
W
e
T
e
P
o
e
a
o
r
N
a
p
n
u
o
e
s
c
r
c
S
r
p
y
n
o
n
s
o
r
a
d
a
C
l
a
s
i
d
d
c
d
n
n
e
a
s
e
w
i
t
e
w
f
c
s
S
W
a
a
n
w
s
w
i
c
e
w
s
e
e
t
n
e
g
c
t
o
c
f
W
d
n
s
u
r
r
o
d
a
e
o
e
l
n
n
t
o
e
u
w
s
G
t
y
e
m
d
s
n
n
k
e
h
i
c
d
e
e
o
s
t
t
y
e
b
s
e
a
p
s
l
a
t
a
e
o
u
c
r
r
c
r
e
g
e
o
a
u
g
u
d
w
e
s
e
o
r
f
n
a
NERAL
G
G
neral P
Th
term "p
ttery-ope
de
lared tot
h
ole work
co
sideratio
per meas
ap
plication t
W
rk Area
a)
eep work
Cl
ttered or
b)
Do not op
liq
ids, gase
Po
wer tools
eep child
c)
Di
tractions
El
ctrical
a)
ower tool
gs with ea
Un
modified
Avoid bod
b)
ref
igerators.
Th
re is an i
c)
o not exp
W
ter enteri
d)
o not abu
d away fr
D
maged o
e)
hen oper
Us
of a cor
f)
he use of
Us
of an R
WARNI
Failur
seriou
WARNI
Save
WARNI
OWER
wer Too
NG Read a
to follow
s injury.
NG! Read
ll warning
wer tool"
ated (cor
G! Depen
l! Adopt p
rocess in
.
res inclu
ols, keepi
Safety
area clea
dark area
rate pow
or dust.
reate sp
en and by
an caus
afety
plugs must
thed (grou
lugs and
contact
creased r
se power
g a pow
e the cord
m heat, oil
entangle
ting a po
suitable
residual
D reduce
TOOLS
Safety
ll safety w
the warni
ll safety w
and instru
n the war
less) po
ing on the
roper mea
luding tim
e among
g hands
and well l
s invite a
r tools in
rks which
tanders a
you to lo
match the
nded) pow
matching
ith earth
sk of elec
ools to rai
r tool will
. Never us
, sharp ed
d cords in
er tool ou
or outdo
urrent devi
the risk o
AFETY
arnings
rnings an
ngs and i
rnings de
ctions for f
ings refe
er tool.
actual use
ures to p
es the pr
others re
arm, perio
t.
cidents.
xplosive
may ignit
ay while
e control.
outlet. Nev
r tools.
outlets wi
d or grou
ric shock
or wet co
increase
the cord f
es or movi
rease th
doors, use
r use red
e (RCD)
electric
ARNIN
all instruc
structions
ignated b
ture refer
s to your
of the pro
otect your
duct is ru
gular mai
ical brea
tmospher
the dust
perating a
r modify t
l reduce r
ded surfa
if your bo
ditions.
he risk of
r carrying,
ng parts.
risk of el
an extensi
ces the ri
hen using
hock.
S
ions.
may resul
the s
nce.
ains-op
uct the vi
elf again
ning und
tenance
s and pro
s, such a
or fumes.
power too
e plug in
sk of elec
es, such
y is earth
lectric sh
pulling or
ctric sho
n cord sui
k of elect
his tool is
in electri
mbol and
rated (co
ration valu
t vibration
r no load
nd care
er plannin
in the pr
.
ny way. D
ric shock.
s pipes, r
d or gro
ck.
npluggin
k.
table for o
ic shock.
ecommen
shock, fi
all instruct
ded) po
s can diff
exposure
or switch
of the pr
of work p
sence of
not use a
diators, r
nded.
the power
tdoor use.
ed.
re and/or
ions.
er tool or
r from the
. Take the
d off into
duct and
ocesses.
lammable
y adapter
nges and
tool. Keep
3
Page 4

GENERAL POWER TOOLS SAFETY WARNINGS
Personal Safety
a) Stay alert, watch what you are doing and use common sense when operating a power tool. Do not
use a power tool while you are tired or under the influence of drugs, alcohol or medication.
A moment of inattention while operating power tools may result in serious personal injury.
b) Use personal protective equipment. Always wear eye protection.
Protective equipment such as dust mask, non-skid safety shoes, hard hat, or hearing
protection used for appropriate conditions will reduce personal injuries.
c) Prevent unintentional starting. Ensure the switch is in the off-position before connecting to power
source and/or battery pack, picking up or carrying the tool.
Carrying power tools with your finger on the switch or energising power tools that have the
switch on invites accidents.
d) Remove any adjusting key or wrench before turning the power tool on.
A wrench or a key left attached to a rotating part of the power tool may result in personal
injury.
e) Do not overreach. Keep proper footing and balance at all times.
This enables better control of the power tool in unexpected situations.
f) Dress properly. Do not wear loose clothing or jewellery. Keep your hair, clothing and gloves away
from moving parts.
Loose clothes, jewellery or long hair can be caught in moving parts.
g) If devices are provided for the connection of dust extraction and collection facilities, ensure these
are connected and properly used.
Use of dust collection can reduce dust-related hazards.
Power Tool Use and Care
a) Do not force the power tool. Use the correct power tool for your application.
The correct power tool will do the job better and safer at the rate for which it was designed.
b) Do not use the power tool if the switch does not turn it on and off.
Any power tool that cannot be controlled with the switch is dangerous and must be repaired.
c) Disconnect the plug from the power source and/or the battery pack from the power tool before
making any adjustments, changing accessories, or storing power tools.
Such preventive safety measures reduce the risk of starting the power tool accidentally.
d) Store idle power tools out of the reach of children and do not allow persons unfamiliar with the
power tool or these instructions to operate the power tool.
Power tools are dangerous in the hands of untrained users.
e) Maintain power tools. Check for misalignment or binding of moving parts, breakage of parts and
any other condition that may affect the power tool’s operation. If damaged, have the power tool
repaired before use. Many accidents are caused by poorly maintained power tools.
f) Keep cutting tools sharp and clean.
Properly maintained cutting tools with sharp cutting edges are less likely to bind and are
easier to control.
g) Use the power tool, accessories and tool bits etc. in accordance with these instructions, taking
into account the working conditions and the work to be performed.
Use of the power tool for operations different from those intended could result in a hazardous
situation.
4
Page 5

GENERAL POWER TOOLS SAFETY WARNINGS
Service
1. Have your power tools serviced by a qualified repair person using only identical
replacement parts. This will ensure that safety of the power tool is maintained.
2. For cable replacement, please contact the specified helpline for spare parts.
SPECIAL SAFETY INSTRUCTIONS FOR LAWN RAKER AND SCARIFIER
Training
Read the instructions carefully. Be familiar with the controls and the proper use of the
machine.
Preparation
1. Never allow people unfamiliar with these instructions or children to use the product. Local
regulations can restrict the age of the operator.
2. Never operate the product while people, especially children, or pets are nearby.
3. Keep in mind that the operator or user is responsible for accidents or hazards occurring to
other people or their property.
4. Wear ear protection and safety glasses at all times while operating the product.
5. Always wear substantial footwear and long trousers while operating the product. Do not operate
the product when barefoot or wearing open sandals.
6. Thoroughly inspect the area where the product is to be used and remove all stones, sticks, wires,
bones and other foreign objects.
7. Before using, always visually inspect to see that the tines, bolts are not worn or damaged.
Replace worn or damaged tines and bolts in sets to preserve balance.
Operation
1. Operate the product only in daylight or in good artificial light.
2. Avoid operating the product in wet grass or take additional precautions to avoid slipping.
3. Always be sure of your footing on slopes.
4. Walk, never run.
5. Always work across the face of slopes, never up and down.
6. Exercise extreme caution when changing direction on slopes.
7. Do not operate the product on steep slopes.
8. Use extreme caution when reversing or pulling the product towards you.
9. Stop the tines if the product has to be tilted for transportation. Do not operate the tines when
crossing surfaces other than grass, and when transporting the product to and from the
working area.
10. Never operate the product with defective guards, or without safety devices, for example
deflectors and/or grass catchers, in place.
11. Switch on the motor carefully according to instructions and with feet well away from the
tine(s).
5
Page 6

SPECIAL SAFETY INSTRUCTIONS FOR LAWN RAKER AND SCARIFIER
12. Do not tilt the product when switching on the motor, except if the product has to be tilted for
starting. In this case, do not tilt it more than absolutely necessary and lift only the part which is
away from the operator.
13. Do not start the motor when standing in front of the discharge opening.
14. Do not put hands or feet near or under rotating parts. Keep clear of the discharge opening at
all times.
15. Never pick up or carry a product while the motor is running.
16. Stop the motor and disconnect the product from the power supply:
--before clearing blockages or unclogging the discharge opening;
--before checking, cleaning or working on the product;
-- after striking a foreign object. Inspect the product for damage and make repairs before
restarting and operating the product;
--if the product starts to vibrate abnormally (check immediately).
--whenever you leave the product.
17. Never use the scarifier without the grass catcher bag securely fitted.
Maintenance and storage
1. Keep all nuts, bolts and screws tight to be sure the product is in a safe working condition.
2. Allow the product to cool before storing in any enclosure.
3. Check the grass catcher frequently for wear or deterioration.
4. Examine the product regularly and replace worn or damaged parts for safety.
Additional safety warnings
1. Warning! Beware of sharp tines. Tines continue to rotate after the motor is switched off.
2. Do not use the product if the cords are damaged or worn.
3. Do not to connect a damaged cord to the supply or touch a damaged cord before it is
disconnected from the supply. A damaged cord can lead to contact with live parts.
4. Keep extension cords away from the tines. The tines can cause damage to the cords and lead
to contact with live parts.
5. If operating a garden power tool in a damp location is unavoidable, use a residual current device
(RCD) protected supply. Use of an RCD reduces the risk of electric shock.
It is recommended that appliances should be supplied via a residual current device (RCD) with a
tripping current of not more than 30mA.
Vibration and noise reduction
To reduce the impact of noise and vibration emission, limit the time of operation, use low
vibration and low-noise operating modes as well as wear personal protective equipment.
Take the following points into account to minimize the vibration and noise exposure risks:
1. Only use the product as intended by its design and these instructions.
2. Ensure that the product is in good condition and well maintained.
3. Use correct application tools for the product and ensure they in good condition.
4. Keep tight grip on the handles/grip surface.
5. Maintain this product in accordance with these instructions and keep it well lubricated
(where appropriate).
6
Page 7

P
P
m
mMe
A
e
S
a
s
epowit
Hpe
Ihid
D
b
e
m
amaba
e
e
awe
esta
m
S
w
o
e
a
a
o
p
a
k
c
f
m
d
c
N
n
e
e
e
d
e
t
f
d
e
u
G
e
N
d
h
u
e
n
c
g
i
t
a
e
d
o
e
s
o
e
p
o
o
n
g
l
o
n
y
s
d
T
r
o
n
p
h
o
a
t
v
l
r
u
r
a
m
o
p
h
t
v
o
f
b
d
s
p
O
h
d
t
u
c
n
c
e
c
e
e
p
D
o
d
o
c
u
o
a
a
m
e
N
t
e
e
a
r
a
e
o
t
o
p
y
e
w
m
u
a
T
b
p
d
o
o
c
s
R
s
z
t
r
c
t
e
o
e
r
v
s
w
n
n
o
o
t
C
a
o
d
r
a
e
t
e
a
o
s
o
s
g
e
u
t
d
e
u
R
o
t
a
e
n
r
i
m
a
u
o
o
u
e
s
v
n
e
S
ECIAL
6.
lan your
E
ergency
Fa
iliarize y
morize th
ha
zards.
1.
lways be
int
rvention
2.
witch off
H
ve the pr
pu
t it into o
Re
idual risks
Ev
n if you
tential ris
h the stru
1.
ealth de
riods of ti
2.
njuries an
den obje
3.
anger of
Vi
ration
Th
Europea
ar
vibratio
m
nufactur
ke inform
sis and th
Th
declare
us
d with th
C
lculating
bsite has
Th
declare
ted abov
e
ission val
WARNIN
from th
WARNI
This fiel
reduce
consult
AFETY I
ork sche
urself wit
safety di
lert when
can prev
nd discon
duct che
eration a
re operat
s of injury
ture and
ects resul
e or not
damag
ts during
injury an
G! This pr
d may und
the risk of
their doct
n Physical
syndrom
rs and su
d decisi
choice
vibratio
current
he actua
urther inf
vibratio
and ma
e may al
! The vibr
declare
STRUC
ule to sp
the use
rections a
sing this
nt serious
ect from t
ked by a
ain.
ng this pr
and dam
design of
ing from
dequate
to prope
use.
property
duct prod
r some ci
erious or f
r and the
Agents (V
injuries t
pliers to
ns as to t
f tool. Fur
emission
uidance
period o
rmation.
emission
be used
o be use
ation emi
value de
IONS F
ead any
f this pro
d follow
roduct, so
injury and
e power s
qualified
duct in a
ge remai
his produ
ibration e
y manag
ty due to
damage
ces an el
cumstanc
tal injury,
edical im
ibration)
power t
rovide in
e period
her Advi
alue sho
n vibrati
the actu
een me
to compa
in a preli
sion valu
ending o
R LAW
igh vibra
uct by m
hem to th
that you c
damage
pply if the
specialist
cordanc
. The foll
t:
mission if
d and pr
broken a
aused b
ctromagn
s interfere
we recom
lant man
irective h
ol users.
icative vi
f time a
e can be
ld be use
n.
l period
sured in a
re one to
inary ass
during a
n the way
RAKE
ion tool u
ans of thi
letter. Th
n recogni
to proper
e is any m
nd repai
with all t
wing dan
he produ
perly mai
plication
flying obj
tic field du
ith active
end pers
facturer b
s been b
he directi
ration te
ower tool
found at
as a mi
ff use ca
ccordanc
l with an
essment o
tual use
in which
AND S
e across
s instructi
is will help
e and han
y.
alfunction.
ed, if nec
he safety
gers can
t is being
ntained.
ools or th
cts.
ring opera
or passive
ns with m
fore oper
ought in t
e require
t results t
can be u
ww.hse.
imum lev
be diffic
e with a s
ther. The
f exposur
f the pow
he tool is
ARIFIE
number
n manual
to preven
le risks e
essary, be
equirem
rise in co
used ove
sudden
ion!
medical i
dical impl
ting this pr
help red
power t
enable u
ed safely
ov.uk
l and sho
lt and th
andard li
eclared
.
er tool ca
sed dep
f days.
.
risks and
rly. Fast
fore you
nts,
nection
long
mpact of
plants! To
nts to
oduct!
ce hand
ol
sers to
n a daily
ld be
HSE
ted test
ibration
differ
ndant on
7
Page 8

P
eHoTheTheThe
n
eMaapAvPla
e
eea
p
tad
S
g
l
n
c
s
G
n
a
o
m
s
)
t
o
o
m
a
e
c
o
N
s
n
d
c
u
d
o
u
o
c
m
a
c
g
T
e
t
n
o
h
e
a
e
e
e
e
o
e
s
a
s
s
m
O
n
n
a
o
p
o
e
o
e
e
a
s
t
g
m
N
e
i
a
s
e
o
o
e
o
n
e
b
o
R
a
d
e
e
a
e
s
n
C
n
m
b
u
e
a
h
T
R
n
a
e
w
d
c
e
b
f
o
S
ECIAL
th
followin
w the too
tool bei
use the
tightnes
A
d the tool
Thi
s tool may
WARNIN
estimati
operati
idle in
total w
H
lping to
intain thi
propriate
oid using
n your w
Do
uble insula
Th
tool is d
ins
ulated fro
th
electric
rthed.
ortant not
Im
Be
sure the s
a
wo-core
justment
AFETY I
example
is used a
g in goo
orrect a
of the gri
is being
cause han
! Identify
on of exp
g cycle s
ddition to
rking peri
inimize yo
tool in a
.
ools in te
rk schedu
tion:
uble insul
the mai
l and me
:
upply is th
able and
r servicin
STRUC
and oth
d the ma
conditio
cessory f
p on the
sed as int
-arm vibr
safety m
sure in th
ch as th
the trigg
d on this
ur vibrati
cordanc
perature
le to spre
ted. This
ns power
hanical c
e same a
plug. Re
.
IONS F
r variatio
erials bei
and well
r the tool
andles.
nded by
tion syndr
asures to
actual c
times wh
r time). N
tool.
n exposur
with thes
of 10°C
d any hig
means th
upply. Thi
omponen
the volta
ove the
R LAW
s on how
g ground
maintain
nd ensur
its design
me if its u
rotect th
nditions
n the to
te The us
risk
instructi
or less.
h vibratio
t all the
is done
s making
e given
ains plug
RAKE
the tool is
or cut.
d.
ng it is sh
nd these
e is not a
operato
f use (tak
l is switch
of other
ns and k
tool use
xternal m
y placing
it unnece
n the rati
from sock
AND S
used:
rp and in
instructio
equately
r that are
ing acco
d off and
tools will r
ep well lu
cross a n
tal parts
insulation
sary for t
g plate.
et before
ARIFIE
good co
s.
anaged.
ased on
nt of all p
when it is
duce th
bricated (
umber of
re electri
barriers b
e tool to
he tool is
carrying
dition.
an
rts of the
running
users’
here
ays.
ally
tween
e
itted with
ut any
8
Page 9
Y
P
a
d
e
o
w
w
o
e
o
t
o
h
t
e
e
h
n
v
n
e
e
c
u
u
o
n
e
a
c
d
k
a
e
n
s
b
t
e
m
a
u
e
c
o
t
g
y
o
l
t
e
b
e
w
n
a
u
s
n
u
S
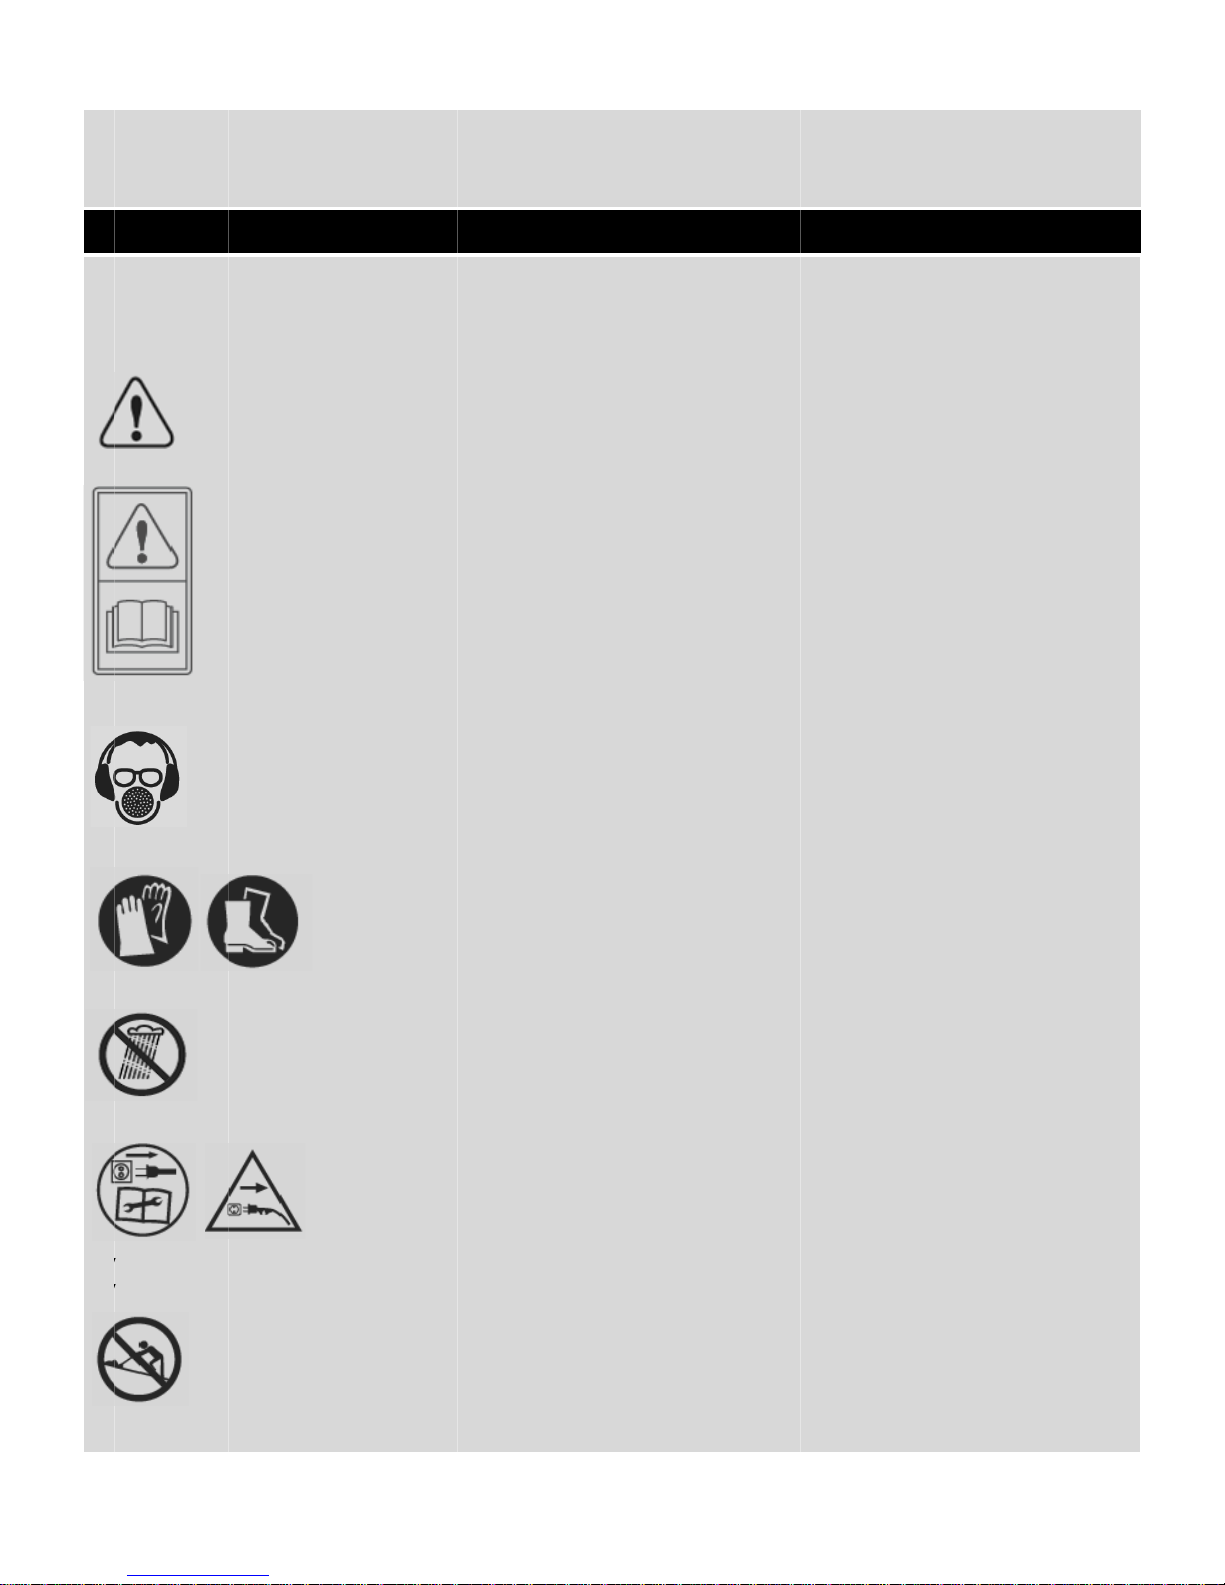
MBOLS
IM
ORTANT:
d learn th
an
m
chine m
In
icates da
Re
ad the ins
W
ar eye pr
Gl
ves with
avoid po
To
S
itch off! R
S
itch off! R
W
rk across
Some of t
ir meani
re effecti
nger, war
ruction m
tection,
and prot
ential ele
move pl
move pl
the face
e followi
g. Proper
ely and r
ing, or c
anual.
ar prote
ction an
tric shoc
g from m
g from th
f slopes,
g symbol
interpreta
duce the
ution.
tion and
boots wi
, do not u
ins befor
mains i
ever up
may be
tion of th
risk of ac
reath pro
h feet pr
se the uni
cleanin
mediatel
nd down.
sed on y
se symbo
ident.
tection.
tection, s
in humid
or maint
if the ca
ur tool. B
s will allo
eel toeca
or wet co
nance
le is dam
sure to st
you to u
p and no
ditions
ged or c
dy them
e the
-slip sole
t.
9
Page 10

Y
rthe
w
b
w
s
o
a
h
g
w
r
t
e
t
w
h
n
s
d
s
t
e
c
d
b
e
t
a
h
p
t
c
o
t
a
t
a
s
o
d
m
e
o
e
a
d
d
S
MBOLS
Ins
pect the
th
own by th
m.
Be
are of s
Re
move plu
rea wher
e produc
arp tines.
from po
the pro
. If object
Tines con
er supply
uct is to
are hidd
inue to ro
before m
e used an
n while o
ate after
intenan
d remove
erating s
he motor
e or if the
all object
op the m
is switche
power co
which c
tor and r
off.
rd is dam
uld be
move
ged.
Ke
ep supply
O
jects thro
Al
ays ensu
it i
in opera
C
nforms to
cord awa
n by the
e that ot
ion. In ge
relevant
y from th
product
er people
eral, chil
afety stan
cutting d
ould hit t
and pets
ren must
dards.
evice.
e user or
remain at
not come
10
ther byst
a safe dis
near the
nders.
ance fro
rea wher
the pro
the pro
uct when
uct is.
Page 11

Y
o
E
c
u200
y
h
l
v
c
n
a
o
y
(
u
c
l
e
c
e
n
l
o
a
p
a
e
i
x
e
S
MBOLS
Thi
s class II s
Gr
unding t
W
EE symbo
bu
t in an en
lo
al counci
G
aranteed
5/88/EC)
mbol indi
is machi
. Tools tha
ironment
l authority
sound p
ates that
e is theref
t are no lo
lly friendl
for recycl
wer level
the prod
ore unne
nger usab
way. Ple
ing advic
tested a
ct is corr
essary.
e should
ase recyc
.
cording t
ctly insul
ot be dis
e where f
Directiv
ted.
osed of w
cilities e
2000/14/
th househ
ist. Check
EC as am
old waste
with your
nded by
11
Page 12

DIAGRAM
Fig.1
12
Page 13

PARTS LIST
(See Fig. 1)
1. Handle
2. Cord stain relief
3. Upper handle bar
4. Mounting set (X4) for handle bar
4a. Knob
4b. Bolt
5. Middle handle bar
6. Lower handle bar
7. Screw (x2)
8. Support
9. Air vents
10. Depth adjustment lever
11. Wheel
12. Castor
13. Discharge opening
14. Deflector guard
15. Grass catcher
15a. Bag
15b. Frame
16. Cord clip (X2)
17. Switch box
18. Lock-off button
19. Start/stop lever
20. Power cable
21. Cutting device (scarifying cylinder)
22. Mounting set for cutting device (X4)
22a. Bolt
22b. Spring washer
23. Cutting device (raking cylinder)
24. Bearing
25. Drive shaft
Remark: Above are all assembled in the standard delivery.
ACCESSORIES
Grass catcher with frame 1SET
Cutting device (raking cylinder) 1PC
Bolt (M6) 4PC
Knob 4PC
Spring washer 4PC
Screw 2PC
Cable clamp 2PC
13
Page 14

N
ngivtheCh
tlaw
twhres
m
e
u
AS
S
l
D
e
v
g
r
e
y
g
e
s
u
u
u
Y
N
T
p
e
e
a
p
k
h
a
d
s
k
o
g
d
a
s
n
r
c
o
g
t
p
h
n
e
r
i
e
o
e
e
x
g
t
o
t
h
e
a
g
e
h
u
b
e
l
h
o
o
m
c
d
o
d
t
a
e
l
w
c
3
i
h
n
o
a
n
g
l
u
h
d
p
r
n
b
m
e
n
a
o
n
a
n
t
r
e
g
a
b
s
I
TENDE
Thi
s product
se
sory or m
en super
ir safety.
ildren sho
This scarif
1).
fit
ed cuttin
ns or for
2).
When us
wi
h speciall
ilst leavin
ulting in a
When us
3).
si
ultaneou
This prod
4).
t or unus
w
5).
This prod
m
st not be
USE
is not int
ntal cap
ision or in
uld be su
ier and ra
device t
aking in d
d as a sc
adapte
the gras
better air
d as a ra
ly picking
ct is not t
ally high
ct is inten
used for a
nded for
bilities, o
struction
ervised t
er is desi
is produc
omestic a
rifier, this
prongs t
blades i
ing.
er, the fin
light deb
be used
rass, e. g.
ed for pri
ny purpos
use by p
lack of e
oncernin
ensure th
nated wi
it is either
nd hobby
roduct w
at collec
tact. At t
needles
is for bett
n wet we
pasture
vate dom
s other t
rsons (inc
perience
use of t
at they d
h a rated
intended
gardens.
rks by scr
and rem
e same ti
will scrat
r oxygen
ther con
rass or for
stic use
an those
uding chi
and kno
e produ
not play
input of 1
for scarify
atching t
ve any u
e the pr
h the surf
absorptio
itions and
shreddin
nly, not fo
escribed
dren) wit
ledge, unl
t by a pe
with the p
00 Watts.
ng and re
rough an
wanted
duct sca
ce of the
, airing a
may not
leaves.
r any com
.
reduced
ess they h
rson resp
roduct.
Dependi
moving th
betwee
arts from
ifies the g
lawn whil
d drainin
e used to
ercial tr
physical,
ve been
nsible for
g on the
tch from
the grass
he lawn
ound
.
mow dry,
de use. It
SEMBL
WARNI
power
EMBLY INS
AS
Fo
low the o
to
easily ass
G! Read
before it i
RUCTIONS
erating i
mble the
ll instructi
complet
structions
machine.
ns caref
ly assem
step-by-st
lly. Do no
led. Alw
p and us
14
connect
ys wear g
the pict
the scarifi
ove s duri
res provid
r to main
g assem
ed as a vi
s supply
ly.
ual guide
Page 15

AS
a
.
a
.Maset
.mo
Y
r
s
a
t
b
n
F
a
S
n
F
n
a
e
.
3
S
o
6
u
a
8
d
e
o
d
a
u
h
e
)
F
t
m
o
e
m
SEMBL
H
ndle Ba
a)
Align the
ndle bars
ha
e
ch to the
b)
Align the
ke sure th
(4) on e
c).
Slide the
d)
Align the
unting se
Assem
lower ha
correspon
upport (8
middle h
e holes of
ch side. (
cord strai
upper ha
(4) on e
ly
d bars (6)
d those in
). (See Fig
ig. 1a
ndle bars
the handl
ee Fig. 2)
relief (2)
ig. 2
dle bar (
ch side. (
with the s
the supp
. 1a, 1b).
(5) to the
bars (5,
onto the
) with the
ee Fig. 4
upports (
rts (8) an
lower on
) corresp
pper han
middle h
, 4b).
). Make s
secure t
s (6).
nd and s
le bar (3
ndle bar
re the hol
e bars wi
Fig. 1b
cure the
. (See Fig.
ig. 3
(5) and se
es in the l
h one scr
with one
3).
cure the
wer
w (7)
mounting
with one
15
Page 16

AS
a
r
O
t
Y
r
o
c
N
N
g
N
g
g
b
F
e
e
o
o
y
u
h
h
n
p
t
t
h
a
d
h
h
u
e
w
d
r
c
5
n
e
p
n
c
c
c
e
d
SEMBL
H
ndle Ba
Fix the c
e).
G
ass Cat
N
TE: A full
At
ach the
WARNI
Dange
WARNI
rotatin
WARNI
Assem
rd with th
her Ass
G! Do not
r of flying
G! The pr
before
G! Never
rass catc
rass catc
ly (conti
ig. 4a
cord cli
mbly
attempt
bjects!
duct mus
ou attac
se the sc
er will re
er (15) to
ued)
s (16) to t
o use the
be switc
or empty
rifier wit
uce the p
the prod
he handl
Fig. 5
product
ed off an
the grass
out the g
erforman
ct before
bar (Fig.
ithout the
the cutti
catcher!
ass catch
e of this
operatio
Fig. 4b
).
grass cat
g device
r bag se
roduct.
.
her atta
must hav
urely fitte
hed.
stopped
.
16
Page 17

AS
r
.(15
.We
.
A
A
i
o
eaw
o
r
Y
c
e
e
e
e
e
U
o
s
o
p
h
a
s
o
e
t
y
u
d
m
e
c
e
f
f
a
o
4
n
e
a
l
n
v
a
n
d
)
n
y
e
o
w
y
a
a
s
a
s
a
t
t
e
a
c
h
t
h
a
c
t
o
i
n
o
a
k
t
c
s
e
m
r
D
m
u
SEMBL
G
ass Cat
a)
Open th
) with the
Empty th
b)
recomm
c).
Lift the d
Empty th
d)
her Ass
deflector
hinges to
grass ca
nd empt
flector g
collecte
mbly (c
guard (1
hang it o
cher (15)
ing it wh
ard (14)
materia
ntinued
), hold it i
to. (See F
frequentl
n it is half
nd pull th
onto a c
position
ig. 6).
during u
full.
grass c
mpost he
nd align t
e. Do not
tcher (15)
ap and re
e hooks
wait until
off the hi
attach it
n the gra
t is compl
ges to re
nto the p
s catcher
tely full.
ove it.
oduct.
C
BLE RO
W
RNING! D
fly
ng object
1).
Always r
contact
int
th
nearest
ay from t
sh
ulder for
2).
For cord
ough the
th
TING
not atte
!
ute the el
with the
oint to th
e cutting
dded sa
train relie
pening
pt to use
ctric mai
utting de
electric
device a
ety.
of the ca
t the han
the produ
cable a
ice. Plan
l outlet,
d avoid it
ble, form
le and in
Fig. 6
ct withou
ay from
our rout
nd work
being ac
loop of t
ert it into
17
the grass
he work a
before st
way from
identally
e end of
he cord s
catcher
rea to pre
rting wor
it. This will
ut. Keep
the main
rain relief
ttached.
vent it fro
. Start yo
keep the
he cable
able and
. (See Fig.
anger of
coming
r work at
cable
over your
bring this
7)
Page 18

AS
A
u
dthe
a
e
Y
U
N
e
a
d
o
e
a
o
s
s
s
o
h
u
e
)
F
e
h
h
d
u
o
t
o
e
u
w
e
R
o
1
a
o
e
o
e
s
e
w
t
SEMBL
C
BLE RO
tting De
C
just the d
A
kind of l
1).
Push the
b
ckward t
2).
Adjust th
(S
e Fig 8b
WARNI
before
TING (c
pth Adju
G! Alway
any adju
pth acc
wn and t
epth adj
adjust th
lever (10
nd table)
ntinued)
tment
switch th
tment
rding to t
e actual
stment le
cutting
to one o
ig. 8a
product
e needs
eight of
ver (10) t
epth. (Se
t of the fiv
Fig. 7
off and p
f your la
he grass.
wards th
Fig. 8a).
e stages.
ll the mai
n. The m
wheel (1
ead the
ns plug fr
st suitabl
), then m
djusted d
Fig. 8b
m power
depth d
ve it for
pth from
upply
pends on
ard or
he scale.
18
Page 19

AS
u
o
e
c
s
C
D
C
a
p
Y
n
N
m
e
a
a
t
b
h
u
e
m
h
s
o
o
r
n
s
s
g
r
e
p
c
g
e
s
t
p
i
e
e
s
d
d
a
s
h
e
m
m
a
y
f
c
v
a
u
i
m
p
o
e
2
u
e
e
u
s
e
m
m
f
e
a
a
c
i
g
a
t
g
i
v
s
g
g
o
e
n
g
R
a
n
n
o
o
h
a
m
a
a
c
e
e
SEMBL
C
tting De
Scale /
Position
1
2
3
4
5
pth Adju
Setting
transport
minimal
middle
deep
maximal
tment (
Depth
-10 mm
+5 mm
0 mm
-5 mm
-10 mm
ontinue
Scarifying
for transp
and stora
scarifying
sensitive l
removing
layers, al
setting w
scarifying
time in th
scarifying
lawn, re
thatch
scarifying
lawn, re
thicker th
scarifying
unkempt
removing
thatch la
)
ortation
ge
a young
wn,
thin thatc
o use this
en
a second
Autumn
healthy
oving
healthy
oving
tch
an
lawn,
thick
ers
A
plication
r
h
Depth
-10 m
+10 m
+5 mm
0 mm
-5 mm
Rakin
for tr
and s
rakin
sensit
remo
layer
rakin
rakin
lawn
do n
nsportati
orage
a young
ve lawn,
ing thin t
healthy l
an unke
t use for r
n
or
atch
wn
pt
king
P
wer Co
WARNI
unda
plug b
Th
product
re
ommend
rrent of m
cu
1).
Mains le
include
thi
-
ut the ca
-
amage t
-
racks ca
- K
inks caus
Such da
2).
use fatal i
c
Always c
3).
o
eration.
nection
G! Before
aged. In
fore start
can be c
to always
x. 30mA.
ds on sca
he followi
le by pa
rough cru
sed by a
d by inco
aged ma
njuries du
eck the
operatin
rder to pr
ing this ta
nnected
use the a
ifier are p
g:
sing over
hing if th
eing of th
rect faste
ins leads
to their
lug and c
the scari
vent risk,
k.
o any so
pliance
articularly
t with the
mains le
insulatio
ning or ro
hould not
amaged
able and
ier, ensur
always sw
ket (with
ia a Resid
susceptib
scarifier.
d is rout
n sheath.
ting of th
be used
nsulation
ake sur
19
that the
itch off th
30-240V
al Curren
le to insul
d under d
mains le
nder any
heath.
they are
astening
motor a
lternatin
t Device (
tion dam
oors or wi
ad.
ircumsta
n good c
lements
d pull out
current).
CD) with
ge. The
dows.
ces as th
ndition b
re
the mains
We
a tripping
auses of
y may
fore
Page 20

P
a
A
eloc
O
sac
O
e
e
e
hpoLet
e
O
n
o
a
t
a
t
b
o
d
p
t
e
y
u
p
N
u
f
i
e
y
m
m
s
o
f
m
k
d
e
d
e
o
e
a
n
e
h
a
a
t
e
e
s
a
o
a
r
h
o
i
e
a
e
t
o
o
a
o
t
u
o
q
o
g
a
u
o
a
v
n
e
u
a
o
u
v
d
m
u
t
s
e
c
e
s
d
o
d
s
e
p
u
s
o
o
s
p
O
ERATI
St
rting a
ST
RTING
Th
product
k-off butt
no
w be rele
N
TE: It is no
is
queezed
cidental s
ST
PPING
Th
product
wil
l have to
r Load Pr
Ov
Th
overloa
1).
A build u
2).
If the ma
3).
Where th
en the cir
W
wer suppl
the prod
N
d Stoppi
is fitted w
n (18) th
sed. (See
necessar
nd the
art-up of
will auto
e depres
tection
protecti
of scarifi
erial scari
re is too
cuit brea
.
ct cool
ng
th a lock-
n fully pr
Fig.9)
to maint
otor is run
the devic
atically st
ed and t
n will be
ed materi
ied is larg
uch resis
er has be
own and
ff button
ss and hol
in pressu
ing. The l
.
op once t
e start/st
ctivated
l around
er than th
ance ag
n activat
liminate
feature. T
d the star
e on the l
ock-off b
e start/st
p level s
n the foll
the cuttin
motor c
inst the c
d switch
he cause
start the
/stop lev
ock-off b
tton is a s
p level is
ueezed t
wing circ
device.
pacity.
tting de
ff the pro
before usi
product,
l (19). The
tton onc
fety devi
released.
restart th
mstance
ice.
uct and
ng the pr
imply de
lock-off b
the start/
e to avoi
The lock-
product
:
isconnec
duct aga
ress the
tton can
top level
d
ff button
motor.
t from the
in.
G
neral O
WARNI
specia
comm
peace
eration
G! In som
l days pro
nity for d
ul neighb
countrie
ucts are
tailed inf
ourhood
regulati
llowed t
rmation
nd avoid
Fig. 9
ns define
be used
nd obser
committi
20
at what ti
nd what
e the reg
g adminis
e of the
restriction
lations in
rative off
ay and
apply! A
order to
nces!
n what
k your
reserve a
Page 21

P
e
a
s
w
e
)the
)
)
a
s13)a r14)
O
p
N
n
g
N
g
e
o
h
p
a
e
v
l
e
e
w
n
u
s
a
r
c
p
m
a
v
o
,
t
o
v
a
a
t
o
o
l
o
c
h
o
h
l
e
o
w
h
e
i
w
a
o
u
c
e
i
a
d
c
e
g
e
t
p
w
g
o
g
W
f
c
a
a
p
m
a
p
o
o
b
e
e
e
n
o
s
h
t
c
p
u
e
w
r
t
r
e
a
w
a
t
v
w
m
n
f
a
d
e
e
r
.
a
e
t
d
t
p
k
n
n
t
t
t
e
e
g
t
t
d
y
u
e
o
c
n
e
p
e
.
n
d
e
a
m
g
w
O
ERATI
G
neral O
WARNI
discon
thorou
WARNI
1).
e
2).
3).
4).
a
5).
en
Al
6).
an
7).
8).
th
9).
10
yo
11
it t
ov
12
str
is
dama
Check th
ch use. D
Double c
Push the
Ensure th
oft brush.
Switch th
tering the
ays let th
Do not o
d have fu
Mow the
Make sur
product
Select th
. Do not
product,
u to slip a
. Slowly p
oo fast to
erloading.
. Work in
ight lines
carified/r
. Circle a
ow or two
. Pay spe
N
eration
G! If the
ect it fro
hly for d
G! Extensi
e! The pr
product
not use
eck that
roduct f
t the air
Blocked
product
working
e produc
erwork yo
l control
lawn bef
that the
or its mot
suitable
ork with t
preventin
d fall.
sh the pr
prevent t
light over
along on
ked with
ound flo
around t
ial attent
(continu
roduct str
the po
mage! H
e vibrati
duct sho
its power
he produ
accessori
rward by
ents are a
ir vents m
off imme
rea.
come to
urself. Tak
ver the pr
re workin
awn is cle
r
.
utting d
is produc
g the pro
duct for
e dischar
apping r
of the sid
ut missin
er beds.
e circum
ion when
d)
kes a fore
er supply
ve any d
n of the
ld be pro
cord and
t if it is d
s are pro
ts handle.
lways uno
y lead t
iately if y
omplete
regular
oduct.
and fertil
ar of ston
pth for th
on a wet
er discha
ard. Mov
e openi
ws. The m
es. This wil
any spot
hen reac
erence of
hanging
ign objec
nd let it
mage re
roduct d
ptly insp
plug as
maged o
erly fixed
Keep the
bstructed
overheat
u are dis
stop befo
reaks to
ize afterw
s, sticks,
actual g
lawn bec
rge of coll
the prod
g from ge
st effecti
l keep the
. (See Fig.
ing a flo
the bed.
direction.
stop the
ool dow
aired be
ring oper
cted an
ell as acc
shows w
.
handle d
and clear
ing and d
urbed whi
e putting
nsure you
rds.
ire or oth
rass heigh
use it ten
ected ma
uct at ap
ting bloc
e patter
rows eve
10).
er bed in
otor! Swi
. Inspect
ore restar
tion is an
repaired
ssories fo
ar.
y to ensur
Clean th
mage th
le workin
it down.
can conc
r objects
.
s to stick
erial, an
ropriate s
ed and e
for scarif
and ens
the middl
ch the pr
he produ
ing!
indicatio
!
r damag
e safe su
m if nec
product
by other
entrate o
hat coul
o the und
it could
peed. Do
ngine fro
ing/rakin
res that al
of the la
duct off,
t
of
before
port.
ssary with
people
the work
damage
rbody of
lso cause
not move
useless
lawns is
l the lawn
n, make
21
Fig.
10
Page 22

P
c
o
aDosca
a
o
e
L
e
t
a
s
a
e
O
e
g
n
f
a
w
G
N
c
t
e
d
n
g
t
o
a
e
t
e
a
w
e
d
e
w
w
u
p
e
M
d
i
e
e
s
a
r
e
b
r
a
h
w
r
a
h
.
d
A
o
e
c
e
d
n
d
i
e
t
y
a
s
a
n
e
n
o
p
m
o
e
d
c
g
a
n
s
o
n
h
w
w
o
n
a
w
r
e
n
o
d
e
p
a
e
d
t
e
n
n
r
h
c
c
r
m
i
a
c
e
c
e
s
o
v
d
e
a
l
n
e
e
o
t
a
C
m
a
m
e
e
h
e
m
e
t
n
o
r
n
u
o
r
h
m
O
ERATI
S
arifying
C
nsider th
du
ring sprin
se
son. Duri
not scari
rify a sec
R
king
In
rder that
to penetr
air
ev
ry 4 - 6
C
EANIN
N
weather
time bet
g a wet s
y during
ond time i
a healthy
te the ar
eeks dep
AND
hen sca
een April
mmer sc
eriods of
n autumn
lawn can
ea aroun
nding on
AINTEN
ifying. Sc
and May
rify agai
ot weath
develop i
the roots
the state
NCE
rify the la
as the la
in late su
r conditi
the spri
of the gr
f your la
n with a
n is bette
mmer wit
n. During
g, it is ne
ss. We re
n.
increase
able to r
a decre
a dry rain
essary for
ommend
depth s
cover du
sed dept
ess summ
greater a
aerate th
tting
ring this
setting.
r do not
ounts of
lawn
S
rvice an
To
ensure lo
d cleanin
an
er the mo
af
1).
Regularly
gu
ide bar, l
Check th
2).
m
intenanc
3).
If the cut
te
ting, repa
Do not cl
4).
Ensure th
5).
n safely
c
6).
Check th
7).
Store you
cl
aned an
8).
Clean th
WARNI
produ
work o
qualifi
G! Before
t has bee
her than
d special
Storag
g and reli
work on
or has b
check for
ose fixing
t covers
or repai
ing devic
ir should
an the p
t all the f
ork with t
product
r product
then oile
product
carrying
n disconn
escribed
st!
able servi
the produ
en switch
obvious
and wor
nd guar
s before u
should h
e carried
oduct wh
stening
e produc
frequentl
in a dry pl
.
ith a bru
ut any re
cted fro
within this
e, carry
ct and th
d off an
efects su
or dama
s are und
sing the p
appen to
out by an
le it is run
lements (
.
for signs
ce. To e
h or clot
airs or se
the pow
instructio
ut the foll
removal
the plug
h as loos
ed com
maged
roduct.
fail despit
authorize
ing.
crews, nu
f wear. R
sure a lo
. Do not u
vicing wo
r supply.
manual
wing ma
of the gu
isconne
, dislodg
onents.
nd corre
the car
speciali
s, etc.) ar
place w
g service
se any sol
k, you mu
Repairs a
ay be p
ntenanc
rds may
ted from
d or dam
tly fitted.
taken in
t.
e tight at
rn or da
life all scr
ents or w
st ensure
d mainte
rformed
regularly.
nly be ca
he power
ged chai
arry out
anufact
ll times s
aged pa
w parts s
ater to re
hat the
ance
nly by
Servicing
ried out
supply.
n and
ecessary
ring and
that you
ts.
ould be
ove dirt.
22
Page 23

L
e
u
e
e
eac
G
d
p
o
n
u
n
a
/
N
b
N
c
a
N
l
r
N
t
e
o
M
e
a
f
i
o
d
p
n
s
a
s
q
u
g
a
u
s
d
d
g
F
A
c
n
b
o
y
g
e
p
r
s
n
a
o
y
y
c
o
w
u
v
u
o
e
o
h
g
Y
r
d
g
e
o
a
o
f
n
d
a
e
b
u
e
g
h
p
b
d
e
d
m
e
o
i
r
n
T
u
t
t
p
u
e
p
u
e
e
r
e
h
g
h
o
e
d
u
m
C
EANIN
S
rvice an
9).
The com
ch
eck the c
- If
the cutti
- If
the prod
ha
s not bee
m
st be rep
placing
R
Th
product
th
product.
cording t
WARNI
down
WARNI
the te
purch
WARNI
carefu
like bu
WARNI
opera
must b
AND
Storag
onent th
ndition o
g device
ct starts t
balance
ired or re
Changi
G! Alway
efore ch
G! Alway
hnical re
sing and
G! Cuttin
ly! Wear s
ns and c
G! Make
e the pro
replace
has two fu
The rakin
different
AINTEN
(contin
t is subje
the cutti
s worn or
suffer fr
correctl
laced.
g Cuttin
switch th
nging/re
use a cor
uirement
sing cutti
devices
fety glov
ts!
ure two b
uct if an
for safet
nctions, s
cylinder
applicati
ig. 11a
NCE
ued)
t to most
g device
lunt it m
m excessi
or has s
Device
product
lacing th
ect cuttin
of this pr
g device
re very s
es when h
lts are ti
one of bo
cause.
arifying o
is include
n. (See Fi
ear is th
and its m
st be repl
e vibrati
ffered de
ff, disco
cutting
g device
duct (se
s!
arp and
andling c
ht compl
lt is missin
ou can re
raking. T
in the su
. 11a, 11
cutting
unting at
ced imm
ns, this m
ormation
nect it fro
evice!
ccording
section T
ecome h
tting dev
tely befo
or loose.
place it w
e scarifyi
ply box.
)
evice. Yo
regular in
ediately;
ans that
ue to im
power s
to the int
chnical s
t during
ces in ord
e operat
If bolt thr
ith one sui
g cylinde
he cylind
Fig. 11b
should t
ervals.
he cuttin
acts. In t
pply and
nded use
ecificati
se! Handl
er to avoi
the prod
ad is da
table size.
is preasse
r can be
erefore
device
is case it
let it cool
! Observe
ns) when
them
injuries
ct, don't
aged, it
mbled on
changed
23
Page 24

L
e
a12a
5
a(Se
t
r
o
G
/
t
h
b
e
d
b
e
l
c
h
e
o
M
n
c
u
t
b
F
s
a
t
w
A
g
w
t
e
e
t
n
p
)
a
b
h
d
o
a
a
h
e
d
w
d
D
t
a
t
o
x
a
y
c
s
e
e
h
n
n
y
n
t
d
r
m
h
C
EANIN
R
placing
1).
Remove
2).
Place the
3).
Loosen t
w
shers (22
).
To remov
4).
(2
).
Align an
5).
sh
ft (25) an
e Fig. 12
AND
Changi
he grass
product
e two bol
) and the
the cutti
insert the
d fix the
).
AINTEN
g Cuttin
atcher .
pside do
s (22a) wi
presently
ng devic
respectiv
earing to
NCE
Device
n on a fla
h a suita
attached
, first lift t
cutting
he suppo
(continu
t stable gr
le wrenc
cutting d
e bearing
evice: Sli
rt with the
ed)
ound to h
, remove
vice (21
and then
e the he
bolts (22
ve acce
hem tog
r 23). (Se
pull it out
nut into t
) and spri
s to the u
ther with
Fig.
from the
e socket
g washe
derbody.
he spring
rive shaft
of driving
s (22b).
Af
er Use
1).
Switch th
2).
Check, c
ass Cat
G
1).
Inspect t
2).
Clean th
st
ring to av
product
ean and
her
e grass c
grass ca
id milde
ig. 12a
off, disco
tore the
tcher (15
cher (15)
.
nect it fr
roduct as
before e
fter oper
m the po
describe
ch use.
tion. Let
24
er suppl
below.
o not use
he grass
Fig. 12b
and let it
it if you fi
atcher dr
cool dow
d any da
thoroug
n.
age.
ly before
Page 25

L
a
a
W
V
G
t
e
a
e
a
h
o
A
t
p
e
c
e
n
f
w
g
N
e
o
n
m
a
s
M
o
d
e
t
t
g
m
e
p
d
o
o
n
A
,
h
”
n
e
L
e
d
o
a
a
r
p
t
w
r
f
d
y
c
a
y
t
e
5
b
a
g
d
a
h
m
9
e
i
l
o
l
g
c
V299
3
s
1
=
=10
1
e
t
u
w
C
EANIN
Tr
nsporta
1).
Switch th
ywhere.
an
Attach tr
2).
Adjust th
3).
to
“CUTTING
4).
Always tr
Protect t
5).
nsportati
tr
6).
Secure th
TE
CHNIC
Rated vol
Power inp
No-load s
Max. cutti
orking h
Grass cat
ibration
Measured
Measured
Guarante
Protectio
Degree o
Machine
Cable len
AND
ion
product
nsportati
cutting
DEPTH AD
nsport th
e produc
n in vehic
e produc
L DATA
age
ut power
eed
ng width
ight ran
her volu
sound pr
sound po
d sound
class
protectio
eight
th
AINTEN
off and di
n guards
epth to t
JUSTMENT
product
from any
les.
to preve
e
e
ssure lev
er level
ower lev
n
NCE
sconnect
if applic
e transpo
).
by its han
heavy im
t it from sl
l L
PA
WA
l LWA
it from po
ble.
tation sta
dle.
act or st
ipping or
er suppl
ge (refer
ong vibra
alling ov
-10/-
before tr
ions whic
r.
/0/5/10m
3.5
84.
97.
nsportin
may oc
230-240
, 5 adju
1m/s2 K=
5dB(A) K
9dB(A) K
Approx.
it
ur during
~ 50Hz
1300W
-1
0min
20mm
tments
30L
.5m/s
3dB(A)
3dB(A)
4dB(A)
II
2.25kg
2
IPX4
10m
WARNI
declar
the wh
into co
Proper
applic
proces
G! Depen
d total! Ad
le work pr
sideration
easures i
tion tools,
es.
ing on the
pt proper
cess inclu
.
clude am
keeping h
actual use
measures
ing times
ng others
nds warm,
of the pro
o protect
the produ
regular m
periodical
25
uct the vi
ourself ag
t is runnin
intenance
breaks an
ration valu
inst vibrat
under no
and care
proper p
s can diff
on exposu
oad or swi
f the prod
anning of
r from the
res. Take
ched off
ct and
ork
Page 26

GUARANTEE
1. This product has been manufactured to a high quality standard. It is guaranteed against
faulty materials and workmanship for 24 months from purchase; please retain your till
receipt as proof of purchase.
2. If the product is found to be defective within the relevant time period, we will either
replace all defective parts or, at our discretion, replace the unit free of charge with the
same item or items of a greater value and/or specification.
3. This guarantee does not cover defects caused by or resulting from:
• Misuse, abuse or neglect,
• Trade, professional or hire use,
• Repairs attempted by anyone other than our authorized repair centre (call 0333 2000 336);
4. In the unlikely event that this product does develop a fault please call the helpline on 0333
2000 336.
5. This guarantee does not affect your statutory rights.
26
Page 27

R
s
r
rdo
rdorefuPo
E
e
apro
d
e
S
m
r
N
t
N
t
c
s
u
e
N
n
n
e
t
a
c
l
t
f
o
s
d
t
n
D
a
p
u
v
a
e
a
e
o
g
e
o
g
g
k
d
s
A
e
a
a
y
.
c
o
s
w
p
t
h
o
t
a
s
n
a
n
t
h
t
a
a
d
d
m
i
m
v
o
o
heleChelePretheCo
eOnac
d
a
o
t
a
e
s
n
b
f
i
h
h
g
o
i
e
e
s
p
n
o
u
g
e
e
T
OUBLE
Su
pected
ch
eck the p
P
oblem
WARNI
inspec
centre
HOOTI
alfunctio
oduct usi
G! Only p
ion, main
or a simil
Possible
G
s are ofte
g this sec
rform th
enance
rly qualifi
Cause
n due to
tion. In m
steps de
nd repair
d special
auses tha
st cases t
cribed wi
ork must
ist if you c
the users
e proble
hin these
be perfor
nnot sol
S
can fix th
can be
nstruction
ed by a
e the pro
lution
mselves.
olved qu
s! All furth
authoriz
lem your
Therefore
ckly.
r
d service
elf!
P
oduct
es not
art
st
P
oduct
es not
ach
ll power
or result
R
CYCLI
Th
product
p
ckage un
perly. Re
Ol
product
ho
usehold r
d protecti
an
ntre (if th
c
Not con
Power
Other e
produc
Lock-of
Power s
has too
Air vent
Cutting
Scarifie
capaci
Scarifyi
G AND
comes in
il you are
ycle the
are pote
bbish. Yo
ng the en
re is one
nected t
ord or plu
ectrical d
button n
urce (e.
low volta
are bloc
device is
material
y
g depth i
ISPOS
packag
sure that
ackage
ntially rec
are requ
ironment
vailable)
power su
is defec
fect to t
t pressed
. generat
e
ed
ull/dama
exceeds
incorrect
L
that pro
ll parts h
fterward
clable u
ested to
by handi
ply
ive
e
r)
ged
ects it ag
ve been
.
der WEEE
ssist us an
g in this a
C
C
so
Cl
R
to
A
inst dam
elivered
and do n
our con
ppliance
nnect to
eck by a
ctrician.
eck by a
ctrician.
ss lock-o
start/sto
nnect to
urce
ean the a
place wit
ly scarify
cording
capacity
just dept
ge durin
and the p
t, therefo
ribution t
t an equi
power su
specialist
specialist
f button fi
p lever
another p
r vents
a new o
materials
of the pr
shipping.
roduct is f
re, belon
saving r
pped coll
ply
rst, then
ower
e
duct
Keep the
nction
in your
sources
ction
27
Page 28

L
K
y
P
e
uBro
ococo
O
u
D
t
t
a
k
e
w
N
p
o
v
l
e
t
c
e
c
A
l
c
l
d
v
6
n
a
o
t
r
a
b
y
e
c
u
i
w
o
o
e
o
e
e
e
k
a
h
e
a
g
c
w
.
o
n
a
d
e
w
g
g
P
UG REP
(U
& IRELAN
If
ou need
IM
ORTANT
Th
wires in
Bl
e = Neutr
wn = Live
the colors
As
lored mar
c
lored blu
lored bro
WARNI
an ap
.
N
TE: If a m
pl
g and se
LACEME
ONLY)
o replace
he mains
l
of the wir
ings iden
must be
n must b
G! Never
roved 13
lded plug
ered cab
NT
the fitted
ead are
s in the e
ifying the
onnecte
connect
onnect li
mp BS13
is fitted a
e, it must
plug then
olored in
ectrical c
terminals
to the te
ed to the
e or neut
3/A plug
d has to
be destro
follow th
ccordan
rd of this
in your pl
rminal wh
erminal
al wires t
nd the c
e remov
ed to pre
instructi
e with th
applianc
g, proce
ch is mar
hich is m
the eart
rrect rat
d take gr
vent eng
ns below.
followin
may not
d as follo
ed with N
rked with
terminal
d fuse
eat care i
ging into
code:
orrespon
s. The wir
The wire
L.
f the plu
disposin
socket.
with the
which is
hich is
. Only fit
of the
28
 Loading...