

Instruction Manual
Important - Please read these instructions fully before starting assembly
These instructions contain important information that will help you get the best from
your mower, ensuring it is assembled correctly and safely.
If you need help or have damaged or missing parts, call the Customer Helpline
on 08456 400 800.
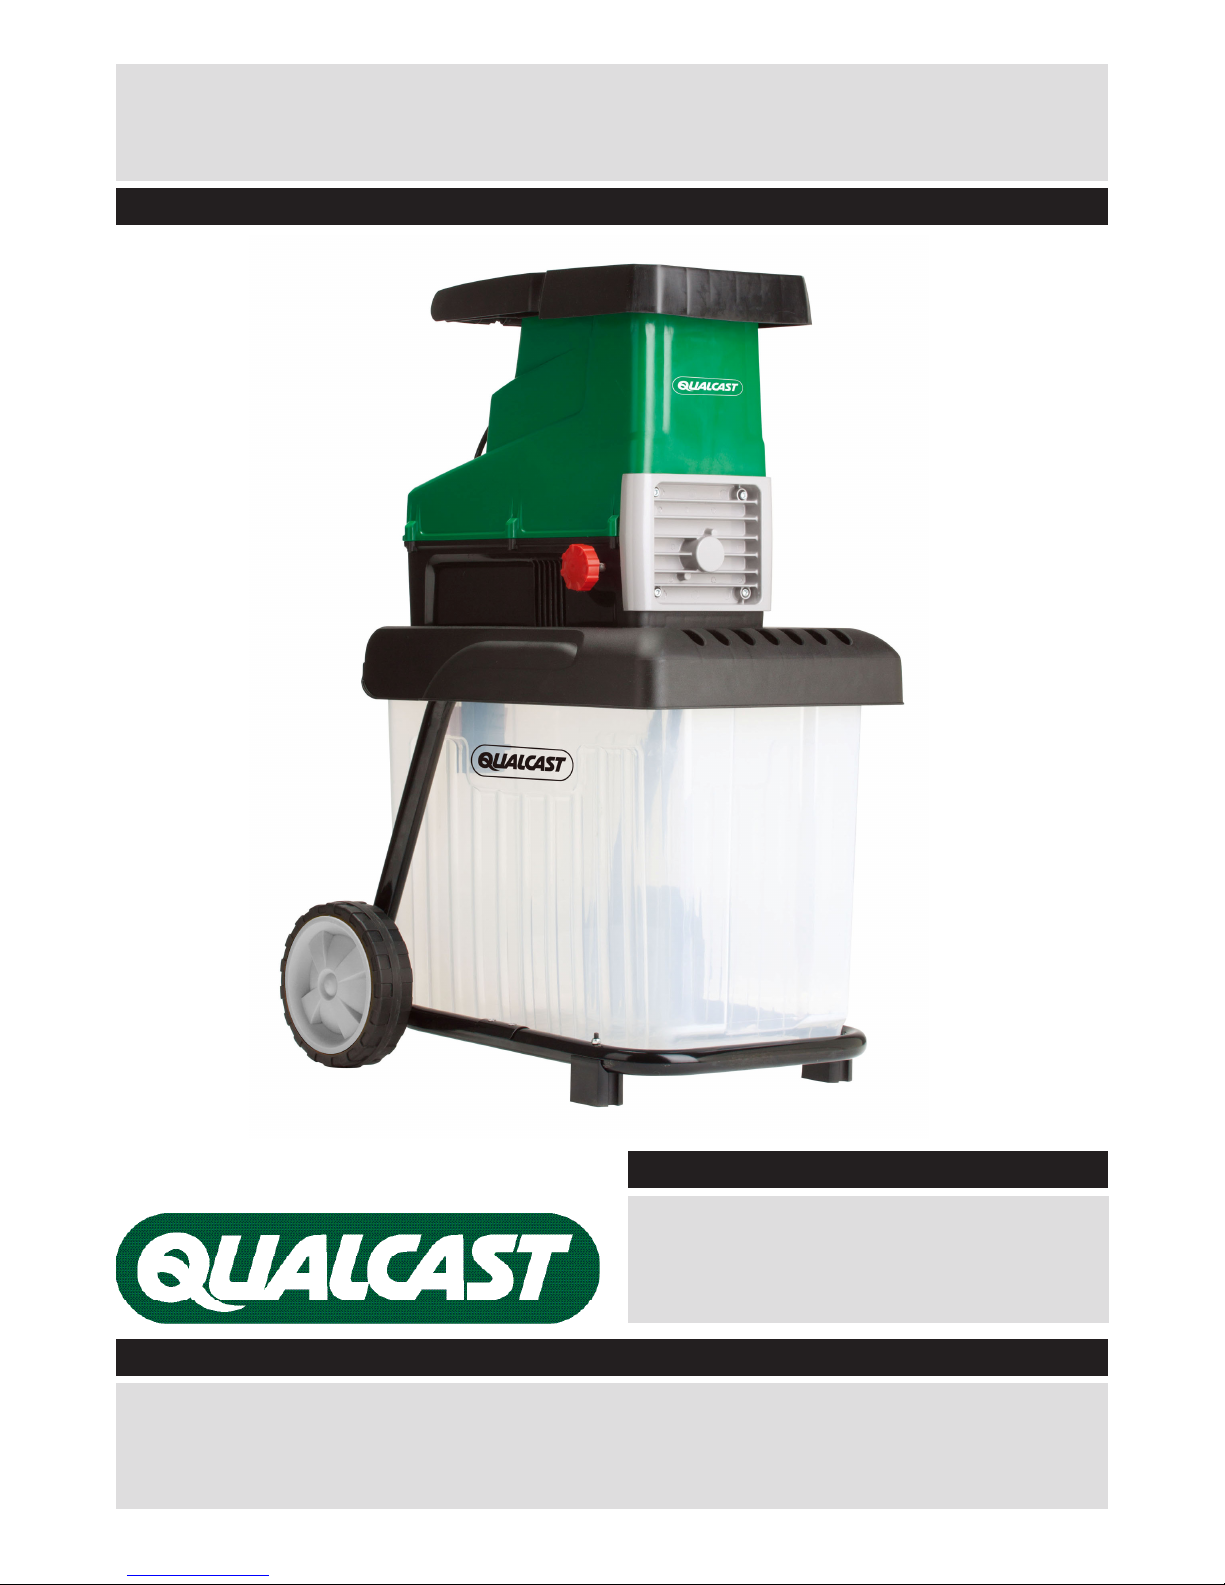
Qualcast
2800W Quiet Shredder (Model: SDS2810)
Aug 2012
UK/Ireland 08456 400 800
Web www.argosspares.co.uk
After Sales Support

Contents
2
Customer Helpline 08456 400 800
Safety Information .......................................................................................................................................... 3
Intended Purpose ....................................................................................................................................... 3
Safety Precautions .......................................................................................................................................3
Symbols used in the Instructions ...............................................................................................................3
Symbols on the Shredder ............................................................................................................................3
General Notes on Safety .............................................................................................................................4
Preparation .......................................................................................................................................................5
Working with the Device ..............................................................................................................................6
Electrical Safety ...........................................................................................................................................7
General description .........................................................................................................................................8
Functional Description.................................................................................................................................8
In the Box .....................................................................................................................................................8
Assembly ..........................................................................................................................................................9
Step 1 - Unpacking ......................................................................................................................................9
Step 2 - Assembling the Shredder ............................................................................................................10
Operating Instructions & Tips .......................................................................................................................11
Operating ....................................................................................................................................................11
Switching the Shredder On and Off ..........................................................................................................11
Emptying the Collection Box and Reverse Operation .............................................................................12
Overload Protection ...................................................................................................................................12
Restarting and using the Blade Reversing Mechanism ..........................................................................12
Blade Adjustment ..........................................................................................................................................13
Adjusting Cutting Blade and Pressure Plate ............................................................................................13
Disassembly & Storage .................................................................................................................................14
Working Methods ...........................................................................................................................................15
General Working Instructions ....................................................................................................................15
Maintenance and Cleaning Precautions .................................................................................................15
General Cleaning and Servicing................................................................................................................16
Replacement Parts ...................................................................................................................................16
Troubleshooting .............................................................................................................................................17
General Troubleshooting ...........................................................................................................................17
Technical Data ................................................................................................................................................18
Technical Data Table ..................................................................................................................................18
Disposal ..........................................................................................................................................................18
Disposal and Recycling .............................................................................................................................18
Getting Help ...................................................................................................................................................18
Important - Please read these instructions fully before starting assembly
3
Customer Helpline 08456 400 800
The shredder is intended for compacting brous and wood-related materials such as hedge and tree
cuttings, branches, bark and pine cones. Any use not expressly permitted in this manual may damage the
shredder and pose a serious danger to the user.
Do not put stones, glass, metal, bones, plastics or other materials into the shredder
The operator or user is responsible for accidents and injury or damage to third parties. The manufacturer
cannot be held responsible for any damage caused by improper operation or use beyond the purpose
intended.
This shredder may cause serious injuries if improperly used. Before using the shredder, read the user manual
carefully and familiarise yourself with all of the controls.
In cases of uncertainty, ask an expert for advice. Keep the manual in a safe place and pass it on to any
subsequent owner to ensure that the information contained therein is available at all times.
Warning! Beware of hazards. Take special care to avoid injury or damage.
Precaution symbol (other symbol may be used instead of exclamation mark ) with information on prevention
of harm / damage.
Notice symbol with information on how to handle the device properly.
Warning! Beware of hazards. Take special care to avoid injury or damage.
Read the manual.
Wear ear and eye protection.
Wear hand protection.
Do not expose the unit to rain.
Intended Purpose
Safety Precautions
Symbols used in the Instructions
Symbols on the Shredder
Safety Information
Important - Please read these instructions fully before starting assembly
4
Customer Helpline 08456 400 800
Symbols on the Shredder (continued)
General Notes on Safety
Safety Information
IMPORTANT! Read carefully before use and keep for future reference
• The device must not be used by people (including children) with limited physical, sensory or mental
faculties or who lack the necessary experience and/or knowledge - other than they are supervised by
a person responsible for safety or are being instructed to operate the trimmer by such a person.
Caution! Switch o the motor and disconnect from the mains before adjustment or cleaning work, or if the
ex is caught or has been damaged.
Warning! Danger of injury from rotating blade ..
Keep your hands and feet away from the hopper funnel while the shredder is in operation.
Warning! Danger from thrown objects. Keep your distance from the funnel and ejection area, and keep
others away from the danger area.
Warning! Electric shock hazard.
Always unplug the shredder before working on it.
Guaranteed noise power level
Do not dispose of electrical equipment in the domestic waste.
Safety class II
Protection against contact with the ngers and solid foreign bodies with Ø > 12 mm as well as protection
against splashed water from all directions.
The product complies with the applicable European directives and an evaluation method of conformity for
these directives was done.
Important - Please read these instructions fully before starting assembly
5
Customer Helpline 08456 400 800
• Keep children and pets at a safe distance away from the device. Children must be supervised in order
to ensure that they do not play with the equipment.
• Never allow children or other persons unfamiliar with the user manual to use the shredder. Local
regulations or bylaws may determine the minimum age for using the shredder.
Observe local noise and other regulations.
CAUTION! When using powered tools, observe the following basic safety measures for the prevention of
electric shocks and the risk of injury and re:
Training: Become familiar with the instruction manual before attempting to operate this equipment.
• Never use the shredder with other persons or animals nearby.
• Wear hearing and eye protection at all times when using the shredder.
• Wear appropriate protective clothing such as protective gloves, rm footwear and long trousers. Do
not wear loosely tting clothes or clothes with dangling cords or belts.
• Only use the shredder in the open (that is, away from walls or other rigid structures) on a rm, level
surface.
• Do not use the machine on a paved or gravelled area, or which could be damaged by ejected material.
• Before you start up the shredder, check that all of the nuts, bolts and other fastenings are tight. Covers
must be fastened properly and in good working order. Replace any damaged or illegible stickers.
• Only use replacement parts and accessories supplied and recommended by the manufacturer. Using
third-party parts will immediately invalidate the guarantee.
• Do not leave the shredder working unattended and keep it in a dry place out of children’s reach.
• While being used in the open, connect the shredder to a residual current (RC) circuit breaker with a
trip current of not more than 30 mA.
• When servicing the cutting means be aware that, even though the power source will not start due
to the interlock feature of the guard, the cutting means can still be moved by a manual starting
mechanism.
• Shut-o the power unit before attaching or removing the collection box
• Keep all guards and deectors in place and in good working condition
General Notes on Safety(continued)
Preparation
Safety Information
Preparation

6
Customer Helpline 08456 400 800
• Make sure that the hopper funnel is empty before you start the shredder.
• Keep your head, hair and body away from the intake opening.
• Do not reach into the hopper funnel during operation. The shredder will continue to run for a short
period after you switch it o.
• Always make sure you are standing in a rm, balanced position. Do not lean forwards, and never stand
above the shredder when inserting materials.
• Make sure that the material inserted into the shredder does not contain hard objects made of metal,
stone, glass or similar.
• Do not use the shredder in the rain and in bad weather. Work in daylight or under good lighting
conditions.
• Do not operate the shredder when you are tired or distracted, or under the inuence of alcohol or
medication. Always take a break when you need one and be sensible about how you work.
• Switch the shredder o and pull the plug under the following circumstances:
when you are not using the device,
transporting it or leaving it unattended;
before releasing a jammed blade.
when you are checking the device, cleaning it or removing blockages;
when you are carrying out cleaning or maintenance work or replacing accessories;
before moving or lifting the shredder
If foreign objects should enter the shredder, if the shredder is making unfamiliar noises or vibrations
(check the shredder for damage before starting it up again)
• Do not allow shredded material to accumulate near the ejection area. This may otherwise hinder
proper ejection and force the material back up through the funnel.
• Do not transport or tip the shredder with the motor running.
• Keep hands, other body parts and clothing out of the lling chamber and ejection channel and away
from other moving parts.
• In the event of blockages in the machine intake or ejection, switch o the motor and disconnect the
machine from the mains before removing leftover material in the intake opening or ejection channel.
Ensure that the motor is free of rubbish and other accumulations in order to safeguard the motor from
damage or possible re.
Remember that the cutting tool is also activated when the starting mechanism is started on a motor
operated machine.
Working with the Device
Preparation

7
Customer Helpline 08456 400 800
CAUTION! The following states how damage to the shredder and possible injury to people can be
avoided:
• Handle the unit with care. Clean the ventilation slots regularly, follow the maintenance instructions.
• Do not overload your device. Work only within the indicated range of performance. Do not use low
power machines for heavy duty work. Do not use your device for purposes for which it has not been
designed.
• Only switch the shredder o once the hopper funnel is completely empty since the shredder may
otherwise clog up and not be able to start afterwards.
• Do not attempt to repair the shredder yourself unless you are qualied to do so. Any work not
specied in this manual may only be carried out by a qualied service centre.
CAUTION! The following states how damage to the shredder and possible injury to people can be
avoided:
• Handle the unit with care. Clean the ventilation slots regularly, follow the maintenance instructions.
• Do not overload your device. Work only within the indicated range of performance. Do not use low
power machines for heavy duty work. Do not use your device for purposes for which it has not been
designed.
• Only switch the shredder o once the hopper funnel is completely empty since the shredder may
otherwise clog up and not be able to start afterwards.
• Do not attempt to repair the shredder yourself unless you are qualied to do so. Any work not
specied in this manual may only be carried out by our service centre.
• Only use extension cables that have been approved for outdoor use and are resistant to splash water.
The core diameter for extension cables measuring up to 25 m must be at least 1.5 mm², and 2.5 mm²
for cables longer than 25m. Always roll the whole cable o the reel before use. Check the cable for
damage.
• Do not unplug the shredder pulling on the cable, only pull the plug itself. Keep the cable away from
heat, oil and sharp edges.
Working with the Device (continued)
Electrical Safety
Preparation

8
Customer Helpline 08456 400 800
The silent shredder is equipped with a powerful motor and motor brake, overload protection with an autoreverse system, and restart prevention for additional safety. A blade cylinder system is used for cutting, which
works extremely quietly and automatically draws in the shredding material. The sturdy chassis ensures a
stable standing position with good mobility.
Refer to the following descriptions for a functional description of the various components and controls.
Functional Description
In the Box
General Description
1
Wheels
2
Collection box
3
Collection box safety
switch
4
Shredder unit
5
Mains cable (includes
strain relief only if
tted with a short
cable)
6
Transport handle
7
Reset switch
8
Hopper funnel feed
inlet
9
Operating mode
selection switch
10 Pusher to help feed
material into hopper
funnel
11 Cutting blade
adjustor knob
12 Chassis
13 Supports
A
7
8
9
10
11
12
13
6
5
4
3
2
1

9
Customer Helpline 08456 400 800
Remove the shredder from the packaging.
Pull the collection box 2 out of the chassis 12 and take out the shredder unit and accessories.
Check the box contents.
Box contents
Operator’s instruction manual.
Shredder unit
Chassis
Collection box
Two wheels and two stabilising feet
Spanner
Allen key
Pusher
Step 1 - Unpacking
Assembly
B
12
2
3

10
Customer Helpline 08456 400 800
Assemble the two wheels 1. Clip the wheel covers into the wheels.
Screw on the two stabilising feet 13 to the chassis 12.
Fix the shredder unit 4 onto the chassis 12 with the four screws enclosed.
To insert the collection box (A2), the safety switch(see picture D) must be unlocked, i.e. in the“OFF”position.
Push the collection box (A2) into the chassis (A11), with the safety switch (A3) on the side of the wheels (A1).
The collection box (A2) can be pushed in only in one direction.
Lock the collection box (A2) by pushing the safety switch up (Fig D) to the ON position. This is a safety device.
Ensure it connects rmly in position otherwise the shredder motor will not function.
Step 2 - Assembling the Shredder
Assembly
C
1
13
12
12
4

11
Customer Helpline 08456 400 800
Before starting the shredder, make sure that the shredder unit is rmly attached to the chassis and the
collection box and safety switch are in their correct positions.
The shredder will not switch on unless the collection box and the safety switch are in their correct positions.
Operation
Switching the Shredder On and Off
Operating Instructions & Tips
D
√
×
Make sure that the mains power voltage corresponds to the information on the rating label on the shredder.
If you shredder is tted with a long mains cable you can plug this directly into a suitable power supply, using
an RCD device if necessary.
Make sure that the hopper funnel is empty before starting.
The collection box must be fitted and the safety switch on the collection box must be firmly
engaged in the ‘ON’ postion (up) or the motor will not start.
To switch off, turn the round operating switch (A9) to the left, back to the central position
CAUTION! The sharp blades continue to rotate for a few seconds after switching o.m
1
2
To switch on, push the rectangular safety lock (A9) in the center of the round switch
forwards and then turn the round switch all the way to the right. The switch locks into the
‘ON’ position.
ON
OFF

12
Customer Helpline 08456 400 800
Do not leave it until too late to empty the collection box. Remember that the collection box lls unevenly
under the ejector opening.
• Switch the shredder o.
• Unlock the collection box (A2) by pushing the safety switch (A3) down to the OFF position.
• Remove the collection box (A2) from the chassis (A12) and empty it.
• Make sure that the area around the safety switch (A3) is free of dust and wood chippings before you re-
t the collection box (A2).
• Re-t the collection box (A2) and push the safety switch (A3) up to the ON position.
In the event of overload, e.g. due to branches that are too thick, the shredder may switch o automatically.
To switch back on, turn the operating mode selection switch (A9) to the “OFF” position. Press the reset switch
(A7).
After switching o automatically as a result of overload, the equipment may not restart automatically if
material remains trapped in the cutting mechanism.
To switch back on, turn the operating mode selection switch (A9) to the “OFF” position.
Press the reset switch (A7).
Release the rectangular safety lock (pulling it back towards the handle), then turn the round knob to the left
to cause the cutting mechanism to work in reverse for a few seconds and release any thick branches that
may have caused the blockage. Stop the machine then remove these obstructions carefully from the feed
hopper and discard them if too big.
Switch the device back on as described above.
Use the pusher to help feed material down the funnel as necessary.
Emptying the Collection Box
Overload Protection
Restarting and using the Blade Reversing Mechanism
Operating Instructions & Tips
1
2

13
Customer Helpline 08456 400 800
Adjusting Cutting Bade and Pressure Plate
Blade Adjustment
• The pressure plate setting is adjusted in the factory to the correct setting, and should normally only
need adjustment after considerable wear.
• If you experience frequent blockages, the distance of the pressure plate from the blade can be
increased by turning the adjusting knob (A11) anticlockwise.
• If the material is not being suciently shredded turn the adjusting screw clockwise to reduce the gap
between the cutting blade and the pressure plate. Only make small adjustments each time.
• Turn the adjusting screw (A11) slowly clockwise until you hear scraping noises. Small aluminium
shavings will come out of the ejection chute.
Avoid unnecessary wear on the pressure plate by not over-adjusting.

14
Customer Helpline 08456 400 800
Disassembly & Storage
Disassembly & Storage
In case of more stubborn blockages you may have to clear material from inside the cutter housing. Proceed
as follows:
• Remove the four allen screws 14 on the housing cover 16.
• Remove the cover. This may require light jerking movements, as this housing cover also contains two
counter bearings.
• Remove any further blockage from the equipment.
• When tting the cover 16 back on, ensure it is tted correctly so that the blade shaft 18, the pressure
plate rod 17 and the four recesses 15 for the allen screws are all correctly aligned and t smoothly into
the recesses on the cover. Ensure that the cutting pressure plate is positioned correctly.
• Screw on the housing cover 15 rmly with the four allen screws 14.
Storage
For convenient storage the shredder unit can be put inside the collection box once disassembled. To do
this turn the shredder upside down and rest it carefully on the hopper. Remove the four screws (Fig. C)
holding the base to the shredder body unit.
E
14
16
17
18
15

15
Customer Helpline 08456 400 800
General Working Instructions
Maintenance and Cleaning Precautions
Working Methods
Keep your face and body at safe distance from the shredder as long branches can be spun around while
being drawn into the shredder.
Wear ear and eye protection
Wear hand protection
• The shredder will not operate if the collection box ix not correctly tted. Ensure the safety connector
on the box is in the ON position.
• When feeding branches into the unit, keep holding them rmly until they are automatically drawn in.
• Adapt to the speed of the shredder and avoid overloading the unit. Overloading will cause it to slow
down, possibly overhead and shut down.
• To avoid the unit clogging up, mix freshly cut branches or leafy material with drier materials such as
twigs.
• Before you shred roots, remove any remaining soil and stones from them.
• Do not shred but directly compost all soft and wet material such as kitchen waste.
• Keep a couple of dry branches to use them for cleaning the unit at the end.
• Do not turn o the unit until all the material has passed the blades. Remaining material may otherwise
block the blade when you restart the unit.
All maintenance or repair work not described in this manual must be carried out by authorized service
centre. Only use original parts.
Wear hand protection when working on the blade cylinder.
Switch the shredder o, unplug it form the mains, and wait for the blade cylinder to come to a complete
stop before working on it.

16
Customer Helpline 08456 400 800
General Cleaning and Servicing
Replacement Parts
Working Methods
• Do not spray water onto the shredder. Electric shock hazard.
• Always keep the shredder, wheels and air vents clean. Use a brush or cloth to clean it, avoid cleaners
and solvents.
• Always check that the shredder and especially the guards are not worn down or damaged but rmly
attached before use. Check that the nuts, bolts and screws are tight.
• Check the covers and guards for damage and improper attachment. If necessary, change the
components
• Keep the shredder in a dry place out of children’s reach. Do not cover the shredder in nylon bags, as
moisture may develop.
Only use original replacement poarts

17
Customer Helpline 08456 400 800
General Troubleshooting
Troubleshooting
Problem Possible cause Fault correction
Motor will not start Collection box not tted
correctly
Push the collection box
rmly to its correct position,
and place the safety switch
on the box to the ON
position.
Overload protection To switch back on, start by
turning the operating mode
selection switch (A9) to the
“OFF” position.
Press the reset switch (A7).
Switch the device back on.
No mains power supply Check the socket, cable, lead
and plug for damage, and if
necessary, have any damage
repaired by qualied repair
personnel.
Garden waste is not drawn in Cylinder running in reverse Change rotational direction
using the switch
Shredding material is too soft Insert wood or shred dried
branches
Shredder blade remains
jammed
Clear the jam (See section on
operation)
Shredding material comes out
in chains
Pressure plate is incorrectly
adjusted
Readjust the pressure plate
(See section on adjusting the
pressure plate)

18
Customer Helpline 08456 400 800
Specification Value
Silent shredder. SDS2810
Nominal power intake 2800W(S6 40% 50S)
Nominal voltage 220V-240V AC, 50 Hz
Safety class II
Degree of protection IP24
Branch thickness. Max 42 mm
Collection box content Approx 60 l
Weight 22 kg
Sound power level Measured (LWA) 96,3 dB(A); KwA = 2,4 dB(A)
Guaranteed 99 dB(A)
* The max. branch thickness that can be shredded is dependent on the type of wood and the quality of the
goods being cut.
For hard wood (e.g. oak/beech branches), the max. branch thickness that can be shredded is less than for soft
wood (e.g. pine/spruce wood). For dry or knotted wood, the cutting thickness may also be less.
The sound levels have been determined in accordance with noise measuring process EN 13683:2009-09,
appendix F.
The equipment is intend for use only in premises having a eliminate current capacity equal to or greater
than 100A per phase supplied from a distribution network having a nominal voltage of 230V. You may need
to check with your electricity provider if in ant doubt.
Noise and vibration values were determined according to the standards and stipulations mentioned in the
declaration of conformity.
Further technical or cosmetic changes may be carried out by the manufacturer without notice due to ongoing product improvement programs. References made in this manual may therefore sometimes vary.
Legal claims, which are made on the basis of the instruction manual, cannot thus be considered as valid.
Technical Data
Technical Data Table
Disposal and Recycling
Getting Help
Disposal
Do not dispose with household waste.
Recycle products and components according to local legal requirements.
After sales helpline number: 08456 400 800
Spare parts purchases: www.argosspares.co.uk
 Loading...