

Page 1
Q-EBH 750; EX; UK
Electric Tiller
Artikel-Nr.: 3431016
Ident-Nr.: 01019
Page 2

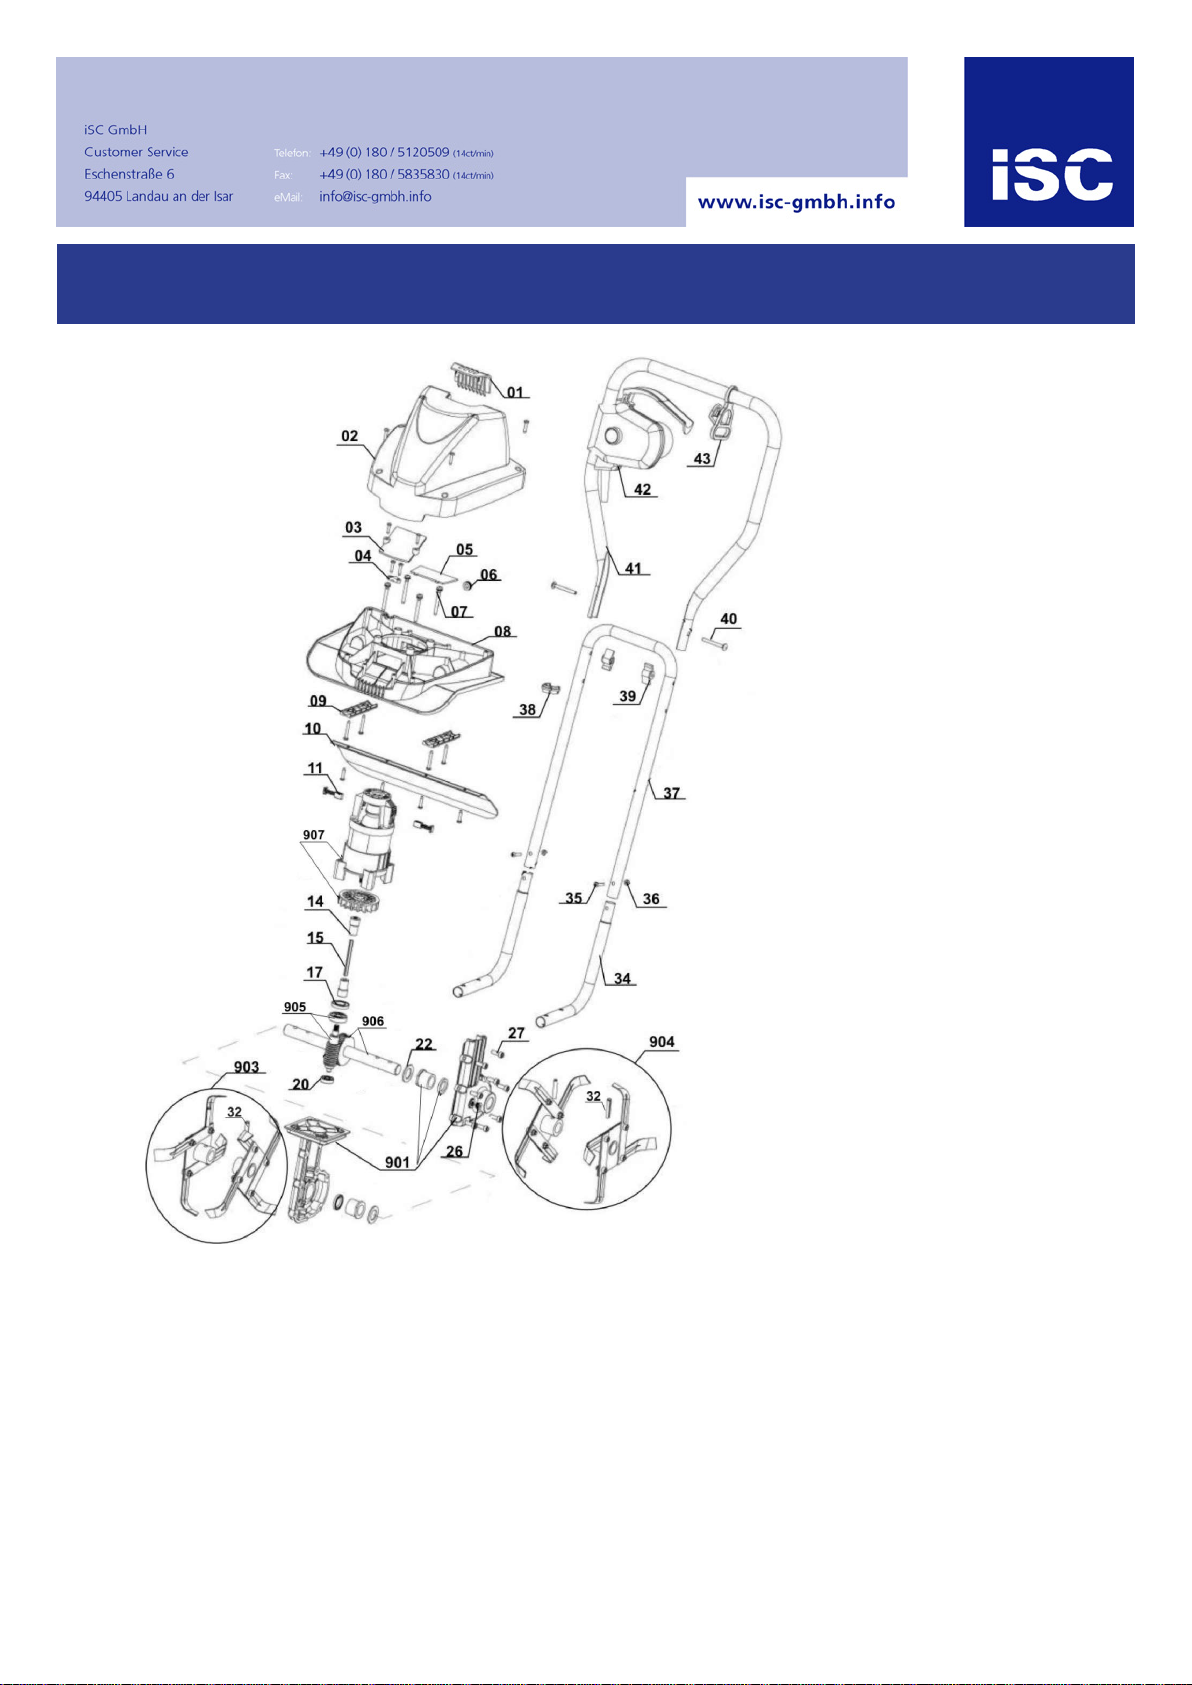
Komponenten / Ersatzteile
Position Artikel-Nr. Beschreibung
1 343101001001 Ventilator cover
2 343101001002 Upper housing
8 343101001008 Bottom housing
10 343101001010 Back shield
11 343101001011 Carbon brush (pair)
14 343101001014 connector
15 343101001015 Flexible shaft
32 343101001032 Spring pin
34 343101001034 nether handspike
35 343101001035 Screw M5*26
36 343101001036 Nut M5
37 343101001037 handspike down
38 343101001038 Cable clip
39 343101001039 knob
40 343101001040 Screw M6*45
41 343101001041 upper handspike
42 343101301042 10m mains cable with plug (UK)
43 343101001043 Cable hook
902 343101001045 handspike assy(34,37,41) (34,37,41)
903 343101001903 blade right
904 343101001904 blade left
905 343101001905 worm assy
906 343101001906 worm wheel + shaft
907 343101001907 motor with fan mit Lüfter 750W
Page 3

Q-EBH 750 ELECTRIC TILLER
OPERATING INSTRUCTIONS
Page 4

Page 5

Contents
1. Safety instructions 4
2. Layout and items supplied 9
3. Proper use 9
4. Proper operation 9
5. Installation 9
6. Starting up 9
7. Tips for proper working 9
8. Maintenance, care and storage 10
9. Replace the hoe blade 10
10. Ordering replacement parts 10
11. Technical data 10
12. Troubleshooting guide 10
Packaging
The unit is supplied in packaging to prevent its being
damaged in transit. This packaging is raw material and can
therefore be reused or can be returned to the raw material
system.
3
Page 6
Safety Notes 1. Safety Instructions
Warning! Read these instructions carefully, be
familiar with the controls and the proper use of the
tiller. Please keep the instruction safe for later use.
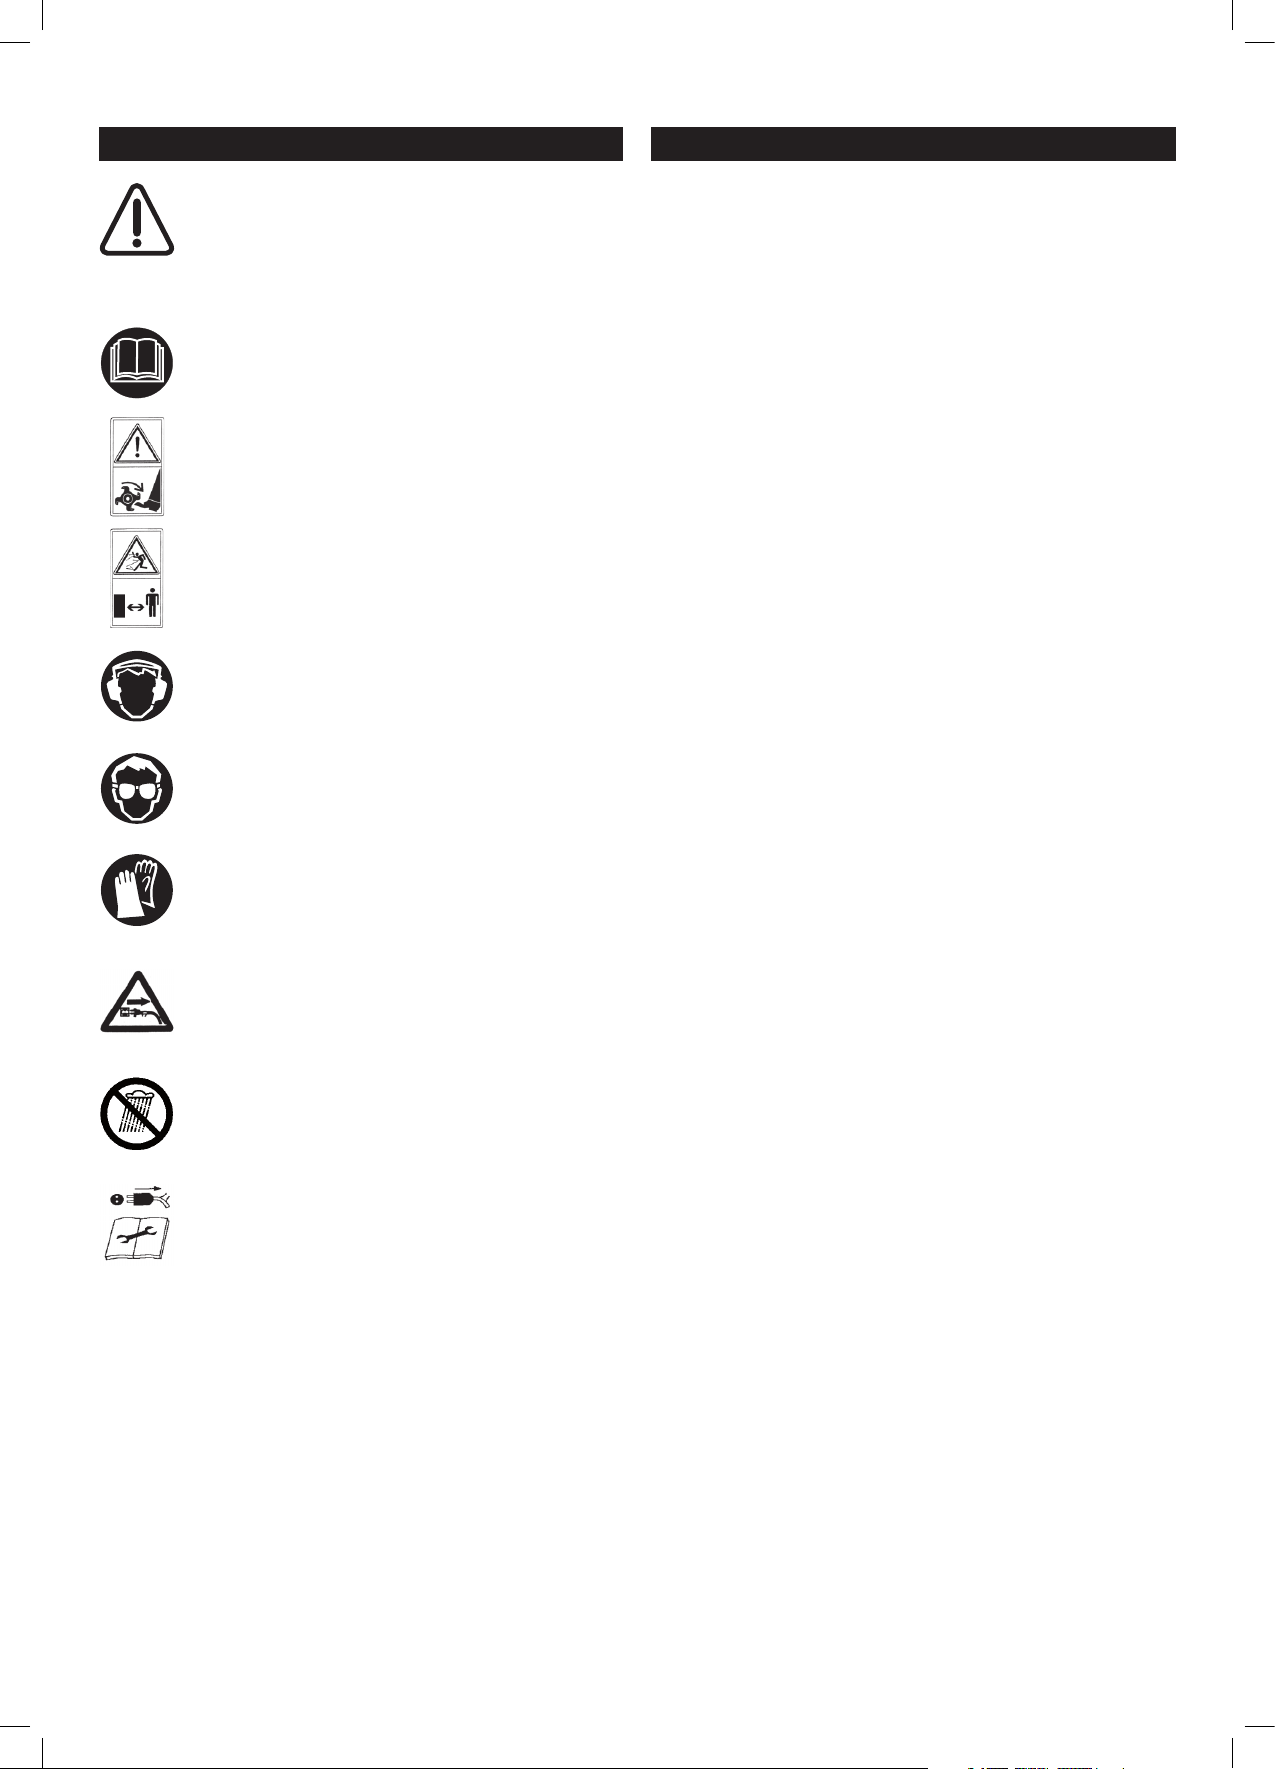
Explination of symbols on the tiller
Note the instructions for use!
Important. Rotating tool.
Caution! Danger from catapulted parts;
keep a safe distance.
Wear ear muffs!
Wear safety goggles!
Wear safety gloves
If the cable is damaged or cut, pull out the
power plug from the mains immediately.
Never use the equipment in damp locations.
Pull the power plug before carrying out
maintenance, cleaning and repair work.
Warning! When using electric tools, basic safety precautions
should always be followed to reduce the risk of fire, electric
shock and personal injury, in-cluding the following.
Read all these instructions before attempting to operate this
product and safe these instructions.
1. Keep work area clean
Cluttered areas and benches invite injuries.
2. Consider work area environment
Don’t expose power tools to rain. Don’t use power tools in
damp or wet locations. Keep work area well lit. Don’t use
power tools in presence of flammable liquids or gases.
3. Guard against electric shock
Prevent body contact with grounded surfaces (e.g. pipes,
radiators, ranges refrigeratiors).
4. Keep children away
Do not let visitors contact tool or extension cord. All visitors
should be kept away from work area.
5. Store idle tools
When not is use, tools should be stored in dry, high, or
locked-up place, out of the reach of children.
6. Don’t force tool
It will do the job better and safer at the rate for which it
was intended.
7. Use right tool
Don’t force small tools or attachments to do the job of
heavy duty tool. Don’t use tools for purposes not intended:
for example, don’t use circular saw for cutting tree limbs
or logs.
8. Dress properly
Do not wear loose clothing or jewelry. They can be caught
in moving parts. Rubber gloves and nonskid footwear are
recommended when working outdoors. Wear protective
hair covering to contain long hair.
9. Use safety glasses
Also use face or dust mask if cutting operation is dusty.
10. Don’t abuse cord
Never carry tool by cord or yank it to disconnect it from
the socket. Keep cord from heat, oil and sharp edges.
11. Don’t overreach
Keep proper footing and balance at all times.
12. Maintain tools with care
Keep tools sharp and clean for better and safer
performance. Follow instructions for lubricating and
changing accessories. Inspect tool cords periodically
and, if damaged, have repaired by authorized service
facility. Inspect extension cords periodically and replace if
damaged. Keep handles dry, clean and free from oil and
grease.
13. Disconnect tools
When not in use, before servicing, and when changing
accessories such as blades, bits and cutters.
14. Remove adjusting keys and wrenches
Form the habit of checking to see that keys and adjusting
wrenches are removed from tool before turning it on.
15. Avoid unintentional starting
Don’t carry plugged-in tool with finger on switch. Be sure
switch is off when plugging in.
4
Helpline No. UK 0151 649 1500 / IRE 189 094 6244
Page 7

16. Outdoor use extension cords
When tool is used outdoors, use only extension cords
intended for use outdoors and so marked.
17. Stay alert
Watch what you are doing. Use common sense. Do not
operate tool when you are tired.
18. Check damaged parts
Before further use of the tool, a guard or other part that is
damaged should be carefully checked to determine that
it will operate properly and perform its intended function.
Check for alignment of moving parts, binding of moving
parts, breakage of parts, mounting, and any other
conditions that may affect its operation. A guard or other
part that is damaged should be properly repaired or
replaced by an authorized service center unless otherwise
indicated elsewhere in this instructions manual. Have
defective switches replaced by an authorized service
center. Do not use tool if switch does not turn it on and off.
19. Warning
The use of any other accessory or attachment other than
recommended in this operating instruction or the Einhell
catalog may present a risk of personal injury.
20. Have your tool repared by an expert
This electric appliance is in accordance with the relevant
safety rules repairing of electric appliances may be
carried out only by experts otherwise it may cause
considerable danger for the user.
Additional safety instructions
Read the operating instructions with due care. Familiarize
yourself with the operator controls and proper operation of
the machine
Never allow children or other persons who are not familiar
with the operating instructions to use the machine. Contact
your local governmental agency for information regarding
minimum age requirements for operating the machine
Never work in the direct vicinity of persons - especially
children - or animals.
Always keep in mind that the machine operator or user is
responsible for accidents involving other persons and/or
damage to their property.
Preliminary measures
Always wear sturdy, non-slip footwear and long trousers when
working. Never operate the machine barefoot or in sandals.
Check the ground on which the machine will be used and
remove all objects that could be caught up and violently
flung out by it.
Before using the machine, always visually examine the tools
for excessive wear or damage. To prevent any imbalance,
replace worn out or damaged parts and mounting bolts as a
set only.
The power cables used are not to be of a lighter duty class
than light rubber-insulated H05RN-F in accordance with DIN
57282/VDE 0282 and they must have a cross section of at
least 1.5 mm2. The connection must be splash-proof. The
power cable must be fed through the stress-relief clips and
be plugged into the switch/plug block. Before use, check the
cable for damage and signs of aging. Never use the machine
with worn or damaged cables. If the cable is damaged while
working, pull the power plug immediately and only then
inspect the damage. Do not touch the power cable until the
plug has been pulled.
Socket couplers to connection elements must be made from
rubber, soft PVC or other thermal material of equal rigidity or
coated with such material.
Make sure that all nuts, bolts and screws are tightened
securely and that the machine is in safe working condition.
Handling
Work only in daylight or in good light.
Always maintain good footing on inclines.
Only operate the machine at a walking pace. Work
perpendicular to the slope, never up or down it.
Be particularly careful when you change direction on a
slope.
Do not work on overly steep inclines.
Be particularly careful when you turn the machine around or
pull it toward yourself.
Switch on the motor carefully as described in the instructions
from the manufacturer and ensure that you keep your feet at
a safe distance from the tool.
Never move your hands or feet toward or under any rotating
parts.
Never lift or carry a machine whilst the motor is running; in
addition the power plug should be pulled.
Switch off the motor whenever you leave the machine
unattended.
If the machine begins to experience unusual vibrations,
immediately switch it off and check it.
Ensure that you avoid paths that could restrict the free
movement of the extension cable.
Maintenance and storage
Always make sure that all nuts, bolts and screws are tightened
securely so that the machine is in safe working condition.
Allow the motor to cool before you put the machine in an
enclosed area.
For your own safety, replace worn or damaged parts without
delay.
Switch the machine off and pull the power plug before
carrying out any adjustment or cleaning work on it, and
before checking to see if the mains connection is entwined
or damaged.
Switch off the motor and pull the power plug:
before you dislodge any blockages or clogs.
before you clean the machine, inspect it or carry out work on
the machine.
after you have traveled over an obstacle.
if you have struck a foreign object.
Do not lose these safety regulations.
Helpline No. UK 0151 649 1500 / IRE 189 094 6244
5
Page 8

A
B C
6
Helpline No. UK 0151 649 1500 / IRE 189 094 6244
Page 9

D E
F G
H I
Helpline No. UK 0151 649 1500 / IRE 189 094 6244
7
Page 10

J K
L M
8
Helpline No. UK 0151 649 1500 / IRE 189 094 6244
Page 11

2. Layout and items supplied 5. Assembly
See Fig. A-C
1. Top push bar
2. Bottom push bar
3. Motor unit
4. Hoe blades
5. Cable strain-relief clamp
6. Two-hand safety switch
7. Cable securing clips
8. 2x screw for installing the top push bar
9. 2x screw for installing the bottom push bar
10. 2x screw for installing 2-hand safety switch
11. 2x nut M6
12. 2x wing nut
3. Proper use
The machine is designed for digging soil (for example
garden beds). Be sure to observe the restrictions in the safety
instructions.
4. Proper operation
Power supply
The machine can be connected to any 13A socket outlet
(with 230 Volt alternating current). However, the socket outlet
must have an earthing contact protected by a 16 A circuit
breaker. Additionally, a residual current device (RCD)
circuit-breaker with max. 30 mA must be used!
Power cable for the device
Please only use power cables that are not damaged. The
total length of the power cable should not exceed 50 meters;
going beyond this distance will reduce the power output of
the electric motor. The power cable must have a crosssection of 3 x 1.5 mm2. The insulating sheath of such machines
is frequently damaged. Some of the causes for this are:
- Cracking due to old age of the insulation
- Kinking caused by improper fastening or
guidance of the power cable Even though power cables
with damaged insulation sheaths pose a lethal hazard, some
people still use them. Do not make this mistake! Cables, plugs
and socket couplers must meet the following requirements
listed below. Power cables used to connect machines must
have a rubber insulation sheath.
The power cables must, at the very minimum, be of type
HO5RN-F and 3-stranded. The cable type must be printed
somewhere on the power cable. Only purchase power
cables that are marked! Plugs and socket couplers for the
power cables must be made from rubber and splash-proof.
There is a limit to how long power cables can be. Longer
power cables require larger conductor cross-sections. Power
cables and connecting lines must be regularly checked for
damage. Ensure that the lines are deenergized before
checking them. Completely unwind the power cable. Also
check power cable entry points, plugs and socket couplers
for kinks.
The machine is intended for private use i.e. for use in home
and gardening environments.
The operating instructions as supplied by the manufacturer
must be kept and referred to in order to ensure that the
machine is properly used and maintained. The instructions
contain valuable information on operating, maintenance
and servicing conditions.
For safety reasons, the machine may not be used as a drive
unit for other work tools or tool sets of and kind.
See Fig. D-K
Place the motor unit and the push bars on the ground in
order (Fig. D). Important. Do not forget to slide the cable
strain-relief clamp (Fig. F/Item 5) over the bottom push bar.
Slide the bottom push bar on to the push bar holder and
secure the two components to each other (Fig. E). Now
secure the top push bar to the bottom push bar (Fig. F). Install
the 2-hand safety switch as shown in (Fig. G-I / Item 6). Secure
the cable using the supplied cable securing clips (Fig. K/A)
6. Starting up
Secure the power cable with the strain-relief clamp (Fig L/
Item 2).
Important!
To prevent accidental start-up of the machine, the push-bar
(Fig. M/Item 1) is equipped with a two-point switch (Fig. M/
Item 2) which must be pressed before the lever switch (Fig.
M/Item 3) can be pressed. If the lever switch is released, the
machine switches off. Repeat this process several times so
that you are sure that your machine functions properly. Before
you perform any repair or maintenance work on the machine,
ensure that the hoe blades are not rotating and that the
power supply is disconnected.
Always ensure that a safe distance (provided by the long
handles) is maintained between the machine and the user.
Be especially careful when changing direction on slopes
and inclines. Maintain a solid footing and wear sturdy, non-slip
footwear and long trousers. Always till along the incline (not
up and down).
Use special caution when backing up and pulling the
machine (tripping hazard).
7. Tips for proper working
Place the machine in front of the area you wish to hoe and
hold it securely on the push bar before you switch on the
machine. Guide the hoe blades over the area.
To achieve cleanly tilled soil always ensure that you guide the
machine in straight lines wherever possible. Insodoing, the
aeration swaths should always overlap each other by a few
centimeters in order to avoid bare strips.
Switch off the motor promptly when you arrive at the end of
the area you wished to till. The motor must be switched off
when you raise the machine (for example to change
direction).
Keep the underside of the machine clean and remove soil
deposits. Deposits make it more difficult to start the machine
and decrease the working depth. Work perpendicular to the
slop on inclined areas. The machine must be switched off
and the mains cable disconnected before you make any
checks on the hoe blades.
Important!
The tiller blades will continue to rotate for a few seconds after
the motor is switched off. Never attempt to manually stop
them. In the event that the rotating tiller blade strikes an
object, immediately switch off the machine and wait for the
tiller blades to come to a complete stop. Then inspect the
condition of the tiller blades. Replace any parts that are
damaged.
Lay the power cable on the ground in front of the outlet in a
figure of 8. Work away from the outlet or cable and ensure
that the power cable always trails in the tilled soil which will
prevent the tiller blades from traveling over the cable.
Helpline No. UK 0151 649 1500 / IRE 189 094 6244
9
Page 12

8. Maintenance, care and storage 10. Ordering replacement parts
Maintenance and cleaning work on the machine as well as
removal of the safety devices may only be performed when
the motor is switched off and the power cable has been
pulled. Worn out or damaged hoe blades should only be
replaced by an authorized professional (see address on
warranty certificate).
Do not clean the tool with running water - and particularly
not with a pressure hose.
Ensure that all mounting components (i.e. screws, bolts, nuts
etc.) are always tightened so that the machine can be safely
operated at all times.
Store the device in a dry room. All the metal parts should be
cleaned and then oil to ensure that they provide a long life.
For best results, clean the plastic parts of the machine with a
brush or rag. Do not use any solvents to remove dirt.
At the end of the season, perform a general inspection of the
machine and remove any deposits which may have
accumulated. At the start of each season, ensure that you
check the condition of the machine. If repairs are necessary,
please contact one of our customer service centers (see
address on warranty certificate).
9. Replace the tiller blades
For safety reasons, we recommend having the tiller blades
replaced by an authorized professional (see address on
warranty certificate).
Important!
Wear working gloves. Use only genuine spare parts since
otherwise the function and safety of the machine cannot be
guaranteed.
Please quote the following data when ordering replacement
parts:
Type of machine
Article number of the machine
Identification number of the machine
Replacement part number of the part required
Helpline numbers:
UK 0151 649 1500
IRE 189 094 6244
11. Technical data
Voltage 230V ~ 50Hz
Power input 750 W
Working width 30 cm
Tiller diameter 22 cm
Idle speed 400 rpm
Number of blades 4 pieces
LpA noise level 70 dB(A)
LWA peak noise level 93 dB(A)
Vibration at the handlebars ahv ≤ 2.5 m/s
2
12. Troubleshooting Guide
Fault Possible causes Remedy
Motor does not start a) No power at the plug a) Check the power cable and fuse
b) Cable defective b) Check
c) Switch/plug block defective c) By customer service workshop
d) Motor terminals or capacitor d) By customer service workshop
disconnected
e) Excessive working depth e) Reduce working depth
Motor performance drops a) Soil too hard a) Correct working depth
b) Blades badly worn b) Replace hoe blades
Important note!
For protection, the motor is equipped with a thermal switch
which cuts out when the motor is overloaded and switches
on again automatically after a short cooling period.
10
Helpline No. UK 0151 649 1500 / IRE 189 094 6244
Page 13

Declaration of conformity
Helpline No. UK 0151 649 1500 / IRE 189 094 6244
11
Page 14

Disposal
For EU countries only
Never place any electric tools in your
household refuse. To comply with European
Directive 2002/96/EC concerning old electric
and electronic equipment and its
implementation in national laws, old electric
tools have to be separated from other waste
and disposed of in an environment-friendly
fashion, e.g. by taking to a recycling depot.
Recycling alternative to the demand to return electrical
devices:
As an alternative to returning the electrical device, the owner
is obliged to cooperate in ensuring that the device is properly
recycled if ownership is relinquished. This can also be done by
handing over the used device to a returns center, which will
dispose of it in accordance with national commercial and
industrial waste management legislation. This does not apply
to the accessories and auxiliary equipment without any
electrical components which are included with the used
device.
ARGOS Product Guarantee
This product is guaranteed against manufacturing defects
for a period of 2 years. This does not cover the product where
the fault is due to misuse, abuse, use in contravention of the
instructions, or where the product has been the subject of
unauthorized modifications or alterations, or has been the
subject of commercial use.
In the event of a problem with the product within the
guarantee period please return it to your nearest Argos store.
If the item is shown to have had an inherent defect present
at the time of sale, the store will provide you with a
replacement. Your statutory rights remain unaffected.
Guarantor: Home Retail Group, 489 - 499 Avebury Boulevard,
Central Milton Keynes, MK9 2NW
If you wish to purchase spare parts, please contact the
Helpline No. below.
Helpline No. UK 0151 649 1500 / IRE 189 094 6244
 Loading...