

Concorde
RE3OX
/RE35X
N4
OPERATING
INSTRUCTIONS
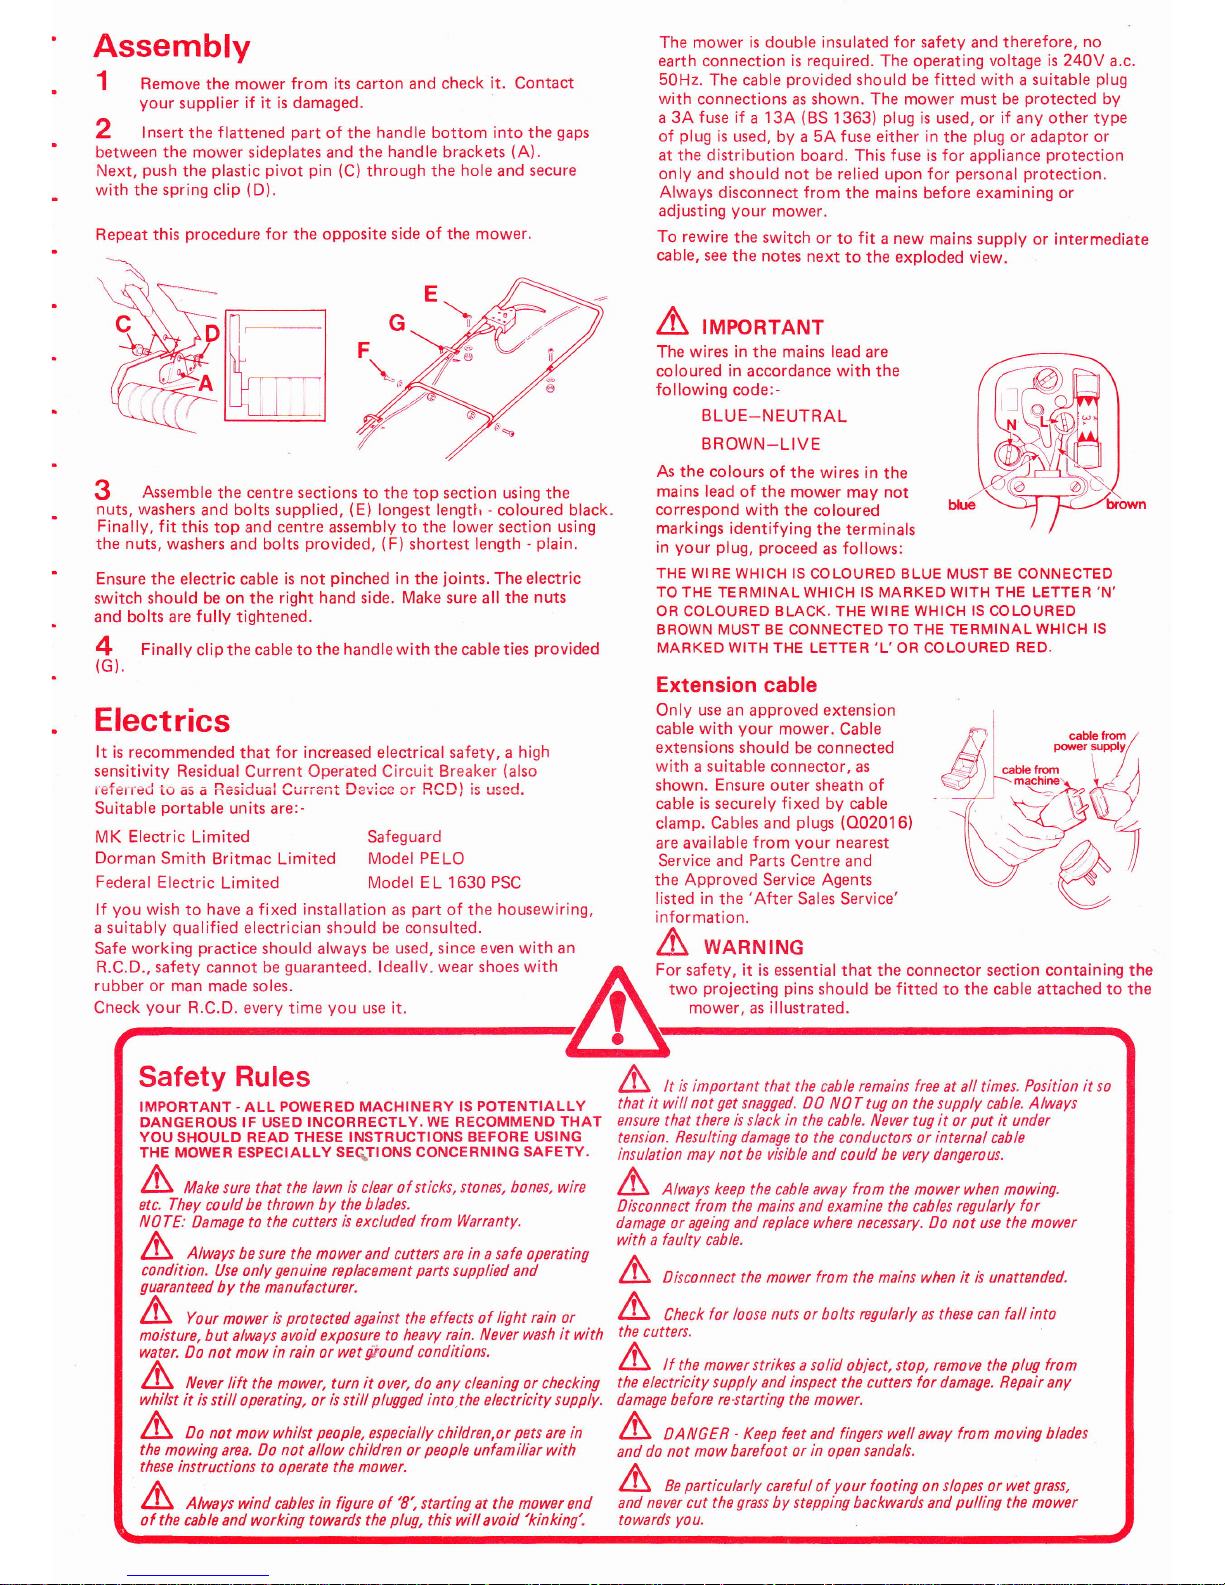
Assembly
1
Rtroue the mower
from its carton and
check
it.
Contact
your
supplier if it is
damaged.
2
lnsert
the
flattened
part
of the
handle bottom into the
gaps
between the mower sideplates
and
the
handle
brackets
(A).
Next,
push
the
plastic
pivot
pin
(C)
through the
hole
and
secure
with the spring clip
(D).
Repeat this
procedure
for
the opposite
side of the mower.
3
Assemble
the centre
sections
to
the top
section using
the
nuts, washers
and bolts supplied,
(E)
longest
lengtl' - coloured black.
Finally, f
it
this top and
centre
assembly to the
lower section using
the
nuts,
washers
and bolts
provided,
(F)
shortest length
-
plain.
Ensure
the electric cable
is not
pinched
in the
joints.
The
electric
switch should be on the
right hand
side.
Make sure
all
the
nuts
and bolts are
f
ully tightened.
4
Finally
clip the
cable
to the
handle with the cable ties
provided
(c).
Electrics
It
is recommended
that
for increased electrical
safety, a
high
sensitivity
Residual
Current
Operated Circuit Breaker
{also
refeireti to as
a
Residual
Curi'ent
Device
or RCD!
is
used.
Suitable
portable
units are:-
lf
you
wish
to
have
a
fixed
installation as
part
of the
housewiring,
a suitably
qualif
ied electrician shculd be consulted.
Safe working
practice
should always be
used, since even with an
R.C.D., safety cannot be
guaranteed.
ldeallv. wear shoes with
rubber or
man made soles.
The mower
is
double
insulated
for
safety
and
therefore,
no
earth
connection
is required.
The operating
voltage is 240V
a.c.
50H2.
The cable
provided
should be f itted
with
a
suitable
plug
with
connections
as
shown. The mower must be
protected
by
a
3A
fuse
if
a
'l
34
(BS
1363)
plug
is used. or if any other type
of
plug
is
used, by a 5Afuse either in
the
plug
or
adaptor
or
at the distribution
board. This
f
use is
for
appliance
protection
only
and should
not
be relied upon
for
personal protection.
Always
disconnect
from
the mains before
examining
or
adjusting
your
mower.
To
rewire
the switch
or
to
fit
a
new
mains
supply or intermediate
cable,
see
the notes
next
to
the
exploded
view.
A
,rrroRrANr
The
wires in
the
mains lead
are
coloured
in
accordance
with
the
following code:-
BLUE-NEUTRAL
BROWN_LIVE
As
the
colours
of the wires
in
the
mains lead
of the mower
may
not
correspond
with
the coloured
markings
identifying
the terminals
in
your plug, proceed
as
follows:
THE WIRE WHICH IS
COLOURED
BLUE
MUST
BE
CONNECTED
TO
THE TERMINAL WHICH IS MARKED WITH THE LETTER
'N'
OR COLOURED BLACK. THE
WIRE WHICH IS COLOURED
BROWN MUST BE CONNECTED TO THE TERMINAL
WHICH
IS
MARKED WITH THE LETTER
'L'OR
COLOURED
RED.
Extension cable
Only
use
an approved
extension
cable
with
your
mower.
Cable
extensions should
be connected
with
a suitable connector,
as
shown.
Ensure
outer sheath of
cable is securely
fixed
by
cable
clamp. Cables and
plugs
(002016)
are
available
f
rom
vour
nearest
Service and
Parts
Centre
and
the Approved Service Agents
listed in
the
'After
Sales Service'
information.
l\
wARNTNG
MK
Electric Limited
Dorman
Smith
Britmac Limited
Federal
Electric
Limited
Safeguard
Model PELO
Model
EL 1630 PSC
Cneck
your
R.C.D. every
time
you
use it.
For
safety,
it
is essential that the connector section containing the
two
projecting pins
should be
fitted
to the cable attached to the
mower,
as
illustrated.
Safety
Rules
IMPORTANT
-
ALL
POWERED MACHINERY IS
POTENTIALLY
DANGEROUS IF USED
INCORRECTLY. WE RECOMMEND
THAT
YOU
SHOULD READ
THESE INSTRUCTIONS
BEFORE USING
THE MOWER ESPECIALLY SEC\TTONS
CONCERNING
SAFETY.
A ,rO, ,urc that the
lawn is clear of sticks,
stones,
bones, wire
etc. They
could
be
thrown
by the
blades.
N0TE:
7anage to
the cutters
is
excluded
from
Warranty.
A\
n*ry,
ne
sure
the mower and
cutters
are in a safe
operating
condition.
Use
only
genuine
replacement
parts
supplied
and
guaranteed
by the manufacturer.
A, ,ou,
mower
is
prltected
against the
effects of
light rain or
noisture, but always avoid exposure
to heavy
rain. Never wash
it
with
water. D0 not
mow
in
rain
or wet
$tound
conditions.
A\
,r*, lift
the mower, turn
it
over,
do
any
cleaning or checking
whibt it is
still operating, or
is still
plugged
into.the electricity supply.
A
,, not
mow whilst
peopte,
especially
children,or
pets
are in
the mowing area. Do not allow
children or
people
unfaniliar
with
these instructions
t0 0perate
the
nower.
A
O,*16 wind
cables in
figure
of
'8',
starting at the mower end
of the
cable
and
working
towards
the
plug,
this
will avoid
'kinking'.
A
A
A
U
is important that the
cable
remains free
at all times.
Position it so
that
it
will
not
get
snagged. 00
N0T tug on
the
supply cable.
Always
ensure that there
is slack in
the cable. Never tug it
or
put
it under
tension.
Resulting damage
to the c0nducton or internal
cable
insulation may not be visible and could be very dangerous.
A.
/l\
a1*tys keep the cable away fron the
nower when mowing.
Disconnect fron
the mains and examine the cables
regularly
for
danage
or ageing
and replace where necessary. Do not
use
the mower
with a
faulty
cable.
Disconnect the mower
from
the
nains when it
is unattended.
Check
for
loose
nuts
or
bolts regularly as these can fall into
the cutters.
A\,r
rn, mower strikes a sotid
object,stop,
remove
the
plug
fron
the electricity supply and inspect
the cutters
for damage.
Repair
any
damage before
re-starting the
mower.
A\
oororB
-
Keep
feet
and fingers well away
from
moving
blades
and
do not now
barefoot or
in
open sandals.
A\
,,
,rn,rularly
careful of
your
footing
on
slopes or
wet
grass,
and
never cut the
grass
by stepping backwards
and
pulling
the mower
towards
you.

How
to use
your
mower
Please
check the cutting action of
your
mower before
you
first use it.
All new mowers are checked before despatch from
our
factory but
occasionally they
go
out
of
adjustment during transit. To reset the
cutters see
'Cutter
Adjustment' below. Poorly set
cutters
will
give
a
rough,
ragged looking
finish.
Grassbox
&
Gompactor
The
grassbox
nestles
in
the
'U'shaped
handle
bottom
with
the
lugs
fittinq
over the
crossbar.
A
grass
compactor is
f
itted to the
grassbox
to increase
its capacity.
When the
grassbox
is
empty,
the
compactor lies
flat in
the bottom
of the box. As
the box
fills,
the
compactor can
be
pulled
up and
secured
to
compress
the clippings
by winding the
cord
{H)
round
the retainer
(J).
To
mow
without
collecting
grass,
fit the
grassbox
so the
front lip
rests on the deflector
plate.
(This
ensures
that the clippings are safely
deflected
onto the
ground.)
Starting
The mower
features
a
safety lock
button
designed
to
prevent
accidental
operation
of the cutting system.
To
start the machine:
-
1. Depress
the
safety
button and hold.
2. Squeeze switch lever.
3.
Release
safety
button.
Once
the
lever
is released it becomes
locked
again and
the
mower
stops
automatically.
Mowing
Place
the surplus cable on the
lawn
close to the starting
point.
Trailthe
electric
cable over
your
shoulder
and/or hold a
short loop
of
cable
in
your
hand,
to
help keep
it behind
you.
Always work
away
from
the
supply
cable to
avoid
loose cable
on
the uncut
grass
where it would
interfere with
your
mowing. At
the
end of each
swath, switch
off and turn the mower in alternate directions,
throwing the
cable
to the opposite side
for
each succeeding cut.
Take care
not
to
get
the cable enrangted in the cutters.
Do not
work in a circular
path.
It
is important that the cable
remains free
at all times.
Position it
so
that it will not
get
snagged.
,l|\
DO
NOT
tug
on
the
supply
cable, always ensure that there
d-$
is slack in the cable. never.tug it or
put
it under
tension.
Resulting damage
to the conductors or internal cable insulation
may not
be
visible
and could be very dangerous.
ADJUSTMENTS
& MAINTENANCE
Height of Cut Adjustment
/t\
ZJJ Always
unplug
the mower
from
the
mains before
adjusting
the
height
of
cut.
The height
of cut can be set
at three
Low
positions,
11mm,
19mm
and27mm.
To
adjust,
loosen
the
nuts
{K}on
each side of the
mower, move the
wheels
to the
required
height
and
re-tighten the nuts
securely. lt is
essential
that the same
position
is
selected on each side.
Cutter
Adjustment
The cutters should be adjusted if
the
mower
does
not
give
a clean
even cut.
/l\
Z-iJ Unplug the mower f rom
the
mains before
handling or adjusting
the
cutters.
A
OO*6ER
-
The
cutting blades are sharp and could cut
your
fingers.
To adjust
the cutters;-
1. Turn the mower upside
down.
2. Adjust
the bottom blade
closer to the cutting cylinder
by
turning
the
screws(L) clockwise
on
each side
of
the mower a
little
at a
time. The
blades
are correctly
adjusted when
the cutting
cylinder
lightly
brushes
the
bottom
blade
evenly
across its full
width
as
the cylinder
is
turned.
(The
cutters
work
like a
pair
of shears.
As
a test,
correctly
adjusted
cutters
will
cut
a
Hish
piece
of
good quality
writing
paper
al
.
-
^
;
any
point
across
the width
of the
"
a,^
-
A
o,*"u, unprug
the mower from the.Y*ror"
blades).
A
ooNoTADJUSTTHE
BOTTOM
BLADE
TOO
TIGHTLY
TO
THE
CUTTING
CYLINDER
as this
wiil
overload
the motor
and
may damage
it
and
the bearings.
lnspect
the
blades
and if
theypre
badly damaged,
bent
or
worn,
they
should
be changed.
New
bottom blades
are available
from
our
Service
Agents
and may
be easily
fitted following
the
instructions
on
the
pack.
Contact
one
of our Approved
Service
Agents
or
your
nearest
Oualcast
Service
and Parts
Centre if
you
require
assistance
or
parts.
Drive Belt
Adjustment
and Replacement
The
drive belt is
tensioned
before
the
mower leaves
our
factory.
The
belt
tension should
be occasionally
checked
as below. An incorrectly
tensioned
belt will either wear
rapidly
if very loose,
snap or burn
out
the motor if very
tight. The
drive belt is also
a fail safe device
designed
to
protect
the motor
if the
cutters strike a hard
object. lt is
manufactured
to close
tolerances.
using
glass
fibre bonded in
nylon
and
neoprene. To
preserve
its
strength, do
not
pinch,
crimp
or
deform it.
A
,"ror"
adjusting
the belt, unplug
the mower
from
the mains.
To
check and adjust
the belt
or
to fit a new belt;-
1 Remove
the drive
cover.
(on
the right hand side
of the
mower)
2
Loosen the motor
screws
(M)
e
(N)Do
not remove completely
or the motor
will
fall inside
the mower.
(lf
fitting
a
new
belt,
move the motor backward
and slide
the belt over the
toothed
pulleys)
3 Tension
the belt by using firm
hand
pressure
to
push
the
motor
pulley
(P)
away from
the
large
pulley.
Ensure
that the raised
black
pad
around
the motor shaft is fully
located in
the
sideplate
cut-out. Tighten
screw(N)then
screw(M)
to
lock
the motor,
whilst
maintaining the
tension
on
the belt.
/!\
po
not use
a
screw
driver
or
similar
object
to
lever
the
motor as
this will
overtension
the belt
-
firm
hand
tension is
enough.
The
belt
tension is
correct when
the
free
movement
of the belt is 4mm
or
less.
Maintenance
handling
or adjusting
the mower mechanism
Check that the
mower
gives a good
clean finish. lf it does
not,
check that
the cutters
are correctly set and not badly
damaged.
After
Cutting
Keep
the air
filter
on
the left
side of the mower clear
of
debris.
The mower can
be
wiped
down with
a dry cloth but
DO NOT
USE
WATER.
Check for loose nuts
and bolts.
The
cutting cylinder bearings
may be
oiled occasionally
but
other
parts
should nof
be oiled.

Motor Pinion
lf
your
motor
pinion
becomes
damaged
then
you
should take
your
mower
to
a
service agent
for repair.
To
Rewire the Switch
1. lnsert a
1mm
diameter
pin
in
the
same
hole
as
the wire.
2. Pull
out
the wire.
3.
Remove
the
pin.
4.
Trim
7a" of insulation
off
the end of each
wire
of the
new lead.
5. Twist
the strands
of
each wire
together.
6. lnsert
each wire
fully
into
the switch.
7. Ensure
outer
sheath
of
cable
is
securley
f
ixed
by
cable clamp.
To Rewire the
lntermediate Cable
Should the
intermediate
cable become damaged,
it
must be
replaced
with a
special
cable
with terminals.
This
is only obtainable
from
your
local
Qualcast
Service
Agent.
(See
separate list).
IMPORTANT:
lt is essential when ordering
spare
parts
that the following information
is
given:-
a) Model and Serial Number
of the mower
b)
Part
Number. NOT
illustration
reference number.
c) Description of
part.
E.G.
The drive
belt is illustration number
50
-
thus
the
part
number
is
T43506
-
Drive belt
pack
NOTE:
Where
parts
are made left hand
(L.H.)
and
right
hand
(R.H.),
these are determined as the mower
is
pushed.
Item
D,escription
1
Screw
(switch
-
long)
2
Screw
(switch
-
short)
3
Switch housing
(uppe0
4
Cable
guard
5 Swilch
assembly
6 Button
seal
7 Lever
8 Screw
(cable
clamp)
9 Cable clamp
'10
Switch housing
(loweo
11 Pivot
pin (plastic)
12 Nut
(switch)
13
50'cable
14 Bolt
(handle
securing)
15
Knob
16
Cord
17
Screw(plasticmotorcover/deflector)
18
Grassbox
assembly
(30cm)
Grassbox assembly
(3scm)
23
24
25
26
27
28
29
30
31
32
33
34
Compactor
(30cm)
Compactor
(35cm)
Nut
(handle
securing)
Handle
bottom
-
30cm
Handle
bottom
-
35cm
Handle centre
Bolt
(handle
securing)
Handle top
Cable cleat
Grommel
'P'clip
Circlip
Tee nut leaf spring assembly
Sideplate
assembly
(L.H.)
Filter
Screw
(sell
tapping)
Lower molor cover/deflector
guard
30cm
Lower motor
cover/deflector
guard
35cm
Motor cover upper
(30cm)
Motor cover upper
(35cm)
Screw
(self
tapping)
Cable clamp
(moto0
Nut
(motor
securing)
Motor assembly
(30cm) (includes
pinion
and rollpin)
Motor
assembly
(35cm)
(includes
pinion
and rollpin)
lntermediate
cable
Spring
clip
Washer
Spindle
(30cm)
Spindle
(35cm)
Floller
rear
(30cm)
Roller rear
(35cm)
Washer
(motor
securing)
Screw
(molor
securing)
Washer
(shakeproof)
Bolt
(stretche0
Nut
Drivb cover
Drive belt
pack
Motor sleeve upper
Large
pulley pack
Sideplate assembly
(R.H.)
Motor
sleeve
lower
Nut
-
triwinged
Dirt seal
(30cm)
Ratchet
plate
Bolt
Circlip
Wheel
Roller carrier assembly
(R.H.)
Spacer
Bush
(large)
Bottom blade
pack
(30cm)
Bottom blade
pack
(35cm)
Screw
(bottom
blade adjust)
Stretcher
(30cm)
Stretcher
(35cm)
Bush
spring assembly
Roller carrier assembly
(1.H.)
Spring
(bottom
blade adjust)
Cylinder assembly
(30cm)
Cylinder assembly
(35cm)
Shakeproo{ washer
Screw
{ self tapping
)
Deflector
guard
transfer
(30X)
Deflector
guard
transfer
(35X)
Motor cover transfer
Grassbox transfer
Warning
transler
Warning transfer
Part No.
T40945
T42036
T45903
T44500.
r44764
r44206
T44880
r44191
T46290
T45904
T46340
T41 1
59
Q02009
T46338
r44862
T43833
r45575
T45906
T45907
T43301
743302
r42020
r46327
r46328
T46435
T46339
T45546
T40567
T46080
T42806
T43899
T4391 3
T46335
T4051
6
T41 953
T46341
T46342
T42620
r41926
T40573
T40562
T40589
r44567
T44568
T44888
T41251
T46127
r$440
r43446
T4391 1
r$912
T40590
oty'
2
3
45
46
47
48
49
50
51
52
53
54
55
56
57
58
59
60
61
62
63
64
T40588
T41024
I4U49
118117
T41 91
6
T43506
T44504
r42727
T46336
T451 39
T46302
T40530
r42867
T40736
r45870
T41931
T46280
r42791
T45585
Q02070
002071
T43 1 63
T45591
T45593
T45586
T46279
T43125
r43710
T4561
5
L18174
T42978
T45641
r45642
T45643
T45645
r46657
T46658
J
2
1
2
5
1
1
1
10
1
1
1
1
4
1
1
2
2
1
2
1
2
2
2
1
2
1
1
1
19
20
65
66
67
68
bv
70
71
72
2
'I
2
2
2
2
,1
2
1
1
1
2
1
1
1
1
1
1
4
2
35
36
37
38
39
40
41
42
tr
*
*
llems indicated
on the drawing wilh
an astrisk
are avallable only lo
Service
Agents
Pinion
Roll
pin
T44827
r44492
/
32
32/
E
29
,--/\-st
-
\_}
14
13
%/
44
tt
46
45
1
I
ot
62
a
53
K
32

lf
your
mower
fails
to
work Spare
Parts
lf the
mower
still fails to operate
or works
intetmittently,
do not
continue to
hold
the trigger
in the
'on' position,
as
this
may cause
further damage to the components.
Check
the
following:-
1.
ls the
mains
socket'live'?
Test by trying another appliance.
2.
ls the
mower
plug
connected correctly?'
3. Has the
fuse
in the mower
piug
failed? Replace with a
new
fuse
and try again.
Unplug
the mower
from
the
mains. No
f
urther checks must
be
nrade
to
find
the
fault
with the
mower
plugged
in. SUCH ACTION
COULD
BE DANGEROUS.
4.
Are the cutters
jammed?
Clear the blockage and try again.
lf
the
mower stillfails to
work
or
if
the
fault
is intermittent
then
it may
lie
within the mains cable.
Do not
attempt to
find this
fault
but
seek
advice
from
a
Oualcast
Service And
Parts
Centre
or
an
approved
Service Agent.
Select
an agent
from the list with an
'E'
(electrical)
approval.
Note:-
Remove
Vour
mains
plug
from
the
cable
before
returning
the mower
for
service or
repair.
Winter
Storage
Store
the mower in
a dry
place,
preferably
off the
ground.
Clean
off any debris
and
wipe metal
parts
with an oily
rag.
Check
all nuts
and bolts are tight and
replace
any
worn
parts.
Warranty
This is as stated on the
guarantee.
Every effort
is made
to ensure
that these instructions are
up-
to-date.
However, due to our
policy
of continuous
product
development, changes
in
production
specification
may have
been
made. lf in
doubt,
please
contact
your
nearest Oualcast
Service
and Parts
Centre or a
Oualcast Service
Agent.
This
product
is manufactured to comply
with the
Radio
lnterference Requirements of
EEC directive 82l499lEEC.
The
following
spares are available in kits complete with
full
instructions to assist
DIY
replacement:-
002070
Bottom Blade
replacement kit
RE30X
AO2O71
Bottom Blade
replacement kit RE35X
T43506 Drive Belt
replacement kit
T42727
Large
Pulley
pack
002010
Concorde Green aerosol spray
paint,
All
parts
and service
assistance are available
from our
Approved
Service Agents and
Service Centres
(See
separate list supplied with
your
machine). Selectan
Agentwith an'E'{electrical)
approval.
Unique
Optional
Features
Oualcast have now developed two
unique
attachments
to
your
Concorde
RE for easier lawn care.
Lawn
Edge
Trimmer
-
converts
your
mower into
a
powered
lawn edge trimmer
to
produce
a
quality
cut equivalent
to the very
best
garden
shears.
Lawn
Rake Kit
-
turns
your
mower
into
a
powered
lawn
raker to
lift
out
moss,
thatch and
other
lawn debris and
rake
up leaves
without
the
hard slog.
Ask
Vour
retailer
for further
details.
A
W,.H,RNING
A
SWITCH OFF,
REMOVE
PLUG
FROM
MAINS
BEFORE
ADJUSTING,
CLEANING
OR
IF
CABLE
IS ENTANGLED.
THE
BLADES
CONTINUE
TO
ROTATE
FOR A FEW
SECONDS
AFTER THE
MACHINE
IS
SWITCHED
OFF.
Qualcast
Garden
Products
Limited,
Sunnyhill,
Derby, England.
DE3 7JT.
Tel. 0332
(Derby)
760202 :Telex: 377514
Pnnted in England
T46346
(N)
44
 Loading...