

Quadro Quadro2x2, Quadro4L Installation Manual


Quadro6L/4L/2x2 Manual I: Installation Guide
Quadro6L/4L/2x2; (SW Version 5.3.x and hi gher)
Copyright and Trademarks
Copyright © 2003-2013 Epygi Technologies, Ltd. All Rights Reserved. Quadro is a registered trademark of Epygi Technologies, Ltd. Microsoft, Windows, and the Windows logo are registered trademarks of Microsoft Corporation. All other
trademarks and brand names are the property of their respective proprietors.
Limited Warranty
Epygi Technologies, Ltd. (‘Epygi’) warrants to the original end-user purchaser every Quadro to be free from physical defects in material and workmanship under normal use for a period of one (1) year from the date of purchase (proof of purchase required) or two (2) years from the date of purchase (proof of purchase required) for products purchased in the
European Union (EU). If Epygi receives notice of such defects, Epygi will, at its discretion, either repair or replace products that prove to be defective.
This warranty shall not apply to defects caused by (i) failure to follow Epygi’s installation, operation or maintenance instructions; (ii) external power sources such as a power line, telephone line, or connected equipment; (iii) products that
have been serviced or modified by a party other than Epygi or an authorized Epygi service center; (iv) products that have
had their original manufacturer’s serial numbers altered, defaced, or deleted; (v) damage due to li ghtning, fire, flood, or
other acts of God.
In no event shall Epygi’s liability exceed the price paid for the product from direct, indirect, special, incidental, or consequential damages resulting from the use of the product, its accompanying software, or its documentation. Epygi offers no
refunds for its products. Epygi makes no warranty or representation, expressed, implied, or statutory, with respect to its
products or the contents or use of this documentation and all accompanying software, and specifically disclaims its quality, performance, merchantability, or fitness for any particular purpose.
Return Policy
If the product proves to be defective during this warranty period, call Epygi Customer Support at (972) 692-1166 to obtain
a Return Material Authorization (RMA) Number. Registered users also may access Epygi’s Technical Support
(www.epygi.com; ‘Support’) to send their RMA request. For Brazil representatives, call (21) 2518-3161 or contact v ia Web
(www.saga.com.br). Please have your proof of purchase on hand when contacting us. When returning a product, mark
the Return Authorization Number clearly on the outside of the package and include your original proof of purchase. Return
requests cannot be processed without proof of purchase. Customers are responsible for shipping and handling charges
when shipping to Epygi.
Epygi or its service center will use commercially reasonable efforts to ship a replacement product within ten (10) working
days after receipt of the returned product. Actual delivery times may vary depending on customer location.
Epygi reserves the right to revise or update its products, pricing, software, or documentation without obligation to notify
any individual or entity. Please direct all inquiries to:
Epygi Technologies, Ltd., Two Legacy Town Center, 6900 North Dallas Parkway, Suite 850, Plano, Texas 75024
Representative in Brazil - Saga Sistemas e Computadores SA, Av. Rio Branco, 18 - 8 andar, Rio de Janeiro 20090-001
Notice to Users
This Installation Guide, in whole or in part, may not be reproduced, translated, or reduced to any machine-readable form
without prior written approval.
Epygi provides no warranty with regard to this Installation Guide or other information contained herein and hereby expressly disclaims any implied warranties of merchantability or fitness for any particular purpose in regard to this manual or
other such information. In no event shall Epygi be liable for any incidental, consequential, or special damages, whether
based on tort, contract, or otherwise, arising out of or in connection with this manual or other information contained herein
or the use thereof.
FCC Statement (Part 15) Class A
• The Epygi Quadro6L/4L/2x2 has been tested and found to comply with the limits for a class A digital device, pur-
suant to Part 15 of the FCC Rules. These limits are designed to provide reasonable protection against harmful interference in a commercial installation. This equipment generates, uses, and can radiate radio frequency energy and, if
not installed and used in accordance with the instructions, may cause harmful interference to radio communications.
However, there is no guarantee that interference will not occur in a particular installation. If this equipment does
cause harmful interference to radio or television reception, which is found by turning the equipment off and on, the
user is encouraged to try to correct the interference by one or more of the aforementioned measures.
You are cautioned that any change or modification to the equipment not expressly approved by the manufacturer could
void the user’s authority to operate this device.
Administrative Council for Terminal Attachments (ACTA) Customer Information
This equipment complies with Part 68 of the FCC rules and the requirements adopted by the ACTA. On the back of this
equipment is a label that contains, among other information, a product identifier in the format US:AAAEQ###TXXXX,
made out to HX7OT00BHX70100. If requested, this number must be provided to the telephone company.
Any plug or jack that is used to connect this equipment to the premises wiring and telephone network must comply with
the applicable FCC Part 68 rules and requirements adopted by the ATCA.
The Ringer Equivalence Number is an indicator of the maximum number of devices allowed for connection to a telephone
interface. The termination on an interface may consist of any combination of devices subject only to the requirements that
the sum of the RENs of all the devices does not exceed five. Excessive RENs on a telephone line may result in the devices not ringing in response to an incoming line. The REN for this product is part of the product identifier that has the
format US:AAAEQ###TXXX, made out to HX7OT00BHX70100. The digits represented by ### are the REN without a decimal point (in this case 00B is a REN of 0.0B.)
If the Quadro causes harm to the telephone network, the telephone company will notify you in advance that a temporary
discontinuance of service may be required. But if advance notice isn’t practical, the telephone company will notify the customer as soon as possible. Also, you will be advised of your right to file a complaint with the FCC if you believe it is necessary.

Quadro6L/4L/2x2 Manual I: Installation Guide
Quadro6L/4L/2x2; (SW Version 5.3.x and hi gher)
The telephone company may make changes in its facilities, equipment, operations or procedures that could affect the operation of the equipment. If this happens, the telephone company will provide advance notice for you to make the necessary modifications to maintain uninterrupted service.
Connection to a party line service is subject to state tariffs. Contact the state public utility commission, public service
commission or the corporation commission for information.
If your home has specially wired alarm equipment connected to the telephone line, ensure the installation of the Quadro
does not disable your alarm equipment. If you have any questions about what will disable alarm equipment, consult your
telephone company or a qualified installer.
Electrical Safety Advisory
To reduce the risk of damaging power surges, we recommend you install an AC surge arrestor in the AC outlet from which
the Quadro is powered.
Industry Canada Statement
This product meets the applicable Industry Canada technical specifications.
Safety Information
Before using the Quadro, please review and ensure the following safety instructions are adhered to:
• To prevent fire or shock hazard, do not expose your Quadro to rain or moisture.
• To avoid electrical shock, do not open the Quadro. Refer servicing to qualified personnel only.
• Never install wiring during a lightning storm.
• Never install telephone jacks in wet locations unless the jack is specified for wet locations.
• Never touch uninsulated telephone wire or terminals unless the telephone line has been disconnected at the net-
work interface.
• Use caution when installing or modifying cable or telephone lines.
• Avoid using your Quadro during an electrical storm.
• Do not use your Quadro or telephone to report a gas leak in the vicinity of the leak.
• An electrical outlet should be as close as possible to the unit and easily accessible.
Emergency Services
The Quadro SIP Service is intended to function as a secondary telephone service. This service is made available through
the Internet and therefore is dependent upon a constant source of electricity and network availability. If a power outage
occurs, the Quadro SIP Service automatically will be disabled. User understands in the event of a power or network outage, the Quadro SIP Service will not support 911 emergency services, and further, such services only will be available via
the user's regular telephone line that is not connected to the Quadro. User further acknowledges that any interruption in
the supply or delivery of electricity or network availability is beyond Epygi's control and Epygi shall have no responsibility
for losses arising from such interruption.

Quadro6L/4L/2x2 Manual I: Installation Guide
Quadro6L/4L/2x2; (SW Version 5.3.x and hi gher)
Table of Contents
Manual I: Installation G u id e
About This Installation Guide ....................................................... 6
Requirements ........................................................................... 7
Hardware Overview ................................................................... 8
The Connectors Panel of Quadro6L/4L/2x2 ............................................... 8
Quadro6L/4L/2x2’s Front Panel LEDs ....................................................... 9
Step 1: Installing the Quadro .................................................... 11
Networking O v e rv ie w ........................................................................... 11
LAN/WAN Conne ction Op tions ............................................................... 12
Connecting the Hardware ..................................................................... 16
Step 2 : Configuring the Quadro ................................................. 20
Step 2.1: Logging into Quadro .............................................................. 20
Step 2.2: Syste m Conf ig uration W izard .................................................. 21
System Configuration ...................................................................................21
DHCP Settings for the LAN Interface ................................................................22
Regional Settings .........................................................................................22
Emergency and PSTN Access Code Settings ......................................................23
Finishing the System Configuration Wizard .......................................................24
Step 2.3: Internet C onf iguration Wizard ................................................. 26
Uplink Config urat ion .....................................................................................27
WAN IP Configuration ...................................................................................28
PPP/PPTP Configuration .................................................................................29
WAN Interface Configuration ..........................................................................30
DNS Settings ..............................................................................................30
Finishing the Internet Configuration Wizard ......................................................31
Step 2-A: Using IP Lines ........................................................... 32
Supported SIP Phones .......................................................................... 35
Tested SIP Phones ............................................................................... 35
Step 2-B: U si ng Key System Emulation ....................................... 37
Configuring S LA Line s .......................................................................... 38
How to disable the Key System Emulation .............................................. 40
Step 2-C: Using Receptionist ..................................................... 41
Step 3: Registering on Epygi’s Technical Support .......................... 42
Step 4: Making/Receiving Calls .................................................. 43
Using the Default SIP Addresses ............................................................ 43
Appendix: Changin g the Admin Password .................................... 45
Appendix: Configuring NAT Traversal .......................................... 47
Appe n dix: R egistering on Epygi’s SIP S erver ................................ 50
Appendix: Checking the Con nections .......................................... 55

Quadro6L/4L/2x2 Manual I: Installation Guide
Quadro6L/4L/2x2; (SW Version 5.3.x and hi gher)
Manual II: see Administrator's Guide
This guide de scribes i n detail the menus av ailable fo r admi nistrators o nly. Furthermore, it inc lud e s a ll the sy ste m’ s de fault values at a g la nce .
Manual III: see Extension User's Guide
This guide describes in de tail the menus av ailable for ex tension users. Furthe rmore, it include s a ll t h e ca ll codes at a glance.

Quadro6L/4L/2x2 Manual I: Installation Guide About This Installation Guide
Quadro6L/4L/2x2; (SW Version 5.3.x and hi gher) 6
About This Installation Guide
This I nstall ation Gu ide exp lains th e inst allati on of th e Quadr o IP PBXs of Qu adro6L, Quadro4L and Quadro2x2 series.
• Quadro6L offers 6 phone lin es (FXO ), 1 Ethernet LAN p ort and 1 Ethernet WAN
port as external interfaces.
• Quadro4L offers 4 phone lines (FXO), 2 phon e extens ions ( FXS), 1 Ethern et LAN
port and 1 Ethernet WAN port as external interfaces.
• Quadro2x2 offers 2 ph on e lines ( F X O) , 2 ph one ext ens i ons (FXS ), 1 Eth ern et LAN
port and 1 Ethernet WAN port as external interfaces.
This Installation Guide gives step-by-step instructi ons to provis ion the Quadro an d configure the phone extensions with the Epygi SIP Server. After successfully configuring the
Quadro, a user wil l b e abl e to mak e S IP ph on e c alls t o remot e Quad ro devic es, m ak e l oc al
calls to the PSTN and access the Internet from devices connected to the LAN.
This I nstallat ion Guid e neith er descr ibes t he PBX, Auto Att endant , Call R elay, and Voic e
Mail features of t h e Q u adro nor d oes it p rovid e ad vanced firewall an d V PN configuration i nform ati on. F or th ese features, ref er to th e A dm in is trator' s and E xtension User's Guides.
Step 1: I nstal ling th e Quadr o explai ns th e connect ion of c ables and devic es to th e Qua-
dro.
XStep 2: C onfig uri ng th e Q uadr o desc rib es th e c onf igur ati on st eps nec ess ary t o int egr at e
the Quadro into your network envir on m ent .
XSt ep 2-A : U s i ng IP Lin es expl ai ns h ow t o configure IP lines on the Quadro IP PB X and to
connect IP phones to become functional in the Quadro’s LAN.
Step 2-B: Using Key System Emulation explains how to configure SLA lines.
Step 2-C: Usi ng R ecept ionis t ref ers t o the d ocum ent d escri bi ng Rec ept ionis t’s conf igur a-
tion on th e Qu ad ro.
Step 3: R egisterin g on Epygi’s Technical Su pport shows you how to access the Epygi
Technical Support Center and the Epygi SIP Server.
Step 4: M aking/R eceivin g CallsX explains how to enable the Quadro’s various t elephon y
features.
Appendix: Changing the Admin Password e xpl ai ns h ow t o c hange t h e d efault ad min is tra-
t or pas swor d .
Appen dix: C onfiguri ng NAT Traver sal explains c onfigur ation of the Q uadro if i t is pl aced
behind a NAT enabled router.
Appendix: Registering on Epygi’s SIP ServerX explains how to register on Epygi's powerful
SIP server.
Appendix: Checking the Connections gives hints on solving common problems.

Quadro6L/4L/2x2 Manual I: Installation Guide Requirements
Quadro6L/4L/2x2; (SW Version 5.3.x and hi gher) 7
Requirements
• One 120/240 VAC power outlet in close proximity to the Quadro.
• One RJ45 Ethernet 10/100 broadband Internet connection.
• At leas t one RJ 11 t elep hon e conn ecti on is r ec omm ended t o c onnect th e Quadr o to
the PSTN network.
• At least one IP ph one with an RJ45 c onnect or conn ected t o t he Q u ad ro WAN port
directly or through a hub or switch.
• One CAT 5 Eth ernet c able with an RJ45 c onnect or to c onnect to th e Quadr o LAN
port.
• One PC with a 10/ 1 00 M bps E th er n et c ar d or ad apter ins t al l ed.
• TCP/IP network protocol installed on each PC.
• For opt imal results, Int ernet Expl orer 5.5 or higher, or Netsc ape Navigator 4.7 or
higher are recommended.
Pleas e Note: T h e Q u adro6L/4L/2x2 is shipped with on e R J 1 1 cable and one s t r aight RJ4 5
CAT 5 c able. If th e LAN c onn ect or of t h e Quadr o c onnec ts t o a hub or s witch, a c ross over
cable m ay b e r equired.
Quadro6L/4L/2x2 Manual I: Installation Guide Hardware Overview
Quadro6L/4L/2x2; (SW Version 5.3.x and hi gher) 8
Hardwa re O ver vie w
The Connect ors Panel of Q uad ro6L/4L/2x2
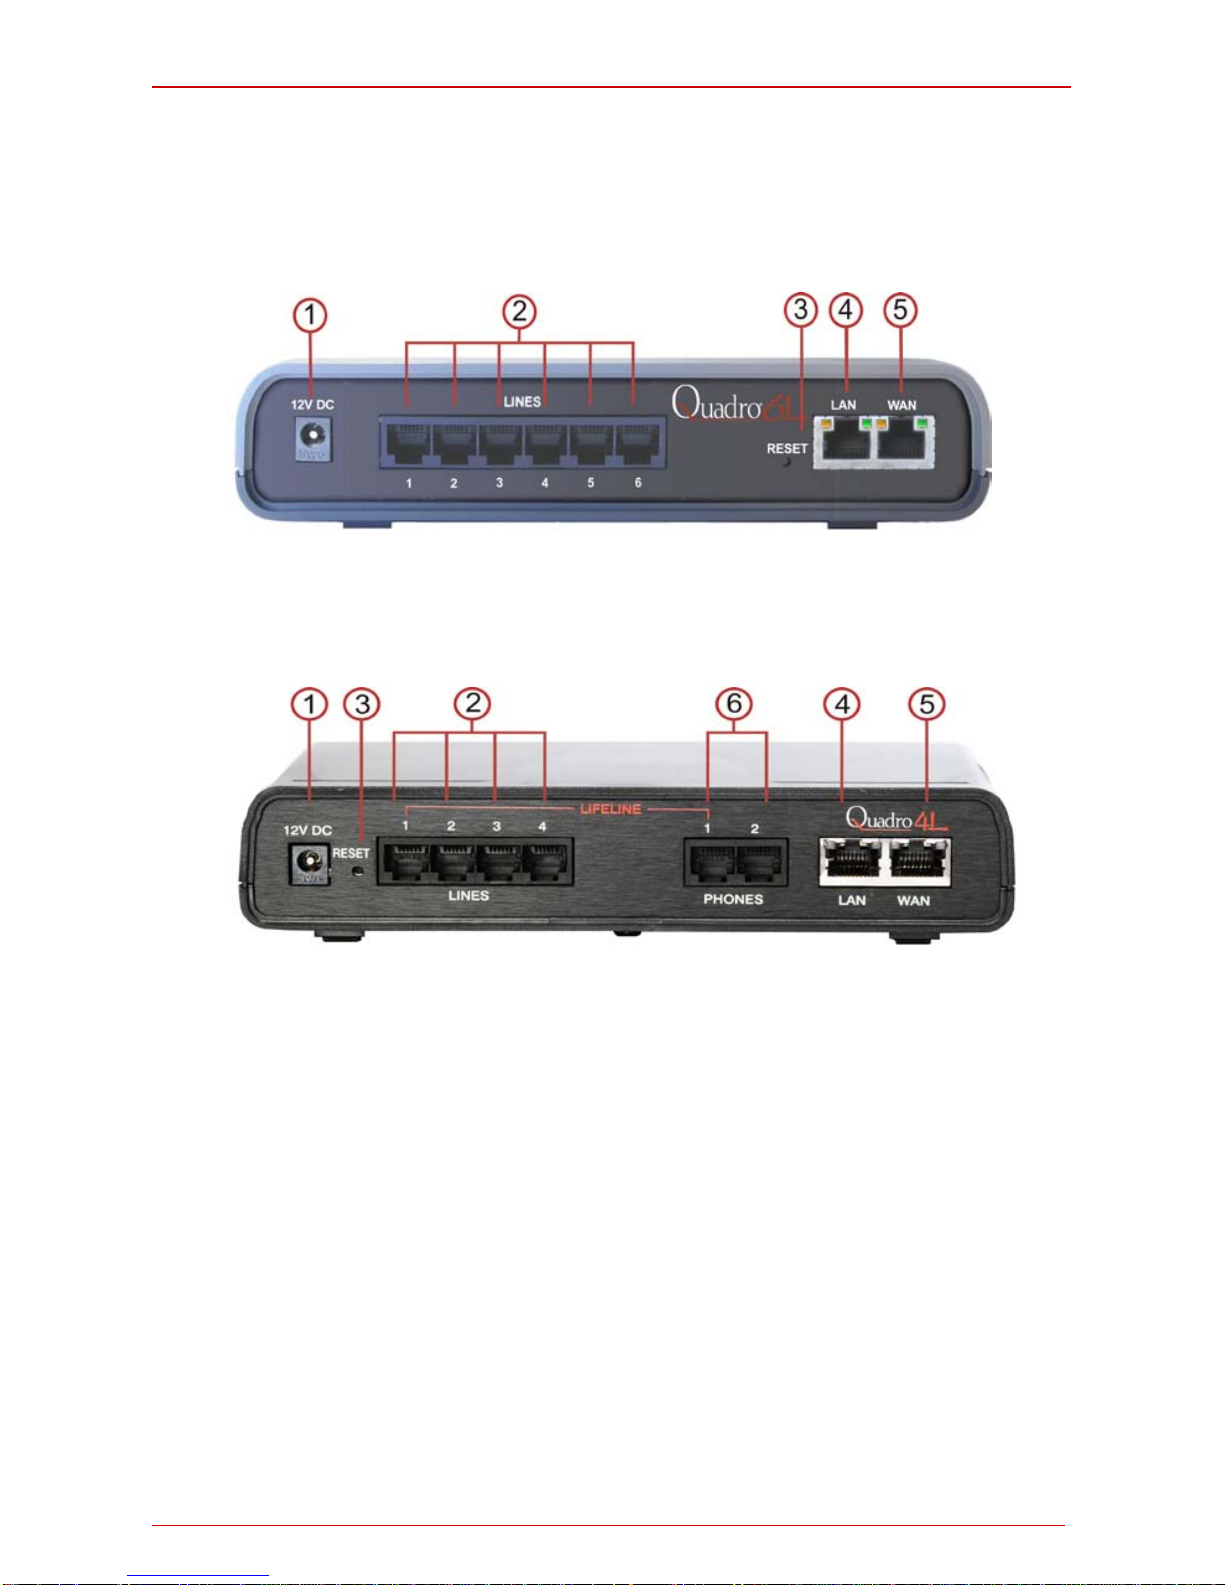
The illustration below includes the connector’s panel of Quadro6L model.
Fig. l- 1: Connectors Panels of Quadro6L IP PBX
The illustration below includes the connector’s panel of Quadro4L/2x2 models.
Fig. l- 2: Connectors Panels of Quadro4L IP PBX
1. Power supply socket. Use only the power adapter delivered with the Quadro.
2. LINES s oc kets to c onn ect th e Qu adr o to th e P STN netw ork us ing stan d ard an a-
log phone service. These are FXO (Foreign Exchange Office) analog ports.
3. The Reset b ut t on m ay b e used in two wa ys: ( 1) t o in i ti at e a norm al reset or ( 2) t o
carry out a fact ory res et. A n ormal r eset is executed by press ing t he Reset button with a paper clip for an i ns t ant .
Press ing th e res et butt on an d h oldin g it dow n for s even s ec onds or more wil l execut e a f act or y res et . This will rest ore the f act ory d ef aults and c lear all s ettin gs
includi ng the IP address and the adminis t r at i on p assword you ent ered.
Pleas e Note: A F actory R eset forc es th e default LA N IP addr ess of 172. 30.0.1
and default admin password of 19.
4. RJ45 s ocket t o att ach to t he Local Ar ea Netw ork (LAN ) via an Et hernet C AT 5
cable. I f a PC is conn ected di rectl y to this sock et, a str aight c able i s used. If an
Ethern et hu b, rout er or s witch is used; a cr ossover c abl e may b e requir ed. This
port may also be used to connect IP phones to the Quadro (optional). In this
case, it is r ec om m en ded to use a hub or a switch to connect the PC along with IP
phones to the Quadro’s LAN port.
Quadro6L/4L/2x2 Manual I: Installation Guide Hardware Overview
Quadro6L/4L/2x2; (SW Version 5.3.x and hi gher) 9
5. RJ45 s ocket to attach t he Internet Uplink (W AN) via an Eth ernet CAT 5 cable.
This port may also be us ed to connect IP phones to the Quadro. Th e default c onfiguration s ettings assume th at IP phon es are att ached to this, r ather than the
LA N port .
6. PHONE sock ets with RJ 11 conn ectors enabl e conn ectivit y of regu lar anal og tel-
ephones. These are FXS (Foreign Exchange Station) analog ports.
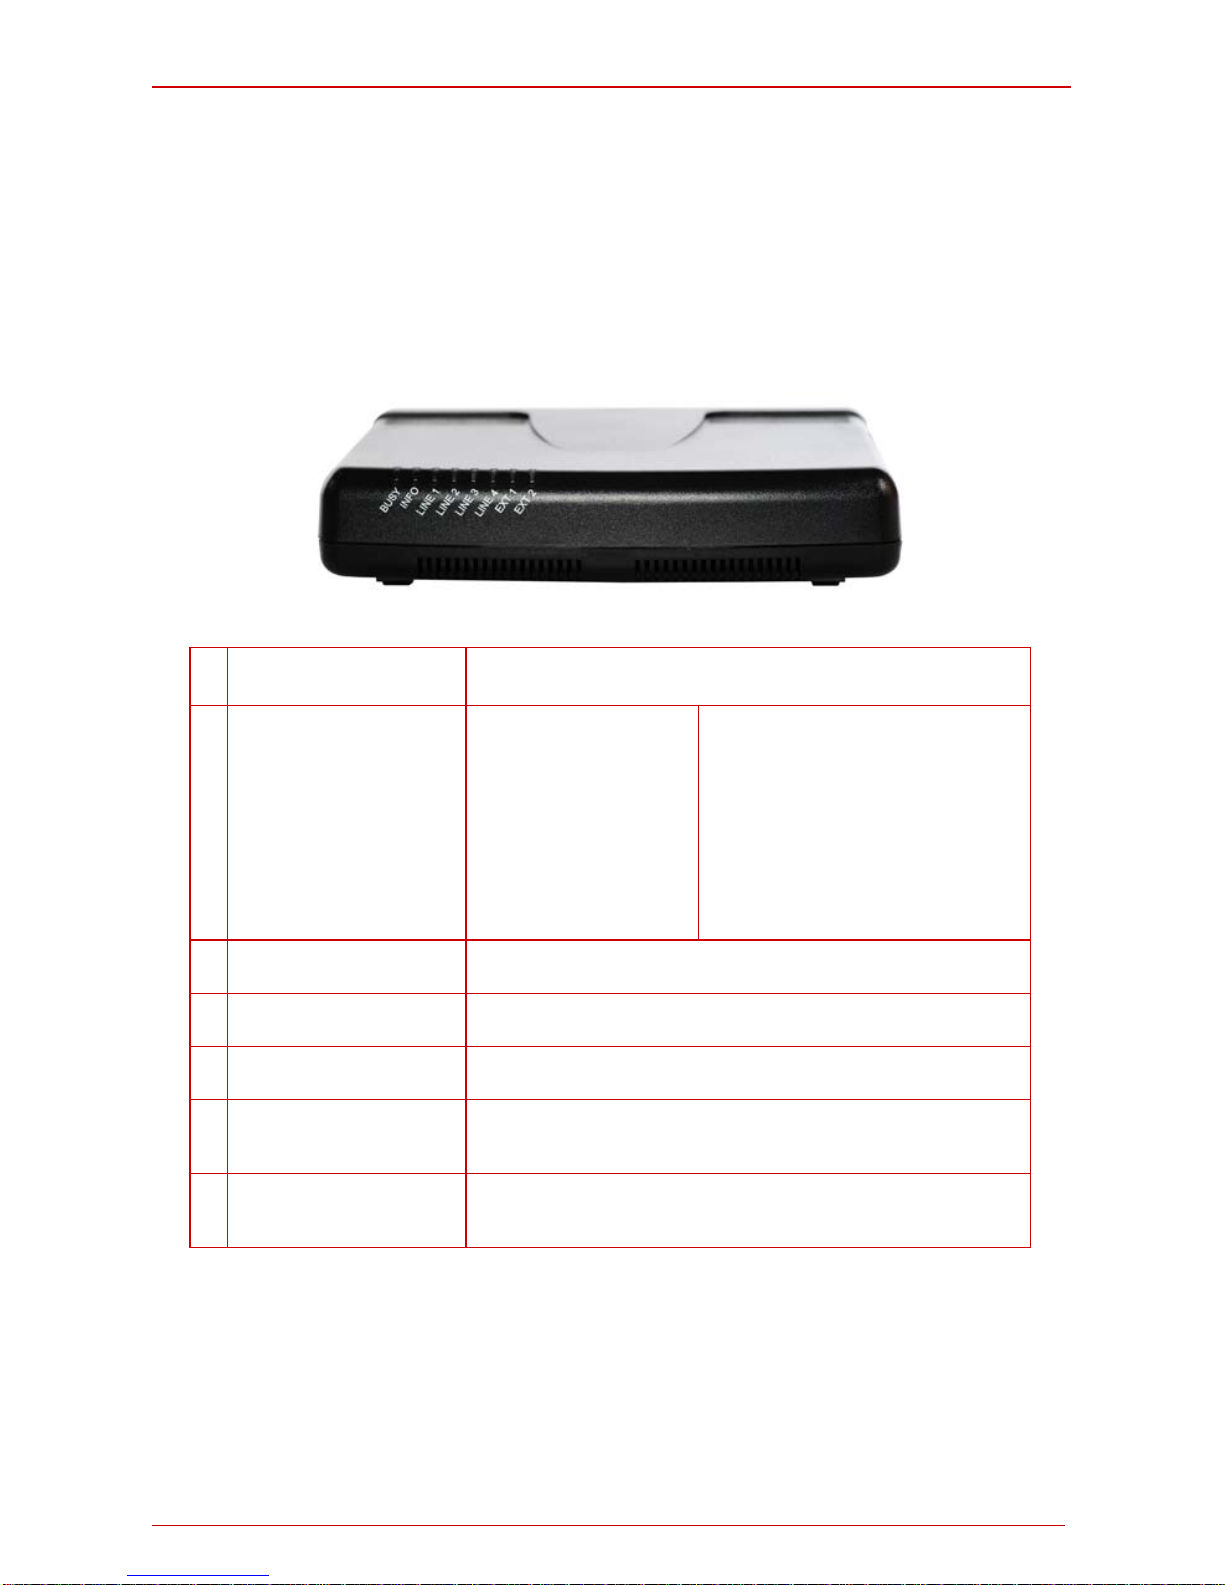
Quadro6L/4L/2x2’s Front Panel LEDs
Fig. l- 3: Quadro4L's Front Panel LEDs
1
BUSY, green
Status of CPU
off: No power
on or blinking: Normal activity
2
INFO/FAULT,
yellow/red/green
System information
on (yellow):
device is booting
on (red):
error or system is booting
on (green):
system is operational
blinking (yellow/green):
event occurred, details specified in
the System Event section of the Management interface
blinking (red/green):
system unusable
blinking (red/yellow):
emergency firmware is needed
blinking (red/green/red/yellow):
firmware update
3
For Quadro 6L- Green
LED for FXO Lines 1– 6
on or blinking: line in use
off: line not in use
4
For Qudaro4L-
Green LED
for FXO Lines 1 – 4
on or blinking: line in use
off: line not in use
5
For Qudaro2x2- Green
LED for FXO Lines 1 – 2
on or blinking: line in use
off: line not in use
6
EXT 1 – Green LED
(available only for Quadro4L and Quadro2x2)
on or blinking: line in use
off: line not in use
7
EXT 2 – Green LED
(available only for Quadro4L and Quadro2x2)
on or blinking: line in use
off: line not in use
LED Indication during a firmware update
A firmware update is indicated by the yellow/red/green Info/Fault LED. It will blink
red/gr een for about f ive minutes whil e the firmware is updated. Th e Quadro will t hen reboot aut omatic all y sh owing the b oot LED s eq uence.
LED Indication during a boot sequence
A boot sequence is indicated as follows: The yellow/red/green Info/Fault LED will gl ow red
for a few seconds, then turn to yellow for another four or five minutes while the green Busy

Quadro6L/4L/2x2 Manual I: Installation Guide Hardware Overview
Quadro6L/4L/2x2; (SW Version 5.3.x and hi gher) 10
LED is blinking. Once the Info/Fault LED is green, the boot sequence has been completed
successfully.
LED indication during uploading an emergency firmware
The yellow /r ed/gr een Info/Fault LED will s t op blinking alter nately r ed /yellow and s t ar t bl inking red/green /red/yell ow. This s hows that Quadro has accept ed the emergency firmware
and is loading it. After a few seconds, Quadro will boot, showing the boot LED sequence.

Quadro6L/4L/2x2 Manual I: Installation Guide Step 1: Installing the Quadro
Quadro6L/4L/2x2; (SW Version 5.3.x and hi gher) 11
Step 1: Installing the Quadro
Networking Overview
To establish a connection between the Internet and your local area network (LAN), an
access router is needed. T he Quadr o6L/4L/2x2 may serve, among oth er functions, as an
access rout er, and wi ll perf orm th e tas k of c onnect ing you r LAN, or a grou p of one or mor e
PCs, to the wide area n et w ork (WAN ) or th e I nternet. T h e Qu ad ro will process and reg ul ate
the data traffic between these two networks. The Quadro6L/4L/2x2 has one LAN port that
can c onnect t o Eth ernet hubs and sw itches on th e LAN, allowi ng addi tion al devic es t o be
connected to the network.
The Qu adr o is a devic e with tw o sid es: on e si de c onn ects t o your L AN, and th e other s ide
connects to the Internet, or th e W AN. Quadr o’s fir ewall and Net work Ad dress Trans lation
(NAT) functi onalit y prot ects your LAN f rom being seen from th e Internet sid e making the
LAN pri vat e an d s ecure.
The Eth ernet WAN port t ransmits up to 10 Mb ps , and the LAN port transmit s at 10 M bps or
100 Mbps .
Ever y device wit hin an IP net work req uires a uni que IP addr ess to i dentif y itself. S inc e th e
Quadr o conn ects to bot h the LA N and t he W AN, it has t o be p art of both net works, and
must ha ve two IP address es: one for the W AN side and one for th e LA N s ide . T he Q uadro’s integrat ed firewall/ NAT f unctionalit y will h ide the LAN IP address from the W AN (Internet) side.
Ther e are t wo w ays of ass i gn i n g an IP ad dr ess : st atically or dynamic all y.
A Static IP address is a fixed, manually assigned IP address that remains valid until
changed. If you plan to use the Quadro as your Internet access router, contact your Internet
Servic e Provid er (ISP) to find out if a static IP ad dress is ass igned to your acc ount. If so,
you will need this static IP address when configuring the Quadro device.
A dyn amic IP addr ess is a temporar y address t hat is automatic ally assi gned by y our ISP
and will change periodically. If your ISP offers a dynam ic IP addr ess , the Quad ro will act as
a DHCP client an d will receive a new IP address from the ISP ’s DHCP server or P PPoE
feature.
Please Note: A DHCP client is a piece of software t hat req uests an IP addr ess from a
DHCP s erver. A DHCP s erver assigns on request a uniqu e IP address to a device. The
Quadr o, like many routers, acts as a DHCP client on its WAN interface and as a DHCP
server on its LAN interface.
The Qu adro must b e vis i bl e to the Int er n et to be ab l e to recei ve and s end VoIP c alls . When
the Qu adro is p l ac ed in a privat e n etwork, t yp ically b eh i n d e xis ting r out er s , it will by default
attempt to pass through the NAT of this router with its STUN (Simple Traversal of U DP ov er
NAT) feature. ST UN will work wit hout us er conf igurat ion wit h the maj ority of b asic r outers.
In som e scenari os , p or t f orwardi ng on t he router is requi r e d t o m ak e t h e Q u a dr o ac ces s i b l e
to oth er Quadr o devices and th e Epygi SI P Serv er on the I nternet . Anoth er config uration
opti on is to us e the Q uadr o as th e Intern et acc ess r outer, c onnec ted dir ectl y to the W AN,
elim inating the traverse to the local NAT firewall.
Quadro6L/4L/2x2 Manual I: Installation Guide Step 1: Installing the Quadro
Quadro6L/4L/2x2; (SW Version 5.3.x and hi gher) 12
LAN/WAN Conne ction Opti ons
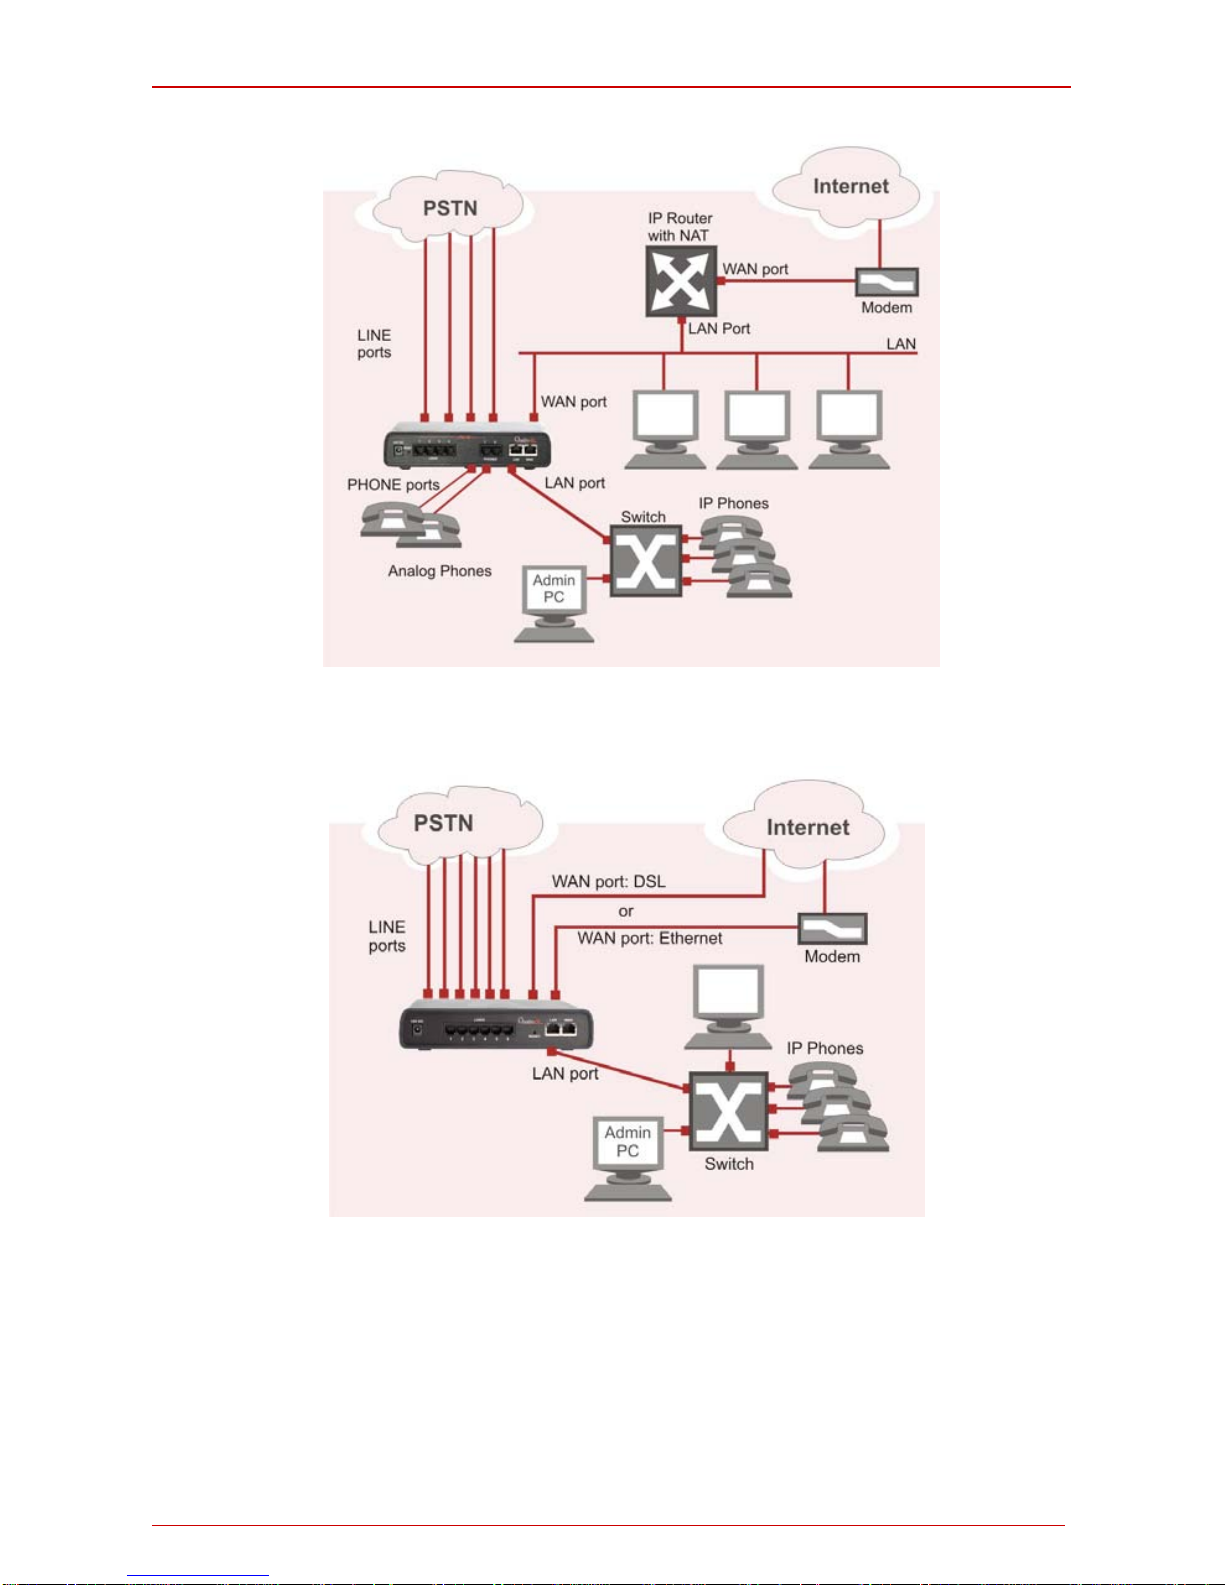
• A Quadro6L with a n Eth er n et W AN port b ehi nd a router, which i s connected
to a cable or xDSL mo dem. IP phones are place d on the WAN side of the
Quadro6L.
Fig. l- 4: Configuration: Quadro6L behind a router with IP phones on WAN
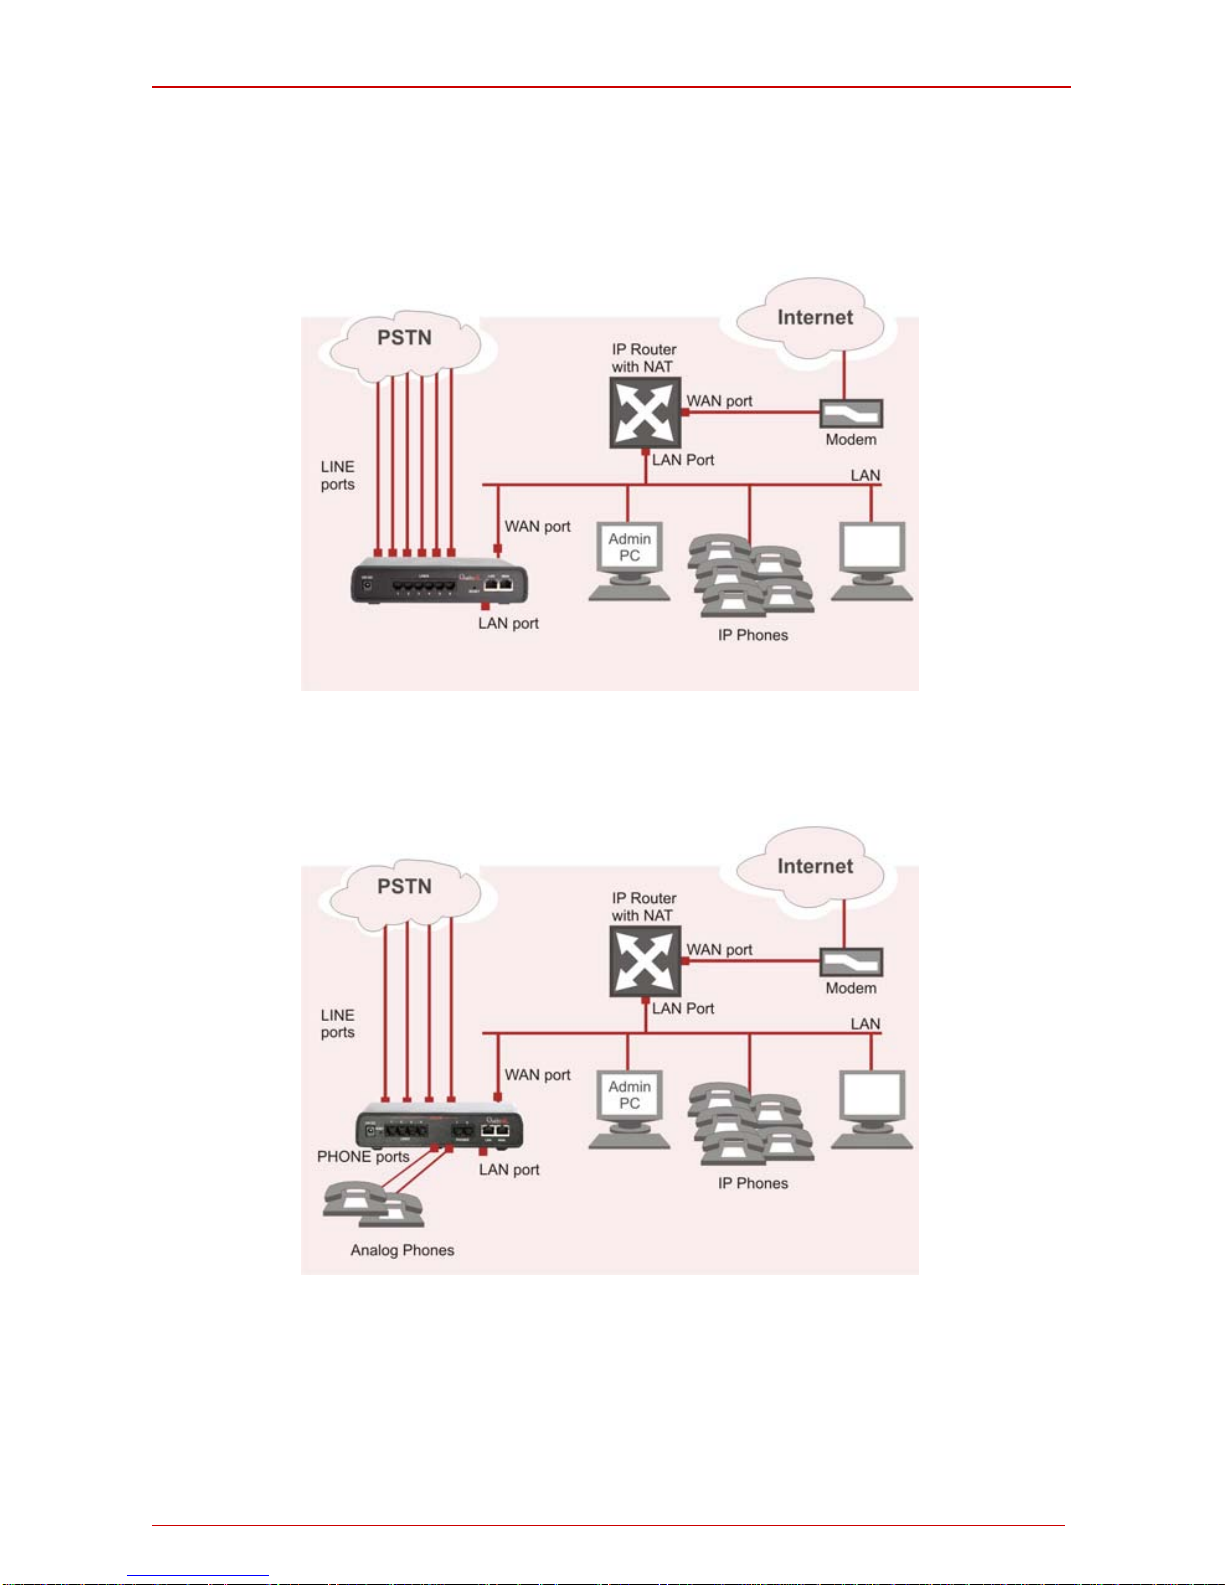
• A Quadro4L/2x2 with an Ethern et WA N port behind a rout er, which i s con-
nected to a c abl e or x DS L mo de m. I P ph on es are placed on the WAN sid e o f
the Quadro4 L/2x2.
Fig. l- 5: Configuration: Quadro4L/2x2 behind a router with IP phones on WAN
In this and t h e f oll ow i ng configurati on (Fi g. I -4, Fi g. I -5, Fi g. I -6 and Fig . I -7), t he I P r outer
t yp ical l y ac t s as a D H C P s er v er for t h e LA N a n d as s i g ns t he I P a ddr es s es t o t h e P C s an d
other devices. The Quadr o can be c onnected t hrough i ts WA N port directl y to one of th e
router's LAN p orts and will get an IP address fr om the rout er. By d efault , the Qu adro acts
as a D HC P c l i en t on t h e WA N por t . Th e I P ph o n es ar e p l ac e d on t h e W A N s id e of th e Quadro4L/2x2, connect ed to the comp an y LAN.
The Ad mi n P C can be connec t ed to the Q u ad ro WAN or LAN port to ac ces s t he Web Ma n-
Quadro6L/4L/2x2 Manual I: Installation Guide Step 1: Installing the Quadro
Quadro6L/4L/2x2; (SW Version 5.3.x and hi gher) 13
agement of the Quadro.
Please Note: S ince Quadro us es STUN by defau lt, it will work with most basic ro u-
ters without any furt her co nfiguration.
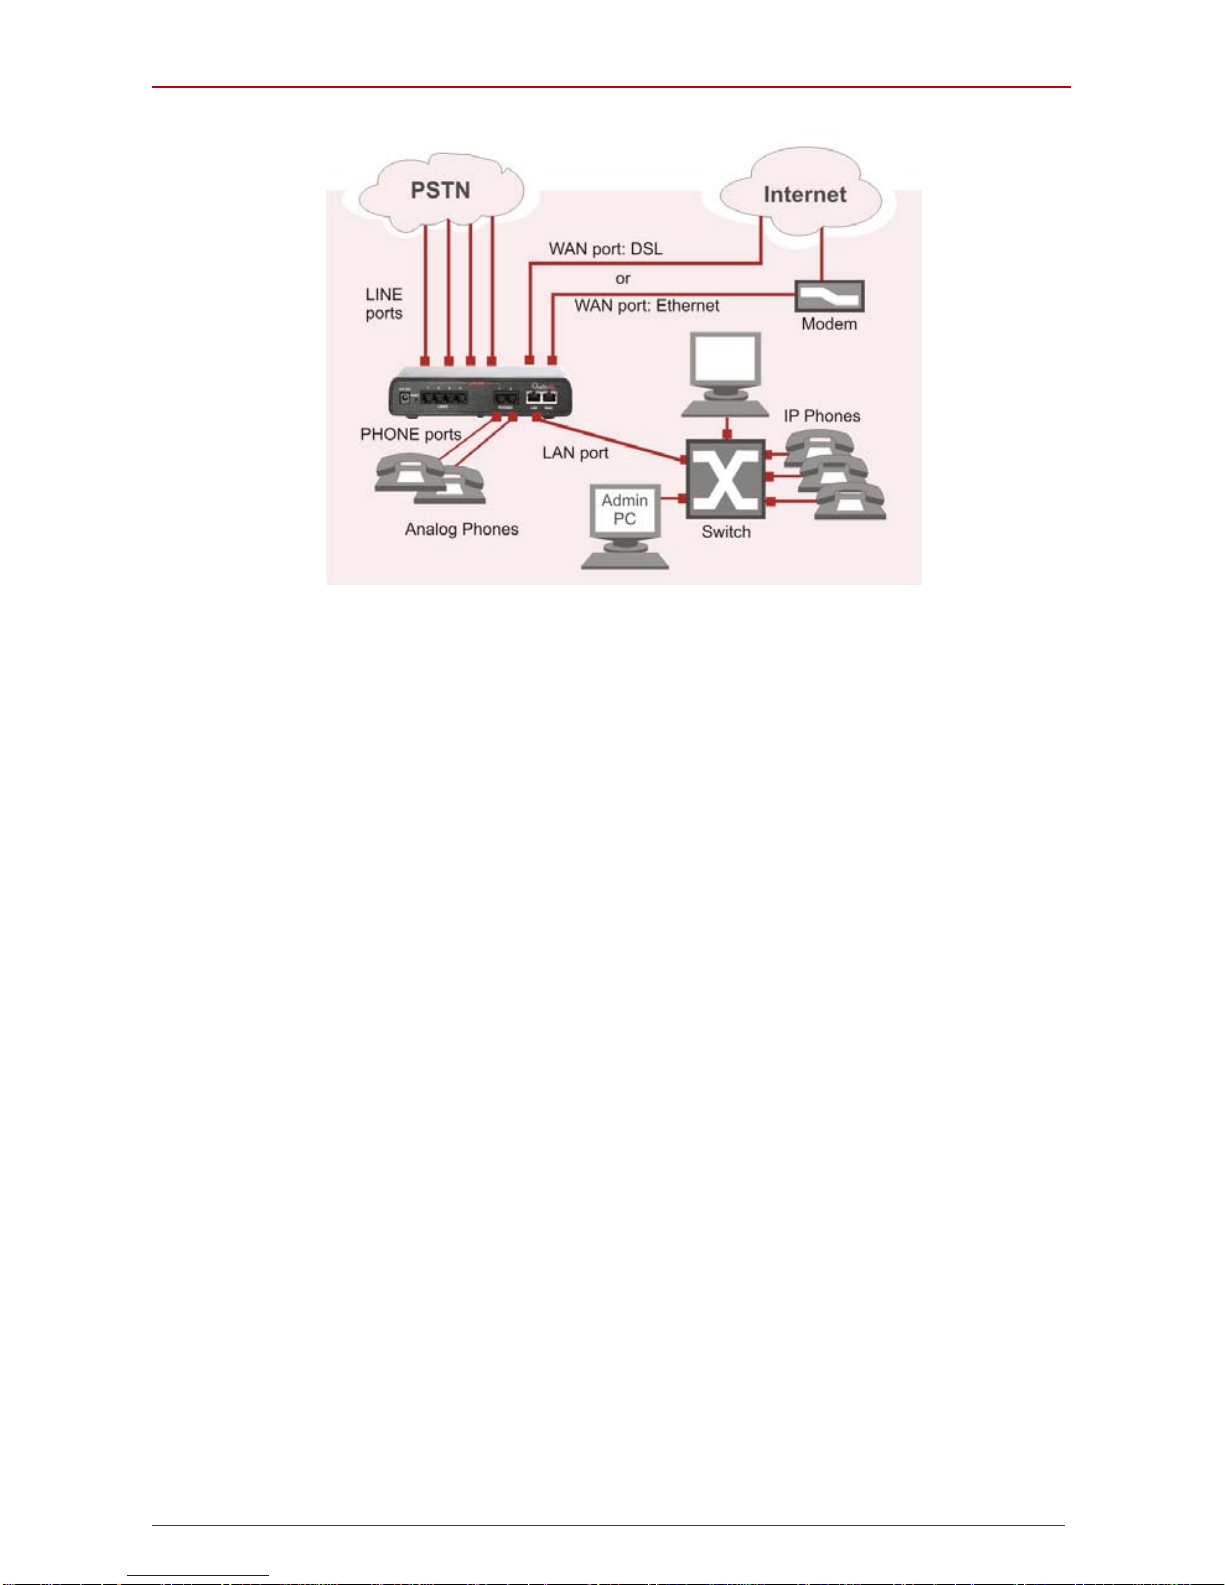
• A Quadro 6L with a n Eth ernet WAN port b ehi nd a ro uter, wh ich i s connected
to a cabl e or xDSL modem. I P phones ar e placed on the LAN si de of the
Quadro6L.
Fig. l- 6: Configuration: Quadro6L behind a router with IP phones on LAN
• A Quadro4L/2x2 with a n Ethern et WAN por t behind a router, which i s con-
nected to a c abl e or x DS L m od em. IP phones are placed o n the LAN sid e of
the Quadro4 L/2x2.
Quadro6L/4L/2x2 Manual I: Installation Guide Step 1: Installing the Quadro
Quadro6L/4L/2x2; (SW Version 5.3.x and hi gher) 14
Fig. l- 7: Configuration: Quadro4L/2x2 behind a router with IP phones on LAN
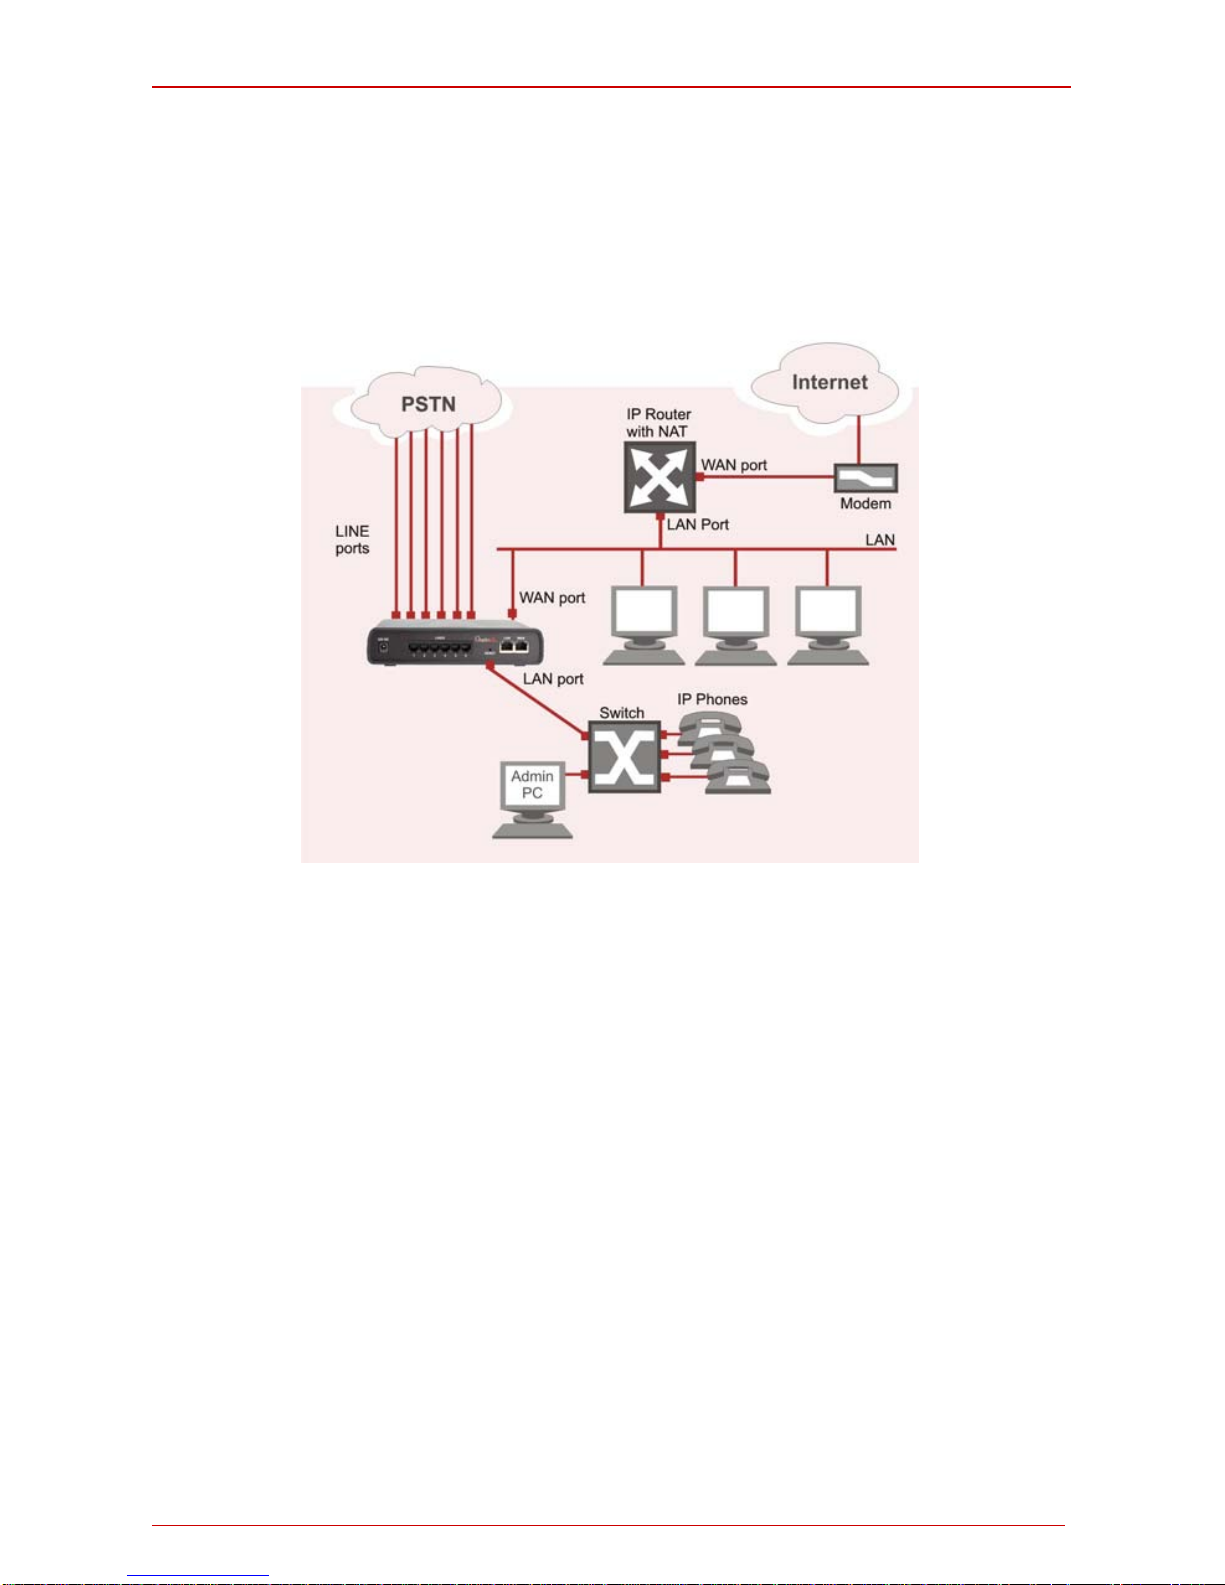
• A Quadro6 L used as an Internet Access Rout er, connect ed directly t o the
Internet.
Fig. l- 8: Configuration: Quadro6L used as Internet Access Router
• A Quadro4L/2x2 used as an I nternet Access R outer, connecte d direct ly to
the Internet .
Quadro6L/4L/2x2 Manual I: Installation Guide Step 1: Installing the Quadro
Quadro6L/4L/2x2; (SW Version 5.3.x and hi gher) 15
Fig. l- 9: Configuration: Quadro4L/2x2 us ed as Internet Access Router
Pleas e Note: T he Admi n PC is c onnected t o the Q uadro’s LAN por t throug h a switc h/hub
t o ac ces s t h e W eb M anage m en t of t h e Q u a d r o (Fig. I -6, Fig. I -7, Fig. I -8 and Fi g. I -9). It
is reco mmen ded to h a ve A dmin PC acting as a DHC P c li en t and obt ain in g IP ad dress f r om
the Quadro.
Quadro6L/4L/2x2 Manual I: Installation Guide Step 1: Installing the Quadro
Quadro6L/4L/2x2; (SW Version 5.3.x and hi gher) 16
Connecting t he H ardware
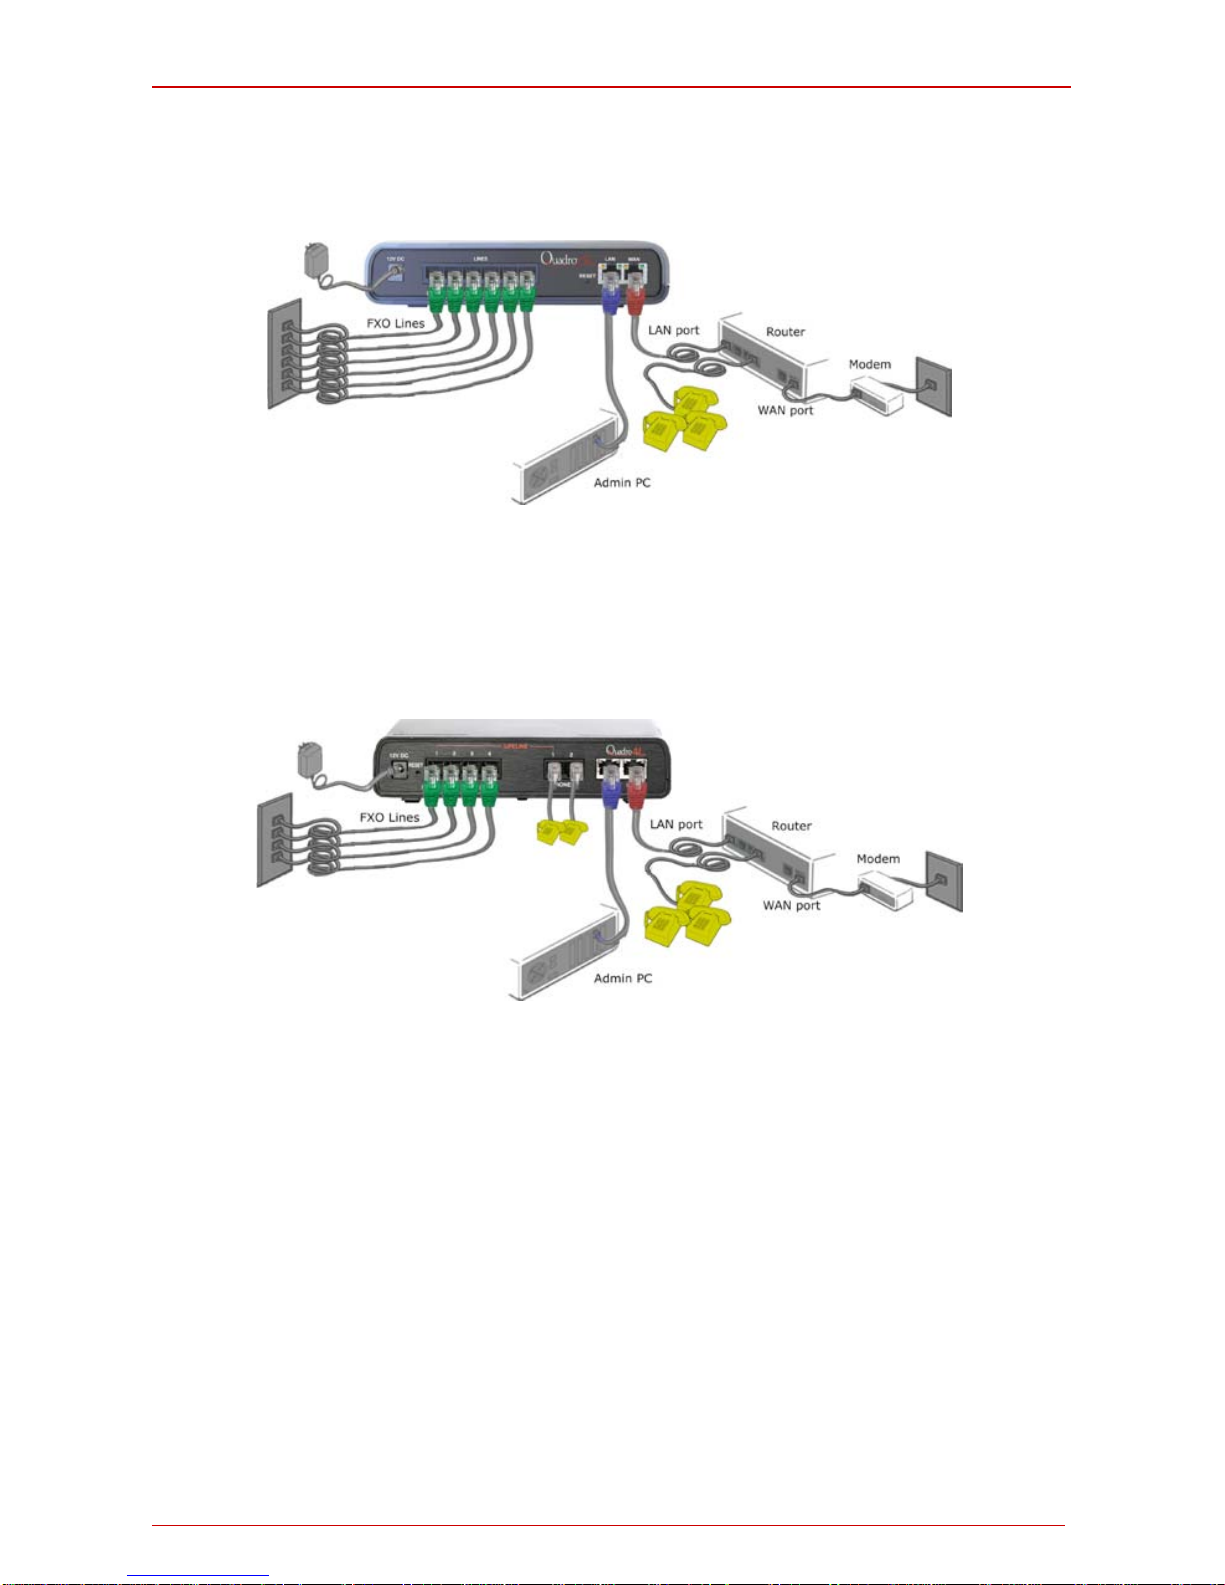
• Quadro6L behind a router with IP phones connected to WAN
Fig. l- 10: Installation: Quadro6L behind a router with IP phones on WAN
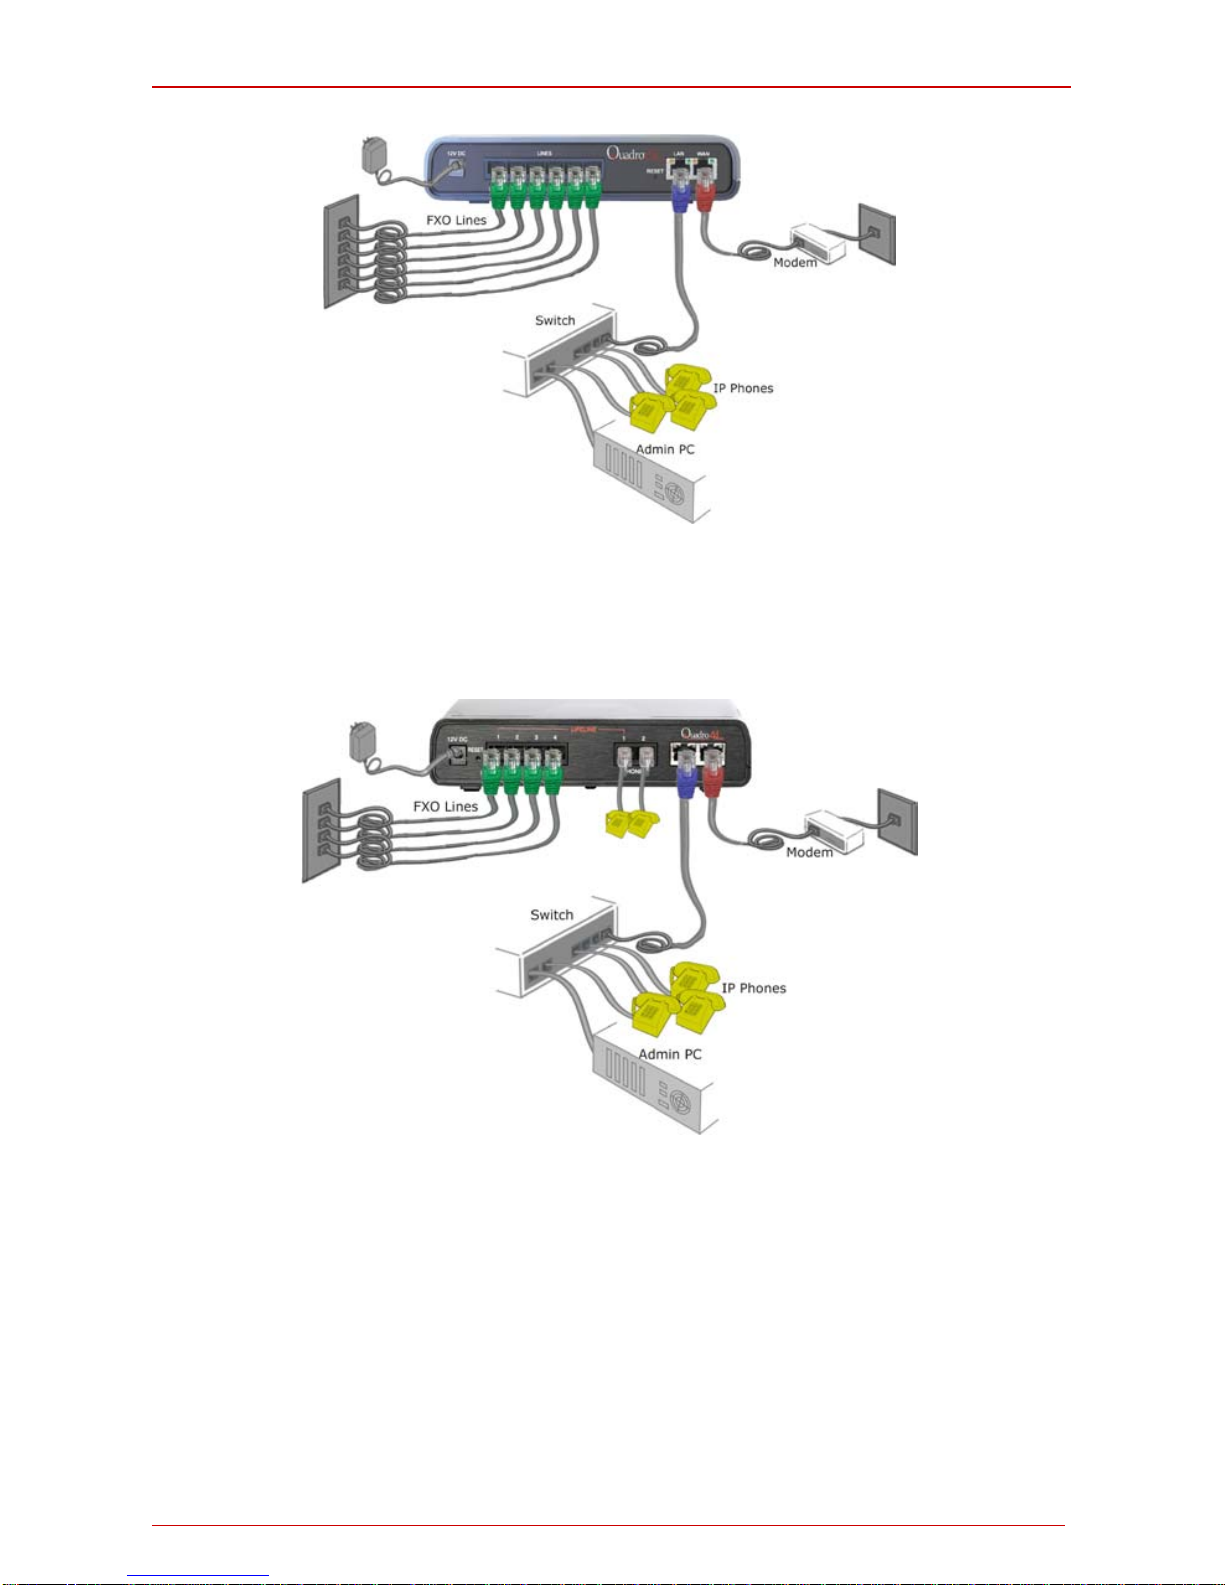
• Quadro4L behind a router with IP phones connected to WAN
Qu adro2x2 is c onnect ed according l y.
Fig. l- 11: Installation: Quadro4L behind a router with IP phones on WAN
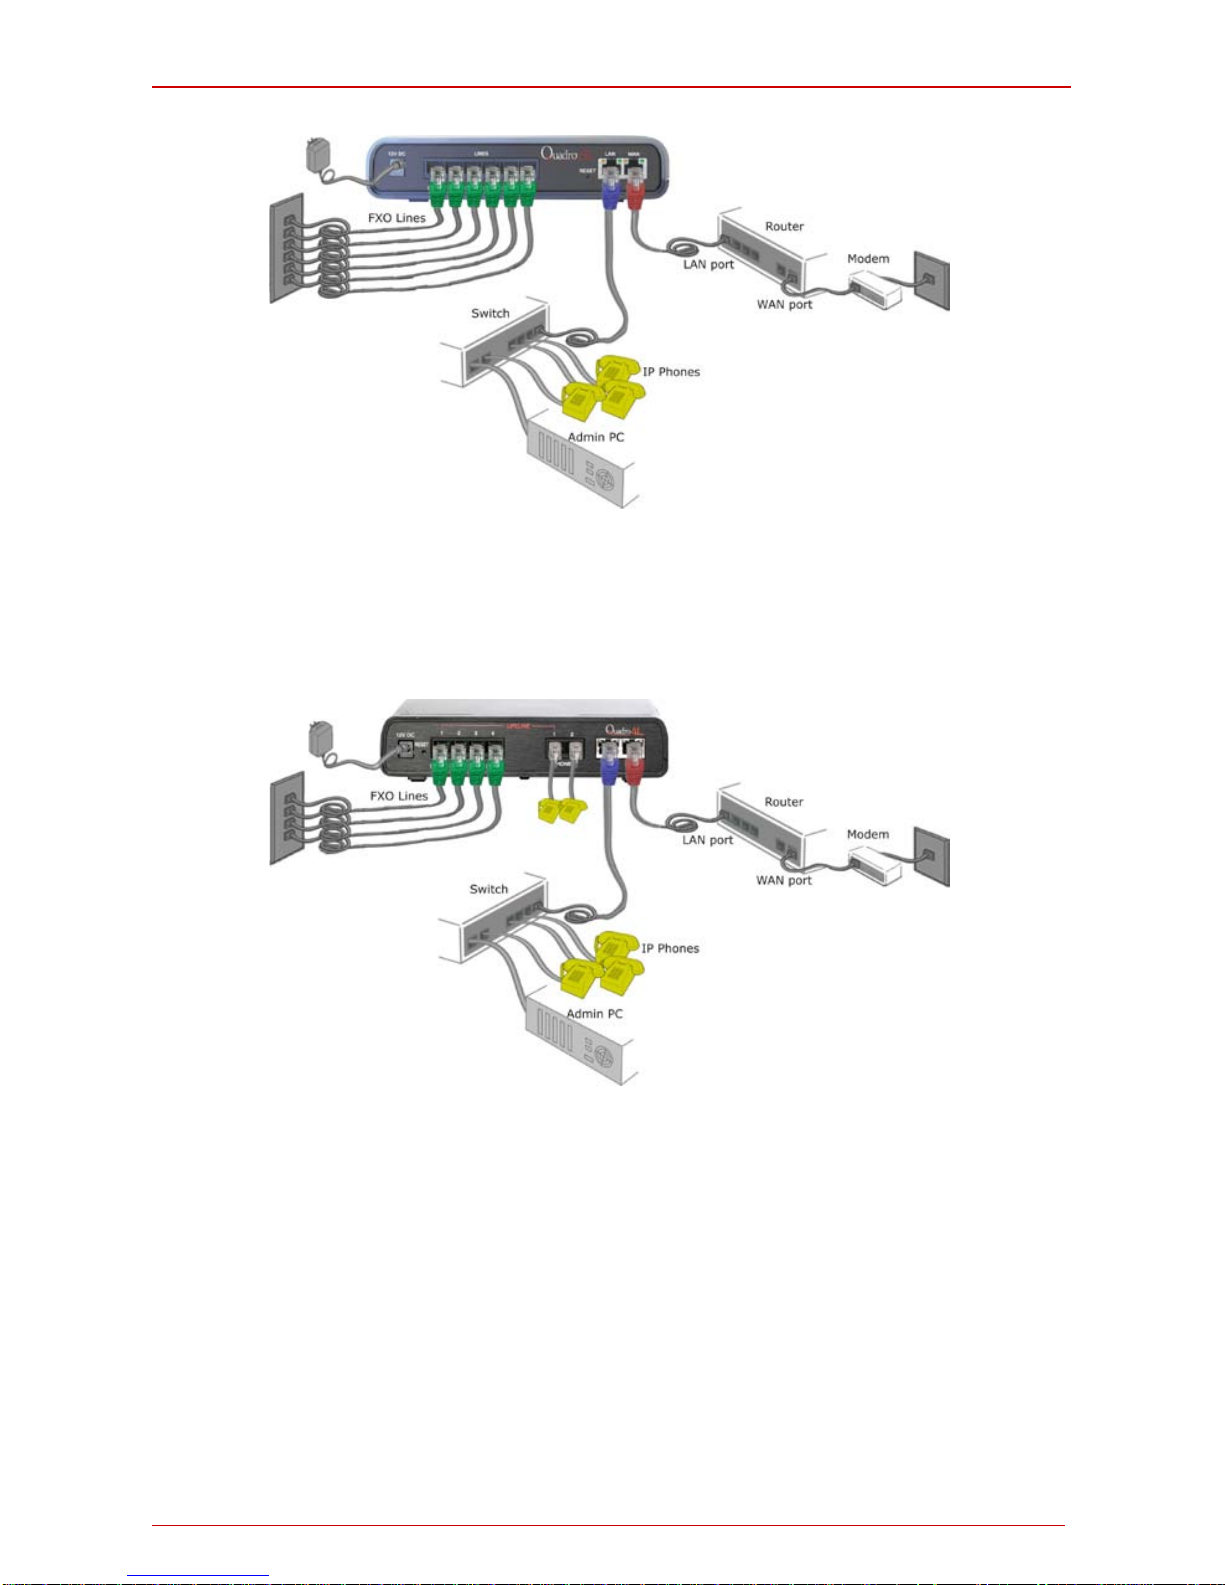
• Quadro6L behind a router with IP phones connected to LAN
Quadro6L/4L/2x2 Manual I: Installation Guide Step 1: Installing the Quadro
Quadro6L/4L/2x2; (SW Version 5.3.x and hi gher) 17
Fig. l- 12: Installation: Quadro6L behind a router with IP phones on LAN
• Quadro4L behind a router with IP phones connected to LAN
Quadro2x2 is connected accordingly.
Fig. l- 13: Installation: Quadro4L behind a router with IP phones on LAN
• Quadro6L used as Internet access router
Quadro6L/4L/2x2 Manual I: Installation Guide Step 1: Installing the Quadro
Quadro6L/4L/2x2; (SW Version 5.3.x and hi gher) 18
Fig. l- 14: Installation: Quadro6L used as an Internet Access Router
• Quadro4L used as Internet access router
Quadro2x2 is connected accordingly.
Fig. l- 15: Installation: Quadro4L used as an Internet Access Router
• Verif y the pr oduct package c ontents ar e com plete. Ref er t o the c ontents sh eet in-
cluded in th e p ac k agi ng to determ in e if al l the items wer e shi pp ed in the box.
• Before you connect the hardware, make sure that all devices are power ed off.
• Conn ect at l eas t one of Qu adro's LIN E (FXO) p or ts t o t h e t elephone service fr om the
PSTN. The Quadro6L offers connectivity of six lines, th e Quadr o4L off ers connectivity of four lines and the Quadro2x2 offers connectivity of two lines.
• Pleas e Note: If your Int ern et connecti on is a DSL m odem, you m ay need to us e a
micro f ilt er bet ween th e F XO LIN E p ort and th e ph on e lin e. Mic ro f ilt ers are t ypically
provi ded by your ISP but are als o avail able at most c omputer st ores . If a micro filt er
is already installed, simply connect the RJ11 from the existing phone to the Quadro6L port leaving the micro filter connection as is.
 Loading...