

Quadro MQ-D07, MQ-D08, QM-D06 User Manual
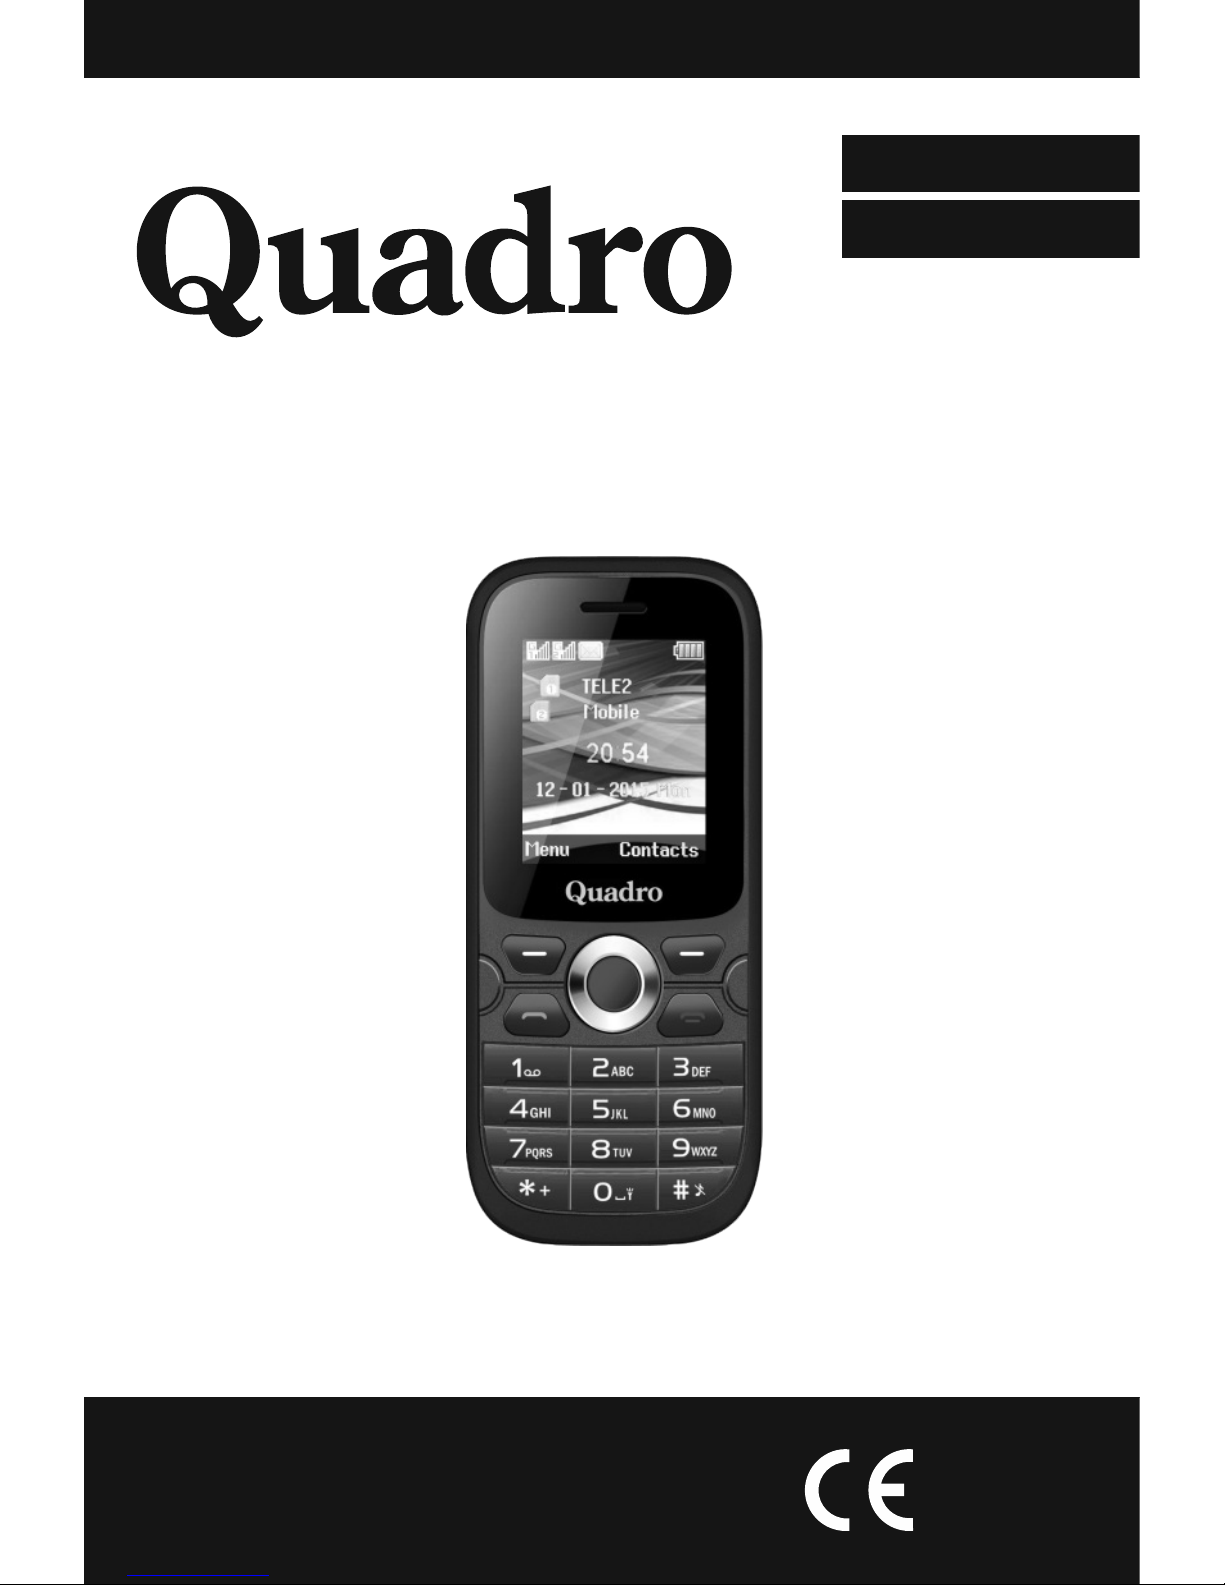
User manual
Upute za uporabu / Izjava o jamstvu (HR)
GSM Digital Mobile Phone
GSM Digitalni Mobilni Telefon
ENGLISH
HRVATSKI
MQ-D07
0700

GSM Digital Mobile Phone
ENGLISH
0700
User manual
MQ-D07


Thank you for purchasing this Quadro product.
Operating Instructions provides the most detailed information to
operate your Phone.
Before using your new Phone for the
f i r s t t i m e , r e a d t h e s a f e t y
instructions in “Safety Notice”
chapter.
To get the most from your Phone, please be sure to read all instructions
thoroughly and keep them where they will be read by all who use the
product.
Your Phone may be slightly different from the devices described in this
manual. The differences depend on the version of software installed in
your Phone.
Some described functions are optional.

TABLE OF CONTENT
ENGLISH
1. Device Description. . . . . . . . . . . . . . . . . . . . . . . . . . . . . . . . . . . . . 3
2. Safety Warning and Notices . . . . . . . . . . . . . . . . . . . . . . . . . . . . . . 5
2.1. Declaration of Conformity . . . . . . . . . . . . . . . . . . . . . . . . . . 9
3. Before use . . . . . . . . . . . . . . . . . . . . . . . . . . . . . . . . . . . . . . . . . 10
3.1. Battery. . . . . . . . . . . . . . . . . . . . . . . . . . . . . . . . . . . . . . . 10
3.2. Charge the Battery . . . . . . . . . . . . . . . . . . . . . . . . . . . . . . 10
3.3. Network Connection . . . . . . . . . . . . . . . . . . . . . . . . . . . . . 11
3.4. Insertion and Take-out of SIM Card . . . . . . . . . . . . . . . . . . 12
3.5. Switch on/off the Phone . . . . . . . . . . . . . . . . . . . . . . . . . . 12
3.6. Unlock the SIM Card . . . . . . . . . . . . . . . . . . . . . . . . . . . . . 12
3.7. Phone Unlock . . . . . . . . . . . . . . . . . . . . . . . . . . . . . . . . . . 13
3.8. Connect to Network . . . . . . . . . . . . . . . . . . . . . . . . . . . . . 13
3.9. Dial a Call. . . . . . . . . . . . . . . . . . . . . . . . . . . . . . . . . . . . . 14
3.10. Dial a Domestic Call. . . . . . . . . . . . . . . . . . . . . . . . . . . . . 14
3.11. Dial a Fixed Call. . . . . . . . . . . . . . . . . . . . . . . . . . . . . . . . 14
3.12. Dial an International Call . . . . . . . . . . . . . . . . . . . . . . . . . 14
3.13. Dial a Call in the Log List . . . . . . . . . . . . . . . . . . . . . . . . . 15
3.14. Dial an Emergency Call . . . . . . . . . . . . . . . . . . . . . . . . . . 15
3.15. Receive a Call . . . . . . . . . . . . . . . . . . . . . . . . . . . . . . . . . 15
3.16. Call Log . . . . . . . . . . . . . . . . . . . . . . . . . . . . . . . . . . . . . 15
3.17. Call Menu . . . . . . . . . . . . . . . . . . . . . . . . . . . . . . . . . . . . 16
3.18. Call Logs. . . . . . . . . . . . . . . . . . . . . . . . . . . . . . . . . . . . . 16
4. Menu functions . . . . . . . . . . . . . . . . . . . . . . . . . . . . . . . . . . . . . . 17
4.1. Messages . . . . . . . . . . . . . . . . . . . . . . . . . . . . . . . . . . . . . 18
4.2. Contacts. . . . . . . . . . . . . . . . . . . . . . . . . . . . . . . . . . . . . . 19
4.3. Call Logs . . . . . . . . . . . . . . . . . . . . . . . . . . . . . . . . . . . . . 21
4.4. Multimedia . . . . . . . . . . . . . . . . . . . . . . . . . . . . . . . . . . . . 22
4.5. Camera . . . . . . . . . . . . . . . . . . . . . . . . . . . . . . . . . . . . . . 23
4.6. Alarm. . . . . . . . . . . . . . . . . . . . . . . . . . . . . . . . . . . . . . . . 23
4.7. Tools. . . . . . . . . . . . . . . . . . . . . . . . . . . . . . . . . . . . . . . . . 24
4.8. Settings . . . . . . . . . . . . . . . . . . . . . . . . . . . . . . . . . . . . . . 26
4.9. Calendar. . . . . . . . . . . . . . . . . . . . . . . . . . . . . . . . . . . . . . 28
4.10. Calculator . . . . . . . . . . . . . . . . . . . . . . . . . . . . . . . . . . . 29
4.11. Image Viewer . . . . . . . . . . . . . . . . . . . . . . . . . . . . . . . . . 29
4.12. FM Radio . . . . . . . . . . . . . . . . . . . . . . . . . . . . . . . . . . . . 30
5. Troubleshooting . . . . . . . . . . . . . . . . . . . . . . . . . . . . . . . . . . . . . 31
5.1. Troubleshooting SIM issues . . . . . . . . . . . . . . . . . . . . . . . . 31
6. Technical specifications . . . . . . . . . . . . . . . . . . . . . . . . . . . . . . . . 32
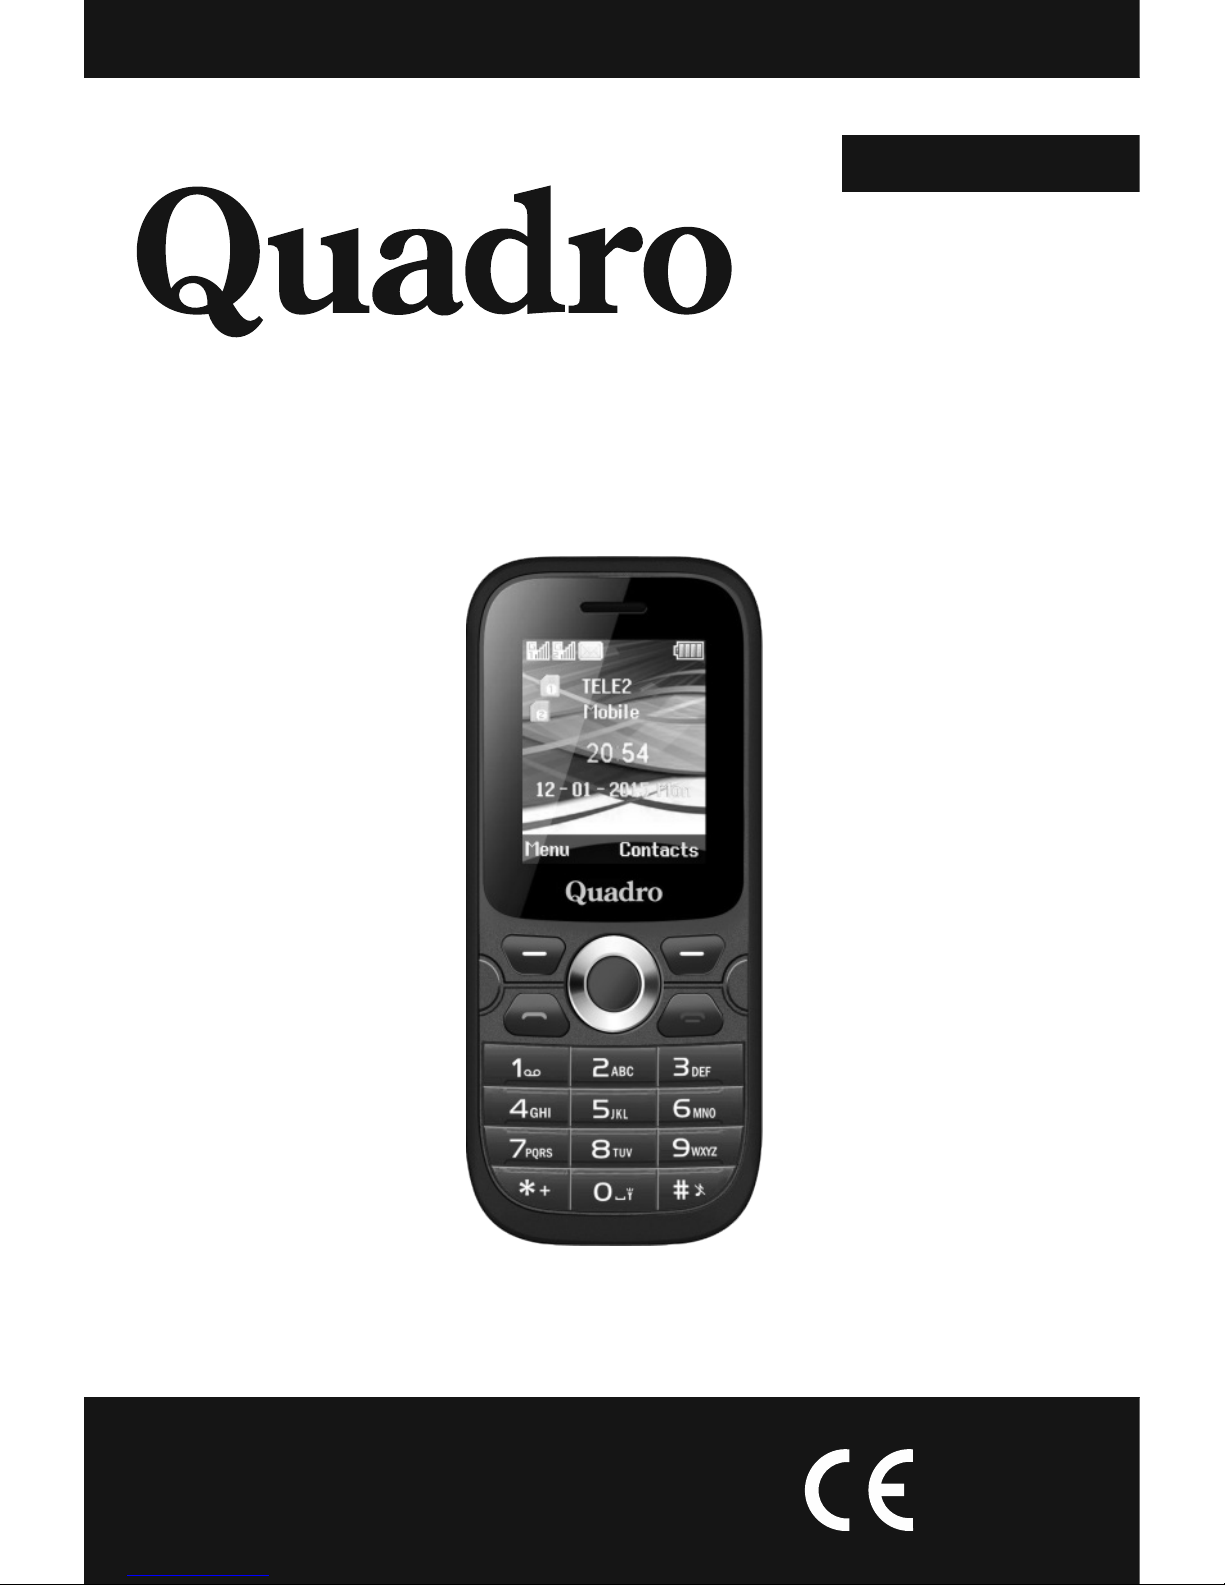
DEVICE DESCRIPTION
ENGLISH
- 3 -
Time/ Date
Battery Status
Network(s) Status
Earphone
SIM Status
Left Soft Key
Function
Right Soft Key
Function
4-Way cursor/
Enter Key
Right Soft Key
Left Soft Key
Dial Key
End Call Key/
Power On Key
Numeric keypad
USB/Charger port
3.5mm Earphone port
Torch Led Light
Microphone
Info Bar
DEVICE DESCRIPTION
ENGLISH
- 4 -
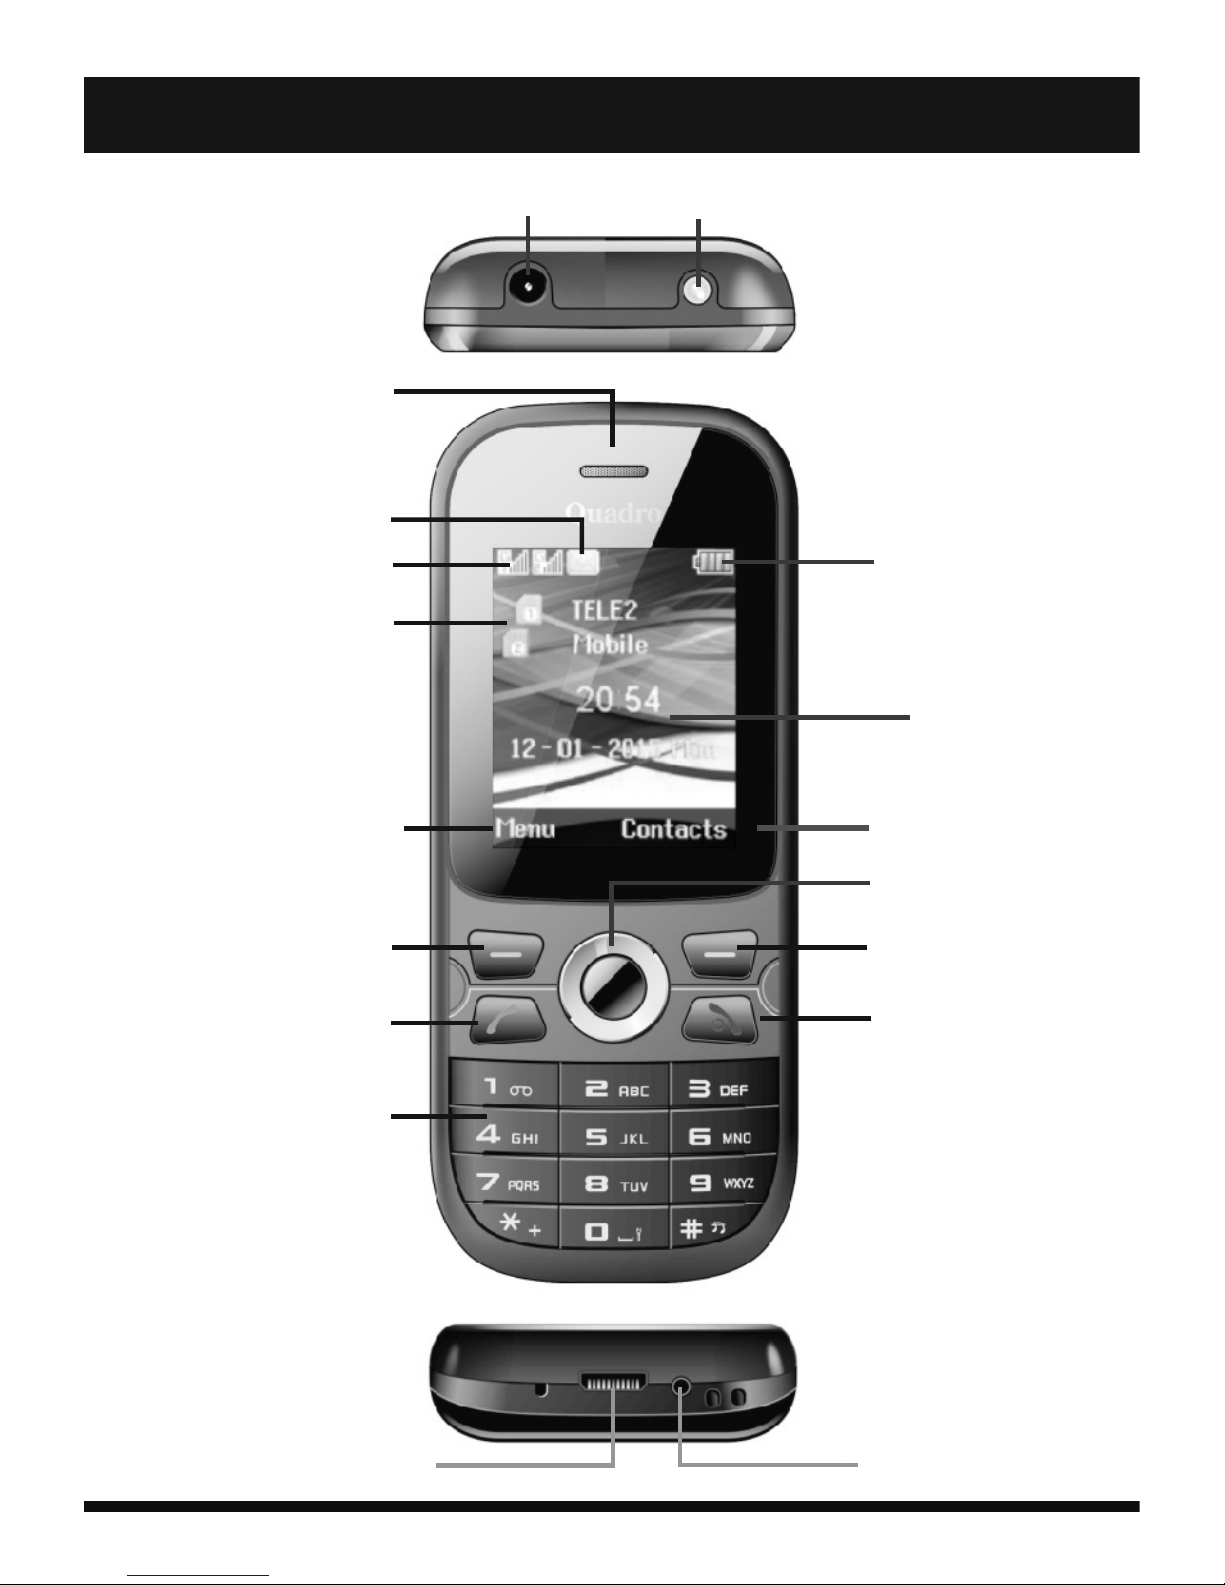
Camera
Speaker
To Open Back Cover:
Press and Slide
the back Cover
Downwards
Note:
Sim Card must be
facing Down
Battery:
Insert Battery into Battery Compartment
Note: that the Battery Contacts match up with
the Contacts on Mobile unit
SIM1 Slot
T-Flash
Memory Card Slot
Note: to insert Flash
Card, slide metal
credle to the left
and lift up metal
part
SIM2 Slot

2. Safety warning and notices
ENGLISH
Read these safety instructions before using your device and store them for
possible future reference. Always follow these basic safety precautions when
using your phone. This reduces the risk of fire, electric shock, and injury.
BATTERY, CHARGER, AND OTHER ACCESSORIES
If the charger cord is damaged, have it repaired by the manufacturer, its
service or a similarly qualified person in order to avoid any hazard.
The charger is not intended for use by persons (including children) with
reduced physical, sensory or mental capacity. Persons who have not read the
manual, unless they have received explanations by a person responsible for
their safety and supervision should not use this unit. Children should be
monitored to ensure that they do not play with the charger.
The charger should always be readily accessible. The device should not be
exposed to dripping or splashing water. No objects filled with liquids such as
vases shall be placed on the device. Always leave a minimum distance of 10 cm
around the unit to ensure sufficient ventilation. Naked flame sources, such as
candles, should not be placed on top of the device. The device is intended for
use only in a temperate climate. Do not dismantle or modify the charger;
otherwise, personal injury, electric shock, fire and charger damage may occur.
Do not use the charger in such places with high humidity such as bathroom,
etc., otherwise, electric shock, fire and charger damage may occur.
Do not touch the charger, electric wire and power socket with wet hand;
otherwise, electric shock may occur.
CAUTION: Danger of explosion if battery is incorrectly placed or not replaced
by the same type or equivalent. The battery should not be exposed to
excessive heat such as sunshine, fire or similar. Different types of batteries,
new and used batteries should not be mixed. The battery must be installed
according to the polarity. If the battery is worn, it must be removed from the
product. The battery must be disposed of safely. Always use the collection bins
provided (check with your dealer) to protect the environment. At full volume,
prolonged listening to the portable audio device may damage the user's
hearing and cause hearing troubles (temporary or permanent deafness,
hearing drone, tinnitus, hyperacusis).
So we recommend not to listen the portable audio device at high audio volume
and no more than one hour per day at medium audio volume.
SWITCH OFF IN RESTRICTED AREAS
Switch the mobile device off where the use of mobile devices is not
allowed or where there is a risk of causing interference or danger,
for example on board an aircraft, near medical equipment, fuel,
chemicals or blasting sites.
Do not handle the mobile device when driving. Concentrate fully on driving.
Radio signals could affect some of the car's electronic systems such as the
audio stereo and alarm systems.
If the car is equipped with an airbag, do not hinder its deployment with fixed or
- 5 -

ENGLISH
- 6 -
wireless equipment. This could result in serious injury due to inadequate
performance.
INTERFERENCE
All wireless devices are susceptible to interference which may affect their
performance.
AUTHORISED PERSONNEL
Only qualified people are authorized to install or repair this product
ACCESSORIES
Only use batteries, chargers and other accessories which are compatible with
this equipment. Do not connect incompatible products.
KEEP THE EQUIPMENT DRY
This equipment is not water proof. Keep it dry.
CHILDREN
Keep your mobile device in a safe place, out of the reach of young children.
The mobile device contains small parts that may present a choking hazard.
Precautions for use
This mobile device meets guidelines concerning the exposure to radio waves.
Your mobile device is a radio transmitter and receiver. It was designed to meet
the limits recommended by international guidelines to limit the exposure to
radio waves. These guidelines were developed by and independent scientific
organization, The ICNIRP; and include safety margins designed to ensure the
protection of all, regardless of age and health.
The recommendations on exposure guidelines for mobile devices employ a
unit of measure known as the Specific absorption rate or SAR. The SAR limit
defined in the ICNIRP recommendations is 2.0 watts/kilogramme (W/kg)
averaged over 10 grams of tissue. In tests to determine the SAR, the
equipment is used in standard usage positions at its highest certified power
level in all tested frequency bands. The actual SAR level of a device in use may
be lower than the maximum value because the equipment is designed to only
use the necessary power required reaching the network. That amount
changes depending on a number of factors such as the distance from a
network base station.
Radio frequency interference
Radio frequency output from electronic devices can interfere with other
electronic equipment and cause malfunctions. Although this mobile device has
been designed in accordance with EU regulations on radio frequency emission,
mobile device wireless transmitters and electrical circuits can cause
interference with other electronic equipment. We therefore recommend
taking the following precautions:
Aircraft: Wireless equipment can cause interference in aircraft.
- Turn off your mobile device before boarding the aircraft.
- Do not use on the ground until allowed to do so by the flight crew.
2. Safety warning and notices

ENGLISH
- 7 -
Vehicles: Mobile device radio frequency emissions can affect the electronic
systems of motor vehicles. In relation to your vehicle, check with the
manufacturer or dealer.
Medical implants : Medical equipment manufacturers recommend a
minimum distance of 15 centimeters between a wireless device and an
implanted medical device such as a pacemaker or defibrillator to avoid any
interference with the medical device. It is recommended that people fitted
with such devices :
- Always keep wireless equipment more than 15cm away from the medical
device.
- Never carry wireless equipment in a breast pocket.
- Place such equipment at the opposite ear to the medical device.
- Turn off the wireless equipment if they think it is interfering with their device
- Follow the instructions provided by the medical implant manufacturer.
If you are fitted with a medical implant and have any questions related to the
use of your mobile/wireless equipment, you should consult your doctor
Hearing: Warning: Using a headset risks not be able to correctly hear outside
sounds. Do not use a headset when it could endanger your safety. Some
mobile devices can interfere with the proper operation of hearing aids.
Other medical devices: Radio transmitting equipment including mobile
devices may interfere with the proper operation of insufficiently protected
medical equipment. Consult a doctor or the medical equipment manufacturer
to find out whether the equipment is sufficiently protected from external radio
wave signals. Turn off your device where required by regulations, particularly
in hospitals.
Health facilities: Hospitals and health facilities may be using equipment
which is particularly sensitive to external radio frequency emissions. Turn off
the mobile device when staff or notices tell you to.
Blasting sites and marked areas: Turn device off in potentially explosive
areas. Follow all official instructions. Sparks in such areas can cause an
explosion or a fire, resulting in serious injury. Turn off your device in gas
stations, especially when near the fuel pumps.
Strictly follow usage restrictions in fuel depots, chemical plants or in places
using explosives.
Potentially explosive areas are often, but not always, clearly signed. These
include areas where it is normally considered advisable to turn of vehicle
engines, the area below deck on ships, chemical storage or transfer plants,
and areas where the air contains chemical products or particles, such as grain,
dust and metal powder. Check with the makers of LPG (such as propane or
butane) vehicles that the device can be used safely in their vicinity.
All our mobile devices conform to international standards and regulations, and
if need be national ones, with a view to limiting user exposure to
electromagnetic fields. These standards and regulations were adopted after
the completion of extensive scientific research. This research established no
2. Safety warning and notices

ENGLISH
- 8 -
link between the use of the mobile device and any adverse effects on health if
the device is used in accordance with standard practices.
However if you would like to reduce the level of exposure to radio frequency
radiation you can limit your use of wireless, because the time in contact with is
a factor of exposure for a person, and you can move away the device from you,
because the exposure level decreases with a smaller distance.
GENERAL SAFETY PRECAUTIONS AND ADVICES
Read and retain these instructions for future reference.
Warnings: On the product and User Guide instructions should always be
adhered to.
Cleaning: Do not use liquid cleaners or aerosol cleaners. Use a damp soft
cloth for cleaning .
Adapters: Use certified adapters recommended by producer. Other adapters
may be hazardous or void your warranty.
Moisture & Water: Do not use near water such as near bath tub, kitchen
sink, laundry tub, or swimming pool.
Ventilation: Should there be slots and openings in the mobile device, they
are provided for ventilation to ensure reliable operation of and protection from
overheating. These openings should never be blocked by placing the product
on a bed, sofa, rug, or other similar surface.
Power Sources: This mobile device should be operated from the type of
power source indicated on the rating label. Consult your product dealer or our
website for more information. For products intended to operate from battery
power or other sources, refer to the operating instructions.
Overloading: Do not overload wall outlets, extension cords, or integral
convenience receptacles as this can result in a risk of fire or electric shock.
Object and Liquid Entry: Never put objects of any kind on to or into this
product through openings as they may touch dangerous voltage points or
short out parts that could result in a fire or electric shock. Never spill liquid of
any kind on the product.
Servicing: Do not attempt to service this product yourself as opening or
removing covers may expose you to dangerous voltage or other hazards and
will void your warranty. Refer all servicing to qualified service personnel.
Damage Requiring Service: Unplug this product from the wall outlet and
refer servicing to qualified service personnel:
a) when the power-supply is damaged
b) if liquid has been spilled
c) if the product has been exposed to rain or water
d) if the product does not operate normally
e) if the product has been dropped or damaged in any way (voids warranty)
f) when the product exhibits a distinct change in performance.
Heat: The product should be kept away from heat sources such as a radiator,
2. Safety warning and notices
ENGLISH
- 9 -
heat register, stove, or other products that generate heat.
Replacement Parts: Unauthorized substitutions when service this product
may result in fire, electric shock, or other hazards. Make sure your service
technician has used parts specified by the manufacturer.
Energy Save: To save energy, unplug the USB power adapter when not in
use. The USB power adapter does not have a power switch, so you must
unplug the USB power adapter from the electrical socket when not in use to
avoid wasting power. The device should remain close to the electrical socket
while charging.
The descriptions in this manual are based on the default settings of your
device.
The device may heat up while charging. This is normal and should not affect
your device’s lifespan or performance.
2.1. DECLARATION OF CONFORMITY
This device is manufactured in accordance with applicable European
standards on R&TTE, Safety (LVD) and electromagnetic compatibility (EMC) in
accordance with the following Standard or Standardized Documents: EC
Council Directive R&TTE Directive 1999/5/EC, 2004/108/EC (EMC Directive) ,
EC Council Directive 2014/35/EU (Low Voltage Directive), ERP directive
(642/2009/EC) and i RoHs directive (2011/65/EU). Market Maker Brand
Licensing, hereby declares that this equipment
conforms to the essential requirements and other
relevant provisions of Directive 1995/5/CE.
THE DISPOSAL OF ELECTRIC AND ELECTRONIC WASTE PRODUCTS
This symbol on the product or on the container indicates that this product
cannot be eliminated with the general waste. The user is responsible for
eliminating this kind of waste by throwing them away at a “recycling point”
specifically for electrical and electronic waste. Selective collection and
electrical equipment recycling contribute to preserve natural
resources and warrant waste recycling to protect environment
and health. In order to receive further information about
electrical and electronic waste collecting and recycling, contact
your Local Council, the service of household waste or the
establishment where the product was acquired.
0700
2. Safety warning and notices

3. Before use
ENGLISH
3.1 Battery
In the initial state, the battery has been charged about 50% and thus it can
be used upon unpacking. Don't charge the battery unless it is used up
completely for the first three times. Only in this way can the battery reach
the optimal working state. Note: Only the AC adapter and USB sync cable
provided with your device must be used to charge the device.
Your device comes with a rechargeable Lithium-ion battery and is designed
to use only manufacturer-specified original batteries and accessories.
Battery performance depends on many factors, including network
configuration, signal strength, and usage patterns.
Warning: To reduce risk of fire or burns:
• Do not attempt to open, disassemble, or service the battery pack.
• Do not crush, puncture, short external contacts, or dispose of in fire
or water.
• Do not expose to temperatures above 60°C (140°F).
• Replace only with the battery pack designated for this product.
• Recycle or dispose of used battery as stipulated by local regulations.
• Align the battery's exposed copper contacts with the battery
connectors at the bottom part of the battery compartment.
• Insert the contacts side of the battery first and then gently push the
battery into place.
• Replace the back cover.
3.2 Charge the Battery
• Plug the charger into the power socket.
• Insert the connector of the charger into the right top of the mobile phone
(always keep the face with arrowhead upward).
• In such case, the power indication icon on the upper right corner of the
screen will flash circularly. If the phone is switched off when it is charged,
there will be the page indicating the ongoing charging of the battery. If the
phone is still used when the battery has low power, the charging indication
icon will not appear on the screen until certain time has passed by.
• When the power indication icon on the upper right corner of the screen is
full and keeps still, it will indicate that the charging is over. If the phone is
charged in switch-off status, the screen will indicate the icon of charging
completed. This process generally needs 3-4h. During charging, the
battery, the phone and the charger may get hot, which is normal.
- 10 -

• After the charging is over, disconnect the AC power socket from the phone
and the charger.
Note:
• During charging, make sure that the phone is placed in a well-ventilated
environment with temperature of +5C~+40C and a charger provided by
the phone manufacturer is used. The use of an unauthorized charger may
result in danger and a violation against the acceptance and maintenance
regulations for the phone.
• When the mobile phone switches off automatically or displays the warning
phase of "low power", be sure to charge the battery in time. If the battery is
not used up, the phone will reduce the charging time accordingly.
• The standby and call duration of the phone provided by the manufacturer
are based on the ideal working environment. In actual use, the working
duration of the battery will vary due to different network situation, working
environment and application mode.
• During charging, make sure that the battery has been installed properly
because the battery being charged cannot be removed. As a safety
precaution, the battery stops charging before it overheats.
• After the charging is over, please disconnect the charger from the phone
and power socket.
• If you don't disconnect the charger from the phone and the power socket,
after certain time (about 5~8h), when the battery power is consumed to
certain degree, the mobile phone will start charging. Doing so is not
recommended, because it will affect the performance and service life of
your battery to some extent.
3.3 Network Connection
SIM Card
• Before the use of the mobile phone, you must insert valid SIM card(s) into it.
The SIM card is your key to enter the digital GSM network.
• All information in connection with network connection and your log list
initializations are recorded on the metallic plane area of the SIM card in
addition to the names, phone numbers and short messages stored and
received in the phonebook of the SIM card. The SIM card can be taken out
freely from your mobile phone and placed into any GSM mobile phone for
use.
• In order to prevent the information being lost and damaged, avoid touching
the metallic plane area of the card and keep the SIM card away from
ENGLISH
- 11 -
3. Before use

sources of electrical or magnetic fields. Once the SIM card is damaged, you
will be unable to enter the GSM network.
Warning: Before taking out the SIM card, be sure to switch off the mobile
phone. Never insert or plug out the SIM card when the phone is connected
with external power supply; otherwise, the SIM card will be damaged.
Note: Some legacy SIM cards may not function with your device. You
should consult with your service provider for a replacement SIM card.
There may be fees for this service.
3.4 Insertion and Take-out of SIM Card(s)
• Generally, the SIM card is stored in a card case. Before installation, take it
out of the case carefully.
• Switch off the phone and remove the battery and other external power
supply.
• Locate the SIM card slot, and then insert the SIM card with its gold
contacts facing down and its cut-off corner facing out the card
slot.Insert the SIM card into the SIM holder. You can choose SIM 1 or
SIM 2, or both holders.
• To take out the SIM card, you should switch off the phone first. Remove
the battery and then take the SIM card out of the holder.
3.5 Switch on/off the Phone
• Press and hold the End key to switch On/Off the phone.
• If the phone is switched on but no SIM card is inserted, then the phone
will remind you of inserting SIM card in. After the SIM card is inserted in,
the phone will automatically check if this card is usable.
Then the screen will have the following instructions in order:
• Input PIN1: if you have set SIM card password.
• Input phone password: if you have set the phone unlock
password.
• Search network: The phone will search the networks until a
suitable network is found.
3.6 Unlock the SIM Card
• In order to avoid illegal use, the SIM card adopts the PIN (Personal
Identification Number) protection function. When this function is
activated, for every switch-on, you must input the PIN number to
ENGLISH
- 12 -
3. Before use

unlock the SIM card, and then you can dial or receive a call. You may
erase the SIM card protection (in such case, the SIM card will be unable
to prevent illegal use).
• Press the End Key to switch on the mobile phone.
• Input the PIN number, press the Right Soft Key to erase a wrong entry
and press the Enter Key to confirm. For example, if the PIN number is
set as 1234, then you will enter the following digits: 1 2 3 4
• If the PIN1 and PIN2 number is input wrongly for three times
successively, your SIM card will be locked by the network and the
mobile phone will ask you to input the PUK1 number.
• PUK code:To change the PIN code, the PUK code is needed (that
is private unlock password). PUK1 and PUK2 codes are also
provided by network operators. If the PUK code is missed, please
contact your network operator.
Note: Your network supplier will set one standard PIN number (4 to 8
digits) for your SIM card, you should change it into your own
private number.
3.7 Phone Lock/Unlock
• In order to prevent illegal use, you may set phone password protection.
When this function is selected, for every switch-on, after the PIN
number (if you have set PIN number protection for your phone) is input,
you must input to unlock the phone, and then you can dial or receive a
call. You may cancel the phone password; in such case, the phone will
be unable to prevent illegal use.
• Input the phone password, press the Left Soft Key and with Arrow keys
choose Settings Menu, Press 4 key (Security options) and choose
option Phone lock and Press ENTER key to Turn on/Cancel Lock Phone. To
confirm Lock/Unlock, you need to enter Phone Lock PIN. The Factory PIN
is: 1 2 3 4. To cancel Lock/Unlock function, repeat above steps.
• If you forget the password number, you should contact your dealer or the
local authorized service center to unlock your phone password.
3.8 Connect to Network
• After the SIM card is unlocked, the phone will automatically search the
available networks (“Searching Networks” occurs on the screen). Once the
desired network is found, the name of the network supplier will display on
ENGLISH
- 13 -
3. Before use

the screen. The phone will be in standby.
In addition to dialing and receiving calls, you may:
• Press the Right Soft Key to enter the business card holder type
phonebook.
• Press the Left Soft Key to enter the operation of the function menus.
Note: If the screen displays “Emergency only”, it will indicate you are out of
the coverage of the network (out of service), but you can send an
emergency call according to the signal strength.
3.9 Dial a Call
• When the logo of the network supplier occurs on the screen, you may dial or
receive a call. The message bars on the screen indicate the strength of
network signals.
• Call quality can be affected greatly by barriers, so the movement in a small
scope may improve call quality.
3.10 Dial a Domestic Call
• Press the desired Number Keys to enter the desired phone number and then
press the Dial Key to start the call. To change the phone number, press the
Right Soft Key backward. During dialing a call, the screen will display the
dialing animation, after the receiving party picks up his/her phone, the
screen will display the information of being connected. If the alert tone is
activated, you will hear the alert tone (the network support is needed).
• Press the End Key to end the call.
Area code + Phone number + Dial Key
3.11 Dial a Fixed Call
• You cannot connect some fixed call extensions directly but connect the
phone exchange and then dial the extension number. If you insert the pause
symbol “P” in between the exchange number and the extension number,
then the phone will help you to complete all dials and connect you to the
target extension.
Area code + Exchange number + P + Extension number + Dial Key
3.12 Dial an International Call
• To dial an international call, you should input the prefix symbol “+”, which
will allow you to dial a call from any country when you don't know the
ENGLISH
- 14 -
3. Before use

international prefix code of the local country.
• After the prefix code is input, you may input the target country code and the
complete phone number. The country code is routine, for example, 49 for
Germany, 44 for UK, 46 for Sweden, etc.
• The same as a domestic call, you need to delete the “0” in the front of the
city code.
Country code + Complete phone number + Dial Key
3.13 Dial a Call in the Log List
• The dialed and received calls are stored in the log list of the phone and
generally the latest calls dialed and received will come to the top of the log
list. These calls are classified into the dialed calls, received calls and missed
calls and the phone will provide all call options for your reference. When the
log list is full, the old calls will be deleted automatically. Please operate as
follows to view the log list:
• Press the Dial Key to view the log list.
• You can directly press the Dial Key to dial any call appearing in the log
list.
• When the log list appears, you may press Enter to view its details, after
entering Options, press Save to directly save the phone number into the
phonebook.
3.14 Dial an Emergency Call
• If you are covered by the network (you may know this by checking the
network signal strength on the upper left corner of the screen of the
phone), you may dial an emergency call. If your network supplier doesn't
provide the roaming service for you in such area, then the screen will
display “Emergency Only”, indicating that you can only dial such emergency
call. If you are covered by the network, even without a SIM card, you may
dial an emergency call.
3.15 Receive a Call
• To recieve a call, you must press the Dial Key or the Left Soft Key to
receive a call. If the headset is inserted, you may press the corresponding
key on the headset to receive a call.
3.16 Call Log
• Your mobile phone also can save the record of the latest call and all call
durations since the use of the phone.
3.17 Calls Menu
• In call state, press Left Soft Key to enter the call options whose operation
ENGLISH
- 15 -
3. Before use

is the same as that of function menus. This call menu can be seen only in
call conversation and such functions as Call Waiting, Call Diverting, etc.
need the support of the network. Please contact your network supplier if
necessary.
• In the Call Menu, you may have the following operations:
• Add new Call: Make a new call
• Hold: You can keep the current call or restore the held call.
• Start Recording: Start to record conversation
• Mute: You can mute your microfone
• Adjust volume: You can change volume of your speaker
• Contacts: You may view the phonebook.
• Call logs: You may view recent call history
• Message: You may create and send a piece of new message.
3.18 Call Logs
In Stand-by state, press Dial Key to view Call logs informations. With4-
Way cursor choose option:
• Dialed: Show all dialed calls, select to view a dialed call's
information, phone number an Call time.
• Received: Show all recieved calls, select to view a recieved
• Rejected: Show all rejected calls, select to view a rejected c a l l ' s
information, phone number, etc.
• Missed:Show all missed calls, select to view a missed call's
information, its date and time, phone number, etc.
In each of above options, press the OK softkey to view the additional
informations: Date of call, Call time, Type and other informations.
To enter in Options of Call Logs, press Left soft key:
• Details: View the current record date, time, type.
• Call: Call the current number.
• Write message: send the current record of SMS
• Add to contacts: Add the selected record's phone number to
your phone's contacts
• Add to blacklist: Set the record's number to be automatically
rejected
• Delete: Delete the currently selected record
• Delete call logs: Delete all call records
• Mark: You can mark / unmark dailed calls, received calls, all calls
total.
ENGLISH
- 16 -
3. Before use
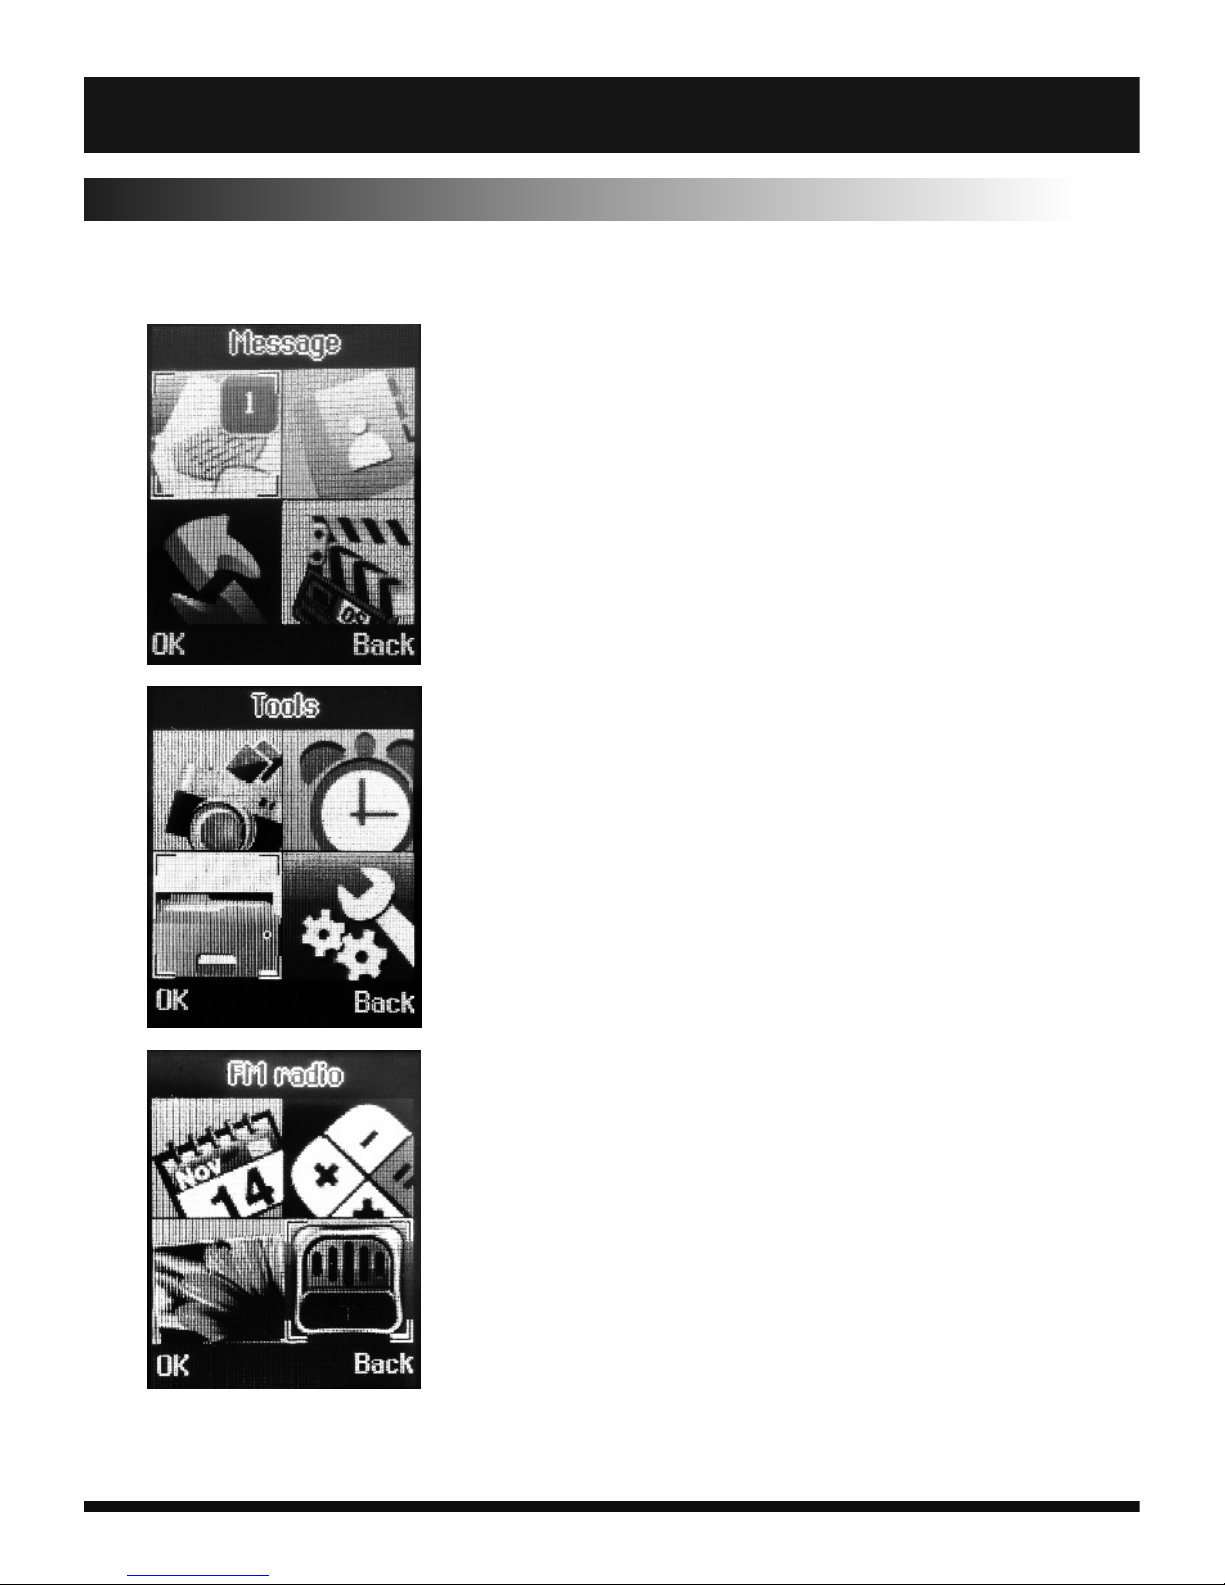
4. Menu functions
In the standby page, press the Left Soft Key to enter the Main Menu and
there are the following options available:
Messages - Enter to SMS Messages , Edit and View
Inbox, Outbox, Drafts, Sendbox and Security
options.
Contacts - Enter to Contact list to Edit, Add, Delete
Contacts.
Call logs- Enter into Call Editor menu. There you
can check Missed, Dialed, Received, Rejected Calls
and Edit or Delete Calls.
Multimedia - Enter into Multimedia menu. There
you can enter into Camera mode (to make photo
or Video, you should insert TF Flash card), Video
Player to play Video files from TF Flash card or
enter into Audio recorder. In each of the
Multimedia modes, press Left Soft key to enter
into options.
Camera - Direct enter into Camera mode. There
you can enter into Camera mode. To make photo
or Video files you should insert TF Flash card.
Alarm - Enter into Alarm settings. You can adjust
up to 3 Alarm times.
Tools - Enter into Application page: use Internet*,
Games, My Files (personal Folder), TourchLight,
WorldClock, Bluetooth and other Internet
applications (This function is optional, some
Internet options are not included in your model)
Settings - Enter into Phone Settings like Call
Settings, Phone Settings, Display, Security etc...
Calendar - Enter into Calendar schedule settings
Calculator- Enter into Calculator mode
Image Viewer - Enter into Image Viewer
FM Radio - Enter into FM Radio Player ( f o r F M
Radio Play you should insert Earphone)
4. Menu Functions
ENGLISH
- 17 -

ENGLISH
- 18 -
4.1 Messages
4.1.1. Write message
The Messaging function is a network service. Sending and receiving
Text can only be used if the service is proposed by your network
operator. You can send ordinary Text messages, enhanced Text
messages (Text messages containing pictures, ring tones and
animation as a ttachments, EMS for short). The SMS is sent to the Text
messages center in the network firstly, and then to the target user. If
the receiver's mobile is powered off or cannot receive messages, the
network will store the message temporarily and the store duration is
determined by the user configuration and the service provider.
The message will be directly stored in the SIM card if the capacity is n o t
full. A blinking icon at the head row of the main screen will be d isplayed
if the capacity is full. If the Text message has been sent to t he receiver,
a beep will sound. (If the tone for Text messages and m essage report
are activated).
To make New SMS or MMS message, press Enter key. With 4-way
cursor choose message type (SMS or MMS) and than press Left Soft
Key or Enter Key.
Enter telephone number by Numeric keypad or press Enter Key to
choose Telephone number from Contacts.
To write a message, press Down key and write message to chose
coresponding key letter and press Enter key to confirm.
To send a message, press Soft Left key and choose Send option.
To make Message settings, press Left Soft Key.
.• Send: Enter the appropriate number of the recipient or from the
phonebook add
• Insert template: Add a preset to the content of the message
currently being edited into the common language
• Add contact info: Insert the contact person
• Add phiz: emoticons into the meaning of the representative
• Save as draft: will save the information to Drafts
• Exit: Exit message
4.1.2. Inbox
In this menu you can check all Incomming messages
4. Menu Functions

ENGLISH
- 19 -
Choose Options to:
• Reply: reply to SMS to each other.
• Delete: Delete short message
• Call: choose a voice call or a call to the sender IP calls
• Lock: lock cannot be deleted
• Move: Move the message to SIM or phone
• Copy: Copy the message to SIM or phone
• Mark: single marker or markers in whole or in text messages stored
in SIM1/SIM2, mark or unmark after delete records
• Sort: In accordance with time / contact / theme / message type sort
• Add sender to: Add sender number to Contacts as a New Contact or
Editing existing Contact.
• Delete repeated numbers: choose to delete the same number of
records.
• Add sender to blacklist: Add the sender to blacklist
4.1.3. Outbox
• Enter the Outbox list, then you will see the SMS saved in the phone
(including SIM and the phone).
• On the page of Read SMS, you may Press the Left Soft Key Options to
enter such options: similar to those of Inbox.
4.1.4 Drafts
• Enter the list of common phrases, then you can choose the desired
template and have such operations as Delete, Edit, Lock, Move, Copy,
Mark or Sort.
4.1.5. Sentbox
• Read and process the mail stored in the SIM card has been sent
information
4.1.6. Templates
• Use the function of templates
4.2 Contacts
• You have 2 phonebooks in this mobile phone: SIM card and the mobile.
The mobile can store 300 phone numbers and the SIM card's capacity
depends on its type.
• In Standby mode, press Right Soft key to enter into Contacts.
4. Menu Functions
 Loading...