

Quadro HOL-B1120, HOL-B1325 User Manual
HOL-B1325
Oil filled heater
Uljna grijalica
Uljni radijator
Ради¼атор на масло
È005
11
SRPSKI
HRVATSKI
ENGLISH
МАКЕДОНСКИ
Upute za uporabu
User Manual
Uputstva za upotrebu
Упатство за употреба
HOL-B1120
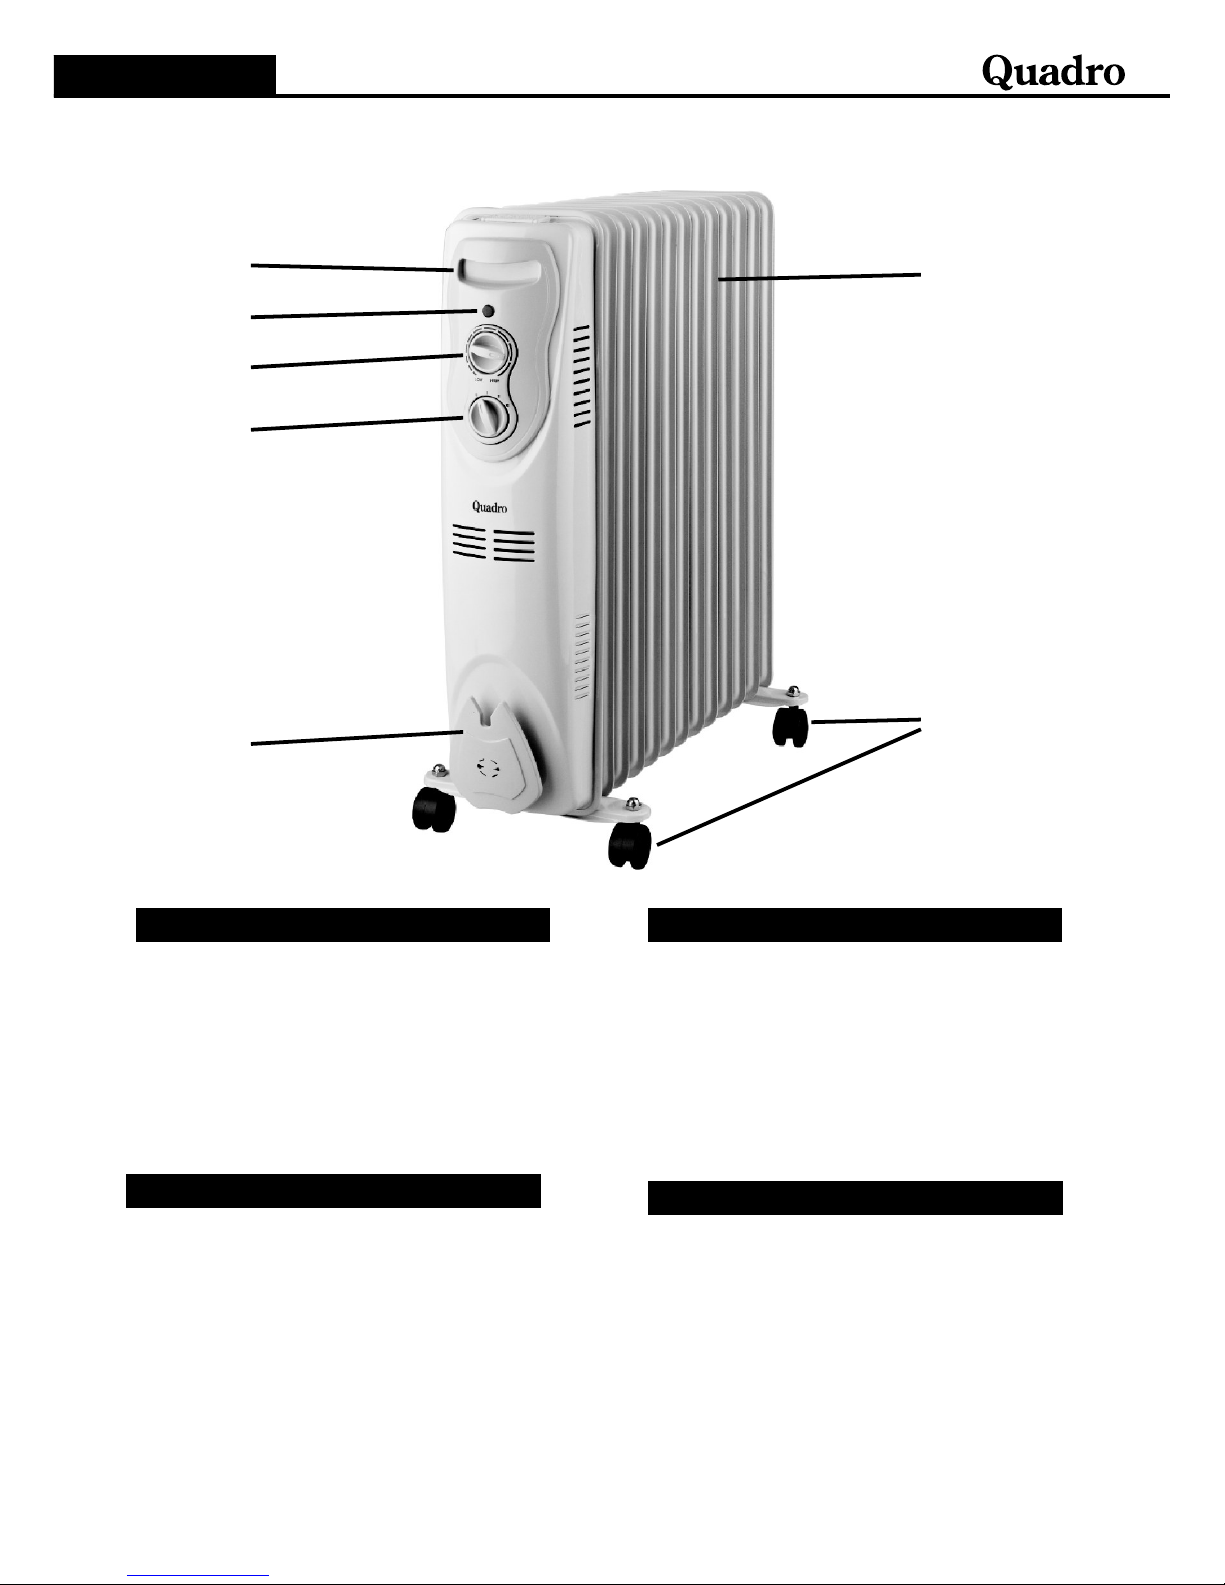
ENG - Description of appliance
SR/MNE - Delovi aparata
A Carry handle
B Power indicator light
C Thermostat knob
D Power swtich
E Power cord storage
F Radiator fins
G Wheels
A Drška
B Signalno svetlo rada grejaèa
C Termostat
D Prekidaè za odabir snage grejanja
E Mesto za kabl napajanja
F Rebra radijatora
G Toèkiæi
HR - Dijelovi ureðaja
MK - Delovi na ради¼аторот
A Ruèke za prenošenje
B Signalna žaruljica rada grijaèa
C Termostat
D Prekidaè za odabir snage rada
E Spremište za naponski kabel
F Rebra grijalice
G Kotaèiæi
A Рачка за пренесуваœе
B Сигнално светло за работа на греачот
C Термостат
D Прекинувач за бираœе снага на грееœе
E Место за напонскиот кабел
F Ребра на ради¼аторот
G Тркалца
A
C
B
D
E
F
G
ENGLISH
- 2 -
Introduction
Basic safety instructions
Environmentally-friendly treatment:
Before using for the first time, kindly take time to carfully read your user manual. Please observe all safety
precautions and follow operating procedures. After reading, kindly store your manual in a safe place for your
future reference. If you pass this appliance to a third party, these operating manual must also be hended over.
• Make sure that your outlet voltage corresponds to the voltage stated on the rating label of the heater.
• Keep the mains cord away from the hot body of the heater.
• The heater is not intended for use in bathrooms, laundry areas or similarly damp/wet indoor places.
Never place the heater where it may fall into bathtub or other water container.
• The heater is for household use only.
• Do not use outdoors.
• Do not use in rooms smaller than 5m².
• Do not cover or obstruct air intake and/or outlet of the heater, there should be at least 1m of free space in front
and 50cm of free space behind the appliance.
• Do not place heater on the carpets having a very deep pile.
• Do not use the appliance for other than its intended use. The heater is designed to heat the air indoors.
• Always ensure the heater is placed on a firm level surface. Keep away from the curtains or furniture as it
could create a fire hazard.
• Do not position the heater in front or directly below the wall socket.
• Do not run the cord under carpeting and do not cover the cord. Place the cord away from traffic area where it
can't be tripped over.
• Use the heater in well ventilated area only. Do not insert any object through the air intake/outlet grills of the
heater.
• Do not use the heater in areas where flammable liquids are stored and flammable fumes are present.
• Particular care should be taken when the heater is situated in areas occupied by children or disabled
people.
• Avoid the use of an extension cord as this may overheat and cause a risk of fire.
• Always unplug the heater after use, or when moving it from one location to another.
• Do not use the heater if the power cord is damaged, or you suspect other damage or malfunction of the
appliance. If the power cord is damaged it must be replaced by authorized service personel.
• The heater is hot when in use. To avoid burns and/or injury, do not let bare skin touch hot surfaces. Use
the handles for transport.
• Never use other appliances on the same electrical circut as the heater as overload may occur.
• The heater is filled with a precise quantity of special oil.
• Repairs requiring oil container to be opened are only to be made by authorized serviced personel who
should be contacted in case of an oil leakage.
• Local regualtions concerning the disposal of oil when scrapping the appliance have to be followed.
• Young children should be supervised to ensure that they do not play with the appliance.
• This appliance is not intended for use by persons (including children) with reduced physical, sensory or
mental capabilities, or lack of experience and knowledge, unless they have been given supervision or
instruction concerning use of the appliance by a person responsible for their safety.
CAUTION: In order to avoid hazard due to inadvertent resetting of the thermal cut-out this appliance must
not be supplied through an external switching device such as timer or connected to a circut that is regularly
switched on and off by third party.
According to the EU Directive No 2002/96/EC concerning the products labeled with a symbol of a crossed
trash can, the manufacturer warns that this product cannot be considered a standard domestic waste. By
proper treatment, management and recycling of such waste the owner of the product prevents users from the
potential negative consequences to health, which may be caused by inadequate management or
disposal of such waste. For more information concerning recycling and management of the
product, please contact your local government office for dangerous waste management, or the
vendor from which you purchased the product.
Waste electrical products must not be dispose with household waste. This equipment should be
taken to your local recycling centre for safe treatment.
ENGLISH
Declaration of Conformity
This device is manufactured in accordance with applicable European standards on safety, EC Council Directive
2006/95/EC (Low Voltage Directive)) and electromagnetic compatibility, EC Council Directive 2004/108/EC
(EMC Directive).
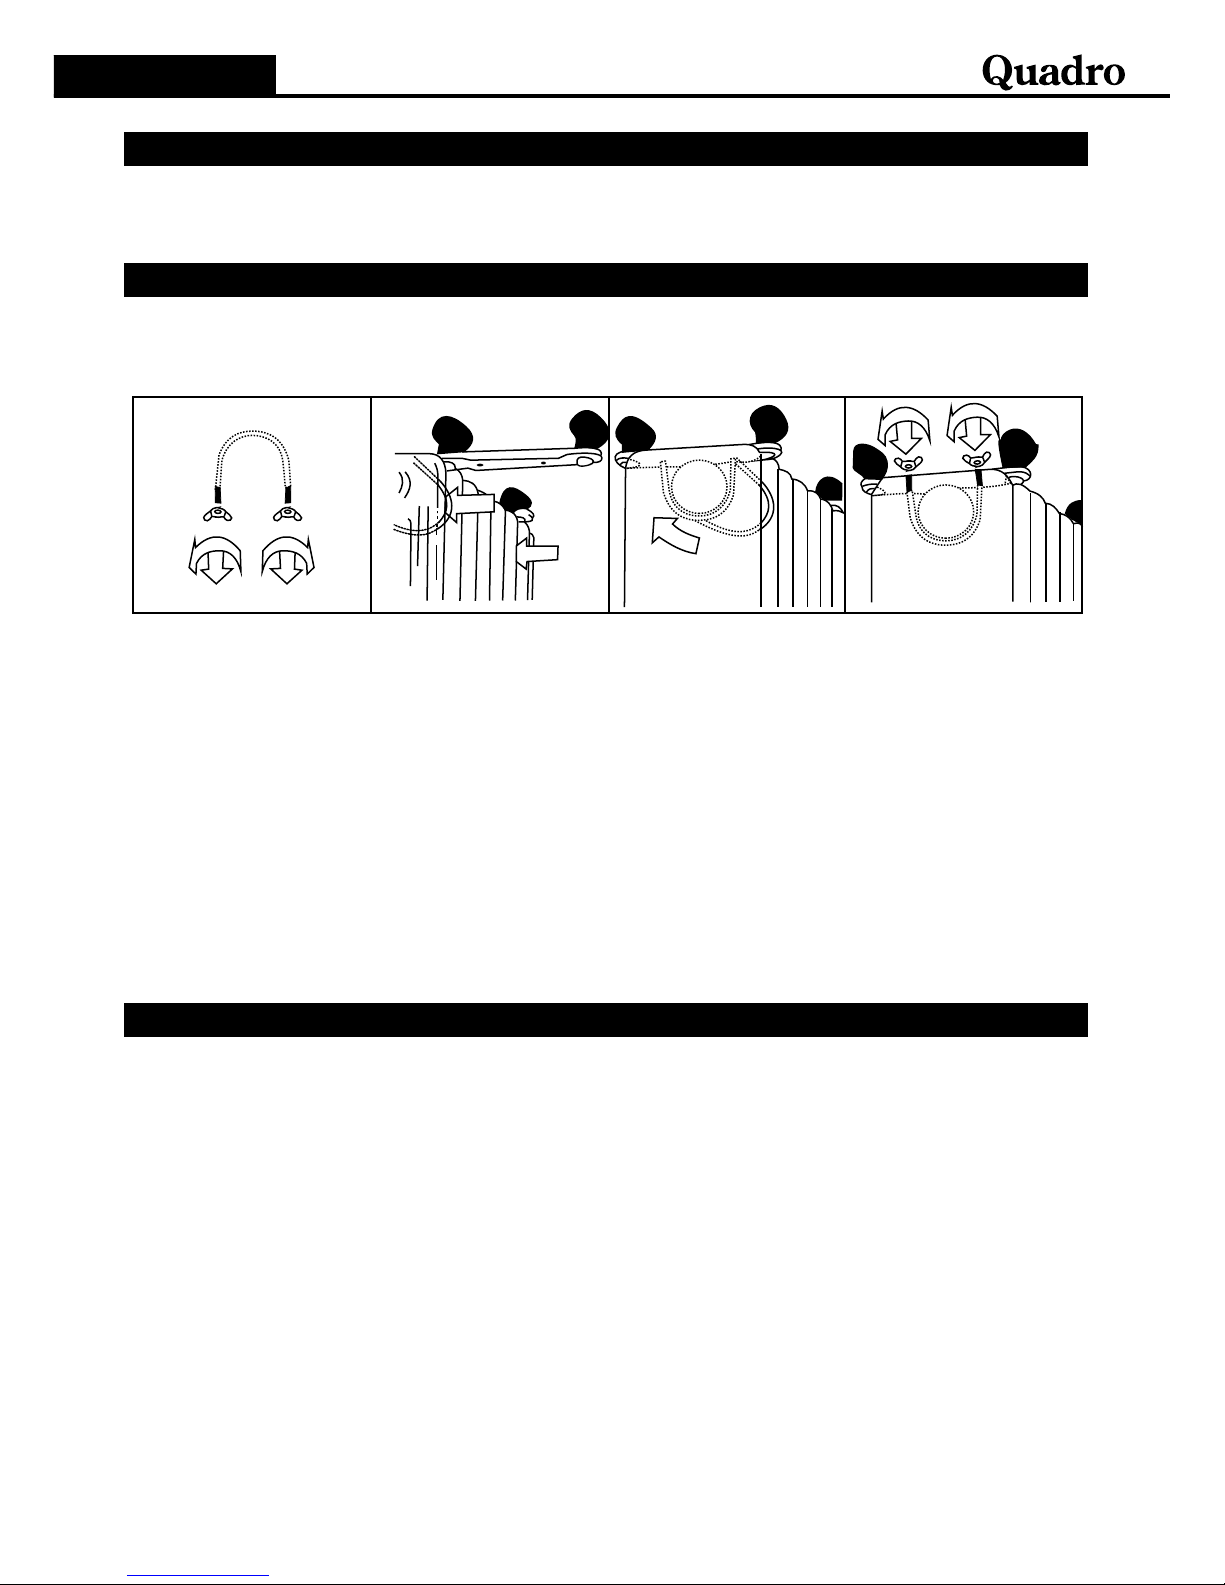
Assembly instructions
Operating instructions
The heater is supplied with the feet unattached. You must attach them before operating the heater.
WARNING: Do not operate without feet attached. Operate the heater in the upright position only
(feet on the bottom, controls on the top), any other position could create a hazardous situation.
1. Place the radiator body upside-down on a scratch-free location, make sure it's stable and will not fall
over.
2. Screw off the wing nuts from the U-shaped blot provided, attach the U-shaped bolt to the U-facing flange
between first and second fins (near the front cover).
3. To attach the wheel mounting plate to the radiator body, you should insert the threaded ends of the U-
bolt in the holes on the wheel mounting plate.
4. Screw the wing nuts back to the U bolt and fasten the wing nut properly.
NOTE: Do not over tighten, which may cause the damage of radiator flange.
5. Screw off spherical nut from the wheel, align the shaft to the hole of the wheel mounting plate, insert in,
and screw on the spherical nut.
6. Repeat 2, 3, 4 and 5 on the rear of radiator for mounting of the rear wheels.
7. Place radiator body into normal position and check that unit stability.
NOTE: The front and rear wheels must be mounted between the end two fins.
1. Before using the heater, make sure that it is on a flat and stable surface. Damage may occur if it is
placed on an incline or decline.
2. Set all the controls to "0" position and insert the plug into a socket-outlet with well grounded. Be sure that
plug fits firmly.
3. Rotate the thermostat knob clockwise to "HIGH" position and rotate the power switch as follows: to
position I for low power, to position II for medium power or to position III for maximum power output. The
power indicator light will go on showing that heater is heating.
4. When your room reaches the desired temperature, slowly rotate the thermostat knob counter clockwise
until the power indicator light goes out. The thermostat can now be left at this setting. As soon as the
room temperature has dropped below the set temperature, the unit will switch it self on automatically
until the set temperature has been reached again. In this way the room temperature remains constant
with the most economical use of electricity.
5. If you want to change the room temperature setting, rotate the thermostat knob clockwise to raise the
temperature, or counter clockwise to lower it.
6. This heater includes an overheat protection system that shuts off the heater when parts of the heater are
getting excessively hot.
7. To completely shut the heater off, turn all the controls to "0", and remove the plug from the socket outlet.
- 3 -
4321
ENGLISH
- 4 -
Maintenance
Technical data HOL-B1120
Technical data HOL-B1325
1. Always remove the plug from the socket-outlet and allow the radiator to cool down before clean the heater.
2. Wipe radiator with a soft damp (not wet) cloth.
3. To store away the heater, wind the cable round bobbin and store the heater in a clean dry place.
4. In case of malfunction or doubt, do not try to repair the radiator yourself, it may result in a fire hazard or electric
shock.
WARNING:
Do not immerse the heater or power cable into the water.
Do not use any cleaning chemicals such as detergents and abrasives.
Do not allow the interior to get wet as this could create a hazard.
Model: Oil filled heater HOL-B1120
Power Supply: AC 230V~ 50Hz
Power: 2000W
Heating thins: 11
Model: Oil filled heater HOL-B1325
Power Supply: AC 230V~ 50Hz
Power: 2500W
Heating thins: 13
 Loading...