

Page 1
Log Set Assembly: LOGS-QFI35FB
LOG PLACEMENT INSTRUCTIONS
Models: QFI35FB, QFI35FB-C, QFI35FB-IFT
12
SRV2223-701
SRV2223-703
3
5
SRV2223-704
6
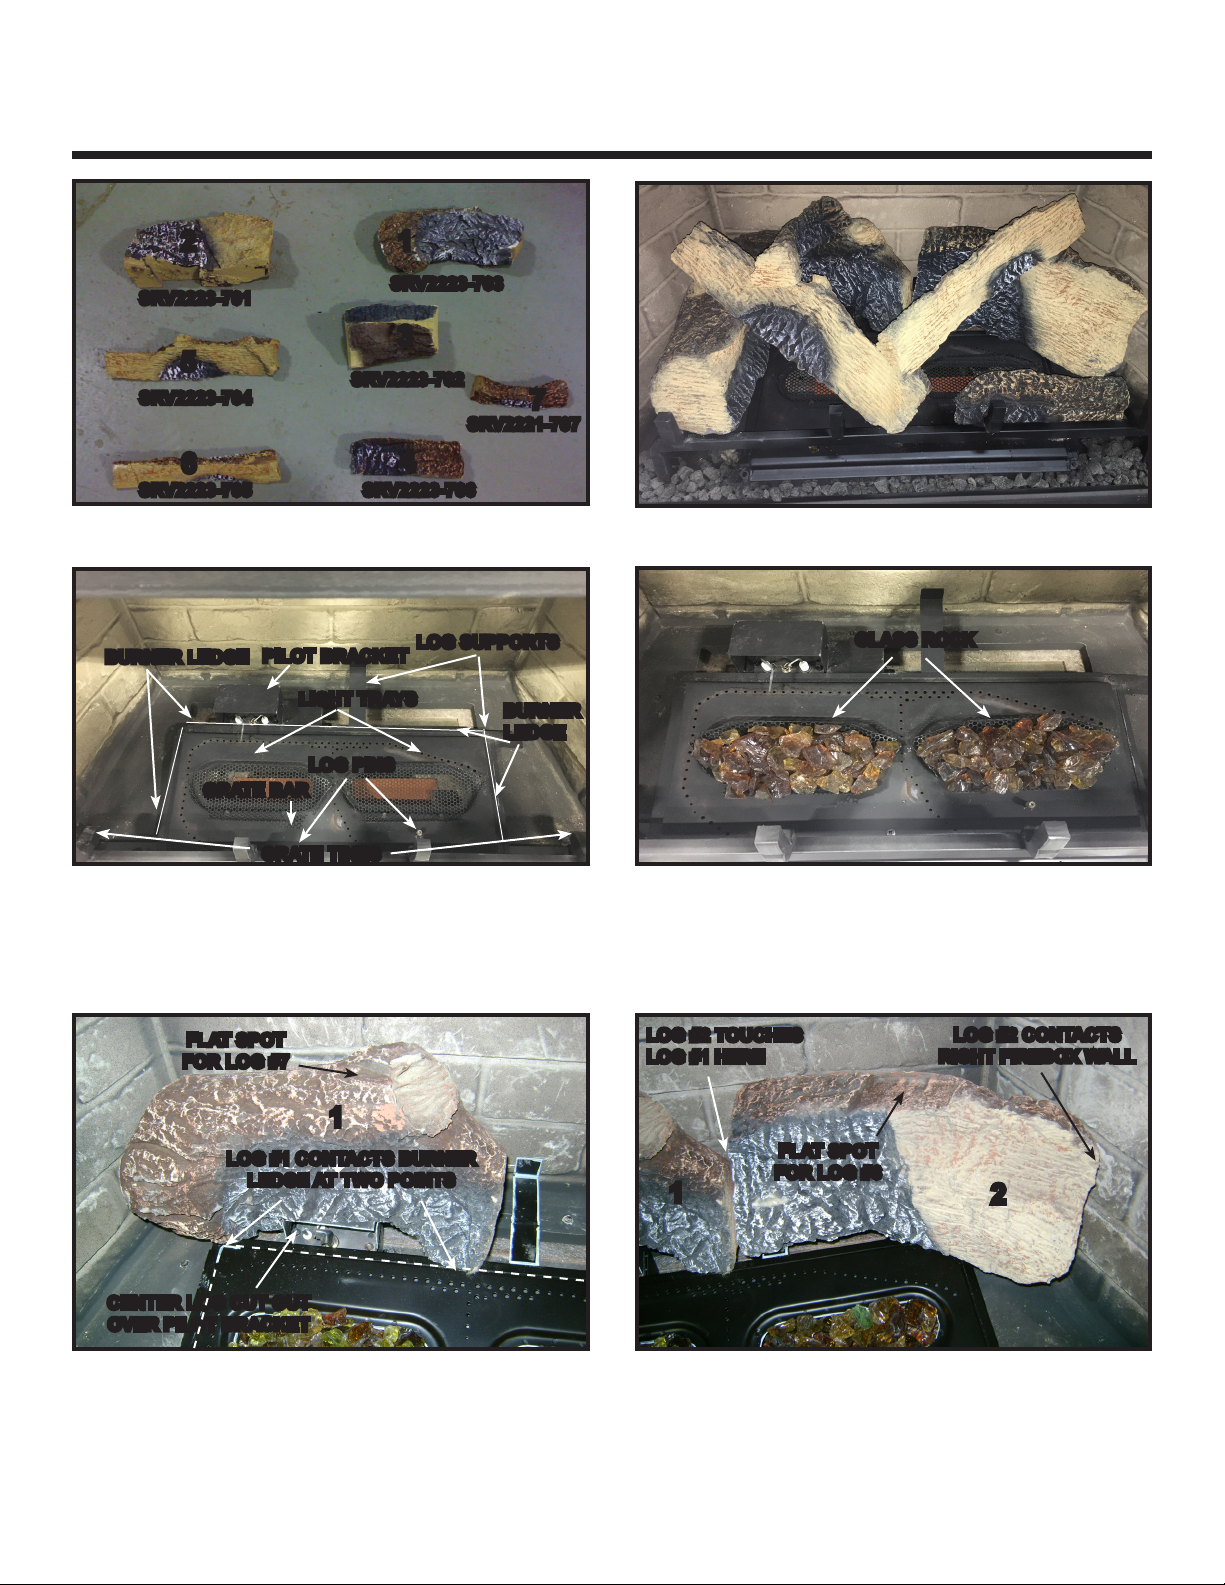
BURNER LEDGE
Figure 2. Reference Points for Log Placement
CAUTION: Logs are fragile, handle with care.
Glass Rock (2201-853): Fill each light tray evenly with the glass rock.
WARNING! Risk of Explosion! DO NOT place glass rock on the burner surface. DO NOT place glass rock directly over
burner ports. Improperly placed glass rock interferes with proper burner operation.
PILOT BRACKET
GRATE BAR
GRATE TINES
SRV2223-702
4
SRV2223-706SRV2223-705
LIGHT TRAYS
LOG PINS
7
SRV2221-707
LOG SUPPORTS
BURNER
LEDGE
Figure 1. Logs Installed
GLASS ROCK
Figure 3. Install Glass Rock
FLAT SPOT
FOR LOG #7
LOG #2 TOUCHES
LOG #1 HERE
LOG #2 CONTACTS
RIGHT FIREBOX WALL
1
LOG #1 CONTACTS BURNER
LEDGE AT TWO POINTS
CENTER LOG CUT OUT
OVER PILOT BRACKET
Figure 4. Place Log #1 Figure 5. Place Log #2
Log #1 (SRV2223-703): Position Log #1 as shown in Figure 4. See Figure 2 for additional points of reference. Center the
log over the pilot bracket. The log should rest on the burner ledge as shown in Figure 4.
Log #2 (SRV2223-701): Position Log #2 as shown in Figure 5. See Figure 2 for additional points of reference. Place the
left end of the log on the rear log support. Slide the log back until it rest against the back of the log support. The left end of
the log should touch Log #1. Swing the right end of the log counterclockwise until it contacts the right refractory wall.
Quadra-Fire • LOGS-QFI35FB Log Instructions • 2223-935 Rev. D • 5/18
1
FLAT SPOT
FOR LOG #6
2
1
Page 2

FLAT SPOT
FOR LOG #5
MATE GROOVE WITH
CORNER OF BURNER TOP
BURNER TOP GROOVE
GRATE TINE GROOVE
3
FRONT BACK
Figure 6. Log #3 - Bottom View
LOG #3 TOUCHES
GRATE TINE
3
Figure 7. Place Log #3
Log #3 (SRV2223-702): Position Log #3 as shown in Figure 7. See Figure 2 and Figure 6 for additional references. Mate
the grate tine groove with the base of the left grate tine. Slide the log forward until it stops against the vertical portion of the
left grate tine. Mate the burner top groove with the left edge of the burner top as shown in Figure 7.
LOG PIN SLOT
4
4
MATE LOG PIN
WITH LOG SLOT
RIGHTLEFT
Figure 8. Log #4 - Bottom View Figure 9. Place Log #4 (Glass Rock not Shown)
Log #4 (SRV2223-706): Position Log #4 as shown in Figure 9. See Figure 2 and Figure 8 for additional references. Mate
the slot located at the left end of log #4, shown in Figure 8, with the right log pin. Rotate the right end of the log clockwise,
until the log contacts the grate bar.
REST LOG ON
FLAT SPOT
FLAT SPOT
FOR LOG #7
5
1
2
FLAT SPOT
FOR LOG #6
REST ENDS OF LOGS
ON THE FLAT SPOTS
LOG CONTACTS
GRATE BAR
6
3
USE LOG PIN TO
LINE SHOWS BACK
EDGE OF GRATE BAR
LOCATE LOG
Figure 10. Place Log #5 (Glass Rock not Shown)
Figure 11. Place Log #6 (Glass Rock not Shown)
Log #5 (SRV2223-704): Position Log #5 as shown in Figure 10. See Figure 2 and Figure 7 for additional references. Rest
the left end of the log on the at spot of log #3. Locate the groove located on the right end of the log. Mate the groove with
the grate bar. Use the left log pin to positively locate the right end of the log.
Log #6 (SRV2223-705): Position Log #6 as shown in Figure 11. See Figures 2, 5 and 10 for additional reference points.
Place the front and back ends of the log on the at spots as shown in Figure 11.
Quadra-Fire • LOGS-QFI35FB Log Instructions • 2223-935 Rev. D • 5/182
Page 3

REST END OF LOG
ON THE LEFT SIDE OF
KNOT
PLACE END OF LOG
ON FLAT SPOT
KNOT
7
Figure 12. Place Log #7
Log #7 (SRV2221-707): Position Log #7 as shown in Figure 12. See Figure 2 and 10 for additional reference points. Place
the front and back ends of the log on the at spots as shown in Figure 12.
Quadra-Fire • LOGS-QFI35FB Log Instructions • 2223-935 Rev. D • 5/18
3
 Loading...