


ESL Series
USER MANUAL
ESL 2805
ESL 2905
Quad Electroacoustics Ltd.
IAG House, Sovereign Court,
Ermine Business Park,
Huntingdon PE29 6XU. England.
Tel : 0845 458 0011 / +44 (0) 1480 447700
Fax : +44 (0) 1480 431767
www.quad-hifi.co.uk
User Cautions
CAUTION!
RISK OF ELECTRIC SHOCK
DO NOT OPEN
TO REDUCE THE RISK OF ELECTRIC SHOCK
DO NOT REMOVE COVER (OR BACK)
NO USER-REMOVEABLE PARTS INSIDE
REFER SERVICING TO QUALIFIED PERSONNEL
ADVERTISSEMENT: RISQUE DE CHOC ELECTRIQUE-
NE PAS OUVRIR
IMPORTANT SAFETY INFORMATION
Read these instructions.
Keep these instructions.
Heed all warnings.
Follow all instructions.
Do not use this apparatus near water.
Clean only with dry cloth.
Do not block any ventilation openings.
Install in accordance with the manufacturer's instructions.
Do not install near any heat sources such as radiators, heat registers, stoves, or other apparatus (including amplifiers) that produce heat.
Do not defeat the safety purpose of the polarized or grounding type plug. A polarized plug has two blades with one wider than the other. A grounding type plug has two blades and a third grounding prong. The wider blade or the third prong are provided for your safety. If the provided plug does not fit into your outlet, consult an electrician for replacement of the obsolete outlet.
Protect the power cord from being walked on or pinched, particularly at plugs, convenience receptacles, and the point where they exit from the apparatus.
Use only attachments/accessories specified by the manufacturer.
Use only with a cart, stand, tripod, bracket, or table specified by the manufacturer, or sold with the apparatus. When a cart is used, use caution when moving the cart/apparatus
combination to avoid injury from tip-over. Unplug this apparatus during lightning storms or when unused for long periods of time.
Refer all servicing to qualified service personnel. Servicing is required when the apparatus has been damaged in any way, such as power-supply cord or plug is damaged, liquid has been spilled or objects have fallen into the apparatus, the apparatus has been exposed to rain or moisture, does not operate normally, or has been dropped.
Warning: To reduce the risk of fire or electrical shock, do not expose this product to rain or moisture. The product must not be exposed to dripping and splashing and no object filled with liquids - such as a vase of flowers - should be placed on the product.
No naked flame sources such as candles should be placed on
This symbol indicates that there are important operating and maintenance instructions in the literature accompanying this unit.
This symbol indicates that dangerous voltage constituting a risk of electric shock is present within this unit.
the product.
Caution: Changes or modifications not expressly approved by the manufacturer could void the user's authority to operate this device.
Warning: The mains power switch for this appliance is located on the rear panel. To permit free access to this switch, the apparatus must be located in an open area without any obstructions.
NOTE: This equipment generates, uses and can radiate radio frequency energy and, if not installed and used in accordance with the instructions, may cause harmful interference to radio communications. However, there is no guarantee that interference will not occur in a particular installation. If this equipment does cause harmful interference to radio or television reception, which can be determined by turning the equipment off and on, the user is encouraged to try to correct the interference by one or more of the following measures:
!Reorient or relocate the receiving antenna.
!Increase the separation between the equipment and receiver.
!Connect the equipment into an outlet on a circuit different from that to which the receiver is connected.
!Consult the dealer or an experienced radio/TV technician for help.
IMPORTANT NOTICE TO UK USERS
The appliance cord is terminated with a UK approved mains plug fitted with a 3A fuse. If the fuse needs to be replaced, an ASTA or BSI approved BS1362 fuse rated at 3A must be used. If you need to change the mains plug, remove the fuse and dispose of this plug safely immediately after cutting it from the cord.
Connecting a Mains Plug
The wires in the mains lead are coloured in accordance with the code: Blue: NEUTRAL, Brown: LIVE:
As these colours may not correspond to the coloured markings identifying the terminals in your plug, proceed as follows:
The BLUE wire must be |
GREEN |
FUSE |
|
connected to the terminal |
|||
& |
(3 A) |
||
marked with the letter N or |
|||
YELLOW |
|
||
coloured BLUE or BLACK. |
(EARTH) |
|
|
The BROWN wire must be |
BLUE |
|
|
connected to the terminal |
BROWN |
||
marked with the letter L or |
(NEUTRAL) |
(LIVE) |
|
coloured BROWN or RED. |
|
|
Warnings
The base stabiliser is a safety feature and must be securely attached to the product in accordance with the installation instructions. Alternatively the speaker may be securely attached to the floor. No other form of operation is permissible. Quad ESL loudspeakers have very high internal voltages. No attempt should be made to remove the protective grilles or the
baseplate. Amplifiers which are not short circuit protected may be damaged by the protection circuits in this loudspeaker and should not be used.
ESL Series |
ESL Series |
The Closest Approach
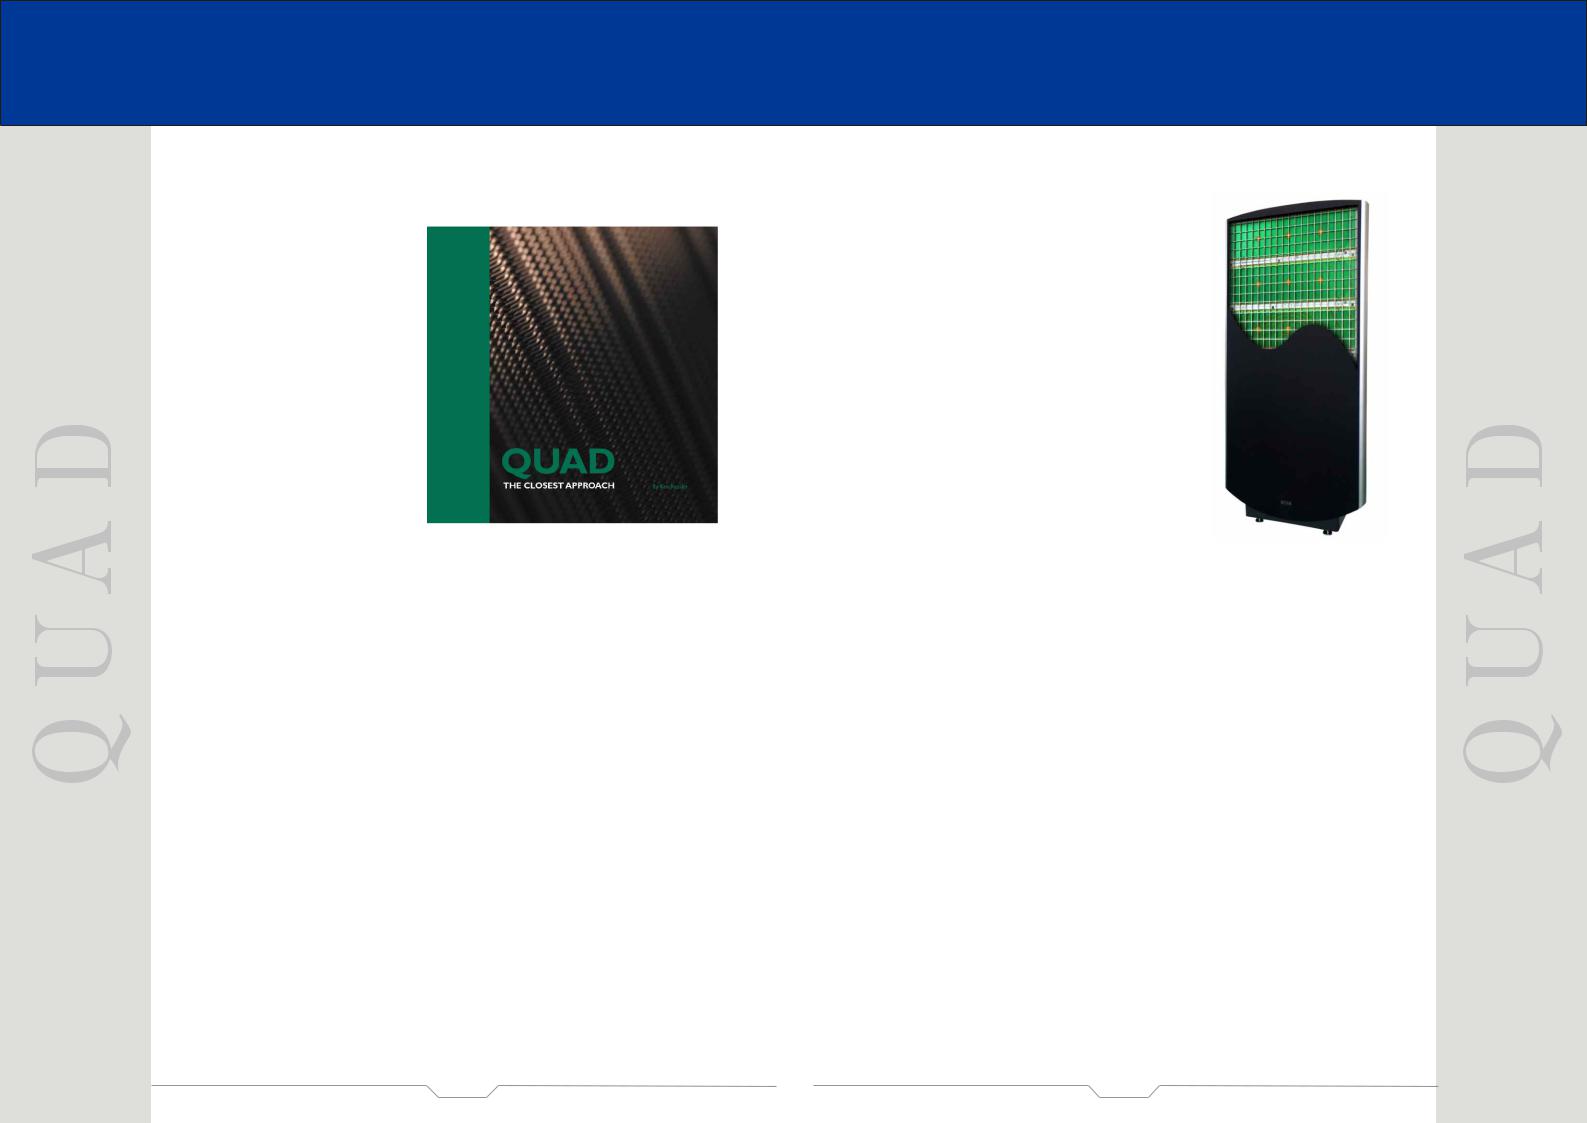
Quad - The Closest Approach by Ken Kessler
A 240 page hard-back, authoritative history with commentaries and contributions from every corner of the hi-fi industry. Technical chapters from Tim De Paravicini and Gordon Hill and interviews with Peter Walker, Ross Walker, Stan Curtis and Mike Albinson. Along with a series of stunning new photographs, fascinating historic documents and reproductions of AES and other technical papers, this is the definitive guide to the history and achievements of Quad.
Available through all good book retailers or any of our Dealers, from the Hi-Fi News Accessory Club, the Hi-Fi Collective, or the Quad Service Department
ISBN number 0-9545742-0-6
Introduction
Congratulations, you have become the owner of a pair of QUAD ESL loudspeakers.
For 50 years Quad Electroacoustics has produced the world’s finest loudspeakers, considered by many to be the most accurate and neutral of all loudspeakers.
The ESL 2805 and 2905 represent the latest evolution of the unique Quad electrostatic concept. Radically redesigned using the most up to date materials and processes, these new evocations of our design philosophy achieve levels of detail, clarity and perspective that will be a revelation and source of continuing delight to all music lovers.
The ESL loudspeaker is a doublet or dipole, which produces a spherical sound field from a point source. All naturally created sounds emanate from a point source and the ESL speaker concept more nearly recreates this point source effect than any other speaker currently available. Another key feature of our unique linear motion design is very low distortion - your Quad ESLs are probably the lowest distortion loudspeakers ever made - and this includes the bass region where conventional speakers suffer from time related delays and associated distortions.
The result is a loudspeaker of unsurpassed accuracy and one which has stood the test of time. Major recording studios have ESLs amongst their reference monitoring loudspeakers and our loudspeakers are consistently in demand by audiophiles who value the clear natural sound that is uniquely the hallmark of all QUAD products.
Contents
CAUTIONS . . . . . . . . . . . . . . . . . . . . . . . . . . . . . . . . . . . . . . . . . . . . . . . . . . . . . . . . . . . . . . . . . . . . . . . . IFC INTRODUCTION . . . . . . . . . . . . . . . . . . . . . . . . . . . . . . . . . . . . . . . . . . . . . . . . . . . . . . . . . . . . . . . . . . . . . . 1 WHAT’S IN THE BOX . . . . . . . . . . . . . . . . . . . . . . . . . . . . . . . . . . . . . . . . . . . . . . . . . . . . . . . . . . . . . . . . . . 2 UNPACKING THE EQUIPMENT. . . . . . . . . . . . . . . . . . . . . . . . . . . . . . . . . . . . . . . . . . . . . . . . . . . . . . . . . . 3 POSITIONING THE LOUDSPEAKERS . . . . . . . . . . . . . . . . . . . . . . . . . . . . . . . . . . . . . . . . . . . . . . . . . . . . . 4 CONNECTING THE LOUDSPEAKERS. . . . . . . . . . . . . . . . . . . . . . . . . . . . . . . . . . . . . . . . . . . . . . . . . . . . . 5 OPERATION . . . . . . . . . . . . . . . . . . . . . . . . . . . . . . . . . . . . . . . . . . . . . . . . . . . . . . . . . . . . . . . . . . . . . . . . . 6 FINAL ADJUSTMENTS . . . . . . . . . . . . . . . . . . . . . . . . . . . . . . . . . . . . . . . . . . . . . . . . . . . . . . . . . . . . . . . . 7 SPECIFICATIONS . . . . . . . . . . . . . . . . . . . . . . . . . . . . . . . . . . . . . . . . . . . . . . . . . . . . . . . . . . . . . . . . . . . . 8 MAINTENANCE AND SERVICE . . . . . . . . . . . . . . . . . . . . . . . . . . . . . . . . . . . . . . . . . . . . . . . . . . . . . . . . 11 QUALITY ASSURANCE . . . . . . . . . . . . . . . . . . . . . . . . . . . . . . . . . . . . . . . . . . . . . . . . . . . . . . . . . . . . . 12 ABOUT YOUR LOUDSPEAKER. . . . . . . . . . . . . . . . . . . . . . . . . . . . . . . . . . . . . . . . . . . . . . . . . . . . . . . . . 13 MAKING AN ELECTROSTATIC LOUDSPEAKER . . . . . . . . . . . . . . . . . . . . . . . . . . . . . . . . . . . . . . . . . . . 14 THE CLOSEST APPROACH . . . . . . . . . . . . . . . . . . . . . . . . . . . . . . . . . . . . . . . . . . . . . . . . . . . . . . . . . . . . 16
16 |
1 |

ESL Series |
ESL Series |
The Making of a Quad Electrostatic Loudspeaker
At Quad we pride ourselves on our long tradition of impeccable craftsmanship.
Here are just some of the stages an ESL goes through on its long journey into your home. At every stage the most rigid standards of construction and inspection are applied, in clinically dust free conditions, to ensure that every loudspeaker maintains its performance over time.
This rigorous attention to minutiae is what makes Quad unique. In a world of near-instant obsolescence there is no junk-pile of Quad products - anywhere. Almost every product we have ever made is still in daily use - somewhere; some are now well over fifty years old, and still giving pleasure to their proud owners.
Stage 1 |
Steel Chassis |
Stage 2
Piano Lacquered
Front Trim
Extruded
Aluminium
Lower Vertical Rails
Fixing Plate
Base with
Electronics
Piano Lacquered
Side Trim
Stage 3
Moulded
Grille Top
Aluminium Extruded
Side Rails
Steel Perforated
Fabricated Grille
Moulded
Lower Plate
Unpacking and Assembly
These loudspeakers are heavy! It needs two people to lift and manoeuvre the loudspeakers into position.
DO NOT USE THE TENSIONING BRACE TO LIFT OR MANOEUVRE THE ESL OR YOU WILL DAMAGE THE LOUDSPEAKER! WHEN MOVING THE LOUDSPEAKER HOLD IT BY THE SIDES OR THE SIDES AND BASE.
Always use the supplied cotton gloves when handling exposed surfaces.
Before you unpack the loudspeakers, ensure that you have a large and completely clear area of floor on which to work. Remove or protect any fragile carpets, etc to avoid any damage.
Each ESL loudspeaker is packed in a cardboard outer carton and then packed on a pallet for safe transportation. The carton has a lidded top and a tabbed seam down one long edge which is taped over.
Place the speaker upright, standing on its wooden pallet. Open the top first, and then open the tabbed seam all the way down. Remove the top packing insert, and then remove the box containing the accessories. Remove the side packing pieces. The loudspeaker may now be lifted out of the base packing.
The stabiliser block is strapped to one of the side packing pieces. Cut the ties and remove the block.
Caution The block is heavy - exercise care.
The ESLs are provided with both spiked and standard feet which screw into the threaded holes in the baseplate. The heights of individual feet can be adjusted to ensure that the loudspeaker sits secure and level on the floor. Determine whether you will be using the spiked or the standard feet. Remember that spiked feet are only suitable for use with carpets as they will damage wood and stone floors. When using spikes take care to avoid the tips which are quite sharp.
Gently lay the loudspeaker down on its front. If the floor surface is hard place a soft cloth such as a towel under the speaker first. Spin one collar onto each foot all the way down but do not tighten.
Attaching the front feet: Insert the two front feet in the threaded inserts on the base and thread them fully in but only handtighten them at this stage. Refer to Illustration A below
Attaching the stabiliser and rear feet: It is essential that you attach the stabiliser as this is both a safety and operational feature. (As an alternative the speaker may be attached to the floor - see Page 7)
First, attach the two clamps to the block using the provided screws and shakeproof washers. Line up the assembly with the mounting holes in the base. Insert the feet through the support brackets and thread them into the base. Ensure that the feet protrude below the clamps by an equal distance. When the speaker is operational the weight/clamp assembly should be clear of the floor surface. Tighten both rear feet. Insert the collar locking bar into a hole in the clamping ring and tighten. Progressively move the bar from hole to hole until the feet are fully locked in place. Refer to Illustration B below
B Attaching the stabiliser and rear feet
Insert bar and tighten clamping ring clockwise
A
14 |
3 |
 Loading...